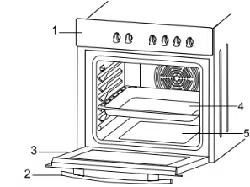
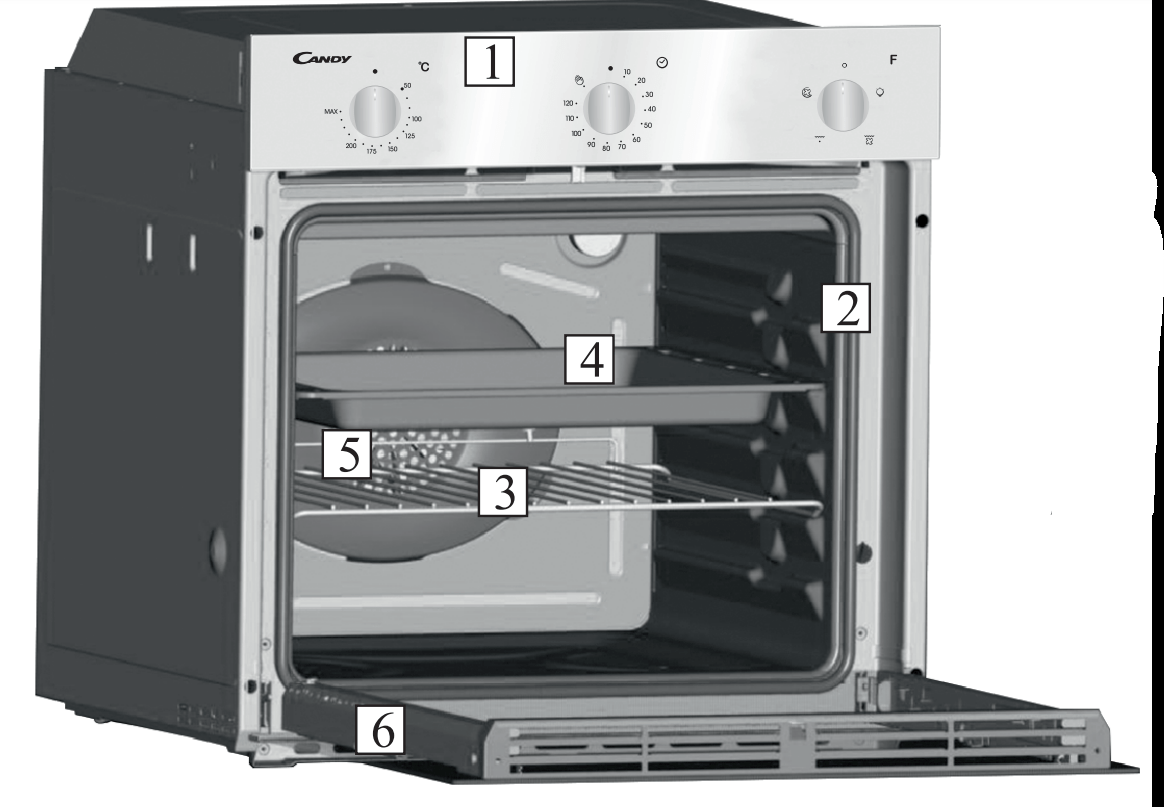
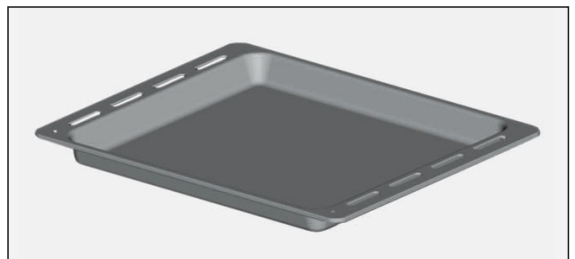
Collects the residues that drip during the cooking of foods on the grills.
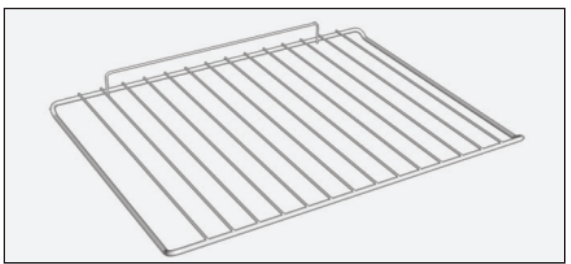
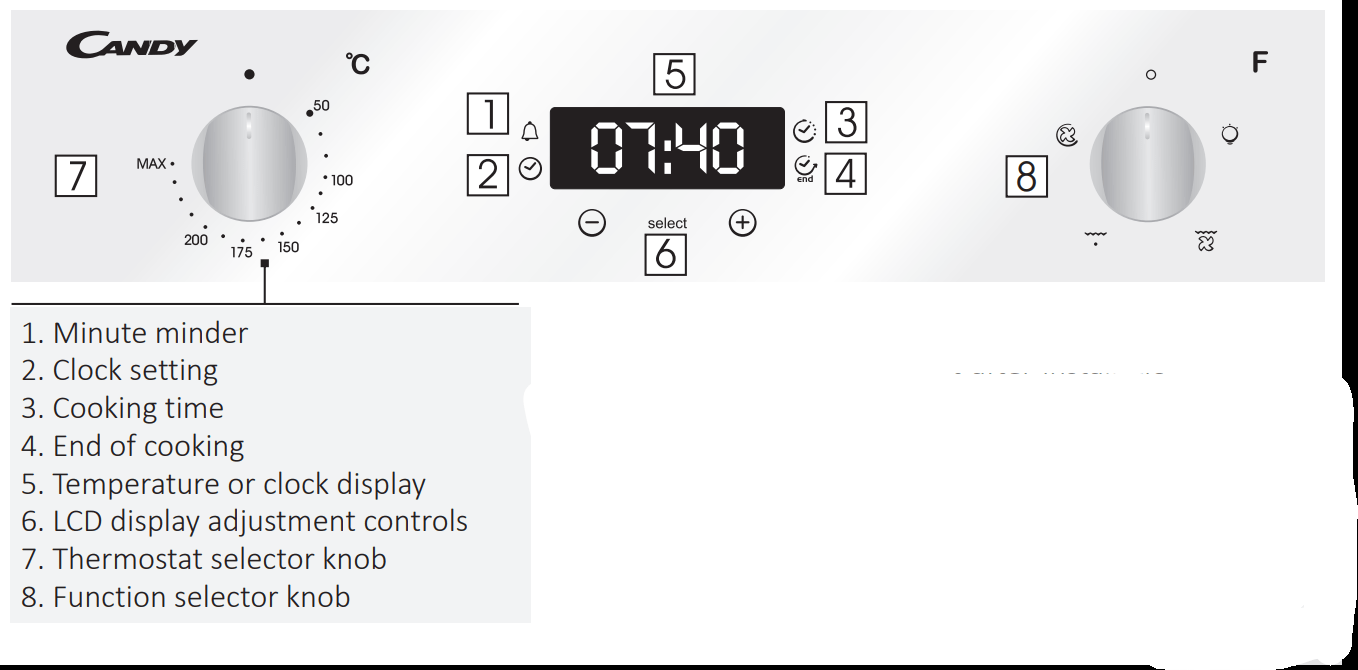
Metal grill
Holds baking trays and plates
First Use
PRELIMINARY CLEANING
Clean the oven before using for the first time. Wipe over external surfaces with a damp soft cloth. Wash all accessories and wipe inside the oven with a solution of hot water and washing up liquid. Set the empty oven to the maximum temperature and leave on for about 1 hour, this will remove any lingering smells of newness.
Use of the Oven
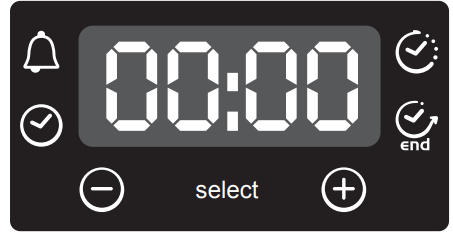
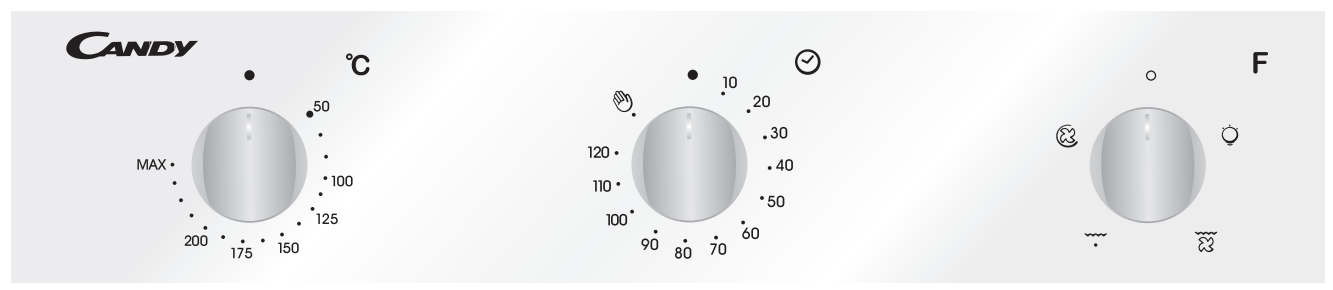
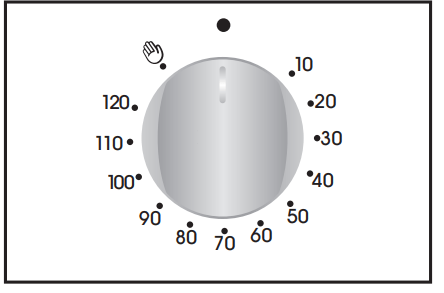
Display description
WARNING!
The first operation to carry out after installation, or after a power cut, is to set the time of day (a power cut has occured if the display is flashing 12:00).
200°-> The temperature LED “°” flashes until the displayed temperature is reached.
HOT -> When a programme finishes, if the oven is still hot, the display shows "HOT", alternating with the time, even if the knobs are positioned to OFF.
Using the end of cooking timer
This control enables to set the desired cooking time (max. 120 min.) the oven will automatically switch off at the end of the set time.
The timer will count down from the set time return to the O position and switch off automatically.
For normal use of oven set the timer to the position.
To set the oven ensure the timer is not on the O position.
Setting the correct time
WARNING: the first operation to carry out after the oven has been installed or following the interruption of power supply (this is recognizable the display pulsating and showing 12:00 ) is setting the correct time. This is achieved as follows.
Push the central button 4 times
Set time with "-" "+" buttons.
Release all buttons.
ATTENTION: The oven will only operate providing the clock is set.
FUNCTION
HOW TO USE
HOW TO DEACTIVATE
WHAT IT DOES
WHY IT IS NEEDED
KEY LOCK
Child Lock function is activated by touching Set (+) for a minimum of 5 seconds. From this moment on all other function are locked and the display will flash STOP and preset time intermittently.
Child Lock function is deactivated by touching touchpad Set (+) again for a minimum of 5 seconds. From this moment on all functions are selectable again.
MINUTE MINDER
Push the central button 1 times
Press the buttons "-" "+" to set the required time
Release all the buttons
When the set time as elapsed an audible alarm is activated (this alarm will stop on its own, however it can be stopped immediately by pressing the button) SELECT.
Sounds an alarm at the end of the set time.
During the process, the display shows the remaining time.
Allows to use the oven as alarm clock (could be activated either with operating the oven or with out operating the oven)
COOKING TIME
Push the central button 2 times
Press the buttons "-" or "+"to set the lenght of cooking required
Release all buttons
Set the cooking function with the oven function selector
Push any button to stop the signal. Push the central button to return to the clock function.
It allows to preset the cooking time required for the recipe chosen.
To check how long is left to run press the SELECT button 2 Times.
To alter/change the preset time press SELECT and "-" "+" buttons.
When the time is elapsed the oven will switch off automatically.
Should you wish to stop cooking earlier either turn the function selector to 0, or set time to 0:00 (SELECT and "-" "+" buttons)
END OF COOKING
Push the central button 3 times
Press the buttons "-" "+" to set the time at which you wish the oven to switch off
Release the buttons
Set the cooking function with the oven function selector.
At the time set, the oven will switch off. To switch off manually, turn the oven function selector to position O.
Enables you to set the end of cooking time •To check the preset time push the central button 3 times
To modify the preset time press buttons SELECT + "-" "+"
This function is typically used with “cooking time” function.
For example if the dish has to be cooked for 45 minutes and needs to be ready by 12:30, simply select the required function, set the cooking time to 45 minutes and the end of cooking time to 12:30.
At the end of the cooking set time, the oven will switch off automatically and an audible alarm will ring.
Cooking will start automatically at 11:45 (12:30 minus 45 mins) and will continue until the preset end-of-cooking-time, when the oven will switch itself off automatically. WARNING.
If the END of cooking is selected without setting the length of cooking time, the oven will start cooking immediately and it will stop at the END of cooking time set.
Cooking Modes
Function Dial
Function (Depends on the oven model)
LAMP: Turns on the oven light
GRILL: use the grill with the door closed.
The top heating element is used alone and you can adjust the temperature. Five minutes preheating is required to get the elements red-hot. Success is guaranteed for grills, kebabs and gratin dishes. White meats should be put at a distance from the grill; the cooking time is longer, but the meat will be tastier. You can put red meats and fish fillets on the shelf with the drip tray underneath. The oven has two grill positions:
Grill: 2140 W Barbecue: 3340 W
FAN ASSISTED GRILL : use the turbo-grill with the door closed.
The top heating element is used with the fan circulating the air inside the oven. Preheating is necessary for red meats but not for white meats. Ideal for cooking thick food items, whole pieces such as roast pork, poultry, etc. Place the food to be grilled directly on the shelf centrally, at the middle level. Slide the drip tray under the shelf to collect the juices. Make sure that the food is not too close to the grill. Turn the food over halfway through cooking.
FAN COOKING: We recommend you use this method for poultry, pastries, fish and vegetables. Heat penetrates into the food better and both the cooking and preheating times are reduced. You can cook different foods at the same time with or without the same preparation in one or more positions. This cooking method gives even heat distribution and the smells are not mixed. Allow about ten minutes extra when cooking foods at the same time.
*Tested in accordance with the CENELEC EN 60350-1 used for definition of energy class.
Oven cleaning and maintenance
General notes on cleaning
The lifecycle of the appliance can be extended through regular cleaning. Wait for the oven to cool before carrying out manual cleaning operations. Never use abrasive detergents, steel wool or sharp objects for cleaning, so as to not irreparably damage the enamelled parts. Use only water, soap or bleach-based detergents (ammonia).
GLASS PARTS: It is advisable to clean the glass window with absorbent kitchen towel after every use of the oven. To remove more obstinate stains, you can use a detergent-soaked sponge, well wrung out, and then rinse with water.
OVEN WINDOW SEAL: If dirty, the seal can be cleaned with a slightly damp sponge.
ACCESSORIES: Clean accessories with a wet, soapy sponge before rinsing and drying them: avoid using abrasive detergents.
DRIP PAN:
After using the grill, remove the pan from the oven. Pour the hot fat into a container and wash the pan in hot water, using a sponge and washing-up liquid.
If greasy residues remain, immerse the pan in water and detergent. Alternatively, you can wash the pan in the dishwasher or use a commercial oven detergent. Never put a dirty pan back into the oven.
Maintenance
REMOVAL OF THE OVEN WINDOW
Open the front window.
Open the clamps of the hinge housing on the right and left side of the front window by pushing them downwards.
Replace the window by carrying out the procedure in reverse.
REMOVAL AND CLEANING OF THE GLASS DOOR
1. Open the oven door.
2.3.4. Lock the hinges, remove the screws and remove the upper metal cover by pulling it upwards.
5.6. Remove the glass, carefully extracting it from the oven door (NB: in pyrolytic ovens, also remove the second and third glass (if present)).
7. At the end of cleaning or substitution, reassemble the parts in reverse order. On all glass, the indication "Pyro" must be legible and positioned on the left side of the door, close to the left-hand lateral hinge. In this way, the printed label of the first glass will be inside the door.
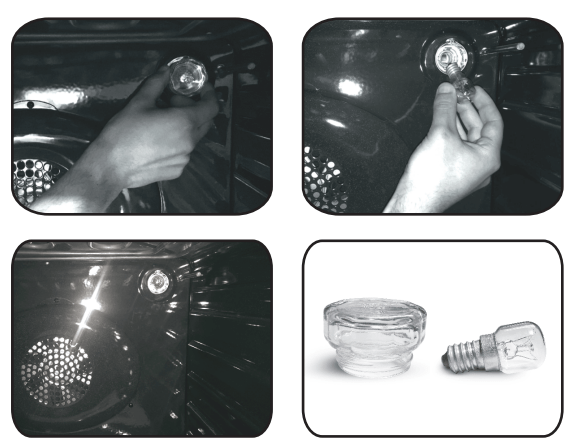
CHANGING THE BULB
Disconnect the oven from the mains supply.
Undo the glass cover, unscrew the bulb and replace it with a new bulb of the same type.
Once the defective bulb is replaced, replace the glass cover.
Troubleshooting
FAQ
PROBLEM
POSSIBLE CAUSE
SOLUTION
The oven does not heat up
A cooking function and temperature has not been set
To set the time, push the control knob and turn anti-clockwise to position at the correct time. To set as minute minder, set the cooking time by turning anticlockwise the knob without pushing, until the desired time is shown at the small window on the left of the clock (max. 180 minutes).
Place the shelf in the bottom position. CONVENTIONAL: Both top and bottom heating elements are used. Preheat the oven for about ten minutes. This method is ideal for all traditional roasting and baking
Using a grill pan in the oven Place your oven rack on the lowest setting, at the bottom of the oven. ... Preheat the grill pan before you put any food on it so you get a nice searing on the meat's surface. ... Cook your food as you would do on an outdoor barbecue, making sure to turn halfway through.
 position.