USER MANUAL Gas Range
FEATURES OF YOUR RANGE
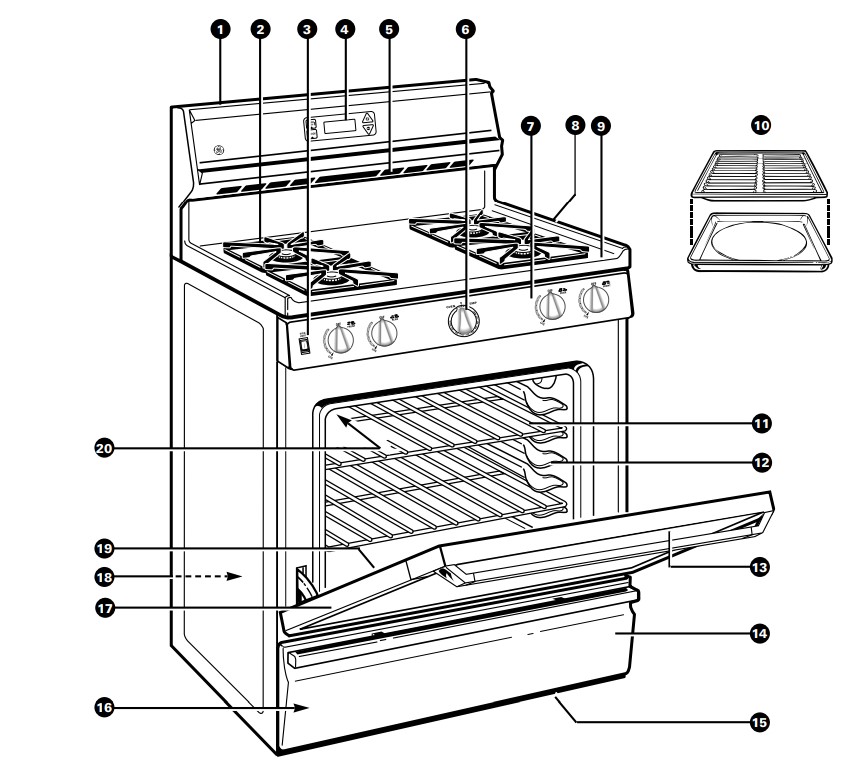

SURFACE COOKING
Surface Burner Controls
- Knobs that turn the surface burners on and off are marked as to which burners they control. The two knobs on the left control the left front and left rear burners. The two knobs on the right control the right front and right rear burners.
Before Lighting a Burner
- If drip pans are supplied with your range, they should be used at all times.
- Make sure all the grates on the range are in place before using any burner.
To Light a Surface Burner
Electric Ignition Models:
- Push the control knob in and turn it to LITE. You will hear a little ‘‘clicking’’ noise—the sound of the electric spark igniting the burner.
- Turn the knob to adjust the flame size. If the knob stays at LITE, it will continue to click.
- When one burner is turned to LITE, all the burners spark. Do not attempt to disassemble or clean around any burner while another burner is on. An electric shock may result, which could cause you to knock over hot cookware.
Standing Pilot Models:
- Push control knob in and turn it to HI position. The burner should light within a few seconds.
- Turn the knob to adjust the flame size.
- Flame will be almost horizontal and will lift slightly away from the burner when the burner is first turned on. A blowing or hissing sound may be heard for 30 to 60 seconds. This normal sound is due to improved injection of gas and air into the burner. Put a pan on the burner before lighting it, or adjust the flame to match pan size as soon as it lights, and the blowing or hissing sound will be much less noticeable.
After Lighting a Burner
- Do not operate a burner for an extended period of time without cookware on the grate. The finish on the grate may chip without cookware to absorb the heat.
- Be sure the burners and grates are cool before you place your hand, a pot holder, cleaning cloths or other materials on them.
Top-of-Range Cookware
- Aluminum: Medium-weight cookware is recommended because it heats quickly and evenly. Most foods brown evenly in an aluminum skillet. Use saucepans with tight-fitting lids when cooking with minimum amounts of water.
- Cast-Iron: If heated slowly, most skillets will give satisfactory results.
- Enamelware: Under some conditions, the enamel of some cookware may melt. Follow cookware manufacturer’s recommendations for cooking methods.
- Glass: There are two types of glass cookware—those for oven use only and those for top-of-range cooking (saucepans, coffee and teapots). Glass conducts heat very slowly.
- Heatproof Glass Ceramic: Can be used for either surface or oven cooking. It conducts heat very slowly and cools very slowly. Check cookware manufacturer’s directions to be sure it can be used on gas ranges.
- Stainless Steel: This metal alone has poor heating properties and is usually combined with copper, aluminum or other metals for improved heat distribution. Combination metal skillets usually work satisfactorily if they are used with medium heat as the manufacturer recommends.
CLOCK AND TIMER
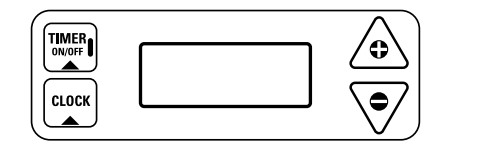
You have the choice of having the timer show the time counting down or the time of day. In either case, the timer will signal at the end of the timer period to alert you that the time is up.
To Set the Clock
NOTE: When you first plug in the range or after a power failure, the entire Clock/Timer display will light up
- Press the CLOCK pad.

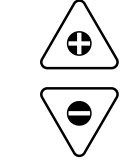
- Press and hold the + or – pad and the time of day will change 10 minutes at a time. To change the time by single minutes, give the pads short taps.
- Press the CLOCK pad to start the clock.
To Set the Timer
- Press the TIMER ON/OFF pad.

- Use the + and – pads to set the timer. Short taps on the + or – pad change the timer’s setting one minute at a time. Pressing and continuing to hold the + pad increases the setting ten minutes at a time.
- Once you have set your timer, press the TIMER ON/OFF pad to start timing.
As the timer counts down, a signal will indicate when one minute is left. After this signal, the display will count down in seconds. When time runs out, a final signal will sound. Press the TIMER ON/OFF pad to stop the signal.
To Change or Cancel the Timer Setting
- When the timer is counting down, use the + and – pad to change the remaining time, or press the TIMER ON/OFF pad to stop the timer. The timer cannot be cancelled unless you have fully completed “set timer” instructions above
Display Clock While Timer Is Operating
- Pressing the CLOCK pad while the timer is operating will not interfere with the timer’s operation; the display will change to show the clock, but the timer will continue to count down and will still signal when time is up. Press the TIMER ON/OFF pad again to change the display back to show the timer.
USING YOUR OVEN
Before Using Your Oven
- Be sure you understand how to set the controls properly. Practice removing and replacing the shelves while the oven is cool. Read the information and tips on the following pages. Keep this guide handy where you can refer to it, especially during the first weeks of using your new range.
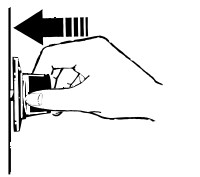
Oven Control
- Your oven is controlled by a single OVEN CONTROL knob.
- It will normally take 30-90 seconds before the flame comes on. After the oven reaches the selected temperature, the oven burner cycles—off completely, then on with a full flame—to maintain the selected temperature.
Oven Moisture
- As your oven heats up, the temperature change of the air in the oven may cause water droplets to form on the door glass. These droplets are harmless and will evaporate as the oven continues to heat up.
Oven Light (on some models)
- Use the switch on the lower control panel to turn the light on or off.
Oven Shelves
- The shelves are designed with stoplocks so when placed correctly on the shelf supports, they will stop before coming completely out of the oven and will not tilt when you are removing food from them or placing food on them.
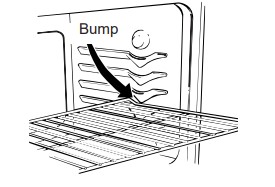
- When placing cookware on a shelf, pull the shelf out to the bump on the shelf support. Place the cookware on the shelf, then slide the shelf back into the oven. This will eliminate reaching into the hot oven.
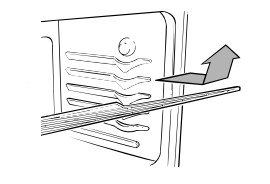
- To remove a shelf from the oven, pull it toward you, tilt the front end upward and pull the shelf out.
- To replace, place the shelf on the shelf support with the stop-locks (curved extension of the shelf) facing up and toward the rear of the oven. Tilt up the front and push the shelf toward the back of the oven until it goes past the bump on the shelf support. Then lower the front of the shelf and push it all the way back.
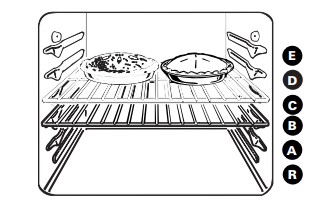
Shelf Positions
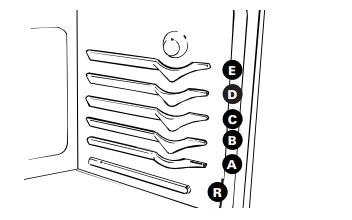
- The oven has five shelf supports for baking and roasting identified in this illustration as A (bottom), B, C, D and E (top). It also has a special low shelf position (R) for roasting extra large items, such as a large turkey—the shelf is not designed to slide out at this position. Shelf positions for cooking are suggested in the Baking, Broiling and Roasting sections.
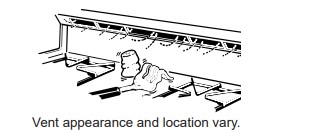
Oven Vents
The oven is vented through duct openings at the rear of the cooktop. See the Features section. Do not block these openings when cooking in the oven—it is important that the flow of hot air from the oven and fresh air to the oven burners be uninterrupted.
- The vent openings and nearby surfaces may become hot. Do not touch them.
- Handles of pots and pans on the cooktop may become hot if left too close to the vent.
- Metal items will become very hot if they are left on the cooktop and could cause burns.
- Do not leave any items on the cooktop. The hot air from the vent may ignite flammable items and will increase pressure in closed containers, which may cause them to burst.
- Do not leave plastic items on the cooktop— they may melt if left too close to the vent.
BAKING
- Your oven temperature is controlled using the latest technology in oven control systems. It is recommended that you operate your new oven for a number of weeks to become familiar with its performance.
- If you think an adjustment is necessary, see the Adjust the Oven Thermostat section. It gives easy Do It Yourself instructions on how to adjust the thermostat.
How to Set Your Range for Baking
To avoid possible burns, place the shelves in the correct position before you turn the oven on.
- Close the oven door. Turn the OVEN CONTROL knob to the desired temperature.
- Check food for doneness at minimum time on recipe. Cook longer if necessary.
- Turn the OVEN CONTROL knob to OFF and then remove food.
Oven Shelves
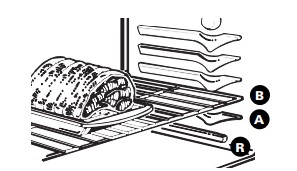
Arrange the oven shelf or shelves in the desired locations while the oven is cool. The correct shelf position depends on the kind of food and the browning desired. As a general rule, place most foods in the middle of the oven, on either shelf position B or C. See the chart for suggested shelf positions.
Preheating
- Preheat the oven if the recipe calls for it. Preheat means bringing the oven up to the specified temperature before putting the food in the oven. To preheat, set the oven at the correct temperature— selecting a higher temperature does not shorten preheat time.
- Preheating is necessary for good results when baking cakes, cookies, pastry and breads. For most casseroles and roasts, preheating is not necessary. For ovens without a preheat indicator light or tone, preheat 10 minutes. After the oven is preheated place the food in the oven as quickly as possible to prevent heat from escaping.
Pan Placement
- For even cooking and proper browning, there must be enough room for air circulation in the oven. Baking results will be better if baking pans are centered as much as possible rather than being placed to the front or to the back of the oven.
- Pans should not touch each other or the walls of the oven. Allow 1– to 11 ⁄2–inch space between pans as well as from the back of the oven, the door and the sides. If you need to use two shelves, stagger the pans so one is not directly above the other.
ROASTING
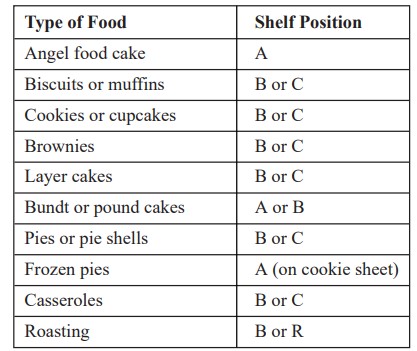
- Roasting is cooking by dry heat. Tender meat or poultry can be roasted uncovered in your oven. Roasting temperatures, which should be low and steady, keep spattering to a minimum.
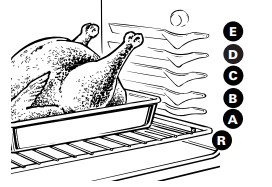
- The oven has a special low shelf (R) position just above the oven bottom. Use it when extra cooking space is needed, for example, when roasting a large turkey. The shelf is not designed to slide out at this position.
- Roasting is really a baking procedure used for meats. Therefore the oven controls are set for Baking. (You may hear a slight clicking sound indicating the oven is working properly.)
- Most meats continue to cook slightly while standing after being removed from the oven. Recommended standing time for roasts is 10 to 20 minutes. This allows roasts to firm up and makes them easier to carve. Internal temperature will rise about 5° to 10°F. If you wish to compensate for temperature rise, remove the roast from the oven when its internal temperature is 5° to 10°F. less than temperature shown in the Roasting Guide.
- Remember that food will continue to cook in the hot oven and therefore should be removed when the desired internal temperature has been reached.
- Position oven shelf at (B) position for small size roast (3 to 5 lbs.) and at (R) position for larger roasts.
- Check the weight of the roast. Place the meat fat-side-up or the poultry breast-side-up on the roasting grid in a shallow pan. The melting fat will baste the meat. Select a pan as close to the size of meat as possible. (The broiler pan with grid is a good pan for this.)
- Turn the OVEN CONTROL knob to the desired temperature. See the Roasting Guide for temperatures and approximate cooking times.
- When roasting is finished, turn the OVEN CONTROL knob to OFF and then remove the food from the oven.
CARE AND CLEANING
Standard Twin Burners (on some models)
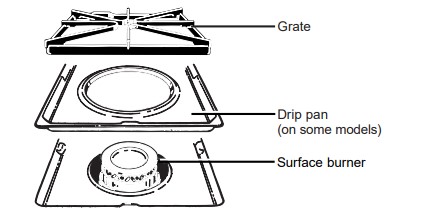
- On models with standard twin burners, the cooktop lifts up for easy access.
- Turn all controls OFF before removing burner parts and drip pans (if so equipped).
- The burner grates and drip pans (if so equipped) can be lifted off, making them easy to clean.
- The holes in the surface burners of your range must be kept clean at all times for proper ignition and an even, unhampered flame.
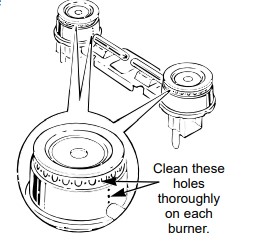
- You should clean the surface burners routinely, especially after bad spillovers, which could clog these holes. Wipe off surface burners. If heavy spillover occurs, remove the surface burners from the range. Burners lift out for cleaning. Lift up the cooktop and then lift out the surface burners.
- To remove burned-on food, soak the surface burner in a solution of mild liquid detergent and hot water. Soak the surface burner for 20 to 30 minutes. For more stubborn stains, use a cleanser like Soft Scrub® brand or Bon Ami® brand. Rinse well to remove any traces of the cleanser that might clog the surface burner openings. Do not use steel wool because it will clog the surface burner openings and scratch the surface burners. If the holes become clogged, clean them with a sewing needle or twist-tie.
- Before putting the surface burner back, shake out excess water and then dry it thoroughly by setting it in a warm oven for 30 minutes. Then place it back in the range, making sure it is properly seated and level. Check the flame pattern of each burner. If the flames are “jumpy” (not steady), clean the holes again with a sewing needle or twist-tie.
Cooktop Surface
- To avoid damaging the porcelain enamel surface of the cooktop and to prevent it from becoming dull, clean up spills right away. Foods with a lot of acid (tomatoes, sauerkraut, fruit juices, etc.) or foods with high sugar content could cause a dull spot if allowed to set
- When the surface has cooled, wash and rinse. For other spills such as fat spatterings, etc., wash with soap and water once the surface has cooled. Then rinse and polish with a dry cloth.
- Be careful when you clean the cooktop because the area over the pilot will be hot (on models with standing pilots).
Oven Bottom
- The oven bottom has a porcelain enamel finish. To make cleaning easier, protect the oven bottom from excessive spillovers by placing a cookie sheet on the shelf below the shelf you are cooking on. This is particularly important when baking a fruit pie or other foods with a high acid content. Hot fruit fillings or other foods that are highly acidic (such as tomatoes, sauerkraut, and sauces with vinegar or lemon juice) may cause pitting and damage to the porcelain enamel surface and should be wiped up immediately.
- We don’t recommend using aluminum foil on the oven bottom. It can affect air flow if the holes are blocked and it can concentrate heat at the bottom of the oven, resulting in poor baking performance.
- If a spillover does occur on the oven bottom, allow the oven to cool first. Remove the oven bottom for easier clean-up and to prevent damage to the continuous cleaning oven coating (on some models).
- Frequent wipings with mild soap and water (particularly after cooking meat) will prolong the time between major cleanings. Rinse thoroughly. Soap left on the oven bottom can cause stains.
- For heavy soil, use an abrasive cleaner or a soapfilled steel wool pad. A commercial oven cleaner may also be used, following the package directions.
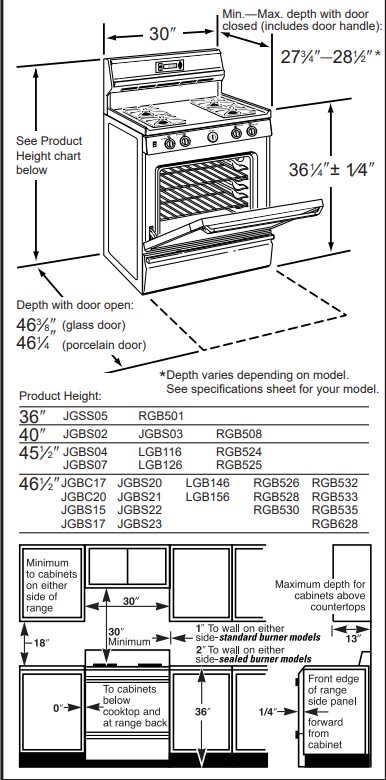
INSTALLATION INSTRUCTIONS
DIMENSIONS AND CLEARANCES
TOOLS YOU WILL NEED
- Phillips and flat-blade screwdrivers
- Pencil and ruler
- Two pipe wrenches (one for backup)
- 13 ⁄8² open-end or adjustable wrench
- Nut drivers or wrenches: 3/16² and 1/4
ADDITIONAL MATERIALS YOU MAY NEED
- Gas line shut-off valve
- Pipe joint sealant or UL-approved pipe thread tape with Teflon* that resists action of natural and LP gases
- Flexible metal appliance connector (1/2² I.D.) A 5-foot length is recommended for ease of installation but other lengths are acceptable. Never use an old connector when installing a new range.
- Flare union adapter for connection to gas supply line (3/4² or 1/2² NPT x 1/2² I.D.)
- Flare union adapter for connection to pressure regulator on range (1/2² NPT x 1/2² I.D.)
*Teflon: Registered trademark of DuPont
PREPARATION
- Remove all tape and packaging. Lift up the cooktop (on models with standard twin burners) and remove any packing material under it. Make sure the standard twin burners are properly seated and level.
- Take the accessory pack out of the oven.
- Check to be sure that no range parts have come loose during shipping
PROVIDE ADEQUATE GAS SUPPLY
- Your range is designed to operate at a pressure of 4² of water column on natural gas or, if designed for LP gas (propane or butane), 10² of water column. Make sure you are supplying your range with the type of gas for which it is designed. This range is convertible for use on natural or propane gas. If you decide to use this range on LP gas, conversion must be made by a qualified LP installer before attempting to operate the range on that gas
- For proper operation, the pressure of natural gas supplied to the regulator must be between 4² and 13² of water column. For LP gas, the pressure supplied must be between 10² and 13² of water column. When checking for proper operation of the regulator, the inlet pressure must be at least 1² greater than the operating (manifold) pressure as given above. The pressure regulator located at the inlet of the range manifold must remain in the supply line regardless of whether natural or LP gas is being used. A flexible metal appliance connector used to connect the range to the gas supply line should have an I.D. of 1/2² and be 5 feet in length for ease of installation. In Canada, flexible connectors must be single wall metal connectors no longer than 6 feet in length.
CONNECT THE RANGE TO GAS
- Shut off the main gas supply valve before disconnecting the old range and leave it off until new hook-up has been completed. Don’t forget to relight the pilot on other gas appliances when you turn the gas back on.
- Because hard piping restricts movement of the range, the use of an A.G.A.-certified flexible metal appliance connector is recommended unless local codes require a hard-piped connection. Never use an old connector when installing a new range. If the hard piping method is used, you must carefully align the pipe; the range cannot be moved after the connection is made.
- To prevent gas leaks, use pipe joint compound or wrap Teflon* pipe thread tape around all male (external) pipe threads.
*Teflon: Registered trademark of DuPont
SEAL THE OPENINGS
- Seal any openings in the wall behind the range and in the floor under the range when hookups are completed.
LIGHT THE PILOTS
(For Models Equipped with Standing Pilots. If the range is an electric ignition model, the burners are ignited by electric ignition which eliminates the need for standing pilot lights.) The range should be installed in its permanent position before any pilots are lit or adjusted.
Light the Surface Burner Pilots
CAUTION: Make sure the surface burner control knobs are in the OFF position before attempting to light the pilots.
- Raise the cooktop.
- Light both pilots with a match.
- To avoid pilot outage, use caution when closing cooktop after lighting pilots.
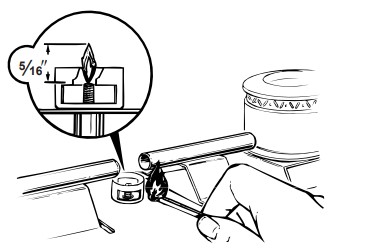
NOTE: Do not leave standing pilot lit in a newly constructed or remodeled home or apartment that will be unoccupied for more than a month. Each pilot flame was adjusted at the factory to be approximately 5/16² tall. A tinge of yellow appearing at the upper tip is normal. If you find pilot adjustment is necessary, follow instructions at right.
Adjust the Surface Burner Pilots if Necessary
- Raise the cooktop.
- Locate the pilot adjustment screw. It can be accessed through the small hole near the center of the manifold panel.
- To adjust, use a blade-type screwdriver with a shaft diameter of less than 3/16². Turn pilot adjustment screw until pilot is 5/16² high. Do not reduce the flame to less than 5/16² or pilot outage may occur. A pilot flame burning higher than recommended may generate soot (carbon black) on the bottom of your cooktop.
CHECK IGNITION OF SURFACE BURNERS
Operation of all cooktop and oven burners should be checked after the pilots have been lighted (on some models) and range and gas supply lines have been carefully checked for leaks
Standing Pilot Models
- Select a top burner knob and simultaneously push in and turn to HI position. The burner should light within a few seconds. Try each burner in succession until all burners have been checked.
Electric Ignition Models
- Select a top burner knob and simultaneously push in and turn to LITE position. You will hear a snapping sound indicating proper operation of the spark module. Once the air has been purged from the supply lines, burners should light within 4 seconds. After burner lights, rotate knob out of the LITE position. Try each burner in succession until all burners have been checked.
BEFORE YOU CALL FOR SERVICE
TOP BURNERS DO NOT LIGHT OR DO NOT BURN EVENLY
- Make sure electrical plug is plugged into a live power outlet
- Burner holes on the side or around the top of burner may be clogged. Remove burners (on models with standard twin burners) or burner heads (on models with sealed burners) or burner caps on spill-proof models, and clean them with a sewing needle or twist-tie. Make sure you do not enlarge the holes. On spill-proof models, check electrode area for burned-on food or grease.
- Make sure the drip pans (on some models) are installed correctly.
- Pilot(s) is (are) not lit (on standing pilot models). See the Lighting Instructions for Standing Pilot Models in Surface Cooking.
BURNER FLAMES VERY LARGE OR YELLOW
- If range is connected to LP gas, contact the person who installed your range or made the conversion.
SURFACE BURNERS LIGHT BUT OVEN DOES NOT
- The oven gas shut-off valve may have accidentally been moved during cleaning or moving.
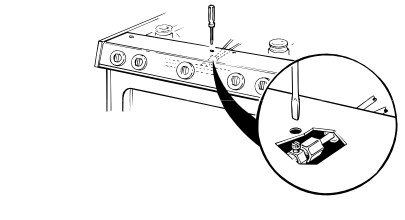
To check the oven gas shut-off valve on standard twin burner models, raise the cooktop and look for the gas shut-off lever at the extreme right rear corner. (Standing pilot models do not have a gas shut-off valve on the regulator.)
Follow the directions in box A or B that match your regulator type.

To check the oven gas shut-off valve on sealed burner models, remove the storage drawer, broiler drawer or kick panel and look for the gas shut-off lever at the back of the range.
Follow the directions in box A or B that match your regulator type.

CLOCK DOES NOT WORK
- Range electrical plug must be securely seated in a live power outlet. Check for blown fuse or tripped circuit breaker.
OVEN LIGHT DOES NOT COME ON
- Bulb may be loose or burned out.
- Electrical plug must be plugged into a live power outlet.
OVEN WILL NOT WORK
- Plug on the range is not completely inserted in the electrical outlet.
- Pilot(s) is (are) not lit (on standing pilot models). See the Lighting Instructions for Standing Pilot Models in Using Your Oven.
- The circuit breaker in your house has been tripped, or a fuse has been blown.
- Oven controls not properly set.
OVEN TEMPERATURE TOO HOT OR TOO COLD
- The OVEN CONTROL knob needs adjustment. See the Adjust the Oven Thermostat—Do It Yourself section.
FOOD DOES NOT ROAST OR BAKE PROPERLY
- Oven controls not properly set. See the Baking or Roasting section.
- Shelf position is not correct.
- Incorrect cookware or cookware of improper size is being used.
- Oven thermostat needs adjustment. See the Adjust the Oven Thermostat— Do It Yourself section.
- Aluminum foil used improperly in the oven.
- Oven bottom not securely seated in position
FOOD DOES NOT BROIL PROPERLY
- Oven controls not properly set. See the Broiling section.
- Oven door and/or broiler drawer not closed.
- Improper shelf position being used. See the Broiling section.
- Food is being cooked on a hot pan
- Cookware is not suited for broiling.
- Aluminum foil used on the broiler pan grid has not been fitted properly and slit as recommended.
- Oven bottom not securely seated in position
RAINBOW EFFECT IN THE OVEN WINDOW (on some models)
- This is normal. It is caused by the heat treatment applied to the oven window.
STRONG ODOR
- Improper air/gas ratio in oven. Adjust oven burner air shutter.
- An odor from the insulation around the oven liner is normal for the first few times oven is used. This is temporary.

