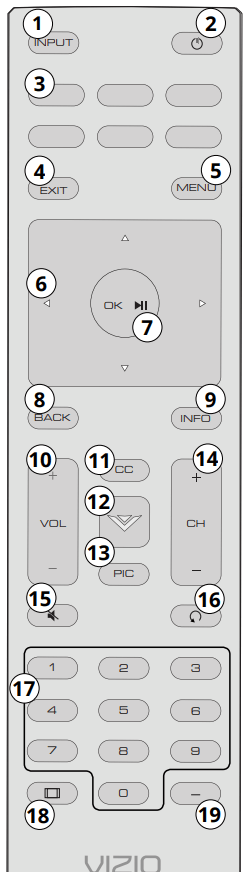
1. Input - Change the currently displayed input 2. Power - Turn Television on or off 3. App Launcher - Quickly launch the pictured app 4. Exit - Close the on-screen menu 5. Menu - Display the settings menu 6. Arrow - Navigate the on-screen menus 7. OK/Play/Pause - Select the highlighted menu option and play or pause content 8. Back - Go to the previous on-screen menu 9. Info - Display the info window 10. Volume Up/Down - Increase or decrease the loudness of the audio 11. Closed Caption - Open the closed caption menu 12. V Button - Launch SmartCast TV/Return to SmartCast TV Home Screen 13. Pic - Cycle through the different picture setting modes 14. Channel Up/Down- Change the channel 15. Mute - Turn the audio on or off 16. Last - Return to the channel last viewed 17. Number Pad - Manually enter a channel 18. Wide - Change the Television mode 19. Dash - Use with number pad to manually enter a digital sub-channel. (For example, 18-4 or 18-5)
Using the On-Screen Menu
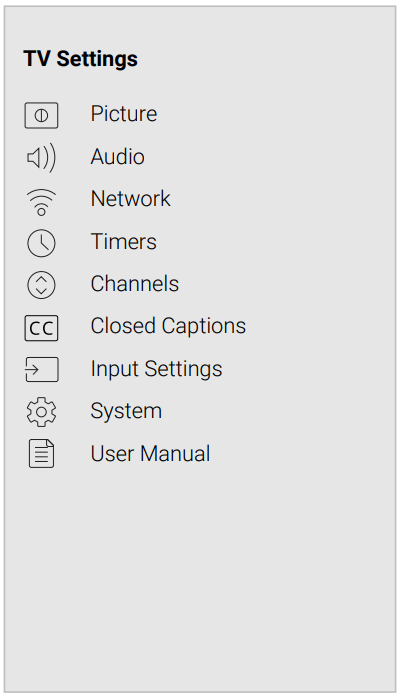
Your TV features an easy-to-use on-screen menu. To open the on-screen menu, press the Menu button on the remote. From this menu, you can:
• Adjust the Picture settings • Adjust the Audio settings • Adjust the Network settings • Set up the Timers • Adjust the Channel settings • Set up Closed Captioning • Name and adjust Inputs • Adjust TV settings • View user manual
NAVIGATING THE ON-SCREEN MENU
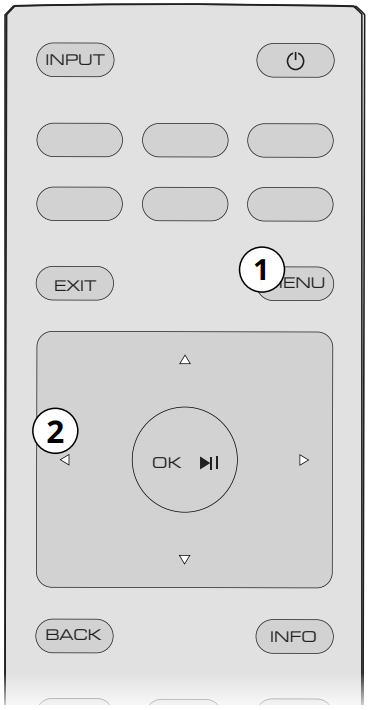
To open the on-screen menu:
1. Press the Menu button on the remote. 2. Use the Arrow buttons to highlight a menu option, and press the OK button to select that option.
Note: While navigating the on-screen menu, you can press the Back button at any time to return to the previous menu screen. The Exit button will close the on-screen menu.
CHANGING THE INPUT SOURCE
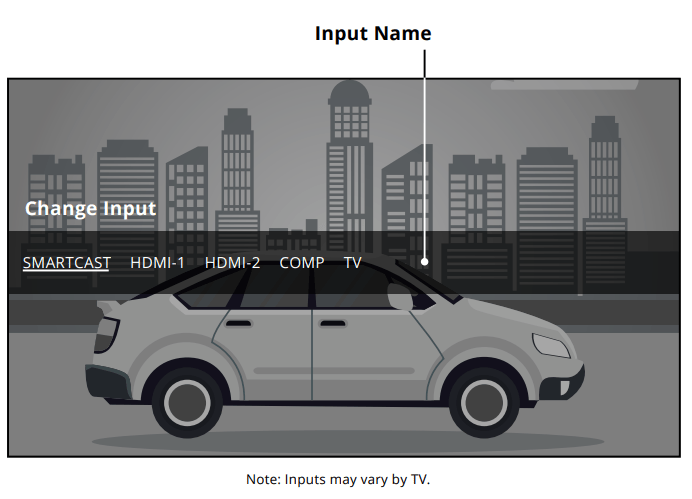
External devices such as DVD players, Blu-ray Players, and video game consoles can be connected to your TV. To use one of these devices with your TV, you must first change the input source using the Input menu.
To change the input sources:
1. Press the Input button on the remote. The Input menu is displayed.
2. Use the Right/Left Arrow buttons or the Input button on the remote to highlight the input you wish to view and press OK. The selected input is displayed.
Note: You can change the input names that appear on the Input menu to make your devices easy to recognize. See Renaming Devices on the Input Menu for more information.
CHANGING THE SCREEN ASPECT RATIO
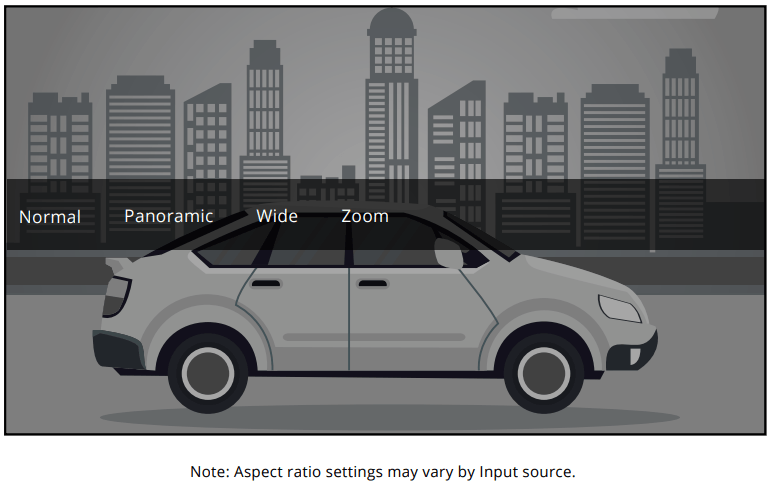
The TV can display images in four different modes: Normal, Panoramic, Wide, and Zoom. Each mode displays the picture differently.
Some programs have black bars on the top or sides of the picture so that the picture keeps its original shape. Examples include wide-screen movies and older television programs.
To change the screen aspect ratio:
1. Press the Wide button on the remote.
2. Use the Arrow buttons to highlight the aspect ratio you wish to view and press OK.
• Normal preserves the content’s original aspect ratio and size.
• Panoramic stretches a 4:3 aspect ratio picture to the left and right edges of the screen. The center of the image is not stretched, but the sides of the image are extremely stretched. If you are watching widescreen (1.85:1 or 2.35:1) content with black bars on the top and bottom, the black bars will still appear on the top and bottom of the display image.
• Wide stretches a 4:3 aspect ratio picture to the edges of the screen. Since the picture is being stretched, the display image may appear distorted—figures appear short and fat. If the program is already formatted for widescreen viewing (1.85:1 or 2.35:1), then black bars will appear on the top and bottom of the display image.
• Zoom expands images evenly in all directions (33% taller and 33% wider) with black bars to fit the screen. A 720p image will fill a 1080p screen.
Tip: The aspect ratio cannot be changed for Ultra HD content or HDR content.
ADJUSTING THE PICTURE SETTINGS
Your TV can be adjusted to suit your preferences and viewing conditions.
If you save changes to the settings for a picture mode, an asterisk appears after its name (see Saving a Custom Picture Mode).
To adjust the picture settings:
1. Press the Menu button on the remote. The on-screen menu is displayed.
2. Use the Arrow buttons on the remote to highlight Picture and press OK. The Picture menu is displayed.
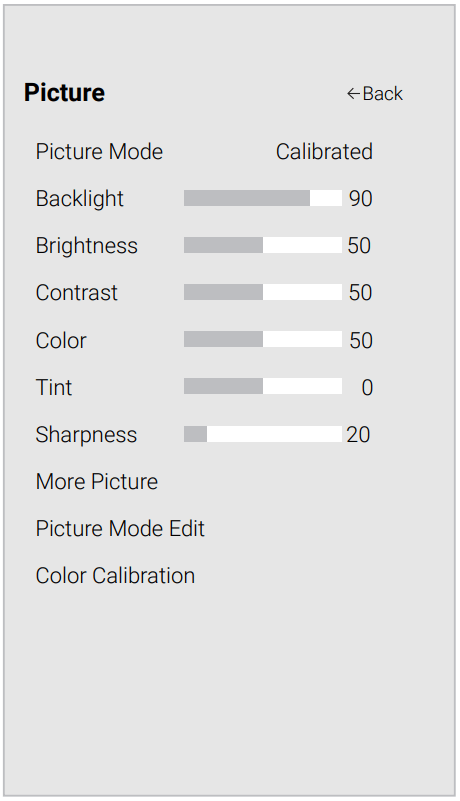
3. Use the Arrow buttons on the remote to highlight Picture Mode, then use the Left/Right Arrow buttons to change the picture mode:
• Standard mode sets the picture settings to the default settings.
• Calibrated mode sets the picture settings to values ideal for watching TV in a brightly-lit room.
• Calibrated Dark mode sets the picture settings to values ideal for watching TV in a dark room.
• Vivid mode sets the picture settings to values that produce a brighter, more vivid picture.
• Game mode reduces throughput delays and optimizes the picture settings for displaying game console output.
• Computer mode optimizes the picture settings for displaying computer output.
If Standard picture mode meets Energy Star® requirements. For the best picture switch to Calibrated mode. Note that Calibrated mode does not meet Energy Star® requirements. Customizing picture setting will change the energy consumption required to operate the TV.
4. To manually change each of the picture settings, use the Up/ Down Arrow buttons on the remote to highlight that picture setting, then use the Left/Right Arrow buttons to adjust the setting:
• Backlight - Adjusts the LED brightness to affect the overall brilliance of the picture. Backlight cannot be adjusted when starting from some picture modes.
• Brightness - Adjusts the black level of the picture. When this setting is too low, the picture may be too dark to distinguish details. When this setting is too high, the picture may appear faded or washed out.
• Contrast - Adjusts the white level of the picture. When this setting is too low, the picture may appear dark. When this setting is too high, the picture may appear faded or washed out. If the setting is too high or too low, detail may be difficult to distinguish in dark or bright areas of the picture.
• Color - Adjusts the intensity of the picture colors.
• Tint - Adjusts the hue of the picture. This setting is useful in adjusting the flesh tones in the picture. If flesh appears too orange, reduce the level of color before adjusting tint.
• Sharpness - Adjusts the edge sharpness of picture elements. It can be used to sharpen non-HD (high definition) content; however, it will not produce detail that does not otherwise exist.
When you have finished adjusting the picture settings, press the Exit button on the remote.
Adjusting More Picture Settings
To adjust more picture settings:
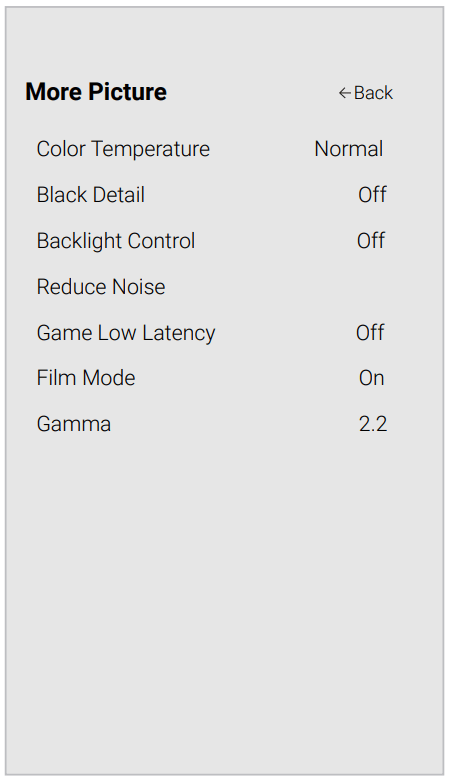
1. From the PICTURE menu, use the Arrow buttons to highlight More Picture, and then press OK.
2. Use the Arrow buttons to highlight the setting you wish to adjust, then press the Left/Right Arrow buttons to change the setting:
• Color Temperature - See Adjusting the Color Temperature.
• Black Detail - Adjusts the average brightness of the picture to compensate for large areas of brightness. Select Off, Low, Medium, or High.
• Reduce Noise - Reduce Signal Noise - Diminishes artifacts in the image caused by the digitizing of image motion content. Select Off, Low, Medium, or High. - Reduce Block Noise - Reduces pixelation and distortion for mpeg files. Select Off, Low, Medium, or High.
• Game Low Latency - Select On to reduce video delay (lag) when gaming.
• Film Mode - Optimizes the picture for watching film. Select Auto or Off.
• Gamma - Set the shape of the Gamma curve. Use lower Gamma values for bright room conditions, and higher values when it’s dark.
3. When you have finished adjusting More Picture Settings, press the Exit button on the remote.
Adjusting the Color Temperature
Adjusting the color temperature changes the white balance of the picture.
To adjust the color temperature:
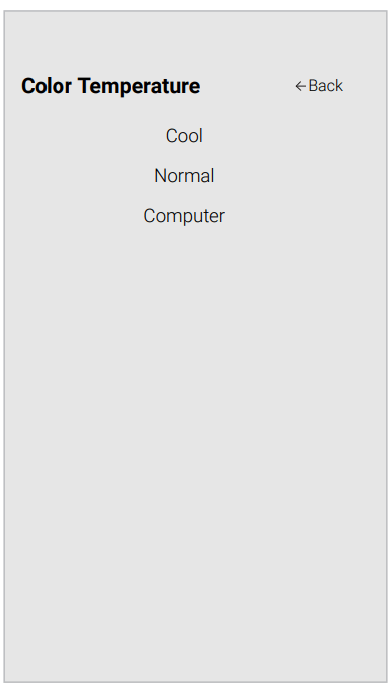
1. From the MORE PICTURE menu, use the Arrow buttons to highlight Color Temperature, and then press OK.
2. Use the Arrow buttons on the remote to highlight a color temperature preset and then press OK.
• Cool produces a blue-hued picture.
• Normal is optimized for television viewing.
• Computer optimizes the picture for use as a PC monitor.
3. When you have finished adjusting the color temperature, press the Exit button on the remote.
ADJUSTING THE AUDIO SETTINGS
To adjust the audio settings:
1. Press the Menu button on the remote. The on-screen menu is displayed.
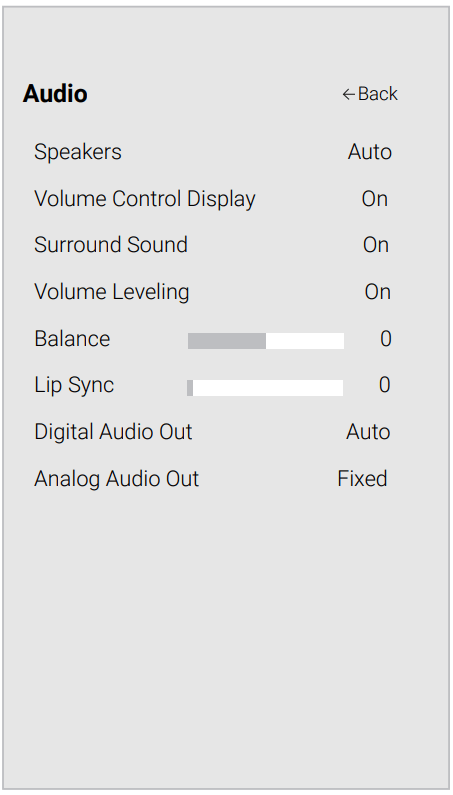
2. Use the Arrow buttons on the remote to highlight Audio and press OK. The Audio menu is displayed.
3. Use the Arrow buttons to highlight the setting you wish to adjust, then press Left/Right Arrow buttons to change the setting:
• Speakers - Turns the built-in speakers On or Off.
• Volume Control Display - Toggle between On or Off to hide or display the on-screen volume slider that appears when volume is adjusted.
• Surround Sound - Surround sound uses DTS TruSurround™ to deliver an immersive surround sound experience from the TV’s internal speakers. TruSurround completes the entertainment experience by providing deep, rich bass and by delivering crisp details and clear, intelligible dialog. Select On or Off.
• Volume Leveling - Volume leveling uses DTS TruVolume™ to maintain consistent volume levels during transitions between program content, AV formats, and input sources. Select On or Off. In a few cases, volume leveling may artificially suppress volume increases, making it difficult to hear dialog or flattening sudden noises. If this occurs, turn volume leveling off.
• Balance - Adjusts the loudness of the audio output from the left and right speakers.
• Lip Sync - Adjusts the synchronization between the display image and the accompanying audio track.
• Digital Audio Out - Changes the type of processing for digital audio out and HDMI ARC output when connected to a home theater audio system. Select Auto, PCM, Dolby D or Bitstream.
Note: You must select Bitstream for audio with more than two channels (3.0, 5.0, or 5.1, for example).
• Analog Audio Out - Sets the volume control properties for the RCA connector when connected to a home theater audio system. Select Variable if you are controlling the volume with the TV’s volume controls, or select Fixed if an external audio device (sound bar or AV receiver) will control the volume.
4. When you have finished adjusting the audio settings, press the Exit button on the remote.
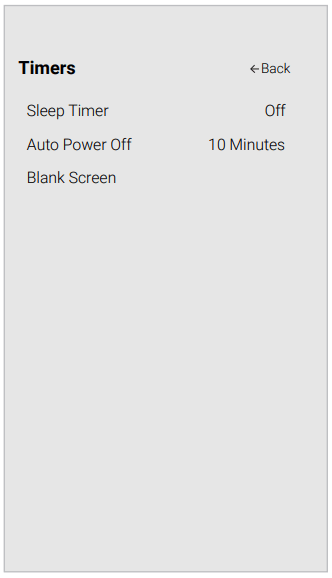
SETTING TIMERS
Setting the Timer
When activated, the TV’s timer will turn the TV off after a set period of time.
1. Press the Menu button on the remote. The on-screen menu is displayed.
2. Use the Arrow buttons on the remote to highlight Timers and press OK. The TIMERS menu is displayed.
3. Use the Left/Right Arrow buttons on the remote to highlight the period of time after which you want the TV to go to sleep: 30, 60, 90, 120, or 180 minutes. If you don’t want the sleep timer to activate, change the setting to Off.
4. When you have finished setting the sleep timer, press the Exit button on the remote.
Setting the Auto Power Off Feature
To help save energy, your TV is set by default to turn off after 10 minutes without a video or audio signal. This feature can be deactivated.
To set the Auto Power Off feature:
1. From the TIMERS menu, use the Up/Down Arrow buttons on the remote to highlight Auto Power Off.
2. Use the Left/Right Arrow buttons on the remote to change whether the TV will turn off. If you don’t want the TV to turn off when there is no signal, change the setting to Off. Otherwise, select 10 minutes.
3. When you have finished setting the auto power off time, press the Exit button on the remote.
Using the Blank Screen Feature
To help save LED life, your TV screen can turn on or off while audio is streaming. To use the Blank Screen feature:
1. From the TIMERS menu, use the Up/Down Arrow buttons on the remote to highlight Blank Screen.
2. Press the OK button to immediatly blank the screen.
3. To exit Blank Screen, press any key.
USING PARENTAL CONTROLS
The TV’s parental controls allow you to prevent the TV from displaying certain channels or programs without a password.
Note: Other devices have their own parental control settings.
The PARENTAL CONTROLS menu only appears when:
• You are using the tuner to receive your TV signals, such as when you are using an antenna for Over-the-Air signals or when connected to cable TV directly from the wall (no cable box).
• You have a device connected using a composite video cable or a coaxial cable, such as a VCR, satellite or cable box, or DVR.
Accessing the Parental Controls Menu
To access the PARENTAL CONTROLS menu:
1. Press the Menu button on the remote. The on-screen menu is
2. displayed.
3. Use the Arrow buttons on the remote to highlight Channels and
4. press OK. The CHANNELS menu is displayed.
5. Use the Arrow buttons on the remote to highlight Parental Controls and press OK.
6. Enter your set System PIN.
Note: To set a custom PIN passcode, see Setting a System Pin.
Enabling or Disabling Program Ratings
To manage program content according to its rating, you must enable the Program Rating feature.
To enable or disable the Program Rating feature:
1. From the PARENTAL CONTROLS menu, highlight Locks and press OK. The LOCKS menu is displayed.
2. Select On or Off and press OK.
Locking and Unlocking Channels
When a channel is locked, it will be inaccessible. Locking a channel is a good way to prevent children from viewing inappropriate material.
To lock or unlock a channel:
1. From the PARENTAL CONTROLS menu, highlight Channel Locks and press OK. The CHANNEL LOCKS menu is displayed.
2. Highlight the channel you want to lock or unlock and press OK.
3. When a channel is locked, the Lock icon appears locked. The channel is not accessible unless the parental PIN is entered.
4. When a channel is unlocked, the Lock icon appears unlocked. The channel is accessible.
Blocking and Unblocking Content by Rating
A channel may sometimes broadcast programs that are meant for children, and at other times broadcast programs that are meant for mature audiences. You may not want to block the channel completely using a channel lock, but you may wish to block certain programs from being viewed.
When this is the case, you can use the TV’s Rating Block feature to block content based on its rating.
To block or unblock content by its rating:
1. From the PARENTAL CONTROLS menu, highlight the content type you want to adjust and press OK:
• USA TV - USA television program broadcasts.
• USA Movie - USA movie broadcasts.
• Canadian English - Canadian English television program broadcasts.
• Canadian French - Canadian French television program broadcasts.
2. For each rating type you want to block or unblock, use the Up/ Down and Left/Right Arrow buttons on the remote to highlight the rating type and press OK.
3. When the rating type is blocked, the Lock icon appears locked. Content with this rating and all higher ratings cannot be viewed.
4. When the rating type is unblocked, the Lock icon appears unlocked. Content with this rating and all lower ratings can be viewed.
If you want to block all unrated content, highlight Block Unrated Shows and use the Arrow buttons on the remote to select On.
5. When you are finished adjusting the rating level blocks, press the Exit button on the remote.
SETTING UP CLOSED CAPTIONING
Your TV can display closed captions for programs that include them. Closed captions display a transcription of a program’s dialogue. To activate or deactivate closed captions:
1. Press the Menu button on the remote. The on-screen menu is displayed.
2. Use the Arrow buttons on the remote to highlight Closed Captions and press OK. The CLOSED CAPTIONS menu is displayed. 3. Use the Arrow buttons on the remote to highlight Closed Captions and then use the Left/ Right Arrow buttons to select On or Off.
4. Use the Arrow buttons on the remote to highlight either Analog or Digital Closed Captions .
5. Use the Left/Right Arrow buttons on the remote to select the caption channel you wish to display, then press Exit .
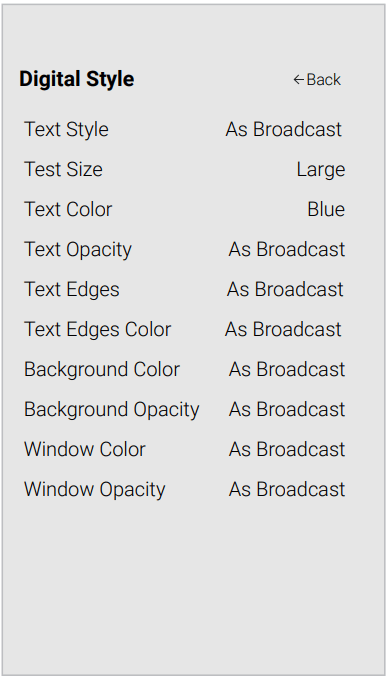
Changing the Appearance of Digital Closed Captions
Digital closed captions can be displayed according to your preference. See the diagram on the next page for an explanation of the parts of the closed caption area.
To change the appearance of digital closed captions:
1. From the CLOSED CAPTIONs menu, use the Arrow buttons to highlight Digital Style and press OK .
2. Use the Left/Right Arrow buttons on the remote to select Custom. The DIGITAL STYLE menu appears as shown.
3. Use the Up/Down Arrow buttons on the remote to highlight the setting you wish to change, then use the Left/Right Arrow buttons to change the setting:
• Caption Style - Choose As Broadcast to keep default settings or Custom to manually change each setting.
• Text Style - Change the font used for the closed captioning text.
• Text Size - Make the text larger or smaller.
• Text Color - Change the color of the text.
• Text Opacity - Change the transparency of the text.
• Text Edges - Change the effects at the edges of the text, such as raising the edges or adding drop shadows.
• Text Edges Color - Change the color of the text edge effects.
• Background Color - Change the color of the background directly behind the text .
• Background Opacity - Change the transparency of the background directly behind the text .
• Window Color - Change the color of the closed captioning box .
• Window Opacity - Change the opacity of the closed captioning box.
4. When you are satisfied with the appearance of the closed captions, press the Exit button on the remote.
Troubleshooting & Technical Support
The remote is not responding.
• Make sure the batteries are properly inserted matching the - and + symbols.
• Replace the batteries with fresh ones.
The TV displays “No Signal.”
• Press INPUT button on the remote control to select a different input source.
• If you are using cable TV or antenna connected directly to the TV, scan for channels. See Scanning for Channels.
There is no power.
• Ensure the TV is plugged into a working electrical outlet.
• Ensure the power cable is securely attached to the TV.
• Press the Power/Standby button on the remote or on the back of the TV to turn the TV on.
The power is on, but there is no image on the screen.
• Ensure all cables are securely attached to the TV.
• Ensure all devices are connected correctly. Devices differ; see your device’s user manual for details. • Adjust Brightness, Contrast, or Backlight. See Adjusting the Picture Settings.
• Press the INPUT button on the remote to select a different input source.
The sound is flat or dialog is not audible.
• Turn off Volume Leveling. See Adjusting the Audio Settings.
Where do I find information on the accessibility features of this product and other VIZIO products?
• Please visit www.vizio.com/accessibility, Email us at: Accessibility@vizio, or give us a call at 1-877-698-4746.
There is no sound.
• Press Volume Up on the remote control.
• Press the MUTE button on the remote to ensure mute is off.
• Check the audio settings. See Adjusting the Audio Settings.
• Check the audio connections of external devices (Blu-ray player, game console, cable/satellite box) that are connected to the TV.
• If you are using an antenna, the signal strength of the channel may be low. Ensure your antenna is connected securely to the TV and move the antenna around the room or close to a window for the best signal.
The colors on the TV don’t look right.
• Adjust the Color and Tint settings in the Picture menu. See Adjusting the Picture Settings.
• Select a pre-set picture mode. See Adjusting the Picture Settings. VIZIO recommends selecting Calibrated.
• Check all cables to ensure they are securely attached.
The image quality is not good.
• For the best image quality, view high-definition programs using digital sources. Connect your devices with HDMI cables.
• If you are using an antenna, the signal strength of the channel may be low. Ensure your antenna is connected securely to the TV and move the antenna around the room or close to a window for the best signal.
The picture is distorted.
• Move the TV away from electrical appliances, cars, and fluorescent lights.
• Ensure all cables are securely attached.
The buttons on the remote aren’t working.
• Ensure you are only pressing one button at a time.
• Point the remote directly at the TV when pressing a button.
• Replace the remote batteries with new ones. See Replacing the Batteries.
The TV image does not cover the entire screen.
• If you are using TV, AV, or Component with 480i input, press the button on the remote to change the screen mode.
The TV has pixels (dots) that are always dark.
• Your HD TV is precision-manufactured using an extremely high level of technology. However, sometimes pixels may not display correctly. These types of occurrences are inherent to this type of product and do not constitute a defective product.
I see “noise” or static on the screen.
• When your TV’s digital capabilities exceed a digital broadcast signal, the signal is up-converted (improved) to match your TV’s display capabilities. This up-converting can sometimes cause irregularities in the image.
• If you are using an antenna, the signal strength of the channel may be low. Ensure your antenna is connected securely to the TV and move the antenna around the room or close to a window for the best signal.
When I change input source, the TV image changes size.
• The TV remembers the viewing mode on each input source. If the viewing mode on the new input source differs from the one on the input source you switch from, the difference may be noticeable.
• See Changing the Screen Aspect Ratio. HELP TOPICS A 48
How do I download the VIZIO SmartCast™ App?
• Make sure your phone or tablet is connected to a Wi-Fi network. Open a browser on your phone or tablet. Navigate to vizio.com/smartcastapp and follow the on-screen instructions to download the VIZIO SmartCast™ App.
How do I change the Inputs?
• Press the Input button on the back of the TV to cycle through the Inputs.
• Press the Input button on the basic remote to cycle through the Inputs.
• Make sure the VIZIO SmartCast™ App is installed on your phone or tablet. Open the VIZIO SmartCast™ App. Tap on the Device list and select your TV. Tap on the Input key and select the Input of your choice
How do I connect to my Wi-Fi network?
• On your IR remote, press the Menu button then go to Network à Select your Wi-Fi name à Enter password.
• Open the VIZIO SmartCast™ App on your phone or tablet. Tap on the device list and select your Display. Tap on the Settings icon à Network à Wireless Access Points. Select your Wi-Fi network from the list, enter the Wi-Fi password, and tap Connect .
How do I stream apps like Netflix and Youtube to my VIZIO SmartCast™ TV?
• Download and open a Chromecast-enabled apps on your mobile device, such as like Netflix or Youtube. Then tap the Cast button
How do I exit Demo Mode
• Press and hold the Input button on the back of the TV to exit the demo mode.
How do I watch Cable/Antenna TV channels?
• If you subscribe to cable or satellite, simply connect an HDMI cable (not included) to the receiver.
• If you use external antennas to watch local broadcast channels, use a coaxial cable to connect to connecto to the.
 locked. The channel is not accessible unless the parental PIN is entered.
  unlocked. The channel is accessible.
  unlocked. Content with this rating and all lower ratings can be viewed.
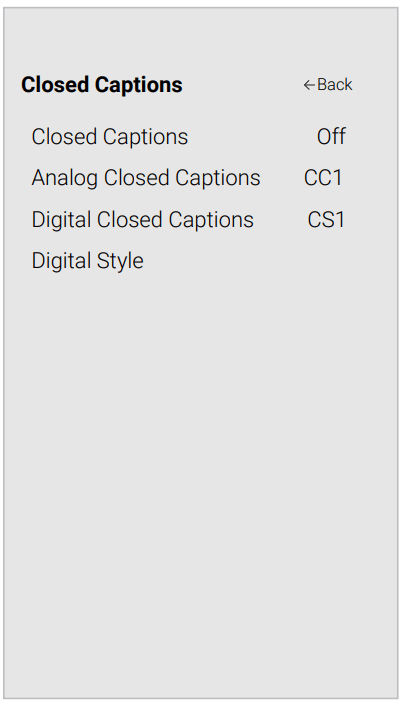
 on the remote to change the screen mode.