Instruction Manual
Getting started with your Quest™ Robot Vaccum
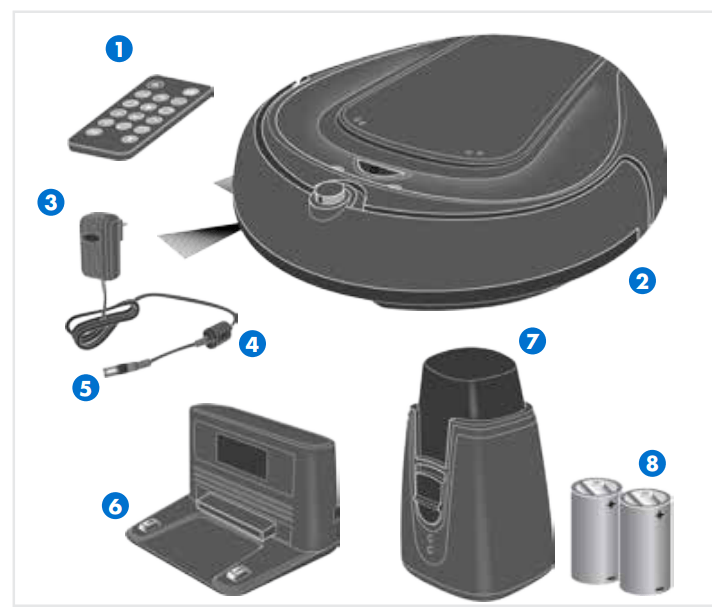
- Remote control
- Robot Vaccum Cleaner
- AC adapter
- AC adapter cord
- AC adapter plug
- Docking Station
- Invisible Wall*
- Batteries for Invisible Wall* (2x type C, 1.5V)
Get to know your Quest™ Robot Vaccum
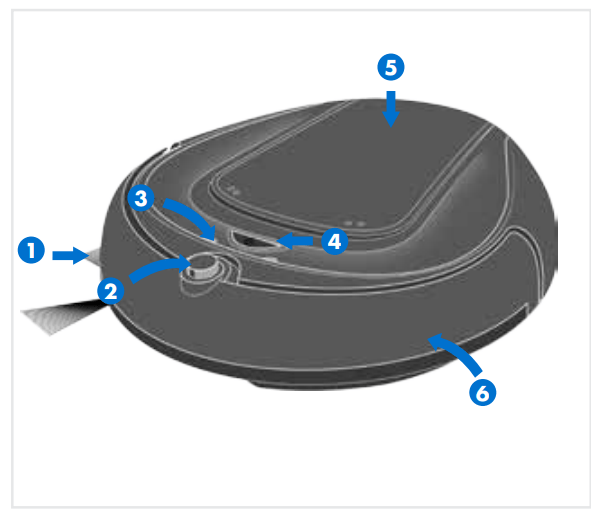
- Side brush:
- sweeps dirt to the main brush
- may be pulled off for low pile carpet cleaning
- IR sensor:
- guides Quest™ back to its docking station as soon as the battery capacity becomes low or it receives the respective command from the remote control or Hoover App
- LED indicators * See Trouble Shooting (page 16 )for information on LED functionality
- "ON/OFF"( ) button:
- Press & hold for 2 seconds to start/stop your robot
- Top panel
- provides access to dirt cup & filter
- Bumper:
- senses impact and tells the robot to move another direction
- if triggered constantly for 5 seconds or longer the robot will stop automatically
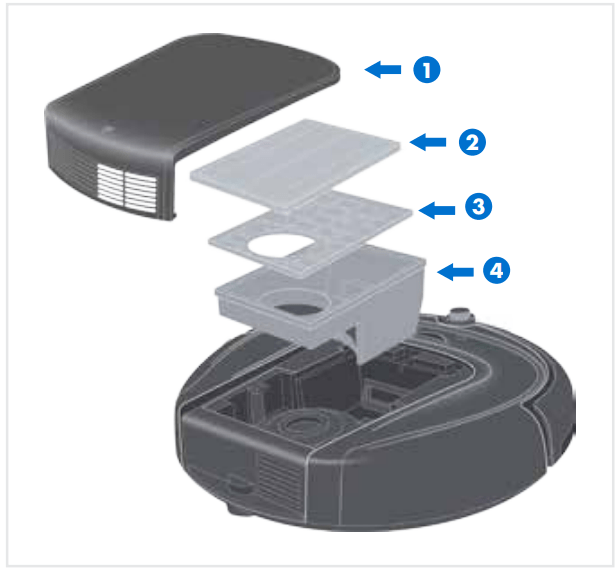
Dirt Cup
- Top panel
- Dirt cup lid
- Filter
- Dirt cup
Docking station and Invisible Wall*
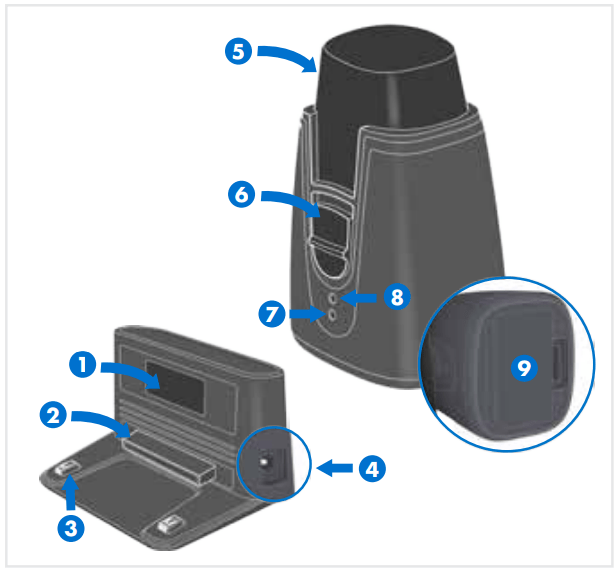
Docking Station
1. Transmitter window - lights up when plugged in - flashes during charging process
2. Front button
3. Charging pins
4. Socket for AC adapter plug
Invisible Wall*
5. Transmitter
6. Power switch
7. LED ( flashes when switched on)
8. Receiver
9. Battery cover
Getting started with your docking station
 |
|
Choose a hard level surface against a wall for your docking station. There should be at least a 4 foot clear path in all directions. |
 |
|
Remove clear film from the rubber feet underneath the docking station and place in location you've selected.
|
 |
|
Always keep the docking station plugged in.
|
CAUTION! Rubber may cause unwanted stains or discoloration on certain surfaces such as wood. Check the manufacturer's recommendations to avoid damage.
NOTE: Do not place invisible wall near the docking station. Otherwise your robot may be impeded from docking to the station.
Charging your Quest™ Robot Vaccum
Charging your Robot before first use will extend it's battery life.
 |
|
To charge your Quest™, manually place it on the docking station making sure the charging pins are aligned. A short beep and flashing blue LED confirm that Quest™ in properly docked for charging. |
 |
|
When Quest™ is fully charged (4.5 - 5.5 hours charging time), it will beep and the blue LED will turn off.
Ambient charging temperature range: 32°F to 113°F (0°C to 45°C)
|
 |
|
IMPORTANT: Battery pack can only be charged if toggle switch is put into "I/ ON" position.
|
WARNING! Danger of injury! Only use the AC adapter and docking station supplied with the appliance to charge this equipment.
Before using your Quest™ Robot Vaccum
 |
|
Attaching Side brush
Locate the side brush post on the bottom of the robot. Place the side brush in the post and press firmly until it snaps into position.
|
 |
|
Microfiber Dust Pad (for BH70800 Series only)
Locate velcro tape underneath your Quest™800. Align the Microfiber Dust Pad and press firmly
|
NOTE: Microfiber Dust Pad is machine washable. Do not use fabric softener.
Using your Quest™ Robot Vaccum
 |
|
Simply press the power button and Quest™ will start cleaning your everyday messes. Press and hold the power button to turn off at anytime. |
 |
|
As it cleans, it switches between the 3 cleaning modes shown to achieve the best results.
Ambient operating temperature range: 32°F to 104°F (0°C to 40°C)
|
WARNING! Danger of injury! You can let your robot run unsupervised, however always be careful not to step on it, this could cause you to fall.
CAUTION! Although your robot recognises drop-offs, we strongly advise against using it on furniture. It is not suitable for this type of use
Quest™ remote control
 |
|
Pull the tab to activate your remote control. |
 |
|
( ) - Turn ON/OFF ) - Turn ON/OFF
(Go) - Start cleaning
|
 |
|
2X - Quest™ will complete 2 cleaning cycles including one charging cycle. |
NOTE: Quest™ automatically returns to the docking station and docks itself when its running low on battery power. If it fails to dock after a few attempts, you may manually position it correctly on the docking station. After fully charged (4.5- 5.5) hours, Quest™ turns all the LEDs off and is ready to use.
 |
|
Directional buttons. |
 |
|
Quiet Mode:
( ) - to enable/ disable quiet mode. ) - to enable/ disable quiet mode.
IMPORTANT: During quiet operation mode, suction rate and speed of your Quest™ may be lower.
|
 |
|
( ) activates smart fence where your invisible wall is placed. After Quest™ cleans the current room (approx 30 min), smart fence will deactivate and allows Quest™ to pass through. To manually deactivate smart fence at any time, press the key again. ) activates smart fence where your invisible wall is placed. After Quest™ cleans the current room (approx 30 min), smart fence will deactivate and allows Quest™ to pass through. To manually deactivate smart fence at any time, press the key again. |
How to schedule cleaning
To deactivate this timer, press and hold the key.
| Delay |
Press the timer key |
| 1 HR |
Once |
| 2 HR |
Twice |
| 4 HR |
Thrice |
| 8 HR |
4 times |
NOTE: Quest™ automatically returns to the docking station and docks itself when its running low on battery power. If it fails to dock after a few attempts, you may manually position it correctly on the docking station. After fully charged (4.5 - 5.5) hours, Quest™ will beep and the blue LED will turn off.
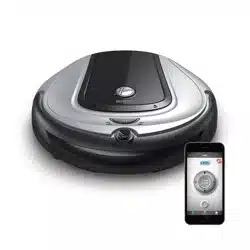
NOTE: For more and easier shceduling options, download Hoover App from iTunes store or Google play
Emptying the dirt cup
CAUTION! Never store the appliance next to heat sources (e.g. heater, oven). Avoid exposing it to direct sunlight, heat can can damage the appliance.
CAUTION! Dirt cup and filter are washable, but they are not suitable for cleaning in washing machines or dishwashers. Also, do not use detergents or brushes with hard bristles.
LUBRICATION: The motor and brushroll are equipped with bearings which contain sufficient lubrication for their lifetime. The addition of lubricant could cause damage. Do not add lubricant to motor or brush roll. Any other servicing should be done by an authorized service representative.
Troubleshooting
| Issue |
Cause |
Action |
| My Quest™ won’t turn on |
Battery may not be charged. |
Check the battery indicator and charge if it indicates low battery. |
| The power switch on the bottom of the Quest™ may be OFF. |
Flip the power switch ON and start your Quest™. |
| Error 1: Red LED blinks, Blue LED is ON |
Indicates battery is too low. |
Charge your Quest™. |
| Error 6: Red LED blinks ,Blue LED blinks. Continuous beeps of 30 sec length |
Indicates dirt cup is not installed or installed incorrectly. |
Turn OFF your Quest™ and install the dust bin. |
| Error 3: Red LED blinks, Blue LED is ON. 2 long beeps. |
Indicates that Drive wheel, Side brush or Main brush is stuck. |
Turn OFF your Quest™ and remove hair from wheels and wheel posts. |
| Indicates that QuestTM's cliff sensors on all 3 sides are sensing an object so it is stuck. |
Move Quest™ to a different location and restart. |
| Indicates Quest™'s bumper is stuck. |
| Side brush has stopped spinning |
It may be that dirt or hair are stuck around the wheel. |
Turn OFF your Quest™ and remove the dirt and hair from the wheels and wheel posts. See page 19 for instructions to remove side brush. |
| Main brush has stopped spinning |
It may be that dirt or hair are stuck around the wheel. |
Turn OFF your Quest™ and remove the dirt and hair from the wheels and wheel posts. See page 19 for instructions to remove side brush. |
| Quest™ is not charging |
AC adapter might not be plugged in properly. |
Ensure that the AC adapter is properly plugged into both the docking station and the outlet. |
| Power Button on the bottom of the Quest™ might be OFF. |
Flip the power switch ON on the bottom of your Quest™. |
| Quest™ is not properly docked. |
Pick up your Quest™ and manually dock it so that the charging pins are aligned |
Cleaning main brush
WARNING! To reduce the risk of personal inju- ry-turn power switch OFF before cleaning or servicing
 |
|
Changing the side brush
- Slide out the battery tray as shown.
- Remove old cell and replace with a new CR2025 cell.
|
 |
|
Changing remote control's battery cell
- Turn OFF your Quest™.
- Grip the bristles and pull the side brush as shown.
- To install a new side brush, press firmly until it snaps into place.
|

 ) button on the remote control. Your robot will start cleaning immediately and schedules cleaning at the same time every 24 hours. To deactivate