Owner's Guide Refrigerator
PARTS AND FEATURES
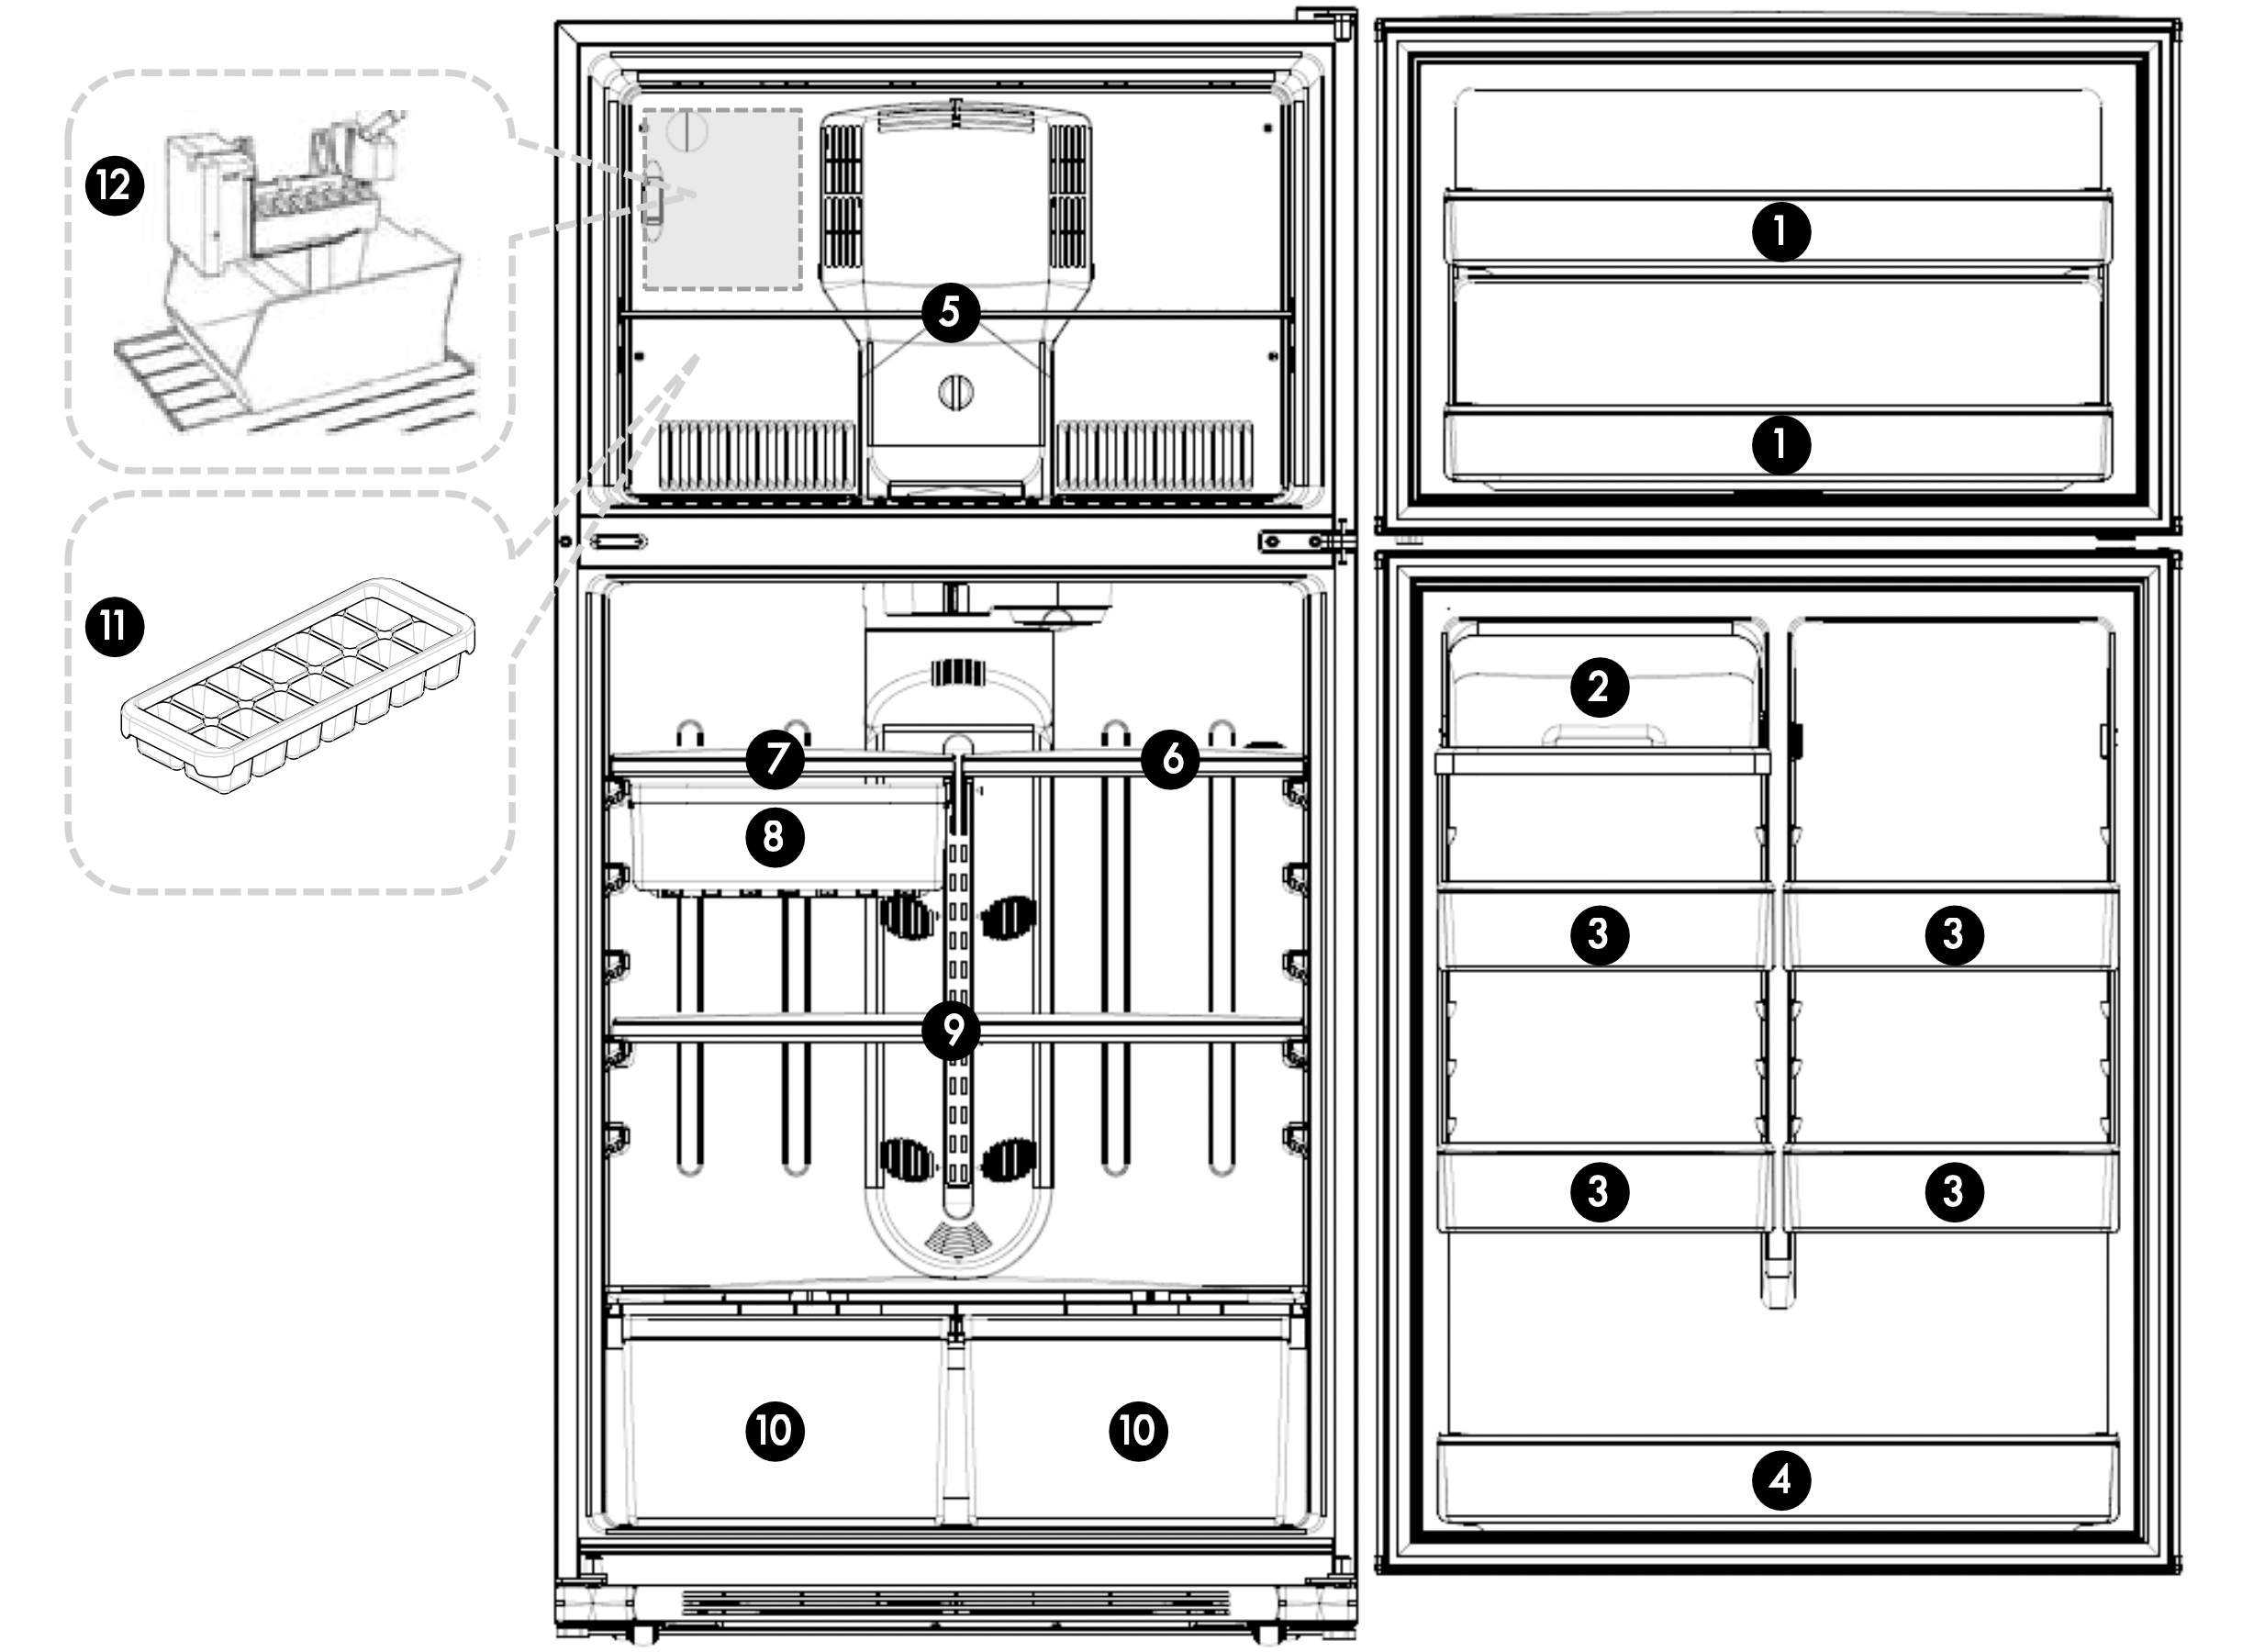
*This instruction manual refers to several models. Features may vary according to model.
- Freezer door bin
- Dairy compartment for spreadable food items such as butter or margarine.
- Adjustable half width door bin
- Full width door bin
- Adjustable wire shelf
- Adjustable half width shelf
- Adjustable half width shelf with deli drawer
- Deli drawer
- Adjustable full width shelf
- Humidity controlled crisper drawer for storage of fruits and vegetables
- Ice tray (optional)
- Ice maker / Ice storage bin (optional)
REFRIGERATOR USE
Using the Controls
Your refrigerator has two controls that affect the temperature.
The Temperature control is located at the top front of the refrigerator compartment and the Airflow control is located on the back wall of the freezer compartment.
IMPORTANT:
- The recommended setting should be correct for normal household refrigerator use. The controls are set correctly when milk or juice is as cold as you like and when ice cream is firm.
- Wait 24 hours for your refrigerator to cool completely before adding food. If you add food before the refrigerator has cooled completely, your food may spoil. NoTe: Adjusting the refrigerator and freezer temperature controls to a colder than recommended setting will not cool the compartments any faster.
- If the temperature is too warm or too cold in the refrigerator or freezer, first check the air vents to be sure they are not blocked before adjusting the controls.
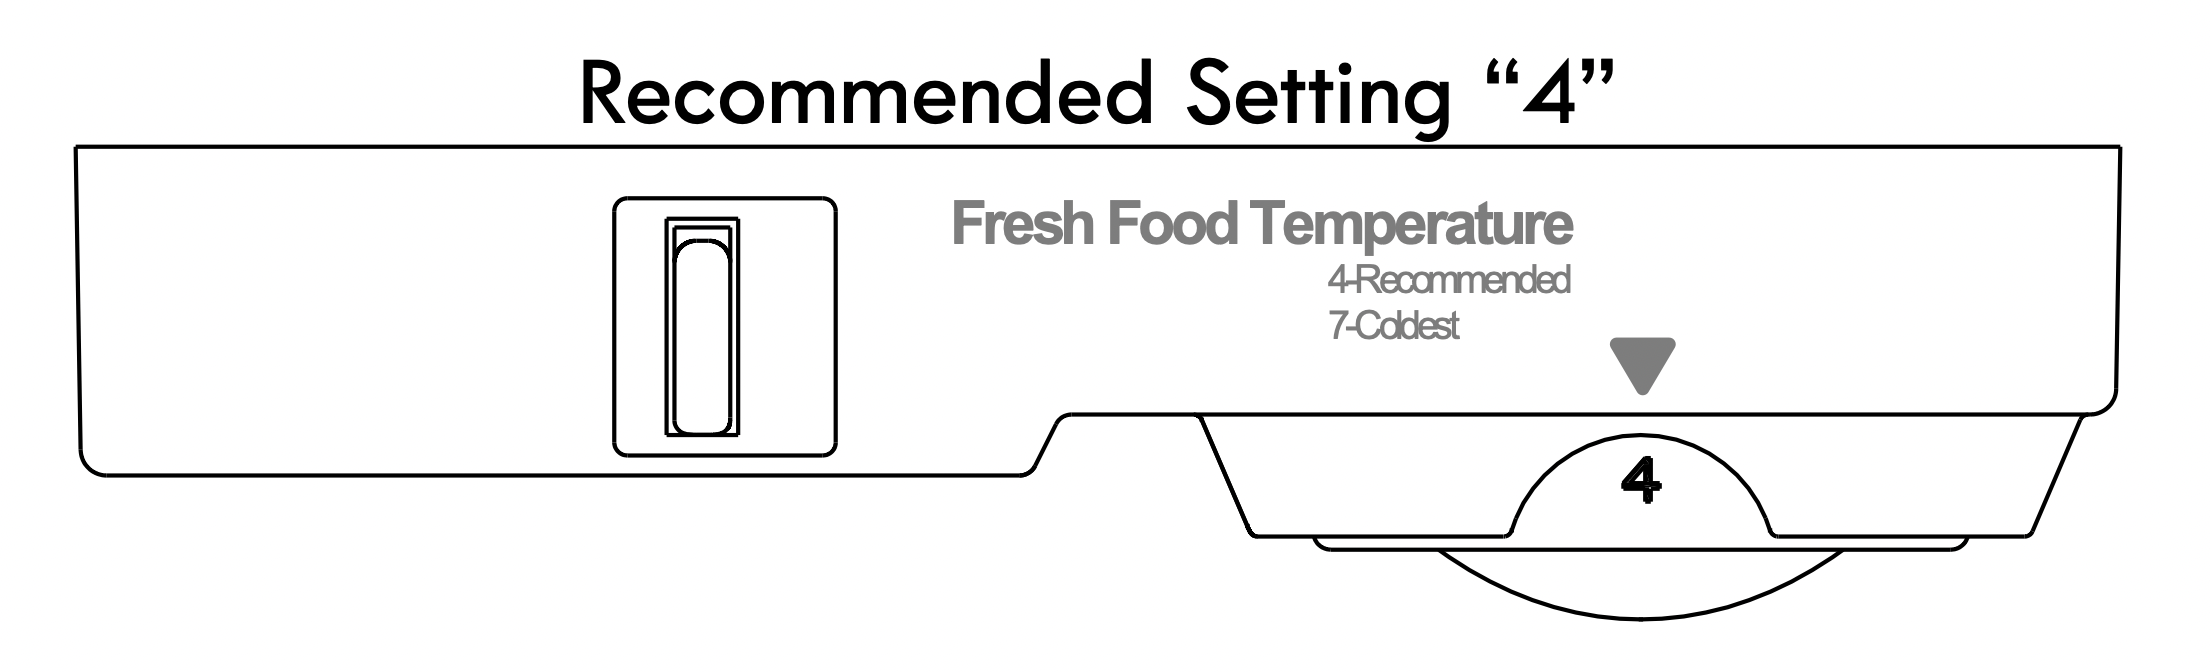
Refrigerator Temperature Control
The temperature control dial is calibrated in a range from 1 (least cold) to 7 (coldest). For your convenience, the Temperature control is preset at the factory to the recommended setting (4).
Note: Your refrigerator will run continuously for several hours when you first start it. This is normal.
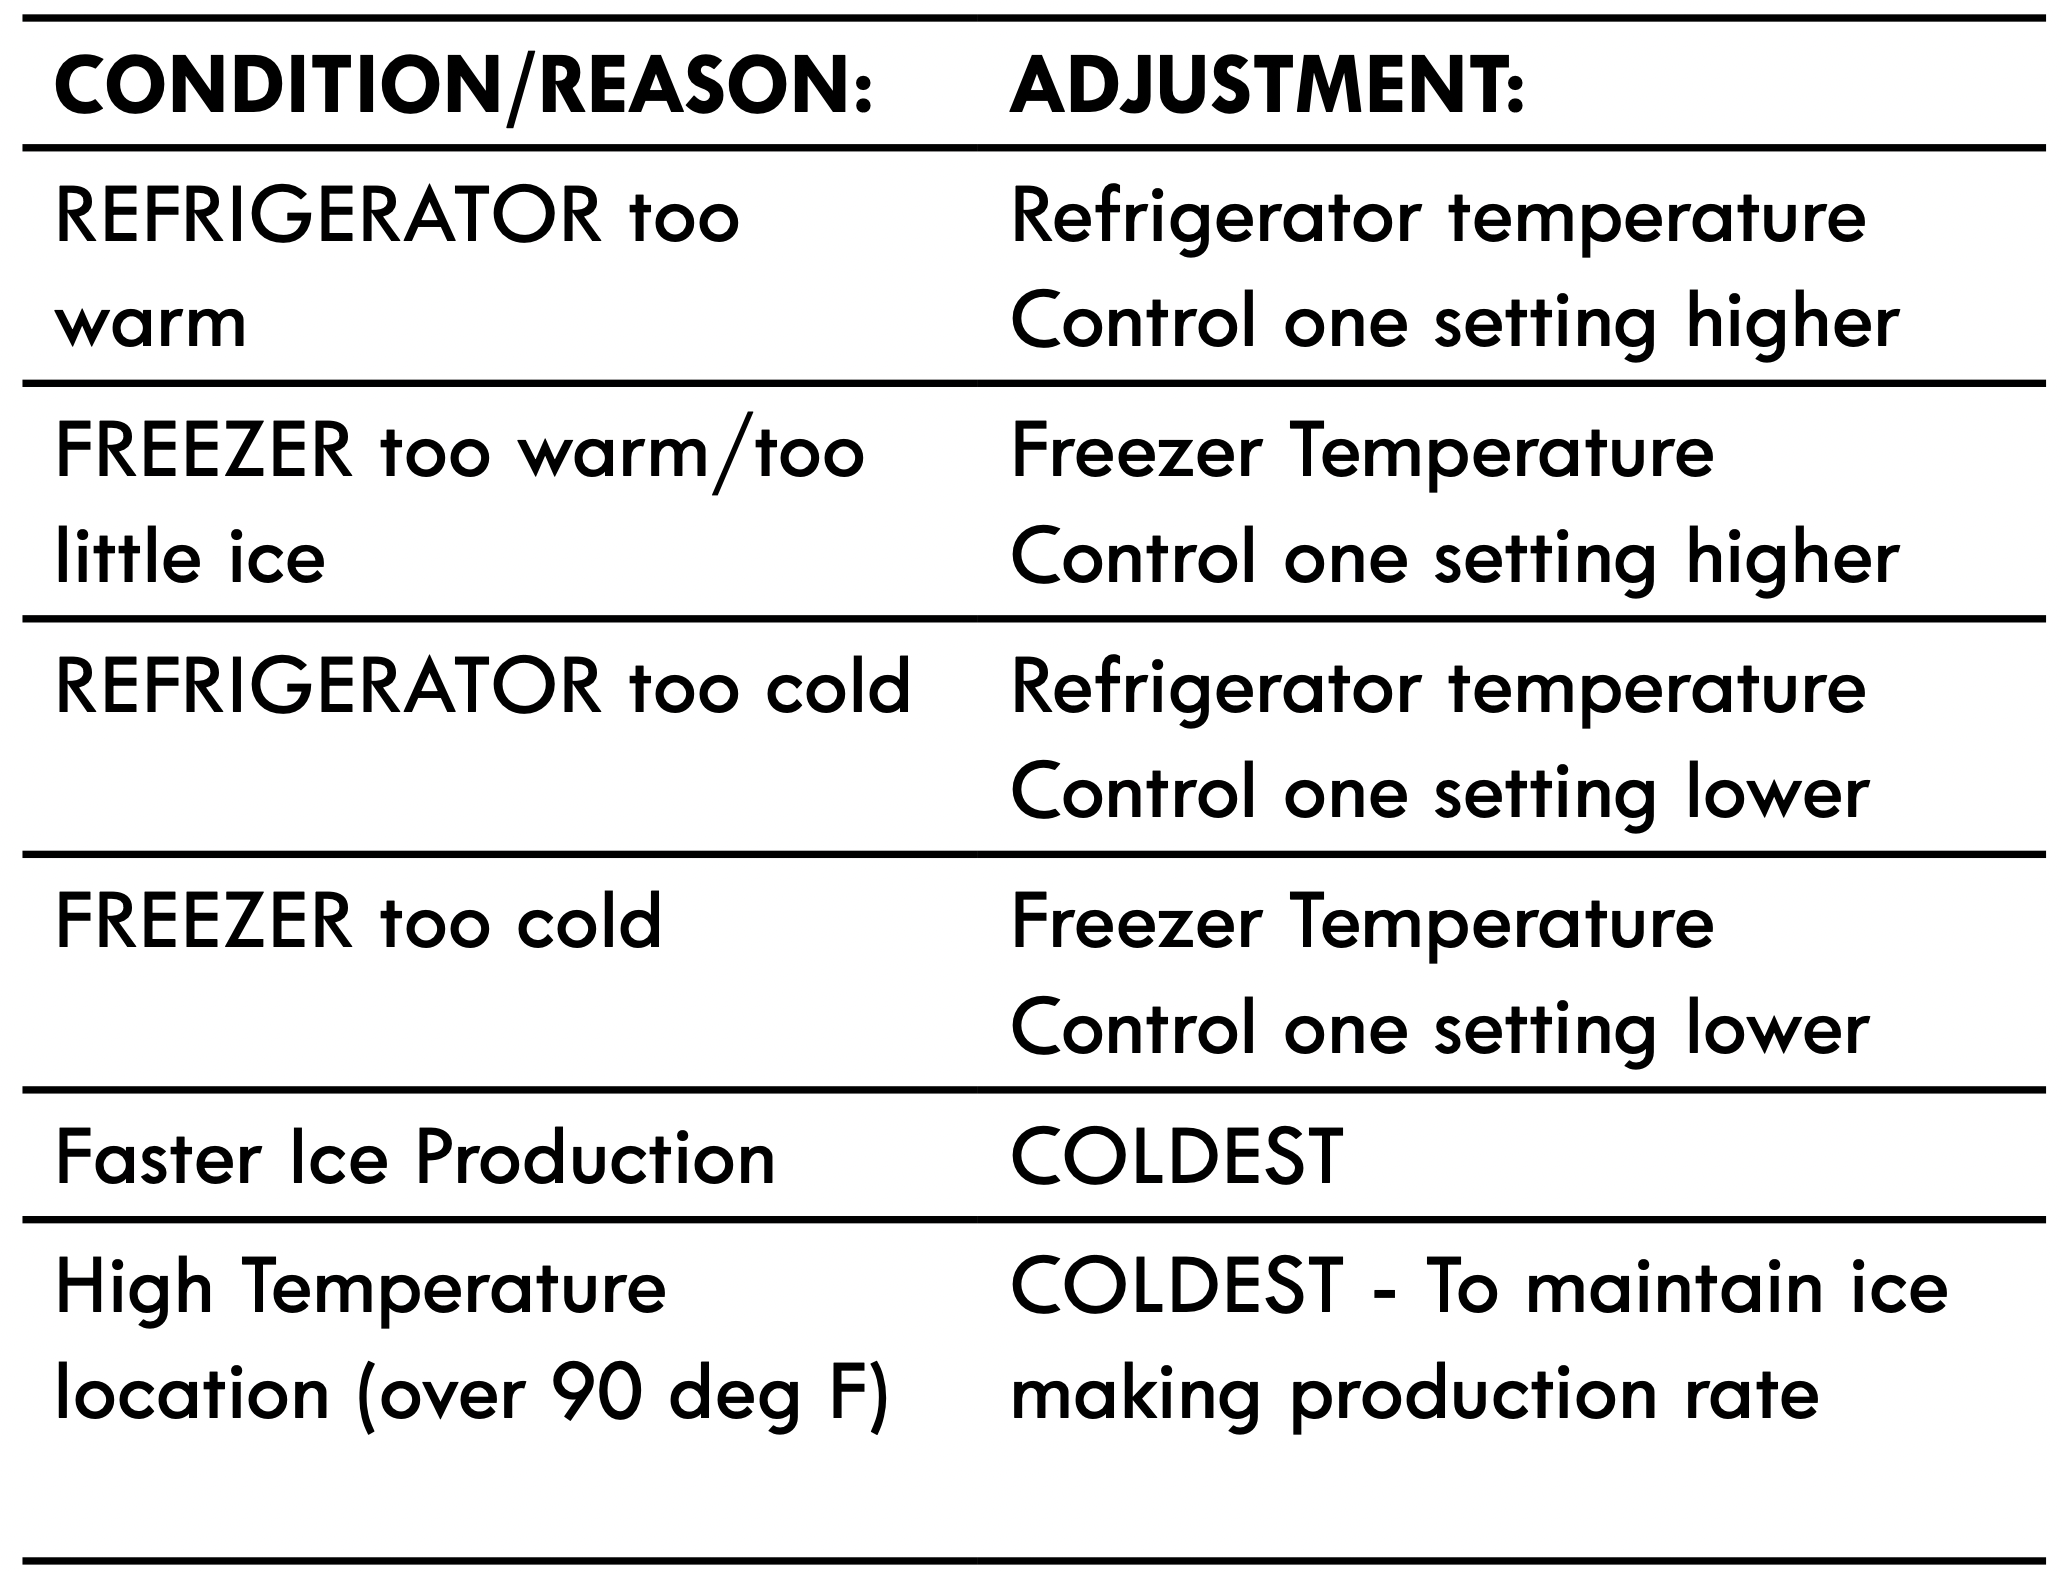
Adjusting the Temperature Control If you need to adjust the temperature in the refrigerator (or freezer compartment), follow the indications in the TEMPERATURE CONTROL GUIDE table.
Note: Do not adjust the control more than one setting at a time. Wait 24 hours between adjustments for the temperature to stabilize.
- Garage Ready Settings: For optimal operation in a garage environment, set temperature control in refrigerator compartment to 4 and set temperature control in freezer compartment to Recommended.
Note: Sustained exposure to ambient temperatures below 39°F (4°C) may result in freezing of food and beverages stored in the refrigeration section.
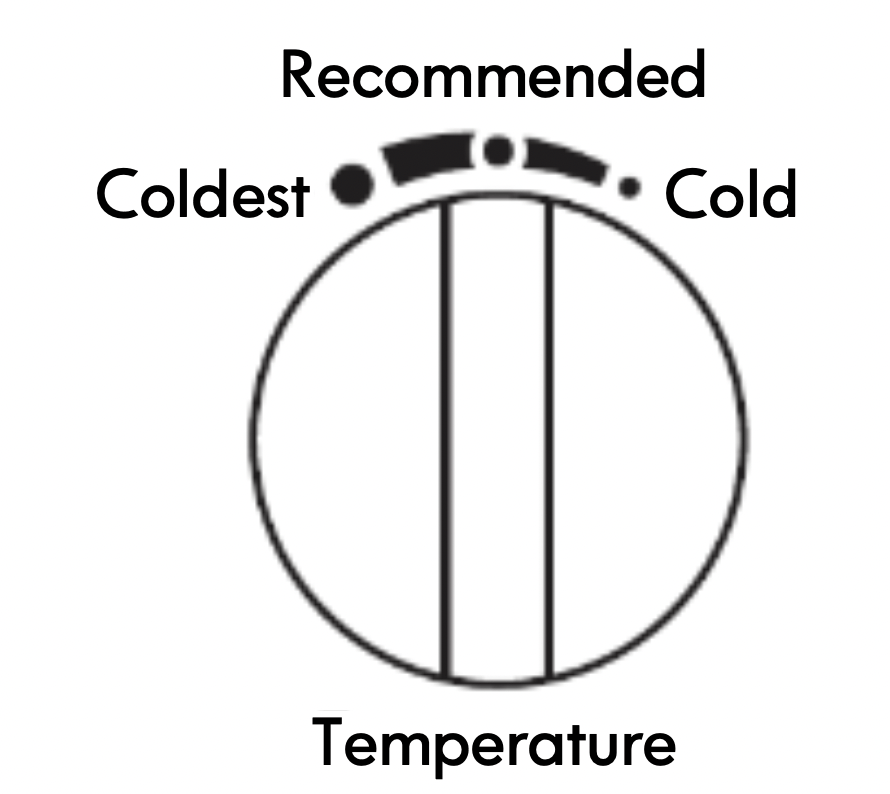
Freezer Temperature Control
The temperature control dial is calibrated in a range from “Coldest” to “Cold”.
For your convenience, the Temperature control is preset at the factory to the recommended setting which is indicated on the dial.
Use the freezer temperature control to adjust the freezer temperature to your desired condition. It is recommended that when you plug in the refrigerator for the first time, make sure the control setting is on Recommended.
Adjusting the freezer Temperature
If you need to adjust the temperature in the freezer (or refrigerator compartment), follow the indications in the TEMPERATURE CONTROL GUIDE table below.
Important: Once the performance is achieved, return the Airflow control to the Recommended setting to keep the refrigerator operating at optimum efficiency.
TEMPERATURE CONTROL GUIDE
Frost Free
Your refrigerator is designed to defrost automatically
Warm Cabinet Surfaces
At times, the front of the refrigerator cabinet may be warm to the touch. This is a normal occurrence that helps prevent moisture from condensing on the cabinet. The condition will be more noticeable when you first start the refrigerator, during hot weather and after excessive or lengthy door openings.
Icemaker (on some models)
Turning the Icemaker On/Off
Note: Do not force the wire shutoff arm up or down.
- To turn the icemaker on, simply lower the wire shutoff arm.
Note: Your icemaker has an automatic shutoff. As ice is made, the ice cubes will fill the ice storage bin and the ice cubes will raise the wire shutoff arm to the OFF (arm up) position.
- To manually turn the icemaker off, lift the wire shutoff arm to the OFF (arm up) position and listen for the click to make sure the icemaker will not continue to operate.

Note: Turn the icemaker off before removing the ice storage bin to serve ice or to clean the bin. This will keep the ice cubes from dropping out of the icemaker and into the freezer compartment. After replacing the ice storage bin, turn on the icemaker.
Ice Production Rate
- The icemaker should produce approximately 8 to 12 batches of ice in a 24 hour period. If ice is not being made fast enough, turn the Freezer control toward a higher (colder) number in half steps. Wait 24 hours and, if necessary, gradually turn the Freezer control to the highest setting, waiting 24 hours between each increase.
Remember
- The icemaker will not begin to operate until it reaches a temperature of 15°F (-9°C) or below. It will then begin operation automatically.
- In conditions of lower water pressure or first water supply, the water valve may turn on up to 3 times to deliver enough water to the icemaker.
- Allow 24 hours to produce the first batch of ice. Allow 3 days to completely fill the ice storage bin. Discard the first three batches of ice produced.
- The quality of your ice will be only as good as the quality of the water supplied to your icemaker. Avoid connecting the icemaker to a softened water supply. Water softener chemicals (such as salt) can damage parts of the icemaker and lead to poor quality ice. If a softened water supply cannot be avoided, make sure the water softener is operating properly and is well maintained.
- Do not store anything on top of the icemaker or in the ice storage bin.
REFRIGERATOR FEATURES
Your model may have some or all of these features.
To know about glass shelves and covers:
Refrigerator Shelves
The shelves in your refrigerator are adjustable to match your individual storage needs.
Storing similar food items together in your refrigerator and adjusting the shelves to fit different heights of items will make finding the exact item you want easier. It will also reduce the amount of time the refrigerator door is open, and save energy.
IMPORTANT:
- Do not clean glass shelves or covers with warm water when they are cold. Shelves and covers may break if exposed to sudden temperature changes or impact, such as bumping.
- Tempered glass is designed to shatter into many small, pebble-size pieces. This is normal.
- Glass shelves and covers are heavy. Use both hands when removing them to avoid dropping.
CAUTION: To avoid personal injury or property damage.
- Never attempt to adjust a shelf when it is loaded with food.
- Confirm that shelf is secure prior to loading items onto it.
Full Width Shelf
Select models are equipped with wire or glass full width shelves that are supported by rails molded into the interior walls of the fresh food compartment.
To remove and replace a full width shelf:
- Remove food from the shelf.
- Grasp each side of the shelf.
- Pull the shelf forward approximately 1 inch (25mm).
- While supporting the shelf from underneath, lift it up and out.
- Slide the shelf into the desired alternate position.
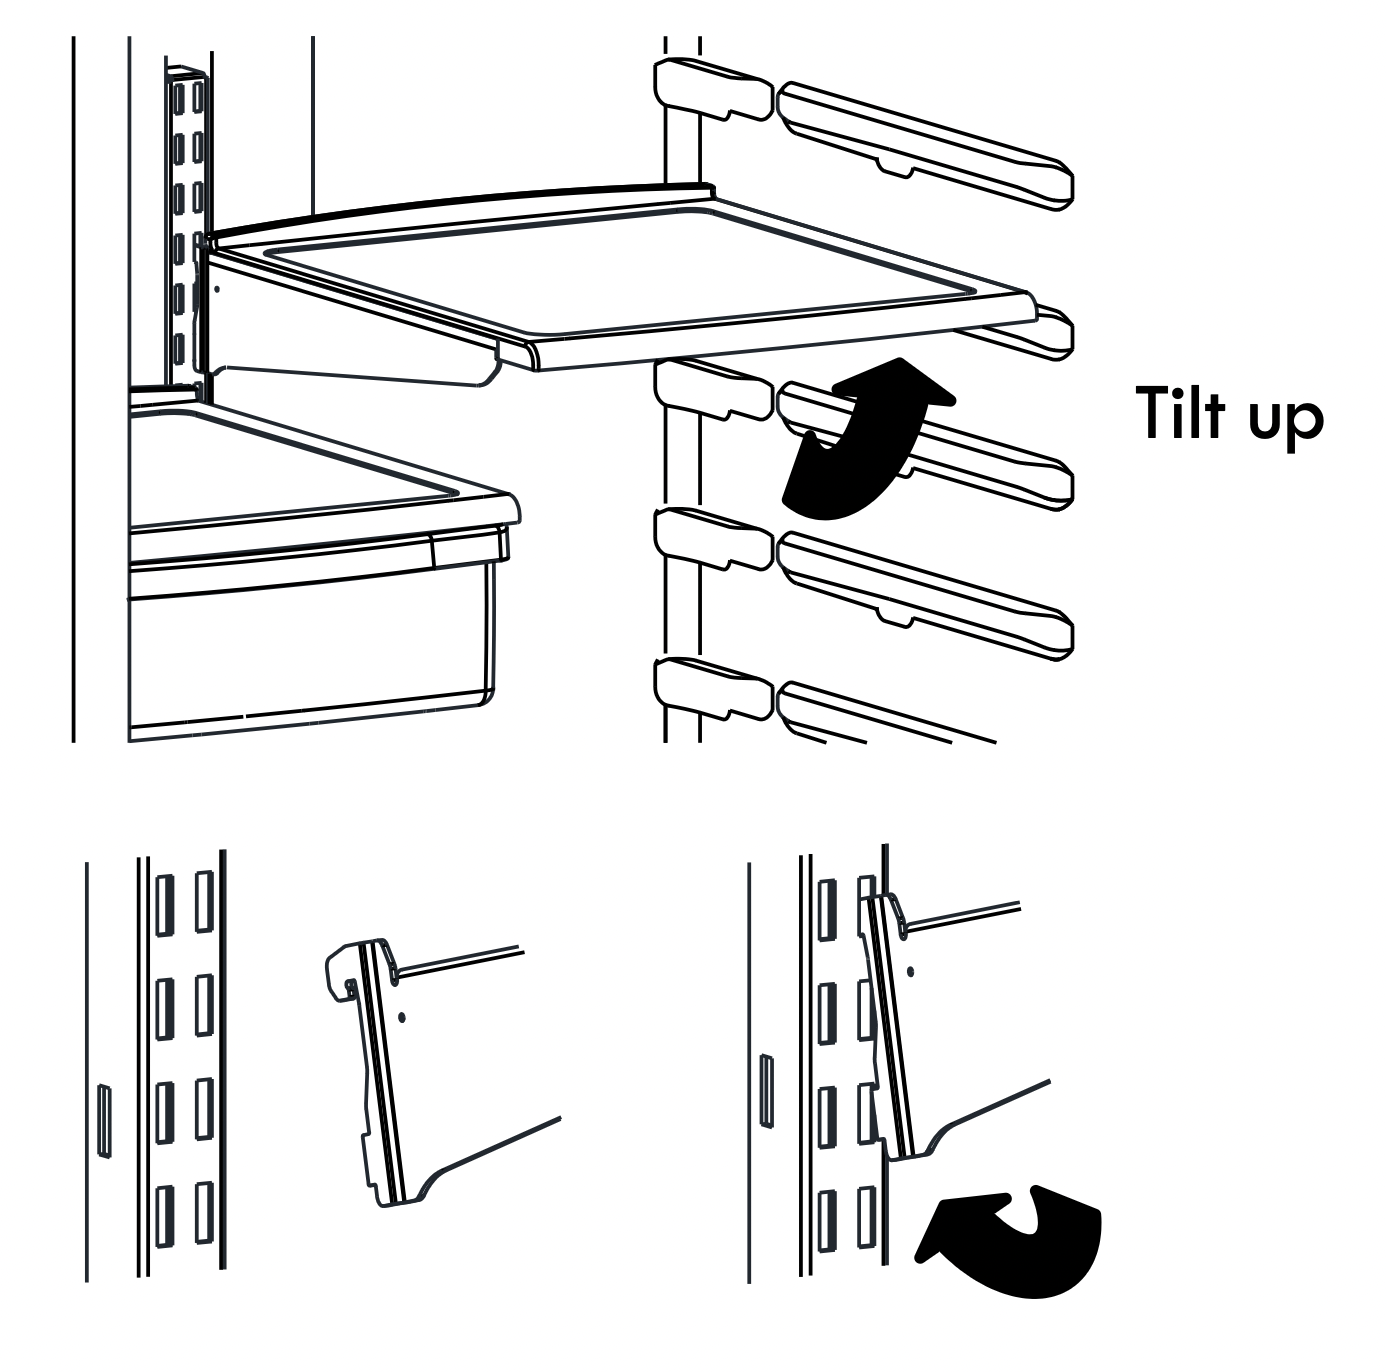
Half-Width Shelf
One side of the shelf rests on a molded side-wall support; a bracket on the other side hooks into a track on the rear cabinet wall.
To remove and replace a half-width shelf:
- Remove food from the shelf.
- Tilt up the front edge of the shelf.
- Lift up the rear of the shelf.
- Pull the shelf out of the track.
- Move the shelf into the desired alternate position.
- While tilting the shelf up, insert the top hook at the back of the shelf in a slot on the track.
- Lower the front of the shelf until the bottom of the shelf locks into place.
Deli Drawer
To remove and replace the deli drawer:
- Slide deli drawer out to the stop.
- Lift front of deli drawer with one hand while supporting bottom of drawer with other hand. Slide drawer out the rest of the way.
- Replace the drawer by sliding it back in fully past the drawer stop.
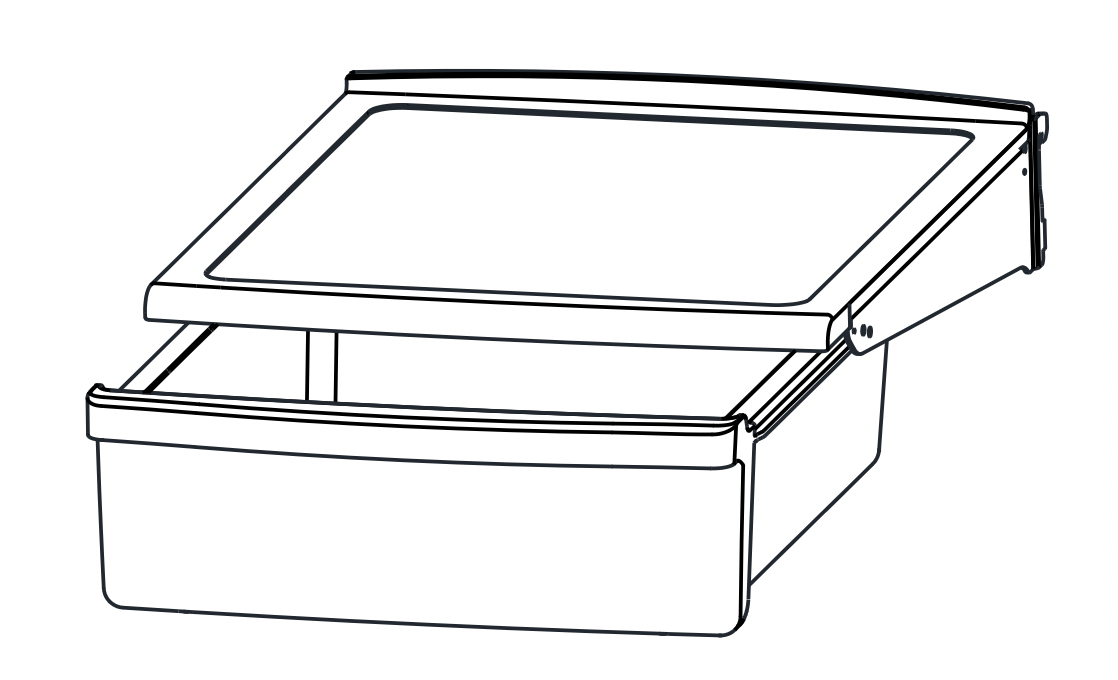
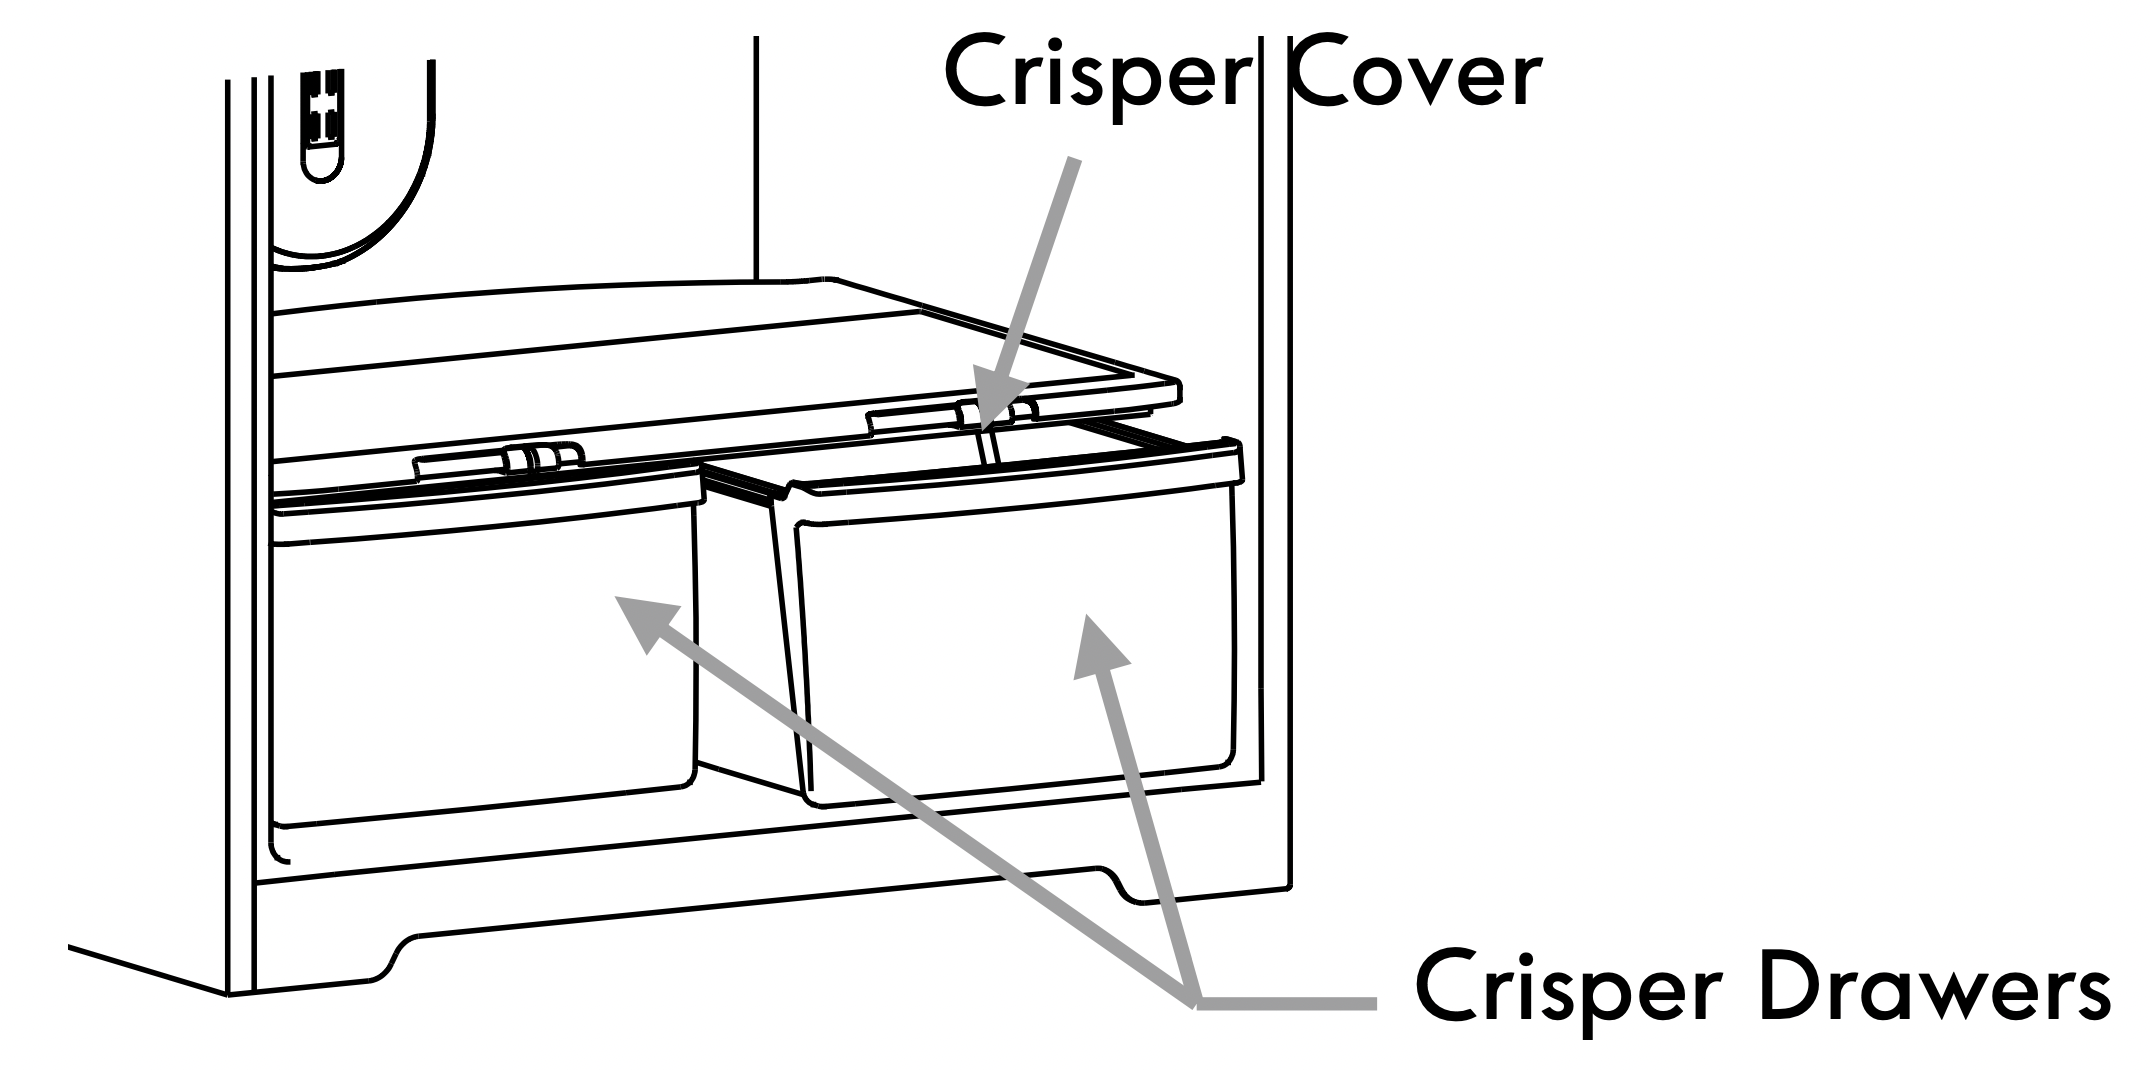
Crisper
Crisper Drawers
The Crispers provide a storage area for fruit and vegetables.
Excess water that may accumulate in the bottom of the drawers or under the drawers should be wiped dry.
To remove and replace the crisper drawer:
- Slide the crisper drawer straight out to the stop. Lift the front and slide the drawer out the rest of the way.
- Replace the drawer by sliding the drawer in fully past the stop.
Note: If the refrigerator door prevents you from taking out a crisper drawer, first try removing any obstructing door bins. If bin removal still does not provide enough clearance, the refrigerator will need to be rolled forward from its installation position until the door can be opened enough to glide the drawers out.
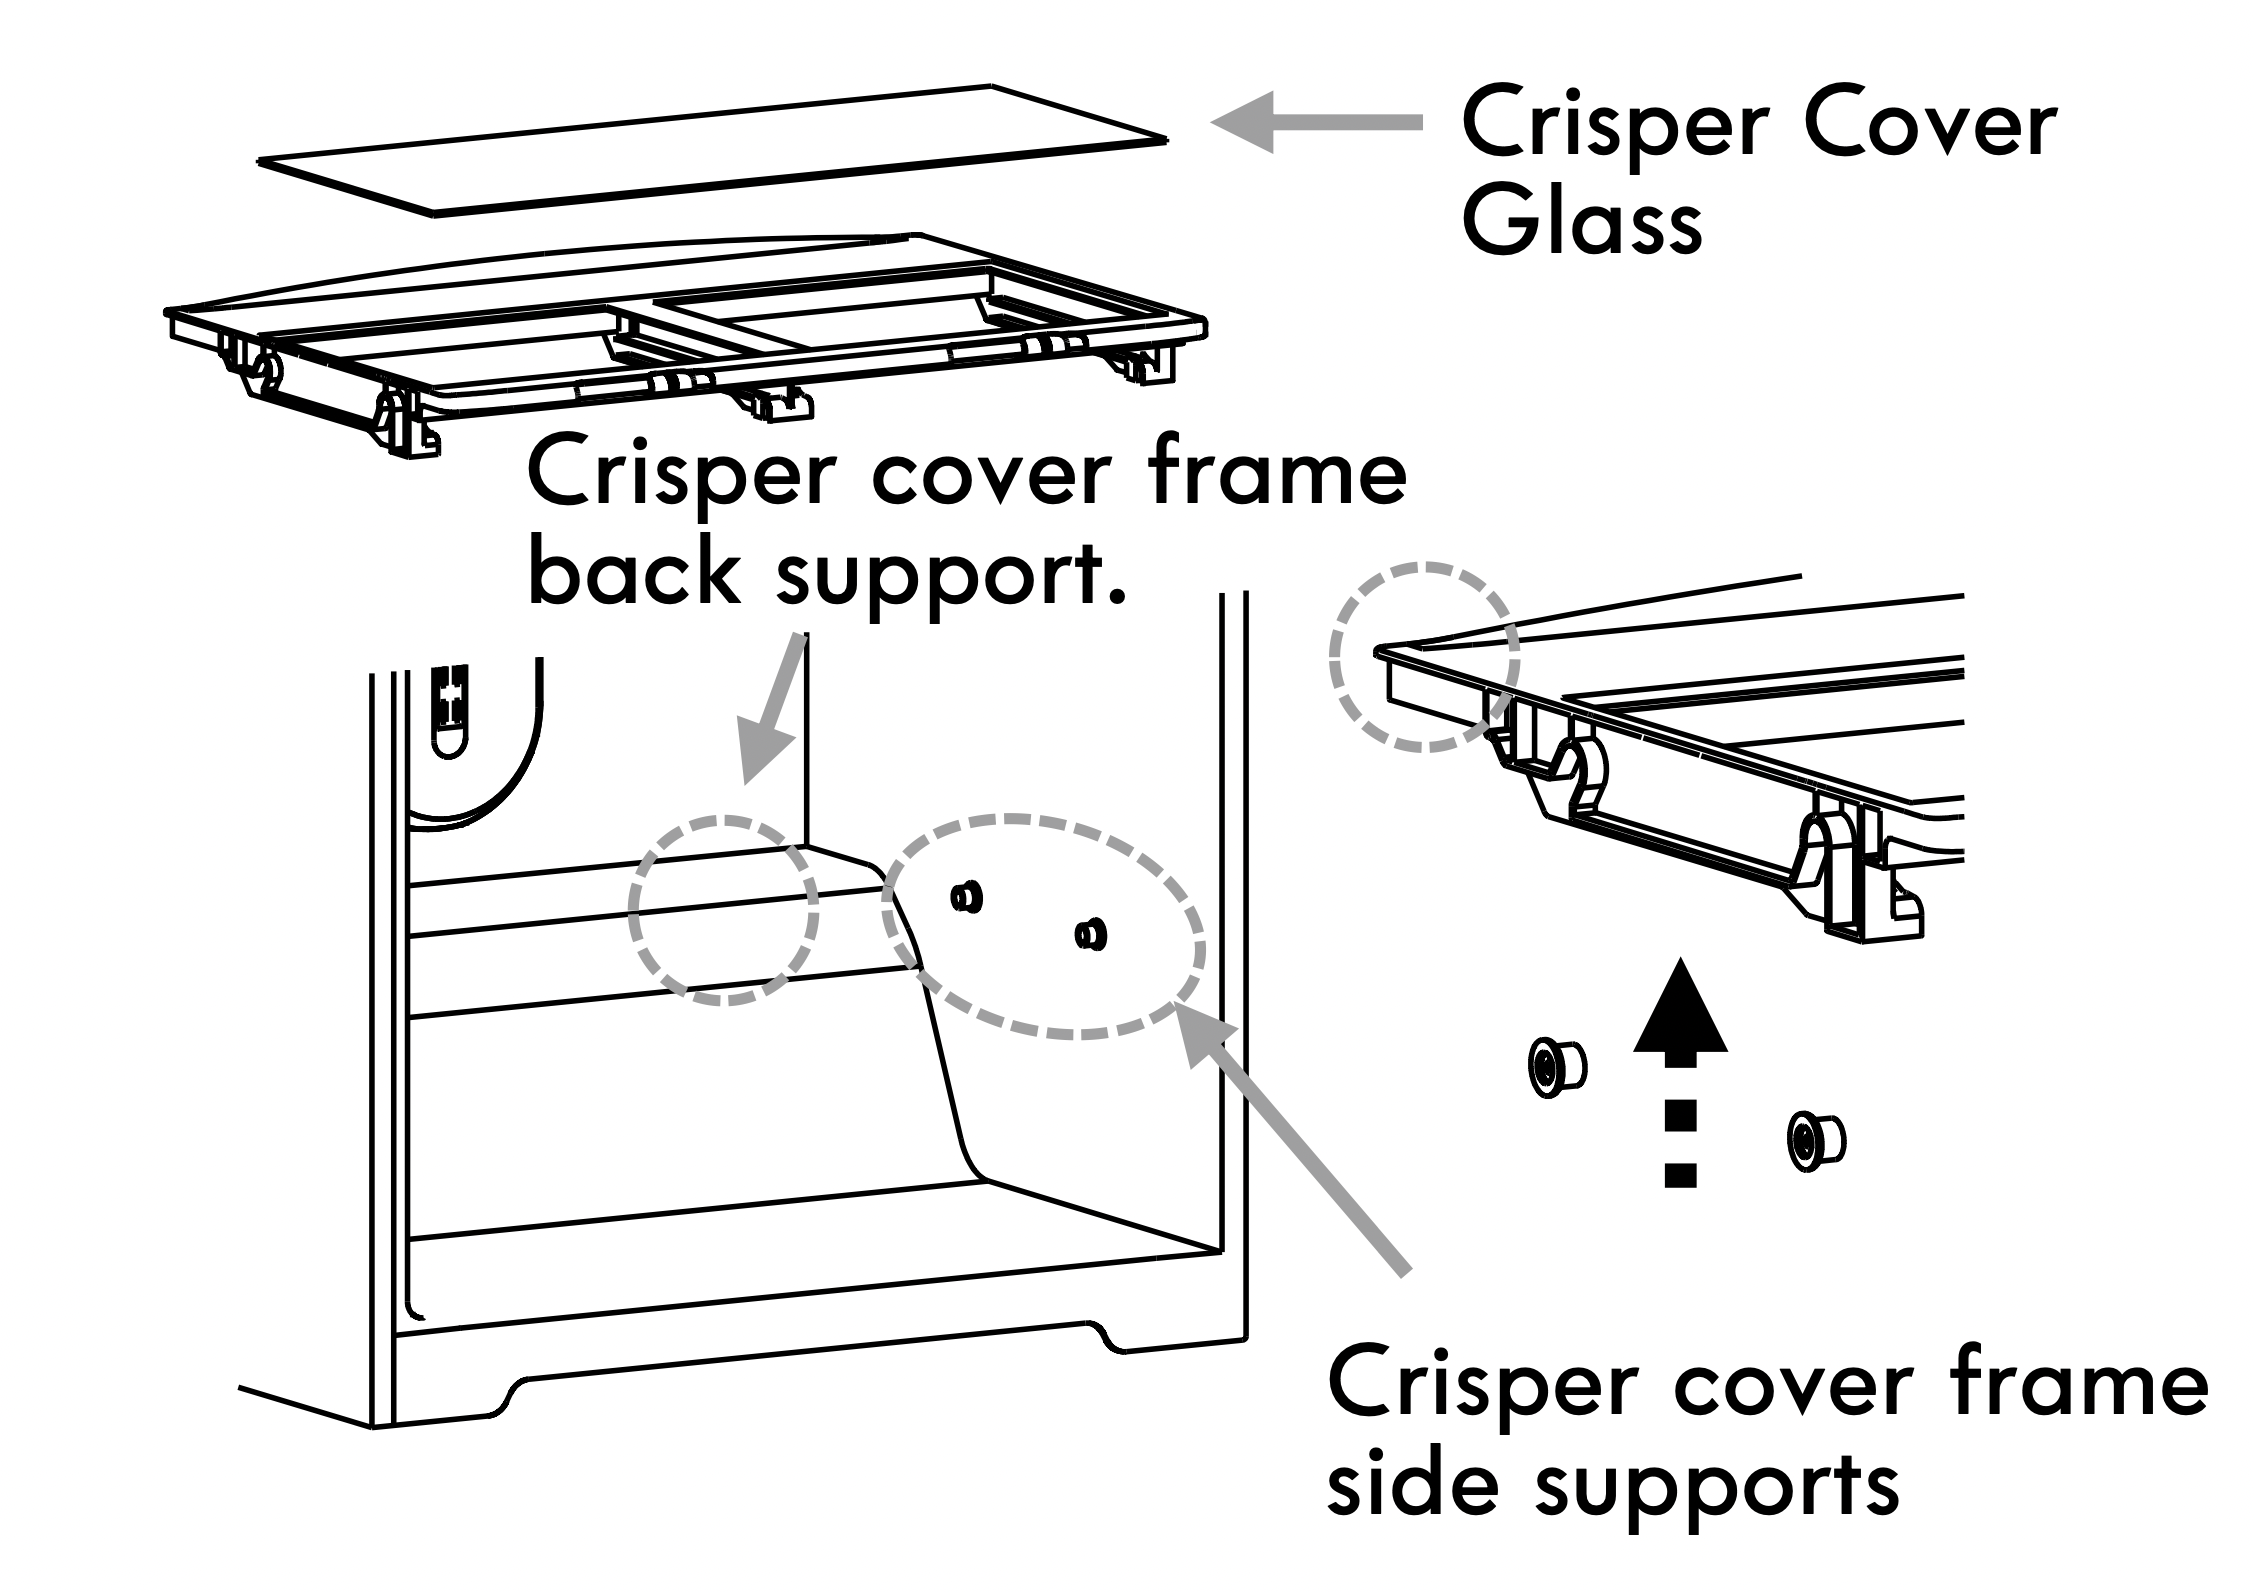
Crisper Cover
To remove and replace the crisper cover:
- Remove the food from the cover and then the crisper drawers.
- Remove the glass pane from the cover frame.
- Slightly lift up the front of the crisper cover frame
- Support the cover from underneath to lift it up and then out of the cabinet.
- To replace the cover, tilt front of cover frame slightly up and carefully insert the back of the cover frame into the cabinet.
With the cover front tilted slightly upward, carefully insert the cover top back into the cabinet. Crisper Drawers
- Position the back and sides of the cover on the supports and let the cover top settle into place.
- Replace the glass by pushing the front edge firmly into the crisper cover. Replace the drawers.
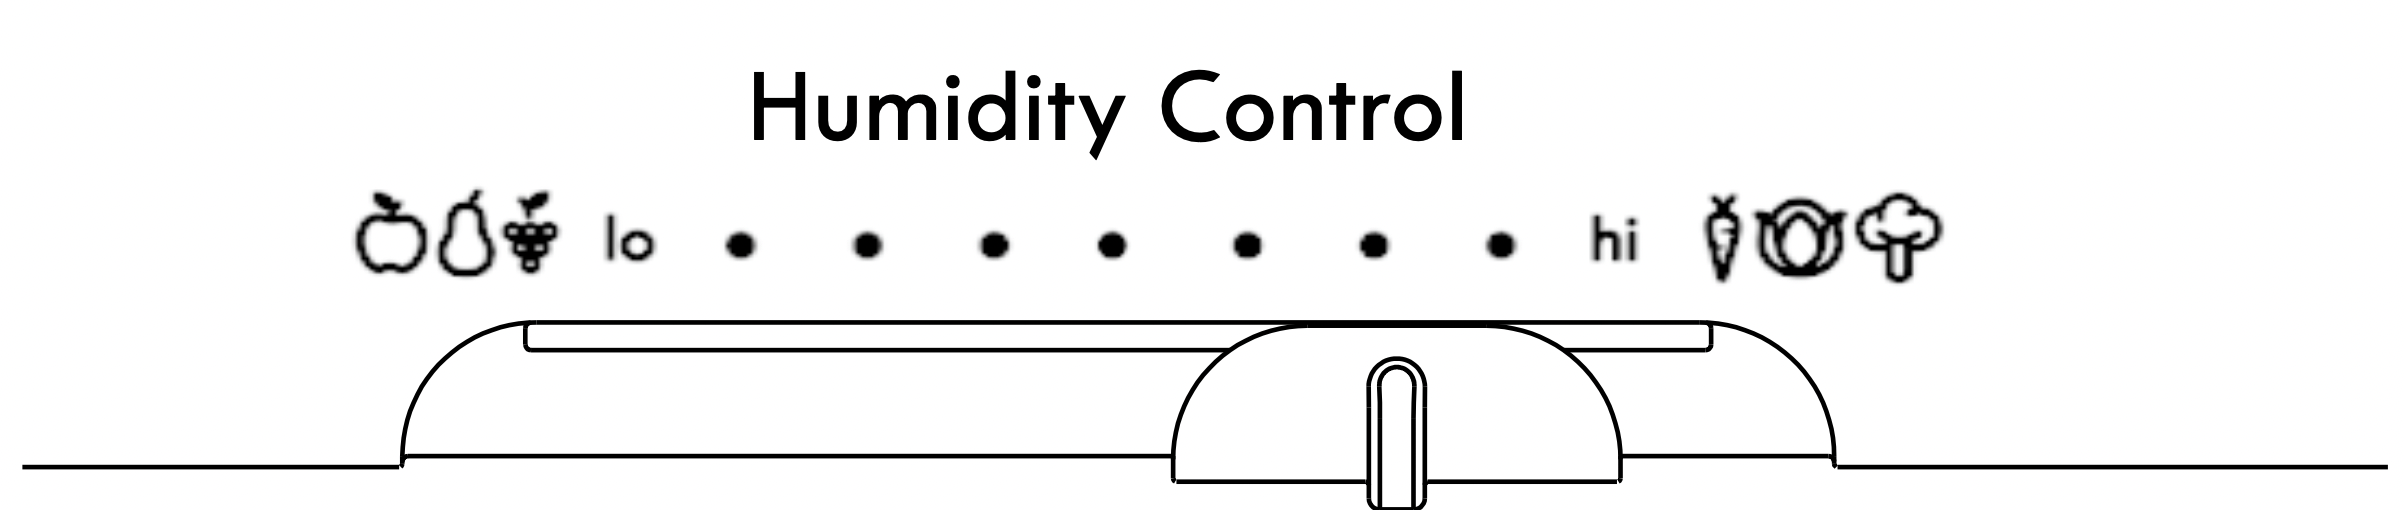
Crisper Humidity Control
You can control the amount of humidity in the moisturesealed crisper. For most fruits, slide the control (select models) to “lo” to provide and vegetables with skins lower humidity conditions in the drawer. For leafy vegetables, slide the control to “hi” to provide higher humidity conditions in the drawer. For best results, keep the crisper drawers tightly closed.
- Fruit: Wash, let dry and store in refrigerator in plastic bag or crisper. Do not wash or hull berries until they are ready to use. Sort and keep berries in original container in crisper, or store in a loosely closed paper bag on a refrigerator shelf.
- Vegetables with skins: Place in plastic bag or plastic container and store in crisper.
- Leafy vegetables: Wash in cold water, drain and trim or tear off bruised and discolored areas. Place in plastic bag or plastic container and store in crisper.
CAUTION :
To avoid personal injury or property damage.
- Never attempt to adjust a shelf when it is loaded with food.
- Confirm that shelf is secure prior to loading items onto it.
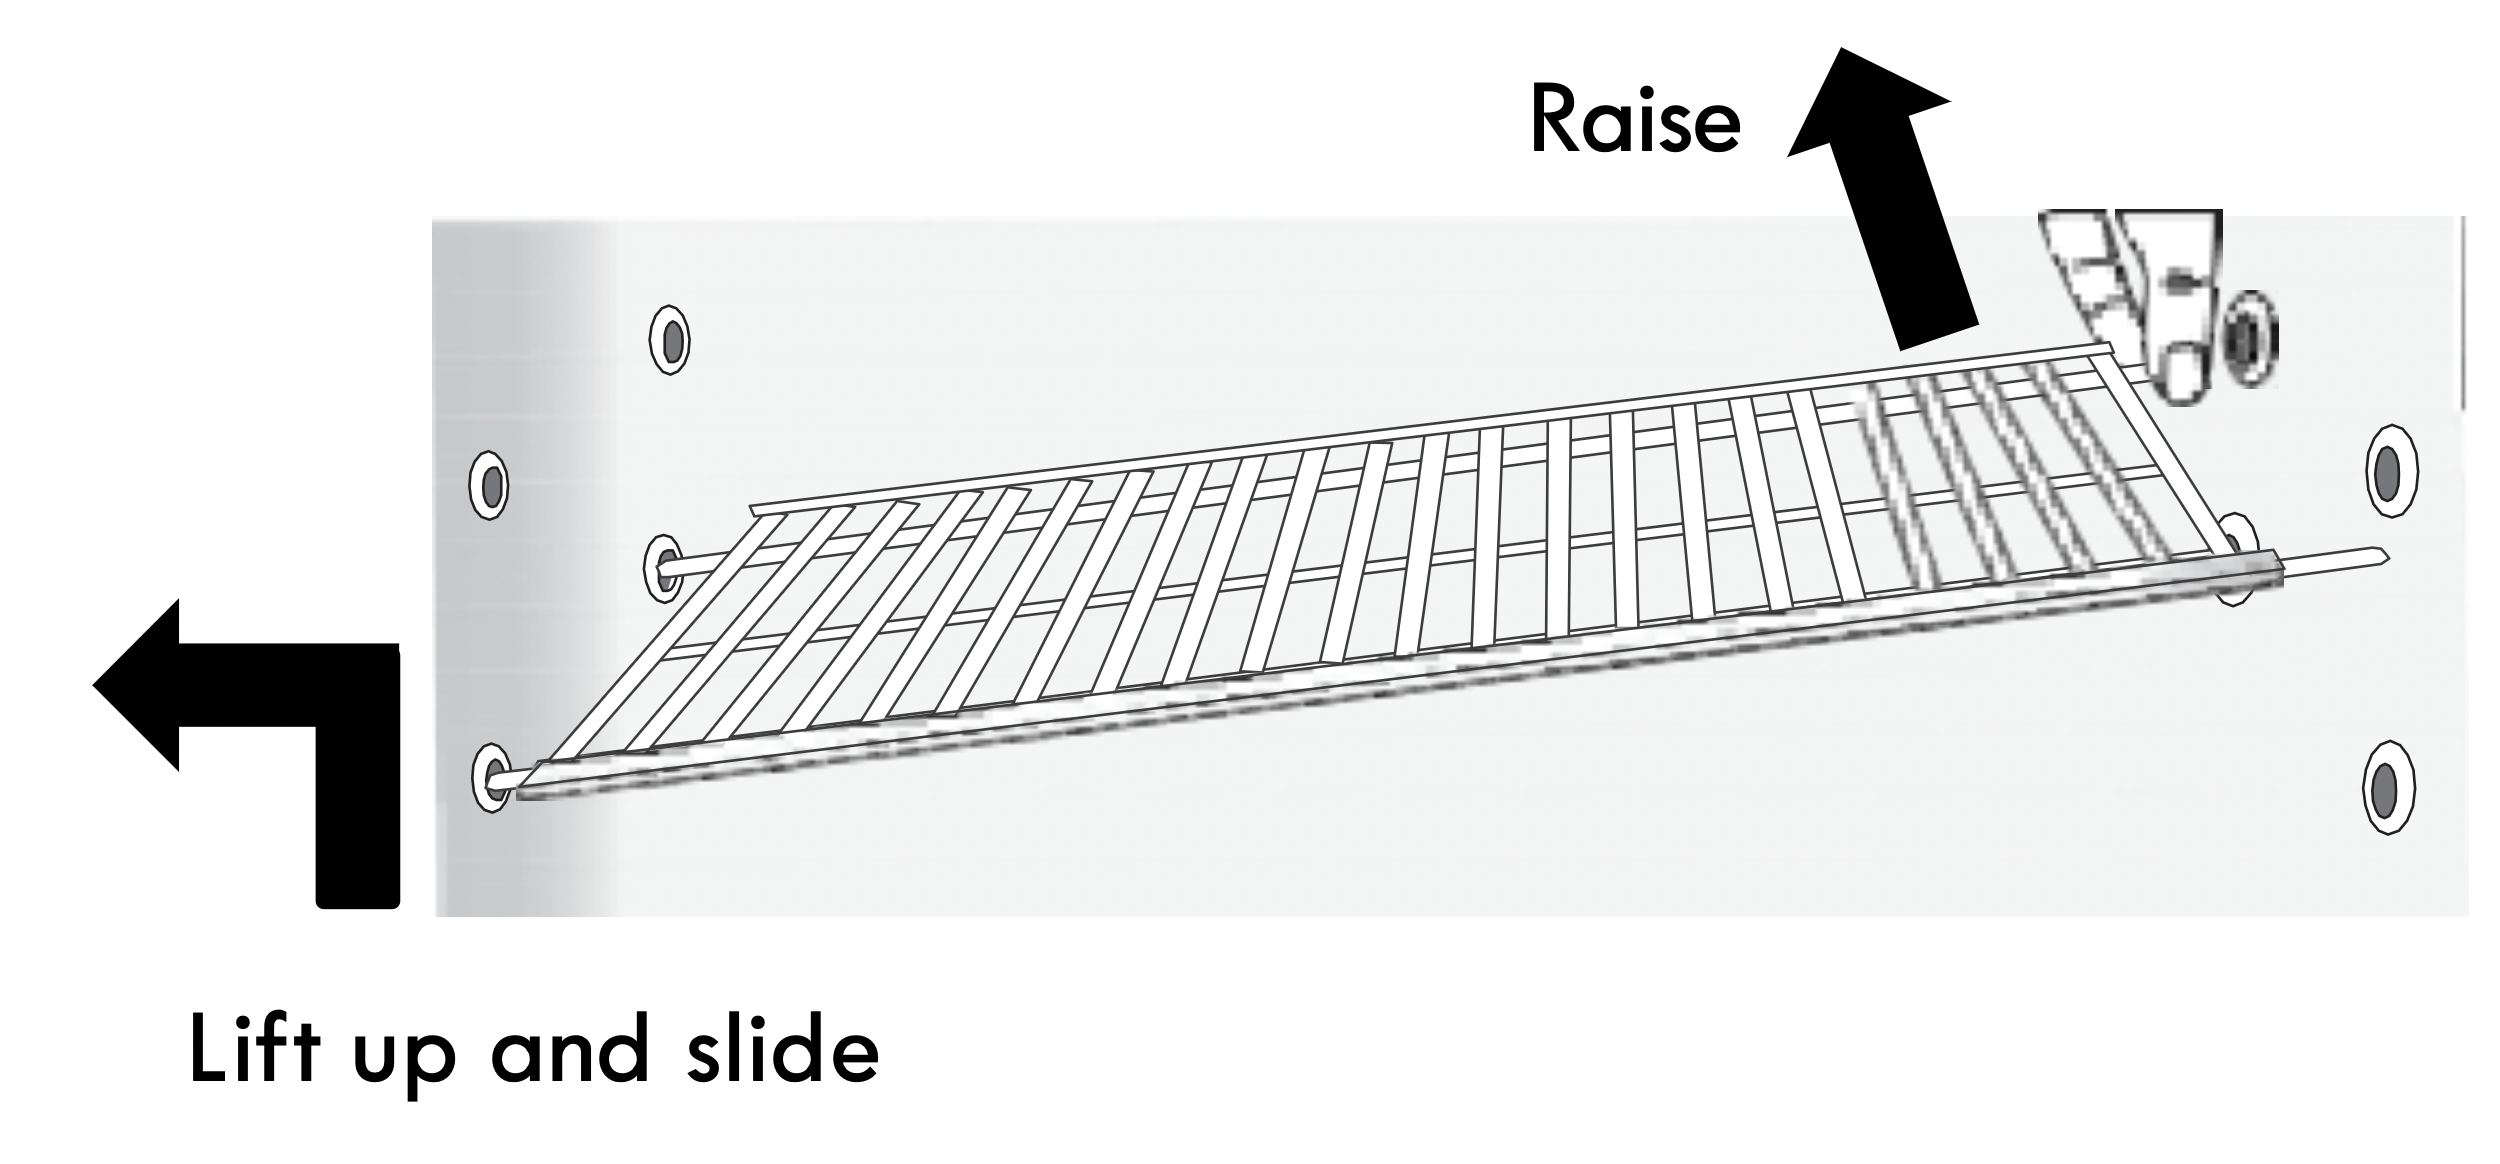
To remove and replace a wire shelf:
- Remove the food from the shelf.
- Lift up left side of shelf slightly and slide it left as far as it will go into the center of the left shelf support holes. The right side of the shelf will release from the support holes on the right. Raise up right side of shelf to remove from freezer compartment.
- To replace, angle right side of shelf up and insert left side of shelf as far as it will go into the center of the left shelf support holes. Lower the right side of shelf to align with right side support holes. Slide the shelf to the right to secure into the support holes.
Note: If icemaker is not in use, the shelf may be inserted into the higher set of support holes to adapt to storage needs once the ice storage bin is removed.
- To relace, holding the shelf diagonally, insert the left end of the shelf into the center of the shelf supports ont the side wall.
- Insert the right end of the shelf into the shelf supports on the side wall. Rest each end of the shelf on the bottom of the shelf supports.
DOOR FEATURES
Door Bins
To remove and replace the bins:
- Remove the bin by lifting it and pulling it straight out.
- Replace the bin by sliding it in above the desired support and pushing it down until it stops.

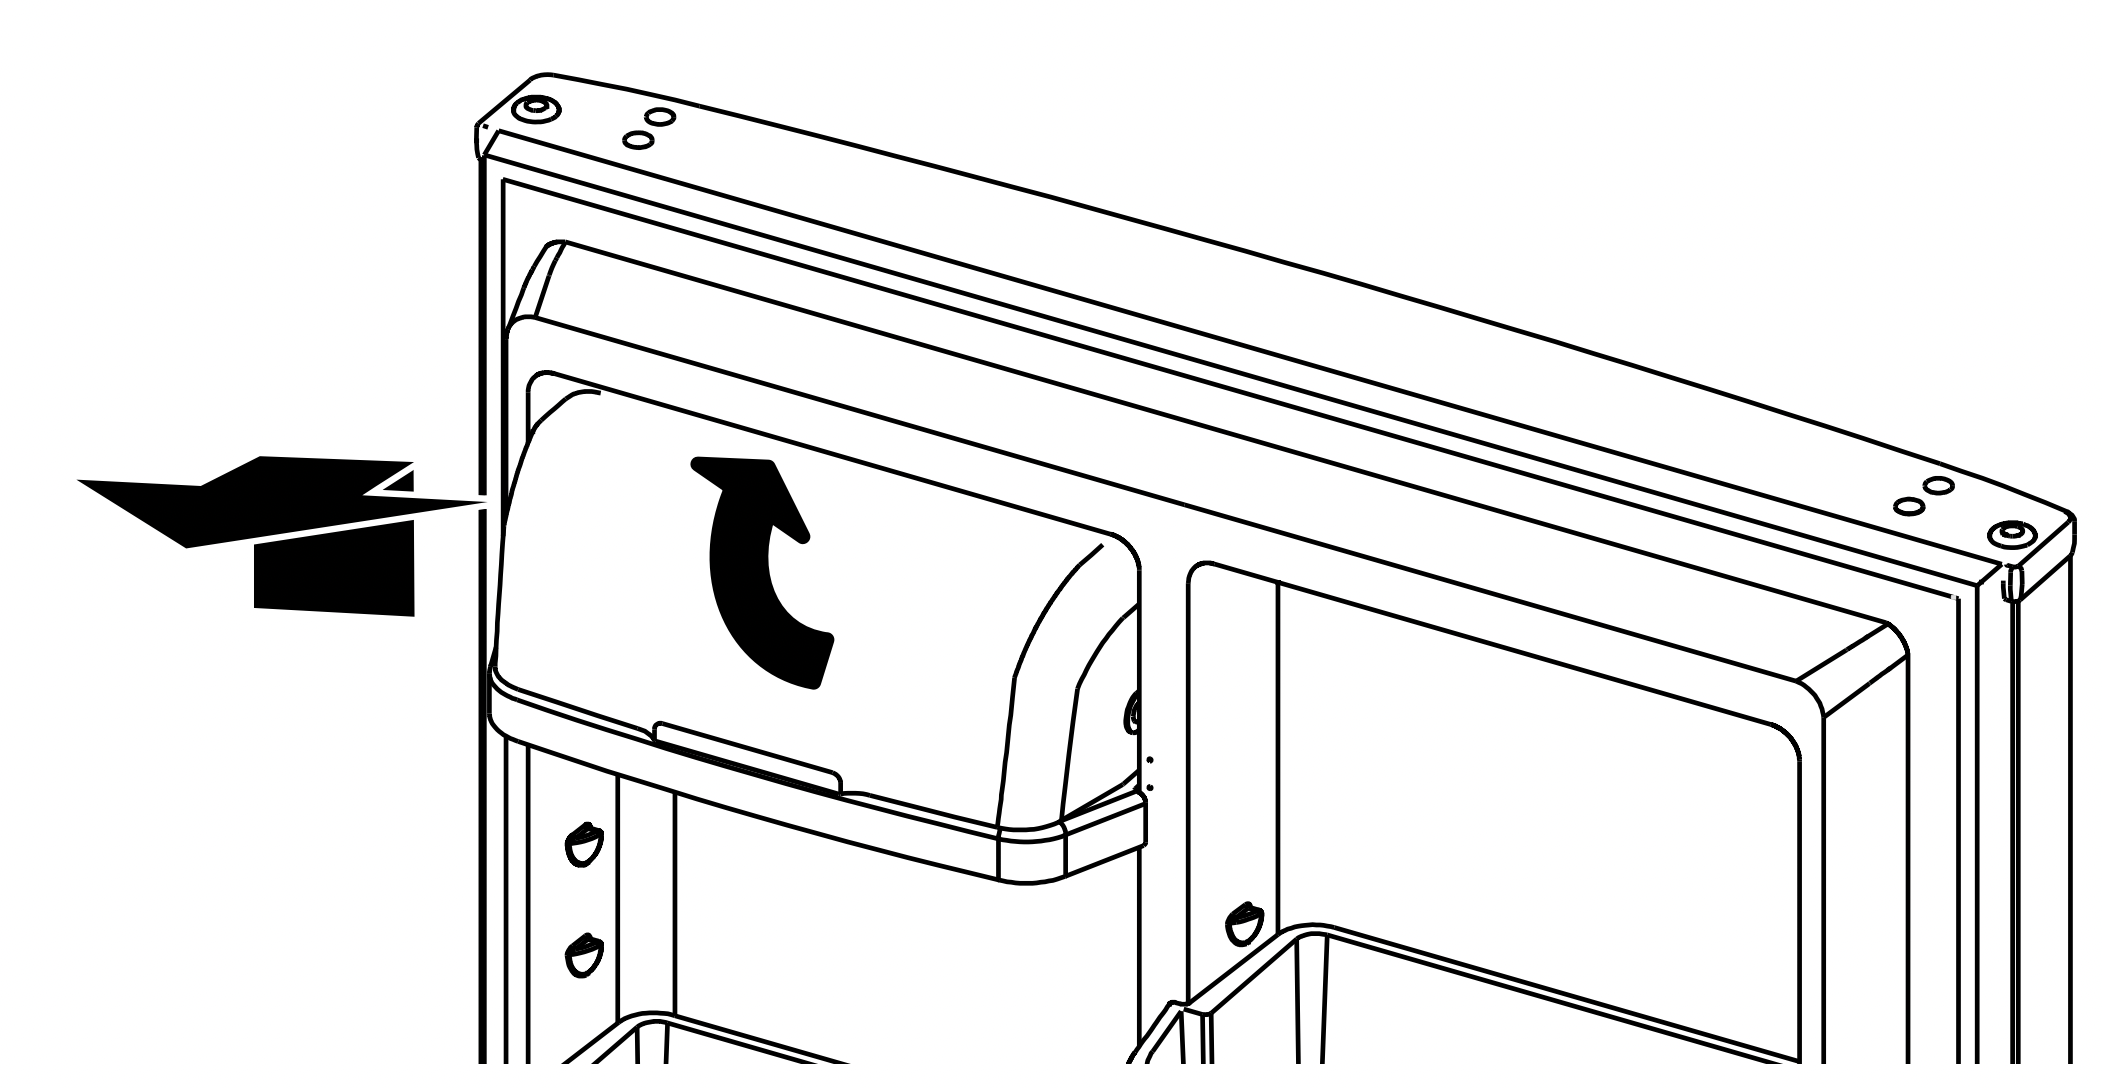
Dairy Compartment
The covered dairy compartment is designed to store spreadable food items such as butter or margarine. To use this compartment, simply raise the lid to store or retrieve items.
To remove for cleaning:
- Grasp the dairy compartment from the bottom and lift up and out.
FOOD STORAGE GUIDE
Fresh Food Storage
- The fresh food compartment of a refrigerator should be kept between 34°F (1°C) and 40°F (4°C) with an optimum temperature of 37°F (3°C). To check the temperature, place an appliance thermometer in a glass of water and place in the center of the refrigerator. Check after 24 hours. If the temperature is above 40°F (4°C) adjust the control as explained on “Temperature Control” page.
- Avoid overcrowding the refrigerator shelves.
This reduces the circulation of air around the food and results in uneven cooling.
- Storage in the crisper drawers traps humidity to help preserve the fruit and vegetable quality for longer time periods
- Sort fruits and vegetables before storage and use bruised or soft items first. Discard those showing signs of decay.
- Always wrap odorous foods such as onions and cabbage so the odor does not transfer to other foods.
- While vegetables need a certain amount of humidity to remain fresh, too much moisture can shorten storage times (especially leafy items). Drain vegetables well before storing.
- Raw meat and poultry should be wrapped securely so leakage and contamination of other foods or surfaces does not occur.
- Occasionally mold will develop on the surface of hard cheeses (Swiss, Cheddar, Parmesan). Cut off at least an inch around and below the moldy area.
Keep your knife or instrument out of the mold itself.
Do not try to save individual cheese slices, soft cheese, cottage cheese, cream, sour cream or yogurt when mold appears.
- Most dairy foods such as milk, yogurt, sour cream and cottage cheese have freshness dates on their cartons for appropriate length of storage.
Store these foods in the original carton and refrigerate immediately after purchasing and after each use.
Freezer Storage
- The freezer compartment of a refrigerator should be kept at approximately 0°F (-18°C). To check the temperature, place an appliance thermometer between the frozen packages and check afeter 24 hours. If the temperater is above 0°F (-18°C), adjust the control as explained on “Temperature Control” page.
- Storage times will vary according to the quality and type of food, the type of packaging or wrap used (should be airtight and moisture-pfoof), and the storage temperature.
- Seal the package or container securely to avoid taste and odor transfer throughout the product. Ice crystals inside a sealed package are normal. This simply means that moisture in the food and air inside the package have condensed, creating ice crystals.
- A freezer operates more efficiently when it is at least 2/3 full. Leave a space between the packages so cold air can circulate freely, allowing food to freeze as quickly as possible.
- To minimize dehydration and quality deterioration use aluminum foil, freezer wrap, freezer bags or airtight containers. Force as much air out of the packages as possible and be sure they are tightly sealed. Trapped air can cause the food to dry out, change color and develop an off-flavor (freezer burn).
- Do not refreeze meat that has completely thawed.
- Avoid adding too much warm food to the freezer at one time. This overloads the freezer, slows the rate of freezing and can raise the temperature of frozen foods.
- Avoid storing hard-to-freeze foods such as ice cream and orange juice on the freezer door shelves. These foods are best stored in the freezer interior where the temperature varies less with door openings.
REFRIGERATOR CARE
Cleaning
WARNING - Explosion Hazard
- Use nonflammable cleaner.
- Failure to do so can result in death, explosion, or fire.
Both the refrigerator and freezer sections defrost automatically. However, clean both sections about once a month to avoid buildup of odors. Wipe up spills immediately.
IMPORTANT: Because air circulates between both sections, any odors formed in one section will transfer to the other. You must thoroughly clean both sections to eliminate odors. To avoid odor transfer and drying out of food, wrap or cover foods tightly.
To Clean Your Refrigerator
WARNING: To avoid electrical shock which can cause severe personal injury or death, disconnect the power cord before moving or cleaning the refrigerator.
Note: Do not use abrasive or harsh cleaners such as window sprays, scouring cleansers, flammable fluids, cleaning waxes, concentrated detergents, bleaches or cleansers containing petroleum products on exterior surfaces (doors and cabinet), plastic parts, interior and door liners or gaskets. Do not use paper towels, scouring pads, or other harsh cleaning tools.
- Unplug refrigerator or disconnect power.
- Hand wash, rinse, and dry removable parts and interior surfaces thoroughly. Use a clean sponge or soft cloth and a mild detergent in warm water.
- Clean the exterior surfaces.
Painted metal or Active finish™: Wash painted metal exteriors with a clean, soft cloth or sponge and a mild detergent in warm water. Rinse surfaces with clean, warm water and dry immediately to avoid water spots.
Stainless Steel: Wash stainless steel surfaces with a clean, soft cloth or sponge and a mild detergent in warm water. Rinse surfaces with clean, warm water and dry immediately to avoid water spots.
Note: When cleaning stainless steel, always wipe in the direction of the grain to avoid cross-grain scratching.
Stainless Steel Cleaner
For best cleaning results, use Kenmore Stainless Steel Cleaner item #02240083 or equivalent. Available on sears.com or by calling 1-844-553-6667.
- There is no need for routine condenser cleaning in normal home operating environments. If the environment is particularly greasy or dusty, or there is significant pet traffic in the home, the condenser should be cleaned every 2 to 3 months to ensure maximum efficiency.
If you need to clean the condenser:
Remove the base grille. See Front Base Grille in Installation Instructions section.
Use a vacuum cleaner with a soft brush to clean the grille, the open areas behind the grille and the front surface area of the condenser.
Replace the base grille when finished.
- Plug in refrigerator or reconnect power.
Vacation and Moving Care
Vacations
If You Choose To Leave The Refrigerator On While You’re Away:
- Use up any perishables and freeze other items.
- If your refrigerator has an automatic icemaker, and is connected to the household water supply, turn off the water supply to the refrigerator. Property damage can occur if the water supply is not turned off.
- If you have an automatic icemaker, turn off the icemaker.
Note: Raise the wire shutoff arm to OFF (up) position.
- Empty the ice bin.
If You Choose to Turn Off the Refrigerator Before You leave:
- Remove all food from the refrigerator.
- Disconnect the refrigerator from the electrical outlet.
- If your refrigerator has an automatic icemaker:
Turn off the water supply to the icemaker at least one day ahead of time.
When the last load of ice drops, raise the wire shutoff arm to the OFF (up) position.
Bleed the water from the icemaker fill line and dry the icemaker thoroughly.
- Clean refrigerator, wipe it, and dry well.
- Tape rubber or wood blocks to the tops of both doors to prop them open far enough for air to get in. This stops odor and mold from building up.
Note: If using an automatic icemaker, discard first two or three ice harvests, when refrigerator is put back into service.
Moving
- If your refrigerator has an automatic icemaker:
Turn off the water supply to the icemaker at least one day ahead of time.
Disconnect the water line from the back of the refrigerator.
When the last load of ice drops, raise the wire shutoff arm to the OFF (up) position.
- Remove all food from the refrigerator and pack all frozen food in dry ice.
- Empty the ice bin.
- Unplug refrigerator.
- Clean, wipe, and dry thoroughly.
- Take out all removable parts, wrap them well, and tape them together so they don’t shift and rattle during the move.
- Depending on the model, raise the front of the refrigerator so it rolls more easily OR raise the leveling legs so they don’t scrape the floor.
- Tape the doors closed and tape the power cord to the back of the refrigerator.
When you get to your new home, put everything back and refer to the “Installation Instructions” section for preparation instructions. Also, if your refrigerator has an automatic icemaker, remember to reconnect the water supply to the refrigerator.
TROUBLESHOOTING GUIDE
First try the solutions suggested here or visit our website to possibly avoid the cost of a service call.
WARNING - Electrical Shock Hazard
- Plug into a grounded 3 prong outlet.
- Do not remove ground prong. Do not use an adapter.
- Do not use an extension cord.
- Failure to follow these instructions can result in death, fire, or electrical shock.
WARNING - Explosion Hazard
- Use nonflammable cleaner.
- Failure to do so can result in death, explosion, or fire.
Review this chart of troubleshooting tips first…you may not need to call for service at all.
GENERAL OPERATION
| Problem |
Possible Causes
|
What to Do |
|
The refrigerator will not operate
|
Not connected to an electrical supply
|
Plug the power cord into a grounded 3 prong outlet. Do not use an extension cord.
|
|
No power to the electrical outlet.
|
Plug in a lamp to see if the outlet is working.
|
|
Household fuse blown or circuit breaker tripped.
|
Replace the fuse or reset the circuit breaker. If the problem continues, contact an electrician.
|
|
New installation
|
Allow 24 hours following installation for the refrigerator to cool completely.
|
|
Runs too long, too frequently
|
Today’s refrigerators start and stop more often to maintain even temperatures.
|
|
|
Normal at startup for new or recently installed units.
|
Wait 24 hours for refrigerator to completely cool down (see “TemperatureControls” page).
|
|
Prolonged or frequent door openings.
|
This is normal. Minimize door openings.
|
|
Door not sealing.
|
Check to see if something is preventing door from closing.
|
|
Front base grille blocked.
|
Unblock to allow warm air to exit unit.
|
|
The door will not close completely
|
The door is blocked open
|
Move food packages away from door. Push bin or shelf back into the correct position. Make sure the crisper cover is fully pushed in, so that the back rests on the supports.
|
|
The door is difficult to open
|
Gaskets are dirty or sticky.
|
Clean gaskets and contact surfaces with mild soap and warm water.
Rinse and dry with soft cloth.
|
|
Warm air from cabinet bottom
|
This is normal air flow for condenser circulation.
|
|
|
There is interior moisture buildup.
|
Humid room
|
Contributes to moisture buildup in the refrigerator.
|
|
Door(s) opened often or not closedcompletely.
|
Allows humid air to enter the refrigerator. Minimize door openings and keep door fully closed.
|
|
Cabinet vibrates
|
Cabinet not level. Weak floor.
|
Level cabinet.
|
|
Odor in cabinet
|
Odor producing foods not covered.
|
Cover or wrap odorous foods tightly. Clean cabinet.
|
TEMPERATURE
| Problem |
Possible Causes
|
What to Do |
|
Freezer, refrigerator too warm
|
New installation
|
Allow 24 hours following installation for the refrigerator to cool completely.
|
|
Control set too warm. Prolonged door openings.
|
Adjust temperature control. Minimize door openings.
|
|
A large amount of warm food has been recently added.
|
Allows several hours for refrigerator to return to normal temperature.
|
|
Products with high sugar content may not harden completely when frozen.
|
|
|
Freezer, refrigerator too cold
|
Control set too cold.
|
Adjust temperature control.
|
NOISE
| Problem |
Possible Causes |
What to Do
|
|
The refrigerator is noisy
Note: Refrigerator noise has been reduced over the years. Due to this reduction in operating noise, you may notice unfamiliar noises that are normal.
|
Normal noise: buzzing
|
Heard when the water valve opens to fill the icemaker
|
|
Normal noise: clicking/Snapping
|
Valves opening or closing
|
|
Normal noise:pulsating
|
Fans/compressor adjusting to optimize performance
|
|
Normal noise: sizzling/Gurgling
|
Water dripping on the heater during defrost cycle
|
|
Normal noise: popping
|
Contraction/expansion of inside walls, especially during initial cool-down.
|
|
Normal noise: water running
|
May be heard when ice melts during the defrost cycle and water runs into the drain pan.
|
|
Normal noise: creaking/cracking
|
Occurs as ice is being ejected from the icemaker mold.
|
|
Cabinet not level.
|
Level cabinet.
|
Icemaker
| Problem |
Possible Causes |
What to Do
|
|
The icemaker is not producing ice or not enough ice (on some models)
|
The icemaker is not connected to a water supply
|
Connect refrigerator to water supply and turn water shutoff valve fully open.
|
|
A kink in the line can reduce water flow
|
Straighten the water source line
|
|
Icemaker is not turned on
|
Make sure the icemaker wire shutoff arm or switch (depending on model) is in the ON position.
|
|
New installation
|
Wait 24 hours after icemaker installation for ice production to begin. Wait 3 days for full ice production.
|
|
Large amount of ice recently removed
|
Allow sufficient time for icemaker to produce more ice.
|
|
Ice cube jammed in the icemaker ejector arm
|
Remove ice from the ejector arm with a plastic utensil.
|
|
A reverse osmosis water filtration system connected to your cold water supply can decrease water pressure
|
See “Water Supply Requirements.”
|
|
The ice cubes are hollow or small (on some models)
Note: This is an indication of low water pressure.
|
The water valve is not completely open
|
Turn the water shutoff valve fully open
|
|
A kink in the line can reduce water flow
|
Straighten the water source line.
|
|
A reverse osmosis water filtration system connected to your cold water supply can decrease water pressure
|
See “Water Supply Requirements”
|
|
Supply line or shuoff valve is clogged.
|
Call a licensed, qualified plumber
|
|
Off-taste, odor or gray color in the ice (on some models)
|
New plumbing connections can cause discolored or off-flavored ice
|
Discard the ice and wash the ice storage bin. Allow 24 hours for the icemaker to make new ice, and discard the first 3 batches of ice produced.
|
|
Ice stored too long can develop an off-taste
|
Discard ice. Wash ice bin. Allow 24 hours for icemaker to make new ice.
|
|
Food odor transferring to ice
|
Use air tight, moisture proof packaging to store food.
|
|
There are minerals (such as sulfur) in the water
|
A water filter may need to be installed to remove the minerals.
|