
SAFETY INFORMATION .........3
USING THE REFRIGERATOR
Temperature Control ...................5
Shelves ...............................5
Drawers ..............................6
Automatic Ice Maker ...................7
CARE AND CLEANING ...........8
INSTALLATION INSTRUCTIONS
Preparing to Install the Refrigerator ......9
Water Line Installation ................10
Installing the Door Handle .............13
Reversing the Door Swing .............14
TROUBLESHOOTING
Normal Operating Sounds .............18
LIMITED WARRANTY .............21
CONSUMER SUPPORT ..........22
ENGLISH/FRANÇAIS/
ESPAÑOL
Write the model and serial
numbers here:
Model # _________________
Serial # _________________
Find these numbers on a label
on the left side, near the middle
of the refrigerator compartment.
49-1000249 Rev. 0 01-19 GEA
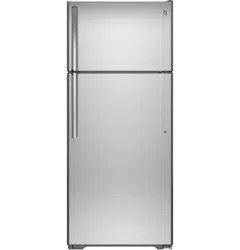
Models 15,16,18
OWNER’S MANUAL &
INSTALLATION
INSTRUCTIONS
REFRIGERATORS
Top-Freezer
GE is a trademark of the General Electric Company. Manufactured under trademark license.

2 49-1000249 Rev. 0
THANK YOU FOR MAKING GE APPLIANCES A PART OF YOUR HOME.
Whether you grew up with GE Appliances, or this is your first, we’re happy to have you in the family.
We take pride in the craftsmanship, innovation and design that goes into every GE Appliances
product, and we think you will too. Among other things, registration of your appliance ensures that we
can deliver important product information and warranty details when you need them.
Register your GE appliance now online. Helpful websites and phone numbers are available in the
Consumer Support section of this Owner’s Manual. You may also mail in the pre-printed registration
card included in the packing material.
49-1000249 Rev. 0 3
CAUTION
To reduce the risk of injury when using your refrigerator, follow these basic safety precautions.
Ŷ 'RQRWFOHDQJODVVVKHOYHVRUFRYHUVZLWKZDUP
water when they are cold. Glass shelves and
covers may break if exposed to sudden temperature
changes or impact, such as bumping or dropping.
Tempered glass is designed to shatter into many
small pieces if it breaks.
Ŷ .HHSILQJHUVRXWRIWKH³SLQFKSRLQW´DUHDV
clearances between the doors and between the
doors and cabinet are necessarily small. Be careful
closing doors when children are in the area.
Ŷ 'RQRWWRXFKWKHFROGVXUIDFHVLQWKHIUHH]HU
compartment when hands are damp or wet, skin
may stick to these extremely cold surfaces.
Ŷ 'RQRWUHIUHH]HIUR]HQIRRGVZKLFKKDYHWKDZHG
completely.
Ŷ ,QUHIULJHUDWRUVZLWKDXWRPDWLFLFHPDNHUVDYRLG
contact with the moving parts of the ejector
mechanism, or with the heating element that
UHOHDVHVWKHFXEHV'RQRWSODFHILQJHUVRUKDQGV
on the automatic ice making mechanism while the
refrigerator is plugged in.
SAFETY INFORMATION
READ AND SAVE THESE INSTRUCTIONS
WARNING
To reduce the risk of fire, explosion, electric shock, or injury when using your refrigerator, follow
these basic safety precautions:
Ŷ 7KLVUHIULJHUDWRUPXVWEHSURSHUO\LQVWDOOHG
DQGORFDWHGLQDFFRUGDQFHZLWKWKH,QVWDOODWLRQ
,QVWUXFWLRQVEHIRUHLWLVXVHG
Ŷ 8QSOXJWKHUHIULJHUDWRUEHIRUHPDNLQJUHSDLUV
replacing a light bulb, or cleaning.
NOTE: Power to the refrigerator cannot be
disconnected by any setting on the control panel.
NOTE: Repairs must be performed by a qualified
Service Professional.
Ŷ 5HSODFHDOOSDUWVDQGSDQHOVEHIRUHRSHUDWLQJ
Ŷ 'RQRWXVHDQH[WHQVLRQFRUG
Ŷ 'RQRWVWRUHRUXVHJDVROLQHRURWKHUIODPPDEOH
vapors and liquids in the vicinity of this or any other
appliance.
Ŷ 'RQRWVWRUHH[SORVLYHVXEVWDQFHVVXFKDVDHURVRO
cans with a flammable propellant in this appliance.
Ŷ 7RSUHYHQWVXIIRFDWLRQDQGHQWUDSPHQWKD]DUGV
WRFKLOGUHQUHPRYHWKHIUHVKIRRGDQGIUHH]HU
doors from any refrigerator before disposing of it or
discontinuing its use.
Ŷ 7RDYRLGVHULRXVLQMXU\RUGHDWKFKLOGUHQVKRXOGQRW
stand on, or play in or with the appliance.
Ŷ &KLOGUHQDQGSHUVRQVZLWKUHGXFHGSK\VLFDOVHQVRU\
or mental capabilities or lack of experience and
knowledge can use this appliance only if they are
supervised or have been given instructions on safe
XVHDQGXQGHUVWDQGWKHKD]DUGVLQYROYHG
Ŷ 7KLVDSSOLDQFHLVLQWHQGHGWREHXVHGLQKRXVHKROG
and similar applications such as: staff kitchen areas
LQVKRSVRIILFHVDQGRWKHUZRUNLQJHQYLURQPHQWV
IDUPKRXVHVE\FOLHQWVLQKRWHOVPRWHOVEHG
EUHDNIDVWDQGRWKHUUHVLGHQWLDOHQYLURQPHQWV
catering and similar non-retail applications.
Ŷ Connect to potable water supply only. A cold water
supply is required for automatic icemaker operation.
The water pressure must be between 40 and 120 psi
(275-827 kilopascals).
Ŷ'RQRWDSSO\KDUVKFOHDQHUVWRWKHUHIULJHUDWRU
Certain cleaners will damage plastic which may
cause parts such as the door or door handles to
detach unexpectedly. See the Care and Cleaning
section for detailed instructions.
IMPORTANT SAFETY INFORMATION
READ ALL INSTRUCTIONS BEFORE USING THE APPLIANCE
WARNING
EXPLOSION HAZARD Flammable Refrigerant
This appliance contains isobutane refrigerant,
R600a, a natural gas with high environmental
compatibility. However, it is also combustible.
Adhere to the warnings below to reduce the risk of
injury or property damage.
1. When handling, installing and operating the
appliance, care should be taken to avoid damage to
the refrigerant tubing.
2. 6HUYLFHVKDOORQO\EHSHUIRUPHGE\DXWKRUL]HG
VHUYLFHSHUVRQQHO8VHRQO\PDQXIDFWXUHUDXWKRUL]HG
service parts.
3. 'LVSRVHRIDSSOLDQFHLQDFFRUGDQFHZLWK)HGHUDO
DQG/RFDO5HJXODWLRQV)ODPPDEOHUHIULJHUDQWDQG
insulation material used require special disposal
procedures. Contact your local authorities for the
environmentally safe disposal of your appliance.
4. .HHSYHQWLODWLRQRSHQLQJVLQWKHDSSOLDQFH
enclosures or in the built-in structure clear of
obstruction.
5. 'RQRWXVHPHFKDQLFDOGHYLFHVRURWKHUPHDQVWR
accelerate the defrosting process.
6. 'RQRWGDPDJHUHIULJHUDQWFLUFXLW
7. 'RQRWXVHHOHFWULFDODSSOLDQFHVLQVLGHWKHIRRG
storage compartment of the appliance.
4 49-1000249 Rev. 0
PROPER DISPOSAL OF YOUR OLD REFRIGERATOR
Do not, under any circumstances, cut or remove the third (ground) prong from the power cord. For
personal safety, this appliance must be properly grounded.
The power cord of this appliance is equipped with a
3-prong (grounding) plug which mates with a standard
SURQJJURXQGLQJZDOORXWOHWWRPLQLPL]HWKH
SRVVLELOLW\RIHOHFWULFVKRFNKD]DUGIURPWKLVDSSOLDQFH
Have the wall outlet and circuit checked by a qualified
electrician to make sure the outlet is properly
grounded.
Where a standard 2-prong wall outlet is encountered, it
is your personal responsibility and obligation to have it
replaced with a properly grounded 3-prong wall outlet.
'RQRWXVHDQDGDSWHU
The refrigerator should always be plugged into its own
individual electrical outlet which has a voltage rating
that matches the rating plate.
$9ROW$&+]RUDPSIXVHGJURXQGHG
electrical supply is required. This provides the best
performance and also prevents overloading house
ZLULQJFLUFXLWVZKLFKFRXOGFDXVHDILUHKD]DUGIURP
overheated wires.
Never unplug your refrigerator by pulling on the power
cord. Always grip plug firmly and pull straight out from
the outlet.
,PPHGLDWHO\GLVFRQWLQXHXVHRIDGDPDJHGVXSSO\
FRUG,IWKHVXSSO\FRUGLVGDPDJHGLWPXVWEH
replaced by a qualified service professional with an
DXWKRUL]HGVHUYLFHSDUWIURPWKHPDQXIDFWXUHU
When moving the refrigerator away from the wall, be
careful not to roll over or damage the power cord.
CONNECTING ELECTRICITY
WARNING
ELECTRICAL SHOCK HAZARD
Plug into a grounded 3-prong outlet
'RQRWUHPRYHWKHJURXQGSURQJ
'RQRWXVHDQDGDSWHU
'RQRWXVHDQH[WHQVLRQFRUG
)DLOXUHWRIROORZWKHVHLQVWUXFWLRQVFDQUHVXOWLQGHDWKILUHRUHOHFWULFDOVKRFN
SAFETY INFORMATION
IMPORTANT SAFETY INFORMATION
READ ALL INSTRUCTIONS BEFORE USING THE APPLIANCE
READ AND SAVE THESE INSTRUCTIONS
WARNING
SUFFOCATION AND ENTRAPMENT HAZARD
)DLOXUHWRIROORZWKHVHGLVSRVDOLQVWUXFWLRQVFDQUHVXOWLQGHDWKRUVHULRXVLQMXU\
IMPORTANT: Child entrapment and suffocation
are not problems of the past. Junked or abandoned
refrigerators are still dangerous even if they will sit
IRU³MXVWDIHZGD\V´,I\RXDUHJHWWLQJULGRI\RXUROG
refrigerator, please follow the instructions below to help
prevent accidents.
Before You Throw Away Your Old Appliance
Ŷ7DNHRIIWKHIUHVKIRRGDQGIUHH]HUGRRUV
Ŷ Leave the shelves in place so that children may not
easily climb inside.
Refrigerant and Foam Disposal:
'LVSRVHRIDSSOLDQFHLQDFFRUGDQFHZLWK)HGHUDODQG/RFDO5HJXODWLRQV)ODPPDEOHLQVXODWLRQPDWHULDOXVHG
requires special disposal procedures. Contact your local authorities for the environmentally safe disposal of your
appliance.
INSTALLATION
WARNING
EXPLOSION HAZARD
.HHSIODPPDEOHPDWHULDOVDQGYDSRUVVXFKDVJDVROLQHDZD\IURPUHIULJHUDWRU)DLOXUHWRGRVRFDQUHVXOWLQILUH
explosion, or death.
49-1000249 Rev. 0 5
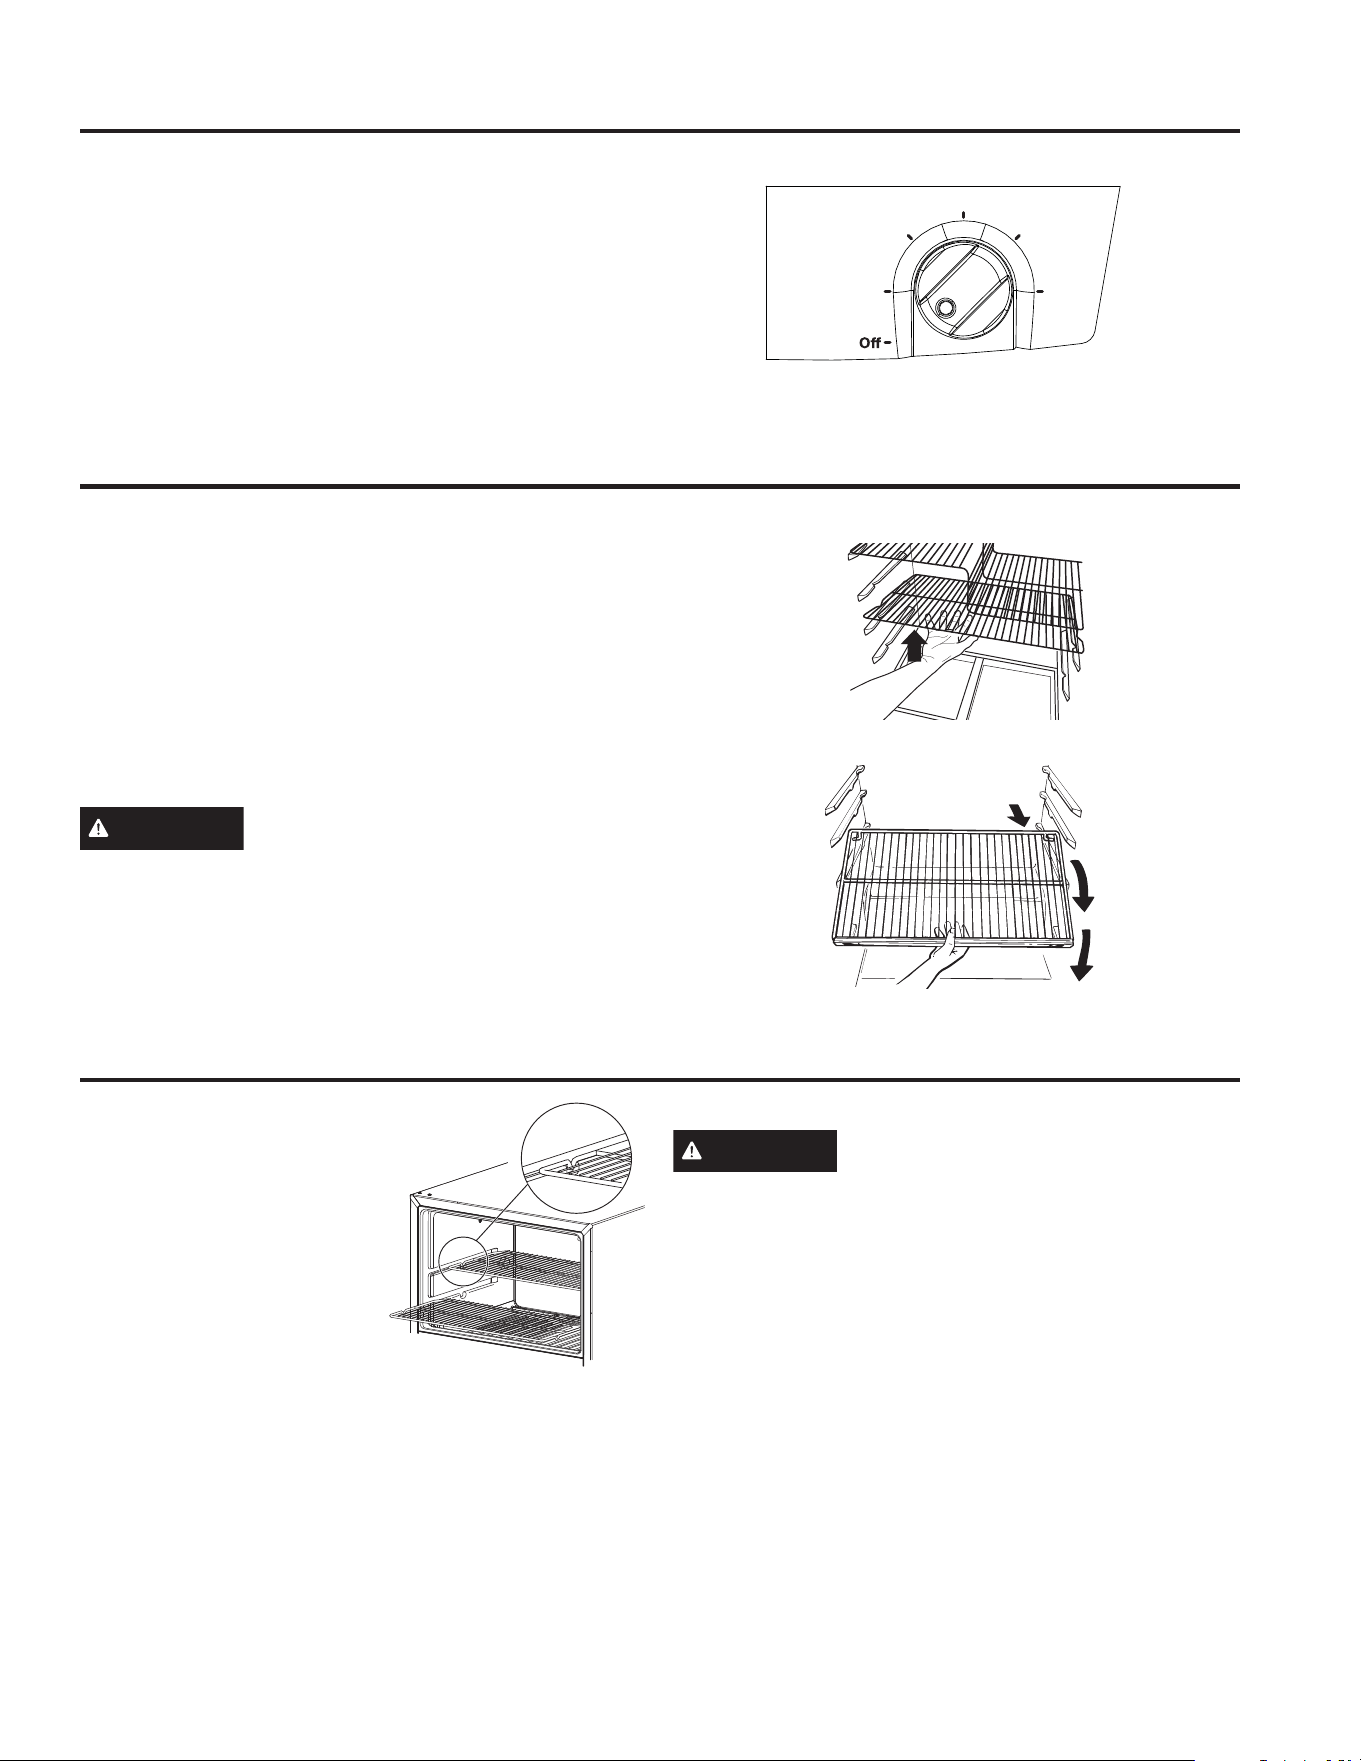
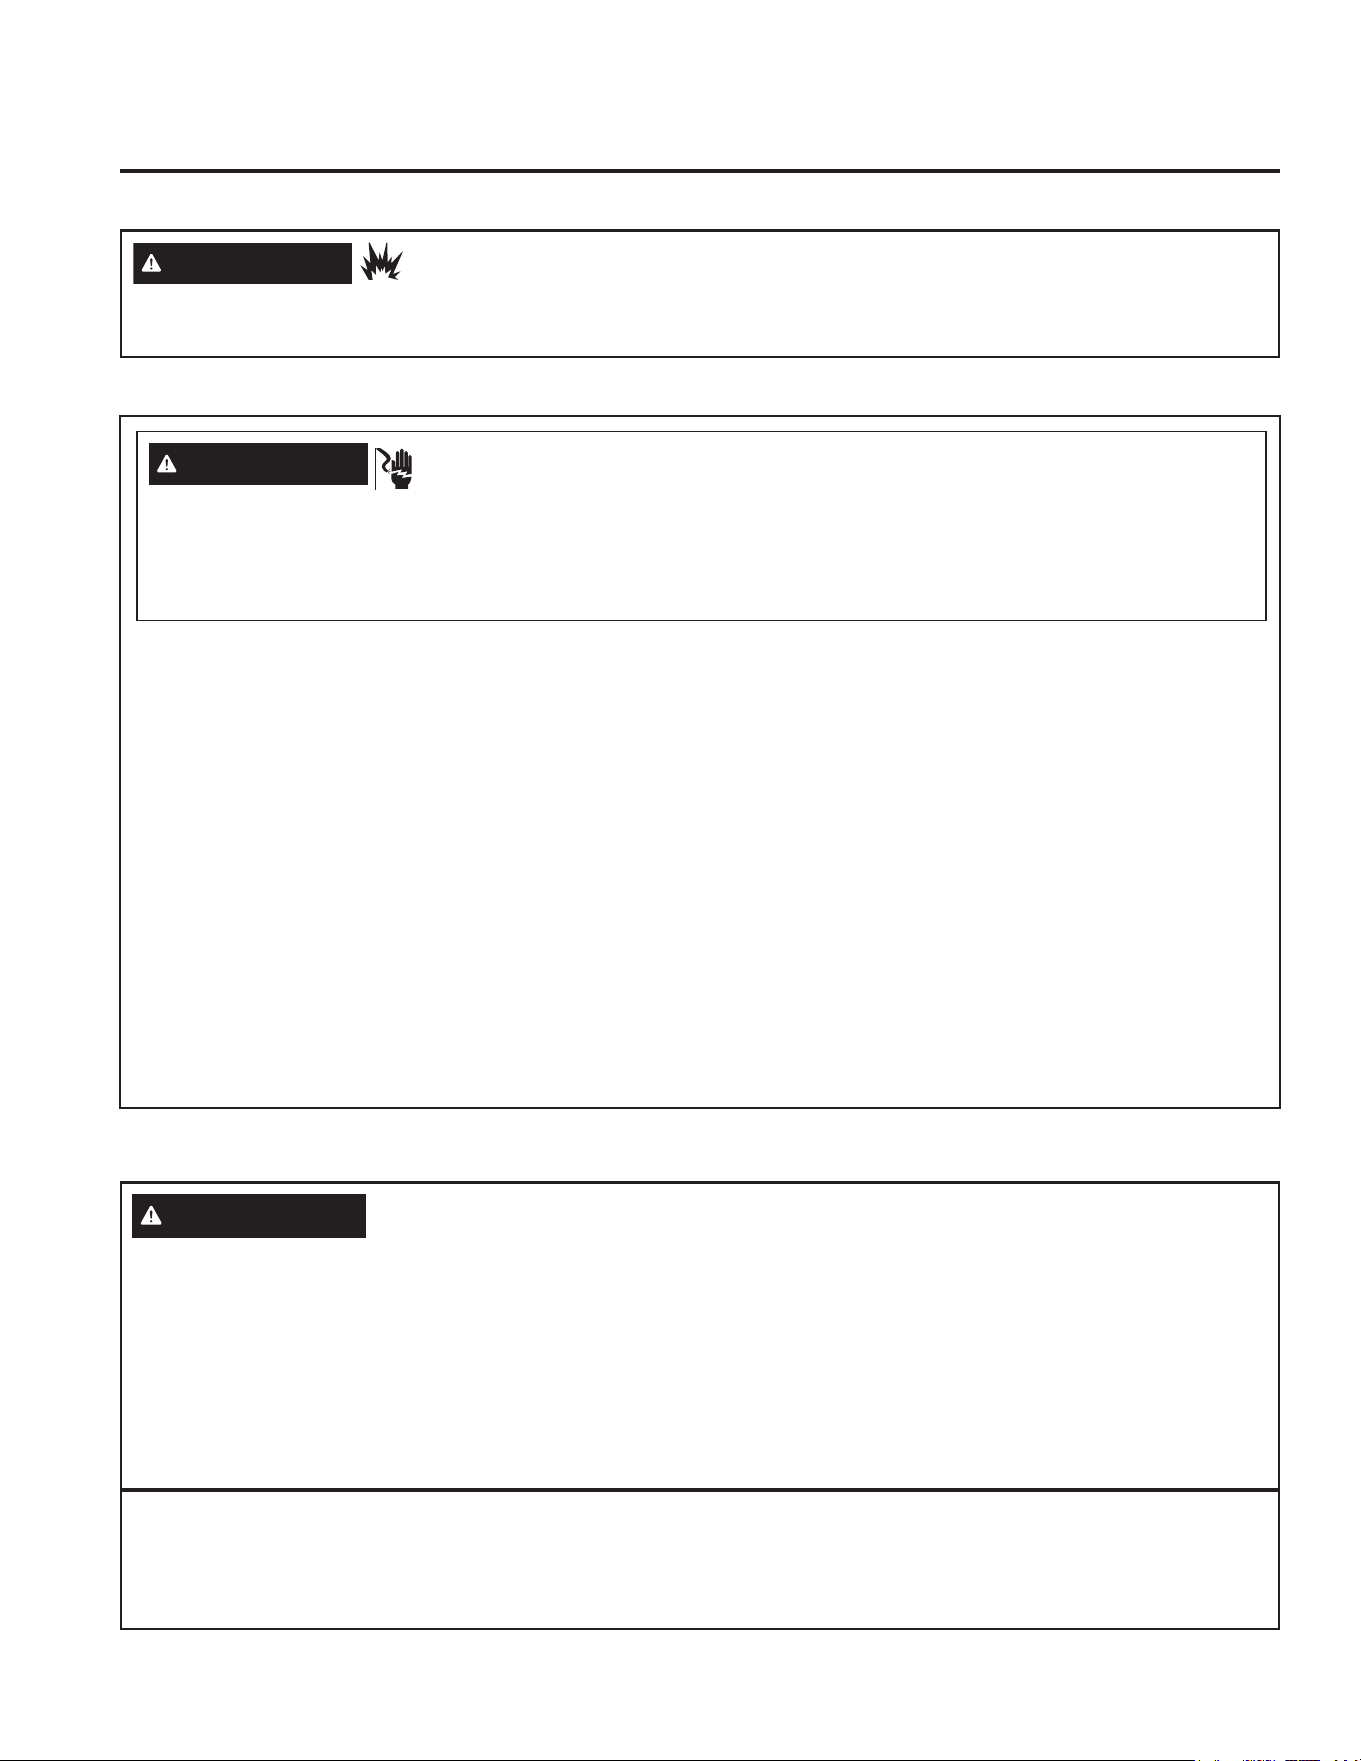
The temperature control adjusts the refrigerator from its
warmest to coldest settings.
Your refrigerator will come with the recommended
IDFWRU\VHWWLQJRQ³´)RUFROGHUWHPSHUDWXUHWXUQ
WKHNQREFORFNZLVHWRHLWKHUVHWWLQJ³´RU³´)RU
warmer temperature, turn the dial counter-clockwise
WRHLWKHUVHWWLQJ³´RU³´7RWXUQRIIWKHFRROLQJLQ
both compartments, turn the knob counter-clockwise to
VHWWLQJ³2II´1RWHWKDWWKLVGRHVQRWVKXWRIISRZHUWRWKH
refrigerator.
Temperature Control
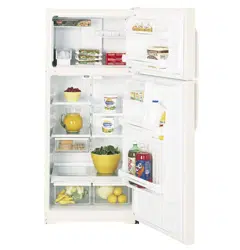
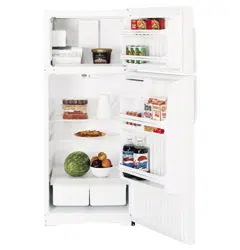
Fresh Food Compartment Shelves
Freezer Compartment Shelves
USING THE REFRIGERATOR: Temperature Control / Shelves
Shelf supports at various levels allow you to custom-space your shelves. Not all features are on all models.
Full-Width Shelves
Some models have a stationary tempered glass shelf,
a spillproof shelf or two steel wire stationary shelves.
These shelves can be moved to another place in the
fresh food compartment.
When placed correctly on the shelf supports, the shelf
will stop before coming completely out of the refrigerator
and will not tilt when you place food on it or remove food
from it.
CAUTION
'RQRWFOHDQJODVVVKHOYHVRUFRYHUV
with warm water when they are cold. Glass shelves and
covers may break if exposed to sudden temperature
changes or impact such as bumping or dropping.
Tempered glass is designed to shatter into many small
pieces if it breaks.
When placed correctly on the
shelf supports, the two steel
wire stationary shelves will
stop before coming completely
RXWRIWKHIUHH]HUDQGZLOOQRW
tilt when you place food on it
or remove food from it.
Some models have glass shelves.
CAUTION
'RQRWFOHDQJODVVVKHOYHVRUFRYHUV
with warm water when they are cold. Glass shelves and
covers may break if exposed to sudden temperature
changes or impact such as bumping or dropping.
Tempered glass is designed to shatter into many small
pieces if it breaks.
3
2
1
Recommended
Coldest
5
4
To remove the full-width shelves
Pull forward
6 49-1000249 Rev. 0
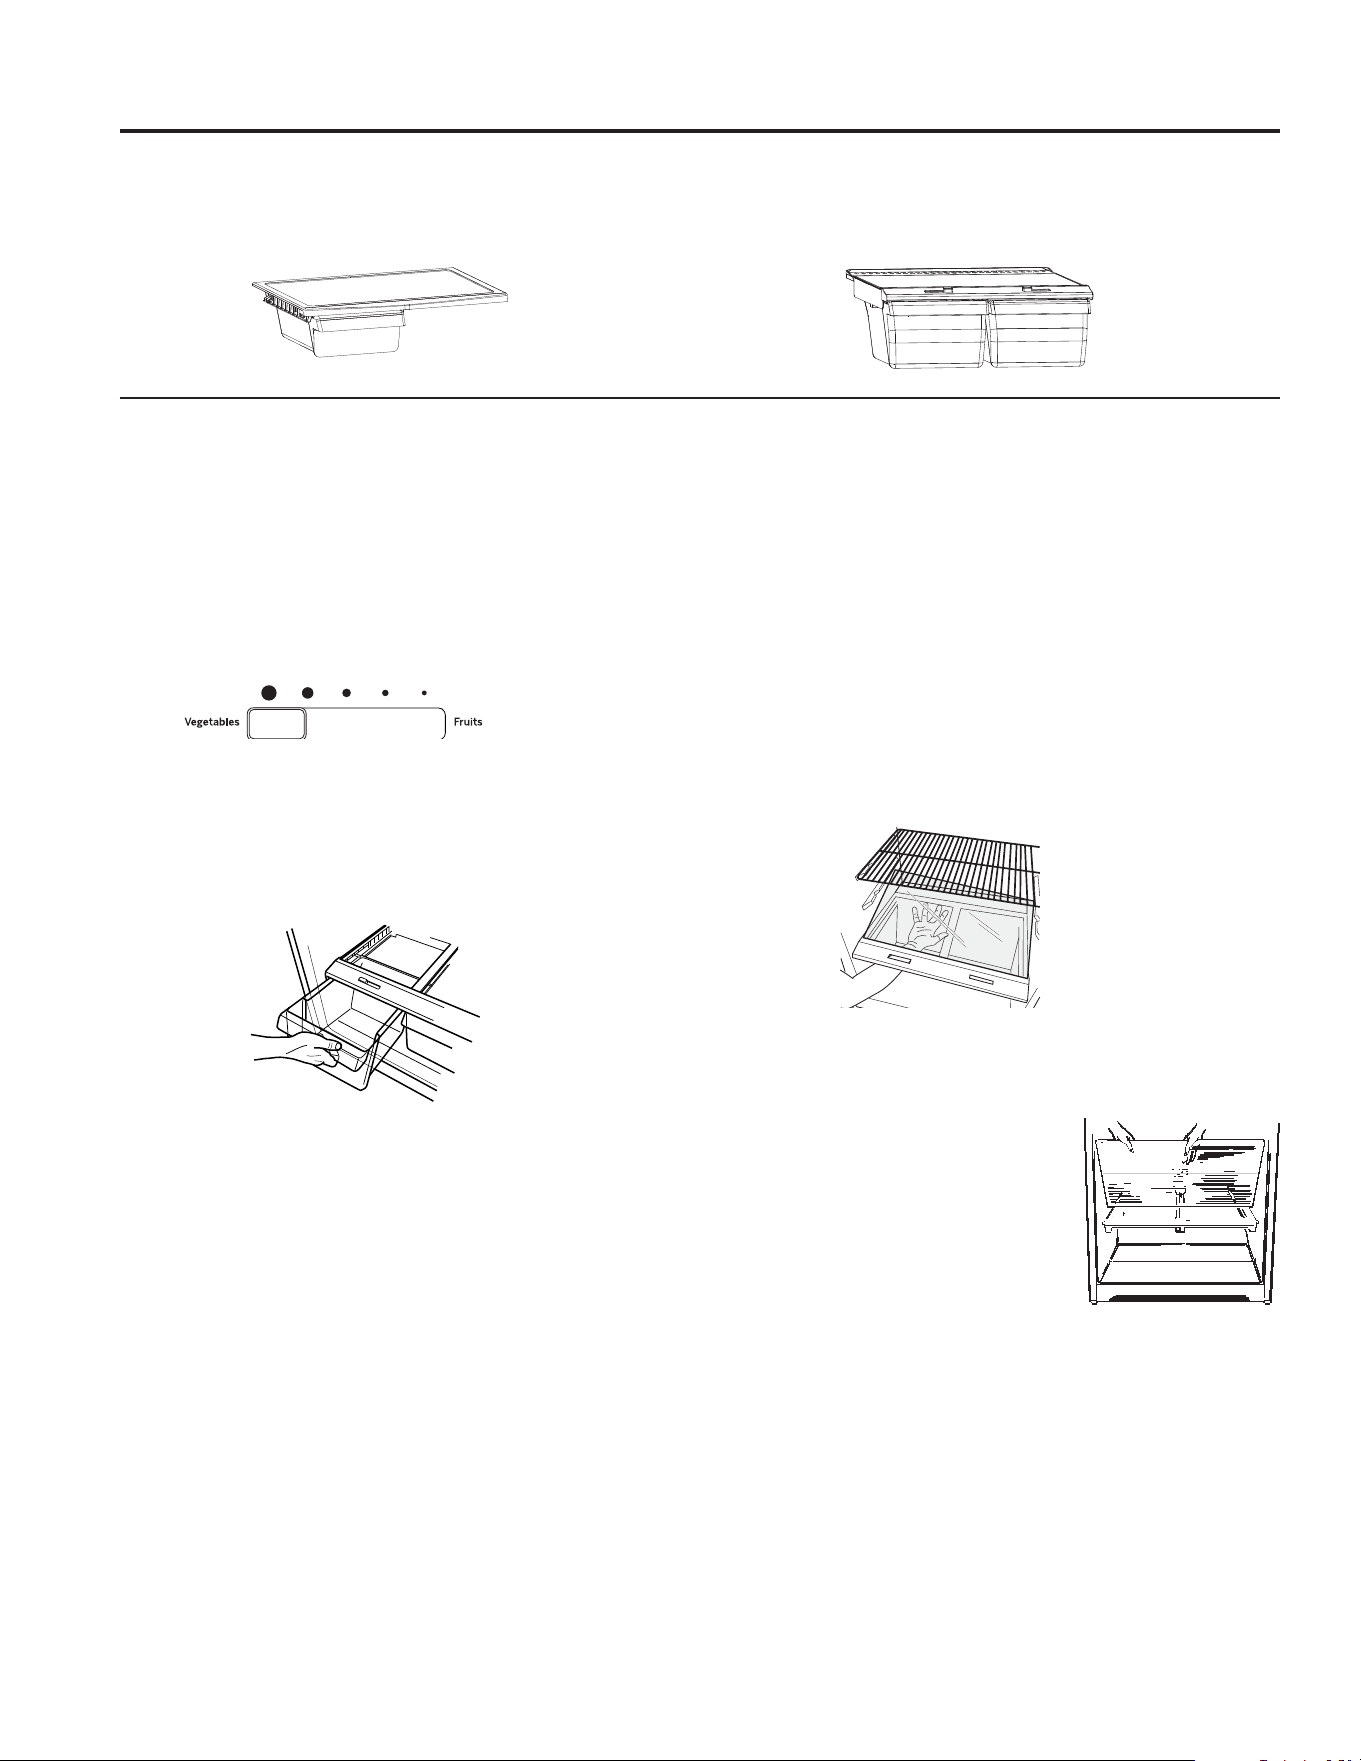
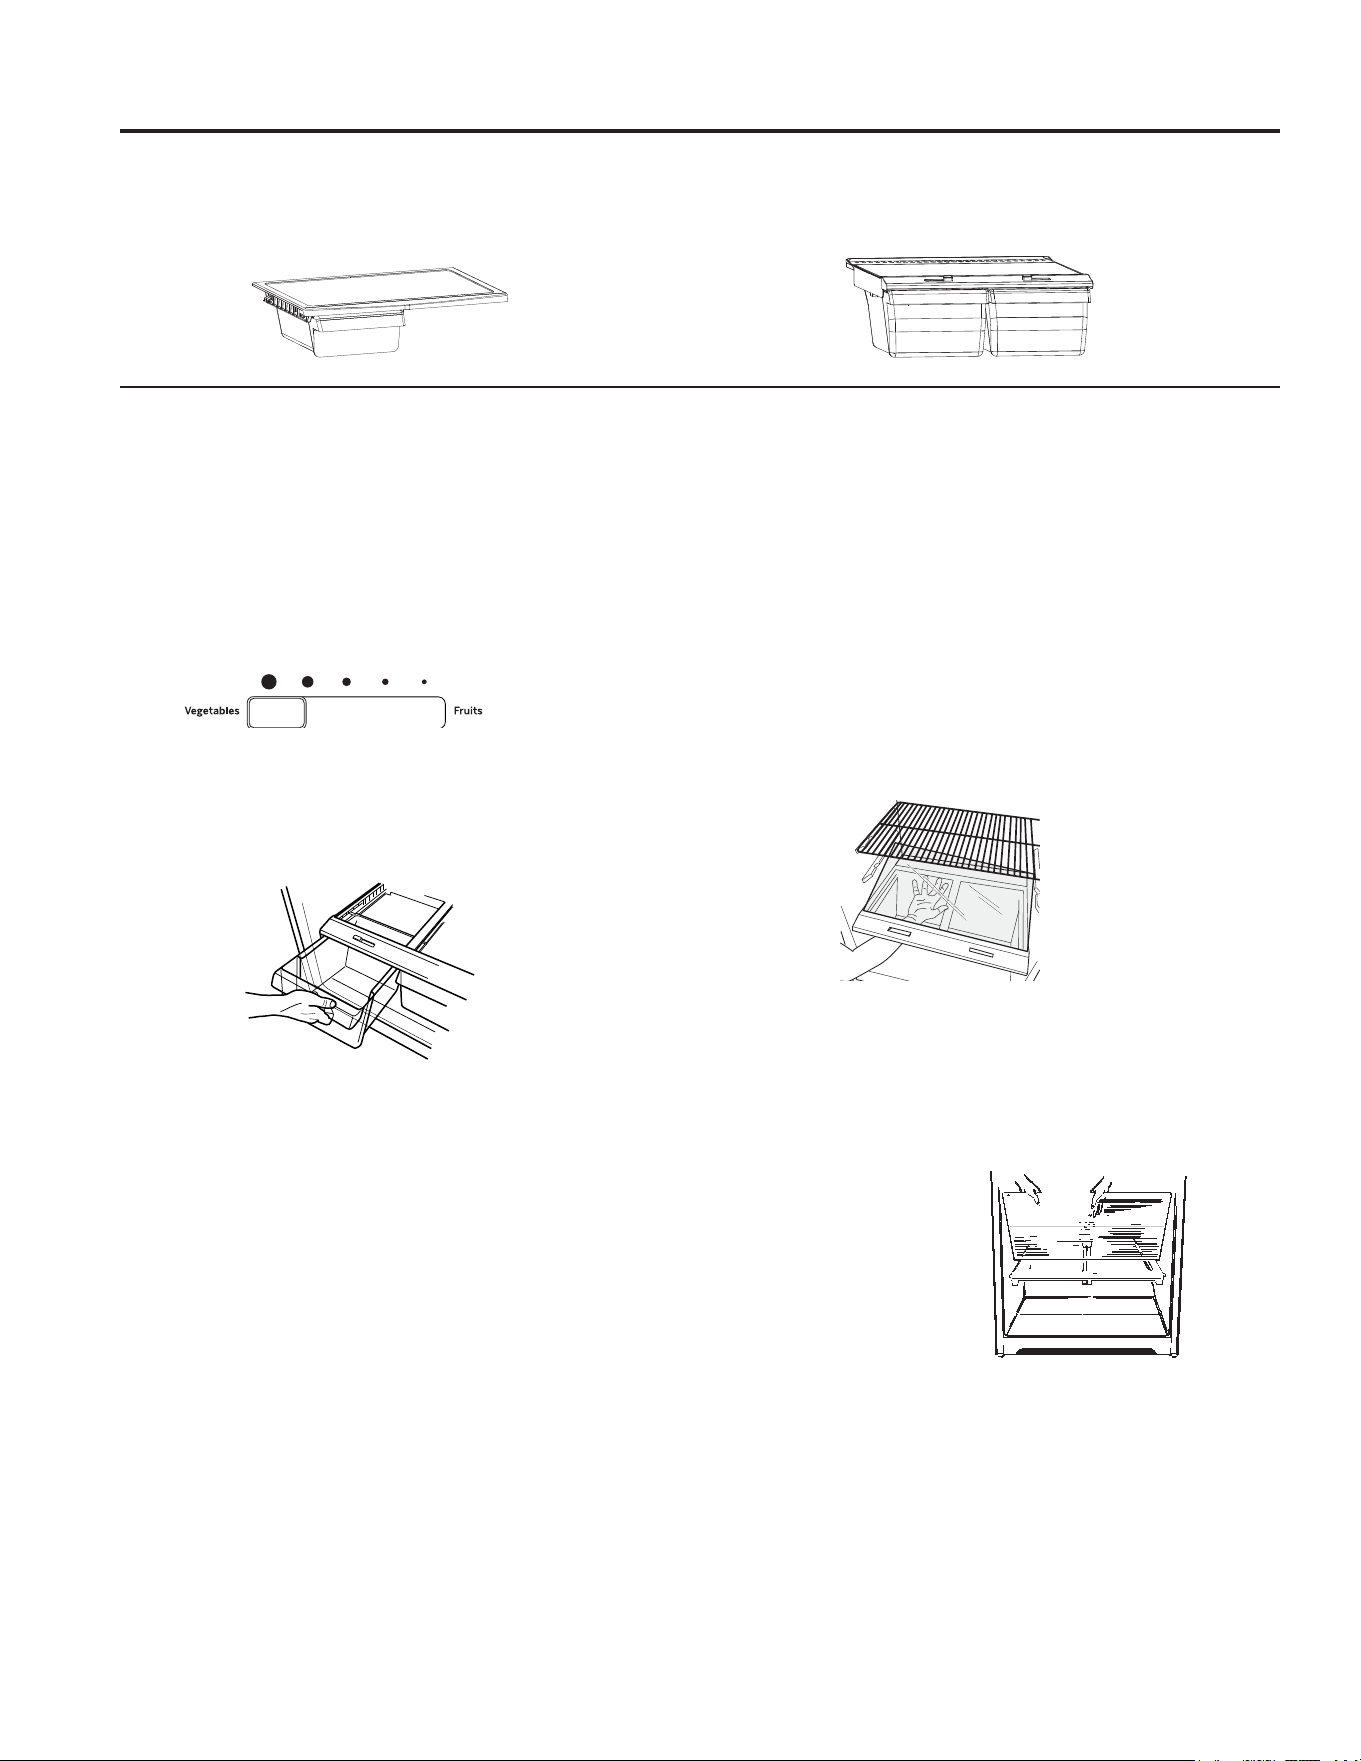
USING THE REFRIGERATOR: 'UDZHUV
Humidity Controlled Drawer and Cover (on some models)
6OLGHWKHFRQWURODOOWKHZD\WRWKH+,*+VHWWLQJ
to provide high humidity recommended for most
vegetables.
Slide the control all the way to the LOW setting to
provide lower humidity levels recommended for most
fruits.
Drawer Removal
'UDZHUVFDQEHUHPRYHGHDVLO\E\JUDVSLQJWKHVLGHV
and lifting up slightly while pulling drawers past the stop
location.
Cover Removal
1. Remove the drawers.
2. Reach in, push the back of glass cover up, and at the
same time, pull it backward as far as it will come.
Tilt it and take it out. Avoid cleaning the cold
glass cover with hot water because the extreme
temperature difference may cause it to break.
3. Remove the drawer frame. (Always remove the glass
cover before you take out the drawer frame.)
Lift the frame off the supports at each side and back,
pull it forward, tilt it and take it out.
To replace:
1. Lower the frame until it rests on the supports at each
side and back.
2. Replace the glass cover, pushing
its front edge firmly into the
front frame channel and gently
lowering the back into place.
3. Replace the drawers.
Storage Drawers
Not all features are on all models.
Snack Drawer
The snack drawer can be moved to the most useful
location for your family’s needs.
Fruit and Vegetable Drawers
Excess water that may accumulate in the bottom of the
drawers should be emptied and the drawers wiped dry.

49-1000249 Rev. 0 7
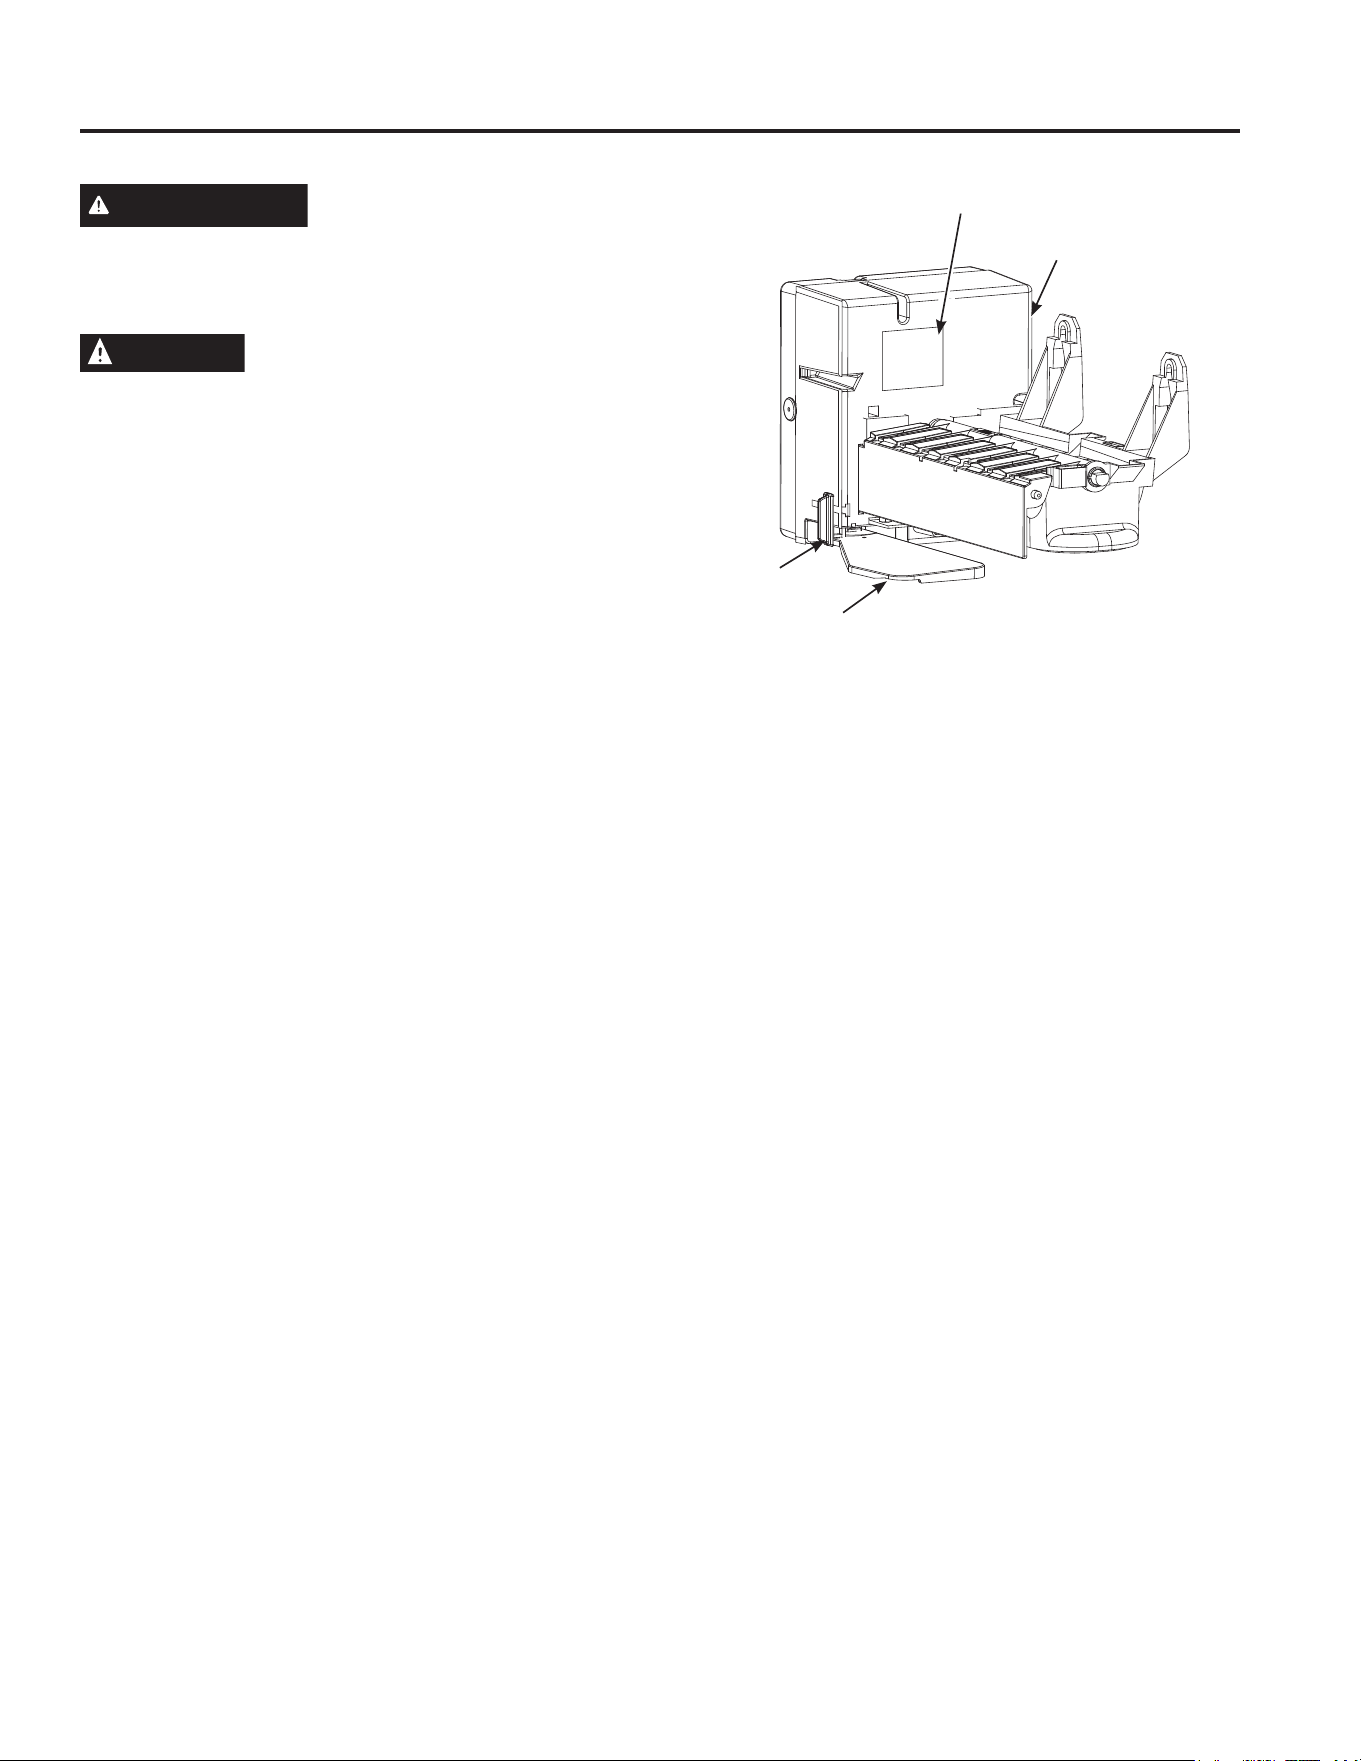
Automatic Icemaker (on some models)
WARNING
Connect to potable water supply only.
A cold water supply is required for automatic icemaker
operation. The water pressure must be between 40 and
120 psi (275-827 kilopascals).
CAUTION
Avoid contact with the moving parts
of the ejector mechanism, or with the heating element
(located on the bottom of the ice maker) that releases
WKHFXEHV'RQRWSODFHILQJHUVRUKDQGVRQWKH
automatic ice making mechanism while the refrigerator is
plugged in.
A newly-installed refrigerator may take 12–24 hours to
begin making ice.
The ice maker will produce approximately 70-100
FXEHVLQDKRXUSHULRGGHSHQGLQJRQWKHIUHH]HU
compartment temperature, room temperature, number of
door openings and other use conditions.
,IWKHUHIULJHUDWRULVRSHUDWHGEHIRUHWKHZDWHUFRQQHFWLRQ
LVPDGHWRWKHLFHPDNHUVHWWKHVZLWFK2))
When the refrigerator has been connected to the water
supply, set the switch ON position.
7KHLFHPDNHUZLOOILOOZLWKZDWHUZKHQLWFRROVWR)
(-9°C). A newly-installed refrigerator may take 12 to 24
hours to begin making ice cubes.
Once the ice maker starts to make ice, it may take up
to 48 hours to fill the bin, depending on the temperature
settings and number of door openings.
<RXZLOOKHDUDEX]]LQJVRXQGHDFKWLPHWKHLFHPDNHU
fills with water.
NOTICE: Throw away the first few batches of ice to
allow the water line to clear.
Be sure nothing interferes with the sweep of the feeler
arm.
When the bin fills to the level of the feeler arm, the ice
maker will stop producing ice.
,WLVQRUPDOIRUVHYHUDOFXEHVWREHMRLQHGWRJHWKHU
,ILFHLVQRWXVHGIUHTXHQWO\ROGLFHFXEHVZLOOEHFRPH
cloudy, taste stale, shrink or fuse together.
,FHPDNHUDFFHVVRU\NLW
,I\RXUUHIULJHUDWRUGLGQRWDOUHDG\FRPHHTXLSSHGZLWK
an automatic ice maker, an ice maker accessory kit is
available at extra cost.
This refrigerator will accept accessory icemaker kit
,0'RU,0'8VHLQVWUXFWLRQV9VXSSOLHGLQWKHNLWIRU
assembly.
IMPORTANT: This refrigerator requires a red label
icemaker. See above for the location of the label on the
LFHPDNHU,IWKHLFHPDNHUWKDWFDPHZLWK\RXUNLWGRHV
QRWKDYHDUHGODEHOLWZLOOQRWIXQFWLRQ,QWKLVFDVH
please call 800.GE.CARES (in Canada 800.561.3344)
for the correct icemaker.
USING THE REFRIGERATOR: $XWRPDWLF,FHPDNHU
,FHPDNHU
,FHPDNHU/DEHO
)HHOHU$UP
Power Switch
Not all features are on all models.

8 49-1000249 Rev. 0
Cleaning the Inside
To help prevent odors, leave an open box of baking soda
LQWKHIUHVKIRRGDQGIUHH]HUFRPSDUWPHQWV
8QSOXJWKHUHIULJHUDWRUEHIRUHFOHDQLQJ,IWKLVLVQRW
practical, wring excess moisture out of sponge or cloth
when cleaning around switches, lights or controls.
8VHZDUPZDWHUDQGEDNLQJVRGDVROXWLRQ²DERXWD
tablespoon (15 ml) of baking soda to a quart (1 liter) of
ZDWHU7KLVERWKFOHDQVDQGQHXWUDOL]HVRGRUV5LQVHDQG
wipe dry.
After cleaning the door gaskets, apply a thin layer of
petroleum jelly to the door gaskets at the hinge side.
This helps keep the gaskets from sticking and bending
out of shape.
CAUTION
'RQRWFOHDQJODVVVKHOYHVRUFRYHUV
with warm water when they are cold. Glass shelves and
covers may break if exposed to sudden temperature
changes or impact such as bumping or dropping.
Tempered glass is designed to shatter into many small
SLHFHVLILWEUHDNV'RQRWZDVKDQ\SODVWLFUHIULJHUDWRU
parts in the dishwasher.
Moving the Refrigerator
Be careful when moving the refrigerator away from
the wall. All types of floor coverings can be damaged,
particularly cushioned coverings and those with
embossed surfaces.
Turn the leveling legs at each front corner of the
refrigerator counterclockwise until the rollers support
the refrigerator. Pull the refrigerator straight out and
return it to position by pushing it straight in. Moving the
refrigerator in a side direction may result in damage to
the floor covering or refrigerator.
When pushing the refrigerator back, make sure you don’t
roll over the power cord or ice maker supply line (on
some models).
After rolling the refrigerator back into place, turn the legs
clockwise until the legs again bear the weight of the
refrigerator.
Replacing the Lights
/('OLJKWLQJLVORFDWHGDWWKHWRSFHQWHURIWKHIUHVKIRRG
compartment.
$QDXWKRUL]HGWHFKQLFLDQZLOOQHHGWRUHSODFHWKH
/('OLJKW
,IWKLVDVVHPEO\QHHGVWREHUHSODFHGFDOO*(
$SSOLDQFHV6HUYLFHDWLQWKH8QLWHG
States or 1.800.561.3344 in Canada.
Preparing for Vacation
)RUORQJYDFDWLRQVRUDEVHQFHVUHPRYHIRRGDQGXQSOXJ
the refrigerator. Move the temperature control dial to the
2))SRVLWLRQDQGFOHDQWKHLQWHULRUZLWKDEDNLQJVRGD
solution of one tablespoon (15 ml) of baking soda to one
quart (1 liter) of water. Leave the doors open.
0RYHWKHVZLWFKWRWKH2))SRVLWLRQRQWKHSRZHUVZLWFK
model, and shut off the water supply to the refrigerator.
,IWKHWHPSHUDWXUHFDQGURSEHORZIUHH]LQJKDYHD
qualified servicer drain the water supply system (on
some models) to prevent serious property damage due
to flooding.
Preparing to Move
Secure all loose items such as grille, shelves and
drawers by taping them securely in place to prevent
damage. To prevent the doors from opening while
moving, secure them to the case with tape. Be sure the
refrigerator stays in an upright position during moving.
Care And Cleaning
CARE AND CLEANING
Cleaning the Outside
Directions for Cleaning Outside Surfaces, Door Handles, and Trim
DO USE DO NOT USE
Soft, clean cloth or sponge Abrasive cloths, scrubbing sponges, scouring or steel
wool pads
Mild detergent mixed with warm water
$SSURYHGVWDLQOHVVVWHHOFOHDQHUV9LVLWWKH*(
Appliances parts store for approved stainless steel
cleaners: GEAppliancesparts.com or call 877.959.8688
&OHDQHUVZLWKR[DOLFDFLGVXFKDV%DU.HHSHUV)ULHQG6RIW
Cleanser™ can be used to remove surface rust, tarnish
and small blemishes on stainless steel surfaces only.
Abrasive powders or sprays
Window Sprays or Ammonia
Citrus or plant oil-based cleaners
Acidic or vinegar-based cleaners
Oven cleaners
Cleaners containing acetone (propanone)
$Q\FOHDQHUZLWK:$51,1*DERXWSODVWLFFRQWDFW
NOTE: DO NOT allow stainless steel cleaner to come in contact with any plastic parts such as trim pieces, handle
KDUGZDUHDQGOLQHUV,IXQLQWHQWLRQDOFRQWDFWRIFOHDQHUVZLWKSODVWLFSDUWVGRHVRFFXUFOHDQSODVWLFSDUWZLWKD
sponge and mild detergent mixed with warm water.
49-1000249 Rev. 0 9
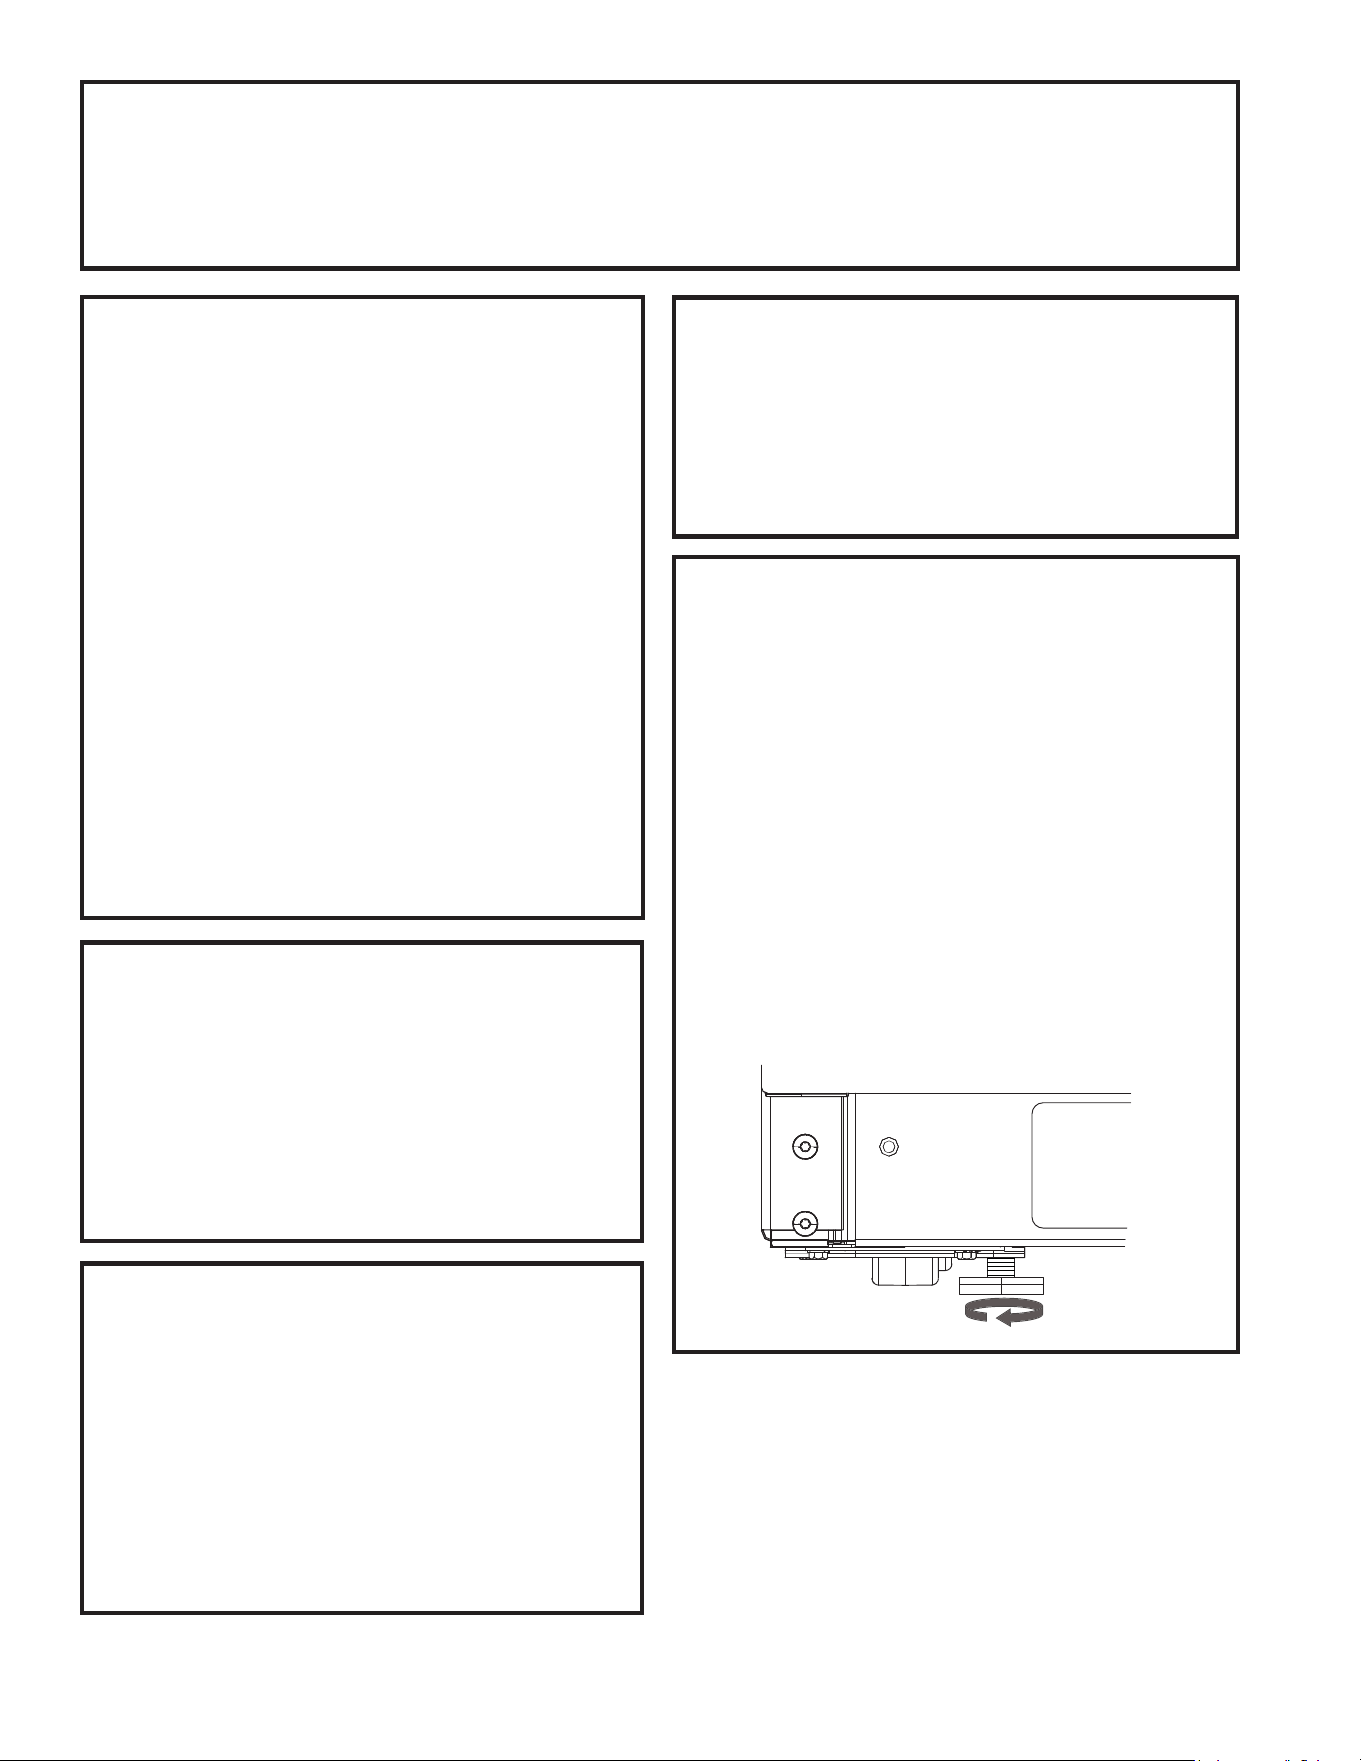
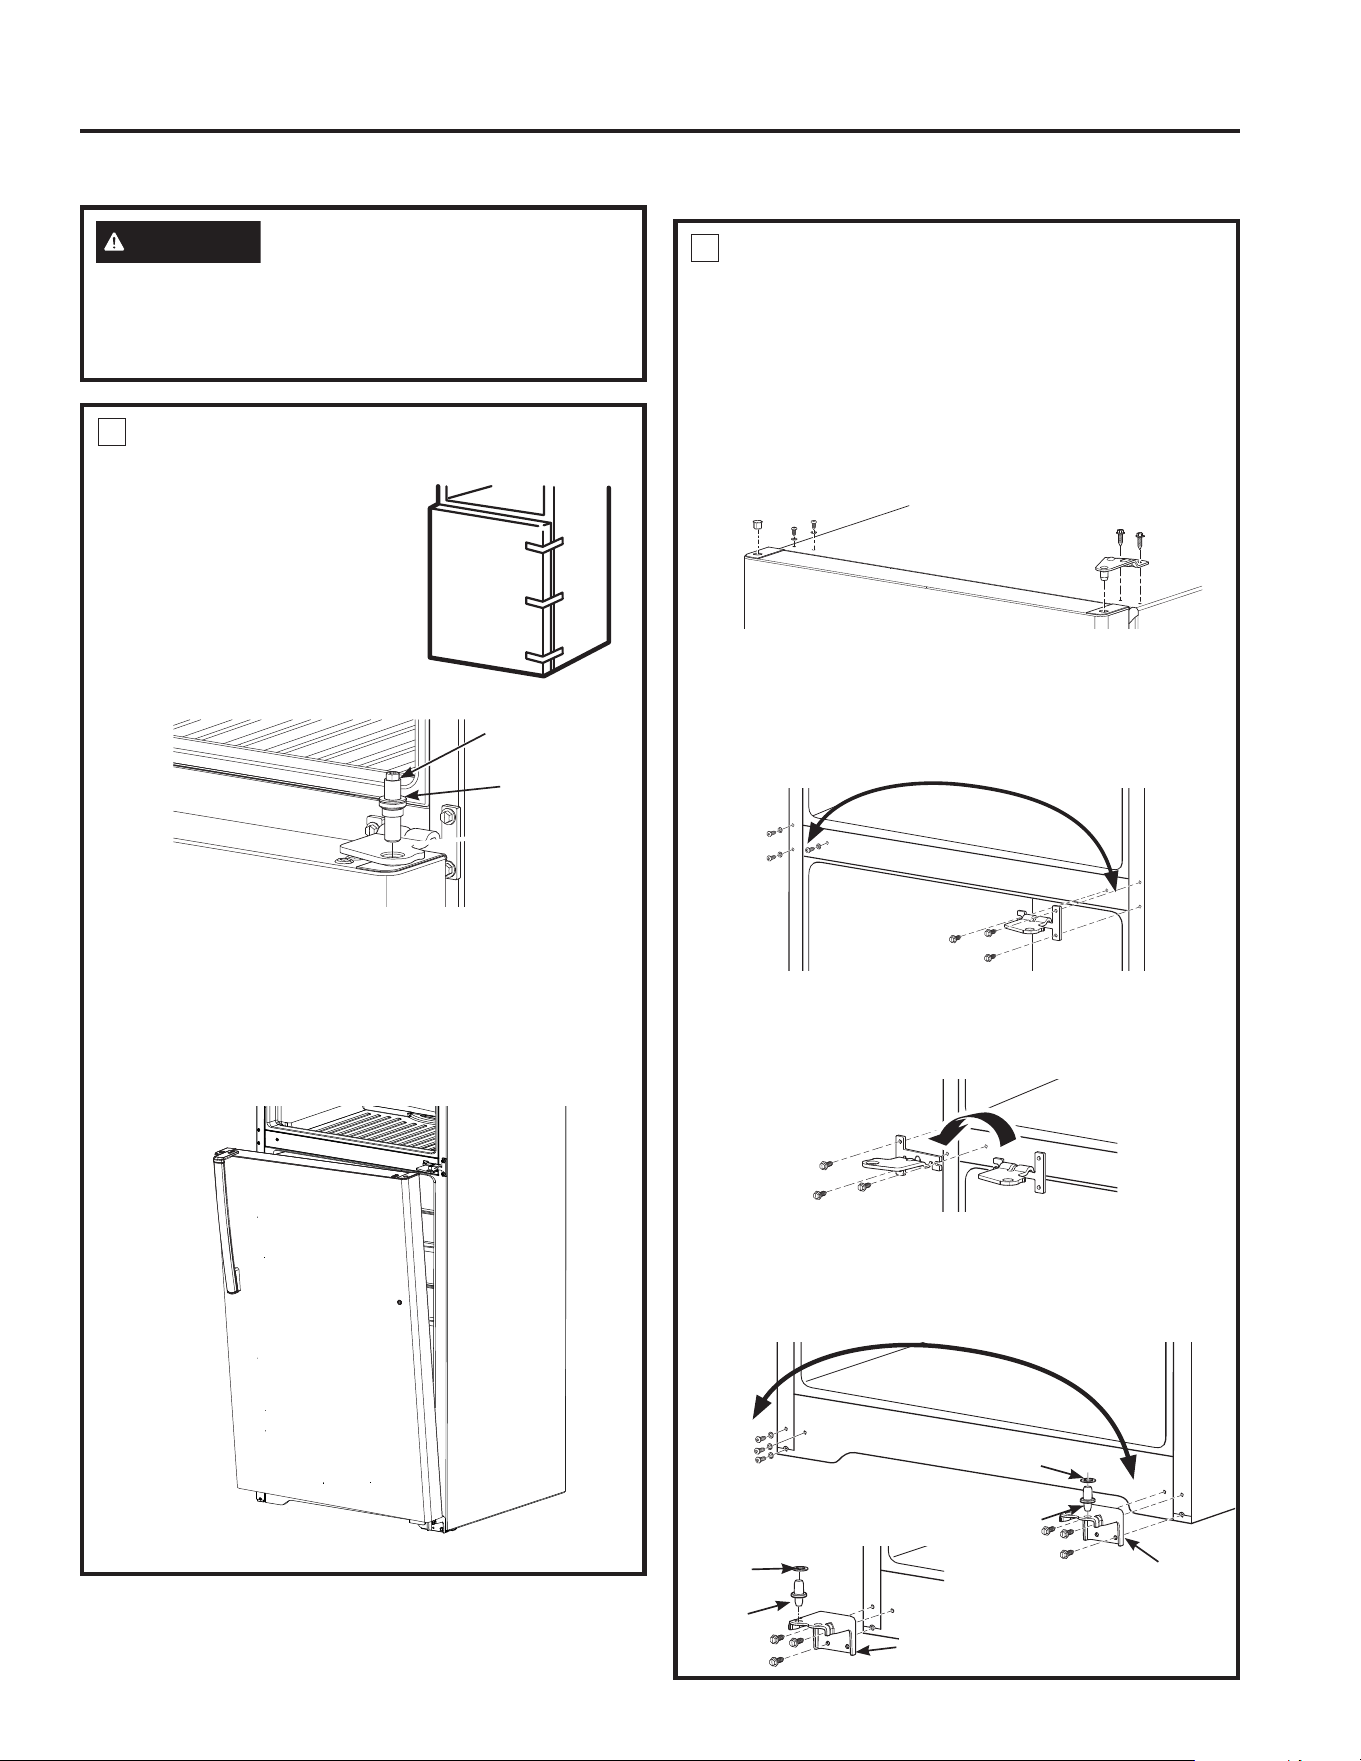
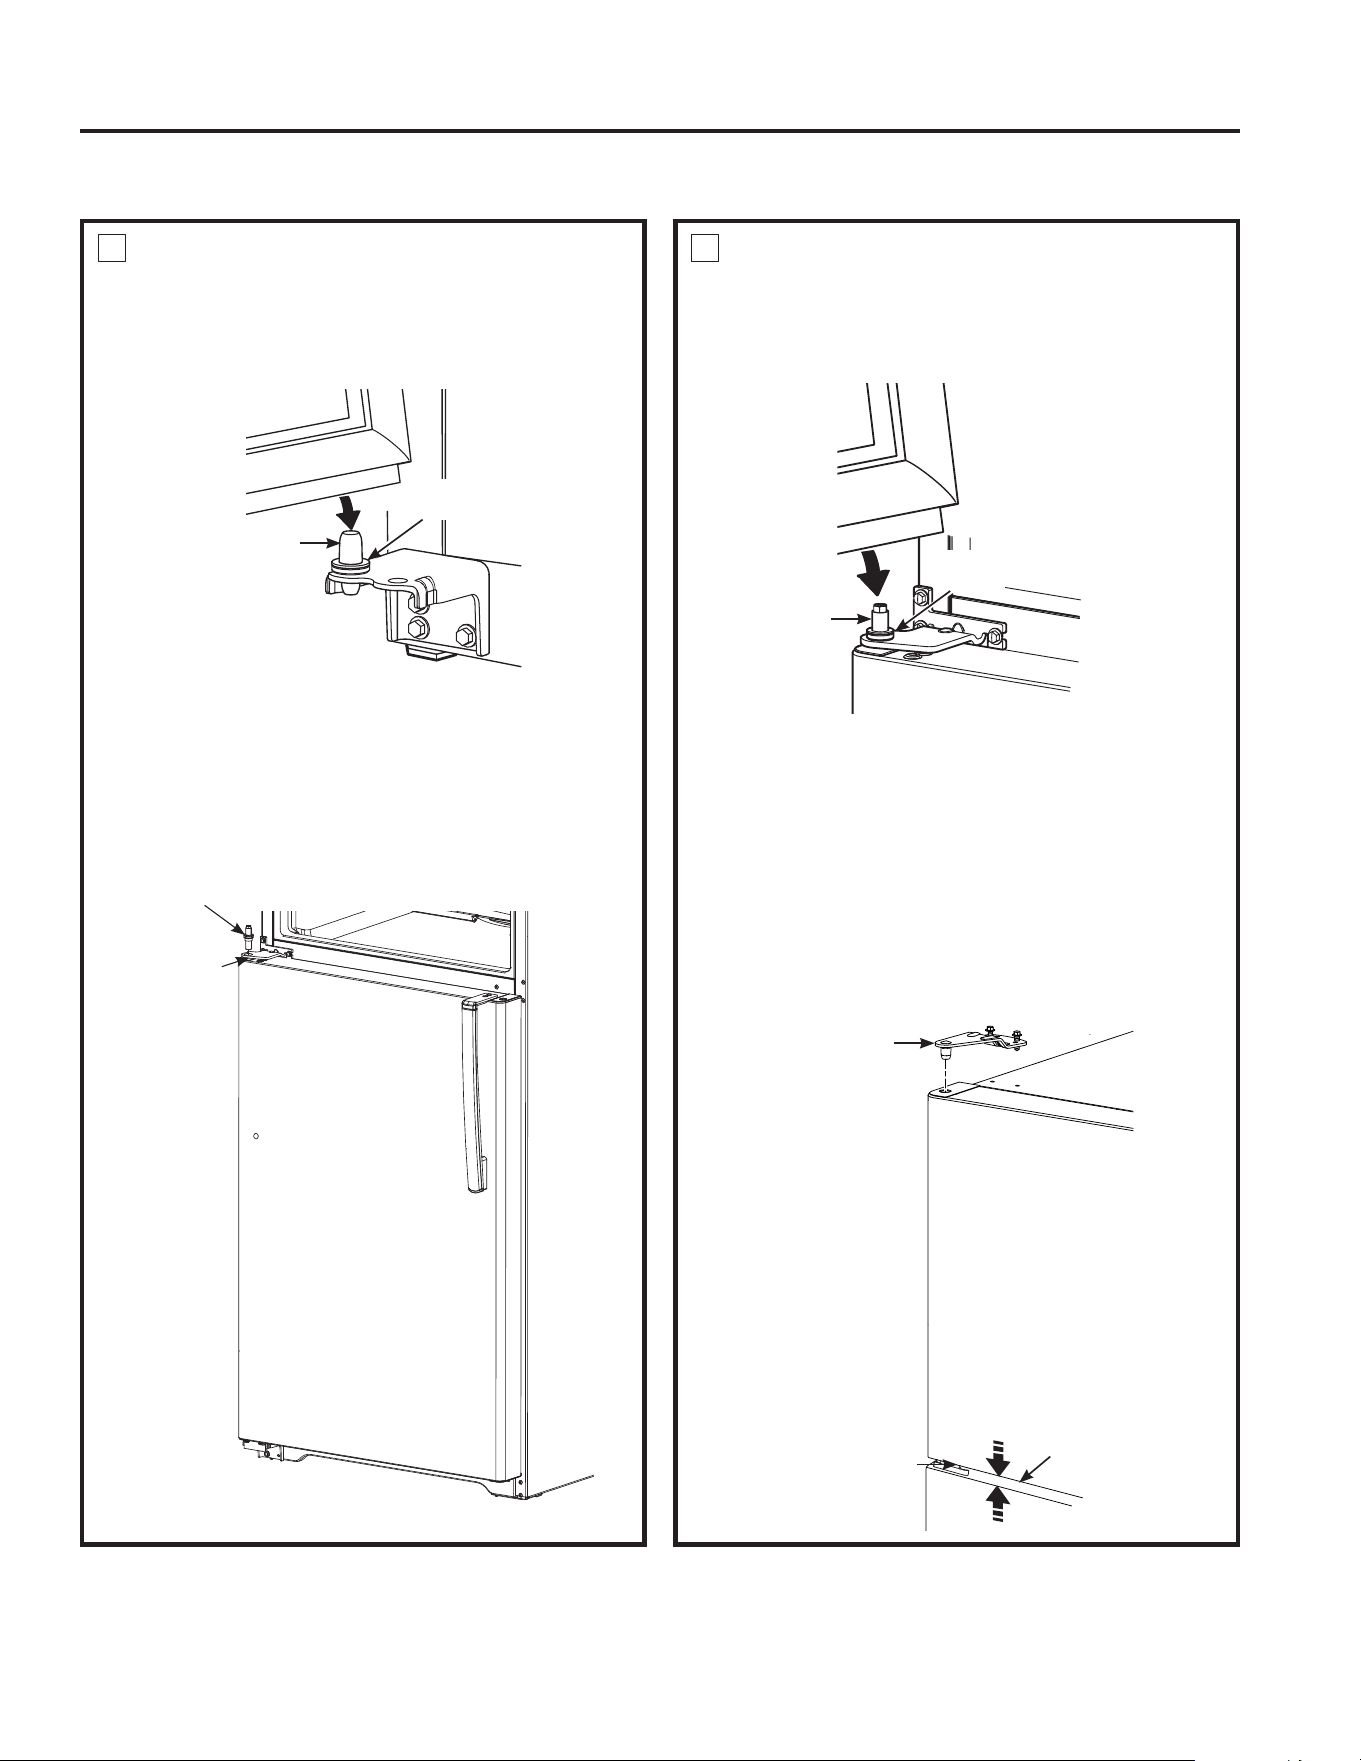
ROLLERS AND LEVELING LEGS
Leveling legs near each front corner of the refrigerator
are adjustable. They firmly position the refrigerator
and prevent it from moving when the doors are
opened. Leveling legs should be set so the front of
the refrigerator is raised just enough that the doors
close easily when opened about halfway.
Turn the leveling legs clockwise to raise the
refrigerator, counterclockwise to lower it.
Rollers next to the leveling legs allow you to move the
refrigerator away from the wall for cleaning.
Turn the legs counterclockwise until the weight of the
refrigerator is transferred from them to the rollers.
After rolling the refrigerator back into place, turn the
legs clockwise until the legs again bear the weight of
the refrigerator.
Installation Instructions Models 15, 16, 18
CLEARANCES
Allow the following clearances for ease of installation,
proper air circulation and plumbing and electrical
connections.
6LGHV´PP
7RS´PP
%DFN´PP
BEFORE YOU BEGIN
Read these instructions completely and carefully.
•
IMPORTANT – Save these instructions for
local inspector’s use.
• IMPORTANT – Observe all governing codes
and ordinances.
• Note to Installer – Be sure to leave these
instructions with the Consumer.
• Note to Consumer – .HHSWKHVHLQVWUXFWLRQV
for future reference.
• Skill level±,QVWDOODWLRQRIWKLVDSSOLDQFHUHTXLUHV
basic mechanical skills.
• Completion time±5HIULJHUDWRU,QVWDOODWLRQ
15 minutes
5HYHUVLQJWKH'RRU6ZLQJ
15 minutes
• Proper installation is the responsibility of the
installer.
• Product failure due to improper installation is not
covered under the Warranty.
REFRIGERATOR LOCATION
• 'RQRWLQVWDOOWKHUHIULJHUDWRUZKHUHWKHWHPSHUDWXUH
ZLOOJREHORZ)&EHFDXVHLWZLOOQRWUXQ
often enough to maintain proper temperatures.
• 'RQRWLQVWDOOWKHUHIULJHUDWRUZKHUHWKH
WHPSHUDWXUHZLOOJRDERYH)&EHFDXVH
it will not perform properly.
• 'RQRWLQVWDOOWKHUHIULJHUDWRULQDORFDWLRQH[SRVHG
to water (rain, etc.) or direct sunlight.
,QVWDOOLWRQDIORRUVWURQJHQRXJKWRVXSSRUWLWIXOO\
loaded.
WATER SUPPLY TO THE ICE
MAKER (on some models)
,IWKHUHIULJHUDWRUKDVDQLFHPDNHULWZLOOKDYHWR
be connected to a cold water line. A water supply
kit (containing copper tubing, shutoff valve, fittings
and instructions) is available at extra cost from your
dealer, by visiting our Website at GEAppliances.
com (in Canada at geappliances.ca) or from Parts
and Accessories, 1.877.959.8688. See instructions
,QVWDOOLQJWKH:DWHU/LQH
If you have questions, call 1.800.GE.CARES or visit our Website at: GEAppliances.com.
In Canada, call 1.800.561.3344 or Visit our Website at: geappliances.ca
INSTALLATION INSTRUCTIONS
10 49-1000249 Rev. 0
Installation Instructions
INSTALLING THE WATER LINE (on some models)
BEFORE YOU BEGIN
Recommended copper water supply kits are WX8X2,
WX8X3 or WX8X4, depending on the amount of
tubing you need. Approved plastic water supply
lines are SmartConnect
™
Refrigerator Tubing
(WX08X10006, WX08X10015 and WX08X10025).
When connecting your refrigerator to a GE
Appliances Reverse Osmosis Water System, the only
DSSURYHGLQVWDOODWLRQLVZLWKD*($SSOLDQFHV59.LW
)RURWKHUUHYHUVHRVPRVLVZDWHUV\VWHPVIROORZWKH
manufacturer’s recommendations.
This water line installation is not warranted by the
UHIULJHUDWRURULFHPDNHUPDQXIDFWXUHU)ROORZWKHVH
LQVWUXFWLRQVFDUHIXOO\WRPLQLPL]HWKHULVNRIH[SHQVLYH
water damage.
Water hammer (water banging in the pipes) in house
plumbing can cause damage to refrigerator parts and
lead to water leakage or flooding. Call a qualified
plumber to correct water hammer before installing the
water supply line to the refrigerator.
To prevent burns and product damage, do not hook
up the water line to the hot water line.
,I\RXXVH\RXUUHIULJHUDWRUEHIRUHFRQQHFWLQJWKH
water line, make sure the ice maker power switch
LVLQWKH2))SRVLWLRQRQSRZHUVZLWFKPRGHOVRU
RSHUDWLQJDUPLVLQ2))SRVLWLRQ
'RQRWLQVWDOOWKHLFHPDNHUWXELQJLQDUHDVZKHUH
WHPSHUDWXUHVIDOOEHORZIUHH]LQJ
When using any electrical device (such as a power
drill) during installation, be sure the device is double
insulated or grounded in a manner to prevent the
KD]DUGRIHOHFWULFVKRFNRULVEDWWHU\SRZHUHG
All installations must be in accordance with local
plumbing code requirements.
WARNING
Connect to potable water supply
only.
WHAT YOU WILL NEED
• Copper or SmartConnect™ Refrigerator Tubing kit,
´RXWHUGLDPHWHUWRFRQQHFWWKHUHIULJHUDWRUWRWKH
ZDWHUVXSSO\,IXVLQJFRSSHUEHVXUHERWKHQGVRI
the tubing are cut square.
To determine how much tubing you need: measure
the distance from the water valve on the back of the
refrigerator to the water supply pipe. Then add 6’
(1.8 m). Be sure there is sufficient extra tubing (about
¶>P@FRLOHGLQWRWXUQVRIDERXW´>FP@
diameter) to allow the refrigerator to move out from
the wall after installation.
WHAT YOU WILL NEED (Cont.)
6PDUW&RQQHFW5HIULJHUDWRU7XELQJ.LWVDUHDYDLODEOH
in the following lengths:
8’ (2.4 m) – WX08X10006
15’ (4.6 m) – WX08X10015
25’ (7.6) m) – WX08X10025
Be sure that the kit you select allows at least 6’
(1.8 m) as described above.
NOTE: The only GE Appliances approved plastic
tubing is that supplied in SmartConnect™ Refrigerator
7XELQJNLWV'RQRWXVHDQ\RWKHUSODVWLFZDWHUVXSSO\
line because the line is under pressure at all times.
Certain types of plastic will crack or rupture with age
and cause water damage to your home.
• A GE Appliances water supply kit (containing tubing,
shutoff valve and fittings listed below) is available
at extra cost from your dealer or from Parts and
Accessories, 877.959.8688.
• A cold water supply. The water pressure must be
between 20 and 120 psi (138 – 827 kilopascals) on
models without a water filter and between 40 and
120 psi (275 – 827 kilopascals) on models with a
water filter.
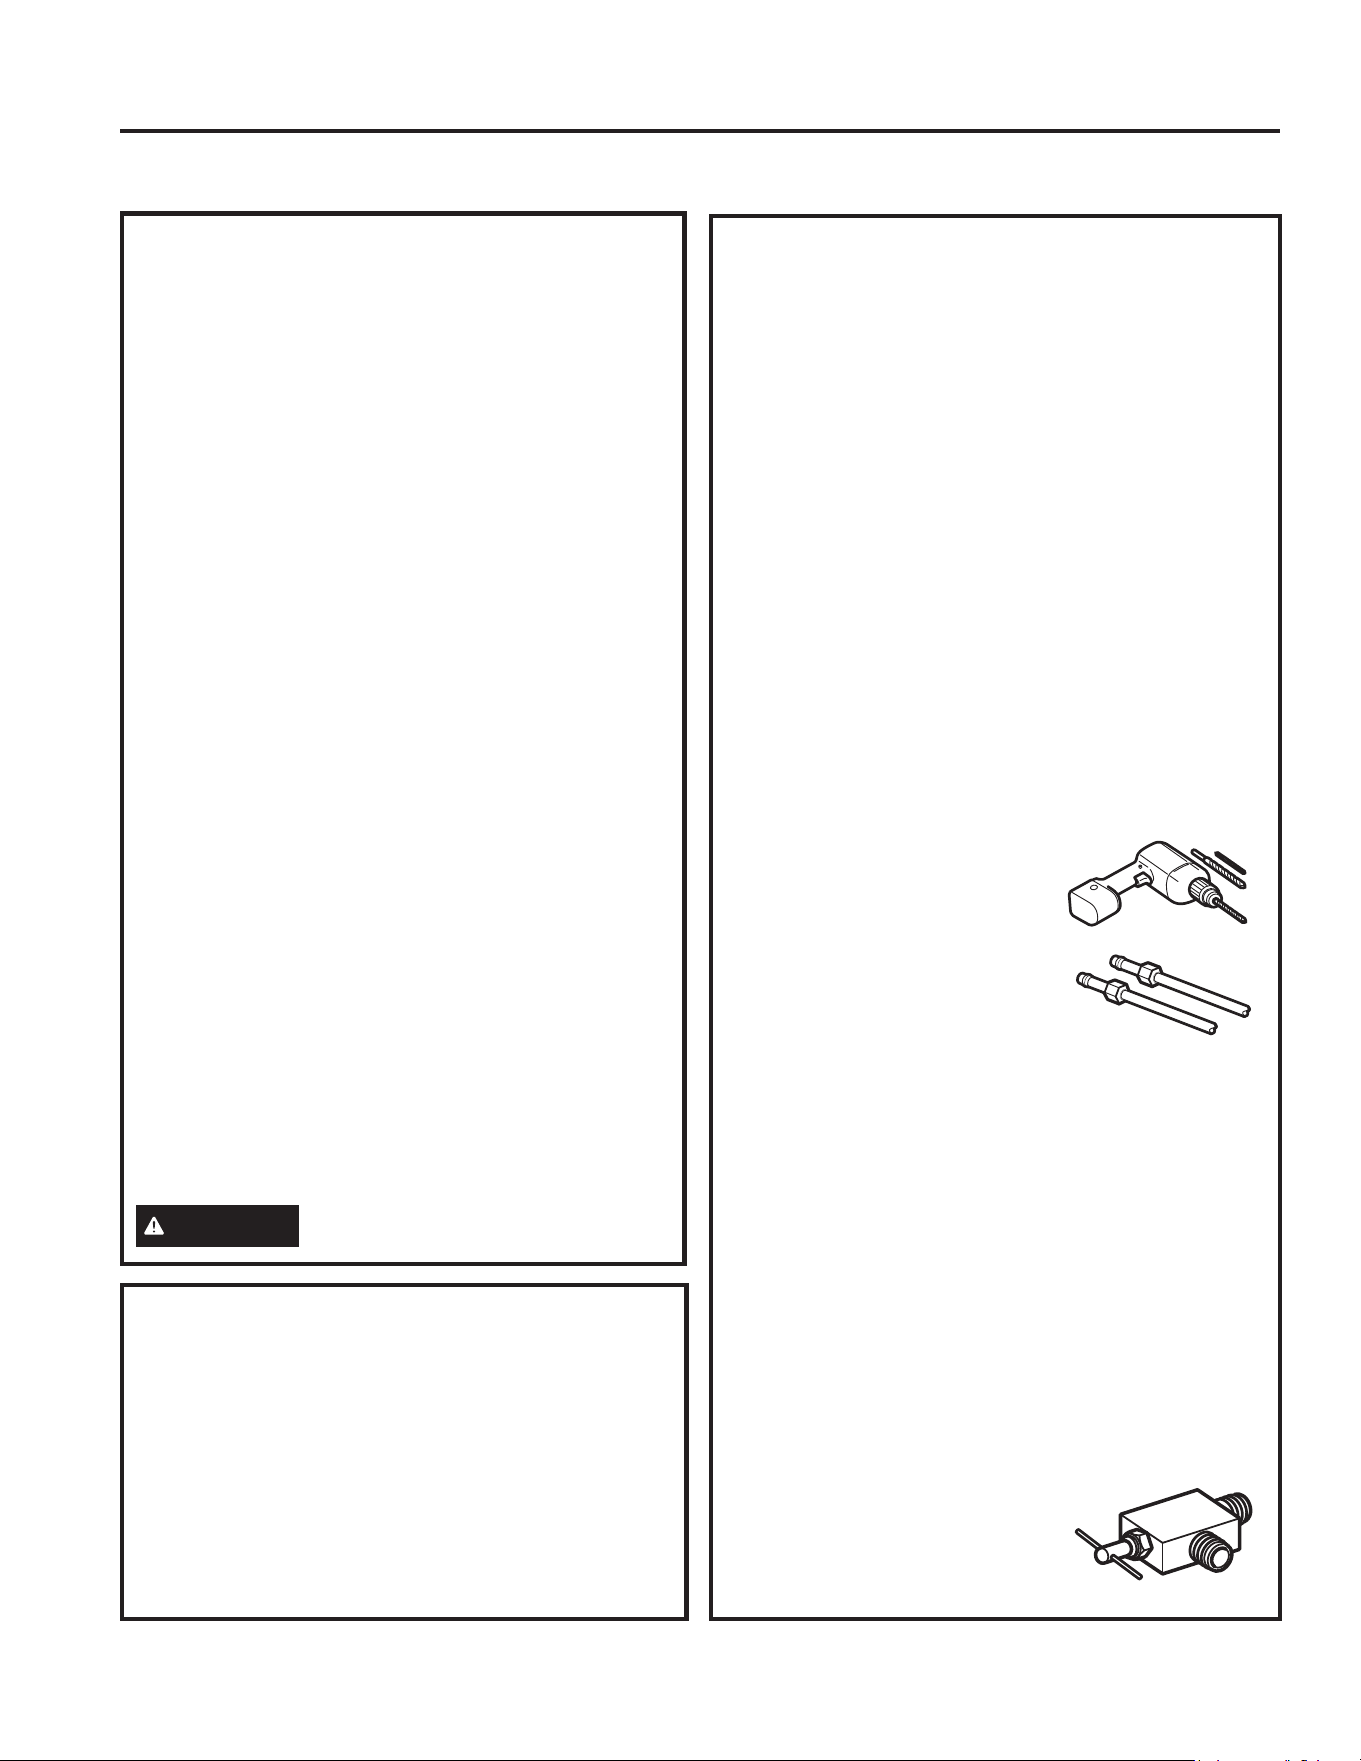
• Power drill.
´RUDGMXVWDEOHZUHQFK
• Straight and Phillips blade
screwdriver.
7ZR´RXWHUGLDPHWHU
compression nuts and 2 ferrules
VOHHYHV²WRFRQQHFWWKHFRSSHU
tubing to the shutoff valve and
the refrigerator water valve.
OR
,I\RXDUHXVLQJD6PDUW&RQQHFW5HIULJHUDWRU
Tubing kit, the necessary fittings are preassembled
to the tubing.
,I\RXUH[LVWLQJFRSSHUZDWHUOLQHKDVDIODUHGILWWLQJ
at the end, you will need an adapter (available at
plumbing supply stores) to connect the water line to
the refrigerator OR you can cut off the flared fitting
with a tube cutter and then use a compression
ILWWLQJ'RQRWFXWIRUPHGHQGIURP6PDUW&RQQHFW
Refrigerator tubing.
• Shutoff valve to connect to the cold water line.
The shutoff valve should have a water inlet with a
PLQLPXPLQVLGHGLDPHWHURI´DWWKHSRLQWRI
FRQQHFWLRQWRWKH&2/':$7(5/,1(6DGGOH
type shutoff valves are included in many water
supply kits. Before purchasing,
make sure a saddle-type valve
complies with your local plumbing
codes.
INSTALLATION INSTRUCTIONS
49-1000249 Rev. 0 11
INSTALLATION INSTRUCTIONS
Installation Instructions
INSTALLING THE WATER LINE (Cont.)
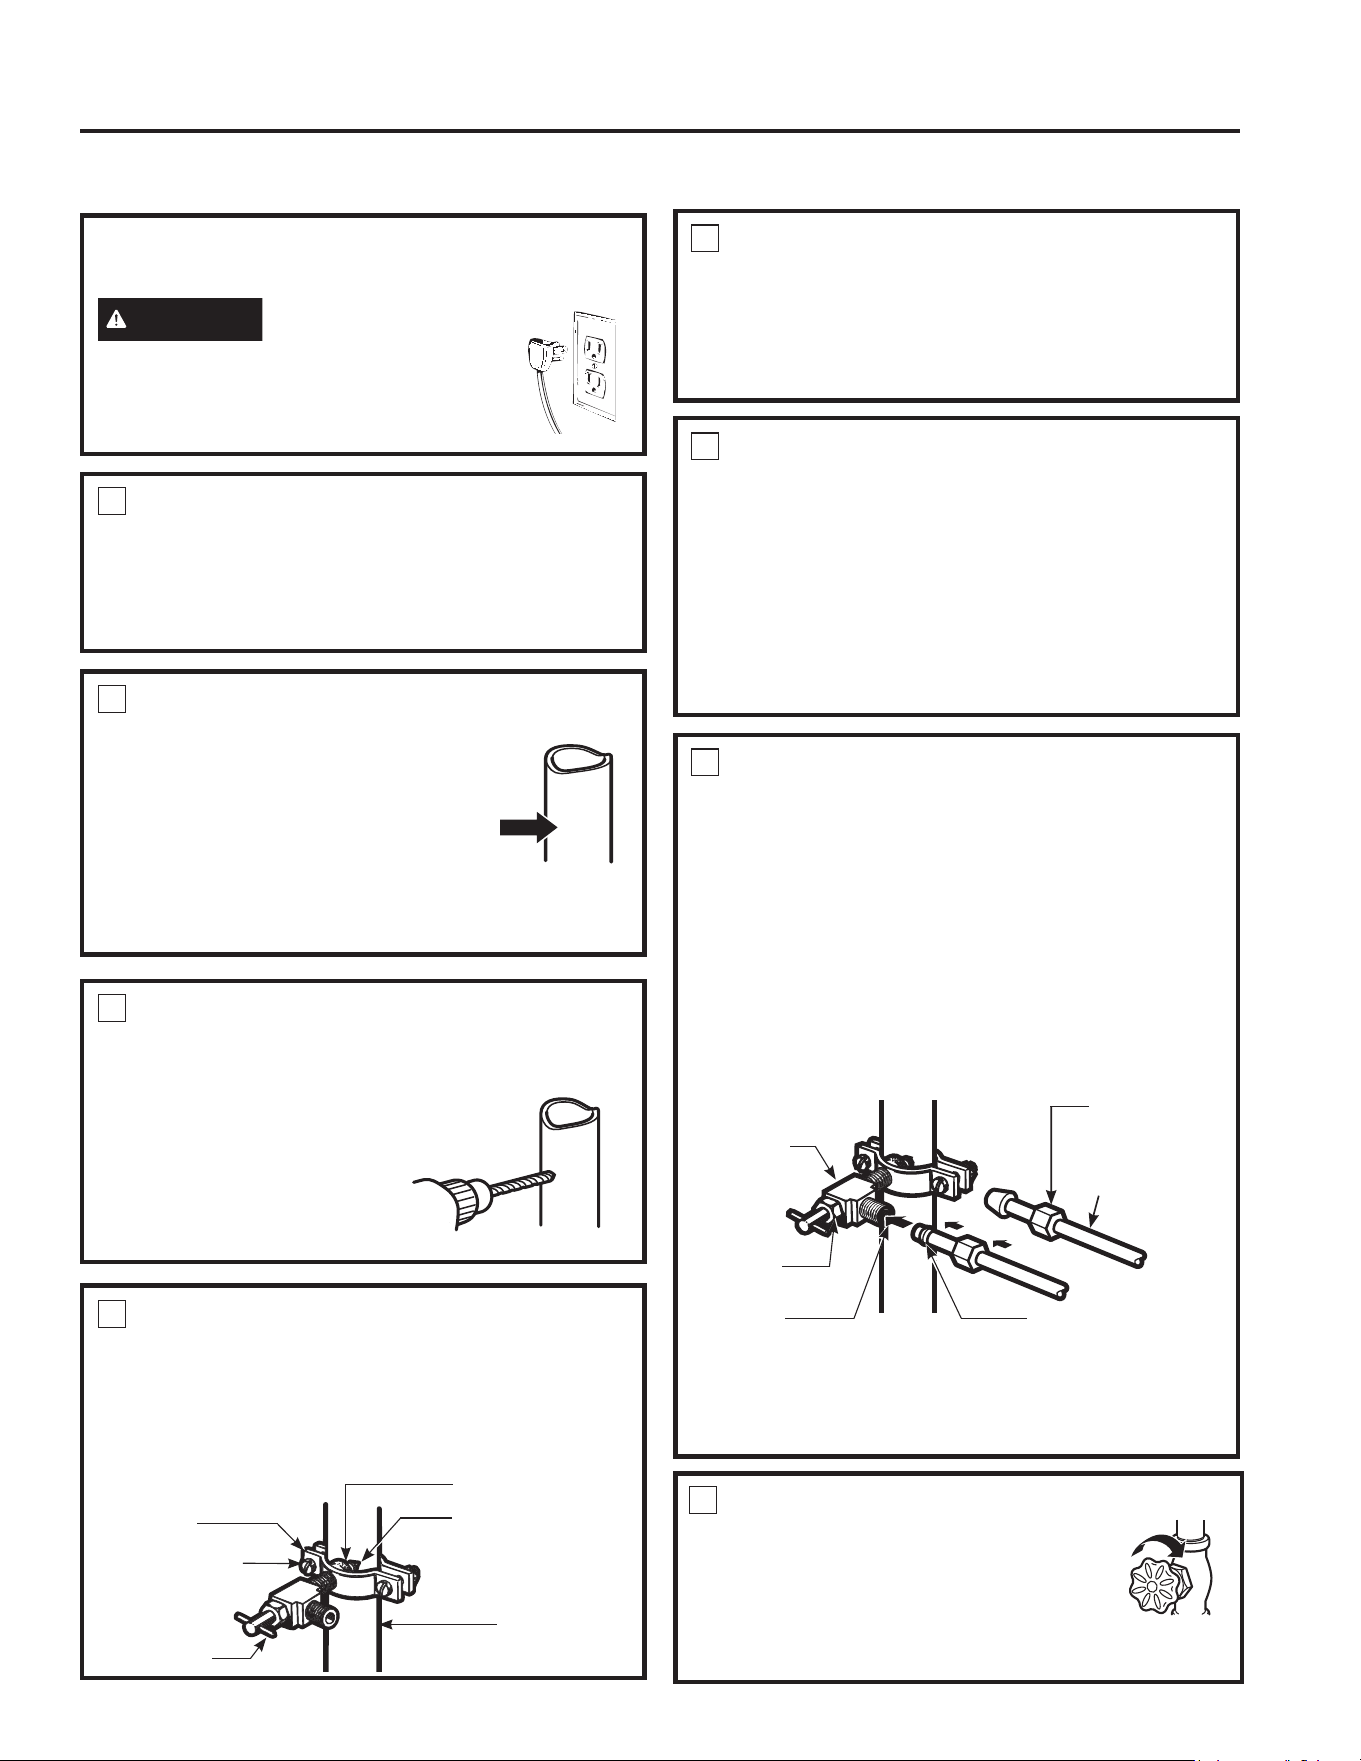
1
SHUT OFF THE MAIN WATER
SUPPLY AND UNPLUG
REFRIGERATOR
Turn on the nearest faucet (counterclockwise)
long enough to clear the line of water.
2
CHOOSE THE VALVE LOCATION
Choose a location for the valve that
LVHDVLO\DFFHVVLEOH,WLVEHVWWR
connect into the side of a vertical
water pipe. When it is necessary
WRFRQQHFWLQWRDKRUL]RQWDOZDWHU
pipe, make the connection to the
top or side, rather than at the
bottom, to avoid drawing off any
sediment from the water pipe.
5
ROUTE THE TUBING
Route the tubing between the cold water line and
the refrigerator.
Route the tubing through a hole drilled in the wall
or floor (behind the refrigerator or adjacent base
cabinet) as close to the wall as possible.
NOTE: Be sure there is sufficient extra tubing
(about 6 feet [1.82 m] coiled into 2 turns of about
´>FP@GLDPHWHUWRDOORZWKHUHIULJHUDWRUWR
move out from the wall after installation.
6
CONNECT THE TUBING TO THE
VALVE
Place the compression nut and ferrule (sleeve)
for copper tubing onto the end of the tubing and
connect it to the shutoff valve.
Make sure the tubing is fully inserted into the
valve. Tighten the compression nut securely.
)RUSODVWLFWXELQJIURPD6PDUW&RQQHFW
Refrigerator Tubing kit, insert the molded end
of the tubing into the shutoff valve and tighten
compression nut until it is hand tight, then tighten
one additional turn with a wrench. Overtightening
may cause leaks.
NOTE: Commonwealth of Massachusetts Plumbing
Codes 248CMR shall be adhered to. Saddle
valves are illegal and use is not permitted in
Massachusetts. Consult with your licensed plumber.
3
DRILL THE HOLE FOR THE VALVE
'ULOOD´KROHLQWKHZDWHUSLSHHYHQLIXVLQJD
self-piercing valve), using a sharp bit. Remove any
burrs resulting from drilling
the hole in the pipe. Take
care not to allow water to
GUDLQLQWRWKHGULOO)DLOXUHWR
GULOOD´KROHPD\UHVXOW
in reduced ice production or
smaller cubes.
4
FASTEN THE SHUTOFF VALVE
)DVWHQWKHVKXWRIIYDOYHWRWKHFROGZDWHUSLSH
with the pipe clamp.
Tighten the clamp screws until the sealing washer
begins to swell.
NOTE: 'RQRWRYHUWLJKWHQRU\RXPD\FUXVKWKH
tubing.
4
FASTEN THE SHUTOFF VALVE
(Cont.)
NOTE: Commonwealth of Massachusetts Plumbing
Codes 248CMR shall be adhered to. Saddle
valves are illegal and use is not permitted in
Massachusetts. Consult with your licensed plumber.
Washer
,QOHW(QG
Clamp
Screw
Vertical Cold
Water Pipe
Saddle-Type
6KXWRႇ9DOYH
Pipe Clamp
Saddle-Type
6KXWRႇ9DOYH
Compression
Nut
SmartConnect
™
Tubing
Packing Nut
Outlet Valve
)HUUXOHVOHHYH
7
FLUSH OUT THE TUBING
Turn the main water supply on
(counterclockwise) and flush out the
tubing until the water is clear.
Shut the water off at the water valve
after about one quart (1 liter) of water
has been flushed through the tubing.
BEFORE YOU BEGIN
Read these instructions completely and carefully.
WARNING
To reduce the risk of
electric shock or injury during installation,
you must first unplug the refrigerator
before proceeding.
12 49-1000249 Rev. 0
Installation Instructions
INSTALLING THE WATER LINE (Cont.)
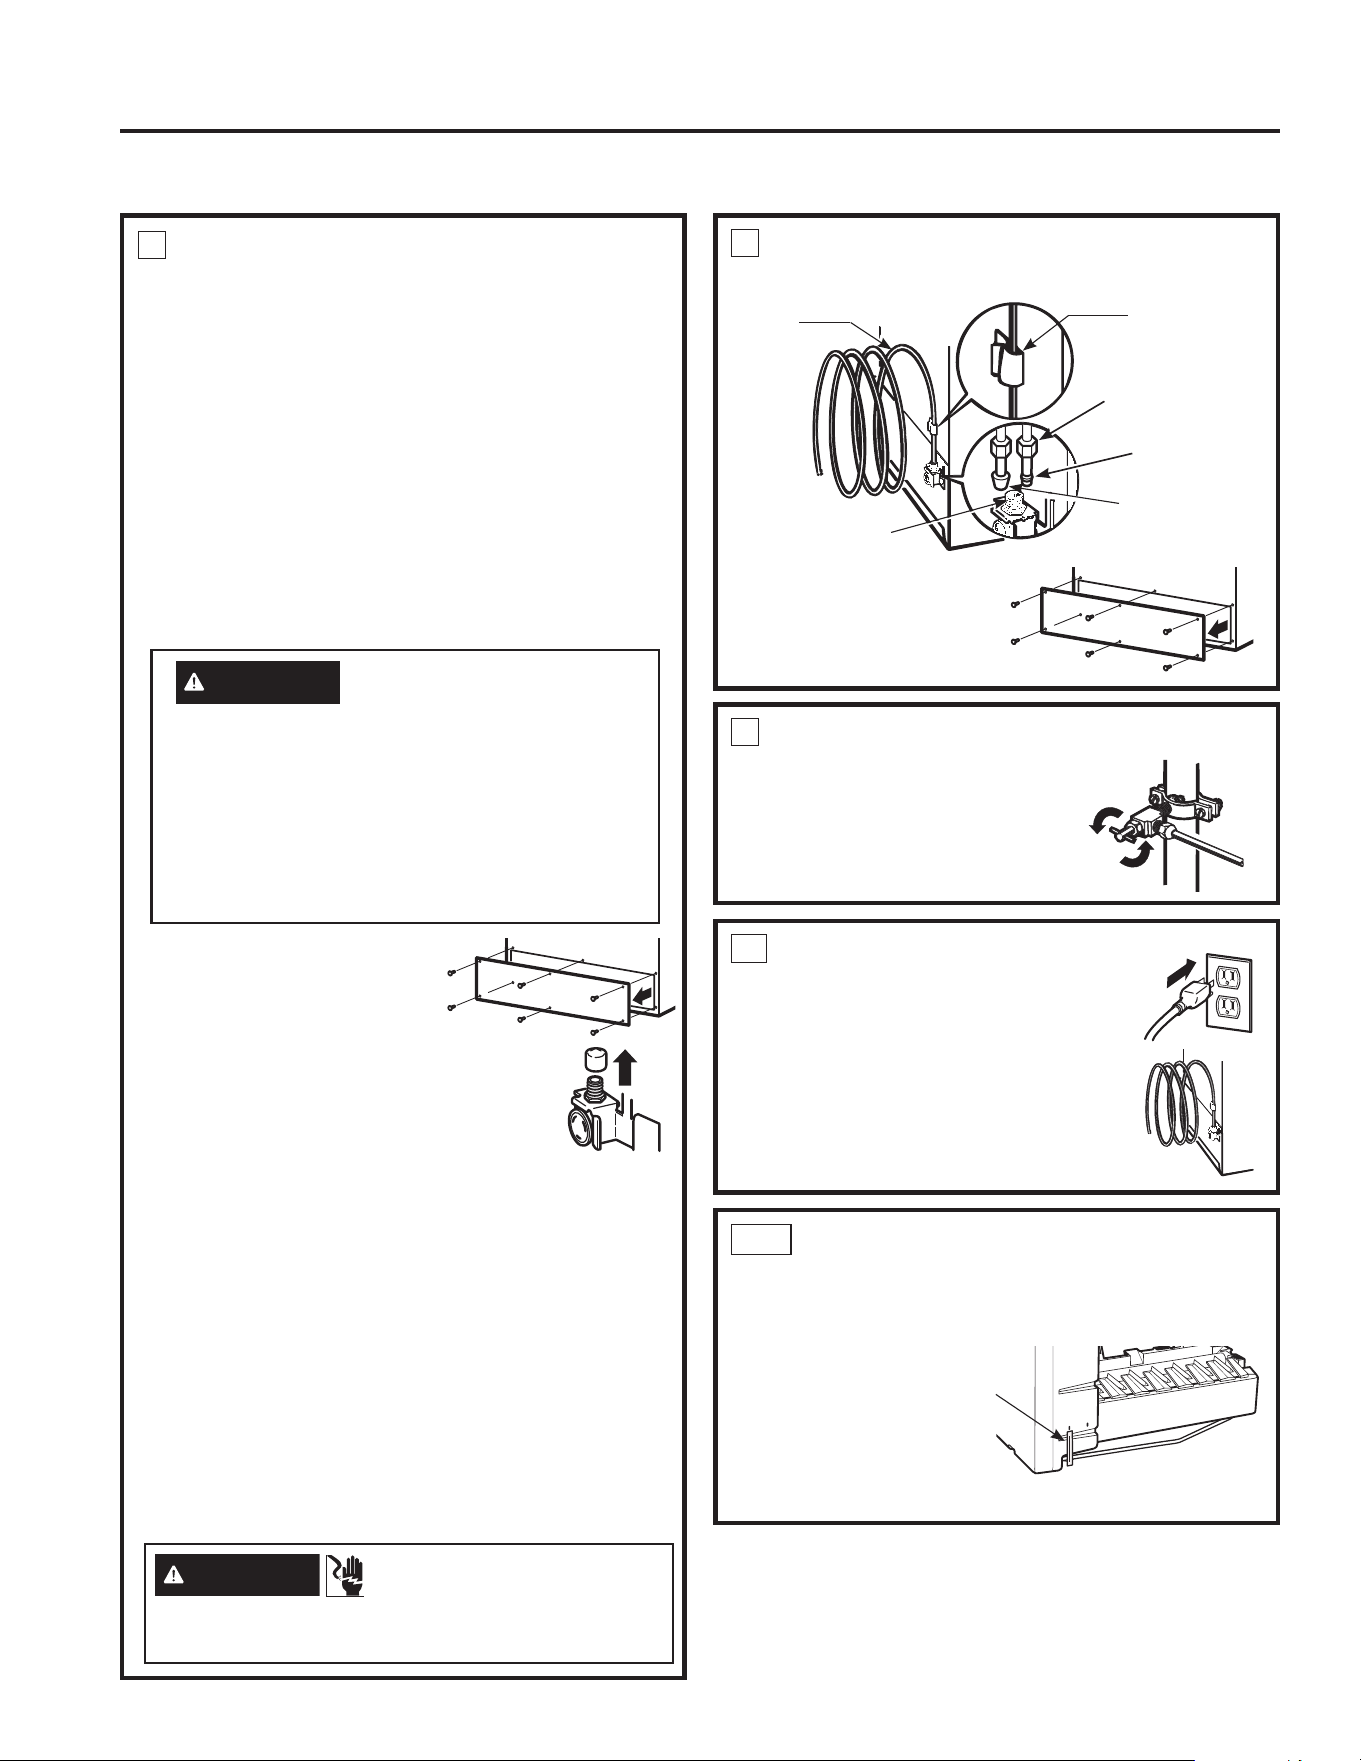
8
CONNECT THE TUBING TO THE
REFRIGERATOR
NOTES:
• Before making the connection to the
refrigerator, be sure the refrigerator power cord
is not plugged into the wall outlet.
• We recommend installing a water filter
(GXRLQ, available on gewaterfilters.com
or 877.959.8688) if your water supply has
sand or particles that could clog the screen
RIWKHUHIULJHUDWRU¶VZDWHUYDOYH,QVWDOOLWLQ
WKHZDWHUOLQHQHDUWKHUHIULJHUDWRU,IXVLQJ
SmartConnect™ Refrigerator Tubing kit, you
will need an additional tube (WX08X10002)
WRFRQQHFWWKHILOWHU'RQRWFXWSODVWLFWXEHWR
install filter.
WARNING
To reduce the risk of death
or electric shock, you must follow these
instructions:
Ŷ Unplug the refrigerator before removing
any panels.
Ŷ Do not damage any wiring while the panel
is removed.
Ŷ Replace all parts and panels before
plugging the refrigerator back in.
• Remove the access
cover.
• Remove the plastic
flexible or screw cap
from the water valve
(refrigerator connection) and
discard.
• Place the compression nut and
ferrule (sleeve) onto the end
of the tubing as shown. On
SmartConnect™ Refrigerator Tubing kit, the
nuts are already assembled to the tubing.
,QVHUWWKHHQGRIWKHWXELQJLQWRWKHZDWHUYDOYH
connection as far as possible. While holding
the tubing, tighten the fitting.
)RUSODVWLFWXELQJIURPD6PDUW&RQQHFW
Refrigerator Tubing kit, insert the molded
end of the tubing into the shutoff valve and
tighten compression nut until it is hand tight,
then tighten one additional turn with a wrench.
Overtightening may cause leaks.
)DVWHQWKHWXELQJLQWRWKHFODPSSURYLGHGWRKROG
it in a vertical position. You may need to pry open
the clamp.
9
TURN THE WATER ON AT THE
SHUTOFF VALVE
Tighten any connections that
leak.
8
CONNECT THE TUBING TO THE
REFRIGERATOR (Cont.)
• Reattach the access
cover.
Tubing
Clamp
´
Compression
Nut
)HUUXOH
(sleeve)
SmartConnect
™
Tubing
Refrigerator
Connection
´
Copper
Tubing
10
INSTALLING THE
REFRIGERATOR
Plug in the refrigerator.
Arrange the coil of tubing so that it
does not vibrate against the back of
the refrigerator or against the wall.
Push the refrigerator back to the
wall.
11
START THE ICE MAKER
Set the ice maker power switch to the 0N
position. The ice maker will not begin
to operate until it reaches its operating
temperature
RI)
(–9°C) or
EHORZ,WZLOO
then begin
operation
automatically.
ON
OFF
Power
switch
Power switch model
WARNING
ELECTRIC SHOCK
HAZARD
Attach tubing clamp using existing hole only.
'2127GULOOLQWRWKHUHIULJHUDWRU
INSTALLATION INSTRUCTIONS

49-1000249 Rev. 0 13
INSTALLATION INSTRUCTIONS
Installation Instructions
INSTALLING THE DOOR HANDLE
1
INSTALL FASTENER
,QVWDOOWKHKDQGOH
fastener into the hole
RQWKHIUHH]HUDQG
fresh food doors. The
fasteners correspond
with the handle side
(the side opposite the
hinge).
2A
PLASTIC HANDLE
$WWDFKKDQGOHWRIUHH]HUGRRUE\VOLGLQJ
handle up onto fastener and with screws at
the bottom of the handle.
2. Attach handle to fresh food door by sliding
handle down onto fastener and with screws at
top of handle.
2
STAINLESS STEEL HANDLE
$WWDFKKDQGOHWRIUHH]HUGRRUZLWKVFUHZVDW
WKHERWWRPRIWKHKDQGOH8VHWKHLQFOXGHG´
allen wrench to tighten the set screw at the top
of the handle. Tighten until handle is locked
firmly into position.
2. Attach handle to fresh food door with screws
DWWKHWRSRIWKHKDQGOH8VHWKHLQFOXGHG´
allen wrench to tighten the set screw at the
bottom of the handle. Tighten until handle is
locked firmly into position.
3
BADGE AND PLUG BUTTON
INSTALLATION
1. Place a plug button on the opposite side of the
fresh food door across from the handle.
2. Remove the backing on the GE Appliances
badge and carefully place it in the hole
RSSRVLWHWKHKDQGOHRQWKHIUHH]HUGRRU%H
sure the badge is oriented the correct way
before applying it to the door.
+DQGOH)DVWHQHU
NOTE: Be sure to
UHPRYH¿OPEHIRUH
handle installation,
if applicable
NOTE: Be sure to remove
¿OPEHIRUHKDQGOHLQVWDOODWLRQ
if applicable)
Plug
button
Badge
14 49-1000249 Rev. 0
REVERSING THE DOOR SWING
Installation Instructions
1
BEFORE YOU START
8QSOXJWKHUHIULJHUDWRUIURPLWVHOHFWULFDO
outlet.
1.2 Empty all door shelves, including the dairy
compartment.
CAUTION
'RQRWOHWHLWKHUGRRUGURSWRWKH
floor. To do so could damage the door stop.
2
REMOVE THE FREEZER DOOR
2.1 Tape the
door shut with
masking tape.
2.2 Remove the
screws that
hold the top
hinge to the
cabinet.
2.3 Lift the hinge
straight up to free
the hinge pin from
the socket in the top
of the door and set
it aside, along with
its screws.
2.4 Remove the tape.
Lift it off the center
hinge pin.
2.5 Set the door on a non-scratching surface with
the outside up.
2.6 Transfer the 2 screws from the opposite side
of the cabinet to the screw holes vacated by
the top hinge removal.
TOOLS REQUIRED
IMPORTANT NOTES:
When reversing the door swing:
• Read the instructions all the way through before
starting.
• Handle parts carefully to avoid scratching paint.
• Set screws down by their related parts to avoid
losing them.
• Provide a non-scratching work surface for the doors.
IMPORTANT: Once you begin, do not move the
cabinet until door-swing reversal is completed.
These instructions are for changing the hinges from
WKHULJKWVLGHWRWKHOHIWVLGH²LI\RXHYHUZDQWWR
change the hinges back to the right side, follow these
same instructions and reverse all references to left
and right.
CAUTION
Lifting Hazard
7KHIUHVKIRRGDQGIUHH]HUGRRUVDUHKHDY\8VHERWK
hands to secure the doors before lifting.
Phillips screwdriver
Masking tape
´KH[KHDG
socket driver
(optional)
´RSHQHQG
wrench (optional)
Putty knife or
thin-blade screwdriver
(optional)
Allen wrench (Stainless
Steel Handle Models)
Top Hinge
WARNING
)ROORZDOOVWHSVZKHQUHYHUVLQJ
WKHGRRUVZLQJ)DLOXUHWRIROORZWKHVHLQVWUXFWLRQV
leaving off parts, or overtightening screws, can lead
to the door falling off and result in injury and property
damage.
INSTALLATION INSTRUCTIONS
49-1000249 Rev. 0 15
INSTALLATION INSTRUCTIONS
Installation Instructions
REVERSING THE DOOR SWING (Cont.)
3
REMOVE THE FRESH FOOD
DOOR
3.1 Tape the door shut
with masking tape.
8QVFUHZWKHFHQWHU
hinge pin and remove
it from its socket. Be
careful not to lose
the center hinge and
washer.
3.3 Remove the tape and tilt the door away from
the cabinet. Lift the door from the pin in the
ERWWRPKLQJH,IWKHSODVWLFZDVKHUVWLFNVWR
the door bottom, put it back on the hinge.)
3.4 Set the door outside-up on a non-scratching
surface.
4
REVERSING THE HARDWARE
,QWHUFKDQJHWKHKLQJHDQGVFUHZVDWWRS
ULJKWZLWKVFUHZVDWWRSOHIWRIFDELQHW'RQRW
tighten screws on hinge side.
NOTE: Some hinges have 4 holes. Which
holes you use for installing depends on which
side you install the hinge.
The outer edge of the hinge should be
parallel to the edge of the case for correct
installation.
4.2 Remove the three screws holding the center
hinge to the cabinet.
4.3 Transfer the three screws from the opposite
side of the cabinet to the screw holes vacated
by the center hinge removal.
4.4 Reattach the center hinge with all three
screws on the left side of the cabinet.
NOTE: The center hinge must be turned over
as shown when mounted on the left side.
4.5 Remove the screws holding the bottom hinge
to the cabinet. Move the bottom hinge from
the right to left side of the cabinet. Switch the
hinge pin to the opposite side of the hinge
and reinsert the screws.
Center
Hinge Pin
Washer
Plastic
Washer
Hinge
Pin
Hinge
Pin
Plastic
Washer
Hinge
Bracket
Hinge
Bracket
Switch the
hinge pin to the
opposite side of
the bracket.
WARNING
)ROORZDOOVWHSVZKHQUHYHUVLQJ
WKHGRRUVZLQJ)DLOXUHWRIROORZWKHVHLQVWUXFWLRQV
leaving off parts, or overtightening screws, can lead
to the door falling off and result in injury and property
damage.

16 49-1000249 Rev. 0
Installation Instructions
REVERSING THE DOOR SWING (Cont.)
5
REVERSING THE DOOR
HANDLES
STAINLESS STEEL HANDLE
5.1a. Remove handle screws from the top of
fresh food door. Remove handle screws
IURPWKHERWWRPRIIUHH]HUGRRU
5.2a. Loosen set screw on handle with the
SURYLGHG´ZUHQFK
5.3a. Remove door handle.
5.4a. Change places between the handle fastener
and plug button on door front.
5.5a. Move the plug buttons on top and front of
the door to fill the now vacant holes.
5.6a. Transfer the door stop on the bottom of the
door.
5.7a. Attach handle to fresh food door with
VFUHZVDWWRSRIKDQGOH8VH´DOOHQ
wrench to tighten set screw at bottom of
handle.
D$WWDFKKDQGOHWRIUHH]HUGRRUZLWKVFUHZV
DWERWWRPRIKDQGOH8VHWKHSURYLGHG´
allen wrench to tighten set screw at top of
handle.
D$WWDFKEDGJHRQIUHH]HUGRRURSSRVLWHWKH
handle.
5
REVERSING THE DOOR
HANDLES (Cont.)
PLASTIC HANDLE ASSEMBLY
5.1b. Remove handle screws from the top of
fresh food door. Remove handle screws
IURPWKHERWWRPRIIUHH]HUGRRU
5.2b. Remove door handle on fresh food door
by sliding the handle up off of the fastener.
5HPRYHGRRUKDQGOHRQIUHH]HUGRRUE\
sliding the handle down off of the fastener.
5.3b. Change places between the handle fastener
and plug button on door front.
5.4b. Move the plug buttons on top and front of
the door to fill the now vacant holes.
5.5b. Transfer the door stop on the bottom of the
door.
5.6b. Attach handle to fresh food door by sliding
handle down onto fastener and with screws
at top of handle.
E$WWDFKKDQGOHWRIUHH]HUGRRUE\VOLGLQJ
handle up onto fastener and with screws at
bottom of handle.
E$WWDFKEDGJHRQIUHH]HUGRRURSSRVLWHWKH
handle.
'RRU
Stop
'RRU
Stop
INSTALLATION INSTRUCTIONS
49-1000249 Rev. 0 17
INSTALLATION INSTRUCTIONS
Installation Instructions
REVERSING THE DOOR SWING (Cont.)
6
RE-HANGING THE DOORS
6.1 Re-hang the fresh food door
6.1.1 Lower the fresh food door onto the
bottom hinge pin. Be sure the washer is
in place on the pin.
6.1.2 Tilt the door towards the cabinet. As
the door is brought into position, align
the socket in the door with the hole
in the center hinge. Place the center
hinge pin into the hole in the center
hinge and tighten. Make sure the
washer is on the top of the hinge pin.
6
RE-HANGING THE DOORS (CO
6.1 Re-hang the fresh food door
/RZHUWKHIUHH]HUGRRURQWRWKHFHQWHU
hinge pin. Be sure the washer is in
place on the pin.
6.2.2 Tilt the door towards the cabinet, lifting
the top hinge so the pin fits into the
socket on the top of the door.
6.2.3 Make sure the door is slightly above
the top of the cabinet and the gap
between the doors is even across the
IURQW7LJKWHQWKHWRSKLQJHVFUHZV'R
not over-tighten these screws. Tighten
them until they are just snug, and then
turn them another one-half turn.
Plastic
Washer
Hinge
Pin
Hinge
Pin with
Washer
Center
Hinge
Hinge
Pin
Plastic
Washer
Top
Hinge
Hinge
Gap

18 49-1000249 Rev. 0
Normal Operating Sounds
Ŷ The new high
efficiency compressor
may run faster and
longer than your old
refrigerator and you may hear a high-pitched hum
or pulsating sound while it is operating.
Ŷ You may hear a whooshing sound when the doors
FORVH7KLVLVGXHWRSUHVVXUHHTXDOL]LQJZLWKLQWKH
refrigerator.
Newer refrigerators sound different from older refrigerators. Modern refrigerators have more features and use newer
technology.
Ŷ You may hear the fans spinning at high
speeds.
This happens when the refrigerator
is first plugged in, when the doors
are opened frequently or when a
large amount of food is added to the
UHIULJHUDWRURUIUHH]HUFRPSDUWPHQWV
The fans are helping to maintain the
correct temperatures.
&/,&.63236
&5$&.6DQG&+,536
Ŷ You may hear cracking or popping sounds when
the refrigerator is first plugged in. This happens as
the refrigerator cools to the correct temperature.
Ŷ The compressor may cause a clicking or chirping
sound when attempting to restart (this could take
up to 5 minutes).
Ŷ Expansion and contraction of cooling coils during
and after defrost can cause a cracking or popping
sound.
Ŷ On models with an ice maker, after an ice making
cycle, you may hear the ice cubes dropping into the
ice bucket.
:$7(56281'6
Ŷ 7KHIORZRIUHIULJHUDQWWKURXJKWKHIUHH]HUFRROLQJFRLOV
may make a gurgling noise like boiling water.
Ŷ Water dropping on the defrost heater can cause a
VL]]OLQJSRSSLQJRUEX]]LQJVRXQGGXULQJWKHGHIURVW
cycle.
Ŷ A water dripping noise may occur during the defrost
cycle as ice melts from the evaporator and flows into
the drain pan.
Ŷ Closing the door may cause a gurgling sound due to
SUHVVXUHHTXDOL]DWLRQ
Do you hear what I hear? These sounds are normal.
HUMMM...
WHOOSH...
TROUBLESHOOTING TIPS: Normal Operating Sounds

49-1000249 Rev. 0 19
TROUBLESHOOTING TIPS
Troubleshooting Tips... Before you call for service
6DYHWLPHDQGPRQH\5HYLHZWKHFKDUWVRQWKHIROORZLQJSDJHVILUVWDQG\RXPD\QRWQHHGWRFDOOIRUVHUYLFH,I
needed, service can be scheduled by visiting us online GEAppliances.com or calling 800.GECARES 800.432.2737.
,Q&DQDGDYLVLWGEAppliances.ca or call 800.561.3344.
Truth or Myth
Truth or Myth? Answer Explanation
The automatic ice maker in
my refrigerator will produce ice
when the refrigerator is plugged
in to a power receptacle.
MYTH The refrigerator must be connected to water, and the ice maker must be turned on.
Make sure the ice maker is turned on, only after the water line is connected and water is
WXUQHGRQ7KHLFHPDNHUFDQEHWXUQHGRIIE\VZLWFKLQJLWWRWKH2))SRVLWLRQ
7KHIUHH]HUPXVWEHGHJUHHVRUFROGHUEHIRUHWKHLFHPDNHUZLOOSURGXFHLFH3OHDVH
allow at least 24 hours for the refrigerator to pull down and the unit’s temperature to
VWDELOL]H
,ZLOOQHYHUVHHIURVWLQVLGHWKH
IUHH]HUFRPSDUWPHQW
MYTH )URVWLQVLGHWKHIUHH]HUW\SLFDOO\LQGLFDWHVWKDWWKHGRRULVQRWSURSHUO\VHDOHGRUKDV
EHHQOHIWRSHQ,IIURVWLVIRXQGFOHDUWKHIURVWXVLQJDSODVWLFVSDWXODDQGWRZHOWKHQ
FKHFNWRHQVXUHWKDWQRIRRGSDFNDJHVRUFRQWDLQHUVDUHSUHYHQWLQJWKHIUHH]HUGRRU
from closing. To help reduce to the potential for frost please make sure there is proper
FOHDUDQFHWRWKHDLUVXSSO\DQGYHQWVLQWKHIUHH]HUWRLPSURYHFLUFXODWLRQ$OZD\VFRYHU
food before loading into the refrigerator, moisture from open containers can add to the
frost load.
Refrigerator door handles can
be easily tightened.
758( ,IGRRUKDQGOHVDUHORRVHRUKDYHDJDSWKHKDQGOHFDQEHDGMXVWHGZLWKVHWVFUHZV
located on the ends of the handles.
After starting the ice maker
throw away 24 hours of ice
production.
758( To avoid issues with odor and taste the first batch of ice should be discarded
'RRUUHPRYDOLVDOZD\VUHTXLUHG
for installation.
MYTH 'RRUVVKRXOGRQO\EHUHPRYHGZKHQQHFHVVDU\WRSUHYHQWGDPDJHIURPSDVVDJHZD\RU
DFFHVVWRILQDOORFDWLRQ,IGRRUVDUHUHPRYHGSOHDVHUHYLHZ5HYHUVLQJWKH'RRU6ZLQJ
section for re-hang procedure.
There is an adjustment to rear
wheels.
MYTH )URQWOHYHOLQJOHJVDUHDGMXVWDEOHDQGVKRXOGEHXVHGWREDODQFHWKHUHIULJHUDWRU
Leveling legs are used to make initial fresh food door adjustment. There should be
DSSUR[LPDWHO\Dó´IDOOIURPWKHIURQWWREDFNWRHQVXUHWKDWWKHGRRUVDOZD\VFORVH
Any All-Purpose cleaner can be
used to clean my refrigerator.
MYTH All-purpose cleaners are not recommended for use on the refrigerator.
'RQRWXVHZD[SROLVKDPPRQLDEOHDFKRURWKHUSURGXFWVFRQWDLQLQJFKORULQHRQ
IRUDQ\VXUIDFHV&OHDQZLWKDFORWKGDPSHQHGZLWKVRDS\ZDWHU'U\ZLWKDVRIWFORWK
The stainless steel doors can be cleaned with a commercially available stainless steel
FOHDQHU&OHDQHUVZLWKR[DOLFDFLGVXFKDV%DU.HHSHUV)ULHQG6RIW&OHDQVHUZLOO
UHPRYHVXUIDFHUXVWWDUQLVKDQGVPDOOEOHPLVKHV8VHRQO\DOLTXLGFOHDQVHUIUHHRIJULW
DQGUXELQWKHGLUHFWLRQRIWKHEUXVKOLQHVZLWKDGDPSVRIWVSRQJH'RQRWXVHDSSOLDQFH
wax or polish on the stainless steel.
Gaskets will last longer
with regular cleaning and
maintenance.
758( Clean gaskets with warm soapy water. Make sure all folds are clean and dry after
cleaning. Make sure flanges are clear of any grit or grime. After cleaning the door
gaskets, apply paraffin wax or petroleum jelly to the door gaskets and hinges at the hinge
side. This helps keep the gaskets from sticking and bending out of shape.
'RRUVPD\EHVKLSSHGZLWK
SURWHFWLYH¿OPWKDWKDVWREH
removed before use.
758( 6PRRWK¿QLVKHGGRRUV6WDLQOHVV6ODWH*ORVV%ODFNDQG*ORVV:KLWHRU6LOYHU0HWDOOLF
ZLOOKDYHDFOHDUSODVWLF¿OPRQWKHGRRUWKDWPXVWEHUHPRYHGDIWHULQVWDOO
+DYHPRUHTXHVWLRQV")RUPRUHLQIRUPDWLRQRQ\RXUUHIULJHUDWRURURWKHU*(DSSOLDQFHVSOHDVHYLVLWgeappliances.com/videos

20 49-1000249 Rev. 0
Notes
49-1000249 Rev. 0 21
LIMITED WARRANTY
Staple your receipt here. Proof of the original purchase
date is needed to obtain service under the warranty.
Refrigerator Limited Warranty
For US Customers, DOOZDUUDQW\VHUYLFHSURYLGHGE\RXU)DFWRU\6HUYLFH&HQWHUVRUDQDXWKRUL]HG&XVWRPHU&DUH
®
technician. To schedule service, on-line, 24 hours a day, visit us at GEAppliances.com, or call 800.GE.CARES
(800.432.2737). Please have serial number and model number available when calling for service.
In Canada, call 800.561.3344.
Servicing your appliance may require the use of the onboard data port for diagnostics. This gives a GE Appliances factory
service technician the ability to quickly diagnose any issues with your appliance and helps GE Appliances improve its
SURGXFWVE\SURYLGLQJ*($SSOLDQFHVZLWKLQIRUPDWLRQRQ\RXUDSSOLDQFH,I\RXGRQRWZDQW\RXUDSSOLDQFHGDWDWREH
sent to GE Appliances, please advise your technician not to submit the data to GE Appliances at the time of service.
Ŷ Service trips to your home to teach you how to
use the product.
Ŷ Improper installation, delivery or maintenance.
Ŷ Failure of the product if it is abused, misused, or
used for other than the intended purpose or used
commercially.
Ŷ Loss of food due to spoilage.
Ŷ Replacement of house fuses or resetting of circuit
breakers.
Ŷ Damage caused after delivery.
Ŷ Replacement of the water filter cartridge, if
included, due to water pressure that is outside
the specified operating range or due to excessive
sediment in the water supply.
Ŷ Replacement of the light bulbs, if included, or
water filter cartridge, if included, other than as
noted above.
Ŷ Damage to the product caused by accident, fire,
floods or acts of God.
Ŷ Incidental or consequential damage caused by
possible defects with this appliance.
Ŷ Product not accessible to provide required service.
Ŷ Damage caused by a non-GE Brand water filter.
Ŷ Damage to finish, such as surface rust, tarnish, or
small blemishes not reported within 48 hours of
delivery.
Ŷ Products which are not defective, broken, or which
are working as described in the owner’s manual.
Ŷ'DPDJHFDXVHGE\UXQQLQJWKHLFHPDNHUZLWKQR
water supply to unit.
What is Not Covered:
For US Customers: This limited warranty is extended to the original purchaser and any succeeding owner for
SURGXFWVSXUFKDVHGIRUKRPHXVHZLWKLQWKH86$,IWKHSURGXFWLVORFDWHGLQDQDUHDZKHUHVHUYLFHE\D*(
$SSOLDQFHV$XWKRUL]HG6HUYLFHULVQRWDYDLODEOH\RXPD\EHUHVSRQVLEOHIRUDWULSFKDUJHRU\RXPD\EHUHTXLUHG
WREULQJWKHSURGXFWWRDQ$XWKRUL]HG*($SSOLDQFHV6HUYLFHORFDWLRQIRUVHUYLFH,Q$ODVNDWKHOLPLWHGZDUUDQW\
excludes the cost of shipping or service calls to your home.
Some states do not allow the exclusion or limitation of incidental or consequential damages. This limited warranty
gives you specific legal rights, and you may also have other rights which vary from state to state. To know what your
legal rights are, consult your local or state consumer affairs office or your state’s Attorney General.
Warrantor US: GE Appliances, a Haier company
Louisville, KY 40225
EXCLUSION OF IMPLIED WARRANTIES—Your sole and exclusive remedy is product repair as
provided in this Limited Warranty. Any implied warranties, including the implied warranties of
merchantability or fitness for a particular purpose, are limited to one year or the shortest period
allowed by law.
For the Period of: GE Appliances Will Replace
One Year
)URPWKHGDWHRIWKH
original purchase
Any part of the refrigerator which fails due to a defect in materials or workmanship.
'XULQJWKHlimited one-year warranty, GE Appliances will also provide, free of
charge, all labor and related service to replace the defective part.
Thirty Days
(Water filter, if included)
)URPWKHRULJLQDOSXUFKDVH
date of refrigerator
Any part of the water filter cartridge which fails due to a defect in materials or
ZRUNPDQVKLS'XULQJWKLV limited thirty-day warranty, GE Appliances will also
provide, free of charge, a replacement water filter cartridge.
For Customers in Canada: This limited warranty is extended to the original purchaser and any succeeding owner
IRUSURGXFWVSXUFKDVHGLQ&DQDGDIRUKRPHXVHZLWKLQ&DQDGD,QKRPHZDUUDQWVHUYLFHZLOOEHSURYLGHGLQDUHDV
ZKHUHLWLVDYDLODEOHDQGGHHPHGUHDVRQDEOHE\0&&RPPHUFLDO,QFWRSURYLGH
Warrantor Canada: MC Commercial, Burlington, Ontario, L7R 5B6

3ULQWHGLQ8QLWHG6WDWHV
GE Appliances Website
Have a question or need assistance with your appliance? Try the GE Appliances Website 24 hours a day, any day
of the year! You can also shop for more great GE Appliances products and take advantage of all our on-line support
VHUYLFHVGHVLJQHGIRU\RXUFRQYHQLHQFH,QWKH86GEAppliances.com,Q&DQDGDGEAppliances.ca
Register Your Appliance
Register your new appliance on-line at your convenience! Timely product registration will allow for enhanced
communication and prompt service under the terms of your warranty, should the need arise. You may also mail in
the pre-printed registration card included in the packing material.
,QWKH86GEAppliances.com/register
,Q&DQDGDProdsupport.mabe.ca/crm/Products/ProductRegistration.aspx
Schedule Service
Expert GE Appliances repair service is only one step away from your door. Get on-line and schedule your service at
\RXUFRQYHQLHQFHDQ\GD\RIWKH\HDU,QWKH86GEAppliances.com/service
or call 800.432.2737 during normal business hours.
,Q&DQDGDGEAppliances.ca/en/support/service-request or call 800.561.3344
Extended Warranties
Purchase a GE Appliances extended warranty and learn about special discounts that are available while your
warranty is still in effect. You can purchase it on-line anytime. GE Appliances Services will still be there after your
warranty expires.
,QWKH86GEAppliances.com/extended-warranty
or call 800.626.2224 during normal business hours.
,Q&DQDGDGEAppliances.ca/en/support/purchase-extended-warranty or call 800.290.9029
Remote Connectivity
)RUDVVLVWDQFHZLWKZLUHOHVVQHWZRUNFRQQHFWLYLW\IRUPRGHOVZLWKUHPRWHHQDEOH
visit our website at GEAppliances.com/connectRUFDOOLQWKH86RQO\
Parts and Accessories
,QGLYLGXDOVTXDOLILHGWRVHUYLFHWKHLURZQDSSOLDQFHVFDQKDYHSDUWVRUDFFHVVRULHVVHQWGLUHFWO\WRWKHLUKRPHV
9,6$0DVWHU&DUGDQG'LVFRYHUFDUGVDUHDFFHSWHG2UGHURQOLQHWRGD\KRXUVHYHU\GD\
,QWKH86GEApplianceparts.com or by phone at 877.959.8688 during normal business hours.
Instructions contained in this manual cover procedures to be performed by any user. Other servicing
generally should be referred to qualified service personnel. Caution must be exercised, since improper
servicing may cause unsafe operation.
Customers in Canada should consult the yellow pages for the nearest Mabe service center, visit our website at
GEAppliances.ca/en/products/parts-filters-accessories or call 800.661.1616.
Contact Us
,I\RXDUHQRWVDWLVILHGZLWKWKHVHUYLFH\RXUHFHLYHIURP*($SSOLDQFHVFRQWDFWXVRQRXU:HEVLWHZLWKDOOWKH
details including your phone number, or write to:
,QWKH86*HQHUDO0DQDJHU&XVWRPHU5HODWLRQV_*($SSOLDQFHV$SSOLDQFH3DUN_/RXLVYLOOH.<
GEAppliances.com/contact
,Q&DQDGD'LUHFWRU&RQVXPHU5HODWLRQV0&&RPPHUFLDO,QF_6XLWH)DFWRU\/DQH_0RQFWRQ1%(&0
GEAppliances.ca/en/contact-us
CONSUMER SUPPORT
Consumer Support

MESURES DE SÉCURITÉ .........3
Instructions de fonctionnement
Bouton de commande de la température .5
Clayettes .............................5
Bacs de rangement ....................6
Machine à glaçons automatique .........7
ENTRETIEN ET NETTOYAGE ....8
INSTRUCTIONS
D’INSTALLATION
Préparation à l’installation
du réfrigérateur .......................9
Installation de la
conduite d’eau .......................10
Installation de la poignée ..............13
Inversion de
l’ouverture des portes .................14
CONSEILS DE DÉPANNAGE
Bruits normaux de fonctionnement .....18
GARANTIE LIMITÉE .............21
SOUTIEN
AU CONSOMMATEUR ...........22
FRANÇAIS
Écrivez ici le numéro de modèle et
le numéro de série :
Modèle # ________________
Série # __________________
Vous les trouvez sur une étiquette
dans le coin supérieur gauche du
compartiment réfrigérateur.
49-1000249 Rev. 0 01-19 GEA
Models 15,16,18
MANUEL
D’UTILISATION
ET D’INSTALLATION
GE est une marque déposée de General Electric Company. Fabriqué sous licence de marque.
RÉFRIGÉRATEUR
Congélateur au sommet

2 49-1000249 Rev. 0
NOUS VOUS REMERCIONS D’ACCUEILLIR GE APPLIANCES CHEZ VOUS
Que vous ayez grandi avec GE Appliances ou qu’il s’agisse de votre première acquisition, nous
sommes heureux de vous accueillir dans notre famille.
Nous sommes fiers du savoir-faire, de l’innovation et de l’esthétique qui composent chaque appareil
GE Appliances, et nous pensons que vous le serez aussi. Dans cette optique, nous vous rappelons
que l’enregistrement de votre électroménager vous assure la communication de renseignements
importants sur le produit et la garantie lorsque vous en avez besoin.
Enregistrez votre électroménager GE en ligne dès maintenant. Des sites Web et des numéros de
téléphone utiles figurent dans la section Soutien au consommateur de ce manuel d’utilisation.
Vous pouvez aussi poster la fiche de garantie pré-imprimée incluse dans l’emballage.
49-1000249 Rev. 0 3
INFORMATION DE SÉCURITÉ
INFORMATION DE SÉCURITÉ IMPORTANTES
LISEZ TOUTES LES DIRECTIVES AVANT D'UTILISER L'APPAREIL
ATTENTION
Pour réduire le risque de blessures lorsque vous utilisez votre réfrigérateurde , veuillez suivre ces
consignes de sécurité.
Ŷ 1HQHWWR\H]SDVOHVFOD\HWWHVRXOHVFRXYHUFOHVHQYHUUH
avec de l’eau tiède quand ceux-ci sont froids. Les clayettes
et couvercles en verre peuvent se casser s’ils sont exposés
à des changements soudains de température ou si vous
les cognez ou les faites tomber. Le verre trempé est conçu
pour se briser en petits morceaux en cas de casse
Ŷ eORLJQH]OHVGRLJWVGHVSDUWLHVGXFRQJpODWHXURO¶RQ
peut facilement se pincer : les espaces entre les portes,
et entre les portes et les placards sont toujours étroits.
Soyez prudent lorsque vous fermez les portes en présence
d’enfants.
Ŷ 1HWRXFKH]SDVOHVVXUIDFHVIURLGHVGXFRQJpODWHXU
lorsque vous avez les mains humides ou mouillées. La
peau risque d’adhérer à ces surfaces extrêmement froides.
Ŷ 1HUHFRQJHOH]SDVOHVDOLPHQWVVXUJHOpVTXLRQW
complètement dégelé.
Ŷ 6LYRWUHUpIULJpUDWHXUHVWGRWpG¶XQHPDFKLQHjJODoRQV
automatique, évitez le contact avec les pièces mobiles du
mécanisme éjecteur, ou avec l’élément chauffant qui libère
les glaçons. Ne posez pas les doigts ou les mains sur le
mécanisme de la machine à glaçons automatique pendant
que le réfrigérateur est branché.
LIRE ET CONSERVER CES INSTRUCTIONS
AVERTISSEMENT
Pour réduire le risque d’incendie, d’explosion, de choc électrique ou de blessures lorsque vous
utilisez votre réfrigérateurde , veuillez suivre ces consignes de sécurité :
Ŷ &HUpIULJpUDWHXUGRLWrWUHFRUUHFWHPHQWLQVWDOOp
FRQIRUPpPHQWDX[&RQVLJQHVG¶,QVWDOODWLRQDYDQWWRXWH
utilisation.
Ŷ 'pEUDQFKH]OHUpIULJpUDWHXUDYDQWG¶HIIHFWXHUXQH
réparation, de remplacer une ampoule ou de le nettoyer.
Remarque : L’alimentation du réfrigérateur ne peut être
déconnectée par aucune des fonctions sur le panneau de
commande.
Remarque : Les réparations doivent être effectuées par
un professionnel qualifié.
Ŷ 5HPHWWH]WRXWHVOHVSLqFHVHWSDQQHDX[HQSODFHDYDQW
d’utiliser l’appareil.
Ŷ
N’utilisez pas un cordon de rallonge.
Ŷ$EVWHQH]YRXVG¶HQWUHSRVHURXG¶XWLOLVHUGHO¶HVVHQFHRX
d’autres vapeurs et liquides inflammables aux alentours de
cet électroménager ou d’autres appareils.
Ŷ1¶HQWUHSRVH]SDVGDQVFHWpOHFWURPpQDJHUGHVVXEVWDQFHV
explosives telles que des bombes aérosols qui contiennent
un gaz propulseur.
Ŷ 3RXUpYLWHUOHVULVTXHVG¶DVSK\[LHHWG¶HQIHUPHPHQWSRXU
les enfants. Démontez les portes du congélateur et du
compartiment de réfrigération avant de le mettre au rebut
ou d’interrompre son utilisation.
Ŷ $ILQGHSUpYHQLUOHVDFFLGHQWVJUDYHVRXODPRUWOHV
enfants ne doivent pas se tenir ni jouer dans ou sur
l’électroménager.
Ŷ/HVHQIDQWVHWOHVSHUVRQQHVGRQWOHVFDSDFLWpVVRQW
réduites sur le plan physique, sensoriel ou mental, ou qui
manquent d’expérience ou de connaissances, peuvent
utiliser cet électroménager seulement si elles sont
surveillées ou ont reçues des consignes de sécurité sur
son usage et les risques y sont associés.
Ŷ&HWpOHFWURPpQDJHUHVWFRQoXSRXUXQHXWLOLVDWLRQ
domestique et applications similaires : salle du personnel
dans une usine, un bureau ou d’autres lieux de travail;
maison de ferme; clients dans un hôtel, un motel, un gîte
touristique et d’autres lieux résidentiels; approvisionnement
et applications similaires non reliées au commerce de
détail.
Ŷ5DFFRUGH]O¶DSSDUHLOjXQHDOLPHQWDWLRQG¶HDXSRWDEOH
seulement. Une alimentation d’eau froide est requise
pour faire fonctionner la machine à glaçons et le pichet à
remplissage automatique. La pression d’eau doit se situer
entre 40 et 120 psi. (275 à 827 kPa)
Ŷ 1¶DSSOLTXH]SDVGHQHWWR\DQWVFRUURVLIVVXUOHUpIULJpUDWHXU
&HUWDLQVQHWWR\DQWVHQGRPPDJHQWOHSODVWLTXHHWSHXYHQW
ainsi causer le détachement inopiné de pièces telles que
porte ou poignées de porte. Voyez la section Entretien et
nettoyage pour des instructions détaillées.
RISQUE D’EXPLOSION Fluide frigorigène inflammable
Cet électroménager contient le réfrigérant isobutane, R600a,
un gaz naturel à compatibilité élevée avec l’environnement.
Il s’agit cependant d’un combustible. Observez les
consignes de sécurité ci-dessous afin de réduire le risque
de blessure ou de dommage à la propriété.
1. Lors de la manipulation, de l’installation et de l’utilisation de
cet appareil, prenez soin de ne pas endommager les tubes
de circulation du fluide frigorigène.
2. L’entretien ou la réparation doivent être effectués par un
personnel de service autorisé. Utilisez seulement des
pièces de rechange autorisées par le fabricant.
3. Mettez le appareil au rebut conformément aux
réglementations fédérales et locales. Le fluide frigorigène
inflammable et le matériel isolant utilisés nécessitent des
SURFpGXUHVGHPLVHDXUHEXWVSpFLDOHV&RPPXQLTXH]
avec les autorités locales compétentes pour la mise au
rebut de votre appareil sans danger pour l’environnement.
4. N’obstruez pas les évents dans l’enceinte prévue pour
l’appareil.
5. N’utilisez pas d’appareils ou autres moyens mécaniques
pour accélérer le processus de dégivrage.
6. N’endommagez pas le circuit du fluide frigorigène.
7. N’utilisez pas d’appareils électriques dans le compartiment
réfrigérateur de cet appareil.
AVERTISSEMENT
4 49-1000249 Rev. 0
Ne coupez pas ou n’enlevez pas, sous aucun prétexte, la troisième broche de mise à la terre du cordon
d’alimentation. Pour des raisons de sécurité, cet appareil doit être correctement mis à la terre.
Le cordon d’alimentation de cet appareil est équipé d’une
fiche à trois broches (pour une mise à la terre) qui s’adapte à
la prise de courant standard à 3 broches (pour une mise à la
terre) pour minimiser les risques de chocs électriques par cet
appareil.
Faites vérifier la prise murale et le circuit électrique par
un électricien qualifié pour s’assurer que le système est
correctement mis à la terre.
Dans le cas d’une prise biphasée, l’installateur a la
responsabilité et l’obligation de la remplacer par une prise
triphasée correctement mise à la terre. N’utilisez pas
d’adaptateur.
Le réfrigérateur doit toujours être branché à sa propre prise
électrique d’une tension nominale correspondant à celle
indiquée sur sa plaque signalétique.
8QHDOLPHQWDWLRQpOHFWULTXHjYROWV&$+]DYHF
un fusible de 15 ou 20 ampères et une mise à la terre est
QpFHVVDLUH&HFLSHUPHWG¶REWHQLUXQPHLOOHXUUHQGHPHQWHW
évite de surcharger les circuits électriques du domicile qui
risque d’occasionner un incendie en surchauffant.
Ne débranchez jamais le réfrigérateur en tirant sur le cordon
d’alimentation. Prenez toujours fermement la fiche en main et
tirez pour la sortir de la prise.
5pSDUH]RXUHPSODFH]LPPpGLDWHPHQWWRXWFRUGRQpOHFWULTXH
usé ou endommagé. N’utilisez pas un cordon fissuré ou
présentant des dommages dus aux frottements soit sur sa
longueur ou aux extrémités.
Lorsque vous éloignez votre réfrigérateur du mur, faites
attention à ne pas le faire rouler sur le cordon d’alimentation
afin de ne pas l’endommager.
BRANCHEMENTS ÉLECTRIQUES
AVERTISSEMENT
RISQUE DE CHOC ÉLECTRIQUE
Branchez l’appareil dans une prise triple avec terre.
Ne retirez pas la broche de terre.
N’utilisez pas d’adaptateur.
N’utilisez pas un cordon de rallonge.
Le non-respect de ces instructions peut entraîner des risques d’incendies, des chocs électriques ou la mort.
INFORMATION DE SÉCURITÉ
MISE AU REBUT APPROPRIÉE DE VOTRE ANCIEN RÉFRIGÉRATEUR
LIRE ET CONSERVER CES INSTRUCTIONS
INFORMATION DE SÉCURITÉ IMPORTANTES
LISEZ TOUTES LES DIRECTIVES AVANT D'UTILISER L'APPAREIL
AVERTISSEMENT
RISQUE DE SUFFOQUER OU D’Y ÊTRE EMPRISONNÉ
Le non-respect de ces instructions d'élimination peut entraîner la mort ou des blessures graves.
IMPORTANT: Les enfants pris au piège ou morts d’asphyxie
sont toujours d’actualité. Les réfrigérateurs et congélateurs
abandonnés sont toujours aussi dangereux, même si on
n’attend que «quelques jours» pour s’en débarrasser. Si vous
ne gardez pas votre ancien réfrigérateur ou congélateur,
veuillez suivre les directives ci-dessous afin de prévenir les
accidents.
Avant de vous débarrasser de votre ancien appareil :
Ŷ'pPRQWH]OHVSRUWHVGXFRPSDUWLPHQWGHUpIULJpUDWLRQHWGX
compartiment de congélation.
Ŷ Laissez les clayettes en place afin d’empêcher les enfants
de grimper à l’intérieur.
Mise au rebut des produits réfrigérants et en mousse
Mettez l’électroménager au rebut conformément à la réglementation fédérale et locale. Les matières isolantes inflammables
XWLOLVpHVH[LJHQWGHVSURFpGXUHVGHPLVHDXUHEXWVSpFLDOHV&RPPXQLTXH]DYHFOHVDXWRULWpVORFDOHVSRXUFRQQDvWUHODIDoRQ
de mettre votre électroménager au rebut qui soit respectueuse de l’environnement.
INSTALLATION
AVERTISSEMENT
RISQUE D’EXPLOSION
&RQVHUYH]OHVPDWpULDX[HWYDSHXUVLQIODPPDEOHVWHOVTXHO¶HVVHQFHjO¶pFDUWGHYRWUHUpIULJpUDWHXU8QHH[SORVLRQXQ
incendie voire la mort pourrait en résulter.
49-1000249 Rev. 0 5
a commande de température règle le réfrigérateur depuis le
plus chaud jusqu’au plus froid.
À la livraison, votre réfrigérateur est réglé à la valeur d’usine «
3 ». Pour une température plus froide, tournez le bouton dans
le sens des aiguilles jusqu’à la valeur « 4 » ou « 5 ». Pour
une température plus chaude, tournez le bouton dans le sens
contraire des aiguilles jusqu’à « 1 » ou « 2 ». Pour désactiver
le refroidissement dans les deux compartiments, tournez le
bouton dans le sens inverse des aiguilles jusqu’à « Off ».
Prenez note que cela ne coupe pas l’alimentation électrique au
réfrigérateur.
Bouton de commande de la température
Clayettes du compartiment réfrigérateur
Clayettes du compartiment congélateur
UTILISATION DU RÉFRIGÉRATEUR: &RPPDQGHGHODWHPSpUDWXUH / &OD\HWWHV
Les clayettes se placent à différents niveaux vous permettant de personnaliser l’espace de rangement. Toutes les caractéristiques
ne sont pas disponibles sur tous les modèles.
Clayettes pleine largeur
Quelques modèles sont équipés de tablettes en verre trempé
fixes, une tablette antigoutte ou de tablettes fixes bimétalliques.
Vous pouvez déplacer ces clayettes à un autre endroit du
compartiment réfrigérateur.
&HUWDLQVPRGqOHVSRVVqGHQWXQHFOD\HWWHFRXOLVVDQWH
métallique, une clayette en verre trempée fixe, une clayette
anti-déversement ou deux clayettes fixes métalliques.
ATTENTION
Ne nettoyez pas les clayettes ou les
couvercles en verre avec de l’eau tiède quand ceux-ci sont
froids. Les clayettes et couvercles en verre peuvent se casser
s’ils sont exposés à des changements soudains de
température ou si vous les cognez ou les faites tomber. Le
verre trempé est conçu pour se briser en petits morceaux en
cas de casse.
Lorsqu’elles sont placées
correctement sur leurs supports,
les deux clayettes fixes se
bloqueront avant de sortir
complètement du congélateur et
elles ne pencheront pas si vous y
placez ou retirez des aliments.
&HUWDLQVPRGqOHVVRQWGRWpVGHWDEOHWWHVHQYHUUH
ATTENTION
Ne nettoyez pas les tablettes ou couvercles
en verre avec de l’eau chaude lorsqu’ils sont froids. Les
tablettes et couvercles en verre peuvent se briser s’ils sont
exposés à une variation de température soudaine, ou soumis à
un impact s’ils sont heurtés ou échappés. S’il se brise, le verre
trempé est conçu pour se fracturer en un grand nombre de
petits éclats.
Pour enlever les clayettes pleine largeur
Tirer vers l’avant
3
2
1
Recommended
Coldest
5
4
49-1000249 Rev. 0
UTILISATION DU RÉFRIGÉRATEUR: Bacs de rangement
Tiroir à humidité contrôlée et du couvercle (sur certains modèles)
)DLWHVJOLVVHUOHUpJODJHHQSRVLWLRQ+LJKpOHYpHSRXUREWHQLU
l’humidité maximum qui est recommandée pour la plupart des
légumes.
Faites glisser le réglage en position Low (basse) pour obtenir
l’humidité minimum qui est recommandée pour la plupart des
fruits
Enlèvement du bac de rangement
Vous pouvez enlever facilement les bacs en relevant
légèrement les côtés lorsque le bac dépasse la position de
butée.
Retrait du couvercle
1. Enlevez les deux bacs.
2. Placez vos mains à l’intérieur, pousser le dos du couvercle
en verre vers le haut tout en le tirant vers l’arrière aussi loin
que possible.
,QFOLQH]OHHWHQOHYH]OHeYLWH]GHQHWWR\HUOHFRXYHUFOHHQ
verre froid avec de l’eau chaude, car la grande différence de
température peut le briser.
3. Enlevez le cadre du bac (enlevez toujours le couvercle en
verre avant d’enlever le cadre).
Soulevez le cadre des supports de chaque côté et derrière,
WLUH]OHYHUVO¶DYDQW,QFOLQH]OHSRXUOHUHWLUHU
Pour remettre les bacs:
1. Placez le cadre pour qu’il repose sur les supports de
chaque côté et derrière.
5HSODFH]OHFRXYHUFOHHQYHUUHHQSRXVVDQWIHUPHPHQWVRQ
bord frontal dans le profilé de cadre avant, puis déposez-le
délicatement en place.
5HSODFH]OHVEDFV
Bacs de rangement
Toutes les caractéristiques ne sont pas disponibles sur tous les modèles.
Bac à collation
Le bac à collation peut être placé à l’emplacement qui convient
le mieux aux besoins de votre famille.
Bacs à légumes et à fruits
Lorsque l’eau s’accumule au fond des bacs, videz-les et
essuyez-les.
49-1000249 Rev. 0 7
AVERTISSEMENT
5DFFRUGH]O¶DSSDUHLOjXQH
alimentation d’eau potable seulement. Une alimentation d’eau
froide est requise pour faire fonctionner la machine à glaçons
et le pichet à remplissage automatique. La pression d’eau doit
se situer entre 40 et 120 psi. (275 à 827 kPa).
ATTENTION
eYLWH]WRXWFRQWDFWDYHFOHVSLqFHVPRELOHV
du mécanisme d’éjection ou l’élément chauffant (situé dans le
bas de la machine à glaçons) qui libère les cubes. Ne placez
pas les doigts ou les mains sur le mécanisme de production de
glace automatique lorsque le réfrigérateur est branché à la
prise électrique.
Un réfrigérateur nouvellement installé prend de 12 à 24 heures
pour commencer à produire des glaçons.
La machine à glaçons produit sept glaçons par cycle, environ
70 à 100 glaçons par 24 heures, selon la température du
compartiment congélation, la température de la pièce, le
nombre de fois que la porte est ouverte et les autres conditions
d’utilisation.
Si vous utilisez votre réfrigérateur avant son raccordement
à l’alimentation d’eau, réglez l’interrupteur à OFF (arrêt) ou
déplacez le levier à la position STOP (vers le haut).
Dès que le réfrigérateur est relié à l’alimentation d’eau, placez
l’interrupteur à la position ON (marche), déplacez le levier vers
le bas.
Après avoir raccordé le réfrigérateur à l’alimentation d’eau,
amenez le bras palpeur en position ON (marche) en bas.
Déplacez le levier à la position ON (vers le bas) ou déplacez
l’interrupteur coulissant vers la position ON (marche) La
PDFKLQHjJODoRQVVHUHPSOLWG¶HDXTXDQGHOOHDWWHLQW&
(15°F). Un réfrigérateur nouvellement installé prend de 12 à 24
heures pour commencer à produire des glaçons.
Une fois que la machine à glaçons commence à produire de la
glace, il peut s’écouler jusqu’à 48 heures avant que le bac ne
se remplisse, tout dépendant du réglage de température et de
la fréquence d’ouverture de la porte.
Un bourdonnement se fait entendre à chaque fois que la
machine à glaçons se remplit d’eau.
REMARQUER: Jetez les premiers lots de glaçons pour
permettre à la conduite d’eau de se purger.
Assurez-vous que rien ne gène la course du bras palpeur.
Quand le bac se remplit jusqu’au niveau du bras palpeur, la
machine à glaçons s’arrête de produire des glaçons.
,OHVWQRUPDOGHWURXYHUGHVJODoRQVTXLVRLHQWVRXGpV
ensemble.
Si vous n’utilisez pas souvent vos glaçons, les vieux glaçons
deviennent opaques, prennent un mauvais goût et rétrécissent.
Trousse accessoire de machine à glaçons
Si votre réfrigérateur n’est pas déjà équipé d’une machine
à glaçons automatique, vous pouvez acheter une trousse
accessoire de machine à glaçons.
&HUpIULJpUDWHXUHVWFRPSDWLEOHDYHFOHVWURXVVHVGHPDFKLQHj
JODoRQV,0'RX,0'3RXUOHPRQWDJHUHSRUWH]YRXVDX[
instructions V fournies avec la trousse.
IMPORTANT : &HUpIULJpUDWHXUUHTXLHUWXQHPDFKLQHj
glaçons avec étiquette rouge. Voyez l’emplacement de
l’étiquette ci-dessus sur la machine à glaçons. Si la machine
à glaçons fournie avec votre trousse n’est pas munie d’une
étiquette rouge, elle ne fonctionnera pas. Dans ce cas, veuillez
FRPSRVHUOH*(&$5(6DX&DQDGDOH
pour obtenir la machine à glaçons appropriée.
Machine à glaçons automatique (sur certains modèles)
UTILISATION DU RÉFRIGÉRATEUR: Machine à glaçons automatique
Toutes les caractéristiques ne sont pas disponibles sur tous les modèles.
Bras palpeur
,QWHUUXSWHXU
de courant
Machine à glaçons
eWLTXHWWHVXUODPDFKLQHjJODoRQV
8 49-1000249 Rev. 0
Nettoyage de l’intérieur
Pour aider à empêcher les odeurs, laissez une boîte ouverte
de bicarbonate de soude dans les compartiments réfrigération
et congélation.
Débranchez votre réfrigérateur avant de le nettoyer.
Si ce n’est pas pratique, enlevez toute humidité au moyen
d’une éponge ou d’un chiffon pour nettoyer autour des
commutateurs, des lumières ou des réglages.
Utilisez une solution d’eau chaude et de bicarbonate de soude
15 ml (soit une cuillère à soupe environ) de bicarbonate de
VRXGHGDQVOLWUHVRLWXQHSLQWHG¶HDX&HWWHVROXWLRQQHWWRLH
WRXWHQQHXWUDOLVDQWOHVRGHXUV5LQFH]HWVpFKH]HQHVVX\DQW
Après avoir nettoyé les joints de porte, appliquez une mince
couche de vaseline sur les joints du côté charnières afin de les
empêcher de coller et de se déformer.
ATTENTION
Ne nettoyez pas les tablettes ou couvercles
en verre avec de l’eau chaude lorsqu’ils sont froids. Les
tablettes et couvercles en verre peuvent se briser s’ils sont
exposés à une variation de température soudaine, ou soumis à
un impact s’ils sont heurtés ou échappés. S’il se brise, le verre
trempé est conçu pour se fracturer en un grand nombre de
petits éclats. Ne lavez aucune pièce en plastique du
réfrigérateur au lave-vaisselle.
Écartement du réfrigérateur
Faites attention quand vous écartez votre réfrigérateur du mur.
Vous pouvez endommager votre revêtement de plancher, en
particulier s’il est matelassé ou s’il a une surface en relief.
Tournez les pieds de nivellement à chaque coin avant du
réfrigérateur vers la gauche pour que les roulettes supportent
le poids du réfrigérateur. Tirez le réfrigérateur en ligne droite et
remettez-le en place en poussant en ligne droite. Vous pouvez
endommager le revêtement de plancher ou votre réfrigérateur
en le déplaçant latéralement.
Lorsque vous remettez en place votre réfrigérateur, assurez-
vous de ne pas le rouler sur le cordon d’alimentation ou la
conduite d’eau de la machine à glaçons (sur certains modèles).
Après avoir remis le réfrigérateur en place en le faisant rouler,
tournez les pieds vers la droite pour qu’ils supportent de
nouveau le poids du réfrigérateur.
Remplacement des lampes
La lampe DEL est située dans le centre supérieur du
compartiment réfrigérateur.
Un technicien agréé devra remplacer l’éclairage DEL.
Si ce composant doit être remplacé, composez 1.800.432.2737
SRXUMRLQGUHOHVHUYLFH*($SSOLDQFHVDX[eWDWV8QLVRXOH
DX&DQDGD
Préparation de départ en vacances
Pour de longues vacances ou absences, enlevez tous vos
aliments et débranchez votre réfrigérateur. Mettez le bouton
de commande de la température en position OFF et nettoyez
l’intérieur avec une solution de bicarbonate de soude, de 15
ml (une cuillère à soupe) de bicarbonate de soude pour 1 litre
(une pinte) d’eau. Laissez les portes ouvertes.
Déplacez le levier à la position STOP (vers le haut) ou
mettez l’interrupteur à la position OFF (arrêt) pour le modèle
à interrupteur coulissant, et fermez l’arrivée d’eau du
réfrigérateur.
Si la température risque de descendre en dessous du point
de congélation, demandez à un technicien qualifié de purger
votre système d’alimentation d’eau (sur certains modèles) pour
empêcher des inondations pouvant occasionner des dégâts
sérieux.
Préparation de déménagement
Fixez en place toutes les pièces mobiles, comme la grille, les
clayettes et les tiroirs, à l’aide de ruban adhésif, pour empêcher
tout dommage. À l’aide de ruban adhésif, fixez les portes sur
la carrosserie pour empêcher les portes de s’ouvrir lors d’un
déménagement. Assurez-vous que votre réfrigérateur soit en
position droite pendant le déménagement.
Entretien et nettoyage
ENTRETIEN ET NETTOYAGE
Nettoyage de l’extérieur
Directives pour nettoyer les surfaces extérieures, les poignées de porte et les garnitures
UTILISER NE PAS UTILISER
Linge ou éponge doux et propres Linges abrasifs, éponges à récurer, tampons à récurer ou en
laine d’acier.
Détergent doux dans eau chaude.
Nettoyants pour acier inoxydable approuvés; visitez la boutique
de pièces GE Appliances pour des nettoyants pour acier
inoxydable approuvés :
Electromenagersge.ca/fr/produits/
filtres-et-accessoires ou appeler 800.661.1616
On peut utiliser des nettoyants à base d’acide oxalique tels que
%DU.HHSHUV)ULHQG6RIW&OHDQVHUSRXUpOLPLQHUODURXLOOHGH
surface, le ternissement et les petites taches sur les surfaces
en acier inoxydable seulement.
Poudres ou vaporisateurs abrasifs.
Vaporisateurs pour fenêtres ou ammoniac.
Nettoyants à base d’agrumes ou de plantes.
Nettoyants acides ou à base de vinaigre.
Nettoyants pour le four.
Nettoyants qui contiennent de l’acétone (propanone).
7RXWQHWWR\DQWDYHF$9(57,66(0(17UHODWLIDXFRQWDFWGX
plastique.
REMARQUE : Ne laissez PAS un nettoyant pour acier inoxydable venir au contact de pièces en plastique telles que garnitures,
quincaillerie de poignée ou doublures. Si un contact non intentionnel d’un nettoyant avec une pièce en plastique survient,
nettoyez la pièce en plastique avec une éponge et un détergent doux mélangé dans l’eau chaude.
49-1000249 Rev. 0 9
ROULETTES ET PIEDS DE
NIVELLEMENT
Les pieds de nivellement situés à proximité des coins avant
GXUpIULJpUDWHXUVRQWUpJODEOHV,OVPDLQWLHQQHQWIHUPHPHQW
le réfrigérateur en place et l’empêchent de bouger lors
de l’ouverture des portes. Les pieds de nivellement
doivent être réglés de sorte que l’avant du réfrigérateur
soit suffisamment relevé pour que les portes se ferment
facilement lorsqu’elles se trouvent à mi-parcours.
Tournez les pieds de nivellement vers la droite pour relever
le réfrigérateur, vers la gauche pour l’abaisser.
Les roulettes situées à proximité des pieds de nivellement
vous permettent de déplacer le réfrigérateur du mur pour le
nettoyage.
Tournez les pieds vers la gauche jusqu’à ce que le poids
du réfrigérateur soit transféré sur les roulettes. Après avoir
remis le réfrigérateur en place, tournez les pieds vers la
droite jusqu’à ce qu’ils supportent le poids du réfrigérateur.
Instructions d’installation Modèles 15, 16, 18
DÉGAGEMENTS
Prévoyez les dégagements suivants pour faciliter
l’installation, la bonne circulation d’air et les raccordements
de plomberie et d’électricité.
&{WpVPPSR
• Dessus : 25 mm (1 po)
• Arrière : 50 mm (2 po)
AVANT DE COMMENCER
Veuillez lire toutes les directives attentivement.
• IMPORTANT – &RQVHUYH]FHVLQVWUXFWLRQVSRXU
l’inspecteur local.
• IMPORTANT – 5HVSHFWH]WRXWHVOHV
ordonnances et les codes locaux.
• Note à l’installateur – Assurez-vous de laisser
ces instructions au consommateur.
• Note au consommateur– &RQVHUYH]FHV
instructions pour référence future.
• Niveau de compétence – L’installation de cet appareil
nécessite des compétences mécaniques de base.
• Temps d’installation – ,QVWDOODWLRQGXUpIULJpUDWHXU
15 minutes
,QYHUVLRQGXVHQVG¶RXYHUWXUH
des portes 15 minutes
• L’installateur est responsable de bien installer ce
réfrigérateur.
• Toute panne du produit due à une mauvaise installation
n’est pas couverte par la garantie.
EMPLACEMENT DU RÉFRIGÉRATEUR
• N’installez jamais votre réfrigérateur dans un
HPSODFHPHQWRODWHPSpUDWXUHDPELDQWHVHUDLQIpULHXUH
j&),OQHVHPHWWUDSDVHQPDUFKH
suffisamment souvent pour maintenir des températures
convenables.
1¶LQVWDOOH]SDVOHUpIULJpUDWHXUGDQVXQHQGURLWROD
WHPSpUDWXUHDPELDQWHVHUDVXSpULHXUHj&)LO
ne fonctionnera pas correctement.
• N’installez pas le réfrigérateur dans un endroit exposé à
l’eau (pluie, etc.) ou directement aux rayons solaires.
,QVWDOOH]YRWUHUpIULJpUDWHXUVXUXQSODQFKHUVXIILVDPPHQW
solide pour le porter lorsqu’il est plein.
ALIMENTATION D’EAU DE LA
MACHINE À GLAÇONS
(sur certains modèles)
Si le réfrigérateur est équipé d’une machine à glaçons,
il devra être raccordé à une conduite d’eau froide.. Vous
pouvez acheter une trousse d’alimentation d’eau GE
Appliances (contenant la tuyauterie, le robinet d’arrêt,
les joints et les instructions) chez votre revendeur
ou en vous adressant à notre site Web à l’adresse
electromenagersge.ca ou à notre service de Pièces et
DFFHVVRLUHVDXQXPpURGHWpOpSKRQH
Si vous avez des questions, appelez le 1.800.561.3344 ou visitez notre site Web à l’adresse:
electromenagersge.ca
INSTRUCTIONS D’INSTALLATION

10 49-1000249 Rev. 0
Instructions d’installation
INSTALLATION DE LA CONDUITE D’EAU (sur certains modèles)
AVANT DE COMMENCER
Nous recommandons les trousses d’alimentation d’eau
en cuivre WX8X2, WX8X3, WX8X4, selon le montant de
conduite dont vous avez besoin. Nous approuvons les
FRQGXLWHVG¶HDXHQPDWLqUHSODVWLTXH6PDUW&RQQHFW
5HIULJHUDWRU7XELQJ:;;:;;HW
WX08X10025).
6LYRXVLQVWDOOH]XQV\VWqPHG¶HDX*($SSOLDQFHV5HYHUVH
Osmosis dans votre réfrigérateur, la seule installation
DSSURXYpHHVWFHOOHGHODWURXVVH*($SSOLDQFHV59.,7
Pour les autres systèmes d’osmose de l’eau, suivez les
recommandations du fabricant.
&HWWHLQVWDOODWLRQGHFRQGXLWHG¶HDXQ¶HVWSDVJDUDQWLHSDUOH
fabricant de réfrigérateur ou de machine à glaçons. Suivez
soigneusement ces instructions pour minimiser le risque de
dommages onéreux d’inondation.
Les coups de bélier (eau qui donne des coups dans
les tuyaux) dans la tuyauterie de la maison peuvent
occasionner des dommages aux pièces de votre
réfrigérateur, ainsi que des fuites ou des inondations.
Appelez un plombier certifié pour corriger les coups
de bélier avant d’installer la conduite d’eau de votre
réfrigérateur.
Pour prévenir toute brûlure et tout dommage à votre
réfrigérateur, ne branchez jamais la conduite d’eau à une
canalisation d’eau chaude.
Si vous utilisez votre réfrigérateur avant de raccorder la
conduite d’eau, assurez-vous que l’interrupteur de courant
de la machine à glaçons se trouve à la position OFF (arrêt)
(modèles à interrupteur) ou que le bras palpeur se trouve à
la position OFF (arrêt).
N’installez jamais les tuyaux de la machine à glaçon dans
GHVHQGURLWVRODWHPSpUDWXUHULVTXHGHGHVFHQGUHHQ
dessous du point de congélation.
Si vous utilisez un outil électrique (comme une perceuse
électrique) pendant l’installation, assurez-vous que
l’isolement ou le câblage de cet outil empêche tout danger
de secousse électrique.
Vous devez procéder à toutes vos installations
conformément aux exigences de votre code local de
plomberie.
AVERTISSEMENT
Le raccordement doit se faire à
une alimentation d’eau potable seulement.
CE DONT VOUS AUREZ BESOIN
7X\DX[HQFXLYUHRXURXVVH6PDUW&RQQHFW5HIULJHUDWRU
Tubing, diamètre extérieur de 1/4 po pour brancher le
réfrigérateur à l’alimentation d’eau. Si vous utilisez un
tuyau en cuivre, assurez-vous que les deux extrémités du
tuyau soient coupées bien droit.
Pour trouver la longueur de tuyau dont vous aurez besoin
: mesurez la distance qui va du robinet d’eau situé derrière
le réfrigérateur jusqu’au tuyau d’alimentation d’eau. Ajoutez
PSLHGV$VVXUH]YRXVTX¶LO\DLWDVVH]GHWX\DXHQ
WURSHQYLURQP>SLHGV@HQURXOpVGHX[IRLVHQFHUFOHV
G¶HQYLURQFP>SR@GHGLDPqWUHSRXUYRXVSHUPHWWUH
de décoller le réfrigérateur du mur après l’installation.
CE DONT VOUS AUREZ BESOIN (suite)
/HVWURXVVHV6PDUW&RQQHFW5HIULJHUDWRU7XELQJVRQW
disponibles dans les dimensions suivantes :--
PSL±:;;
PSL ±:;;
PSL ±:;;
$VVXUH]YRXVTXHYRWUHWURXVVHDLWDXPRLQVPSLHGV
comme indiqué ci-dessus.
NOTE: Les seuls tuyaux en matière plastique approuvés par
GE Appliances sont ceux qui font fournis dans les trousses
6PDUW&RQQHFW5HIULJHUDWRU7XELQJ1¶XWLOLVH]MDPDLVXQ
autre tuyau en matière plastique, car le tuyau d’alimentation
G¶HDXHVWWRXWOHWHPSVVRXVSUHVVLRQ&HUWDLQHVFDWpJRULHV
de tuyaux en matière plastique peuvent devenir cassants
avec l’âge et peuvent se fendre, en occasionnant des
dommages d’inondation dans votre maison.
• Vous pouvez acheter une trousse d’alimentation d’eau GE
Appliances (contenant un tuyau, un robinet d’arrêt et les
joints énumérés ci-dessous) chez votre distributeur local
ou en le commandant au service de pièces et accessoires.
• Une alimentation d’eau froide. La pression de l’eau doit
être entre 20 et 120 p.s.i. (138-827 kilospascals).
• Une perceuse électrique.
• Une clé de 1/2 po ou une clé
anglaise.
• Un tournevis à lame plate et un
tournevis Phillips.
• Deux écrous à compression d’un
diamètre extérieur de 1/4 po et deux
bagues (manchons)—pour brancher
le tuyau en cuivre au robinet d’arrêt
et au robinet d’eau du réfrigérateur.
OU BIEN
6LYRXVXWLOLVH]XQHWURXVVH6PDUW&RQQHFW5HIULJHUDWRU
Tubing, les garnitures nécessaires sont déjà montées au
tuyau.
• Si votre canalisation d’eau actuelle a un raccord évasé
à une extrémité, vous aurez besoin d’un adaptateur
(que vous trouverez dans votre magasin de matériel de
plomberie) pour brancher le tuyau d’eau au réfrigérateur,
28%,(1YRXVSRXYH]FRXSHUOHUDFFRUGpYDVpjO¶DLGH
d’un coupe-tube, puis utiliser un raccord à compression.
Ne coupez jamais l’extrémité finie d’un tuyau de la trousse
6PDUW&RQQHFW5HIULJHUDWRU7XELQJ
• Un robinet d’arrêt pour brancher le tuyau d’eau froide.
Le robinet d’arrêt doit avoir une entrée d’eau avec un
diamètre intérieur minimal de 0,45 cm (5/32 po) au
SRLQWGHMRQFWLRQDYHF/$&21'8,7('¶($8)52,'(
Des robinets d’arrêt à étrier sont souvent inclus dans
les trousses d’alimentation d’eau.
Avant d’acheter, assurez-vous que
le robinet à étrier se conforme à
vos codes de plomberie locaux.
INSTRUCTIONS D’INSTALLATION
49-1000249 Rev. 0 11
INSTRUCTIONS D’INSTALLATION
Instructions d’installation
INSTALLATION DE LA CONDUITE D’EAU (SUITE)
1
FERMEZ L’ALIMENTATION
PRINCIPALE D’EAU ET
DÉBRANCHEZ LE RÉFRIGÉRATEUR
Ouvrez le robinet le plus proche en sens inverse des
aiguilles d’une montre suffisamment longtemps pour
purger le tuyau.
2
CHOIX DE L’EMPLACEMENT DU
ROBINET
&KRLVLVVH]SRXUOHURELQHWXQ
emplacement facilement accessible.
,OYDXWPLHX[OHEUDQFKHUGHF{Wpj
un tuyau vertical. Si vous devez le
brancher à un tuyau horizontal, faites
le branchement en haut ou de côté,
plutôt qu’en bas du tuyau, pour éviter
de recevoir des sédiments du tuyau
d’alimentation d’eau.
5
ACHEMINEZ LE TUYAU
Acheminez le tuyau du tuyau d’eau froide au
réfrigérateur.
Faites passer le tuyau par un trou percé dans le mur
ou le plancher (derrière le réfrigérateur ou au niveau de
l’armoire de cuisine adjacente), aussi près du mur que
possible.
NOTE: Assurez-vous qu’il y ait assez de tuyau en
WURSHQYLURQP>SLHGV@HQURXOpVGHX[IRLVHQ
FHUFOHVG¶HQYLURQFP>SR@GHGLDPqWUHSRXUYRXV
permettre de décoller le réfrigérateur du mur après
l’installation.
BRANCHEZ LE TUYAU AU
ROBINET
Placez un écrou de compression et une bague
(manchon) à l’extrémité du tuyau et branchez-les au
robinet d’arrêt.
Assurez-vous que le tuyau soit bien inséré dans le
robinet. Serrez fort l’écrou de compression.
Pour le tuyau en matière plastique d’une trousse
6PDUW&RQQHFW5HIULJHUDWRU7XELQJLQVpUH]
l’extrémité moulée du tuyau dans le robinet d’arrêt et
serrez l’écrou de compression à la main, puis serrez un
autre demi tour avec une clé. Si vous serrez trop fort,
vous pouvez occasionner des fuites.
3
PERCEZ UN TROU POUR LE ROBINET
Percez un trou de 1/4 po dans le tuyau d’eau, à l’aide
d’un foret dur. Enlevez toute barbure due au perçage
du trou dans le tuyau. Faites
attention de ne pas laisser
de l’eau couler dans votre
perceuse électrique. Si vous
ne percez pas un trou de
1/4 po, vous obtiendrez une
alimentation d’eau réduite et
des glaçons plus petits.
4
FIXEZ LE ROBINET D’ARRÊT
Fixez le robinet d’arrêt au tuyau d’eau froide à l’aide du
collier de serrage.
Serrez les vis du collier jusqu’à ce que la rondelle
d’étanchéité commence à enfler.
NOTE: Ne serrez pas trop. Vous risquez d’écraser le
tuyau de cuivre
.
5RQGHOOH
Entrée
Vis du
collier
Tuyau vertical
d’eau froide
5RELQHW
d’arrêt à étrier
&ROOLHU
de serrage
5RELQHW
d’arrêt à étrier
eFURXGH
compression
Tuyau
6PDUW&RQQHFW
Presse-joint
5RELQHWGHVRUWLH
Bague (manchon)
7
PURGEZ LE TUYAU
Ouvrez le robinet d’alimentation principale
d’eau en sens inverse des aiguilles d’une
montre et purgez le tuyau jusqu’à ce que
l’eau soit claire.
Fermez l’eau au niveau du robinet d’eau
après écoulement d’environ 1 litre (1 quart) d’eau par le
tuyau.
AVANT DE COMMENCER
Lisez soigneusement chaque étape avant
de commencer.
AVERTISSEMENT
Pour réduire
le risque de choc électrique ou de
blessure durant l’installation, vous devez
d’abord débrancher le réfrigérateur avant
de procéder. L’omission de suivre ces
instructions pose un risque de choc électrique.

12 49-1000249 Rev. 0
Instructions d’installation
INSTALLATION DE LA CONDUITE D’EAU (SUITE)
8
BRANCHEZ LE TUYAU À VOTRE
RÉFRIGÉRATEUR
NOTES:
• Avant de brancher le tuyau à votre réfrigérateur,
assurez-vous que le cordon d’alimentation électrique
du réfrigérateur ne soit pas branché à la prise
murale.
• Nous vous recommandons de poser un filtre à eau
*;5/4GLVSRQLEOHVXUgewaterfilters.com ou au
VLYRWUHDOLPHQWDWLRQG¶HDXFRQWLHQWGX
sable ou des particules qui peuvent boucher la grille
GXURELQHWG¶HDXGHYRWUHUpIULJpUDWHXU,QVWDOOH]OHVXU
la conduite d’eau près de votre réfrigérateur. Si vous
XWLOLVH]XQHWURXVVH6PDUW&RQQHFW5HIULJHUDWRU
Tubing, vous aurez besoin d’un tuyau additionnel
(WX08X10002) pour brancher le filtre. Ne coupez
jamais un tuyau en matière plastique pour installer
votre filtre.
AVERTISSEMENT
Afin de réduire le risque
de mort ou de décharge électrique, vous devez
suivre les instructions suivantes :
Ŷ'pEUDQFKH]OHUpIULJpUDWHXUDYDQWGHUHWLUHU
quelque panneau que ce soit.
Ŷ1¶HQGRPPDJH]DXFXQILOORUVGXUHWUDLWGX
panneau.
Ŷ5HSODFH]WRXWHVOHVSLqFHVHWWRXVOHV
panneaux avant de rebrancher le réfrigérateur.
• Enlevez le couvercle
d’accès.
• Enlevez le capuchon en
matière plastique flexible
ou le capuchon du vis
du robinet d’arrêt d’eau
(branchement du réfrigérateur).puis
le jeter.
• Placez l’écrou de compression et la
bague (manchon) à l’extrémité du
tuyau comme l’indique l’illustration.
6LYRXVXWLOLVH]XQHWURXVVH6PDUW&RQQHFW
5HIULJHUDWRU7XELQJOHVpFURXVVRQWGpMjDVVHPEOpV
au tuyau.
,QVpUH]O¶H[WUpPLWpGXWX\DXGDQVOHEUDQFKHPHQWGX
robinet d’arrêt d’eau, le plus loin que possible. Tout
en tenant le tuyau, serrez le raccord.
• Si vous utilisez un tuyau en matière plastique
G¶XQHWURXVVH6PDUW&RQQHFW5HIULJHUDWRU7XELQJ
insérez l’extrémité moulée du tuyau dans le robinet
d’arrêt et serrez l’écrou de compression à la main,
puis serrez un autre tour avec une clé. Si vous
serrez trop fort, vous pouvez occasionner des fuites.
• Fixez le tuyau au collet fourni pour le tenir en
SRVLWLRQYHUWLFDOH,OHVWSRVVLEOHTXHYRXVD\H]j
disjoindre le collet.
9
FERMEZ L’EAU AU
NIVEAU DU ROBINET
D’ARRÊT
5HVVHUUH]WRXWMRLQWTXLIXLW
8
BRANCHEZ LE TUYAU À VOTRE
RÉFRIGÉRATEUR (Suite)
5HPHWWH]OHFRXYHUFOH
d’accès:
&ROOHWj
tuyau
eFURXGH
compression de
FPSR
&ROOHW
(manchon)
Tuyau
6PDUW&RQQHFW
Branchement au
réfrigérateur
Tuyau de
FP
(1/4 po)
10
INSTALLEZ LE RÉFRIGÉRATEUR
Branchez le réfrigérateur.
Disposez la spirale de tuyau
en cuivre de manière à ce
qu’elle ne vibre pas contre
l’arrière de votre réfrigérateur ou contre
le mur. Mettez votre réfrigérateur à sa
place contre le mur en le poussant.
11
METTEZ EN MARCHE LA MACHINE
À GLAÇONS
Déplacez le levier à la position ON (vers le bas) ou
déplacez l’interrupteur coulissant vers la position
ON (marche)La machine à glaçons ne se met en
marche que lorsqu’elle atteint une température de
fonctionnement
GH±&)
ou moins. Elle
commence
immédiatement à
fonctionner.
ON
OFF
,QWHUUXSWHXU
d’alimentation
Modèle de commutateur
de puissance
AVERTISSEMENT
RISQUE DE DÉCHARGE
ÉLECTRIQUE
Fixez le collier de serrage dans le trou présent
VHXOHPHQW1(3(5&(=3$6GDQVOHUpIULJpUDWHXU
INSTRUCTIONS D’INSTALLATION
49-1000249 Rev. 0 13
INSTRUCTIONS D’INSTALLATION
Instructions d’installation
INSTALLATION DE LA POIGNÉE
1
POSEZ LA FIXATION DE POIGNÉE
Posez la fixation de
poignée dans le trou sur
les portes du congélateur
et du réfrigérateur. Les
fixations correspondent
au côté poignée (le côté
opposé à la charnière).
2A
MODÈLES AVEC POIGNÉE EN
PLASTIQUE
1. Fixez la poignée sur la porte du congélateur en la
glissant vers le bas sur la fixation puis à l’aide de
vis dans le bas de la poignée.
2. Fixez la poignée sur la porte du réfrigérateur en la
glissant vers le haut sur la fixation puis à l’aide de
vis dans le haut de la poignée.
2
MODÈLES AVEC POIGNÉE EN
ACIER INOXYDABLE
1. Fixez la poignée sur la porte du congélateur à
l’aide de vis dans le bas de la poignée. Utilisez la
clé hexagonale 1/8 po fournie pour serrer la vis de
pression dans le haut de la poignée. Serrez jusqu’à
verrouiller la poignée solidement en position.
2. Fixez la poignée de la porte du réfrigérateur à
l’aide de vis dans le haut de la poignée. Utilisez la
clé hexagonale 1/8 po fournie pour serrer la vis de
pression dans le bas de la poignée. Serrez jusqu’à
verrouiller la poignée solidement en position.
3
ÉCUSSON ET LE BOUCHON
D’INSTALLATION
1. Placez un bouchon sur le côté opposé de la porte
du réfrigérateur de l’autre côté de la poignée.
5HWLUH]ODGRXEOXUHVXUO¶HQGRVGHO¶pFXVVRQ*(
Appliances et placez délicatement celui-ci dans
le trou à l’opposé de la poignée de la porte du
congélateur. Assurez-vous d’orienter l’écusson
correctement avant de l’appliquer sur la porte.
Fixation de poignée
REMARQUE :
Assurez-vous de
retirer la pellicule
avant de poser la
poignée, le cas
échéant.
REMARQUE : Assurez-vous
de retirer la pellicule avant
de poser la poignée, le cas
échéant.
Bouchon
eFXVVRQ
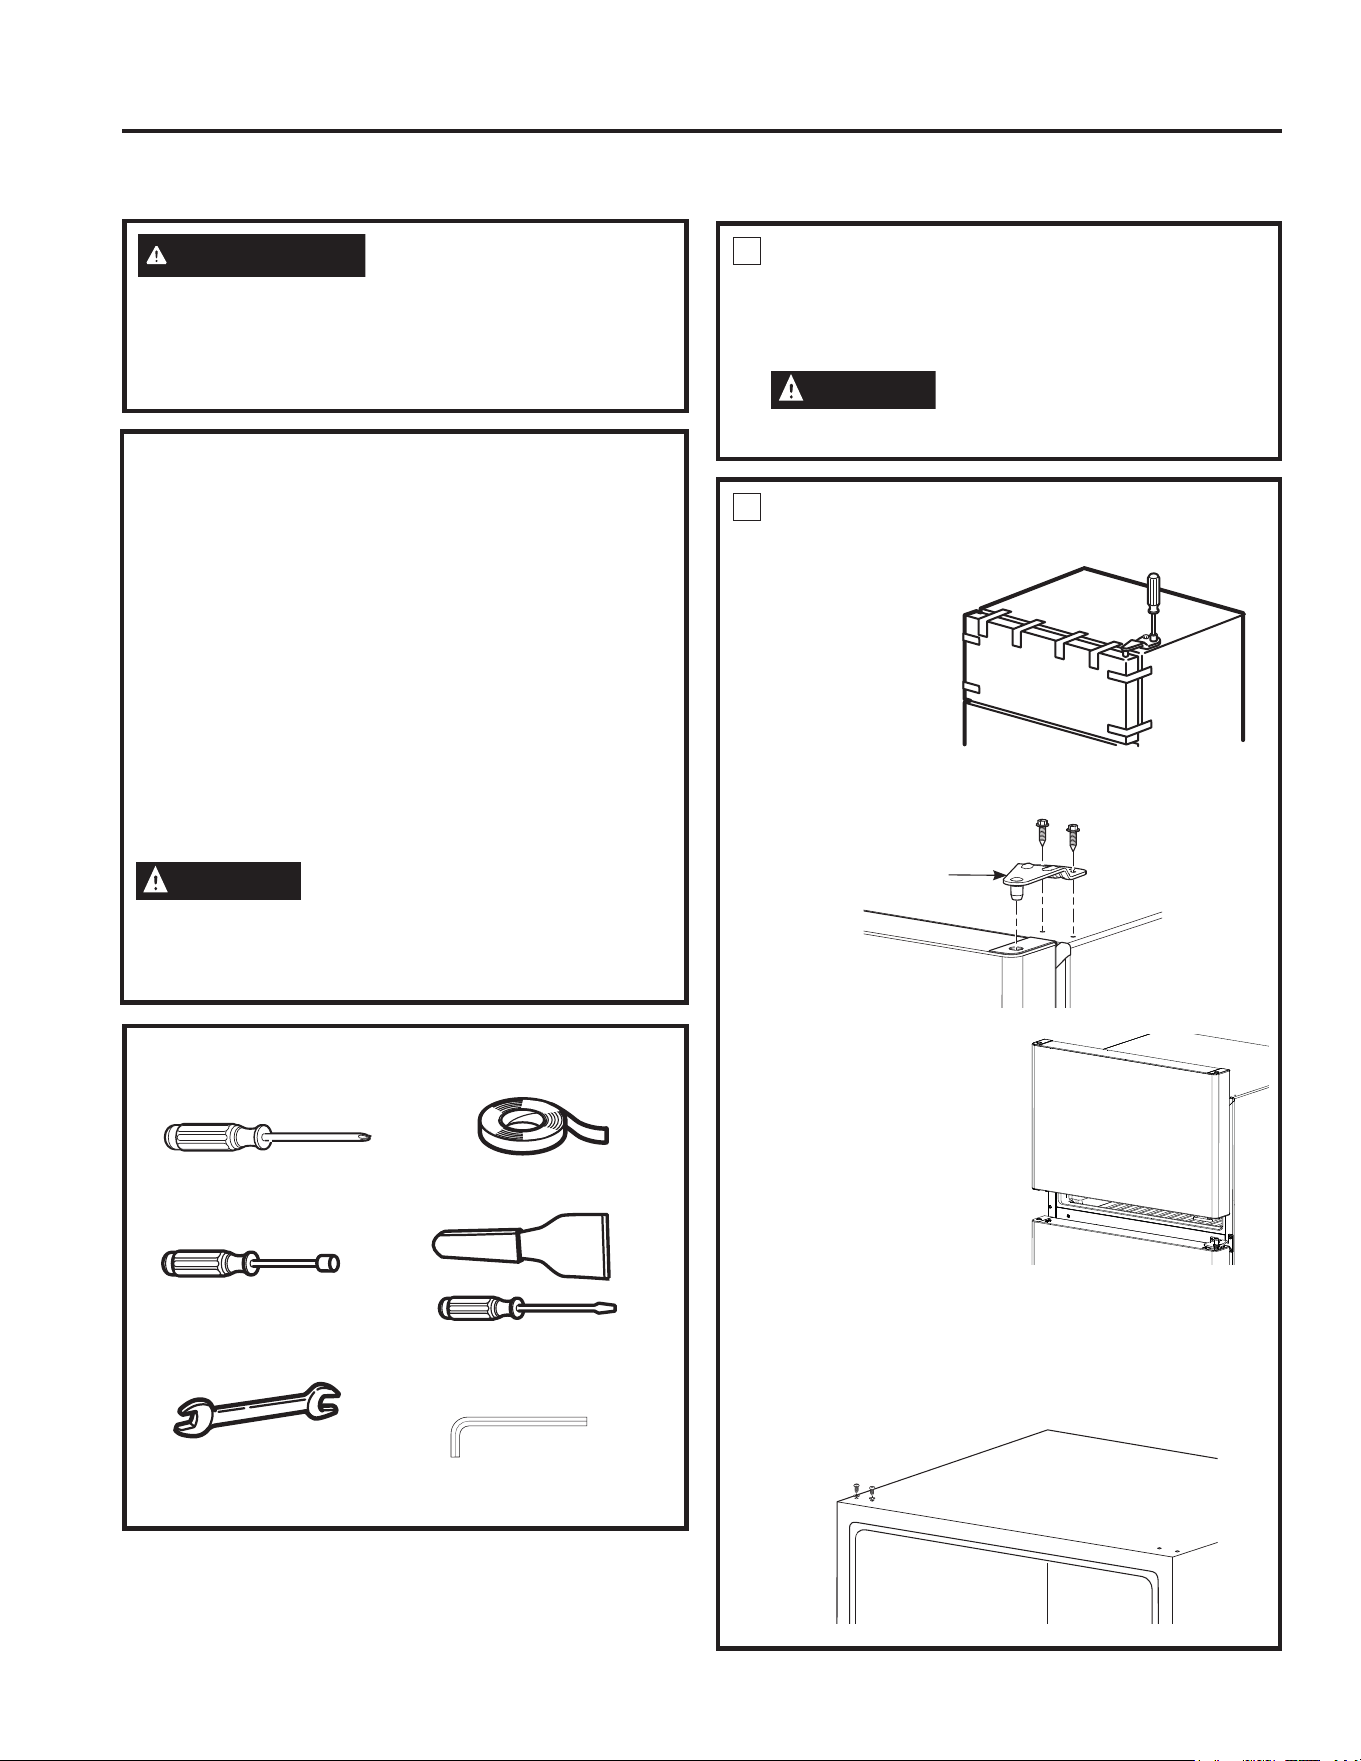
14 49-1000249 Rev. 0
INVERSION DE L’OUVERTURE DES PORTES
Instructions d’installation
1
AVANT DE COMMENCER
1.1 Débranchez le réfrigérateur.
1.2 Videz tous les balconnets y compris le
compartiment laitier.
ATTENTION
Ne laissez pas tomber la porte sur
le sol ce qui pourrait endommager la butée de porte.
2
ENLÈVEMENT DE LA PORTE DU
CONGÉLATEUR
2.1 Maintenez la
porte fermée
avec du ruban
à masquer.
2.2 Enlevez
les vis qui
retiennent
la charnière
supérieure à
la caisse.
2.3 Enlevez la charnière en
la soulevant pour libérer
l’axe de charnière du trou
sur le dessus de la porte
et mettez-la de côté avec
ses vis.
5HWLUH]OHUXEDQDGKpVLI
Soulevez la porte pour
la dégager de l’axe de
charnière central.
2.5 Placez la porte sur une surface antiégratignure
avec la surface extérieure vers le haut.
'pSODFH]OHVYLVGHSXLVOHF{WpRSSRVpGHOD
carrosserie jusqu’aux trous de vis laissés libres par
le retrait de la charnière supérieure.
OUTILS REQUIS
NOTES IMPORTANTES
Pour inverser le sens d’ouverture des portes :
• Lisez toutes les directives avant de commencer.
• Manipulez les pièces avec précaution pour éviter de rayer
la peinture.
• Placez les vis avec leurs pièces associées pour éviter de
les perdre.
• Posez les portes sur un plan de travail qui ne risque pas
de rayer la peinture.
IMPORTANT : Une fois commencée votre inversion du
sens d’ouverture des portes, ne déplacez jamais votre
réfrigérateur avant d’avoir terminé.
&HVGLUHFWLYHVV¶DSSOLTXHQWjO¶LQYHUVLRQGHVFKDUQLqUHV
du côté droit au côté gauche. Si vous voulez remettre
les charnières à droite, suivez les mêmes directives en
inversant toutes les références aux côtés gauche et droit.
ATTENTION
Portes pesantes
Les portes des compartiments réfrigérateur et congélateur
sont lourdes. Utilisez les deux mains pour immobiliser les
portes avant le soulèvement.
Tournevis Phillips
5XEDQFDFKH
Tourne-écrou à
douille de 3/8 po
(optionnel )
&OpRXYHUWHGHSR
(optionnel )
&RXWHDXjPDVWLTXHURX
tournevis à lame mince
(optionnel )
&Op$OOHQPRGqOHVj
poignée en acier inoxydable)
&KDUQLqUH
supérieure
AVERTISSEMENT
Suivez toutes les étapes pour
inverser le sens d’ouverture de porte. L’omission de suivre
ces instructions, de ne pas utiliser toutes les pièces, ou
le serrage excessif des vis, peuvent causer la chute de la
porte et occasionner des blessures ou des dommages à la
propriété.
INSTRUCTIONS D’INSTALLATION
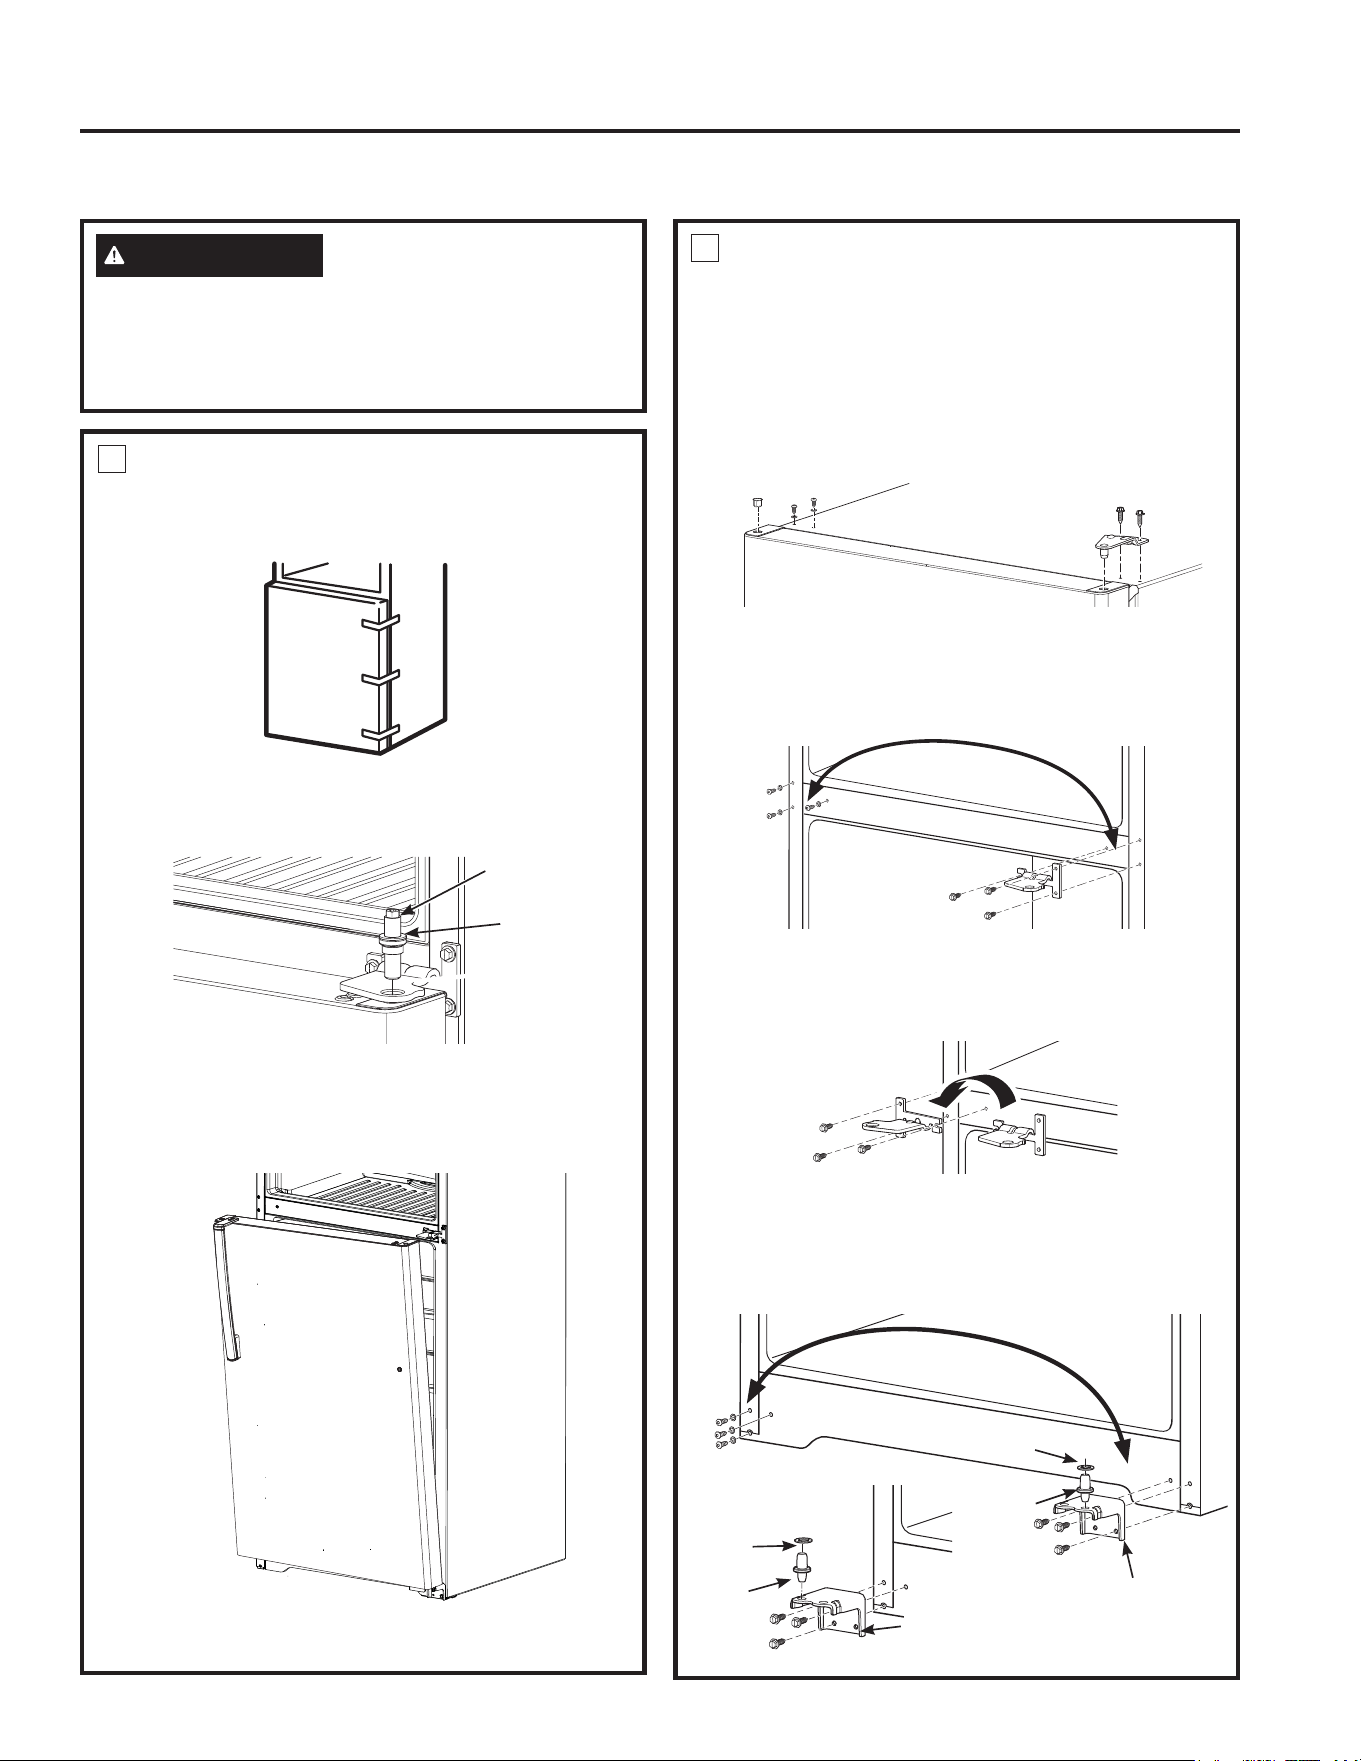
49-1000249 Rev. 0 15
INSTRUCTIONS D’INSTALLATION
Instructions d’installation
INVERSION DE L’OUVERTURE DES PORTES (SUITE)
3
ENLÈVEMENT DE LA PORTE DU
RÉFRIGÉRATEUR
3.1 Maintenez la porte fermée avec du ruban à
masquer.
3.2 Dévissez l’axe de charnière central et retirez-le de
son logement. Veillez à ne pas perdre la charnière
centrale et la rondelle.
3.3 Enlevez le ruban et inclinez la porte en l’éloignant
GHODFDLVVH5HOHYH]ODSRUWHGHO¶D[HGDQVOH
support de charnière inférieure (si la rondelle en
plastique colle au bas de la porte, replacez-la sur
la charnière).
3.4 Placez la porte avec l’extérieur vers le haut sur
une surface antiégratignure.
4
INVERSION DE LA QUINCAILLERIE
,QWHUYHUWLVVH]ODFKDUQLqUHHWOHVYLVGHODGURLWH
supérieure avec les vis de la gauche supérieure.
Ne serrez pas les vis du côté charnière.
NOTA: &HUWDLQHVFKDUQLqUHVVRQWGRWpHVGH
trous. Les trous que vous utilisez pour l’installation
GpSHQGHQWGXF{WpRYRXVSRVH]ODFKDUQLqUH
Une installation correcte exige que le bord
extérieur de la charnière soit parallèle au bord de
la carrosserie.
4.2 Enlevez les trois vis qui fixent la charnière centrale
à la carrosserie.
4.3 Déplacez les trois vis depuis le côté opposé de la
carrosserie jusqu’aux trous de vis laissés libres par
le retrait de la charnière centrale.
5HSRVH]ODFKDUQLqUHFHQWUDOHDYHFOHVWURLVYLV
du côté gauche de la carrosserie. NOTA : La
charnière centrale doit être retournée comme
illustrée lorsqu’elle est montée du côté gauche.
4.5 Enlevez les vis qui fixent la charnière inférieure
à la carrosserie. Déplacez la charnière inférieure
depuis la droite jusqu’au côté gauche de la
carrosserie. Déplacez l’axe de charnière sur le
côté opposé de la charnière et réinsérez les vis.
Axe de
charnière
central
5RQGHOOH
5RQGHOOH
en plastique
Axe de
charnière
Axe de
charnière
5RQGHOOHHQ
plastique
Support de
charnière
Support de
charnière
Déplacez l’axe
de charnière sur
le côté opposé
du support.
AVERTISSEMENT
Suivez toutes les étapes pour
inverser le sens d’ouverture de porte. L’omission de suivre
ces instructions, de ne pas utiliser toutes les pièces, ou
le serrage excessif des vis, peuvent causer la chute de la
porte et occasionner des blessures ou des dommages à la
propriété.
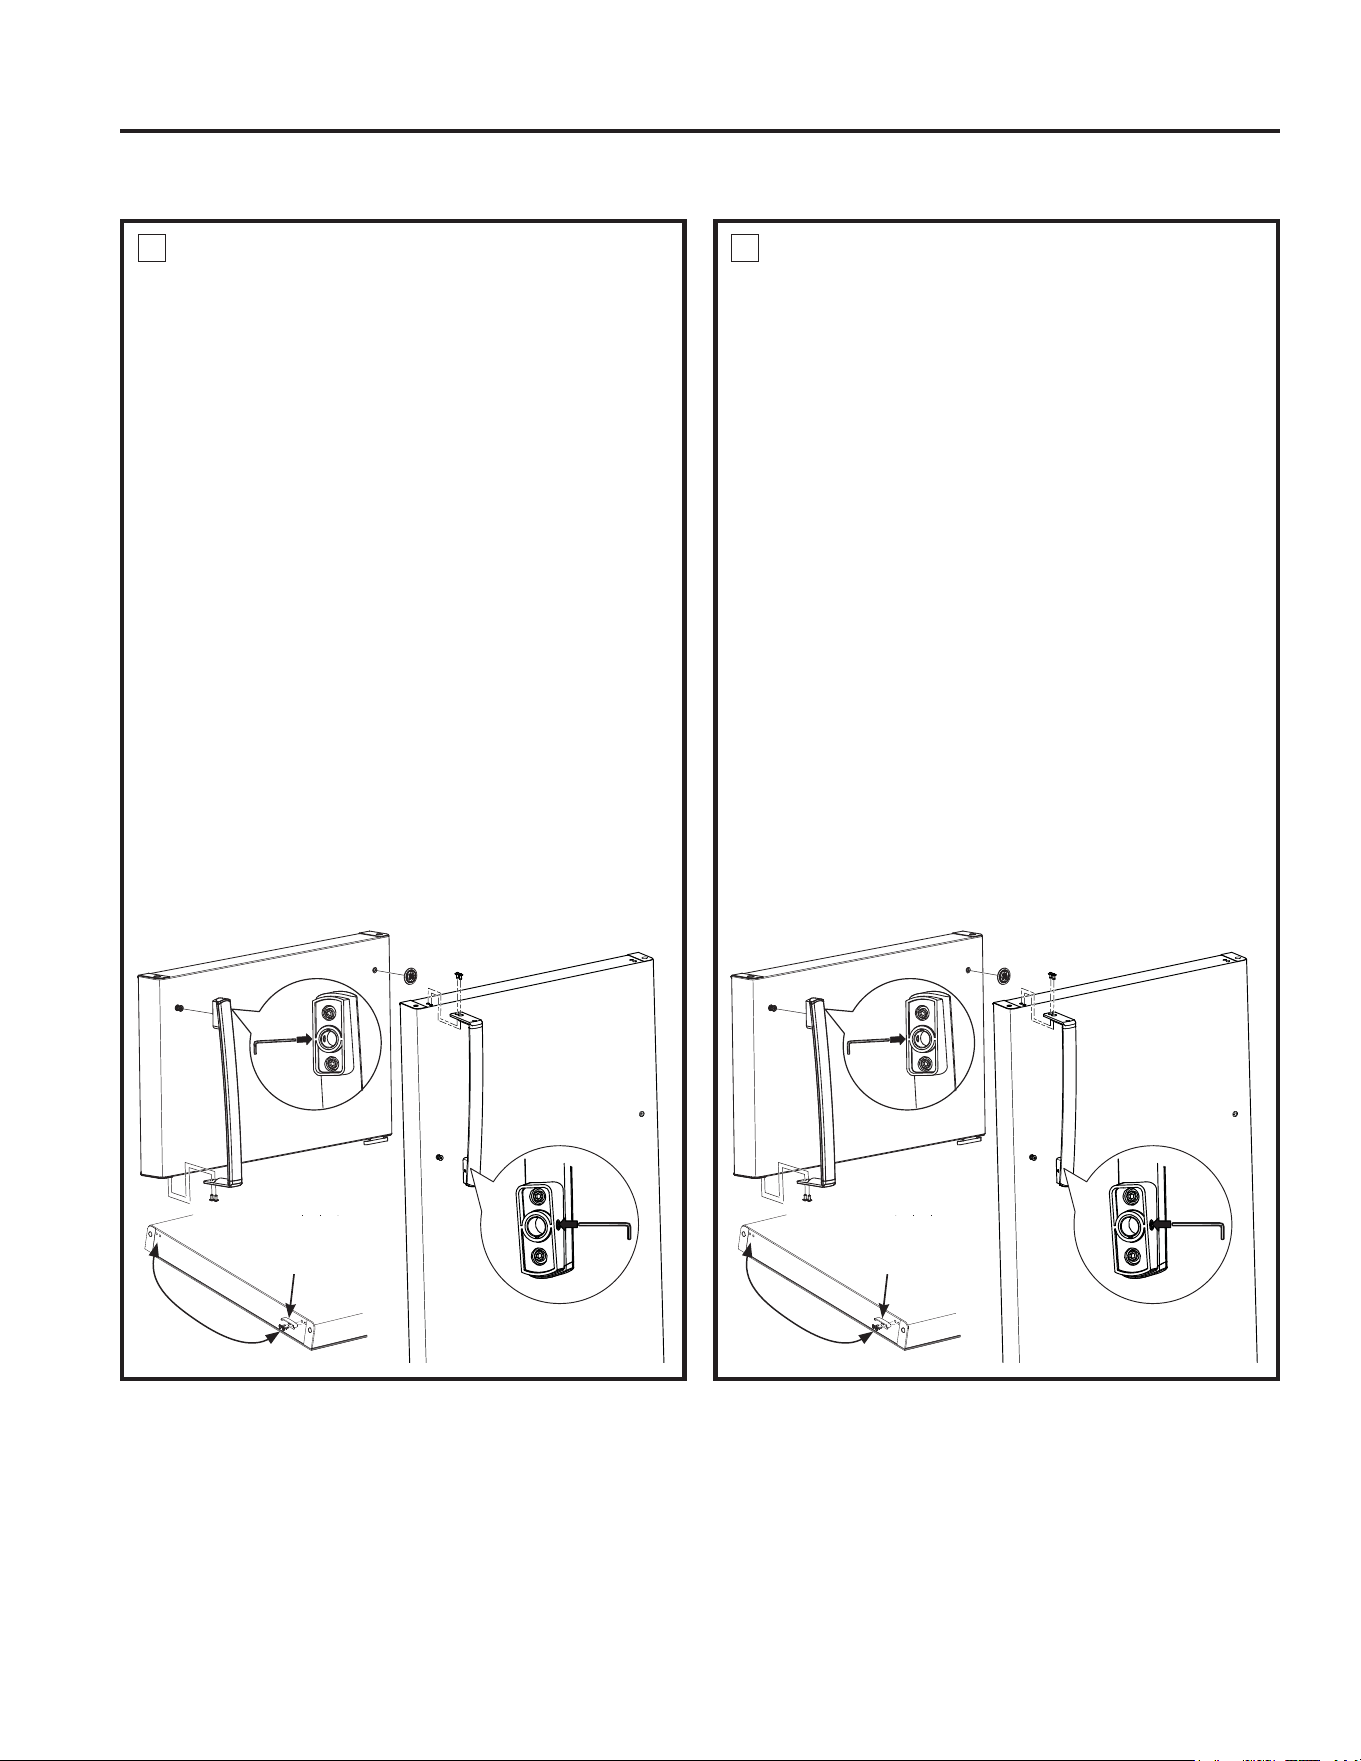
49-1000249 Rev. 0
Instructions d’installation
INVERSION DE L’OUVERTURE DES PORTES (SUITE)
5
INVERSION DES POIGNÉES DE
PORTE
POIGNÉE EN ACIER INOXYDABLE
5.1a. Enlevez les vis de la poignée dans le haut de
la porte du réfrigérateur. Enlevez les vis de la
poignée dans le bas de la porte du réfrigérateur.
5.2a. Desserrez la vis de pression de la poignée à
l’aide de la clé 1/8 po fournie.
D5HWLUH]ODSRLJQpHGHSRUWH
D,QYHUVH]OHVSRVLWLRQVGHODIL[DWLRQGHSRLJQpHHW
du bouchon sur le devant de la porte.
5.5a. Déplacez les bouchons dans le haut et le devant
de la porte pour boucher les trous inoccupés.
D'pSODFH]ODEXWpHGHSRUWHGDQVOHEDVGHOD
porte.
5.7a. Fixez la poignée de la porte du réfrigérateur à
l’aide de vis dans le haut de la poignée. Utilisez
la clé hexagonale 1/8 po pour serrer la vis de
pression dans le bas de la poignée..
5.8a. Fixez la poignée sur la porte du congélateur à
l’aide de vis dans le bas de la poignée. Utilisez
la clé hexagonale 1/8 po pour serrer la vis de
pression dans le haut de la poignée.
5.9a. Fixez l’écusson sur la porte du congélateur du
côté opposé de la poignée.
5
INVERSION DES POIGNÉES DE
PORTE (SUITE)
MONTAGE DE LA POIGNÉE DE PLASTIQUE
5.1b. Enlevez les vis de la poignée dans le haut de
la porte du réfrigérateur. Enlevez les vis de la
poignée dans le bas de la porte du réfrigérateur.
5.2b. Enlevez la poignée de la porte du réfrigérateur
en la glissant vers le haut pour la dégager de
la fixation. Enlevez la poignée de la porte du
congélateur en la glissant vers le bas pour la
dégager de la fixation.
E,QYHUVH]OHVSRVLWLRQVGHODIL[DWLRQGHSRLJQpHHW
du bouchon sur le devant de la porte.
5.4b. Déplacez les bouchons dans le haut et le devant
de la porte pour boucher les trous inoccupés.
5.5b. Déplacez la butée de porte dans le bas de la
porte.
E)L[H]ODSRLJQpHVXUODSRUWHGXUpIULJpUDWHXUHQ
la glissant vers le bas sur la fixation puis à l’aide
de vis dans le haut de la poignée.
5.7b. Fixez la poignée sur la porte du congélateur en la
glissant vers le haut sur la fixation puis à l’aide de
vis dans le bas de la poignée.
5.8b. Fixez la poignée sur la porte du congélateur en la
glissant vers le haut sur la fixation puis à l’aide de
vis dans le bas de la poignée.
Butée de porte
Butée de porte
INSTRUCTIONS D’INSTALLATION
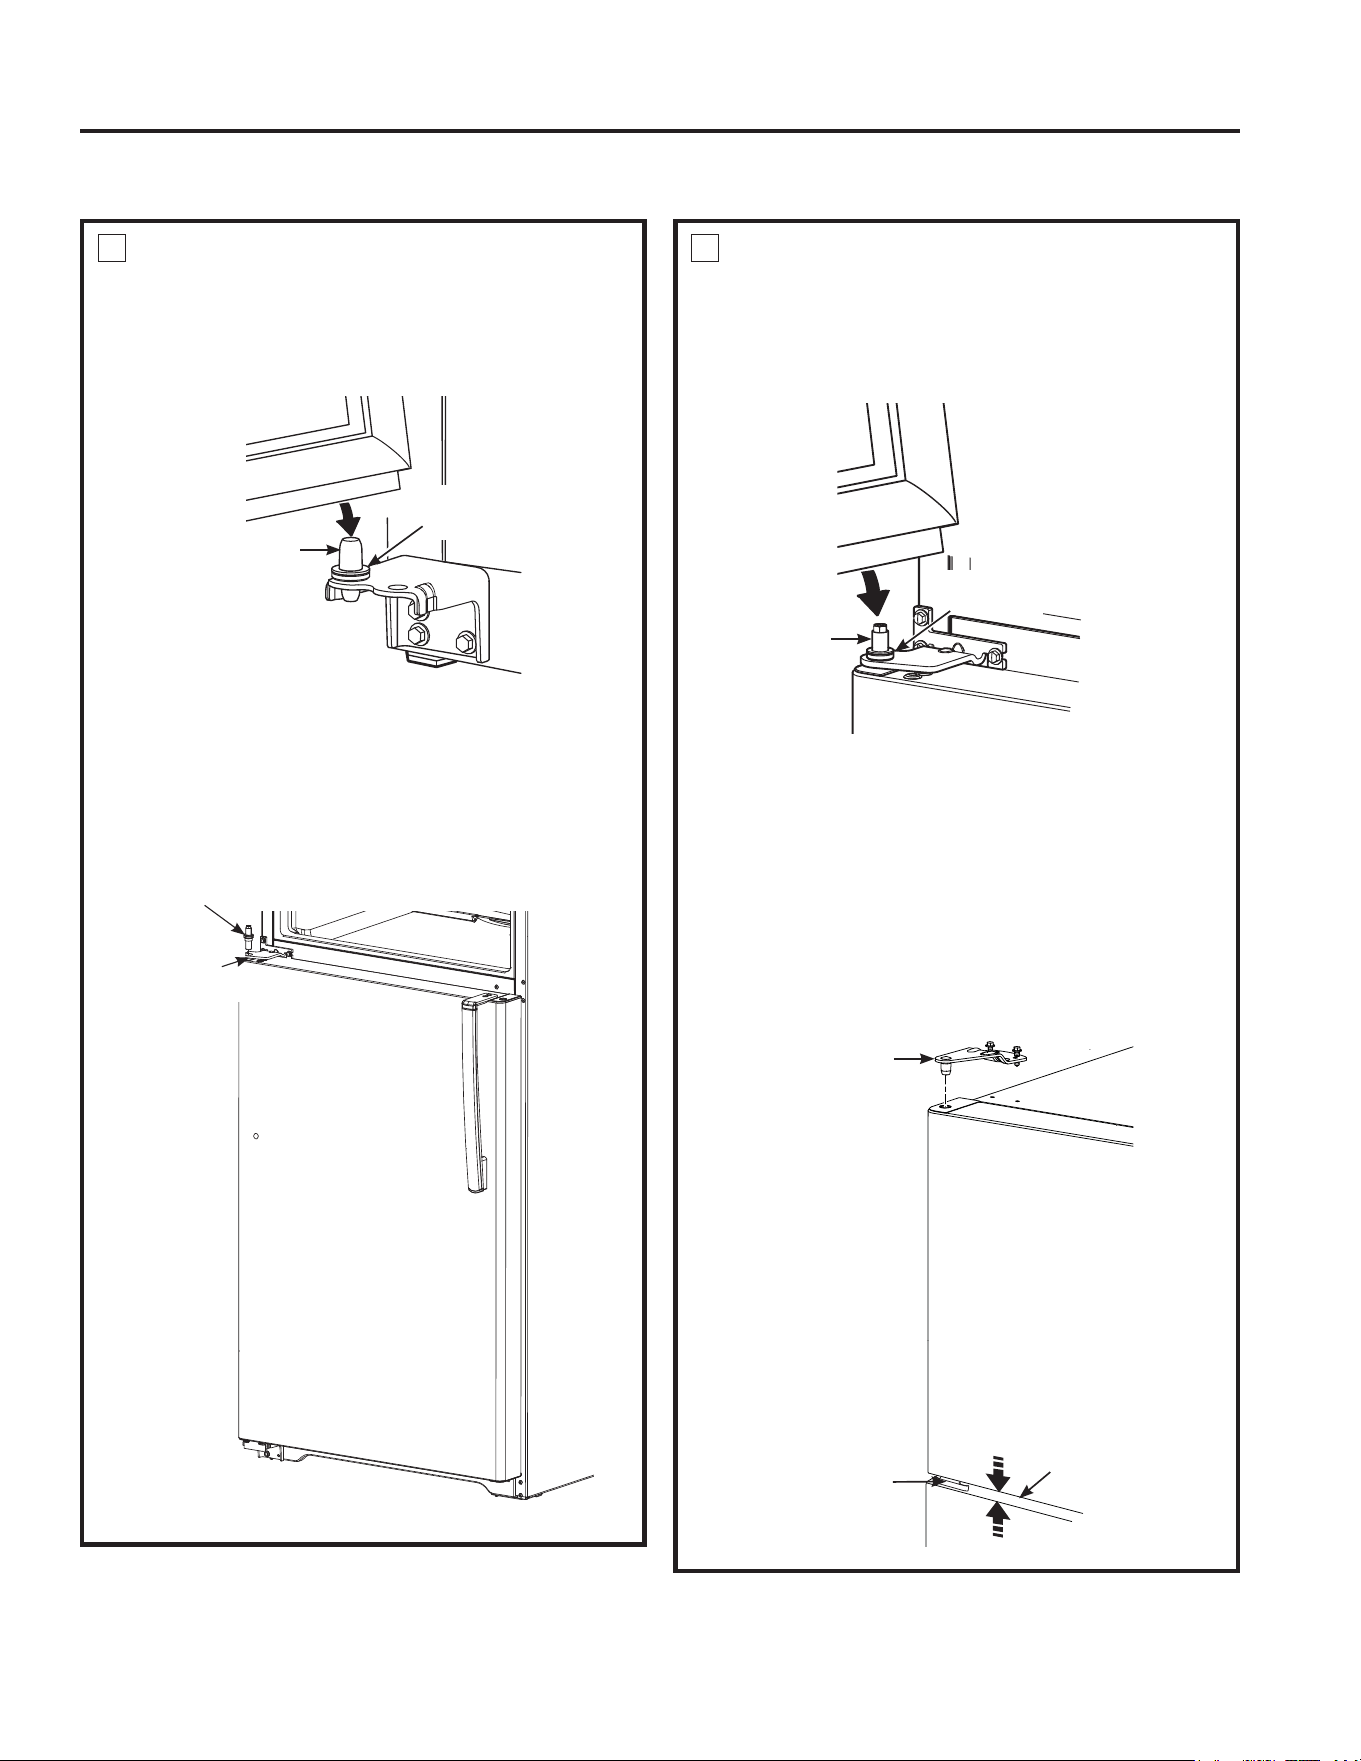
49-1000249 Rev. 0 17
INSTRUCTIONS D’INSTALLATION
INVERSION DE L’OUVERTURE DES PORTES (SUITE)
REMISE EN PLACE DES PORTES
5HPLVHHQSODFHGHODSRUWHGXUpIULJpUDWHXU
$EDLVVH]ODSRUWHGXFRPSDUWLPHQW
réfrigérateur sur l’axe de charnière inférieur.
Assurez-vous que la rondelle est en place
sur l’axe.
,QFOLQH]ODSRUWHYHUVODFDUURVVHULH/RUVTXH
la porte arrive en position, alignez le
logement dans la porte sur le trou dans la
charnière centrale. Placez l’axe de charnière
central dans le trou de la charnière centrale,
puis serrez. Assurez-vous que la rondelle se
trouve sur le dessus de l’axe.
REMISE EN PLACE DES PORTES
(suite)
5HPLVHHQSODFHGHODSRUWHGXFRQJpODWHXU
3ODFH]ODSRUWHGXFRQJpODWHXUVXUO¶D[HGH
charnière centrale. Assurez-vous que la
rondelle est en place sur l’axe.
,QFOLQH]ODSRUWHYHUVODFDUURVVHULHHQ
soulevant la charnière supérieure de façon
que l’axe s’insère dans le logement dans le
haut de la porte.
6¶DVVXUHUTXHODSRUWHHVWOpJqUHPHQW
au-dessus du haut de la carrosserie et que
l’espace entre les portes est uniforme sur
l’ensemble du devant. Serrer les vis de la
charnière supérieure. Ne serrez pas ces vis
excessivement. Serrez-les jusqu’au bout,
puis d’un autre demi-tour.
5RQGHOOHHQ
plastique
Axe de
charnière
Axe de
charnière
avec rondelle
Axe de
charnière
centrale
Axe de
charnière
5RQGHOOHHQ
plastique
&KDUQLqUH
supérieure
&KDUQLqUH
Espace
Instructions d’installation

18 49-1000249 Rev. 0
Bruits normaux de fonctionnement
Ŷ /HQRXYHDXFRPSUHVVHXU
à rendement élevé
peut fonctionner plus
longtemps et plus
vite que votre ancien
réfrigérateur et vous pouvez entendre un son modulé ou
un ronflement aigu pendant son fonctionnement.
Ŷ 9RXVSRXYH]HQWHQGUHXQVLIIOHPHQWORUVTXHOHVSRUWHVVH
IHUPHQW&HODYLHQWGHO¶pTXLOLEUDJHGHSUHVVLRQGDQVOH
réfrigérateur.
Les nouveaux réfrigérateurs n’émettent pas les mêmes sons que les anciens. Les réfrigérateurs modernes
comportent davantage de fonctions et utilisent une technologie plus récente.
Ŷ Vous pouvez entendre les ventilateurs
WRXUQHUjKDXWHVYLWHVVHV&HODVH
produit lorsque le réfrigérateur vient
d’être branché, lorsque les portes
sont ouvertes fréquemment ou lors de
l’ajout d’une grande quantité d’aliments
dans les compartiments congélateur
ou réfrigérateur. Les ventilateurs
permettent de maintenir les bonnes
températures.
CLICS, CLAQUEMENTS,
CRAQUEMENTS et
GRÉSILLEMENTS
Ŷ Vous pouvez entendre des craquements ou des
claquements lorsque le réfrigérateur est branché
SRXUODSUHPLqUHIRLV&HODVHSURGXLWORUVTXHOH
réfrigérateur se refroidit à la bonne température.
Ŷ Le compresseur peut causer un clic ou un
grésillement lors de la tentative de redémarrage
(cela peut prendre 5 minutes).
Ŷ L’expansion et la contraction des serpentins de
refroidissement pendant et après le dégivrage
peuvent causer un craquement ou un claquement.
Ŷ Sur les modèles équipés d’une machine à glaçons,
après un cycle de fabrication de glaçons, vous
pouvez entendre les glaçons tomber dans le bac.
%58,76'¶($8
Ŷ Le passage de l’agent frigorifique dans les serpentins
de refroidissement du congélateur peut être
accompagné d’un gargouillement semblable à celui de
l’eau en ébullition.
Ŷ L’eau tombant sur l’élément chauffant de dégivrage
peut faire un bruit de grésillement, de claquement ou de
bourdonnement pendant le cycle de dégivrage.
Ŷ Un bruit de suintement d’eau peut être entendu pendant
le cycle de dégivrage lorsque la glace de l’évaporateur
fond et tombe dans le bac de récupération.
Ŷ Fermer la porte peut causer un gargouillement en
raison de l’équilibrage de pression.
Entendez-vous ce que j’entends? Ces bruits sont normaux.
HUMMM...
WOUUCH...
OUIR !
CONSEILS DE DÉPANNAGE: Bruits normaux de fonctionnement

49-1000249 Rev. 0 19
CONSEILS DE DÉPANNAGE
Conseils de dépannage... Avant de faire un appel de service
eFRQRPLVH]WHPSVHWDUJHQW&RQVXOWH]G¶DERUGOHVWDEOHDX[GHVSDJHVVXLYDQWHVHWYRXVSRXUULH]YRXVpYLWHUXQDSSHOGH
service.Au besoin, vous pouvez programmer un appel de service en nous visitant sur GEAppliances.com ou en composant le
*(&$5(6$X&DQDGDYLVLWH]Electromenagersge.caRXFRPSRVH]OH
Vérité ou mythe
Vérité ou mythe? Réponse Explication
La machine à glaçons
automatique produit
de la glace lorsque le
réfrigérateur est bran-
ché dans une prise
électrique.
0<7+( Le réfrigérateur doit être raccordé à l’alimentation d’eau et la machine à glaçons doit être
allumée. Assurez-vous d’allumer la machine à glaçons, mais seulement après avoir raccordé
la conduite d’eau et ouvert le robinet d’eau. La machine à glaçons s’éteint en mettant
l’interrupteur à la position OFF (Arrêt).
La température du congélateur doit être égale ou inférieure à 15 degrés avant que la
machine à glaçons ne produise de la glace. Veuillez patienter 24 heures pour permettre au
réfrigérateur de refroidir et à la température de se stabiliser.
Je n’observerai jamais
de givre à l’intérieur du
compartiment congé-
lateur.
0<7+( Le givre à l’intérieur du congélateur indique généralement que la porte n’est pas
suffisamment étanche ou qu’elle a été laissée ouverte. Si du givre est observé, enlevez-le à
l’aide d’une spatule en plastique et d’une serviette, puis assurez-vous qu’aucun emballage
ou contenant d’aliment ne gêne la fermeture de la porte. Pour réduire le risque de givrage,
assurez-vous de laisser un dégagement suffisant à l’admission d’air et aux évents du
FRQJpODWHXUDILQG¶DPpOLRUHUODFLUFXODWLRQ5HFRXYUH]WRXMRXUVOHVDOLPHQWVDYDQWGHOHV
ranger dans le réfrigérateur puisque l’humidité émanant des contenants ouverts peut
contribuer à l’apparition du givre.
Les poignées de la
porte du réfrigérateur
peuvent se serrer
facilement.
9e5,7e Lâche ou ont une poignées d’écart peuvent être serrées à l’aide des vis aux extrémités des
poignées.
Une fois démarrée, la
machine à glaçons a
gaspillé 24 heures de
production de glace.
9e5,7e Le premier lot de glace doit être jeté en raison d’une odeur et d’un goût douteux.
La porte doit toujours
être enlevée lors de
l’installation.
0<7+( Les portes ne doivent être enlevées qu’en cas de nécessité pour éviter d’endommager les
lieux de passage ou permettrev l’accès à l’emplacement final. Si les portes sont enlevées,
YHXLOOH]FRQVXOWH]ODVHFWLRQ,QYHUVLRQGHO¶RXYHUWXUHGHVSRUWHVSRXUFRQQDvWUHODSURFpGXUH
de remise en place.
,OHVWSRVVLEOHG¶DMXVWHU
les roulettes arrière.
0<7+( Les pattes de nivellement avant sont ajustables et sont utilisées pour équilibrer le
réfrigérateur. Les pattes de nivellement servent à l’ajustement initial de la porte du
réfrigérateur. Une légère pente d’environ ¼ po doit être laissée de l’avant vers l’arrière pour
garantir la fermeture des portes.
N’importe quel
nettoyant tout usage
peut servir à nettoyer
le réfrigérateur.
0<7+( Les nettoyants tout usage ne sont pas recommandés pour le réfrigérateur.
N’utilisez pas de cire, de produit à polir, d’ammoniaque, de javellisant ou d’autres produits
contenant du chlore sur aucune des surfaces. Nettoyez les surfaces à l’aide d’un chiffon
imbibé d’eau savonneuse. Asséchez à l’aide d’un linge doux. On peut nettoyer les portes
en acier inoxydable avec un nettoyant de commerce spécialement conçu à cet effet. Les
QHWWR\DQWVTXLFRQWLHQQHQWGHO¶DFLGHR[DOLTXHSH[%DU.HHSHUV)ULHQG6RIW&OHDQVHU
éliminent la rouille
de surface
, la ternissure et les petites taches. Utilisez uniquement
un nettoyant liquide exempt d’abrasif et frottez dans la direction des lignes de brosse
à l’aide d’une éponge douce humide. N’utilisez pas de cire ou de produit à polir pour
électroménagers sur l’acier inoxydable.
Un nettoyage et un
entretien réguliers
prolongeront la durée
de vie des joints
d’étanchéité.
9e5,7e Nettoyez les joints d’étanchéité avec de l’eau tiède savonneuse. Assurez-vous que les plis
sont bien propres et secs après le nettoyage. Assurez-vous que les rebords sont exempts
de particules et de saletés. Une fois les joints d’étachéité nettoyés, appliquez de la paraffine
ou de la gelée de pétrole sur les joints d’étanchéité et sur les charnières (du côté charnière).
&HWWHPHVXUHHPSrFKHUDOHVMRLQWVGHFROOHURXGHVHGpIRUPHU
À la livraison, les
portes peuvent
comporter une
pellicule protectrice qui
doit être retirée avant
l’utilisation.
9e5,7e /HVSRUWHVDX¿QLOLVVHLQR[DUGRLVHQRLUHWEODQFEULOODQWVRXDUJHQWPpWDOOLTXH
comportent une pellicule de plastique transparent sur la porte qui doit être retirée après
l’installation.
Vous avez d’autres questions? Pour plus de renseignements sur votre réfrigérateur ou d’autres électroménagers GE, veuillez
visiter le electromenagersge.ca .

20 49-1000249 Rev. 0
Notes
49-1000249 Rev. 0 21
GARANTIE LIMITÉE
$JUDIH]YRWUHIDFWXUHLFL3RXUEpQp¿FLHUGXVHUYLFHGHUpSDUDWLRQ
sous garantie, une preuve de la date d’achat initial est nécessaire.
Garantie limitée du réfrigérateur
Pour les clients des États-Unis, WRXWHVOHVUpSDUDWLRQVHQYHUWXGHODJDUDQWLHVRQWIRXUQLVSDUQRV&HQWUHGH6HUYLFHG¶8VLQHRXSDU
XQWHFKQLFLHQDXWRULVp&XVWRPHU&DUH3RXUSUpYRLUXQHUpSDUDWLRQFRQVXOWH]QRWUHVLWHelectromenagersge.ca ou appelez le
*(&$5(9HXLOOH]DYRLUYRWUHQXPpURGHVpULHHWYRWUHQXPpURGHPRGqOHjSRUWpHGHPDLQORUVTXHYRXV
appelez pour obtenir un service. Au Canada,DSSHOH]OH
3RXUOHGLDJQRVWLFODUpSDUDWLRQGHYRWUHUpIULJpUDWHXUSHXWQpFHVVLWHUO¶XWLOLVDWLRQGXSRUWGHGRQQpHVHPEDUTXp&HOXLFLSHUPHWDX
WHFKQLFLHQGHUpSDUDWLRQ*($SSOLDQFHVGHGLDJQRVWLTXHUUDSLGHPHQWGHVSUREOqPHVDYHFYRWUHDSSDUHLO,OSHUPHWpJDOHPHQWj*(
Appliances d’améliorer ses produits en fournissant à ces derniers des informations sur votre appareil. Si vous ne voulez pas que les
données de votre appareil soient envoyées à GE Appliances, veuillez demander à votre technicien de NE PAS soumettre les données
à GE Appliances pendant la réparation.
Ce qui n’est pas couvert :
Pendant la période de :
GE Appliances remplacera
Un An
A compter de la date d’achat
initial
Toute pièce du réfrigérateur qui s’avère défectueuse en raison d’un défaut de matériau ou de
fabrication. Pendant la validité de la présente garantie limitée d’un an, GE fournira également
gratuitement la main d’œuvre et le service pour réparer la pièce défectueuse.
Trente Jours
(Filtre à eau,
si inclus) A compter de la date
d’achat initial
Toute pièce du une cartouche de filtre à eau qui s’avère défectueuse en raison d’un défaut de
matériau ou de fabrication. Pendant la validité de la présente garantie limitée de 30 jours, nous
fournirons gratuitement une cartouche de filtre à eau.
Pour les clients des États-Unis : &HWWHJDUDQWLHOLPLWpHHVWpWHQGXHjO¶DFKHWHXUG¶RULJLQHHWDX[SURSULpWDLUHVVXLYDQWVSRXUWRXW
SURGXLWDFKHWpSRXUXQHXWLOLVDWLRQGRPHVWLTXHDX[eWDWV8QLV6LOHSURGXLWHVWLQVWDOOpGDQVXQHUpJLRQRQHVHWURXYHDXFXQ
réparateur autorisé GE Appliances, vous devrez peut-être assumer les frais de transport ou apporter l’appareil à un centre de
service autorisé GE Appliances. En Alaska, cette garantie limitée exclut le coût d’expédition ou de dépannage à votre domicile.
&HUWDLQVpWDWVQ¶DFFHSWHQWSDVG¶H[FOXVLRQRXGHOLPLWHVDX[GRPPDJHVLQGLUHFWVFRQVpFXWLIV&HUWDLQVGURLWVSDUWLFXOLHUV
vous sont dévolus en vertu de la présente garantie limitée et peuvent s’accompagner d’autres droits qui varient selon votre
lieu de résidence. Pour connaître vos droits juridiques, veuillez consulter le bureau local ou le bureau d’état des affaires aux
consommateurs ou le Procureur Général de votre état.
Garant : États-Unis : GE Appliances, a Haier company
Louisville, KY 40225
EXCLUSION DES GARANTIES TACITES - Votre recours exclusif est l’échange du produit suivant
les modalités de la Garantie Limitée. Toutes garanties tacites, y compris les garanties de valeurs
marchandes ou d’adéquation à des fins particulières, sont limitées à une durée d’un an ou à la durée la
plus courte autorisée par la loi.
Pour les consommateurs canadiens: &HWWHJDUDQWLHHVWpWHQGXHjO¶DFKHWHXUG¶RULJLQHHWDX[SURSULpWDLUHVVXLYDQWVSRXUWRXW
SURGXLWDFKHWpDX[&DQDGDSRXUXQHXWLOLVDWLRQGRPHVWLTXHDX&DQDGD/HVHUYLFHjGRPLFLOHHQYHUWXGHODJDUDQWLHVHUDIRXUQL
GDQVOHVUpJLRQVRLOHVWGLVSRQLEOHHWR0&&RPPHUFLDO,QFHVWLPHUDLVRQQDEOHGHOHIRXUQLU
Garant Canada : MC Commercial Inc, Burlington, Ontario, L7R 5B6
Ŷ Les déplacements à votre domicile pour vous expliquer
l’utilisation de ce produit
Ŷ 8QHLQVWDOODWLRQOLYUDLVRQRXPDLQWHQDQFHGpIHFWXHXVH
Ŷ 8QHSDQQHGXSURGXLWSDUDEXVG¶XWLOLVDWLRQSDU
mauvaise utilisation, par modification ou s’il a été utilisé
dans un but autre que celui pour lequel il a été fabriqué.
Ŷ 'pWpULRUDWLRQGHVDOLPHQWV
Ŷ /HUHPSODFHPHQWGHVIXVLEOHVRXOHUpHQFOHQFKHPHQW
du disjoncteur du domicile.
Ŷ /HVGRPPDJHVFDXVpVDSUqVODOLYUDLVRQ
Ŷ /HUHPSODFHPHQWGHODFDUWRXFKHILOWUDQWHVLLQFOXVH
à cause d’une pression d’eau en dehors de la gamme
de fonctionnement recommandée ou à cause d’une
concentration excessive de sédiments dans l’eau
d’alimentation.
Ŷ /HUHPSODFHPHQWGHVDPSRXOHVVLLQFOXVHVRXOD
cartouche filtrante, si incluse, et dans des conditions
autres que celles susmentionnées.
Ŷ 7RXWGRPPDJHFDXVpSDUDFFLGHQWLQFHQGLHLQRQGDWLRQ
ou une catastrophe naturelle.
Ŷ 7RXWGRPPDJHIRUWXLWRXLQGLUHFWFDXVpSDUGHVGpIDXWV
éventuels de cet appareil.
Ŷ/HVHUYLFHV¶LOHVWLPSRVVLEOHG¶DYRLUDFFqVDXSURGXLW
Ŷ'RPPDJHVFDXVpVSDUO¶XWLOLVDWLRQG¶XQILOWUHTXLQ¶HVW
pas de marque GE Appliances.
Ŷ/HVGRPPDJHVjODILQLWLRQWHOVTXHURXLOOHGHVXUIDFH
ternisse ment ou petites taches, non signalés dans un
délai de 48 heures suivant la livraison.
Ŷ/HVSURGXLWVQ¶pWDQWSDVGpIHFWXHX[EULVpVRXTXL
fonctionnent selon la description du manuel du
propriétaire.
Ŷ'RPPDJHFDXVpSDUOHIRQFWLRQQHPHQWjYLGHVDQV
d’alimentation d’eau de la machine à glaçons.

,PSULPpDX[eWDWV8QLV
Soutien au consommateur
Site Web de GE Appliances
Vous avez une question ou vous avez besoin d’aide pour votre appareil électroménager? Visitez le site Web de GE
$SSOLDQFHVKHXUHVSDUMRXUWRXVOHVMRXUVGHO¶DQQpH9RXVSRXYH]DXVVL\WURXYHUG¶DXWUHVIRUPLGDEOHVSURGXLWV
*($SSOLDQFHVHWWLUHUDYDQWDJHGHWRXVQRVVHUYLFHVG¶DVVLVWDQFHHQOLJQH$X[eWDWV8QLVGEAppliances.com
$X&DQDGDElectromenagersge.ca
Enregistrez votre électroménager
(QUHJLVWUH]YRWUHQRXYHODSSDUHLOHQOLJQHDXPRPHQWTXLYRXVFRQYLHQWOHPLHX[/¶HQUHJLVWUHPHQWGHYRWUHSURGXLW
dans les délais prescrits permet une meilleure communication et un service rapide, selon les modalités de votre
garantie, si besoin est. Vous pouvez également envoyer par courrier la carte d’enregistrement pré-imprimée qui se
trouve dans l’emballage de votre appareil.
$X[eWDWV8QLVGEAppliances.com/register
$X&DQDGDProdsupport.mabe.ca/crm/Products/ProductRegistration.aspx
Service de réparation
8QVHUYLFHGHUpSDUDWLRQH[SHUW*($SSOLDQFHVVHWURXYHjTXHOTXHVSDVGHFKH]YRXV5HQGH]YRXVVXUQRWUHVLWH
et programmez, à votre convenance, une visite de réparation à n’importe quel jour de l’année.
$X[eWDWV8QLVGEAppliances.com/service ou composez le 800.432.2737 durant les heures normales de bureau.
$X&DQDGDElectromenagersge.ca/fr/soutien.demande-de-serviceRXFRPSRVH]OH
Prolongation de garantie
Procurez-vous une prolongation de garantie GE Appliances et informez-vous des rabais spéciaux en vigueur
pendant la durée de votre garantie. Vous pouvez vous la procurer en ligne en tout temps. Les services GE
$SSOLDQFHVVHURQWWRXMRXUVGLVSRQLEOHVDSUqVO¶H[SLUDWLRQGHODJDUDQWLH$X[eWDWV8QLV
GEAppliances.com/extended-warrantyRXFRPSRVH]OHGXUDQWOHVKHXUHVQRUPDOHVGHEXUHDX
$X&DQDGD Electromenagersge/fr/soutien/achat-d-une-garantie-prolongee ou composez le 800.290.9029
Connectivité à distance
Pour de l’assistance concernant la connectivité au réseau sans fil (pour les modèles équipés de cette fonction),
visitez notre site Web au GEAppliances.com/connectRXFRPSRVH]OHDX[eWDWV8QLVVHXOHPHQW
Pièces et accessoires
Les personnes ayant les compétences requises pour réparer elles-mêmes leurs appareils peuvent recevoir
GLUHFWHPHQWjODPDLVRQGHVSLqFHVRXDFFHVVRLUHVOHVFDUWHV9,6$0DVWHU&DUGHW'LVFRYHUVRQWDFFHSWpHV
&RPPDQGH]HQOLJQHKHXUHVSDUMRXU
$X[eWDWV8QLVGEApplianceparts.comRXSDUWpOpSKRQHDXGXUDQWOHVKHXUHVQRUPDOHVGHEXUHDX
Les instructions contenues dans le présent manuel comportent des procédures que tout utilisateur peut
effectuer. Les autres types de réparation doivent généralement être confiés à un technicien qualifié. Usez de
prudence : une réparation ou un entretien mal effectués peuvent rendre l’utilisation de l’appareil dangereuse.
/HVFRQVRPPDWHXUVDX&DQDGDGRLYHQWFRQVXOWHUOHVSDJHVMDXQHVSRXUFRQQDvWUHOHFHQWUHGHVHUYLFH0DEHOH
plus proche, visiter notre site Web au Electromenagersge/fr/produits/filtres-et-accessoiires ou composer le
Communiquez avec nous
Si vous n’êtes pas satisfait du service après-vente de GE Appliances, communiquez avec nous depuis notre site Web
en fournissant tous les détails dont votre numéro de téléphone, ou écrivez à :
$X[eWDWV8QLV*HQHUDO0DQDJHU&XVWRPHU5HODWLRQV_*($SSOLDQFHV$SSOLDQFH3DUN_/RXLVYLOOH.<
GEAppliances.com/contact
$X&DQDGD'LUHFWRU&RQVXPHU5HODWLRQV0&&RPPHUFLDO,QF_6XLWH)DFWRU\/DQH_0RQFWRQ1%(&0
Electromenagersge/fr/contactez-nous
SOUTIEN AU CONSOMMATEUR

INFORMACIÓN
DE SEGURIDAD ...................3
OPERACIÓN DEL
REFRIGERADORE
Control ...............................5
Estantes ..............................5
Gavetas ..............................6
Máquina de hielos automática ...........7
CUIDADO Y LIMPIEZA ...........8
INSTRUCCIONES PARA
LA INSTALACIÓN
Preparación para instalar el refrigerado . .9
Instalación de la tubería del agua .......10
Instalación de la manija de la puerta ....13
Cómo invertir el vaivén de la puerta ....14
CONSEJOS PARA
LA SOLUCIÓN DE PROBLEMAS
Sonidos normales de operación ........18
GARANTÍA LIMITADA .............21
SOPORTE AL CONSUMIDOR ...22
49-1000249 Rev. 0 01-19 GEA
Modelos 15,16,18
REFRIGERADORES
Congelador superior
ESPAÑOL
MANUAL DEL
PROPIETARIO E
INSTRUCCIONES DE
INSTALACIÓN
Escriba los números de modelo
y de serie aquí:
Nº de Modelo ____________
Nº de Serie ______________
Busque estos números en una etiqueta
del lado izquierdo, cerca de la parte
intermedia del compartimiento del
refrigerador.
GE es una marca registrada de General Electric Company. Fabricado bajo licencia de marca.

2 49-1000249 Rev. 0
GRACIAS POR HACER QUE GE APPLIANCES SEA PARTE DE SU HOGAR.
Ya sea que haya crecido usando GE Appliances, o que ésta es su primera vez, nos complace
tenerlo en la familia.
Sentimos orgullo por el nivel de arte, innovación y diseño de cada uno de los electrodomésticos de
GE Appliances, y creemos que usted también. Entre otras cosas, el registro de su electrodoméstico
asegura que podamos entregarle información importante del producto y detalles de la garantía
cuando los necesite.
Registre su electrodoméstico GE ahora a través de Internet. Sitios Web y números telefónicos útiles
están disponibles en la sección de Soporte para el Consumidor de este Manual del Propietario.
También puede enviar una carta en la tarjeta de inscripción preimpresa que se incluye con
el material embalado.
49-1000249 Rev. 0 3
INFORMACIÓN DE SEGURIDAD
LEA Y GUARDE ESTAS INSTRUCCIONES
INFORMACIÓN IMPORTANTE DE SEGURIDAD
LEA TODAS LAS INSTRUCCIONES ANTES DE USAR
PRECAUCIÓN
A fin de reducir el riesgo de lesiones al usar el refrigerador, siga estas precauciones básicas.
Ŷ 1ROLPSLHHVWDQWHVGHYLGULRQLWDSDVFRQDJXDFDOLHQWH
cuando estén fríos. Los estantes de vidrio y las tapas
se pueden romper si son expuestos a cambios de
temperatura repentinos o impactos, tales como sacudones
o caídas. El vidrio templado está diseñado para destruirse
en pequeñas piezas en caso de rotura.
Ŷ 0DQWHQJDORVGHGRVIXHUDGHORVHVSDFLRVGH³ULHVJRGH
lastimaduras”; los despejes entre las puertas y entre las
puertas y el gabinete son necesariamente pequeños.
Tenga el cuidado de cerrar las puertas cuando los niños
se encuentren en el área.
Ŷ 1RWRTXHODVVXSHUILFLHVIUtDVGHOFRPSDUWLPLHQWRGHO
freezer cuando las manos estén húmedas o mojadas,
ya que la piel se podrá adherir a estas superficies
extremadamente frías.
Ŷ 1RYXHOYDDFRQJHODUFRPLGDVTXHKD\DQHVWDGR
totalmente congeladas en forma previa.
Ŷ (QUHIULJHUDGRUHVFRQPiTXLQDVGHKDFHUKLHOR
automáticas, evite el contacto con las partes móviles del
mecanismo eyector o con el elemento de calefacción que
OLEHUDORVFXERV1RFRORTXHORVGHGRVQLODVPDQRVHQHO
mecanismo de la máquina de hielo automática mientras el
refrigerador esté enchufado.
ADVERTENCIA
A fin de reducir el riesgo de incendio, explosión, descargas eléctricas o lesiones al usar su
refrigerador, siga estas precauciones básicas de seguridad:
Ŷ (VWHUHIULJHUDGRUVHGHEHUiLQVWDODU\XELFDU
adecuadamente de acuerdo con las Instrucciones de
Instalación antes de ser usado.
Ŷ 'HVHQFKXIHHOUHIULJHUDGRUDQWHVGHKDFHUUHSDUDFLRQHV
reemplazar una lámpara de luz o hacer una limpieza.
NOTA: La corriente que va al refrigerador no puede ser
desconectada por ninguna configuración del panel de
control.
NOTA: Las reparaciones deberán ser realizadas por un
Profesional del Servicio Técnico calificado.
Ŷ 5HHPSODFHWRGDVODVSLH]DV\SDQHOHVDQWHVGHOXVR
Ŷ 1RXVHXQSURORQJDGRU
Ŷ 1RJXDUGHQLXVHJDVROLQDXRWURVYDSRUHVLQIODPDEOHV\
líquidos cerca de este ni de otro electrodoméstico.
Ŷ 1RJXDUGHVXVWDQFLDVH[SORVLYDVWDOHVFRPRODWDV
de aerosoles con propelentes inflamables en este
electrodoméstico.
Ŷ $ILQGHHYLWDUULHVJRVGHTXHORVQLxRVVXIUDQDVIL[LDR
queden atrapados, retire las puertas de comidas frescas y
del freezer de cualquier refrigerador antes de deshacerse
o dejar de usar el mismo.
Ŷ 3DUDHYLWDUOHVLRQHVJUDYHVRODPXHUWHORVQLxRVQRVH
deberán parar sobre ni jugar en o con el electrodoméstico.
Ŷ /RVQLxRV\ODVSHUVRQDVFRQFDSDFLGDGItVLFD
sensorial o mental reducida o con falta de experiencia y
conocimiento podrán usar este electrodoméstico sólo si
son supervisados o les fueron dadas instrucciones sobre
un uso seguro y entienden los riesgos involucrados.
Ŷ (VWHHOHFWURGRPpVWLFRIXHGLVHxDGRSDUDXVRKRJDUHxR
y para aplicaciones similares tales como: áreas de
personal de cocina en tiendas, oficinas y otros espacios
laborales; casas de campo; por clientes en hoteles,
moteles, hostales y otros espacios residenciales, catering
y aplicaciones no minoristas similares.
Ŷ 5HDOLFHODFRQH[LyQDXQVXPLQLVWURGHDJXDSRWDEOH
únicamente. Se requiere un suministro de agua fría para
el funcionamiento de la máquina de hielos automática. La
presión del agua deberá estar entre 40 y 120 psi (275-827
kilopascales).
Ŷ (VWHHOHFWURGRPpVWLFRIXHGLVHxDGRSDUDXVRKRJDUHxR
y para aplicaciones similares tales como: áreas de
personal de cocina en tiendas, oficinas y otros espacios
laborales; casas de campo; por clientes en hoteles,
moteles, hostales y otros espacios residenciales, catering
y aplicaciones no minoristas similares.
ADVERTENCIA
PELIGRO DE EXPLOSIÓN Refrigerantes Inflamables
Este electrodoméstico cuenta con refrigerante isobutano,
R600a, un gas natural con alto nivel de compatibilidad
medioambiental. Sin embargo, también es combustible.
Siga las advertencias que figuran a continuación, a fin de
reducir el riesgo de lesiones o daños sobre la propiedad.
1. Al mover, instalar y operar el electrodoméstico, se deberá
tener cuidado de no dañar la tubería del refrigerante.
2. El servicio técnico sólo debe ser realizado por personal
autorizado del servicio. Use sólo piezas del servicio
autorizadas por el fabricante
3. 'HVFDUWHHOHOHFWURGRPpVWLFRGHDFXHUGRFRQODV
Regulaciones Federales y Locales. El refrigerante
inflamable y el material aislante inflamable usados
requieren procedimientos de descarte especiales.
Comuníquese con las autoridades locales para descartar
su electrodoméstico de forma ambiental mente segura.
4. Mantenga las aberturas de ventilación en el espacio
de protección del electrodoméstico o en la estructura
incorporada libres de obstrucción.
5. 1RXVHGLVSRVLWLYRVPHFiQLFRVXRWURVPHGLRVSDUD
acelerar el proceso de descongela miento.
6. 1RGDxHHOFLUFXLWRGHOUHIULJHUDQWH
7. 1RXVHGLVSRVLWLYRVHOpFWULFRVGHQWURGHOFRPSDUWLPLHQWRGH
almacenamiento de comida del electrodoméstico.
4 49-1000249 Rev. 0
FORMA ADECUADA DE DESCARTAR SU ANTIGUO REFRIGERADOR
ADVERTENCIA
PELIGRO DE SUFFOCATION Y ENTRAPMENT
El incumplimiento de estas instrucciones de eliminación puede causar la muerte o lesiones graves.
IMPORTANTE: Que un niño quede atrapado o que sufra
una asfixia no son problemas del pasado. Los refrigeradores
antiguos o abandonados aún son peligrosos, incluso aunque
VHFRQVHUYHQSRU³VyORXQRVSRFRVGtDV´6LVHGHVKDUiGHVX
antiguo refrigerador, siga las siguientes instrucciones a fin de
evitar accidentes.
Antes de descartar su antiguo aparato:
Ŷ5HWLUHODVSXHUWDVGHFRPLGDVIUHVFDV\GHOIUHH]HU
Ŷ'HMHORVHVWDQWHVHQVXOXJDUGHPRGRTXHORVQLxRVQR
puedan trepar dentro con facilidad.
Cómo Eliminar Refrigerantes y Gomaespumas:
'HVFDUWHHOHOHFWURGRPpVWLFRGHDFXHUGRFRQODV5HJXODFLRQHV)HGHUDOHV\/RFDOHV(OPDWHULDODLVODQWHLQIODPDEOHXVDGR
requiere procedimientos de descarte especiales. Comuníquese con las autoridades locales para descartar su electrodoméstico
de forma ambientalmente segura
CONEXIÓN DE LA ELECTRICIDAD
INFORMACIÓN DE SEGURIDAD
INFORMACIÓN IMPORTANTE DE SEGURIDAD
LEA TODAS LAS INSTRUCCIONES ANTES DE USAR
Nunca, bajo ninguna circunstancia, corte o elimine el tercer cable (tierra) del cable de corriente. Para su seguridad
personal, este electrodoméstico debe estar adecuadamente conectado a tierra.
El cable de corriente de este electrodoméstico contiene un
enchufe de 3 cables (conexión a tierra) que se conecta a un
tomacorriente de pared estándar de 3 cables (conexión a
tierra) para minimizar la posibilidad de riesgos de descargas
eléctricas por parte del mismo.
Contrate a un electricista calificado para que controle el
tomacorriente y el circuito eléctrico, a fin de asegurar que el
enchufe esté correctamente conectado a tierra.
En caso de contar con un tomacorriente de pared de 2
cables, es su responsabilidad y obligación reemplazarlo
por un tomacorriente de pared de 3 cables correctamente
FRQHFWDGRDWLHUUD1RXVHXQDGDSWDGRU
El refrigerador debería estar siempre conectado a un enchufe
específico con un índice de voltaje equivalente al que figura
en su etiqueta de características técnicas.
Se requiere un suministro eléctrico con fusible y conexión
a tierra de 115 voltios de CA, 60 Hz, 15 o 20 amperes.
Esto garantiza el mejor funcionamiento y además previene
la sobrecarga de los circuitos del hogar, lo cual podría
ocasionar riesgos de incendio debido al recalentamiento de
cables.
1XQFDGHVHQFKXIHHOUHIULJHUDGRUWLUDQGRGHOFDEOHGH
corriente. Siempre tome su enchufe firmemente y empuje el
mismo hacia afuera para retirarlo.
Repare o reemplace de inmediato todos los cables de
FRUULHQWHSHODGRVRFRQFXDOTXLHUWLSRGHGDxR1RXVH
un cable con cortaduras o abrasión sobre su extensión o
extremos.
Al alejar el refrigerador de la pared, se deberá tener cuidado
de que no ruede sobre ni dañe el cable de corriente.
ADVERTENCIA
RIESGO DE DESCARGA ELÉCTRICA
Enchufe en un tomacorriente con conexión a tierra de 3 cables.
1RHOLPLQHHOFDEOHGHFRQH[LyQDWLHUUD
1RXVHXQDGDSWDGRU
1RXVHXQSURORQJDGRU
Si no se siguen estas instrucciones se podrá producir a muerte, incendios o descargas eléctricas.
LEA Y GUARDE ESTAS INSTRUCCIONES
INSTALACIÓN
ADVERTENCIA
RIESGO DE EXPLOSIÓN
Mantenga cualquier material y vapores inflamables, tales como gasolina, alejados del refrigerador. Si no se cumple con esto
se podrá producir una explosión, incendio o la muerte.
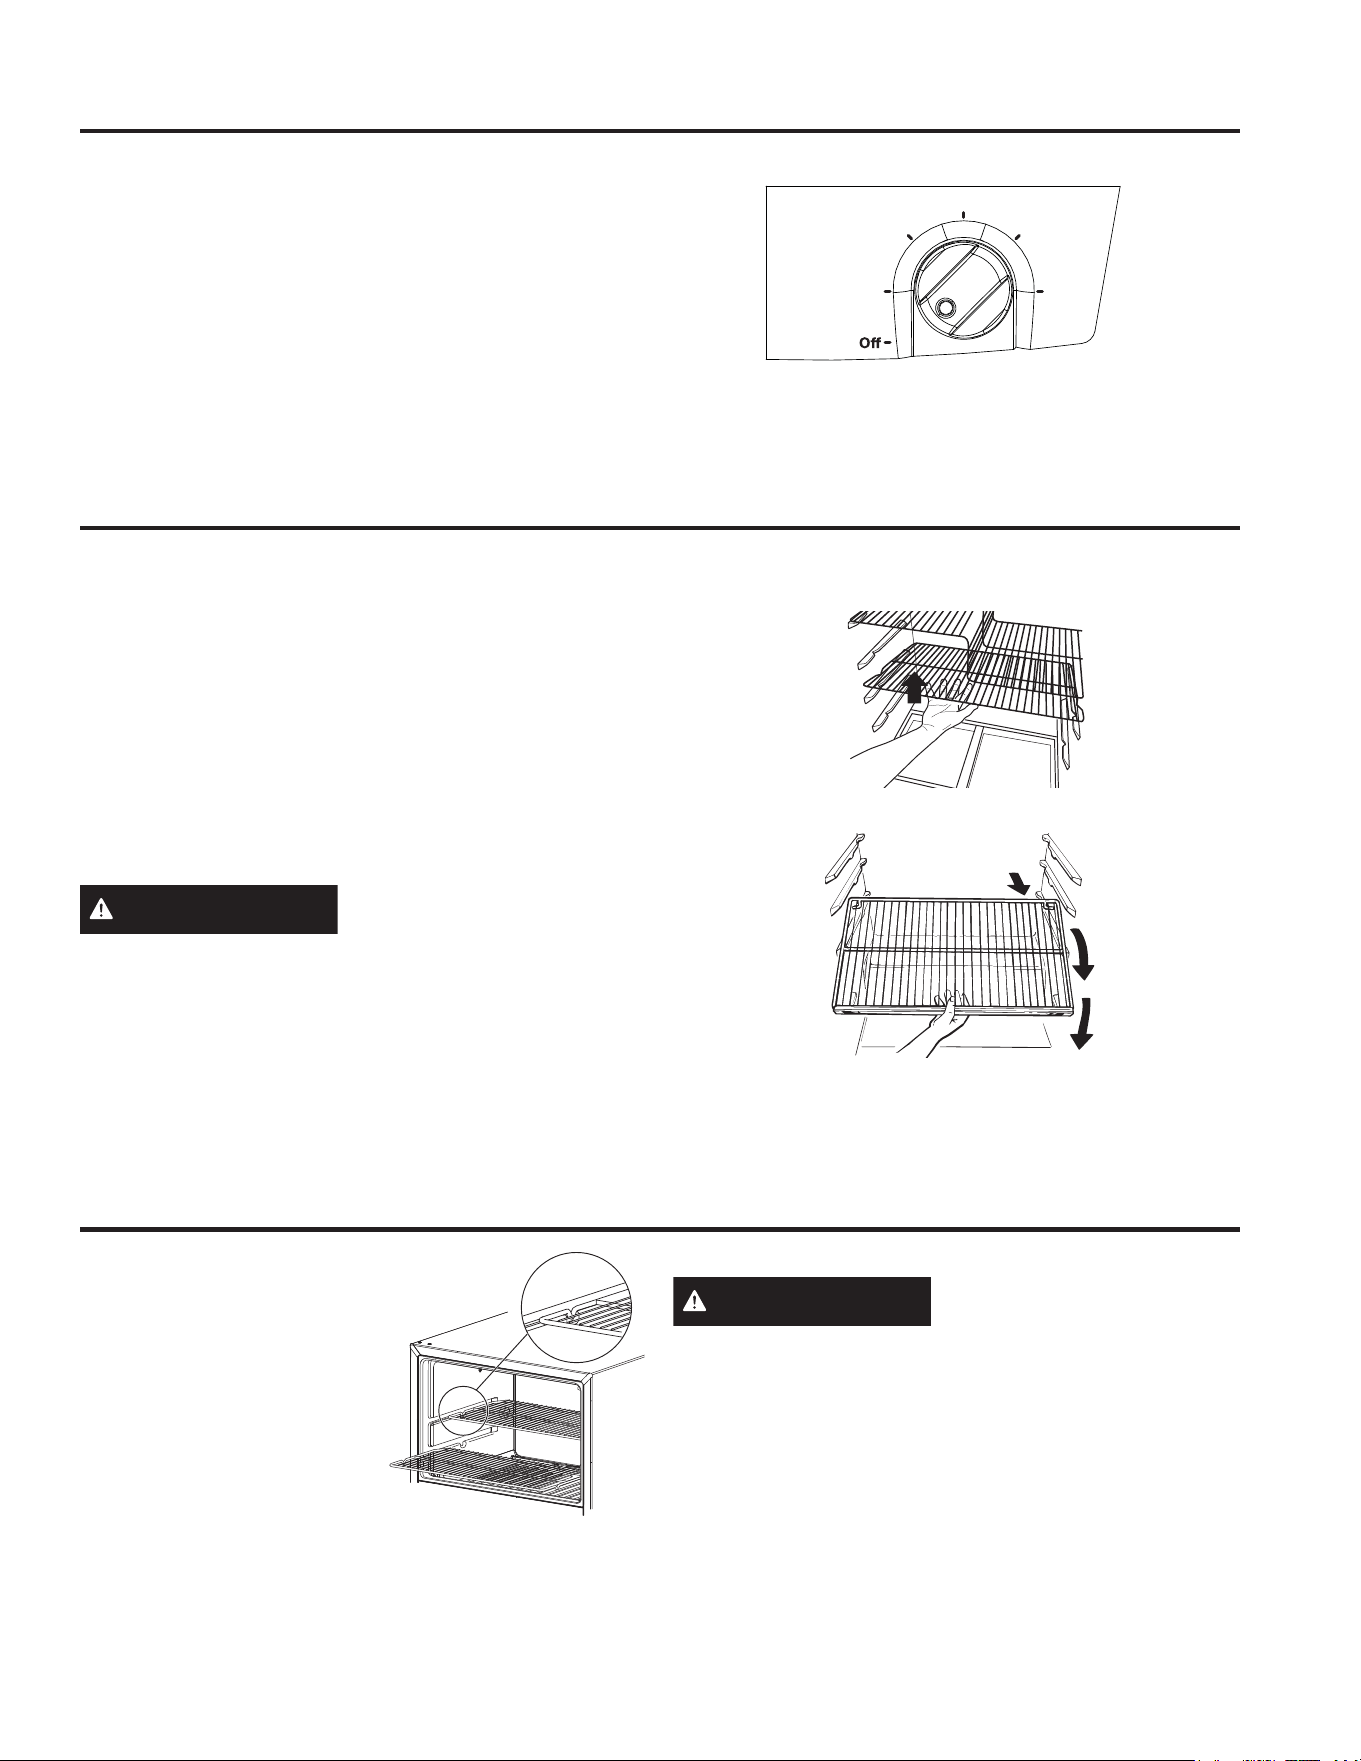
49-1000249 Rev. 0 5
l control de temperatura ajusta el refrigerador desde la
configuración más caliente a la más fría.
Su refrigerador contará con la configuración de fábrica
UHFRPHQGDGDHQ³´3DUDDFFHGHUDXQDWHPSHUDWXUD
PiVIUtDJLUHODSHULOODHQVHQWLGRKRUDULRD³´R´3DUD
acceder a una temperatura más cálida, gire el dial en sentido
DQWLKRUDULRD³´R³´ Para desactivar la función de frío en
ambos compartimientos, gire la perilla en dirección de en
GLUHFFLyQFRQWUDULDDODVDJXMDVGHOUHORMDODFRQILJXUDFLyQ³2II´
(Apagado). Se debe observar que esto no apaga la corriente
del refrigerador.
Control de la temperatura
Estantes del compartimiento de alimentos frescos
Estantes del compartimiento del congelador
/RVVRSRUWHVGHORVHVWDQWHVHQGLIHUHQWHVQLYHOHVOHSHUPLWHQDMXVWDUORVHVSDFLRVGHORVHVWDQWHV1RWRGDVODVIXQFLRQHV
corresponden a todos los modelos.
Estantes con Ancho Completo
Algunos modelos tienen un estante deslizante en alambre de
acero, un estante de vidrio temperado estacionario, un estante
a prueba de salpicaduras o dos estantes estacionarios en
alambre de acero. Estos estantes se pueden mover hacia otro
lugar en el compartimiento de alimentos frescos.
El estante deslizante de tamaño completo tiene frenos. Cuando
se coloca correctamente en los soportes del estante, el estante
frena antes de salirse completamente del refrigerador y no se
inclinará cuando coloque o retire alimentos del mismo.
PRECAUCIÓN
1ROLPSLHHVWDQWHVGHYLGULR
ni tapas con agua caliente cuando estén fríos. Los estantes
de vidrio y las tapas se pueden romper si son expuestos a
cambios de temperatura repentinos o impactos tales como
sacudones o caídas. El vidrio templado está diseñado para
destruirse en pequeñas piezas en caso de rotura.
Cuando se coloquen de forma
correcta en los soportes de los
estantes, los dos estantes fijos
con cables de acero se detendrán
antes de salir completamente
del freezer y no se inclinarán al
colocar o retirar comida de los
mismos.
Algunos modelos cuentan con estantes de vidrio.
PRECAUCIÓN
1ROLPSLHHVWDQWHVGHYLGULR
ni tapas con agua caliente cuando estén fríos. Los estantes
de vidrio y las tapas se pueden romper si son expuestos a
cambios de temperatura repentinos o impactos tales como
sacudones o caídas. El vidrio templado está diseñado para
destruirse en pequeñas piezas en caso de rotura.
Para retirar los estantes de ancho completo
Tire a la frente
OPERACIÓN DEL REFRIGERADORE: Control de la temperatura / Estantes
3
2
1
Recommended
Coldest
5
4
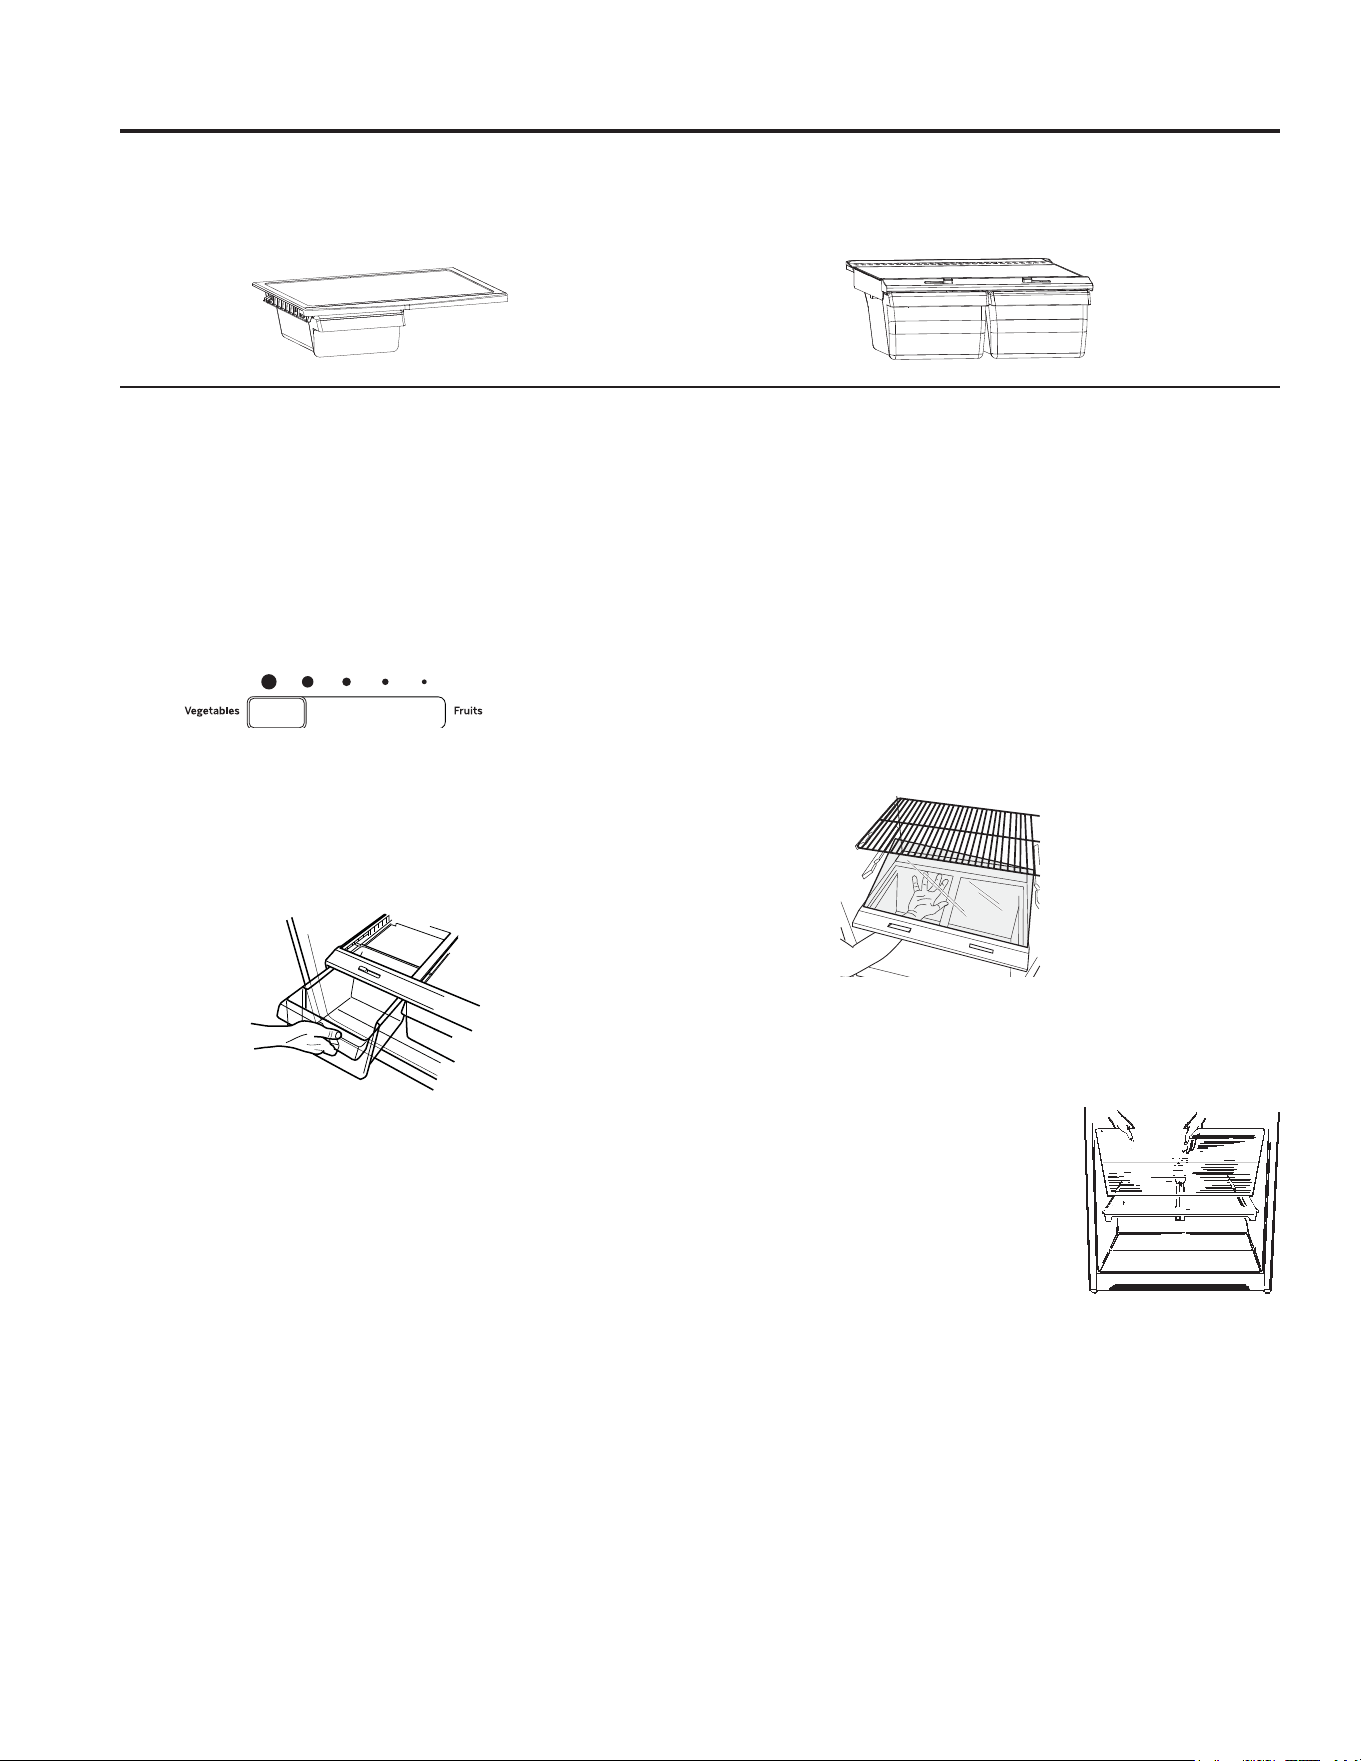
6 49-1000249 Rev. 0
OPERACIÓN DEL REFRIGERADORE: Gavetas
Cajón con Control de Humedad (en algunos modelos)
'HVOLFHHOFRQWUROFRPSOHWDPHQWHKDVWDODSRVLFLyQ+,*+DOWR
para ofrecer la alta humedad recomendada para la mayoría de
los vegetales.
/OHYHHOFRQWUROSRUFRPSOHWRKDVWDODSRVLFLyQ/2:EDMR
para ofrecer los niveles bajos de humedad recomendados para
la mayoría de las frutas.
Retiro del Cajón
Los cajones pueden ser retirados con facilidad tomando
ambos lados y levantando levemente mientras se los empuja
superando el punto de detención.
Retiro de la Tapa
1. Retire las gavetas.
2. Alcance y empuje la parte trasera de la tapa de vidrio hacia
arriba, y al mismo tiempo empuje la misma hacia atrás tanto
como sea posible.
Inclínela y sáquela. Evite limpiar la cubierta de vidrio fría
con agua caliente ya que la diferencia de temperaturas
extremas podría causar que se quiebre.
3. Retire el marco de la gaveta. (Siempre retire la cubierta de
vidrio antes de sacar el marco de la gaveta.)
Levante el marco de los soportes en cada costado y atrás,
hale hacia delante, incline y saque.
Para reemplazar:
1. Baje el marco hasta que descanse sobre los soportes en
cada costado y atrás.
2. Reemplace la tapa de vidrio,
empujando su extremo frontal de
manera firme sobre el canal de la
estructura frontal, y suavemente
haciendo descender la parte trasera
hasta su posición.
3. Reemplace las gavetas.
Gavetas de almacenamiento
1RWRGDVODVFDUDFWHUtVWLFDVHVWiQSUHVHQWHVHQWRGRVORVPRGHORV
Gaveta de refrigerio
La gaveta de refrigerio se puede mover a la posición más útil
según las necesidades de su familia.
Gavetas para frutas y vegetales
Se debe retirar el exceso de agua que se pueda acumular al
fondo de las gavetas y se deben secar las gavetas.
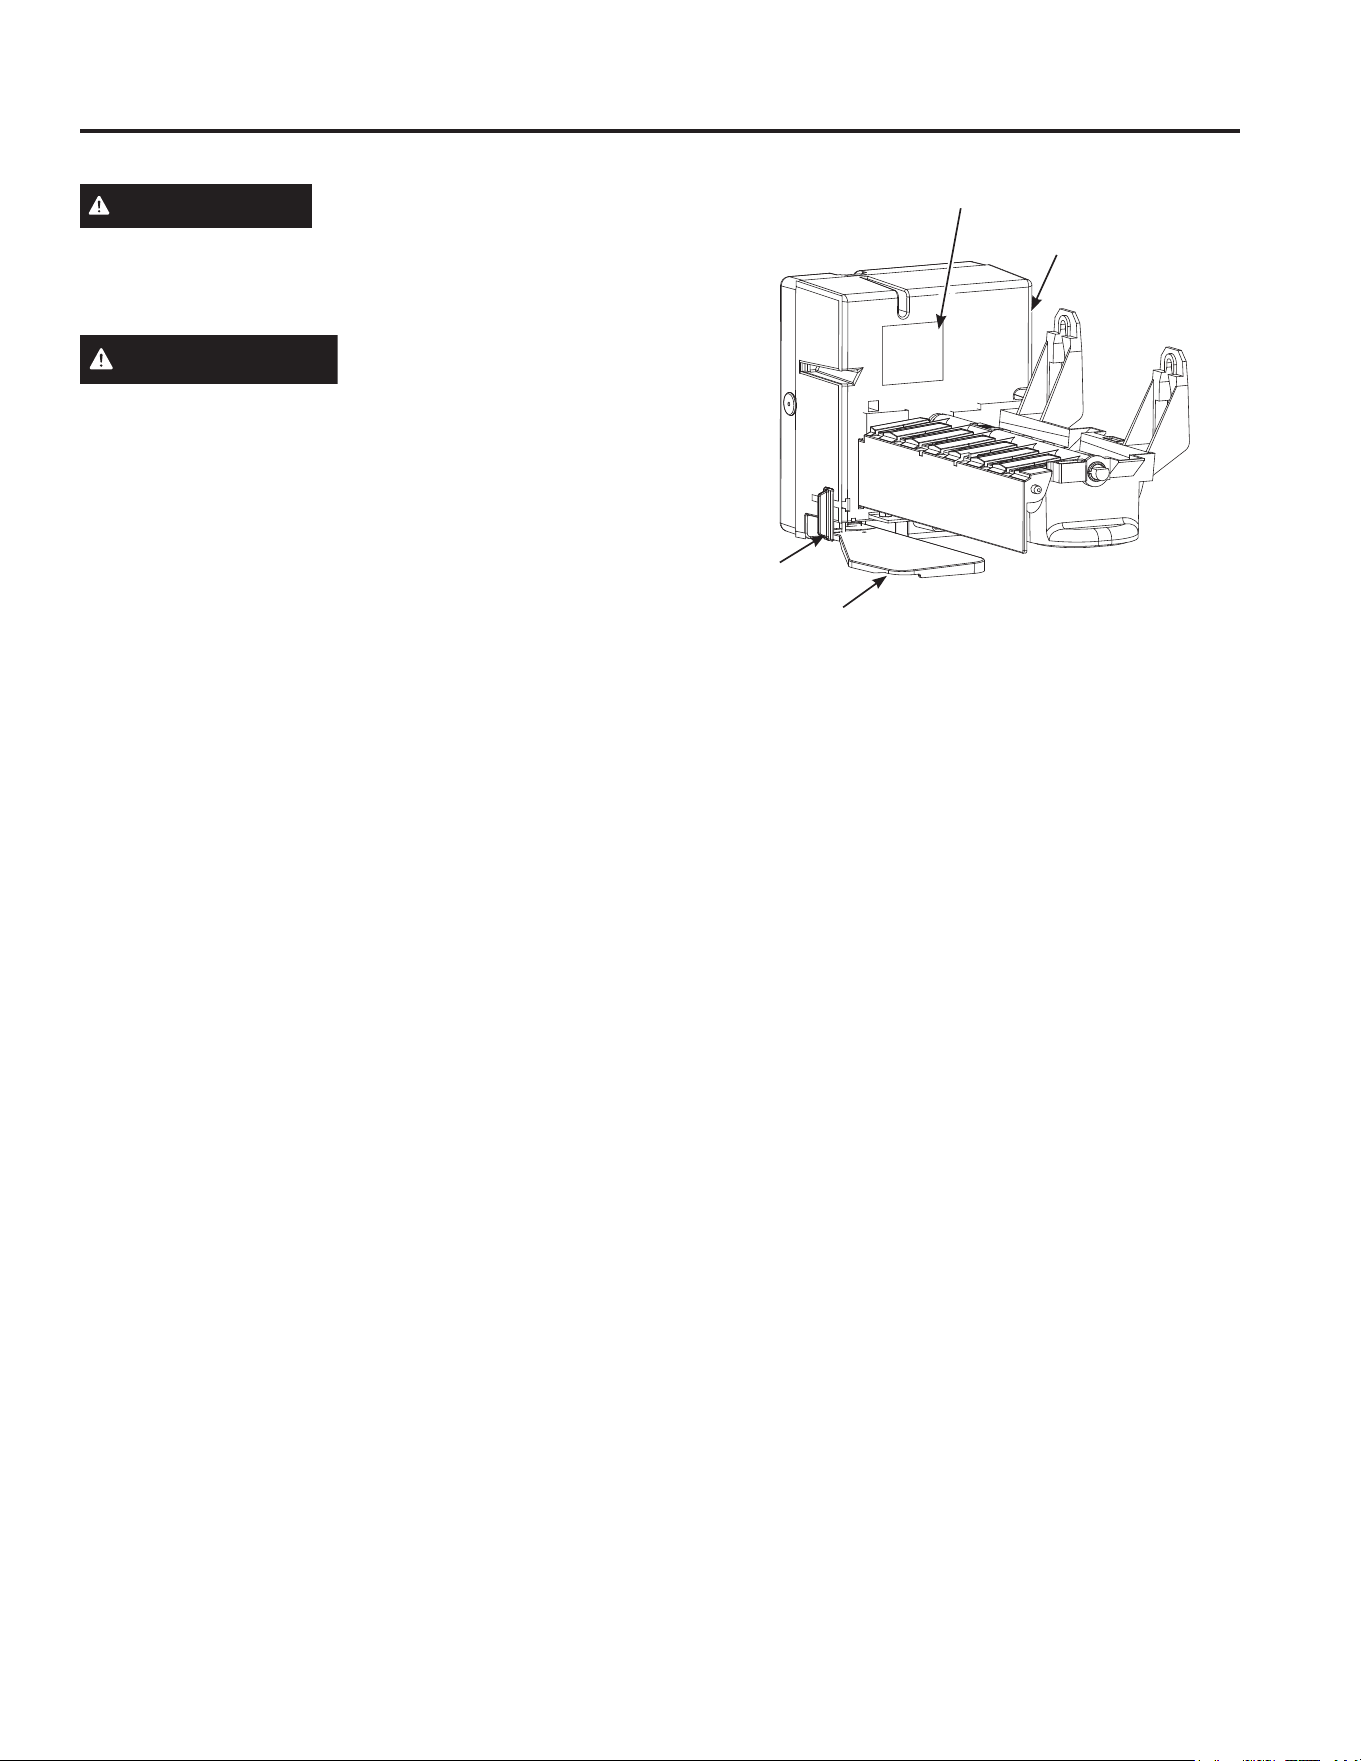
49-1000249 Rev. 0 7
Máquina de hielos automática (en algunos modelos)
ADVERTENCIA
Realice la conexión a un suministro
de agua potable únicamente. Se requiere un suministro de
agua fría para el funcionamiento de la máquina de hielos
automática. La presión del agua deberá estar entre 40 y 120
psi (275-827 kilopascales).
PRECAUCIÓN
Evite el contacto con las partes
en movimiento del mecanismo expulsor o con el elemento
de calefacción (ubicado en la parte inferior de la máquina de
KLHORTXHH[SXOVDORVFXERV1RFRORTXHORVGHGRVQLODV
manos en el mecanismo de la máquina de hielo automática
mientras el refrigerador esté enchufado.
Un refrigerador recientemente instalado puede tomar entre 12
y 24 horas para empezar a hacer hielo.
La máquina de hielos producirá siete cubos por ciclo,
aproximadamente entre 70 y 100 cubos en un período de 24
horas, dependiendo de la temperatura del compartimiento del
congelador, la temperatura del cuarto, el número de veces que
se abre la puerta y otras condiciones de uso.
Si el refrigerador se opera antes de hacer la conexión del agua
hacia la máquina de hielo, coloque el interruptor en la posición
2))$SDJDGR
Cuando el refrigerador fue desconectado del suministro de
DJXDPXHYDHOLQWHUUXSWRUDODSRVLFLyQ21(QFHQGLGR
La máquina de hielos se llenará de agua cuando se enfríe
hasta 15°F. Un refrigerador recién instalado se puede tomar
entre 12 y 24 horas para empezar a hacer cubos de hielo.
Una vez que la máquina de hielos comienza a hacer el hielo,
podrá tardar hasta 48 horas en llenar el cubo, dependiendo
de las configuraciones de la temperatura y de la cantidad de
aperturas de la puerta.
Escuchará un zumbido cada vez que la máquina de hielos se
llene de agua.
ADVERTIR: 'HVHFKHORVSULPHURVFXERVGHKLHORSDUDSHUPLWLU
que la línea del agua se limpie.
Asegúrese de que nada interfiera con el movimiento del brazo
indicador.
Cuando el contenedor se llene al nivel del brazo indicador, la
máquina de hielos dejará de producir hielos.
Es normal que varios cubos de hielo se junten.
Si el hielo no se usa con frecuencia, los cubos de hielo viejo
se volverán turbios, con sabor rancio y se encogerán o se
fusionarán.
Kit de accesorios de la máquina de hielos
Si su refrigerador no viene ya equipado con una máquina de
hielos automática, existe un kit accesorio para la máquina de
hielos que está disponible por un costo adicional.
El refrigerador acepta los kits de accesorios para la
PiTXLQDGHKLHORV,0'R,0'6LJDODVLQVWUXFFLRQHV9
suministradas en el kit de ensamble.
IMPORTANTE: Este refrigerador requiere el uso de una
máquina de hielos con etiqueta roja. Consulte más arriba
sobre la ubicación de la etiqueta en la máquina de hielos.
Si la máquina de hielos incluida con el kit no posee una
etiqueta roja, la misma no funcionará. En este caso, por favor
comuníquese al 800.GE.CARES (En Canadá al 800.561.3344)
para acceder a la máquina de hielos correcta.
OPERACIÓN DEL REFRIGERADORE: Máquina de hielos automática
1RWRGDVODVFDUDFWHUtVWLFDVHVWiQSUHVHQWHVHQWRGRVORVPRGHORV
Brazo con Sensor
Interruptor de
Encendido
Hielera
Etiqueta de la Máquina de Hielos
8 49-1000249 Rev. 0
Limpieza interior
Para ayudar a evitar olores, deje una caja abierta de
bicarbonato en los compartimientos de alimentos frescos y en
el congelador.
'HVFRQHFWHHOUHIULJHUDGRUDQWHVGHOLPSLDUOR6LHVWRQRHV
práctico, escurra la humedad excesiva con una esponja o paño
al limpiar alrededor de los interruptores, luces o controles.
Use una solución de agua tibia y bicarbonato—una cucharada
(15 ml) de bicarbonato para un cuarto (1 litro) de agua. Esto
limpia y neutraliza los olores. Enjuague y seque.
'HVSXpVGHOLPSLDUORVHPSDTXHVGHODSXHUWDDSOLTXHXQD
capa delgada de vaselina en los empaques de la puerta en el
costado de la bisagra. Esto ayuda a evitar que los empaques
se peguen y se doblen hasta perder su forma.
PRECAUCIÓN
1ROLPSLHHVWDQWHVGHYLGULR
ni tapas con agua caliente cuando estén fríos. Los estantes
de vidrio y las tapas se pueden romper si son expuestos a
cambios de temperatura repentinos o impactos tales como
sacudones o caídas. El vidrio templado está diseñado para
destruirse en pequeñas piezas en caso de rotura.
1RODYHQLQJXQDSDUWHSOiVWLFDGHOUHIULJHUDGRUHQODODYDGRUD
de platos.
Mover el refrigerador
Tenga cuidado al mover el refrigerador lejos de la pared.
Todos los tipos de cubiertas de piso se pueden dañar,
particularmente las cubiertas acojinadas y aquellas con
superficies con diseños en relieve.
Hale el refrigerador en línea recta y regréselo a su posición
empujándolo de la misma forma. Mover el refrigerador en una
dirección lateral puede resultar en daños a la superficie del
piso o al refrigerador.
Cuando empuje de nuevo el refrigerador, asegúrese de no
pisar el cable eléctrico o la línea de suministro a la máquina de
hielos (en algunos modelos).
'HVSXpVGHURGDUHOUHIULJHUDGRUDVXSRVLFLyQJLUHODVSDWDV
del refrigerador en el sentido de las manecillas del reloj hasta
que las patas sostengan nuevamente el peso del refrigerador.
Replacing the Lights
/DOX]/('HVWiXELFDGDHQHOFHQWURVXSHULRUGHO
compartimiento de comidas frescas.
Será necesario que un técnico autorizado reemplace
ODOX]/('
En caso de ser necesario un reemplazo de este ensamble,
llame al Servicio Técnico de GE Appliances al 1.800.432.2737
en Estados Unidos o al 1.800.561.3344 en Canadá.
Cómo prepararse para las vacaciones
Para una largas vacaciones o ausencias, retire los alimentos
y desconecte el refrigerador. Gire el dial de control de la
WHPSHUDWXUDKDFLDODSRVLFLyQ2))DSDJDGR\OLPSLHHO
interior con una solución de una cucharada de bicarbonato (15
PO\XQFXDUWROLWURGHDJXD'HMHODVSXHUWDVDELHUWDV
0XHYDHOLQWHUUXSWRUDODSRVLFLyQ2))$SDJDGRHQHOPRGHOR
con interruptor deslizable y cierre el suministro de agua hacia
el refrigerador.
Si la temperatura puede caer por debajo del punto de
congelamiento, haga que una persona calificada drene el
sistema del suministro de agua (en algunos modelos) para
evitar serios daños a la propiedad causados por inundaciones.
Cómo prepararse para trasladarse
Asegure todos los artículos sueltos como la rejilla, los estantes
y cajones pegándolos con cinta en su lugar para evitar daños.
A fin de evitar la apertura de puertas durante el movimiento,
asegure las mismas al cuerpo con cinta. Asegúrese de que el
refrigerador permanezca en una posición vertical durante el
traslado.
Cuidado y limpiez
CUIDADO Y LIMPIEZ
Limpieza exterior
Instrucciones para la Limpieza de Superficies Exteriores, Manijas de Puertas y Bordes
USE NO USE
Telas suaves y limpias o esponjas Telas abrasivas, esponjas de fregar, almohadillas de estropajo
o de lana de acero
'HWHUJHQWHVXDYHPH]FODGRFRQDJXDFDOLHQWH
Limpiadores de acero inoxidable aprobados. 9LVLWHODWLHQGD
de piezas de GE Appliances para acceder a limpiares de
acero inoxidable aprobados: GEApplianceparts.com o
comuníquese al 877.959.8688
Los limpiadores con ácido oxálico tales como Bar Keepers
Friend Soft Cleanser™ podrán ser usados para eliminar el
óxido, deslustres y pequeñas manchas de las superficies de
acero inoxidable únicamente.
Polvos o rociadores abrasivos
5RFLDGRUHVGH9HQWDQDR$PRQtDFR
Limpiadores a base de cítrico o aceite vegetal
Limpiadores ácidos o a base de vinagre
Limpiadores de horno
Limpiadores que contengan acetona (propanona)
&XDOTXLHUOLPSLDGRUFRQ$'9(57(1&,$6VREUHHOFRQWDFWR
con el plástico
NOTA: 12SHUPLWDTXHHOOLPSLDGRUGHDFHURLQR[LGDEOHHQWUHHQFRQWDFWRFRQFXDOTXLHUSDUWHSOiVWLFDWDOFRPRSDUWHVGHERUGHV
materiales de manijas y cobertores. Si se produce un contacto no intencional de los limpiadores con las partes plásticas, limpie
estas últimas con una esponja y un detergente suave mezclado con agua caliente.
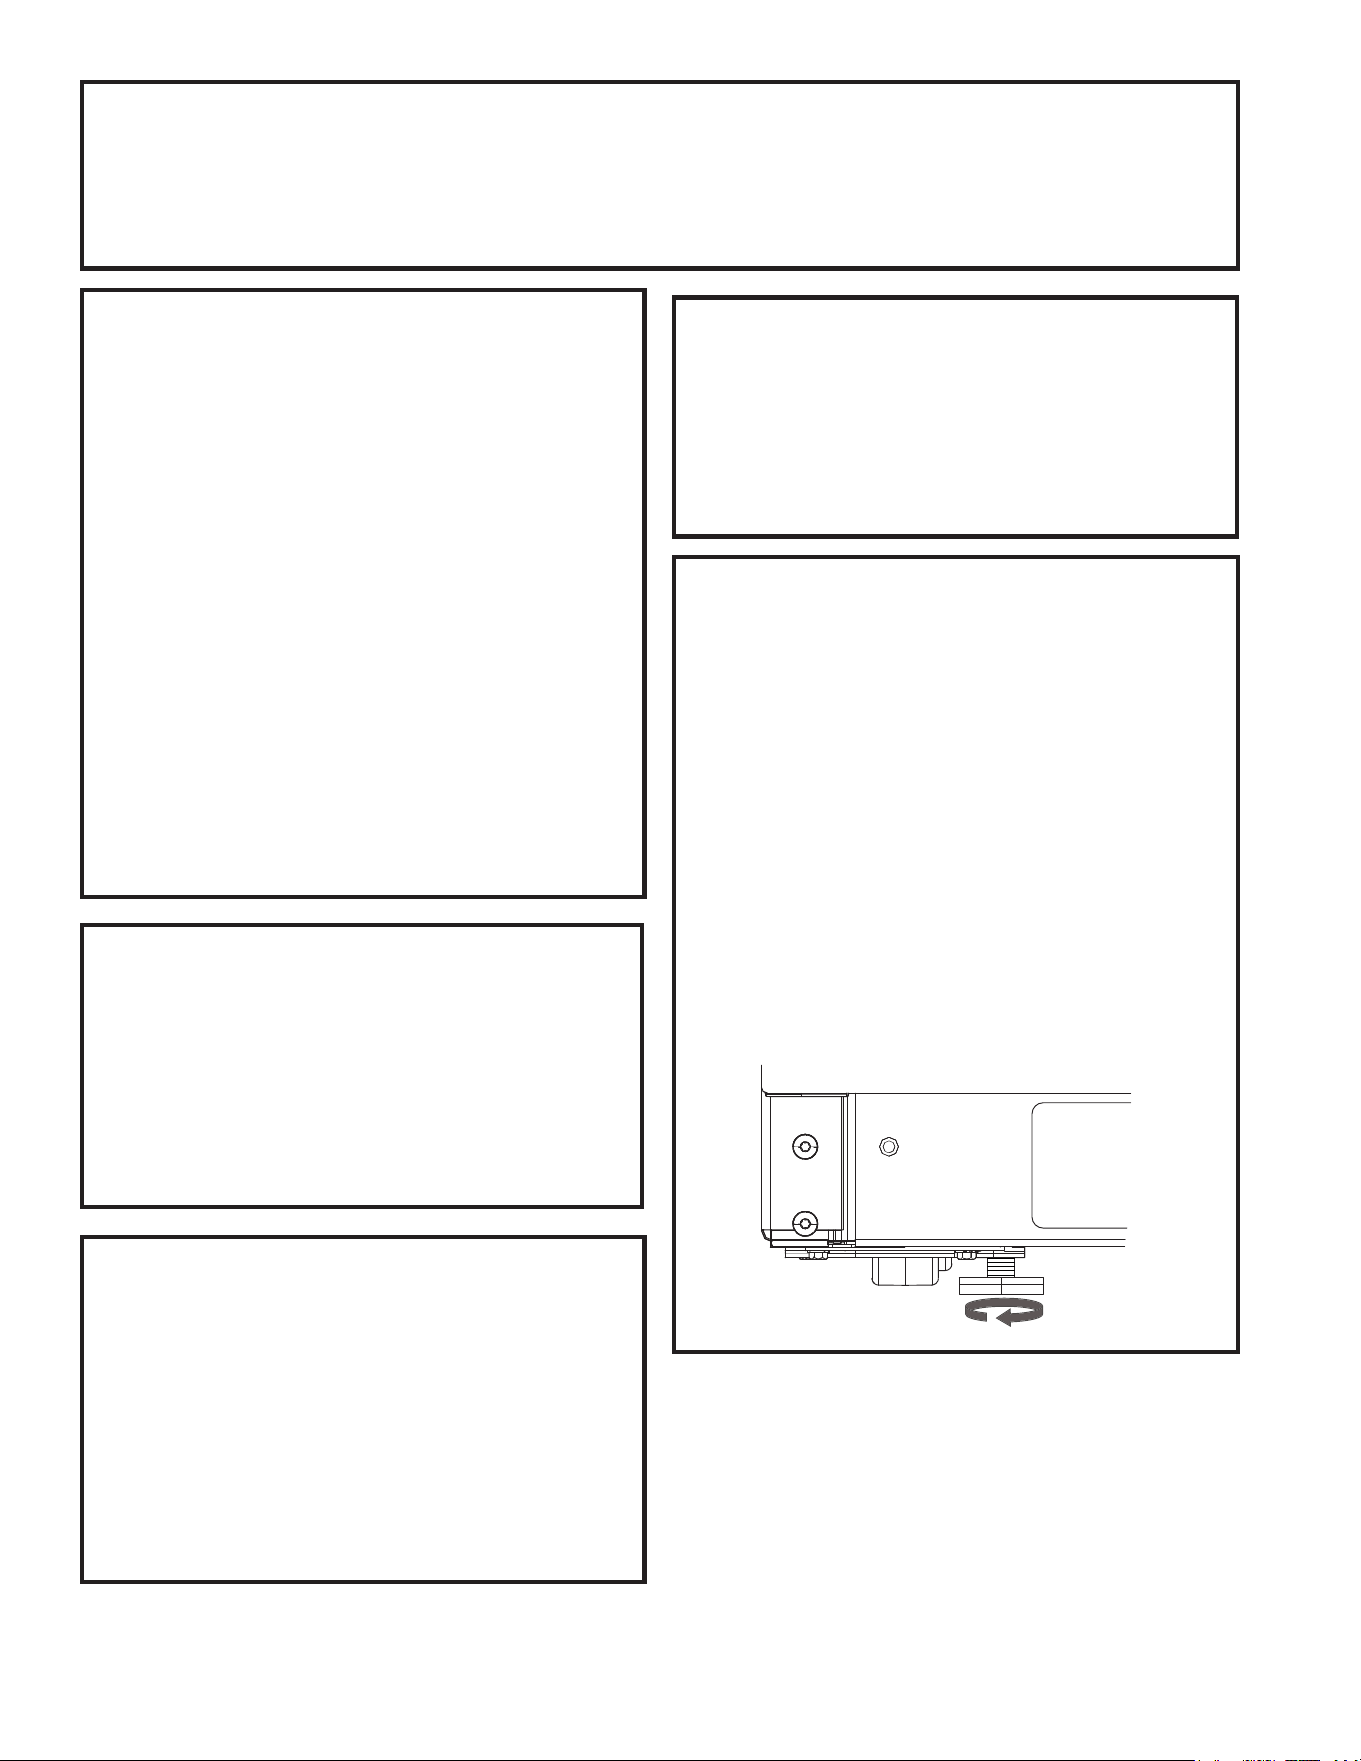
49-1000249 Rev. 0 9
RODILLOS Y PATAS NIVELADORAS
Las patas niveladoras cerca de cada esquina delantera del
refrigerador son ajustables. Éstas colocan firmemente el
refrigerador y evitan que se mueva cuando las puertas se
abran. Las patas niveladoras se deben colocar de manera
que el frente del refrigerador se levante lo suficiente para
que las puertas se cierren fácilmente cuando se abran
hasta la mitad.
Gire las patas niveladoras en el sentido de las manecillas
del reloj para levantar el refrigerador, y en el sentido
contrario para bajarlo.
Los rodillos al lado de las patas niveladoras le permiten
mover el refrigerador lejos de la pared para limpiarlo.
Gire las patas en el sentido contrario de las manecillas
del reloj hasta que el peso del refrigerador se traslade de
pVWDVKDFLDORVURGLOORV'HVSXpVGHURGDUHOUHIULJHUDGRU
de nuevo hacia su lugar, gire las patas en el sentido de
las manecillas del reloj hasta que las patas sostengan
nuevamente el peso del refrigerador.
Instrucciones para la instalación Modelos 15, 16, 18
ÁREA
Permita el siguiente espacio para una fácil
instalación, apropiada circulación del aire y
conexiones de plomería y eléctricas.
• Costados 3/4” (19 mm)
• Arriba 1” (25 mm)
• Atrás 2” (50 mm)
SUMINISTRO DE AGUA HACIA LA
MÁQUINA DE HIELOS
(en algunos modelos)
Si el refrigerador cuenta con una máquina de hielos,
deberán ser conectadas al suministro de agua fría. Un kit
de suministro de agua (contiene tubería de cobre, válvula
de cierre, accesorios e instrucciones) está disponible con
un costo adicional a través de su proveedor, visitando
nuestra página Web GEAppliances.com o bien a través
de Partes y Accesorios, 877.959.8688.
Si tiene preguntas, llame al 800.GE.CARES (800.432.2737) o bien visite nuestra página Web:
GEAppliances.com
ANTES DE COMENZAR
Lea estas instrucciones por completo y con detenimiento.
•
IMPORTANTE – Guarde estas instrucciones para
el uso de inspectores locales.
•
IMPORTANTE – Cumpla con todos los códigos y
ordenanzas vigentes.
• Nota al instalador – Asegúrese de dejar estas
instrucciones con el Consumidor
.
• Nota al consumidor – Conserve estas
instrucciones para referencia futura.
• Nivel de capacidad – La instalación de este aparato
requiere capacidades mecánicas básicas.
• Tiempo de finalización – Instalación del refrigerador
15 minutos
Invertir el vaivén de la puerta
1 hora
• El instalador tiene la responsabilidad de efectuar
una instalación adecuada.
• La Garantía no cubre las fallas del producto debido
a una instalación incorrecta.
UBICACIÓN DEL REFRIGERADOR
• 1RLQVWDOHHOUHIULJHUDGRUGRQGHODVWHPSHUDWXUDVVHDQ
inferiores a 60ºF (16ºC), ya que no se mantendrá en
funcionamiento el tiempo suficiente para conservar las
temperaturas adecuadas.
• 1RLQVWDOHHOUHIULJHUDGRUGRQGHODWHPSHUDWXUDVHD
superior a los 100ºF (37ºC), ya que no funcionará de
forma correcta.
• 1RLQVWDOHHOUHIULJHUDGRUHQXQDXELFDFLyQH[SXHVWDDO
agua (lluvia, etc.) o en contacto directo con la luz solar.
• Instale el refrigerador en un piso lo suficientemente fuerte
como para soportarlo completamente cargado.
INSTRUCCIONES PARA LA INSTALACIÓN
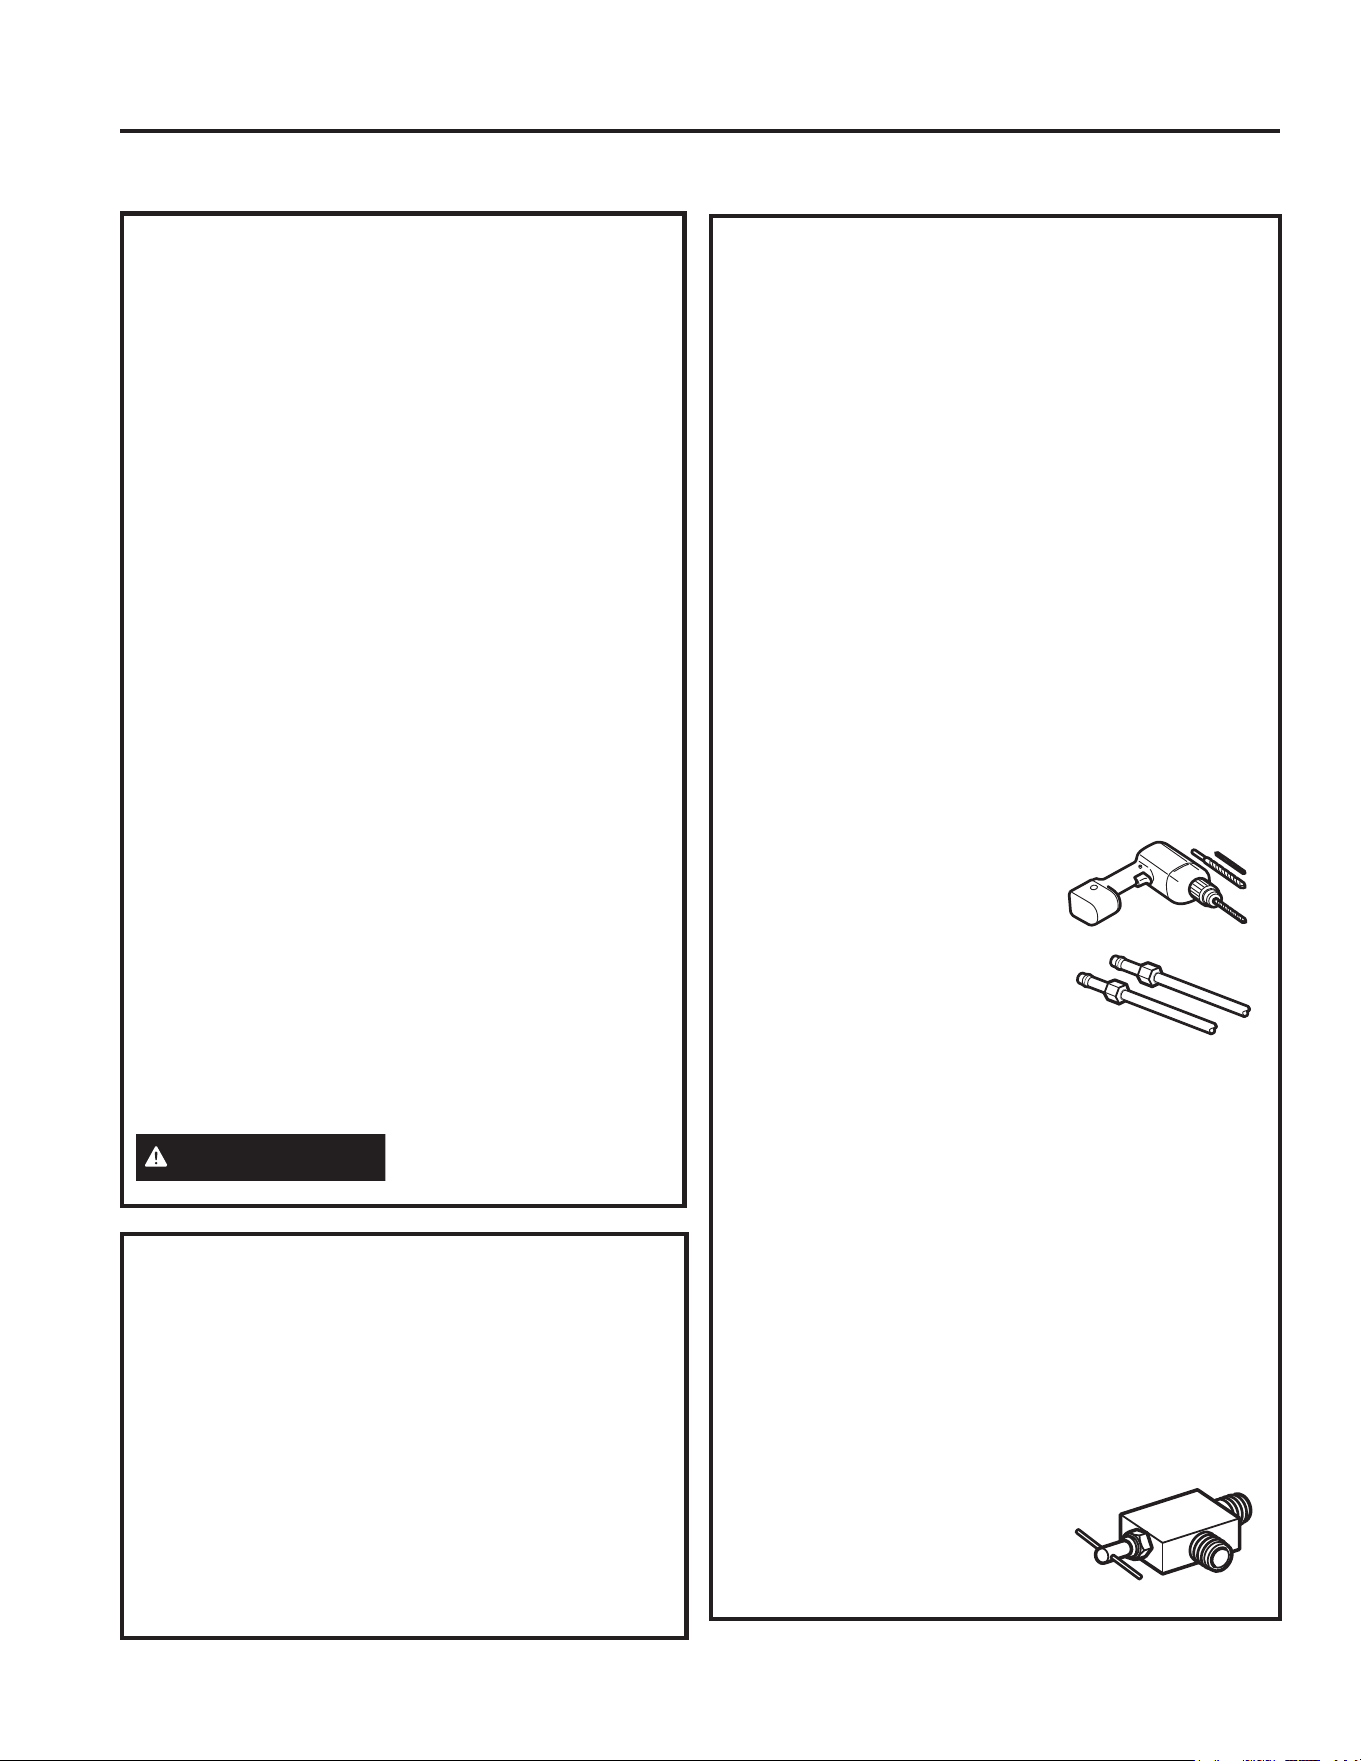
10 49-1000249 Rev. 0
Instrucciones para la instalación
CÓMO INSTALAR LA TUBERÍA DEL AGUA (EN ALGUNOS MODELOS)
ANTES DE INICIAR
Los kits de cobre recomendados para el suministro de agua
son WX8X2, WX8X3 o WX8X4, dependiendo de la cantidad
de tubería necesaria. Las tuberías plásticas aprobadas
para el suministro de agua son las tuberías para el
refrigerador SmartConnect™ (WX08X10006, WX08X10015
y WX08X10025).
Al conectar su refrigerador a un Sistema de Agua de
Ósmosis Inversa de GE Appliances, la única instalación
aprobada es con un kit de Ósmosis Inversa de GE
Appliances. Para otros sistemas de agua de ósmosis
inversa, siga las instrucciones del fabricante.
Esta instalación de la tubería del agua no está garantizada
por el fabricante del refrigerador o de la máquina de hielos.
Siga estas instrucciones cuidadosamente para minimizar el
riesgo de un daño costoso debido al agua.
El martilleo del agua (agua golpeando contra la tubería) en
la tubería de la casa puede causar daños a las partes del
refrigerador y conducir a un goteo o inundación por el agua.
Llame a un plomero calificado para corregir el martilleo del
agua antes de instalar la tubería del agua al refrigerador.
Para evitar quemaduras y daños con el producto, no
conecte la tubería del agua a la tubería del agua caliente.
Si usa el refrigerador antes de conectarlo al suministro
de agua, asegúrese de que el interruptor de la máquina
GHKLHORVVHHQFXHQWUHHQODSRVLFLyQ2))$SDJDGRHQ
modelos con interruptor) o que el brazo de funcionamiento
HVWpHQODSRVLFLyQ2))$SDJDGR
1RLQVWDOHODWXEHUtDGHODPiTXLQDGHKLHORVHQOXJDUHV
donde la temperatura caiga por debajo del nivel de
congelamiento.
Al usar cualquier aparato eléctrico (como un taladro
eléctrico) durante la instalación, asegúrese de que el
aparato esté aislado o conectado de manera que evite el
peligro de una descarga eléctrica, o se opere por baterías.
Todas las instalaciones se deben realizar según los
requisitos del código local de plomería.
ADVERTENCIA
Conecte al suministro de agua
potable solamente.
QUÉ NECESITA
• Kit de tubería de cobre para el refrigerador o
SmartConnect™, 1/4” de diámetro externo para conectar
el refrigerador al suministro de agua. Si usa cobre,
asegúrese de que ambos extremos de la tubería se corten
uniformemente.
Para determinar la cantidad de tubería que necesita: mida
la distancia desde la válvula del agua en la parte posterior
del refrigerador hasta el tubo de suministro de agua. Luego
agregue 6 pies (1,8 m). Asegúrese de que haya suficiente
tubería adicional (unos 6 pies [1,8 m] enrollado en dos
vueltas de unas 10 pulgadas [25 cm] de diámetro) para
permitir que el refrigerador se pueda mover de la pared
después de la instalación.
QUÉ NECESITA (cont.)
Los kits de tubería para el refrigerador SmartConnect™
están disponibles en las siguientes longitudes:
8’ (2,4 m) – WX08X10006
15’ (4,6 m) – WX08X10015
25’ (7,6 m) – WX08X10025
Asegúrese de que el kit que haya seleccionado permita al
menos 6 pies (1,8 m) como se describe arriba.
127$/D~QLFDWXEHUtDGHSOiVWLFRDSUREDGDGH*(
Appliances es la que viene provista con los kits de tubería
SDUDHOUHIULJHUDGRU6PDUW&RQQHFW1RXVHQLQJXQDRWUD
tubería plástica para el suministro del agua ya que la tubería
está bajo presión todo el tiempo. Ciertos tipos de plástico se
fracturarán o se romperán con el tiempo y causarán daños
en su casa debido al agua.
• Un kit de suministro de agua de GE Appliances (contiene
tubería, válvula de cierre y accesorios enumerados abajo)
está disponible a un costo adicional en su tienda o por
medio de Partes y Accesorios, 877.959.8688.
Ɣ8QVXPLQLVWURGHDJXDIUtD/DSUHVLyQGHODJXDGHEH
estar entre 20 y 120 p.s.i. (138-827 kilopascals) en
modelos sin filtro de agua y entre 40 y 120 p.s.i. (275-827
kilopascals) en modelos con filtro de agua.
• Taladro eléctrico.
• Llave de 1/2” o ajustable.
'HVWRUQLOODGRUSODQR\GHHVWUHOOD
'RVWXHUFDVGHFRPSUHVLyQGH
1/4” de diámetro exterior y 2 férulas
(mangas) – para conectar la tubería
de cobre a la válvula de cierre y la
válvula del agua del refrigerador.
2ELHQ
• Si está usando un kit de tubería para el refrigerador
SmartConnect™, los accesorios necesarios ya vienen
preinstalados en la tubería.
• Si su tubería existente de cobre para el agua tiene
un accesorio con vuelo en el extremo, necesitará un
adaptador (disponible en las tiendas de suministros de
SORPHUtDSDUDFRQHFWDUODOtQHDGHODJXDDOUHIULJHUDGRU2
%,(1SRGUiFRUWDUHODFFHVRULRFRQYXHORFRQXQFRUWDGRU
GHWXERV\OXHJRXVDUXQDFFHVRULRGHFRPSUHVLyQ1R
corte el extremo formado de la tubería para el refrigerador
SmartConnect™.
9iOYXODGHFLHUUHSDUDFRQHFWDUDODOtQHDGHODJXDIUtD/D
válvula de cierre deberá tener una entrada de agua con un
diámetro interno mínimo de 5/32” en el punto de conexión
DOD78%(5Ë$'(/$*8$)5Ë$/DVYiOYXODVGHDSDJDGR
tipo silla vienen incluidas en muchos kits de suministro de
agua. Antes de comprar, asegúrese
de que una válvula tipo silla cumple
con los códigos de plomería en su
localidad.
INSTRUCCIONES PARA LA INSTALACIÓN
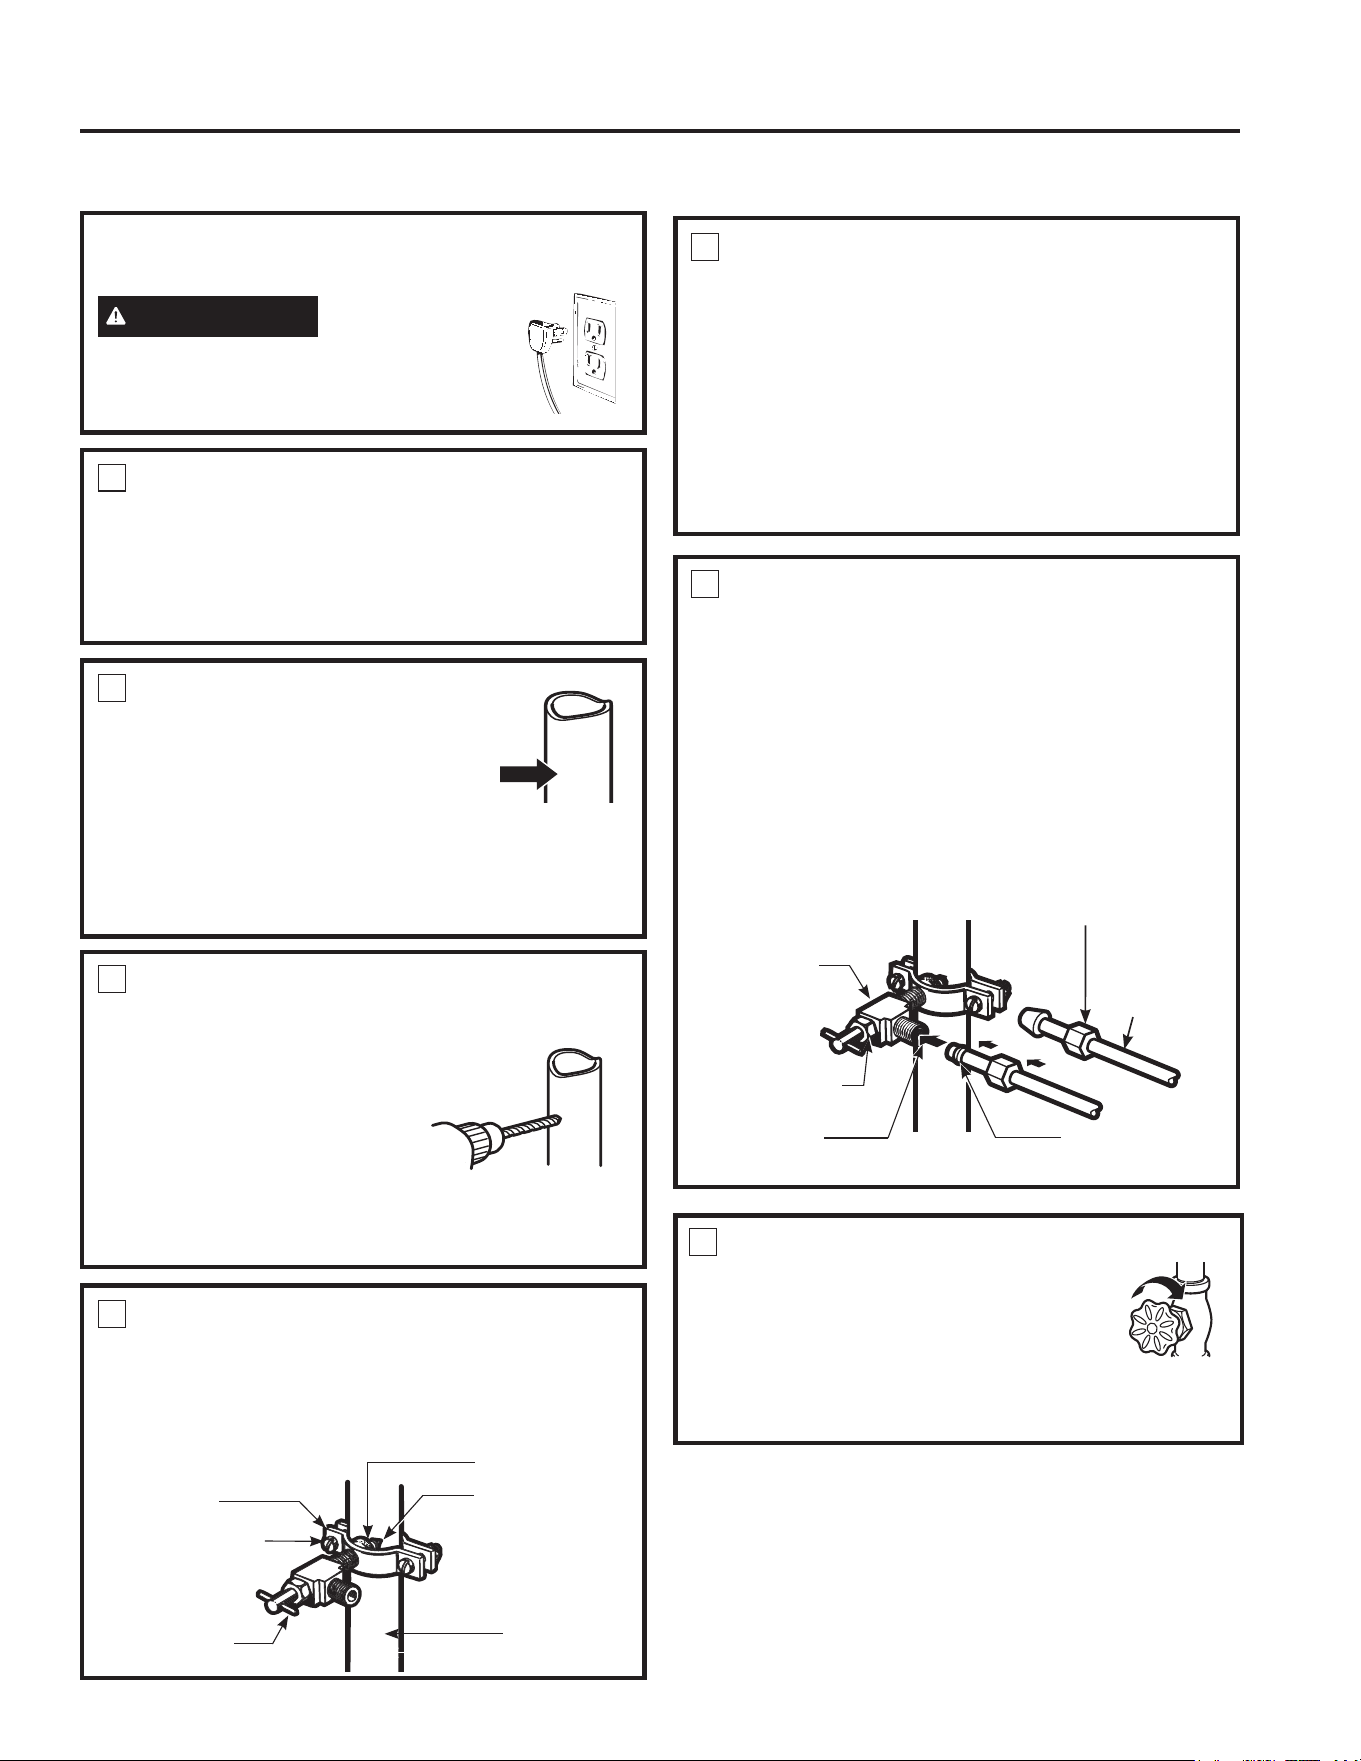
49-1000249 Rev. 0 11
INSTRUCCIONES PARA LA INSTALACIÓN
Instrucciones para la instalación
CÓMO INSTALAR LA TUBERÍA DEL AGUA (EN ALGUNOS MODELOS)
1
CIERRE EL SUMINISTRO
PRINCIPAL DE AGUA Y
DESENCHUFE EL REFRIGERADOR
Abra el grifo más cercano en contra del sentido de las
agujas del reloj por suficiente tiempo para limpiar la
tubería del agua.
2
ELIJA LA UBICACIÓN DE
LA VÁLVULA
Seleccione una ubicación para la
válvula que sea fácilmente accesible.
Es mejor conectarla en el costado de
una tubería vertical de agua. Cuado sea necesario
conectarla en una tubería horizontal de agua, haga
la conexión en la parte superior o al lado, en vez
de hacerlo en la parte de abajo, para evitar retirar
cualquier sedimento de la tubería del agua.
5
DIRIJA LA TUBERÍA
'LULMDODWXEHUtDHQWUHODOtQHDGHODJXDIUtD\HO
refrigerador.
'LULMDODWXEHUtDDWUDYpVGHXQRULILFLRSHUIRUDGRHQ
la pared o en el piso (detrás del refrigerador o del
gabinete de la base adyacente) lo más cerca posible a
la pared.
NOTA: Asegúrese de que haya suficiente tubería
adicional (unos 6 pies [1,8 m] enrollada en dos vueltas
de alrededor de 10” [25 cm] de diámetro) para permitir
que el refrigerador se pueda mover de la pared
después de la instalación.
6
CONECTE LA TUBERÍA A LA
VÁLVULA
Coloque la tuerca de compresión y férula para la
tubería de cobre (manga) en el extremo de la tubería y
conéctela a la válvula de cierre.
Asegúrese de que la tubería esté complemente
insertada en la válvula. Apriete la tuerca de
compresión firmemente.
Para tubería de plástico de un kit de tubería para
el refrigerador SmartConnect™, inserte el extremo
moldeado de la tubería en la válvula de cierre y apriete
la tuerca de compresión hasta que esté firmemente
apretada a mano, luego apriete otro giro con una llave.
Apretar demasiado puede causar fugas.
3
SELECCIONE LA UBICACIÓN DE LA
VÁLVULA
Perfore un orificio de 1/4” en
la tubería del agua (incluso si
está usando una válvula auto
perforadora), usando una broca
afilada. Retire cualquier sobrante
que resulte de perforar el orificio
en la tubería. Tenga cuidado
GHQRSHUPLWLUTXHVHILOWUHDJXDKDFLDHOWDODGUR1R
perforar un orificio de 1/4” puede resultar en menor
producción de hielo o cubos más pequeños.
4
INSTALE LA VÁLVULA DE CIERRE
Una la válvula de cierre a la tubería de agua fría con la
abrazadera para el tubo.
Apriete los tornillos de la abrazadera hasta que la
arandela sellante empiece a hincharse.
NOTA:1RDSULHWHGHPDVLDGRODWXEHUtD\DTXHSRGUtD
romperse.
7
LAVE LA TUBERÍA
Abra el suministro principal de agua en
contra del sentido de las agujas del reloj
y lave la tubería hasta que el agua esté
limpia.
Cierre el agua en la válvula después de
que un cuarto (1 litro) de agua se haya eliminado por la
tubería.
ANTES DE EMPEZAR
Lea cada paso completamente antes de proceder.
ADVERTENCIA
A fin de reducir el
riesgo de descarga eléctrica o lesión durante
la instalación, primero deberá desenchufar el
refrigerador antes de proceder.
Arandela
Extremo de
entrada
Tornillo de la
abrazadera
Tubería
vertical de
agua fría
9iOYXODGH
cierre tipo silla
Abrazadera
del tubo
9iOYXODGH
cierre tipo silla
Tuerca de
compresión
Tubería
SmartConnect
™
Tuerca de
empaque
9iOYXODGHVDOLGD
Férula (manga)
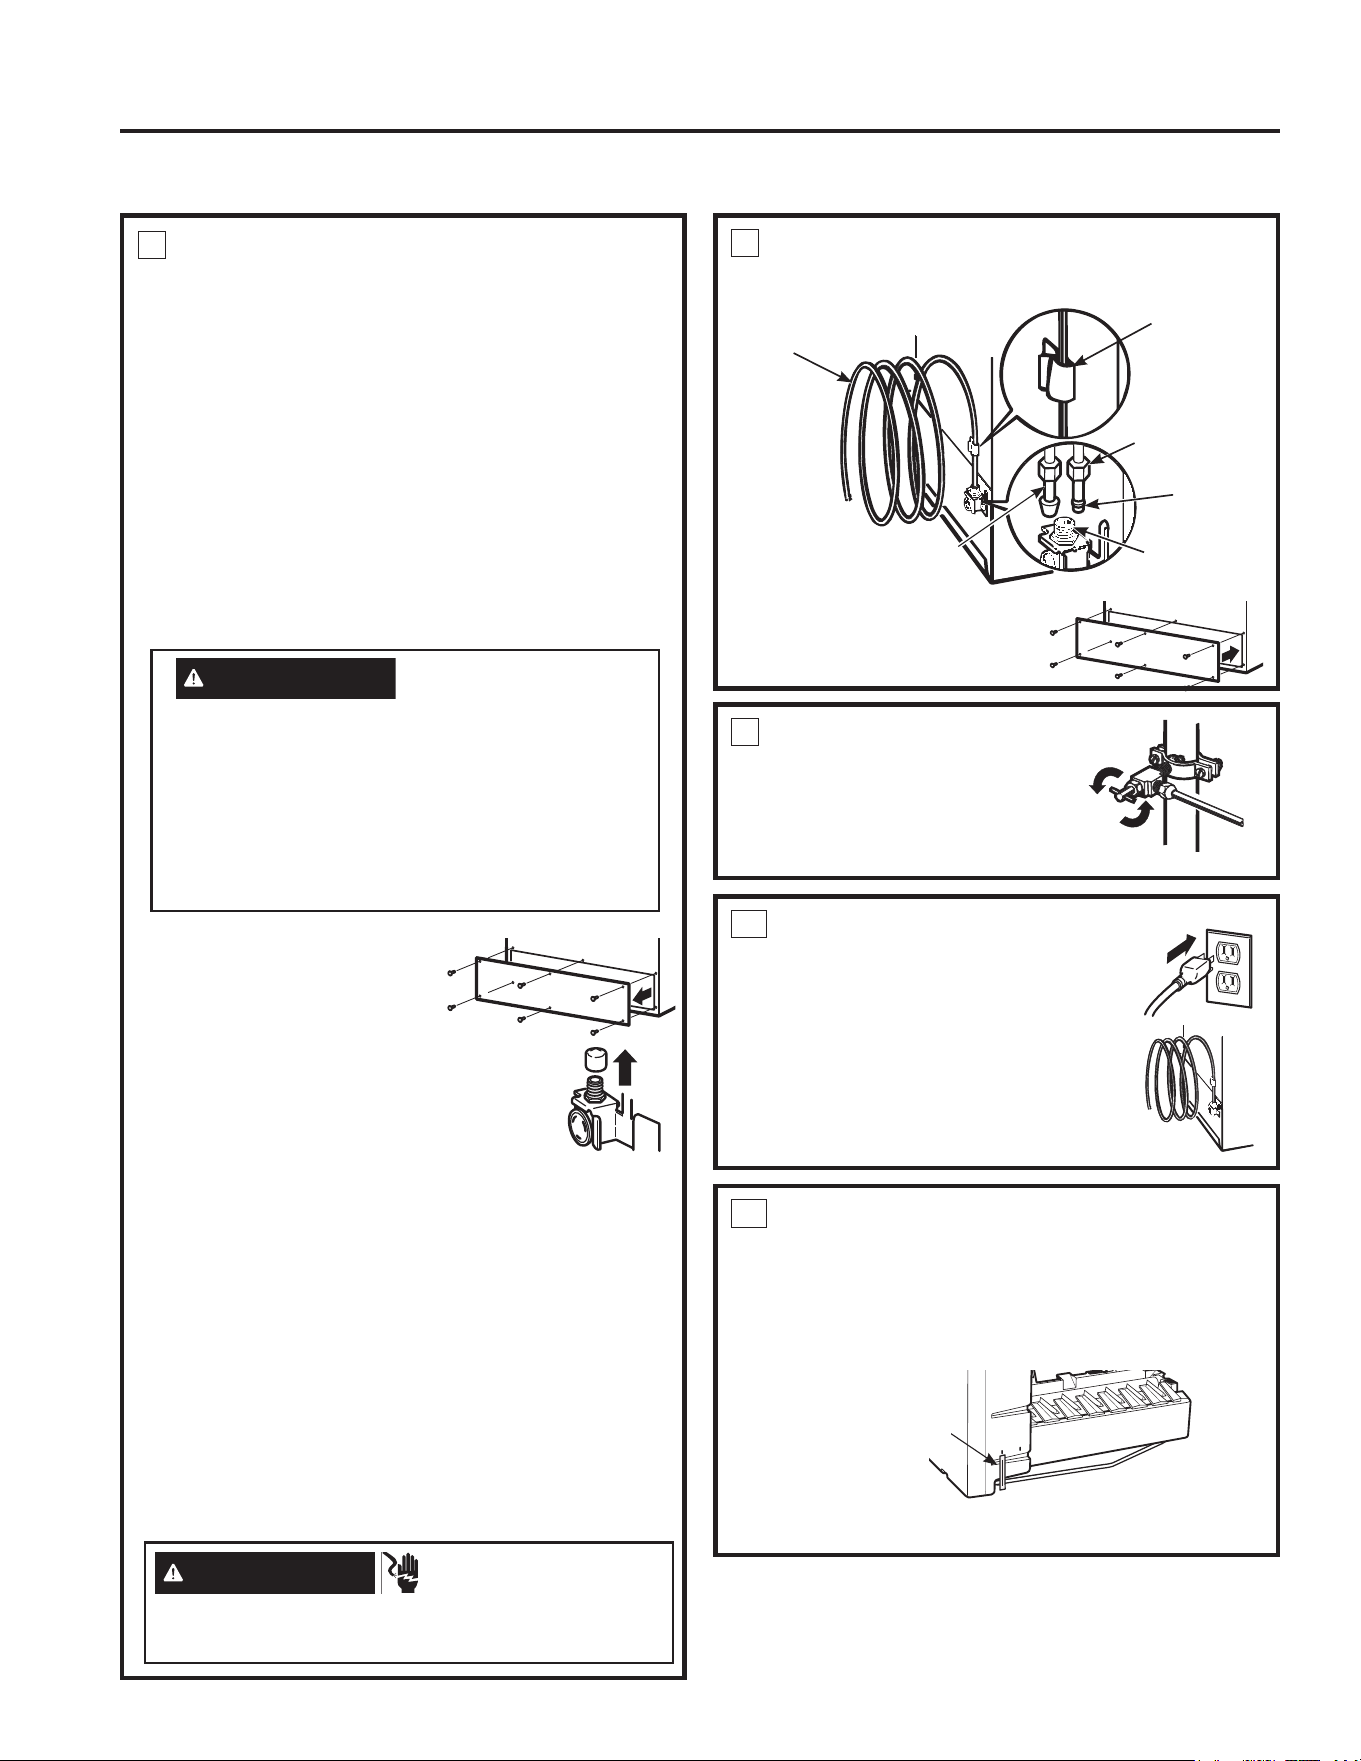
12 49-1000249 Rev. 0
CÓMO INSTALAR LA TUBERÍA DEL AGUA (Cont.)
8
CONECTE LA TUBERÍA AL
REFRIGERADOR
NOTAS:
• Antes de hacer la conexión al refrigerador,
asegúrese de que el cable de corriente del
refrigerador no esté conectado en el tomacorriente
de la pared.
• Recomendamos instalar un filtro de agua si
su suministro de agua (GXRLQ, disponible en
gewaterfilters.com o llamando al 877.959.8688)
tiene arena o partículas que podrían obstruir
la malla de la válvula de agua del refrigerador.
Instálelo en la tubería del agua cerca al refrigerador.
Si usa un kit de tubería para el refrigerador
SmartConnect™, necesitará un tubo adicional
:;;SDUDFRQHFWDUHOILOWUR1RFRUWHOD
tubería plástica para instalar el filtro.
ADVERTENCIA
A fin de reducir el riesgo
de muerte o de descargas eléctricas, se deberán
seguir estas instrucciones:
Ŷ'HVHQFKXIHHOUHIULJHUDGRUDQWHVGHUHWLUDU
cualquier panel.
Ŷ1RGDxHQLQJ~QFDEOHPLHQWUDVHOSDQHOHV
retirado.
Ŷ5HHPSODFHWRGDVODVSLH]DV\SDQHOHVDQWHVGH
volver a enchufar el refrigerador.
• Retire la cubierta del
acceso.
• Retire la tapa flexible
de plástico o la tapa
del tornillo de la válvula
de agua (conexión del
refrigerador) y descarte la misma..
• Coloque la tuerca de compresión y
la férula (manga) en el extremo de
la tubería como se muestra. En el
kit de tubería para el refrigerador
SmartConnect™, las tuercas ya vienen armadas con
la tubería.
• Inserte el extremo de la tubería en la conexión de
la válvula del agua lo más que se pueda. Mientras
sostiene la tubería, apriete el accesorio.
• Para tubería de plástico de un kit de tubería para
el refrigerador SmartConnect™, inserte el extremo
moldeado de la tubería en la válvula de cierre y
apriete la tuerca de compresión hasta que esté
firmemente apretada a mano, luego apriete otra
vuelta con una llave. Apretar demasiado puede
causar fugas.
• Una la tubería a la abrazadera provista para
sostenerla en una posición vertical. Quizás necesite
apalancar la abrazadera.
9
ABRA LA LLAVE DEL
AGUA EN LA
VÁLVULA DE CIERRE
Apriete cualquier conexión que
pueda presentar fugas.
8
CONECTE LA TUBERÍA AL
REFRIGERADOR (Cont.)
• Reemplace la cubierta de
acceso.
10
CÓMO INSTALAR EL
REFRIGERADOR
Enchufe el refrigerador.
2UJDQLFHHOFDEOHGHODWXEHUtDGH
manera que no vibre contra la parte
trasera del refrigerador o contra la
pared. Empuje el refrigerador hacia la
pared.
11
INICIE LA MÁQUINA DE HIELO
0XHYDHOEUD]RGHOOHQDGRDODSRVLFLyQ21KDFLD
abajo). La máquina de hielos no empezará a operar
hasta que alcance su temperatura de operación de
15°F (–9°C) o menor. Luego, empezará a operar
automáticamente.
ON
OFF
Modelo de conmutador de
alimentación
Interruptor
de encendido
ADVERTENCIA
PELIGRO DE
DESCARGA ELÉCTRICA
Adhiera la abrazadera de la tubería usando el agujero
H[LVWHQWH~QLFDPHQWH12SHUIRUHHOUHIULJHUDGRU
Instrucciones para la instalación
Tuerca de
compresión de
1/4”
Abrazadera
de la tubería
Tubería
de 1/4”
Férula
(manga)
Conexión del
refrigerador
Tubo de
SmartConnect
™
INSTRUCCIONES PARA LA INSTALACIÓN

49-1000249 Rev. 0 13
INSTRUCCIONES PARA LA INSTALACIÓN
INSTALACIÓN DE LA MANIJA DE LA PUERTA
1
INSTALE EL AJUSTE DE LA
MANIJA
Instale el ajuste de la
manija en el agujero del
freezer y en las puertas
para comidas frescas.
Los ajustes coinciden
con el lado de la manija
(el lado opuesto a la
bisagra).
2A
MODELOS CON MANIJA DE
PLÁSTICO
1. Adhiera la manija a la puerta del freezer,
deslizando la manija sobre el ajuste y con los
tornillos al final de la manija.
2. Adhiera la manija a la puerta de comidas frescas,
deslizando la manija sobre el ajuste y con los
tornillos sobre la manija.
2
MODELOS CON MANIJA DE
ACERO INOXIDABLE
1. Adhiera la manija a la puerta del freezer con tornillos
al final de la manija. Use la llave Allen de 1/8”
incluida para ajustar el tornillo correspondiente en
la parte superior de la manija. Ajuste hasta que la
manija quede firme en su posición.
2. Adhiera la manija a la puerta de comidas frescas
con tornillos en la parte superior de la manija. Use
la llave Allen de 1/8” incluida para ajustar el tornillo
correspondiente en la parte inferior de la manija.
Ajuste hasta que la manija quede firme en su
posición.
3
ETIQUETA Y BOTÓN INSTALACIÓN
1. Coloque un botón de corriente del lado opuesto de
la puerta de comidas frescas en forma cruzada a la
manija.
2. Retire el protector de la insignia de GE Appliances
y con cuidado coloque la misma en el agujero
opuesto a la manija de la puerta del freezer.
Asegúrese de que la insignia esté orientada de
forma correcta antes de aplicar la misma a la
puerta.
Ajuste de la Manija
NOTA: Asegú-
rese de retirar la
película antes de
instalar la manija,
si corresponde.
NOTA: Asegúrese de retirar
la película antes de instalar la
manija, si corresponde.
Botón de
corriente
Etiqueta
Instrucciones para la instalación
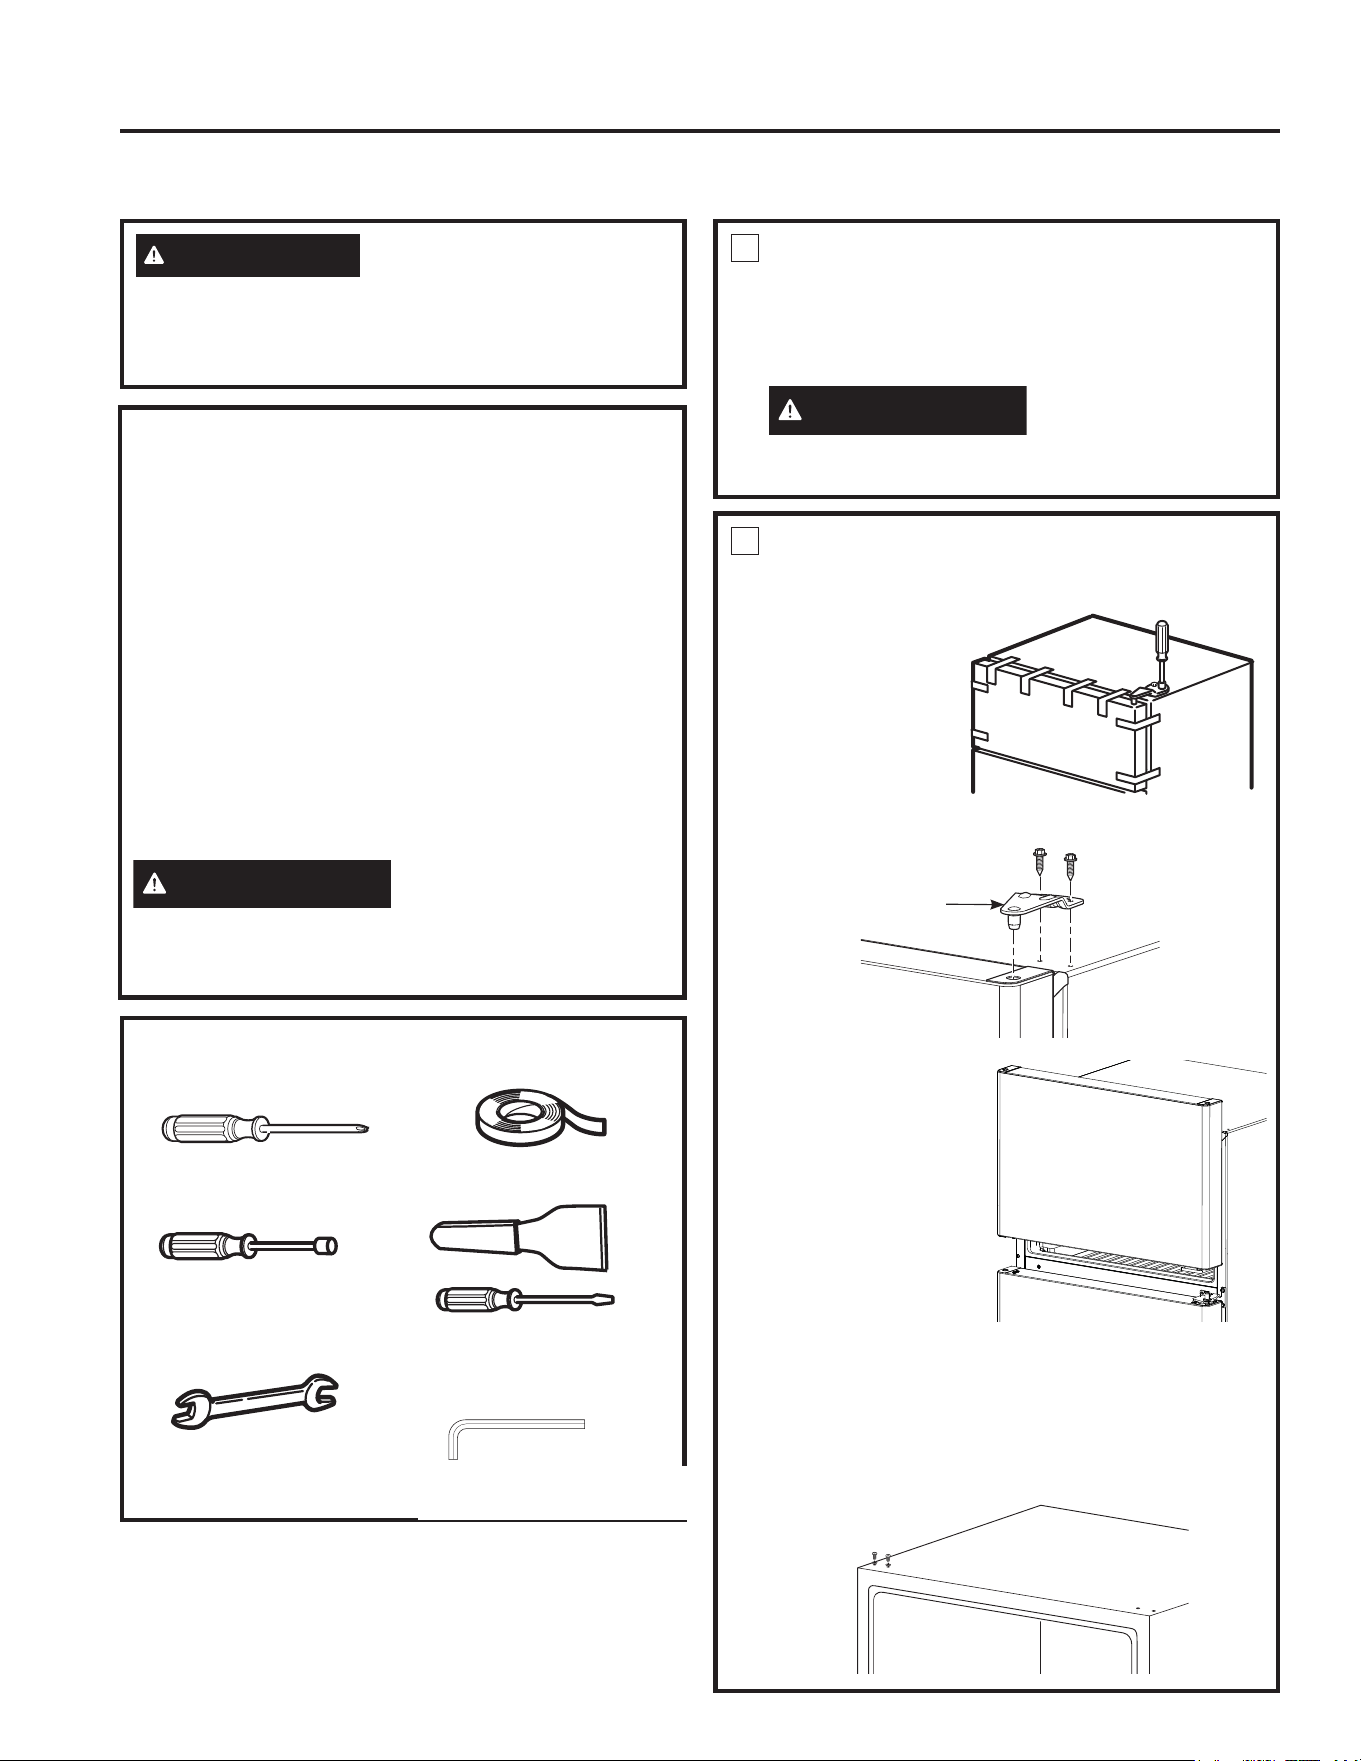
14 49-1000249 Rev. 0
CÓMO INVERTIR EL VAIVÉN DE LA PUERTA
1
ANTES DE INICIAR
'HVFRQHFWHHOUHIULJHUDGRUGHOWRPDFRUULHQWH
eléctrico.
'HVRFXSHWRGRVORVHVWDQWHVGHODSXHUWD
incluyendo el compartimiento de lácteos.
PRECAUCIÓN
1RSHUPLWDTXHQLQJXQD
puerta se caiga al piso, ya que esto podría dañar el
freno de la puerta.
2
RETIRE LA PUERTA DEL
CONGELADO
2.1 Pegue la
puerta cerrada
con cinta de
enmascarar.
2.2 Retire los
tornillos que
sostienen
la bisagra
superior del
gabinete.
2.3 Levante la bisagra
directamente hacia
arriba para liberar
el pasador de la
bisagra del casquillo
en la parte superior
de la puerta y
colóquela a un lado,
junto con los tornillos
correspondientes.
2.4 Retire la cinta.
Levante la puerta
desde el perno de la
bisagra central.
2.5 Coloque la puerta sobre una superficie que no
raye con la parte exterior hacia arriba.
2.6 Transfiera los 2 tornillos desde el lado opuesto del
gabinete a los agujeros de los tornillos que están
vacíos por el retiro de la bisagra superior.
HERRAMIENTAS REQUERIDAS
NOTAS IMPORTANTES
Al invertir el vaivén de la puerta:
• Lea las instrucciones completamente antes de empezar.
• Maneje las partes con cuidado para evitar raspar la
pintura.
• Ajuste los tornillos con sus partes relacionadas, a fin de
evitar su pérdida.
'LVSRQJDGHXQDVXSHUILFLHGHWUDEDMRTXHQRVHUDVSH
para las puertas.
IMPORTANTE: Una vez que empiece, no mueva el
gabinete hasta que haya completado el proceso de invertir
el vaivén de la puerta.
Estas instrucciones son para cambiar las bisagras del
lado derecho al izquierdo, si alguna vez desea cambiar
las bisagras al lado derecho nuevamente, siga las mismas
instrucciones e invierta toda las referencias hacia la
izquierda y derecha.
PRECAUCIÓN
Riesgo al Levantar
La Puerta de Comidas Frescas y las puertas del Freezer
son pesadas. Use ambas manos para asegurar las puertas
antes de levantarlas.
'HVWRUQLOODGRUGHHVWUHOOD
Cinta de enmascarar
'HVWRUQLOODGRUGH
casquillo de cabeza
hexagonal de 3/8”
(opcional)
Llave abierta de 7/16”
(opcional)
Cuchillo para
masilla (espátula) o
destornillador delgado
(opcional)
Llave Allen (Modelos con
Manija de Acero Inoxidable)
Bisagra
superior
Instrucciones para la instalación
ADVERTENCIA
Siga todos los pasos al invertir
la dirección de la apertura de la puerta. Si no se siguen
estas instrucciones, dejando piezas sin uso o ajustando
tornillos en exceso, esto podrá hacer que la puerta se caiga
y producir lesiones y daños sobre la propiedad.
INSTRUCCIONES PARA LA INSTALACIÓN
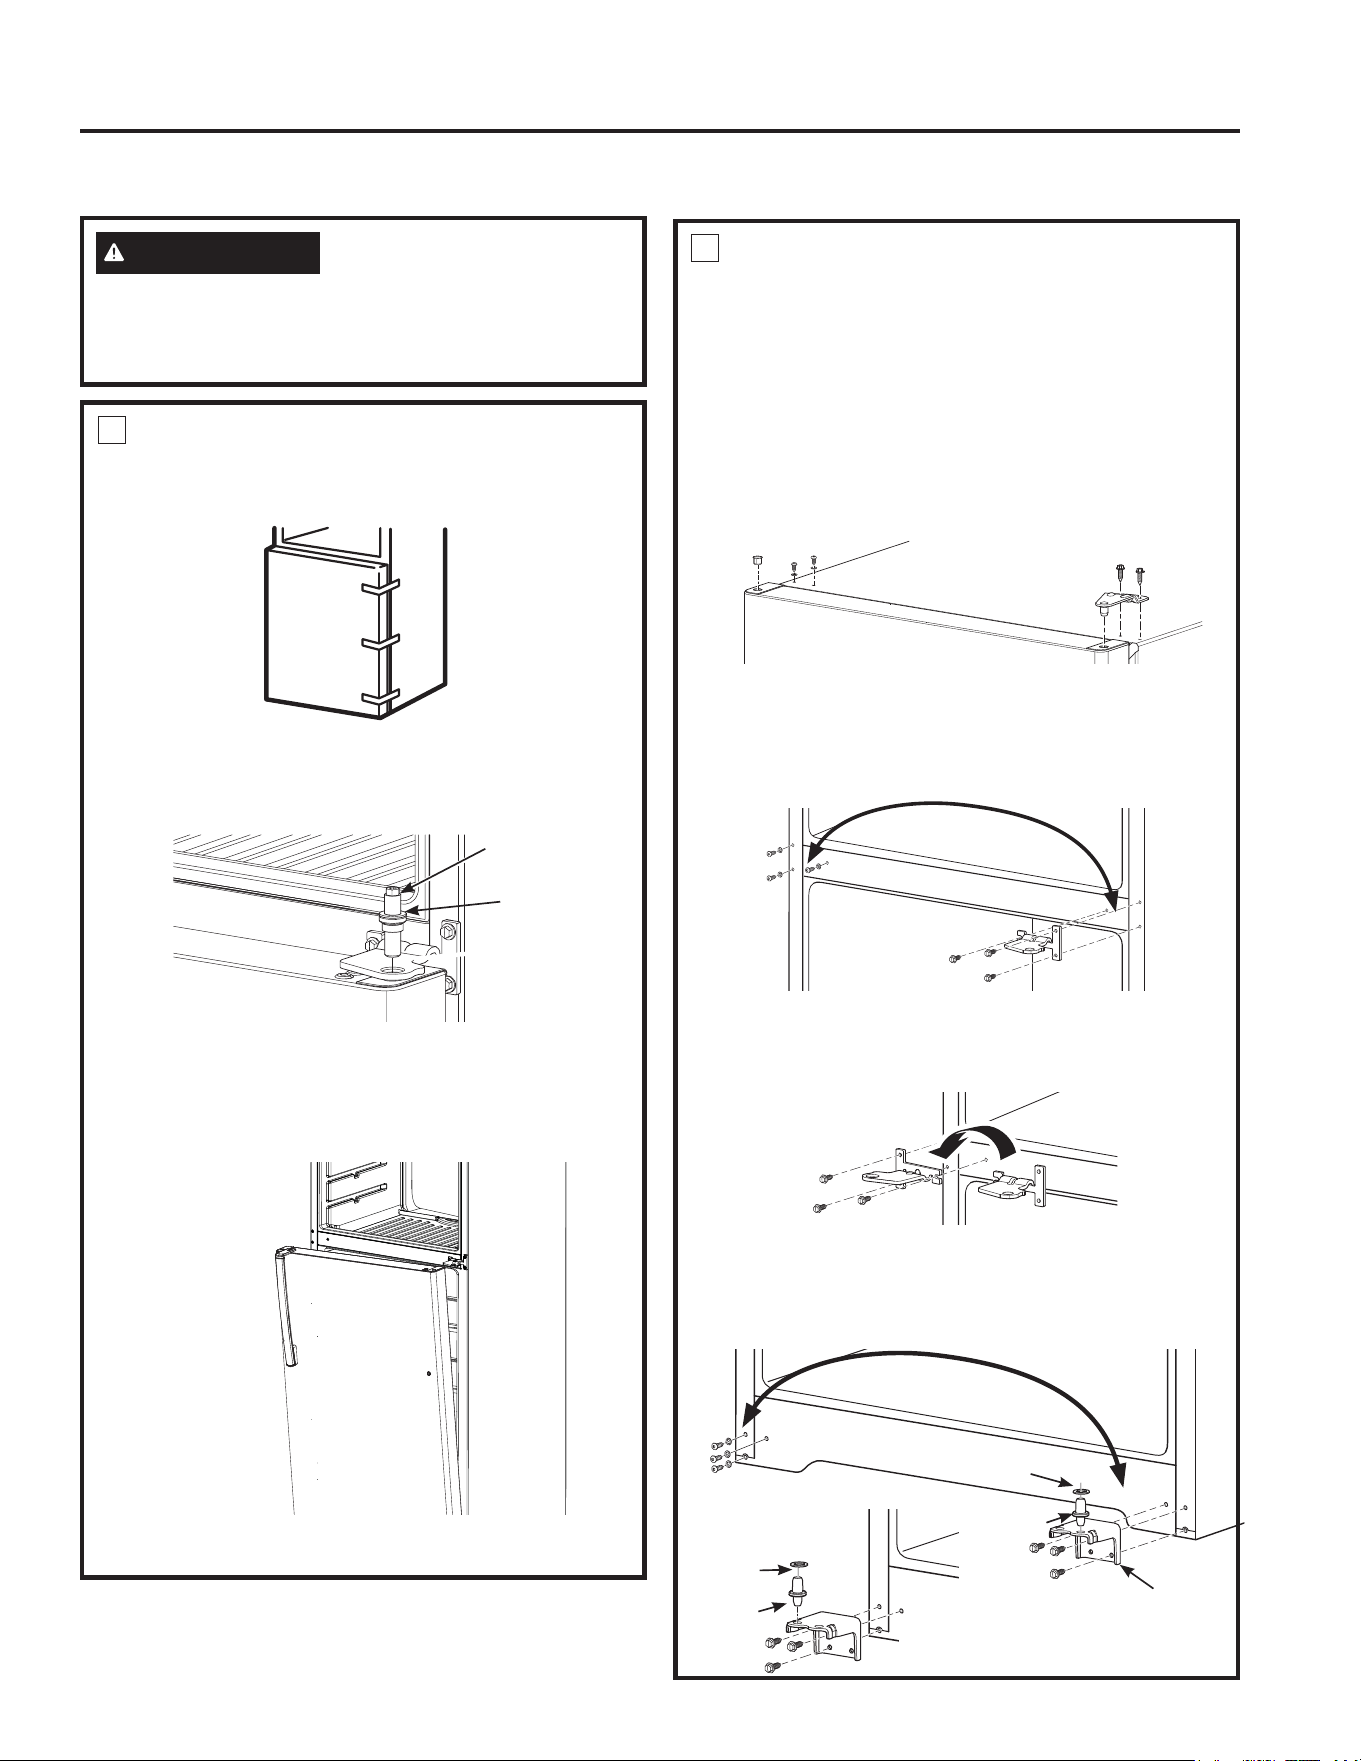
49-1000249 Rev. 0 15
INSTRUCCIONES PARA LA INSTALACIÓN
CÓMO INVERTIR EL VAIVÉN DE LA PUERTA (Cont.)
3
RETIRE LA PUERTA DE
ALIMENTOS FRESCOS
3.1 Coloque cinta de mascarar en el cierre de la
puerta..
'HVHQURVTXHHOSHUQRGHODELVDJUDFHQWUDO\UHWLUH
el mismo de su ficha. Tenga cuidado de no perder
la bisagra central ni la arandela.
3.3 Retire la cinta e incline la puerta hacia fuera
del gabinete. Levante la puerta del pasador en
el soporte de la bisagra inferior. (Si la arandela
plástica se pega al fondo de la puerta, colóquela
de nuevo en la bisagra.)
3.4 Coloque la puerta con el exterior hacia arriba en
una superficie que no raye..
4
CÓMO INVERTIR LOS ELEMENTOS
DE SOPORTES
4.1 Intercambie la bisagra y los tornillos en la parte
superior derecha con tornillos en la parte superior
L]TXLHUGDGHOJDELQHWH1RDMXVWHORVWRUQLOORVGHO
lado de la bisagra.
NOTA: Algunas bisagra cuentan con 4 agujeros.
Qué agujeros usará para la instalación dependerá
de lado del cual instale la bisagra.
Para una instalación correcta, el extremo externo
de la bisagra deberá ser paralelo al extremo del
cuerpo.
4.2 Retire los tres tornillos, asegurando la bisagra
central al gabinete.
4.3 Transfiera los tres tornillos desde el lado opuesto
del gabinete a los agujeros del tornillo que está
vacío por el retiro de la bisagra central.
9XHOYDDDGKHULUODELVDJUDFHQWUDOFRQORVWUHV
tornillos del lado izquierdo del gabinete. NOTE: La
bisagra central debe ser girada como se muestra,
al ser montada del lado izquierdo.
4.5 Retire los tornillos, sosteniendo la bisagra central
al gabinete. Mueva la bisagra inferior de la
derecha al lado izquierdo del gabinete. Cambie el
perno de la bisagra al lado opuesto de la bisagra y
reinserte los tornillos.
Perno de
la Bisagra
Central
Arandela
Instrucciones para la instalación
Arandela
Plástica
Perno de
la Bisagra
Perno de
la Bisagra
Arandela
Plástica
Soporte de la
Bisagra
Soporte
de la
Bisagra
Cambie el pasador
de la bisagra al
lado opuesto del
soporte.
ADVERTENCIA
Siga todos los pasos al invertir
la dirección de la apertura de la puerta. Si no se siguen
estas instrucciones, dejando piezas sin uso o ajustando
tornillos en exceso, esto podrá hacer que la puerta se caiga
y producir lesiones y daños sobre la propiedad.
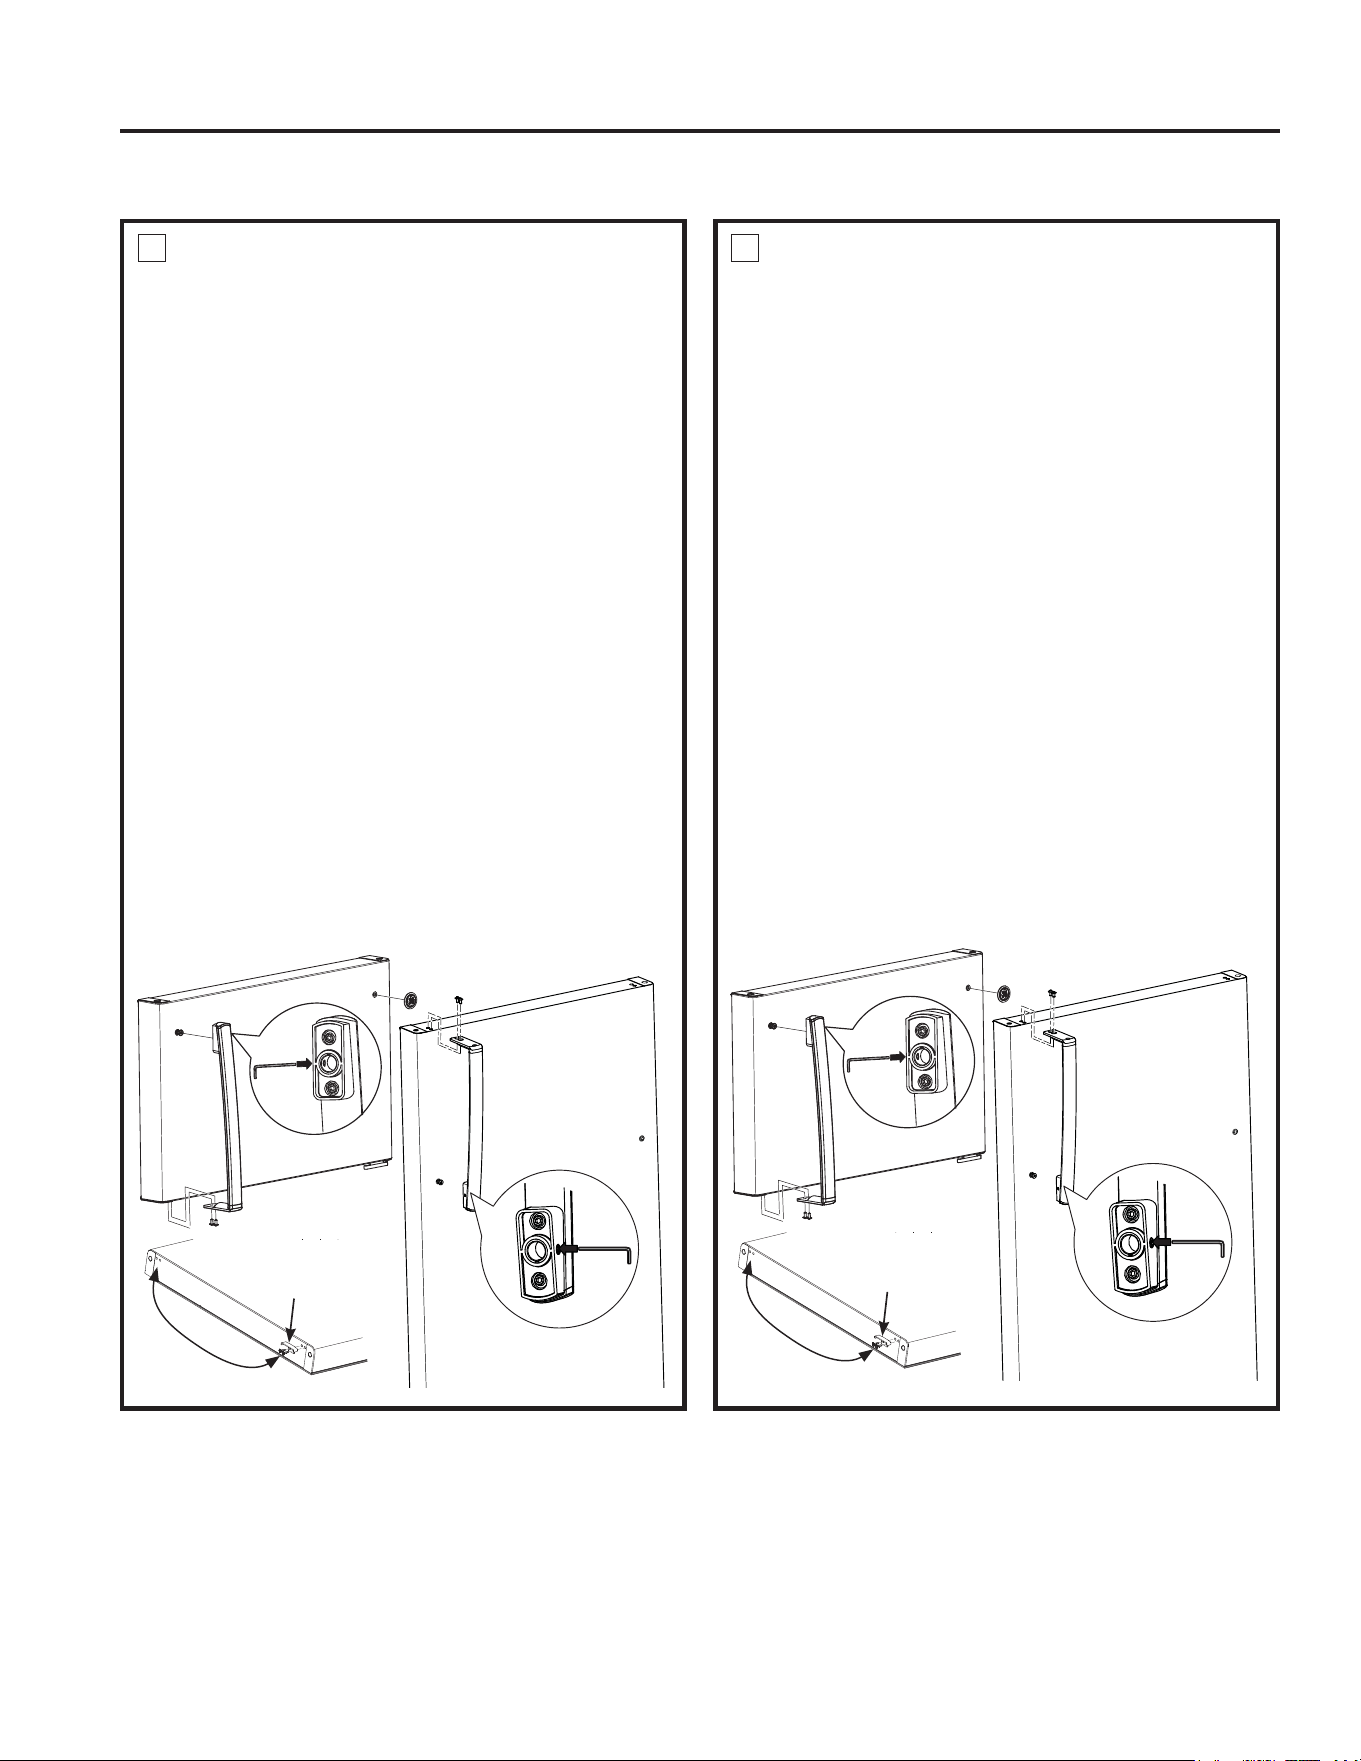
16 49-1000249 Rev. 0
CÓMO INVERTIR EL VAIVÉN DE LA PUERTA (Cont.)
5
CÓMO INVERTIR LAS MANIJAS DE
LAS PERTAS
MANIJA DE ACERO INOXIDABLE
5.1a. Retire los tornillos de la manija de la parte
superior de la puerta de comidas frescas. Retire
los tornillos de la manija de la parte inferior de la
puerta del freezer.
5.2a. Afloje el tornillo de la manija con la llave de 1/8”
provista.
5.3a. Retire la manija de la puerta.
5.4a. Intercambie los lugares entre el ajuste de la
manija y el botón de corriente en el frente de la
puerta. .
5.5a. Mueva los botones de corriente en la parte
superior y en el frente de la puerta para llenar los
agujeros ahora vacíos.
5.6a. Transfiera la traba de la puerta en la parte inferior
de la puerta.
5.7a. Adhiera la manija a la puerta de comidas frescas
con tornillos en la parte superior de la manija.
Use una llave Allen de 1/8” para ajustar el tornillo
específico en la parte inferior de la manija.
5.8a. Adhiera la manija a la puerta del freezer con
tornillos al final de la manija. Use la llave Allen de
1/8 provista” para ajustar el tornillo específico en
la parte superior de la manija.
5.9a. Adhiera la insignia en la puerta del freezer en la
posición opuesta a la manija.
5
CÓMO INVERTIR LAS MANIJAS DE
LAS PERTAS(Cont.)
ENSAMBLE DE LA MANIJA PLÁSTICA
5.1b. Retire los tornillos de la manija de la parte
superior de la puerta de comidas frescas. Retire
los tornillos de la manija de la parte inferior de la
puerta del freezer.
5.2b. Retire la manija en la puerta de comidas frescas,
deslizando la manija hacia arriba y afuera del
ajuste. Retire la manija en la puerta del freezer,
deslizando la manija hacia abajo y afuera del
ajuste.
5.3b. Intercambie los lugares entre el ajuste de la
manija y el botón de corriente en el frente de la
puerta.
5.4b. Mueva los botones de corriente en la parte
superior y en el frente de la puerta para llenar los
agujeros ahora vacíos.
5.5b. Transfiera la traba de la puerta en la parte inferior
de la puerta.
5.6b. Adhiera la manija a la puerta de comidas frescas,
deslizando la misma hacia abajo en el ajuste y
con tornillos en la parte superior de la manija.
5.7b. Adhiera la manija a la puerta del freezer,
deslizando la manija hacia arriba sobre el ajuste
y con los tornillos en la parte inferior de la manija
5.8b . Adhiera la insignia en la puerta del freezer en la
posición opuesta a la manija
Traba de
la puerta
Traba de la
puerta
Instrucciones para la instalación
INSTRUCCIONES PARA LA INSTALACIÓN
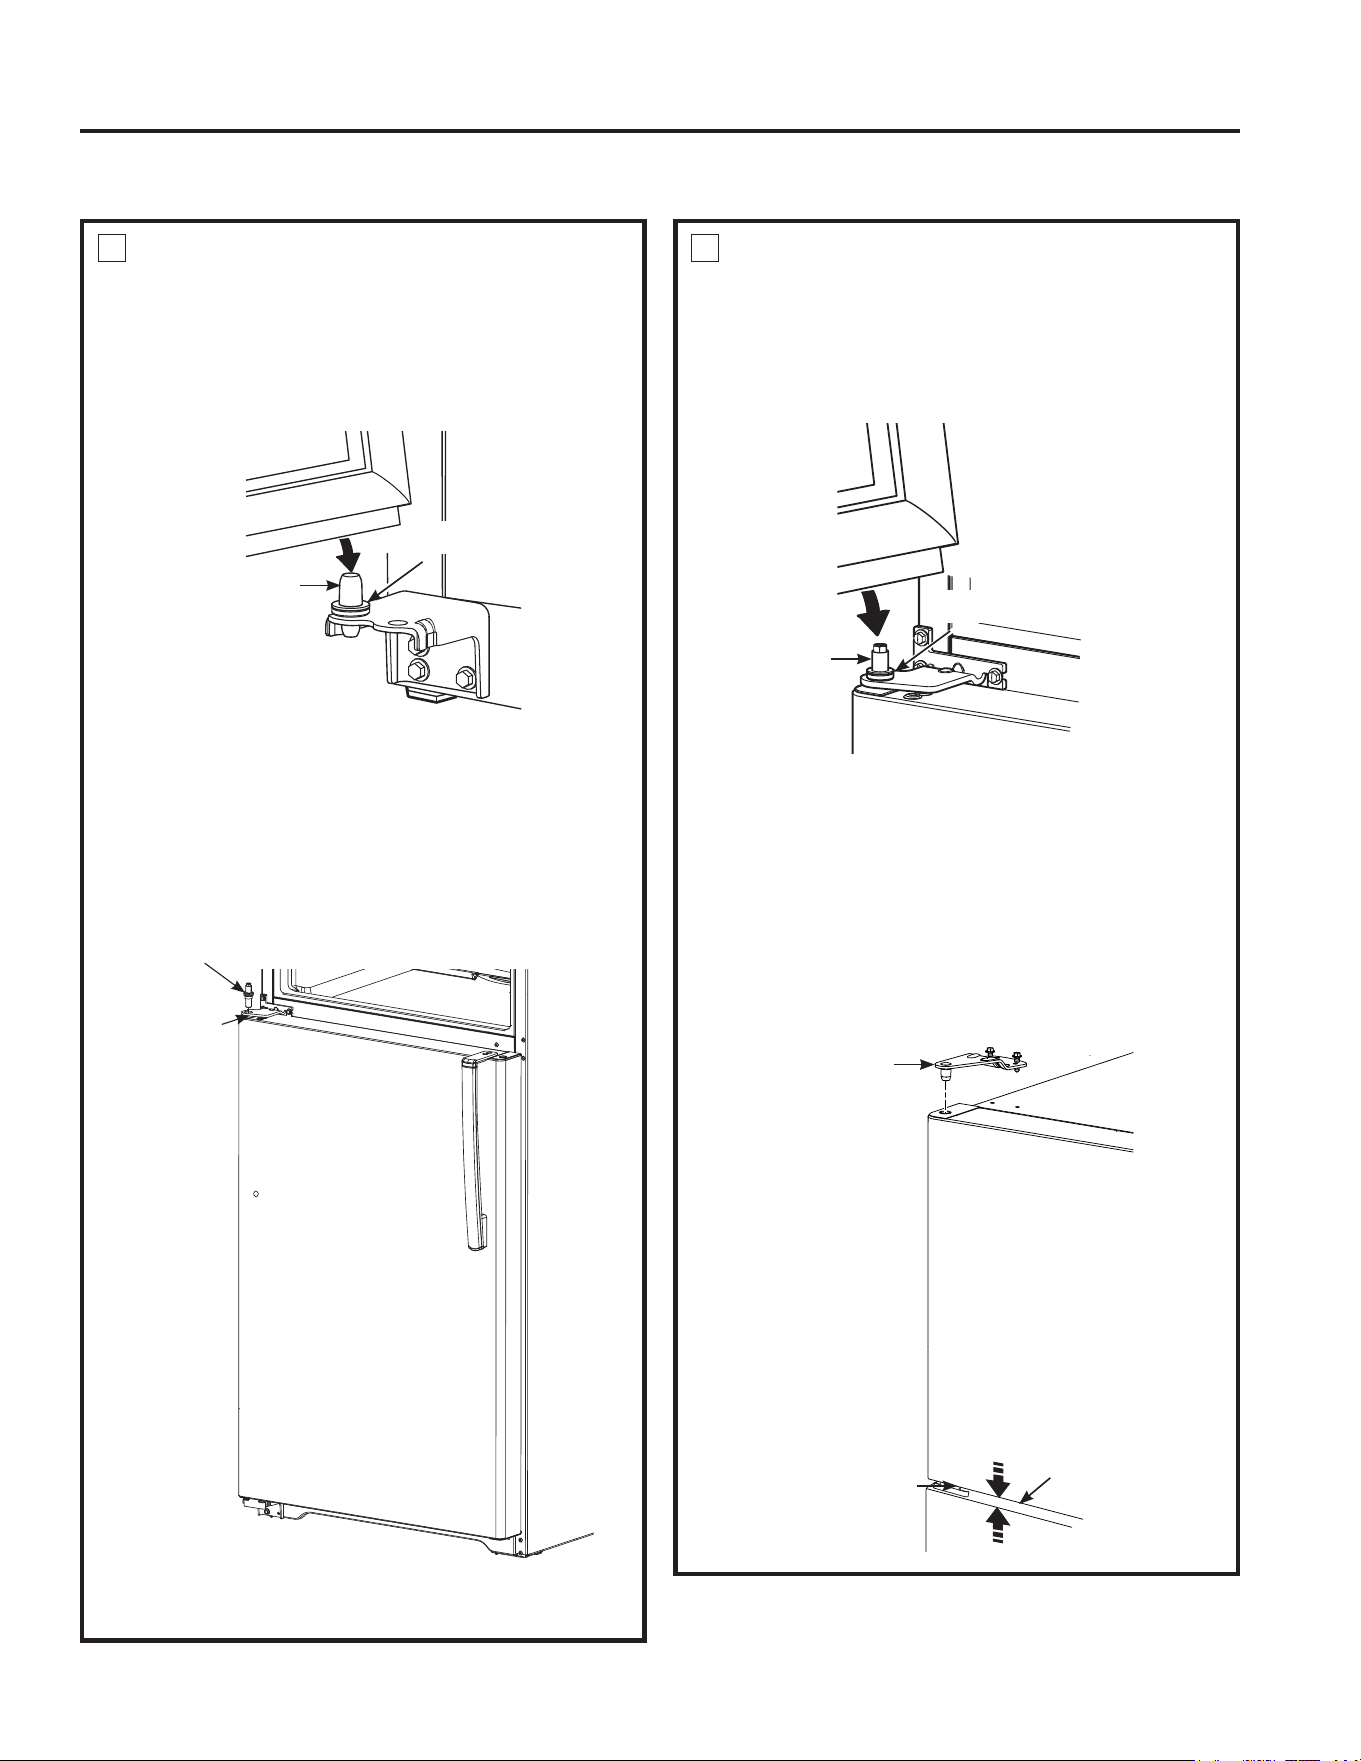
49-1000249 Rev. 0 17
INSTRUCCIONES PARA LA INSTALACIÓN
6
CÓMO VOLVER A COLGAR LAS
PUERTAS
9XHOYDDFROJDUODSXHUWDGHORVDOLPHQWRVIUHVFRV
6.1.1 Baje la puerta de alimentos frescos al perno
de la bisagra inferior. Asegúrese de que la
arandela esté correctamente colocada en el
perno.
6.1.2 Incline la puerta hacia el gabinete. A medida
que la puerta se coloca en su posición,
Alinee la ficha en la puerta con el agujero
en la bisagra central. Coloque el perno de la
bisagra central en el agujero de la bisagra
central y ajuste la misma con una llave de
boca de 3/8”. Asegúrese de que la arandela
esté en la parte superior del perno de la
bisagra.
6
CÓMO VOLVER A COLGAR LAS
PUERTAS (Cont.)
9XHOYDDFROJDUODSXHUWDGHOFRQJHODGRU
6.2.1 Baje la puerta del congelador al pasador
de la bisagra central. Asegúrese de que la
arandela esté correctamente colocada en el
perno.
6.2.2 Incline la puerta hacia el gabinete,
levantando la bisagra superior de modo
que el perno calce en la ficha sobre la parte
superior de la puerta.
6.2.3 Asegúrese de que la puerta esté apenas
sobre la parte superior del gabinete y que la
brecha entre las puertas sea pareja a lo largo
del frente. Asegure los tornillos de la bisagra
VXSHULRU1RDMXVWHHVWRVWRUQLOORVHQH[FHVR
Presione los mismos hasta que queden
ajustados, y luego dé medio giro adicional.
Arandela
plástica
Pasador
de la
bisagra
Perno de la
Bisagra con
Arandela
Bisagra
Central
Pasador
de la
bisagra
Arandela
plástica
Bisagra
Central
Bisagra
Brecha
CÓMO INVERTIR EL VAIVÉN DE LA PUERTA (Cont.)
Instrucciones para la instalación
18 49-1000249 Rev. 0
Sonidos De Funcionamiento Normal
El sonido de los refrigeradores nuevos es diferente al de aquellos más antiguos. Los refrigeradores modernos cuentan con más
funciones y utilizan una tecnología más nueva.
Ŷ Es posible que el nuevo
compresor de alta
efectividad funcione más
rápido y por más tiempo
que aquel de su refrigerador
antiguo, y es posible que escuche un zumbido o sonido
de pulsación en un tono alto mientras está funcionando.
Ŷ (VSRVLEOHTXHHVFXFKHJRUJRWHRVDOFHUUDUODSXHUWD
Esto se debe al equilibrio de la presión dentro del
refrigerador.
Ŷ Es posible que escuche los ventiladores
girar en altas velocidades.
Esto sucede cuando el refrigerador se
enchufa por primera vez, cuando las
puertas se abren con frecuencia o cuando
una gran cantidad de comida es agregada
a los compartimientos del refrigerador o del
freezer. Los ventiladores están ayudando a
mantener las temperaturas correctas.
&+$648,'26(67$//,'26
&58-,'2*25-(26
Ŷ 3XHGHHVFXFKDUVRQLGRVFRPRGHFUXMLGRRHVWDOOLGRV
cuando el refrigerador se conecta por primera vez. Esto
pasa a medida que el refrigerador se enfría hasta la
temperatura correcta.
Ŷ (OFRPSUHVRUSXHGHFDXVDUXQFKDVTXLGRRXQJRUMHR
cuando intenta volver a arrancar (esto puede tomar hasta
5 minutos).
Ŷ ([SDQVLyQ\FRQWUDFFLyQGHODVERELQDVGXUDQWHR
después del ciclo de descongelación puede causar
sonidos como de crujido o estallidos.
Ŷ (QPRGHORVFRQPiTXLQDGHKLHORVGHVSXpVGH
completar un ciclo de hacer hielo, se pueden escuchar
los cubos de hielo cuando caen a la bandeja de hielos.
621,'26'($*8$
Ŷ (OIOXLGRGHOUHIULJHUDQWHDWUDYpVGHODVERELQDVSXHGH
producir un sonido de borboteo como de agua hirviendo.
Ŷ (ODJXDTXHFDHHQHOFDOHQWDGRUGHGHVFRQJHODFLyQSXHGH
causar un chisporroteo, estallido o zumbido durante el ciclo
de descongelación.
Ŷ 8QUXLGRGHDJXDFD\HQGRVHSXHGHHVFXFKDUGXUDQWHHO
ciclo de descongelación a medida que el hielo se derrite del
evaporador y fluye hacia la bandeja de drenaje.
Ŷ (OFLHUUHGHODVSXHUWDVSXHGHSURGXFLUXQVRQLGRGHJRUJRWHR
debido a la estabilización de la presión.
¿Escuchas lo que yo escucho? Estos sonidos son normales.
HUMMM...
WHOOSH...
SOLUCIÓN DE PROBLEMAS : 6RQLGRV'H)XQFLRQDPLHQWR1RUPD

49-1000249 Rev. 0 19
SOLUCIÓN DE PROBLEMAS
Truth or Myth
¿Verdad o Mito? Respuesta Explicación
La máquina de hielos au-
tomática de mi refrigerador
producirá hielo cuando el
refrigerador se encuentre
enchufado a un receptáculo
de corriente.
0,72 El refrigerador debe estar conectado al agua, y la máquina de hacer hielo debe
estar encendida. Asegúrese de que la máquina de hielos esté encendida, sólo
después de que se haya realizado la conexión a la cañería de agua y que el agua
esté abierta. La máquina de hielos se podrá apagar presionando el interruptor en
ODSRVLFLyQ2))$SDJDGR
El freezer debe estar a 15 grados o menos para que la máquina de hielos
produzca hielo. Espere por lo menos 24 horas hasta que el refrigerador esté
preparado y a que la temperatura de la unidad se estabilice.
1XQFDYHUpHVFDUFKDGHQ-
tro del compartimiento del
freezer.
0,72 La escarcha dentro del freezer típicamente indica que la puerta no está
correctamente sellada, o se dejó abierta. Si se encuentra escarcha, despeje la
misma utilizando una espátula de plástico y una toalla, luego asegúrese de que
no haya paquetes ni envases de comida que impidan que la puerta del freezer
se cierre. Para ayudar a reducir la producción de escarcha, asegúrese de que
haya suficiente espacio para el suministro de aire y que las ventilaciones del
freezer mejoren la circulación. Siempre cubra la comida antes de colocarla en el
refrigerador, ya que la humedad de envases abiertos puede contribuir a la carga
de escarcha.
Las manijas de la puerta
del refrigerador se pueden
ajustar fácilmente.
9(5'$'(52 Si las manijas de la puerta están flojas o tienen una separación con la puerta, se
deberán ajustar sobre los tornillos ubicados en los extremos de las manijas.
Luego de activar la máqui-
na de hielos, descarte la
producción de hielo de las
primeras 24 horas.
9(5'$'(52 Para evitar problemas de olor y gusto, la primera producción de hielo deberá ser
descartada.
Siempre se requiere el
retiro de la puerta para la
instalación.
0,72 Las puertas sólo se deben retirar cuando sea necesario para evitar daños en
el pasillo o en el acceso hasta la ubicación final. Si las puertas son retiradas,
revise la sección de Inversión de la Puerta Giratoria para proceder a colocarla
nuevamente.
Hay un ajuste sobre las
ruedas traseras.
0,72 Las patas niveladoras frontales son ajustables y se deberían usar para equilibrar
el refrigerador. Las patas niveladoras se usan para hacer el ajuste inicial de la
SXHUWDGHDOLPHQWRVIUHVFRV'HEHUtDKDEHUDSUR[LPDGDPHQWHó´GHFDtGDGHVGH
el frente hasta la parte trasera, a fin de asegurar que las puertas siempre se
cierren.
Se puede usar cualquier
limpiador multiuso para
limpiar el refrigerador.
0,72 Los limpiadores multiuso no son recomendables para refrigeradores.
1RXVHFHUDSXOLGRUHVDPRQtDFREODQTXHDGRUHVXRWURVSURGXFWRVTXH
contengan cloro sobre ninguna superficie. Limpie con una tela humedecida con
agua y jabón. Seque con una tela seca. Las puertas de acero inoxidable se
pueden limpiar con un limpiador de acero inoxidable disponible comercialmente.
Los limpiadores con ácido oxálico tales como Bar Keepers Friend Soft Cleanser™
WDOHVFRPRy[LGRVREUHODVXSHU¿FLH, , deslustres y pequeñas manchas. Use sólo
un limpiador líquido libre de material abrasivo y frote en la dirección de las líneas
GHOFHSLOORFRQXQDHVSRQMDVXDYH\K~PHGD1RXVHFHUDSDUDHOHFWURGRPpVWLFRV
ni pula sobre el acero inoxidable.
Las juntas durarán
más con una limpieza y
mantenimiento regular.
9(5'$'(52 Limpie las juntas con agua caliente y jabón. Asegúrese de que todos los pliegues
estén limpios y secos luego de la limpieza. Asegúrese de que lo
s rebordes estén
limpios de cualquier arenilla o suciedad. Luego de limpiar las juntas de la puerta,
aplique cera de parafina o de vaselina a las juntas de la puerta y bisagras del lado
de las bisagras. Esto ayuda a evitar que las juntas se peguen o pierdan su forma
debido a una inclinación.
La puerta podrá ser
enviada con una película
protectora, la cual deberá
ser retirada antes del uso.
9(5'$'(52 Las puertas con acabado delicado (acero inoxidable, pizarra, negro brillante y
blanco brillante, o metálico plateado) tendrán una película plástica clara en la
puerta, la cual deberá ser retirada luego de la instalación.
¿Tiene más preguntas? Para más información sobre su refrigerador u otros electrodomésticos de GE, visítenos en
geappliances.com/videos
Solución de problemas.. Antes de Solicitar el Servicio Técnico
¡Ahorre tiempo y dinero! Primero revise los cuadros que aparecen en las siguientes páginas y es posible que no necesite solicitar
UHSDUDFLRQHV'HVHUQHFHVDULRSRGUiSURJUDPDUHOVHUYLFLRWpFQLFRYLVLWiQGRQRVHQGEAppliances.com o llamando al 800.
GECARES (800.432.2737). En Canadá, visite GEAppliances.ca o llame al 800.561.3344.

20 49-1000249 Rev. 0
Notas
49-1000249 Rev. 0 21
GARANTÍA LIMITADA
Grape aquí su recibo. Se requiere facilitar prueba de la fecha
de compra original para obtener un servicio bajo la garantía.
Garantía limitada del refrigerador
Todo el servicio de garantía es provisto por nuestros Centros de Servicio de Fabricación, o un técnico autorizado de Servicio al
Cliente (Customer Care®). Para programar una visita del servicio técnico, visítenos en GEAppliances. com, o comuníquese al
800.GE.CARES (800.432.2737). Cuando llame para solicitar el servicio, tenga los números de serie y modelo disponibles.
Para realizar el servicio técnico de su refrigerador se podrá requerir el uso de datos del puerto de abordaje para su diagnóstico.
Esto da al técnico del Servicio de Fábrica de GE Appliances la habilidad de diagnosticar de forma rápida cualquier problema con
su electrodoméstico, y de ayudar a GE Appliances a mejorar sus productos al brindarle a GE Appliances la información sobre su
electrodoméstico. Si no desea que los datos de su electrodoméstico sean enviados a GE Appliances, solicitamos que le indique a su
WpFQLFR12HQWUHJDUORVGDWRVD*($SSOLDQFHVHQHOPRPHQWRGHOVHUYLFLR
Ŷ Viajes de servicio a su hogar para enseñarle cómo usar
el producto.
Ŷ Instalación o entrega inapropiada, o mantenimiento
impropio.
Ŷ Fallas del producto si hay abuso, mal uso, o uso para
otros propósitos que los propuestos, o uso para fines
comerciales.
Ŷ Pérdida de alimentos por averías.
Ŷ Reemplazo de fusibles de su hogar o reajuste de
interruptores de circuito.
Ŷ &XDOTXLHUGDxROXHJRGHODHQWUHJD
Ŷ (OUHHPSOD]RGHOFDUWXFKRGHILOWURGHDJXDRYiOYXODGH
agua, si estuviera incluido, debido a presión de agua
que se encuentra fuera del rango de presión operativa
especificada o debido a sedimento excesivo en el
suministro de agua.
Ŷ 5HHPSOD]RGHODVERPELOODVVLLQFOXLGDVRGHOFDUWXFKR
de filtro de agua, si incluido, diferente a como se
especifica anteriormente.
Ŷ 'DxRDOSURGXFWRFDXVDGRSRUDFFLGHQWHIXHJR
inundaciones o actos de Dios.
Ŷ Daños consecuentes o incidentales causados por
posibles defectos sobre este producto.
Ŷ 3URGXFWRQRDFFHVLEOHSDUDIDFLOLWDUHOVHUYLFLR
requerido.
Ŷ /RVGDxRVFDXVDGRVSRUXQILOWURGHDJXD0DUFDQR*(
Appliances.
Ŷ 'DxRVVREUHHODFDEDGRWDOHVFRPRy[LGRVREUH
la superficie, deslustres o manchas pequeñas no
informadas dentro de las 48 horas luego de la entrega.
Ŷ 3URGXFWRVTXHQRSUHVHQWHQGHIHFWRVQLHVWpQURWRVR
que estén funcionando de acuerdo con lo descrito en el
Manual del Propietario
Ŷ'DxRVSURYRFDGRVSRUKDFHUIXQFLRQDUODPiTXLQDGH
hielo sin suministro de agua dirigido a la unidad.
Lo que no está cubierto
Para los clientes de EE.UU. Esta garantía limitada se extiende al comprador original y a cualquier dueño subsiguiente de
productos comprados para uso hogareño dentro de EE.UU. Si el producto está en un área donde no se encuentra disponible un
Proveedor Autorizado del Servicio Técnico de GE Appliances, usted será responsable por el costo de un viaje o se podrá requerir
que traiga el producto a una ubicación del Servicio Técnico de GE Appliances Autorizado para recibir el servicio. En Alaska, la
garantía limitada excluye el costo de envío o llamadas del servicio a su hogar.
Algunos estados no permiten la exclusión o limitación de daños fortuitos o consecuentes. Esta garantía limitada le da derechos
legales específicos y es posible que tenga otros derechos legales que varían entre un estado y otro. Para conocer cuáles son
sus derechos legales, consulte a la oficina de asuntos del consumidor local o estatal o al Fiscal de su estado.
Garante US: GE Appliances, a Haier company
Louisville, KY 40225
(;&/86,Ï1'(*$5$17Ë$6,03/Ë&,7$6²6X~QLFR\H[FOXVLYRGHUHFKRHVODUHSDUDFLyQGHOSURGXFWR
tal y como se indica en esta Garantía limitada. Cualquier garantía implícita, incluyendo las garantías
implícitas de comerciabilidad o adecuación para un fin determinado, están limitadas a un año o el
período de tiempo más breve permitido por la ley.
Por el período de: GE Appliances reemplazará:
Un Año
'HVGHODIHFKDGHODFRPSUD
original
Cualquier parte del refrigerador que falle debido a un defecto en los materiales o la fabricación.
'XUDQWHHVWDgarantía limitada de un año, GE Appliances también proveerá, sin costo, todo el
trabajo y el servicio relacionado con el reemplazo de la parte que presente defectos.
Treinta Días
(Filtro de Agua, si está
LQFOXLGR'HVGHODIHFKD
de la compra original del
refrigerador
Cualquier parte del cartucho del filtro de Agua que falle debido a un defecto en los materiales o la
IDEULFDFLyQ'XUDQWHOD garantía limitada por treinta días, GE Appliances también le brindará, sin
costo, el reemplazo de un cartucho del filtro de agua.
Para Clientes en Canadá: Esta garantía se extiende al comprador original y a cualquier dueño subsiguiente de productos
comprados para uso hogareño dentro de Canadá. El servicio técnico hogareño de la garantía será brindado en áreas donde MC
Commercial Inc. se encuentre disponible y lo considere apropiado.
Warrantor Canada: MC Commercial Inc., Burlington, Ontario, L7R 5B6

Impreso en los Estados Unidos
Soporte para el Consumidor
SOPORTE PARA EL CONSUMIDOR
Sitio Web de GE Appliances
¢'HVHDUHDOL]DUXQDFRQVXOWDRQHFHVLWDD\XGDFRQVXHOHFWURGRPpVWLFR"£,QWHQWHDWUDYpVGHO6LWLR:HEGH*($SSOLDQFHVODV
24 horas del día, cualquier día del año! Usted también puede comprar más electrodomésticos maravillosos de GE Appliances y
aprovechar todos nuestros servicios de soporte a través de Internet, diseñados para su conveniencia.
En EE.UU.: GEAppliances.com
Registre su Electrodoméstico
¡Registre su electrodoméstico nuevo a través de Internet, según su conveniencia! Un registro puntual de su producto permitirá
una mejor comunicación y un servicio más puntual de acuerdo con los términos de su garantía, en caso de surgir la necesidad.
También puede enviar una carta en la tarjeta de inscripción preimpresa que se incluye con el material embalado.
En EE.UU.: GEAppliances.com/register
Servicio Programado
El servicio de reparación de expertos de GE Appliances está a sólo un paso de su puerta. Conéctese a través de Internet y programe
su servicio a su conveniencia cualquier día del año. En EE.UU.: GEAppliances.com/service
o comuníquese al 800.432.2737 durante el horario de atención comercial.
Garantías Extendidas
Adquiera una garantía extendida de GE Appliances y conozca los descuentos especiales que están disponibles mientras su
garantía aún está vigente. La puede adquirir en cualquier momento a través de Internet. Los servicios de GE Appliances aún
estarán allí cuando su garantía caduque.
En EE.UU.: GEAppliances.com/extended-warranty o comuníquese al 800.626.2224 durante el horario de atención comercial.
Conectividad Remota
Para solicitar asistencia para la conectividad de red inalámbrica (para modelos con acceso remoto),
visite nuestro sitio web en GEAppliances.com/connect o comuníquese al 800.220.6899 en EE.UU.
Piezas y Accesorios
Aquellos individuos calificados para realizar el servicio técnico de sus propios electrodomésticos podrán solicitar el envío de
SLH]DVRDFFHVRULRVGLUHFWDPHQWHDVXVKRJDUHVVHDFHSWDQODVWDUMHWDV9,6$0DVWHU&DUG\'LVFRYHU2UGHQHKR\DWUDYpVGH
Internet durante las 24 horas, todos los días. En EE.UU.: GEApplianceparts.com o de forma telefónica al 877.959.8688 durante
el horario de atención comercial.
Las instrucciones que figuran en este manual cubren los procedimientos que serán realizados por cualquier usuario.
Otros servicios técnicos generalmente deben ser derivados a personal calificado del servicio. Se deberá tener cuidado,
ya que una reparación indebida podrá hacer que el funcionamiento no sea seguro.
Contáctenos
Si no se encuentra satisfecho con el servicio que recibió de GE Appliances, comuníquese con nosotros a través de nuestro sitio
Web con todos los detalles, incluyendo su número telefónico, o escriba a:
En EE.UU.: General Manager, Customer Relations | GE Appliances, Appliance Park | Louisville, KY 40225
GEAppliances.com/contact