DO NOT, UNDER ANY CIRCUMSTANCES. REMOVE THE POWER SUPPLY CORD GROUND PRONG.
ELECTRICAL GROUND IS REQUIRED ON THIS APPLIANCE
A 115-VOLT 60Hz, AC ONLY, 15A or 20A FUSED AND PROPERLY GROUNDED ELECTRICAL SUPPLY IS REQUIRED.
A time delay fuse or time delay circuit breaker is recommended. Use a dedicated circuit serving only this appliance.
If an extension cord must be used. the cord must be a minimuml4AWG and rated not less than 1875 watts.
RECOMMENDED GROUNDING METHOD
For your personal safety, this appliance must be grounded. This appliance has a power supply cord with a 3-prong grounded plug. To minimize possible shock hazard the cord must be plugged into a matching grounded electrical outlet that complies with the latest edition of the National Electrical Codes and all local codes and ordinances.
If a grounded 3-prong electrical outlet is not available, it is the personal responsibility and obligation of the customer to have one installed by a qualified electrician.
ELECTRICAL SHOCK HAZARD
Plug into a grounded 3-prong outlet.
Do not remove the ground pin from the plug. Do not use an adapter.
Failure to follow these instructions can result in death. fire. or electrical shock.
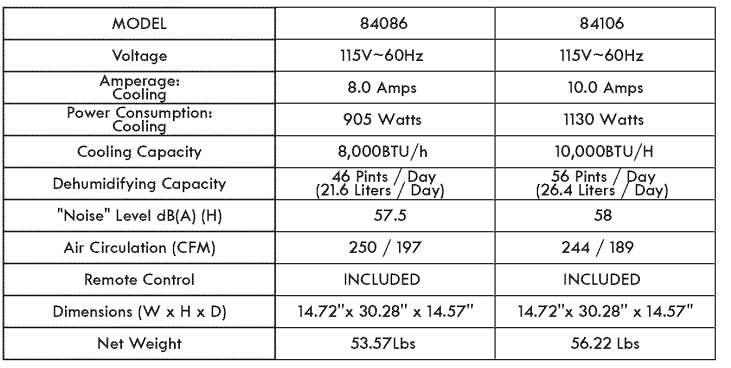
Production specifications
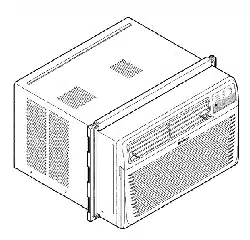
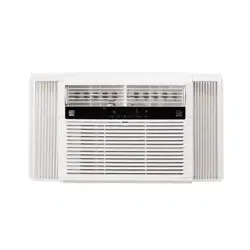
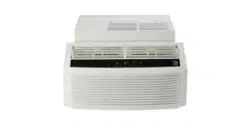
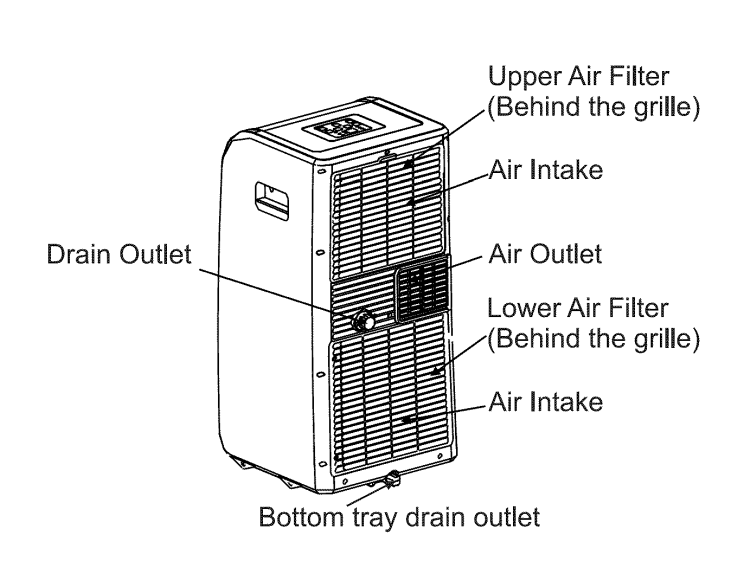
Parts and Features
Front
Rear
Operation
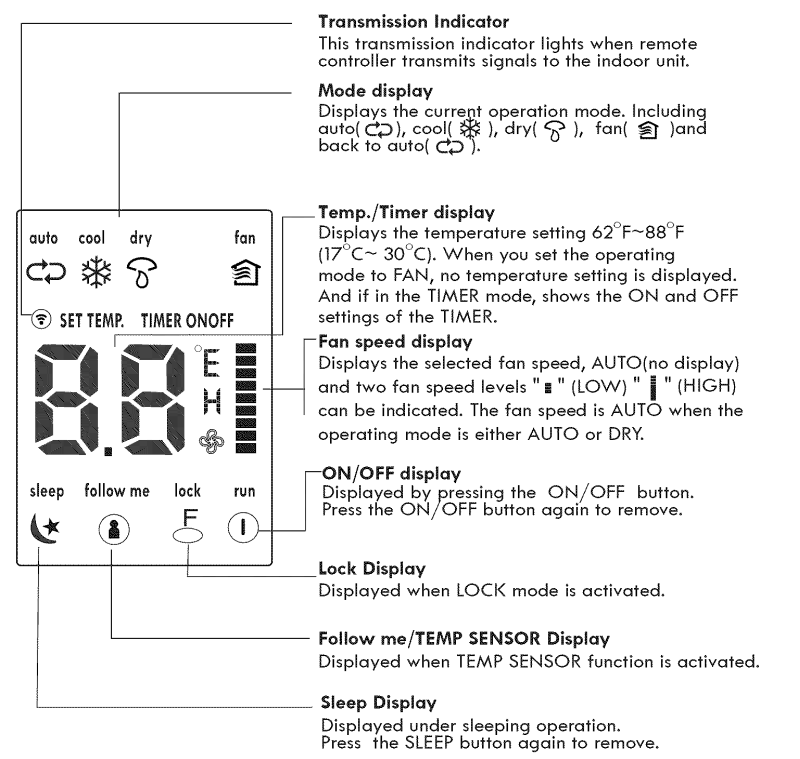
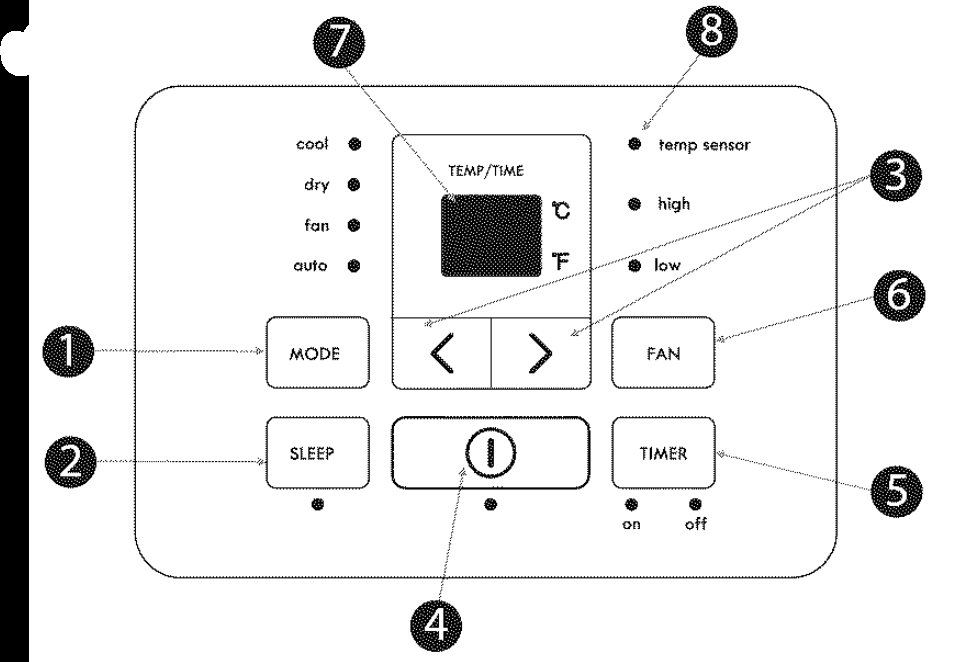
Control panel
MODE button: Press this button to select the operating mode in a sequence that advances from AUTO to COOL to DRY to FAN. An indicator light will illuminate for each mode setting.
SLEEP button: Used to initiate the SLEEP operation.
UP(>) and DOWN (<) button:
Press to increase or decrease temperature settings in 2°F (1°C) increments from 62°F (17°C) to 88°F (30°C), or TIMER setting from 0 to 24 hrs.
NOTE: Temperature can be displayed in Fahrenheit or Celsius. To change from one to the other, press and hold the Up and Down buttons at the same time for 3 seconds.
POWER button with OPERATION indicator: Power switch on/off.
TIMER button
Used to initiate the AUTO ON start time and AUTO OFF stop time program, in conjunction with the < & > buttons.
An indicator light will illuminate with each setting.
FAN button: Press to select three different fan speed settings: LOW, HIGH, and AUTO. An indicator light will illuminate for each speed setting.
LED Display: Shows the set temperature in °C or °F and the Auto-timer settings. While in DRY and FAN modes. the display shows the room temperature.
TEMP SENSOR feature
NOTE: This feature can be activated from the remote control ONLY. The remote control serves as a remote thermostat allowing for precise temperature control at its location. To activate the TEMP SENSOR feature. point the remote control towards the unit and press the TEMP SENSOR. button. The remote display shows the actual temperature at its location. The remote control will send this signal to the Air Conditioner at intervals of every 3 minutes until pressing the TEMP SENSOR button again.
If the unit does not receive the TEMP SENSOR signal during any 7 minute interval, the unit will beep to indicate the TEMP SENSOR mode has ended.
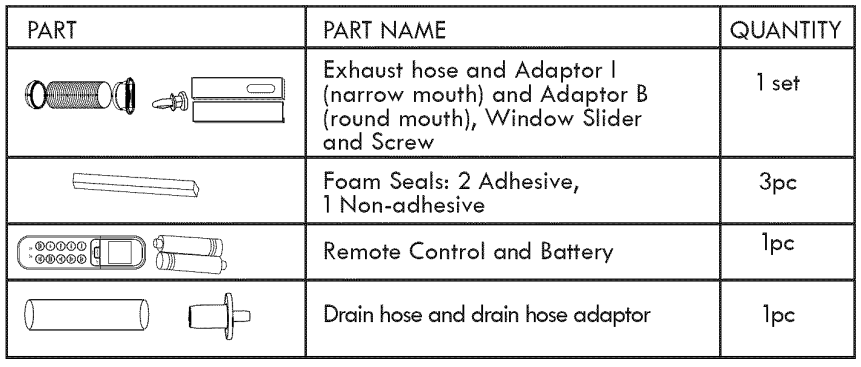
Accessories
ERROR CODES AND PROTECTION CODE:
El- Room temperature sensor error - Unplug the unit and plug it back in. If error repeats, arrange for service.
E2- Evaporator temperature sensor error - Unplug the unit and plug it back in. If error repeats, arrange for service.
E3- Condenser temperature sensor error - Unplug the unit and plug it back in. If error repeats, arrange for service.
E4- Display panel communication error - Unplug the unit and plug it back in. If error repeats, arrange for service.
PI- Bottom tray is full - Connect the drain hose and drain the collected water away. If error repeats, arrange for service.
OPERATING INSTRUCTIONS
COOL operation
Press the "MODE" button until the "COOL" indicator light comes on.
Press the "+" or "-" buttons to select your desired room temperature. The temperature can be set within a range of 62°F (17°C) - 88°F (30°C).
Press the "FAN" button to choose the fan speed.
AUTO operation
When Air Conditioner is in AUTO mode. it will automatically choose cooling or fan-only operation based on the set temperature point.
In AUTO mode you cannot manually set the fan speed.
FAN operation
Press the "MODE" button until the "FAN " indicator light comes on.
Press the "FAN " button to choose the fan speed. The temperature cannot be adjusted.
In FAN mode, detach the exhaust hose from the air outlet in the back of the unit.
TIMER operation
With the unit on, press the Timer button. The Off light will indicate the Auto Stop function may be programmed. Within 5 seconds press the UP or DOWN buttons to select a period of time after which operation will stop. Press the Timer button twice. The On light will indicate the Auto Start function may be programmed. Within 5 seconds press the UP or DOWN buttons fo select a period of time after which operation will resume.
With the unit off, press the Timer button. The On light will indicate the Auto Start function may be programmed. Within 5 seconds press the UP or DOWN buttons to select a period of time after which operation will start. Press the Timer button twice. The Off light will indicate the Auto Stop function may be programmed. Within 5 seconds press the UP or DOWN button to select a period of time after which operation will stop.
NOTES:
Auto time changes in 0.5 hour increments up to 10 hours. then in 1 hour increments up to 24 hours.
Turning the unit ON or OFF or adjusting both timer settings to 0.0 will cancel the Auto Start/Stop timer program.
When a malfunction (E1. E2. E3 or E4) occurs. Auto Start/Stop will also be cancelled.
SLEEP operation
Press the SLEEP button for the selected temperature setting to increase to 2° F (1° C) warmer after 30 minutes and another 2° F (1° C) warmer after another 30 minutes. The warmer temperature will be maintained for 7 hours, at which time the unit will return to the originally selected temperature.
NOTE: The SLEEP feature is not available in the FAN or DRY mode.
OTHER FEATURES
Auto-Restart
If there is a power failure, the unit will return to the same operating condition when the power is restored.
Wait 3 minutes before resuming operation
3 minute compressor delay - Any time the compressor stops running for any reason. such as when the humidity set point has been reached, it will not restart again for a minimum of 3 minutes. This is a safety design to prolong the life of the compressor.
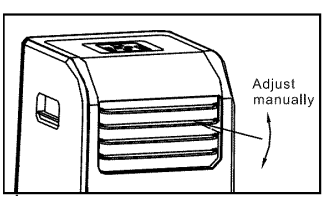
Air flow direction adjustment
The louver can be set to the desired position manually.
Do not place any heavy objects or other loads on the louver. Doing so so will cause damage manually to the unit.
Ensure the louver is fully opened under heating operation.
Keep the louver fully opened during operation.
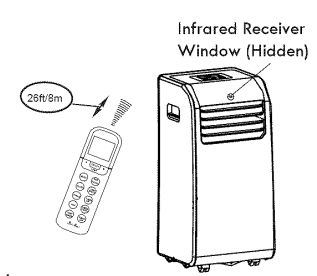
Using The Remote Control
Location of the remote control
Use the remote control within a distance of 26 ft (8m) from the appliance. pointing it towards the receiver. Reception is confirmed by a beep.
CAUTION
The Air Conditioner will not operate if curtains, doors or other materials block the signals from the remote control to the unit receiver.
Prevent any liquid from falling into the remote control. Do not expose the remote control to direct sunlight or heat.
If the infrared signal receiver on the unit is exposed to direct sunlight, the Air Conditioner may not function properly. Use curtains to prevent the sunlight from falling on the receiver.
If other electrical appliances react to the remote control. move the appliances out of the range of the remote control signal.
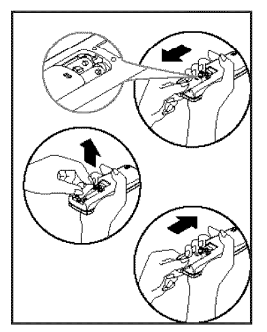
Replacing batteries
The remote control is powered by two AAA batteries.
Remove the battery compartment cover by pressing and sliding off.
Remove the old batteries and insert the new batteries, placing the(+) and (-) ends correctly.
Reattach the cover by sliding it back into position.
CAUTION
Do not mix old and new batteries or batteries of a different type.
Do not leave the batteries in the remote control if it is not going to be used for 2 or 3 months.
Do not throw batteries in household garbage; dispose of them at battery collection stations or special garbage sites.
Remote control Specifications
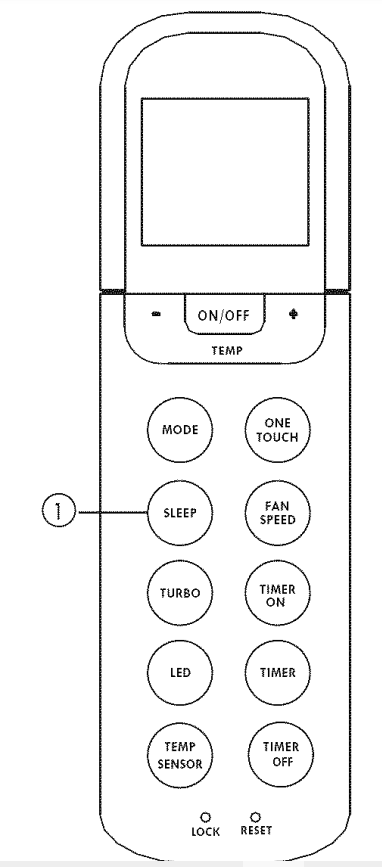
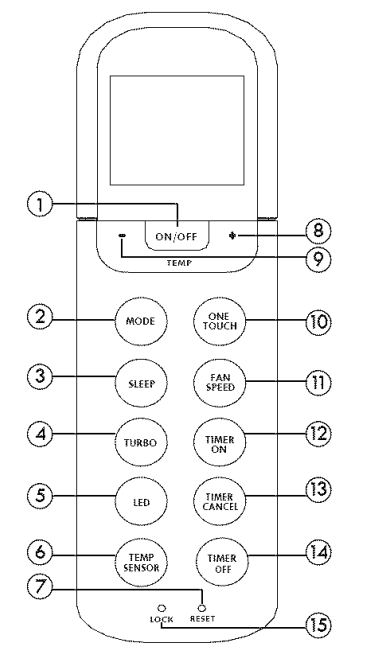
1. ON/OFF Button (/): Turns the main unit on and off
2. MODE Button: Each time the button is pressed, the operating mode changes in this sequence:
3. SLEEP Button: Enables/Disables the SLEEP function. NOTE: If the unit is in SLEEP mode, it will be cancelled if the MODE. FAN SPEED or ON/OFF buttons are pressed.
4. TURBO Button: Activates the TURBO function. The fan will increase to maximum speed, in COOL mode only. There is no effect in other modes.
5. LED Button: Disable/Activate unit screen display.
6. TEMP SENSOR Button: The remote control serves as a remote thermostat allowing for temperature control at its location. To activate the TEMP SENSOR feature. point the remote control toward the unit and press the TEMP SENSOR button. The remote display shows the temperature at its location. The remote control will send this signal to the Air Conditioner at intervals of every 3 minutes until the TEMP SENSOR button is pressed again. If the unit does not receive the TEMP SENSOR signal during any 7 minute interval, the unit will beep to indicate the TEMP SENSOR mode has ended.
7. RESET Button: If the recessed RESET button is pressed. all current settings are cancelled and the control will return to the initial settings.
8. UP Button (/+ ): Push this button to increase the setting temperature or to increase the hour during Timer setting.
9. DOWN Button ( / - ): Push this button to decrease the setting temperature or to decrease the hour during Timer setting.
10. ONE TOUCH Button
Used to restore to a favorite setting or the previous settings.
The first time the unit is connected to power. if the ONE TOUCH button is pressed, the unit will change to AUTO mode, set to 76°F, and the fan speed will be set to Auto.
If this button is pushed when remote controller is on, the system will automatically revert back to the previous settings including operating mode. setting temperature. fan speed level and sleep feature (if activated), and it will transmit these settings to the unit to set it.
If this button is pushed when remote controller is off. the system will automatically revert back to the previous settings including operating mode, setting temperature, fan speed level, but will disable the Sleep feature. The remote will not transmit the signals to the unit.
If this button is pressed for more than 2 seconds, the system will automatically store the current operation settings including operating mode, setting temperature, fan speed level and sleep feature (if activated). Then the next time the button is pressed. the remote will transmit these stored setting to the unit.
11. FAN SPEED Button: Used to select the fan speed in three steps:
12. TIMER ON Button: Press this button to initiate the Auto-on time sequence. Each press will increase the auto-timed setting in 30-minute increments. When the setting time displays 10H, each press will increase the auto-timed setting in 60 minutes increments. To cancel the auto-timed program, simply adjust the Auto-on time all the way back to 0.0.
13. TIMER CANCEL Button: Press this button to cancel the auto-timed program. NOTE: If the unit is running in timer mode. when you press this button. the function will be cancelled, and the unit will turn off.
14. TIMER OFF Button: Press this button to initiate the auto-off time sequence. Each press will increase the auto timed setting in 30 minutes increments. When the setting time displays 10H. each press will increase the auto-timed setting in 60 minutes increments. To cancel the auto-timed program, simply adjust the auto-off time to 0.0
15. LOCK Button: When you press the recessed LOCK button. all current settings are locked in and the remote controller does not accept any operation except that of the LOCK button. Press again to cancel the LOCK mode.
Indicators on LCD
HOW TO USE THE BUTTONS
AUTO OPERATION
Ensure the unit is plugged in and power is available. The OPERATION indicator on the display panel of the main unit will be illuminated.
Press the MODE button to select Auto.
Press the UP/DOWN button to set the desired temperature. The temperature can be set within a range of 62°F ~ 88°F (17°C ~ 30°C) in 2°F (1°C) increments.
Press the ON/OFF button to start the Air Conditioner.
NOTE
In Auto mode. the Air Conditioner will logically choose a mode of Cooling, Fan, or Dry, by sensing the difference between the actual ambient room temperature and the setting temperature on the remote controller.
In Auto mode, you cannot switch the fan speed. It will be automatically controlled.
If the Auto mode is not comfortable for you. the desired mode can be selected manually.
COOLING/FAN OPERATION
Ensure the unit is plugged in and power is available.
Press the MODE button to select COOL or FAN mode.
Press the UP/DOWN buttons to set the desired temperature (in COOL mode only). The temperature can be set within a range of 62°F ~ 88°F (17°C ~ 30°C) in 2°F (1°C) increments.
Press the FAN button to select the fan speed in three steps- Auto, Low, or High.
Press the ON/OFF button to start the Air Conditioner.
NOTE in the FAN mode, the temperature setting is not displayed in the remote controller and you are not able to control the room temperature. In this case, only step 1, 3 and 4 may be performed.
DEHUMIDIFYING OPERATION
Ensure the unit is plugged in and power is available. The OPERATION indicator on the display panel of the indoor unit will be illuminated.
Press the MODE button to select DRY mode.
Press the ON/OFF button to start the Air Conditioner in Dry mode.
NOTE: In the Dehumidifying mode. you cannot switch the fan speed. It will be automatically controlled.
LED OPERATION
Pressing the LED button will disable or activate unit screen display.
TIMER OPERATION
Pressing the TIMER ON button will set the Auto-on time of the unit. Pressing the TIMER OFF button will set the Auto-off time of the unit.
TO SET THE AUTO-ON TIME:
Press the TIMER ON button. The remote controller shows TIMER ON, the last Auto-on setting time and the symbol "h" will be shown on the LCD display area. Now it is ready to set the Auto on time to START the operation.
Push the TIMER ON button again to set desired Auto-on time. Each time you press the button. the time increases by half an hour between O and 10 hours, and by one hour between 10 and 24 hours.
After setting the TIMER ON, there will be a one second delay before the remote controller transmits the signal to the Air Conditioner. Then, after approximately another 2 seconds, the symbol “h" will disappear and the set temperature will re-appear on the LCD display window. The set temperature will not appear in FAN mode.
TO SET THE AUTO-OFF TIME
Press the TIMER OFF button. The remote controller shows TIMER OFF. the last Auto-off setting will be shown on the LCD display area. Now it is ready to set the Auto time and the symbol “h” off time to STOP the operation.
Push the TIMER OFF button again to set desired Auto-off time. Each time you press the button. the time increases by half an hour between 0 and 10 hours. and by one hour between 10 and 24 hours.
After setting the TIMER OFF. there will be a one second delay before the remote controller transmits the signal to the Air Conditioner. Then after approximately another 2 seconds. the symbol “h" will disappear and the set temperature will re-appear on the LCD display window. The set temperature will not appear in FAN mode.
TO CANCEL AUTO TIME
Press the TIMER CANCEL button to cancel the auto time.
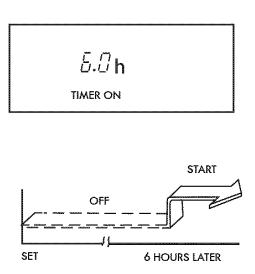
EXAMPLE OF TIMER SETTING TIMER ON (Auto-on Operation)
The TIMER ON feature is useful when you want the unit to turn on automatically, for example, before you return home. The Air Conditioner will automatically start operating at the set time. Example: To start the Air Conditioner in 6 hours.
Press the TIMER ON button. The last setting of starting operation time and the signal “h” will show on the display area.
Press the TIMER ON button to display “6:0h" on the TIMER ON display of the remote control.
Wait for about 3 seconds and the digital display area will show the temperature again. Now this function is activated
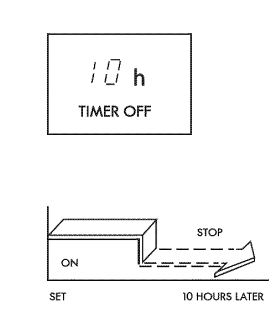
TIMER OFF (Auto-off Operation)
The TIMER OFF feature is useful when you want the unit to turn off automatically after you go to bed. The Air Conditioner will stop automatically at the set time. Example: To stop the Air Conditioner in 10 hours.
Press the TIMER OFF button. The last setting of stopping operation time and the signal "h" will show on the display area.
Press the TIMER OFF button to display "10h" on the TIMER OFF display of the remote control.
Wait for about 3 seconds and the digital display area will show the temperature again. Now this function is activated.
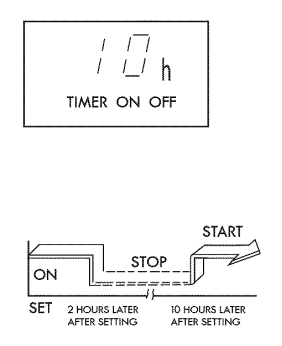
COMBINED TIMER (Setting both ON and OFF timers simultaneously)
TIMER OFF ->TIMER ON (On > Stop-> Start operation)
This feature is useful when you want to stop the Air Conditioner after you go to bed, and start it again in the morning when you wake up or when you return home.
Example: To stop the Air Conditioner 2 hours after setting and start it again 10 hours after setting.
Press the TIMER OFF button.
Press the TIMER OFF button again to display 2.0h on the TIMER OFF display.
Press the TIMER ON button.
Press the TIMER ON button again to display 10h on the TIMER ON display.
Wait for the remote control to display the setting temperature.
TIMER OFF TIMER ON (On —> Stop—> Stop operation)
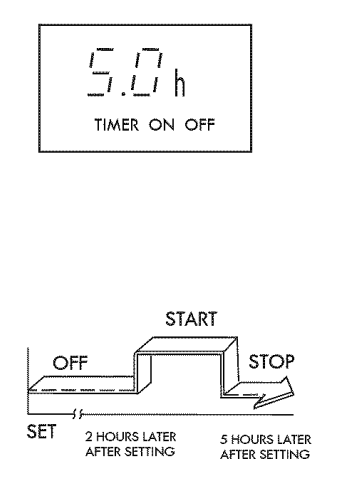
This feature is useful when you want to start the Air Conditioner before you wake up and stop it after you leave the house. Example: To start the Air Conditioner 2 hours after setting and stop it 5 hours after setting.
Press the TIMER ON button.
Press the TIMER ON button again to display 2.0h on the TIMER ON display.
Press the TIMER OFF button.
Press the TIMER OFF button again to display 5.0h on the TIMER OFF display.
Wait for the remote control to display the setting temperature.
CAUTION: The timer setting (TIMER ON or TIMER OFF) that occurs first after the set time will be activated first. SLEEP OPERATION
Press the SLEEP button for the selected temperature setting to increase to 2° F (1° C) warmer after 30 minutes. and another 2° F (1° C) warmer after another 30 minutes.
The warmer temperature will be maintained for 7 hours at which time the unit will return to the originally selected temperature.
NOTE: The SLEEP feature is not available in the FAN or DRY mode.
Care And Maintenance
IMPORTANT:
Be sure to unplug the unit before cleaning or servicing.
Do not use gasoline. thinner or other chemicals to clean the unit.
Tap or hose washing may result in an electrical hazard when resuming operation of the unit.
If the power cord is damaged. discontinue unit use. Take unit to a Sears or other qualified service dealer for repair.
AIR FILTER
Clean the air filter at least once every two weeks, to prevent inferior fan operation because of dust.
Removal: The unit has two filters. Pull open the upper filter grille, and raise the filter up and out of the unit (Fig. 21). Loosen and remove the screw on the lower filter grille, open the grille and remove the lower filter from the unit (Fig. 21).
Cleaning: Wash the filters by immersing them gently in warm water (about 140°F/40°C) with a mild detergent. Rinse the filter and dry it in a shaded area.
Mounting: Reinstall the air filters only after they are completely dry.
UNIT EXTERIOR
Use a lint-free cloth soaked in mild detergent water to clean the exterior surfaces of the unit. Use another clean cloth to wipe the exterior surfaces dry.
UNIT IDLE FOR A LONG TIME
Remove the plug from the upper drain hole fitting. Attach the open end of the supplied drain hose to the fitting, and place the other end so that water flows into a floor drain ).
Carefully move the unit to a floor drain location, and remove the bottom drain plug to drain the water from the bottom tray (See Fig. 20 on page 12).
Run the unit in FAN mode for half a day in a warm room to dry the inside of the unit and prevent mold formation.
Turn off and unplug the unit, wrap the cord and bundle it with the supplied strap. Remove the batteries from the remote control.
Clean and reinstall the air filters.
Troubleshooting
Before calling for service. review the chart below first yourself.
PROBLEM
CAUSE
SOLUTION
Unit does not Start when Pressing on/off Button
P1 appears in the display window
Drain the water in the bottom tray.
When in COOL mode, room temperature is lower than the set temperature.
Reset the temperature
2. Not cool enough
The windows or doors in the room are not closed.
Make sure all the windows and doors are closed.
There are heat sources inside if possible.
Remove the heat sources the room.
Exhaust air hose is not connected or blocked.
Connect the hose and make sure it can function properly.
Temperature setting is too high.
Decrease the set temperature.
Air filter is blocked by dust.
Clean the air filter.
3. Unit noise or vibration
The ground is not level or not flat enough.
Place the unit on "a" flat, level ground if possible.
4. Gurgling sound
The sound comes from the flowing of the refrigerant inside the Air Conditioner.
It is normal.
5. Unit stops operating
The automatic over heat protection function. When the temperature at the air outlet exceed 158°F/70°C, the device will stop.
Q: My Kenmore portable A/C was running great, but when i tried turn it back on it won't start at all. I clean the filters and it sttill won't start what could be the problem. Reply


 /
/ ): Turns the main unit on and off
 /+ ): Push this button to increase the setting temperature or to increase the hour during Timer setting.
 / - ): Push this button to decrease the setting temperature or to decrease the hour during Timer setting.