OWNER’S MANUAL
ELECTRIC RANGE
Please read this guide thoroughly before operating
and keep it handy for reference at all times.
MODELS
LRE30453SW
LRE30453SB
LRE30453ST
MFL57206002
www.lg.com
ENGLISH
ESPAÑOL

- 2 -
TABLE OF CONTENTS
SAFETY ...................................................................3-7
- Important safety instructions...............................3-7
SURFACE CONTROLS COOKING ........................8-12
-
PF or HS
message...............................................8
- Locations of the radiant surface elements
and controls ........................................................8
- Setting surface controls......................................9
- Operating the warming zone .............................10
- About glass cooktop surface..............................11
- About cookware.................................................12
INFORMATION ......................................................13-14
- Parts and features ............................................13
- Control panel features.......................................14
OPERATION ..........................................................15-24
- Setting the clock ................................................15
- Minimum & maximum control pad settings .......15
- Setting the timer on/off.......................................15
- Setting oven lockout feature..............................16
- Options ..............................................................16-17
&KDQJLQJKRXUPRGHRQFORFNKUKU
6HWWLQJWHPSHUDWXUHXQLW)RU&
6HWWLQJEHHSHUYROXPH
6HWWLQJSUHKHDWLQJDODUPOLJKWRQRII
6HWWLQJFRQYHFWLRQDXWRFRQYHUVLRQIHDWXUH
Please record the model number and serial number of
this unit for future reference. We also suggest that you
record the details of any contact with LG (LG
Electronics USA, Inc.) concerning this unit.
Staple your receipt here to verify your retail purchase.
Model No.:
Serial No.:
Dealer:
Dealer Phone No.:
Customer Relations
LG Electronics U.S.A., Inc.
Service Division Bldg. #3
201 James Record Rd.
Huntsville, AL 35824-0126
Thank you for purchasing an LG electric oven.
- Thermostat adjustment......................................17
- Setting bake .......................................................18
- Setting timed bake.............................................19
- Setting delayed timed bake ...............................20
- Setting broil........................................................20
- Recommended broiling guide ............................21
- Setting convection bake.....................................22
- Setting convection roast ....................................23
- Setting the cook & warm feature........................24
- To turn the oven light on/off ...............................24
- Setting the proof feature....................................24
SELF-CLEAN .........................................................25-26
MAINTENANCE ......................................................27-31
- Removing & replacing the storage drawer .......27
- Oven vent .........................................................27
- Care & cleaning.................................................28-30
- Removing & replacing the lift-off oven door ......31
- Door care instructions............................................31
TROUBLESHOOTING...........................................32-35
- Before calling for service ..................................32-35
WARRANTY ..........................................................36
- 3 -
SAFETY
I
I
M
M
P
P
O
O
R
R
T
T
A
A
N
N
T
T
S
S
A
A
F
F
E
E
T
T
Y
Y
I
I
N
N
S
S
T
T
R
R
U
U
C
C
T
T
I
I
O
O
N
N
S
S
Read and follow all instructions before using your oven to prevent the risk of fire, electric shock, personal injury, or damage
when using the range. This guide do not cover all possible conditions that may occur. Always contact your service agent or
manufacturer about problems that you do not understand.
This symbol will alert you to hazards or unsafe practices which could cause serious bodily
harm or death.
This is the safety alert symbol. This symbol alerts you to potential hazards that can kill or hurt you and others.
All safety messages will follow the safety alert symbol and either the word “WARNING” or “CAUTION”.
These word means :
This symbol will alert you to hazards or unsafe practices which could cause bodily injury or
property damage.
WARNING
CAUTION
• Be certain your appliance is properly installed and
grounded by a qualified technician.
• Do not repair or replace any part of the appliance unless
specifically recommended in the manual.
• All other servicing should be referred to a qualified
technician.
• Always disconnect power to appliance before servicing by
unplugged, removing the fuse or switching off the circuit breaker
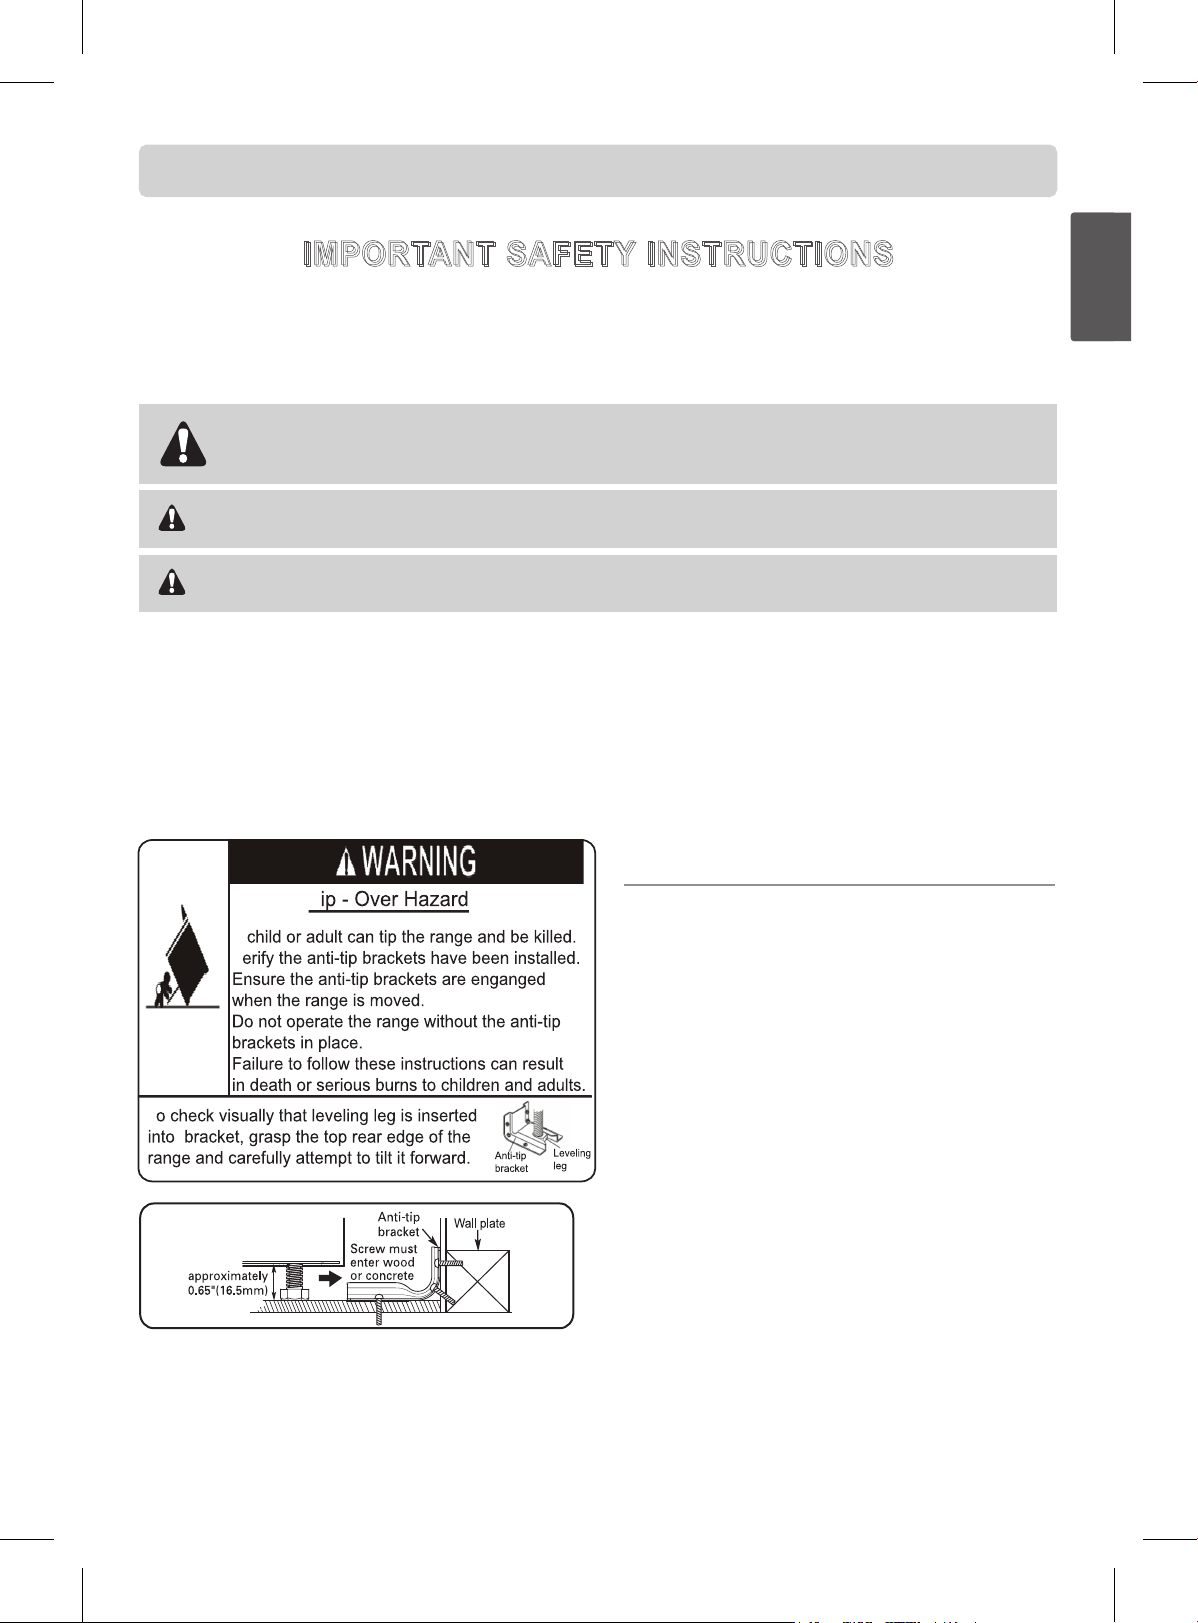
• To reduce the risk of tipping of the range, the range must
be secured by properly installing anti-tip devices.
• To check that the anti-tip bracket is properly installed:
Grasp the top rear edge of the range back guard and
carefully attempt to tilt it forward. Verify that the anti-tip
devices are engaged.
• Warming drawer or Storage drawer: Remove drawer and
visually inspect that the rear leveling leg is fully inserted
into the anti-tip bracket.
• Refer to the installation manual for proper anti-tip bracket
installation.
SURFACE COOKING UNITS
• Use Proper Pan Sizes. This appliance is equipped with
one or more surface units of different size. Select utensils
having flat bottoms large enough to cover the surface unit
heating element.
The use of undersized utensils will expose a portion of the
heating element to direct contact and may result in ignition
of clothing. Proper relationship of utensil to burner will
also improve efficiency.
• Never Leave Surface Units Unattended at High
Heat Settings. Boilovers cause smoking and greasy
spillovers that may ignite.
• Glazed Cooking Utensils. Only certain types of glass,
glass/ceramic, ceramic, earthenware, or other glazed
utensils are suitable for range-top service without breaking
due to the sudden change in temperature.
• Utensil Handles Should Be Turned Inward and Not
Extend Over Adjacent Surface Units. To reduce the
risk of burns, ignition of flammable materials, and spillage
due to unintentional contact with the utensil, the handle of
a utensil should be positioned so that it is turned inward,
and does not extend over adjacent surface units.
• Be sure you know which control pads operate each surface
unit.
Make sure you turned on the correct surface unit.
ENGLISH
T
A
V
T
You can download an owners manual at http://www.lg.com.
ENGLISH
- 4 -
SAFETY
I
I
M
M
P
P
O
O
R
R
T
T
A
A
N
N
T
T
S
S
A
A
F
F
E
E
T
T
Y
Y
I
I
N
N
S
S
T
T
R
R
U
U
C
C
T
T
I
I
O
O
N
N
S
S
OVEN
DO NOT TOUCH HEATING ELEMENTS OR
INTERIOR SURFACES OF OVEN. Heating elements
may be hot even though they are dark in color. Interior
surfaces of an oven become hot enough to cause burns.
During and after use, do not touch or let clothing or other
flammable materials contact heating elements or interior
surfaces of oven until they have had sufficient time to cool.
Other surfaces of the appliance may become hot enough to
cause burns. Among these surfaces are the cooktop and
areas facing the cooktop, oven vent openings, surfaces near
these openings, oven doors, and windows of oven doors.
Use Care When Opening Door. Let hot air or steam
escape before you remove or replace food in the oven
Do Not Heat Unopened Food Containers. Build-up of
pressure may cause container to burst and result in injury.
Protective Liners. Do not use aluminum foil or any other
material to line the oven bottoms. Improper installation of
these liners may result in a risk of electric shock or fire.
Keep Oven Vent Ducts Unobstructed. The oven vent
is located above the left rear surface unit. This area could
become hot during oven use. Never block this vent and
never place plastic or heat-sensitive items on vent.
Placement of Oven Racks. Always place oven racks in
desired location while oven is cool. If rack must be moved
while oven is hot, do not, let a potholder come in contact
with the hot heating element in the oven.
Do Not allow aluminum foil or meat probe to contact
heating elements.
SELF-CLEANING OVENS
Do Not Clean Door Gasket. The door gasket is essential
for a good seal. Care should be taken not to rub, damage, or
move the gasket.
Do Not Use Oven Cleaners. No commercial oven
cleaner or oven liner protective coating of any kind should
be used in or around any part of the oven.
Clean in the self-clean cycle only parts listed in this
manual. Before self-clean the oven, remove the broiler
pan and any utensils of foods from the oven.
Before Self-Cleaning the Oven. Remove broiler pan
and other utensils.
Never keep pet birds in the kitchen. The health of
birds is extremely sensitive to the fumes released during an
oven self-clean cycle. Fumes may be harmful or fatal to
birds. Move birds to well-ventilated room.
Important Instruction. In the event the self clean error
code F is displayed, or three long beeps sound, the oven is
malfunctioning in the self clean mode. Turn off or
disconnect appliance from power supply and have serviced
by a qualified technician.
VENTILATING HOODS:
Clean Ventilating Hoods Frequently. Grease should
not be allowed to accumulate on hood or filter.
When flaming foods under the hood, turn the fan
on.
GLASS/CERAMIC COOKING
SURFACES
DO NOT TOUCH SURFACE UNITS OR AREAS
NEAR UNITS. Surface units may be hot even though they
are dark in color.
Areas near surface units may become hot enough to cause
burns. During and after use, do not touch, or let clothing or
other flammable materials contact surface units or areas
near units until they have had sufficient time to cool.
The areas include – Cooktop, area above the oven door.
Do Not Cook on Broken CookTop. If cooktop should
break, cleaning solutions and spillovers may penetrate the
broken cook-top and create a risk of electric shock. Contact
a qualified technician immediately.
Clean CookTop With Caution. Do not use sponges or
cloth to wipe spills on a hot cooking area. Use a proper
metal scraper.
DEEP FAT FRYERS:
Use extreme caution when moving the grease kettle or
disposing of hot grease.
WARNING
'2127SODFHDOXPLQXPIRLOGLUHFWO\RQ
the oven bottom.
aluminium foil
- 5 -
SAFETY
I
I
M
M
P
P
O
O
R
R
T
T
A
A
N
N
T
T
S
S
A
A
F
F
E
E
T
T
Y
Y
I
I
N
N
S
S
T
T
R
R
U
U
C
C
T
T
I
I
O
O
N
N
S
S
WARNING
• DO NOT step or sit on the door. Install the Anti-Tip Bracket packed with range.
- The range could be tipped and injury might result from spilled hot liquid, food, or the range itself.
- If the range is pulled away from the wall for cleaning, service, or any other reason, ensure that the Anti-Tip Device is
properly reengaged when the range is pushed back against the wall.
• Turn POWER OFF before removing the Warming Drawer.
- Failure to do so can result in severe personal injury, death or electrical shock.
• Before replacing your oven light bulb, DISCONNECT the electrical power to the range at the
main fuse or circuit breaker panel.
- Failure to do so can result in severe personal injury, death or electrical shock.
• Make sure oven and bulb are cool.
• Children should be kept away from the range.
- Accessible parts may become hot when the grill is in use.
CAUTION
• DO NOT store items of interest to children in cabinets above a range or on the back guard of a
range.
- Children climbing on the range to reach items could be seriously injured.
• DO NOT use the glass cooktop surface as a cutting board.
• DO NOT place or store items that can melt or catch fire on the glass cooktop, even when it is
not being used.
• Always turn the surface units on after placing cookware.
• DO NOT store heavy items above the cooktop surface that could fall and damage it.
• DO NOT place aluminum foil or plastic items such as salt and pepper shakers, spoon holders,
or plastic wrappings or any other material on the range when it is in use.
- The hot air from the vent could melt plastics or ignite flammable items.
• Make sure you turned on the correct surface unit.
• NEVER cook directly on the glass. Always use cookware.
• Always place the pan in the center of the surface unit you are cooking on.
• DO NOT leave children alone.
- Children should not be left alone or unattended in area where appliance is in use. Children should never be allowed to sit
or stand on any part of the appliance.
• NEVER use your appliance for warming or heating the room.
• DO NOT use water on grease fires.
- Turn off the oven to avoid spreading the flames. Smother the fire by closing the oven door or use dry chemical, baking
soda, or foam-type extinguishers.
• Use only dry potholders.
- Moist or damp pot holders on hot surfaces may result in burns from steam. Do not let the pot holder touch hot heating
elements. Do not use a towel or other bulky cloth.
ENGLISH
• WARNING:
- This product contains chemicals known to the State of California to cause cancer. Wash hands after handling.
- 6 -
SAFETY
CAUTION
6WRUDJHLQRURQDSSOLDQFH
- Flammable materials should not be stored in an oven or near surface elements.
%HFHrtain all packing materials are removed from the appliance before operating.
- Keep plastics, clothes, and paper away from parts of the appliance that may become hot.
Wear proper apparel.
- Loose-fitting or hanging garments should never be worn while using the appliance.
1(9(5OHDYHVXrface units unattended at high heat setting.
- Boilovers cause smoking and greasy spillovers that may catch on fire.
$OZD\VWXUQWKHVXrface units off before removing cookware.
'2127XVHSODVWLFZUDSWRFRYHUIRRG
- Plastic may melt onto the surface and be very difficult to remove.
'2127WRXFKVXrface units until it has cooled down.
7KHVXrface elements may still be hot and burns may occur if the glass surface is touched
before it has cooled down sufficiently.
,PPHGLDWHO\FOHDQWKHVSLOOVRQFRRNLQJDUHDWRSUHYHQWDWRXJKFOHDQLQJFKRUHODWHr.
,IFDELQHWVWRUDJHLVSURYLGHGGLUHFWO\DERYHFRRNLQJVXrface, limit it to items that are
infrequently used and can be safely stored in an area subjected to heat. Temperatures may be
unsafe for items such as volatile liquids, cleaners or aerosol sprays.
'2127WRXFKVXrface elements until it has cooled down sufficiently.
- The surface elements may still be hot and burns may occur.
1(9(5OHDYHIRRGXQDWWHQGHGDWKLJKRUPHGLXPKLJKVHWWLQJ
- Boilovers can cause smoking and greasy spillovers may catch on fire.
8VHRQO\FRRNZDUHDQGGLVKHVUHFRPPHQGHGDVVDIHIRURYHQDQGFRRNWRSXVH
:KHQZDUPLQJIRRGVGRQRWXVHFRQWDLQHUVWKDWVHDO$OORZYHQWLQJIRUKHDWHGDLUWRHVFDSH
'2127ZDUPIRRGRQWKHZDUPLQJ]RQHIRUPRUHWKDQKRXUV
- Placing uncooked or cold food on the warming zone could result in foodborne illness.
$OZD\VXVHSRWKROGHUVRURYHQPLWWVZKHQUHPRYLQJIRRGIURPWKHWarming Drawer or
Warming Center as cookware and plates will be hot.
- You can be burned as cookware and plates will be hot.
$OZD\VDUUDQJHRYHQUDFNVZKHQWKHRYHQLVFRRO
I
I
M
M
P
P
O
O
R
R
T
T
A
A
N
N
T
T
S
S
A
A
F
F
E
E
T
T
Y
Y
I
I
N
N
S
S
T
T
R
R
U
U
C
C
T
T
I
I
O
O
N
N
S
S
$OZD\VWXUQRIIDOOSRZHUWRWKHZDUPLQJEHIRUHDWWHPSWLQJWRUHPRYHLW

- 7 -
SAFETY
CAUTION
8VHFDXWLRQZLWKWKH7,0('%$.(RU'(/AYED TIMED BAKE features. Use the automatic timer
when cooking cured or frozen meats and most fruits and vegetables. Foods that can easily
spoil, such as milk, eggs, fish, meat or poultry, should be chilled in the refrigerator first. Even
when chilled, they should not stand in the oven for more than 1 hour before cooking begins,
and should be removed promptly when cooking is completed.
- Eating spoiled food can result in sickness from food poisoning.
6KRXOGDQRYHQILUHRFFXr, leave the oven door closed and turn the oven off. If the fire
continues, throw baking soda on the fire or use a fire extinguisher.
'2127SXWZDWHURUIORXURQWKHILUH
- Flour may be explosive and water can cause a grease fire to spread and cause personal injury.
'2127XVHWKHURDVWLQJUDFNZKHQERLOLQJ
- To do so can prevent contacting the broil element and grease splattering.
'2127OHDYHVPDOOFKLOGUHQXQDWWHQGHGQHDUWKHDSSOLDQFH
- During the Self-cleaning cycle, the outside of the range can become very hot to touch.
'2127OLQHWKHRYHQZDOOVUDFNVERWWRPRUDQ\RWKHUSDrt of the range with aluminum foil or
any other material.
- Doing so will destroy heat distribution, produce poor baking results and cause permanent damage to the oven interior
(aluminum foil will melt to the interior surface of the oven).
'2127IRUFHWKHGRRURSHQ
- This can damage the automatic door locking system. Use care when opening the oven door after the Self-Cleaning cycle.
Stand to the side of the oven when opening the door to allow hot air or steam to escape. The oven may still be VERY
HOT.
'2127XVHDVWHHOZRROSDG
- It will SCRATCH the surface.
'2127XVHKDUVKDEUDVLYHFOHDQHUVRUVKDUSPHWDOVFUDSHUVWRFOHDQWKHRYHQGRRUJODVVVLQFH
they can scratch the surface.
- It may result in shattering of the glass.
'2127XVHVFUXESDGVRUDEUDVLYHFOHDQLQJSDGV
- They may damage your glass cooktop surface.
&RRNZDUHZLWKURXJKRUERWWRPVFDQPDUNRUVFUDWFKWKHFRRNWRSVXrface.
'RQRWVOLGHDQ\WKLQJPHWDORUJODVVDFURVVWKHFRRNWRS
'RQRWXVHFRRNZDUHZLWKGLUWRUGLrt build up on bottom.
%HFDUHIXOZKHQUHPRYLQJDQGOLIWLQJWKHGRRr.
'2127OLIWWKHGRRUE\WKHKDQGOH
- The door is very heavy.
7KH2YHQPXVWEHVZLWFKHGRIIEHIRUHUHPRYLQJWKHIDQJXDUGIRUFOHDQLQJWKHJXDUGPXVWEH
replaced in accordance with the instructions after cleaning.
I
I
M
M
P
P
O
O
R
R
T
T
A
A
N
N
T
T
S
S
A
A
F
F
E
E
T
T
Y
Y
I
I
N
N
S
S
T
T
R
R
U
U
C
C
T
T
I
I
O
O
N
N
S
S
ENGLISH
ENGLISH
- 8 -
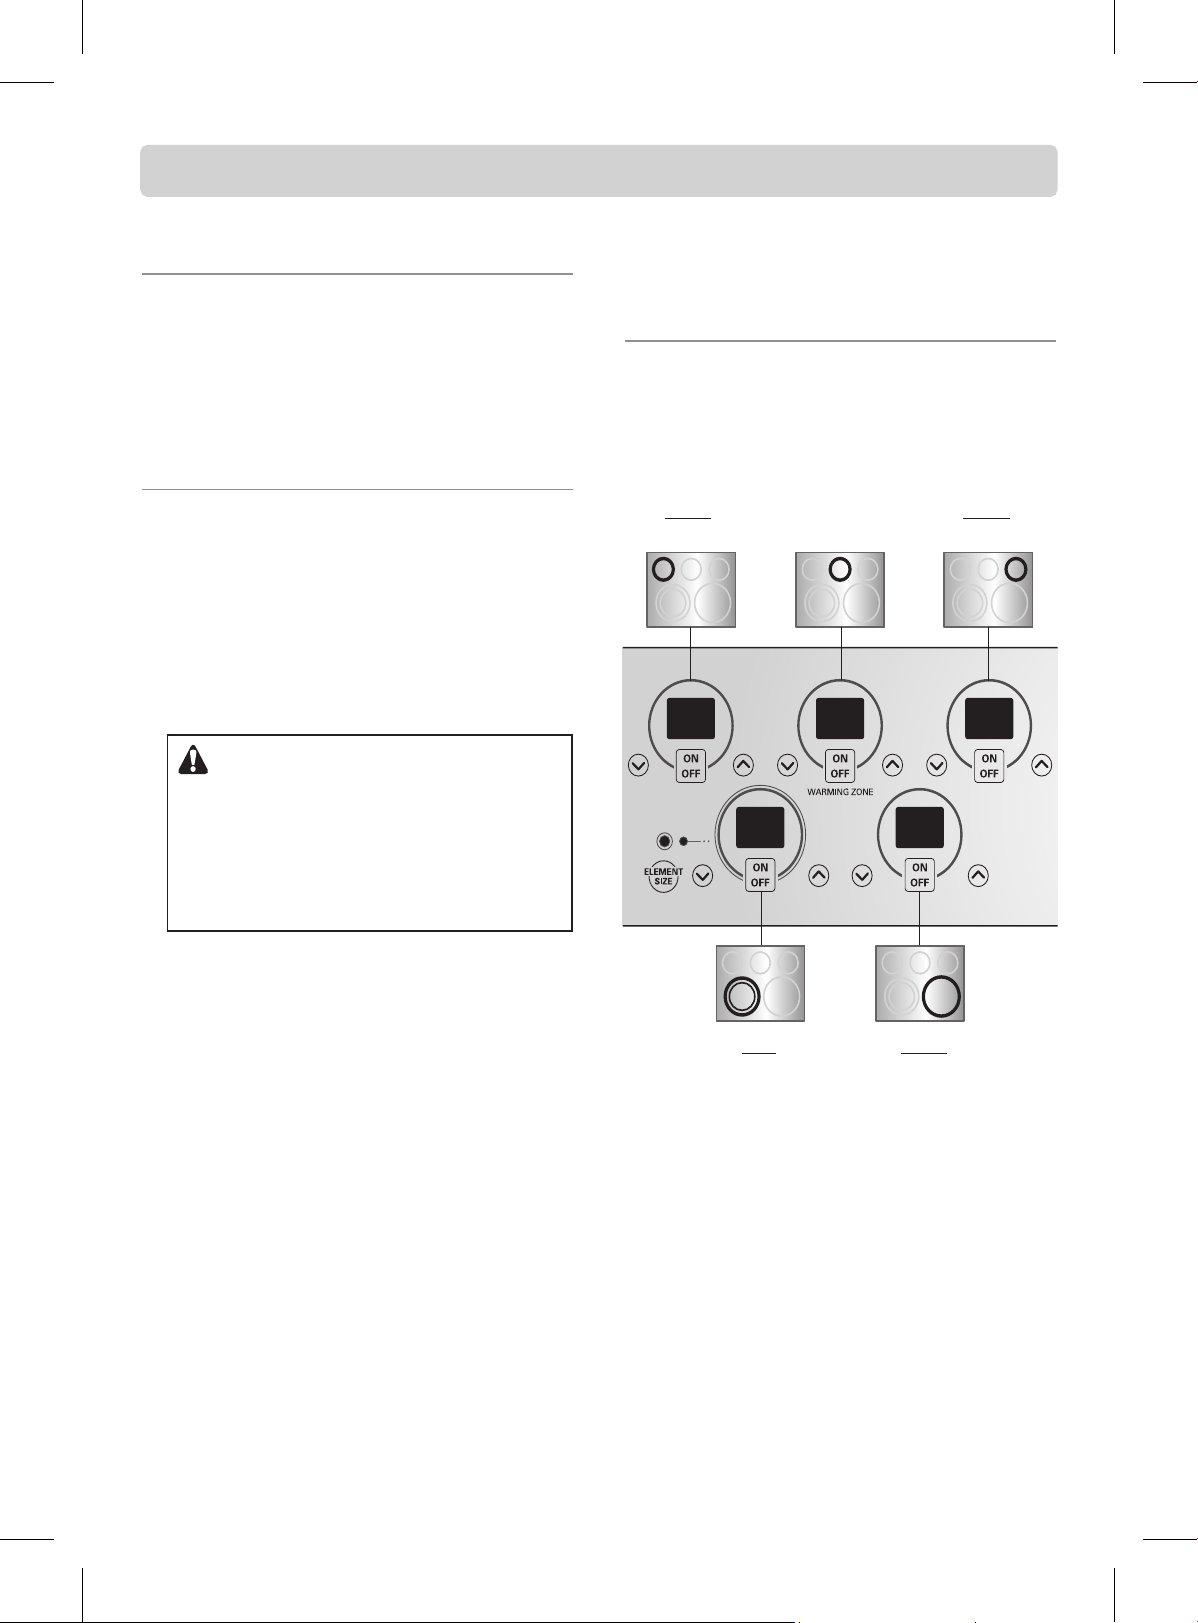
SURFACE CONTROLS COOKING
LOCATIONS OF THE RADIANT
SURFACE ELEMENTS AND
CONTROLS
The radiant surface elements are located on the cooktop as
below.
The radiant control key locations are correlative to radiant
surface elements on the cooktop as shown below.
PF
(Power Failure) MESSAGE
The PF message will appear whenever there has been a
power interruption to the appliance. To clear the PF message
press ON/OFF control pad to reset and be sure to reset the
clock with the correct time of day.
HS
( Hot Surface) MESSAGE
LIGHT WILL:
&RPHRQZKHQWKHXQLWLVKRWWRWRXFKDIWHULWLVWXUQHGRII
&RPHRQGXULQJ6HOI&OHDQLQJ&\FOH
6WD\RQHYHQDIWHUWKHXQLWLVWXUQHGRII
*ORZXQWLOWKHXQLWKDVFRROHGGRZQWRDSSUR[LPDWHO\°F.
Single
Left Rear Element
Single
Right Front Element
Dual
Left Front
Dual Element
Warming Zone
Single
Right Rear Element
CAUTION
SURFACE ELEMENT CYCLES
- When cooking on the surface elements it is possible
for the element to cycle on and off during cooking.
This will happen more frequently when a lower
power is selected however it can also occur on
higher settings as well.
- 9 -
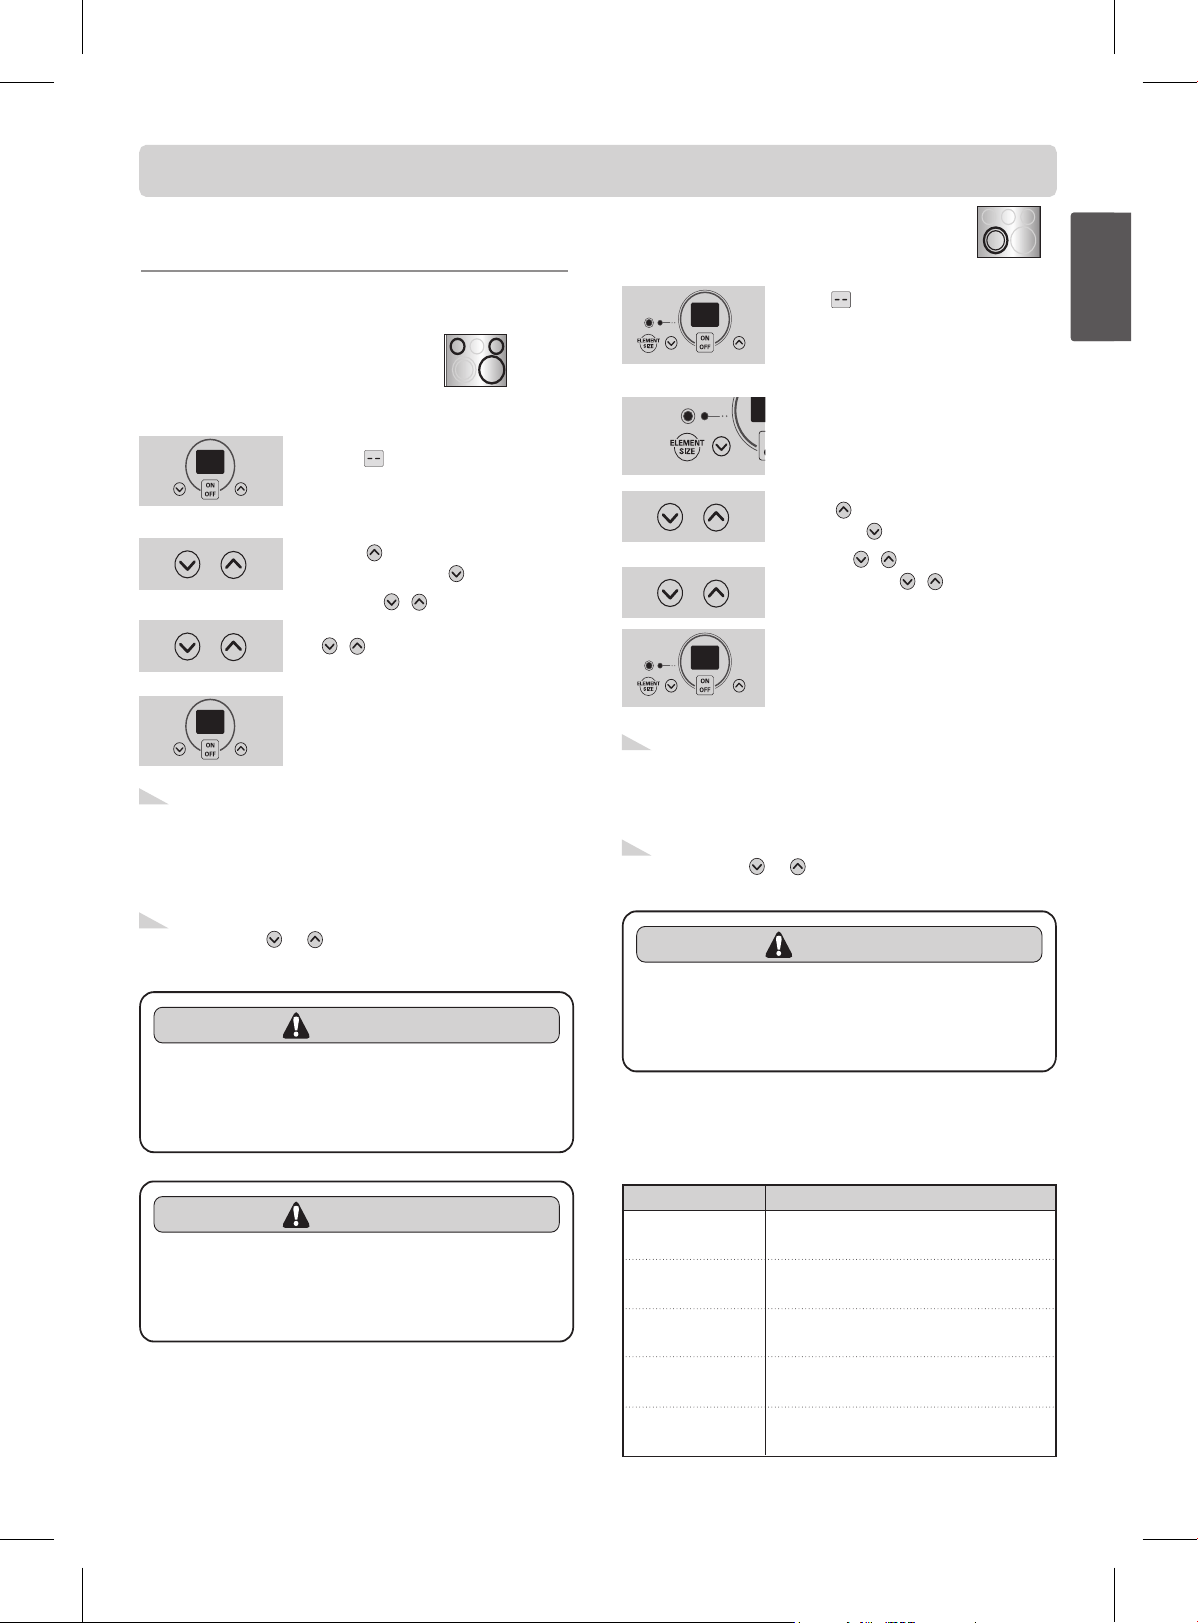
SURFACE CONTROLS COOKING
SETTING SURFACE CONTROLS
When changing from a high heat setting to a lower heat
setting, the surface unit may stop glowing. This is normal.
1. Press ON/OFF for the desired
element position. The display will
flash .
(If no further pads are pressed
within 10 seconds, the display will
disappear.)
2. Press once to turn on the
power level Hi or once for Lo.
3. Use the / to choose the
desired power setting.
/ is continuously accessible.
(Adjustable at any time while the
element is ON.)
4. To turn off the unit after cooking,
press ON/OFF once.
To turn on a single surface unit
(Right Rear, Left Rear, Right Front)
1. Press ON/OFF. The display will
flash .
(If no further pads are pressed within
10 seconds, the display will
disappear.)
2. Press ELEMENT SIZE as needed to
select the desired burner size. When
first selected, 12” size is ON. The
light above ELEMENT SIZE indicates
which size surface unit is on.
3. Press once to turn on the power
level Hi or once for Lo.
4. Use the / to choose the desired
power setting. / is continuously
accessible. (Adjustable at any time
while the element is ON.)
5. To turn off the unit after cooking,
press ON/OFF once.
To turn on a dual surface unit (Left Front)
Recommended Surface Cooking
Settings
Recommended setting for the single & dual elements.
Each time a pad is pressed a beep will sound.
The power level decreases or increases by 0.5
from 9.0 through 3.0. (by 0.2 from 3.0 through
1.0)
Lo is the lowest power level available.
Note:
Each time a pad is pressed a beep will sound.
The power level decreases or increases by 0.5 from
9.0 through 3.0. (by 0.2 from 3.0 through 1.0)
Lo is the lowest power level available.
Note:
Setting
Type of cooking
HIGH
(8.5 – Hi)
MEDIUM HIGH
(5.5 – 8.0)
MEDIUM
(3.5 – 5.0)
MEDIUM LOW
(2.2 – 3.0)
LOW/SIMMER
(Lo – 2.0)
Start most foods, bring water to a
boil or pan broiling.
Continue a rapid boil, fry, or deep
fat fry.
Maintain a slow boil, thicken sauces
and gravies, or steam vegetables.
Keep foods cooking, poach, or stew
(2.8 or lower is a simmer setting).
Keep warm, melt, or simmer.
To scroll through the power levels quickly press and
hold the or key pads until the power level
desired is reached.
Note:
To scroll through the power levels quickly press and
hold the or key pads until the power level
desired is reached.
Note:
CAUTION
'2127WRXFKVXUIDFHHOHPHQWVXQWLOLW
has cooled down sufficiently.
- The surface elements may still be hot and burns may
occur.
CAUTION
'2127WRXFKVXUIDFHHOHPHQWVXQWLOLW
has cooled down sufficiently.
- The surface elements may still be hot and burns may
occur.
CAUTION
1(9(5OHDYHIRRGXQDWWHQGHGDWKLJKRU
medium-high setting.
- Boilovers can cause smoking and greasy spillovers
may catch on fire.
ENGLISH
ENGLISH
- 10 -
SURFACE CONTROLS COOKING
OPERATING THE WARMING
ZONE
1. Press ON/OFF at the warming zone
control position. The warming zone
indicator light will flash.
(If no further pads are pressed within
10 seconds the display will
disappear.)
2. Press once to turn on the power
level Hi or to turn on for Lo.
3. Use the / to choose the desired
power setting. (Adjustable at any time
while the element is ON.)
4. To turn off the unit when the food is
ready to serve, press ON/OFF once.
To set the warming zone control
Suggested Settings
Each time a pad is pressed a beep will sound.
The controls for the warming zone allow for 5
different heat settings: Lo~Hi
“HS” will appear when the unit is hot to touch.
Note:
Setting
Type of cooking
Lo
2 – 4
Hi
Breads/Pastries
Casseroles
Dinner Plate with Food
Soups (Cream)
Vegetables
Fried Foods
Soups (Liquid)
Gravies
Eggs
Sauces
Stews
Meats
Hot Beverages
CAUTION
8VHRQO\FRRNZDUHDQGGLVKHV
recommended as safe for oven and
cooktop use.
$OZD\VXVHRYHQPLWWVZKHQUHPRYLQJ
food from the warming center as
cookware and plates will be hot.
:KHQZDUPLQJIRRGVGRQRWXVH
containers that seal. Allow venting for
heated air to escape.
'212T use plastic wrap to cover foods.
- Plastic may melt onto the surface and be very difficult
to clean.
)RRGVKRXOGEHNHSWLQLWVFRQWDLQHUDQG
covered with a lid or aluminum foil to
maintain food quality.
'2127ZDUPIRRGRQWKHZDUPLQJ
zone for more than 2 hours
- Placing uncooked or cold food on the warming
zone could result in foodborne illness.
- 11 -
SURFACE CONTROLS COOKING
TIPS TO PROTECT THE GLASS
COOKTOP SURFACE
Cleaning
(see pages 29~30 for more information)
Before first use, clean the cooktop.
Clean your cooktop daily or after each use. This will keep
your cooktop looking good and can prevent damage.
If a spillover occurs while cooking, immediately clean the
spill from the cooking area while it is hot to prevent a tough
cleaning chore later. Using extreme care, remove spill with a
proper metal scraper.
Do not allow spills to remain on the cooking area or the
cooktop trim for a long period of time.
Do not use abrasive cleansing powders or scouring pads
which will scratch the cooktop.
Do not use chlorine bleach, ammonia, or other cleansers
not specifically recommended for use on glass-ceramic.
To Prevent Marks and Scratches
Do not use glass pans. They may scratch the surface.
Do not place a trivet or wok ring between the surface and
pan. These items can mark or scratch the top.
Do not slide aluminum pans across a hot surface. The pans
may leave marks which need to be removed promptly.”
(See Cleaning pages 29~30.)
Make sure the surface and the pan bottom are clean and dry
before turning on to prevent scratches.
To prevent scratching or damaging to the glass-ceramic top,
do not leave sugar, salt, or fats on the cooking area. Wipe the
cooktop surface with a clean cloth or paper towel before
using.
Do not slide heavy metal pans across the surface since these
may scratch.
To Prevent Stains
Do not use a soiled dish cloth or sponge to clean the
cooktop surface. A film will remain which may cause stains
on the cooking surface after the area is heated.
Continuously cooking on a soiled surface may/will result in a
permanent stain.
To Prevent Other Damages
Do not allow plastic, sugar, or foods with high sugar content
to melt onto the hot cooktop. Should this happen, clean
immediately. (See Cleaning pages 29~30.)
Do not let a pan boil dry as this will damage the surface and
pan.
Do not use cooktop as a work surface or cutting board.
Do not cook food directly on the surface.
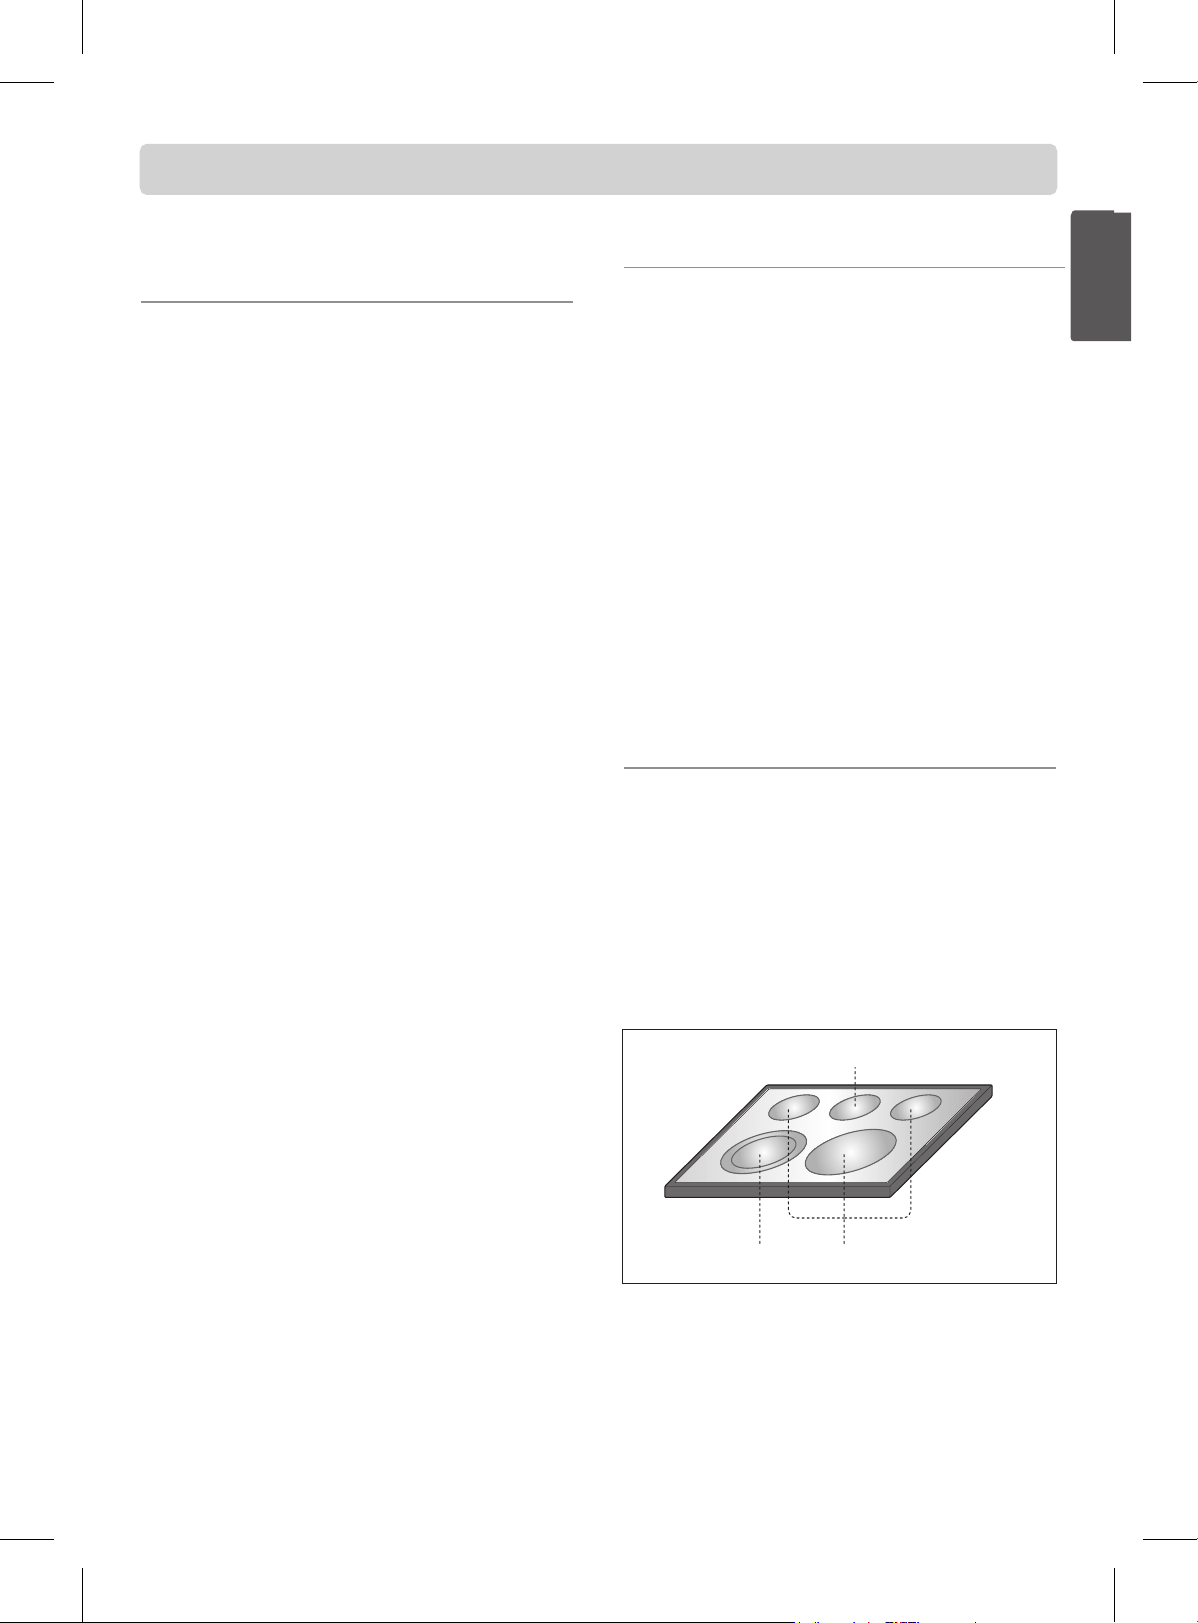
COOKING AREAS
The cooking areas on your range are identified by permanent
circles on the glass cooktop surface. For the most efficient
cooking, fit the pan size to the element size.
Pans should not extend more than
1
/
2
to 1-inch
beyond the cooking area.
When a control is turned on, a glow can be seen through the
glass cooktop surface. The element will cycle on and off
to maintain the preset heat setting, even on Hi.
For more information on cookware, refer to Cookware
Recommendations.
GLASS COOKTOP SURFACE
Glass Cooktop Surface Notes:
Cooktop may emit light smoke and odor the first few
times the cooktop is used. This is normal.
Glass cooktops retain heat for a period of time after
the elements are turned off. Turn the elements off a few
minutes before food is completely cooked and use the
retained heat to complete cooking. When the hot surface
light turns off, the cooking area will cool down enough to
touch. Because of the way they retain heat, the cooktop
elements will not respond to changes in settings as quickly as
coil elements.
,QWKHHYHQWRIDSRWHQWLDOERLORYHUUHPRYHWKHSDQIURPWKH
cooking surface.
Do not attempt to lift the cooktop.
7KHVPRRWKWRSVXUIDFHPD\DSSHDUGLVFRORUHGZKHQLWLVKRW
This is normal and will disappear when the surface cools.
Dual element Single element
Warming zone
ENGLISH
ENGLISH
- 12 -
SURFACE CONTROLS COOKING
HOME CANNING TIPS
Be sure the canner is centered over the surface unit.
Make sure the canner is flat on the bottom.
The base must not be more than 1 inch larger than the
element. Use of water bath canners with rippled bottoms
may extend the time required to bring the water to a boil and
cooktops may be damaged.
Some canners are designed with smaller bases for use on
smooth top surfaces.
Use the high heat setting only until the water comes to a boil
or pressure is reached in the canner.
Reduce to the lowest heat setting that maintains the boil,
or pressure. If the heat is not turned down,the cooktop may
be damaged.
USING THE PROPER COOKWARE
Using the right cookware can prevent many problems, such
as food taking longer to cook or achieving inconsistent
results. Proper pans will reduce cooking times and cook food
more evenly. Stainless steel is recommended.
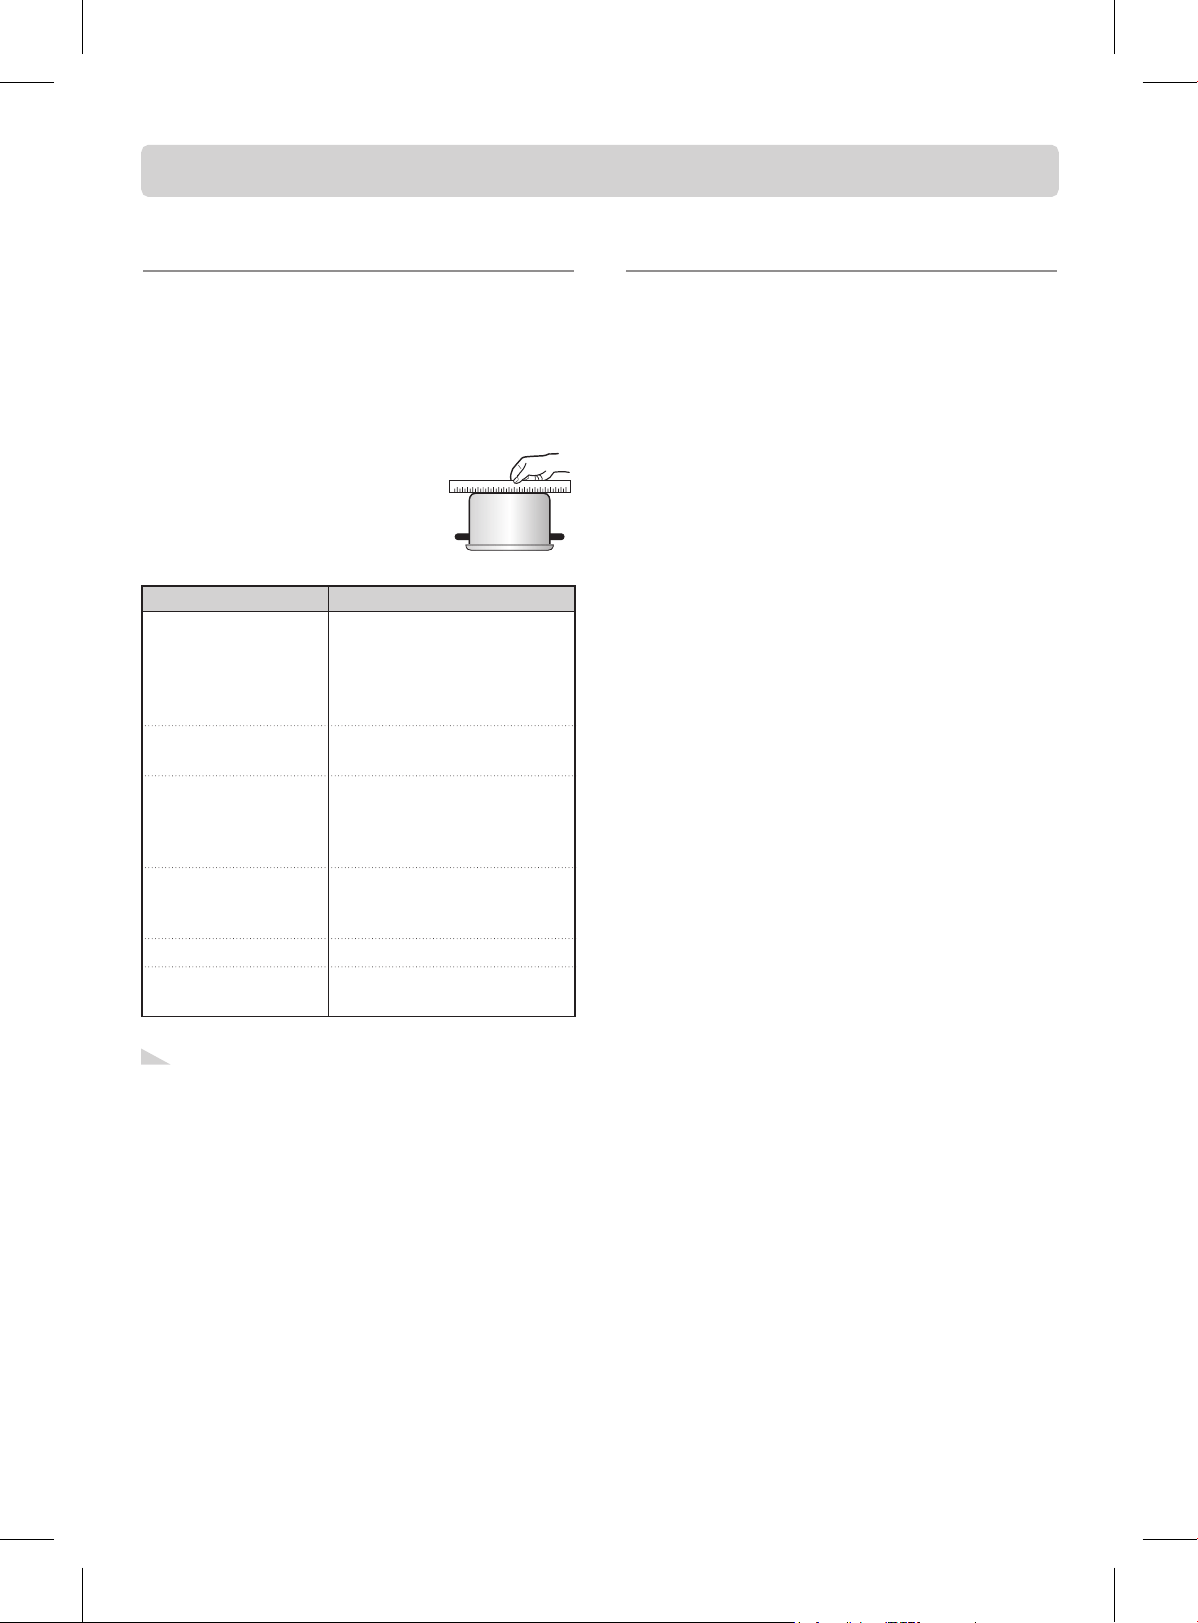
Check pans for flat bottoms by
using a straight edge or ruler
1. Place a ruler across the bottom of the
pan.
2. Hold it up to the light.
3. No light should be visible under the
ruler.
'RQRWXVHDVPDOOSDQRQDODUJHHOHPHQW1RWRQO\
does this waste energy, but it can also result in
spillovers burning onto the cooking area which
requires extra cleaning.
'RQRWXVHQRQIODWVSHFLDOW\LWHPVWKDWDUHRYHUVL]HG
or uneven such as round bottom woks, rippled
bottom, and/or oversized canners and griddles.
'RQRWXVHIRLORUIRLOW\SHFRQWDLQHUV)RLOPD\PHOW
onto the glass. If metal melts on the cooktop, do not
use. Call an authorized Service agent.
Note:
Recommended
Incorrect
Flat bottom and
straight sides.
Heavy-gauge pans.
Pan sizes match the
amount of food to be
prepared and the size
of the surface element.
Weight of handle does
not tilt pan. Pan is well
balanced.
Tight-fitting lids.
Flat bottom woks.
Curved, grooved, or warped
pan bottoms. Pans with
uneven bottoms do not cook
efficiently and sometimes may
not boil liquid.
Very thin-gauge metal or glass
pans.
Pans are smaller or larger than
the element.
Cookware with loose or broken
handles. Heavy handles that tilt
the pan.
Loose-fitting lids.
Woks with a ring-stand
bottom.
- 13 -
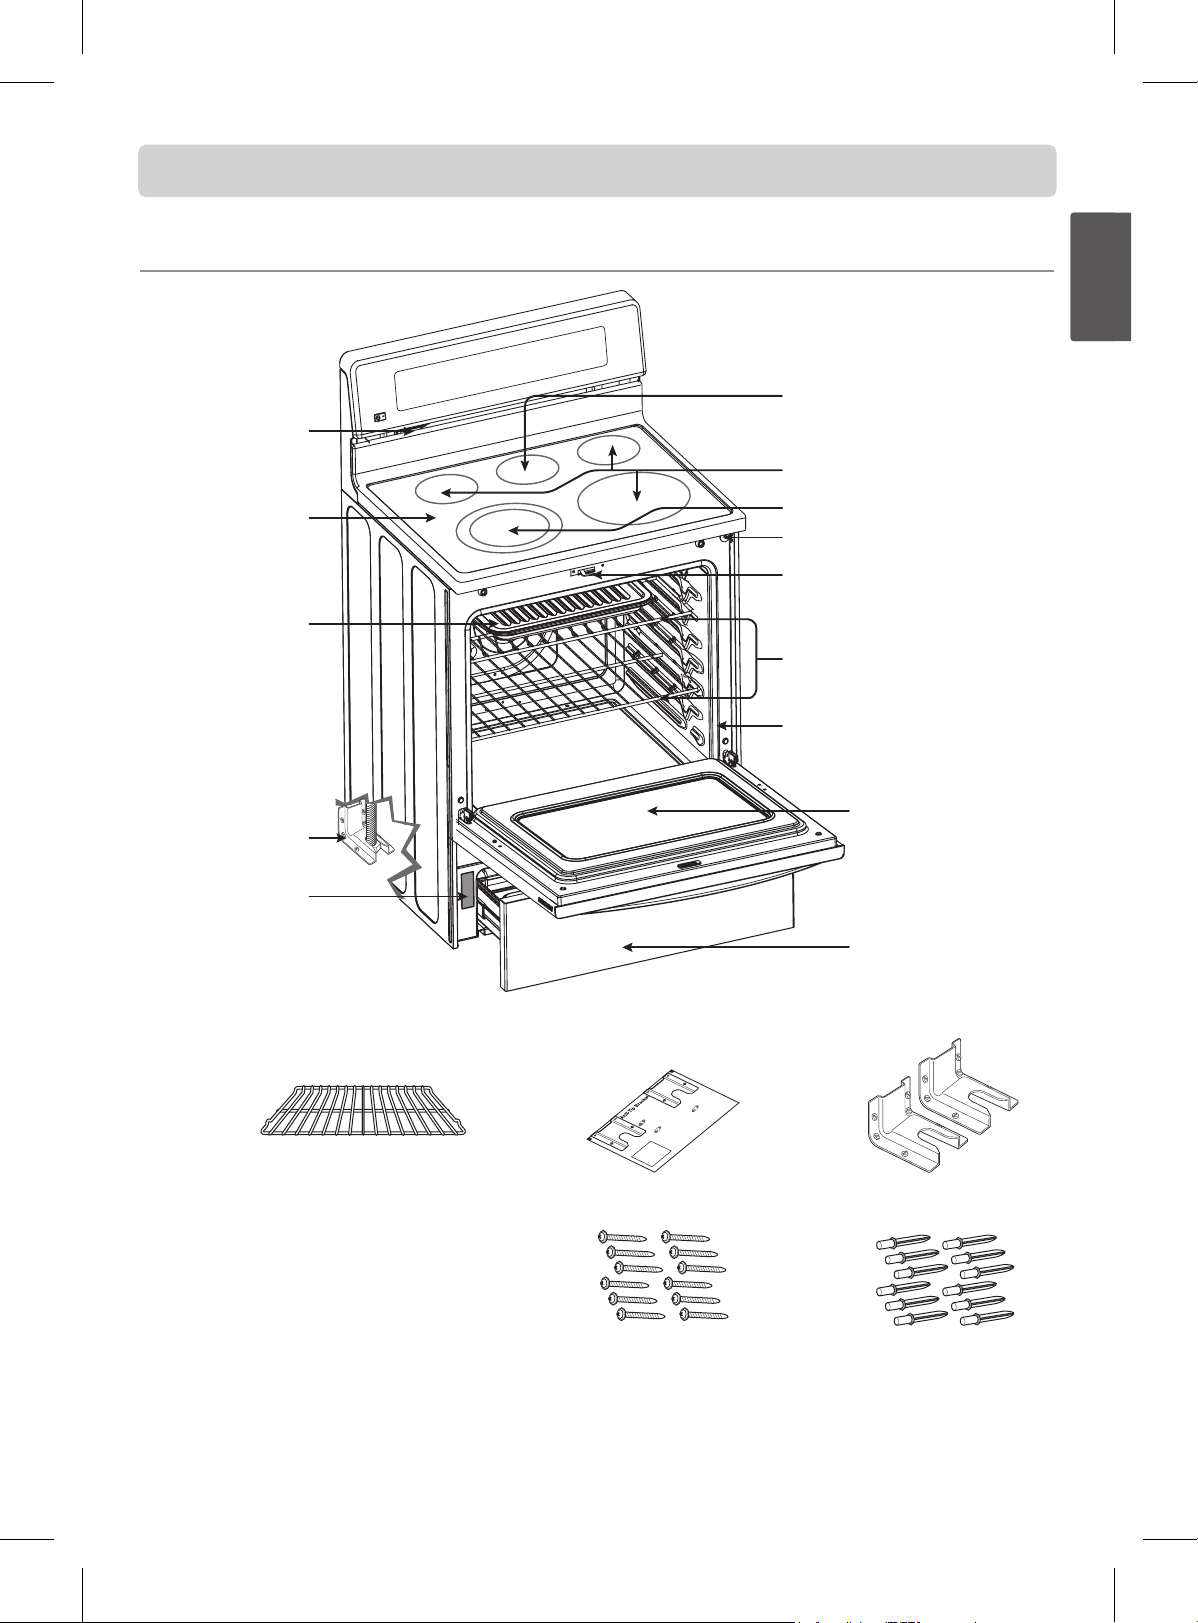
INFORMATION
PARTS AND FEATURES
Oven vent
Ceramic glass
Broiler pan & Grid
(Not included in this model)
Anti-tip bracket
Model and serial
number plate
Oven racks (2 ea)
Storage drawer
Oven door
Gasket
Oven racks (2 ea)
Self clean latch
Automatic oven light switch
Dual element
Single element
Warming zone element
Template
ENGLISH
(12 ea)
Screws
Anti-tips brackets
(12 ea)
Anchors
ENGLISH
- 14 -
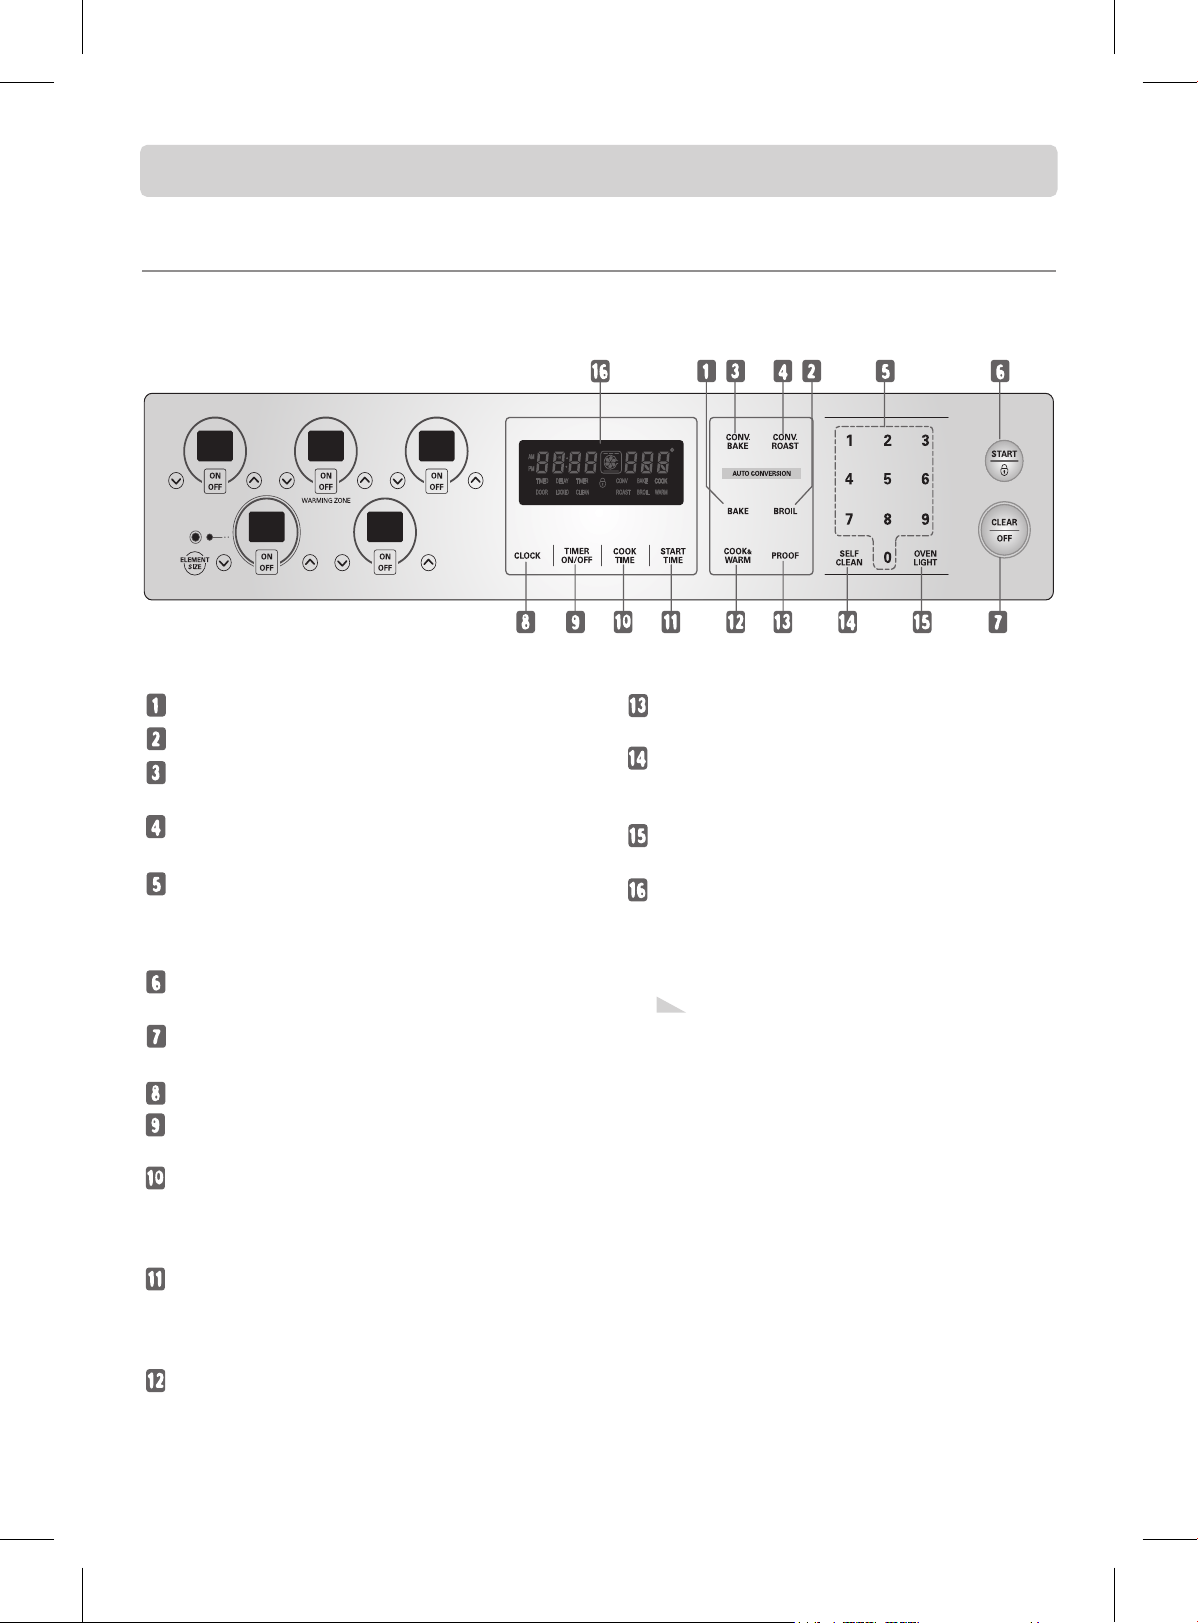
CONTROL PANEL FEATURES
READ THE INSTRUCTIONS CAREFULLY BEFORE USING THE OVEN. For satisfactory use of your oven, become
familiar with the various features and functions of the oven as described below. Detailed instructions for each feature and
function follow later in this Owner’s manual.
INFORMATION
If F– and a number appear in the
display and the oven control signals, this
indicates a function error code.
See page 32.
Press the CLEAR/OFF pad. Allow the oven to
cool for one hour. Put the oven back into
operation.
If the function error code repeats, disconnect
the power to the oven and call for service.
If your oven was set for a timed oven
operation and a power outage occurred,
the clock and all programmed functions must
be reset.
The time of day will flash and PF will
appear in the display when there has
been a power outage.
Note:
. BAKE PAD: Press to select the bake function.
. BROIL PAD: Press to select the broil function.
. CONVECTION BAKE PAD: Press to select baking
with the convection function.
. CONVECTION ROAST PAD: Press to select
roasting with the convection function.
. NUMBER PADS: Use to set any function requiring
numbers such as the time of day on the clock, the
timer, the oven temperature, the start time and
length of operation for timed baking.
. START PAD: Must be pressed to start any cooking
or cleaning function.
. CLEAR/OFF PAD: Press to cancel all oven
operations except the clock and timer.
. CLOCK PAD: Press before setting the time of day.
. TIMER ON/OFF PAD: Press to select the timer
feature.
. COOK TIME PAD: Press and then use the number
pads to set the amount of time you want your food
to cook. The oven will shut off when the cooking
time has run out.
. START TIME PAD: Use along with BAKE, CONV.
BAKE, CONV. ROAST, COOK TIME, and SELF
CLEAN pads to set the oven to start and stop
automatically at a time you set.
. COOK & WARM PAD: Press to keep cooked foods
warm. See the how to set the oven for warming
section.
. PROOF PAD: Press to select a warm environment
useful for rising yeast-leavened products.
. SELF CLEAN PAD:Press to select self-cleaning
function. See the using the Self-Cleaning Oven
section.
. OVEN LIGHT PAD: Press to turn the oven light on
or off.
. DISPLAY: Shows the time of day, oven
temperature, whether the oven is in the bake, broil
or self-cleaning mode, and the times set for the
timer or automatic oven operations.
- 15 -
OPERATION
SETTING THE CLOCK
The CLOCK pad is used to set the clock. The clock has been
preset at the factory for 12 hours operation. When the range
is first plugged in, or when the power supply to the range has
been interrupted, the timer in the display will show with
power failure PF. You can make a choice between 12-hour
clock and 24-hour clock (refer to the page 16):
1. Press CLEAR/OFF.
2. Press CLOCK.
3. Press 1, 3, and 0 to set the time of
day to 1:30.
4. Press START.
The clock will start.
To set the clock (example below for 1:30):
MINIMUM & MAXIMUM
CONTROL PAD SETTINGS
All of the features listed have minimum and maximum time
or temperature settings that may be entered into the control.
An entry acceptance beep will sound each time a control pad
is pressed.
An entry error tone (3 short beeps) will sound if the entry of
the temperature or time is below the minimum or above the
maximum settings for the feature.
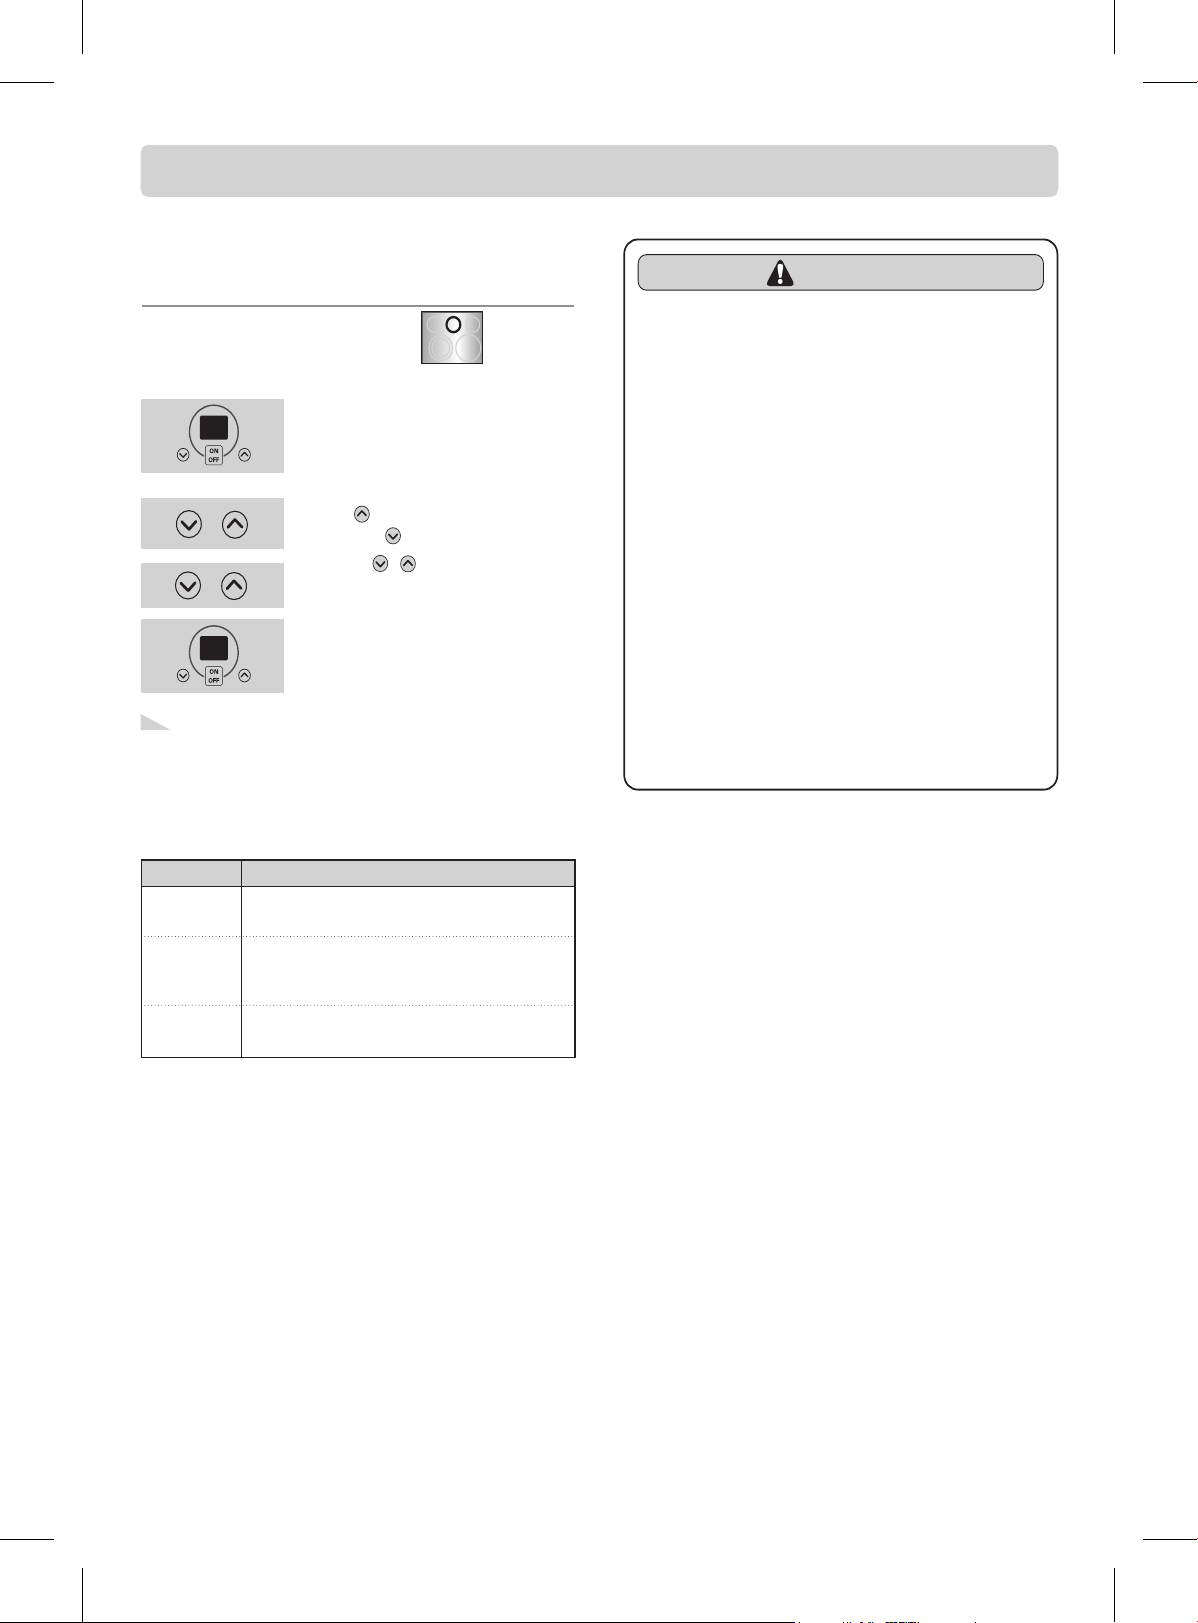
1. Press TIMER ON/OFF twice.
0:00 and HR inside O will appear
and TIMER will flash in the display.
2. Press the number pads to set the
desired time in the display (press
5).
If you make a mistake press the
TIMER ON/OFF and begin again.
3. Press TIMER ON/OFF. The time
will count down with 5:00 and
TIMER will show in the display.
4. When the set time has run out,
End will show in the display. The
clock will sound with 3 beeps
every 15 seconds until TIMER
ON/OFF is pressed.
1. Press TIMER ON/OFF once.
The display will return to the time
of day.
To set the Timer (example for 5 minutes):
To cancel the Timer before the set time has run out:
SETTING THE TIMER ON/OFF
The TIMER ON/OFF serves as an extra timer in the
kitchen that will beep when the set time has run out. It does
not start or stop cooking. The TIMER ON/OFF feature can
be used during any of the other oven control functions.
FEATURE
MIN. TEMP. MAX. TEMP.
/TIME /TIME
BAKE TEMP.
BROIL TEMP.
SELF CLEAN TIME
CONVECTION BAKE/
CONVECTION ROAST
COOK & WARM
RADIANT ELEMENT
WARMING ZONE
PROOF
170°F / 75°C
LO (400°F)
2 hours
300°F / 150°C
550°F / 285°C
HI (550°F)
4 hours
550°F / 285°C
170°F (75°C) / 3 hours
Default: 12 Hr.
Default: 2 Hr.
Default: 12 Hr.
If the remaining time is not in the display, recall the
remaining time by pressing the TIMER ON/OFF.
Note:
1. If you press TIMER ON/OFF once, it allows you to set the
time in seconds.
(for example: if you press 5 and 6, it means 56 seconds)
2. If you press TIMER ON/OFF twice, it allows you to set the
time in minutes.
(for example: if you press 5 and 6, it means 56 minutes)
Note:
If TIMER ON/OFF is
not pressed, the timer will
return to the time of day.
Note:
ENGLISH
ENGLISH
- 16 -
OPERATION (OPTIONS)
1. Press COOK & WARM for 3
seconds.
2. Press 3. The display will show
BEEP Hi.
3. Press 3 to switch beeper volume
( Hi, Lo, and OFF ).
4. Press START to accept the
desired change.
To set beeper volume
SETTING BEEPER VOLUME
The beeper volume feature allows you to adjust the volumes
to a more acceptable volume. There are three possible
volume levels.
1. Press COOK & WARM for 3
seconds.
2. Press 2. The display will show
Unit F.
3. Press 2 to switch between the F
and C.
4. Press START to accept the
desired change.
To change display from Fahrenheit to Centigrade or
Centigrade to Fahrenheit:
SETTING TEMPERATURE UNIT —
FAHRENHEIT OR CENTIGRADE
COOK & WARM pad control the Fahrenheit or Centigrade
temperature display modes. The oven control can be
programmed to display temperatures in Fahrenheit or
Centigrade. The oven has been preset at the factory to
display in Fahrenheit.
1. Press and hold START for
3 seconds.
2. 2 beeps will sound, DOOR
LOCKED will flash in the display.
Once the oven door is locked the
DOOR LOCKED indicator will stop
flashing and remain on along with
the lock icon( ) light.
To activate the Oven Lockout feature:
1. Press and hold START for 3
seconds. A beep will sound
2 times. The DOOR LOCKED will
continue to flash until the oven
door has completely unlocked and
the lock icon( ) light will clear.
2. The oven is again fully operational.
To reactivate normal oven operation:
SETTING OVEN & COOKTOP
LOCKOUT FEATURE
The START pad controls the Oven & Cooktop Lockout feature.
The Oven & Cooktop Lockout feature automatically locks the
oven door, prevents the cooktop element and most oven
controls from being turned ON. It does not disable the clock,
timer or the interior oven light.
1. Press and hold COOK & WARM
pad for 3 seconds. OPt will be
displayed.
2. Press 1. The display will show CLO
12H.
3. Press 1 to switch between the
12H and 24H.
4. Press START to accept the desired
change.
Changing between 12 or 24 hour time of day
CHANGING HOUR MODE ON
CLOCK (12hr, 24hr)
Your control is set to use a 12-hour clock. If you would prefer
to have a 24-hour time clock, follow the steps below.
- 17 -
OPERATION (OPTIONS)
1. Press COOK & WARM for 3
seconds.
2. Press 4. The display will show PrE
On.
3. Press 4 to switch between the On
and OFF.
4. Press START to accept the
change.
To set smart oven light on/off
SETTING PREHEATING ALARM
LIGHT ON/OFF
The interior oven light automatically turn on when the oven
door is opened.
When oven reaches set-temperature after preheat, the oven
notifies preheat-end by flashing oven lamp until door is
opened.
You can activate or deactivate smart oven light feature.
Default Setting is on.
1. Press and hold BAKE for 3
seconds.
2. To increase the temperature use
the number pads to enter the
desired change.
(Example 20°F : 2 and 0).
20° will be displayed.
3. Press START to accept the
temperature change and the
display will return to the time of
day. Press CLEAR/OFF to reject
the change if necessary.
To increase the oven temperature:
1. Press and hold BAKE for 3
seconds.
2. To decrease the temperature use
the number pads to enter the
desired change.
(Example -20°F : 2 and 0) and then
press BAKE once.
- 20° will be displayed.
3. Press START to accept the
temperature change and the
display will return to the time of
day. Press CLEAR/OFF to reject
the change if necessary.
To decrease the oven temperature:
THERMOSTAT ADJUSTMENT
The temperature in the oven has been preset at the factory.
When first using the oven, be sure to follow recipe times and
temperatures. If you think the oven is too hot or too cool, the
temperature in the oven can be adjusted. Before adjusting,
test a recipe by using a temperature setting that is higher or
lower than the recommended temperature. The baking
results should help you to decide how much of an
adjustment is needed.
The oven temperature can be adjusted from ±35°F(±19°C).
The thermostat adjustments made with this feature
will just change Bake, Convection Bake and
Convection Roast temperature.
Note:
1. Press the COOK & WARM for 3
seconds.
2. Press 5. The display will show
Auto On.
3. Press 5 to switch between the On
and OFF.
4. Press START to accept the
desired change.
To set the feature ON/OFF
SETTING CONVECTION AUTO
CONVERSION FEATURE
When using convection bake, the Convection Auto
Conversion feature will automatically convert entered
regular baking temperatures to convection baking
temperatures.
This feature is activated so that the display will show the
actual converted (reduced) temperature. For example, if you
enter a regular recipe temperature of 350°F and press the
START pad, the display will show the converted
temperature of 325°F.
ENGLISH
ENGLISH
- 18 -
OPERATION
Press CLEAR/OFF to cancel the Bake feature at any time.
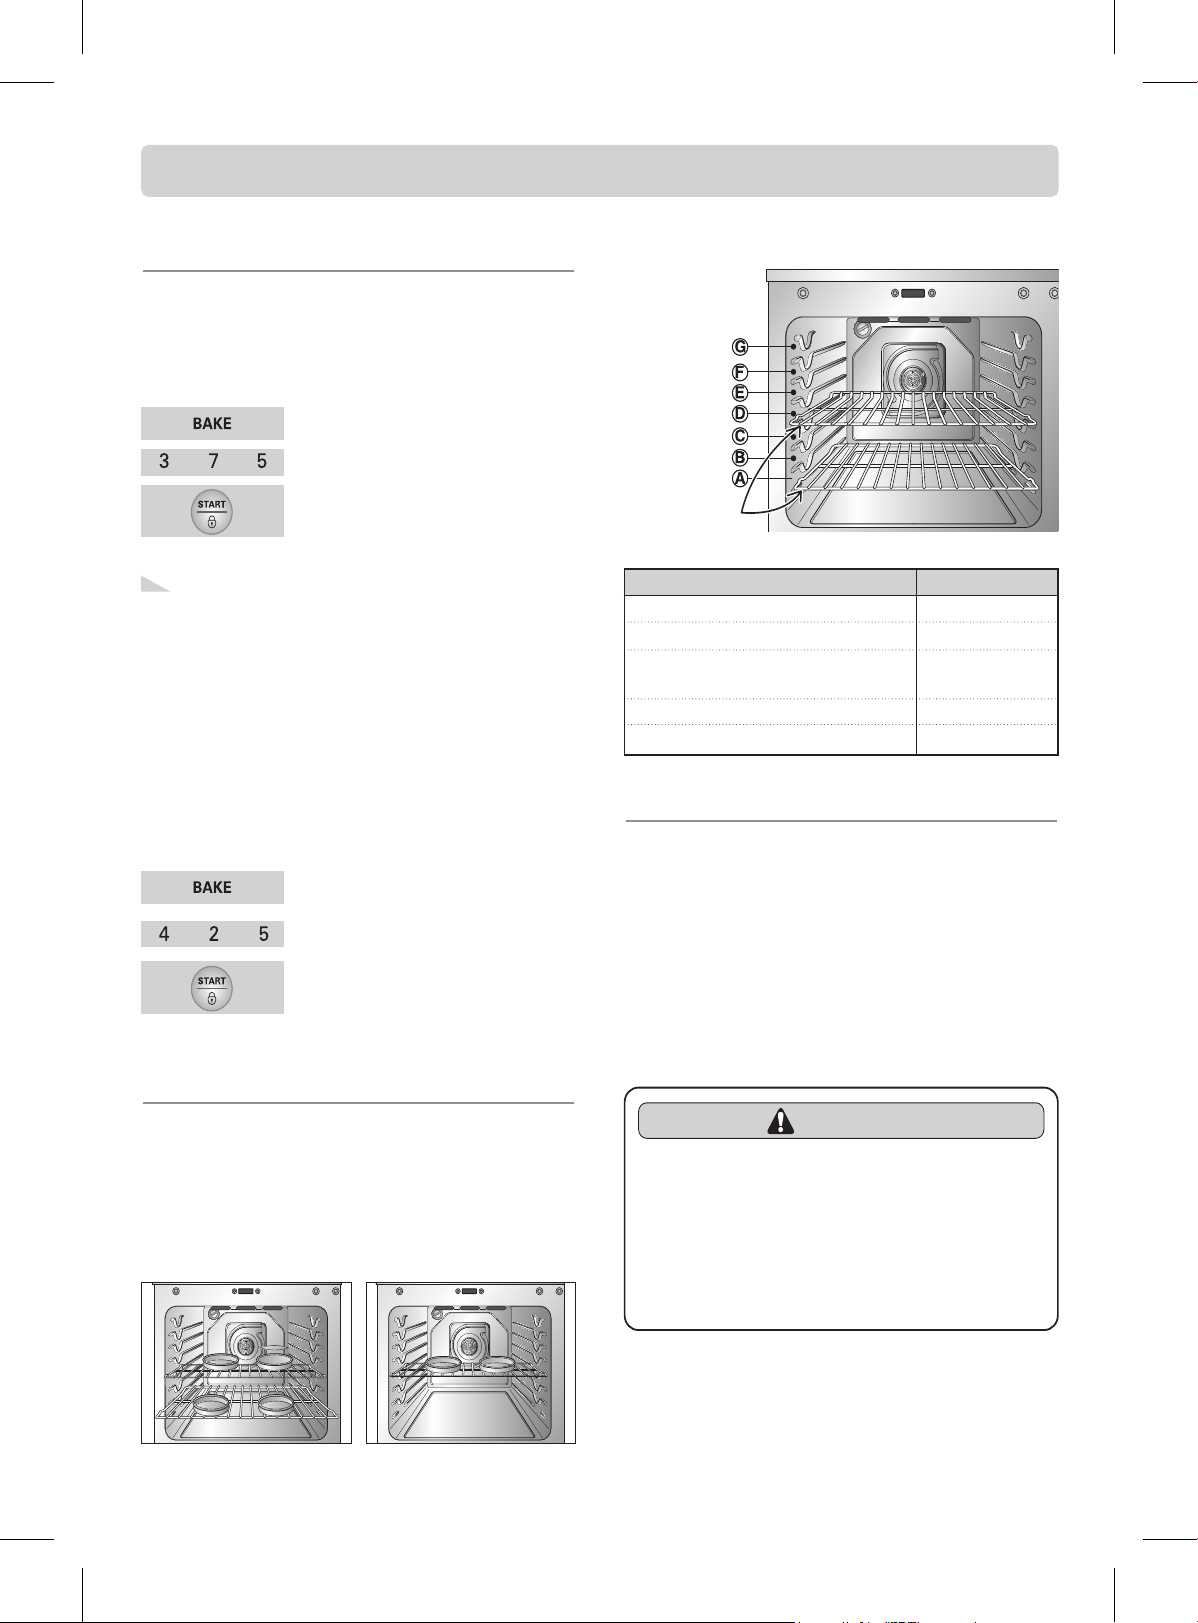
7KHRYHQKDVUDFNSRVLWLRQV
To set the Bake Temperature to 375°F:
1. If the oven temperature needs to
be changed to 425°F, press BAKE
and 350° will show in the display.
2. Press 4, 2, and 5.
3. Press START.
To change the Bake Temperature while cooking
(example changing from 375° to 425°F):
SETTING BAKE
The BAKE pad controls normal baking. The oven can be
programmed to bake at any temperature from 170°F to
550°F. Default temperature is 350°F (175°C).
BAKING LAYER CAKES
Baking results will be better if baking pans are centered in
the oven as much as possible. If baking with more than one
pan, place the pans so each has at least 1” to 1
1
/
2
” of air space
around it.
If cooking on multiple racks,place the oven racks in positions
B and D (for 2 racks). Place in positions B, D, and F (for 3
racks). Place the cookware as shown in Fig. 1, 2.
BEFORE USING OVEN RACKS
The oven has 2 racks. The racks have stops to be placed correctly
on the supports, those will stop before coming completely out.
To remove racks:
1. Pull the rack straight out until it stops.
2. Lift up the front of the rack and pull it out.
To replace racks.
1. Place the end of the rack on the support.
2. Tilt the front end up and push the rack in.
1. Press BAKE. 350° will appear in
the display.
2. Press 3, 7, and 5. BAKE will flash.
3. Press START. The display will
show BAKE and the changing
temperature starting at 100°F.
Fig.1 Fig.2
Type of Food
Rack Position
Angel food cake, Frozen pies
Bundt or pound cakes
Biscuits, muffins, brownies, cookies,
cupcakes, layer cakes, pies
Casseroles
Turkey, roast, or ham
B
C
D
D
A
Place food in the oven after preheating if the recipe calls for
it. Preheating is so important for good results when baking
cakes, cookies, pastry, and breads. After the oven has
reached the desired temperature, long beeps will sound
5 times and oven lamp will flash. Preheating will take
approximately 10~15 minutes.
Important Note:
Oven Racks
CAUTION
'2127FRYHUDUDFNZLWKDOXPLQXPIRLO
or any other material or place on the
oven bottom.
- This will result in poor baking by disturbing heat
circulation and may damage the oven bottom.
$OZD\VDUUDQJHRYHQUDFNVZKHQWKH
oven is cool.
- 19 -
OPERATION
1. Be sure the clock is set for the
correct time of day.
2. Press BAKE, 350° will appear in
the display.
3. Press 3, 0, and 0. BAKE will flash
and 300° will appear in the display.
4. Press COOK TIME. TIMED will
flash. BAKE, 0:00 and 300° will
appear in the display.
5. Enter the desired baking time by
pressing 3 and 0. TIMED will flash
and BAKE, 30:00 and 300° will
appear in the display.
6. Press START. The oven will turn
on, and the display will show the
cooking time countdown and the
changing temperature starting at
100°F (the temperature display will
start to change once the oven
temperature reaches 100°F). The
oven will continue to cook for the
set amount of time, then turn off
automatically, unless the COOK &
WARM feature was set. Refer to
the Setting the COOK & WARM
feature section on page 24.
To program the oven to begin baking immediately
and to shut off automatically:
(example below to bake at 300°F for 30 minutes):
When the Timed Bake finishes:
SETTING TIMED BAKE
The oven will turn on immediately and cook for a selected
length of time. At the end of the cooking time, the oven will
turn off automatically.
1. End and the time of day will show
in the display. The oven will shut
off automatically.
2. The control will continue to beep 3
times every minute until
CLEAR/OFF is pressed.
Place food in the oven after preheating if the recipe calls for
it. Preheating is so important for good results when baking
cakes, cookies, pastry, and breads. After the oven has
reached the desired temperature, long beeps will sound
5 times and oven lamp will flash. Preheating will take
approximately 10~15 minutes.
Important Note:
Baking time can be set for
any amount of time between
1 minute to 11 hours and 59
minutes.
Note:
CAUTION
8VHFDXWLRQZLWKWKH7,0('%$.(RU
DELAYED TIMED BAKE features. Use the
automatic timer when cooking cured or
frozen meats and most fruits and
vegetables. Foods that can easily spoil,
such as milk, eggs, fish, meat or poultry,
should be chilled in the refrigerator first.
Even when chilled, they should not
stand in the oven for more than 1 hour
before cooking begins, and should be
removed promptly when cooking is
completed.
- Eating spoiled food can result in sickness from
food poisoning.
ENGLISH
ENGLISH

- 20 -
OPERATION
SETTING BROIL
Leave the door open to the broil stop
position. The door will stay open by itself,
yet the proper temperature is maintained in
the oven.
1. Place the meat or fish on the
broiler grid in the broiler pan.
2. Follow suggested rack positions in
the Broiling Guide.
3. Press BROIL once for Hi broil or
twice for Lo broil. Use Lo to cook
foods such as poultry or thick cuts
of meat thoroughly without over-
browning them.
4. Press START. The oven will begin
to broil.
5. Broil on one side until food is
browned; turn and cook on the
other side.
6. To cancel broiling or if finished
broiling press CLEAR/OFF.
To set the oven to broil at the Hi or Lo setting:
1. Be sure that the clock is set with
the correct time of day.
2. Arrange interior oven rack(s) and
place the food in the oven.
3. Press BAKE. 350° will appear in
the display.
4. Press 3, 0, and 0. BAKE will flash
and 300° will appear in the display.
5. Press COOK TIME. TIMED will
flash; BAKE, 0:00 and 300° will
appear in the display.
6. Enter the desired baking time
using the number pads by pressing
3 and 0. TIMED will flash; BAKE,
30:00 and 300° will appear in the
display.
7. Press START TIME. Enter the
desired start time using the
number pads 4, 3, and 0.
8. Press START. At the set time, a
short beep will sound. The oven
will begin to Bake. When the oven
has reached the desired
temperature, a long beep will
sound 5 times and oven lamp will
flash. The display will show 300°
and BAKE.
To program the oven for a Delay Start and to shut
off automatically (example for baking at 300°F for
30 minutes and starting at 4:30):
SETTING DELAYED TIMED
BAKE
The BAKE , COOK TIME and START TIME pads control
the Delayed Timed Bake feature. The automatic timer of the
Delayed Timed Bake will turn the oven ON and OFF at the
time you select in advance.
1. End and the time of day will show
in the display. The oven will shut
off automatically.
2. The unit will continue to beep 3
times every minute until
CLEAR/OFF is pressed.
When the set bake time runs out:
Press CLEAR/OFF to cancel the Delayed Timed Bake
feature at any time.
Note:
Always pull the rack out to
the stop position before
turning or removing food.
Note:
Baking time can be set for
any amount of time from
1 minute to 11 hours and 59
minutes.
Note:
If you want to change cook
time, repeat steps 5~6 and
press START.
Note:
Broil Stop Position
CAUTION
6KRXOGDQRYHQILUHRFFXr, leave the
oven door closed and turn the oven off.
If the fire continues, throw baking soda
on the fire or use a fire extinguisher.
'2127SXWZDWHURUIORXURQWKHILUH
- Flour may be explosive and water can cause a
grease fire to spread and cause personal injury.
- 21 -
OPERATION
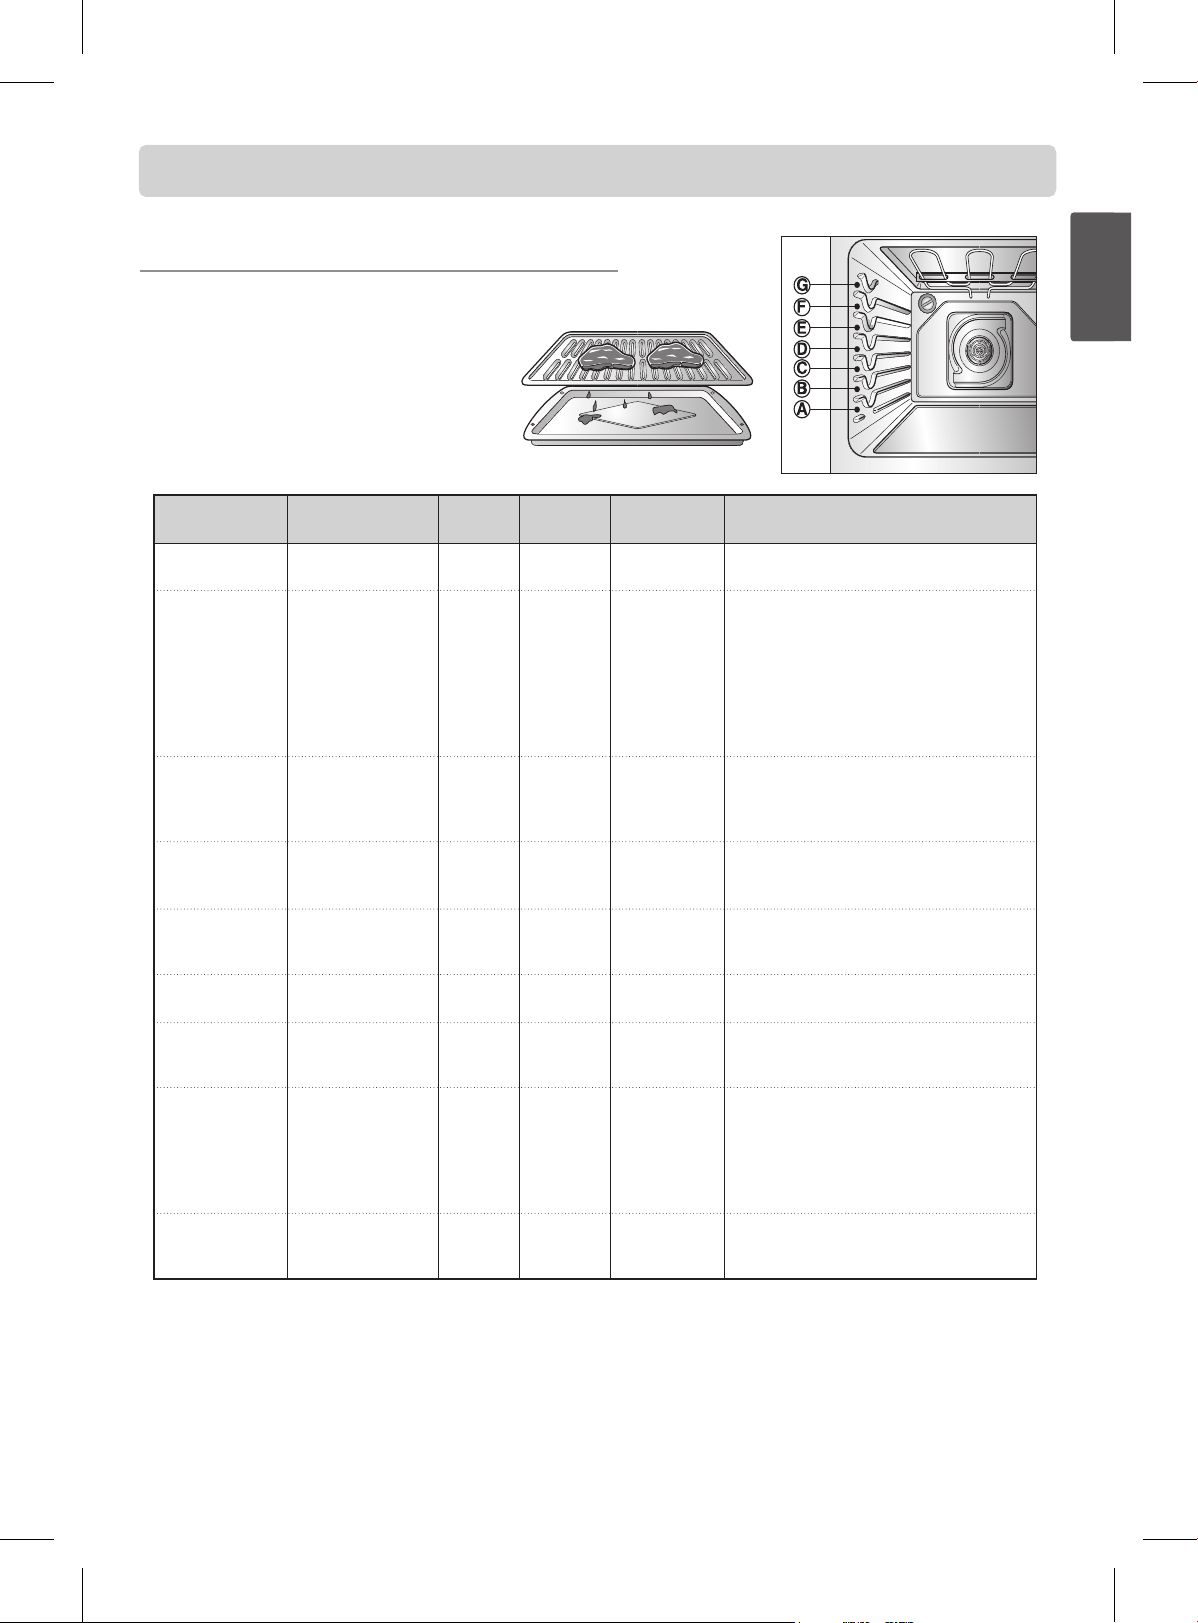
RECOMMENDED BROILING GUIDE
The size, weight, thickness, starting temperature, and your
preference of doneness will affect broiling times.
This guide is based on meats at refrigerator
temperature.
For best results when broiling, use a pan designed
for broiling (refer to the Fig. 1)
Fig.1 (Not included in this model)
Food
Quantity and/ or
Thickness
Shelf
Position
First Side
Time (min.)
Second Side
Time (min.)
Comments
Ground Beef
Well Done
Beef Steaks
Rare
Medium
Well Done
Rare
Medium
Well Done
Chicken
Lobster Tails
Fish Fillets
Ham Slices
(precooked)
Pork Chops
Well Done
Lamb Chops
Medium
Well Done
Medium
Well Done
Salmon
Steaks
Space evenly. Up to 8 patties may be
broiled at once.
Steaks less than 1” thick cook through
before browning.
Pan frying is recommended. Slash fat.
Broil skin-side-down first.
Cut through back of shell. Spread open.
Brush with melted butter before
broiling and after half of broiling time.
Handle and turn very carefully. Brush
with lemon butter before and during
cooking, if desired.
Increase time 5 to 10 minutes per side
for 1
1
/
2
” thick or home-cured ham.
Slash fat.
Slash fat.
Grease pan. Brush steaks with melted
butter.
1 lb. (4 patties)
1
/
2
to
3
/
4
” thick
1” thick
1 to 1
1
/
2
lbs.
1
1
/
2
”thick
2 to 2
1
/
2
lbs.
1 whole cut up
2 to 2
1
/
2
lbs.,
split lengthwise
2 Breasts
2–4
10 to 12 oz. each
1
/
4
to
1
/
2
” thick
1
/
2
” thick
2 (
1
/
2
” thick)
2 (1” thick) about
1 lb.
2 (1” thick) about
10 to 12 oz.
2 (1
1
/
2
” thick)
about 1 lb.
2 (1” thick)
4 (1” thick)
about 1 lb.
F or G
F
F
F
D
D
D
C
C
C
E
D
E
D
E
E
E
E
D
D
7–9
6
7
8
10
12
14
20
20
12–14
5
5
7
9–10
6
8
11
13
8
9
3–5
2–3
2–3
3–4
4–6
6–8
8–10
6–8
6–10
Do not turn
over.
3–4
3–5
6–8
7–9
4–6
7–9
9
9–11
3–4
4–6
ENGLISH
ENGLISH
- 22 -
OPERATION
SETTING CONVECTION BAKE
Benefits of Convection Bake:
1. Some foods cook up to 25 to 30% faster, saving time and
energy.
2. Multiple rack baking.
3. No special pans or bakeware needed.
The CONV. BAKE pad controls the Convection Bake
feature. Use the Convection Bake feature when cooking
speed is desired. The oven can be programmed for
Convection Bake at any temperature between 300°F (150°C)
to 550°F (285°C).
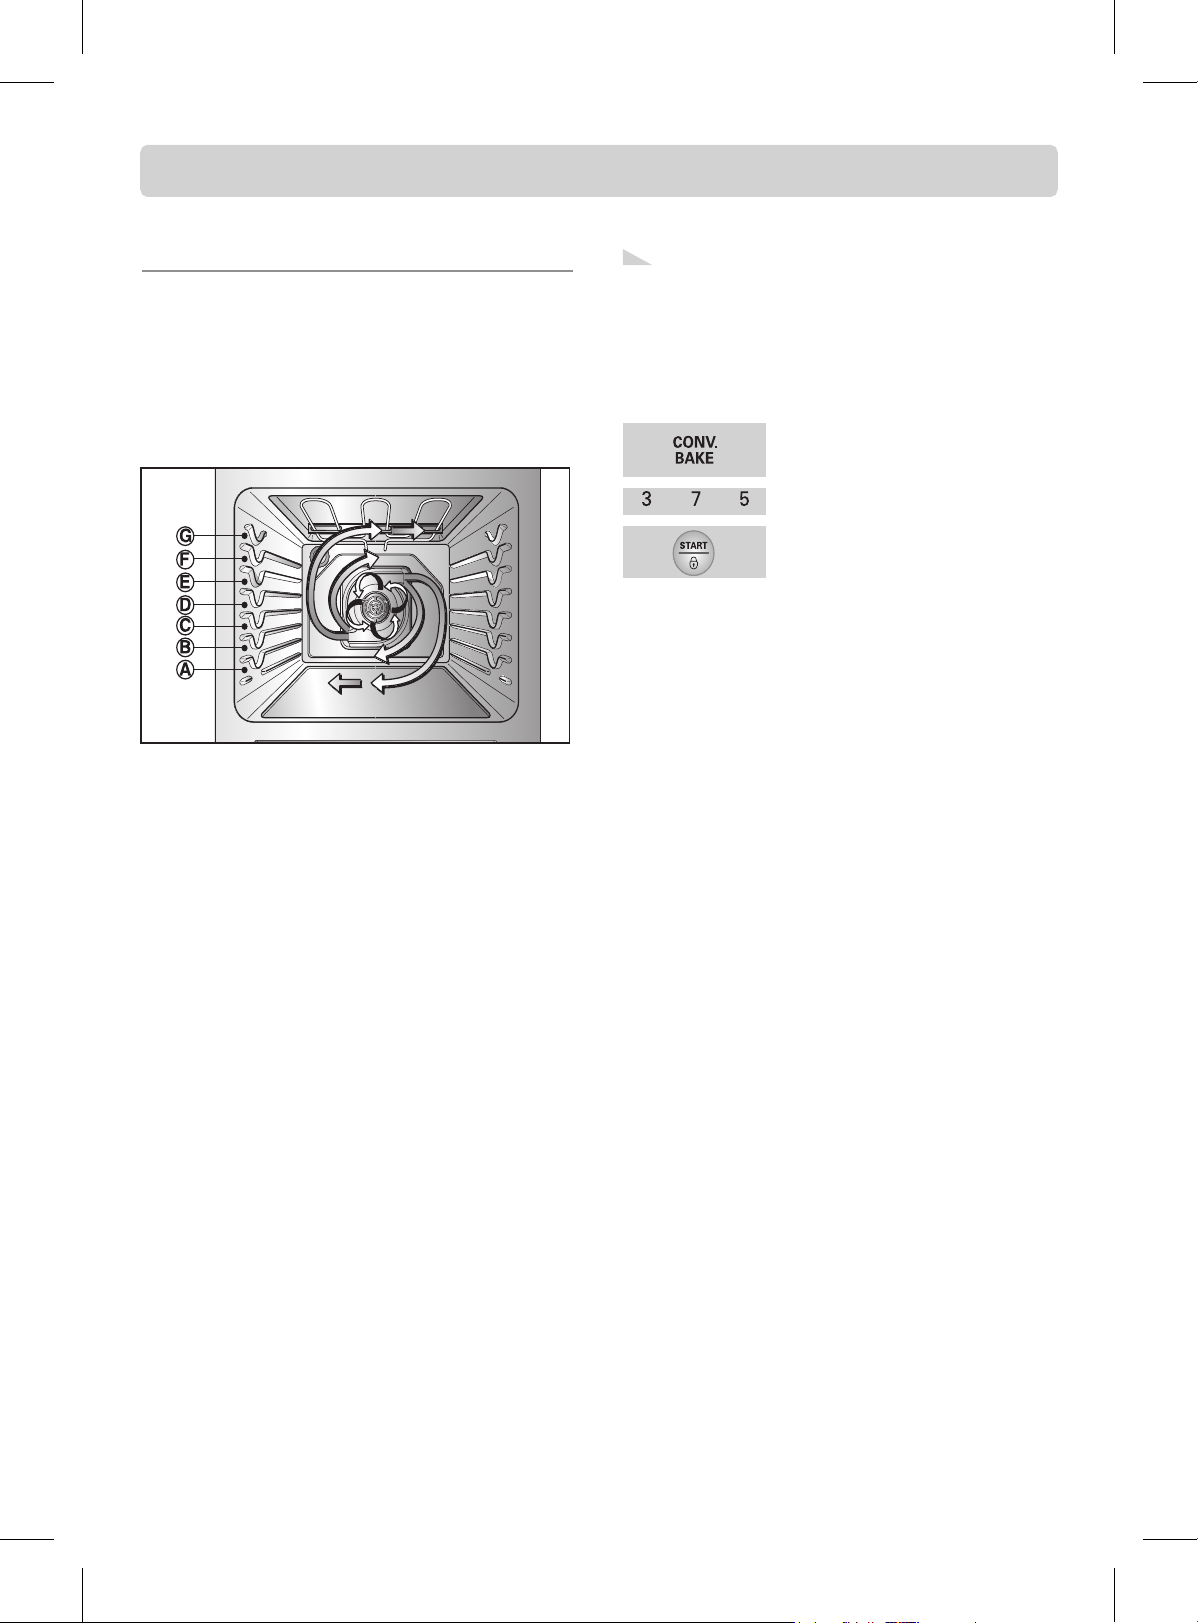
Convection baking uses a fan to circulate the oven's heat
evenly and continuously within the oven. This improved heat
distribution allows for even cooking and excellent results
using multiple racks at the same time. Foods cooked on a
single oven rack will generally cook faster and more evenly
with Convection Bake. Multiple oven rack cooking may
slightly increase cook times for some foods, but the overall
result is time saved. Breads and pastries brown more evenly.
Tips for Convection Bake
7LPHUHGXFWLRQVZLOOYDU\GHSHQGLQJRQWKHDPRXQWDQG
type of food to be cooked. Cookies and biscuits should be
baked on pans with no sides or very low sides to allow
heated air to circulate around the food. Food baked on pans
with a dark finish will cook faster.
:KHQXVLQJ&RQYHFWLRQ%DNHZLWKDVLQJOHUDFNSODFHRYHQ
rack in position D. If cooking on multiple racks, place the
oven racks in positions B and D (for 2 racks). Place in
positions B, D, and F (for 3 racks).
&DNHVKDYHEHWWHUUHVXOWVZKHQEDNHGXVLQJWKH%$.(SDG
(you can still use multiple racks when baking multiple cake
layers at the same time).
&RRNLHVPXIILQVELVFXLWVDQGRWKHUTXLFNEUHDGVJLYHYHU\
good results when using multiple racks.
1. Press CONV. BAKE. CONV BAKE
will flash and 350° will appear in
the display.
2. Press 3, 7, and 5.
3. Press START. The display will
show CONV BAKE and the
changing temperature starting at
100°F. A beep will sound 3 times
when the adjusted oven
temperature (for this example it is
350°F) is reached and the display
will show auto-converted oven
temperature 350°, CONV BAKE
and the fan icon.
To set the oven for Convection Bake and
temperature to 375°F:
Press CLEAR/OFF to cancel Convection Bake at any time.
The convection fan can stop during a convection bake
cycle to allow for more even heating. This is not a
failure of the range and should be considered normal
operation.
Note:
- 23 -
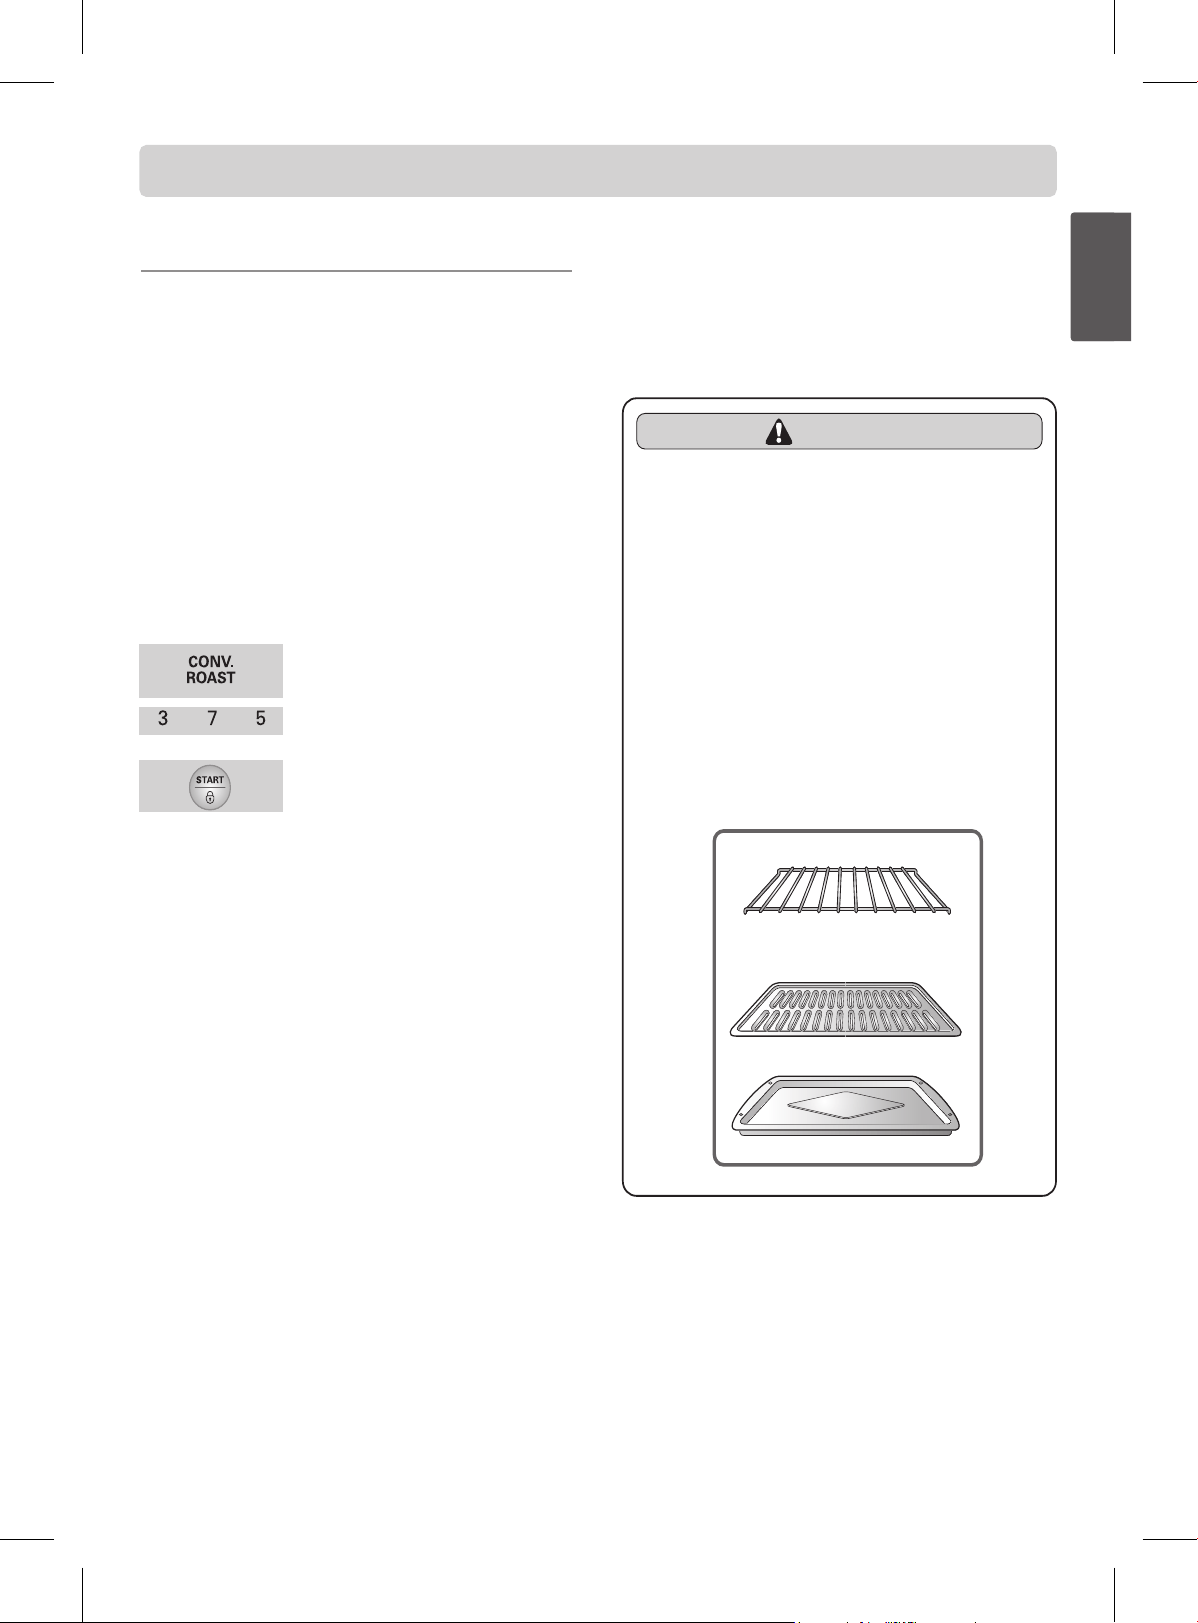
Roasting Rack Instructions
When preparing meats for convection roasting,use the
broiler pan and grid along with the roasting rack. The
broiler pan will catch grease spills and the grid will help
prevent grease splatters. The roasting rack will allow the
heat to circulate around the meat.
1. Arrange interior oven racks and
place food in oven.
2. Press CONV. ROAST. CONV
ROAST will flash and 350° will be
displayed.
3. Press 3, 7, and 5.
4. Press START. The display will
show CONV ROAST and the
changing temperature starting at
100°F. A beep will sound 3 times
when the adjusted oven
temperature (for this example it is
350°F) is reached and the display
will show auto-converted oven
temperature 350°, CONV ROAST
and the fan icon.
To set the Convection Roast feature
(example for Meats to cook at 375°F):
SETTING CONVECTION ROAST
The CONV. ROAST pad is designed to give optimum
cooking performance for this feature. The Convection Roast
pad combines a cook cycle with the convection fan and
element to roast meats and poultry. Preheating is not
necessary for meats and poultry. Heated air circulates
around the food from all sides, sealing in juices and flavors.
Foods are crispy brown on the outside while staying moist on
the inside.
&RQYHFWLRQ5RDVWLVHVSHFLDOO\JRRGIRUODUJHWHQGHUFXWVRI
meat, uncovered.
Press CLEAR/OFF to cancel this mode at any time.
OPERATION
CAUTION
'2127XVHWKHURDVWLQJUDFNZKHQ
broiling.
- To prevent food from coming in contact with the
broil element and grease from splattering.
1. Place oven rack on bottom or next to the bottom rack
position.
2. Place the grid in the broiler pan. The roasting rack fits
on the grid allowing the heated air to circulate under
the food for even cooking and helps to increase
browning on the underside. Make sure the roasting
rack is securely seated on the grid in the broiler pan.
DO NOT use the broiler pan without the grid. DO
NOT cover the grid with aluminum foil.
3. Position food (fat side up) on the roasting rack.
4. Place the broiler pan on the oven rack.
Roasting rack
(Right side of the split rack)
Grid
Broiler Pan
[Not included in this model]
ENGLISH
ENGLISH
- 24 -
OPERATION
SETTING THE PROOF FEATURE
The proof feature maintains a warm environment useful for
rising yeast-leavened products.
1. Place the covered dough in a dish
in the oven on shelf B or C.
2. Press PROOF and then the
START. The proof feature
automatically provides the
optimum temperature for the proof
process, and therefore does not
have a temperature adjustment.
3. When proofing is finished, press
CLEAR/OFF.
To avoid lowering the oven temperature and lengthening
proofing time, do not open the oven door unnecessarily.
Check bread products early to avoid over-proofing.
How to Set the Oven For Proofing
SETTING THE COOK & WARM
FEATURE
The COOK & WARM feature will maintain an oven
temperature of 170° F. This feature is not desired to reheat
cold foods. The Cook & Warm feature will keep cooked food
warm for serving up to 3 hours after cooking has finished.
After 3 hours the Cook & Warm feature will shut the oven
OFF automatically. The Cook & Warm feature may be used
without any other cooking operations or can be used after
cooking has finished using TIMED BAKE (CONV. BAKE,
CONV. ROAST) or DELAYED TIMED BAKE (CONV.
BAKE, CONV. ROAST).
1. Press COOK & WARM.
2. Press START.
3. To turn Cook & Warm OFF, press
CLEAR/OFF at any time.
To set Cook & Warm:
1. Set the cooking feature that you
want to use: TIMED (BAKE,
CONV. BAKE, CONV. ROAST),
DELAY TIMED (BAKE, CONV.
BAKE, CONV. ROAST) refer to
the relevant previous page.
2. Press START.
3. Press COOK & WARM. COOK &
WARM mode is set to turn on
automatically after completing the
TIMED COOKING or DELAY
TIMED COOKING.
4. To turn Cook & Warm off at any
time press CLEAR/OFF.
To set Cook & Warm feature after timed cooking
TO TURN ON/OFF THE OVEN
LIGHT
The oven light automatically turns ON
when the door is opened. The oven
light may also be manually turned ON
or OFF by pressing the OVEN LIGHT
pad.
Do not use plastic containers, lids, or plastic wrap.
Cover them with an oven-safe lids or aluminum foil.
Note:
For best results, cover the
dough with a cloth or with
plastic wrap.
Note:
The oven light cannot be turned on if the self-clean
feature is active.
Note:
'RQRWXVHWKHSURRILQJPRGHIRUZDUPLQJIRRGRU
keeping food hot. The proofing oven temperature is
not hot enough to hold foods at safe temperatures.
Use the COOK & WARM feature to keep food
warm.
3URRILQJZLOOQRWRSHUDWHZKHQRYHQLVDERYH)
Hot will show in the display.
Note:
- 25 -
7KHVLOYHUFRORUHGRYHQUDFNVFDQEHVHOIFOHDQHGEXWWKH\
will darken, lose their luster and become hard to slide. It is
recommended to remove all racks before starting the self
clean cycle.
6RLORQWKHIURQWIUDPHRIWKHUDQJHDQGRXWVLGHWKHJDVNHW
on the door will need to be cleaned by hand. Clean these
areas with hot water, soap-filled steel-wool pads, or
cleansers such as Soft Scrub. Rinse well with clean water
and dry.
'RQRWFOHDQWKHJDVNHW7KHILEHUJODVVPDWHULDORIWKHRYHQ
door gasket cannot withstand abrasion. It is essential for
the gasket to remain intact. If you notice it becoming worn
or frayed,replace it.
:LSHXSDQ\KHDY\VSLOORYHUVRQWKHRYHQERWWRP
0DNHVXUHWKHRYHQOLJKWEXOEFRYHULVLQSODFHDQGWKHRYHQ
light is off.
'RQRWOHDYHEDNLQJSL]]DVWRQHLQWKHRYHQGXULQJWKH
Self-Clean cycle.
The self-clean cycle uses above normal cooking temperatures
to clean the oven’s interior automatically.
It is normal for flare-ups, smoking, or flaming to occur
during cleaning if the oven is heavily soiled. It is better to
clean the oven regularly rather than to wait until there is a
heavy build-up of soil in the oven.
During the cleaning process, the kitchen should be well
ventilated to get rid of normal odors associated with
cleaning.
Before a Self-Clean Cycle
We recommend venting your
kitchen with an open window
or using a ventilation fan or
hood during the first self-clean
cycle.
Remove the oven racks, broiler
pan, broiler grid, all cookware,
and aluminum foil or any other
material from the oven.
Wipe up heavy soil on the
oven bottom.
Do hand
clean door
Don’t hand
clean oven
door gasket
SELF-CLEAN
Remove silver-colored
oven racks before you
begin the self-clean
cycle.
Note:
CAUTION
'2127OHDYHVPDOOFKLOGUHQ
unattended near the appliance.
- During the Self-cleaning cycle, the outside of the
range can become very hot to touch.
0RYH%LUGVWRDQRWKHUZHOOYHQWLODWHG
room.
- The health of some birds is extremely sensitive to
the fumes given off during the Self-Cleaning cycle
of any range.
'2127OLQHWKHRYHQZDOOVUDFNVERWWRP
or any other part of the range with
aluminum foil or any other material.
- Doing so will destroy heat distribution, produce poor
baking results and cause permanent damage to the
oven interior (aluminum foil will melt to the interior
surface of the oven).
'2127IRUFHWKHGRRURSHQ
- This can damage the automatic door locking system.
Use care when opening the oven door after the Self-
Cleaning cycle. Stand to the side of the oven when
opening the door to allow hot air or steam to escape.
The oven may still be VERY HOT.
ENGLISH
ENGLISH
- 26 -
SELF-CLEAN
The SELF-CLEAN pad is used to start a Self-Clean cycle.
When used with START TIME pad, a delayed Self-Clean
cycle may also be programmed. The Self-Clean function has
cycle times of 2, 3, or 4 hours.
1. Be sure the clock is set with the
correct time of day, the oven is empty
and the oven door is closed.
2. Touch SELF CLEAN once for a
3-hour clean time or twice for a
2-hour clean time or 3 times for
4-hour clean time. A 3-hour self-clean
time is recommended for use when
cleaning small, contained spills. A self
clean time of 4 hours is recommended
for heavily soiled ovens.
3. Touch START. The DOOR LOCKED
icon will flash.
4. Once the SELF CLEAN is set, the
oven door will lock automatically. You
will not be able to open the oven door
until the oven is cooled. The lock will
release automatically.
To start an immediate Self-Clean cycle and shut off
automatically
1. Touch SELF CLEAN. Select the
desired self clean time by touching
SELF CLEAN.
2. Touch START TIME. Enter the
desired Self-Clean starting time
using the number 8, 0, and 0.
3. Touch START. DELAY and CLEAN
will remain on.
4. Self-Cleaning cycle will turn on
automatically at the set time.
To set a delay start time of 8:00 o’clock
1. Touch CLEAR/OFF.
2. After the oven has cooled down,
the DOOR LOCK will
automatically release allowing you
to open the oven door.
If it becomes necessary to stop or interrupt a Self-Cleaning
cycle due to excessive smoke or fire in the oven:
During the Self-Clean cycle
<RXPD\VHHVRPHVPRNHDQGVPHOODQRGRUWKHILUVWIHZ
times the oven is cleaned. This is normal and will lessen in
time. Smoke may also occur if the oven is heavily soiled or
if a broiler pan was left in the oven.
$VWKHRYHQKHDWV\RXPD\KHDUVRXQGVRIPHWDOSDUWV
expanding and contracting. This is normal and will not
damage the oven.
'RQRWIRUFHWKHRYHQGRRURSHQZKHQ/2&.LVGLVSOD\HG
The oven door will remained locked until the oven
temperature has cooled. Forcing the door open will
damage the door.
After the Self-Clean cycle
You may notice some white ash in the oven. Wipe it off with a
damp cloth or a soapfilled steel wool pad after the oven cools.
These deposits are usually a salt residue that cannot be
removed by the clean cycle.
If the oven is not clean after one clean cycle, repeat the cycle.
If oven racks were left in the oven and do not slide smoothly
after a clean cycle, wipe racks and rack supports with a
small amount of vegetable oil to make them glide easier.
)LQHOLQHVPD\DSSHDULQWKHSRUFHODLQEHFDXVHLWZHQW
through heating and cooling. This is normal and will not
affect performance.
When the Self-Clean cycle is done
,WZLOOQRWEHSRVVLEOHWRRSHQWKHRYHQGRRUXQWLORYHQ
temperature has cooled.
It is recommend to use 2 hour self-clean cycle for light soil,
3 hours cycle for average soil, and 4 hours cycle for heavy soil.
$GGLWLRQDOWLPHLVQHHGHGWRFRROWKHRYHQGRZQ7KHUHIRUH
the oven door will not release from the lock position until
after it has cooled.
When using the Self-Clean feature:
$6HOI&OHDQF\FOHFDQQRWEHVWDUWHGLIOven
Lockout feature is active.
2QFHWKH6(/)&/($1LVVHWWKHRYHQGRRUZLOOORFN
automatically. You will not be able to open the oven
door until the oven is cooled. The lock will release
automatically.
2QFHWKHGRRUKDVEHHQORFNHGWKH³'225´
“LOCKED” indicator light will stop flashing and
remain on. Allow about 15 seconds for the oven door
lock to close.
,I\RXUFORFNLVVHWIRUQRUPDOKRXUVGLVSOD\PRGH
the Delayed Self-Clean can never be set to start more
than 12 hours in advance.To set for a delayed Self-
Clean cycle 12- 24 hours in advance see page 32 for
instructions to set the control for the 24 hours time
of day display mode.
Note:
HS (Hot Surface) will display on the cooktop during
the Self Clean cycle.
Note:
The cooktop can be used during the self clean cycle.
Note:
- 27 -
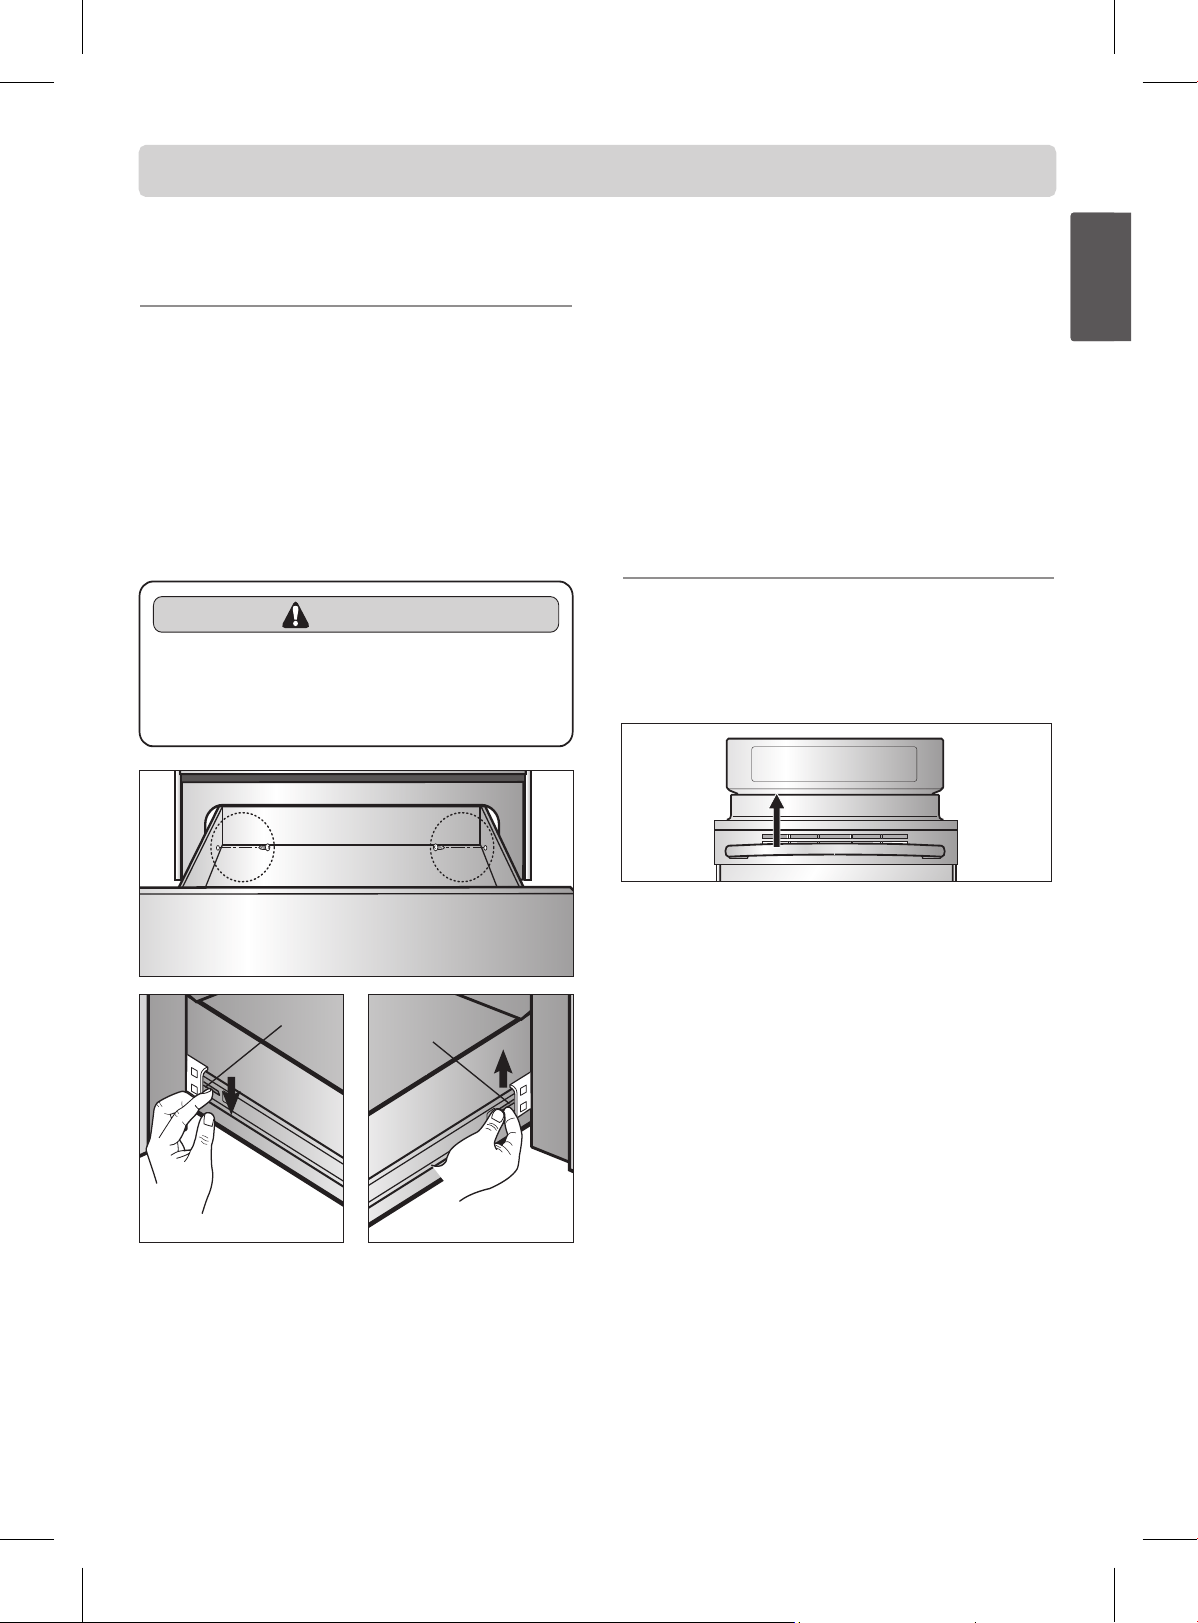
REMOVING & REPLACING THE
STORAGE DRAWER
To Remove Storage Drawer:
1. CAUTION - Turn power OFF before removing the Stroage
Drawer.
2. Open the drawer to the fully opened position.
3. Remove the 2 screws (right and left sides). (refer to the
drowing below)
4. Locate glide lever on each side of drawer, push down on
the left glide lever and pull up on the right glide lever.
5. Pull the Stroage Drawer away from the range.
To Replace the Storage Drawer:
1. Replace shield on the right glide of the drawer body.
2. Pull the bearing glides to the front of the chassis glide.
3. Align the glide on each side of the drawer with the glide
slots on the range.
4. Push the drawer into the range until levers click
(approximately 2 inches). Pull the drawer open again to
seat bearing glides into position. If you do not hear the
levers click or the bearing glides do not feel seated,
remove the drawer and repeat steps 2-4.
This will minimize possible damage to the bearing glides.
OVEN VENT
The oven vent is located above the left rear surface unit.
This area could become hot during oven use.
It is normal for steam to come out of the vent.
The vent is important for proper air circulation. Never block
this vent.
MAINTENANCE
Push down with finger
Lever
Pull up with finger
Lever
Remove screw
WARNING
Turn POWER OFF before removing the
Warming Drawer.
- Failure to do so can result in severe personal
injury, death or electrical shock.
ENGLISH
ENGLISH
- 28 -
MAINTENANCE
CARE & CLEANING
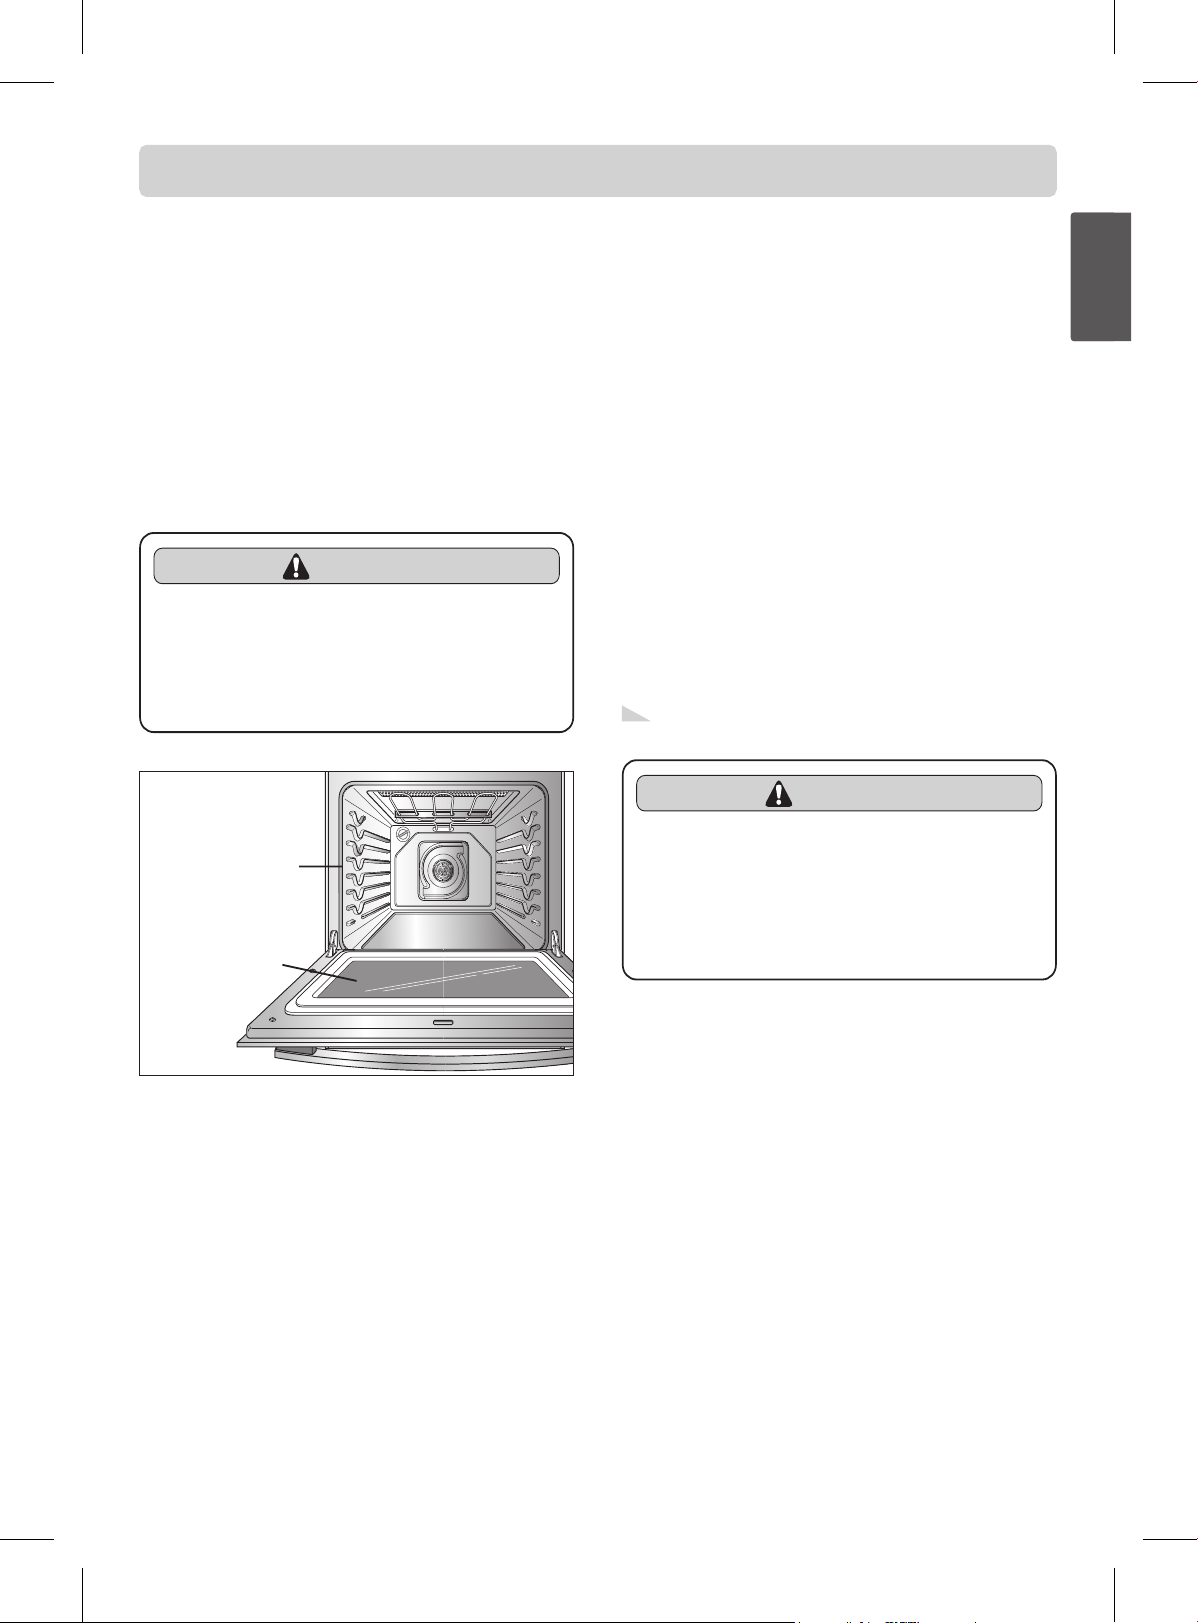
Changing the Oven Light
The oven light is a standard 40-watt appliance bulb. It will
come on when the oven door is open. When the oven door is
closed, press OVEN LIGHT to turn it on or off. It will not
work during the Self-Clean cycle.
To replace:
0DNHVXUHRYHQDQGEXOEDUHFRRO
1. Unplug range or disconnect power.
2. Turn the glass bulb cover in the back of
the oven counterclockwise to remove.
3. Turn bulb counterclockwise to remove from socket.
4. Replace bulb and bulb cover by turning clockwise.
5. Plug in range or reconnect power.
Painted and Body Parts, and
Decorative Trim
For general cleaning, use a cloth with hot and soapy water.
For more difficult soils and built-up grease, apply a liquid
detergent directly onto the soil. Leave on soil for 30 to 60
minutes. Rinse with a damp cloth and dry. DO NOT use
abrasive cleaners on any of these materials; they can scratch.
Stainless Steel Surfaces (on some
models)
Do not use a steel-wool pad; it will scratch the
surface.
1. Shake bottle well.
2. Place a small amount of Stainless Steel Appliance Cleaner
or polish on a damp cloth or damp paper towel.
3. Clean a small area, rubbing with the grain of the stainless
steel if applicable.
4. Dry and buff with a clean, dry paper towel or soft cloth.
5. Repeat as necessary.
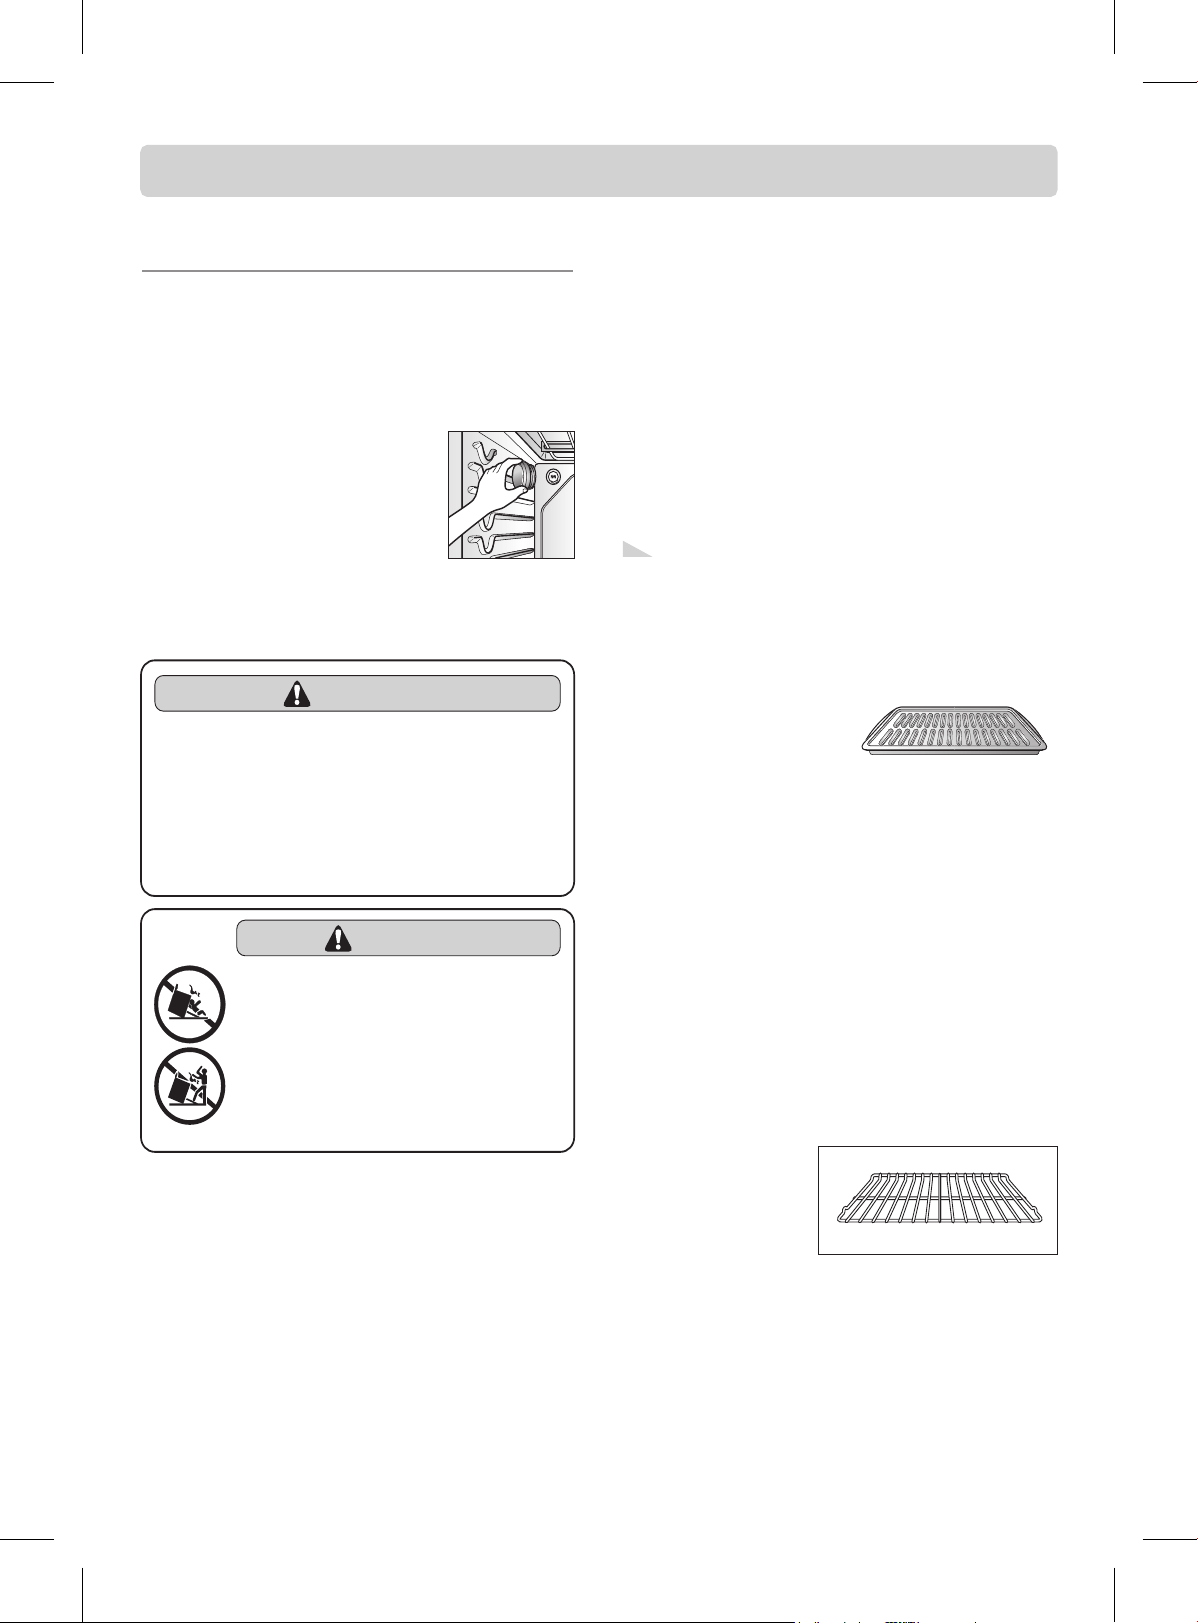
Broiler Pan and Grid
Do not clean the broiler
pan or grid in a self-
cleaning mode.
After broiling, remove the
broiler pan from the oven.
Remove the grid from the pan.
Carefully pour out the grease
from the pan into a proper container.
Wash and rinse the broiler pan and grid in hot
water with a soap-filled or plastic scouring pad.
If food has burned on,sprinkle the grid with cleaner while
hot and cover with wet paper towels or a dishcloth. Soaking
the pan will remove burned-on foods.
Both the broiler pan and grid may be cleaned with a
commercial oven cleaner.
Both the broiler pan and grid can also be cleaned in a
dishwasher.
Oven Racks
Remove the oven racks
before operating the Self-
Clean cycle. Leaving the
racks in place could cause
discoloration, and, if food
is spilled into the tracks,
could causes the racks to become stuck. If left, clean by using
a mild, abrasive cleaner. Rinse with clean water and dry.
If the racks are cleaned in the Self-Clean cycle, their color
will turn slightly blue and the finish will be dull. After the
Self-Clean cycle is complete, and the oven has cooled, rub
the sides of the racks with wax paper or a cloth containing a
small amount of oil. This will make the racks glide easier into
the rack tracks.
Do not store a soiled broiler
pan and grid anywhere in the
range. (Not included in this model)
If a mineral oil-based stainless steel appliance cleaner has
been used before to clean the appliance, wash the surface
with dishwashing liquid and water prior to using the
Stainless Steel Appliance Cleaner or polish.
Note:
WARNING
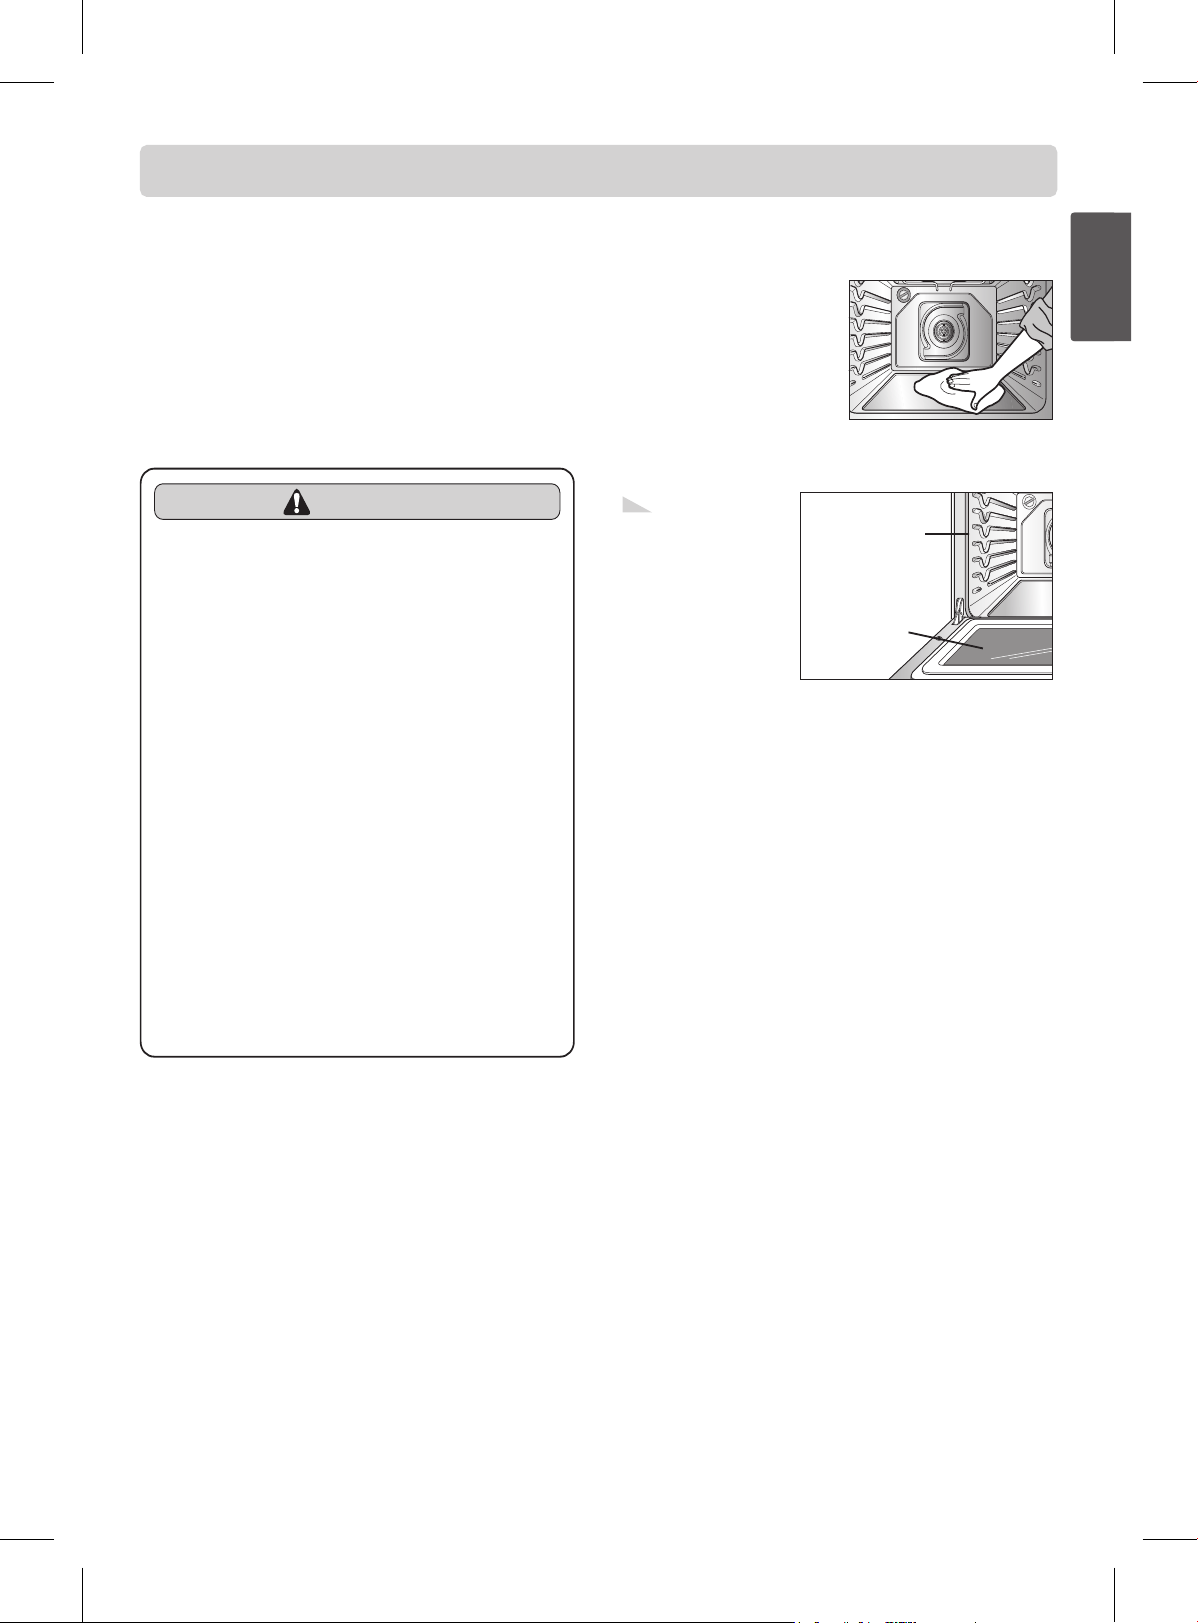
%HIRUHUHSODFLQJ\RXURYHQOLJKWEXOE
DISCONNECT the electrical power to the
range at the main fuse or circuit breaker
panel.
- Failure to do so can result in severe personal
injury,death or electrical shock.
0DNHVXUHRYHQDQGEXOEDUHFRRO
WARNING
DO NOT step or sit on the door. Install the
Anti-Tip Bracket packed with range.
- The range could be tipped and injury might result
from spilled hot liquid, food, or the range itself.
- If the range is pulled away from the wall for
cleaning, service, or any other reason, ensure that
the Anti-Tip Device is properly reengaged when
the range is pushed back against the wall.
- 29 -
MAINTENANCE
Oven door
Use soap & water to thoroughly clean the top, sides, and
front of the oven door. Rinse well. You may use a glass
cleaner on the outside glass of the oven door. DO NOT
immerse the door in water. DO NOT spray or allow
water or the glass cleaner to enter the door vents.
DO NOT use oven cleaners, cleaning powders, or any harsh
abrasive cleaning materials on the outside of the oven door.
DO NOT clean the oven door gasket. The oven door gasket
is made of a woven material which is essential for a good
seal. Care should be taken not to rub, damage or remove this
gasket.
CLEANING THE GLASS COOKTOP
Normal Daily Use Cleaning
ONLY use Ceramic Cooktop Cleaner on the glass cooktop.
Other creams may not be as effective or they might damage
the surface with scratches or permanent staining.
To maintain and protect the surface of your glass cooktop,
follow these steps:
1. Before using the cooktop for the first time, clean it with
Ceramic Cooktop Cleaner. This helps protect the top and
makes cleanup easier.
2. Daily use of Ceramic Cooktop Cleaner will help keep the
cooktop looking new.
3. Shake the cleaning cream well. Apply a few drops of
Cleaner directly to the cooktop.
4. Use a paper towel clean the entire cooktop surface.
5. Rinse with clear water and use a dry cloth or paper towel
to remove all cleaning residue.
Do hand
clean door
Don’t hand
clean oven
door gasket
DO NOT heat the cooktop until it has been cleaned
thoroughly.
Note:
CAUTION
'2127XVHKDUVKDEUDVLYHFOHDQHUVRU
sharp metal scrapers to clean the oven
door glass since they can scratch the
surface.
- It may result in shattering of the glass.
CAUTION
'2127XVHVFUXESDGVRUDEUDVLYH
cleaning pads.
- They may damage your glass cooktop surface.
)RU\RXUVDIHW\SOHDVHZHDUDQRYHQPLWW
potholder while cleaning the hot cooking
surface.
ENGLISH
ENGLISH
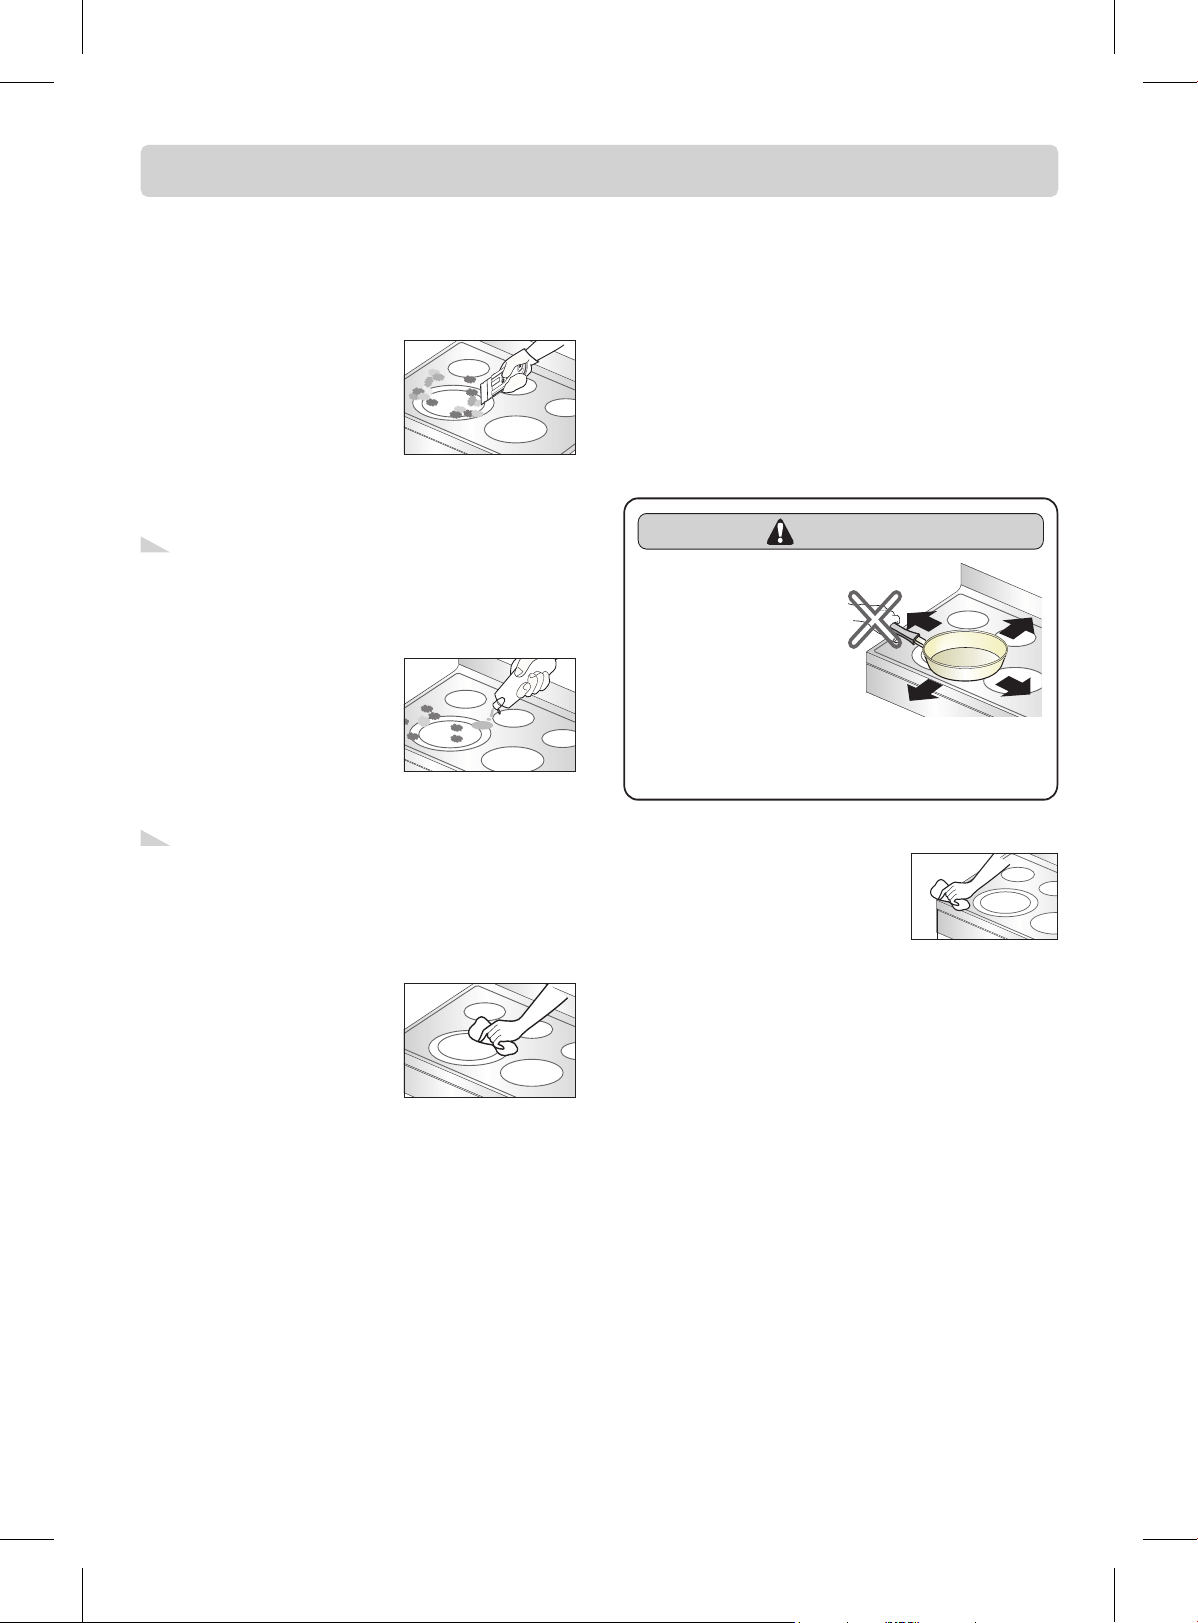
- 30 -
MAINTENANCE
Burned-On Residue
To clean the glass-ceramic
Step. 1
First remove any burnt-on deposits
or spilled food from your glass-
ceramic cooking surface with a
suitable metal razor scraper (similar
to scraping paint off of your
windowpanes in your home - it will
not damage the decorated cooking surface). Hold the
VFUDSHUDWDSSUR[LPDWHO\DÛDQJOHWRWKHFRRNWRS
Step. 2
When the cooking surface has
cooled down apply a few dabs
(about the size of a dime) of an
approved cleaner in each burner
area and work the cleaning cream
over the cooktop surface with a
damp paper towel as if you were cleaning a window.
Step. 3
As a final step, clean with clear
water and wipe the cooktop surface
with a clean, dry paper towel.
Important: If any sugar or food containing sugar (preserves,
ketchup, tomato sauce, jellies, fudge, candy, syrups,
chocolate, etc.), a plastic item or kitchen foil accidentally
melts on the hot surface of your cooktop, remove the
molten material IMMEDIATELY with a metal razor scraper
(it will not damage the decorated cooking surface) while
the cooking surface is still hot to avoid the risk of damage
to the glass-ceramic surface. For your safety please wear
an oven mitt potholder while cleaning the hot cooking
surface.
Metal Marks and Scratches
1. Be careful not to slide pots and pans across your cooktop.
It will leave metal markings on the cooktop surface.
These marks are removable using the Ceramic Cooktop
Cleaner with the Cleaning Pad for Ceramic Cooktops.
2. If pots with a thin overlay of aluminum or copper are
allowed to boil dry, the overlay may leave black
discoloration on the cooktop. This should be removed
immediately before heating again or the discoloration may
be permanent.
Cooktop Seal
To clean the cooktop seal around the
edges of the glass, lay a wet cloth on it
for a few minutes, then wipe clean with
nonabrasive cleaners.
CAUTION
Cookware with rough
or uneven bottoms
can mark or scratch
the cooktop surface.
'RQRWVOLGHPHWDO
or glass across the
cooktop surface.
'RQRWXVHFRRNZDUHZLWKDQ\GLrt build
up on bottom.
Do not use a dull or nicked blade. For your safety,
please wear an oven mitt potholder while using the
metal scraper.
Note:
Approved cleaner
Weiman CookTop Cleaning Cream (www.weiman.com)
Cerama Bryte (www.ceramabryte.com)
Hope’s Cooktop Cleaning Cream (www.camden-industrial.com)
Easy-Off 3 in 1 Glass Top Cleaner Spray (www.easyoff.us).
Note:

- 31 -
MAINTENANCE
REMOVING & REPLACING THE
LIFT-OFF OVEN DOOR
To remove the door:
Step. 1
Open the door fully.
Step. 2
Pull the hinge locks down
toward the door frame to
the unlocked position.
Step. 3
Firmly grasp both sides of the door at the top.
Step. 4
Close door to the door removal
position, which is approximately 5
degrees.
Step. 5
Lift door up and out until the hinge arm is clear of the slot.
To replace the door:
Step. 1
Firmly grasp both sides of the door at the top.
Step. 2
With the door at the
same angle as the
removal position, seat
the indentation of the
hinge arm into the
bottom edge of the
hinge slot. The notch in
the hinge arm must be
fully seated into the
bottom of the slot.
Step. 3
Open the door fully. If the door will not open fully, the
indentation is not seated correctly in the bottom edge of the
slot.
Step. 4
Push the hinge locks up against
the front frame of the oven cavity
to the locked position.
Step. 5
Close the oven door.
DOOR CARE INSTRUCTIONS
0RVWRYHQGRRUVFRQWDLQJODVVWKDWFDQEUHDN
Read the following recommendations:
1. Do not close the oven door until all the oven racks are
fully in place.
2. Do not hit the glass with pots, pans, or any other object.
3. Scratching, hitting, jarring or stressing the glass may
weaken its structure causing an increased risk of
breakage at a later time.
Slot
Hinge
lock
Lock
Unlock
about 5°
Hinge arm
Indentation
Bottom
edge of
slot
Hinge arm
Hinge lock
CAUTION
%HFDUHIXOZKHQUHPRYLQJDQGOLIWLQJWKH
door.
'2127OLIWWKHGRRUE\WKHKDQGOH
- The door is very heavy.
ENGLISH
ENGLISH
- 32 -
TROUBLESHOOTING
Possible cause / Solution
Poor installation. Place oven rack in center of oven. Place a level on the oven rack.
Adjust leveling legs at base of range until the oven rack is level.
%HVXUHIORRULVOHYHODQGLVVWURQJDQGVWDEOHHQRXJKWRDGHTXDWHO\VXSSRUWUDQJH.
,IIORRULVVDJJLQJRUVORSLQJFRQWDFWDFDUSHQWHUWRFRUUHFWWKHVLWXDWLRQ.
Kitchen cabinet alignment may make range appear unlevel. Be sure cabinets are square
and have sufficient room for range clearance.
Cabinets not square or are built in too tightly. Contact builder or installer to make appliance
accessible.
&DUSHWLQWHUIHUHVZLWKUDQJH3URYLGHVXIILFLHQWVSDFHVRUDQJHFDQEHOLIWHGRYHUFDUSHW.
Electronic control has detected the fault
condition. Press CLEAR/OFF to clear
the display and stop beeping.
Reprogram oven. If fault recurs, record
fault number. Press CLEAR/OFF and
contact a Service agent
Improper cookware being used.
- Use pans which are flat and match the diameter of the surface unit selected.
In some areas, the power (voltage) may be low.
- Cover pan with a lid until desired heat is obtained.
A fuse in your home may be blown or the circuit breaker tripped.
- Replace the fuse or reset the circuit breaker.
Cooktop controls improperly set.
- Check to see the correct control is set for the surface unit you are using.
7KLVLVQRUPDO7KHXQLWLVVWLOORQDQGKRW.
Food spillovers not cleaned before next use.
- See Cleaning the glass cooktop section.
Hot surface on a model with a light-colored cooktop.
- This is normal. The surface may appear discolored when it is hot. This is temporary and
will disappear as the glass cools.
This is normal.
- The element will cycle on and off to maintain the heat setting.
BEFORE CALLING FOR SERVICE
Before you call for service, review this list. It may save you time and expense. The list includes common occurrences that are not
the result of defective workmanship or materials in this appliance.
CODE
F-1
F-2
F-3
F-4
F-7
F-9
CAUSE
Shorted keypad
Door locking system don’t operate
Open oven sensor
Shorted oven sensor
No heating
Oven is too hot
Problem
Range is not level.
Cannot move appliance
easily.
Appliance must be
accessible for service.
Oven control beeps and
displays any F code error.
Surface units will not
maintain a rolling boil or
cooking is not fast
enough
Surface units do not work
properly
Surface unit stops
glowing when changed
to a lower setting
Areas of discoloration on
the cooktop
Frequent cycling on and
off of surface units
- 33 -
TROUBLESHOOTING
Possible cause / Solution
3OXJRQUDQJHLVQRWFRPSOHWHO\LQVHUWHGLQWKHHOHFWULFDORXWOHW
- Make sure electrical plug is plugged into a live, properly grounded outlet.
$IXVHLQ\RXUKRPHPD\EHEORZQRUWKHFLUFXLWEUHDNHUWULSSHG
- Replace the fuse or reset the circuit breaker.
2YHQFRQWUROVLPSURSHUO\VHW
- See the Using the oven section.
2YHQWRRKRW
- Allow the oven to cool to below locking temperature.
0DNHVXUHFRUGLVSOXJJHGFRUUHFWO\LQWRRXWOHW&KHFNFLUFXLWEUHDNHUV
6HUYLFHZLULQJLVQRWFRPSOHWH&RQWDFW\RXUDSSOLDQFH6HUYLFHUIRUDVVLVWDQFH
3RZHURXWDJH&KHFNKRXVHOLJKWVWREHVXUH&DOO\RXUORFDOHOHFWULFFRPSDQ\IRUVHUYLFH
7KH3)PHVVDJHZLOODSSHDUZKHQHYHUWKHUHKDVEHHQDSRZHULQWHUUXSWLRQWRWKHDSSOLDQFH
To clear the PF message press CLEAR/OFF control pad and be sure to reset the clock with
the correct time of day.
7RFOHDUWKH+6PHVVDJHSUHVV212))SDG
5HSODFHRUWLJKWHQEXOE6HHChanging Oven Light section in this Owner’s manual.
&RQWUROQRWVHWSURSHUO\)ROORZLQVWUXFWLRQVXQGHU6HWWLQJ2YHQ&RQWUROV
0DNHVXUHRYHQGRRULVRSHQHGWRbroil stop position.
0HDWWRRFORVHWRWKHHOHPHQW5HSRVLWLRQWKHUDFNWRSURYLGHSURSHUFOHDUDQFHEHWZHHQWKH
meat and the element. Preheat broil element for searing.
0HDWQRWSURSHUO\SUHSDUHG5HPRYHH[FHVVIDWIURPPHDW&XWUHPDLQLQJIDWW\HGJHVWR
prevent curling, but do not cut into lean.
,QVHUWRQEURLOHUSDQZURQJVLGHXSDQGJUHDVHQRWGUDLQLQJ$OZD\VSODFHJULGRQWKHEURLOHU
pan with ribs up and slots down to allow grease to drip into pan.
*UHDVHKDVEXLOWXSRQRYHQVXUIDFHV5HJXODUFOHDQLQJLVQHFHVVDU\ZKHQEURLOLQJIUHTXHQWO\
Old grease or food spatters cause excessive smoking.
2YHQFRQWUROVLPSURSHUO\VHW
- See the using the oven section.
5DFNSRVLWLRQLVLQFRUUHFWRUWKHUDFNLVQRWOHYHO
- See the using the oven section.
,QFRUUHFWFRRNZDUHRUFRRNZDUHRILPSURSHUVL]HEHLQJXVHG
- See the using the oven section.
2YHQVHQVRUQHHGVWREHDGMXVWHG
- See the adjusting your oven temperature in option section.
2YHQFRQWUROVLPSURSHUO\VHW
- Make sure you press the BROIL pad.
,PSURSHUUDFNSRVLWLRQEHLQJXVHG
- See the Broiling Guide, page 21.
&RRNZDUHQRWVXLWHGIRUEURLOLQJ
- For best results, use a pan designed for broiling.
Problem
Oven will not work
Appliance does not
operate.
Oven control displays
PF, HS message.
Oven light does not work.
Oven smokes
excessively during
broiling.
Food does not bake or
roast properly
Food does not broil
properly
ENGLISH
ENGLISH
- 34 -
TROUBLESHOOTING
Possible cause / Solution
$OXPLQXPIRLOXVHGRQWKHWKHEURLOLQJSDQDQGJULGKDVQRWEHHQILWWHGSURSHUO\DQGVOLW
as recommended.
- See the using the oven section.
,QVRPHDUHDVWKHSRZHUYROWDJHPD\EHORZ
- Preheat the broil element for 10 minutes.
- See the Broiling Guide, page 21.
2YHQ6HQVRUQHHGVWREHDGMXVWHG
- See the adjusting your oven Temperature in option section.
&RDUVHSDUWLFOHVVXFKDVVDOWRUVDQGEHWZHHQFRRNWRSDQGXWHQVLOVFDQFDXVHVFUDWFKHV
Be sure cooktop surface and bottoms of utensils are clean before usage. Small scratches
do not affect cooking and will become less visible with time.
&OHDQLQJPDWHULDOVQRWUHFRPPHQGHGIRUFHUDPLFJODVVFRRNWRSKDYHEHHQXVHG
See Cleaning The Glass Cooktop in the MAINTENANCE section, page 29.
&RRNZDUHZLWKURXJKERWWRPKDVEHHQXVHG8VHVPRRWKIODWERWWRPHGFRRNZDUH
6FUDSLQJRIPHWDOXWHQVLOVRQFRRNWRSVXUIDFH'RQRWVOLGHPHWDOXWHQVLOVRQFRRNWRS
surface. Use a ceramic-glass cooktop cleaning cream to remove the marks. See Cleaning
The Glass Cooktop in the MAINTENANCE section, page 29.
%RLORYHUVDUHFRRNHGRQWRVXUIDFH8VHWKHEODGHVFUDSHUWRUHPRYHVRLO6HHCleaning
The Glass Cooktop in the MAINTENANCE section, page 29.
0LQHUDOGHSRVLWVIURPZDWHUDQGIRRG5HPRYHXVLQJDFHUDPLFJODVVFRRNWRSFOHDQLQJ
cream. Use cookware with clean, dry bottoms.
7KHRYHQWHPSHUDWXUHLVWRRKLJKWRVHWDVHOIFOHDQRSHUDWLRQ
- Allow the range to cool and reset the controls.
2YHQFRQWUROVLPSURSHUO\VHW
- See the using the self-cleaning oven section.
$6HOI&OHDQF\FOHFDQQRWEHVWDUWHGLI2YHQ/RFNRXWIHDWXUHLVDFWLYHRUUDGLDQWVXUIDFH
remains ON.
7KLVLVWKHVRXQGRIWKHPHWDOKHDWLQJDQGFRROLQJGXULQJERWKWKHFRRNLQJDQGFOHDQLQJ
functions.
- This is normal.
([FHVVLYHVRLO
- Press the CLEAR/OFF pad. Open the windows to rid the room of smoke. Wait until the
Self Clean Mode is cancelled. Wipe up the excess soil and reset the clean .
2YHQLVWRRKRW
- Allow the oven to cool below locking temperature.
2YHQFRQWUROVQRWSURSHUO\VHW
- See the Self-Clean section, page 26.
2YHQZDVKHDYLO\VRLOHG
- Clean up heavy spillovers before starting the clean cycle. Heavily soiled ovens may need
to self-clean again or for a longer period of time.
Problem
Food does not broil
properly
Oven temperature too hot
or too cold
Scratches or abrasions on
cooktop surface
Metal marks
Brown streaks or specks
Areas of discoloration
with metallic sheen
Oven will not self-clean
“Crackling” or “popping”
sound
Excessive smoking during
a self clean cycle
Oven door do not open
after a self clean cycle
Oven not clean after a self
clean cycle
- 35 -
TROUBLESHOOTING
Possible cause / Solution
7KHVHOIFOHDQF\FOHKDVEHHQVHOHFWHGEXWWKHGRRULVQRWFORVHG
- Close the oven door.
7KHRYHQGRRULVORFNHGEHFDXVHWKHWHPSHUDWXUHLQVLGHWKHRYHQKDVQRWGURSSHGEHORZ
the locking temperature.
- Press the CLEAR/OFF pad. Allow the oven to cool.
:KHQXVLQJWKHFRQYHFWLRQIHDWXUHLWLVQRUPDOWRVHHVWHDPFRPLQJRXWRIWKHRYHQYHQW
As the number of racks or amount of food being cooked increases, the amount of visible
steam will increase.
- This is normal.
7KLVLVQRUPDOLQDQHZRYHQDQGZLOOGLVDSSHDULQWLPH
- To speed the process, set a self-clean cycle for a minimum of 3 hours.
See the Self-Clean section, page 26.
$FRQYHFWLRQIDQPD\DXWRPDWLFDOO\WXUQRQDQGRII
- This is normal.
7KHVKLQ\VLOYHUFRORUHGUDFNVZHUHFOHDQHGLQDVHOIFOHDQF\FOH
- Apply a small amount of vegetable oil to a paper towel and wipe the edges of the oven
racks with the paper towel.
&RQYHFWLRQIDQVWRSVGXULQJDFRQYHFWLRQEDNHF\FOH
- This is normal and is done to allow for more even heating during the cycle.
This is not a failure of the range and should be considered normal operation.
Problem
CLEAN flashes in the
display
DOOR LOCKED light and
icon are on when you
want to cook
Steam from the vent
Burning or oily odor
emitting from the vent
Fan noise
Oven racks are difficult to
slide
Convection Fan stops
ENGLISH
ENGLISH
- 36 -
LG ELECTRIC OVEN LIMITED WARRANTY – USA
LG Electronics Inc. will repair or replace your product, at LG’s option, if it proves to be defective in material or
workmanship under normal use, during the warranty period set forth below, effective from the date of original consumer
purchase of the product. This limited warranty is good only to the original purchaser of the product and effective only
when used in U.S.A.
THIS WARRANTY IS IN LIEU OF ANY OTHER WARRANTIES, EXPRESS OR IMPLIED, INCLUDING
WITHOUT LIMITATION, ANY WARRANTY OF MERCHANTABILITY OR FITNESS FOR A PARTICULAR
PURPOSE. TO THE EXTENT ANY IMPLIED WARRANTY IS REQUIRED BY LAW, IT IS LIMITED IN
DURATION TO THE EXPRESS WARRANTY PERIOD ABOVE. LG WILL NOT BE LIABLE FOR ANY
CONSEQUENTIAL, INDIRECT, OR INCIDENTAL DAMAGES OF ANY KIND, INCLUDING LOST
REVENUES OR PROFITS, IN CONNECTION WITH THE PRODUCT. SOME STATES DO NOT ALLOW
LIMITATION ON HOW LONG AN IMPLIED WARRANTY LASTS OR THE EXCLUSION OF INCIDENTAL
OR CONSEQUENTIAL DAMAGES, SO THE ABOVE LIMITATIONS OR EXCLUSIONS MAY NOT APPLY TO
YOU.
THIS LIMITED WARRANTY DOES NOT APPLY TO:
1. Service calls to correct the installation of your appliance, to instruct you how to use your appliance, to replace house
fuses or correct house wiring, or to replace owner-accessible light bulbs.
2. Repairs when your appliance is used in other than normal, single-family household use.
3. Pickup and delivery. Your appliance is designed to be repairable in the home.
4. Damage resulting from accident, alteration, misuse, abuse, fire, flood, improper installation, acts of God, or use of
products not approved by LG Corporation.
5. Repairs to ceramic glass cooktop or other surfaces if they have not been cared for as recommended in the Owner's
manual.
6. Repairs to parts or systems resulting from unauthorized modifications made to the appliance.
7. Replacement parts or repair labor costs for units operated outside the united states.
8. Any labor costs during the limited warranty period.
This warranty is extended to the original purchaser for products purchased for home use within the USA.
In Alaska, the warranty excludes the cost of shipping or service calls to your home.
Some states do not allow the exclusion or limitation of incidental or consequential damages, so this exclusion or limitation
may not apply to you. This warranty gives you specific legal rights, and you may also have other rights which vary from
states to states. To know what your legal rights are, consult your local or state consumer affairs or your state’s Attorney
General.
CUSTOMER ASSISTANCE INFORMATION:
WARRANTY PERIOD:
One Year
From the date of the
original purchase
Five Years
From the date of the
original purchase
HOW SERVICE IS HANDLED:
Any part of the range which fails due to a defect in materials or workmanship. During this
full one-year warranty, LG will also provide, free of charge, all labor and in-home service
to replace the defective part.
A replacement glass cooktop if it should crack due to thermal shock and crack at the
rubber seal between the glass cooktop and the porcelain edge.
A replacement radiant surface unit if it should burn out.
During this limited additional four-year warranty, you will be responsible for any labor or
in-home service.
To Prove Warranty Coverage
Retain your Sales Receipt to prove date of purchase.
A copy of your Sales Receipt must be submitted at the time warranty
service is provided.
To Obtain Nearest Authorized
Service Center or Sales Dealer, or to
Obtain Product, Customer, or
Service Assistance
Call 1-800-243-0000 (Phone answered 24 hours - 365 days a year) and
choose the appropriate prompt from the menu; or visit our website at:
http://us.lgservice.com.

MANUAL DEL PROPIETARIO
ESTUFA ELÉCTRICA
Lea este manual con atención antes de utilizar el
equipo y guárdelo para futuras consultas.
LRE30453SW
LRE30453SB
LRE30453ST
P/No.: MFL57206002
www.lg.com
ESPAÑOL

- 2 -
ÍNDICE DE MATERIAS
SEGURIDAD................................................................3-7
- Instrucciones de seguridad muy importantes..........3-7
COCCIÓN CON CONTROLES DE SUPERFICIE .......8-12
- Mensajes PF o HS...................................................8
- Ubicaciones de los elementos rde superficie radiantes
y sus controles ...........................................................8
- Ajuste de los controles de superficie.......................9
- Cómo funciona la zona de calentamiento ..............10
- Consejos para la protección de la superficie lisa....11
- Acerca de los utensilios de cocina .........................12
INFORMACIÓN ...........................................................13-14
-
Piezas y características
.........................................13
-
Características del panel de control
...........................14
OPERACIÓN ................................................................15-24
- Cómo ajustar el reloj ...............................................15
- Ajustes máximos y mínimos del botón de control.....15
- Cómo ajustar el temporizador on/off.......................15
- Ajuste de la característica oven lockout
(bloqueo del horno) ................................................16
- Opciones................................................................16-17
Cómo cambiar el modo horario del reloj (12hr., 24hr.)
Ajuste de las unidades de temperatura.
(Fahrenheit o Centígrados)
Cómo ajustar el volumen de los pitidos
Ajuste del encendido o apagado de la lámpara de
alarma de precalentamiento
Ajuste de las funciones de conversión automática de la
convección
Sírvase anotar el número de modelo y el número de
serie de esta unidad para consultarlo en el futuro. Le
sugerimos también que anote todos los detalles de
cualquier contacto con LG (LG Electronics USA, Inc.) en
relación con esta unidad.
Para comprobar su compra, grape aquí su factura.
Número de modelo:
Número de serie:
Distribuidor:
Número de teléfono del distribuidor:
Relaciones con los clientes
LG Electronics U.S.A., Inc.
Service Division Bldg. #3
201 James Record Rd.
Huntsville, AL 35824-0126
Muchas gracias por su compra de un horno eléctrico LG.
- Ajuste del termostato..............................................17
- Ajuste de bake .......................................................18
- Ajuste de timed bake (horneo cronometrado)........19
- Ajuste de delayed timed bake (horneo con
tiempo de retraso)..................................................20
- Cómo fijar broil.......................................................20
- Guía del asado sugerida
.......................................21
- Cómo ajustar convection bake
(cocción por
convección) ........................................................22
- Cómo ajustar convection
roast (asado por
convección) .........................................................23
-
Ajuste de la característica cook & warm.................24
- Cómo encender o apagar la lámpara del horno......24
- Ajuste de la característica proof (fermentación)......24
LIMPIEZA AUTOMÁTICA ...........................................25-26
MANTENIMIENTO.......................................................27-31
- Cómo desmontar y reponer el cajón de
calentamiento..........................................................27
- Respiradero del horno............................................27
- Cuidados y limpieza................................................28-30
- Cómo desmontar y reponer la puerta removible
del horno .................................................................31
LOCALIZACIÓN Y REPARACIÓN DE AVERÍAS .......32-35
- Antes de solicitar servicio ........................................32-35
GARANTÍA ...................................................................36

- 3 -
SEGURIDAD
I
I
N
N
S
S
T
T
R
R
U
U
C
C
C
C
I
I
O
O
N
N
E
E
S
S
D
D
E
E
S
S
E
E
G
G
U
U
R
R
I
I
D
D
A
A
D
D
M
M
U
U
Y
Y
I
I
M
M
P
P
O
O
R
R
T
T
A
A
N
N
T
T
E
E
S
S
Lea y siga cuidadosamente todas las instrucciones antes de usar su horno para prevenir riesgos de incendios, sacudidas eléctricas,
lesiones personales y otros daños cuando use la estufa. El ámbito de esta guía impide cubrir todas las condiciones posibles que podrían
suscitarse. Siempre consulte a su agente de servicio o al fabricante si se le presentan problemas que no pueda comprender
Este símbolo le advierte de riesgos o prácticas inseguras que podrían causar la muerte o
lesiones corporales muy graves.
Este es el símbolo de alerta de seguridad. Este símbolo lo alerta sobre peligros potenciales que pueden matarlo a
lastimarlo a usted o a otros. Todos los mensajes de seguridad se encontrarán después de los símbolos de alerta de
seguridad y de las palabras "ADVERTENCIA" O "PRECAUCIÓN". Estas palabras significan:
Este símbolo le advierte de riesgos o prácticas inseguras que podrían causar daños fisicos o
daños materiales.
ADVERTENCIA
PRECAUCIÓN
• Cerciórese de que el artefacto fue instalado y conectado a tierra
correctamente por un técnico calificado
• No repare o reponga alguna pieza del artefacto salvo que se
recomiende hacerlo específicamente en este manual.
• Todas los demás reparaciones deberán ser ejecutadas por un técnico
calificado.
• Siempre desconecte la energía al artefacto antes de efectuar servicios
desenchufándolo, quitando el fusible o apagando el disyuntor.
• Para reducir el riesgo de volcaduras de la estufa, ésta deberá
asegurarse con di
spositivos anti-volcaduras instalados debidamente.
• Para verificar que el soporte anti-volcaduras esté bien instalado:
Tome el extremo superior trasero de la protección trasera de la cocina
y con cuidado trate de volcarla hacia adelante. Verifique que los
dispositivos anti-volcaduras estén accionados.
• Cajón de calentamiento o cajón de almacenamiento: Quite el cajón y
inspeccione en forma visual que la pata niveladora trasera esté bien
colocada en el soporte anti-volcaduras.
• Consulte el manual de instalación si desea detalles de
la instalación
correcta de la ménsula anti-volcaduras.
UNIDADES DE SUPERFICIE DE
COCCIÓN
• Siempre utilice cacerolas del tamaño adecuado.
Este artefacto viene equipado con una o más unidades de
superficies de cocción de distintos tamaños. Elija utensilios
con fondo plano y suficientemente grandes para cubrir
todo el elemento de calefacción de la unidad de superficie.
Si se utilizan utensilios más pequeños, se podría exponer
una parte del elemento de calefacción al contacto directo y
podría resultar en un incendio de la ropa. Una proporción
adecuada entre el utensilio y el quemador mejorará la
eficiencia.
• Nunca deje desatendidas las unidades de
superficie ajustadas a temperaturas elevadas. Los
derrames pueden causar humaredas y los desbordes
podrían encenderse.
• Utensilios de cocina vidriados. Solamente ciertos
tipos de utensilios de vidrio, vidrio/cerámica, cerámica,
barro y otro tipo de vidriado son adecuados para cocinar en
la superficie de cocción sin romperse debido a cambios
súbitos de temperatura.
• Todos los mangos de los utensilios deberán estar
orientados hacia el interior y nunca deberán
extenderse sobre las unidades de superficie
adyacentes. Para reducir el riesgo de quemaduras,
incendio de materiales inflamables y desbordes debidos a
contactos no intencionales con el utensilio, el mango del
utensilio deberá estar colocado de tal forma que esté
orientado hacia adentro y nunca deberá extenderse sobre
las unidades de superficie adyacentes.
• Cerciórese que sabe cuales son los botones que encienden
cada una de las unidades de superficie. Siempre cerciórese
de haber encendido la unidad de superficie
correspondiente.
ESPAÑOL
provocar su muerte.
Un niño o un adulto pueden volcar el aparato y
Verifique que los corchetes anti-vuelco han sido
instalados.
Asegurese que los corchetes anti-vuelcos estén
ajustados cuando mueva el aparato.
No haga funcionar el aparato sin que los corchetes
anti-vuelco estén ajusados.
No seguir estas instrucciones puede ser causa de
muerte o graves quemaduras en niños o adultos.
posterior está introducido en el corchete, coja la
esquina superior posterior del aparato e
inclinela con cuidado hacia adelante.
A fin de examinar visualmente que el tubo nivelador
Ménsula
Anti-vuelco
Tubo
Nivelador.
Usted puede descargar el manual de usuario de la siguiente direccion web http://www.lg.com.
ESPAÑOL
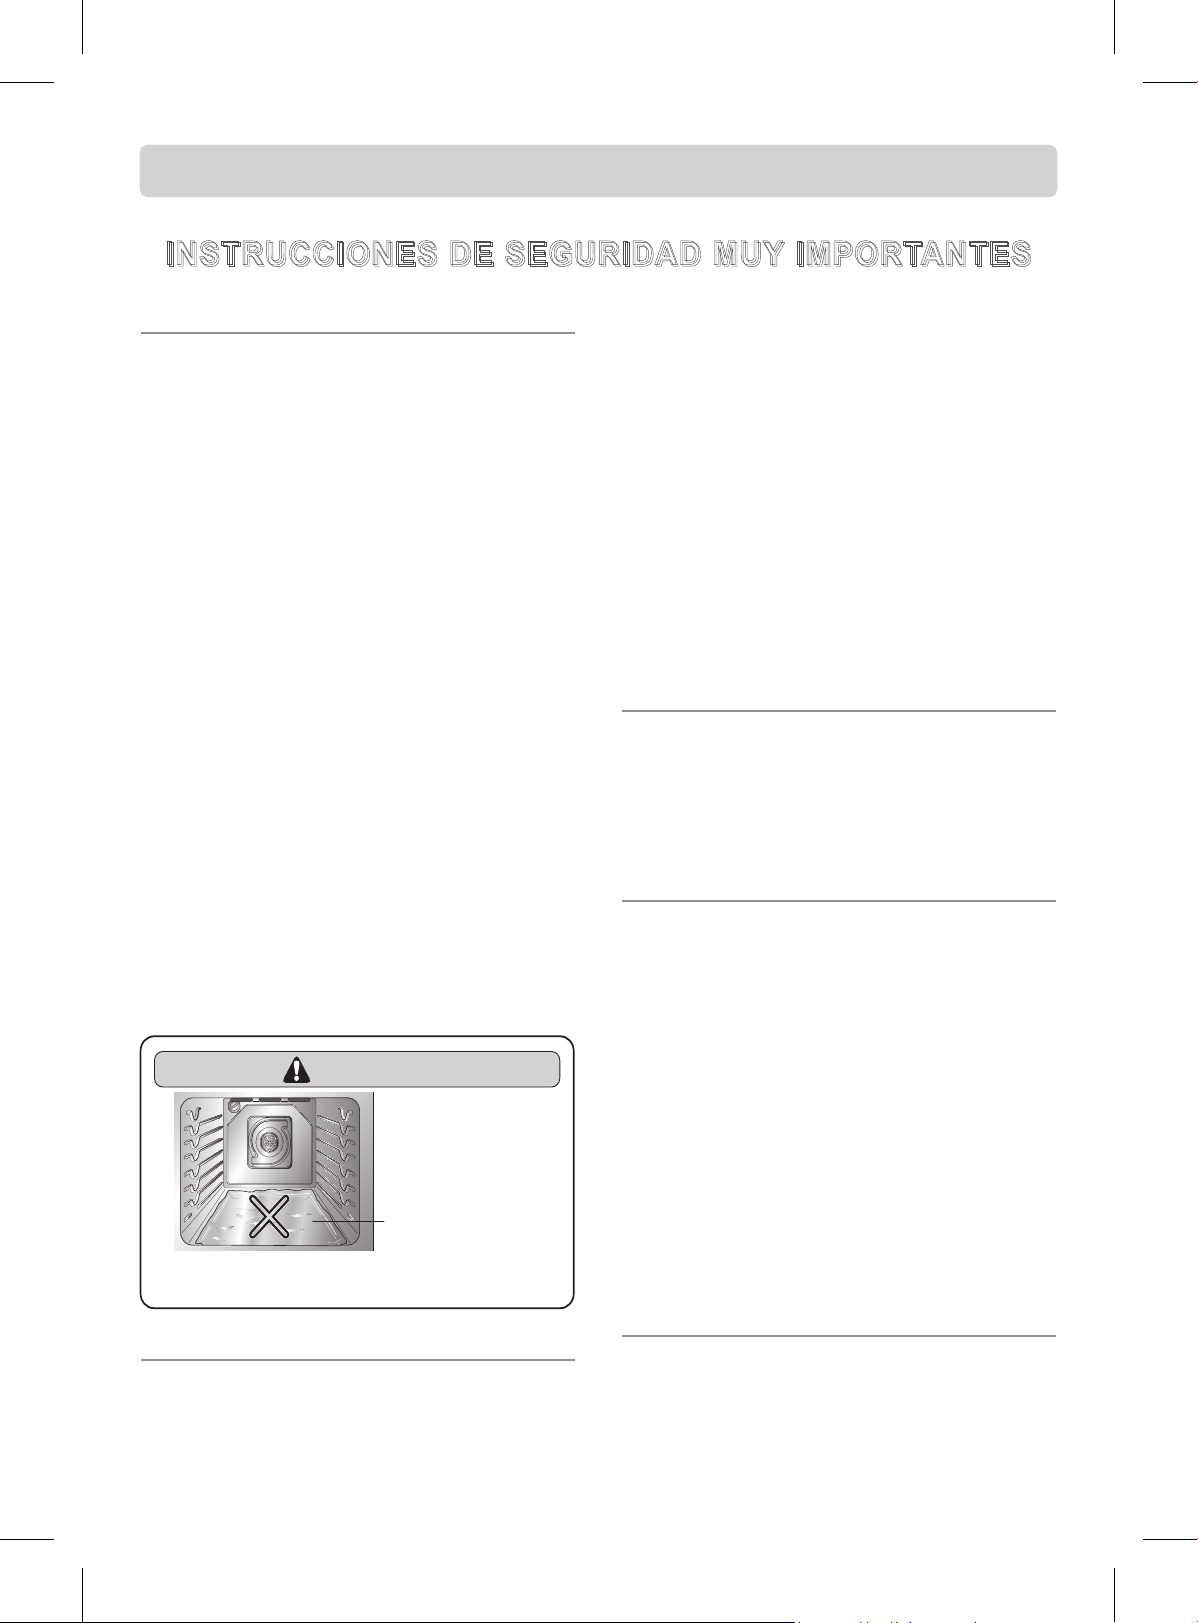
- 4 -
SEGURIDAD
I
I
N
N
S
S
T
T
R
R
U
U
C
C
C
C
I
I
O
O
N
N
E
E
S
S
D
D
E
E
S
S
E
E
G
G
U
U
R
R
I
I
D
D
A
A
D
D
M
M
U
U
Y
Y
I
I
M
M
P
P
O
O
R
R
T
T
A
A
N
N
T
T
E
E
S
S
HORNO
NO TOQUE LOS ELEMENTOS CALEFACTORES O LAS
SUPERFICIES INTERIORES DEL HORNO.
A pesar de aparecer oscuros, los elementos calefactores podrian estar
calientes. Las superficies interiores de un horno se calientan tanto
que pueden causar quemaduras. durante el uso y posteriormente, no
lo toque o permita que ropa u otros materiales inflamables toquen
los elementos calefactores o las superficies interiores del horno hasta
que hayan tenido tiempo de enfriarse. Hay otras superficies del
artefacto que podrian calentarse lo suficiente como para causar
quemaduras. Entre estas superficies se encuentra la parilla y las áreas
frente a la parrilla, las aberturas de ventilación del horno y superficies
adyacentes, las puertas y las ventanas de las puertas del horno.
Tenga cuidado al abrir la puerta. Permita que el aire o vapor
caliente se escape antes de retirar o colocar alimentos en el horno.
No caliente recipientes de alimentos cerrados.
La presión acumulada podría hacer explotar al recipiente y
causar lesiones.
Forros de protección. Nunca use papel aluminio para forrar
el fondo del horno. La instalación inadecuada de estos forros
podría causar sacudidas eléctricas o incendios.
Despeje siempre los conductos de ventilación.
El respiradero del horno está encima de la unidad de superficie
posterior izquierda. Esta zona podría alentarse mientras se usa
el horno. Nunca obstruya el respiradero ni coloque sobre el
mismo artículos de plástico o sensibles al calor.
Colocación de las rejillas del horno. Siempre coloque las
rejillas del horno en el sitio deseado cuando el horno esté frío. Si
es necesario mover la rejilla con el horno caliente, no permita
que las agarraderas toquen el elemento calefactor del horno.
No permita el contacto entre el papel aluminio o de la sonda de
carne y los elementos calefactores.
HORNOS DE LIMPIEZA AUTOMÁTICA
Nunca limpie la empaquetadura del horno. La
empaquetadura del horno es esencial para tener un cierre correcto.
Debe tener cuidado de no frotar, dañar o mover la empaquetadura.
Nunca use limpiadores de hornos. Nunca use limpiadores
de hornos comerciales o ningún tipo de recubrimientos
protectivos del forro en ninguna parte del horno.
Solamente las piezas enumeradas en este manual
pueden limpiarse con el ciclo de limpieza automática.
Antes de la limpieza automática del horno retire la bandeja del
asador y todos los utensilios con alimentos del interior del mismo.
Antes de la limpieza automática del horno. Retire la
bandeja del asador y otros utensilios.
Nunca tenga pájaros mascota en la cocina. Los pájaros
son muy sensibles a los vapores que se liberan durante un ciclo
de limpieza automática del horno. Esos vapores pueden ser
dañinos o fatales para los pájaros. Lleve a los pájaros a una
habitación bien ventilada.
Instrucción importante. Si se enciende el código F del modo
de limpieza automática, o se escuchan tres pitidos, el horno está
funcionando mal en el modo de limpieza automática. Apague el
artefacto o desenchúfelo del tomacorrientes y haga que lo revise
un técnico calificado
CAMPANAS DE VENTILACIÓN:
Limpie frecuentemente las campanas de ventilación.
Nunca permita que se acumule la grasa en la campana o en el filtro.
6LHVtá cocinando debajo de la campana con fuego
abierto, encienda el ventilador.
SUPERFICIES DE COCCIÓN DE
VIDRIO O CERÁMICA
NO TOQUE LAS UNIDADES DE SUPERFICIE O LAS
ZONAS CERCANAS. Las unidades de superficie pueden estar
calientes aunque aparezcan de color oscuro. Las zonas cercanas
a las unidades de superficie se calientan tanto que pueden
causar quemaduras. Nunca toque o permita que la ropa u otros
materiales inflamables toquen las unidades de superficie o las
zonas cercanas hasta que las mismas hayan tenido tiempo
suficiente para enfriarse. Las áreas incluyen: Anafe, área por
encima de la puerta del horno.
Nunca cocine en una superficie de cocción rota. Si
llegara a romperse la superficie de cocción. los líquidos de
limpieza y los derrames podrían penetrar la superficie de
cocción rota y crear el riesgo de sacudidas eléctricas. Consulte
inmediatamente a un técnico calificado.
Tenga cuidado al limpiar la superficie de cocción. No
utilice esponjas ni trapos para limpiar derrames en una
superficie caliente. Utilice un raspador metálico adecuado.
FREIDORAS:
Tenga mucho cuidado al mover el recipiente de grasa o al
desechar la grasa caliente.
WARNING
1O coloque utensilios ni papel de aluminio
directamente en la parte inferior del horno.
papel de aluminio
- 5 -
SEGURIDAD
I
I
N
N
S
S
T
T
R
R
U
U
C
C
C
C
I
I
O
O
N
N
E
E
S
S
D
D
E
E
S
S
E
E
G
G
U
U
R
R
I
I
D
D
A
A
D
D
M
M
U
U
Y
Y
I
I
M
M
P
P
O
O
R
R
T
T
A
A
N
N
T
T
E
E
S
S
ADVERTENCIA
• NO se pare o se siente en la puerta. Instale el soporte anti-volcaduras incluido con la cocina.
- La cocina puede inclinarse y pueden provocarse lesiones debido al derrame de líquido o alimentos calientes o la cocina misma.
- Cuando se jala la estufa de la pared por motivos de limpieza, servicio u otra razón, asegúrese de volver a embonar
correctamente el Dispositivo Antivolcadura al volver a empujar la estufacontra la pared.
• Antes de desmontar el cajón de calentamiento, apague (OFF) la alimentación.
- No hacerlo puede provocar lesiones personales graves, la muerte o una descarga eléctrica.
• Antes de reemplazar la bombilla de la lámpara de su horno, DESCONECTE la alimentación de
energía a la estufa en el panel de fusibles o disyuntores principal.
- No hacerlo puede provocar lesiones personales graves, la muerte o una descarga eléctrica.
• Cerciórese de que tanto el horno como la bombilla se han enfriado.
• Los niños siempre deben estar lejos de la cocina.
- Las piezas accesibles pueden calentarse cuando la parrilla está en uso.
PRECAUCIÓN
• Nunca guarde artículos que podrían interesarle a los niños en los gabinetes encima de una
estufa o en el protector posterior de una estufa.
- Si los niños trepan por la estufa para alcanzar algún artículo, podrían lesionarse muy seriamente.
• No use la superficie de cocción de vidrio como tabla de corte.
• Nunca coloque o guarde en la superficie de cocción de vidrio artículos que podrían derretirse o
incendiarse, aunque no se esté utilizando.
• Siempre encienda las unidades de superficie solamente después de haber puesto el utensilio
de cocina encima de la misma.
• Nunca guarde artículos pesados encima de la superficie de cocción, ya que podrían caerse y
dañar la superficie.
• Nunca ponga papel aluminio o artículos de plástico como serían saleros y pimenteros, porta
cucharas o envolturas de plástico mientras esté usando la estufa.
-
El aire caliente proveniente del respiradero podría derretir los plásticos o encender materiales inflamables.
• Siempre cerciórese de haber encendido la unidad de superficie correspondiente.
• Nunca cocine directamente sobre el vidrio. Use siempre utensilios de cocina.
• Coloque siempre la bandeja en el centro de la unidad de superficie sobre la que está cocinando.
• NO deje a los niños solos.
- No hay que dejar a los niños solos o desatendidos en el área de uso de la cocina. Nunca debe permitirse que los niños se
sienten o se paren en cualquier parte de este artefacto.
• NUNCA use su a
r
tefacto para calentar la habitación.
• NO utilice agua en incendios de grasa.
- Apague el horno para evitar la dispersión de las llamas. Extinga el fuego cerrando la puerta del horno o utilizando un
químico seco, bicarbonato de sodio o extintores de espuma.
• Use solo agarraderas secas.
- Las agarraderas húmedas o mojadas en superficies calientes pueden provocar quemaduras de vapor. No permita que la
agarradera toque los elementos de calentamiento. No use una toalla u otra tela gruesa.
ESPAÑOL
• ADVERTENCIA:
- Este producto contiene quimicos conocidos por el Estado de California de causar cáncer. Lávese las manos despues de
manipuilar
ESPAÑOL
ESPAÑOL
- 6 -
SEGURIDAD
PRECAUCIÓN
1RDOPDFHQHHOHPHQWRVGHQWURRVREUHHODrtefacto.
- Los materiales inflamables no deben almacenarse dentro o cerca de elementos de superficie.
$VHJ~UHVHGHTXLWDUWRGRVORVPDWHULDOHVGHHPEDODMHGHODrtefacto antes de ponerlo en
funcionamiento.
- Mantenga los plásticos, ropa y papel lejos de las piezas del artefacto que pueden calentarse.
Utilice ropa adecuada.
- Nunca debe utilizar ropa suelta o que cuelgue mientras utiliza este artefacto.
1XQFDGHMHGHVDWHQGLGDVODVXQLGDGHVGHVXSHrficie ajustadas a temperaturas elevadas.
- Los derrames pueden causar humaredas y los desbordes podrían encenderse.
6LHPSUHDSDJXHODVXQLGDGHVGHVXSHrficie antes de retirar los utensilios de cocina.
1RXVHSHOtFXODGHSOiVWLFRSDUDFXEULUORVDOLPHQWRV
- El plástico puede derretirse sobre la superficie y es muy difícil desprenderlo
1RWRTXHODVXQLGDGHVGHVXSHrficie hasta que se hayan enfriado.
(VSRVLEOHTXHORVHOHPHQWRVGHVXSHrficie sigan estando calientes y se produzcan quemaduras
si se toca la superficie de vidrio antes de que ésta se haya enfriado lo suficiente.
/LPSLHORVGHUUDPHVLQPHGLDWDPHQWHSDUDHYLWDUXQWUDEDMRGHOLPSLH]DSHVDGR
posteriormente.
6LVHKDSURYLVWRHVSDFLRGHDOPDFHQDPLHQWRGLUHFWDPHQWHHQFLPDGHODVXSHrficie de cocción,
procure guardar solamente los artículos de uso infrecuente y que puedan guardarse sin riesgo
en una zona sujeta a temperaturas altas. Esa temperatura podría ser peligrosa para artículos
tales como líquidos volátiles, limpiadores o atomizadores de aerosol.
1RWRTXHODVXQLGDGHVGHVXSHrficie hasta que se hayan enfriado.
- Es posible que los elementos de superficie sigan estando calientes y se pueden producir quemaduras.
181&$GHMHDOLPHQWRVVLQDWHQFLyQHQODVFRQILJXUDFLRQHVDOWDRPHGLD
- Los alimentos que hierven y se derraman pueden provocar humo y derrames grasosos que pueden prenderse fuego.
8WLOLFHVRODPHQWHORVXWHQVLOLRVGHFRFLQD\ORVSODWRVUHFRPHQGDGRVFRPRVHJXURVSDUD
usarse en el horno y en las superficies de cocción..
&XDQGRFDOLHQWHDOLPHQWRVQRXWLOLFHUHFLSLHQWHVTXHVHFLHUUHQKHUPpWLFDPHQWH'HMHXQD
ventilación para que salga el aire caliente.
1RFDOLHQWHORVDOLPHQWRVHQOD]RQDGHFDOHQWDPLHQWRSRUPiVGHKRUDV
- Si coloca en la zona de calentamiento alimentos fríos o no cocinados, se corre el riesgo de enfermedades propagadas por
los alimentos.
6LHPSUHXWLOLFHDJDUUDGHUDVRJXDQWHVGHFRFLQDFXDQGRTXLWDDOLPHQWRVGHOFDMyQGH
calentamiento o centro de calentamiento, ya que los recipientes y los platos estarán calientes.
- Usted puede quemarse, ya que los recipientes y los platos estarán calientes.
6LHPSUHDFRPRGHORVDQDTXHOHVGHOKRUQRFXDQGRHOKRUQRHVWpIUtR
I
I
N
N
S
S
T
T
R
R
U
U
C
C
C
C
I
I
O
O
N
N
E
E
S
S
D
D
E
E
S
S
E
E
G
G
U
U
R
R
I
I
D
D
A
A
D
D
M
M
U
U
Y
Y
I
I
M
M
P
P
O
O
R
R
T
T
A
A
N
N
T
T
E
E
S
S
6LHPSUHGHVFRQHFWHODDOLPHQWDFLRQGHOFDMRQGHFDOHQWDPLHQWRDQWHVGHLQWHQWDUUHPRYHUOR
- 7 -
SEGURIDAD
PRECAUCIÓN
8VHODVFDUDFWHUtVWLFDV7,0('%$.(R'(/AYED TIMED BAKE con precaución. Use el
temporizador automático cuando cocine carnes curadas o congeladas o la mayoría de las
frutas y verduras. Los alimentos que pueden echarse a perder fácilmente, como sería leche,
huevos, pescado, carnes o aves deberían enfriarse previamente en el refrigerador. Aunque se
hayan enfriado, no deberán dejarse en el horno por más de 1 hora antes de iniciar la cocción, y
una vez que ésta haya concluido, deberán retirarse rápidamente.
- . El consumo de alimentos echados a perder podría causar intoxicación alimenticia.
(QHOFDVRGHTXHRFXUULHUDXQLQFHQGLRGHMHODSXHUWDGHOKRUQRFHUUDGD\DSiJXHOR6LHO
LQFHQGLRFRQWLQ~DDUURMHELFDUERQDWRGHVRGDVREUHHOIXHJRRXVHXQH[WLQWRUGHLQFHQGLRV
181&$XVHDJXDRKDULQDSDUDLQWHQWDUDSDJDUHOLQFHQGLR
- La harina podría ocasionar una explosión y el agua podría permitir que un incendio de grasa se extienda y cause lesiones
personales.
12XWLOLFHODSDUULOODGHURVWL]DGRFXDQGRDVH
- Hacerlo puede evitar el contacto con el elemento de asado y los derrames de grasa.
1O deje solos a los niños cerca del artefacto.
- Durante el ciclo de limpieza automática, la parte externa de la estufa puede calentarse demasiado y no podrá tocarla.
12IRUUHFRQSDSHOGHDOXPLQLRODVSDUHGHVRHOIRQGRGHGHOKRUQRDQDTXHOHVRFXDOTXLHURWUD
parte del horno.
- Si lo hace, se altera la distribución del calor, se obtienen resultados deficientes al hornear y se puede dañar
permanentemente el interior del horno (el papel de aluminio se derrite sobre la superficie interior del horno).
12IXHUFHODSXHrta del horno para abrirla.
- El hacerlo puede dañar el sistema de bloqueo automático de la puerta del horno. Tenga cuidado al abrir la puerta del horno
después del ciclo de limpieza automática. Póngase a un lado de la puerta del horno para permitir que se escape el vapor o
el aire caliente. El horno puede estar MUY CALIENTE.
1O use estropajos de fibra de acero.
- rayan la superficie.
12XWLOLFHOLPSLDGRUHVDEUDVLYRVIXHUWHVRUDVSDGRUHVGHPHWDODILODGRVSDUDOLPSLDUHOYLGULR
de la puerta del horno ya que pueden rayar la superficie.
- Puede provocar la rotura del vidrio.
12XWLOLFHHVSRQMDVDEUDVLYDVRSDxRVGHOLPSLH]DPHWiOLFRV
- Pueden dañar la superficie de vidrio del anafe.
&RQFXLGDGRYHULILTXHODVEDVHVGHORVUHFLSLHQWHVSDUDYHULILFDUTXHQRVHDQiVSHUDV
- Podrían rayar el anafe.
Tenga cuidado al desmontar y levantar la puerta.
181&$OHYDQWHODSXHrta usando la agarradera.
- La puerta es muy pesada.
(OKRUQRGHEHDSDJDUVHDQWHVGHTXLWDUODSURWHFFLyQGHOYHQWLODGRUSDUDOLPSLH]DODSURWHFFLyQ
debe colocarse de acuerdo con las instrucciones después de la limpieza.
I
I
N
N
S
S
T
T
R
R
U
U
C
C
C
C
I
I
O
O
N
N
E
E
S
S
D
D
E
E
S
S
E
E
G
G
U
U
R
R
I
I
D
D
A
A
D
D
M
M
U
U
Y
Y
I
I
M
M
P
P
O
O
R
R
T
T
A
A
N
N
T
T
E
E
S
S
ESPAÑOL
ESPAÑOL
ESPAÑOL
- 8 -
COCCIÓN CON CONTROLES DE SUPERFICIE
UBICACIONES DE LOS
ELEMENTOS DE SUPERFICIE
RADIANTES Y SUS
CONTROLES
Los elementos de superficie radiantes están ubicados en la
superficie de cocción como se indica a continuación.
La ubicación de las teclas de control de los elementos
radiantes corresponde a los elementos de la superficie en la
superficie de cocción como se muestra a continuación:
MENSAJE PF (Falla de
alimentación de energía)
El mensaje PF aparece siempre que se produce una
interrupción de alimentación de energía al artefacto. Para
eliminar el mensaje PF presione el botón de control ON/OFF
para restablecerlo y cerciórese de que restablece el.
EL MENSAJE HS (SUPERFICIE
CALIENTE):
6HHQFLHQGHFXDQGRODXQLGDGHVWiD~QPX\FDOLHQWH
después de haberla apagado
6HHQFLHQGHGXUDQWHHOFLFORGHOLPSLH]DDXWRPiWLFD
&RQWLQ~DHQFHQGLGRDXQTXHVHKD\DDSDJDGRODXQLGDG
(OEULOORFRQWLQ~DKDVWDTXHODXQLGDGVHKDHQIULDGRD
150°F (65°C.).
Sencillo
Elemento posterior
izquierdo
Sencillo
Elemento anterior
izquierdo
Doble
Anterior derecho
Elemento doble
Zona de
calentamiento
Sencillo
Elemento anterior
izquierdo
PRECAUCIÓN
Ciclos de los elementos de superficie.
- Al cocinar en los elementos de superficie, es posible
que el elemento se active y desactive durante la
cocción. Esto ocurrirá con más frecuencia cuando
se seleccione un ajuste bajo, sin embargo, también
puede ocurrir en los ajustes más altos.

- 9 -
COCCIÓN CON CONTROLES DE SUPERFICIE
AJUSTE DE LOS CONTROLES
DE SUPERFICIE
Cuando se cambia de un ajuste de temperatura alta a uno
más bajo, es posible que desaparezca el brillo de la unidad de
superficie. Esto es normal.
1. Presione ON/OFF correspondiente
al elemento en la posición
deseada. La visualización comienza
a destellar . (La visualización
desaparece si no se presionan más
botones en 10 segundos.)
2. Presione una vez para encender el
nivel de potencia Hi( ) o una vez
para Lo( ).
3. Use / para elegir el nivel de
potencia deseado. / es
accesible constantemente.
(Ajustable en cualquier momento
mientras el elemento esté ON)
4. Para apagar la unidad después de
cocinar presione ON/OFF una sola
vez.
Para encender una unidad de superficie
sencilla (posterior derecha, posterior
izquierda, anterior derecha)
1. Presione ON/OFF. La visualización
comienza a destellar . (La visualización
desaparece si no se presionan más
botones en 10 segundos.)
2. Presione ELEMENT SIZE (tamaño del
elemento) según sea necesario para
seleccionar el tamaño del quemador deseado.
Al seleccionarlo por primera vez, el tamaño de
12" es el que enciende (ON). La lámpara
encima de ELEMENT SIZE indica de qué
tamaño es la unidad de superficie encendida.
3. Presione una vez para encender el nivel de
potencia Hi( ) o una vez para Lo( ).
4. Use la / para elegir el ajuste de
potencia deseado. / es accesible
constantemente. (Ajustable en cualquier
momento mientras el elemento está
encendido.
5. Para apagar la unidad después de cocinar,
presione ON/OFF una vez solamente.
Para encender una unidad de superficie
doble (anterior izquierda)
Ajustes de la superficie de
cocción recomendados
Ajuste recomendado para los elementos sencillos y dobles.
Cada vez que presione un botón se escuchará un
pitido.
El nivel de potencia se disminuye o aumenta
desde 9.0 hasta 3.0 en unidades de 0.5. (en
unidades de 0.2 desde 3.0 hasta 1.0)
Lo es el nivel de potencia más bajo posible.
Nota:
Cada vez que presione un botón se escuchará un pitido.
El nivel de potencia se disminuye o aumenta desde 9.0
hasta 3.0 en unidades de 0.5. (en unidades de 0.2
desde 3.0 hasta 1.0)
Lo es el nivel de potencia más bajo posible.
Nota:
Ajuste
Tipo de cocción
ALTA
(8.5 – Hi)
MEDIA ALTA
(5.5 – 8.0)
MEDIA
(3.5 – 5.0)
MEDIA BAJA
(2.2 – 3.0)
BAJA/FUEGO LENTO
(Lo – 2.0)
Para empezar a cocinar la mayoría de los
alimentos, hervir agua o asar en bandeja.
Seguir un hervor rápido, freír o con freidora.
Hervir lentamente, espesar salsas y caldillos o
cocer vegetales al vapor.
Seguir cocinando alimentos, escalfar o estofar
(2.8 o menor es un ajuste de fuego lento).
Mantener caliente, derretir o cocer a fuego
lento.
Para desplazarse rápidamente por los niveles de
potencia, mantenga presionadas las teclas o del
teclado hasta alcanzar el nivel de potencia deseado.
Nota:
Para desplazarse rápidamente por los niveles de
potencia, mantenga presionadas las teclas o del
teclado hasta alcanzar el nivel de potencia deseado.
Nota:
PRECAUCIÓN
12WRTXHODVXQLGDGHVGHVXSHrficie hasta
que se hayan enfriado.
- Es posible que los elementos de superficie sigan
estando calientes y se pueden producir quemaduras.
PRECAUCIÓN
181&$GHMHGHVDWHQGLGRVORVDOLPHQWRV
en los ajustes de mediano a alto.
- Los derrames pueden causar humaredas y los
excedentes grasos podrían causar incendios.
PRECAUCIÓN
12WRTXHODVXQLGDGHVGHVXSHrficie hasta
que se hayan enfriado lo suficiente.
- Es posible que los elementos de superficie sigan
estando calientes y se pueden producir quemaduras.
ESPAÑOL
ESPAÑOL
ESPAÑOL
- 10 -
COCCIÓN CON CONTROLES DE SUPERFICIE
CÓMO FUNCIONA LA ZONA DE
CALENTAMIENTO
Cómo ajustar la zona de calentamiento
Cada vez que presione un botón se escuchará un pitido.
Los controles de la zona de calentamiento permiten 5
ajustes de calor diferentes Lo~Hi (Alto-bajo)
"HS" se visualiza cuando la unidad está demasiado
caliente para tocarla.
Nota:
Ajuste
Tipo de cocción
Lo
2 – 4
Hi
Panes y repostería
Cacerolas
Plato grande con alimentos
Sopas (cremosas)
Vegetales
Alimentos fritos
Sopas (líquidas)
Caldillos
Huevos
Salsas
Estofados
Carnes
Bebidas calientes
1. Presione ON/OFF en la posición de
control de la zona de calentamiento.
La lámpara indicadora de la zona de
calentamiento comienza a destellar.
(La visualización desaparece si no se
presionan más botones en 10 segundos.)
2. Presione una vez para encender el nivel
de potencia Hi( ) o una vez para Lo( ).
3. Use la / para elegir el ajuste de
potencia deseado. (Ajustable en cualquier
momento mientras el elemento está
encendido).
4. Para apagar la unidad después de que el
alimento está listo para servirse, presione
ON/OFF una vez.
Ajustes sugeridos
PRECAUCIÓN
8VHVRORUHFLSLHQWHVFRFFLyQ\SODWRV
recomendados como seguros para uso en
horno y en anafe.
6LHPSUHXWLOLFHJXDQWHVGHFRFLQDFXDQWR
quite alimentos del centro de
calentamiento, ya que los recipientes de
cocción y los platos estarán calientes.
&XDQGRFDOLHQWHDOLPHQWRVQRXWLOLFH
recipientes que se cierren
herméticamente. Deje una ventilación
para que salga el aire caliente.
12XWLOLFHHQYROWRULRVSOiVWLFRVSDUDFXEULU
alimentos.
- El plástico puede derretirse en la superficie y será
muy difícil limpiarlo.
/RVDOLPHQWRVGHEHQJXDUGDUVHHQVX
recipiente y cubrirse con una tapa o
papel de aluminio para mantener su
calidad.
12FDOLHQWHDOLPHQWRVHQOD]RQDGH
calentamiento por más de 2 horas
- Colocar alimentos fríos o sin cocer en la zona de
calentamiento puede provocar enfermedades
transmitidas por los alimentos.
- 11 -
COCCIÓN CON CONTROLES DE SUPERFICIE
CONSEJOS PARA LA PROTECCIÓN DE
LA SUPERFICIE LISA
Limpieza
(si desea más información consulte las páginas 29~30)
Limpie la superficie de cocción antes de usarla por primera vez.
Limpie la superficie de cocción todos los días o después de cada utilización.
De esa manera, su superficie de cocción estará en buenas condiciones y se
podrán prevenir los daños.
En caso de derrames mientras cocina, limpie inmediatamente la superficie
de cocción mientras está caliente para evitar un trabajo pesado de limpieza
posterior. Con extremo cuidado, utilice un raspador metálico adecuado
para eliminar la suciedad.
No deje que los derrames permanezcan mucho tiempo en la zona
decoccion o en los adornos de la superficie de coccion.
Nunca use polvos de limpieza abrasivos o estropajos que podrían rayar la
superficie de cocción.
No use blanqueadores a base de cloro, amoniaco u otros limpiadores no
recomendados específicamente para usarse en vidrio o cerámica.
Cómo impedir marcas y rayones
No use cazuelas de vidrio. Pueden rayar la superficie.
No coloque un trébede o anillo de wok entre la superficie y las cacerolas.
Esos artículos pueden marcar o rayar la superficie. No deslice las cacerolas
de aluminio sobre una superficie caliente. Las cacerolas pueden dejar
marcas que deben limpiarse rápidam
ente.
(Vea Limpieza páginas 29~30.)
Asegúrese de que la superficie de cocción y la base de la sartén u olla estén
limpias y secas antes de encender para evitar rayar la superficie.
Para prevenir rayones o daños a la superficie de vidrio cerámico, nunca
deje azúcar, sal o grasa en la zona de cocción. Limpie la superficie de
cocción con un trapo o toalla de papel antes de usarla.
No deslice cacerolas metálicas pesadas sobre la superficie ya que podrían
rayarla.
Para prevenir las manchas
Nunca use un trapo de cocina o esponja sucios para limpiar la superficie
de cocción. Pueden dejar una película que cause manchas en la superficie
de cocción después de que se ha calentado la zona.
Si cocina constantemente sobre una superficie sucia puede dejar una
mancha permanente.
Cómo prevenir otros daños
No deje derretir plástico, azúcar u otros alimentos con alto contenido de
azúcar en la superficie de cocción. Si llegara a suceder límpielo
inmediatamente. (Vea Limpieza páginas 29~30.)
Nunca deje una cacerola hirviendo en seco ya que así se puede dañar
tanto la superficie como la cacerola.
No use la superficie de cocción como zona de trabajo o como tabla de
corte.
Nunca cocine alimentos directamente sobre la superficie.
ZONAS DE COCCIÓN
Unos círculos permanentes en la superficie lisa identifican a
las zonas de cocción de su estufa. Para lograr una cocción
eficaz, use la cacerola adecuada para el tamaño del elemento.
Las cacerolas no deberán ocupar más de
1
/
2
a 1
pulgada más allá de la zona de cocción.
En cuanto se enciende un control, se observa un brillo en la
superficie lisa. El elemento recicla entre encendido y
apagado para mantener el ajuste de calor deseado,
D~QHQ+L
Si desea más información sobre utensilios de cocina,
consulte Recomendaciones de utensilios de cocina.
Notas sobre la superficie lisa:
(VSRVLEOHTXHODVXSHUILFLHGHFRFFLyQHPLWDKXPRV\
olores ligeros en las primeras ocasiones que se use. Esto es
normal.
Las superficies de cocción lisas retienen el calor un
rato después de haber apagado los elementos.
Apague los elementos unos minutos antes de que los
alimentos se cocinen completamente y use el calor retenido
para terminar la cocción.
Cuando se apaga la lámpara de aviso de superficie caliente,
indica que la zona de cocción se ha enfriado lo suficiente
para poder tocarla. Por la manera como los elementos de la
superficie de cocción retienten el calor, no responden a los
cambios de los ajustes tan pronto como lo harían los
quemadores normales.
6LOOHJDUDDSURGXFLUVHXQGHUUDPHUHWLUHODFDFHURODGHOD
superficie de cocción.
No intente levantar la superficie de cocción.
Cuando la superficie lisa está caliente puede aparecer
descolorida. Eso es normal y desaparece cuando la
superficie se enfría.
SUPERFICIE LISA
Elemento sencilloElemento doble
Zona de calentamiento
ESPAÑOL
ESPAÑOL
ESPAÑOL
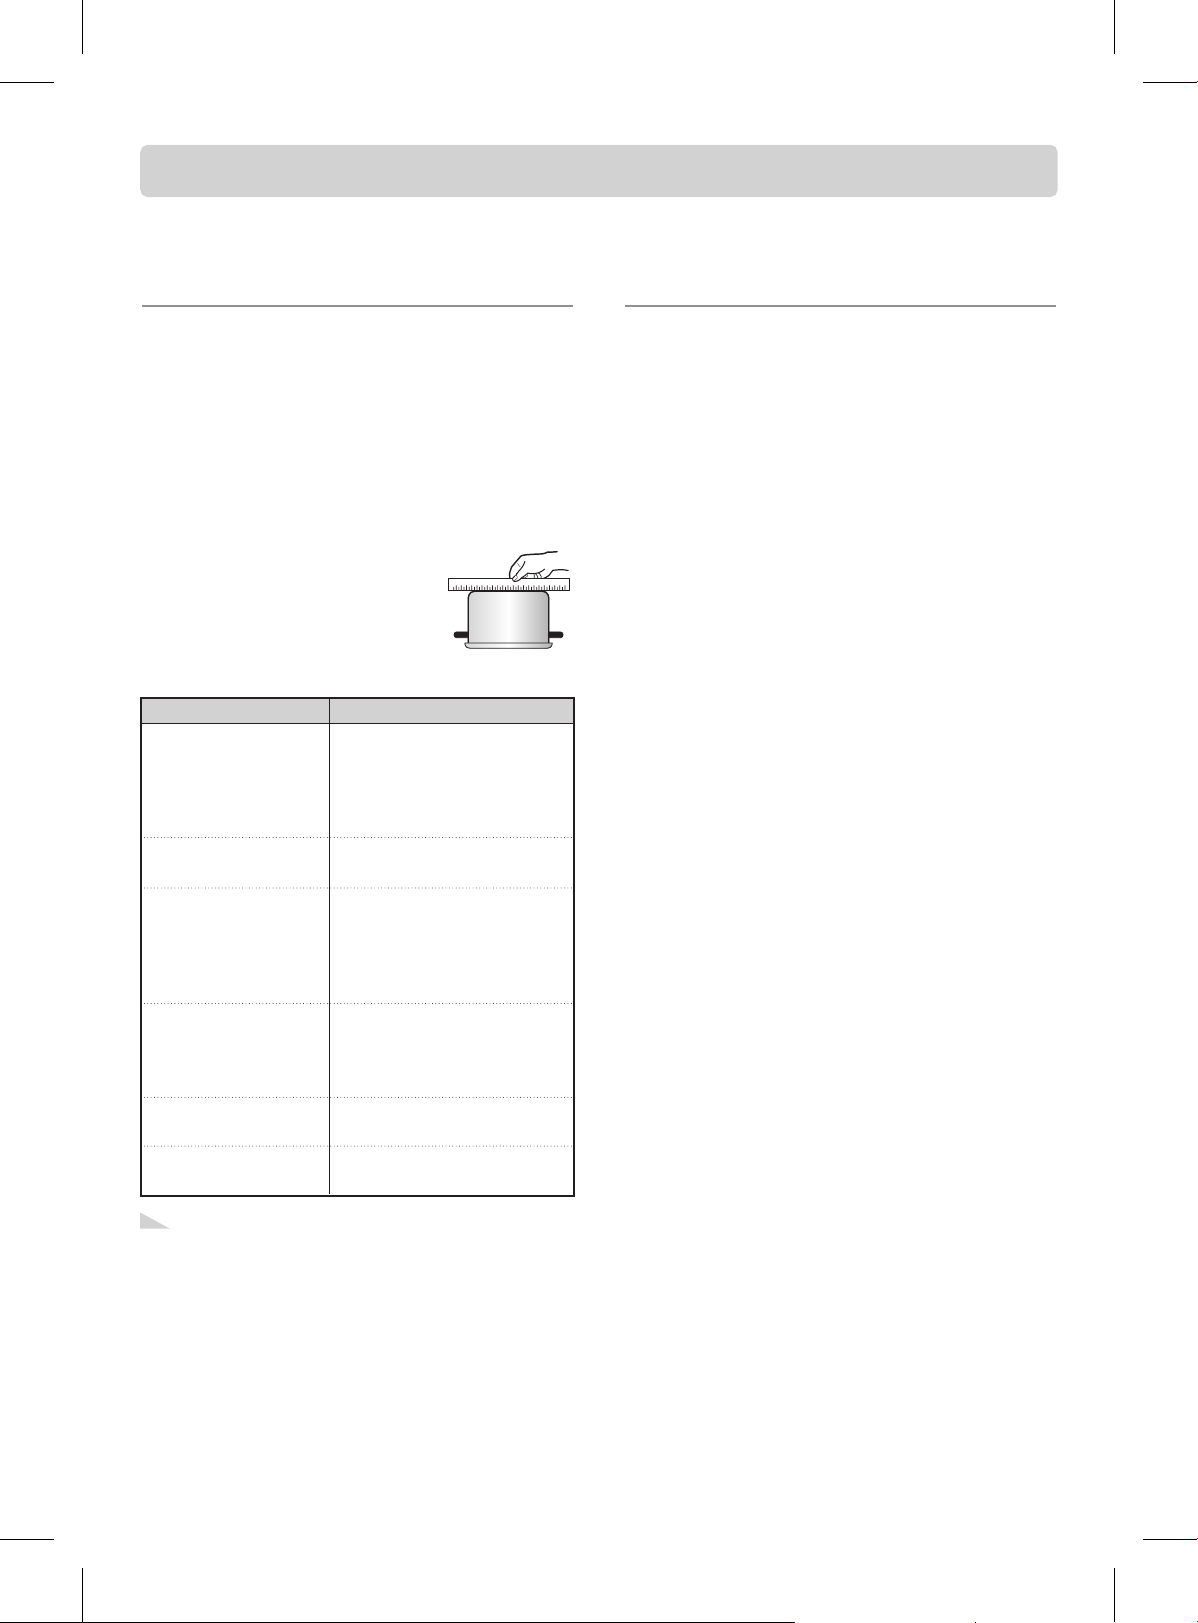
- 12 -
COCCIÓN CON CONTROLES DE SUPERFICIE
CONSEJOS PARA ENLATAR
CONSERVAS EN CASA
Cerciórese de que el enlatador está bien centrado
sobre la unidad de superficie. Cerciórese que el
enlatador tiene fondo plano.
La base no deberá ser mayor que el elemento por más de 1
pulgada. Si usa enlatadores de baño maría con fondos
acanalados, se puede prolongar el tiempo necesario para
hervir el agua, y así pueden dañarse las superficies de
cocción.
Se han diseñado algunos enlatadores con base más
pequeñas para usarse sobre superficies lisas.
Solamente use el ajuste alto hasta que el agua hierva o se
haya alcanzado la presión en el enlatador.
Baje hasta el ajuste más bajo de calor para mantener el
hervor o la presión. Si no se reduce el calor se odrá dañar la
superficie de cocción.
EL USO DE LOS UTENSILIOS DE
COCINA DEBIDOS
El uso de los utensilios de cocina debidos ayuda a prevenir
muchos problemas, como serían tiempos más prolongados
de cocción u obtener resultados inconsistentes. Las cacerolas
apropiadas reducen el tiempo de cocción y cocinan los
alimentos de manera más uniforme. Es recomendable usar el
acero inoxidable.
Use una regla o regletas para
comprobar que el fondo de las
cacerolas es plano.
1. Coloque una regla contra el fondo de la
cacerola.
2. Póngalo a contraluz.
3. La regleta no debe permitir el paso de
la luz.
No use una cacerola pequeña con un elemento grande.
No sólo se gasta energía, sino que pueden presentarse
desbordes que se queman en la zona de cocción y el
trabajo de limpieza será más pesado.
Nunca use artículos especializados que no tengan fondo
plano y que sean más grandes o irregulares como serían
los fondos redondos de los woks, fondos acanalados y
enlatadores de conservas o planchas de gran tamaño.
Nunca use recipientes de papel de aluminio o similares.
El papel de aluminio puede derretirse en el vidrio. Si se
ha derretido metal sobre la superficie no deberá usarla.
Llame a un agente de servicio autorizado.
Nota:
Se recomiendan
Inexacto
Fondos planos y lados rectos
Cacerolas de calibre grueso
El tamaño de las cacerolas
deberá ser el adecuado para
la cantidad de alimentos a
prepararse y el tamaño del
elemento de superficie.
El peso del mango no
desequilibra la cacerola. La
cacerola deberá estar bien
equilibrada.
Tapas que ajusten
correctamente.
Woks de fondo plano.
Fondos de cacerola curvos, acanalados
o deformes. Las cacerolas con fondos
desnivelados no cocinan con eficacia y
en ocasiones hasta no sería posible
hervir algún líquido.
Cacerolas de cristal o de metal de
pequeño calibre.
Cacerolas más grandes o más
pequeñas que el elemento.
Utensilios de cocina con mangos
sueltos o rotos. Mangos tan pesados
que desequilibren las cacerolas.
Tapas que no ajusten correctamente.
Woks con un soporte anular en el
fondo.
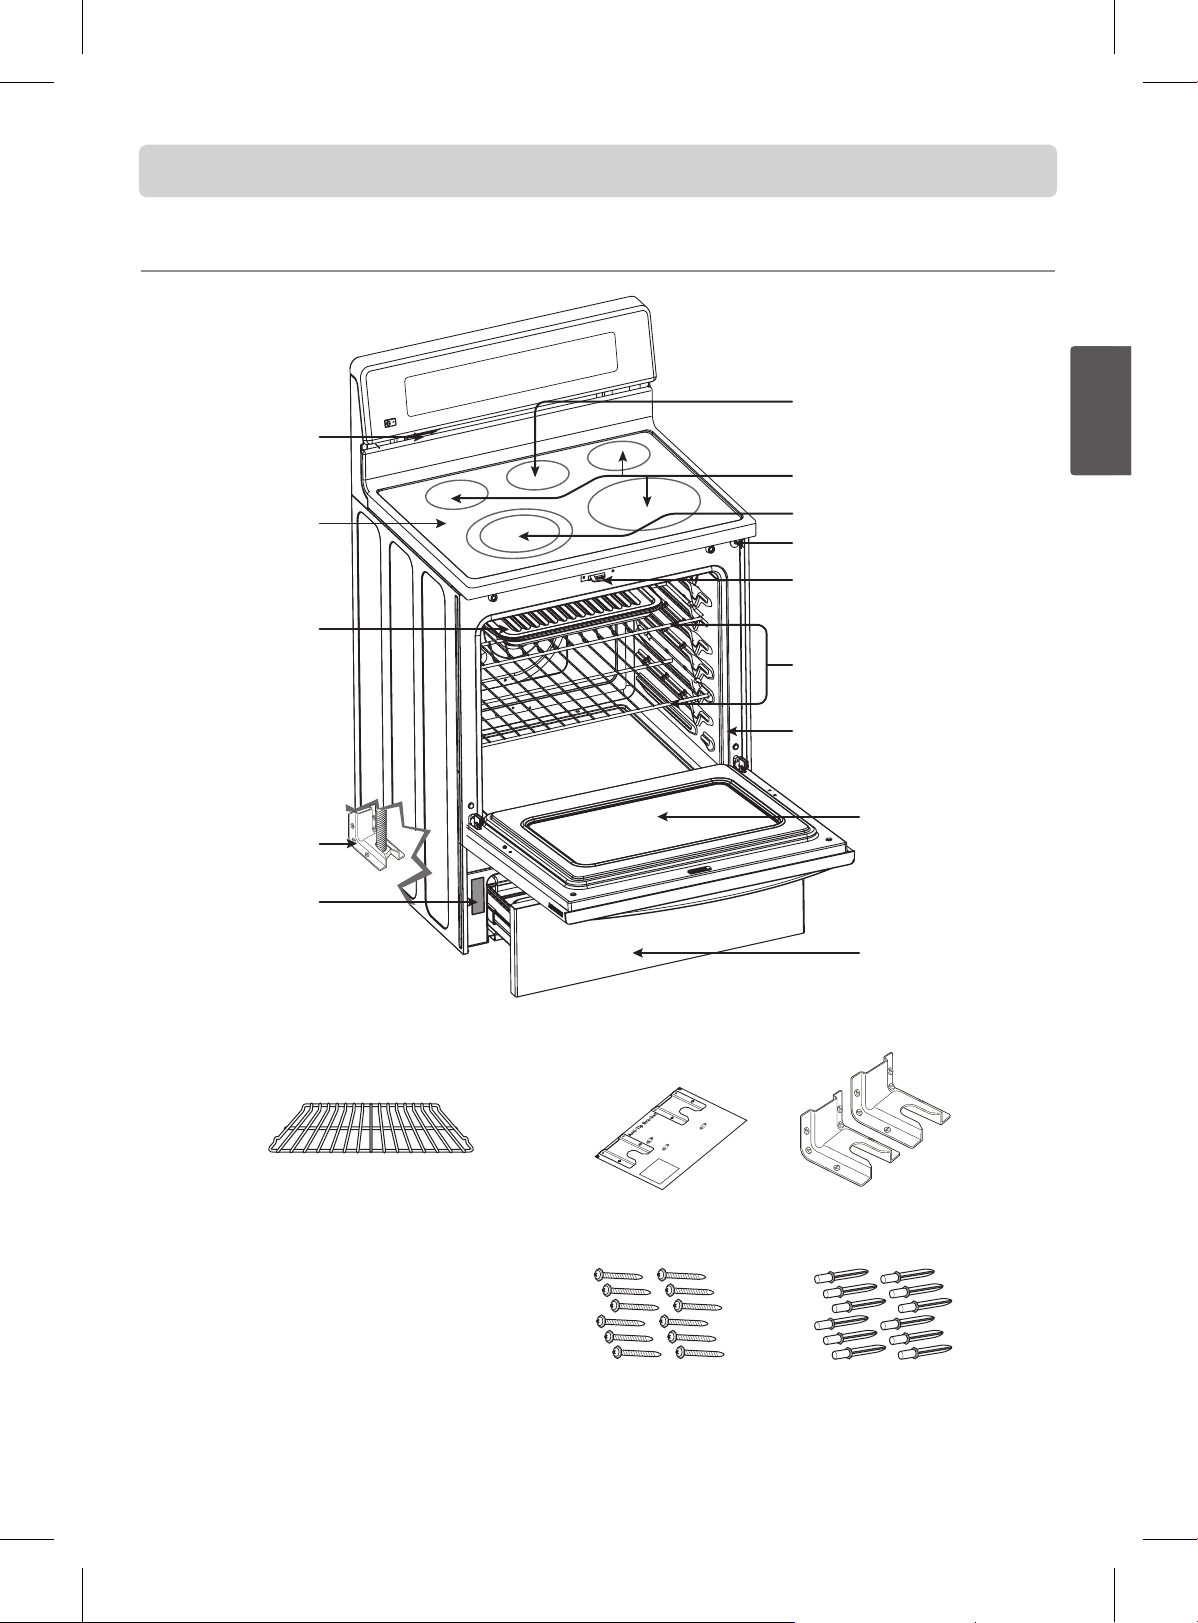
- 13 -
INFORMACIÓN
PIEZAS Y CARACTERÍSTICAS
Respiradero del
horno
Cristal cerámico
Bandeja para asar y
rejilla
(No incluido en este modelo)
Ménsula anti-
volcaduras
Placa del número de
serie y modelo
Cajón de
almacenamiento
Puerta del horno
Empaquetadura
Anaqueles estándar (2 c/u.)
Cerrojo de limpieza automática
Interruptor de la lámpara
automática del horno
Elemento doble
Elemento sencillo
Elemento de la zona de
calentamiento
Anaqueles estándar
(2 c/u.)
Plantilla
Tornillos (12 c/u) Anclas (12 c/u)
Ménsulas anti-
volcaduras
ESPAÑOL
ESPAÑOL
ESPAÑOL
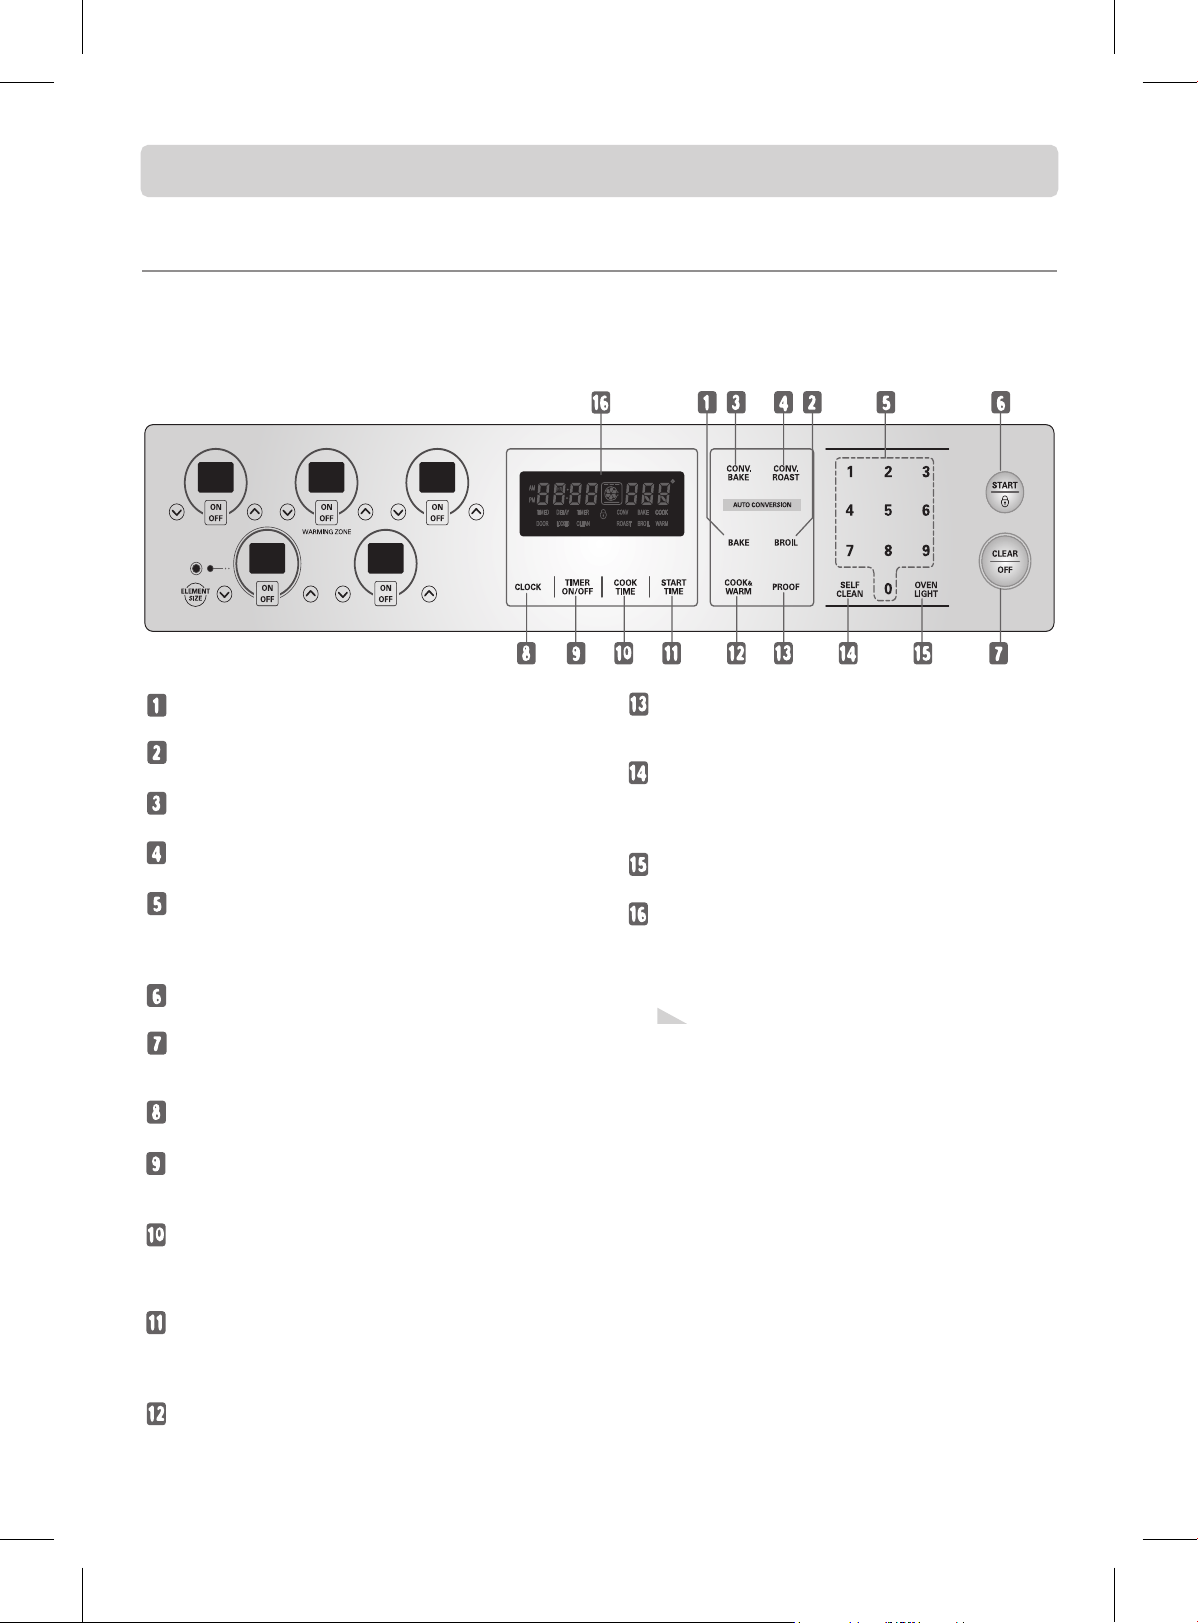
- 14 -
CARACTERÍSTICAS DEL PANEL DE CONTROL
ANTES DE USAR EL HORNO LEA LAS INSTRUCCIONES CUIDADOSAMENTE. Para usar satisfactoriamente su
horno deberá familiarizarse con las distintas características y funciones del horno que se describen más adelante.
Encontrará las instrucciones detalladas de cada característica o función más adelante en este Manual del
Propietario.
INFORMACIÓN
/DYLVXDOL]DFLyQGHXQD)FRQXQQ~PHUR
y la escucha de una señal del control del
horno, indican que se trata de un código
de error. (Consulte la página 32)
Pulse el botón CLEAR/OFF. Deje que el horno
se enfríe por una hora. Vuelva a poner a
funcionar al horno.
Si se repite el código de error, desenchufe el
horno del tomacorriente y solicite un servicio de
reparación. Si el horno se había ajustado
para una operación del horno controlada
por el reloj y se presenta una falla de
energía eléctrica, se debe restablecer tanto el
reloj como todas las funciones programadas.
Si hubo una falla de energía eléctrica,
empieza a destellar la hora del día y se
visualiza una P.F.
Nota:
. BAKE PAD (botón Hornear): Presione para seleccionar la
función de hornear.
. BROIL PAD (botón del Asador): Presione para seleccionar la
función de asar.
. CONVECTION BAKE PAD (botón Hornear con convección):
Presione para seleccionar la función de convección.
. CONVECTION ROAST PAD (botón Asar con convección):
Presione para seleccionar la función de asar con convección.
. NUMBER PADS (botones numéricos): Se usa para ajustar
cualquier función que necesite de información numérica, como
sería la hora del día en el reloj, el temporizador, la temperatura del
horno y la hora de inicio para horneo cronometrado y su duración.
. START PAD (botón Iniciar): Debe de presionarse para iniciar
cualquier función de cocción o de limpieza.
. CLEAR/OFF PAD (botón Eliminar / apagar): Presionar para
cancelar todas las operaciones del horno, exceptuando el reloj y el
temporizador.
. CLOCK PAD (botón Reloj): Presionar antes de fijar la hora del
día.
. TIMER ON/OFF PAD (botón de encender o pagar el
Temporizador): Presione para seleccionar la función del
Temporizador.
. COOK TIME PAD (botón Tiempo de cocción): Presione y luego
utilice los botones numéricos para ajustar el lapso de tiempo que
desea cocinar sus alimentos. El horno se apagará después de que
transcurra el tiempo de cocción.
. START TIME PAD (botón Hora de inicio): Se usa junto con los
botones BAKE, CONV.BAKE, CONV.ROAST, COOK TIME y SELF
CLEAN para ajustar el encendido y apagado automático del horno
al horario fijado.
. COOK & WARM PAD (botón de cocción y calentamiento):
Presionar para mantener calientes los alimentos cocinados.
Consulte la sección sobre cómo ajustar el horno para el
calentamiento.
. PROOF PAD (botón Fermentación): Presionar para
seleccionar un entorno caliente, útil para que crezcan los
productos con levadura.
. SELF CLEAN PAD (botón Limpieza automática):
Presionar para seleccionar la función de limpieza
automática. Consulte la sección Horno de limpieza
automática
. OVEN LIGHT PAD (botón de lámpara del horno):
Presionar para encender o apagar la lámpara del horno.
. DISPLAY (Visualización): Muestra la hora del día, la
temperatura del horno, si es que el horno está en el modo
de hornear, asar o limpieza automática, y el horario para la
operación del temporizador o la automática del horno.
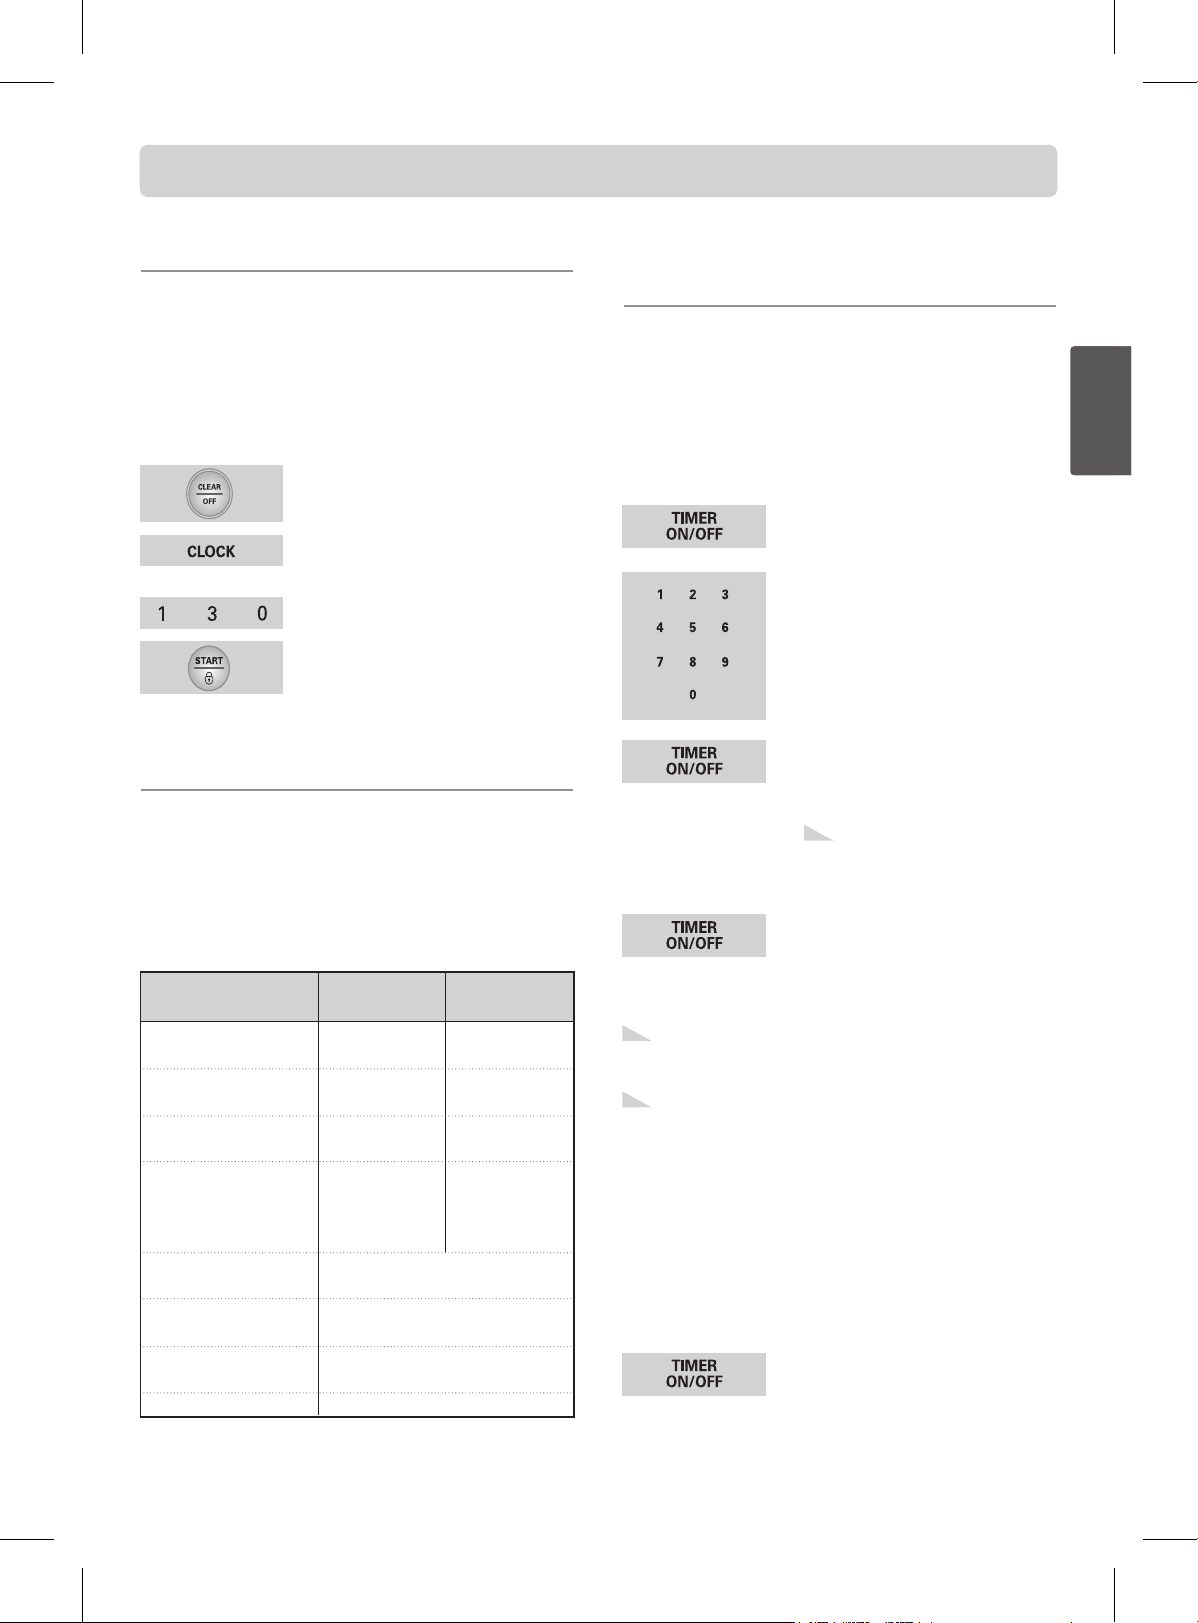
- 15 -
OPERACIÓN
CÓMO AJUSTAR EL RELOJ
Para ajustar el reloj se usa el botón CLOCK. El reloj viene
ajustado de fábrica para funcionar en horario de 12 horas.
Cuando se enchufa por primera vez la estufa, o cuando hubo una
interrupción de la fuente de alimentación de la estufa, se visualiza
una falla de energía eléctrica PF. Se puede elegir entre el horario
de 12 horas o de 24 horas (consultar la página 26).
1. Presione CLEAR/OFF
2. Presione CLOCK.
3. Presione 1, 3, y 0 para ajustar la
hora del día a la 1:30.
4. Presione START.
El reloj comienza a funcionar.
Para ajustar el reloj (se muestra el ejemplo para la 1:30)
AJUSTES MÁXIMOS Y MÍNIMOS DEL
BOTÓN DE CONTROL
Todas las características enumeradas tienen funciones máximas o
mínimas de horario o temperatura que pueden ingresarse en el
botón de control. Siempre que se presione un botón de control va a
sonar un pitido de aceptación de la entrada.
Se va a escuchar una señal de error de ingreso (3 pitidos breves) si la
entrada de la temperatura o del horario está por arriba o por debajo
de los ajustes mínimos o máximos para esa característica.
1. Presione dos veces TIMER
ON/OFF. Se muestran 0:00 y HR
dentro de O y TIMER comienza a
destellar en la visualización.
2. Presione los botones numéricos
para ajustar el tiempo deseado en
la visualización (presione 5).
Si se equivocó. presione TIMER
ON/OFF y comience nuevamente.
3. Presione TIMER ON/OFF. Se
empezará a contar el tiempo
transcurrido desde 5.00 y
aparecerá TIMER en la
visualización.
4. Una vez que transcurrió el tiempo
fijado, se visualiza End. Sonarán 3
pitidos cada 15 segundos en el
reloj hasta que se presione TIMER
ON/OFF.
1. Presione TIMER ON/OFF una vez
solamente. Se regresa a la
visualización de la hora del día.
Para ajustar el temporizador (se muestra el ejemplo
para 5 minutos)
Para cancelar el Temporizador antes de que
transcurra el tiempo fijado:
CÓMO AJUSTAR EL
TEMPORIZADOR ON/OFF
La característica TIMER ON/OFF sirve como un
temporizador adicional en la cocina después de que
transcurrió el tiempo fijado. No inicia o detiene la cocción.
La característica TIMER ON/OFF puede usarse durante
cualquiera de las otras funciones de control del horno.
CARACTERÍSTICA
TEMPERATURA Y TEMPERATURA Y
HORARIO MIN HORARIO MÁX.
BAKE TEMP.
(temperatura de horneo)
BROIL TEMP.
(temperatura de asado)
SELF CLEAN TIME
(horario de limpieza automática)
CONVECTION BAKE
(hornear con convección) /
CONVECTION ROAST
(asar con convección)
COOK & WARM
(cocción y calentar)
RADIANT ELEMENT
(elemento radiante)
WARMING ZONE
(zona de calentamiento)
PROOF (fermentación)
170°F / 75°C
LO (400°F)
2 horas
300°F / 150°C
550°F / 285°C
HI (550°F)
4 horas
550°F / 285°C
170°F (75°C) / 3 horas
Predeterminado: 12 Hr.
Predeterminado: 2 Hr.
Predeterminado: 12 Hr.
Si no se muestra el tiempo restante, podrá recordarlo
si presiona TIMER ON/OFF.
Nota:
1. Si se presiona TIMER ON/OFF una vez solamente, le permite
ajustar el tiempo en segundos.
(por ejemplo: si presiona 5 y 6, querrá decir 56 segundos)
2. Si se presiona TIMER ON/OFF dos veces, le permite ajustar
el tiempo en minutos.
(por ejemplo: si presiona 5 y 6, querrá decir 56 minutos)
Nota:
Si no se presiona TIMER
ON/OFF, el temporizador
regresa a la hora del día.
Nota:
ESPAÑOL
ESPAÑOL
ESPAÑOL
- 16 -
OPERACIÓN (OPCIONES)
1. Presione START durante 3 segundos
2. Suenan 2 pitidos, se visualiza
LOCKING y DOOR LOCKED (puerta
bloqueada) comienza a destellar. En
cuanto se bloquea la puerta, deja de
destellar el indicador DOOR LOCKED
y el indicador se queda encendido
junto con la lámpara del icono de
bloqueo ( ).
Para activar la función de Oven Lockout:
1. Presione START durante 3 segundos
Un pitido va a sonar 2 veces. DOOR
LOCKED sigue destellando hasta que
se haya desbloqueado totalmente la
puerta del horno y se borre la lámpara
del icono de bloqueo ( ).
2. El horno queda nuevamente en
condiciones de funcionamiento.
Para reactivar la operación normal del horno:
BLOQUEO DE LAS FUNCIONES
DEL HORNO Y LA CERAMICA DE
LA ESTUFA)
El botón START controla el bloqueo del horno y la ceramica de la
estufa. La funcion de bloqueo cierra la puerta del horno automáticamente
e impide que la ceramica de la estufa y la mayoría de los controles del
horno puedan activarse. No se desactiva el reloj, el temporizador ni la
lámpara interior del horno.
1. Presione y mantenga presionado el
botón COOK & WARM durante 3
segundos Se visualiza OPt.
2. Presione 1. Se visualiza CLO 12H.
3. Presione 1 para conmutar entre
12H y 24H.
4. Presione START para aceptar el
cambio deseado.
Para cambiar el horario del día de 12 horas a 24 horas
CÓMO CAMBIAR EL MODO
HORARIO DEL RELOJ (12HR., 24HR.)
El control está ajustado para usar un horario del reloj de 12
horas. Si prefiere un horario de reloj de 24 horas, siga los
pasos siguientes:
1. Presione COOK & WARM por 3
segundos.
2. Presione 3. Se visualiza BEEP Hi.
3. Presione 3 para conmutar el
volumen de los pitidos.
( Hi, Lo y OFF ).
4. Presionar START para aceptar el
cambio deseado.
Para ajustar el nivel de los pitidos
CÓMO AJUSTAR EL VOLUMEN
DE LOS PITIDOS
La característica del volumen de los pitidos le permite
ajustar el volumen a un nivel más aceptable. Se dispone de
tres niveles de volumen posibles.
1. Presione COOK & WARM por 3
segundos.
2. Presione 2. Se visualiza Unit F.
3. Presione 2 para conmutar entre F y
C.
4. Presione START para aceptar el
cambio deseado.
Para cambiar la visualización de Fahrenheit a
Centígrados o Centígrados a Fahrenheit:
AJUSTE DE LAS UNIDADES DE
TEMPERATURA.
— Fahrenheit o Centígrados
El botón COOK & WARM controla los modos de
visualización de temperatura entre Fahrenheit o
Centígrados. El control del horno puede programarse para
visualizar las temperaturas en Fahrenheit o Centígrados La
temperatura del horno viene ajustada de fábrica para
visualizarse en Fahrenheit.

- 17 -
OPERACIÓN (OPCIONES)
1. Presione COOK & WARM por 3
segundos.
2. Presione 4. Se visualiza PrE On.
3. Presione 4 para conmutar entre On
y OFF.
4. Presionar START para aceptar el
cambio deseado.
Cómo ajustar el encendido o apagado de la
lámpara del horno inteligente
AJUSTE DEL ENCENDIDO O
APAGADO DE LA LÁMPARA DE
ALARMA DE PRECALENTAMIENTO
La lámpara interior del horno se enciende automáticamente
al abrir la puerta del horno.
En cuanto el horno alcanza la temperatura fijada después del
precalentamiento, el horno informa el fin del
precalentamiento haciendo que la lámpara del horno destelle
hasta que se abra la puerta.
Se puede activar o desactivar la característica de la lámpara
del horno inteligente. Se activa el ajuste predeterminado.
1. Presione BAKE durante 3
segundos.
2. Para aumentar la temperatura use
los botones numéricos para
ingresar el cambio deseado.
(Por ejemplo 20°F: 2 y 0). Se
muestra 20°.
3. Presione START para aceptar el
cambio de temperatura y entonces
aparece la hora del día en la
visualización. Si es necesario
rechazar el cambio, presione
CLEAR/OFF.
Para aumentar la temperatura del horno
1. Presione BAKE durante 3
segundos.
2. Para disminuir la temperatura use
los botones numéricos para
ingresar el cambio deseado. (Por
ejemplo -20°F: 2 y 0) y luego
presione BAKE dos veces. Se
muestra - 20°.
3. Presione START para aceptar el
cambio de temperatura y entonces
aparece la hora del día en la
visualización. Si es necesario
rechazar el cambio, presione
CLEAR/OFF.
Para reducir la temperatura del horno
AJUSTE DEL TERMOSTATO
La temperatura del horno viene ajustada de fábrica. Cuando
use el horno por primera vez, obedezca los horarios y
temperaturas de las recetas. Si considera que el horno está
muy caliente o muy frío, puede ajustarse la temperatura del
horno. Antes de ajustarlo, pruebe con una receta usando un
ajuste de temperatura mayor o inferior que la temperatura
recomendada. Los resultados del horneo servirían para
ayudarle a decidir que tanto debe ajustarse.
La temperatura del horno puede ajustarse ±35°F (±19°C ).
Los ajustes del termostato que se llevan a cabo con
esta característica afectarán la temperatura de Bake,
Convection Bake y Convection Roast.
Nota:
1. Presione COOK & WARM por 3
segundos.
2. Presione 5. Se visualiza Auto On.
3. Presione 5 para conmutar entre On
y OFF.
4. Presionar START para aceptar el
cambio deseado.
Para ajustar la característica ON/OFF
AJUSTE DE LAS FUNCIONES DE
CONVERSIÓN AUTOMÁTICA
DE LA CONVECCIÓN
Si usa el horneo por convección, la característica Auto-
conversión de convección convierte automáticamente las
temperaturas de horneo normales a las temperaturas de
horneo por convección.
Esta característica se habilita de manera que se visualiza la
temperatura convertida (reducida) real. Por ejemplo, si se
ingresó 350°F, la temperatura normal de una receta y
presiona el botón START, se muestra una temperatura
convertida de 325°F.
ESPAÑOL
ESPAÑOL
ESPAÑOL
- 18 -
OPERACIÓN
Presionar CLEAR/OFF si desea cancelar la característica
Bake en cualquier momento.
(OKRUQRWLHQHSRVLFLRQHVSDUDORVDQDTXHOHV
Para ajustar la temperatura de horneo a 375°F:
1. Si es necesario cambiar la
temperatura del horno a 425°F,
presione BAKE y se visualizará 350°.
2. Presionar 4, 2 y 5.
3. Presionar START.
Para cambiar la Bake Temperature mientras esté
cocinando (por ejemplo, cambiar de 375° a 425°F):
AJUSTE DE BAKE
El botón BAKE controla el horneo normal. Se puede programar
el horno para hornear a cualquier temperatura desde 170°F a
550°F. La temperatura predeterminada es 350°F (175°C).
CÓMO HORNEAR PASTELES DE
CAPAS
El horno va a producir mejores resultados si las bandejas para
hornear se centran lo mas posible. Cuando use mas de una
bandeja para hornear, colóquelas demanera que dejen una
holgura de 1" a 1 ” (2.5 a 3.5cm) de aire alrededor de cada una.
1
/2
Cuando cocine en varios anaqueles, colóquelos en las posiciones
B y D (para 2 anaqueles). Colóquelos en las posiciones B, D y F
(para 3 anaqueles). Coloque los utensilios de cocina como se
muestra en las figuras 1 y 2.
ANTES DE USAR LOS
ANAQUELES DEL HORNO
El horno tiene 2 anaqueles. Los anaqueles tienen retenes
para colocarse correctamente en los soportes; sirven para
detenerlos antes de que se salgan completamente.
Para retirar los anaqueles:
1. Tire del anaquel hacia fuera hasta que se detenga.
2. Levante el frente del anaquel y tire de él hacia fuera.
Para reponer los anaqueles:
1. Coloque el extremo del anaquel en el soporte.
2. Incline el frente hacia arriba y empuje el anaquel hacia adentro.
Fig.1 Fig.2
Tipo de alimento
Posición del anaquel
Bizcocho blanco, tartas congeladas
Pasteles Bundt o de una libra
Panecillos, magdalenas, "brownies" (bocadillo
de chocolate y nueces), galletas, tortitas
individuales, pasteles de capas y tartas
Cacerolas
Pavo, asado o jamón
B
C
D
D
Si la receta lo solicita, coloque los alimentos en el horno después
del precalentamiento. El precalentamiento es muy importante
para obtener buenos resultados al hornear pasteles, galletas,
repostería y panes. Después de que el horno alcance la
temperatura deseada, se escucharán 5 pitidos prolongados y
empezará a destellar la lámpara del horno. Todo esto llevará 10 a
15 minutos aproximadamente.
Nota Importante:
Anaquel estándar
1. Presionar BAKE. y se visualizará
350°.
2. Presionar 3, 7 y 5. Comienza a
destellar BAKE.
3. Presionar START Se visualiza
BAKE y la temperatura que está
cambiando, comenzando con 100°F.
PRECAUCIÓN
12&8%5$XQDSDUULOODFRQSDSHOGH
aluminio y no la coloque en el piso del
horno.
- Esto provocará un horneado pobre al interrumpir la
circulación de calor y también puede dañar el piso
del horno.
6LHPSUHDFRPRGHORVDQDTXHOHVGHO
horno cuando el horno esté frío.
A

- 19 -
OPERACIÓN
1. Cerciórese de que el reloj está
ajustado con la hora del día correcta.
2. Presione BAKE, y se visualizará 350°.
3. Presione 3, 0 y 0. Entonces destella
BAKE y se visualizará "300°".
4. Presione COOK TIME (tiempo de
cocción). Comenzará a destellar
TIMED. Se visualizará BAKE, 0:00 y
300°.
5. Ingrese el tiempo de horneo deseado
presionando 3 y 0, comienza a
destellar TIMED y se visualizará
BAKE, 30:00 y 300°.
6. Presione START. Se enciende el
horno y se visualiza el tiempo de
horneo a transcurrir y la temperatura
está cambiando, comenzando con
100°F (la visualización de la
temperatura empezará a cambiar una
vez que la temperatura del horno
alcance 100°F). El horno seguirá
funcionando durante el lapso de
tiempo fijado y luego se apagará
automáticamente; salvo que se
hubiera ajustado la característica
COOK & WARM. Consulte la sección
Ajuste de la característica COOK &
WARM en la página 24.
Para programar el horno para que comience a cocinar
inmediatamente y luego se apague de igual forma
(el ejemplo a continuación ilustra el horneo a 300°F
durante 30 minutos):
Al concluir Timed Bake:
AJUSTE DE TIMED BAKE
(horneo cronometrado)
El horno se enciende inmediatamente y va a cocinar por un
periodo de tiempo seleccionado. Al final del tiempo de
cocción, el horno se apagará automáticamente.
1. Se visualiza End y la hora del día.
El horno se va a apagar
automáticamente.
2. El control va a seguir emitiendo 3
pitidos por minuto hasta que se
presione CLEAR/OFF.
Si la receta lo solicita, coloque los alimentos en el horno después
del precalentamiento. El pre-calentamiento es muy importante
para obtener los mejores resultados cuando se hornean pasteles,
galletas, repostería y panes. Después de que el horno alcance la
temperatura deseada, se escucharán 5 pitidos prolongados y
empezará a destellar la lámpara del horno. Todo esto llevará 10 a
15 minutos aproximadamente.
Nota importante:
El tiempo de horneo puede
ajustarse para cualquier lapso
de tiempo desde 1 minuto
hasta 11 horas y 59 minutos.
Nota:
PRECAUCIÓN
8VHODVFDUDFWHUtVWLFDV7,0('%$.(R
DELAYED TIMED BAKE con precaución.
Use el temporizador automático cuando
cocine carnes curadas o congeladas o la
mayoría de las frutas y verduras. Los
alimentos que pueden echarse a perder
fácilmente, como sería leche, huevos,
pescado, carnes o aves deberían
enfriarse previamente en el refrigerador.
Aunque se hayan enfriado, no deberán
dejarse en el horno por más de 1 hora
antes de iniciar la cocción, y una vez
que ésta haya concluido, deberán
retirarse rápidamente.
- El consumo de alimentos echados a perder podría
causar intoxicación alimenticia.
ESPAÑOL
ESPAÑOL
ESPAÑOL
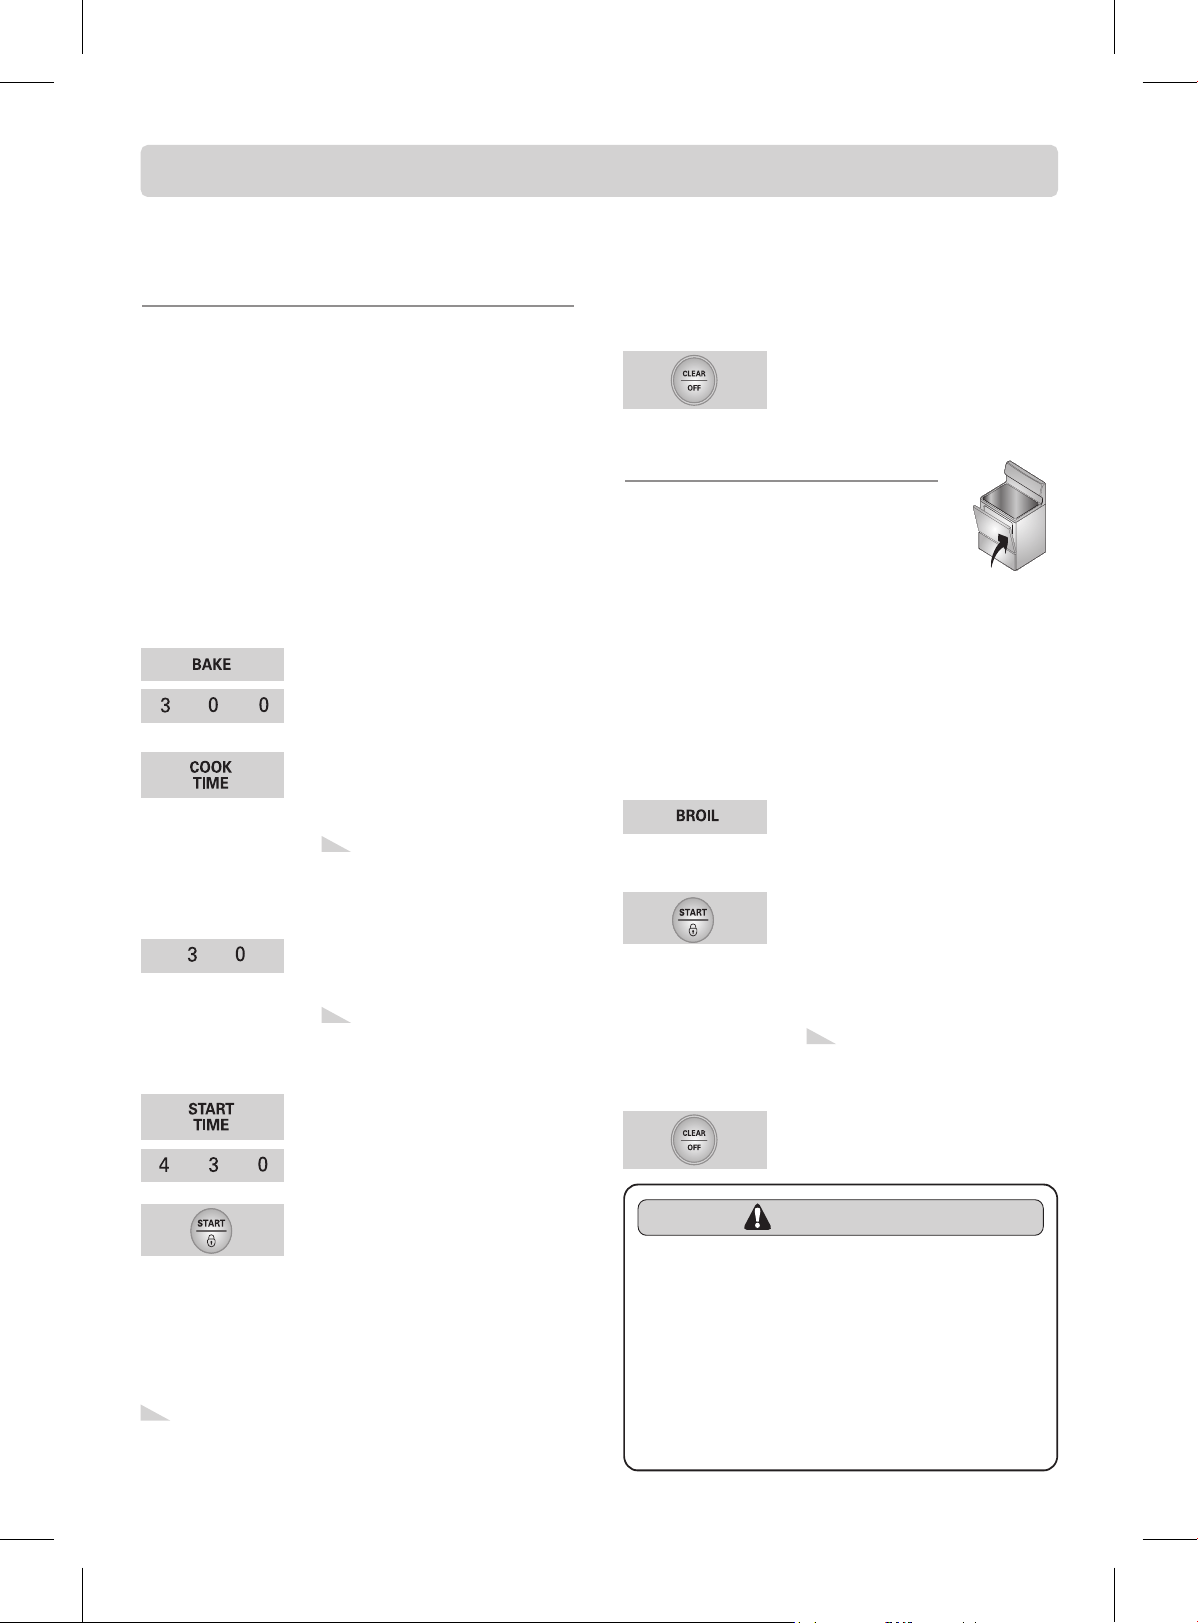
- 20 -
OPERACIÓN
CÓMO FIJAR BROIL
Deje la puerta del horno abierta en la
posición de retención para asar. La puerta
se quedará abierta por sí misma, sin
embargo el horno va a mantener la
temperatura debida.
1. Coloque la carne y el pescado en la
rejilla del asador en la bandeja del
asador.
2. Use las posiciones de los anaqueles
sugeridas en la Guía del asado.
3. Presione BROIL una vez para asar en
Hi o dos veces para asar en Lo. Use
Lo para cocinar a fondo alimentos
como aves o cortes gruesos de carne
sin dorarlos demasiado.
4. Presione START. El horno
comenzará a asar.
5. Ase de un lado hasta que el alimento
se dore; déle vuelta y cocine por el
otro lado.
6. Para cancelar el asado o si el proceso
terminó, presione CLEAR/OFF.
Para ajustar el horno par asar con el ajuste Hi o Lo:
1. Cerciórese de que el reloj está
ajustado con la hora del día correcta.
2. Acomode los anaqueles interiores del
horno y coloque los alimentos en el
horno.
3. Presione BAKE. Se visualizará 350°.
4. Presione 3, 0 y 0 y entonces destella
BAKE y se visualizará 300°.
5. Presione COOK TIME (tiempo de
cocción). TIMED comienza a
destellar, se visualizarán BAKE, 0:00
y 300°.
6. Ingrese el tiempo de horneo deseado
usando los botones numéricos 3 y 0,
comienza a destellar TIMED y se
visualizará BAKE, 30:00 y 300°.
7. Presione START TIME Ingrese la
hora de inicio deseada usando los
botones numéricos 4, 3, y 0.
8. Presione START. Al llegar la hora
fijada, se escuchará un pitido breve.
El horno comenzará hornear.
Después de que el horno alcance la
temperatura deseada, se escucharán
5 pitidos prolongados y empezará a
destellar la lámpara del horno. Se
visualizará 300° y BAKE.
Para programar el horno para encendido y
apagado retrasado automáticamente (por ejemplo,
para hornear a 300°F por 30 minutos y
comenzando a las 4:30):
AJUSTE DE DELAYED TIMED BAKE
(horneo con tiempo de retraso)
Los botones BAKE, COOK TIME y START TIME controlan
la característica de Delayed Timed Bake (horneo con tiempo de
retraso). El temporizador automático de Delayed Timed Bake va
a encender y apagar el horno a la hora fijada con anticipación.
1. Se visualiza End y la hora del día.
El horno se va a apagar
automáticamente.
2. El control va a seguir emitiendo 3
pitidos por minuto hasta que se
presione CLEAR/OFF.
Cuando se termina el tiempo de horneado:
Presione CLEAR/OFF si desea cancelar la
característica Delayed Timed Bake en cualquier
momento.
Nota:
Siempre saque el anaquel
hasta la posición de
retención antes de dar la
vuelta o retirar los alimentos.
Nota:
El tiempo de horneo puede
ajustarse para cualquier lapso
de tiempo desde 1 minuto
hasta 11 horas y 59 minutos.
Nota:
Si desea cambiar el tiempo
de cocción, repita los pasos
5~6 y presione START.
Nota:
Posición de
retención para asar
PRECAUCIÓN
En el caso de que ocurriera un incendio, deje la
puerta del horno cerrada y apáguelo. Si el
LQFHQGLRFRQWLQ~DDUURMHELFDUERQDWRGHVRGa
sobre el fuego o use un extintor de incendios.
NUNCA use agua o harina para intentar apagar
el incendio.
- La harina podría ocasionar una explosión y el agua podría
permitir que un incendio de grasa se extienda y cause
lesiones personales.
- 21 -
OPERACIÓN
GUÍA DEL ASADO SUGERIDA
El tiempo de asado dependerá del tamaño, peso, grosor,
temperatura de inicio y el punto de cocción de su
preferencia.
Esta guía se basa en carnes que se encuentran a la
temperatura del refrigerador.
Para obtener los mejores resultados al asar, use una
bandeja diseñada para el efecto (consulte la figura 1)
Fig.1 (No incluido en este modelo)
Alimento
Cantidad o grosor
Posición
del anaquel
Primer lado
Tiempo (minutos)
Segundo lado
Tiempo (minutos)
Comentarios
Carne molida
Bien cocido
Bistecs
Crudo
Término medio
Bien cocido
Crudo
Término medio
Bien cocido
Pollo
Colas de
langosta
Filetes de
pescado
Rebanadas de
jamón
(pre-cocinado)
Chuletas de
cerdo
Bien cocido
Chuletas de
cordero
Término medio
Bien cocido
Término medio
Bien cocido
Salmón
Filetes
Espaciarlos uniformemente. Se pueden asar
hasta 8 tortitas a la vez.
Los filetes de menos de 1" de grueso deberán
cocinarse a conciencia antes de dorarlos.
Se recomienda freírlos en bandeja. Recorte la
grasa.
Áselo primero por el lado de la piel.
Corte por la parte trasera de la concha. Ábralo
en cruz. Aplique mantequilla derretida antes de
asar y a la mitad del tiempo de asado.
Manipúlelo y déle vuelta muy cuidadosamente.
Si se desea, aplique mantequilla de limón antes
y durante la cocción.
Aumente el tiempo de 5 a 10 minutos por lado
para jamones de 1 de grueso o curado en
1
/
2
”
casa.
Recorte la grasa.
Recorte la grasa.
Engrase la bandeja. Aplique mantequilla
derretida a los filetes.
1 lb. (4 tortitas)
1
/
2
a
3
/
4
” de grueso
1” de grueso
1 a 1
1
/
2
libras.
1
1
/
2
”de grueso
2 a 2 libras.
1
/
2
1 corte completo
hasta de
2 a 2 libras.,
1
/
2
partirlo a lo largo
2 pechugas
2–4
10 a 12 oz.
cada una
1
/
4
a
1
/
2
” de grueso
1
/
2
” de grueso
2 ( de grueso)
1
/
2
”
2 (1” de grueso)
cerca de 1 lb.
2 (1” de grueso)
cerca de 10 a 12 oz.
2 (1
1
/
2
” de grueso)
cerca de 1 lb.
2 (1” de grueso)
4 (1” de grueso)
cerca de 1 lb.
F o G
F
F
F
D
D
D
C
C
C
E
D
E
D
E
E
E
E
D
D
7–9
6
7
8
10
12
14
20
20
12–14
5
5
7
9–10
6
8
11
13
8
9
3–5
2–3
2–3
3–4
4–6
6–8
8–10
6–8
6–10
No le dé
vuelta.
3–4
3–5
6–8
7–9
4–6
7–9
9
9–11
3–4
4–6
ESPAÑOL
ESPAÑOL
ESPAÑOL
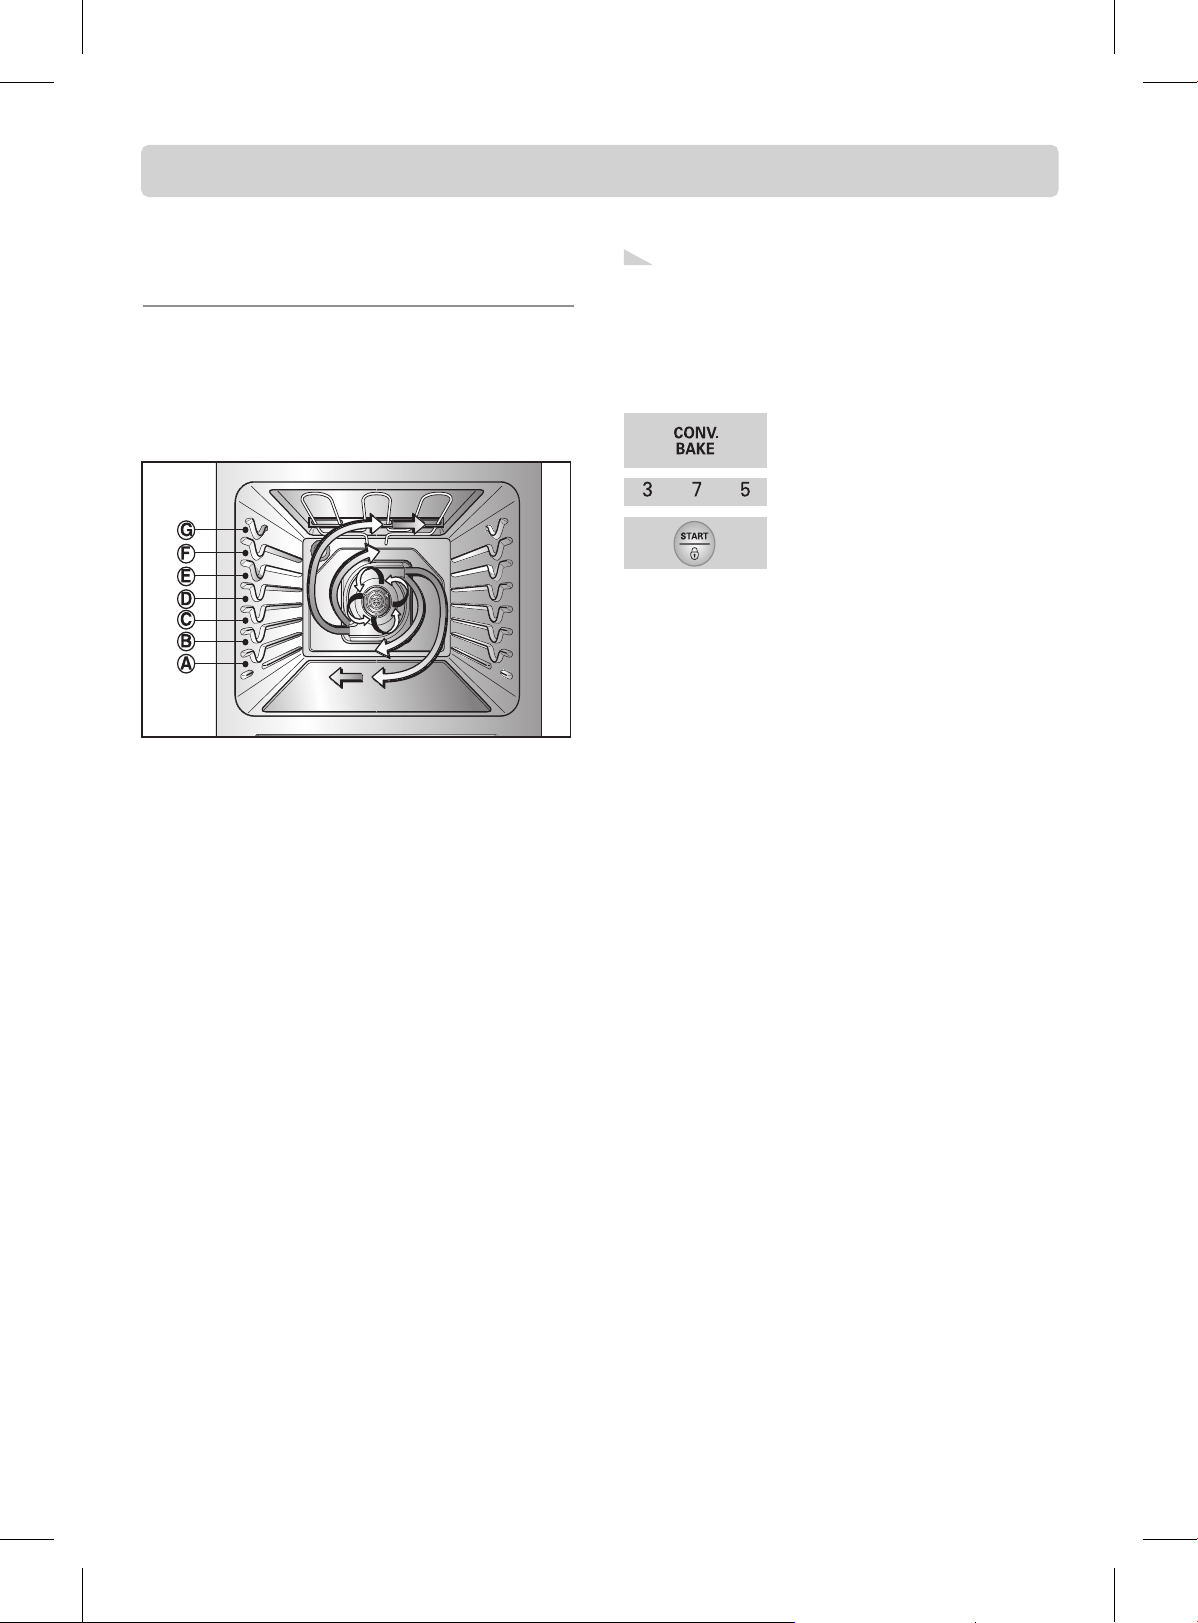
- 22 -
OPERACIÓN
CÓMO AJUSTAR CONVECTION BAKE
(COCCIÓN POR CONVECCIÓN)
Los beneficios de Convection Bake:
1. Algunos alimentos pueden cocinarse hasta 25 o 30% más
rápido, con el consiguiente ahorro de tiempo y electricidad.
2. Se puede cocinar en varios anaqueles.
3. se necesitan bandejas o utensilios de hornear especiales.
Los botones CONV. BAKE controlan la característica
Convection Bake. Cuando se desea velocidad de cocción, use la
característica Convention Bake. El horno puede programarse
para Convention Bake a cualquier temperatura entre 300°F
(150°C) y 550°F (285°C).
El horneo por convección usa un ventilador para circular el calor
de horno de manera uniforme y continua dentro del horno. Esta
distribución del calor mejorada permite una cocción más
uniforme y brinda resultados excelentes usando varios anaqueles
a la vez. Generalmente, los alimentos cocinados en un sólo
anaquel se cocinarán más rápido y de manera más uniforme con
Convection Bake La cocción con varios anaqueles podría
aumentar el tiempo de cocción para algunos alimentos, pero en
general, se ahora tiempo. Los panes y la repostería se doran más
uniformemente.
Consejos para Convection Bake
TLa reducción de tiempo variará dependiendo de la cantidad y
tipo de los alimentos que se van a cocinar. Las galletas y
panecillos deben hornearse en bandejas sin lados o con lados
muy bajos para dejar que el aire caliente circule alrededor de los
alimentos. Los alimentos horneados en bandejas con acabados
oscuros se cocinarán más rápidamente.
Cuando use Convection Bake con un sólo anaquel, coloque el
anaquel en la posición D. Si se cocina con varios anaqueles,
coloque los anaqueles en las posiciones B y D (para 2
anaqueles). Colóquelos en las posiciones B, D y F (para 3
anaqueles).
Se obtienen mejores resultados con pasteles si los hornea
usando el botón BAKE (se pueden utilizar varios anaqueles al
hornear pasteles de varias capas a la vez).
Se obtienen resultados excelentes con las galletas, magdalenas,
panecillos y otros panes rápidos al usar varios anaqueles.
1. Presione CONV. BAKE. El botón
CONV BAKE comienza a destellar
y se visualizará 350°.
2. Presionar 3, 7 y 5.
3. Presionar START. Se visualiza
CONV BAKE y la temperatura que
está cambiando, comenzando
con100°F. Se escuchará un pitido 3
veces cuando se alcance la
temperatura ajustada del horno
(en este ejemplo es 350°F) y se
visualizará la temperatura del horno
convertida automáticamente 350°,
CONV BAKE y el icono del
ventilador.
Para ajustar el horno para Convection Bake y
temperaturas de hasta 375°F:
Presionar CLEAR/OFF si desea cancelar Convection Bake
en cualquier momento.
El ventilador de convección puede detenerse durante
un ciclo de cocción por convección a fin de permitir un
calentamiento más uniforme. Esto no es síntoma de
avería, debe considerarse una función normal.
Nota:

- 23 -
Instrucciones del anaquel asador
Al preparar las carnes para asar por convección, use la
bandeja y la rejilla de asado junto con el anaquel asador. La
bandeja de asado atrapará todos los derrames de grasa y la
rejilla va a impedir las salpicaduras de grasa. El anaquel
asador permitirá que circule el calor alrededor de la carne.
1. Acomode los anaqueles interiores
del horno y coloque los alimentos
en el horno.
2. Presione el botón CONV. ROAST.
CONV ROAST va a destellar y se
visualizará 350°.
3. Presione 3, 7 y 5.
4. Presione START. Se visualiza
CONV ROAST y la temperatura
que está cambiando, comenzando
con100°F. Se escuchará un pitido 3
veces cuando se alcance la
temperatura ajustada del horno
(en este ejemplo es 350°F) y se
visualizará la temperatura del horno
convertida automáticamente 350°,
CONV BAKE y el icono del
ventilador.
Para ajustar la característica Convection Roast
(un ejemplo para cocinar carnes a 375°F)
CÓMO AJUSTAR CONVECTION
ROAST (ASADO POR CONVECCIÓN)
El botón CONV. ROAST ha sido diseñado para ofrecer un
rendimiento óptimo de la cocción para esta característica. El
botón Convection Roast combina un ciclo de cocción con el
ventilador de convección y el elemento para asar carnes y
aves. No es necesario el pre-calentamiento para carnes y
aves. El aire calentado circula por todos los lados alrededor
de los alimentos, sellando los jugos y el sabor.
Los alimentos quedan doraditos y crujientes por fuera y
jugosos por dentro.
&RQYHFWLRQ5RDVWHVDGHFXDGRHVSHFLDOPHQWHSDUDFRUWHVGH
carne grandes y tiernos, destapados.
Presionar CLEAR/OFF si desea cancelar este modo en
cualquier momento.
OPERACIÓN
PRECAUCIÓN
12XWLOLFHODSDUULOODGHURVWL]DGR
cuando ase.
- Con el fin de prevenir que la carne toque el
elemento asador, así como las salpicaduras de
grasa
1. Coloque el anaquel del horno al fondo o cerca de la
posición del anaquel del fondo. Consulte Cómo
acomodar los anaqueles en la sección Antes de
ajustar los controles del horno.
2. Coloque la rejilla en la bandeja de asado. El anaquel
de asado se ajusta en la rejilla de manera que permite
que el aire calentado circule por debajo de los
alimentos para lograr una cocción uniforme y ayuda a
dorar mejor la parte de abajo. Cerciórese de que el
anaquel de asado se asienta con seguridad en la rejilla
de la bandeja de asado. NUNCA USE la bandeja de
asado sin la rejilla. NO cubra la rejilla con papel de
aluminio.
3. Coloque los alimentos (el lado grasiento hacia arriba)
en el anaquel de asado.
4. Coloque la bandeja de asado en el anaquel del horno.
[ No incluido en este modelo ]
Anaquel para asar
(Lado derecho del anaquel dividido)
Rejilla
Bandeja del asador
ESPAÑOL
ESPAÑOL
ESPAÑOL
- 24 -
OPERACIÓN
AJUSTE DE LA CARACTERÍSTICA
COOK & WARM
La característica COOK & WARM se usa para mantener
una temperatura del horno de 170°F. No se sugiere usar esta
característica para recalentar alimentos fríos. La
característica Cook & Warm va a conservar calientes los
alimentos cocinados para servirlos hasta 3 horas después de
que termine la cocción.
La característica COOK & WARM apagará
automáticamente el horno. La característica Cook & Warm
puede usarse sin ninguna operación de cocción o se puede
utilizar después de que termine la cocción con TIMED
BAKE (CONV.BAKE, CONV. ROAST) o DELAYED
TIMED BAKE (CONV.BAKE, CONV. ROAST).
1. Presione COOK & WARM.
2. Presione START.
3. Para apagar Cook & Warm,
presione CLEAR/OFF en cualquier
momento.
Para ajustar Cook &Warm:
1. Fije la característica de cocción que
desea usar: TIMED (BAKE,
CONV.BAKE, CONV. ROAST),
DELAY TIMED (BAKE,
CONV.BAKE, CONV. ROAST)
consulte la página anterior
correspondiente.
2. Presione START.
3. Presione COOK & WARM. El
modo COOK & WARM se ajusta
para activarse automáticamente
después de terminar TIMED
COOKING o DELAY TIMED
COOKING.
4. Para apagar Cook & Warm,
presione CLEAR/OFF en cualquier
momento.
Para ajustar la característica Cook &Warm
después de la cocción cronometrada.
No use recipientes, tapas o envolturas de plástico,
Tape los alimentos con papel de aluminio o tapas
seguras para usar en el horno.
Nota:
La lámpara del horno no puede encenderse si está
activada la función de limpieza automática.
Nota:
La lámpara interior del horno se enciende
automáticamente al abrir la puerta del
horno. La lámpara del horno puede
encenderse o apagarse manualmente
presionando el botón OVEN LIGHT.
CÓMO ENCENDER O APAGAR
LA LÁMPARA DEL HORNO
No utilice el modo de fermentación para calentar
alimentos o para mantenerlos calientes. La temperatura del
horno para la fermentación no es lo suficientemente
caliente como para conservar los alimentos a temperaturas
seguras. Use la característica COOK & WARM para
mantener calientes los alimentos.
La fermentación no funciona si la temperatura del horno
está por encima de 125°F. Se visualiza “Oven is Hot”
(Horno caliente).
Nota:
AJUSTE DE LA CARACTERÍSTICA
PROOF (FERMENTACIÓN)
La característica de fermentación mantiene un entorno caliente,
útil para que crezcan los productos con levadura.
1. Coloque la masa cubierta en un plato
en el anaquel B o C del horno.
2. Presione PROOF y luego START.
La característica de fermentación
brinda la temperatura óptima para el
proceso de fermentación, y en
consecuencia no tiene un ajuste de
temperatura.
3. Una vez que la fermentación ha
terminado, presione CLEAR/OFF.
Para evitar reducir la temperatura del horno y prolongar el tiempo
de fermentación, no abra la puerta del horno innecesariamente.
Revise los productos de pan con tiempo para evitar la
fermentación excesiva.
Para ajustar el horno para Proofing
Para obtener los mejores
resultados, cubra la masa con un
trapo o con envoltura de plástico.
Nota:
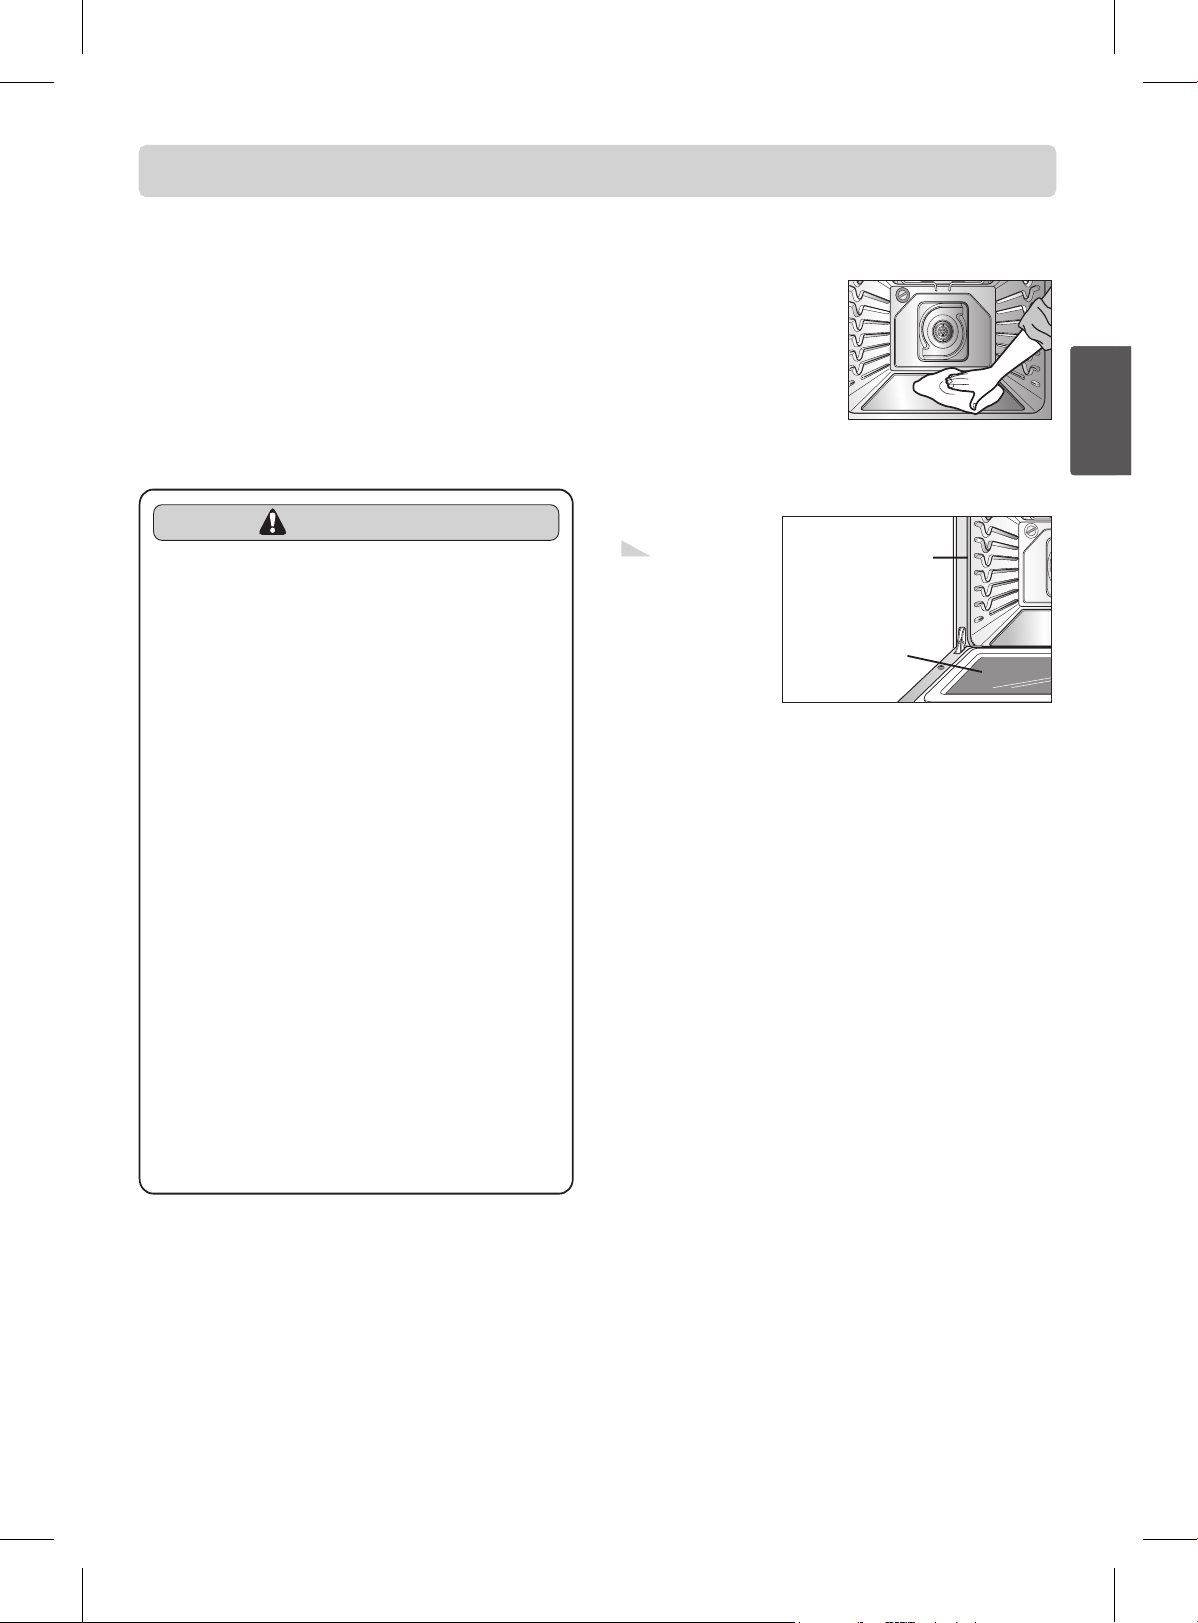
- 25 -
/RVDQDTXHOHVGHOKRUQRGHFRORUSODWHDGRSXHGHQ
limpiarse automáticamente, pero podrían obscurecerse,
perder su brillo o dificultar el deslizamiento.
Recomendamos quitar todos los soportes antes de iniciar el
ciclo de autolimpieza.
/LPSLHDPDQRWRGDODVXFLHGDGHQHOPDUFRGHODQWHURGHOD
estufa y fuera de la empaquetadura de la puerta.
Limpie esas zonas con agua caliente, estropajos de fibra de
acero rellenos de jabón o limpiadores como Soft Scrub.
Enjuague bien con agua limpia y séquelo.
1ROLPSLHODHPSDTXHWDGXUD(OPDWHULDOGHILEUDGHYLGULR
de la empaquetadura de la puerta del horno no es
resistente a la abrasión. Es fundamental que la
empaquetadura se conserve intacta. Reemplace la
empaquetadura si le parece que se está desgastando o
deshilachando.
/LPSLHWRGDODVXFLHGDGGHQVDHQHOIRQGRGHOKRUQR
&HUFLyUHVHTXHODFXELHUWDGHODERPELOODGHODOiPSDUDGHO
horno está en su sitio y el horno está apagado.
1XQFDGHMHODSLHGUDGHKRUQHDUSL]]DHQHOKRUQRGXUDQWH
el ciclo Self-Clean.
El ciclo de limpieza automática usa temperaturas de cocción
por encima de lo normal para limpiar automáticamente el
interior del horno,
Si el horno está muy sucio, es normal que surjan llamaradas,
humaredas o combustión durante la limpieza Es mejor
limpiar el horno regularmente que esperar a que se acumule
mucha suciedad en el horno.
Durante el proceso de limpieza, se debe ventilar bien la
cocina para deshacerse de los olores normales originados por
la limpieza.
Antes de un ciclo de limpieza
automática
Le recomendamos ventilar su
cocina abriendo una ventana o
con un ventilador o campana
durante el primer ciclo de
limpieza automática.
Retire del horno los anaqueles,
la bandeja de asado, todos los
utensilios de cocina y cualquier
papel de aluminio (cualquiera).
Limpie toda la suciedad
densa en el fondo del horno.
Nunca limpie la
puerta a mano
Nunca limpie a
mano la
empaquetadura de
la puerta del horno
LIMPIEZA AUTOMÁTICA
Antes de comenzar el
ciclo de limpieza
automática, retire los
anaqueles del horno
de color plateado.
Nota:
PRECAUCIÓN
1O deje solos a los niños cerca del
artefacto.
- Durante el ciclo de limpieza automática, la parte
externa de la estufa puede calentarse demasiado y no
podrá tocarla.
/OHYHDORVSiMDURVDXQDKDELWDFLyQELHQ
ventilada.
- Los pájaros son muy sensibles a los vapores que se
liberan durante el ciclo de limpieza automática de
cualquier estufa.
12IRUUHFRQSDSHOGHDOXPLQLRODV
paredes o el fondo de del horno,
anaqueles o cualquier otra parte del
horno.
- Si lo hace, se altera la distribución del calor, se
obtienen resultados deficientes al hornear y se puede
dañar permanentemente el interior del horno (el papel
de aluminio se derrite sobre la superficie interior del
horno).
12IXHUFHODSXHrta del horno para abrirla.
- El hacerlo puede dañar el sistema de bloqueo
automático de la puerta del horno. Tenga cuidado al
abrir la puerta del horno después del ciclo de limpieza
automática. Póngase a un lado de la puerta del horno
para permitir que se escape el vapor o el aire caliente.
El horno puede estar MUY CALIENTE.
ESPAÑOL
ESPAÑOL
ESPAÑOL
- 26 -
LIMPIEZA AUTOMÁTICA
El botón SELF-CLEAN se utiliza para iniciar un ciclo Self-Clean. Si se
usa con el botón START TIME, es posible programar un ciclo Self-
Clean. La función Self-Clean tiene tiempos de ciclado de 2, 3 o 4 hors.
1. Cerciórese que el reloj muestra la hora del día
correcta, el horno está vacío y la puerta del
horno esté cerrada.
2. Presione SELF CLEAN una vez para un
tiempo de limpieza de 3 horas o 2 veces para
un tiempo de limpieza de 2 horas o 3 veces
para un tiempo de limpieza de 4 horas. Se
recomienda usar el ciclo de limpieza automática
de 3 horas cuando se limpien derrames
pequeños y controlados. Se recomienda un
tiempo de SELF CLEAN (limpieza automática)
de 4 horas para hornos muy sucios.
3. Presione START. Empieza a destellar el icono
DOOR LOCKED.
4. Una vez que se ha configurado SELF CLEAN
(limpieza automática), la puerta del horno se
bloqueará de manera automática. Usted no
podrá abrir la puerta del horno hasta que se
haya enfriado el horno. El bloqueo se liberará
automáticamente.
Para iniciar un ciclo Self-Clean inmediatamente y
apagarlo automáticamente
1. Presione SELF CLEAN (limpieza
automática). Seleccione el tiempo de
limpieza automática deseado
presionando SELF CLEAN.
2. Presione START TIME. Ingrese la hora
de inicio deseada de Self-Clean usando
los botones numéricos 8, 0, y 0.
3. Presione START. DELAY y CLEAN
seguirán encendidos.
4. El ciclo Self-Cleaning se encenderá
automáticamente al llegar la hora fijada.
Para ajustar un tiempo de retraso del inicio a las 8:00
1. Presione CLEAR/OFF.
2. Después de que el horno se haya
enfriado, DOOR LOCK (puerta
bloqueada) destrabará la puerta de
manera automática.
Si llegara a ser necesario detener o interrumpir un ciclo Self-Cleaning
debido a humos o fuego excesivo en el horno:
Stopping or Interrupting a Self-Clean cycle:
Mientras se lleva a cabo el ciclo Self-Clean
Es posible que se vea un poco de humo y sienta un olor las primeras
veces que se limpie el horno. Esto es normal e irá disminuyendo con el
paso del tiempo. También podría haber emisión de humos si el horno
está muy sucio o si se dejó una bandeja de asado en el horno.
A medida que el horno se calienta se podrían escuchar los ruidos de partes
metálicas contrayéndose o en expansión. Eso es normal y no daña al horno.
No fuerce la puerta del horno cuando puede verse LOCK (bloqueado). La
puerta del horno permanece
rá bloqueada hasta que la temperatura del
horno se haya enfriado. Tratar de abrir la puerta a la fuerza dañará la puerta.
Cuando se usa la característica Self-Clean:
No podrá iniciarse un ciclo Self—Clean si es que está activa
la característica Oven Lockout.
Una vez que se ha configurado SELF CLEAN (limpieza
automática), la puerta del horno se bloqueará de manera
automática. Usted no podrá abrir la puerta del horno hasta que
éste se haya enfriado. El bloqueo se liberará automáticamente.
Una vez que la puerta se ha bloqueado, la luz indicadora
"DOOR LOCKED" (puerta bloqueada) dejará de destellar y
permanecerá encendida. Permita alrededor de 15 segundos
para que la traba de la puerta del horno se cierre.
Si se ha fijado el horario normal de 12 horas en el reloj, el
ciclo Delayed Self-Clean (Limpieza automática retrasada)
nunca podría ajustarse más de 12 horas anticipadas. Si
desea fijar un ciclo de Self-Clean con 12 – 24 horas de
anticipación, consulte la página 24 para obtener
instrucciones para el ajuste del control al modo de
visualización de horario de 24 horas.
Nota:
HS (SUPERFICIE CALIENTE) aparecerá en el anafe
durante el ciclo de LIMPIEZA AUTOMÁTICA.
Nota:
La cocina se puede utilizar durante el ciclo de
autolimpieza.
Nota:
Cuando finaliza el ciclo de limpieza automática
Usted no podrá abrir la puerta del horno hasta que se haya enfriado
el horno.
Se recomienda usar un ciclo de limpieza automática de 2 horas para
suciedad suave, 3 horas para suciedad promedio y 4 horas para
suciedad rebelde.
Se necesita tiempo adicional para que el horno se enfríe. Por lo tanto,
la puerta del horno no se liberará de la posición de bloqueado hasta
que se haya enfriado.
Después del ciclo Self-Clean
Es posible que observe un poco de ceniza blanca en el horno. Después de
que se enfríe el horno, límpiela con un trapo húmedo o con un estropajo
de fibra de acero relleno de jabón. Generalmente, estos depósitos son
residuos salinos que no pueden eliminarse con el ciclo de limpieza. Repita
el ciclo si el horno no quedó limpio después de un ciclo de limpieza.
Si se quedaron los anaqueles en el horno y no deslizan suavemente
después de un ciclo de limpieza, limpie los anaqueles y sus soportes con
un poco de aceite vegetal, lo que hará que se deslicen más fácilmente.
Es posible que aparezcan unas líneas muy finas en la porcelana ya que
pasó por periodos de calentamiento y de enfriamiento. Eso es normal y
no afecta el rendimiento.
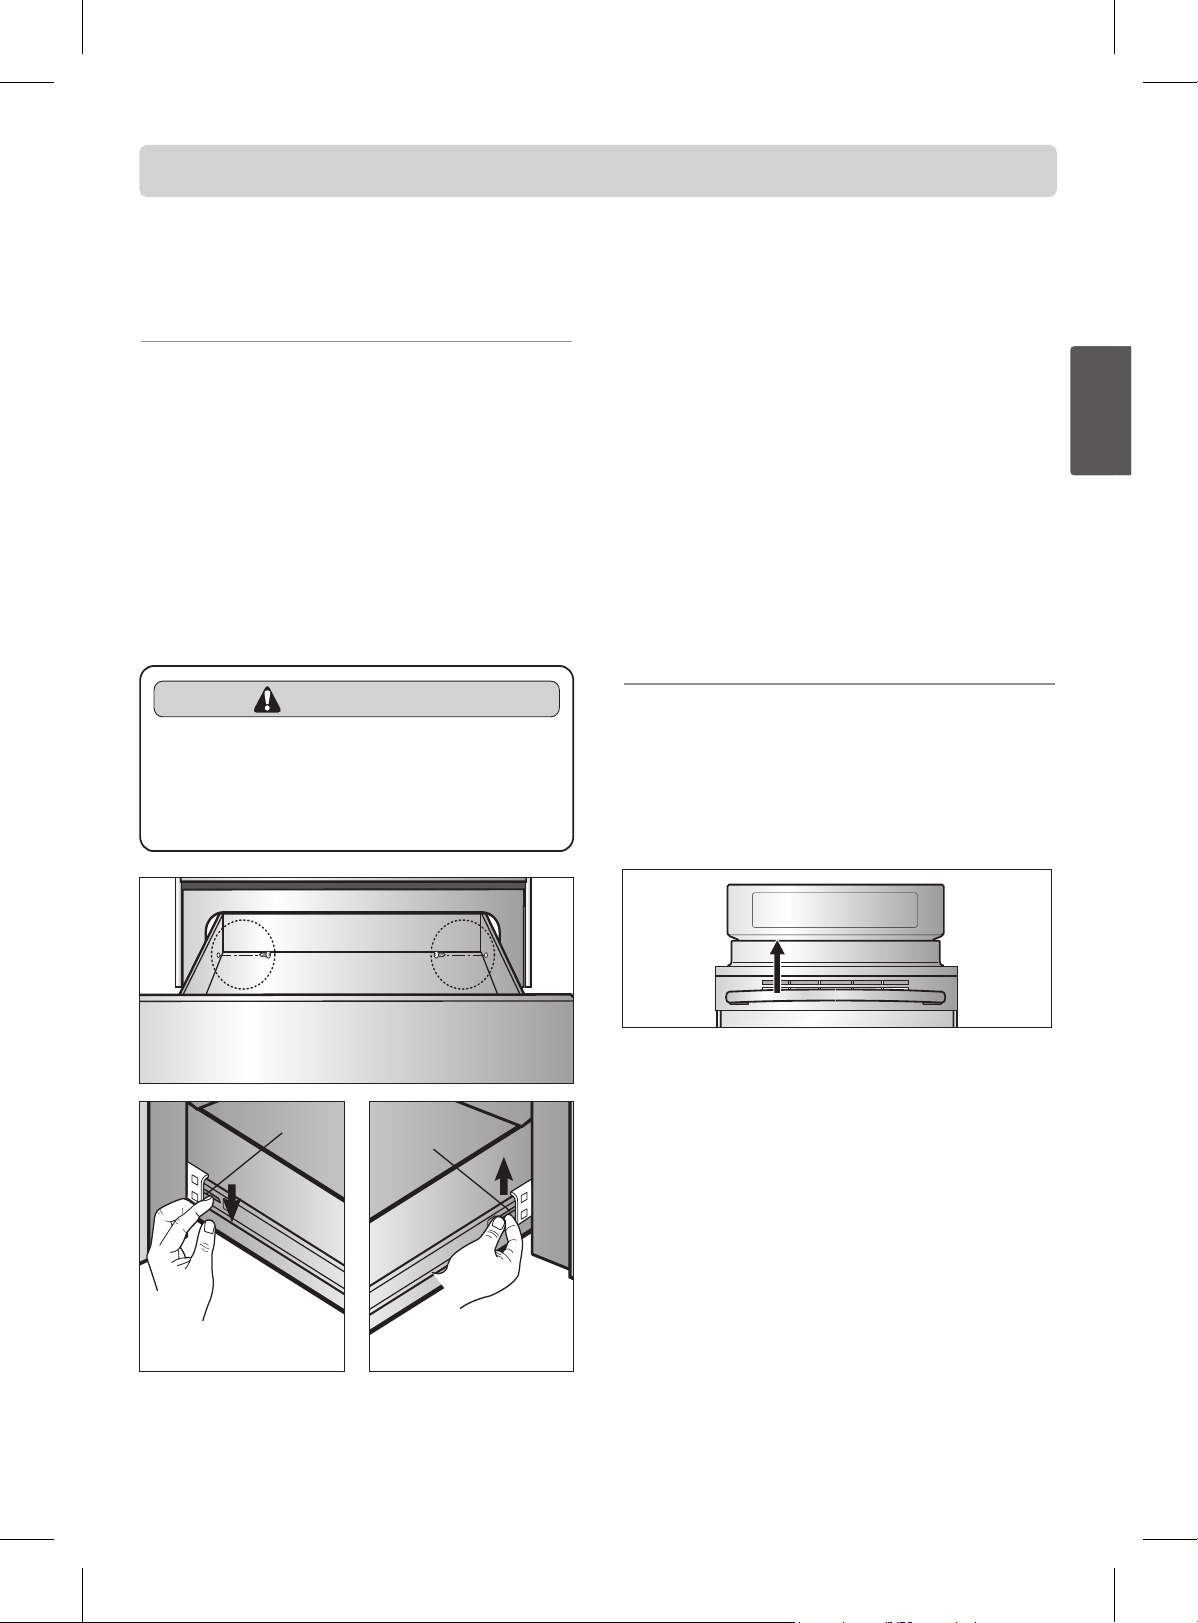
- 27 -
CÓMO DESMONTAR Y
REPONER EL CAJÓN DE
ALMACENAMIENTO
Para desmontar el cajón de almacenamiento:
1. PRECAUCIÓN - Antes de desmontar el cajón de
almacenamiento, apague (OFF) la alimentación.
2. Abra el cajón hasta su posición de completamente
abierto.
3. Quite los 2 tornillos (del lado derecho y del izquierdo).
(Consulte el dibujo a continuación)
4. Localice la palanca de la corredera a ambos lados del
cajón, presione hacia abajo en la palanca de la corredera
derecha y tire de la palanca de la corredera derecha.
5. Extraiga de la estufa el Cajón de almacenamiento.
Para reponer el Cajón de almacenamiento:
1. Reponga la capa protectora en la corredera derecha del
cuerpo del cajón.
2. Tire de las correderas con cojinetes hacia el frente de
la corredera del chasis.
3. Alinee la corredera de cada lado del cajón con las ranuras
de la corredera en la estufa.
4. Empuje el cajón dentro de la estufa hasta que escuche
que las correderas hacen "clic" (aproximadamente 2").
Vuelva a tirar del cajón para abrirlo y lograr que las
correderas con cojinetes se asienten en su sitio. Si no
escucha el "clic" de las palancas o las correderas con
cojinetes no dan la impresión de estar bien asentadas,
desmonte el cajón y repita los pasos de 2 al 4.
De esta forma se evitarían los daños posibles a las
correderas con cojinetes.
RESPIRADERO DEL HORNO
El respiradero del horno está encima de la unidad de
superficie posterior izquierda.
Esta zona podría calentarse mientras se usa el horno.
Es normal que salgan vapores por el respiradero.
El respiradero es muy importante para la circulación
correcta del aire. Nunca obstruya este respiradero.
MANTENIMIENTO
Presione hacia abajo
con el dedo
Palanca
Presione hacia arriba
con el dedo
Palanca
Quite el tornillo
ADVERTENCIA
$QWHVGHGHVPRQWDUHOFDMyQGH
calentamiento, apague (OFF) la
alimentación.
- No hacerlo puede provocar lesiones personales
graves, la muerte o una descarga eléctrica.
ESPAÑOL
ESPAÑOL
ESPAÑOL
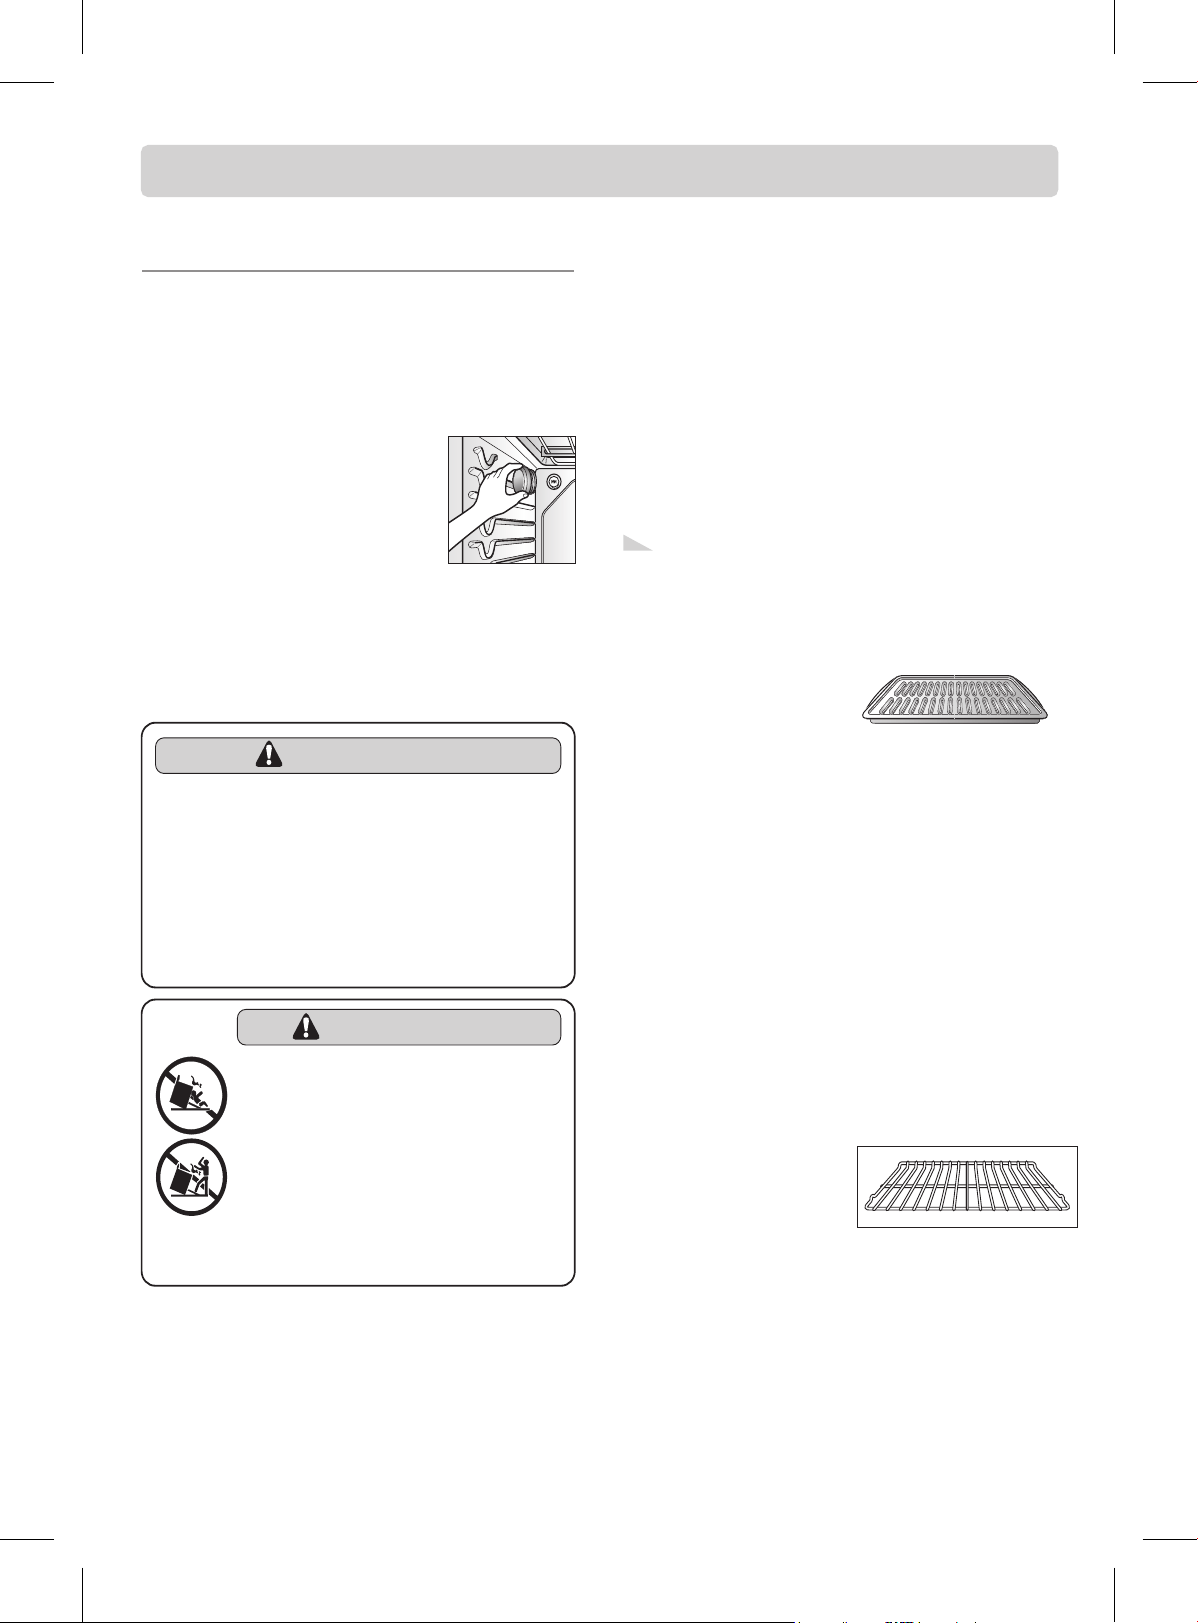
- 28 -
MANTENIMIENTO
Cambio de la lámpara del horno
La lámpara del horno está equipada con una bombilla estándar de
40 vatios para artefactos. Se enciende cuando se abre la lámpara
del horno. Si la puerta del horno está cerrada, presione OVEN
LIGHT para encenderla o apagarla. No funciona durante el ciclo
Self-Clean.
Para reemplazarla:
Cerciórese de que tanto el horno como la
bombilla se han enfriado.
1. Desenchufe la estufa o desconecte la
fuente de alimentación
2. Para retirar la tapa de cristal de la bombilla de cristal en la parte
posterior del horno déle vuelta a la izquierda.
3. De vuelta a la izquierda a la bombilla para extraerla del casquillo.
4. Reemplace la bombilla y la tapa de la bombilla dando vuelta a la
derecha.
5. Enchufe la estufa o reconecte la alimentación
Partes del cuerpo y pintadas y adornos
decorativos
Para una limpieza general, use un trapo con agua caliente
jabonosa. Aplique un detergente ligero directamente a la superficie
sucia y grasa acumulada. Déjelo reposar en la superficie sucia unos
30 a 60 minutos. Enjuáguelo con un trapo húmedo y séquelo. NO
use limpiadores abrasivos sobre estos materiales; pueden rayarse.
Superficies de acero inoxidable
(en algunos modelos)
No use estropajos de fibra de acero; rayan la superficie.
1. Agite bien la botella.
2. Aplique una cantidad pequeña de Stainless Steel Appliance
Cleaner (limpiador de artefactos de acero inoxidable) o de
pulimento en un trapo o toalla de papel húmedo.
3. Limpie una zona pequeña, frotando, si corresponde, en el
sentido del grano del acero inoxidable.
4. Seque y pula con una toalla de papel o trapo suave seco.
5. Repita su uso si es necesario.
CUIDADOS Y LIMPIEZA
Bandeja de asado y rejilla
No use el proceso de
limpieza automática para
limpiar la bandeja de
asado o la rejilla.
Después de asar, quite la
bandeja de asado del horno.
Quite la rejilla de la bandeja.
Con cuidado, vierta la grasa de la bandeja en un recipiente
adecuado.
Lave y enjuague la bandeja de asado y la rejilla en
agua caliente con un estropajo de plástico o relleno
de jabón.
Si se ha adherido algún alimento quemado, rocíe la rejilla
con limpiador mientras esté caliente y cúbrala con toallas de
papel húmedas o con un trapo de cocina. Se logran quitar
los alimentos quemados adheridos remojando la bandeja.
Tanto la bandeja de asado como la rejilla pueden
limpiarse con un limpiador de hornos comercial.
Tanto la bandeja de asado como la rejilla pueden limpiarse
en una lava vajillas.
Rejillas del horno
Antes de operar el ciclo Self-
Clean retire los anaqueles del
horno. Si los anaqueles se dejan
en su sitio podrían decolorarse y, si es que se derramó algún
alimento en los soportes, los anaqueles podrían atascarse.
Si sucedió así, límpielos usando un limpiador ligeramente
abrasivo. Enjuague bien con agua limpia y séquelos.
Si los anaqueles se limpiaron en el ciclo Self-Clean, se
podrían colorear de un azul ligero y el acabado se vería
opaco. Después de concluir el ciclo Self-Clean, y que el
horno se haya enfriado, frote los lados de los anaqueles con
papel encerado o con un trapo remojado en un poco de
aceite. Eso hará que los anaqueles se deslicen más fácilmente
por los soportes.
Nunca guarde una bandeja de
asado y rejilla sucios en ningún
sitio de la estufa. (No incluido)
Si se utilizó previamente un limpiador de artefactos de acero
inoxidable con base de aceite mineral, lave la superficie con un
líquido limpia vajillas y agua antes de utilizar el limpiador de
artefactos de acero inoxidable o pulimento.
Nota:
ADVERTENCIA
$QWHVGHUHHPSOD]DUODERPELOODGHOD
lámpara de su horno, desconecte la
alimentación de energía a la estufa en el
panel de fusibles o disyuntores principal.
- No hacerlo puede provocar lesiones personales
graves, la muerte o una descarga eléctrica.
&HUFLyUHVHGHTXHWDQWRHOKRUQRFRPROD
bombilla se han enfriado.
ADVERTENCIA
NO se pare o se siente en la puerta.
Instale el soporte anti-volcaduras
incluido con la cocina.
- La cocina puede inclinarse y pueden provocarse
lesiones debido al derrame de líquido o alimentos
calientes o la cocina misma.
- Cuando se jala la estufa de la pared por motivos de
limpieza, servicio u otra razón, asegúrese de volver a
embonar correctamente el Dispositivo Antivolcadura
al volver a empujar la estufacontra la pared.

- 29 -
MANTENIMIENTO
Puerta del horno
Use jabón y agua para limpiar meticulosamente la parte
superior, los lados y el frente de la puerta del horno
Enjuáguelo bien. Se puede usar un limpiador de vidrio para
limpiar el vidrio exterior de la puerta del horno. NO sumerja
la puerta en agua. Nunca rocíe con agua o deje que ésta
o el limpiador de vidrio penetren por los
respiraderos de la puerta. NO use limpiadores de horno
ni polvos limpiadores o ni algún material de limpieza
abrasivo en el exterior de la puerta del horno.
NO limpie la empaquetadura de la puerta del horno. La
empaquetadura de la puerta del horno está hecha de un
material tejido y es esencial para lograr un cierre óptimo.
Debe tener cuidado de no frotar, dañar o quitar la
empaquetadura. Nunca limpie la puerta a mano. Nunca
limpie a mano la empaquetadura de la puerta del horno.
CÓMO LIMPIAR LA SUPERFICIE
DE COCCIÓN DE VIDRIO
Limpieza diaria normal
Utilice EXCLUSIVAMENTE limpiador para vitrocerámica
en la placa de vidrio. Otras cremas pueden no ser tan
eficaces o podrían dañar la superficie, rayarla o
manchándola permanentemente.
Con el fin de mantener y proteger la superficie de su
superficie de cocción de vidrio, siga los pasos siguientes:
1. Antes de utilizar la superficie de cocción por primera vez,
Límpiela con un limpiador de superficies de cocción de
cerámica o el limpiador proporcionado. Así se ayuda a
proteger la superficie y se facilita la limpieza.
2. El uso diario del limpiador de superficies de cocción de
cerámica o el limpiador proporcionado ayudará a
mantener la superficie de cocción como nueva.
3. Agite bien la crema limpiadora. Ponga unas cuantas gotas
del limpiador directamente en la superficie de cocción.
4. Utilice papel de cocina para limpiar toda la superficie de
cocción.
5. Enjuague con agua limpia y utilice un paño seco o papel
de cocina para retirar todos los residuos.
Nunca limpie la
puerta a mano
Nunca limpie a
mano la
empaquetadura de
la puerta del horno
No caliente la superficie de cocción hasta que quede
completamente limpia.
Nota:
PRECAUCIÓN
12XWLOLFHHVSRQMDVDEUDVLYDVRSDxRVGH
limpieza metálicos.
- Pueden dañar la superficie de vidrio del anafe.
3RUVHJXULGDGSyQJDVHXQJXDQWHGH
cocina en la mano al limpiar la superficie
de cocción caliente.
PRECAUCIÓN
12XWLOLFHOLPSLDGRUHVDEUDVLYRVIXHUWHVR
raspadores de metal afilados para limpiar
el vidrio de la puerta del horno ya que
pueden rayar la superficie.
- Puede provocar la rotura del vidrio.
ESPAÑOL
ESPAÑOL
ESPAÑOL
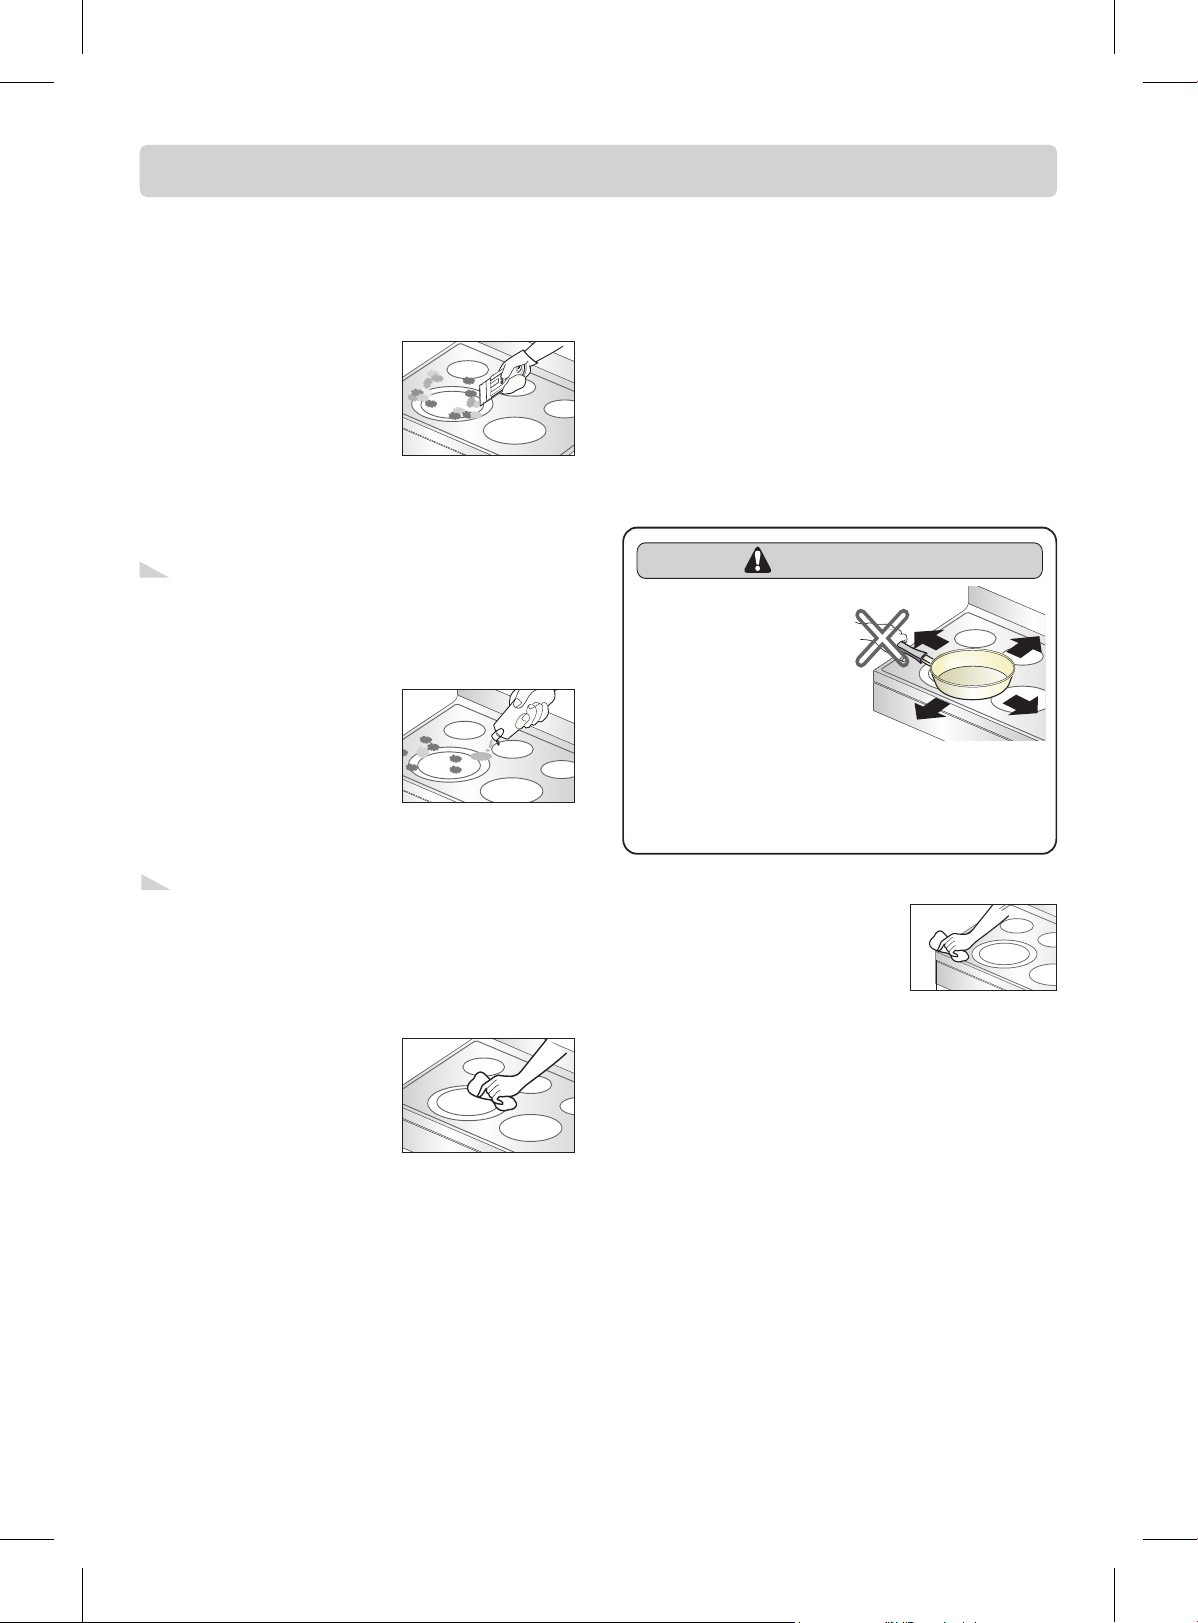
- 30 -
MANTENIMIENTO
Marcas y raspones metálicos
1. Tenga cuidado de no deslizar las cacerolas o bandejas por
la superficie de cocción. Van a quedar marcas metálicas
por toda la superficie de cocción. Estas marcas pueden
ser eliminadas utilizando limpiador y bayeta para
vitrocerámicas.
2. Si permite que el contenido de las cacerolas con una capa
delgada de aluminio o cobre hierva hasta que se
consuma, esa capa delgada podría dejar una decoloración
negra en la superficie de cocción. Eso deberá quitarse
inmediatamente antes de volver a calentar o la
decoloración podría ser permanente.
Sello de la superficie de cocción
Para limpiar el sello de la superficie de
cocción alrededor de los bordes de
vidrio, deposite por unos minutos un
trapo húmedo y luego limpie con
limpiadores no abrasivos.
PRECAUCIÓN
Los utensilios de cocina
con fondos ásperos o
desiguales pueden
provocar marcas o
rayar la superficie de la
encimera.
No deslice metal o cristal por la superficie de
la encimera.
No utilice utensilios de cocina con
acumulación de suciedad en la parte inferior.
Residuos quemados adheridos
Limpieza de la vitrocerámica
Paso. 1
Retire primero todos los restos
quemados o comida derramada en
la superficie de cocción
vitrocerámica con ayuda de un
raspador metálico adecuado (como
raspar pintura de los vidrios - esto
no dañará la superficie).
Sujete el raspador formando un ángulo aproximado de 30°
con la placa.
Paso. 2
Una vez que la superficie de
cocción se haya enfriado, aplique
pequeñas cantidades (tamaño de
una moneda pequeña) de un
limpiador aprobado sobre cada
quemador y extienda la crema
sobre la superficie de cocción con un papel de cocina
húmedo, como si limpiara una ventana.
Paso. 3
El último paso consiste en enjuagar
con agua limpia y frotar la superficie
de cocción con papel de cocina
limpio y seco.
Importante:
Si algún resto de azúcar o alimento que contiene azúcar
(conservas, cátsup, salsa de tomate, gelatina, caramelo,
dulce, jarabe, chocolate, etc.), un artículo de plástico o papel
de aluminio se derritiera sobre la superficie de cocción
caliente, retire el material derretido INMEDIATAMENTE con
ayuda de un raspador con cuchilla metálica (esto no dañará
la superficie de cocción decorada) mientras que la
VXSHUILFLHD~QHVWpcaliente para evitar el riesgo de daños
en la superficie vitrocerámica.
Por seguridad, póngase un guante de cocina en la mano
al limpiar la superficie de cocción caliente.
No utilice un raspador con una cuchilla roma o dañada.
Por seguridad, póngase un guante de cocina en la mano al
utilizar el raspador.
Nota:
Weiman CookTop Cleaning Cream (www.weiman.com)
Cerama Bryte (www.ceramabryte.com)
Hope’s Cooktop Cleaning Cream (www.camden-industrial.com)
Easy-Off 3 in 1 Glass Top Cleaner Spray (www.easyoff.us).
Nota:
limpiador aprobado
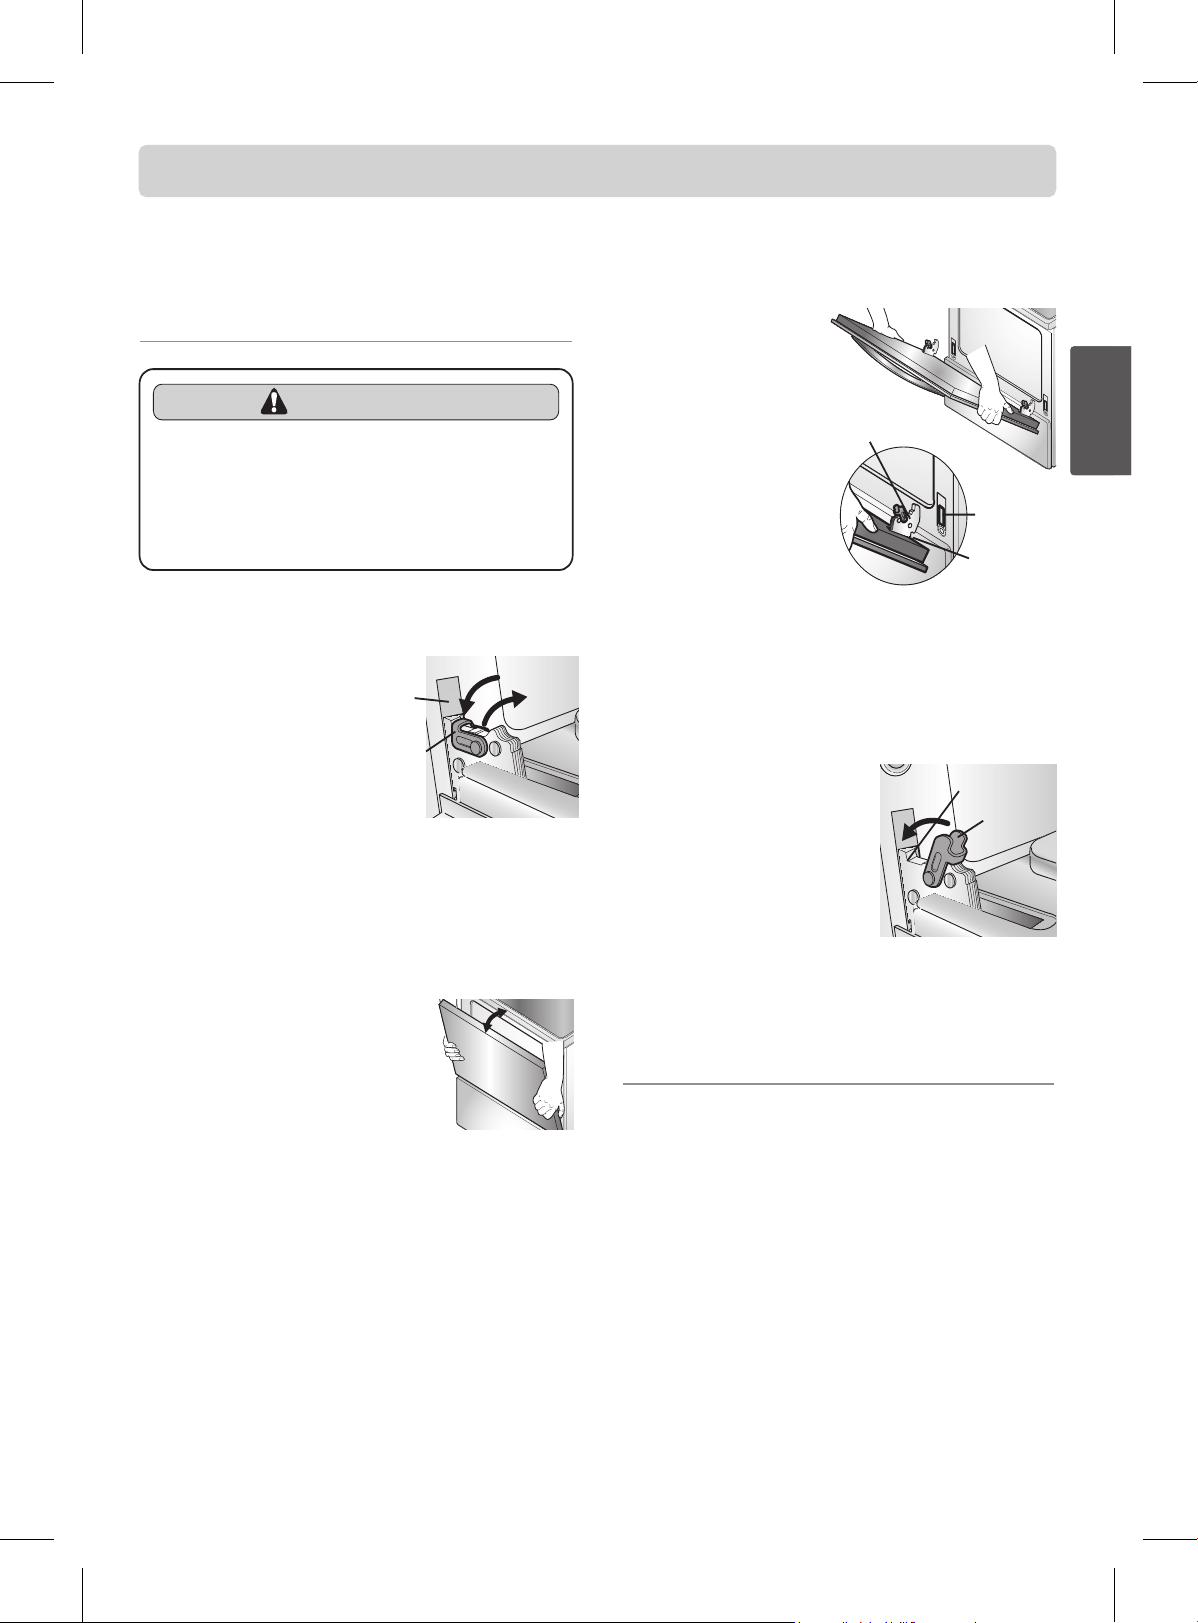
- 31 -
MANTENIMIENTO
CÓMO DESMONTAR Y
REPONER LA PUERTA DEL
HORNO REMOVIBLE
Para desmontar la puerta:
Paso. 1
Abra la puerta completamente.
Paso. 2
Tire hacia debajo de los
seguros de la bisagra hacia el
marco de la puerta para
alcanzar la posición de
desbloqueo.
Paso. 3
Agarre con firmeza ambos lados de la puerta por la parte
superior.
Paso. 4
Cierre la puerta hasta la posición de
desmonte, es decir, cerca de 5 grados.
Paso. 5
Tire de la puerta hacia arriba y afuera
hasta que el brazo de la bisagra se libere de la ranura.
Para reponer la puerta del horno:
Paso. 1
Agarre con firmeza ambos
lados de la puerta por la
parte superior.
Paso. 2
Sostenga la puerta en el
mismo ángulo que en la
posición de desmonte y
asiente la muesca del brazo
de la bisagra dentro del
extremo inferior de la ranura
de la bisagra. La muesca del
brazo de la bisagra deberá
estar completamente asentada en el fondo de la ranura.
Paso. 3
Abra la puerta completamente. Si la puerta no puede abrirse
completamente, la muesca no se ha asentado
correctamente en el borde del fondo de la ranura.
Paso. 4
Presione los seguros de la bisagra
contra el marco delantero de la
cavidad del horno hasta la posición
de bloqueo.
Paso. 5
Cierre la puerta del horno.
INSTRUCCIONES PARA EL
CUIDADO DE LA PUERTA
/DPD\RUtDGHODVSXHUWDVGHKRUQRVVRQGHYLGULR\SXHGHQ
romperse.
Lea las recomendaciones siguientes:
1. No cierre la puerta del horno hasta que todos los
anaqueles de horno estén en su sitio completamente.
2. No golpee el vidrio con cacerolas, bandejas o cualquier
otro objeto.
3. Si el vidrio se raya o golpea o se sujeta a tensiones, su
estructura podría debilitarse, lo que puede crear un
aumento en el riesgo de ruptura en el futuro.
Ranura
Seguro de
la bisagra
Bloquear
Desbloquear
Cerca de 5°
Brazo de la bisagra
Muesca
Lado del
fondo de
la ranura
Brazo de la
bisagra
Seguro de
la bisagra
PRECAUCIÓN
Tenga cuidado al desmontar y levantar la
puerta.
181&$OHYDQWHODSXHrta usando la
agarradera.
- La puerta es muy pesada.
ESPAÑOL
ESPAÑOL
ESPAÑOL
- 32 -
LOCALIZACIÓN Y REPARACIÓN DE AVERÍAS
Causa posible / Solución
Instalación deficiente. Coloque un anaquel del horno en el centro del horno. Coloque un nivel sobre el anaquel
del horno. Ajuste las patas niveladoras de la base de la estufa hasta que el anaquel del horno esté nivelado.
Cerciórese de que el piso está bien nivelado y es lo suficientemente sólido como para soportar la estufa
correctamente.
Si el piso está pandeado o desnivelado, solicite ayuda de un carpintero para corregir el problema.
La estufa podría verse desnivelada por la forma en que se alinearon los gabinetes de la cocina. Cerciórese de
que los gabinetes estén bien cuadrados y que se deje la holgura suficiente para el despeje de la estufa.
Los gabinetes no están cuadrados o se construyeron sin holgura. Póngase en contacto con el constructor o
instalador para que le hagan espacio a la estufa.
La alfombra interfiere con la estufa. Deje el espacio suficiente para que la estufa pueda levantarse por encima
de la alfombra.
El control electrónico ha detectado la
condición de falla. Presione
CLEAR/OFF para borrar la
visualización y detener los pitidos. Vuelva
a programar el horno. Si se vuelve a
repetir la falla, anote el número de falla.
Presione CLEAR/OFF y lla
me a un
representante de servicio.
Se están usando los utensilios de cocina inadecuados.
- Use bandejas planas y que se ajusten al diámetro de la unidad de superficie seleccionada.
La tensión de línea (voltaje) puede ser baja en algunas zonas.
- Cubra la bandeja con una tapa hasta obtener el calor deseado.
Es posible que se fundiera un fusible o se disparara un disyuntor en su casa.
- Reponga el fusible o restablezca el disyuntor.
Se ajustaron incorrectamente los controles de la superficie de cocción.
- Compruebe que se ajustó el control correspondiente de la unidad de superficie que esté usando.
Esto es normal. La unidad de control está aún encendida y caliente.
No se limpiaron los derrames de alimentos antes de usar la estufa de nuevo.
- Consulte la sección Cómo limpiar la superficie de cocción de vidrio.
Superficie caliente en un modelo con una superficie de cocción de color claro.
- Esto es normal. Cuando la superficie lisa está caliente puede aparecer descolorida. Eso es temporal y
desaparece cuando la superficie se enfría.
Esto es normal.
- El elemento se enciende y se apaga para mantener la temperatura ajustada.
ANTES DE SOLICITAR SERVICIO
Revise esta lista antes de solicitar servicio Le puede ahorrar tiempo y dinero. En la lista se incluyen eventos comunes que no
fueron causados por defectos de mano de obra o de materiales en este artefacto.
CÓDIGO
F-1
F-2
F-3
F-4
F-7
F-9
CAUSA
Teclado en corto circuito
No funciona el sistema de bloqueo de la puerta
Sensor del horno abierto
Sensor del horno en corto circuito
No hay calentamiento
El horno está demasiado caliente
Problema
La estufa no está nivelada.
La estufa no se puede mover
con facilidad.
Es necesario el acceso a la
estufa para darle servicio.
Las unidades de superficie
no logran mantener un
hervor intenso o la cocción
no es suficientemente rápida.
Las unidades de superficie
no funcionan correctamente.
Las unidades de superficie
dejan de brillar cuando se les
cambia a un ajuste más bajo.
Zonas descoloridas en la
superficie de cocción.
Las unidades de superficie
ciclan entre encendido y
apagado frecuentemente
- 33 -
LOCALIZACIÓN Y REPARACIÓN DE AVERÍAS
Causa posible / Solución
El enchufe de la estufa no se insertó completamente dentro del tomacorriente.
- Cerciórese que el enchufe eléctrico está conectado a un tomacorriente activo y conectado a tierra correctamente.
Es posible que se fundiera un fusible o se disparara un disyuntor en su casa.
- Reponga el fusible o restablezca el disyuntor.
Se ajustaron incorrectamente los controles del horno.
- Consulte la sección Cómo usar el horno.
El horno está demasiado caliente.
- Deje enfriar el horno por debajo de la temperatura de bloqueo.
Cerciórese de que el cable esté bien enchufado en el tomacorriente. Compruebe los disyuntores.
El cableado de servicio no está completo. Solicite ayuda de su reparador de electrodomésticos.
Interrupción de alimentación de energía. Para estar seguro, compruebe la iluminación en su hogar. Solicite los
servicios de su proveedor de energía eléctrica local.
El mensaje PF siempre aparecerá cuando se presente una interrupción de la fuente de alimentación al artefacto.
Para eliminar el mensaje PF presione el botón de control CLEAR/OFF y cerciórese de que restablece la hora
correcta del día.
Para borrar el mensaje HS presione el botón ON/OFF.
Reponga la bombilla o apriétela. Consulte la sección Cambio de la lámpara del horno en este manual del
propietario.
El control no se ajustó debidamente. Siga las instrucciones en Ajustar los controles del horno.
Cerciórese de que la puerta del horno esté abierta en la posición de retención para asar.
La carne está demasiado cerca del elemento. Vuelca a colocar el anaquel para lograr la holgura adecuada entre la
carne y el elemento. Precaliente el elemento del asador para dorar rápidamente.
La carne no estaba preparada correctamente. Quite la grasa sobrante de la carne. Solamente recorte los bordes
grasientos para impedir que se enrosquen, pero no corte la carne.
Insértela con el lado contrario hacia arriba en la bandeja del asador y que la grasa no se esté escurriendo. Siempre
coloque la rejilla en la bandeja de asado con los travesaños de la parrilla hacia arriba y las ranuras hacia abajo para
permitir que la grasa se escurra en la bandeja.
La grasa se ha acumulado en las superficies del horno. Es necesario limpiar regularmente cuando se asa con
frecuencia. La grasa antigua o las salpicaduras de los alimentos pueden humear en exceso.
Se ajustar
on incorrectamente los controles del horno.
- Consulte la sección Cómo usar el horno.
La posición del anaquel no es correcta o no está nivelado.
- Consulte la sección Cómo usar el horno.
Los utensilios de cocina no son los adecuados o se utilizan utensilios del tamaño incorrecto.
- Consulte la sección Cómo usar el horno.
Se debe ajustar el sensor del horno.
- Consulte cómo ajustar la temperatura del horno en la sección Option.
Se ajustaron incorrectamente los controles del horno.
- Cerciórese de que presiona el botón BROIL
Se usa una posición del anaquel inadecuada.
- Consulte la Guía del asado, página 21.
Los utensilios de cocina so son adecuados para asar.
- Para obtener los mejores resultados, utilice una cazuela diseñada para asados.
Problema
El horno no funciona
El artefacto no funciona.
Se visualiza un mensaje
PF, HS del control del
horno.
La lámpara del horno no
funciona.
El horno humea
excesivamente durante el
asado.
Los alimentos no se
hornean o asan
correctamente.
Los alimentos no se asan
debidamente.
ESPAÑOL
ESPAÑOL
ESPAÑOL
- 34 -
LOCALIZACIÓN Y REPARACIÓN DE AVERÍAS
Causa posible / Solución
Se usó papel de aluminio en la bandeja de asado y la rejilla y la abertura no se ajustaron correctamente y
como se recomienda.
- Consulte la sección Cómo usar el horno.
La tensión de línea puede estar baja en algunas zonas.
- Precaliente el elemento del asador durante 10 minutos.
- Consulte la Guía del asado, página 21.
Se debe ajustar el sensor del horno.
- Consulte cómo ajustar la temperatura del horno en la sección Option.
Las partículas ásperas como sería la sal o la arena que se encuentran entre la superficie de cocción y los
utensilios pueden causar rayones. Cerciórese de que las superficies de cocción y los fondos de los utensilios
estén limpios antes de utilizarlos. Los rayones pequeños no afectan la cocción y serán cada vez menos visibles
con el transcurso del tiempo.
Se han usado materiales de limpieza no recomendados para las superficies de cocción de vidrio cerámico.
Consulte la sección Cómo limpiar la superficie de cocción de vidrio en la página 29 de la sección
MANTENIMIENTO.
Se han usado utensilios de cocina con fondos rugosos. Use utensilios de cocina lisos y de fondo plano.
Se ha raspado la superficie de cocción con utensilios metálicos. No deslice los utensilios de metal en la
superficie de cocción. Para quita
r las marcas use una crema de limpieza de superficies de vidrio cerámico.
Consulte la sección Cómo limpiar la superficie de cocción de vidrio en la página 29 de la sección
MANTENIMIENTO.
Los derrames se han adherido a la superficie. Utilice el raspador para quitar la suciedad. Consulte la sección
Cómo limpiar la superficie de cocción de vidrio en la página 29 de la sección MANTENIMIENTO.
Depósitos minerales del agua o de los alimentos. Quítelos con una crema limpiadora de superficies de
cocción de vidrio cerámico. Use utensilios de cocina con fondo limpio y seco.
La temperatura del horno es demasiado alta para ajustar una actividad de limpieza automática.
- Deje enfriar el horno y restablezca los controles.
Se ajustaron incorrectamente los controles del horno.
- Consulte la sección Horno de limpieza automática.
No podrá iniciarse un ciclo Self—Clean si es que está activa la característica Oven Lockout o si la superficie
radiante queda encendida.
Así suena el horno cuando se calienta y se enfría durante las funciones de cocción y limpieza.
- Esto es normal.
Demasiada suciedad.
- Pulse el botón CLEAR/OFF. Abra las ventanas para expulsar el humo de la habitación. Espere hasta que se
cancele el modo de limpieza autom
ática. Limpie la suciedad acumulada y restablezca la limpieza.
El horno está demasiado caliente.
- Deje enfriar el horno por debajo de la temperatura de bloqueo.
No se han ajustado correctamente los controles del horno.
- Consulte la página 26 de la sección Limpieza automática.
El horno estás sumamente sucio.
- Antes de comenzar el ciclo de limpieza limpie todos los derrames densos. Los hornos sumamente sucios
podrían necesitar un ciclo de limpieza nuevo o que dure un lapso de tiempo más prolongado.
Problema
Los alimentos no se asan
debidamente.
El horno está muy caliente o
muy frío
Rayones o raspaduras en la
superficie de cocción
Marcas metálicas
Depósitos o manchas de
color marrón
Zonas decoloradas con visos
metálicos
No funciona la limpieza
automática del horno
Sonido de "crujidos" o
"estallidos".
Humos en exceso durante un
ciclo de limpieza automática.
La puerta del horno no abre
después de un ciclo de
limpieza automática.
El horno no quedó limpio
después de un ciclo de
limpieza automática.
- 35 -
LOCALIZACIÓN Y REPARACIÓN DE AVERÍAS
Causa posible / Solución
Se seleccionó el ciclo de limpieza automática pero la puerta no está cerrada.
- Cierre la puerta del horno.
La puerta del horno permanece bloqueada ya que la temperatura interior del horno no ha llegado por debajo
de la temperatura de bloqueo.
- Pulse el botón CLEAR/OFF. Deje enfriar el horno.
Cuando use la característica de convección, es normal ver que el vapor escape por el respiradero del horno.
La cantidad de vapor que se puede ver aumentará en la medida que aumenta el número de anaqueles o la
cantidad de alimentos que se está cocinando.
- Esto es normal.
Esto es normal para un horno nuevo y desaparecerá con el tiempo.
- Para acelerar este proceso, ajuste un ciclo de limpieza automática de 3 horas al menos.
- Consulte la página 26 de la sección Limpieza automática.
Un ventilador de convección podría encenderse o apagarse automáticamente.
- Esto es normal.
Los anaqueles brillantes, de color plateado se limpiaron con un ciclo de limpieza automática.
- Aplique un poco de aceite vegetal a una toalla de papel y limpie los extremos de los anaqueles del horno con
la toalla de papel.
El ventilador de convección se detiene durante un ciclo de cocción por co
nvección.
- Esto es completamente normal y es debido a la necesidad de permitir un calentamiento más uniforme
durante el ciclo. Esto no es síntoma de avería, debe considerarse una función normal.
Problema
Se visualiza CLEAN
destellando.
Cuando quiere cocinar, tanto
la lámpara como el icono
DOOR LOCKED están
encendidos.
Vapor por el respiradero
Salen del respiradero olores
aceitosos o a quemado.
Ruidos del ventilador
Los anaqueles del horno no
se deslizan con facilidad.
Ventilador de convección a
veces
ESPAÑOL
ESPAÑOL
ESPAÑOL
- 36 -
GARANTÍA LIMITADA DEL HORNO ELÉCTRICO LG – América
LG Electronics Inc, reparará o reemplazará su producto, a la opción de LG, si el mismo se comprueba que está defectuoso
en los materiales o en la mano de obra con un uso normal, durante el período de garantía descrito a continuación, y con
vigencia a partir de la fecha de adquisición del producto por el comprador original. Esta garantía limitada es válida
solamente para el comprador original del producto y únicamente cuando se utilice en EE.UU.
ESTA GARANTÍA SUSTITUYE A TODAS LAS OTRAS GARANTÍAS EXPRESAS O IMPLÍCITAS, INCLUIDAS, PERO SIN
LIMITARSE A ELLAS, CUALQUIER GARANTÍA IMPLÍCITA DE COMERCIALIZACIÓN O DE IDONEIDAD PARA UN
FIN EN PARTICULAR EN LA MEDIDA EN LA QUE LA LEY LO EXIGE, CUALQUIER GARANTÍA IMPLÍCITA ESTÁ
LIMITADA EN DURACIÓN AL PERIODO DE GARANTÍA MENCIONADO EXPRESAMENTE CON ANTERIORIDAD.
BAJO NINGUNA CIRCUNSTANCIA SERÁ LG RESPONSABLE DE DAÑOS CONSECUENCIALES, ESPECIALES O
INCIDENTALES DE CUA
LQUIER TIPO, INCLUIDOS PÉRDIDA DE INGRESOS Y PÉRDIDA DE GANANCIAS EN
CONEXIÓN CON ESTE PRODUCTO. ALGUNOS ESTADOS NO PERMITEN LIMITACIONES EN LA DURACIÓN DE
UNA GARANTÍA IMPLÍCITA O LA EXCLUSIÓN DE DAÑOS INCIDENTALES O CONSECUENCIALES, DE MANERA
QUE LAS LIMITACIONES Y EXCLUSIONES MENCIONADAS ANTERIORMENTE PODRÍAN NO SER APLICABLES EN
SU CASO.
ESTA GARANTÍA LIMITADA NO SE APLICA A:
1. Llamadas de servicio para reparar la instalación de su artefacto, para capacitarle en el uso de su artefacto, para reemplazar fusibles
domésticos o corregir el cableado doméstico o para reemplazar bombillas de lámparas accesibles a los propietarios.
2. Reparaciones cuando el artefacto no se utiliza en condiciones de grupos familiares individuales.
3. Recogerla y entregarla. Su artefacto ha sido diseñado para repararlo en su hogar.
4. Los daños que resulten de accidentes, modificaciones, alteraciones, mal uso, abuso, incendios, inundaciones, instalación inadecuada,
actos de fuerza mayor o productos no autorizados por LG Corporation.
5. Reparaciones a la superficie de cocción de vidrio cerámico u otras superficies si es que no se ha tenido el cuidado debido tal como se
describe en el Manual del propietario y guía de cocción.
6. Las reparaciones de piezas o sistemas que resulten de modificaciones no autorizadas a los artefactos.
7. Los costos de piezas de reemplazo o de mano de obra para unidades que funcionan fuera de los Estados Unidos.
8. Cualquier costo de mano de obra durante la vigencia de la garantía limitada.
Esta garantía se ofrece al comprador original de productos adquiridos para uso doméstico dentro de EE.UU.
En Alaska, la garantía excluye el costo de envío o de reparaciones en su hogar.
Algunos estados no permiten la exclusión de daños incidentales o consecuenciales, de manera que la exclusión mencionada anteriormente
podría no ser aplicable en su caso. Esta garantía le otorga derechos legales específicos, y usted pudiese tener otros derechos que varían de
estado en estado. Si desea enterarse de sus derechos legales, consulte la oficina de asuntos de consumidores local o estatal o al Procurador
de Justicia de su estado.
INFORMACIÓN DE AYUDA A LOS CLIENTES:
PERIODO DE GARANTÍA:
Un año
A partir de la fecha de la
compra original
Cinco años
A partir de la fecha de la
compra original
CÓMO SE MANEJAN LOS SERVICIOS:
Cualquier pieza
obra. En el transcurso de esta garantía de un año completo, LG suministrará, sin costo, todos
los servicios en su domicilio para reemplazar la pieza defectuosa.
Una superficie de cocción de reemplazo si llegara a partirse debido a choques térmicos,
rajaduras del sello de goma entre la superficie de cocción y el borde de porcelana.
Una unidad de superficie radiante si ésta llegara a quemarse.En el transcurso de esta garantía
limitada de cuatro años adicionales, usted será responsable del costo de cualquier trabajo o
servicio a domicilio.
Para demostrar la vigencia de su
garantía
Conserve la factura como evidencia de la fecha de compra.
Deberá presentar una copia de su Factura al momento de recibir algún
servicio bajo la garantía.
Para obtener la información del Centro
de servicio autorizado o de su
distribuidor más cercano, o para ayuda
respecto a productos, clientes o servicio
Llame al 1-800-243-0000 (Se atiende el teléfono durante las 24 horas,
365 días al año) y elija la opción correspondiente del menú o visite
nuestro sitio Web en:
http://us.lgservice.com.

MEMO

MEMO

MEMO
Printed in Mexico
www.lg.com
Register your product Online!
LG Customer Information Center
1-800-243-0000
1-888-865-3026
1-888-542-2623
USA, Consumer User
USA, Commercial User
CANADA