Loading ...
Loading ...
Loading ...
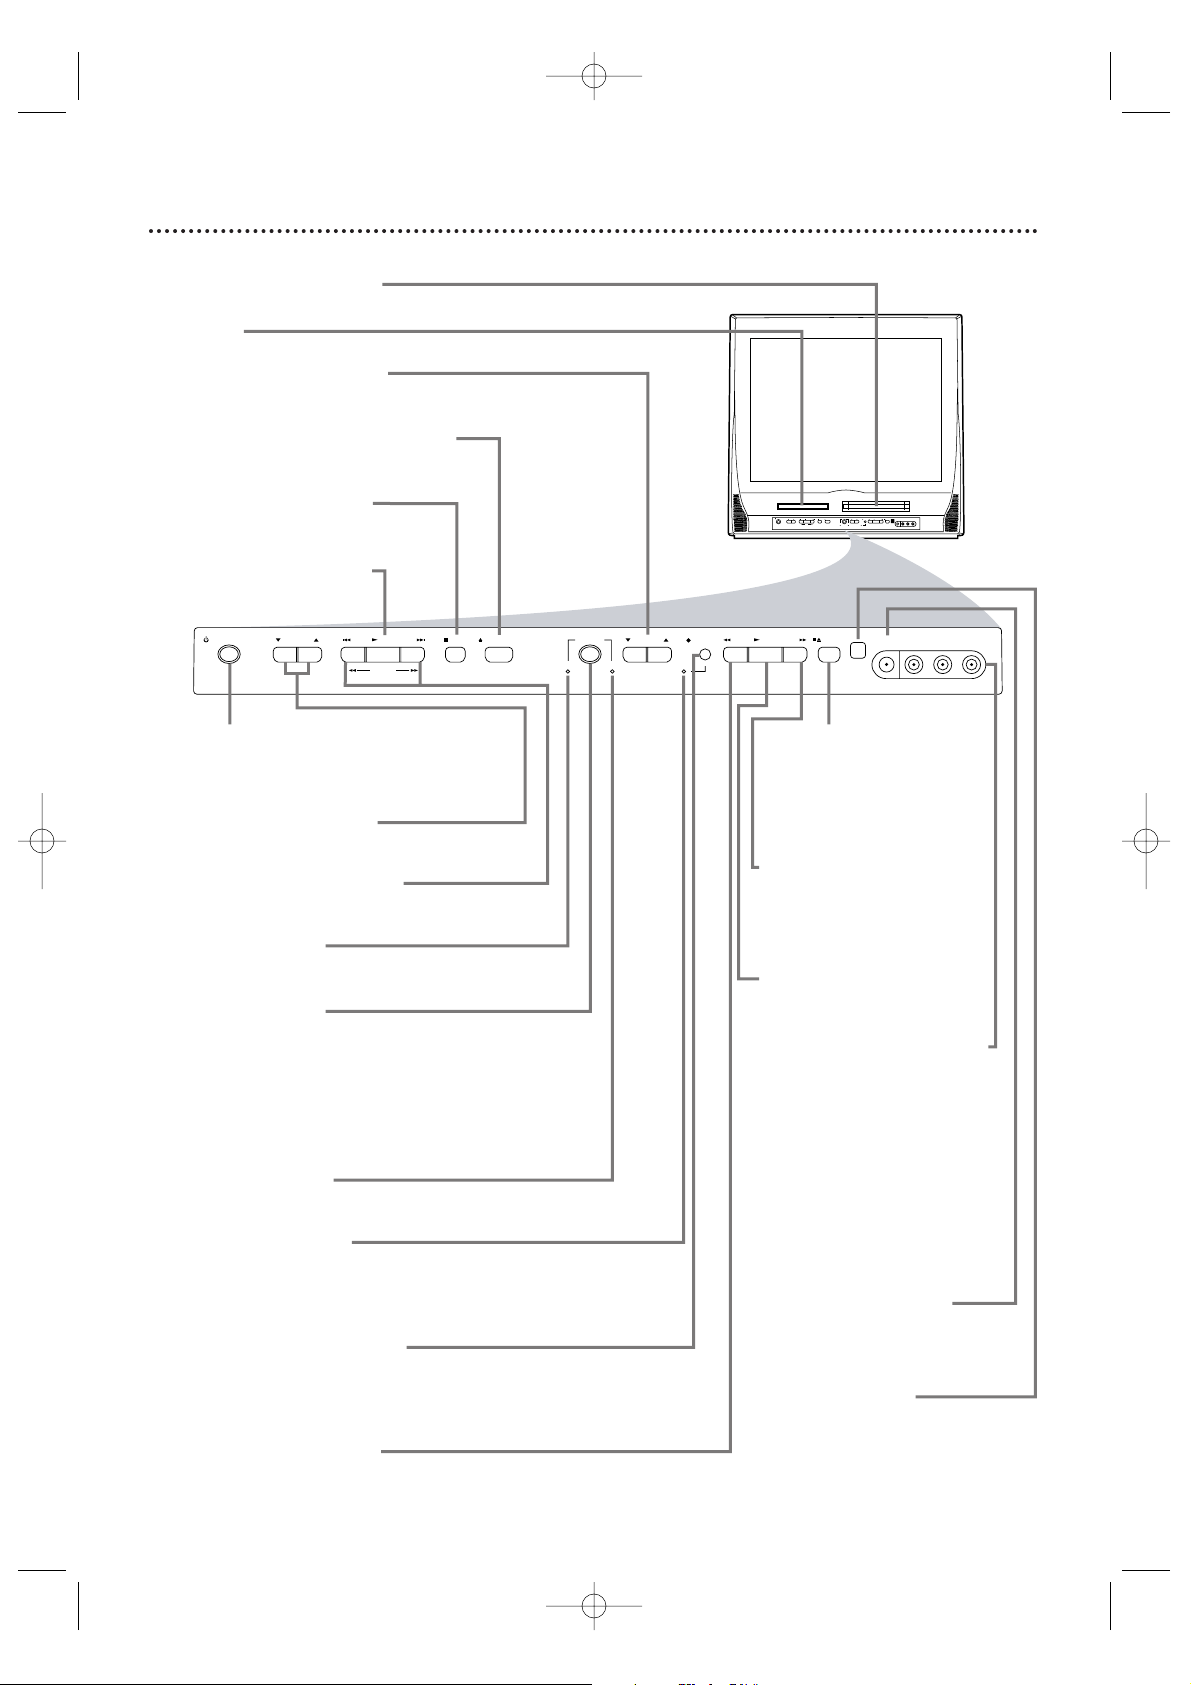
14 Front Panel
VIDEO
HEADPHONE
L-AUDIO-R
F.FWDPLAYREW
STOP/EJECT
STOP
OPEN/CLOSE
VOLUME
PLAY
PREV NEXT
SEARCH
STANDBY-ON
SOURCE
CHANNEL
VCR/TVDVD
REC/OTR
VIDEO
HEADPHONE
L-AUDIO - R
SOURCE CHANNEL REC/OTR
VCR/TVDVD
FWDPLAYREWSTANDBY-ON
STOP/EJECT
STOP OPEN/CLOSE
VOLUME NEXTPLAYPREV
SEARCH
Front design varies slightly among models.
Cassette Compartment
Insert a videotape here.
Disc Tray
Insert a disc here.
CHANNEL K/L Buttons
Press to select TV channels.
Details are on page 16.
OPEN/CLOSE A Button (DVD)
Press to open or close the disc tray.
Details are on page 18.
STOP C Button (DVD)
Press to stop disc playback.
Details are on page 18.
PLAY B Button (DVD)
Press to start disc playback.
Details are on page 18.
STANDBY-ONy Button
Press to turn the TV/VCR/DVD on or
off. Turn off the TV/VCR/DVD for a
timer recording.
VOLUME K/L Buttons
Press to adjust the volume.
PREV H,
NEXTi Buttons (DVD)
Press to go to a different chapter or
track. Details are on page 61.
DVD light (green)
Appears if the TV/VCR/DVD is in DVD
mode.
SOURCE Button
Press to select TV/VCR or DVD mode.
(TV/VCR mode includes Analog TV,
Digital TV or AUX mode.) If you switch
to TV/VCR mode, wait about 4 seconds
before switching back to DVD mode.
This button works the same as the
SELECT button on the remote.
VCR/TV light (red)
Appears if the TV/VCR/DVD is in
TV/VCR mode.
REC/OTR light (red)
This light flashes during recording. It
lights when the TV/VCR/DVD is in
standby mode (power off) for a timer
recording.
REC/OTR I Button (VCR)
Press to start a videotape recording.
Details are on page 29.
Press repeatedly to start a One-Touch
Recording. Details are on page 30.
REW E Button (VCR)
Press to rewind the tape or to search
backward quickly during playback.
Details are on page 42.
STOP/EJECT CA
Button (VCR)
Press to stop tape playback.
Press while playback is
stopped to remove the
tape.
FWD D Button (VCR)
Press to fast forward the
tape or to search forward
quickly during playback.
Details are on page 42.
PLAY B Button (VCR)
Press to start tape playback.
Details are on page 17.
VIDEO and AUDIO L/R
(left/right) In jacks
Use audio and video cables
to connect these jacks to
the Audio and Video Out
jacks of a Camcorder, DVD
player or VCR.This lets you
watch materials playing on
the other equipment when
you choose AUX at the
TV/VCR/DVD. Details are on
pages 10 and 36.
HEADPHONE jack
Connect headphones (not
supplied) here for personal
listening.
Remote Sensor
Receives a signal from your
remote control so you can
operate the TV/VCR/DVD
from a distance.
T3221UB_EN1 4/20/06 9:32 PM Page 14
Loading ...
Loading ...
Loading ...