User Manual for TV
Your TV
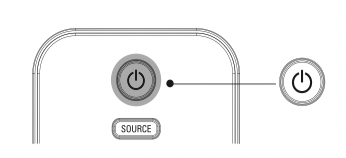
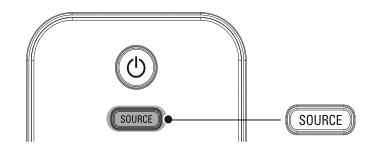
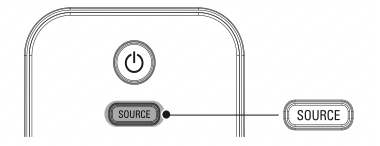
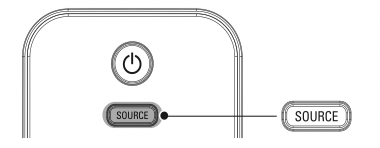
Side controls and indicators
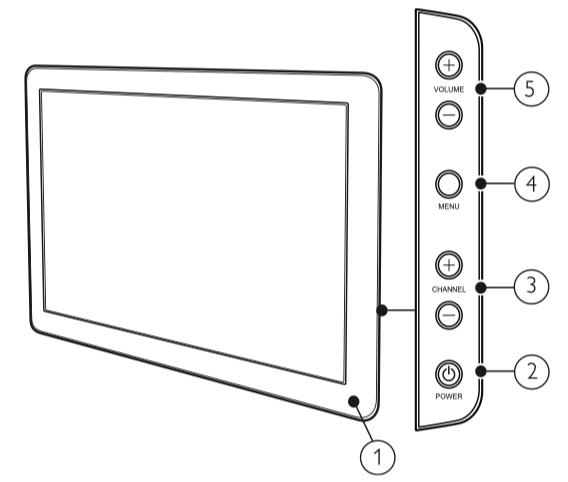
- Standby indicator / remote control sensor
- POWER: Switches the TV on or off. The TV is not powered off completely unless it is physically unplugged.
- CHANNEL +/ -: Switches to the next or previous channel.
- MENU: Toggles the main menu on or off.
- VOLUME +/-: Increases or decreases volume.
Remote control
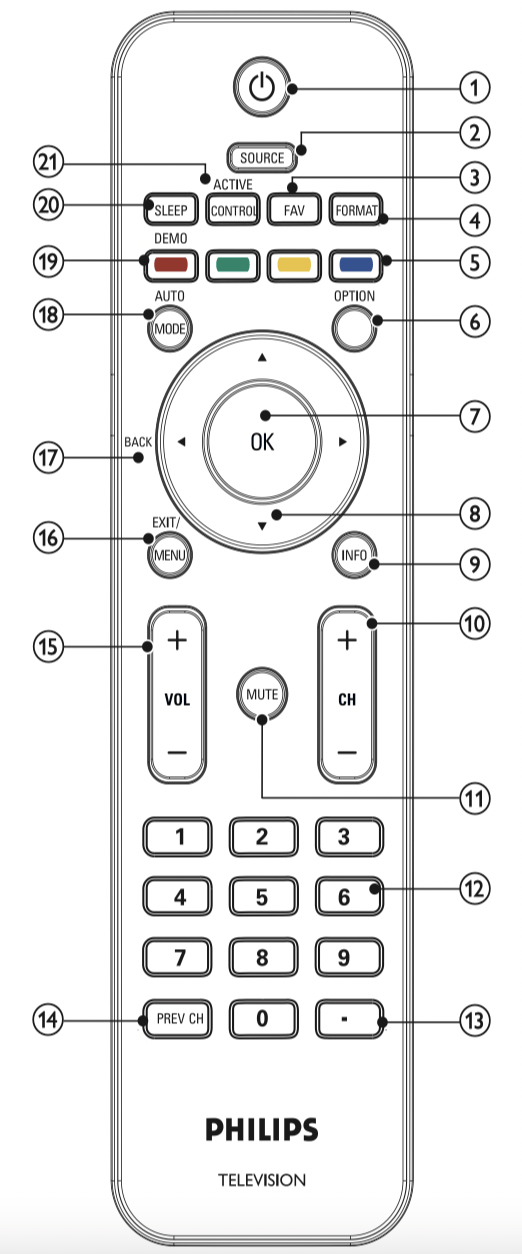
1.  (Standby-On)
Switches the TV on or off. The TV is not powered off completely unless it is physically unplugged.
2. SOURCE
Selects connected devices.
3. FAV
Displays a list of all channels marked as favorite. (Includes subchannels.)
4. FORMAT
Selects a picture format (see ‘Change picture format’ on page 14). e
5. Color buttons
Selects tasks or options.
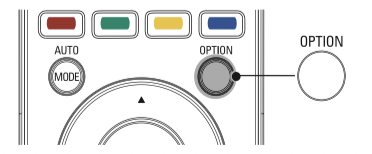
6. OPTION
Activates the quick access menu (see ‘Use the quick access menu’ on page 13).
7. OK
Activates a selection or accesses the menu.
8.  (Navigation buttons)
Navigates through the menus.
9. INFO
Displays information about the TV channel or accessory device. The quality and accuracy of the information depends on the broadcaster. You might see a difference in broadcast time if the broadcast is from a different time zone.
10. CH +/-
Switches to the next or previous channel.
11. MUTE
Mutes or unmutes audio.
12. Number buttons
Select a channel, page or setting.
13 . (Dot)
Press the dot (.) for digital channels.
14. PREV CH
Returns to the previously viewed channel.
15. VOL +/-
Increases or decreases volume.
16. MENU/EXIT
Turns the menu on or off.
17. BACK
Returns to a previous screen.
18. AUTO MODE
Cycles through the preset picture and sound settings (see ‘Use Auto Mode’ on page 15).
19. DEMO
Toggles the demo menu on or off.
20. SLEEP
Sets a delay after which the TV switches to standby.
21. ACTIVE CONTROL
The TV continuously measures and corrects incoming signals to provide the best picture quality.
Get started
This section supplements information in the Quick Start. For information about how to mount and install your TV, refer to the Quick Start.
Position the TV
Warning
• Do not insert the power plug into the wall socket before all the connections are made.
• Large screen TVs are heavy. Two people are required to carry and handle a large screen TV.
• Before you move the TV, disconnect the cables to prevent breakage.
In addition to reading and understanding the safety instructions, consider the following before positioning your TV:
• Ensure that you always have easy access to the power cord or plug to disconnect the TV from the power.
• If the TV is mounted on a swivel base, ensure that no strain is placed on the power cord when the TV is swiveled. Strain on the power cord can loosen connections.
• The ideal viewing distance for watching TV is three times its screen size.
• Position the TV where light does not fall on the screen.
• Connect your devices before you position the TV.
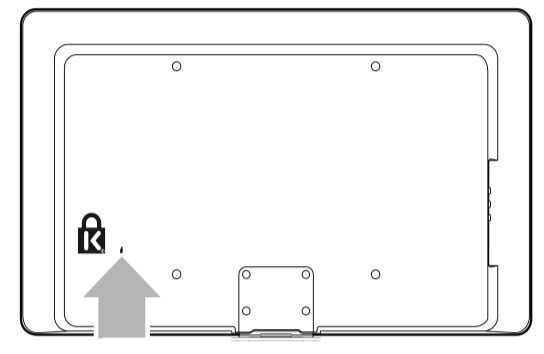
Use a Kensington lock
There is a Kensington security slot on the back of the TV. Prevent theft by looping a Kensington lock between the slot and a permanent object, such as a heavy table.
Insert the remote control batteries
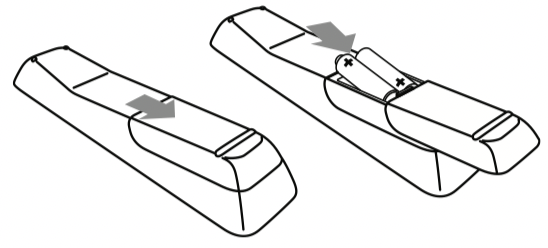
1. Slide the battery cover off the back of the remote control.
2. Insert the 2 supplied batteries (AAA). Be sure the + and - ends of the batteries line up with the markings inside the case.
3. Slide the cover back into position.
Note
• Remove the batteries if not using the remote control for an extended period of time.
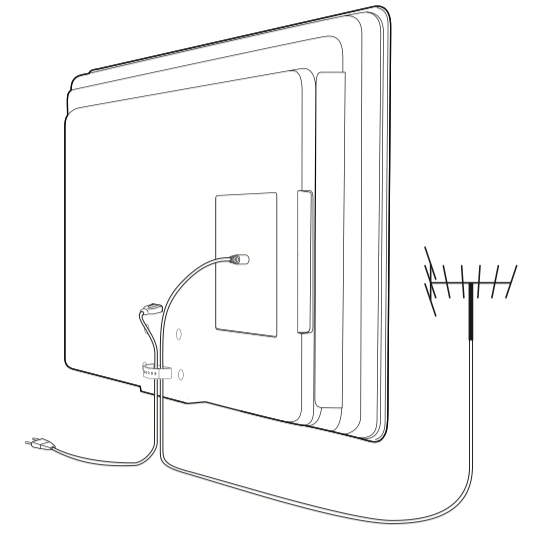
Connect the antenna or cable
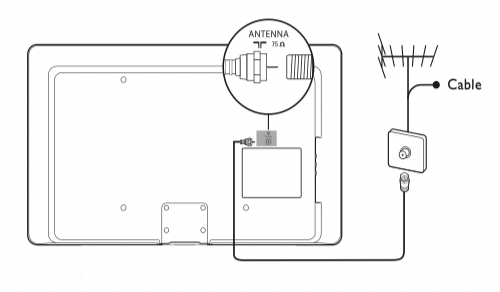
Connect to an antenna
Any DTV programs that are broadcast in your area can be received for free through an antenna connection.
Contact your local content provider or your local electronics retailer if you are unsure about what HDTV programs are available in your area.
Broadcasters are transitioning from analog to digital TV. This means that a given broadcaster can have channels available either in analog or in digital, or both analog and digital at the same time.
The TV produces stereo sound only if a stereo signal is broadcast.
Connect to a cable
When your TV is connected to the cable socket, you might receive free digital and high definition programs (depending on your cable provider). The channel number for digital and high definition channels includes a dot “.” For example, 11.1, 46.30, 108.201. Contact your cable provider for more information.
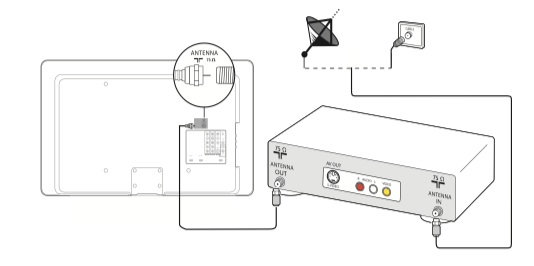
Connect to a Direct Broadcast Satellite (DBS)
There are two main DBS systems: DirecTV and DishNetwork. These systems require a separate, proprietary set-top box to decode signals and send them to the TV. The set-top box contains a digital TV tuner for receiving off-air digital broadcasts.
Contact your local DBS provider for more information about the connections and the TV channels.
Connect to a set-top box
A cable box or satellite set-top box can be connected to the TV through the following connections:
• ANT
• A/V (Composite Video and Audio)
• S-Video
• YPbPr (Component Video Input)
• HDMI
For information about how to connect a set-top box, see the Quick Start provided.
Connect a set-top box through RF IN/OUT
If the TV is connected to a cable box or satellite set-top box via a coaxial connection, set the TV to channel 3 or 4, or to the channel specified by the service provider.
Connect a set-top box through component video input or HDMI
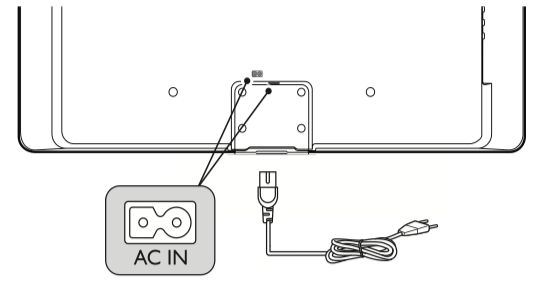
Connect the power cord
Warning
• Verify that your power voltage corresponds with the voltage printed at the back of the TV. Do not insert the power cord if the voltage is different.
1. Locate the power connector at the back of the TV.
The location of the power connector varies according to TV model.
2. Insert the power cord fully into the power connector.
3. Connect the power cord plug to the power outlet. Ensure that the cord is tightly secured at both ends.
Disconnect the TV from the power outlet
Caution
• Pull the power cord by the plug; do not pull on the power cord.
1. Unplug the power cord from the power outlet.
2. Unplug the power cord from the power connector at the back of the TV.
Manage cables
Route your power cord, antenna cable and all other cables through the cable holder at the back of the TV. The holder helps keep your cables tidy and easily manageable.
Switch on and set up the TV
The TV turns on automatically after the power cord is inserted into the power connector. The following screen appears:
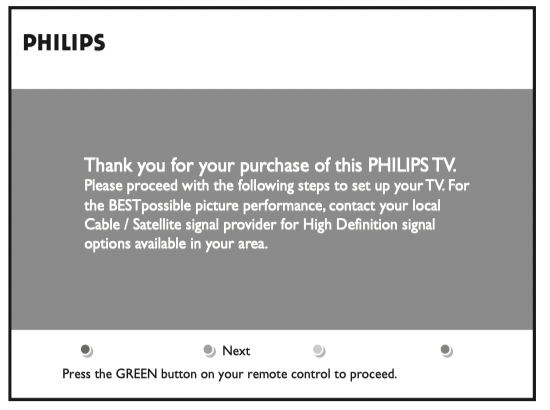
Follow the on-screen instructions to select your language and complete your TV setup.
Note
• If you connect your TV to a cable box or satellite set-top box, you do not need to install channels. Press the red button on the remote control to exit this stage of the setup.
Finish the setup by selecting your location:
• If you choose [Retail store] your settings are erased each time you turn off the TV. Use this mode for retail store displays only.
• If you choose [Home] you are guided through a choice of picture display options. Press the left or right cursor buttons to select your preferred screen.
Use your TV
This section helps you perform basic TV operations.
Switch your TV on/off or to standby
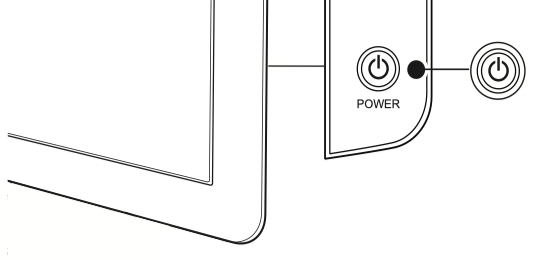
To switch on
• Press  POWER at the side of the TV.
• Press on the remote control.
To switch to standby
• Press on the remote control.
To switch off
• Press POWER at the side of the TV.
Note
• Energy consumption contributes to air and water pollution. When the power cord is plugged in, your TV consumes energy. Your TV has a very low standby power consumption.
Switch channels
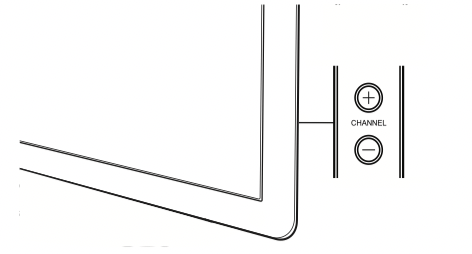
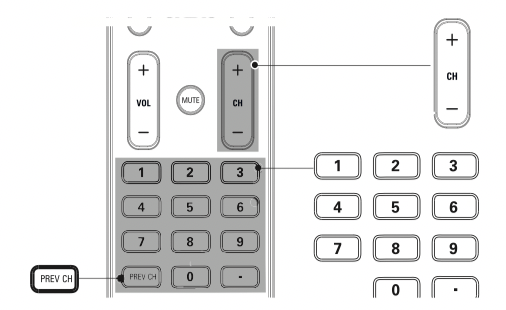
• Press CHANNEL +/ - on the side of the TV. For digital channels, press a number (1 to 999) followed by a dot “.” and then the corresponding sub channel number (1 to 999). Ex. 108.30.
• Press CH +/- or enter a number on the remote control.
• Press PREV CH to return to the previously viewed channel.
Adjust volume
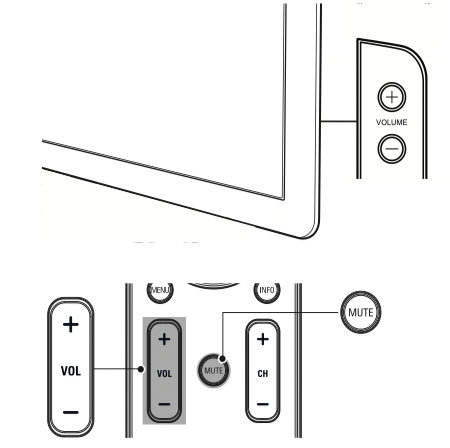
To increase or decrease volume
• Press VOL +/- on the remote control or press VOLUME +/- on the side of the TV.
To mute or unmute sound
• Press MUTE on the remote control to mute the sound.
• Press MUTE again to restore the sound.
To adjust headphone volume
• Press VOL +/- on the remote control or press VOLUME +/- on the side of the TV. When headphones are plugged into the TV, the loud speakers are automatically muted.
Watch channels from a set-top box
To watch channels from a set-top box
1. Switch on the set-top box.
 The picture from your set-top box might appear automatically on your screen.
2. Use the remote control of your set-top box to select channels.
If the picture does not appear
1. Press SOURCE repeatedly to select the set-top box and wait a few seconds for the picture to appear.
2. Use the remote control of your set-top box to select channels.
Watch connected devices
To watch connected devices
1. Switch on the connected device.
The picture from your connected device might appear automatically on the TV.
2. Use the remote control of the device to select channels.
If the picture does not appear
1. Press SOURCE repeatedly to select the connected device and wait a few seconds for the picture to appear.
2. Use the remote control of the device to select channels.
Watch a DVD
To watch a DVD
1. Insert a DVD disc into your player.
2. Press on the remote control of the DVD player to select channels.
The DVD might automatically play on the TV.
If the picture does not appear
1. Press SOURCE repeatedly to select the DVD player and wait a few seconds for the picture to appear.
2. Use the remote control of the DVD player to play the disk.
Use more of your TV
Use the quick access menu
The quick access menu gives direct access to some often-needed menu items.
Note
• When digital channels are installed and broadcast, the relevant digital options are displayed in the quick access menu.
1. Press OPTION on the remote control.
2. Press  or
or  and then OK to access one of the following menus:
• Audio language, for digital channels only, where multiple audio languages are broadcast.
• Closed captions (see ‘View closed captions (subtitles)’ on page 19).
• Picture format (see ‘Change picture format’ on page 14).
• Equalizer (see ‘Summary of sound settings’ on page 15).
• Clock (see ‘Set the clock’ on page 15).
Change picture and sound settings
Change picture settings
1. Press MENU on the remote control.
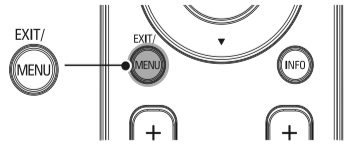
2. Press to enter the [TV settings] menu.
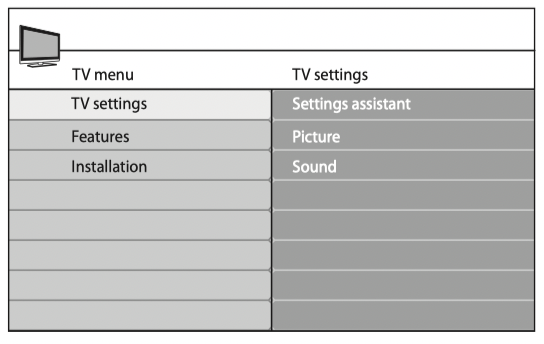
3. Press  and
and to select the [Picture] menu.

*Available in selected models
4. Press or to select one of the picture settings, and press to enter the setting.
5. Press or to adjust the setting, and press or OK to confirm the change.
6. Press MENU to exit.
Change picture settings by using the settings assistant
The settings wizard helps you to configure your picture settings.
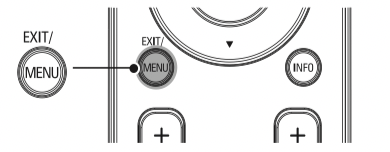
1. Press MENU on the remote control.
2. Press to enter the [Settings assistant] menu.
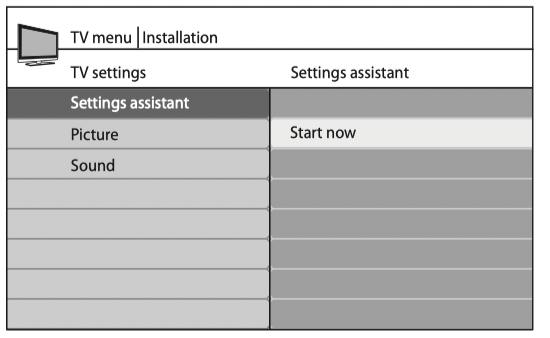
3. Press to highlight [Start now], and press OK to start the [Settings assistant].
You are guided through a choice of picture display options.
4. Press the color buttons, , , and OK to make your selections and store your setup
Summary of picture settings
The following picture settings can be configured. Depending on the format of the picture source, some picture settings are not available.
• [Contrast]: Adjusts the intensity of bright areas, keeping dark areas unchanged.
• [Brightness]: Adjusts the intensity and details of dark areas.
• [Color]: Adjusts color saturation.
• [Tint]: Adjusts the color balance in an image.
• [Sharpness]: Adjusts the level of sharpness in image details.
• [Color temperature]: To set the color temperature to [Normal], [Warm] or [Cool].
• [Dynamic contrast]: Automatically enhances contrast in an image.
• [Digital Natural Motion]: In selected models only. Reduces field and line flicker to display movement smoothly. You can switch HDNM on or off.
• [Noise Reduction]: Automatically filters out and reduces image noise. Improves picture quality for weak video signals. You can switch DNR on or off.
• [MPEG artifact reduction]: Smooths out transitions on digital pictures. You can switch this feature on or off.
• [Color enhancement]: Makes colors more vivid and improves the resolution of details in bright colors.You can switch this feature on or off.
• [Active Control]: Corrects incoming signals for the best picture possible, according to lighting conditions in the room. You can switch [Active Control] to one of these settings: [Off], [On with light sensor] or [On without light sensor].
Tip
• Save power with Eco TV. Switch [Active Control] to [On with light sensor]. The TV will adjust the brightness according to the ambient room lighting, reducing power consumption.
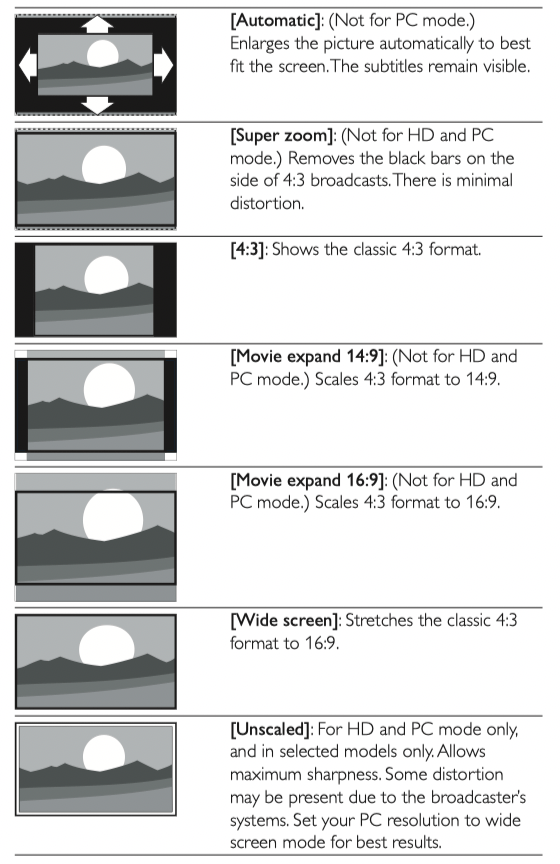
• [Picture format]: Changes the picture format.
• [Horizontal Shift]/[Vertical Shift]: Adjusts the horizontal and vertical position of the picture. The availability of this settings depends on certain signals or sources.
Change picture format
1. Press FORMAT on the remote control.
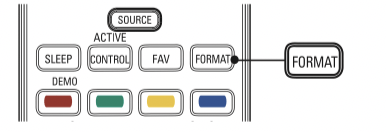
2. Press or to select a picture format and press OK to confi rm your choice.
Summary of picture formats
The following picture formats can be selected.
Depending on the format of the picture source, some picture formats are not available.
Change sound settings
1. Press MENU on the remote control and select [TV settings] > [Sound].
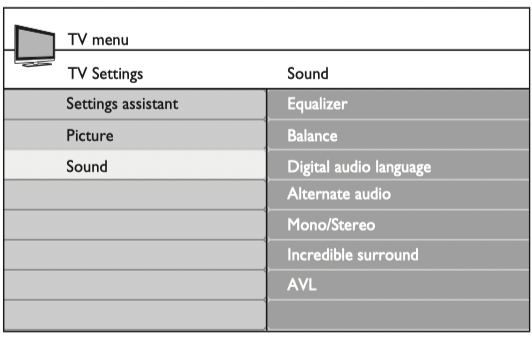
2. Press or to highlight a sound setting and press to select the setting.
3. Press or to adjust the setting, and press OK to confirm the change.
4. Press MENU to exit.
Summary of sound settings
The following sound settings can be configured. Depending on the sound source, some sound settings are not available.
• [Equalizer]: Adjusts individual sound frequencies.
• [Balance]: Adjusts the balance of the right and left speakers to best suit your listening position.
• [Digital audio language]: Available for digital channels only, when multiple languages are broadcast. Lists available audio languages.
• [Alternate audio]: Available for analog channels only when a main and second audio program (SAP) is broadcast. Select the main or second audio program.
• [Mono]/[Stereo]: Select mono or stereo.
• [Incredible Surround]: Selects available modes for surround sound.
• [AVL] ([Auto volume leveling]): Reduces sudden changes in volume, for example, during commecials or when switching channels. Select on or off.
• [TV Speakers]: Select on or off, or output sound to an EasyLinkcompliant device. [Master EasyLink] must be activated in the [Preferences] menu to make the [TV Speakers] menu available. When [Speakers EasyLink] is selected, the TV speakers are disabled and TV sound outputs to the speakers of the compatbile EasyLink-compliant device. Adjust the volume using the remote control of the EasyLink-compliant device.
• [Delta volume]: Levels out volume differences between channels or connected devices. Switch to the connected device before you change the delta volume.
Use Auto Mode
1. Press AUTO MODE to set your TV to a predefined picture and sound setting.
2. Press or to select one of the following settings:
• [Personal]: The customized settings you defined by using the [Picture] menu.
• [Sports]: Vivid picture settings and clear sound for high action.
• [Standard]: For normal TV viewing.
• [Movie]: Brilliant picture settings for a cinematic experience.
• [Game]: Optimized for PCs, games consoles and playstations.
• [Power Saver]: Eco TV settings for lower power consumption.
Create and use lists of favorite channels
You can create lists of your preferred TV channels and radio stations so that you can find those channels easily.
Select a list of favorite channels
1. Press the FAV key on the remote control.
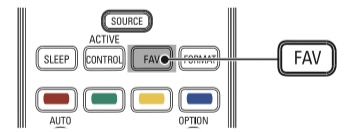
Your lists of favorite channels are displayed.
2. Press or to highlight a list, and press OK to select the list.
Create or edit a list of favorite channels
1. Press the FAV key on the remote control to display your lists of favorite channels.
2. Press or to highlight a list, and press OK to select the list.
3. Press the green key to enter Edit mode.
A list of channels is shown.
4. Press or to highlight a channel.
5. Press OK to select or deselect the highlighted channel.
The channel is added to or removed from the list of favorite channels.
6. Press the green button to exit.
Switch to one of the channels on a list
1. Press OK on the remote control to display the last list that you selected.
2. Press or to highlight a channel.
3. Press OK to select the channel.
The TV switches to that channel.
Tip
• Press CH+/- to select channels in a list or press the numeric keys to select channels that are not in a list.
Set the clock
You can set the time on your TV and program your TV to switch off at a specific time.
Set the time automatically
Some digital channels transmit the time. For these channels, you can set the time automatically and choose which channel to read the time from.
1. Press MENU on the remote control and select [Installation] > [Clock] > [Auto clock mode].
2. Select [Automatic] and press to confirm your choice.
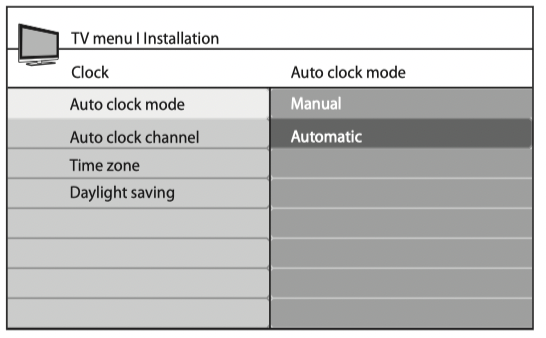
3. (Optional) Select the channel from which the TV reads the time.
• Press and to enter the menu for [Auto clock channel].
• Press or to highlight a channel.
• Press to confirm your choice.
4. (Optional) Select the time zone.
• Press and to enter the menu for [Time zone].
• Press or to highlight the time zone.
• Press to confirm your choice.
5. (Optional) Set daylight saving.
• Press and to enter the menu for [Daylight saving].
• Press or to highlight [Automatic] or [Off].
• Press to confirm your choice.
6. Press MENU to exit.
Set the time manually
1. Press MENU on the remote control and select [Installation] > [Clock] > [Auto clock mode].
2. Select [Manual], and press to confirm your choice.
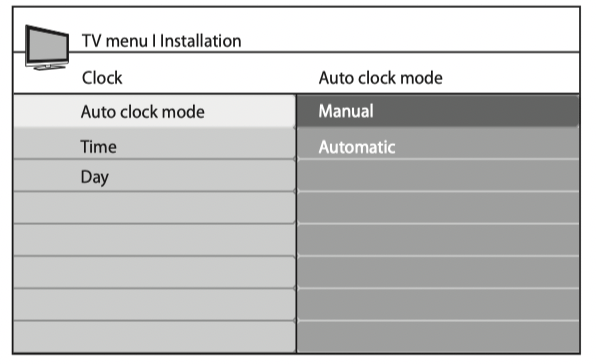
3. Press to select [Time] and then press to set the time.
Use the format HH:MM. Select [AM]/[PM] for morning or afternoon.
4 Press OK to confirm your choice.
5. Press and to enter the menu for [Day].
6. Press or to select the day.
7. Press OK to confirm your choice.
8. Press MENU to exit.
Set the sleeptimer
Sleeptimer switches the TV to standby after a pre-defined period of time. You can always switch off your TV earlier or reset the sleeptimer during the countdown.
1. Press MENU on the remote control and select [Features] > [Sleeptimer].
2. Press or to select a value from 0 to 180 minutes. For example, if you select 90 the TV switches to standby in 90 minutes.
3. Press MENU to exit.
Use child control and rating locks
You can prevent your children from watching certain programs or certain channels by locking the TV controls and by using ratings.
Set or change your PIN
1. Press MENU on the remote control and select [Features] > [Change PIN].
2. Enter a 4-digit PIN on the number buttons of the remote control.
• If you have a PIN, enter your current PIN.
• If you do not have a PIN or if you have forgotten your PIN, enter 0711.
• You are asked to enter your new 4-digit PIN again.
3. Enter your PIN again to confirm.
A message appears to confirm that your PIN has been changed.
4. Press MENU to exit.
Lock the TV
This section describes how to lock all channels on the TV. At the specified time, screen is blanked out and the audio is muted.
1. Ensure that the clock is set with the current time (see ‘Set the clock’ on page 15).
2. Press MENU on the remote control and select [Features] > [Child lock] > [Lock after].
3. Enter your PIN (see ‘Set or change your PIN’ on page 16).
4. Press to select [Timer].
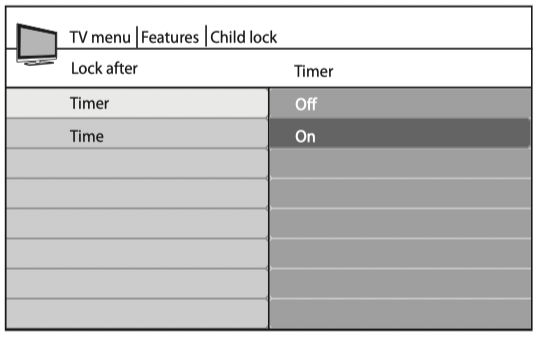
5. Press to select [On] and activate the [Lock after] feature. Select [Off] to deactivate the feature.
6. Press to confirm your choice.
7. Press to select [Time] and press to set the time.
Use the format HH:MM, and select [AM]/[PM] for morning or afternoon.
8. Press OK to confirm the time.
9. Press MENU to exit.
10. Turn the TV off and on again.
Lock a channel
This section describes how to lock specified channels. The channels can be selected but the screen is blanked out and the audio is muted.
1. Ensure that the clock is set with the current time (see ‘Set the clock’ on page 15).
2. Press MENU on the remote control and select [Features] > [Child lock] > [Channel lock].
3. Enter your PIN (see ‘Set or change your PIN’ on page 16).
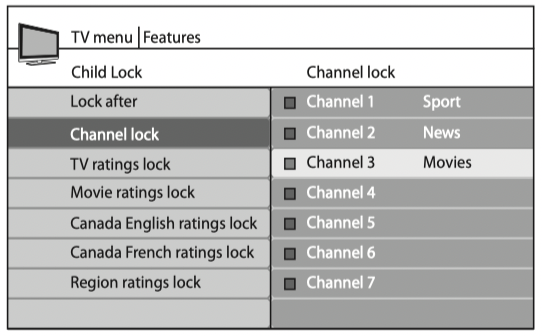
4. Press or and then press OK to lock one or more channels or external sources.
5. Each channel has a box-graphic in front of it to indicate whether it is locked:
• A box with X indicates that the channel is locked
• An empty box indicates that the channel is not locked
6. Press MENU to exit.
Use the TV ratings lock
Your TV is equipped with a V-chip that allows you to control access to individual programs based on their age rating and content rating. The program content advisory data are sent by the broadcaster or by the program provider.
If you receive channels through a set-top box or cable box connected by HDMI, you cannot use the TV ratings lock. Your set-top box or cable box must be connected through RF or AV connectors.
1. Press MENU on the remote control and select [Features] > [Child lock] > [TV ratings lock].
2. Enter your PIN (see ‘Set or change your PIN’ on page 1
3. Press or and then press OK to lock or unlock one or more ratings.
Each rating has a box-graphic in front of it to indicate whether programs carrying that rating are locked:
• A box with X indicates that all items in the content ratings list are locked.
• An empty box indicates that no items in the content ratings list are locked.
• A box with / indicates that some content ratings are deselected. For example, for rating TV-14, you can deselect one or more of the following content ratings: [(D) Dialog], [(L) Language], [(S) Sex], or [(V) Violence].
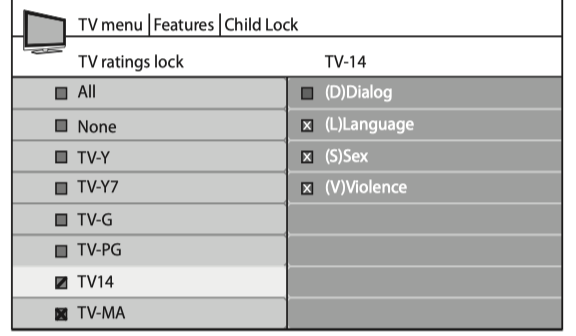
When you select [All], all items in the ratings list are locked. When you select [None], programs with no rating and programs with a rating of None are locked.
When you lock a rating, all ratings in the younger age categories are automatically locked.
4. Press MENU to exit.
Connect devices
This section describes how to connect various devices with different connectors and supplements examples provided in the Quick Start.
Caution
• Disconnect the power cord before connecting devices.
Note
• Different types of connectors may be used to connect a device to your TV, depending on availability and your needs.
Connection overview
Back connectors

- Signal input from an antenna, cable or satellite.
- AV1 and AV2:Video input from analog devices such as DVD, receiver, game console, etc. This connector is used with audio input.
- AV3 Composite video (back):Video input for analog devices such as DVD, camcorder, game console, etc. To be used with audio input.
- For use by service personnel only.
- Digital audio output to home theaters and other digital audio systems.
- Audio input for HDMI3.
- AV3 S-VIDEO (back): S-Video (back) input connector to be used with Audio L/R connectors for camcorder, game console, etc. When you use the S-Video (back) for video signals, do not use Composite video (back) for video signals.
- HDMI 1/2/3: Digital audio and video input from high definit digital devices such as Blu-ray players.
Side connectors
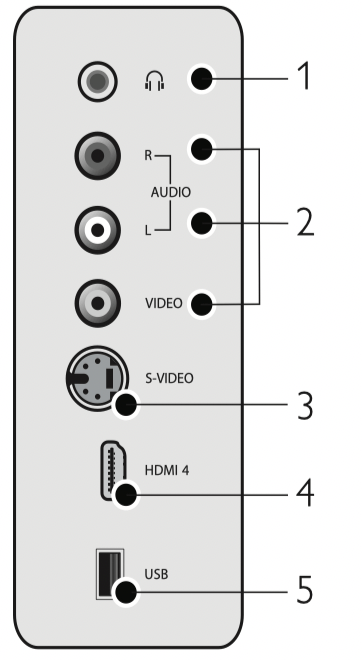
- Stereo audio output to headphones or earphones.
- Composite video: Video input for analog devices such as DVD, camcorder, game console, etc. To be used with audio input.
- S-Video (side) to be used with Audio L/R connectors for camcorder, game console, etc. When you use the S-Video (side) for video signals, do not use the Composite video (side) input for video signals.
- HDMI (side): Digital audio and video input from high definition digital devices such as Blu-ray players.
- Data input from USB storage devices.
Select your connection quality
HDMI - Highest quality
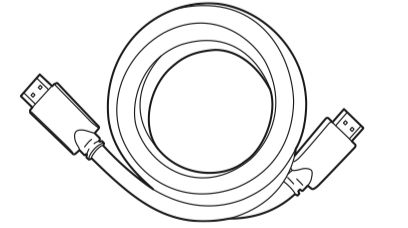
Supports high-definition signals and gives highest picture and sound quality. Video and audio signals are combined in one cable. You must use HDMI for full high-definition video and to enable Philips EasyLink.
Tip
• To connect to a PC without an HDMI connector, use a DVI-HDMI adaptor and a separate audio cable.
Note
• Philips HDMI supports Highbandwidth Digital Contents Protection (HDCP). HDCP is a form of Digital Rights Management that protects high definition content in DVD or Blu-ray Discs.
Component (Y Pb Pr) - High quality

Component video cable (red/green/blue) and audio L/R cable (red/ white)
Supports high-definition signals but gives lower picture quality than HDMI. Component cables combine a red/green/blue video cable with a red/white audio L/R cable. Match the cable colors when you connect to the TV.
S-Video - Good quality
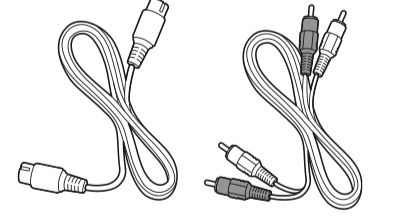
S-Video cable and audio L/R cable (red/white)
For analog connections. Use an S-Video cable together with an audio L/R cable.
Composite - Basic quality
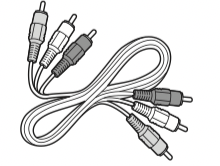
Composite video/audio cable (yellow/red/white)
For analog connections. Composite cables usually combine a yellow video cable with a red/white audio L/R cable. Match the cable colors when you connect to the TV.
Label your connections
When you connect devices, you can label the connections to help you to identify where devices are connected.
1. Press MENU on the remote control and select [Installation] > [Source labels].
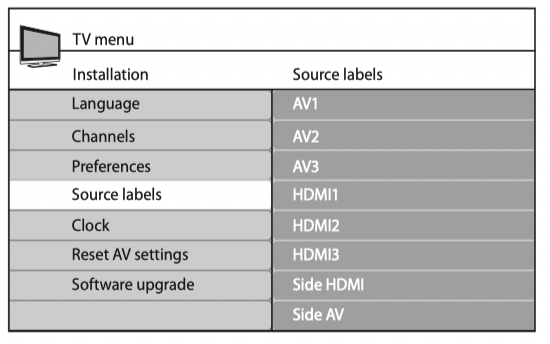
2 Press to enter the list of available connections.
3 Press or to highlight a connection in the list.
4 Press to enter the list of devices for the connection, and press or to highlight a device.
5 Press to confirm your choice.
6 Press MENU to exit.
Connect your devices
This section describes how to connect a selection of devices with different connectors. Different types of connectors can be used to connect a device to your TV. The following sections describe examples only, other configurations are possible.
When you connect composite or component cables, match the cable colors to the connectors on the TV.
Connect a DVD player/recorder via composite connectors
Do not place your recorder too close to the screen because some recorders can be susceptible to signals.
If your recorder has an S-VHS video jack: For improved picture quality, connect an S-Video cable with the S-Video input. Connect the audio cables to the audio L and R input jacks of AV3/side AV.
Note
• When you use an S-Video connector, do not connect any device to the AV3/side AV video jack.
If you use mono equipment, the left loudspeaker reproduces sound but the right speaker does not. Use a mono to stereo adapter (not supplied) for sound reproduction via all internal loudspeakers.
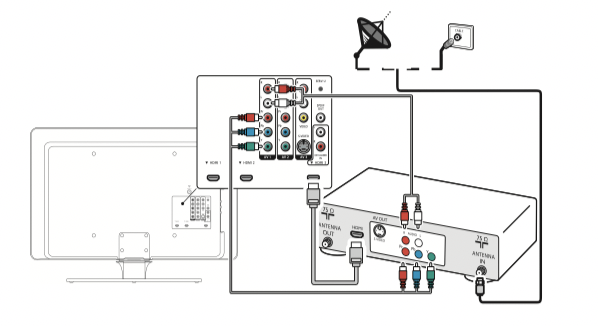
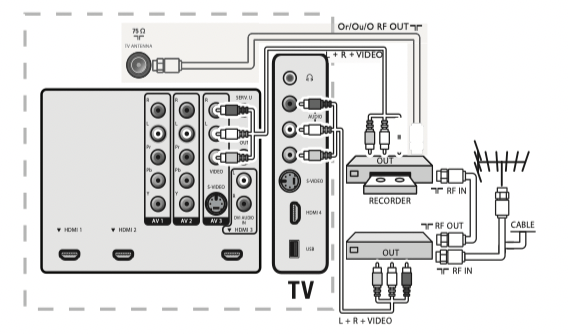
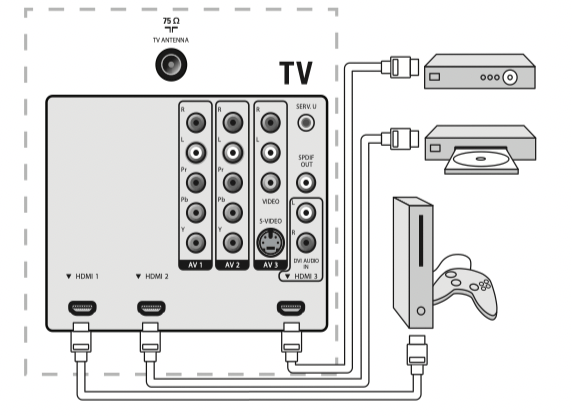
Connect a set-top box, DVD player/recorder and game console via HDMI
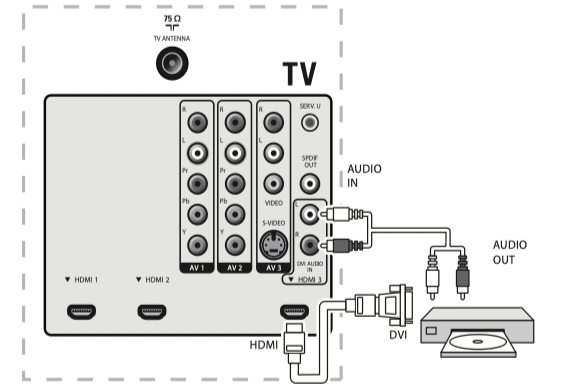
Connect a DVD player/recorder via HDMI-DVI and DIGITAL AUDIO OUT connectors
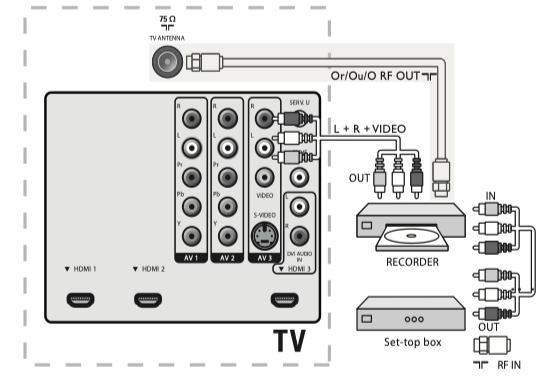
Connect a set-top box via a composite connector
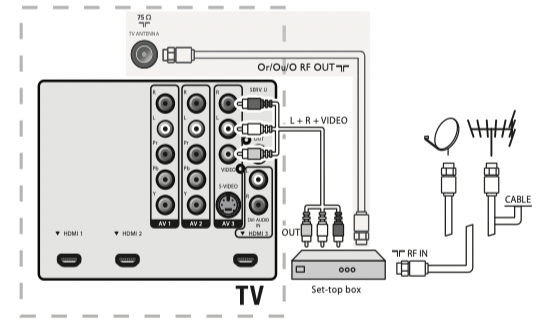
If your device has an S-VHS video jack, improve the picture quality as follows:
• Connect an S-Video cable to the S-Video input of AV3/side AV
• Connect the audio cables to the audio L and R input jacks of AV3/side AV.
When you use the S-Video connector, do not connect any device to the video jack of AV3 or the side AV.
Only the left loudspeaker reproduces sound for mono equipment. Use a mono to stereo adapter (not supplied) for sound reproduction via all internal loudspeakers.
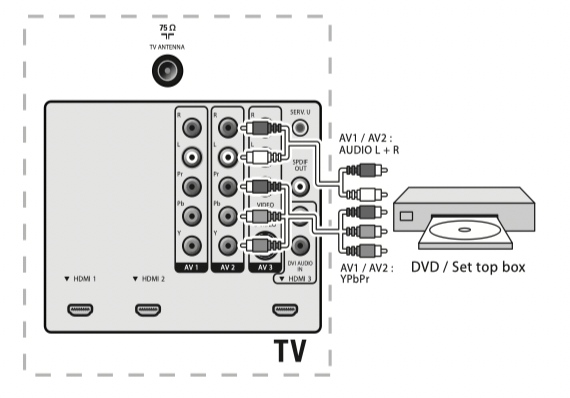
Connect a DVD player/recorder via component video output connectors (YPbPr) and analog audio
Selected TV models can display 1080i, 1080p, 720p and 480p DTV signals when connected to a DTV set-top box. Set the output of the cable box to either 1080i, 1080p, 720p or 480p. A DTV signal must be available in your area.
Connect a digital home theater amplifier

For legal reasons, the digital audio signal can be muted for copyprotected PCM audio qualities on accessory devices connected through HDMI.
Connect a PC
Connect a PC with an S-Video connector at the back
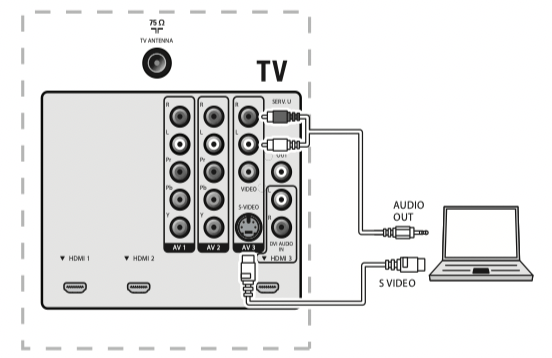
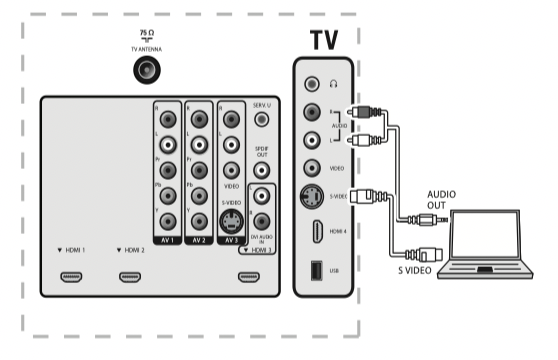
Connect a PC with an S-Video connector at the side
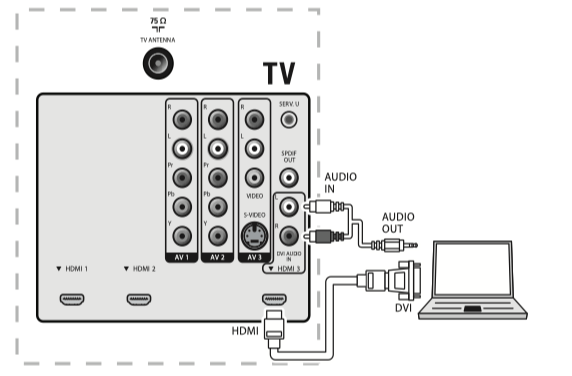
Connect a PC with a DVI connector
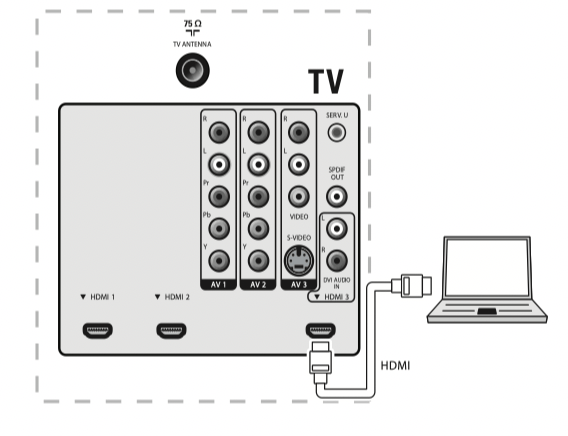
Connect a PC with an HDMI connector
Troubleshooting
| Problem |
Possible cause and solution |
| No power or indicator light. |
- The TV is not connected to the power.
- Press at the side of the TV or on the remote control.
- Ensure that the power cord is connected tightly to the TV power connector and to the power socket outlet.
- Remove the power cord from the power socket outlet, wait 60 seconds and reconnect the power cord.
- Connect the TV to a different power socket outlet.
|
| Error message on the screen with HDMI connection. |
- HDCP authentication fail.
- Ensure that your HDMI cable is certified.
- Press SOURCE on the remote control to switch to another source and then switch back to the HDMI source.
- Reset the accessory device and the TV.
- Turn on the TV.
- Select the HDMI channel.
- Turn on the accessory device.
- While the TV and the accessory device are powered on, unplug either end of the HDMI cable and then reinsert the cable.
|
| No sound is detected from the PC. |
- An incorrect HDMI port is connected or an audio cable is not connected.
- Connect a DVI-HDM cable to the HDMI 3 port on the TV.
- Connect an audio cable to the DVI AUDIO IN port on the TV.
- Press SOURCE on the remote control, and select the HDMI 3 source.
|
| TV does not respond to the remote control. |
- Batteries are installed incorrectly, or low battery power.
- Ensure the indicator light on the TV blinks when you press the remote control buttons.
- Ensure that you are using the TV remote control. Ensure that the batteries are inserted correctly and do not need to be replaced.
- Remove the power cord from the power socket outlet, wait 60 seconds and reconnect the power cord.
|
| The picture is distorted, stretched out, or has black bars on the side or top. |
- Broadcast video format.
- Press FORMAT on the remote control to select the best picture format.
- For some accessory devices, the picture format must be set in the accessory device.
|
| The picture is mostly red and green, or the picture misses red when connected to an accessory device via component cables. |
- Insecure/incorrect connection.
- Ensure all the connections are made according to the color code.
- Push the component cables all the way into the YPbPr sockets on the TV.
|
| No picture or sound. |
- No picture or sound - ensure you have selected the correct channel.
- Incomplete channel installation If the TV receives channels via an AV connection, set the TV to the correct source input.
- If the TV is connected directly to the wall via a coaxial connection, perform the auto-installation again.
|
| No sound on the TV loudspeaker. |
- Volume level is set to zero - increase the volume Sound is muted - press MUTE on the remote control.
- Headphones are connected - ensure that headphones are not plugged into the TV.
- Audio cable is not connected - for AV connection, ensure that the Audio L/R cable is connected as described in Connect your devices (see ‘Connect your devices’ on page 28). If you use a component cable, ensure that you have not crossed the red audio cable with the red video cable.
- Audio output setting for the accessory device is incorrect. For HDMI connections, some accessory devices have an HDMI audio output setting that must be turned on for HDMI to HDMI connections.
|
| Bad picture quality with a coaxial connection. |
- Standard definition channels are not as clear as high definition channels - connect the devices via component or HDMI cables.
|
| Cannot control your TV and connected devices with one remote control. |
- Confirm that the connected devices are EasyLink compliant and are connected to your TV via an HDMI cable. Not all brands of devices such as DVD players use the same system as Philips EasyLink. Other brands might not work with Philips EasyLink.
|
Download an electronic copy
To obtain an electronic copy of this manual:
- Point your browser to www.philips.com/support.
- Choose your country of location.
- Enter the model number or a keyword in the “Find your product” field. Alternatively, you can browse the catalogue.
- Click the description or model.
- Under Product support, click User manuals.