Model: G6Pro-1
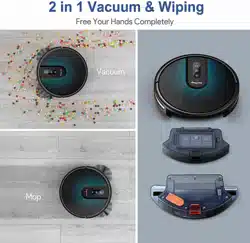
4-in-1 Sweeping, Vacuuming, Mopping and Self-Cleaning
User Manual
1. SAFETY INFORMATION
Important Safety Instructions
Read all safety instructions before using your robot vacuum.
Intended Use
This appliance is intended for household indoor use only on hard floors and carpets. It is designed to vacuum and mop dry debris and light liquid spills.
General Precautions
- Use only the power adapter and charging station provided by Bagotte.
- Do not use the robot to pick up hazardous, flammable, or combustible materials (e.g., water, bleach, ashes, paint).
- Keep the robot and its station away from open flames and heat sources.
- Do not operate the robot in an area with exposed electrical outlets or loose cords.
- Before cleaning or maintenance, always turn off the robot and disconnect it from the charging station.
- This appliance is not a toy. Supervise children and pets when the robot is operating.
- Do not sit or stand on the robot or the self-emptying station.
- Use only genuine Bagotte replacement parts and accessories.
2. PACKAGE CONTENTS
Please verify that all the following items are included in the box.
- 1x Robotic Vacuum
- 1x Charging & Self-emptying Station
- 2x Mop Pads
- 1x Mop Holder
- 2x Side Brushes
- 2x HEPA Filters
- 1x Cleaning Tool
- 1x 2-in-1 Dust & Water Tank
- Power Adapter
- User Manual
Quick Start Checklist: Before first use, ensure you have installed the side brushes, main brush, filter, and charged the robot fully.
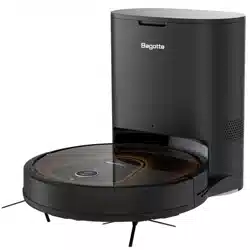
3. PRODUCT OVERVIEW

Robot Vacuum Components
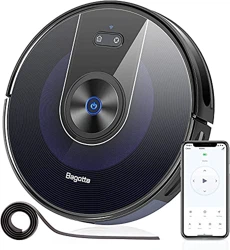
- Top: Lidar Navigation Sensor (rotating dome), Control Buttons (Power/Clean, Home/Dock, Spot Clean), Status Indicator LED.
- Front: Bumper with Collision Sensors.
- Sides: Side Brushes, Cliff Sensors (underside).
- Bottom: Main Rolling Brush, Drive Wheels, Charging Contacts, Dustbin Release Latch, Mop Module Attachment Point.
- Rear: 2-in-1 Dust & Water Tank compartment.
Self-Emptying Station Components
- Front: Dock Entry Guide, Robot Charging Contacts.
- Top/Interior: Dust Bag Compartment, Sealed Dust Bag, Power Port.
- Back: Cable Management, Power Input.
4. GETTING STARTED
4.1 Charging the Robot
Place the self-emptying station against a wall, with at least 1.5 feet (0.5 meters) of clearance on each side and 5 feet (1.5 meters) in front. Plug the station into a power outlet. Place the robot on the station's charging contacts. The indicator light on the robot will illuminate, showing it is charging. Allow it to charge fully (approximately 4-6 hours) before first use.
4.2 Installing the Side Brushes and Main Brush
Flip the robot over. Press the side brushes onto the pegs on the underside until they click into place. Ensure they rotate freely. To install the main brush, open the brush guard cover by pressing the release tabs. Insert the main brush into the slots and close the cover securely.
4.3 Installing the Dustbin and Filter
Open the dustbin cover on the top rear of the robot. Remove the dustbin by pulling the handle. Open the dustbin lid and insert the HEPA filter into the slot. Close the dustbin lid and reinsert the dustbin into the robot until it clicks.
4.4 Attaching the Mop Module and Water Tank
Fill the 2-in-1 tank's water reservoir with clean water. Do not exceed the "MAX" line. Attach a clean mop pad to the mop holder. Slide the mop holder onto the back of the robot, aligning it with the attachment points. You will hear a click when it is secure. The robot can now vacuum and mop simultaneously.
4.5 Setting Up the Self-Emptying Station
Open the top lid of the station. Remove the pre-installed dust bag from its packaging and insert it into the compartment, ensuring the bag's collar is seated correctly over the port. Close the lid. The station is now ready to automatically empty the robot's dustbin.
4.6 Powering On
Press the Power button on the robot's top panel. The robot will beep and its indicator light will turn on. It is now ready for setup and operation.
5. SMART APP SETUP & WI-FI CONNECTION
Downloading the "Bagotte" App
Search for "Bagotte" in the Apple App Store or Google Play Store. Download and install the official app.
Creating an Account
Open the app and follow the prompts to create a new account using your email address.
Step-by-Step Wi-Fi Connection Guide
- Ensure your robot is powered on and near your 2.4GHz Wi-Fi router. (The robot does not support 5GHz networks).
- In the Bagotte app, tap the "+" icon to add a new device.
- Select your robot model (G6Pro-1).
- The app will prompt you to connect your phone to the robot's Wi-Fi network (typically named "Bagotte-XXXX"). Go to your phone's Wi-Fi settings, select this network, then return to the app.
- Back in the app, select your home Wi-Fi network and enter the password.
- The app will configure the robot. This process may take a minute. A voice prompt from the robot will confirm a successful connection.
Your robot is now connected and will appear on the app's main screen.
6. BASIC OPERATION
Using the Robot Buttons
- Power/Clean Button: Press once to start or pause a cleaning cycle. Press and hold for 3 seconds to turn the robot on or off.
- Home/Dock Button: Press to send the robot back to its self-emptying station to charge or empty.
- Spot Clean Button: Press to initiate a focused cleaning spiral in the immediate area (approx. 5ft diameter).
Using the App for Basic Control
On the app's main screen, you can:
- Tap the large Clean button to start a full-house clean.
- Tap the Pause or Stop button during a clean.
- Tap the Home icon to recall the robot to the station.
7. SMART MAPPING & NAVIGATION
Initiating the First Cleaning for Mapping
For best results, clear the floor of obstacles like loose cables and small objects. Start a full cleaning cycle via the app. The robot will use its LiDAR sensor to systematically explore and map your home.
Understanding the LiDAR Map
After the first complete clean, a map of your home will appear in the app. Walls and permanent furniture are shown as gray outlines. The robot's cleaning path is displayed in real-time.
Saving and Naming the Map
Once the map is complete, the app will prompt you to save it. You can then use the app's editing tools to:
- Divide: Split the map into separate rooms by drawing dividing lines.
- Name: Label each room (e.g., Living Room, Kitchen).
- Set No-Go Zones: Draw virtual barriers where the robot should not enter.
Note: Keep the station in a permanent location to ensure accurate map retention. If the station is moved, you may need to remap.
8. CLEANING MODES & SETTINGS
All modes and settings are configured within the Bagotte app.
Suction Power Levels
- Quiet: Lower suction for quiet operation.
- Standard: Balanced suction for daily cleaning.
- Max: 5000Pa maximum suction for deep cleaning carpets and picking up pet hair.
Water Flow Settings for Mopping
- Low: For lightly soiled hard floors or quick damp mopping.
- Medium: For regular mopping.
- High: For stronger scrubbing on sticky or dirtier spots.
Cleaning Modes
- Auto: The robot cleans the entire mapped area.
- Room Selection: Select one or multiple specific rooms to clean from the saved map.
- Zone Cleaning: Draw a rectangle on the map for the robot to clean a specific zone twice.
- Spot: Clean a concentrated area (also accessible via the physical button).
- Edge: The robot follows walls and edges to clean baseboards.
Scheduling
In the app, go to Schedule. Tap "+" to create a new schedule. Set the time, days of the week, cleaning mode (e.g., Auto, Room Select), and suction/water settings. The robot will automatically start at the scheduled time.
No-Go Zones & Virtual Walls
In the map editor, select the No-Go Zone tool. Draw lines or boxes on the map where you do not want the robot to enter (e.g., around pet bowls, fragile furniture). The robot will avoid these areas during all future cleaning cycles.
9. VOICE CONTROL
Setup with Amazon Alexa
- Ensure your robot is connected to the Bagotte app.
- Open the Alexa app on your smartphone.
- Go to Skills & Games and search for the "Bagotte" skill.
- Enable the skill and link your Bagotte account.
- Discover devices. Your robot vacuum should appear.
Supported Voice Commands
Once setup is complete, you can use commands such as:
- "Alexa, ask Bagotte to start cleaning."
- "Alexa, tell Bagotte to go home."
- "Alexa, ask Bagotte to clean the living room."
- "Alexa, ask Bagotte to pause cleaning."