1. Overview
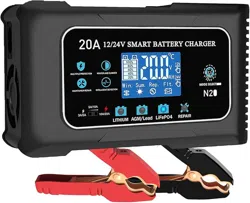
The Haisito 12V/24V 20 Amp Car Battery Charger is a fully automatic battery maintainer and trickle charger designed for a wide range of battery types. It features multiple protection mechanisms and adjustable charging currents.

Key Functions:
- Charges and maintains 12V and 24V batteries.
- Supports Lithium, LiFePO4, Lead-Acid (AGM, GEL, Wet, EFB), and other battery chemistries.
- Features a 7-stage automatic charging process.
- Includes trickle charge, maintenance, and pulse repair modes.
2. Specifications
- Brand: Haisito
- Product Dimensions: 8.66"D x 7.86"W x 3.96"H
- Item Weight: 1.5 Pounds
- Input Voltage: 110V ~ 240V AC
- Output Voltage: 12V / 24V DC
- Maximum Output Current: 12V/20A, 24V/10A
- Supported Battery Capacity: 2AH - 200 AH (Note: Charge batteries below 15AH with the minimum current setting)
- Minimum Starting Voltage: > 2.0 V
- Operating Temperature Range: -10°C (14°F) to 40°C (104°F)
3. Features and Controls

3.1 Display and Indicators
The digital display shows real-time information during operation:
- Voltage/Current: Displays real-time charging voltage or current.
- Mode Indicators: Shows active mode (e.g., Repair, Test, Trickle).
- Status Messages: Displays "FUL" when charging is complete, or error codes for low voltage or faults.
- Temperature Icon: Indicates when temperature compensation is active.
3.2 Control Buttons
- Mode/Type Button: Selects the battery type (e.g., Standard, AGM, Lithium).
- Current/Voltage Button: Cycles through the three adjustable current levels for 12V and 24V operation.
3.3 Charging Modes
- 7-Stage Automatic Charging: Bulk, Absorption, Analysis, Recondition, Float, Trickle, and Maintenance.
- Repair/Pulse Mode: Attempts to recover deeply discharged batteries (from 0V, except dead batteries).
- Trickle/Maintainer Mode: Provides a low, continuous charge to keep a battery at full capacity.
- Test Mode: Automatically engages trickle charging when the battery is nearly full.
3.4 Adjustable Current Levels
You can manually select from three charging current levels:
- Level 1: 12V/5A, 24V/3A
- Level 2: 12V/10A, 24V/5A
- Level 3: 12V/20A, 24V/10A (Maximum)
Note: The system may automatically reduce the current based on battery voltage to protect the battery.
3.5 Protection Features
- Temperature Protection
- Overcharge Protection
- Overvoltage Protection
- Short Circuit Protection
- Overcurrent Protection
- Reverse Polarity Protection
- Electrostatic Spark Protection
3.6 Temperature Detection
A built-in sensor adjusts charging voltage based on ambient temperature:
- Below 10°C (50°F): Increases charge voltage.
- Above 28°C (82°F): Decreases charge voltage.
4. Use Guide

4.1 Before First Use
- Inspect the charger, power cord, and battery clamps for any damage.
- Ensure your work area is dry, well-ventilated, and away from sparks or flames.
- Verify your battery's voltage (12V or 24V) and type (e.g., Lead-Acid, AGM, Lithium).
- For Lithium/LiFePO4 Batteries: Only charge batteries equipped with a Battery Management System (BMS).
4.2 Connection Procedure
- Power Off: Ensure the charger is unplugged from the AC outlet.
- Connect to Battery:
- Attach the RED positive (+) clamp to the battery's positive terminal.
- Attach the BLACK negative (-) clamp to the battery's negative terminal or a clean, unpainted metal part of the chassis (for negative-grounded vehicles).
- Ensure connections are secure and metal-to-metal.
- Select Settings:
- Plug the charger into a 110V-240V AC outlet.
- Use the Mode button to select the correct battery type.
- Use the Current button to select the appropriate charging current for your battery's capacity.
- Start Charging: The charger will automatically begin the charging process. The display will show the progress.
4.3 During Charging
- Monitor the display for voltage, current, and status messages.
- The fan may operate; this is normal for cooling.
- Do not touch the battery clamps while the charger is active.
4.4 Completion and Disconnection
- When charging is complete, the display will show "FUL".
- Unplug the charger from the AC outlet.
- Disconnect the BLACK negative (-) clamp first, then the RED positive (+) clamp from the battery.
- Store the charger in a cool, dry place.
4.5 Using as a Maintainer
For long-term storage, you can leave the charger connected to a battery. It will automatically switch to and maintain a trickle charge, keeping the battery at full charge without overcharging.
5. Battery Compatibility
This charger is compatible with the following battery types:
- Lithium (with BMS)
- LiFePO4 (with BMS)
- Lead-Acid: Wet/Flooded, AGM (Absorbent Glass Mat), GEL, EFB (Enhanced Flooded Battery), MF (Maintenance-Free), VRLA (Valve-Regulated Lead-Acid), SLA (Sealed Lead-Acid), Calcium.
Typical Applications: Cars, trucks, motorcycles, electric motorcycles, golf carts, lawn mowers, tractors, forklifts, motor boats, and other 12V/24V systems.
6. Troubleshooting
- Charger won't start / Display is off:
- Check that the AC power cord is securely plugged in.
- Verify the battery voltage is above 2.0V. The charger may not start if voltage is too low.
- Check battery connections for corrosion and ensure clamps have good contact.
- Charging current is lower than selected:
- This is normal. To protect the battery, the system automatically identifies battery voltage and selects the most appropriate current. It will use maximum current when battery voltage is low (e.g., a 12V battery below 11V).
- Lithium/LiFePO4 battery doesn't seem fully charged:
- When fully charged, the charger has a callback function, reducing voltage by about 1V-2V, which is normal. It then adds a small, uninterrupted trickle charge.
- Fan is noisy:
- Fan operation and wind noise are normal during charging.
- Display shows an error or "Low Voltage":
- The battery voltage is too low or the battery cannot hold a charge. The charger's repair mode may attempt to recover it. If the battery is completely dead, recovery may not be possible.
7. Safety Information
- Read all instructions before use.
- This is not a toy. Keep out of reach of children.
- Use only with 12V or 24V lead-acid, AGM, GEL, or Lithium/LiFePO4 (with BMS) batteries.
- Do not use the charger for any purpose other than charging rechargeable batteries.
- Do not expose the charger to rain, snow, or liquids.
- Do not operate in an enclosed area or near flammable materials.
- Wear eye protection when working near batteries.
- Do not connect the charger to a frozen battery.
- Ensure the AC power cord is not damaged and does not present a tripping hazard.
- Disconnect the AC power and battery clamps before performing any maintenance or cleaning.