The Ambrane MiniVac 03 is a cordless, handheld vacuum cleaner designed for portable cleaning tasks. It is suitable for use in cars, homes, and for pet hair removal. The device is compact, lightweight, and operates on a rechargeable battery.
Key attributes include a 100W BLDC motor, a HEPA-13 filter, two suction power levels, and a 7800mAh battery providing up to 40 minutes of runtime.
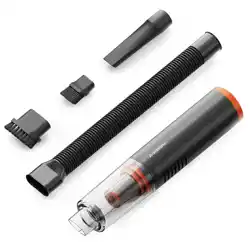
Identify the main parts of your vacuum cleaner before use.
3.1 Main Unit
Body: Houses the motor, battery, and dust container.
Power Button: Turns the device on and off. Press to cycle between power levels (Low and High).
Dust Container Release: Button or mechanism to detach the dust container for emptying.
Filter Compartment: Located inside the dust container. Houses the HEPA filter.
Charging Port: USB port for connecting the charging cable.
Attachment Socket: The front opening where nozzles and tubes connect.
3.2 Attachments
Long Soft Suction Tube: Flexible hose for extending reach into tight spaces.
Flat Suction Nozzle: For cleaning flat surfaces and narrow gaps.
Big Brush: For loosening and collecting debris from carpets and upholstery.
Small Brush: For detailed cleaning on keyboards, vents, and other small areas.
4. How To Use
How to Power On
Kindly press the power button at the bottom to activate the vacuum cleaner.
Low Suction Mode: The vacuum cleaner will start in Low Suction Mode for light cleaning when you turn it on.
High Suction Mode: Short-press the power button once to switch to High Suction Mode for more intensive cleaning.
Light Mode: Long press to turn on/off the light
How to Power Off
Press the power button again during operation to turn it off.
Note:Pause usage after 41 minutes of continuous operation and resume after a 5-minute break. However, the remaining use time is very short and you’ll need to recharge the vacuum for a stable runtime.
How to Charge
Connect the provided USB-A to Type-C cable to a power source.
Insert the Type-C end of the cable into the vacuum cleaner’s Type-C port, visible at the bottom.
The vacuum cleaner will take approximately 4 to 5 hours to charge completely.
Disconnect the cable from the vacuum cleaner once the charging is complete.
When the battery is fully charged, the LED indicator shows green light whereas red light indicates stable or normal charge.
How to Clean
Twist the dust bin anticlockwise to remove it and take out the HEPA combination.
Empty the dust bin, rotate the steel mesh anticlockwise to take it off.
Wipe the dust bin with a damp cloth, and wash the steel mesh and filter screen.
Make sure to dry everything before reusing.
Install the steel mesh by rotating it clockwise into the HEPA, then assemble the HEPA combination into the dust cup.
Reattach the dust bin by twisting it clockwise until secure.
How to Utilise Accessories
Flat Suction Nozzle: It’s suitable for cleaning doors, seats, corners, dashboards, ashtrays, and narrow or tight spots.
Small Brush: It’s handy in suction through the flat nozzle and can sweep clean dust on surfaces such as cushions, rugs, keyboards, or air conditioning vents.
Flexible Suction Tube: Suitable for all-around cleaning and extends reachability to hidden areas like beneath the car seat.
Large Brush: Greatly facilitates suction in hard-to-reach corners while attached to the long suction tube and can also be used separately.
Operating Instructions & Tips
Ensure the vacuum cleaner is fully charged before the first use. Plug the charging cable directly into the back of the unit to charge.
Remember to empty the dust container after each use to prevent overflow.
The HEPA combination is washable. After washing, ensure it is completely dry before reusing it to avoid motor damage.
Note: There is a buckle on the dust cup, just insert the machine in the direction of the buckle.
Cleaning & Maintenance Instructions
Rinse and Reassemble: The dust cup, HEPA combination, replaceable filter, and suction head are washable. After drying, reassemble in order.
Body Care: Wipe the body with a damp cloth, avoiding the charging port. Consider replacing the filter every 6 months for optimal performance.
Surface Cleaning: For dirt, use a neutral detergent and a dry cloth for a thorough wipe.
Avoid Harsh Cleaners: Do not use volatile oils, thinners, alcohol, or spray cleaners to prevent damage.
Prevent Direct Rinsing: Avoid rinsing the product directly and carefully follow specified cleaning instructions.
Regular Dust Cup Maintenance: Clean the dust cup regularly to prevent debris buildup.
HEPA Filter Care: Clean the HEPA filter with water, ensuring it's dry before reinstalling.
Periodic Charging: Charge the product fully at least once every three months if unused for a long period to maintain battery health.
Emptying the Dust Container
Turn off and disconnect the vacuum from the charger.
Press the release button or latch to detach the dust container from the main body.
Hold the container over a trash bin and open the lid to empty the collected debris.
Close the lid securely and reattach the container to the main body until it clicks into place.
Cleaning and Maintaining the Filter
Empty the dust container as described above.
Open the filter compartment inside the dust container and remove the HEPA filter.
Gently tap the filter over a trash bin to dislodge loose dust.
For a deeper clean, rinse the filter under cold running water. Do not use detergents.
Allow the filter to air dry completely for at least 24 hours before reinstalling.
Place the dry filter back into its compartment and reassemble the dust container.
Important: Never operate the vacuum without the filter installed, as this can damage the motor.
5. Safety instructions and warnings
Not a Toy: This product is not intended for children. Use under adult supervision to prevent injury.
Accidental Injury: Seek immediate medical attention in case of accidental injury.
Avoid Liquids and Flammable Substances: Do not vacuum water, liquids, flammable materials, or uncooled ashes to prevent hazards.
Read Carefully: Familiarize yourself with the user manual to prevent accidents.
No Unauthorised Modifications: Do not disassemble or modify the product without authorisation.
Avoid Extreme Conditions: Prevent exposure to fire, heat, direct sunlight, shocks, vibration, or high falls.
Safe Charging: Use a charger that meets safety standards and matches the product's voltage marking.
Suitability Warning: Not suitable for physically or mentally impaired individuals, children, or inexperienced users without supervision by experienced individuals.
Damaged Unit Warning: Do not use the vacuum cleaner if it is damaged.
Temperature Range: Operate and charge the product within the temperature range of 0°C to 40°C.
Cable Removal After Charging: Remove the charging cable promptly after charging to avoid safety hazards.
Avoid Usage In:
High Heat Areas: Avoid proximity to heating equipment or hot air sources.
Steamy or Smoky Environments: Do not use near steamy areas like pools, hot springs, or kitchens.
6. Troubleshooting
Problem
Possible Cause
Solution
Vacuum does not turn on.
Battery is depleted.
Connect to charger and allow to charge fully.
Weak suction power.
Dust container is full.
Filter is clogged.
Air path is blocked.
Empty dust container.
Clean or replace the filter.
Check hose and nozzles for blockages.
Vacuum stops during use.
Battery is low.
Motor overheating protection activated.
Recharge the battery.
Turn off and allow the unit to cool for 30 minutes.
Unusual noise or vibration.
Foreign object stuck in impeller or hose.
Loose attachment.
Turn off, disconnect power, and check for obstructions.
Ensure all attachments are securely connected.
Insufficient Suction:
Check the battery; recharge if necessary.
Ensure the exhaust port is clear from obstructions.
Automatic Shutdown Shortly After Startup:
Charge the vacuum cleaner promptly to resolve this issue.
Abnormal Vacuuming:
Verify the correct installation of the dust collection bin.
Empty the dust cup, if full.
Clean or replace the steel mesh and HEPA filter if clogged.
Note: For unresolved problems, please contact our customer service for assistance.
Battery Care and Disposal
For optimal battery life, avoid completely draining the battery before recharging.
If the vacuum will not be used for an extended period, charge it to approximately 50% and store it in a cool, dry place.
Do not attempt to disassemble or replace the battery. The battery is not user-serviceable.
Dispose of the product and its battery according to local regulations for electronic waste. Do not dispose of in household trash.
6. Warranty and Support
For warranty service, product support, or to purchase replacement parts, please contact the manufacturer using the details below: