The Ambrane Mini Vac 02 is a compact, cordless, handheld vacuum cleaner and air blower. It is designed for cleaning car interiors, home surfaces, and pet hair. The device is battery-powered, lightweight, and includes multiple attachments for versatile cleaning.
2. Package Contents
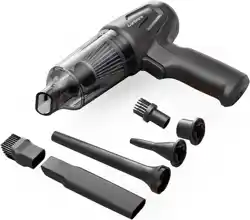
1 N MiniVac-02 Portable Vacuum Cleaner
6 N Product Attachments
1 N Charging Cable
1 N Rating Card
3. Key Features & Specifications
3.1 Physical Specifications
Weight: 442 grams (including accessories)
Dimensions (L x W x H): 21.9 cm x 17.4 cm x 6.6 cm
Dust Box Capacity: 200 ml
Form Factor: Handheld
3.2 Power & Performance
Motor Power: 80W BLDC Motor
Motor Speed: Up to 80,000 RPM
Suction Power: Two modes - High (12 kPa) and Low (6 kPa)
Noise Level: Less than 68 dB
3.3 Battery & Charging
Battery Type: Dual 2600mAh Lithium-ion (5200mAh total capacity)
Charging Port: USB Type-C
Cordless Runtime: Up to 35 minutes per charge (usage dependent on suction mode).
Charging Indicator: LED indicator on the vacuum body shows charging status.
3.4 Filtration
Filter Type: Washable HEPA Filter
The filter traps fine dust and allergens.
4. Parts Identification
Main Body: Houses the motor, battery, dust box, and controls.
Power Button: Used to turn the device on/off and cycle between suction modes (Low/High) and blower mode.
USB Type-C Charging Port: Located on the body for connecting the charging cable.
Dust Box Release Button/Latch: For removing the dust box for emptying.
Nozzle Attachment Point: Where cleaning accessories attach.
Accessories: Various brushes and nozzles for different cleaning tasks.
5. Getting Started
5.1 Initial Setup
Unpack all components.
Ensure the HEPA filter is correctly installed inside the dust box compartment.
Fully charge the device before first use using the provided USB Type-C cable and a compatible power adapter (not included). The charging indicator will light up.
5.2 Charging the Vacuum
Connect the USB Type-C cable to the charging port on the vacuum cleaner.
Connect the other end to a USB power source (e.g., wall adapter, power bank, computer).
The LED indicator will show the charging status. Refer to the indicator's behavior (e.g., solid, blinking) as described in the product's quick start guide (if included) for specific status meanings.
Disconnect once fully charged.
Note: Use only the specified USB Type-C cable. Do not use a damaged cable.
6. How To Use
How to Power On
Long-press the power button for around 3 seconds to activate the vacuum cleaner.
Low Suction Mode: The vacuum cleaner will start in Low Suction Mode for light cleaning when you turn it on.
High Suction Mode: Short-press the power button once to switch to High Suction Mode for more intensive cleaning.
Blower Mode: Use the same procedure as suction modes to activate the blowing option from the opposite end of the vacuum cleaner for versatile cleaning.
How to Power Off
Press the power button again during operation to turn it off.
Note: After 35 minutes of continuous use, pause and recharge before resuming.
How to Charge
Connect the provided USB-A to Type-C cable to a power source.
Insert the Type-C end of the cable into the vacuum cleaner’s Type-C port.
Fully charging the vacuum cleaner will take approximately 4 hours and 15 minutes.
On charging, the LED light will be red; once fully charged, the light changes to green.
Disconnect the cable from the vacuum cleaner and the power source when charging is complete.
How to Clean
Twist the dust bin anticlockwise to remove it.
Empty the dust bin and clean the filter screen.
Wipe the dust bin with a damp cloth, and wash the filter screen. Let both dry.
Reattach the dust bin by twisting it clockwise until secure.
Operating Instructions & Tips
Ensure the vacuum cleaner is fully charged before the first use. Plug the charging cable directly into the back of the unit to charge.
Remember to empty the dust container after each use to prevent overflow.
The HEPA filter is washable. After washing, ensure it is completely dry before reusing to avoid motor damage.
Emptying the Dust Box
Turn off and disconnect the vacuum from the charger.
Press the dust box release button or latch and remove the dust box from the main body.
Open the dust box lid over a trash bin and empty the contents.
Close the lid and reattach the dust box to the main unit until it clicks securely.
Cleaning the HEPA Filter
Remove the dust box as described above.
Open the dust box and take out the HEPA filter.
Gently tap the filter to remove loose dust. For a thorough clean, rinse it under lukewarm water and let it air dry completely for 24 hours before reinstalling.
Ensure the filter is completely dry before placing it back into the dust box and reassembling.
7. Care & Maintenance
Rinse and Reassemble: The dust cup, filter screen, replaceable filter, and suction head are washable. After drying, reassemble in order.
Body Care: Wipe the body with a damp cloth, avoiding the charging port. Replace the filter every 3 months for optimal performance.
Surface Cleaning: For dirt, use a neutral detergent and a dry cloth for a thorough wipe.
Avoid Harsh Cleaners: Do not use volatile oils, thinners, alcohol, or spray cleaners to prevent damage.
Prevent Direct Rinsing: Avoid rinsing the product directly; follow specified cleaning instructions.
Regular Dust Cup Maintenance: Clean the dust cup regularly to prevent debris buildup.
HEPA Filter Care: Clean the HEPA filter with water, ensuring it's dry before reinstalling.
Periodic Charging: Charge the product fully at least once every three months if unused for a long period to maintain battery health.
8. Troubleshooting
Problem
Possible Cause
Solution
Device does not turn on.
Battery is depleted.
Charge the device fully.
Weak suction power.
Dust box is full; filter is clogged; accessory is blocked.
Empty dust box. Clean the HEPA filter. Check and clear blockage from nozzle.
Device stops during use.
Battery is low; motor overheating protection activated.
Recharge the device. Turn off and let it cool down for 30 minutes.
Dust box is difficult to attach/remove.
Not aligned correctly; latch obstructed.
Align properly and ensure no debris is blocking the latch mechanism.
Device does not charge.
Faulty cable/power source; charging port dirty.
Try a different USB-C cable and power adapter. Gently clean the charging port.
Insufficient Suction:
Check the battery; recharge if necessary.
Ensure the exhaust port is clear from obstructions.
Automatic Shutdown Shortly After Startup:
Charge the vacuum promptly to resolve this issue.
Abnormal Vacuuming:
Verify the correct installation of the dust collection bin.
Empty the dust cup is full.
Clean or replace the HEPA filter if clogged.
Note: For unresolved problems, please contact our customer service for assistance.
9. Warranty and Support
Warranty Period: 365 Days (1 Year) from the date of purchase.
For warranty service or support, please contact the seller or the manufacturer using the email address provided. Keep your proof of purchase (invoice). The warranty covers defects in materials and workmanship under normal use.
10. Safety Instructions
Not a Toy: This product is not intended for children. Use under adult supervision to prevent injury.
Accidental Injury: Seek immediate medical attention in case of accidental injury.
Avoid Liquids and Flammable Substances: Do not vacuum water, liquids, flammable materials, or uncooled ashes to prevent hazards.
Read Carefully: Familiarize yourself with the user manual to prevent accidents.
No Unauthorized Modifications: Do not disassemble or modify the product without authorization.
Avoid Extreme Conditions: Prevent exposure to fire, heat, direct sunlight, shocks, vibration, or high falls.
Safe Charging: Use a charger that meets safety standards and matches the product's voltage marking.
Suitability Warning: Not suitable for physically or mentally impaired individuals, children, or inexperienced users without supervision by experienced individuals.
Damaged Unit Warning: Do not use the vacuum cleaner if it is damaged.
Temperature Range: Operate and charge the product within the temperature range of 0°C to 40°C.
Cable Removal After Charging: Remove the charging cable promptly after charging to avoid safety hazards.
Avoid Usage In:
High Heat Areas: Avoid proximity to heating equipment or hot air sources.
Steamy or Smoky Environments: Do not use near steamy areas like pools, hot springs, or kitchens.
Outdoor or Industrial Settings: Avoid outdoor, commercial, or industrial usage.