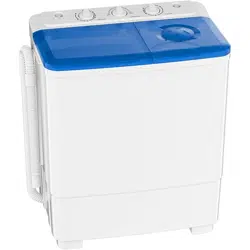
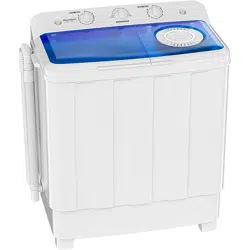
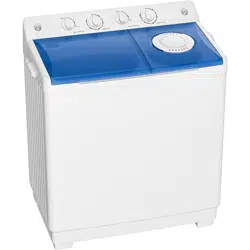
This manual covers the Auertech Portable Twin Tub Washing Machine. This is a semi-automatic, compact laundry appliance featuring separate washing and spinning tubs. It is designed for use in locations with limited space, such as apartments, dormitories, and RVs.
The machine operates on 110V/60Hz power and uses a manual control system with knobs for setting wash and spin times.
Features and Components
Physical Description
Twin Tub Design: Separate compartments for washing (left) and spinning (right).
Control Panel: Located on the top front, housing three control knobs and two water inlet ports.
Transparent Lids: Clear lids on both tubs allow you to monitor the process.
Drain Pump & Hose: An integrated pump and drain hose for emptying water.
Inlet Hose: A supplied hose for connecting to a water source.
Lint Filter: Located inside the washing tub to catch debris.
Body Material: Constructed from polypropylene (PP).
Control Panel and Indicators
The control panel includes the following elements:
Wash Timer Knob: Controls the duration of the wash cycle (up to 15 minutes).
Wash Mode Selector Knob: Selects between "Gentle" and "Standard" wash actions.
Spin Timer Knob: Controls the duration of the spin cycle (up to 5 minutes).
Water Inlet Ports: Two ports for connecting the inlet hose to fill either the wash or spin tub.
Remove the machine and all accessories from the packaging.
Inspect for any shipping damage.
Remove any protective tapes or films.
Note: The machine is tested before packaging. The presence of a small amount of water inside is normal and does not indicate a used product.
Placement
Place the machine on a flat, stable, and waterproof floor surface near a standard 110V electrical outlet.
Ensure there is adequate space around the unit for air circulation and access to the drain hose.
Do not place the machine on carpet.
Water Connection
Connect the provided inlet hose to a faucet. An adapter may be required depending on your faucet type.
Attach the other end of the hose to either the "Wash" or "Spin" water inlet port on the control panel, depending on which tub you are filling.
Ensure all connections are secure to prevent leaks.
Drainage Setup
Attach the drain hose firmly to the outlet at the back of the machine.
Place the free end of the hose into a sink, bathtub, floor drain, or a suitable container.
The built-in drain pump allows water to be drained to a higher location (e.g., into a sink). Ensure the hose path does not have sharp kinks.
Electrical Connection
Warning: This appliance is rated for 110V. Using it with a higher voltage will cause damage and void the warranty. Plug directly into a wall outlet. Do not use an extension cord.
Ensure the control knobs are in the "OFF" (0) position.
Plug the power cord into a grounded 110V outlet.
Use Guide
Operating Instructions
WASHING PROCEDURE
Washing
Water Inlet Select the water lever to the desired position.
Add in water and dissolved detergent to make the water reach the expected level. Operate the machine to stir the detergent evenly by turning the Wash knob.
Put in laundry.
Select wash duration according to the weight of laundry.
Select washing type (Normal/Stronger) according to the weight of laundry. After each washing operation ends, set the Wash Selector to Drain.
Drain the water
Since the washing machine has a drain pump, the water will flow faster upon turning the Drain Selector to Drain position. Be sure to turn Drain Selector immediately back to Normal position when the water is completely gone from the Wash tub.
Intermediate-Spin (Removing Detergent/Dry)
Move laundry from wash tub to spin tub.
Spin to remove dissolved detergent.
Arrange laundry uniformly in the spin tub without stacking them all on one side. An unbalance spin tub may cause abnormal vibration and noise.
Press the laundry down firmly and place the safety cap on top of them.
After rinsing, close the outer cover of the spin tub and spin for 1 minute.
*An unbalance spin tub may cause abnormal vibration or noise. If such incident occur, open the cover of the spin tub and rearrange the laundry, then continue the spinning operation.
Soak Rinse
Place the laundry into the wash tub, and then select suitable washing type.
Select the water level. (Select the water level according to the amount of laundry)
Rinse: Set the timer to 0–5 minutes and let it rinse.
Dry Spin
Arrange laundry uniformly in the spin tub without stacking them all on one side. An unbalance spin tub may cause abnormal vibration and noise.
Press the laundry down firmly and place the safety cover on top of them.
Select suitable spinning duration according to the quantity of laundry. (1 minute, 3 minutes, 5 minutes)
Cleaning and Maintenance
Please unplug the power supply cord before performing any disposal. There will be lint left behind in the overflow filter and the lint filter after each time of use. These filters need to be cleaned frequently in order to maintain the top performance of the machine.
Clean of the entire machine
Clean the machine with a soft damp cloth.
Do not spray water directly onto the machine.
If the machine is too dirty, add neutral detergent to clean.
Do not use petroleum-based detergent to clean the machine, as this will spoil the appearance.
Cleaning of the overflow filter
Please clean the filter at least once in 2 months.
Dismantling of the overflow filter. Pinch the fixing of the overflow filter. Pinch the flexible fastening claw, pull it gently away from machine as shown in picture.
After Each Use: Drain all water. Leave the lids open to allow the interior to air dry and prevent mildew.
Cleaning the Lint Filter: Regularly remove and clean the lint filter located in the wash tub under running water.
Exterior Cleaning: Wipe the exterior with a soft, damp cloth. Do not use abrasive cleaners or solvents.
Inlet Filter: Periodically check the inlet hose connection for debris.
Storage: If storing for an extended period, ensure the machine is completely dry. Store in a cool, dry place.
Troubleshooting
Problem
Possible Cause
Solution
Machine does not start.
Power cord not plugged in. Control knobs are at "0". Household circuit breaker tripped.
Plug in the cord. Turn a timer knob to a time setting. Check home circuit breaker/fuse.
Wash or Spin tub does not operate.
Lid is not closed properly. Motor overload protection activated.
Close lid securely. Unplug machine for 15 minutes to allow motor to cool down. Reduce load size.
Water does not drain.
Drain hose is kinked or blocked. Drain pump filter clogged. Drain hose positioned too high.
Straighten hose and clear blockage. Clean the pump filter (refer to maintenance). Lower the drain hose outlet.
Water leaks from underneath.
Drain hose not connected tightly. Internal hose connection loose.
Reconnect and secure the drain hose. Check internal connections (may require contacting support).
Excessive vibration or noise.
Machine is not on a level surface. Clothes are unevenly loaded in spin tub.
Place machine on a flat, solid floor. Stop the spinner and redistribute clothes evenly.
Clothes are still very wet after spinning.
Spin tub overloaded. Spin time too short.
Do not exceed the spin capacity (8 lbs). Use the full 5-minute spin cycle.
Safety Information
Important Safety Instructions:
Read all instructions before use.
This appliance must be grounded. Connect to a properly grounded 110V outlet.
Do not operate if the power cord or plug is damaged, or if the machine malfunctions.
Do not immerse the unit, cord, or plug in water or other liquids.
Unplug the machine before cleaning, maintenance, or when not in use.
Do not let children play on or with the appliance.
Close supervision is necessary when the appliance is used near children.
Do not wash articles that have been soaked in flammable liquids (gasoline, oil, etc.).
Do not reach into the spinner basket while it is moving.
Always ensure the spin tub lid is closed before starting the spin cycle.
NOTE:
Set the mode back to NORMAL after draining is complete.
Before the spin cycle, balance the spinner and press clothes firmly with the white spin cap to prevent small items from spinning out and falling to the bottom.
If there is a lot of water in the spin dryer, please drain it first before the spin cycle.
The motor and drain pump are equipped with overheating protection. If they overheat, restart them after 30–60 minutes of cooling.
The drain hose should not be submerged in water to prevent drain issues or siphoning.
Recommended Wash & Spin Cycle:
Add clothes and laundry detergent, connect the faucet and the water inlet on the left side of the control panel with the inlet hose, or use a bucket to add water.
Plug in the power.
Set the program selector to NORMAL, and then turn the WASH TIMER to the desired time.
When it's done, set the program selector to DRAIN and drain the dirty water.
Add water again and repeat above steps 3–4 times to rinse clothes.
Transfer wet clothes to the spin dryer and set the SPIN timer.
Press clothes firmly with the white round piece, and balance the spinner.
Turn the SPIN TIMER to the desired time. The SPIN TIMER will start the drain pump, so there is no need to change the mode to DRAIN.
After a few minutes, the spin dryer can spin out 70–80% of the water.