1. Overview
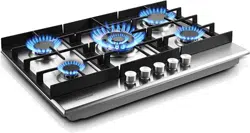
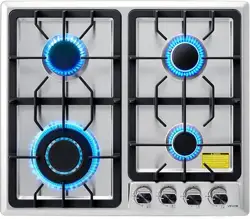
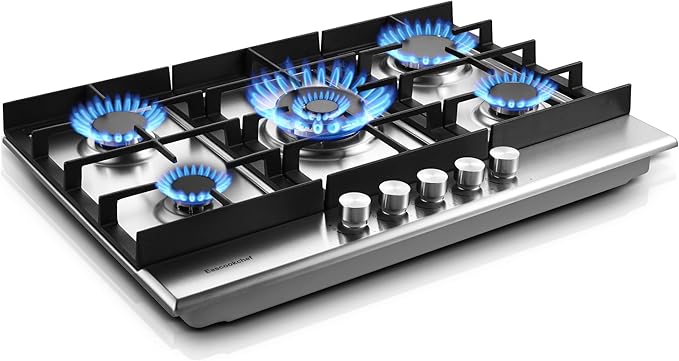
This manual provides instructions for the safe installation, operation, and maintenance of the Eascookchef 30-inch built-in gas cooktop. The cooktop features five sealed burners, a stainless steel surface, and is convertible for use with Natural Gas (NG) or Liquid Propane Gas (LPG).
Key Identifiers: Model variations include a 30-inch size. The product operates on a 120V power source.
2. Safety Information
WARNING: Improper installation, adjustment, alteration, service, or maintenance can cause property damage, personal injury, or death. Read and understand all instructions before installing or using this appliance.
2.1 Important Safety Instructions
- This appliance must be installed by a qualified installer in accordance with all local codes and ordinances.
- DO NOT install the stove in a damp, closed environment, as long-term moisture can cause rust on the stainless steel panel.
- This cooktop is for built-in use only. Do not use as a freestanding unit.
- Ensure the gas supply is turned off at the source before beginning installation.
- Keep the area around the appliance free from combustible materials, gasoline, and other flammable vapors and liquids.
- Do not use this appliance for space heating.
2.2 Child Safety
- The control knobs feature a child safety lock. They require pressing and rotating simultaneously to ignite, helping to prevent accidental activation by children.
- Do not leave children unattended in an area where the appliance is in use.
3. Specifications
| Specification | Detail |
|---|
| Brand | Eascookchef |
|---|
| Product Dimensions (D x W x H) | 20" x 29.9" x 3.9" |
|---|
| Cut-out Dimensions (D x W) | 18.9" x 28" |
|---|
| Number of Burners | 5 |
|---|
| Burner Type | Sealed |
|---|
| Burner BTU Range | 3,400 to 13,600 BTU |
|---|
| Fuel Type | Natural Gas (NG) / Liquid Propane Gas (LPG) Convertible |
|---|
| Surface Material | Brushed #304 Stainless Steel |
|---|
| Control Type | Melt-proof Bakelite Knobs |
|---|
| Ignition System | Electronic |
|---|
| Safety Feature | Thermocouple Flame Failure Device (FFD) |
|---|
| Power Requirement | 120V, 60Hz (Pre-installed power cord included) |
|---|
| Installation Type | Drop-In / Built-in |
|---|
| Included Components | Installation Kit, LPG Conversion Nozzles |
|---|
| Item Weight | 16.94 kg (37.3 lbs) |
|---|
4. Features & Components

4.1 Cooktop Surface
Constructed from a single piece of brushed #304 stainless steel. This design helps prevent spilled liquids from seeping into the interior, making it corrosion-resistant and easy to clean.
4.2 Burners
- Quantity & Power: Five sealed burners with varying heat outputs from 3,400 to 13,600 BTU.
- Purpose: The range of burner sizes accommodates different cooking tasks, from simmering to high-heat wok cooking.
4.3 Grates
Heavy-duty cast iron grates are included. They are designed to be solid, resist deformation, and provide stable support for various pot and pan sizes.
4.4 Control Panel
- Knobs: Five individual melt-proof, anti-scalding Bakelite knobs, each corresponding to one burner.
- Child Lock: Each knob requires pressing inward while turning to activate, providing a child safety feature.
4.5 Safety Systems
- Thermocouple Flame Failure Device (FFD): Automatically shuts off the gas supply to a burner if the flame is extinguished (e.g., by a boil-over), helping to prevent gas leaks.
- Sealed Burners: Help contain spills on the surface for easier cleaning and prevent food debris from entering the internal components.
5. Installation Guide
Professional Installation Recommended: Installation and gas connection must be performed by a qualified professional in accordance with all national and local gas and electrical codes.
5.1 Pre-Installation Checklist
- Verify Fit: Confirm the cabinet cut-out dimensions (28" W x 18.9" D) and the product's overall dimensions are suitable for your space.
- Gas Supply: Ensure you have the correct gas type (Natural Gas or Propane) and that the supply line and shut-off valve are accessible. Note: A natural gas pressure regulator and gas pipe are NOT included.
- Electrical Supply: A standard 120V, 60Hz electrical outlet must be accessible for the ignition system. The cooktop comes with a pre-installed power cord.
- Ventilation: Ensure adequate ventilation, such as a range hood, is installed above the cooktop.
- Contents: Unpack the cooktop and verify all parts are present (Cooktop, Grates, Installation Kit, LPG nozzles).
5.2 Gas Conversion (If Required)
The cooktop is shipped configured for use with Natural Gas (NG). An installation kit with LPG nozzles is included for conversion to Propane.
- Conversion must be performed by a qualified technician.
- Do not attempt to use the appliance with a gas type for which it is not configured.
5.3 Installation Steps (Overview)
- Turn off the electrical power and gas supply at the source.
- Prepare the countertop cut-out according to the specified dimensions.
- Place the cooktop into the cut-out, ensuring it is level.
- Secure the cooktop to the countertop using the brackets provided in the installation kit.
- Connect the gas line to the cooktop's gas inlet using an approved flexible gas connector. All connections must be checked for leaks with a soapy water solution or leak detector.
- Plug the 120V power cord into a grounded electrical outlet.
6. Use Guide
6.1 Initial Use
- After professional installation, ensure all packaging materials are removed from the cooktop surface and burner areas.
- Wipe the stainless steel surface and grates with a damp cloth to remove any dust.
- Turn on the gas supply and electrical power.
6.2 Lighting the Burners
- Place a pot or pan on the grate above the burner you wish to use.
- Press the corresponding control knob firmly INWARD and turn it counterclockwise to the ignition position (usually marked with a spark symbol or "LITE").
- You will hear a clicking sound from the electronic igniter. Continue holding the knob in for 3-5 seconds after the flame lights to allow the thermocouple to heat up.
- Release the knob. The flame should remain lit. If it goes out, repeat the process, holding the knob in slightly longer.
- Turn the knob further counterclockwise to adjust the flame to the desired height.
6.3 Turning Off a Burner
Turn the control knob clockwise to the "OFF" position. Ensure the flame is completely extinguished.
6.4 Cookware Recommendations
- Use flat-bottomed pots and pans that match or slightly exceed the size of the burner grate for maximum efficiency.
- The heavy-duty cast iron grates support most types of cookware, including cast iron, stainless steel, and aluminum.
- Avoid using cookware with warped or rounded bottoms, as they may be unstable.
7. Cleaning & Maintenance
7.1 Daily Cleaning
- Allow the cooktop and grates to cool completely before cleaning.
- Wipe the stainless steel surface with a soft, damp cloth and a mild detergent. Dry with a clean cloth to prevent water spots.
- For stubborn stains or light grease, use a dedicated stainless steel cleaner. Always wipe in the direction of the grain.
- Lift off the grates and wash them with warm, soapy water. Dry thoroughly before replacing.
7.2 Burner Caps & Heads
- The sealed burner caps can be lifted off for cleaning once the cooktop is cool.
- Wash them with warm, soapy water, rinse, and dry completely. Ensure all ports are clear of debris.
- Replace the caps in their correct positions, aligning them properly over the burner heads.
7.3 Important Notes
- DO NOT use abrasive cleaners, steel wool, or scouring pads on the stainless steel surface, as they will scratch it.
- DO NOT use oven cleaners on the cooktop surface.
- Spills containing sugar or acidic foods (e.g., tomato sauce) should be wiped up immediately to prevent potential surface damage.
- Never immerse the cooktop body, control knobs, or electrical components in water.
8. Troubleshooting
| Problem | Possible Cause | Solution |
|---|
| Burner will not light. | 1. Gas supply is off.
2. Knob not pressed in during ignition.
3. Power outlet is dead. | 1. Check gas supply valve.
2. Press knob in firmly while turning.
3. Check circuit breaker and ensure the power cord is plugged in. |
|---|
| Burner lights but goes out when knob is released. | 1. Knob released too quickly.
2. Thermocouple is not properly heated or is faulty.
3. Burner ports are clogged. | 1. Hold knob in for 3-5 seconds after ignition.
2. Contact qualified technician.
3. Ensure burner cap is correctly positioned and ports are clean. |
|---|
| Flame is yellow or uneven. | 1. Incorrect gas type/configuration.
2. Burner ports are clogged.
3. Improper air-to-gas mixture. | 1. Verify appliance is configured for your gas type (NG/LPG).
2. Clean burner ports.
3. Contact a qualified technician for adjustment. |
|---|
| Clicking sound continues after burner is lit. | Faulty igniter switch. | Turn burner off and on again. If problem persists, contact a technician. |
|---|
| Gas odor. | 1. Burner not fully lit.
2. Gas leak. | 1. Ensure all flames are lit.
2. If you suspect a leak, turn off the gas supply at the source, ventilate the area, and contact your gas company or a technician immediately. Do not operate electrical switches or create sparks. |
|---|
9. Warranty and Support
The product includes a 1 Year Labor warranty. For support, contact the manufacturer, Eascookchef. The brand states they provide professional after-sales service and 12-month product support with online service availability.