1. Overview
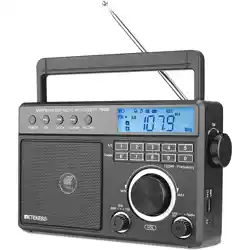
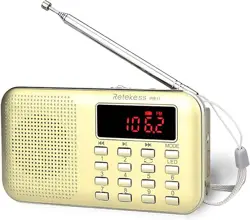
The Retekess TR635 is a portable digital radio that receives AM, FM, and Shortwave (SW) bands. It features a backlight LCD display, a built-in clock, and can be powered by batteries or AC power. The design is intended for ease of use, with a focus on clear sound and simple operation.

Key characteristics include:
- 3-Band Reception: AM, FM, and Shortwave.
- Power Options: Operates on 3 x D batteries (not included) or AC power via the included cord.
- Portable Design: Features a foldable carrying handle.
- Display: Backlit LCD screen showing frequency, time, and other information.
- Audio Output: Built-in 3.5-inch speaker and a 3.5mm headphone jack.
2. Features and Components

2.1 Front Panel and Controls
- LCD Display: Shows the current frequency, band, time, and other status indicators.
- Main Tuning Knob: A large dial for manually tuning to stations.
- Volume/Power Knob: Combined control. Rotating clockwise from the off position turns the radio on and increases volume.
- Function Buttons: Buttons for band selection (AM/FM/SW), automatic station search, and preset memory functions.
- Speaker Grille: Covers the internal 3.5-inch, 3W speaker.
2.2 Rear and Side Panels
- Carrying Handle: Foldable handle for easy portability.
- External Antenna Jack: For connecting an external antenna to improve reception, especially for SW and AM bands.
- Headphone Jack (3.5mm): For private listening.
- DC Power Input: For connecting the included AC power adapter.
- Battery Compartment: Holds 3 x D batteries.
2.3 Technical Specifications
- Model: TR635
- Dimensions: 9.64" L x 3.34" W x 6.69" H
- Tuner Technology: Digital Tuning for AM, FM, and SW
- Power Supply: AC 110V or 3 x D Batteries
- Display: Backlight LCD
- Included Components: Radio, AC Power Cord, Owner's Manual
3. Initial Setup and Power
3.1 Installing Batteries
- Locate the battery compartment on the back or bottom of the radio.
- Open the compartment cover.
- Insert three (3) D-cell batteries, observing the correct polarity (+/-) markings inside.
- Close the cover securely.
Note: For best performance, use fresh alkaline batteries. Remove batteries if the radio will not be used for an extended period.
3.2 Using AC Power
- Connect the included AC power cord to the DC input jack on the radio.
- Plug the adapter into a standard 110V AC wall outlet.
- The radio will operate on AC power. The batteries are automatically disconnected when AC power is connected.
This plug-in radio is also a battery-powered radio. It can be connected to AC power indoors or used with batteries outdoors.
4. Basic Operation
4.1 Turning the Radio On/Off and Adjusting Volume
- Rotate the Volume/Power Knob clockwise. You will hear a click as the radio turns on.
- Continue rotating clockwise to increase the volume. Rotate counterclockwise to decrease volume.
- To turn the radio off, rotate the knob fully counterclockwise until it clicks off.
4.2 Selecting a Band (AM/FM/SW)
Press the Band button to cycle through the available bands: FM -> AM -> SW. The current band will be shown on the LCD display.
4.3 Tuning to a Station
There are two primary methods:
- Manual Tuning: Slowly rotate the large Tuning Knob. The frequency on the display will change. Stop when you find a clear station.
- Automatic Search (ATS): Press and hold the Auto Search button. The radio will scan upward and stop when it finds a station of sufficient signal strength. Press the button briefly to stop the scan manually.
For FM Reception: Fully extend the built-in telescopic antenna for best results.
For AM/SW Reception: For improved reception, you can connect an external long-wire antenna to the antenna jack. Rotating the radio's position may also help.

5. Advanced Functions
5.1 Setting the Clock
- Ensure the radio is on.
- Press and hold the Clock button (or designated time set button) until the hour digits on the display start flashing.
- Use the Tuning Knob or Up/Down buttons to set the correct hour.
- Press the Clock button again to move to the minutes. Adjust using the knob/buttons.
- Press the Clock button once more to confirm and exit setting mode.
5.2 Saving and Recalling Preset Stations
The radio allows you to save favorite stations for quick access.
- Tune to the desired station.
- Press and hold a numbered Preset button (e.g., 1-5) for a few seconds until the display confirms the save.
- To recall a preset station, simply press the corresponding numbered Preset button briefly.
5.3 Using Headphones
Plug a standard 3.5mm audio plug headphone into the headphone jack on the side of the radio. The internal speaker will be muted automatically.
6. Care and Maintenance
- Cleaning: Wipe the exterior with a soft, dry cloth. Do not use abrasive cleaners or solvents.
- Storage: Store in a cool, dry place. Remove batteries for long-term storage.
- Antenna: Extend and retract the telescopic antenna gently. Do not force it.
- Avoid: Exposure to extreme temperatures, moisture, dust, and direct sunlight for prolonged periods.
7. Troubleshooting
| Problem | Possible Cause | Solution |
|---|---|---|
| Radio does not turn on. | Dead batteries; AC adapter not plugged in; Power knob in OFF position. | Replace batteries; Check AC power connection; Rotate Volume/Power knob clockwise. |
| Poor or no reception. | Antenna not extended (FM); Weak signal area; Incorrect band selected. | Fully extend antenna; Move radio location; Try connecting an external antenna; Ensure correct band (AM/FM/SW) is selected. |
| Sound is distorted or weak. | Volume set too high; Low batteries; Poor station signal. | Reduce volume; Replace batteries; Reposition radio or antenna for better signal. |
| Display is dim or blank. | Backlight may be off; Very low batteries. | Check for a dedicated backlight button; Replace batteries. |
| Clock resets or is incorrect. | Batteries were removed or completely drained while on AC power. | Reset the clock following the instructions in section 5.1. |
8. Warranty and Support
The Retekess TR635 comes with a 1-year limited warranty and a 30-day return policy.
Warranty Service: For warranty claims or product support, contact the seller directly through your Amazon account order page. The seller states they will respond within 12 hours.
Note: Warranty does not cover damage from misuse, accidents, or unauthorized modifications. Keep your proof of purchase.