Product Overview

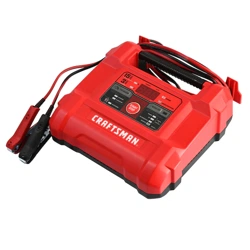
The CRAFTSMAN CMXCESM274 is a manual timer-controlled wheeled battery charger and engine starter designed for 12V power sport, automotive, and marine batteries. It combines a 175-amp engine start capability with a 25-amp boost charge and a 6-amp charging mode, providing a 2-in-1 solution for starting and charging batteries. The unit features a 135-minute timer for precise manual control of the charging process and an analog ammeter for monitoring charging visually. It is compatible with standard, AGM, gel, and deep-cycle 12V batteries and is suitable for motorcycles, ATVs, cars, trucks, SUVs, RVs, and marine batteries. The charger is built with a sturdy steel case, heavy-duty clamps, a retractable handle, and solid compact wheels for easy mobility.
What's in the Box
- CRAFTSMAN CMXCESM274 Manual Timer-Controlled Wheeled Battery Charger and Engine Starter
- User Manual
Product Features
2-in-1 Device
This device functions both as a battery charger and an engine starter, allowing you to start and charge batteries with one unit.
Charging and Starting Power
- 175-amp engine start for powerful starting capability.
- 25-amp boost charge mode to quickly add charge to deeply discharged batteries.
- 6-amp charge mode for steady, routine charging.
Precision Manual Control
The unit includes a 135-minute timer that gives users complete control over every stage of charging. The timer automatically shuts off the charger when the set time expires to prevent overcharging.
Wide Compatibility
Compatible with gas and diesel vehicles and supports 12V batteries including standard, AGM, gel, and deep-cycle battery types.
Monitoring and Indicators
Equipped with an analog ammeter that allows visual monitoring of the charging process without digital distractions.
Construction and Mobility
- Sturdy steel case for durability.
- Heavy-duty clamps designed for reliable connection.
- Retractable handle and solid compact wheels for easy maneuverability in your workspace.
Technical Specifications
| Output Voltage |
12 Volts |
| Input Voltage |
120 Volts |
| Current Rating |
175 Amps |
| Product Dimensions |
8.91" D x 11.76" W x 33.37" H |
| Color |
Red |
| Specification Met |
UL |
Usage Instructions
- Place the charger on a flat surface near the battery to be charged or started.
- Ensure the unit is unplugged before connecting the clamps.
- Connect the positive (red) clamp to the positive terminal of the battery.
- Connect the negative (black) clamp to the negative terminal of the battery or a suitable ground point on the vehicle.
- Plug the charger into a 120V AC power outlet.
- Set the timer to the desired charging duration, up to 135 minutes, based on the battery condition.
- Select the appropriate charging mode: 6A charge, 25A boost, or 175A engine start.
- Monitor the analog ammeter to observe the charging progress.
- When the timer expires, the charger will automatically shut off to prevent overcharging.
- Unplug the charger from the power outlet before disconnecting the clamps.
- Remove the clamps in reverse order: negative clamp first, then positive clamp.
Maintenance & Cleaning
- Always unplug the charger before performing any maintenance or cleaning.
- Keep the unit clean and free from dust and debris by wiping with a dry cloth.
- Inspect the clamps and cables regularly for signs of wear or damage; replace if necessary.
- Store the charger in a dry, cool place when not in use to prevent corrosion and damage.
- Do not use harsh chemicals or solvents to clean the charger.
Safety Information
- Use the charger only with 12V batteries as specified.
- Ensure proper polarity when connecting clamps to avoid damage or injury.
- Do not operate the charger if the power cord or clamps are damaged.
- Keep the charger away from flammable materials and liquids.
- Use the charger in a well-ventilated area to avoid accumulation of explosive gases.
- Do not leave the charger unattended while in use.
- Follow all instructions carefully to prevent electric shock or fire hazards.
- Wear protective eyewear and gloves when handling batteries and charger clamps.
Troubleshooting
- Charger does not start: Verify that the charger is plugged into a working power outlet and the timer is set correctly.
- Battery does not charge or start: Check that clamps are securely connected to the correct battery terminals with proper polarity.
- Timer fails to shut off: Stop using the charger and contact customer service for assistance as this may pose a safety risk.
- Analog ammeter shows no reading: Ensure the charger is properly connected and powered on; if the problem persists, have the unit inspected.
- Clamps are too small or cables too short: Use caution and ensure clamps are making good contact; consider using extension cables if necessary.
- Charger overheats: Turn off and unplug the charger immediately; allow it to cool before resuming use.