Overview
This manual provides instructions for the safe installation, operation, and maintenance of the FORIMO 24-inch by 20-inch built-in gas cooktop. The appliance features four sealed burners, a stainless steel surface, and an electronic ignition system.

Features & Specifications
Key Features
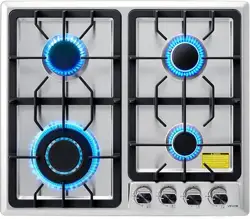
- Four Burners: One 130mm triple ring wok burner (3.3kW/11,260 BTU), two 75mm semi-rapid burners (1.75kW/5,971 BTU each), and one 55mm auxiliary burner (1.0kW/3,412 BTU). Total power output: 26,610 BTU.
- Gas Compatibility: Configured for Natural Gas (NG) installation. Includes a Liquefied Petroleum Gas (LPG/Propane) conversion kit.
- Safety System: Thermocouple flameout protection automatically shuts off the gas supply if the flame is extinguished.
- Construction: Stainless steel top, cast iron grates, and bakelite control knobs.
- Ignition: Electronic (piezoelectric) ignition system.
- Design: Enclosed chassis designed to maintain combustion stability by preventing airflow interference.
Technical Specifications
- Brand: FORIMO
- Product Dimensions (D x W x H): 20" x 23.5" x 3.9"
- Cutout Size (W x H): 24" x 20.5"
- Size Designation: 20Wx24L
- Color: Silver
- Material: Stainless Steel
- Burner Type: Sealed
- Ignition System Type: Electronic
- Control Type: Knob
- Installation Type: Built-In
- Voltage: 110 Volts
- Wattage: 7800 watts
- Fuel Type: Gas
- Power Source: Gas Powered
Installation Guide
Warning: Installation must be performed by a qualified technician in accordance with all local and national gas and electrical codes.
Pre-Installation
- Verify that the countertop cutout dimensions (24" W x 20.5" H) are correct.
- Ensure the installation location provides adequate ventilation and clearance from combustible materials.
- Confirm the gas type (Natural Gas or LPG) and that the correct gas supply line and shut-off valve are present.
Gas Connection & Conversion
- The cooktop is preset for Natural Gas.
- To convert to LPG (Propane), use the provided conversion kit to replace the gas nozzles (orifices) following the kit instructions.
- Connect the provided 5-foot CSA-certified gas hose and regulator to the cooktop and the gas supply line.
- Check all connections for leaks using a soapy water solution. Do not use an open flame to check for leaks.
Securing the Cooktop
- Place the cooktop into the countertop cutout.
- Secure the cooktop from underneath using the provided mounting brackets, following the manufacturer's instructions to ensure it is level and firmly seated.
Use Guide
Control Layout
The cooktop has four control knobs, each corresponding to one burner. The knobs control both gas flow and ignition.
Lighting the Burners
- Push the desired burner control knob in and turn it counterclockwise to the high flame symbol (usually a large flame icon).
- Continue to hold the knob in for 3-5 seconds after the burner ignites to allow the thermocouple to heat up.
- Release the knob. The burner should remain lit. If it goes out, repeat the process, holding the knob in slightly longer.
- Turn the knob to adjust the flame to the desired level.
Turning Off Burners
Turn the control knob clockwise to the "Off" position. Ensure the flame is completely extinguished.
Safety Features in Operation
- Thermocouple Protection: If a burner flame goes out accidentally (e.g., from a pot boiling over), the thermocouple will cool and automatically shut off the gas supply to that burner within a minute.
- If this occurs, turn the control knob to "Off", wait a minute for any gas to dissipate, then re-light the burner following the standard procedure.
Cleaning & Maintenance
Daily Cleaning
- Allow the cooktop to cool completely before cleaning.
- Wipe the stainless steel surface with a soft, damp cloth. For tougher stains, use a mild detergent or a cleaner specifically designed for stainless steel appliances.
- Dry the surface with a clean cloth to prevent water spots.
- Do not use abrasive pads, steel wool, or harsh chemical cleaners.
Burner Grates & Caps
- The cast iron grates and burner caps can be lifted off for cleaning.
- Wash them with warm, soapy water, rinse, and dry thoroughly before replacing.
- Ensure burner caps are correctly seated on the burner bases after cleaning to ensure proper flame distribution.
Spillage & Drip Tray
Clean any food spills or boil-overs immediately after the cooktop has cooled to prevent staining and to keep the burner ports clear. The sealed burner design helps contain spills for easier cleaning.
Troubleshooting
- Burner will not ignite:
- Check that the cooktop is plugged into a 110V electrical outlet (required for the electronic ignition).
- Ensure the gas supply valve is open.
- Confirm the control knob is being pushed in while turning.
- Check that the burner cap is properly aligned on the burner base.
- Burner flame is uneven or yellow:
- This may indicate clogged burner ports or an incorrect air-to-gas mixture. Ensure the burner head and ports are clean and free of debris.
- Verify the correct gas conversion kit has been installed for your fuel type (NG vs. LPG).
- Burner goes out when knob is released:
- Hold the knob in for a longer period (5-10 seconds) after ignition to allow the thermocouple to fully heat.
- If the problem persists, the thermocouple may be faulty or misaligned in the flame. Contact customer support.
- Smell of gas:
- Immediately turn off all burner knobs and the main gas supply valve.
- Do not operate any electrical switches or create sparks.
- Ventilate the area and contact a qualified gas technician to inspect for leaks.