Overview
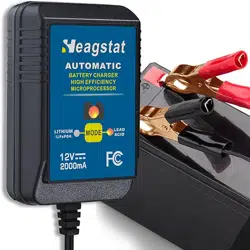
The Heagstat HEAG010 is a fully automatic, microprocessor-controlled battery charger and maintainer. It is designed to charge and maintain 6V and 12V lead-acid batteries, including flooded, GEL, AGM, VRLA, and deep-cycle types. Its compact design and automatic operation make it suitable for long-term maintenance of vehicles and equipment during storage.


Features and Specifications
Key Features
- Fully Automatic Operation: Microprocessor-controlled 4-step charging program (Initialization, Bulk Charge, Absorption Mode, Float Mode).
- Dual Voltage: Automatically selects between 6V and 12V output.
- Smart LED Indicators: Provide state-of-charge feedback and diagnostic information.
- Safety Protections: Includes spark-proof connection, reverse polarity protection, and protection against short-circuits, overcharging, and over-temperature.
- Maintenance Mode: Automatically switches to a float mode to maintain battery charge without overcharging.
- Long Cable: 12-foot output cable with quick-disconnect harness.
Technical Specifications
- Model Number: HEAG010
- Input Voltage: 100-120V AC, 50/60Hz
- Output Voltage: DC 6V & 12V
- Output Current: 1 Amp
- Compatible Batteries: 6V/12V Lead-Acid (AGM, GEL, WET, Sealed, Deep-Cycle)
- Battery Capacity Range (Charge): 5-55 Ah
- Battery Capacity Range (Maintain): 5-120 Ah
- Dimensions: 2.32"D x 3.78"W x 1.38"H
- Color: Blue
Package Contents
- Heagstat HEAG010 Battery Charger/Maintainer (1x)
- Alligator Clip Connectors (1x)
- O-Ring Terminal Connectors (1x)
- User Manual (1x)
Use Guide
Safety Warnings
- This charger is for lead-acid batteries ONLY. Do NOT connect to 24V systems, lithium-ion, NiCd, or other unsuitable battery types.
- The charger is not designed to be used as a power supply.
- Connect to AC power only after the DC connections to the battery are secure.
- Ensure the area is well-ventilated when charging batteries.
- Do not disassemble the charger.
Identifying Charger Components
The charger unit has an LED indicator panel and a cable output with a quick-disconnect plug. The included accessories are alligator clips for temporary connection and O-ring terminals for permanent installation.
Connection Instructions
Using Alligator Clips (Temporary Connection)
- Ensure the charger is unplugged from the AC outlet.
- Connect the alligator clips to the quick-disconnect plug on the charger cable.
- Identify the battery terminals: RED is positive (+), BLACK is negative (-).
- Connect the RED clip to the positive (+) battery terminal.
- Connect the BLACK clip to the negative (-) battery terminal or a solid, unpainted metal point on the vehicle chassis (ground).
- Plug the charger into a standard 120V AC wall outlet.
Using O-Ring Terminals (Permanent Connection)
- Disconnect the vehicle's battery following the manufacturer's safety instructions (usually negative terminal first).
- Attach the ring terminals to the battery posts: RED to positive (+), BLACK to negative (-).
- Reconnect the vehicle battery (negative terminal last).
- Plug the quick-disconnect harness from the charger into the connector attached to the battery.
- Plug the charger into a standard 120V AC wall outlet.
Understanding the LED Indicators
The smart LED indicators show the charger's status:
- Red (Flashing): Battery voltage is detected, and charging is in progress (Bulk/Absorption mode).
- Green (Solid): Battery is fully charged, and the unit is in maintenance (Float) mode.
- Red/Green (Alternating): Indicates a fault condition, such as reverse polarity, bad battery, or voltage outside operating range.
- No Light: Check AC power connection and DC clips/terminals. If the battery voltage is below 3.5V, the charger may not recognize it as a viable battery.
Charging and Maintenance Process
- After correct connection, the charger will automatically begin its 4-step program.
- It will charge the battery until full, then automatically switch to float mode to maintain the charge.
- The charger can be left connected indefinitely to maintain the battery, making it ideal for seasonal storage (e.g., winter).
- To disconnect, unplug the charger from the AC outlet first, then remove the clips or disconnect the harness from the battery.
Compatible Applications
This charger/maintainer is suitable for a wide range of 6V and 12V lead-acid batteries used in:
- Cars, Trucks, SUVs
- Motorcycles, Scooters, ATVs, UTVs
- Lawn Mowers, Tractors
- Boats, Personal Watercraft, Marine Batteries
- Golf Carts
- Classic Cars
- Emergency Backup Batteries
Note: If the battery voltage is below 3.5V, it may be damaged or sulfated and cannot be charged normally by this unit.
Troubleshooting
- Charger does not turn on (No LED): Verify the AC outlet is live. Check that all DC connections are clean, secure, and correct (red to positive, black to negative).
- LED flashes Red/Green alternately: Indicates a fault. Disconnect and re-check polarity. Ensure you are not connecting to a 24V battery or a non-lead-acid battery. A deeply discharged battery (<3.5V) may trigger this fault.
- Charger remains in charging mode (Red LED) for an extended period: The battery may be very large or deeply discharged. If charging continues for more than 48 hours on a standard automotive battery, the battery may be faulty.
- Charger gets warm: Some warmth during operation is normal. It should not become excessively hot to the touch.
Warranty and Support
This product is covered by a 2-year warranty from the date of purchase for quality-related issues. For product support or to make a warranty claim, please contact the Heagstat seller customer service team directly through your point of purchase.