
Table of Contents
3
EN
1Description 8
1.1 General Description 8
1.2 Control panel 9
1.3 Other parts 9
1.4 Available accessories 10
1.5 Other cooking containers 11
2Use 12
2.1 Instructions 12
2.2 First use 13
2.3 Using the accessories 13
2.4 Using the oven 14
2.5 Cooking tips 39
2.6 Special features 40
2.7 Programs 51
2.8 Personal programs 59
2.9 Settings 64
3 Cleaning and maintenance 71
3.1 Instructions 71
3.2 Cleaning the surfaces 71
3.3 Cleaning the door 72
3.4 Cleaning the oven cavity 74
3.5 Extraordinary maintenance 83
IMPORTANT SAFETY INSTRUCTIONS
WARNING: If the instructions contained in this manual are not followed
precisely, fire or explosion may result causing property damage, personal
injury or loss of life.
READ AND SAVE THESE INSTRUCTIONS - Your safety and the safety of
others are very important.
We have provided many important safety messages throughout this manual and
on the appliance.
Read all the instructions before using the appliance and always obey all safety
messages.
Important Safety Instructions
4
The safety messages will inform you of potential hazards, on how to avoid the risk of injury
and what can occur if the instructions are not followed.
IMPORTANT: Observe all codes and ordinances in force.
Do not store or use gasoline or other flammable vapors, liquids or materials near this or any
other appliance.
RECOGNIZE SAFETY INFORMATION
This is a safety alert symbol. This symbol alerts you to potential hazards that can
result in severe personal injury or loss of life.
UNDERSTAND SIGNAL WORDS
A signal word - DANGER, WARNING or CAUTION - is used with the safety alert
symbol. DANGER denotes the most serious hazards. It means you could lose your
life or be seriously injured if you do not immediately
follow the instructions.
WARNING means you could lose your life or be seriously injured if the instructions
are not followed. CAUTION indicates a potentially hazardous situation which, if
not avoided, could result in minor to moderate injury.
WARNING
• This appliance is intended for use in the home only.
• Use this appliance only for its intended purpose. The
manufacturer cannot be held liable for damage caused by
improper use of this appliance.
• This appliance complies with current safety regulations.
Improper use of this appliance can result in personal injury
and material damage.
• Read all the instructions before installing or using the
appliance for the first time.
• Keep these operating instructions in a safe place and pass
them on to any future user.
WARNING: For your safety, the instructions contained in this manual must be
followed to minimize the risk of fire or explosion and to prevent property damage,
personal injury or loss of life.
NOTE: This appliance is NOT designed for installation in manufactured (mobile)
homes or in recreational vehicles (RVs).
DO NOT install this appliance outdoors.

Important Safety Instructions
5
EN
• Read all instructions.
• Proper installation is your responsibility.
Have a qualified technician install and
ground this appliance in accordance
with these installation instructions.
• It is the responsibility of the installer to
comply with installation information
specified on the model/serial ID plate.
The ID plates are visibly located on the
back of the appliance and on the oven
door frame. These ID plates must never
be removed.
• Proper installation is your responsibility.
Make sure your appliance is properly
installed and grounded by a qualified
installer.
• WARNING: NEVER use this appliance
as a space heater to heat or warm the
room. Doing so may result in overheating
of the oven.
• DO NOT LEAVE CHILDREN
UNATTENDED: Children should not be
left alone or unattended in the area
where the appliance is being used.
Never allow children to sit or stand on
any part of the appliance.
• CAUTION: Do not store items of interest
to children in cabinets above a range or
on the backguard of a range - children
climbing on the range to reach items
could be seriously injured.
• WEAR PROPER APPAREL: Loose-fitting or
hanging garments should never be worn
while using the appliance.
• For safety reasons and to avoid damage
to your appliance, never sit, stand or
lean on the oven door.
• FLAMMABLE MATERIALS SHOULD
NEVER BE STORED IN THE OVEN.
• DO NOT TOUCH THE INSIDE OF THE
APPLIANCE: Heating elements may be
hot even though they are dark in color.
The oven cavity can be hot enough to
cause burns. During and after use, do not
touch areas inside of the oven until they
have had sufficient time to cool. Do not
allow garments or any flammable
material to come into contact with hot
surfaces. If personal clothing or hair
catches on fire, drop and roll
immediately to extinguish the flames.
• PLACE THE OVEN RACKS IN THE
DESIRED POSITION WHILE THE OVEN
IS COOL: If a rack must be removed
while the oven is hot, do not allow the
potholders to come in contact with the
broiler burner.
• USE CAUTION WHEN OPENING
THE OVEN DOOR: Allow hot air or
steam to escape before removing or
placing foods in the oven.
• Do not leave the packing materials
around the home. Sort the various items
of waste and take them to the nearest
specialized waste collection facility.
• Do not obstruct oven vents or openings
for air intake.
WARNING
To reduce the risk of fire, electrical shock, personal injury, or
damage when using the appliance, follow basic safety
precautions, including the following:

Important Safety Instructions
6
• ELECTRICAL GROUNDING IS
REQUIRED. It is the customer’s
responsibility:
1. To contact a qualified electrician.
2. To ensure that the electrical system is
adequate and in compliance with the
National Electrical Code ANSI / NFPA
70 Electrical Code – latest edition – or
the CANADIAN ELECTRICAL CODE,
C22.11 – 1982 and C22.2 No.
01982 – or latest edition – and all local
codes and ordinances.
• Always check that the controls are in the
"zero" (off) position when the oven is not
in use.
• Do not attempt to repair or replace any
part of this appliance unless specifically
recommended in this manual. All other
servicing should be done by a qualified
technician.
• Never use any part of the oven for
storage. Flammable materials can ignite
and plastic items may melt or burst into
flame.
• Do not hang articles on any part of the
appliance or place anything against the
oven. Some fabrics are extremely
flammable and could ignite.
• DO NOT USE ALUMINUM FOIL TO
LINE ANY PART OF THE OVEN. Use of
a foil liner can result in an electrical
shock or fire hazard or obstruct the flow
of heat and air. Foil is an excellent heat
insulator, allowing heat to be trapped
under it. This can interfere with cooking
and can damage the enamel of the
oven.
• Prevent aluminum foil from contacting the
heating elements.
• DO NOT HEAT UNOPENED FOOD
CONTAINERS: A buildup of pressure
can cause the containers to burst.
• DO NOT USE FLAMMABLE
PRODUCTS TO CLEAN THE OVEN.
• Do not clean, rub, damage or remove
the oven door gasket. It is essential for a
good, tight seal during baking and when
the self-clean cycle is engaged. Replace
the oven door gasket if it becomes
damaged or encrusted with food
residue.
• ONLY QUALIFIED SERVICE
PERSONNEL SHOULD PERFORM
REPAIRS. Service personnel must
disconnect the power supply before
servicing this unit.
State of California Proposition 65 Warning
WARNING
This product can expose you to chemicals including vinyl chloride, which is
known to the State of California to cause cancer and birth defects or other
reproductive harm. For more information go to www.P65Warnings.ca.gov.
Important Safety Instructions
7
EN
• Do Not Use Water on Grease Fires -
Smother fire or flame or use dry chemical
or foam-type extinguisher.
• Use Only Dry Potholders - Moist or
damp potholders on hot surfaces may
result in burns from steam. Do not let
potholders touch hot heating elements.
Do not use a towel or other bulky cloth.
• Do not stand or sit on the oven door.
• Remove all packing materials and
temporary labels from the oven.
• Record the Model and Serial number on
Page 2 of this booklet. The Model and
Serial numbers are on the appliance ID
plate. The ID plates are visibly located
on the oven door frame. THE ID PLATE
MUST NOT BE REMOVED.
• BEFORE BAKING FOR THE FIRST TIME,
turn on the oven to burn off any dirt, oil or
grease remaining from the manufacturing
process. Turn the oven on and set to
450°F for 20 to 30 minutes.
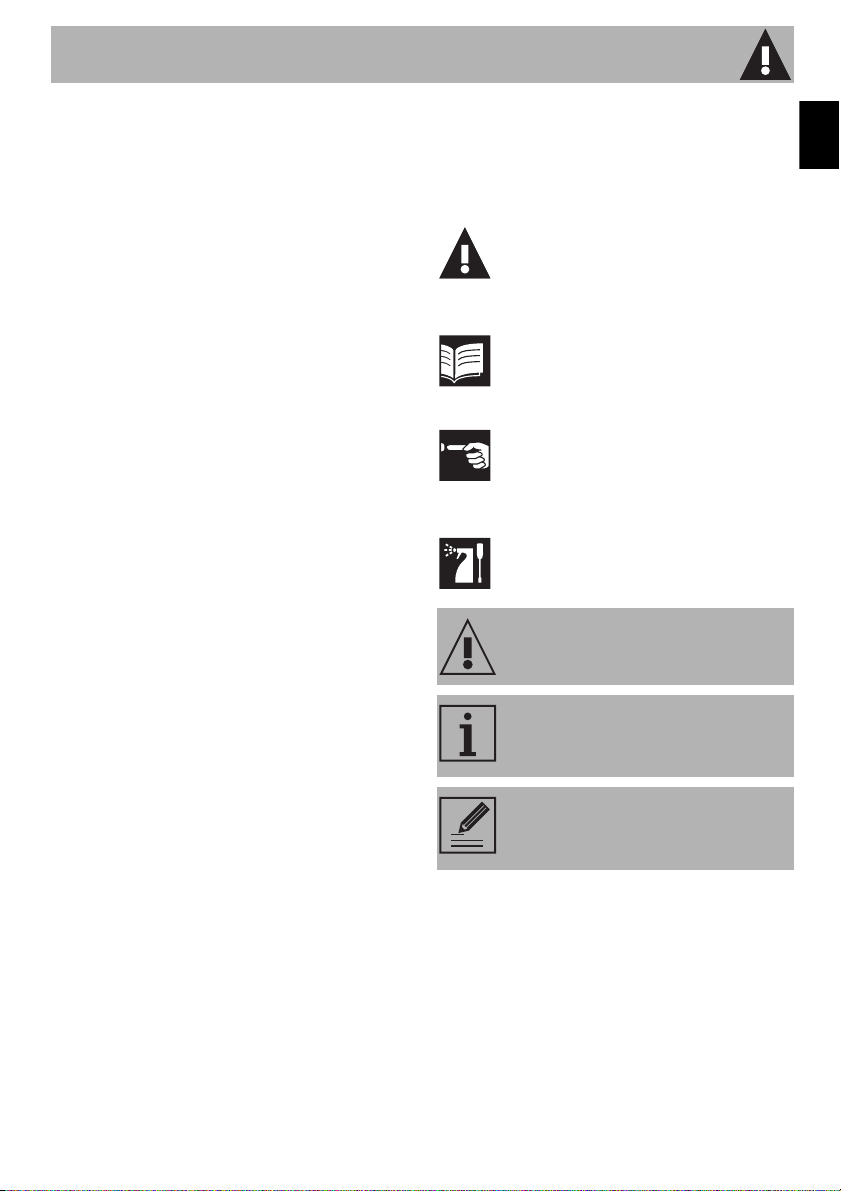
How to read the user manual
This user manual uses the following reading
conventions:
1. Use instruction sequence.
• Single use instruction.
SAVE THESE INSTRUCTIONS
Instructions
General information on this user
manual, on safety and final
disposal.
Description
Description of the appliance and its
accessories.
Use
Information on the use of the
appliance and its accessories,
cooking advice.
Cleaning and maintenance
Information for proper cleaning and
maintenance of the appliance.
Safety instructions
Information
Advice
Description
8
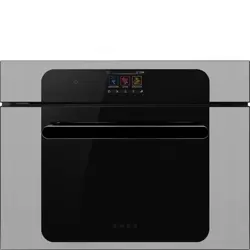
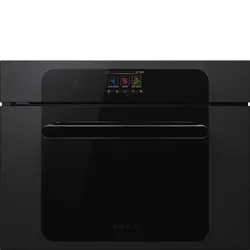
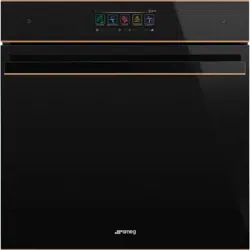
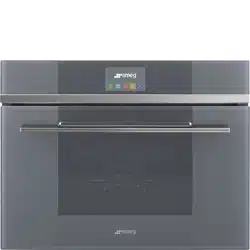
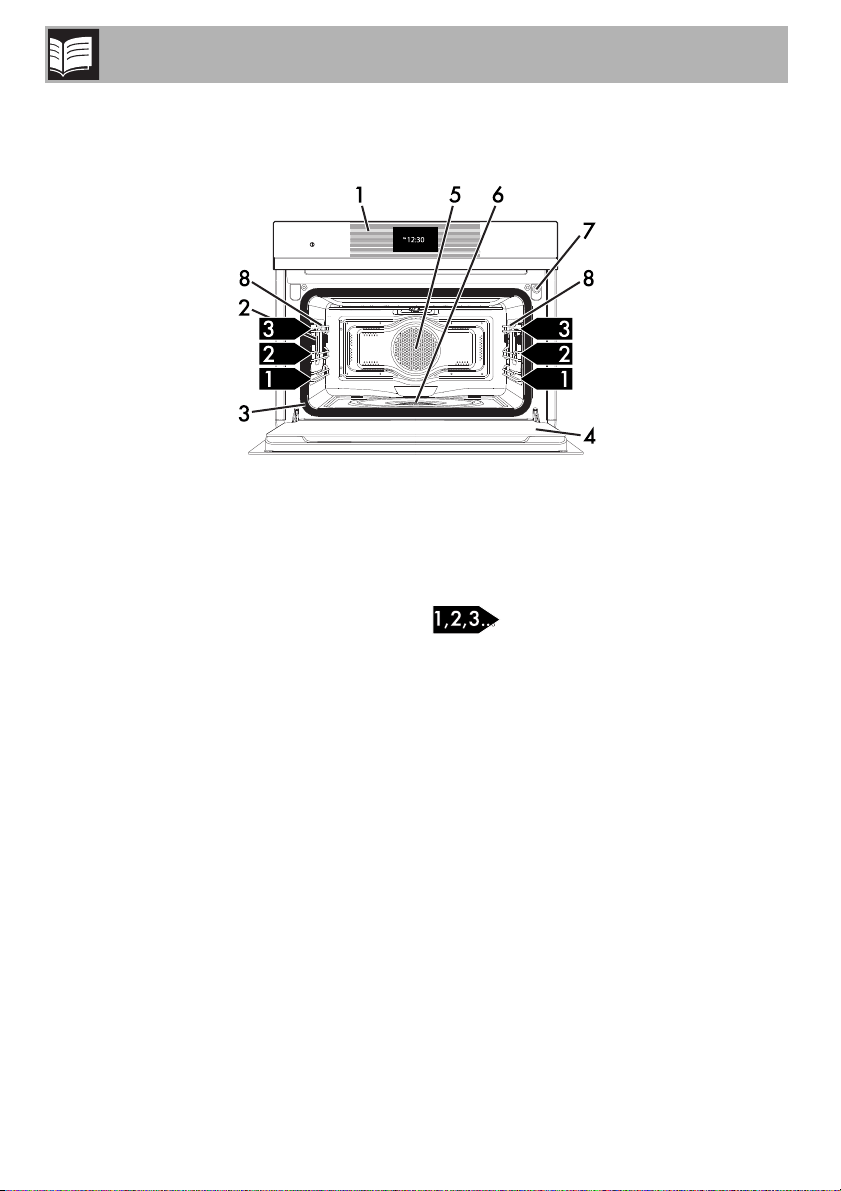
1 Description
1.1 General Description
1 Control panel
2 Oven light
3 Seal
4 Door
5 Fan
6 Evaporation tray
7 Water supply tube
8 Rack support frames
Frame shelf
Description
9
EN
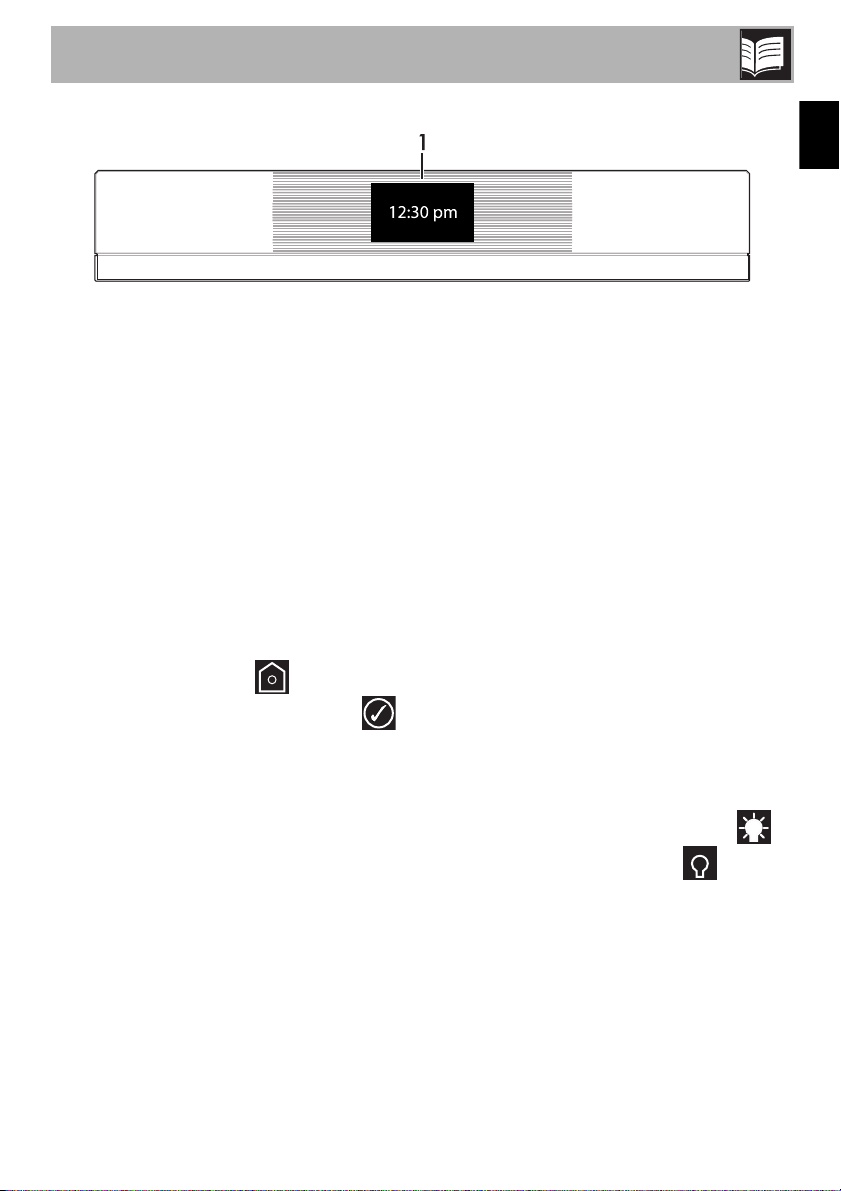
1.2 Control panel
1 ON/OFF button
The ON/OFF button turns the appliance on
or off.
2 Display
The touch screen makes it possible to
interact with the appliance. Press the icons
to access the various available functions.
The display shows all parameters for the
appliance’s operation, such as: the function
selected, settings related to the time/
temperature and to saved cooking
programs.
In general, to return to the previous menu or
end a function, press the symbol; to
confirm the options selected press the
symbol.
1.3 Other parts
Positioning shelves
The appliance has shelves for positioning
trays and racks at various heights. The
position heights go from the bottom
upwards (see 1.1 General Description).
Cooling fan
The fan cools the appliance and turns on
during cooking or baking.
The fan provides a steady outflow of air
from above the door, which may continue
for a short time after the appliance has
been turned off.
Internal lighting
The internal lighting for the appliance turns
on:
• when the door is opened;
• during a function, by pressing the
symbol to activate it, or the symbol
to manually deactivate internal lighting.
Description
10
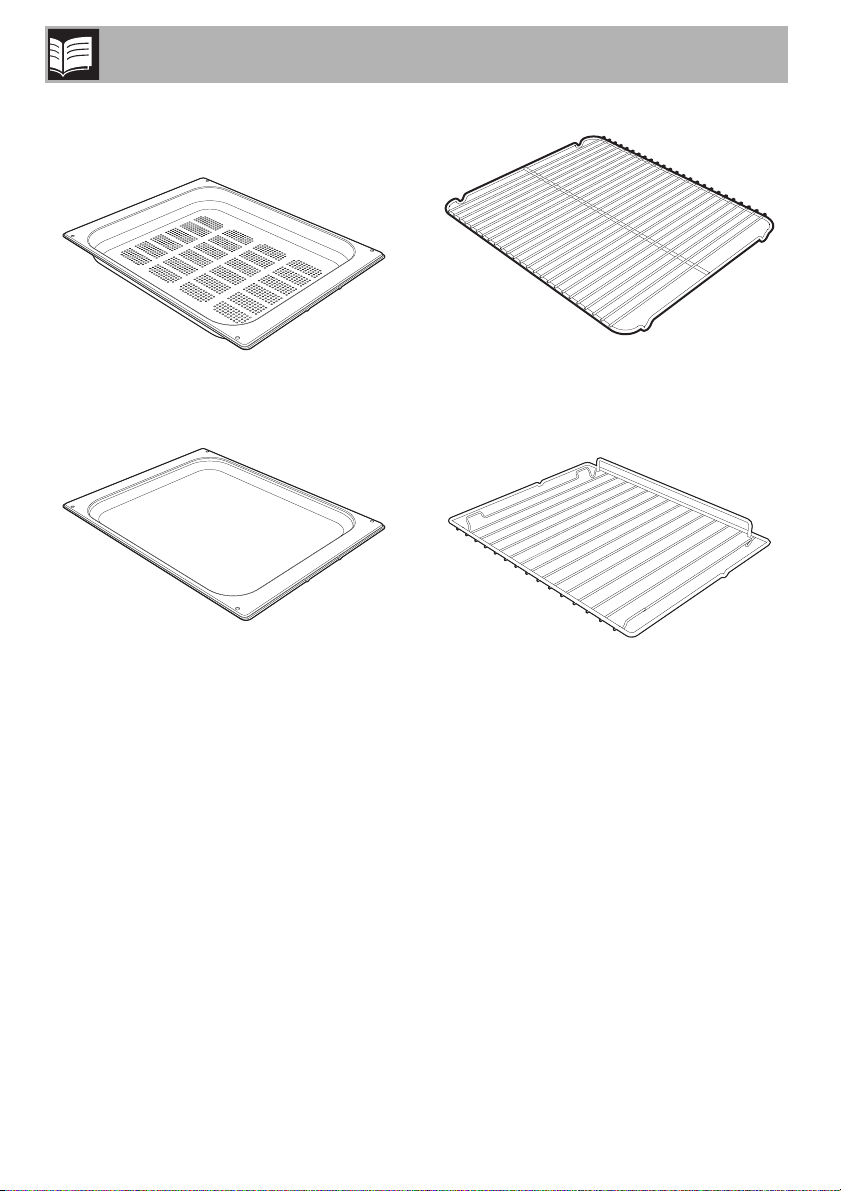
1.4 Available accessories
Perforated tray
Useful for steaming fish and vegetables.
Tray
Useful when cooking cakes (with cooking
times of less than 25 minutes or without
steam), rice, beans and cereals. It is also
essential for collecting liquids produced by
steaming or defrosting foods contained in
the perforated trays above.
Tray rack
To be placed over the top of the tray; for
cooking foods which may drip.
Rack
Used for supporting containers with food
during cooking.

Description
11
EN
Jug
Useful for containing liquids during filling
and emptying of the tank.
Sponge
Useful for removing condensation from
inside the oven.
Evaporation tray cover
Evenly distributes steam inside the oven.
1.5 Other cooking containers
• You may also use your own containers
for cooking in the oven, as long as they
are resistant to high temperatures.
• For steam cooking, the use of metal
containers is recommended. Metal
facilitates better distribution of heat to the
foods.
• It is normal for metal containers to deform
somewhat during high-temperature
cooking, but they will return to their
original shape when they cool down.
• Thick ceramic plates may require more
heat than normal. Longer cooking times
may be necessary.
a
a
a
a
a
a
a
a
a
a
a
a
a
a
a
a
a
a
a
a
a
a
a
a
a
a
a
a
a
a
a
a
a
a
a
a
a
a
a
a
a
a
a
a
a
a
a
a
a
a
a
a
a
a
a
a
a
a
a
a
a
a
a
a
a
a
a
a
a
a
a
a
a
a
a
a
a
a
a
a
a
a
a
a
a
a
a
a
a
a
a
a
a
a
a
a
a
a
a
a
a
a
a
a
a
a
a
a
a
a
a
a
a
a
a
a
a
a
a
a
a
a
a
a
a
a
a
a
a
a
a
a
a
a
a
a
a
a
a
a
a
a
a
a
a
a
a
a
a
a
a
a
a
a
a
a
a
a
a
a
a
a
a
a
a
a
a
a
a
a
a
a
a
a
a
a
a
a
a
a
a
a
a
a
a
a
a
a
a
a
a
a
a
a
a
a
a
a
a
a
a
a
a
a
a
a
a
a
a
a
a
a
a
a
a
a
a
a
a
a
a
a
a
a
a
a
a
a
a
a
a
a
a
a
a
a
a
a
a
a
a
a
a
a
a
a
a
a
a
a
a
a
a
a
a
a
a
a
a
a
a
a
a
a
a
a
a
a
a
a
a
a
a
a
a
a
a
a
a
a
a
a
a
a
a
a
a
a
a
a
a
a
a
a
a
a
a
a
a
a
a
a
a
a
a
a
a
a
a
a
a
a
a
a
a
a
a
a
a
a
a
a
a
a
a
a
a
a
a
a
a
a
a
a
a
a
a
a
a
a
a
a
a
a
a
a
a
a
a
a
a
a
a
a
a
a
a
a
a
a
a
a
a
a
a
a
a
a
a
a
a
a
a
a
a
a
a
a
a
a
a
a
a
a
a
a
a
a
a
a
a
a
a
a
a
a
a
a
a
a
a
a
a
a
a
a
a
a
a
a
a
a
a
a
a
a
a
a
a
a
a
a
a
a
a
a
a
a
a
a
a
a
a
a
a
a
a
a
a
a
a
a
a
a
a
a
a
a
a
a
a
a
a
a
a
a
a
a
a
a
a
a
a
a
a
a
a
a
a
a
a
a
a
a
a
a
a
a
a
a
a
a
a
a
a
a
a
a
a
a
a
a
a
a a
a
a
a
a
a
a
a
a
a
a
a
a
a
a
a
a
a
a
a
a
a
a
a
a
a
a
a
a
a
a
a
a
a
a
a
a
a
a
a
a
a
a
a
a
a
a
a
a
a
a
a
a
a
a
a
a
a
a
a
a
a
a
a
a
a
a
a
a
a
a
a
a
a
a
a
a
a
a
a
a
a
a
a
a
a
a
a
a
a
a
a
a
a
a
a
a
a
a
a
a
a
a
a
a
a
a
a
a
a
a
a
a
a
a
a
a
a
a
a
a
a
a
a
a
a
a
a
a
a
a
a
a
a
a
a
a
a
a
a
a
a
a
a
a
a
a
a
a
a
a
a
a
a
a
a
a
a
a
a
a
a
a
a
a
a
a
a
a
a
a
a
a
a
a
a
a
a
a
a
a
a
a
a
a
a
a
a
a
a
a
a
a
a
a
a
a
a
a
a
a
a
a
a
a
a
a
a
a
a
a
a
a
a
a
a
a
a
a
a
a
a
a
a
a
a
a
a
a
a
a
a
a
a
a
a
a
a
a
a
a
a
a
a
a
a
a
a
a
a
a
a
a
a
a
a
a
a
a
a
a
a
a
a
a
a
a
a
a
a
a
a
a
a
a
a
a
a
a
a
a
a
a
a
a
a
a
a
a
a
a
a
a
a
a
a
a
a
a
a
a
a
a
a
a
a
a
a
a
a
a
a
a
a
a
a
a
a
a
a
a
a
a
a
a
a
a
a
a
a
a
a
a
a
a
a
a
a
a
a
a
a
a
a
a
a
a
a
a
a
a
a
a
a
a
a
a
a
a
a
a
a
a
a
a
a
a
a
a
a
a
a
a
a
a
a
a
a
a
a
a
a
a
a
a
a
a
a
a
a
a
a
a
a
a
a
a
a
a
a
a
a
a
a
a
a
a
a
a
a
a
a
a
a
a
a
a
a
a
a
a
a
a
a
a
a
a
a
a
a
a
a
a
a
a
a
a
a
a
a
a
a
a
a
a
a
a
a
a
a
a
a
a
a
a
a
a
a
a
a
a
a
a
a
a
a
a
a
a
a
a
a
a
a
a
a
a
a
a
a
a
a
a
a
a
a
a
a
a
a
a
a
a
a
a
a
a
a
a
a
a
a
a
a
a
a
a
a
a
a
a
a
a
a
a
a
a
a
a
a
a
a
a
a
a
a
a
a
a
a
a
a
a
a
a
a
a
a
a
a
a
a
a
a
a
a
a
a
a
a
a
a
a
a
a
a
a
a
a
a
a
a
a
a
a
a
a
a
a
a
a
a
a
a
a
a
a
a
a
a
a
a
a
a
a
a
a
a
a
a
a
a
a
a
a
a
a
a
a
a
a
a
a
a
a
a
a
a
a
a
a
a
a
a
a
a
a
a
a
a
a
a
a
a
a
a
a
a
a
a
a
a
a
a
a
a
a
a
a
a
a
a
a
a
a
a
a
a
a
a
a
a
a
a
a
a
a
a
a
a
a
a
a
a
a
a
a
a
a
a
a
a
a
a
a
a
a
a
a
a
a
a
a
a
a
a
a
a
a
a
a
a
a
a
a
a
a
a
a
a
a
a
a
a
a
a
a
a
a
a
a
a
a
a
a
a
a
a
a
a
a
a
a
a
a
a
a
a
a
a
a
a
a
a
a
a
a
a
a
a
a
a
a
a
a
a
a
a
a
a
a
a
a
a
a
a
a
a
a
a
a
a
a
a
a
a
a
a
a
a
a
a
a
a
a
a
a
a
a
a
a
a
a
a
a
a
a
a
a
a
a
a
a
a
a
a
a
a
a
a
a
a
a
a
a
a
a
a
a
a
a
a
a
a
a
a
a
a
a
a
a
a
a
a
a
a
a
a
a
a
a
a
a
a
a
a
a
a
a
a
a
a
a
a
a
a
a
a
a
a
a
a
a
Not all accessories are available
on some models.
The appliance accessories
intended to come into contact with
food are made of materials that
comply with the provisions of
current legislation.
Original supplied and optional
accessories can be requested to
Authorized Assistance Centers.
Use only original accessories
supplied by the manufacturer.

Use
12
2 Use
2.1 Instructions
High temperature inside the oven
during use
Danger of burns
• Keep the oven door closed during
cooking.
• Protect your hands by wearing oven
gloves when moving food inside the
oven.
• Open the appliance door carefully
during or after cooking.
• Take care because steam may not be
visible at certain temperatures.
• Do not cook dishes containing large
quantities of strong alcoholic beverages.
Alcohol vapor inside the oven could
ignite.
• Do not touch the heating elements inside
the oven.
• Do not pour water directly onto very hot
trays.
• Do not allow children to approach the
appliance when it is in operation.
Improper use
Risk of damage to enameled
surfaces
• When steaming, always place the tray
below the perforated tray in order to
catch any drips.
• Do not cover the bottom of the oven
cavity with aluminum or tin foil sheets.
• The base of the oven and the
evaporation tray must always be left
free.
• Dishes must be heat and steam resistant.
• Do not use silicone molds when
steaming.
• If you wish to use greaseproof paper,
place it so that it will not interfere with the
hot air circulation inside the oven cavity.
• Do not place pans or trays directly on
the bottom of the oven cavity.
• Do not pour water directly onto very hot
trays.

Use
13
EN
2.2 First use
1. Remove any protective film from the
outside or inside of the appliance,
including accessories.
2. Remove any labels (apart from the
technical data plate) from the
accessories and from the oven cavity.
3. Remove and wash all the appliance's
accessories (see “Cleaning the oven
cavity”).
4. Heat the empty oven at the maximum
temperature for at least 20 minutes to
burn off any residues left by the
manufacturing process (see “Using the
oven”).
5. You must set the current time in order to
start using the appliance (see “Clock”).
2.3 Using the accessories
Racks and trays
Racks and trays have to be inserted into the
side guides until they come to a complete
stop.
• The mechanical safety locks that prevent
the rack and tray from being removed
accidentally must face downwards
towards the back of the oven.
Tray rack
The tray rack has to be inserted into the tray.
In this way fat can be collected separately
from the food which is being cooked.
High temperature inside the oven
during use
Danger of fire or explosion
• Do not spray any spray product near the
appliance.
• Do not use or leave flammable materials
near the appliance.
• Do not use plastic cookware or
containers when cooking food.
• Do not place sealed tins or containers in
the oven cavity.
• Do not leave the appliance unattended
during cooking operations where fats or
oils could be released.
• Remove all trays and racks which are
not required during cooking.
Use
14
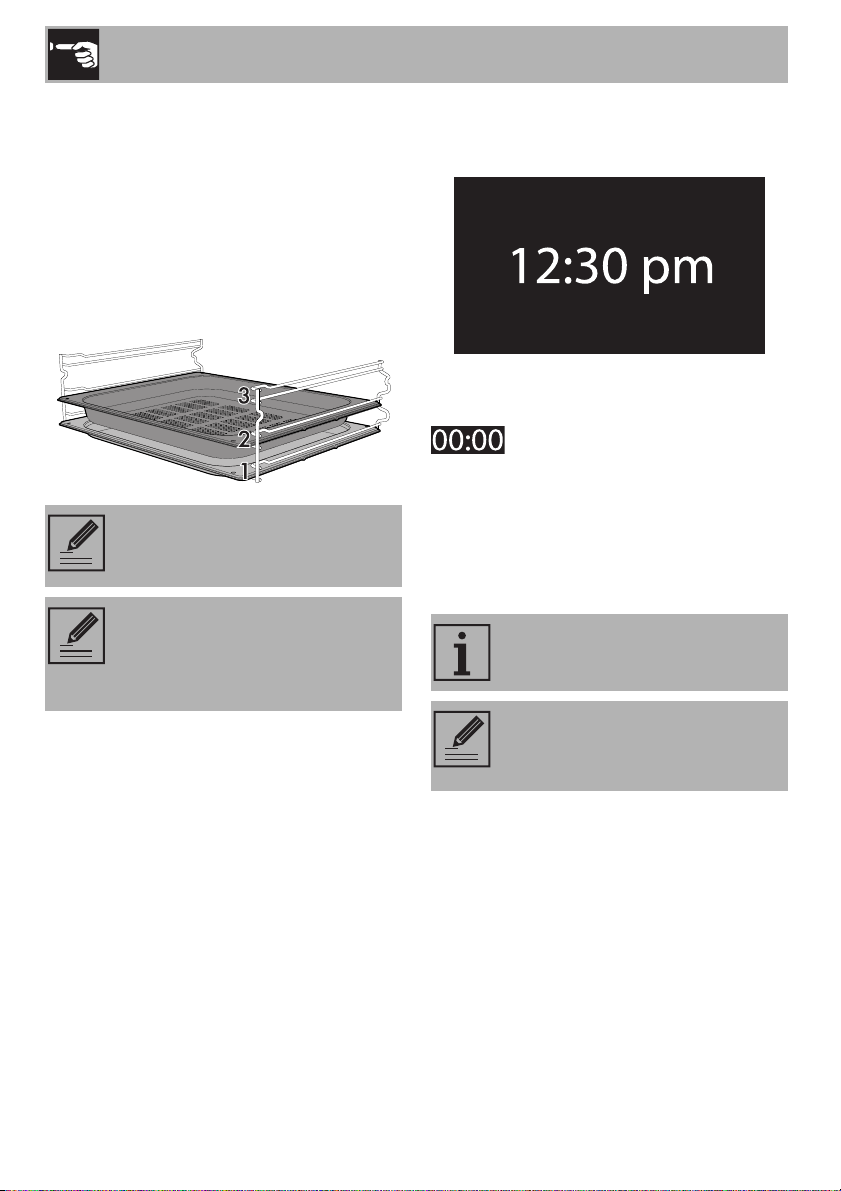
Configuration 2+1
If you intend to use the perforated baking
tray for steam cooking, it must be placed on
the second shelf and the baking tray must
be placed on the first shelf. In this way it is
possible to collect the liquids separately
from the food that is being cooked
(configuration 2+1, see “Manual water
drain”).
2.4 Using the oven
First use
At first use, or after a power failure, the
appliance’s display will show a flashing
symbol. To be able to start any
cooking function, the current time must be
set (if it is the first time using the appliance,
we also recommend setting the desired
language).
Press the display to bring up the settings
menu.
Gently insert racks and trays into
the oven until they come to a stop.
Clean the trays before using them
for the first time to remove any
residues left by the manufacturing
process.
The appliance’s initial default
language is English.
At first use, or after a power failure,
wait a few seconds before trying
to use the appliance.
Use
15
EN
Reactivating the display
If the Eco-Light mode is active (see “Eco-
Light” in the “Settings” section), the display
will switch off 2 minutes after the appliance
was last used.
To reactivate the display when it is off:
• Press the ON/OFF button.
The appliance will emit a series of sounds
and the display will switch on after a few
seconds. The display shows the current time
screen when it is switched on again.
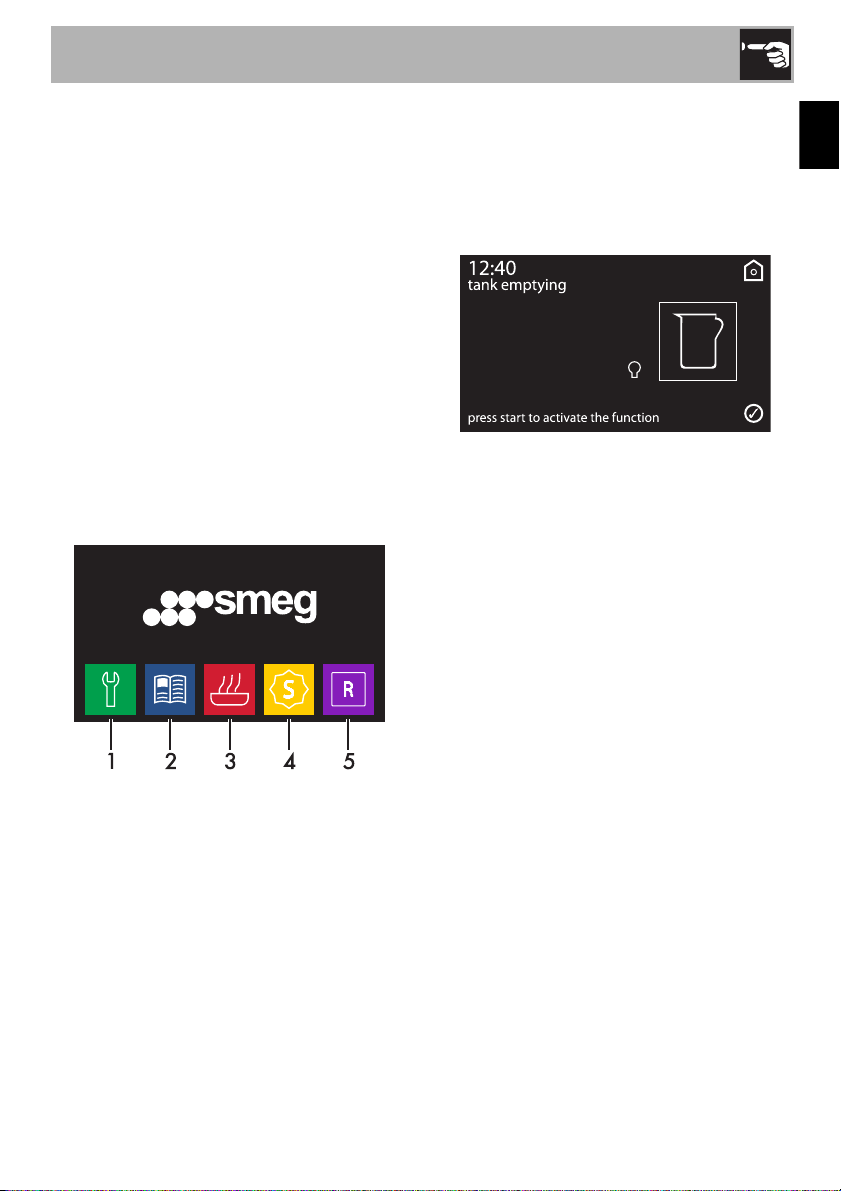
Home screen
Press the time on the display window. It will
then be possible to select the various
available functions from the appliance's
home screen.
1 Settings
2 Programs
3 Cooking functions
4 Special features
5 Personal programs
For safety reasons, at the first electrical
connection or after a power failure, if there
is even a small amount of water inside the
reservoir, at the end of the first function set
(even without using steam), the display will
show the request to drain the reservoir.
• Drain the reservoir as described in the
section “Removing the residual water”.
Use
16
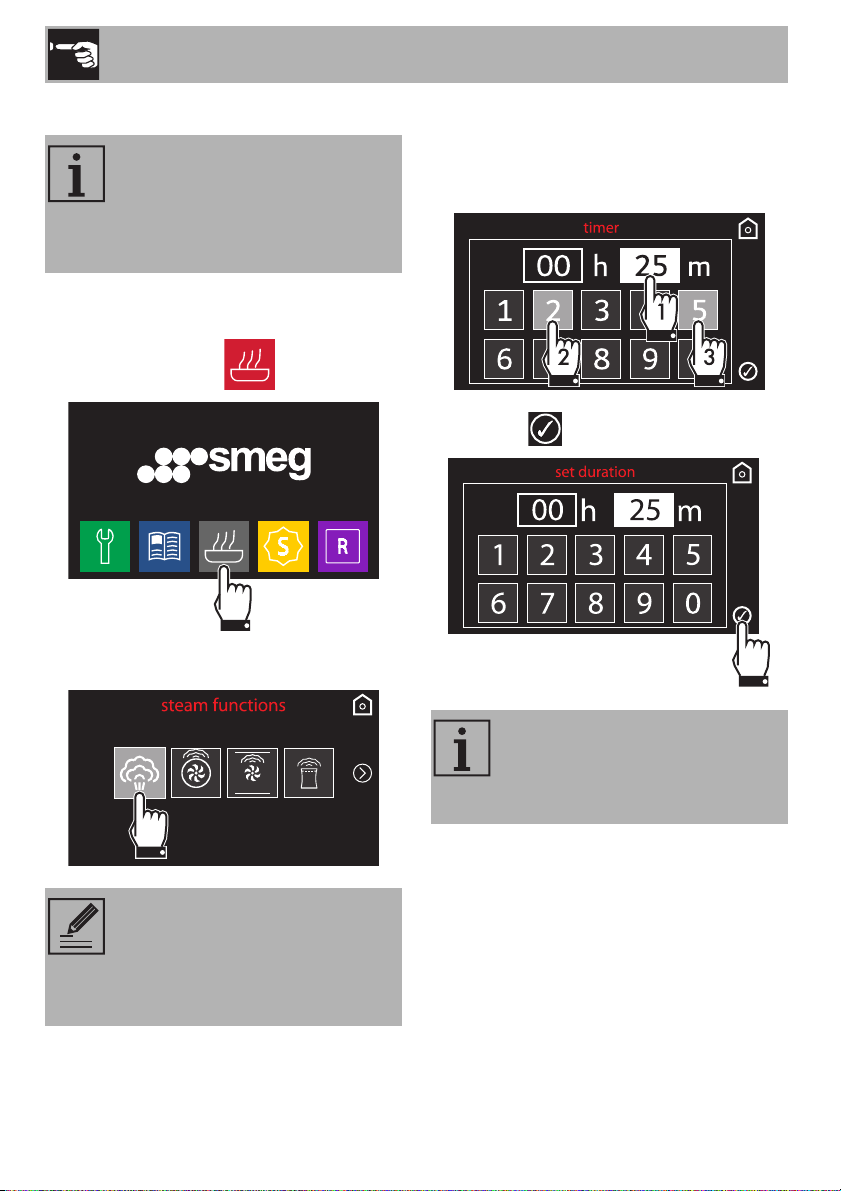
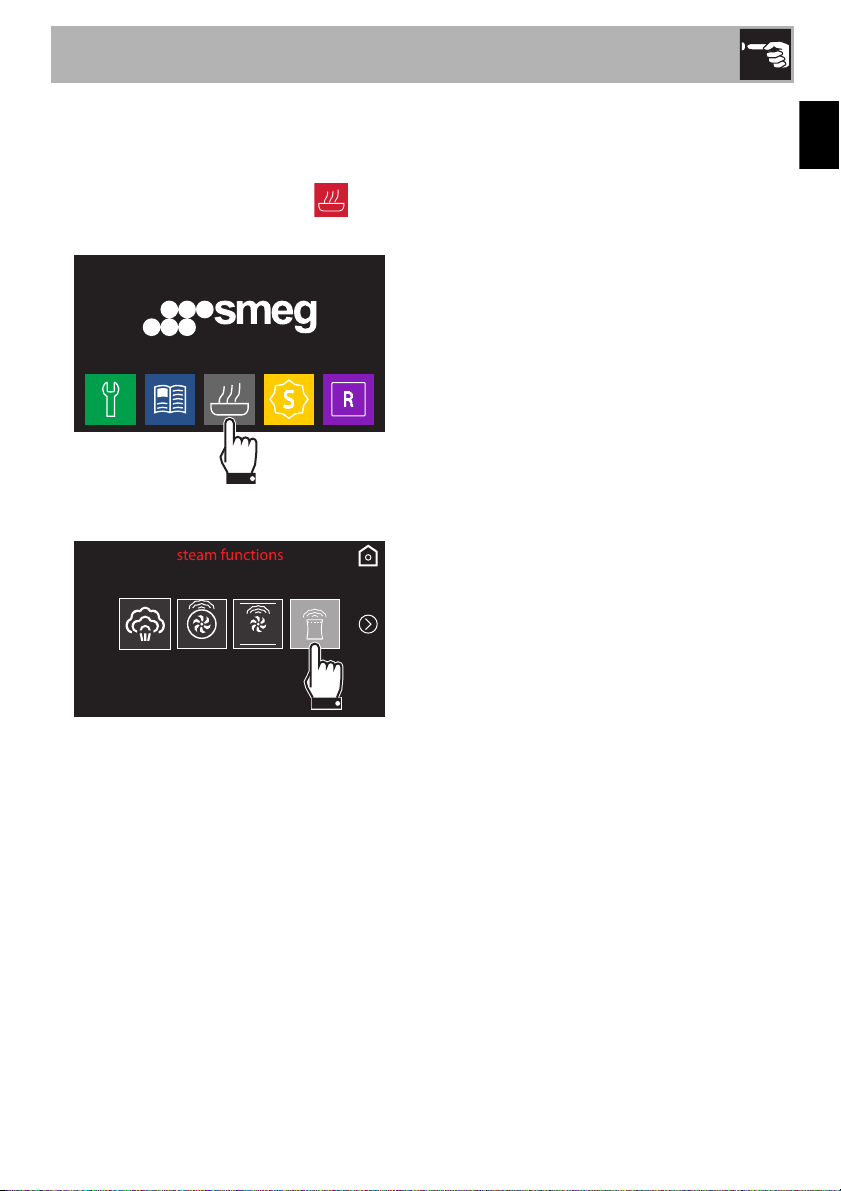
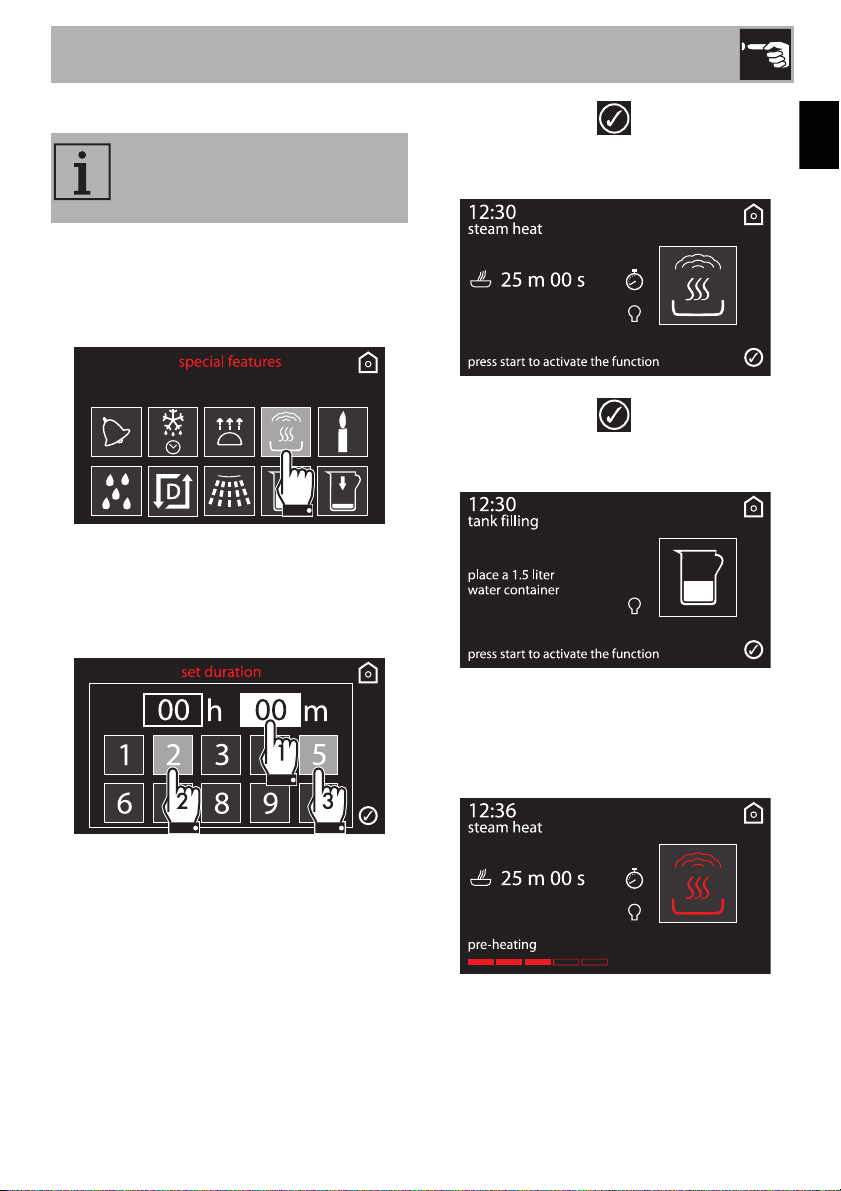
Steam function settings
1. Place the food inside the oven.
2. From the home screen, select the
cooking functions icon.
3. Select the “steam” function.
4. Enter the time desired. For example, if
you want to set a timer for 25 min, first
press the minutes box, then the numbers
2 and 5.
5. Press the symbol to confirm.
Do not place food or any other
object directly on the bottom of the
oven. The base of the oven and
the evaporation tray must always
be left free.
If cooking has just been performed
with temperatures greater than
215°F, you must wait for the oven
to cool in order to use the steam
function.
Even if a longer time is set, the
appliance will set the cooking
duration to the maximum time
allowed.

Use
17
EN
The display shows the screen for setting the
steaming parameters
6. Press the displayed temperature to
change it.
7. Press the symbol and to set the
required temperature.
8. Press the symbol to confirm the
cooking temperature set (for example
200°F)
9. Press the symbol to confirm.
A request to fill the reservoir with water is
shown on the display.
The minimum temperature that can
be set is 90°F. The value changes
by 10°F each time the symbols
and are pressed.
Keep pressing the symbol for
a few seconds to immediately turn
off the oven and return to the main
menu.
Each time the door is opened, the
function in progress will stop and
then automatically restart when the
door is closed again.
Use
18
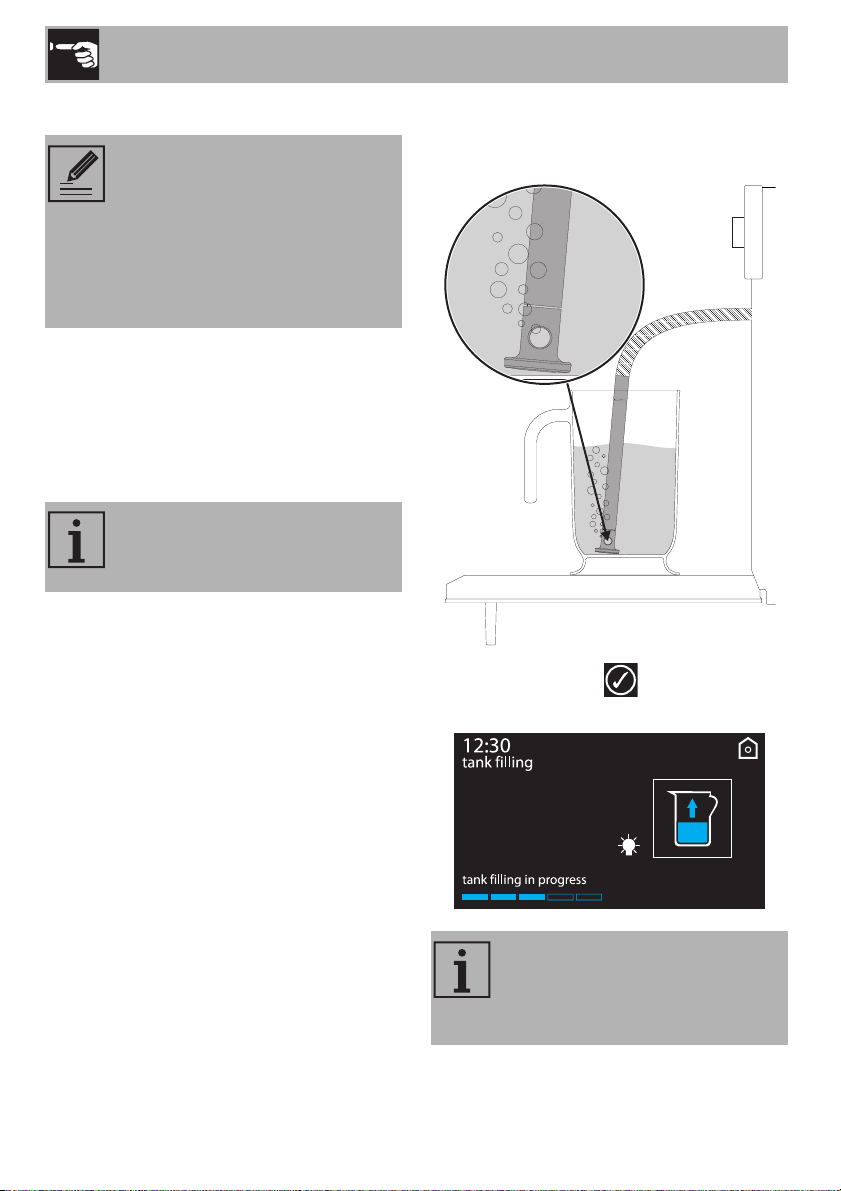
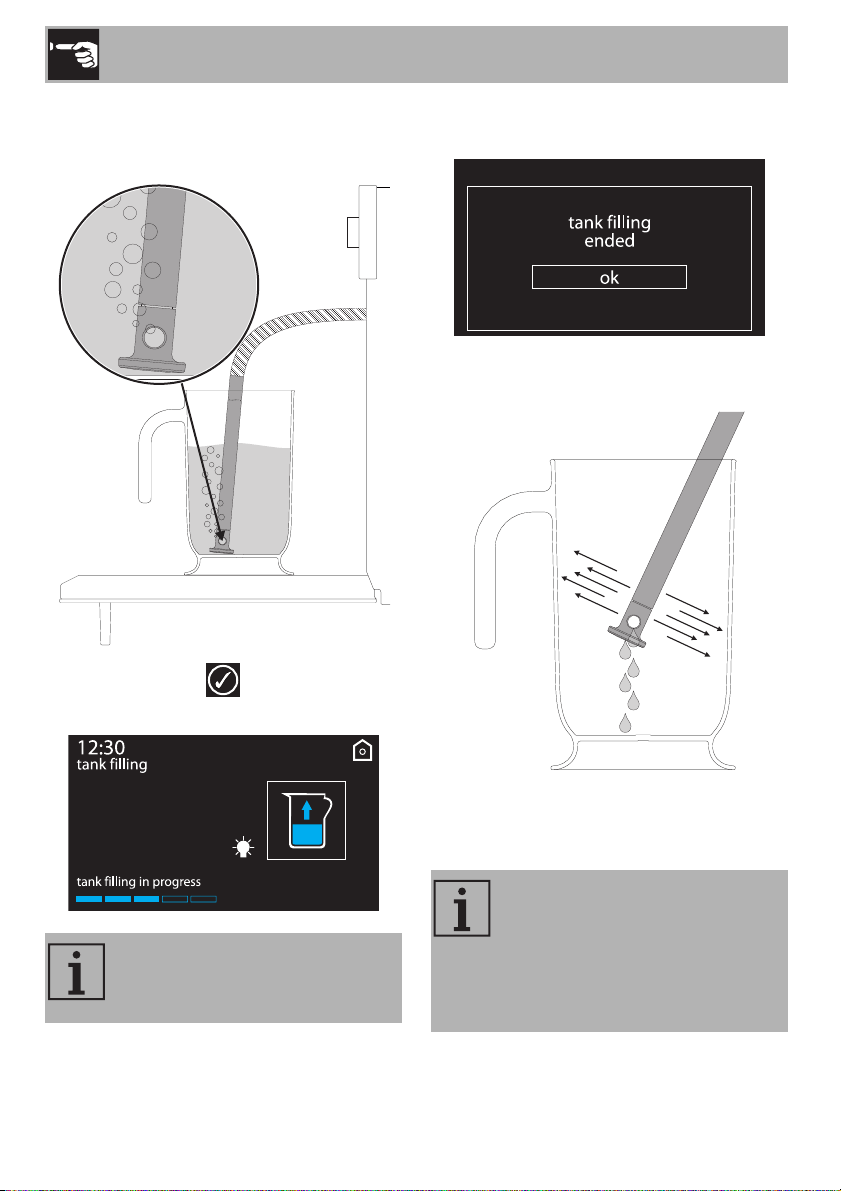
Filling the reservoir
10. Fill the jug provided (or a container)
with sufficient water for the cooking
duration.
11. Open the oven door.
12. Place the jug (or container) on the open
door.
13. Extract the tube from its seat and
immerse its end in the jug (or container)
until it reaches all the way to the bottom.
14. Press the symbol to start filling the
reservoir with water.
• Use cold tap water which is not
too hard, softened water or still
mineral water.
• Do not use distilled water, tap
water with a high chloride
content (> 40 mg/l), or other
liquids.
Note: the jug (or container) with
the water must have a gross weight
lower than 5 kg.
The appliance will automatically
draw the quantity of water
necessary for cooking on the basis
of the set duration.
Use
19
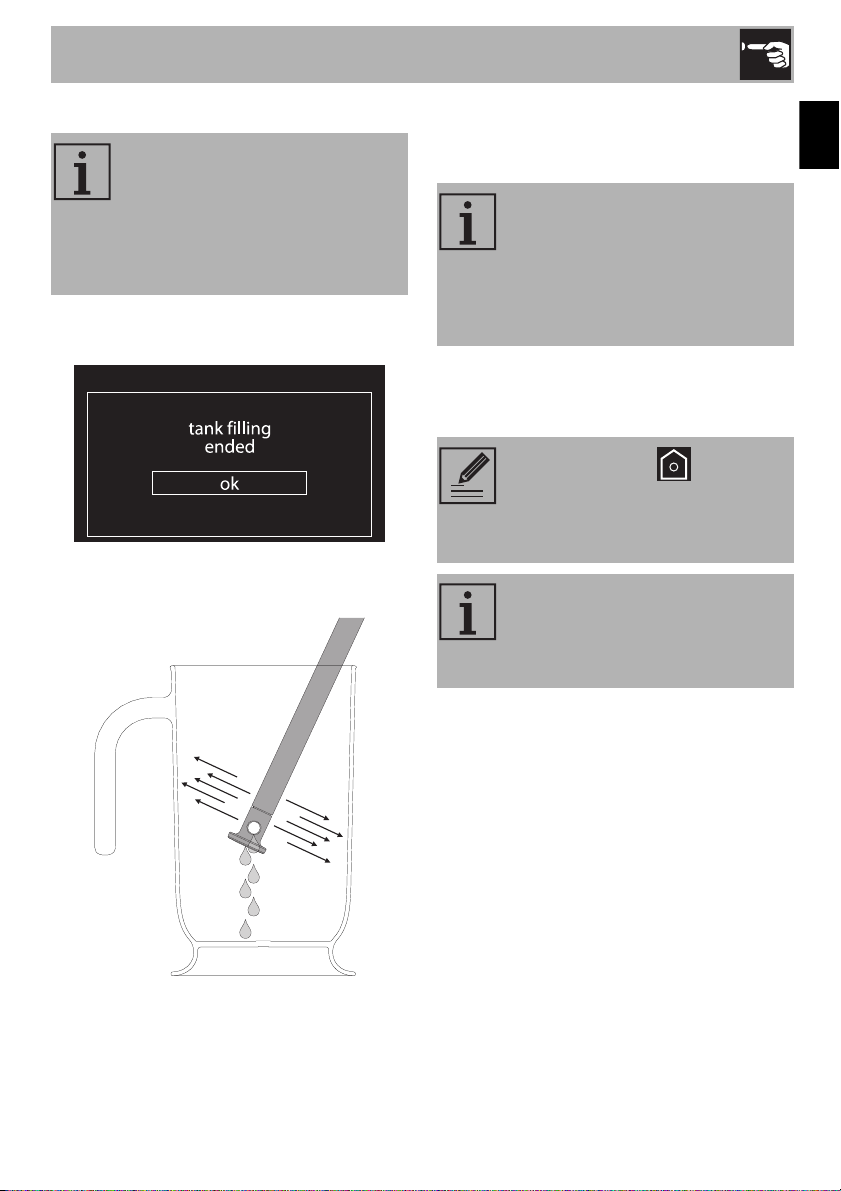
EN
15. At the end press “ok” to confirm that
you have finished filling the reservoir.
16. Shake the tube in order to remove any
remaining water.
17. Return the tube to its original position,
remove the jug (or container) and close
the door.
18. Close the door. The appliance starts the
function automatically using the
parameters set.
In the event that the water runs out,
the appliance will automatically
stop the cooking process, a
buzzer will sound and the display
will show a request to fill the
reservoir with water.
When the door is closed, an
automatic system will automatically
draw in any residual water in the
tube to avoid drips. A bubbling
noise may be heard; this is
completely normal.
Keep pressing the symbol for
a few seconds to immediately turn
off the oven and return to the main
menu.
Each time the door is opened, the
function in progress will stop and
then automatically restart when the
door is closed again.
Use
20
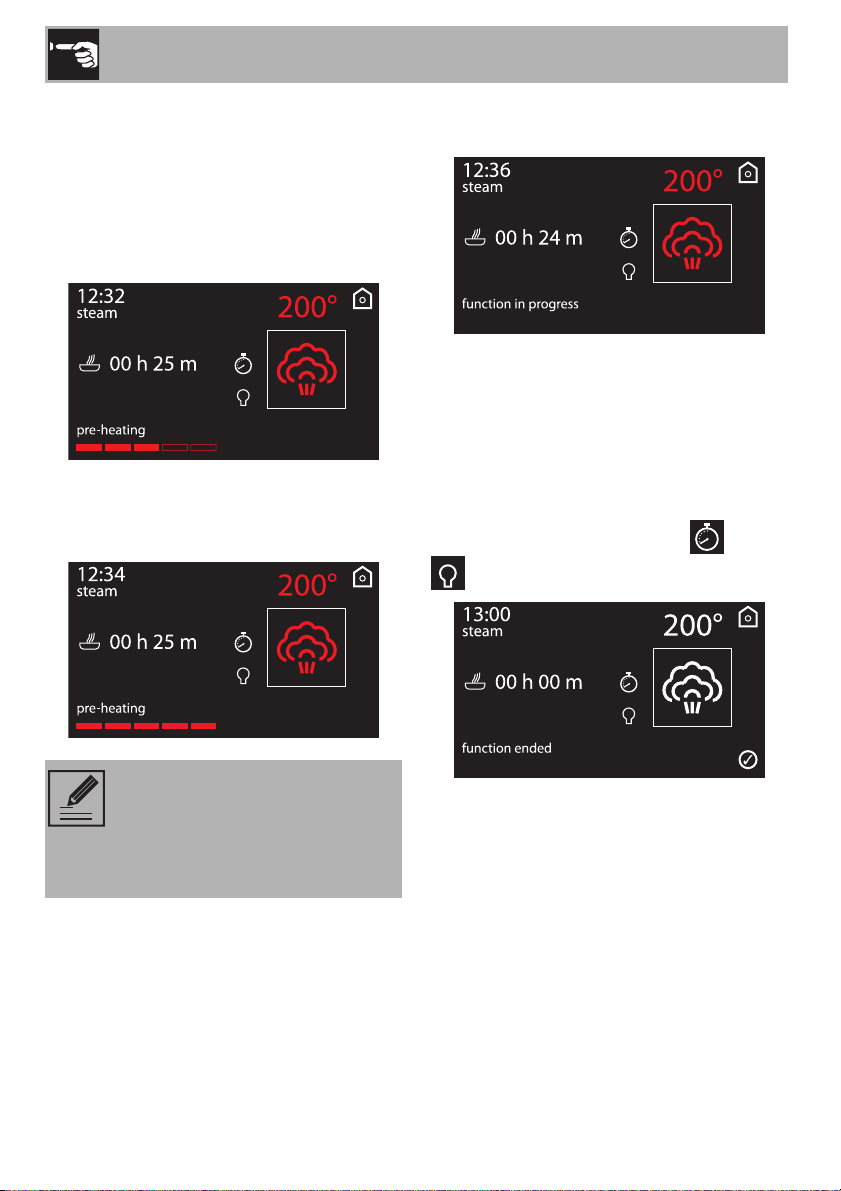
Preheating stage
Steaming is always preceded by a
preheating stage, which allows the
appliance to heat up to cooking
temperature.
This stage is indicated by a progressive
increase in the temperature level reached.
At the end of preheating the temperature
reaches the maximum set level.
A buzzer sounds to indicate that cooking
starts automatically.
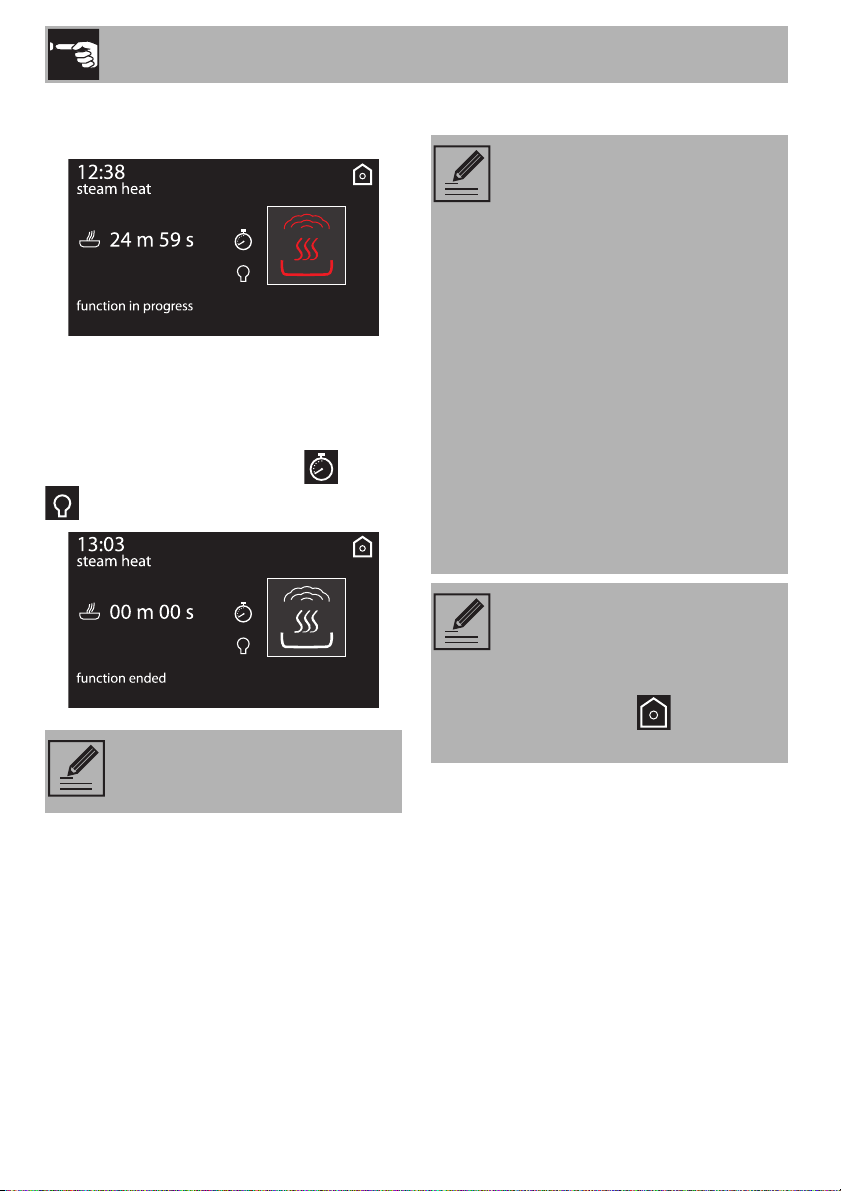
End of the steam function
At the end of cooking, “steam function
ended” appears on the display and a
buzzer sounds, which can be deactivated
by touching any modifiable zones of the
display (temperature, function, and
) or by opening the door.
If cooking has just been performed
with temperatures greater than
210°F, you must wait for the oven
to cool in order to use the steam
function.
Use
21
EN
Removing the residual water
At the end of steaming, the water can be
emptied from the reservoir.
19. When the steam function has ended,
press the return symbol : the
appliance prompts you to drain water
from the reservoir.
20. Stand to the side of the appliance and
open the door ajar for a few seconds to
allow excess steam to escape.
21. Fully open the door when safe to do so
and cautiously remove the food from the
oven.
22. Place the jug (or container) on the open
door.
23. Extract the tube from its seat and
immerse its end in the jug (or container)
until it reaches all the way to the bottom.
24. Press the symbol to start draining
the water into the jug (or container).
We recommend emptying the
reservoir each time you finish
using the appliance to avoid
scale build-up.
Use
22
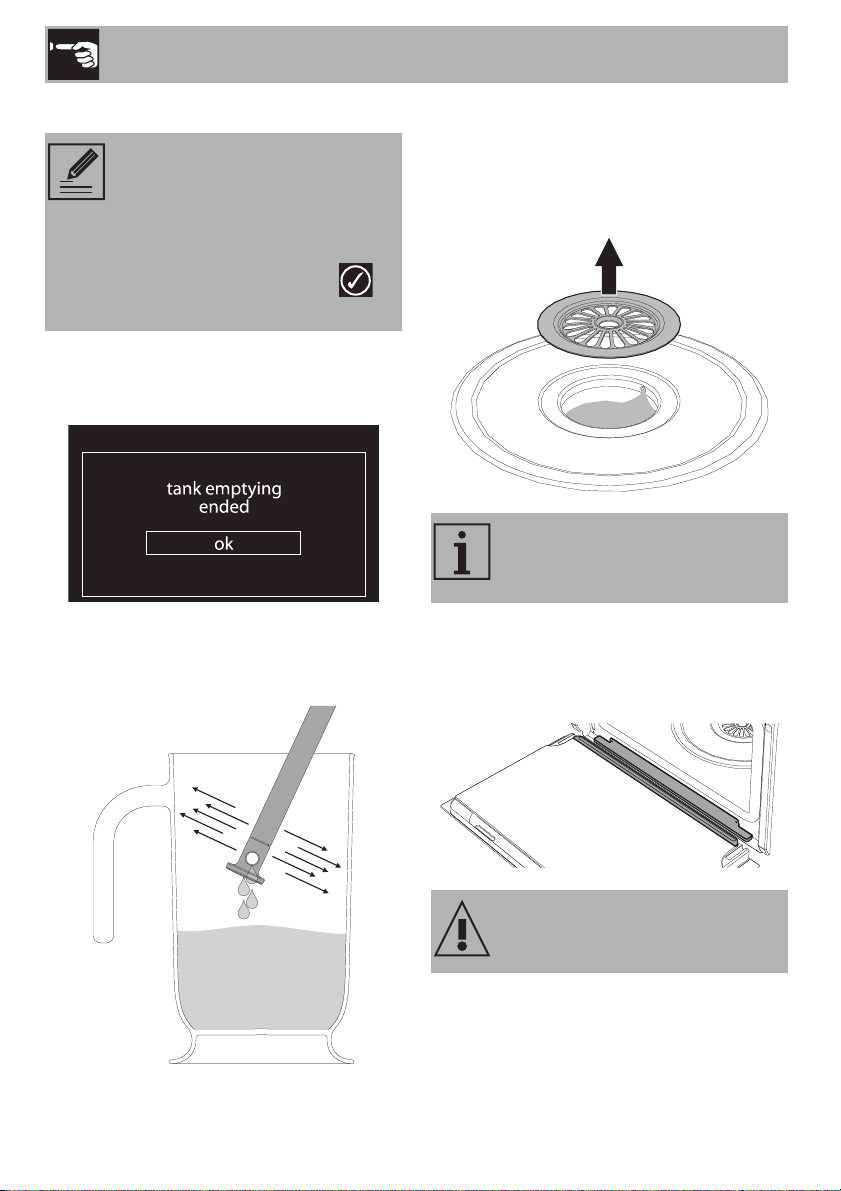
When complete, the display will indicate
that the residual water removal process is
complete.
25. Press “ok” to confirm.
26. Shake the tube in order to remove any
remaining water.
27. Place the tube back into its seat and
remove the jug.
28. Remove the cover from the evaporation
tray inside the oven cavity and dry it with
the sponge provided.
29. Remove condensation from the base
and walls of the oven cavity, the door
glass and drip tray and the front of the
appliance using a sponge.
It is only possible to drain the water
when the door is open. Always
make sure that you have removed
the tube from its seat and inserted
its end into the jug (or container)
before pressing the symbol to
start the draining cycle.
Note: the evaporation tray cover
may be very hot, use appropriate
protection.
Take care: the water may be very
hot.

Use
23
EN
Advice for steam cooking
• Pasta and rice: upon reaching 210 °F,
the cooking time will be the same as with
cooking on a hob. Place the pasta or
rice in a metal tray and cover with
around a centimeter of water. For best
results when cooking rice, place a lid on
the container or cover with aluminum foil.
This procedure allows the rice to absorb
all the water, and it can then be served
directly to the table.
• Eggs: these may be boiled, scrambled
or poached by using the steam function
at 210 °F. To obtain perfect boiled
eggs, place them on the perforated tray
and cook for 4-6 minutes for soft boiled
eggs and 8-10 minutes for hard-boiled
eggs. For scrambled eggs, place the
beaten eggs in a metal tray together with
milk, butter and seasoning. Cover the
tray with aluminum foil. Mix every couple
of minutes using a fork. For poached
eggs, pour boiling water into the metal
tray with a drop of vinegar and steam
cook for around 4-5 minutes.
• Vegetables: steaming vegetables gives
excellent results. They maintain their
color, flavor and nutritional properties.
For dense vegetables such as potatoes,
turnips and parsnips, cook at 210 °F for
the same length of time you would boil
them on a hob. For broccoli and carrots,
cook for 6 minutes if you want them to
remain firm, or 10 minutes if you want
them to be softer.
• Fish: due to the delicate nature of fish,
steaming gives excellent results. For oily
fish such as salmon or trout, cook at
210°F for around 5 minutes. For white
fish such as cod or haddock, cook at
180°F for around 5 minutes. If you are
cooking different foods, all fish must be
cooked in the perforated tray which must
be placed on the bottom shelf of the
oven to avoid liquid from the fish
dripping onto other food products.
• Meat: casseroles and curries are ideal
for steaming. Prepare the casserole as
for normal oven cooking. Place it in a
metal tray, cover with a lid or aluminum
foil, and cook for between 45 minutes
and 3 hours depending on the cut of
meat used.
• Thin soups: steaming allows flavors to
develop perfectly with minimum effort, as
the liquids will not boil over. For
vegetable soup with the correct
consistency, first steam the vegetables,
then add broth and steam cook at
210°F. The steam function is also ideal
for preparing large quantities for later
use.
• Soups: Thicker soups are also easy and
quick to prepare. Place the soup in a
metal tray, cover with a lid or aluminum
foil and steam cook at 210 °F for the
same time you would cook it in a
microwave oven. To obtain a creamy
texture stir halfway through cooking.
Use
24
• Reheating: the steaming function will not
dry foods out and gives a moister result.
A previously prepared home-cooked
meal, covered with aluminum foil, will
take around 10-12 minutes to reheat.
Ready meals will require approximately
double the time indicated on the
package.
• Defrosting: it is possible to use the steam
function to defrost foods. Times vary, but
defrosting with the steam function takes
around half the time necessary for
covered foods left to defrost at room
temperature.
• Peeling peppers and tomatoes: this is
very easy to do when using the steam
function. Use a knife to cut a small cross
in the skin of the tomato, and steam for
1 minute. Peppers have tougher skin,
and may require up to 4 minutes to
soften it sufficiently for peeling.
• Chocolate: this can be melted using
the steaming function. Place the
chocolate in a metal tray, cover with
aluminum foil and steam for 1 minute.
Unlike other methods, chocolate is
unlikely to burn in the steam oven.
• Hot towels: ideal for facial treatments, a
close shave or for use after a meal, these
are easy to prepare using the steaming
function. Moisten a towel with water, roll
it up and steam it for 1 minute.
Combination cooking functions
Combination functions list
Combination cooking functions
are ideal for preparing moist cakes
and bread and for tender roast
meats.
Steam + circular + fan
The combination of the fan, the
circular heating element and the
steam is particularly suitable for
preparing roast meats, chicken and
baked goods such as bread and
leavened sweets.
Steam + static + fan
The operation of the fan combined
with traditional cooking, with the
assistance of steam, ensures uniform
cooking even with complex recipes.
Ideal for roast veal, roast duck and
cooking whole fish.
Sous Vide
Steam function for perfect cooking
inside a sealed bag. The food’s
flavours are enhanced and no
nutrients are lost.
Use
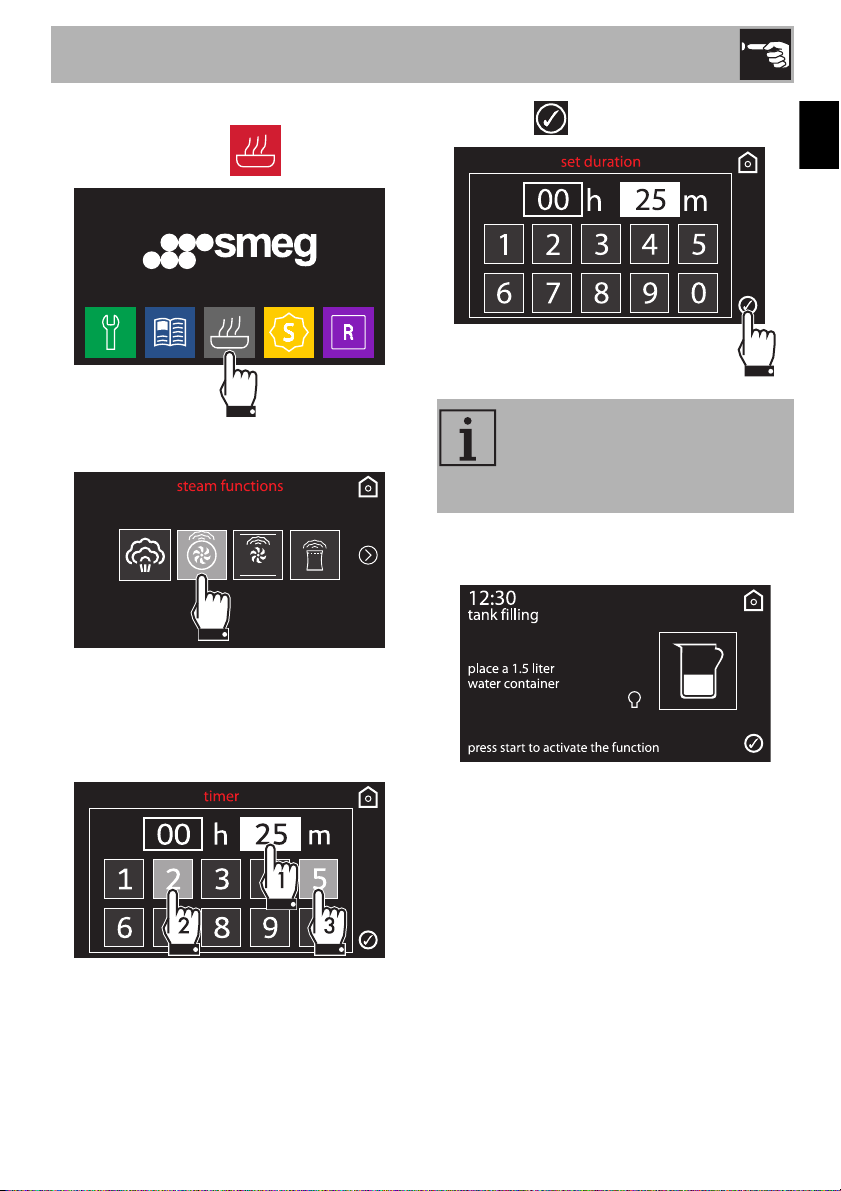
25
EN
1. From the home screen, select the
cooking functions icon.
2. Select a combination function.
3. Enter the time desired. For example, if
you want to set a timer for 25 min, first
press the minutes box, then the numbers
2 and 5.
4. Press the symbol to confirm.
A request to fill the reservoir with water is
shown on the display.
5. Fill the reservoir as described in chapter
“Filling the reservoir”.
Even if a longer time is set, the
appliance will set the cooking
duration to the maximum time
allowed.
Use
26
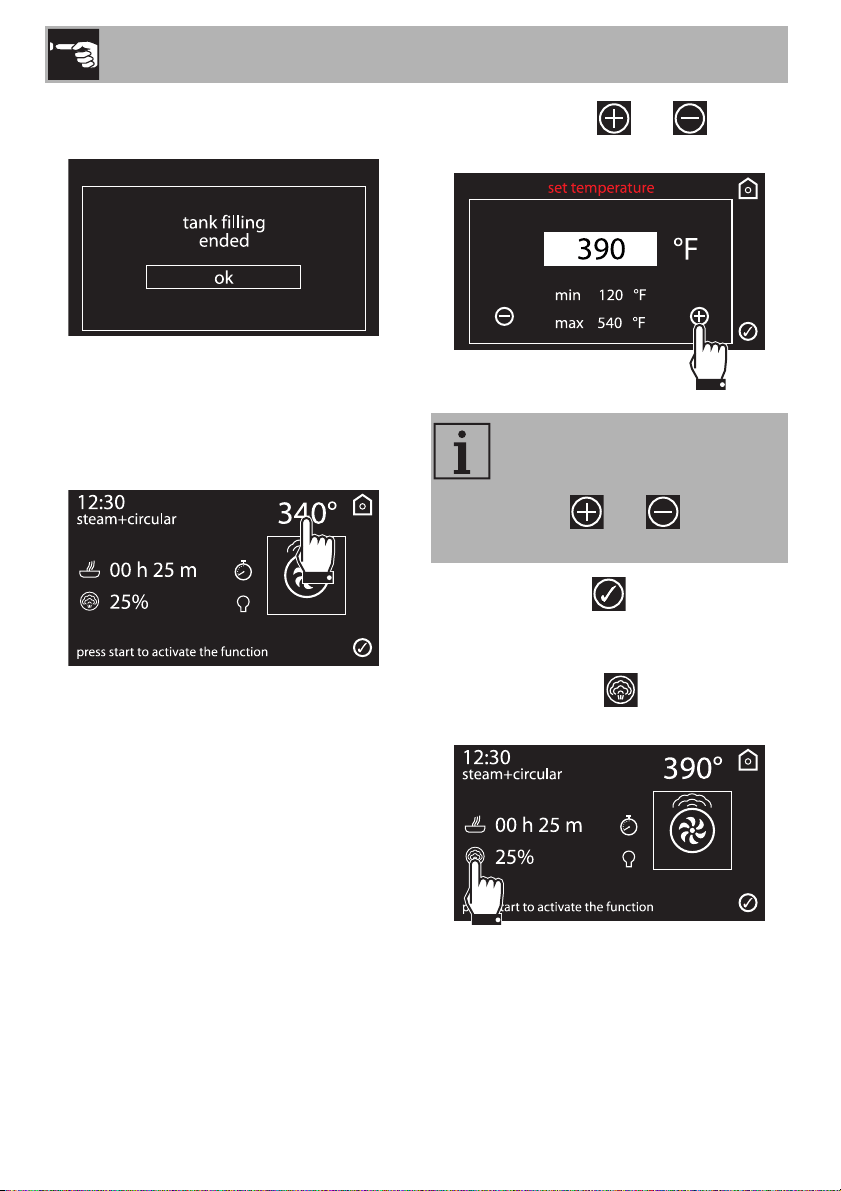
6. At the end press “ok” to confirm that you
have finished filling the reservoir.
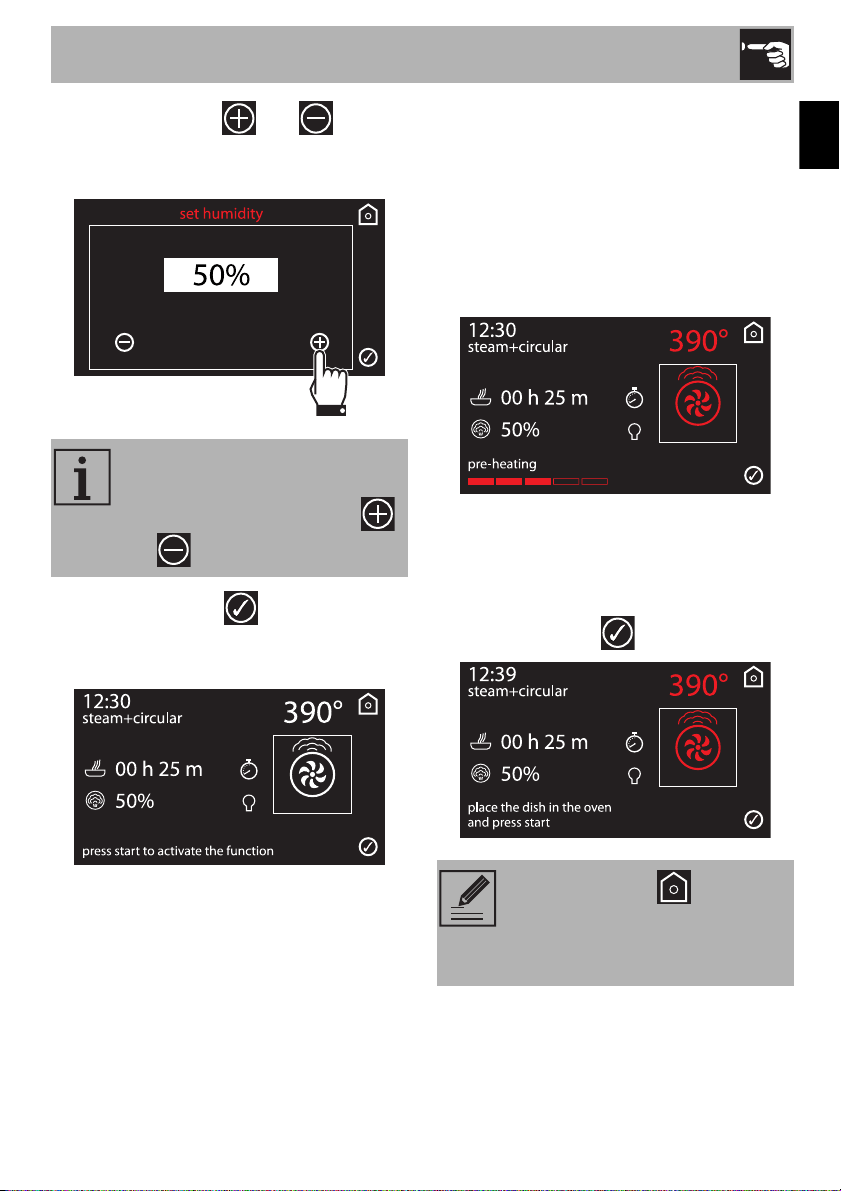
The display shows the screen for setting the
parameters of the selected combination
function.
7. Press the displayed temperature to
change it.
8. Press the symbols and to set the
required temperature.
9. Press the symbol to confirm the
cooking temperature set (for example
390°F).
10. Press the symbol to change the
percentage of steam used for cooking.
The minimum temperature that can
be set is 120°F. The value
changes by 10°F each time the
symbols and are
pressed.
Use
27
EN
11. Use the symbols and to
change the percentage of steam used
for cooking.
12. Press the symbol to confirm the
percentage of steam set (for example
50%).
Preheating stage
Combination functions are preceded by a
preheating stage, which allows the
appliance to heat up to cooking
temperature.
This stage is performed without using steam
and is indicated by the progressive increase
in the temperature level reached.
At the end of preheating the temperature
reaches the maximum set level.
A buzzer sounds to indicate that the food to
be cooked can be put in the oven.
• Press the symbol to start cooking.
The minimum percentage that can
be set is 20%. The value changes
by 5% each time the symbols
and are pressed.
Keep pressing the symbol for
a few seconds to immediately turn
off the oven and return to the main
menu.
Use
28
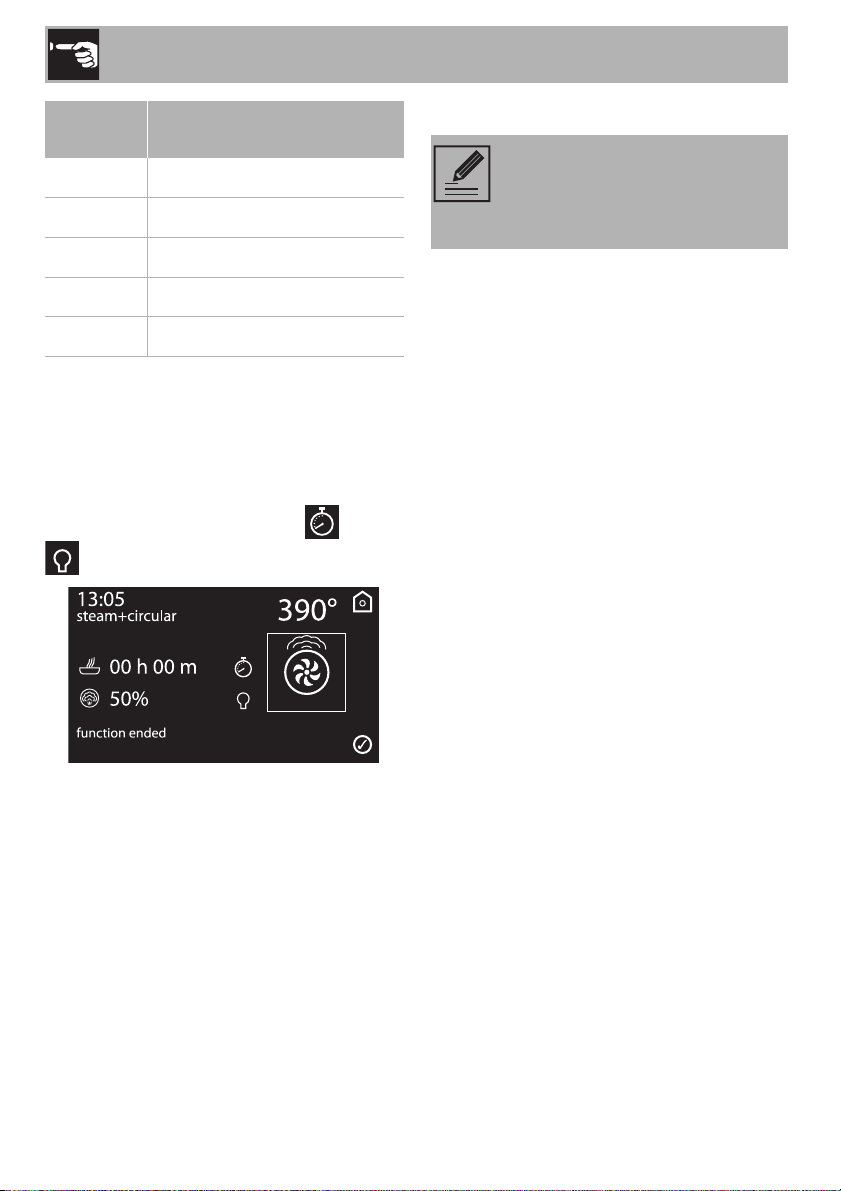
Combination function end
At the end of cooking, “function ended”
appears on the display and a buzzer
sounds, which can be deactivated by
touching any modifiable zones of the
display (temperature, function, and
) or by opening the door.
13. Drain the reservoir as described in the
section “Removing the residual water”.
Sous Vide cooking
Sous vide cooking in a steam oven is the
best way to cook food without altering its
nutritional properties and quality. It is also
an extremely healthy and natural type of
cooking.
• The Sous vide technique allows the heat
to be transferred efficiently from the
steam to the food, preventing the loss of
flavour through the oxidation and
evaporation of nutrients and humidity
during cooking.
• Sous vide cooking also allows greater
control over the cooking compared to
traditional methods and ensures that
cooking is uniform.
• It also allows cooking to be carried out
at lower temperatures compared to
traditional cooking methods.
Steam
percentage
Type of food
25% Breads and cakes
30% Duck
40% Beef, veal and lamb
50% Chicken and chops
70% Whole fish
The bag containing the food can
be placed on the perforated tray
or on a rack positioned on the first
or second shelf.
Use
29
EN
To select the Sous Vide cooking:
1. Press the time on the display to activate
the appliance.
2. Select the cooking functions icon
on the “home screen”.
3. Select the Sous Vide function.
For Sous Vide cooking you need to:
• Have a chamber vacuum packing
machine that allows you to achieve a
better and safer vacuum for solid and
liquid foods.
• Make sure that the seal area of the bag
is clean and free from food residues.
• Hermetically seal the food in a special
food grade bag that can withstand the
cooking temperatures.
• Create a vacuum in the bag of at least
99.8% to prevent air bubbles forming
inside that could affect the cooking.
• If you have a Smeg vacuum drawer, use
the maximum vacuum level (level 3).
Once cooked, it is recommended to
remove the product from the bag and finish
cooking it in a pan or by grilling.
Use
30
Tips:
• Preferably use fresh, high quality raw
materials well-preserved until cooked.
• To improve the cooking result, dressings
can be added inside the bag.
• Clean the food well from bones or
fishbones that could pierce the bag and
damage the cooking.
• Do not leave the food to be cooked for
too long at room temperature as the bag
may swell during cooking, losing all the
advantages of vacuum.
• The food to be vacuum-packed for Sous
Vide cooking or storage must be at a
refrigerator temperature (from 3°C to
7°C), never hot.
• Keep the products in a vacuum (cooked
and then blast chilled) at a constant
temperature not exceeding 3°C in the
refrigerator.
• For even cooking, do not overfill the
bags and place the food in the best
possible way on a single layer.
• If you are cooking multiple bags at the
same time, place the bags on the same
shelf without overlapping them.
• Do not reuse the bags after cooking.
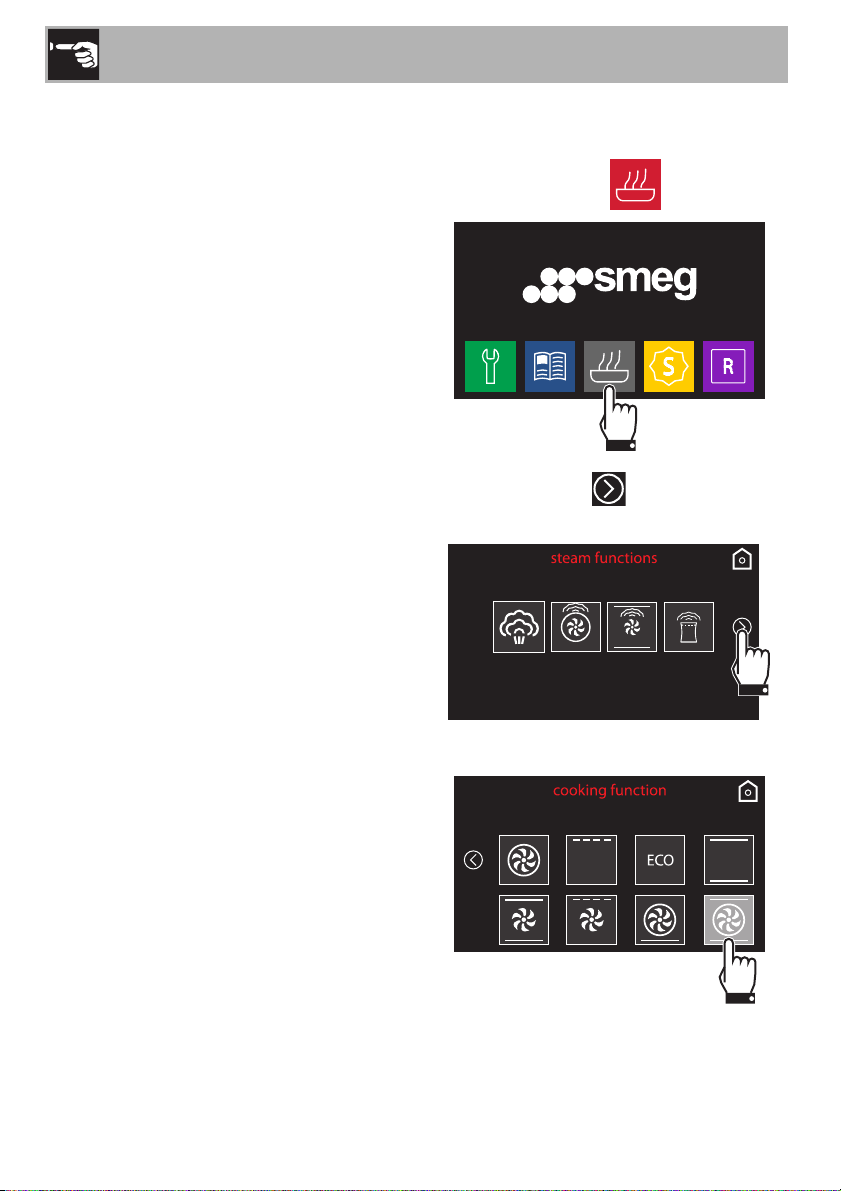
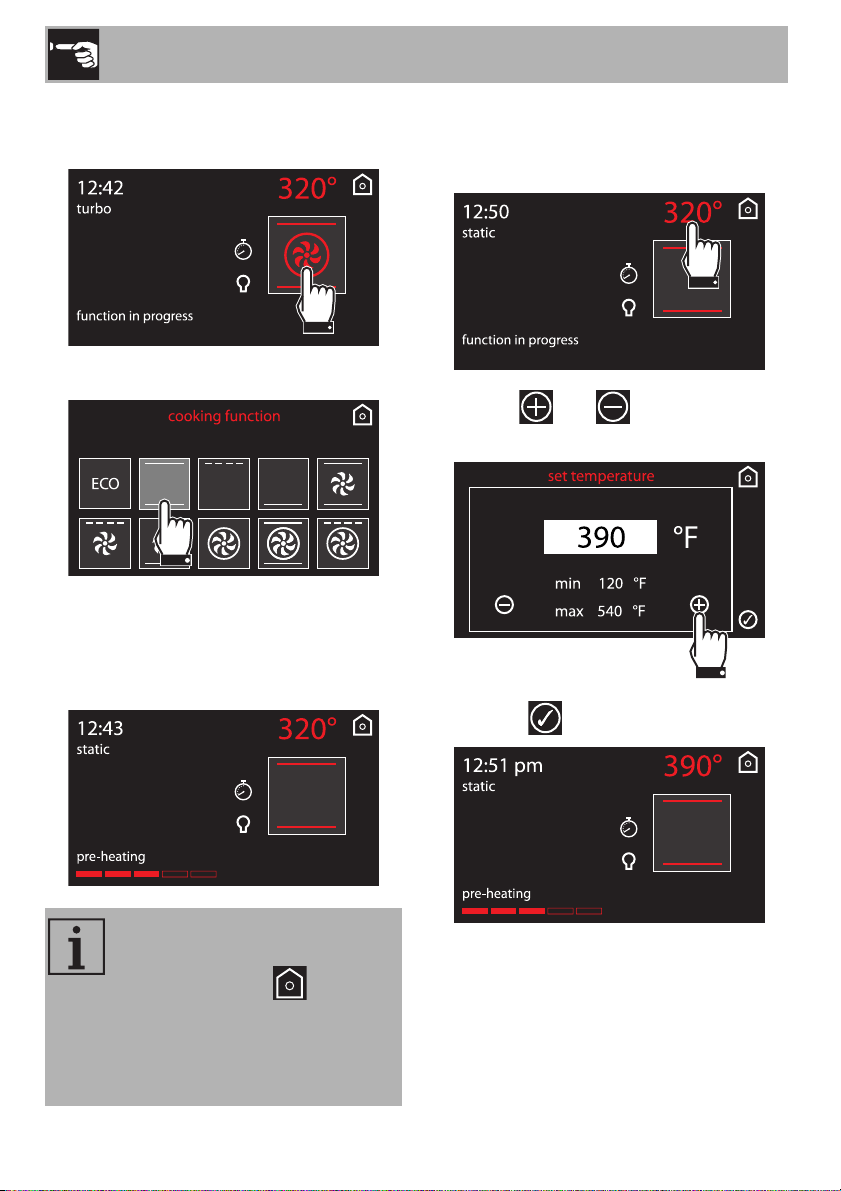
Traditional cooking functions
1. From the home screen, select the
cooking functions icon.
2. Press the symbol to access the
traditional cooking functions menu.
3. Select the desired function.
Use
31
EN
4. The appliance will begin preheating. The
selected function, preset temperature,
current time and the progress made in
reaching the desired temperature
(preheating) will be displayed.
5. When the preheating stage is over, a
buzzer will sound to indicate that the
food can be placed inside the oven.
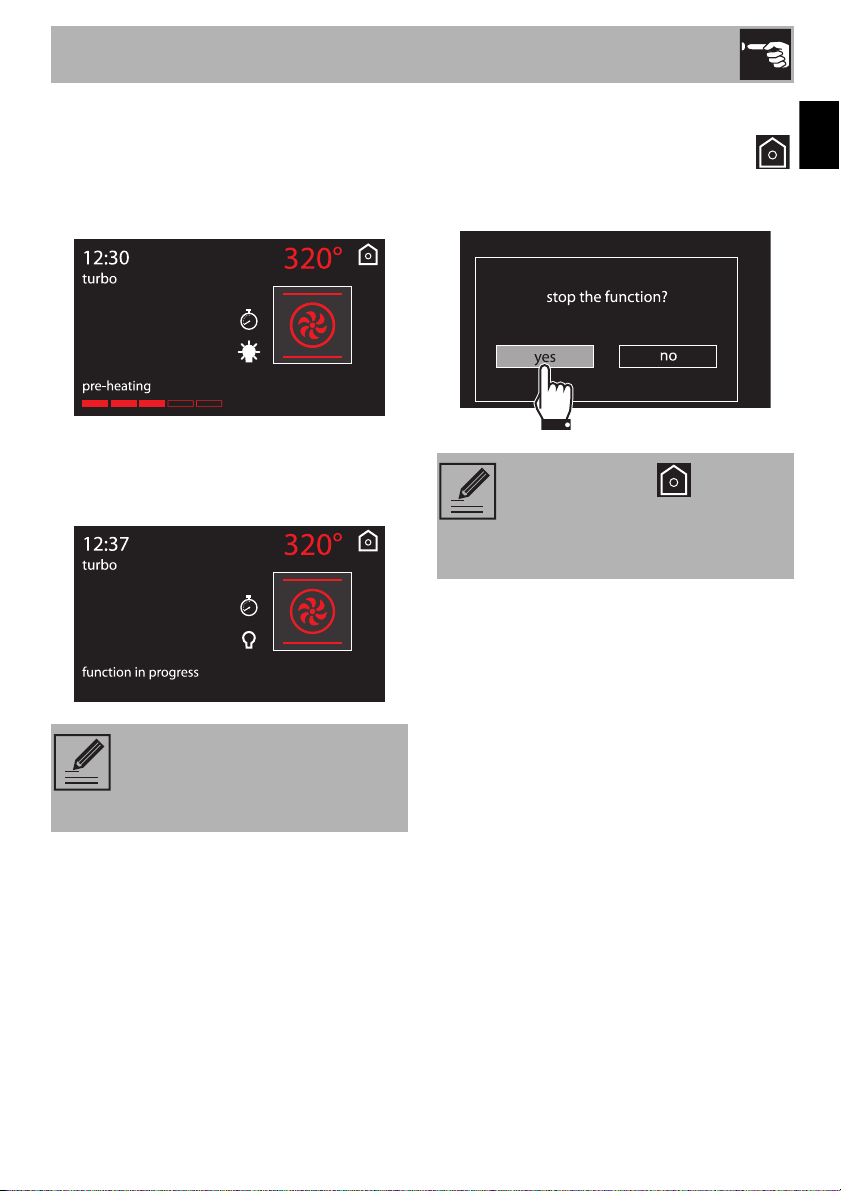
Stopping a function
To interrupt cooking functions, press the
symbol for about 2 seconds. Select the
desired function.
With traditional cooking, food can
be placed in the oven immediately
or after preheating, as the user
prefers.
Keep pressing the symbol for
a few seconds to immediately turn
off the oven and return to the main
menu.
Use
32
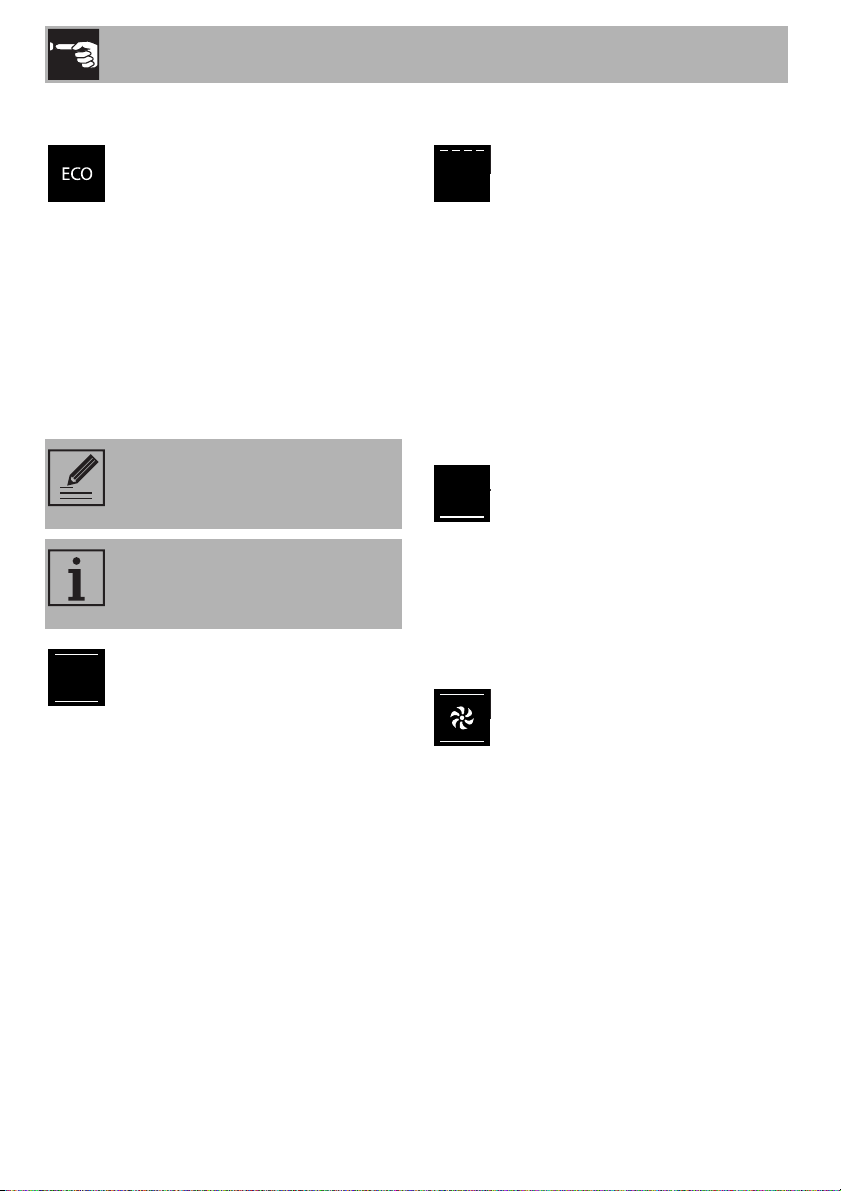
List of traditional cooking functions
Eco
This function is particularly useful for
cooking on a single rack with
reduced energy consumption.
Ideal for cooking meat, fish and
vegetables. It is not recommended
for food which needs to rise.
To save as much energy as possible
and to reduce the cooking time, put
the food in the oven without
preheating it.
When using the ECO function,
avoid opening the oven door
while cooking.
When using the ECO function,
cooking times (and preheating, if
any) are longer.
Top+bottom bake elements
As the heat comes from above and
below at the same time, this system
is particularly suitable for certain
types of food. Conventional
cooking, also known as static
cooking, is suitable for cooking just
one dish at a time. Perfect for all
types of roasts, bread, and cakes, it
is also particularly suitable for fatty
meats such as goose and duck.
Broiler
The heat coming from the broiler
element gives perfect broiling
results, especially for thin and
medium thickness meat, and in
combination with the rotisserie
(when present), it gives the food an
even browning at the end of the
cooking. Perfect for sausages, ribs
and bacon. This function allows you
to broil large quantities of food,
particularly meat, evenly.
Bottom bake element
The heat radiating only from the
bottom allows you to complete the
cooking/baking of foods that
require a higher base temperature,
without affecting their browning.
Perfect for cakes, pies, tarts and
pizzas.
Convection bake
The operation of the fan, combined
with traditional cooking, ensures
uniform cooking even with complex
recipes. Perfect for cookies and
cakes, even when simultaneously
cooked on several levels. (For multi-
level cooking, we recommend using
the 1
st
and 4
th
level slots).

Use
33
EN
Convection broiler
The air that the fan produces softens
the set heat wave generated by the
broiler element, allowing for perfect
broiling, even of very thick foods.
Perfect for large cuts of meat (e.g.
shank of pork).
Convection bottom bake element
The combination of the fan with only
the bottom heating element allows
cooking to be completed more
rapidly. This system is
recommended for sterilizing or for
finishing off the cooking of food
already well-cooked on the
surface, but not inside, which
therefore needs a little more heat.
Perfect for any type of food.
Circular
The combination of the fan and the
circular element (incorporated in the
rear of the oven) allows you to cook
different foods on several levels, as
long as they require the same
temperature and cooking time. Air
circulation ensures instant and
uniform distribution of heat. It will be
possible, for instance, to cook fish,
vegetables and cookies
simultaneously (on different levels)
without mixing smells and flavors.
Turbo
The combination of convection
cooking and conventional cooking
allows you to cook different foods
on several levels extremely quickly
and efficiently, without mixing smells
and flavors. Perfect for large
volumes of food that call for intense
cooking. (For multi-level cooking,
we recommend using the 1
st
and 4
th
level slots).
Circular + convection broiler
The combination of convection
cooking and traditional cooking
allows you to cook different foods
on several levels extremely quickly
and efficiently, without mixing smells
and flavors. Perfect for large
volumes that call for intense
cooking.
Use
34
Modifying a function during cooking
1. Press the function’s symbol to modify it.
2. Press the new function’s symbol.
3. The new function, preset temperature,
current time and the progress made in
reaching the desired temperature
(preheating) will be displayed.
Changing the preset temperature
1. Press the value of the temperature to
modify it.
2. Use the and symbols to set the
temperature as desired.
3. Press the symbol to confirm.
To avoid accidentally changing
the current function or exiting the
current display, the symbol
must be held for longer than
normal. Pressing the symbol for 3
seconds will always exit the current
screen and function.
Use
35
EN
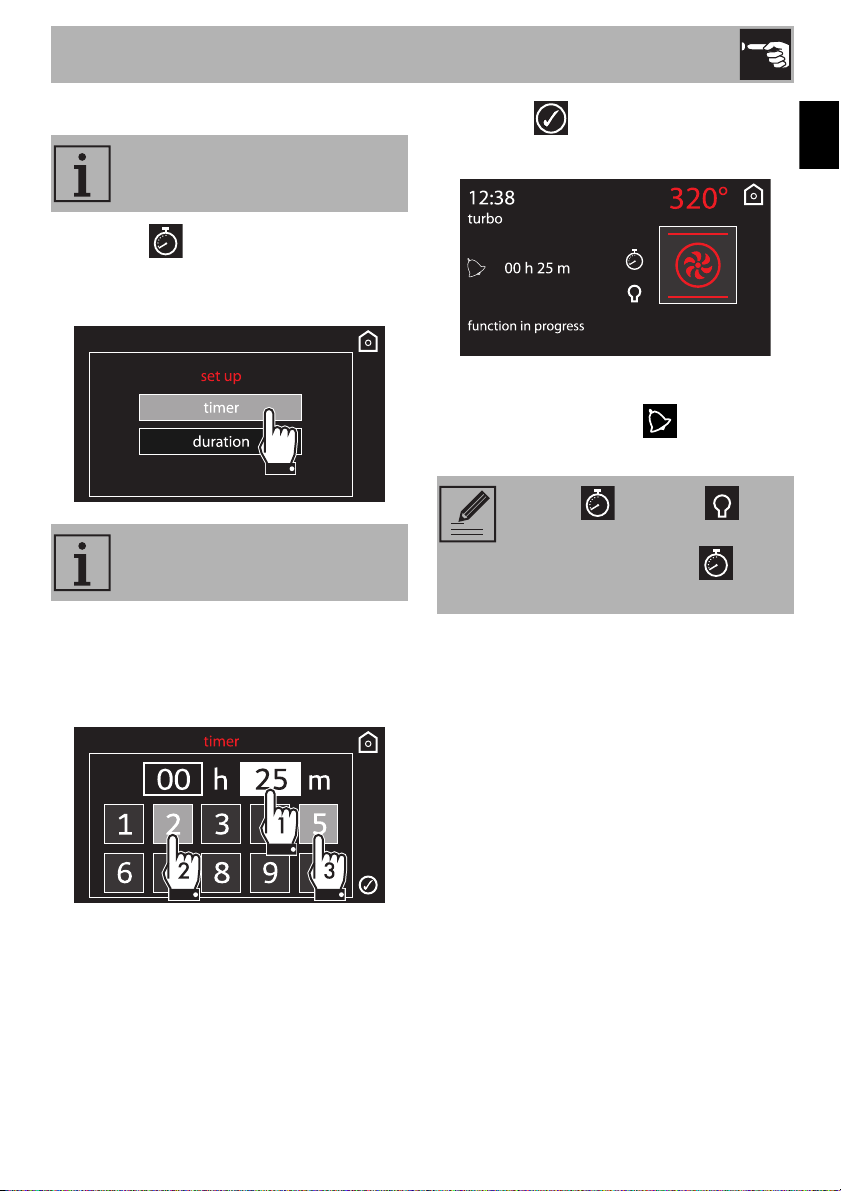
Timer operation during a function
1. Press the symbol while using a
cooking function.
2. Press timer.
3. Enter the time desired. For example, if
you want to set a timer for 25 min, first
press the minutes box, then the numbers
2 and 5.
4. Press the symbol to confirm.
5. The countdown will begin.
6. Wait until the buzzer sounds to indicate
that the time is up. The
symbol will
flash.
This function does not turn the oven
off, but rather sounds a buzzer.
The timer can go from 1 minute
(minimum) to 4 hours (maximum).
Press the symbol or to
turn the buzzer off. To select
another timer, press the
symbol again.
Use
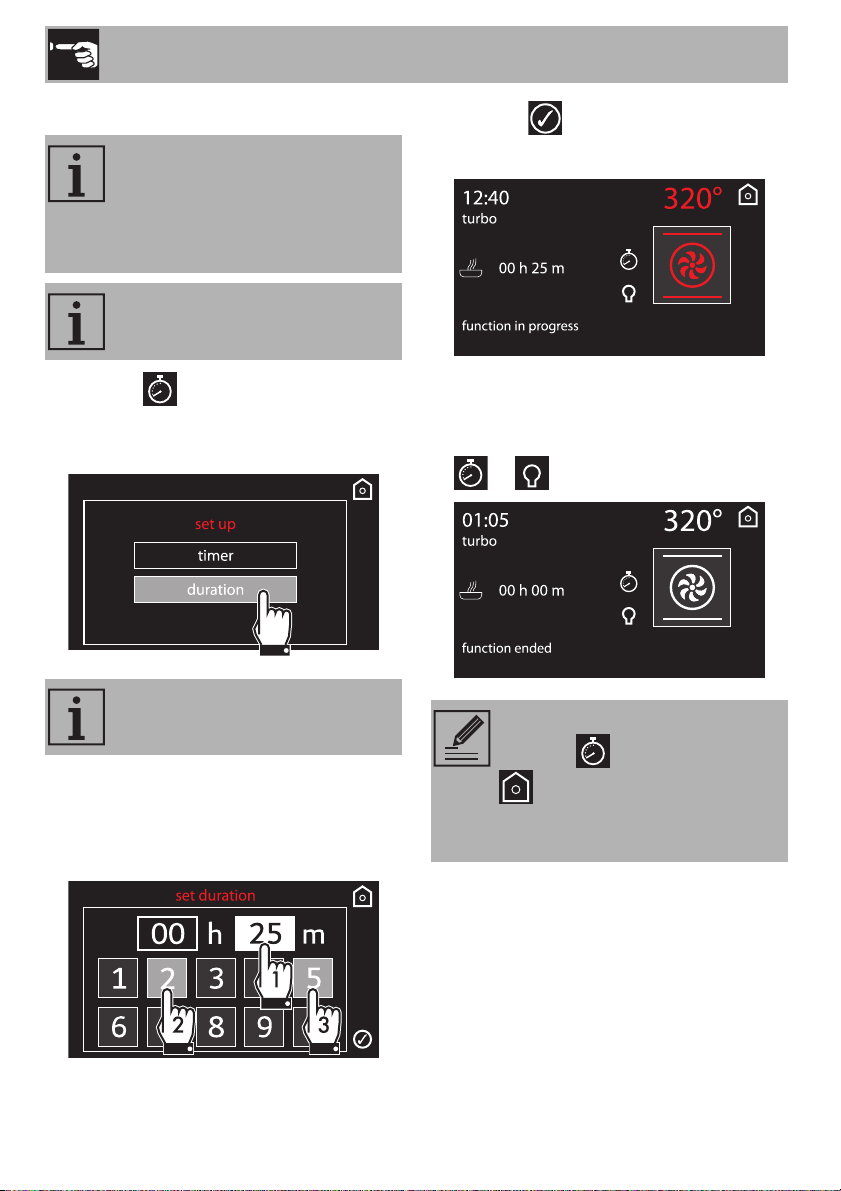
36
Timed cooking
1. Press the symbol while using a
cooking function.
2. Press the duration lettering.
3. Enter the time desired. For example, if
you want to set a timer for 25 min, first
press the minutes box, then the numbers
2 and 5.
4. Press the symbol to confirm.
5. Timed cooking has begun.
6. Once done, “function completed” will be
displayed and a buzzer will sound
(which can be turned off by pressing the
or symbol).
Timed cooking is the function
which allows a cooking operation
to be started and then ended after
a specific length of time set by the
user.
Activating timed cooking will
cancel any previously-set timers.
The timer can go from 1 minute
(minimum) to 13 hours (maximum).
To keep cooking in manual mode,
press the symbol and then the
symbol. The appliance will
resume its normal operation with
the previously-selected settings.
Use
37
EN
Modifying the settings during timed
cooking
When in operation, it is possible to change
the duration of timed cooking:
1. Press the symbol.
2. Press the duration lettering.
3. Enter the new desired duration and then
press the symbol to confirm.
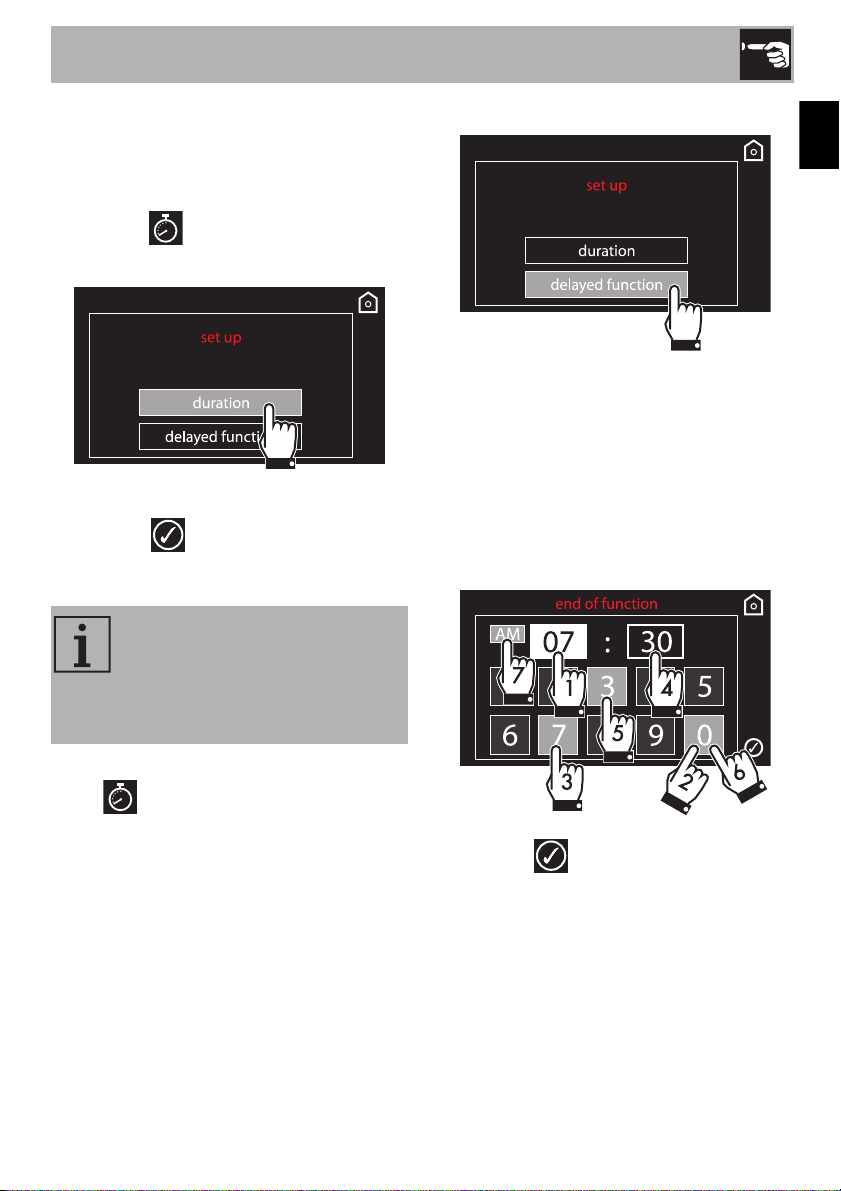
Cooking
delayed
1. After having set a cooking duration, press
the symbol.
2. Press the function delayed lettering.
3. Enter the time you want the cooking
function to end (for example, at 7:30 pm
(19:30 on the 24-hour clock): first press
the hour box, then the numbers 1 and 9,
then press the minutes box and the
numbers 3 and 0. Remember that the
oven operates on a 24-hour clock, not a
12-hour clock).
4. Press the symbol to confirm.
Cooking delayed is the function
which ends cooking at a specific
time, as set by the user,
subsequently turning the appliance
off.
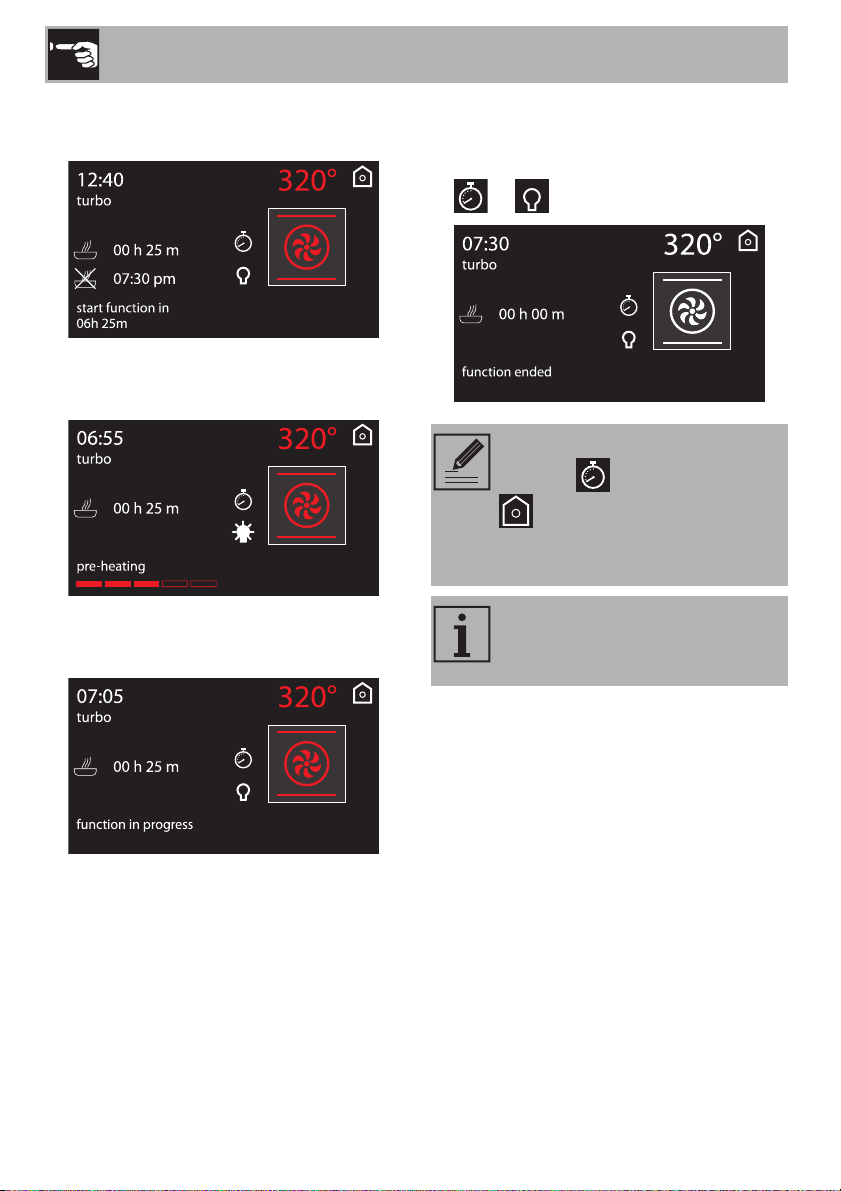
Use
38
5. The appliance will turn on at the
programmed time.
6. Depending on the values, the appliance
will preheat for about 10 minutes...
7. ...and then proceed with the selected
operation.
8. Once done, “function completed” will be
displayed and a buzzer will sound
(which can be turned off by pressing the
or symbol).
To keep cooking in manual mode,
press the symbol and then the
symbol. The appliance will
resume its normal operation with
the previously-selected settings.
For safety reasons, the end of
cooking time cannot be set without
having programmed the duration.
Use
39
EN
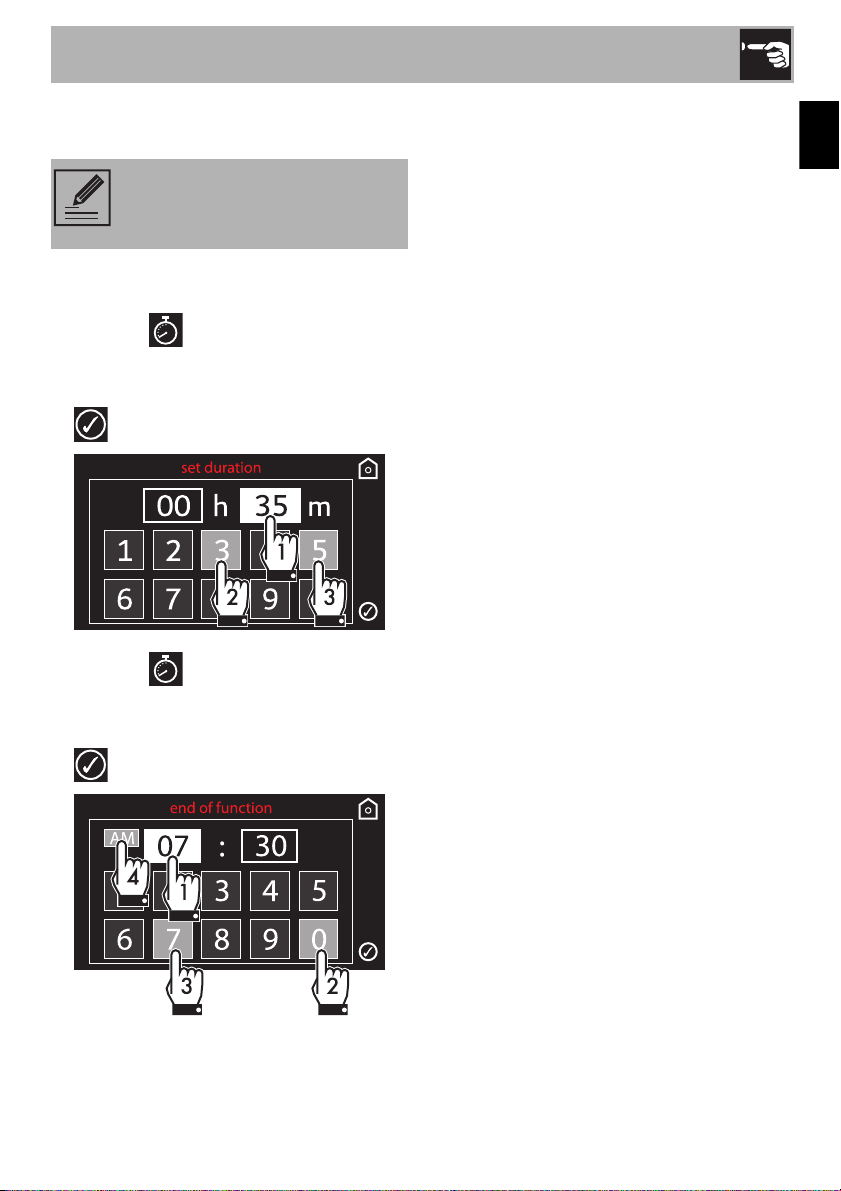
Modifying the settings during
programmed cooking
When in operation, the duration for
programmed cooking can be modified:
1. Press the symbol.
2. Enter the new desired duration (for
example, 35 minutes) and then press the
symbol to confirm.
3. Press the symbol again.
4. Enter the new cooking end time (e.g. 7
pm, entered as 19:00), and press the
symbol to confirm.
2.5 Cooking tips
General tips
• Use a convection function to achieve
uniform cooking at several levels.
• Increasing the temperature does not
shorten cooking or baking times (the
food could be well cooked on the
outside and undercooked on the inside).
• Once cooked, to avoid condensation
from forming on the glass, don’t leave
hot food in the oven for too long.
Tips for cooking meats
• Cooking times vary depending on the
thickness and quality of the meat, and on
consumer tastes.
• Use a meat thermometer when cooking
roasts, or simply press on the roast with a
spoon. If it feels hard, it is ready;
otherwise, it needs to roast a bit longer.
Tips for cooking with the broiler and
convection broiler
• The meat can be grilled starting with a
cold oven or with the oven preheated if
you want to change the effect of the
cooking.
• With the convection broiler function, it is
recommended that the oven be
preheated before broiling.
• We recommend placing the food at the
center of the rack.
Tips for baking cakes and cookies
• It is preferable to use dark metal pans,
which help to absorb the heat better.
• The temperature and baking duration
depend on the quality and consistency
of the dough.
Modifying the cooking duration
makes it necessary to reset the
cooking stop time.

Use
40
• To check whether the cake is baked
through, stick a toothpick into its highest
point at the end of the baking time. If the
dough does not stick to the toothpick, the
dessert is cooked.
• If the dessert goes flat when it comes out
of the oven, on the next occasion reduce
the set temperature by about 50°F,
selecting a longer cooking time if
necessary.
Tips for defrosting and proofing
• With the wrapping removed, place
frozen foods into a lidless container and
place it on the first rack in the oven.
• Do not overlap foods.
• To defrost meat, use a rack placed on
the second level and a tray placed on
the first level. This way, the meat does not
remain in contact with the liquid from
thawing.
• The most delicate parts can be covered
with aluminum foil.
• For good proofing, place a container of
water at the bottom of the oven.
To save energy
• Turn off the oven a few minutes before
the time required. Cooking will continue
for the remaining minutes with the heat
already accumulated inside the oven.
• Do not open the oven door very often to
avoid heat loss.
• Always keep the inside of the appliance
clean.
• (Where present) If not used, remove the
pizza tray and place the cover in its
special location.
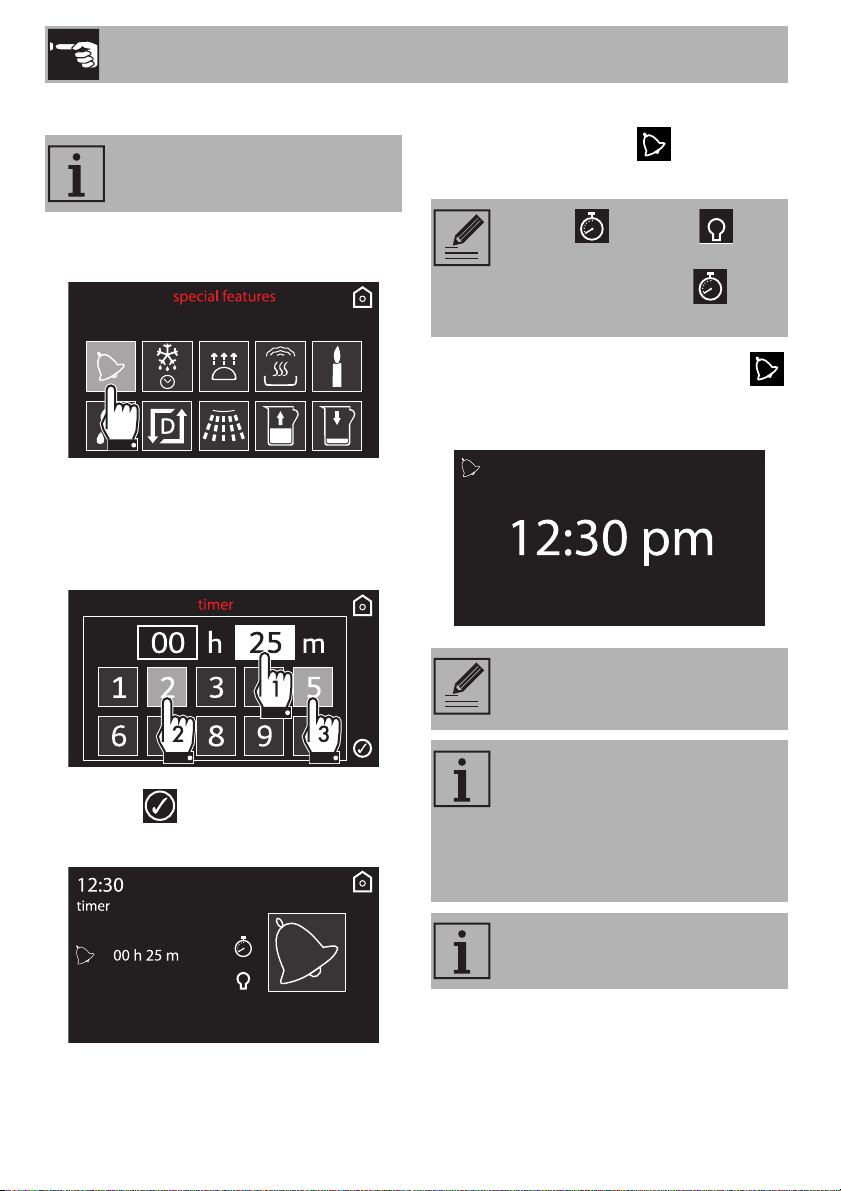
2.6 Special features
The special features menu lists a few
functions, such as a timer when the oven is
off, defrosting and cleaning features.
From the home screen, select the special
features icon.
For the following special functions
Vapor Clean
Descaling
Clean reservoir
see the “Cleaning and maintenance”
section in this manual.
Certain functions are not available
on some models.
Use
41
EN
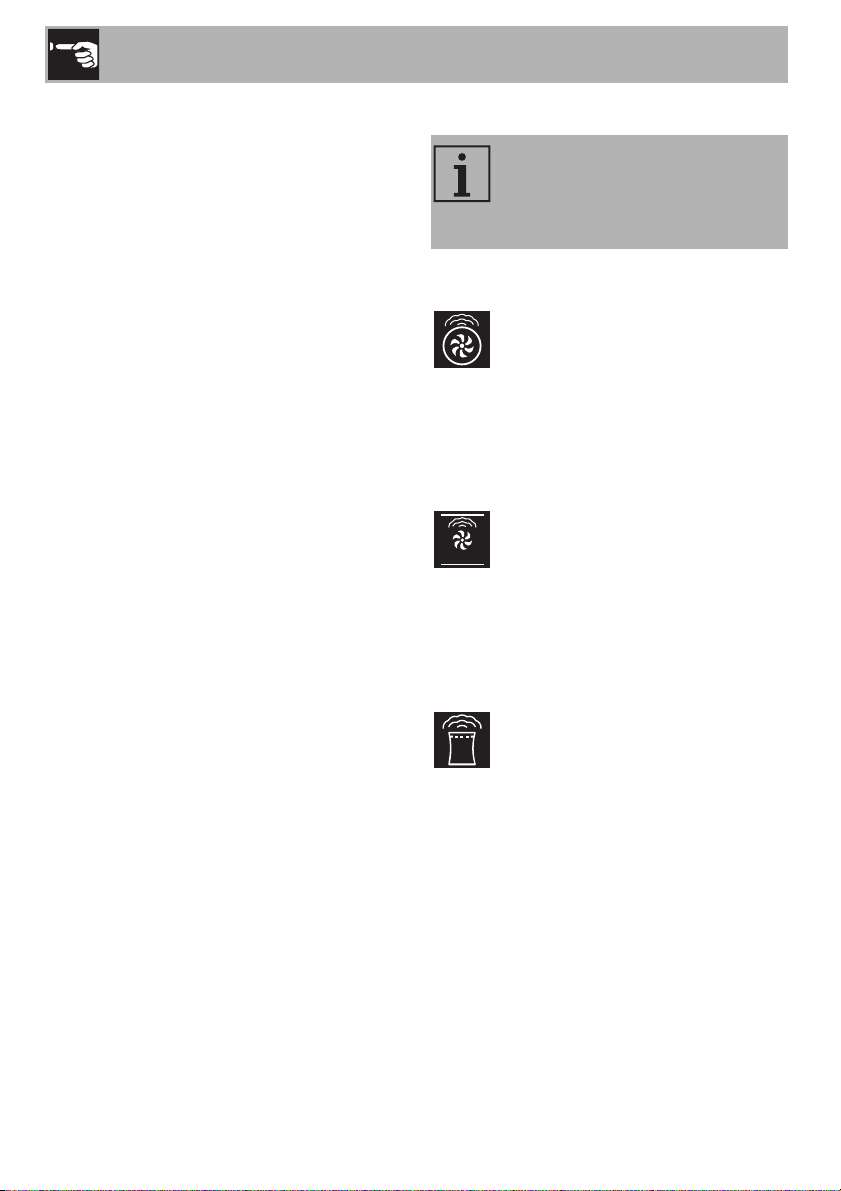
List of special features
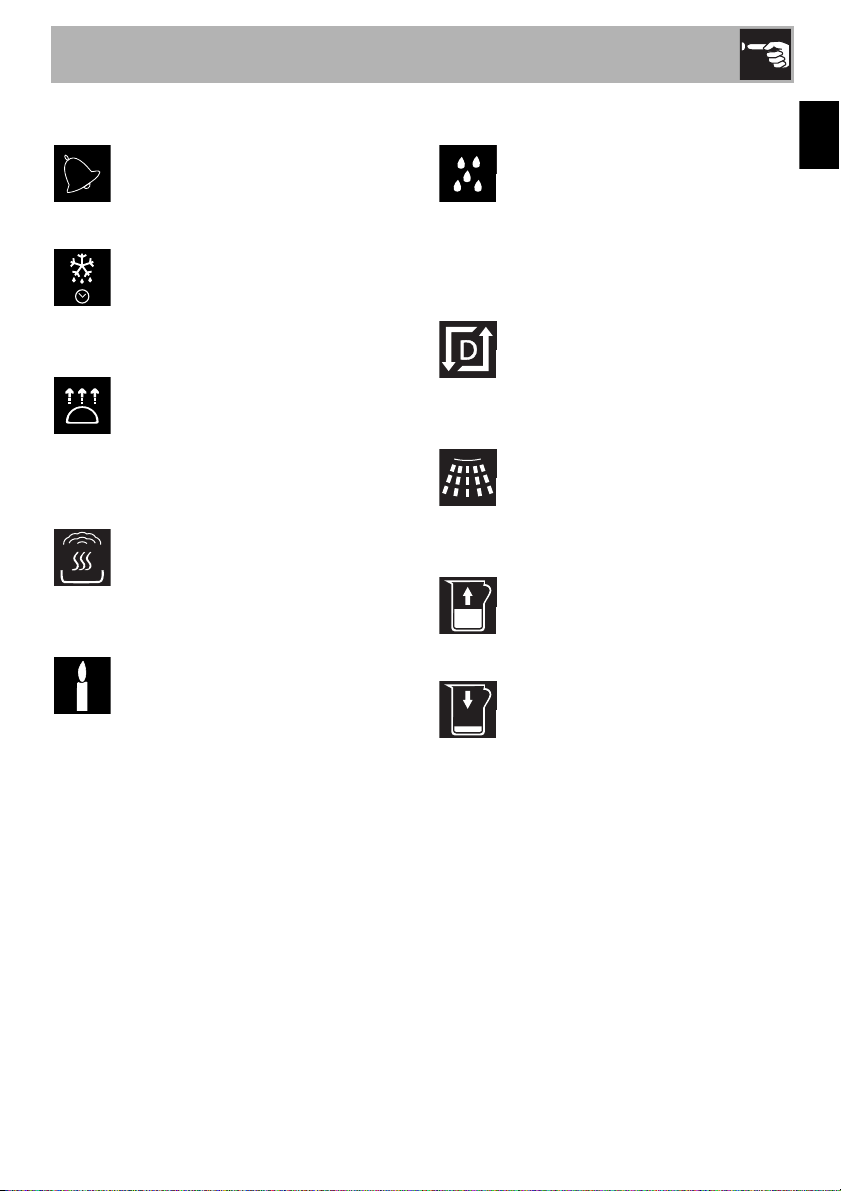
Timer
A buzzer will sound at the end of
the minutes set.
Timed defrost
This function defrosts food
according to a selected amount of
time.
Proofing
Proofing encouraged by warmth
coming from above for doughs of
all types, ensuring great results in
short amounts of time.
Reheat
This function allows you to reheat
previously cooked food kept cool
or in the refrigerator.
Sabbath
This function makes it possible to
cook food in accordance with the
provisions of the Jewish rest day.
Vapor Clean
This function makes cleaning easy
thanks to a small amount of steam
generated by a bit of water poured
into the special trough at the bottom
of the oven.
Descaling
This function allows you to descale
the oven. (see “Cleaning and
maintenance”).
Clean reservoir
This function allows you to clean the
reservoir. (see “Cleaning and
maintenance”).
Reservoir filling
This function allows you to fill the
reservoir.
Empty reservoir
This function allows you to empty
the reservoir.
Use
42
Timer
1. Select timer from the “special features”
menu.
2. Enter the time desired. For example, if
you want to set a timer for 25 min, first
press the minutes box, then the numbers
2 and 5.
3. Press the symbol to confirm.
4. The countdown will begin.
5. Wait until the buzzer sounds to indicate
that the time is up. The
symbol will
flash.
6. If you exit the timer setting menu, the
symbol will be displayed at the top left to
indicate that a timer is active.
The timer can go from 1 minute
(minimum) to 4 hours (maximum).
Press the symbol or to
turn the buzzer off. To select
another timer, press the
symbol again.
To stop the special timer, set the
countdown value to zero.
If you activate a function after
having set a timer, this time will
automatically be inserted as the
function’s timer, except for a few
special features, automatic
programs and personal recipes.
This function does not turn the oven
off, but rather sounds a buzzer.
Use
43
EN
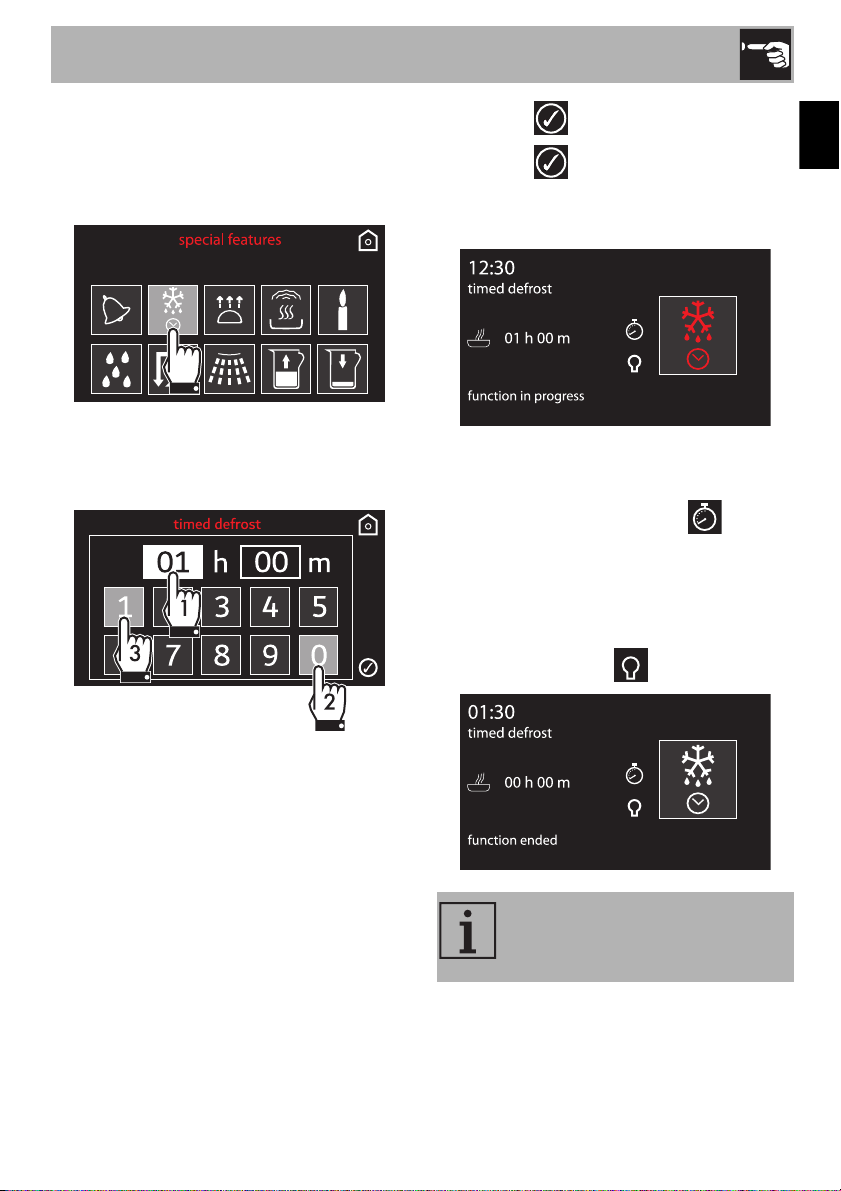
Timed defrost
1. Place the food in the appliance.
2. Select Timed defrost from the “special
features” menu.
3. Enter the time desired. For example, if
you want to set 1 hour, first press the hour
box, then the numbers 0 and 1.
4. Press the symbol to confirm.
5. Press the symbol again to start the
Timed defrost function.
6. Timed defrost has begun.
7. While the function is active, you can still
change the defrosting duration (see
“Timed cooking”). Press the symbol
to modify as desired.
8. At the end of the cycle, “function
completed” will be displayed and a
buzzer will sound (which can be turned
off by pressing the symbol).
The Timed defrost function can go
from 1 minute (minimum) to 13
hours (maximum).
Use
44
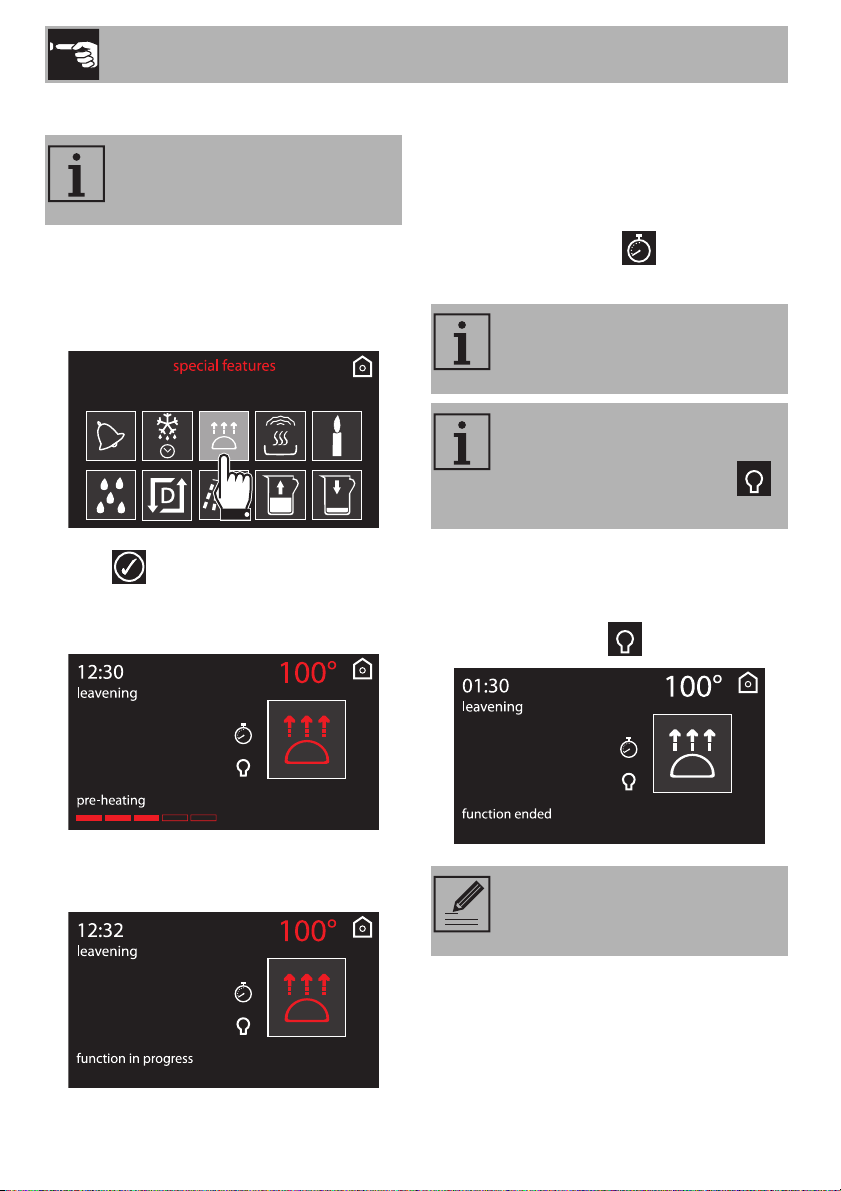
Proofing
1. Place the dough to be proofed on the
second level.
2. Select proofing from the “special
features” menu.
3. Press to confirm you want to start the
proofing function.
4. The appliance will begin preheating.
5. ...and then proceed with the selected
operation.
6. While the function is underway, a timer
can be set for a maximum of 4 hours (see
“Timer operation during a function”), a
proofing duration (see “Timed cooking”)
or delayed proofing (see “Cooking
delayed”). Press the symbol to
modify as desired.
7. At the end of the cycle, “function
completed” will be displayed and a
buzzer will sound (which can be turned
off by pressing the symbol).
For good proofing, place a
container of water at the bottom of
the oven.
If not set to a different length, the
proofing function will last 13 hours
at most.
For better proofing, the light inside
the oven will remain off, but it can
be turned on by pressing the
symbol.
It is not possible to modify the
default temperature for the
proofing function (100°F).
Use
45
EN
Reheat
1. Place the food to be heated inside the
oven.
2. Select reheat from the “special
functions” menu.
3. Enter the wished duration (from 30
seconds to 99 minutes). For example 25
minutes: first touch the minutes box, then
the numbers 2 and 5.
4. Press the symbol to confirm. The
display shows the main screen with the
set duration.
5. Press the symbol to confirm. The
display will show the screen for filling the
water in the reservoir.
6. Fill the reservoir as described in chapter
“Filling the reservoir”.
7. After filling the reservoir, close the door.
The appliance will begin preheating.
This function allows you to heat
previously cooked food which has
been kept in the refrigerator.
Use
46
8. It will then proceed with the selected
function.
At the end of reheat, “function ended”
appears on the display and a buzzer
sounds, which can be deactivated by
touching any modifiable zones of the
display (temperature, function, and
) or by opening the door.
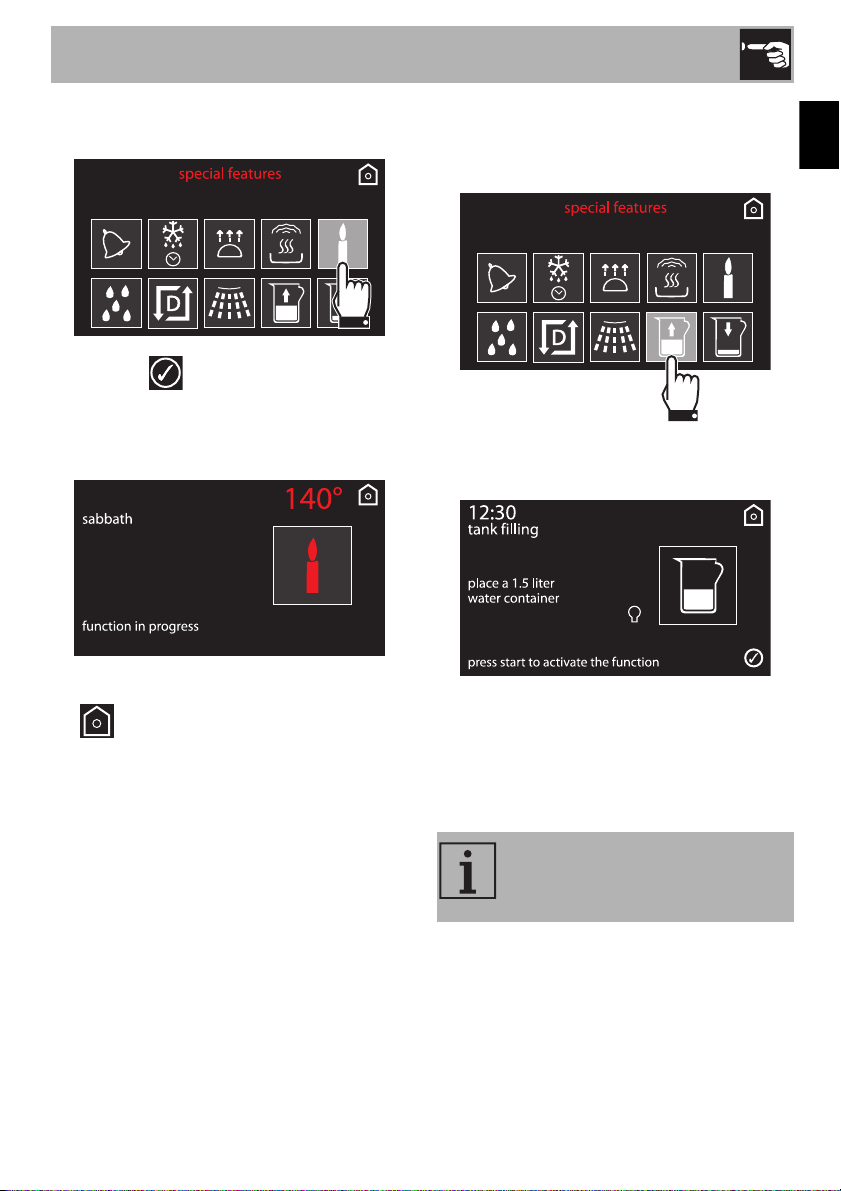
Sabbath
When using the reheat function the
temperature cannot be altered.
When in this mode, the appliance
will operate as follows:
• Cooking can continue for an
indefinite amount of time, and no
timers or timed cooking can be
set.
• The oven will not preheat.
• The available cooking
temperature will be from 140-
215 °F.
• The oven light will be off, any
actions such as opening the
door or manual operation will
not turn the light on.
• The fan will be deactivated.
• Buzzers will be deactivated.
After having activated Sabbath
mode, parameters cannot be
modified.
All actions will be ineffective, while
the back button ( ) to return to
the main menu will remain active.
Use
47
EN
1. Select Sabbath from the “special
features” menu.
2. Press the symbol to start Sabbath
mode or press the value of the preset
temperature to change it (from 60° to
100°).
3. Once completed, keep the back symbol
( ) pressed to return to the main menu.
Manual water filling
1. Select reservoir filling from the “special
functions” menu.
A request to fill the reservoir with water is
shown on the display.
2. Fill the jug provided (or a container) with
sufficient water for the cooking duration.
3. Open the oven door.
4. Place the jug (or container) on the open
door.
Note: the jug (or container) with
the water must have a gross weight
lower than 5 kg.
Use
48
5. Extract the tube from its seat and immerse
its end in the jug (or container) until it
reaches all the way to the bottom.
6. Press the symbol to start filling the
appliance reservoir with water.
7. At the end press “ok” to confirm that you
have finished filling the reservoir.
8. Shake the tube in order to remove any
remaining water.
9. Return the tube to its original position,
remove the jug (or container) and close
the door.
The device charges a quantity of
water until the tank is completely
filled.
When the door is closed, an
automatic system will automatically
draw in any residual water in the
tube to avoid drips. A bubbling
noise may be heard; this is
completely normal.
Use
49
EN
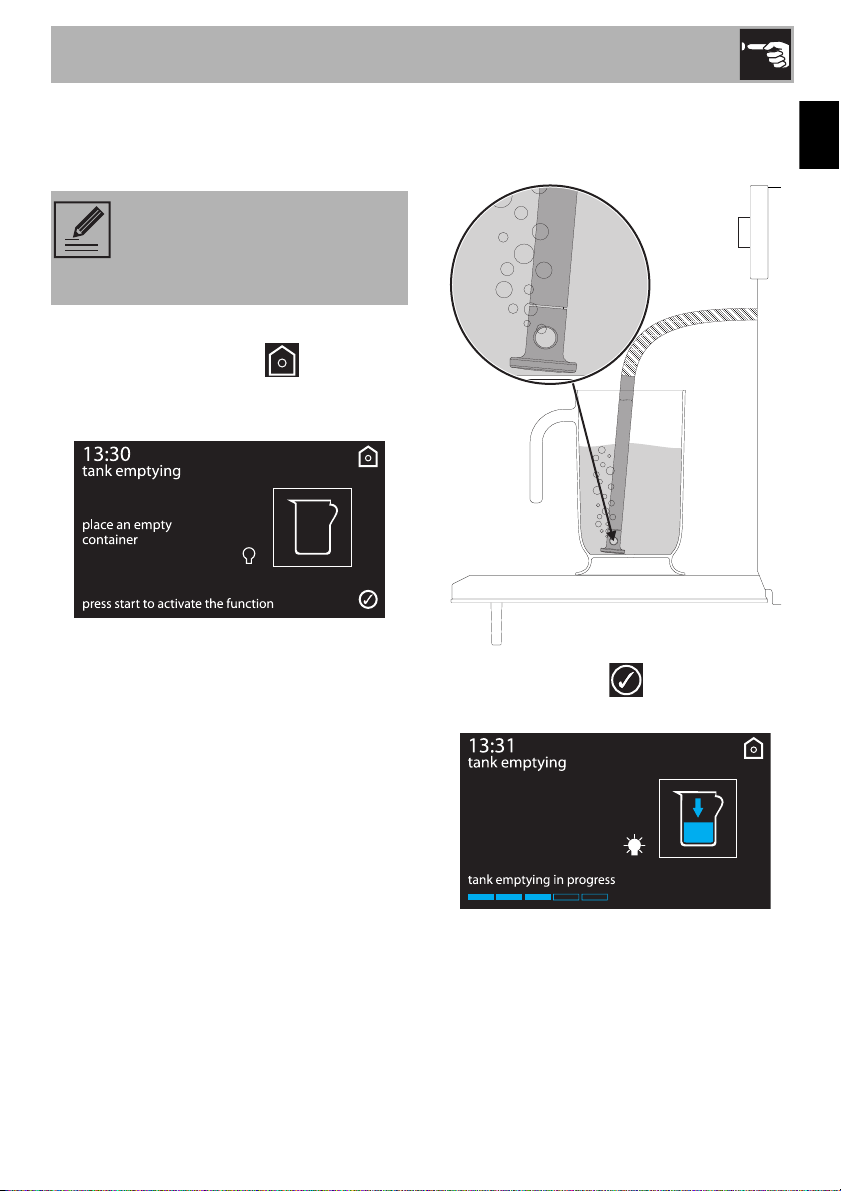
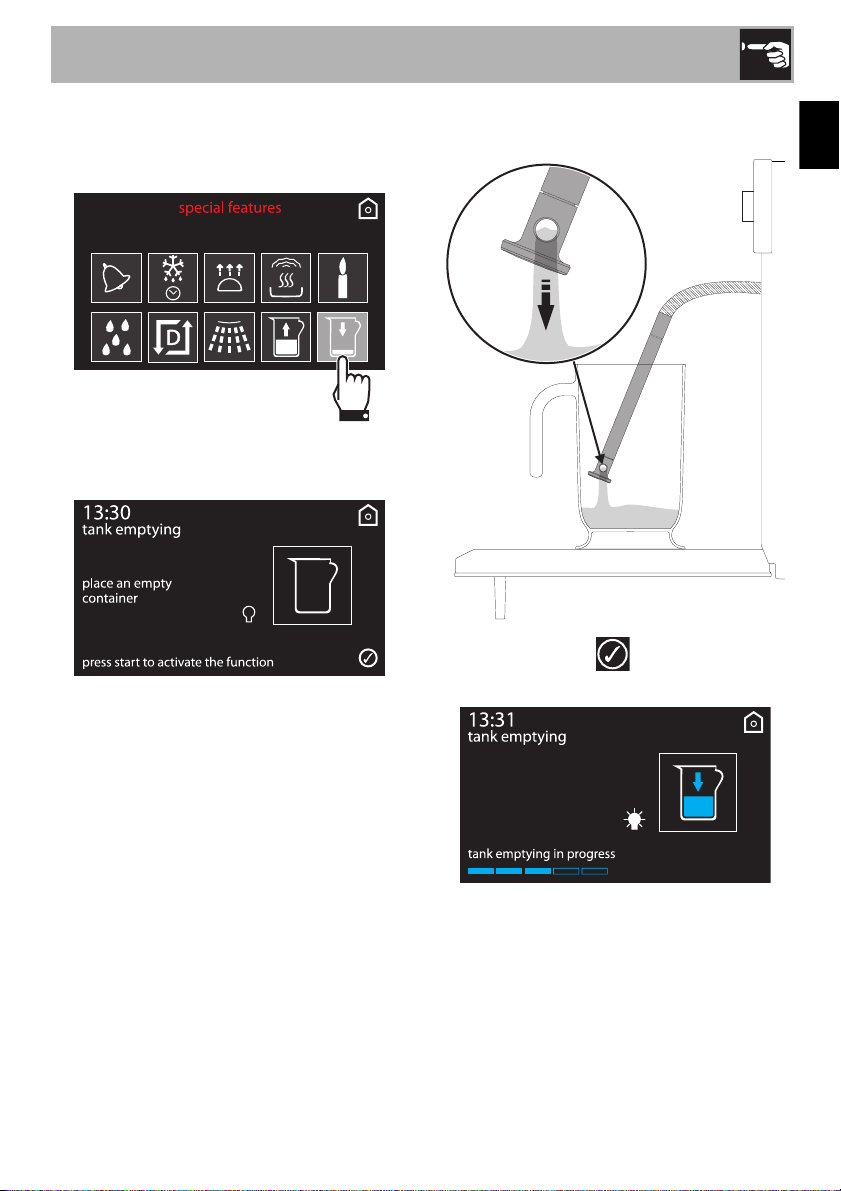
Manual water drain
1. Select reservoir emptying from the
“special functions” menu.
The display will show the screen for
draining the water.
1. Place the jug provided (or a container)
on the open door.
2. Remove the tube from its seat and insert
the end of it into the jug (or container).
3. Press the function knob to start draining
the water into the jug (or container).
4. Press the symbol to start draining the
water into the jug (or container).
Use
50
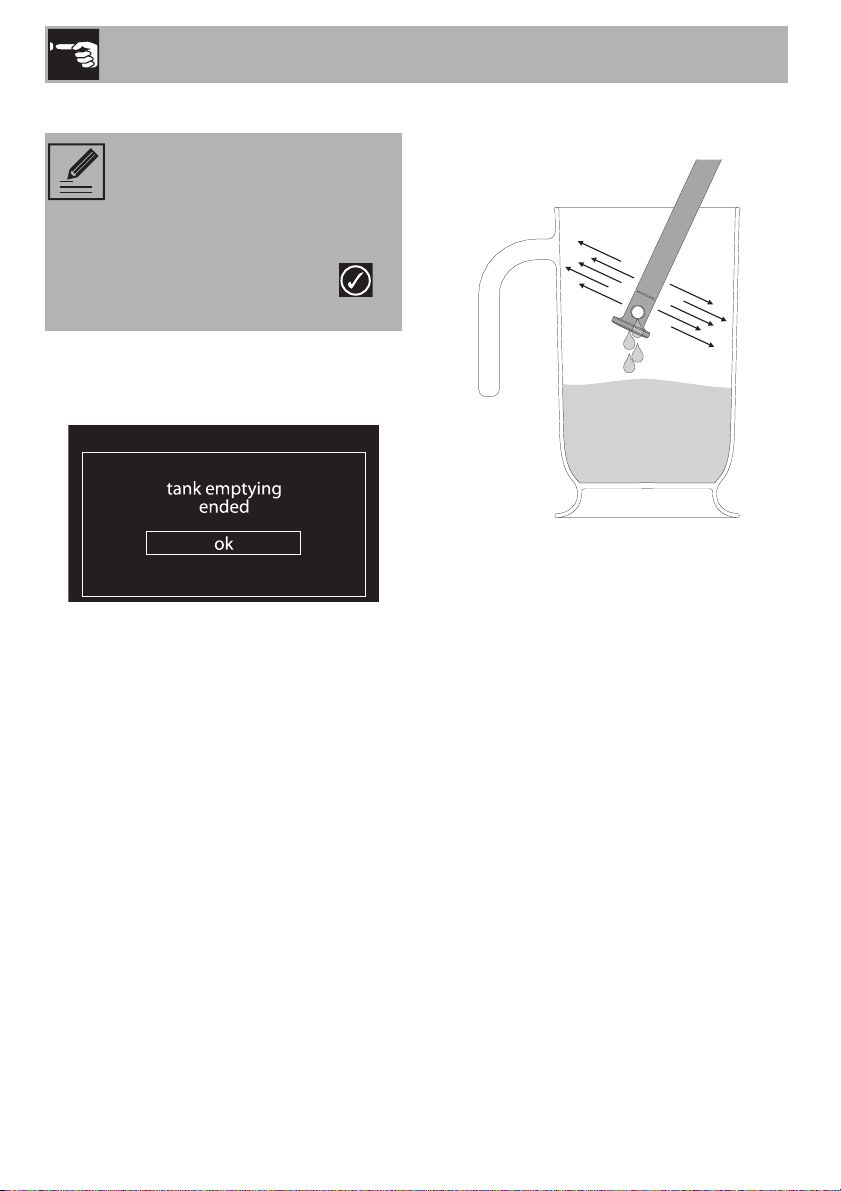
When complete, the display will indicate
that the residual water removal process is
complete.
5. Press “ok” to confirm.
6. Shake the tube in order to remove any
remaining water.
7. Return the tube to its original position,
remove the jug (or container) and close
the door.
It is only possible to drain the water
when the door is open. Always
make sure that you have removed
the tube from its seat and inserted
its end into the jug (or container)
before pressing the symbol to
start the draining cycle.
Use
51
EN
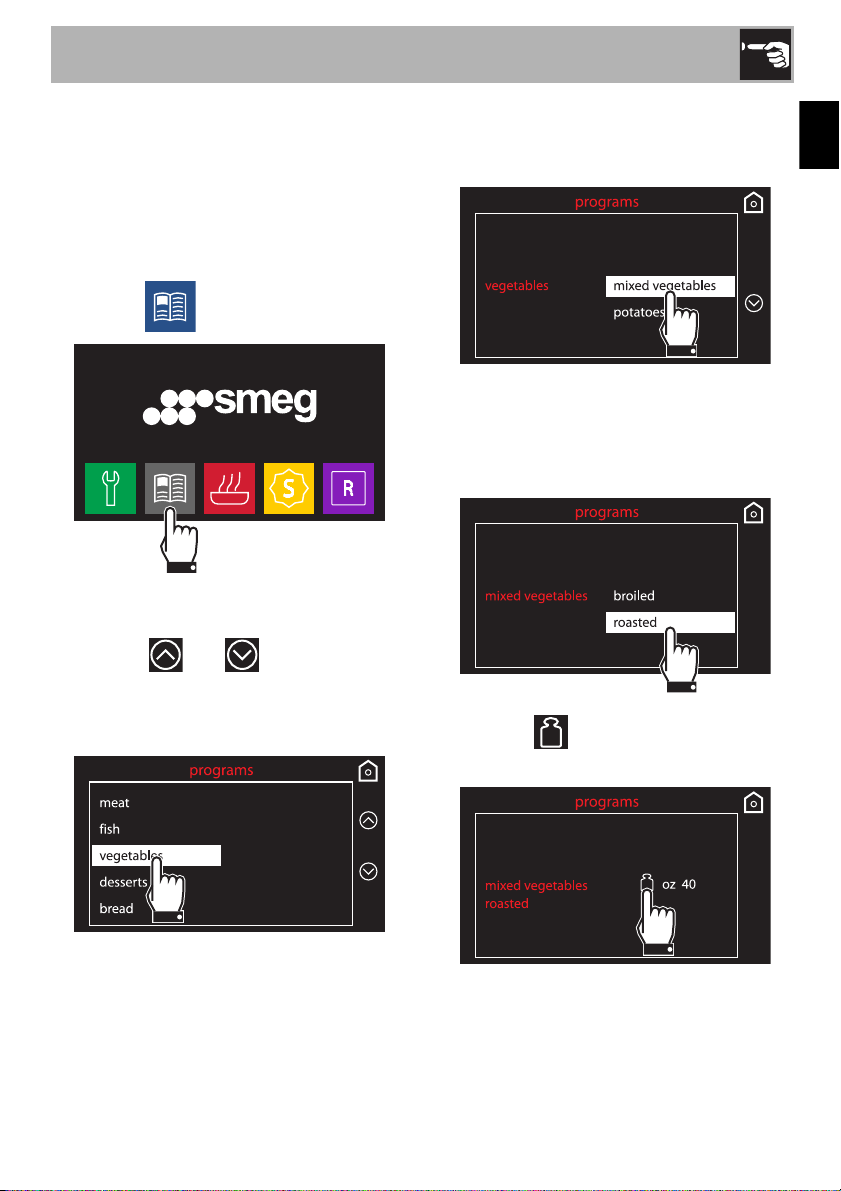
2.7 Programs
This mode makes it possible to select a
saved preset cooking program. According
to the weight selected, the appliance will
automatically calculate the best cooking
settings.
From the home screen, select the
programs icon.
Launching a program
1. Press the and symbols until you
have found the desired food on the
“programs” menu. Then press the name
of the food to confirm.
2. Select the sub-type of food to cook and
press the name of the subcategory to
confirm.
3. Select the desired cooking method
(according to the food selected, when
possible) and press the name of that
cooking method to confirm.
4. Press the symbol to change the
food's weight.

Use
52
5. Use the and symbols to set the
weight (in kilograms) of the food.
6. Press the symbol to confirm.
7. Press the symbol again to go to the
next screen.
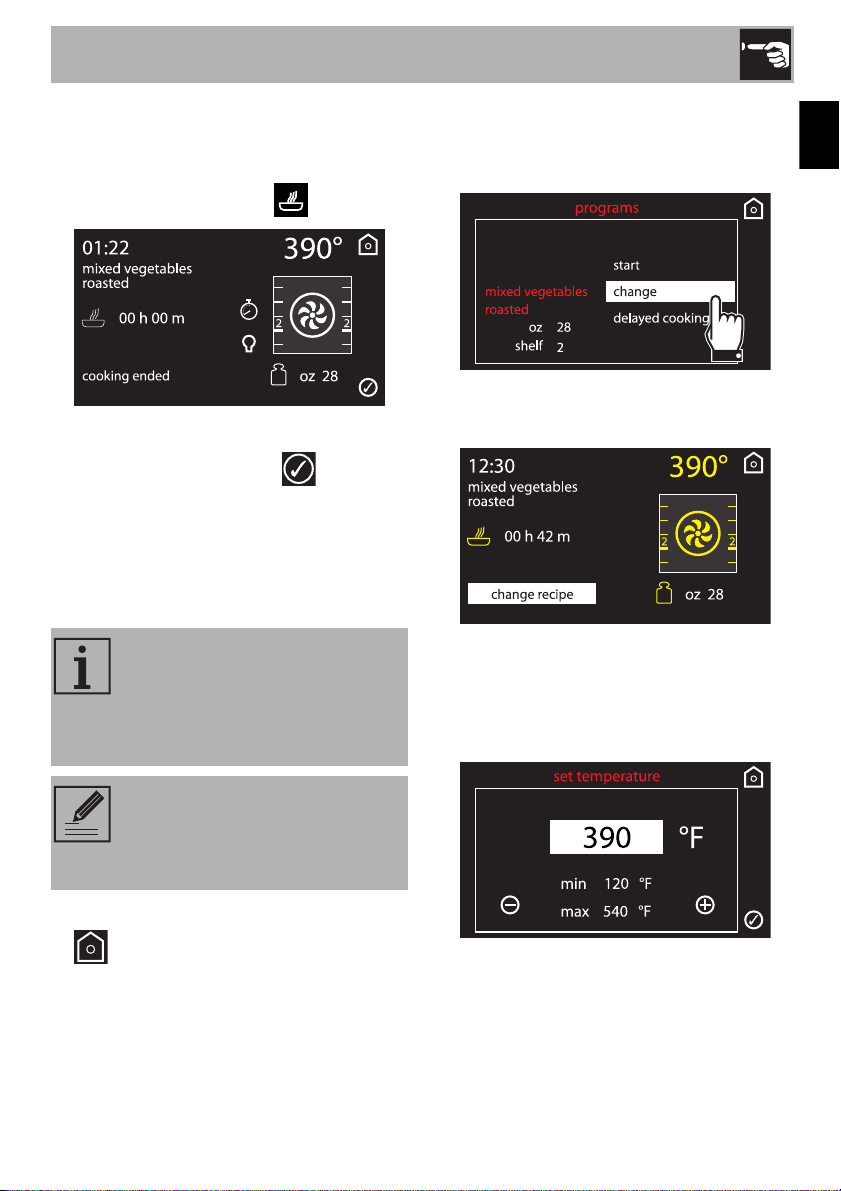
8. At this point, the selected program can
be started, permanently changing the
settings or launching cooking delayed.
9. If you press start, cooking will begin with
the program's default presets and the
display will show all the cooking
parameters.
10. A buzzer and a special message on the
display will indicate when it is time to put
the food in the oven or confirm the start of
cooking.
11. Press the symbol to start cooking.
The time indicated does not
include preheating times.
Some preset cooking parameters
can be changed at any time, even
once cooking has begun.
Use
53
EN
At the end of a program
1. Once a program has been completed,
the appliance will notify the user through
a buzzer and a flashing symbol.
2. To start cooking again with the already-
set parameters, press the symbol
(press it twice if the buzzer is sounding).
The appliance will automatically begin
cooking again if it is still at the right
cooking temperature; if not, it will begin
preheating.
3. To exit and end the program, keep the
back symbol pressed.
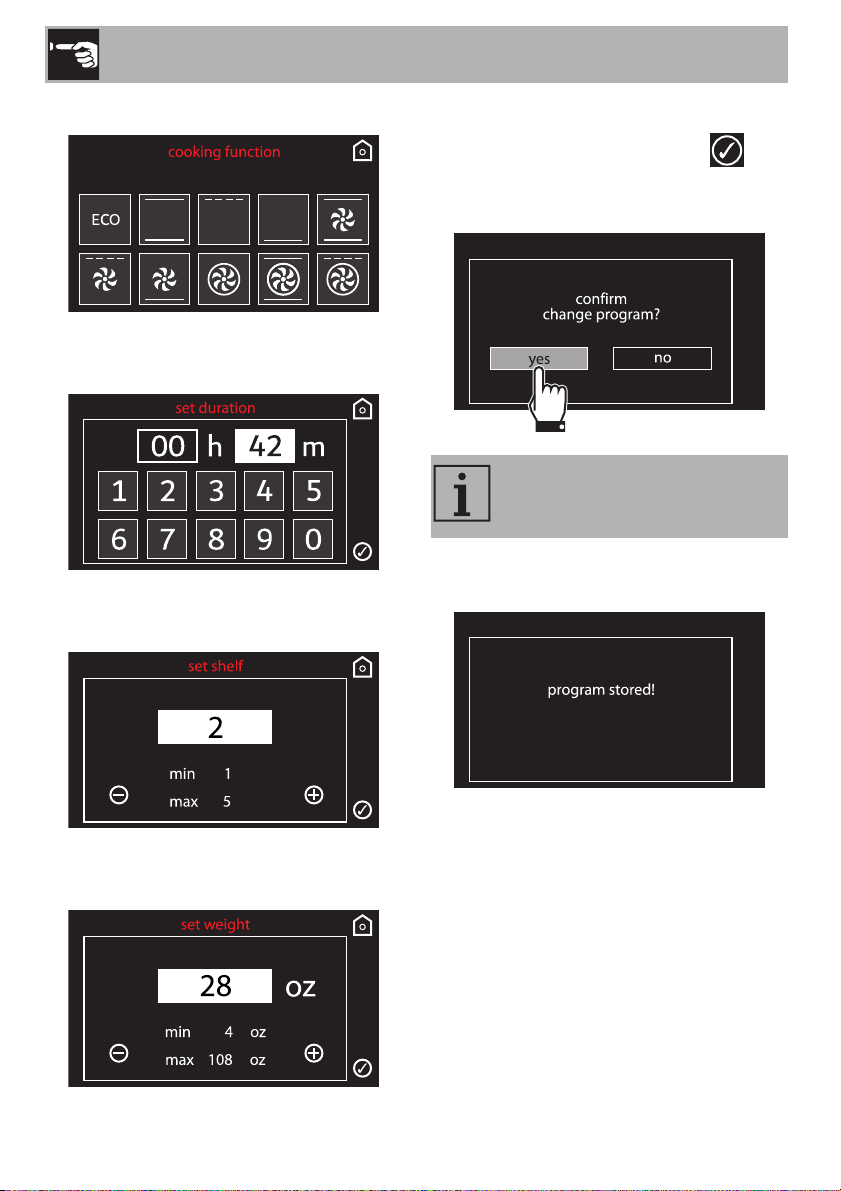
Permanently modifying a program
1. Within the selected program, select
modify from the selected food’s menu.
On the main menu, all modifiable
parameters will be highlighted in yellow.
2. Press the parameter that you want to
change:
• cooking temperature
Cooking in a sequence can be
useful when cooking multiple
dishes of the same type. For
example, cooking numerous
pizzas in a row.
We do not recommend placing
the food in the oven during the
preheating phase. Wait for the
appropriate message.
Use
54
• cooking function
• cooking duration
• frame rack
• food weight
3. Set as desired.
4. To save the program, press the
symbol. You will then be asked to
confirm the changes.
5. If the changes are confirmed, a
confirmation will be displayed.
If the changes are not confirmed,
the program will remain as before.

Use
55
EN
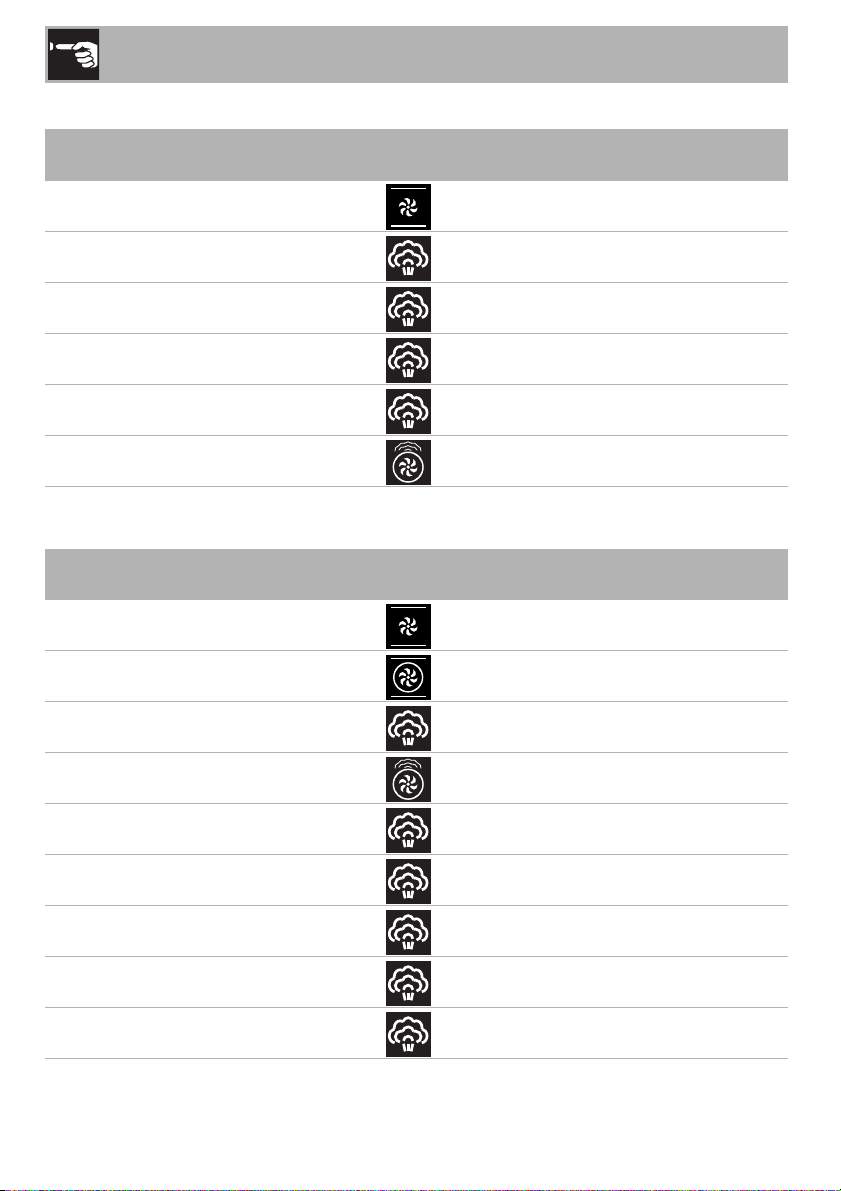
Preset program chart
MEAT
Sub-category
Weight
(oz/kg)
Function
%
Steam
Shelf
Temp.
(°F/°C)
Time
(minutes)
Roast beef (rare)
36/1,0 40 2 360/180 60
Roast beef (medium)
36/1,0 40 2 360/180 80
Roast beef (well done)
36/1,0 40
2 360/180 90
Spare ribs
36/1,0 50 2 300/150 140
Pork chops
36/1,0 - 3 480/250 15
Pork sausages
36/1,0 - 3 480/250 12
Bacon
20/0,5 - 3 480/250 7
Chicken breast
20/0,5 100 2 + 1 210/100 18
Wurstel (pre-cooked)
20/0,5 100 2 + 1 210/100 3
Pork loin
36/1,0 50 2 360/180 95
Veal
36/1,0 40 2 340/170 70
Chicken (roasted)
36/1,0 50 2 210/200 40
Duck (roasted)
72/2,0 30 2 300/150 120
Use
56
FISH
VEGETABLES
Sub-category
Weight
(oz/kg)
Function
%
Steam
Shelf
Temp.
(°F/°C)
Time
(minutes)
Baked fish
20/0,5 - 1 320/160 35
Sea bream filllet
20/0,5 100 2 + 1 180/85 5
Cod fillet
36/1,0 100 2 + 1
210/100 6
Salmon fillet
28/0,8 100 2 + 1 210/100 5
Prawns
36/1,0 100 2 + 1
190/90 5
Whole fish
36/1,0 70
2 + 1 390/200 25
Sub-category
Weight
(oz/kg)
Function
%
Steam
Shelf
Temp.
(°F/°C)
Time
(minutes)
Potatoes (frozen fried)
20/0,5 - 2 430/220 13
Potatoes (roasted)
36/1,0 - 2 430/220 40
Potatoes (fresh)
20/0,5 100 2 + 1 210/100 25
Potatoes (au gratin)
20/0,5 50 2 390/200 60
Carrots
20/0,5 100 2 + 1 430/220 6
Cauliflower
20/0,5 100 2 + 1 210/100 12
Fennel
20/0,5 100 2 + 1 210/100 6
Asparagus
20/0,5 100 2 + 1 210/100 6
Spinach
12/0,3 100 2 + 1 210/100 2

Use
57
EN
DESSERTS
BREAD
Sub-category
Weight
(oz/kg)
Function
%
Steam
Shelf
Temp.
(°F/°C)
Time
(minutes)
Donuts
36/1,0 - 1 320/160 60
Cookies/Muffins
24/0,6 - 1 320/160 18
Éclair
20/0,5 - 1 360/180 70
Meringue
12/0,3 - 1 250/120 90
Tart/Pie
28/0,8 - 1 340/170 40
Croissant
24/0,6 - 1 320/160 30
Apple pie
20/0,5 100 2 + 1 210/100 8
Syrup pudding
8/0,2 100 1 210/100 50
Strudel
36/1,0 25 1 390/200 40
Sponge cake
36/1,0 25 1 330/165 35
Sub-category
Weight
(oz/kg)
Function
%
Steam
Shelf
Temp.
(°F/°C)
Time
(minutes)
Focaccia
20/0,5 25 2 370/190 20
Proofed bread
72/2,0 25 2 360/180 30
Use
58
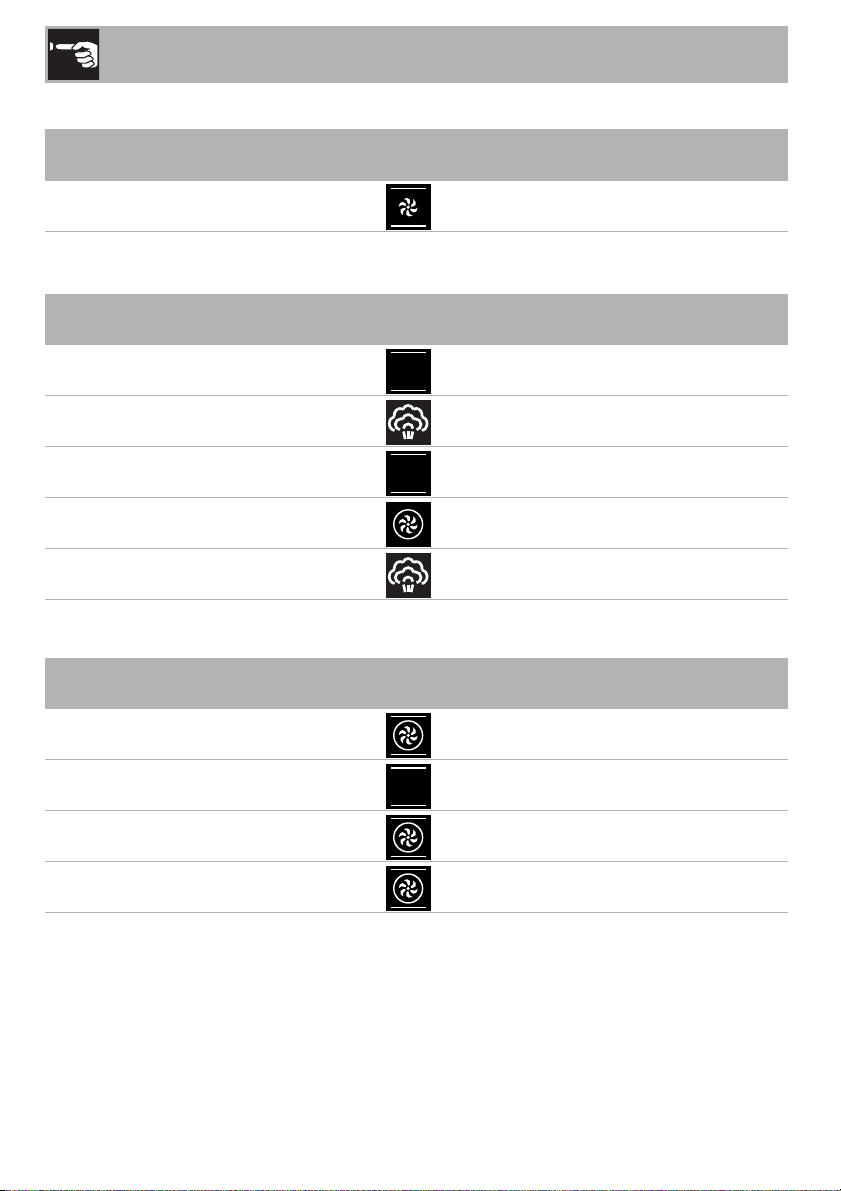
PIZZA
PASTA/RICE
LOW TEMP COOKING
Sub-category
Weight
(oz/kg)
Function
%
Steam
Shelf
Temp.
(°F/°C)
Time
(minutes)
Deep-dish pizza
36/1,0 - 1 480/250 9
Sub-category
Weight
(oz/kg)
Function
%
Steam
Shelf
Temp.
(°F/°C)
Time
(minutes)
Baked pasta/Lasagna
72/2,0 - 1 430/220 40
Paella
72/2,0 100 2 210/100 35
Quiche lorraine 20/0,5
-
1 390/200 40
Soufflè
20/0,5 - 1 360/180 25
Basmati rice
20/0,5 100 2 + 1 210/100 12
Sub-category
Weight
(oz/kg)
Function
%
Steam
Shelf
Temp.
(°F/°C)
Time
(minutes)
Veal
36/1,0 - 1 190/90 360
Beef (rare)
36/1,0 - 1 190/90 240
Beef (well done)
36/1,0 - 1 190/90 330
Lamb
36/1,0 - 1 190/90 360

Use
59
EN
2.8 Personal programs
This menu makes it possible to add a
personal program with the settings you
require. At first use, the only option will be to
add a new recipe.
After having saved your recipes, they will
be found in the appropriate menu.
From the home screen, select the personal
programs icon.
Adding a recipe
1. Select add from the “personal recipes”
menu.
On the main menu, all modifiable
parameters will be highlighted in yellow.
2. Press the parameter that you want to
change:
• cooking temperature
Up to about 10 personal recipes
can be saved.
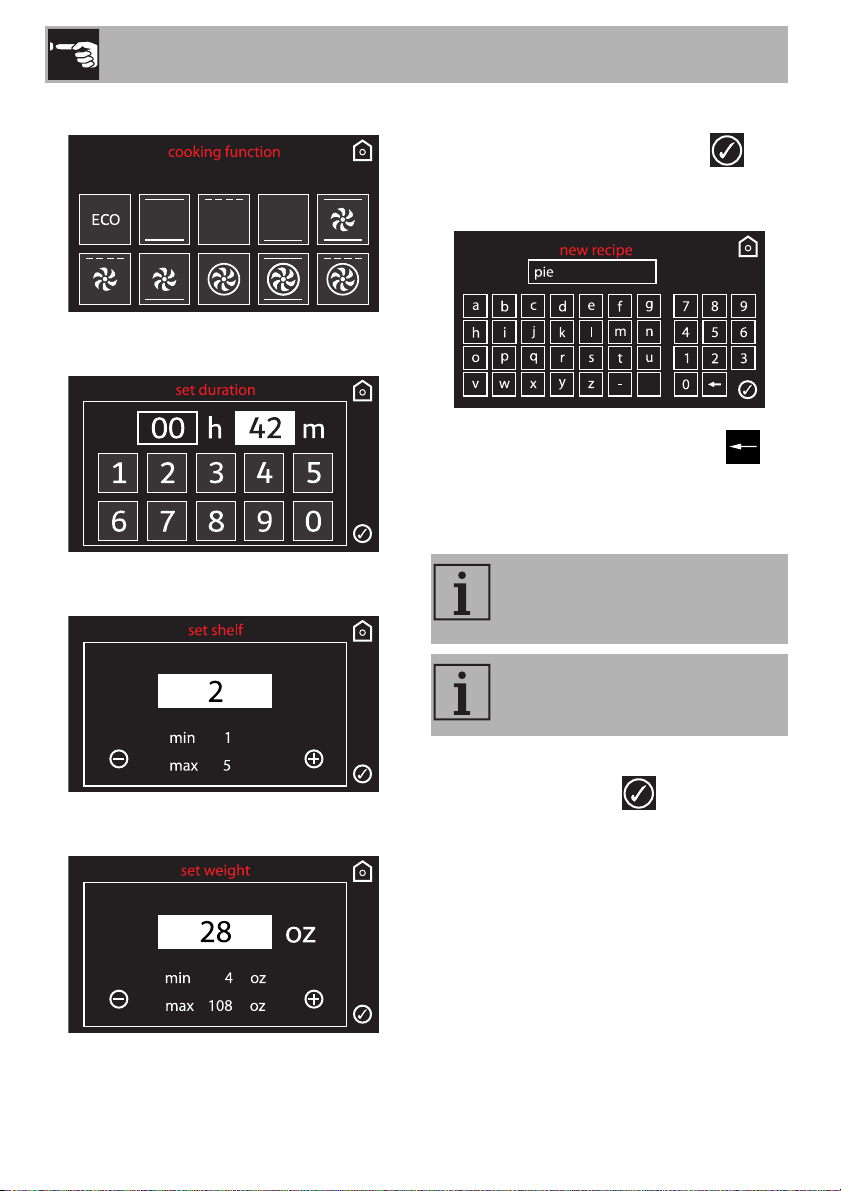
Use
60
• cooking function
• cooking duration
• frame rack
• food weight
3. Set as desired.
4. To save the program, press the
symbol. You will be asked to enter a
name for the newly-created recipe.
5. Enter the name of the recipe. The
character deletes the preceding letter
(the example shows that recipe 1 has
been saved).
6. After the name of the new recipe has
been entered, press to confirm.
The name of the recipe can be up
to 10 characters in length, spaces
included.
To save the recipe, its name must
contain at least one character.
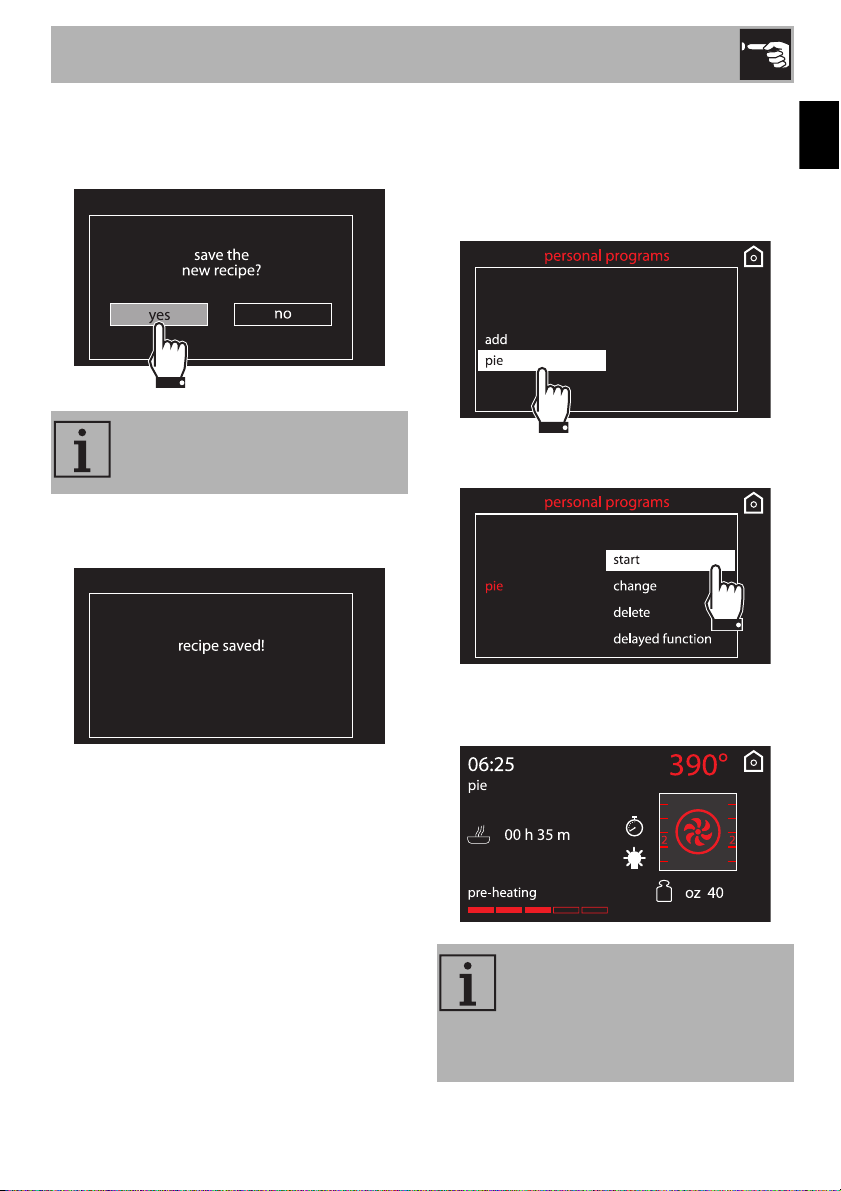
Use
61
EN
7. You will then be asked to confirm the
changes. Select yes if you want to save
the recipe.
8. If the changes are saved, a confirmation
will be displayed.
Using a personal recipe
1. Select an already-saved personal
recipe from the “personal recipes” menu
(the example shows the recipe saved as
recipe 1).
2. Select start.
3. Cooking will begin with the recipe’s
previously-set parameters.
Select no if you do not want to
save the recipe.
You can always change the
temperature and cooking time
while the oven is in operation, but
those changes will not be saved to
the recipe for future use.
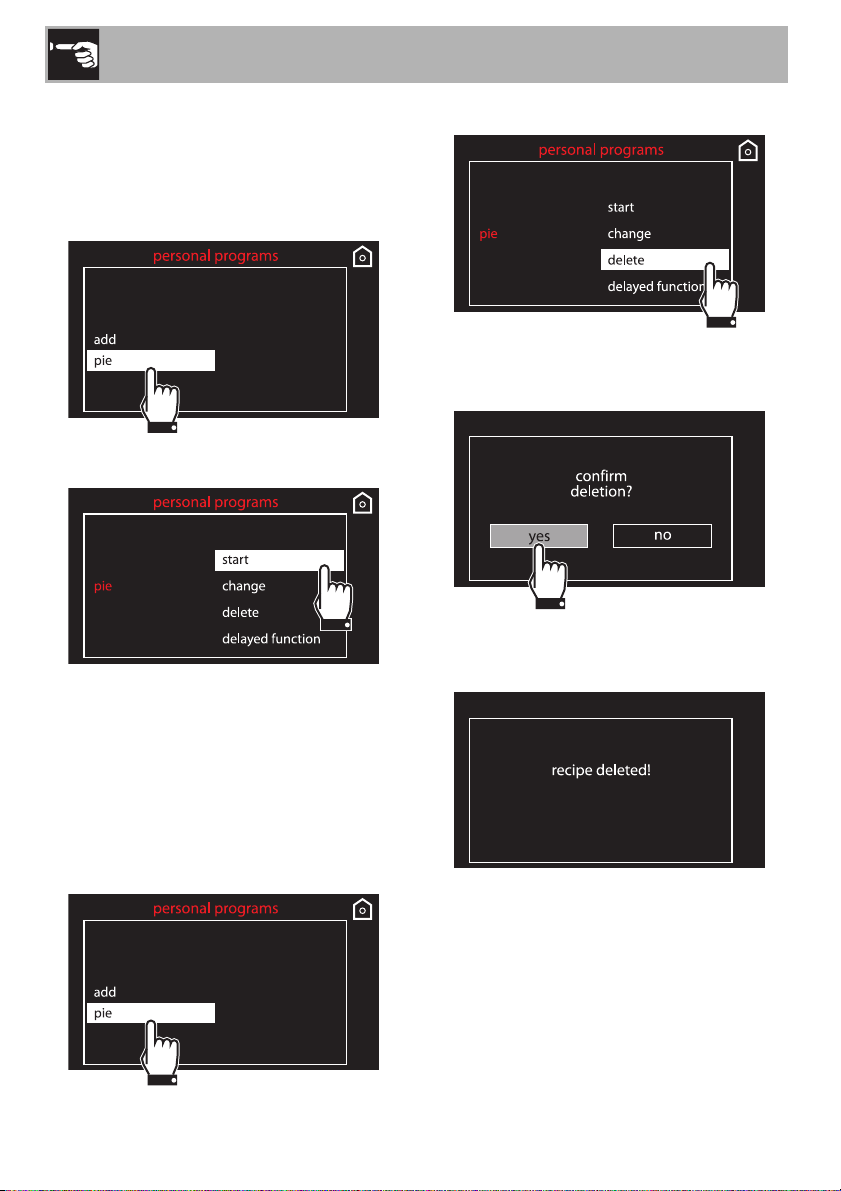
Use
62
Modifying a personal recipe
1. Select an already-saved personal
recipe from the “personal recipes” menu
(the example shows the recipe saved as
recipe 1).
2. Select modify.
3. Repeat the steps in section 2 of “Adding
a recipe”.
Deleting a personal recipe
1. Select an already-saved personal
recipe from the “personal recipes” menu
(the example shows the recipe saved as
recipe 1).
2. Select delete.
3. Confirm the deletion. Select yes if you
want to permanently delete the recipe.
4. If the deletion is confirmed, a
confirmation message will be displayed.
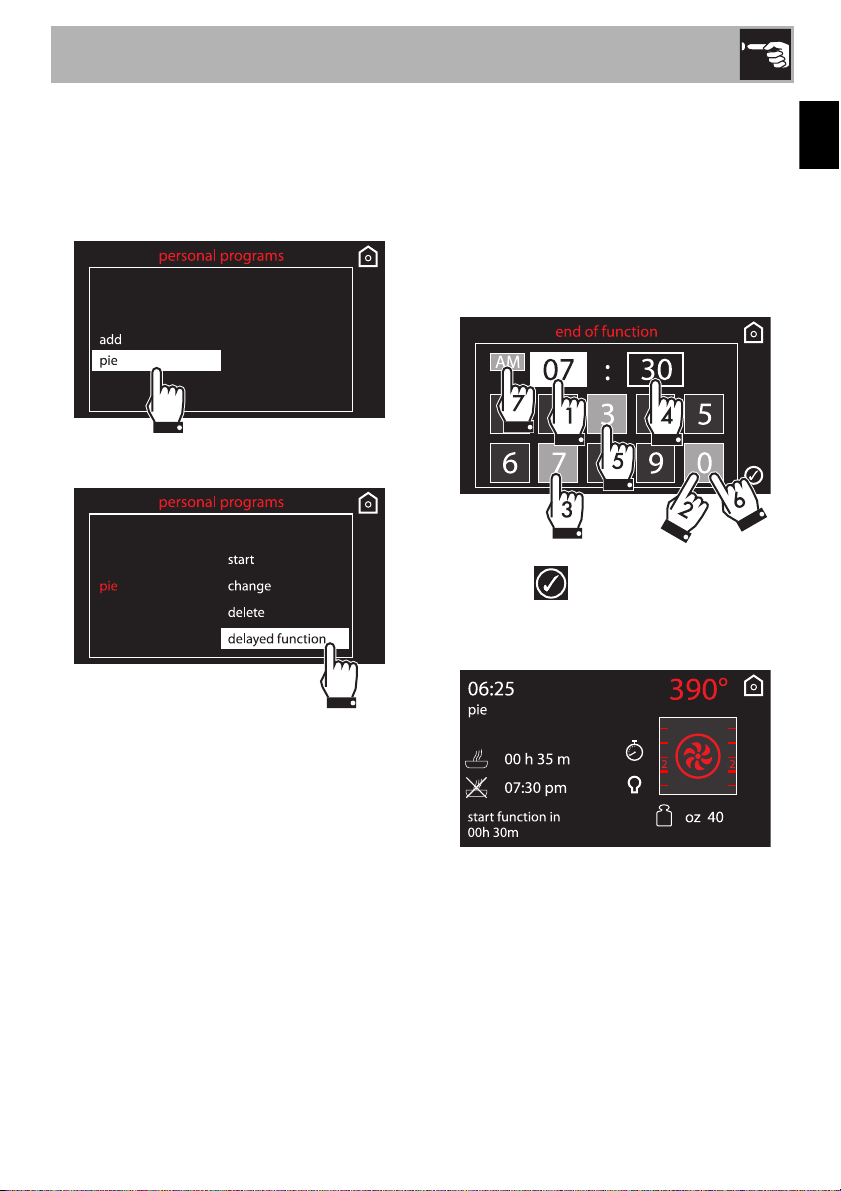
Use
63
EN
Cooking delayed
1. Select an already-saved personal
recipe from the “personal recipes” menu
(the example shows the recipe saved as
recipe 1).
2. Select the function delayed option.
3. Enter the time you want the cooking
function to end (for example, at 7:30 pm
(19:30 on the 24-hour clock): first press
the hour box, then the numbers 1 and 9,
then press the minutes box and the
numbers 3 and 0. Remember that the
oven operates on a 24-hour clock, not a
12-hour clock).
4. Press the symbol to confirm.
5. The appliance will turn on at the
programmed time.
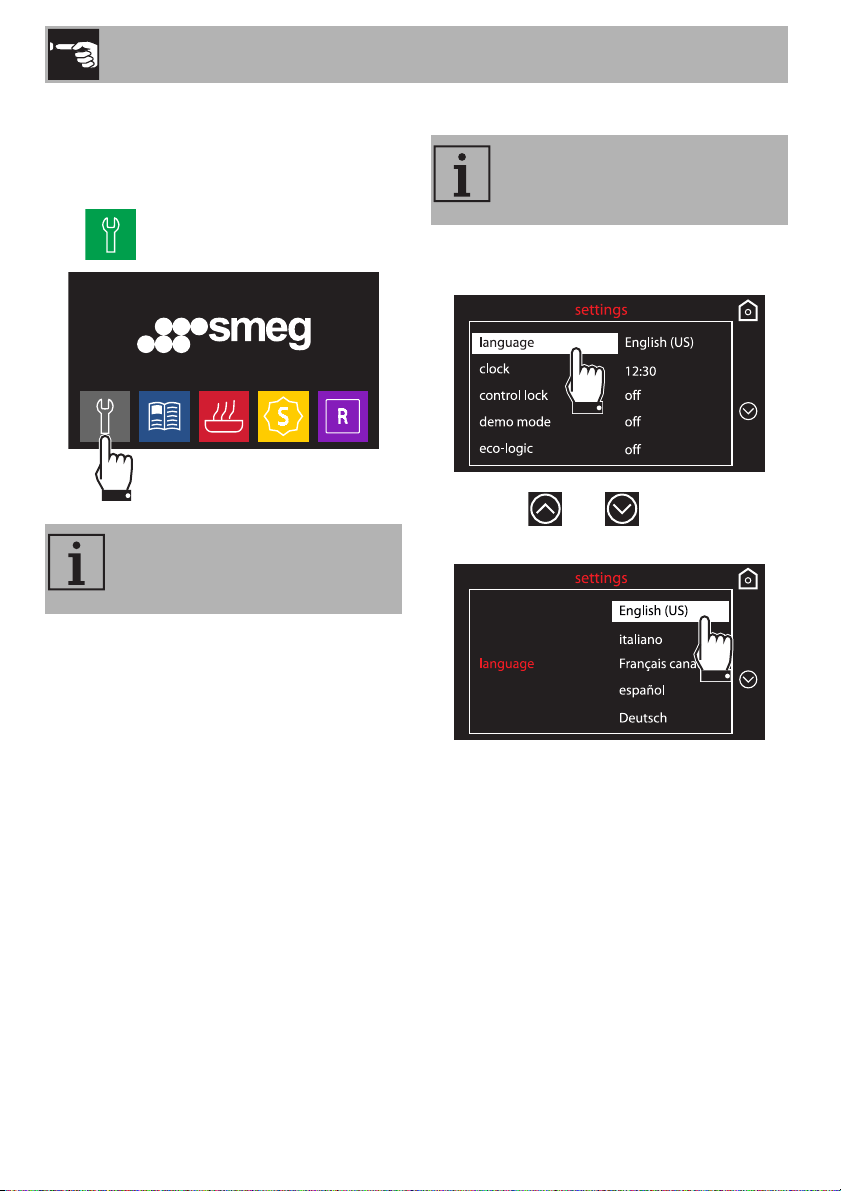
Use
64
2.9 Settings
This menu makes it possible to set the
configurations for the product.
From the home screen, select the settings
icon .
Language
1. Select language from the “settings”
menu.
2. Press the and symbols to select
the desired language.
3. Confirm the selected language.
In case of a temporary power
outage, all custom settings will be
saved.
This option makes it possible to
select a default language for the
appliance.
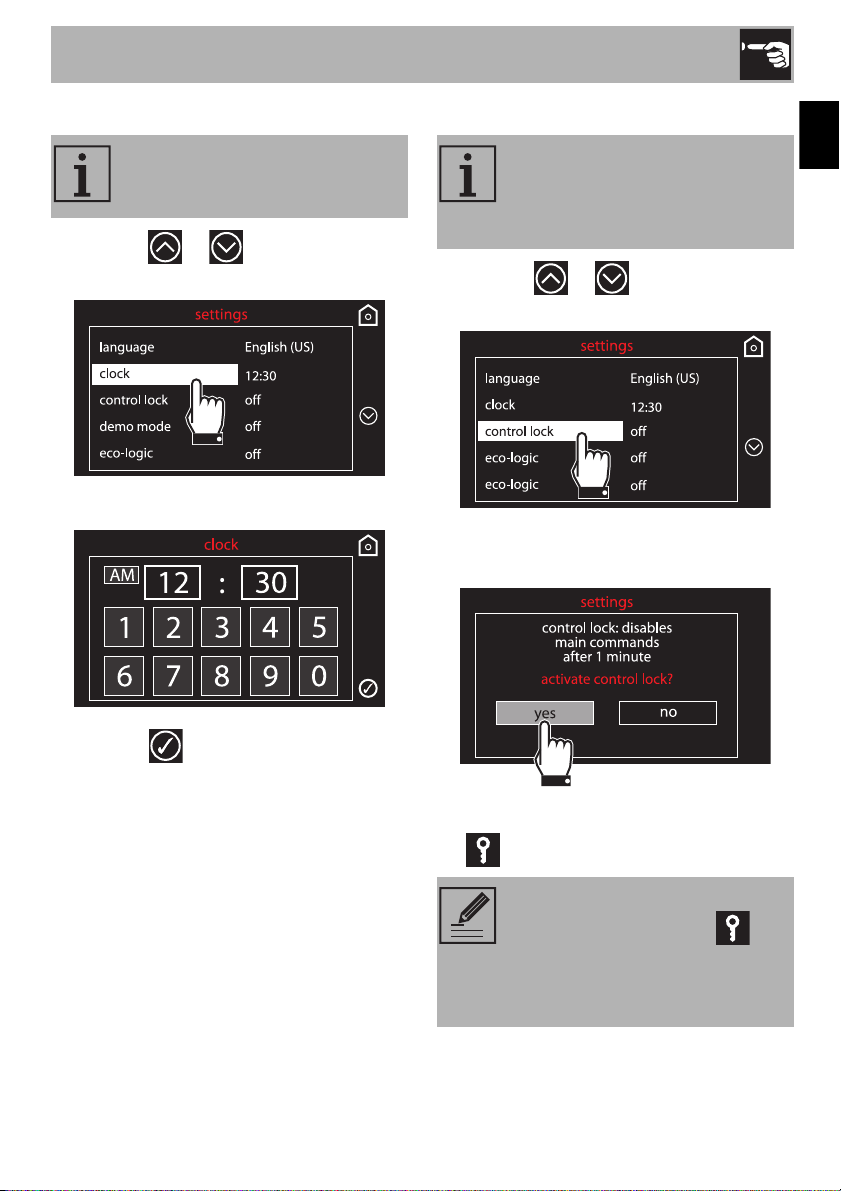
Use
65
EN
Clock
1. Press the or symbols and select
clock from the “settings” menu.
2. Enter the current time.
3. Press the symbol to confirm.
Control lock
1. Press the or symbols and select
control lock from the “settings” menu.
2. To confirm the activation of the control
lock option, select yes.
When normally operating, it is indicated by
the indicator light.
Modifies the time displayed.
Automatically blocks the
appliance’s commands after a
minute of normal operation without
any intervention by the user.
To disconnect the lock temporarily
during cooking, press the
symbol for at least 3 seconds. One
minute after the last setting the lock
will become active again.
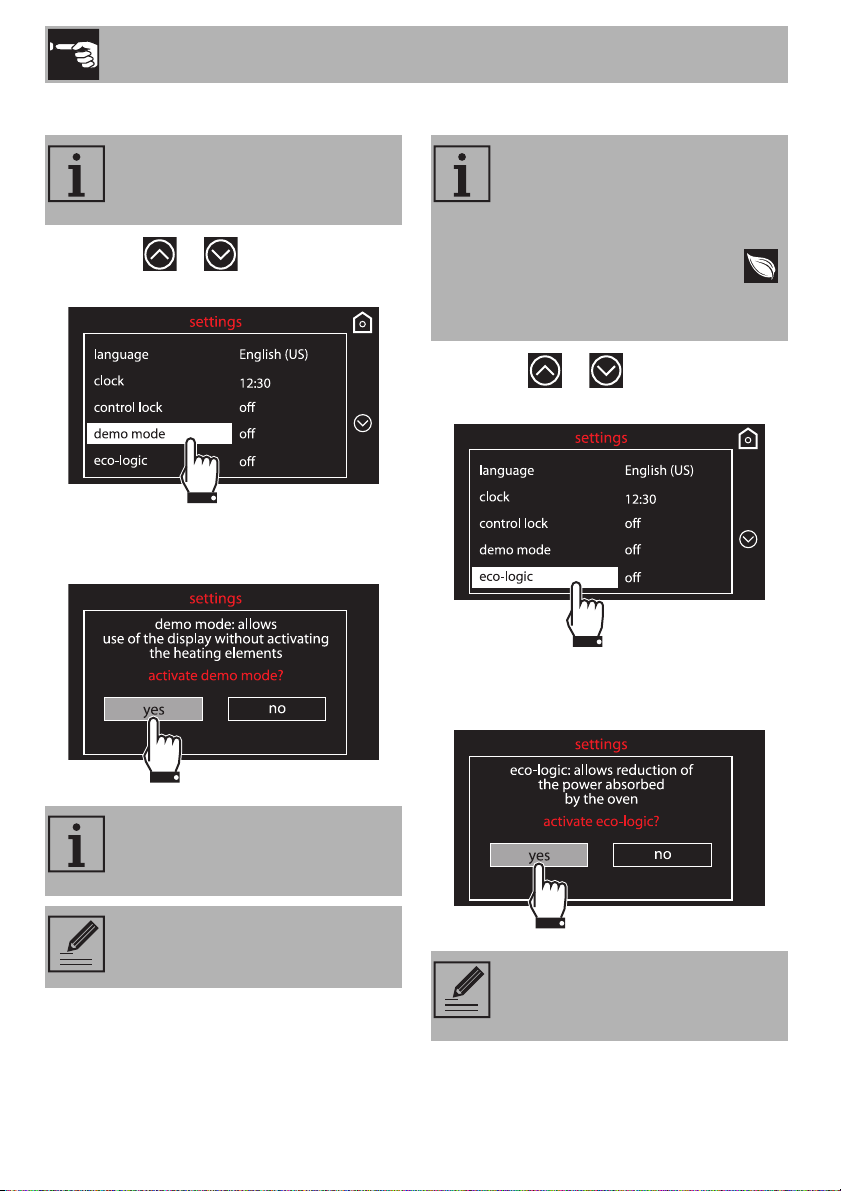
Use
66
Demo mode (for showrooms only)
1. Press the or symbols and select
demo mode from the “settings” menu.
2. To confirm the activation of the demo
mode, select yes.
Eco-logic
1. Press the or symbols and select
eco-Logic from the “settings” menu.
2. To confirm the activation of the eco-logic
mode, select yes.
Deactivates the appliance’s
heating elements, yet keeps the
control panel active.
When the mode is activated, the
words “demo mode” will appear
on the display.
To use the appliance normally, set
this mode to OFF.
Limits the power used by the
appliance.
It is indicated for using
multiple home appliances at the
same time.
When this mode is active, the
symbol will be displayed next to
the function.
When the eco-logic mode is
active, preheating and cooking
times may be extended.
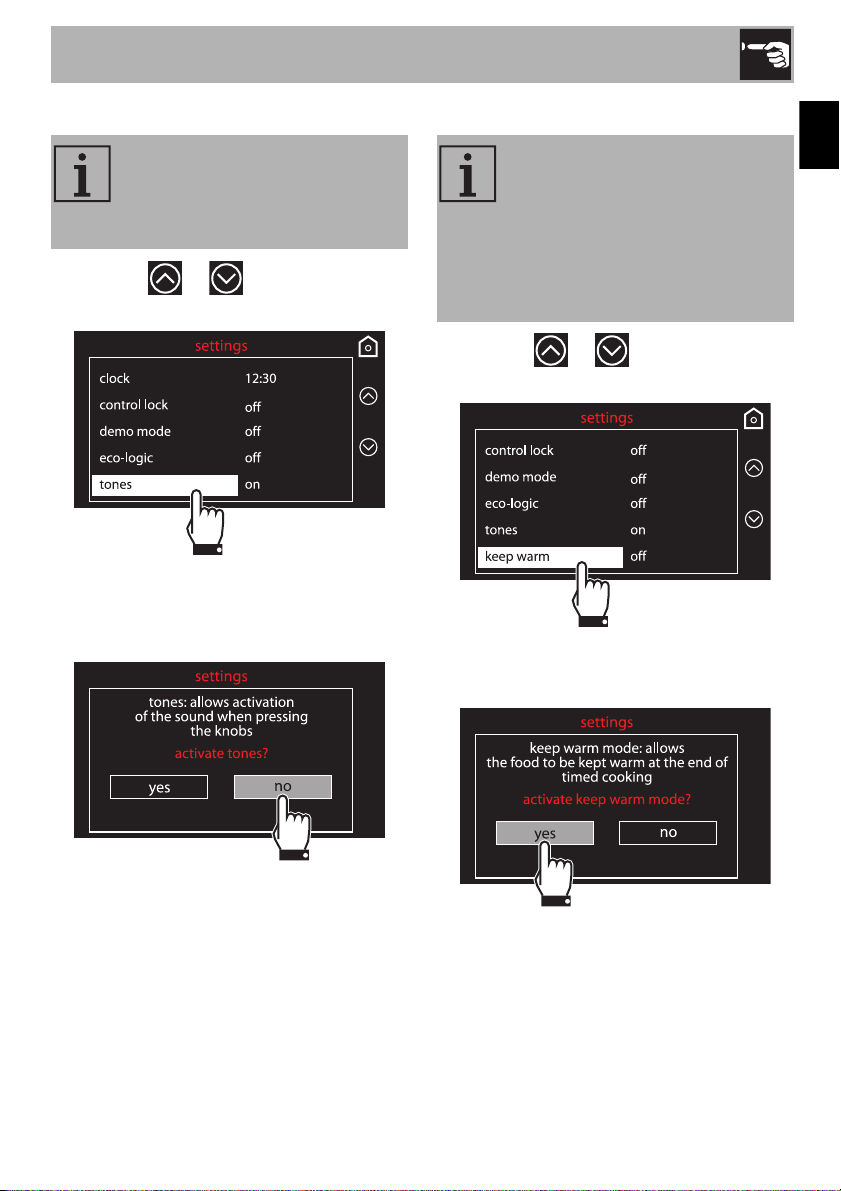
Use
67
EN
Tones
1. Press the or symbols and select
tones from the “settings” menu.
2. To disable the sound associated with
pressing the symbols on the display,
select no.
Keep warm
1. Press the or symbols and select
keep warm from the “settings” menu.
2. To confirm the activation of the keep
warm option, select yes.
Every time the symbols on the
display are pressed, the appliance
will emit a sound. Use this setting to
disable it.
After food has been cooked for a
preset amount of time (if it is not
interrupted), this mode keeps the
just-cooked food warm (at a low
temperature), preserving the odors
and flavors which are the result of
cooking.
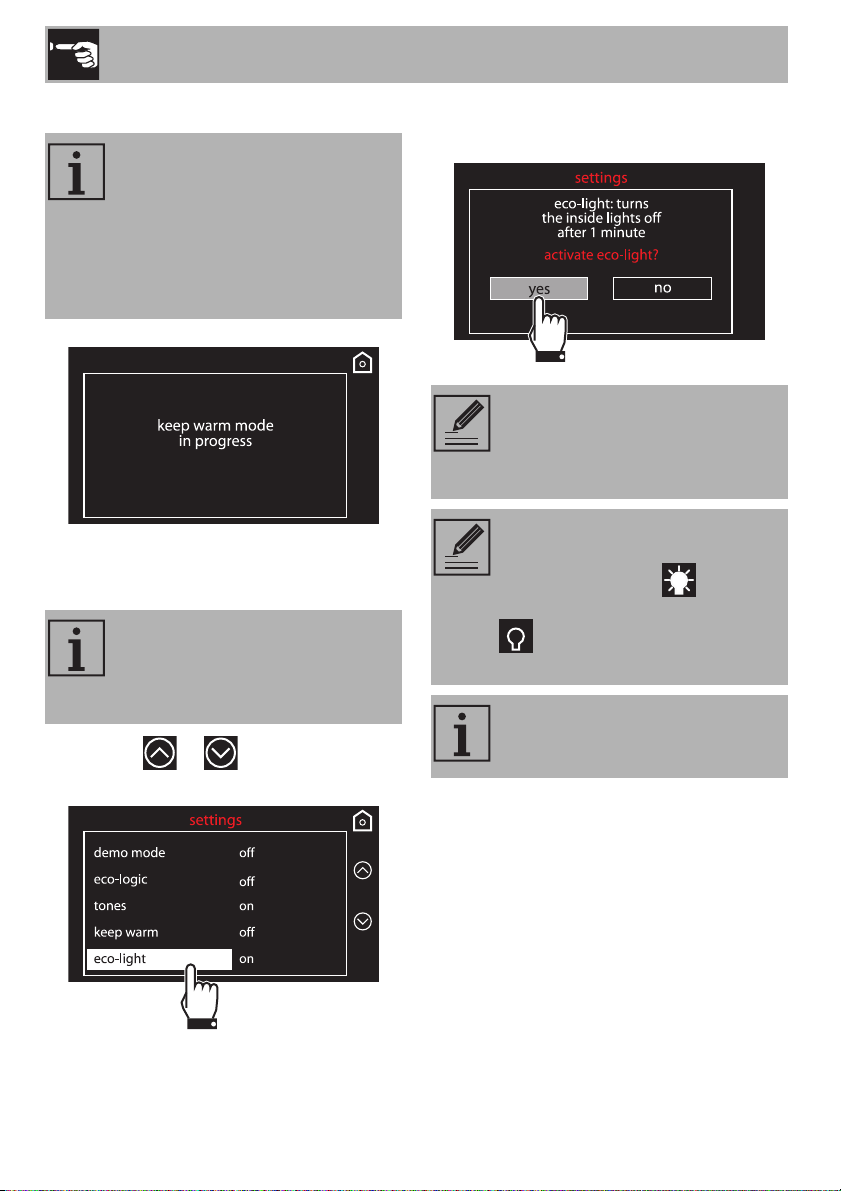
Use
68
Eco-Light
1. Press the or symbols and select
eco-light from the “settings” menu.
2. To confirm the activation of the eco-light
mode, select yes.
The “keep warm” option will be
activated immediately after
cooking, indicated by a series of
buzzers (see “cooking” or
“function completed”). After a few
minutes, the display will appear as
below.
For even greater energy savings,
the light is automatically turned off
after a minute once cooking
begins.
To deactivate the function which
turns the light off (i.e., to keep the
light on after one minute), set this
mode to OFF.
Manually turning the appliance
on/off is always possible. If
available, press the symbol to
activate the internal light, or the
symbol to manually
deactivate it.
The default setting for the eco-light
is on.
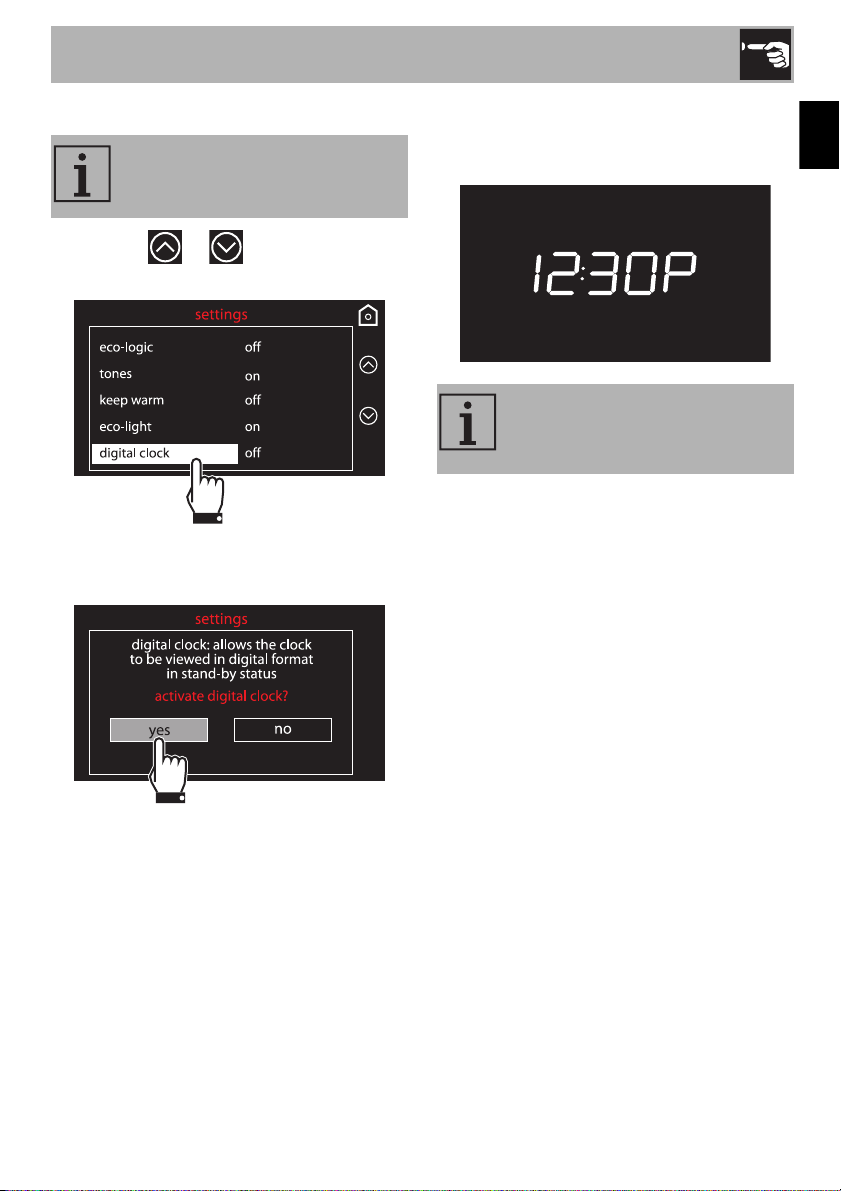
Use
69
EN
Digital clock
1. Press the or symbols and select
digital clock from the “settings” menu.
2. To confirm the activation of the digital
clock, select yes.
When none of the appliance’s functions are
being used, the current time will be
displayed in a digital format.
Displays the time in a digital
format.
In case of a temporary power
outage, the digital version will
remain active.
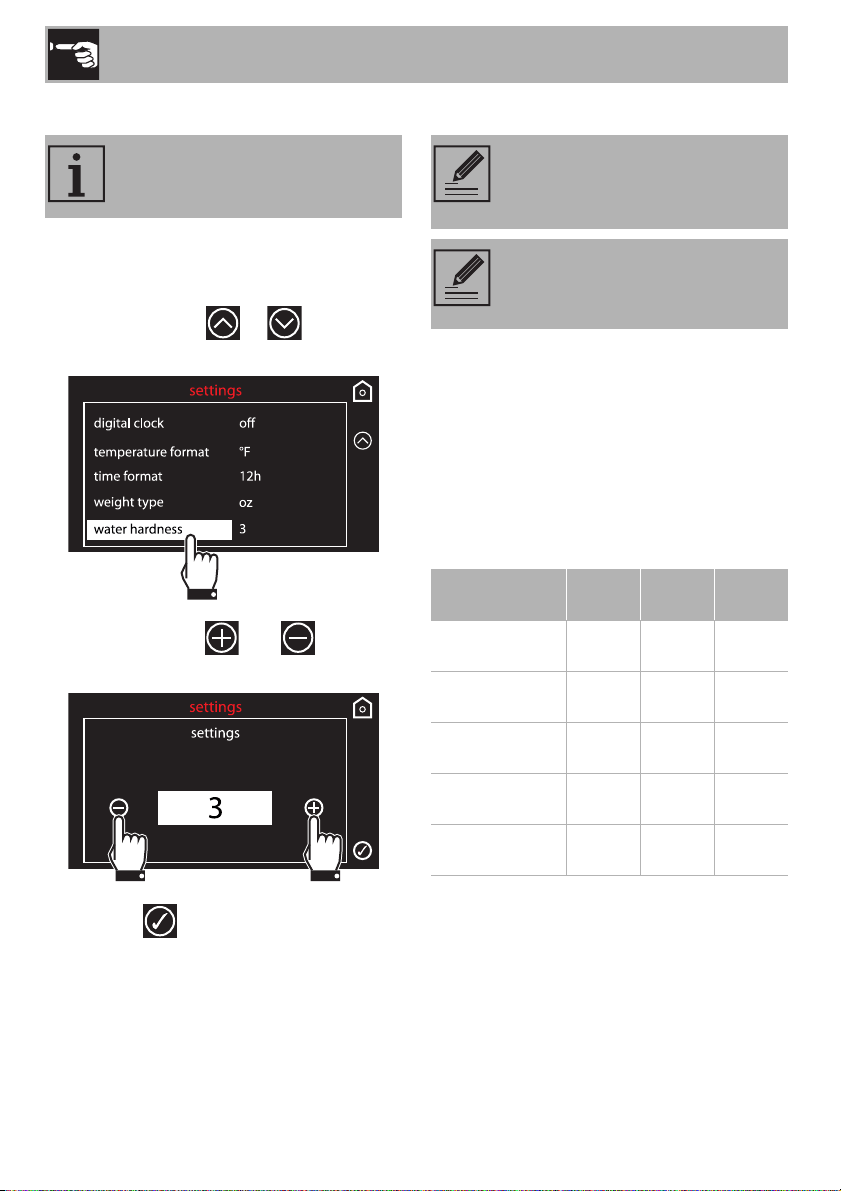
Use
70
Water hardness setting mode
This mode allows you to set the water
hardness value in order to optimize the
descaling process.
1. Press the symbol or and select
water hardness from the “settings” menu.
2. Use the symbols and to set the
water hardness.
3. Press the symbol to confirm.
Depending on the water hardness value
that has been set, after the steam function
has been used for a certain number of
hours, the display will prompt you to carry
out the descaling procedure (see
“Removing racks/trays support frames”).
According to the use of the appliance, the
approximate number of hours is as follows:
The appliance is factory set for
water of medium hardness (3).
If your mains water supply is too
hard, we recommend
using a water softener.
Request information on the
hardness of your water from your
local water board.
Water hardness
value
°dH °dF Hours
1 0 ÷ 11 0 ÷ 20 35 - 40
2 12 ÷ 17 21 ÷ 30 25 - 30
3 18 ÷ 24 31 ÷ 42 15 - 20
4 25 ÷ 30 43 ÷ 53 12 - 15
5 31 ÷ 50 54 ÷ 90 8 - 10

Cleaning and Maintenance
71
EN
3 Cleaning and maintenance
3.1 Instructions
3.2 Cleaning the surfaces
To keep the surfaces in good condition,
they should be cleaned regularly after use.
Let them cool first.
Ordinary daily cleaning
Always and only use specific products that
do not contain abrasives or chlorine-based
acids.
Pour the product onto a damp cloth and
wipe the surface, rinse thoroughly and dry
with a soft cloth or a microfiber cloth.
Food stains or residues
Do not use steel sponges and sharp
scrapers as they will damage the surface.
Use normal, non-abrasive products and a
wooden or plastic tool, if necessary. Rinse
thoroughly and dry with a soft cloth or a
microfiber cloth.
Do not allow residues of sugary foods (such
as jam) to set inside the oven. If left to set for
too long, they might damage the enamel
lining of the oven.
Improper use
Risk of damage to surfaces
• Do not use steam jets to clean the
appliance.
• Do not use cleaning products containing
chlorine, ammonia or bleach on parts
made of steel or that have metallic
surface finishes (e.g. anodizing, nickel-
or chromium-plating).
• Do not use abrasive or corrosive
detergents (e.g. scouring powders, stain
removers and metallic sponges) on
glass parts.
• Do not use rough or abrasive materials
or sharp metal scrapers.
Improper use
Risk of damage to the appliance
• Do not remove the seal on the face of
the oven.
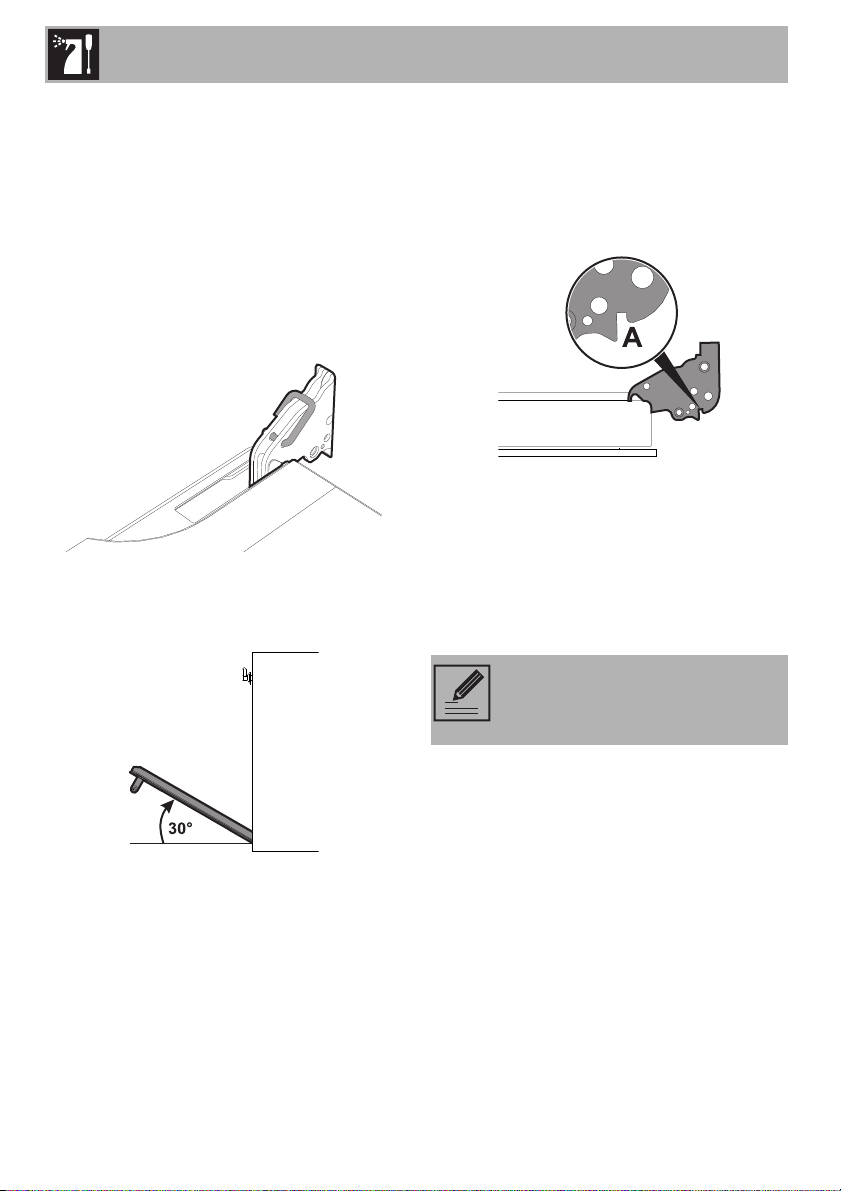
Cleaning and Maintenance
72
3.3 Cleaning the door
Removing the door
For easier cleaning it is recommended to
remove the door and place it on a tea
towel.
To remove the door proceed as follows:
1. Open the door completely and insert two
pins into the holes on the hinges
indicated in the figure.
2. Grasp the door on both sides with both
hands, lift it forming an angle of around
30° and remove it.
3. To reassemble the door, put the hinges in
the relevant slots in the oven, making sure
that grooved sections A are resting
completely in the slots. Lower the door
and once it is in place remove the pins
from the holes in the hinges.
Cleaning the door glazing
The glass in the door should always be kept
thoroughly clean. Use absorbent kitchen
roll. In case of stubborn dirt, wash with a
damp sponge and an ordinary detergent.
Removing the internal glass panes
For easier cleaning the internal glass panes
of the door can be removed.
1. Open the door.
We recommend the use of
cleaning products distributed by
the manufacturer.
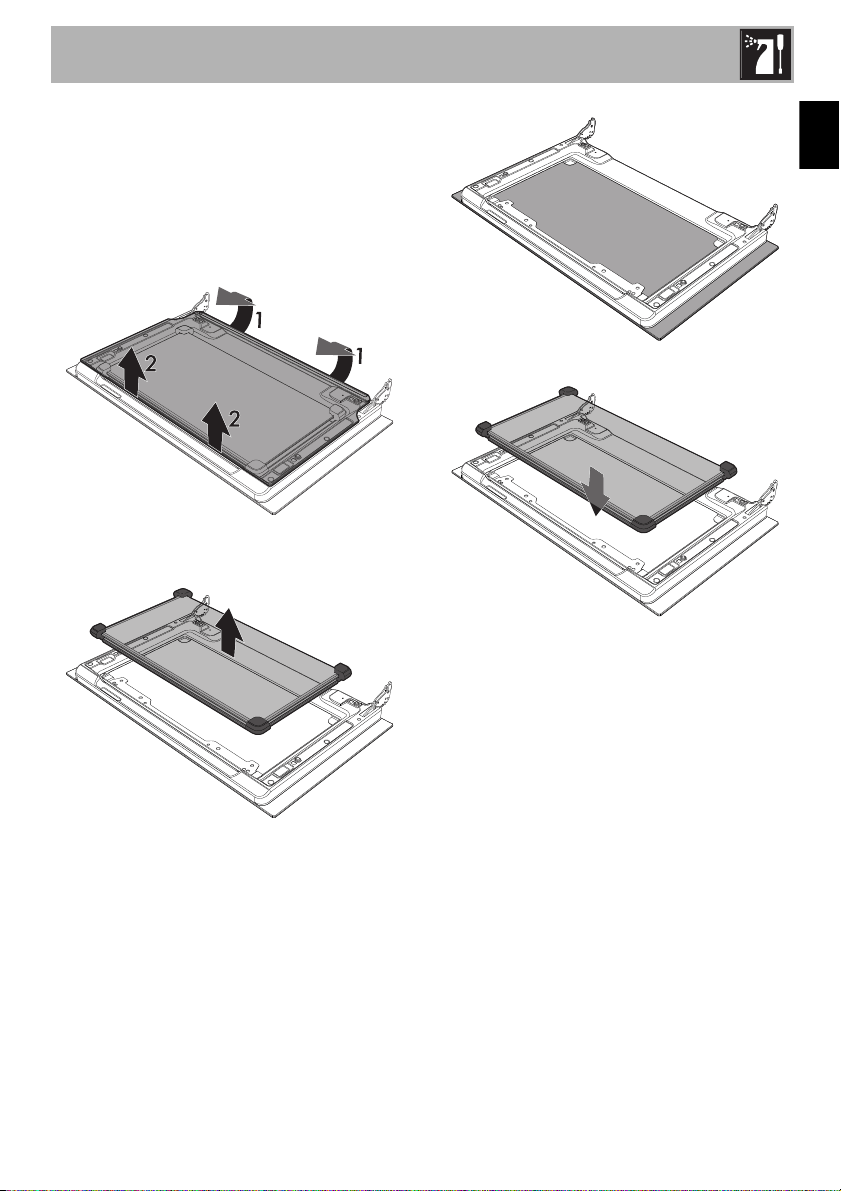
Cleaning and Maintenance
73
EN
2. Remove the internal glass pane by
pulling the rear part gently upwards,
following the movement indicated by the
arrows (1).
3. Then, pull the front part upwards (2). This
way, the 4 pins attached to the glass
detach from their housings in the door.
4. Raise the intermediate glass unit
upwards.
5. Clean the external glass pane and the
panes removed previously. Use
absorbent kitchen roll. In case of
stubborn dirt, wash with a damp sponge
and neutral detergent.
6. Reposition the intermediate glass unit.
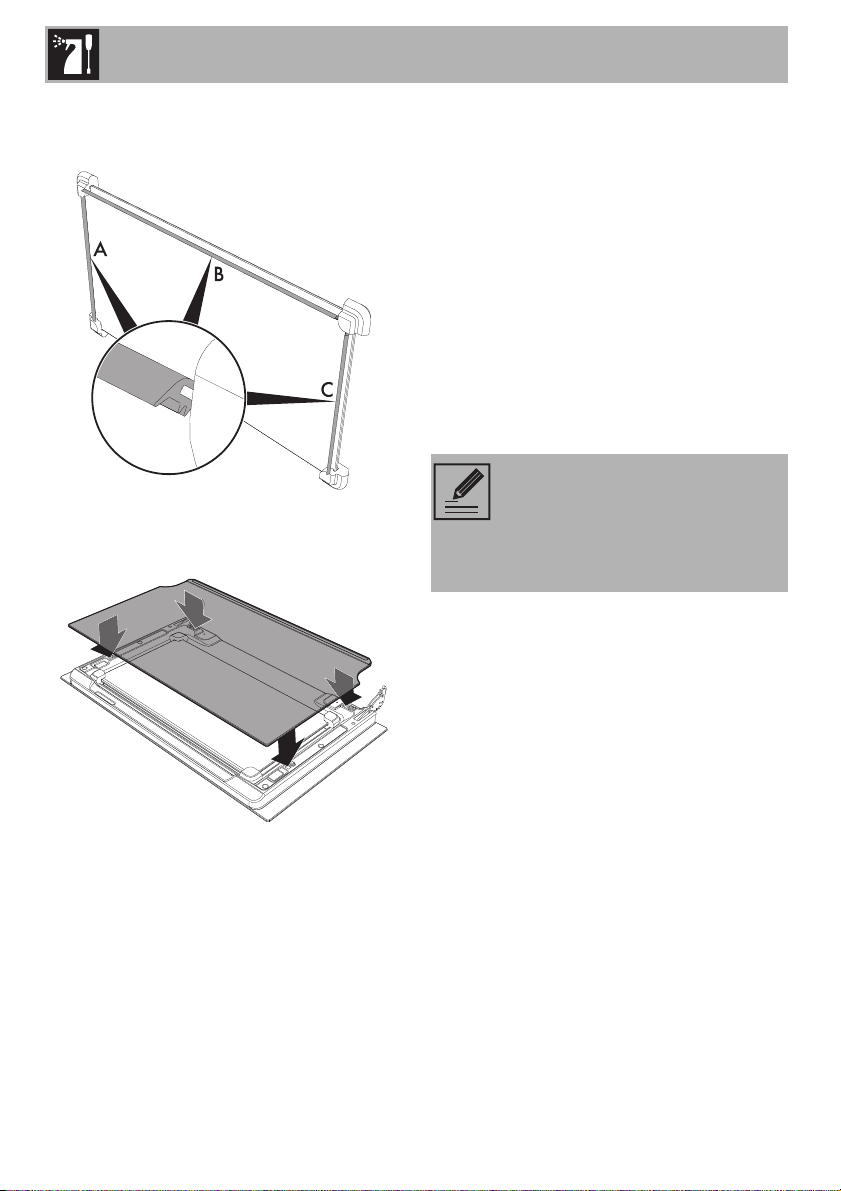
Cleaning and Maintenance
74
7. The rubber strips A, B and C of the
intermediate glass unit must face the
outer glass.
8. Center and insert the 4 pins into their
housings in the oven door by applying
slight pressure.
3.4 Cleaning the oven cavity
In order to keep your oven in the best
possible condition, clean it regularly after
letting it cool down.
Avoid letting food residue dry inside the
oven cavity, as this could damage the
enamel.
Take out all removable parts before
cleaning.
For easier cleaning, it is recommended to
remove:
•the door
• The rack/tray support frames
The appliance should be operated
at the maximum temperature for
about 15-20 minutes after the use
of specific products, to burn off the
residues left inside the oven.
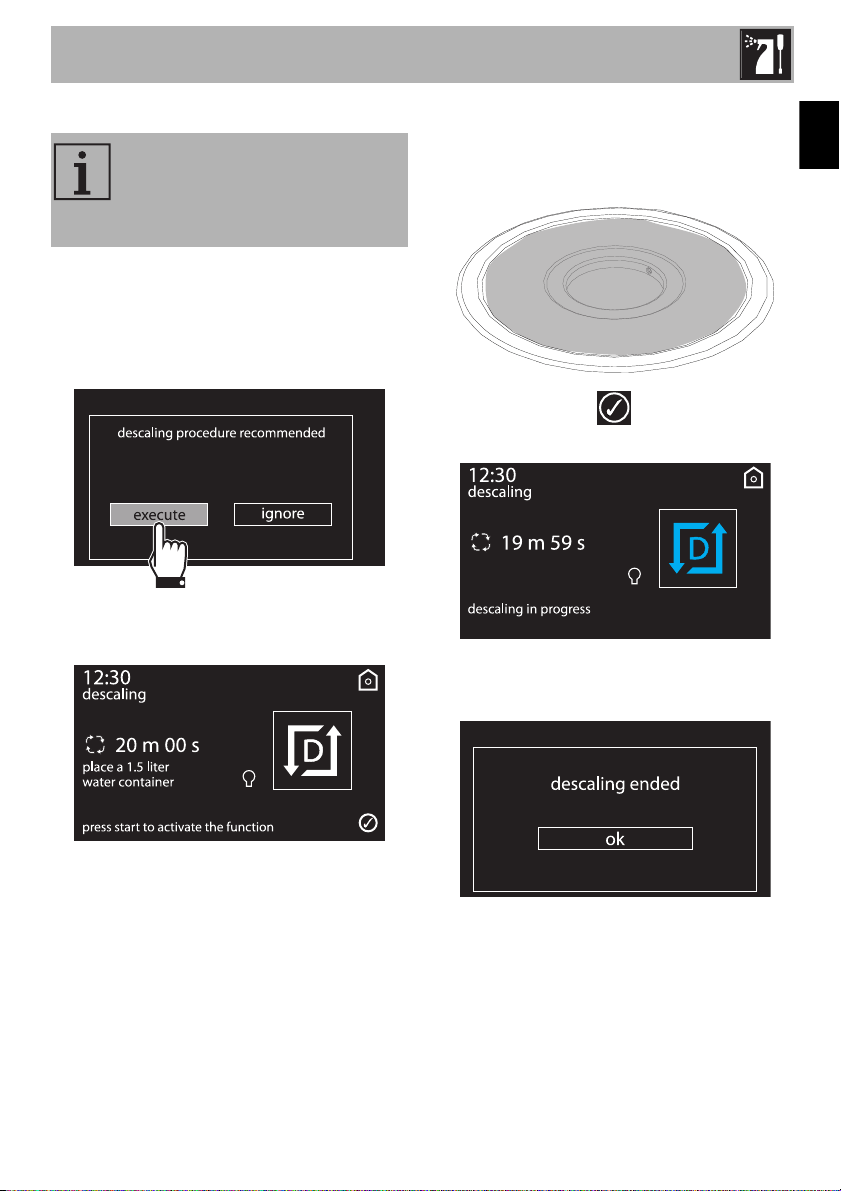
Cleaning and Maintenance
75
EN
Descaling
The following message will periodically
appear on the appliance’s display,
notifying you that it is necessary to perform
descaling of the evaporation tray on the
base of the oven:
1. Press execute to accept the descaling
procedure.
2. Open the door completely.
3. Pour approximately 250 ml of white
vinegar into the evaporation tray, thus
also covering part of the base of the
oven.
4. Press the symbol to start the
descaling function.
5. Press the ok key at the end of the
descaling process.
6. Remove the vinegar from the base of the
oven with the supplied sponge.
7. Use a dish sponge on softened
encrustations in order to remove the
largest possible quantity of scale.
The presence of scale due to lack
of descaling can compromise
correct operation of the appliance
in the long term.
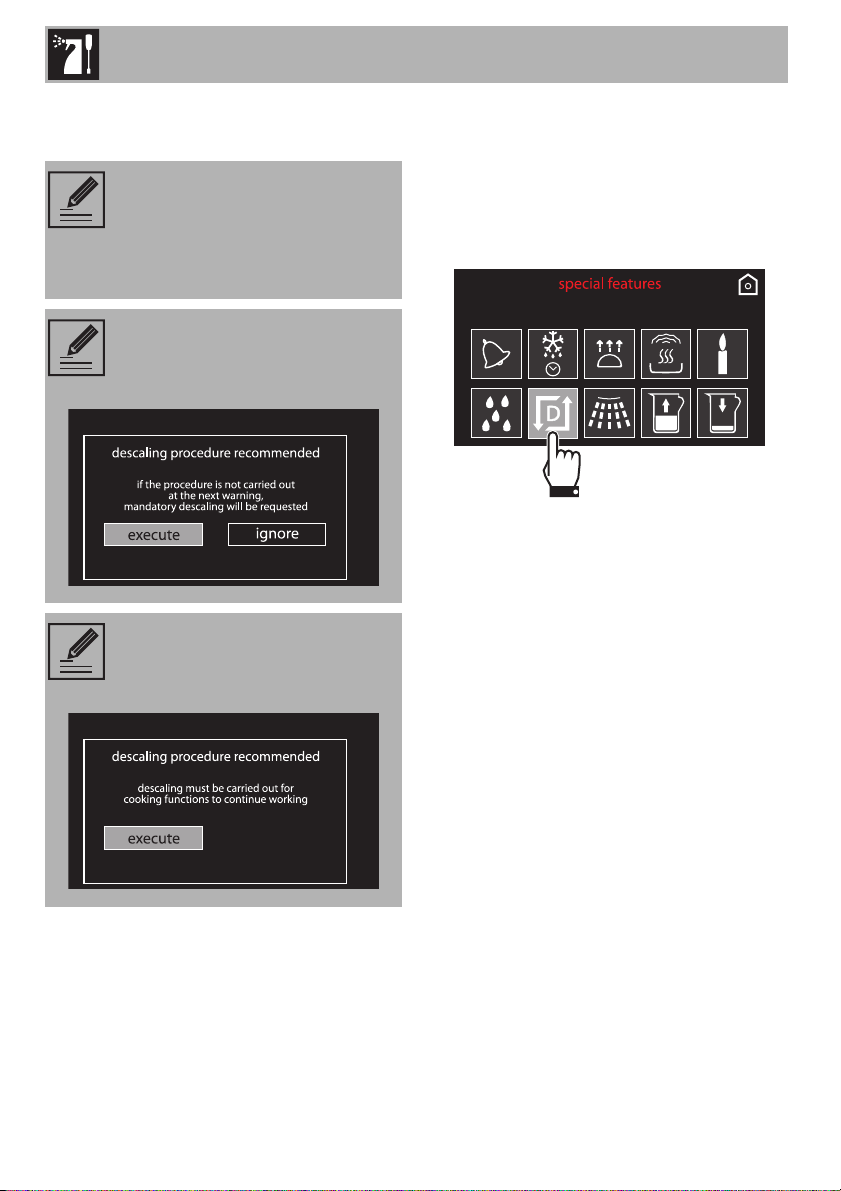
Cleaning and Maintenance
76
8. When you have finished cleaning, close
the door again.
Manual descaling
When you wish to perform descaling in
advance, you can run the function
manually:
1. Select manual descaling from the
“special functions” menu.
2. Proceed with the procedure described in
the “Removing racks/trays support
frames” chapter, beginning at point 2.
We recommend performing
descaling every time this is
indicated on the display in order to
keep the boiler in perfect
operating condition.
Note: the descaling process can
be skipped three consecutive
times.
The appliance will not allow you to
run any other function until the
descaling process is performed.
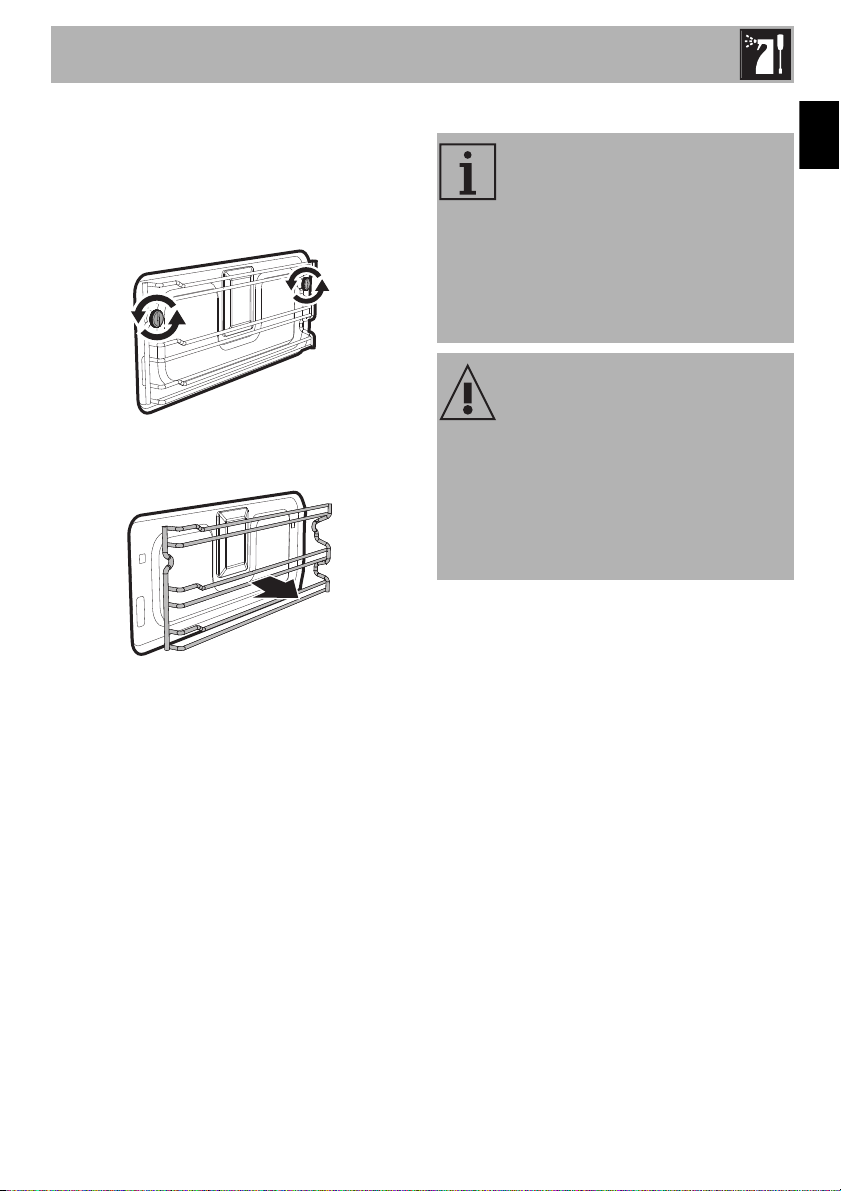
Cleaning and Maintenance
77
EN
Removing racks/trays support frames
Removing the guide frames enables the
sides to be cleaned more easily.
To remove the guide frames:
1. Unscrew the frame fastening pins:
2. Pull the frame towards the inside of the
oven to free it from the fastening pins.
3. When cleaning is complete, repeat the
above procedures to put the guide
frames back in.
Vapor Clean
Preliminary operations
Before starting the Vapor Clean function:
• Completely remove all accessories from
inside the oven.
Vapor Clean is an assisted
cleaning procedure which
facilitates the removal of dirt. This
process makes it possible to clean
the inside of the oven very easily.
The dirt residues are softened by
the heat and water vapor for
easier removal afterwards.
Improper use
Risk of damage to surfaces
• Remove any large amounts of food
residues or spills from previous cooking
operations from the inside of the oven.
• Carry out assisted oven cleaning
operations only when the oven is cold.
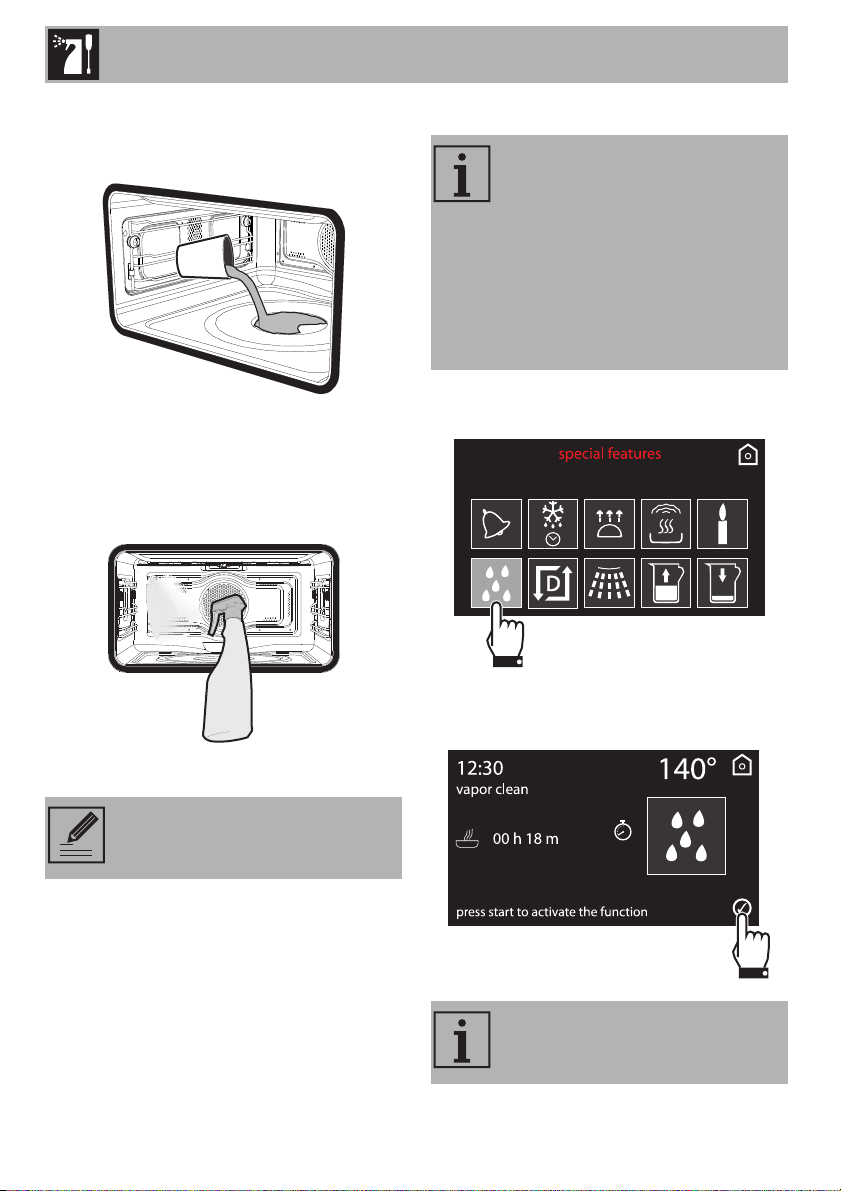
Cleaning and Maintenance
78
• Pour approx. 40 cc of water onto the
floor of the oven. Make sure it does not
overflow out of the cavity.
• Spray a water and washing-up liquid
solution inside the oven using a spray
nozzle. Direct the spray against the side
walls, upwards, downwards and
towards the deflector.
• Close the door.
Vapor Clean Settings
1. Select Vapor Clean from the “special
features” menu.
2. The length and temperature of the
cleaning cycle will be displayed.
We recommend spraying approx.
20 times at the most.
If the temperature inside the oven is
higher than that allowed for the
Vapor Clean cycle, it will
immediately be paused and
“Internal temperature too high,
wait for cooling” will be displayed.
Let the appliance cool down
before starting the assisted
cleaning function.
Temperature and duration settings
cannot be changed by the user.
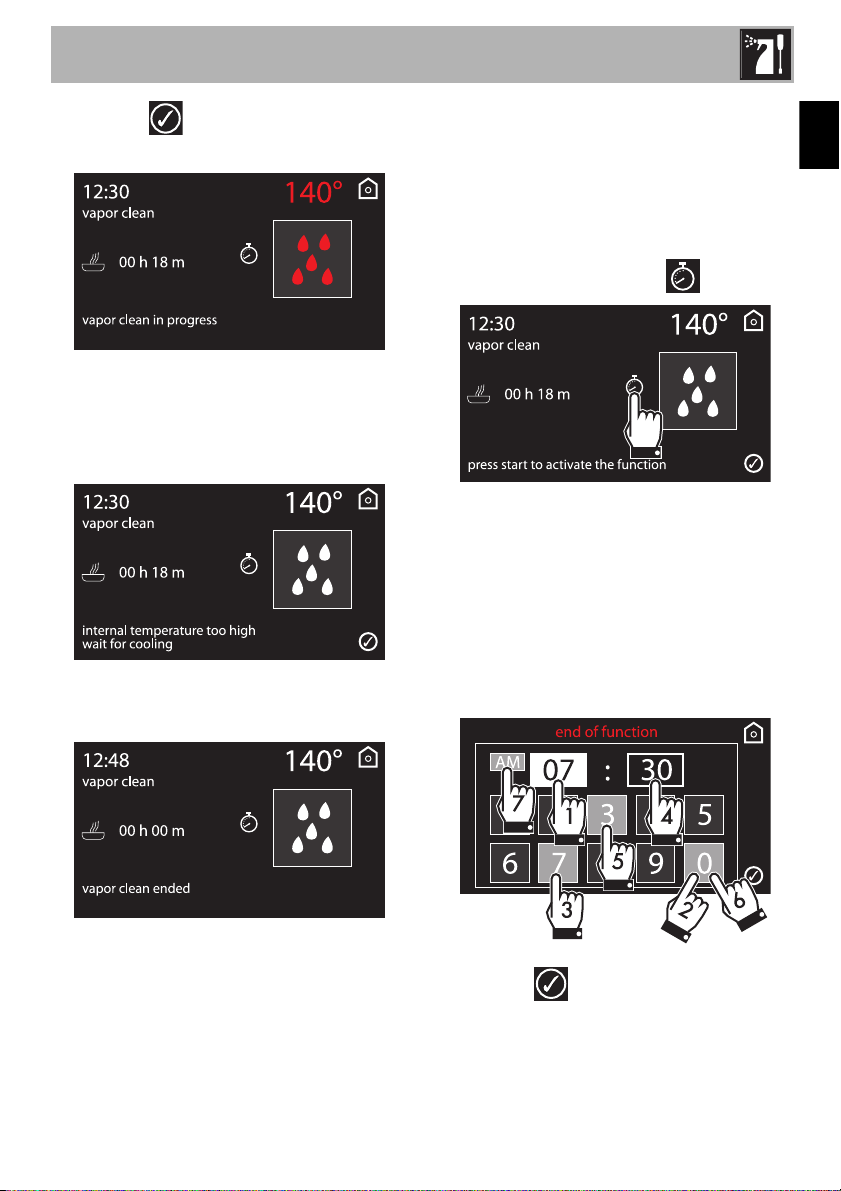
Cleaning and Maintenance
79
EN
3. Press the symbol to confirm. The
assisted cleaning cycle has begun.
4. If the temperature inside the oven is too
high, a buzzer will sound and a warning
will appear, indicating you must wait for
the oven to cool.
5. A buzzer will sound at the end of the
Vapor Clean cycle.
Setting the programmed Vapor Clean
cycle
The Vapor Clean cycle can be set for a
certain time, just like all the cooking
functions.
1. After having selected the special Vapor
Clean function, press the symbol.
2. Enter the time you want the Vapor Clean
function to end. For example, at 7:30 pm
(19:30 on the 24-hour clock): first press
the hour box, then the numbers 1 and 9,
then press the minutes box and the
numbers 3 and 0. Remember that the
oven operates on a 24-hour clock, not a
12-hour clock).
3. Press the symbol to confirm.
4. The appliance will wait until the
appropriate start time to begin the
cleaning cycle.
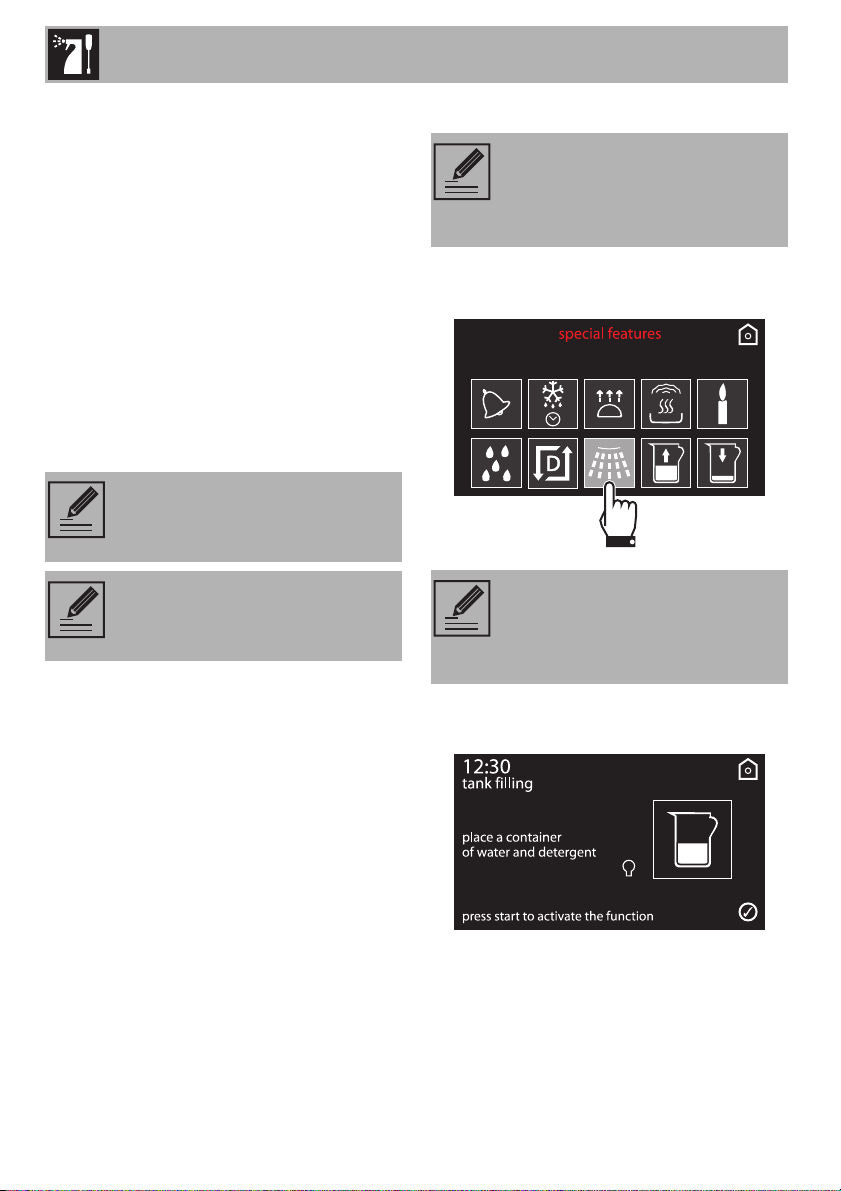
Cleaning and Maintenance
80
End of the Vapor Clean cycle
5. Open the door and clean the least-
stubborn residue with a microfiber cloth.
6. Use a brass scratch-proof sponge on the
toughest residues.
7. For fat residues, use products specifically
formulated for cleaning ovens.
8. Remove any remaining water from inside
the oven.
For greater hygiene and to ensure food
does not absorb unpleasant odors, dry the
inside of the oven using the convection
setting at 320°F for about 10 minutes.
Reservoir cleaning
1. Select clean reservoir from the “special
functions” menu.
The display will show a request to fill the
reservoir.
We recommend using rubber
gloves while carrying out these
tasks.
To make it easier to manually clean
the most hard-to-reach spots, we
suggest removing the door.
To guarantee optimum
performance of your appliance,
we recommend cleaning the
reservoir every 2-3 months.
In the event that there is residual
water inside the reservoir, the
appliance will activate the
reservoir emptying procedure.
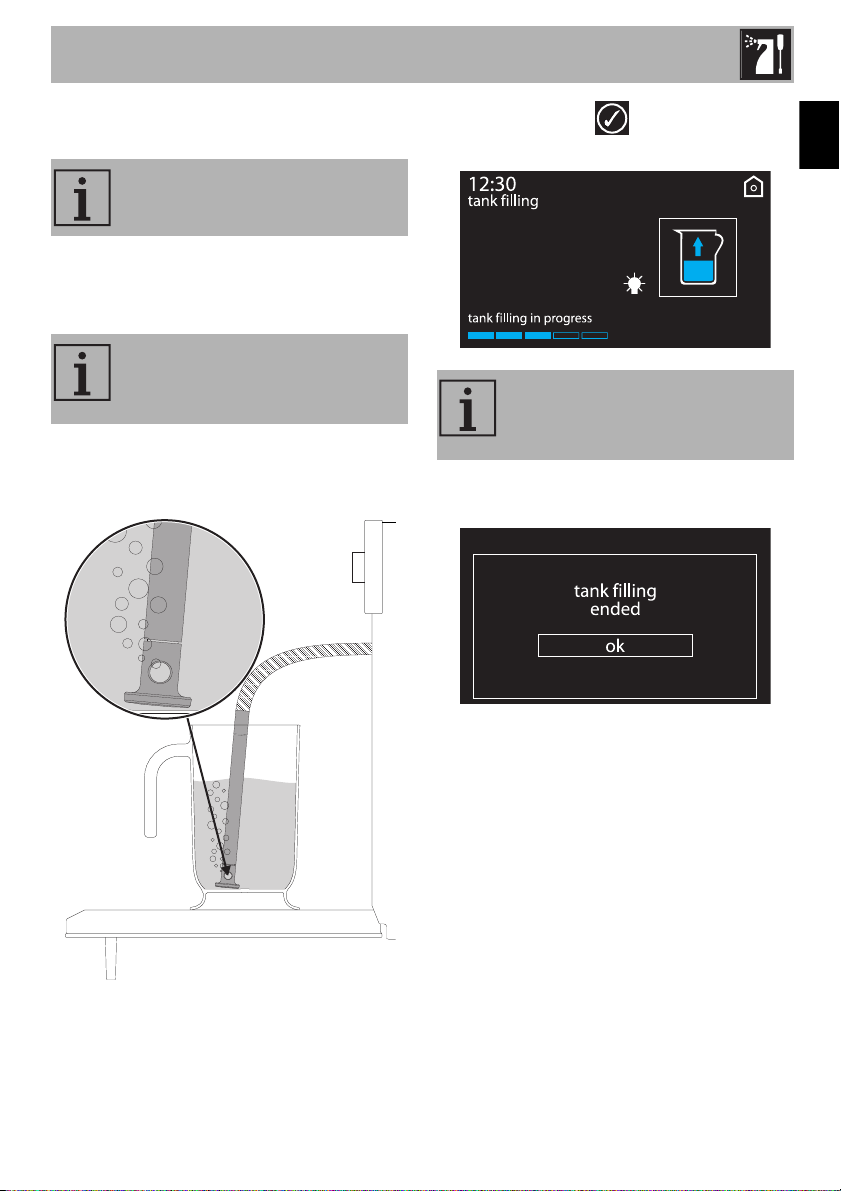
Cleaning and Maintenance
81
EN
2. Fill the jug provided (or a container) with
a solution of water and citric acid.
3. Open the oven door.
4. Place the jug (or container) on the open
door.
5. Extract the tube from its seat and immerse
its end in the jug (or container) until it
reaches all the way to the bottom.
6. Press the symbol to start drawing the
solution into the appliance’s reservoir.
7. At the end press “ok” to confirm that you
have finished filling the reservoir.
We recommend mixing 30 g of
citric acid with 1.5 liters of water.
Note: the jug (or container) with
the mixture must have a gross
weight lower than 5 kg.
The appliance will automatically
draw sufficient solution to fill the
reservoir.
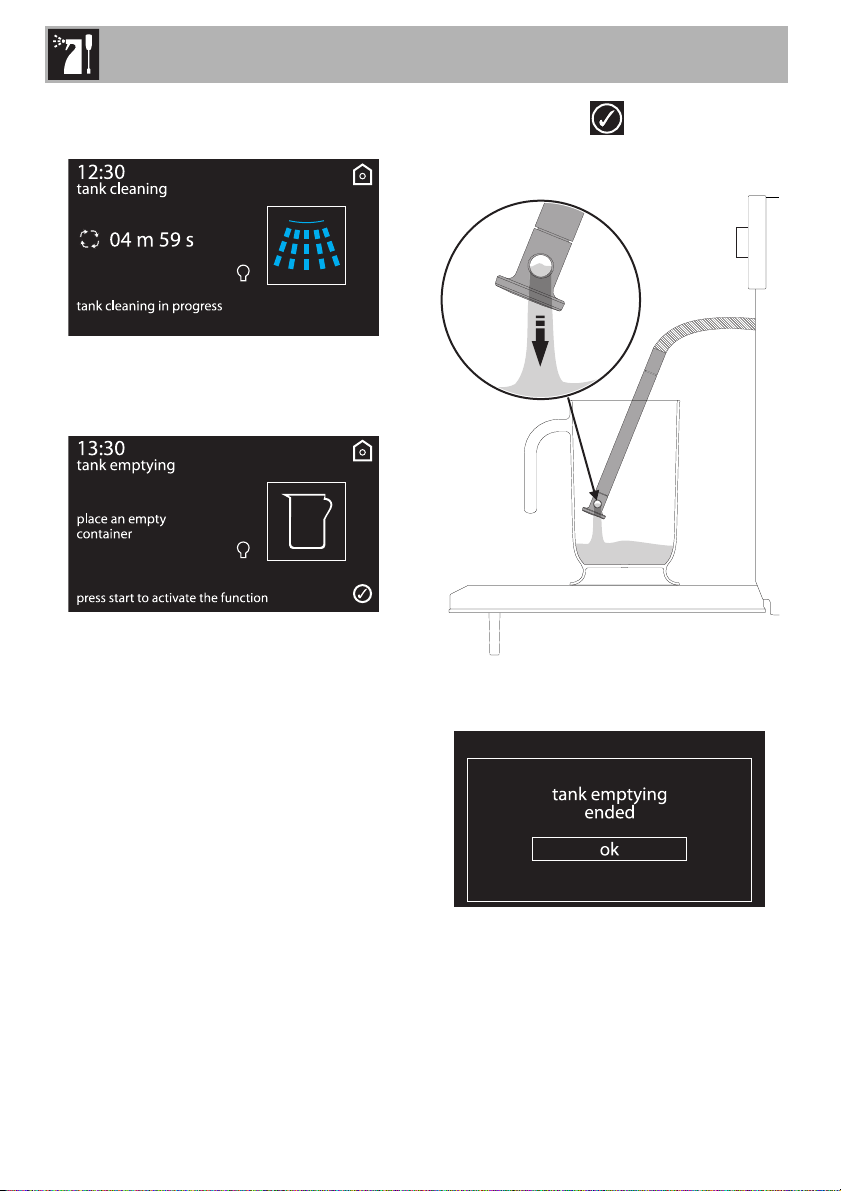
Cleaning and Maintenance
82
The display will show the time left until the
end of the cleaning cycle.
When the cleaning process is complete, a
buzzer will sound and the display will show
the solution draining screen.
8. Press the symbol to start draining the
solution from the reservoir into the jug (or
container).
When finished “reservoir cleaning
complete”appears on the display.
9. Press "ok" to confirm the end of the
reservoir cleaning procedure.

Cleaning and Maintenance
83
EN
10. Shake the tube in order to remove any
remaining solution.
11. Return the tube to its original position,
remove the jug (or container) and close
the door.
3.5 Extraordinary maintenance
Replacing the internal light bulb
1. Completely remove all accessories from
inside the oven.
2. Remove the rack/tray support frames.
3. Remove the bulb cover using a tool (e.g.
a spoon).
After having cleaned the reservoir
with the solution of water and citric
acid, carry out at least one “clean
reservoir” cycle using ordinary
water in order to rinse out any
residues there may be from the
reservoir.
Live parts
Danger of electrocution
• Unplug the appliance.
Take care not to scratch the
enamel of the oven cavity wall.
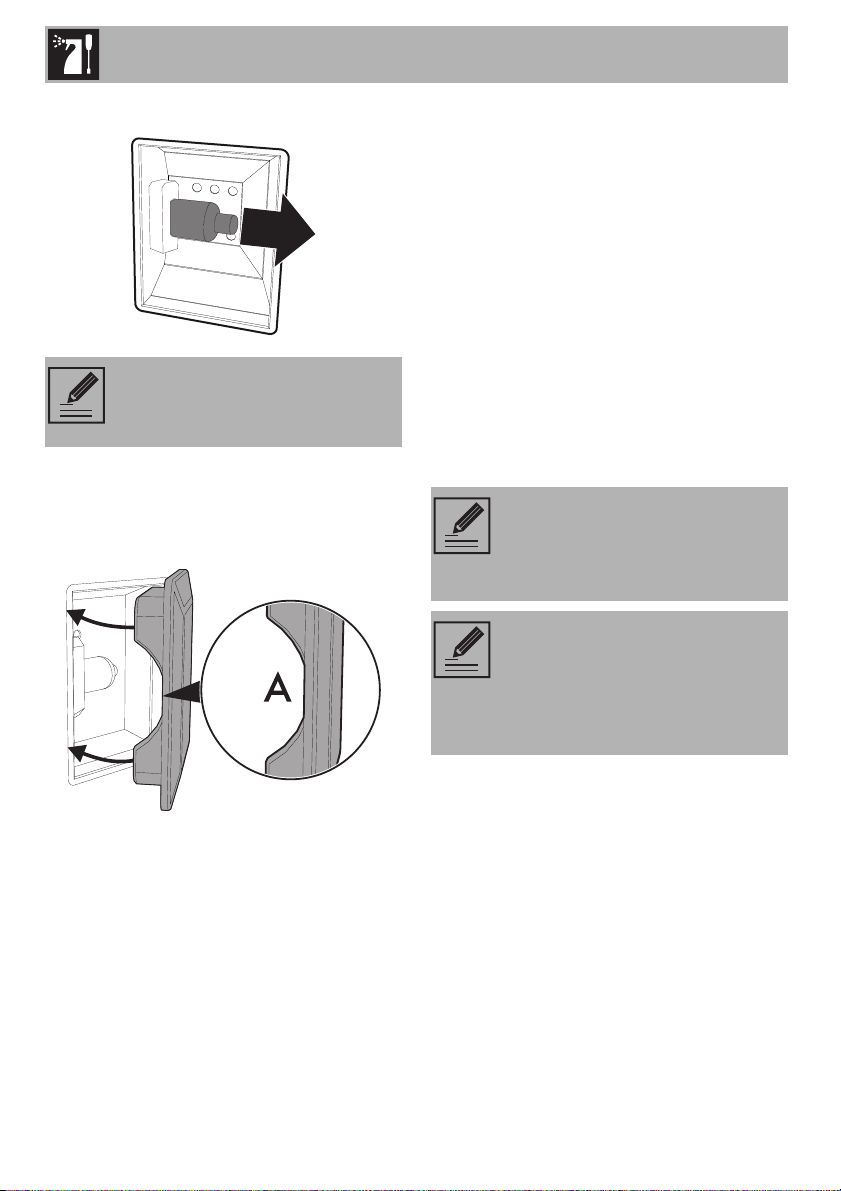
Cleaning and Maintenance
84
4. Slide out and remove the light bulb.
5. Replace the light bulb with one of the
same type (40 W).
6. Refit the cover. Ensure the molded part of
the glass (A) is facing the door.
7. Press the cover completely down so that
it attaches perfectly to the bulb support.
What to do if...
The display is completely off:
• Check the main power supply.
• Check whether an omnipolar switch
upstream from the oven feed line is in the
“ON” position.
The appliance doesn’t heat up:
• Check whether the “demo” mode has
been set (for further details see the
“Settings” section).
The controls do not respond:
• Check whether the “control lock” mode
has been set (for further details see the
“Settings” section).
Do not touch the halogen light
bulb directly with your fingers, use
an insulating material.
If the problem has not been
resolved or there are other types of
faults, contact your local technical
assistance center.
If other “ERRx” error messages
appear:
Note the error message, function
and temperature set and contact
Customer Service.