Owner 's Manual for DVD Player
Getting Started
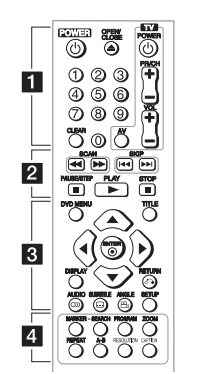
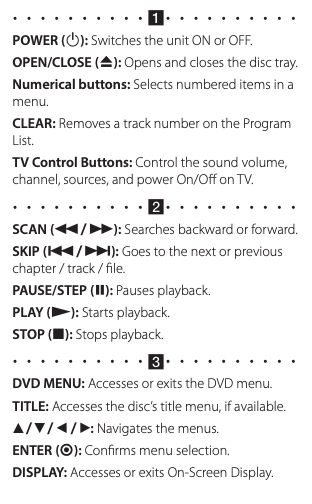
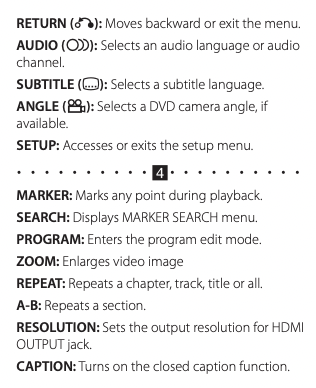
Remote Control
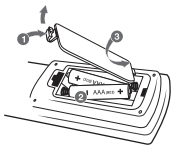
Battery Installation
Remove the battery cover on the rear of the Remote Control, and insert R03 (size AAA) battery with  and
and  matched correctly.
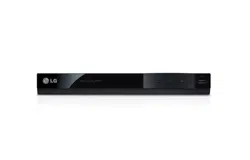
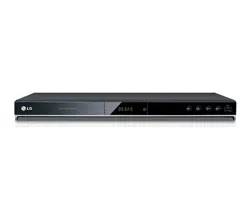
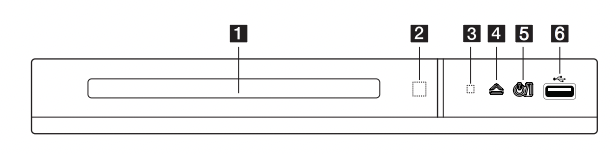
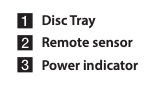
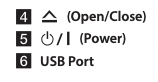
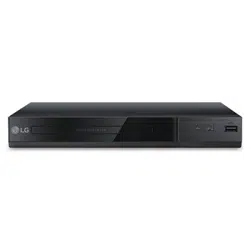
Front Panel
Rear Panel
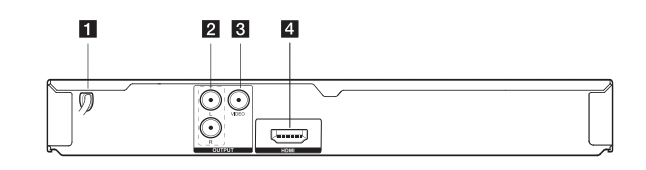
 AC power cord
 AUDIO OUTPUT (Left/Right)
 VIDEO OUTPUT
 HDMI
HDMI
Connecting to your TV
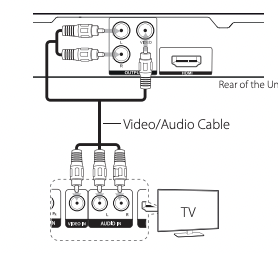
Connecting Video / Audio Cable
Connect the VIDEO/AUDIO OUTPUT on the unit to VIDEO/AUDIO IN on TV with Video/Audio cable, such as VIDEO with yellow, AUDIO Left/Right with white/ red.
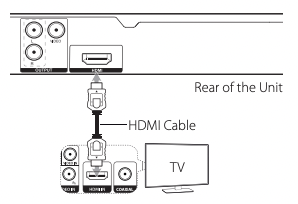
Connecting HDMI Cable
Connect the HDMI on the unit to the HDMI IN on compatible TV with HDMI cable. (Type A, High Speed HDMI™ Cable)
Additional Information for HDMI
- When you connect a HDMI or DVI compatible device, make sure of the following:
- Try switching off the HDMI/DVI device and this unit. Next, switch on the HDMI/DVI device and leave it for around 30 seconds, then switch on this unit.
- The connected device’s video input is set correctly for this unit.
- The connected device is compatible with 720x576i(480i), 720x576p(480p), 1280x720p, 1920x1080i or 1920x1080p video input.
- Not all HDCP-compatible DVI devices will work with this unit.
- The picture will not be displayed properly with non-HDCP device.
Resolution Setting
You can change the resolution using RESOLUTION button. y The unit is able to provide a 1080p full HD image to most 1080p-capable TVs in the market today.
- However, there are some 1080p TVs available from certain companies that are limited in the types of 1080p images that can be accepted.
- Specifically, 1080p-capable TVs that don’t accept images in 60Hz can’t display an image from this unit. y Depending on your TV, some of the resolution settings may result in the picture disappearing or an abnormal picture appearing. In this case, press RESOLUTION repeatedly until the picture re-appears.
Connecting to an Amplifier
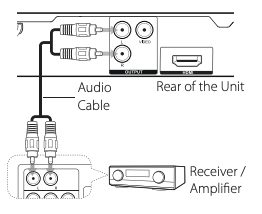
Connecting Audio Cable
Connect the AUDIO OUTPUT on the unit to 2CH AUDIO IN on amplifier with Audio cable, such as AUDIO Left/Right with white/red.
Connecting HDMI Cable
Connect the HDMI on the unit to the HDMI IN on amplifier with HDMI cable. (Type A, High Speed HDMI™ Cable) Connect the HDMI jack on amplifier to HDMI IN jack on TV with HDMI cable, if the amplifier has HDMI jack.

Note
- If the audio format of the digital output does not match the capabilities of your amplifier, the amplifier will produce a strong, distorted sound or no sound at all.
- To see the audio format of the current disc in the on-screen display, press AUDIO.
- This unit does not perform internal (2 channel) decoding of a DTS sound track. To enjoy DTS multi channel surround, you must connect this unit to a DTS compatible amplifier via one of this unit’s HDMI output.
Settings
When the unit is turned-on at the first time, you have to select the desired language. (Optional)
Adjust the Setup Settings
You can change the settings of the unit in the [Setup] menu.
- 1. Press SETUP.
- 2. Use
 /
/ to select the first setup option, and press
  to move to the second level.
- 3. Use / to select a second setup option, and press to move to the third level.
- 4. Use / to select a desired setting, and press ENTER (
 ) to confirm your selection.
[LANGUAGE] Menu
Menu Language
Select a language for the Setup menu and onscreen display.
Disc Audio/Subtitle/Menu
Select a language for the Disc Audio/Subtitle/ Menu.
[Original]: Refers to the original language in which the disc was recorded.
[Other]: To select another language, press number buttons then ENTER () to enter the corresponding 4-digit number according to the language code list. (See page 20) If you make a mistake while entering number, press CLEAR to delete numbers then correct it.
[Off] (for Disc Subtitle): Turn off Subtitle.
[DISPLAY] Menu
TV Aspect
Select which screen aspect to use based on the shape of your TV screen.
[4:3]: Select when a standard 4:3 TV is connected.
[16:9]: Select when a 16:9 wide TV is connected.
Display Mode
If you selected 4:3, you’ll need to define how you would like widescreen programs and films to be displayed on your TV screen.
[Letterbox]: This displays a widescreen picture with black bands at the top and bottom of the screen.
[Panscan]: This fills the entire 4:3 screen, cropping the picture as necessary.
[AUDIO] Menu
Set the player’s Audio options according to various disc output type you use.
Dolby Digital / DTS / MPEG
Select the type of digital audio signal to use the HDMI jack.
[Bitstream]: Select to connect HDMI jack to an amplifier with Dolby Digital, DTS or MPEG decoder.
[PCM] (for Dolby Digital / MPEG): Select to connect HDMI jack to an amplifier without Dolby Digital or MPEG decoder.
[Off] (for DTS): Select to connect HDMI jack to an amplifier without DTS decoder.
Note
- If [Audio Guidance] is set to [On], the audio is output in PCM.
- If [Audio Guidance] is set to [On], the [Dolby Digital], [DTS] and [MPEG] are not activated.
Sample Freq. (Frequency)
Selects the sampling frequency of the audio signal between [48 kHz] and [96 kHz].
DRC (Dynamic Range Control)
Make the sound clear when the volume is turned down (Dolby Digital only). Set to [On] for this effect.
Vocal
Set to [On] only when a multi-channel karaoke DVD is playing. The karaoke channels on the disc mix into normal stereo sound.
[LOCK] Menu
Firstly, you have to create the 4-digit password on [Area Code] to use the LOCK menu.
If you forget your password
First, remove the disc in the unit. Display setup menu then input the 6-digit number “210499”. The password is deleted.
Rating
Select a rating level. The lower the level, the stricter the rating. Select [Unlock] to deactivate the rating.
Password
Sets or changes the password for lock settings.
Area Code
To input the standardized area code referring the Area Code List on page 19.
Operating
General Playback
Playing a Disc

1. Press OPEN/CLOSE  , and place a disc on the disc tray.
2. Press OPEN/CLOSE to close the disc tray For the most DVD-ROM discs, playback starts automatically.
For the Audio CD, select a track using // / and press PLAY
  ) or ENTER () to play the Track.
Playing a File 
1. Press OPEN/CLOSE to place a disc on the disc tray, or connect the USB device.
2. Select a file using ///, and press PLAY () or ENTER () to play the file.
On-Screen Display
You can display and adjust various information and ry settings about the content.
- 1. While playback, press DISPLAY to show various playback information.
- 2. Select an option using /.
- 3. Use / and numerical button to adjust the selected option value.
- 4. Press DISPLAY to exit the On-Screen display
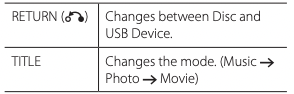
General Operation
Advanced Playback
Movie
| To |
Do this |
| Display disc menu |
Press DVD MENU. (DVD Only) |
| Play repeatedly |
Press REPEAT during playback. To select an option to be repeated, Press REPEAT repeatedly.
• DVD: Chapter/ Title/ Off
• MOVIE: Track/ All/ Of
|
| Play frame-byframe |
Press PAUSE/STEP  while Video file playback and press PAUSE/STEP repeatedly to play Frame-by-Frame playback. while Video file playback and press PAUSE/STEP repeatedly to play Frame-by-Frame playback. |
| Repeat a specific portion |
Press A-B at the beginning of the portion you wish to repeat and again at the end of the portion. To return to normal playback, press A-B to select [Off ]. |
| Set the desired starting time of playback |
Searches for the starting point of entered time code. Press DISPLAY then select clock icon. Enter a time then press ENTER().
For example, to find a scene at 1 hour, 10 minutes, and 20 seconds, enter “11020” and press ENTER().
If you enter the wrong number, press CLEAR to enter again.
|
| Mark a favorite scene |
scene Press MARKER at the desired position up to nine markers. Press SEARCH to recall or clear position. Use or to select a desired marker, then press ENTER() to recall it or CLEAR to clear it. |
| Change the subtitle code page (Video file only) |
Press and hold SUBTITLE for 3 seconds during playback. The language code will appear. Press / to select another language code until the subtitle is displayed properly and then press ENTER () |
| Slow down the playing speed (Forward only) |
While the playback is paused, press  repeatedly to play various speeds of slow motion. Press PLAY () to continue play at normal speed. repeatedly to play various speeds of slow motion. Press PLAY () to continue play at normal speed. |
| Watch an enlarged video |
During playback or pause mode, press ZOOM repeatedly to select zoom mode.
ZOOM: 100 200 300 400 100 200 300 400 100
///: Move through the zoomed picture.
|
Music
| To |
Do this |
| Play repeatedly |
Press REPEAT during playback. To select an item to be repeated, Press REPEAT repeatedly.
• TRACK/ ALL/ (REPEAT Off )
|
| Create or delete your own program |
Press the PROGRAM to select desired file and then,  mark appears on screen. mark appears on screen.
Using / and ENTER () to add a music file(s) on the program list,
If you add desired music file(s), press PROGRAM to end edit program list.
To clear a music file(s) from the program list, select the music file you want to clear then press CLEAR in program edit mode.
To clear all music file(s) from the program list, select [Clear All] then press ENTER () in program edit mode
|
| Display file information (ID3 TAG). |
While playing a MP3 file containing file information, you can display the information by pressing DISPLAY repeatedly.
- Depending on the MP3 files, information may not be displayed on the screen.
|
| Record the Audio CD to USB device |
Connect USB Flash Drive to the unit before recording. Insert an Audio CD, and then select a track using /, DVD MENU.
- For track recording: Press AUDIO(
 ) in play, pause or resume stop mode. ) in play, pause or resume stop mode.
- For all track recording: Press AUDIO() in complete stop mode.
- For program list recording: In stop mode, press AUDIO() after selecting a track on the program list.
|
Note
- If you use this function, the “CD_REC” folder will be created automatically in the USB Flash Driver then the music file(s) is saved in it.
- If you remove USB Flash Drive, turn off or open the unit while recording, it can make a malfunction.
- If the remaining space on the USB Flash Drive is insufficient, the recording is not available. To increase the free space, delete files in it using your PC.
- CD-G disc and Audio CDs encoded in DTS cannot be recorded. y External HDD, Multi Card reader, Multi Partition USB, Locked device and MP3 player are not supported.
- You can set the recording speed pressing AUDIO during USB direct recording.
- X1 Track: While normal speed recording, you can listen to the music.
- X4 Track: While 4X speed recording, you can not listen to the music.
- Recording format: MP3 file
- Encoding Bit rate: 128 Kbps / 160 Kbps / 192 Kbps / 256 Kbps / 320 Kbps
Photo 
Troubleshooting
| Symptom |
Cause |
Solution |
| No power. |
The power cord is disconnected. |
Plug the power cord into the wall outlet securely. |
| The power is on, but the unit does not work. |
No disc is inserted. |
Insert a disc. |
The unit does not start playback.
|
An unplayable disc is inserted. |
Insert a playable disc. (Check the disc type and regional code.) |
| The rating level is set. |
Change the rating level. |
The remote control does not work properly
|
The remote control is not pointed at the remote sensor on the unit. |
Point the remote control at the remote sensor of the unit. |
| The remote control is too far from the unit. |
Operate the remote control closer to the unit. |
| There is an obstacle in the path of the remote control and the unit. |
Remove the obstacle. |
| Poor picture quality and sound distortion. |
Fingerprints and dust are stained on the disc. |
Wipe the disc from the center to out with a clean cloth. Do not use strong solvents. (alcohol, benzine, thinner, commercially available cleaners) |
No picture.
|
The TV is not set to receive the signal from the unit. |
Select the appropriate video input mode on the TV. |
| The video cable is not connected securely. |
Connect the video cable securely. |
| The TV does not accept the resolution that is set on the unit. |
Press RESOLUTION repeatedly to select appropriate resolution. |
No sound.
|
The equipment connected with the audio cable is not set to receive the signal from the unit. |
Select the correct input mode of the audio amplifier. |
| The AUDIO options are set to the wrong position. |
Set the AUDIO settings to the correct position. |


 or
or  during playback
 or
or  on the screen (Resume Stop)
  ) icon then press ENTER (
 ) icon is highlighted.
 ) icon then press ENTER (