User Guide for Dryer
DRAIN HOSE : FITTING INSTRUCTIONS FOR TANK IN DOOR DRAWER
To avoid emptying the water container after each drying cycle, the water can be discharged directly to a waste water drain pipe (the same drainage system as household sinks). Water Bye-Laws prohibit connection to a surface water drain. The waste water drain pipe should be located adjacent to the tumble dryer.
The kit consists of:1 hose and 1 tap.
WARNING! Switch off and remove the tumble dryer plug from the electricity supply before carrying out any work.
Fit the Hose as Follows:
1.Tilt the machine backwards.
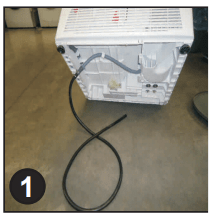
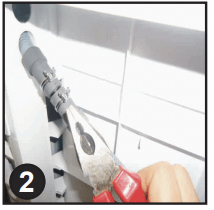
2. The waste water pipe is situated at the right-hand side of the machine (see the picture). A grey hose connects to the bridge at the left hand side of the machine. Using pliers, remove the pipe retaining clip from the bridge.
3. Pull the hose off the bridge connection.
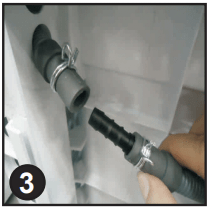
4. Attach the black hose from the kit, (using the connector and pipe clips supplied), to the hose removed from the bridge connection.

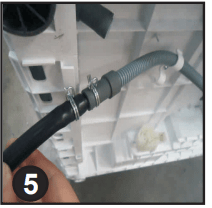
5 . Place the tap supplied by the kit to close the remaing hose. Connect the new drain hose to the waste black water pipe .
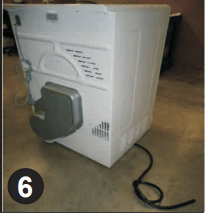
6. Once the machine is in place, check the bottom to ensure that the new hose does not kink when pushing the tumble dryer into position.
Connect to the mains electricity supply.
PREPARING THE LOAD
Before using the tumble dryer for the first time:
●Please read this instruction book thoroughly.
● Remove all items packed inside drum.
● Wipe the inside of the drum and door with a damp cloth to remove any dust which may have settled in transit.
Clothes Preparation
Make sure that the laundry you are going to dry is suitable for drying in a tumble dryer, as shown by the care symbols on each item. Check that all fastenings are closed and that pockets are empty. Turn the articles inside out. Place clothes loosely in the drum to make sure that they don't get tangled.
Do Not Tumble Dry:
Silk, nylon stockings, delicate embroidery, fabrics with metallic decorations, garments with PVC or leather trimmings.
IMPORTANT: Do not dry articles which have been treated with a dry cleaning fluid or rubber clothes (danger of fire or explosion).
During the last 15 minutes the load is always tumbled in cool air.
Energy Saving
Only put into the tumble dryer laundry which has been thoroughly wrung or spin-dried. The drier the laundry the shorter the drying time thus saving electricity.
ALWAYS
● Check that the filter is clean before every drying cycle.
NEVER
● Put dripping wet items into the tumble dryer, this may damage the appliance.
Sort the Load as Follows
● By care symbols
These can be found on the collar or inside seam:
 Suitable for tumble drying.
 Tumble drying at high temperature.
 Tumble drying at low temperature only.
 Do not tumble dry
If the item does not have a care label it must be assumed that it is not suitable for tumble drying.
● By amount and thickness
Whenever the load is bigger than the dryer capacity, separate clothes according to thickness (e.g. towels from thin underwear).
● By type of fabric
Cottons/linen: Towels, cotton jersey, bed and table linen.
Synthetics: Blouses, shirts, overalls, etc. made of polyester or polyamid, as well as for cotton/synthetic mixes.
 Do not overload the drum, large items when wet exceed the maximum admissible clothes load (for example: sleeping bags, duvets).
CLEANING AND ROUTINE MAINTENANCE
Cleaning the Dryer
● Clean the filter and empty the water container after every drying cycle.
● Regularly clean the condenser.
● After each period of use, wipe the inside of the drum and leave the door open for a while to allow circulation of air to dry it.
● Wipe the outside of the machine and the door with a soft cloth.
● DO NOT use abrasive pads or cleaning agents.
● To prevent the door sticking or the build up of fluff clean the inner door and gasket with a damp cloth after every drying cycle.
WARNING! The Drum, door and load may be very hot.
IMPORTANT Always switch off and remove the plug from the electricity supply before cleaning this appliance.
For electrical data refer to the rating label on the front of the dryer cabinet (with the door open).
WATER CONTAINER
The water removed from the laundry during the drying cycle is collected in a container inside the door of the dryer. When the container is full the indicator on the control panel will light, and the container MUST be emptied. However, we recommend that the container is emptied after each drying cycle.
NOTE: Very little water will collect during the first few cycles of a new machine as an internal reservoir is filled first.
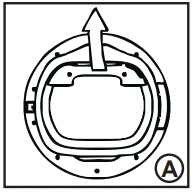
To remove the container tank in door drawer
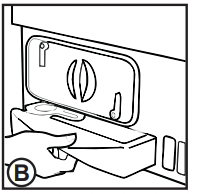
1. Gently pull out the water container holding the handle. (A) When it is full the water container will weigh about 6 kg.
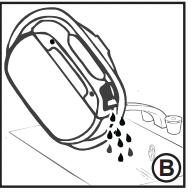
2. Tilt the water container to empty the water out through the spout. (B)
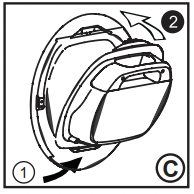
When empty, replace the water container back as shown; (C) first insert the base of the container into position as shown (1) then gentle push the top into position (2).
3. Press  Button to restart the cycle.
NOTE: If you have the option of drainage near to the dryer you can use the discharge kit to provide a permanent drainage for the water collected in the container of the dryer. This means that you don't have to empty the water container.
To remove the container bottom water drawer
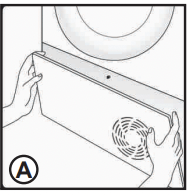
1.Gently pull the bottom of the kickplate so that it unclips from the dryer. The top section can then be unhinged allowing the kickplate to be completely removed. (A)
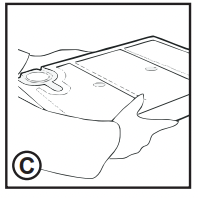
2.Pull firmly on the handgrip and slide the water container out of the dryer. (B) Support the container with both hands . (C)When full, the water container will weigh about 4kg.
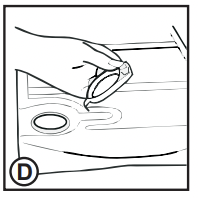
3. Open the lid located on the top of the container and empty the water.(D)
4. Refit the lid and slide the water container back into position. (D) PUSH FIRMLY INTO PLACE.
5. Refit the kickplate by engaging the hinges at the top and 'snapping' the lower clips into place.
DOOR and FILTER
Pull on handle to open the door. To restart the dryer, close the door and press Start / Pause button.
WARNING! When the tumble dryer is in use the drum and door may be VERY HOT.
Filter
IMPORTANT: To maintain the efficiency of the dryer check that the fluff filter is clean before each drying cycle.
|
1.Pull the filter upwards.
2.Open filter as shown.
3.Gently remove lint using a soft brush or your fingertips.
4.Snap the filter together and push back into place.
|
|


|
Filter Care Indicator
 Lights when the filter needs cleaning.
If the laundry is not drying check that the filter is not clogged.
IF YOU CLEAN FILTER UNDER WATER, REMEMBER TO DRYIT.
WARNING! If you open the door mid cycle, before the cool-down cycle has completed,the handle may be hot. Please use extreme caution when attempting to empty the water reservoir during the cycle.
To Remove the Condenser
|
1.Remove the kickplate.
2.Turn the two locking levers anti-clockwise and pull out the condenser.
3.Pull out the condenser unit.
4.Gently remove any dust or fluff with a cloth, then wash the unit by holding it under a running tap turning it so that water flows between the plates, to remove any dust or fluff.
5.Check the gasket position after cleaning . Fit the gasket in to the groove if it is misaligned.
6.Refit the condenser ensuring it is in the correct way ( as indicated by the arrow) and pushed firmly into place. Lock the two levers by turning them clockwise.Be sure that condenser unit fixed to the basement tightly.
7. Refit the kickplate.
|
|


|
CONTROLS AND INDICATORS
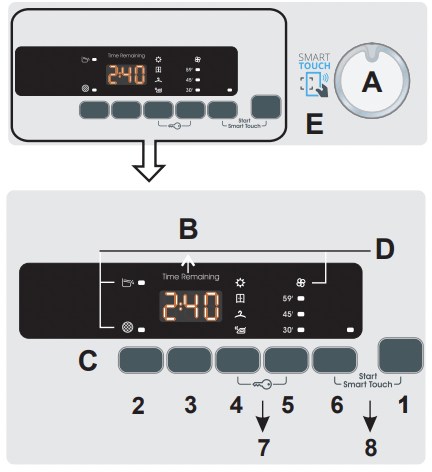
A-Programme Selector - Rotating the knob in both directions it's possible to select the desired drying program. To cancel the selections or switch off the dryer rotate the knob on OFF.
B- Display Digit - The display shows the remaining time for drying, the postponed time in case of delayed start selection and other notifications setting.
C-Buttons -
1.Start/Pause Button
To start the selected program and/or suspend it.
2.Time cycle selection
It's possible transform a cycle from automatic to programmed, up to 3 minutes after the start of the cycle. The progressive pressure increases the time in 10-minute intervals. After this selection to reset the automatic dying functioning is necessary to switch off the dryer In case of incompatibility, all LEDs flash quickly for 3 times.
3.Delay Start Button
It allows to delay the start of the program from 1 to 24 hours in 1-hour intervals. The delay selected is shown on the display. After pressing the START button the time showed decrease hour after hour.
Opening of the porthole with delayed start set, after re-closing the porthole, press start again to resume the counting.
4. Drying Selection Button
It allows to set the desired dryness level editable option up to 5 minutes after the starting of the cycle:
 - Ready to Iron : It leaves the garments slightly wet to facilitate ironing.
 - Dry Hanger : To get garment ready to be hang
 - Dry wardrobe : For laundry that can be directly stored
 - Extra-dry : To get completely dry garments, ideal for full load.
This appliances is equipped with Drying Manager Function. On automatic cycles, each level of intermediate drying, prior to the reaching the selected one, is indicated by flashing the light indicator corresponding to the degree of drying reached In case of incompatibility, all LEDs flash quickly for 3 times.
5. Rapids Button
It's possible switch an automatic program to RAPID program, up to 3 minutes after the start of the cycle. The progressive pressure increases the time (30-45-59 minutes). After this selection to reset the automatic dying functioning is necessary to switch off the dryer In case of incompatibility, all LEDs flash quickly for 3 times.
6. Anti crease
This option allows to activate an anti-creases movement of the drum pre cycle in case of activation of the delay and at the end of drying cycle. It is activated every 10 minutes, up to 6 hours after the end of the drying cycle. To stop the movements set the knob to OFF. Useful when it's not possible to remove immediately.
7. Keylock
This function allows to block unwanted changes of the set options on the bezel , during drying phase.
Activation/ Inactivation: Push 4 and 5 buttons simultaneously for two seconds . The sign " LOC" appears on the display. Unlocking the option, on the display appears the sign "Unl", only once. In case of opening of 'porthole' with activated key lock, the cycle stops but the lock is kept: to restart the cycle, you must remove the lock and restore Start. When the dryer is off, the option is automatically inactivated. Key lock can be modified at any time of the cycle.
8.Start smart touch
Simultaneously pressing the START/PAUSE and OPTIONS buttons allows a previously downloaded cycle to be started whilst the Smart Touch position is selected on the programme knob (for downloading cycles from the App see the relevant section of this user manual).
D- Led
Water tank- It lights up when it's necessary to empty the condensate water tank.
Filter cleaning - It lights up when the cleaning of the filters is requested (the door and the lower filter.)
Cooling  - It lights up when the cycle is in the final cooling phase.
ESMART TOUCH area - pressing the START/PAUSE button allows to a previously downloaded cycle to start whilst the Touch position is selected on the programme knob for downloading cycles from the App see the relevant section of this user manual).
 The wool drying cycle of this machine has been approved by The Woolmark Company for the drying of machine washable wool products provided that the products are washed and dried according to the instructions on the garment label and those issues by the manufacturer of this machine. M1524.
In UK, Eire, Hong Kong and India the Woolmark trade mark is a Certification trade mark.
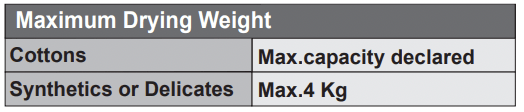
Drying Guide
The standard cycle COTTON DRY ( ) is the most energy efficient and best suited for drying normal wet cotton laundry.
The table in last page shows the approximate time and energy consumption of the main drying programmes.

OPERATION
1. Open the door and load the drum with laundry. Ensure that garments do not hinder closure of the door.
2. Gently close the door pushing it slowly until you hear the door 'click' shut.
3. Turn the Programme Selector dial to select the required drying programme (see Programme Guide).
4. Press the button. The dryer will start automatically and the indicator above the button will be continuously lit.
5. If the door is opened during the programme to check the laundry, it is necessary to press to recommence drying after the door has been closed.
6. When the cycle is nearing completion the machine will enter the cool down phase, the clothes will be tumbled in cool air allowing the load to cool down.
7. Following the completion of the cycle the drum will rotate intermittently to minimize creasing. This will continue until the machine is switched OFF or the door is opened.
Do not open the door during the automatic programs in order to obtain a proper drying.
SELECTING THE PROGRAMME AND SET THE FUNCTION
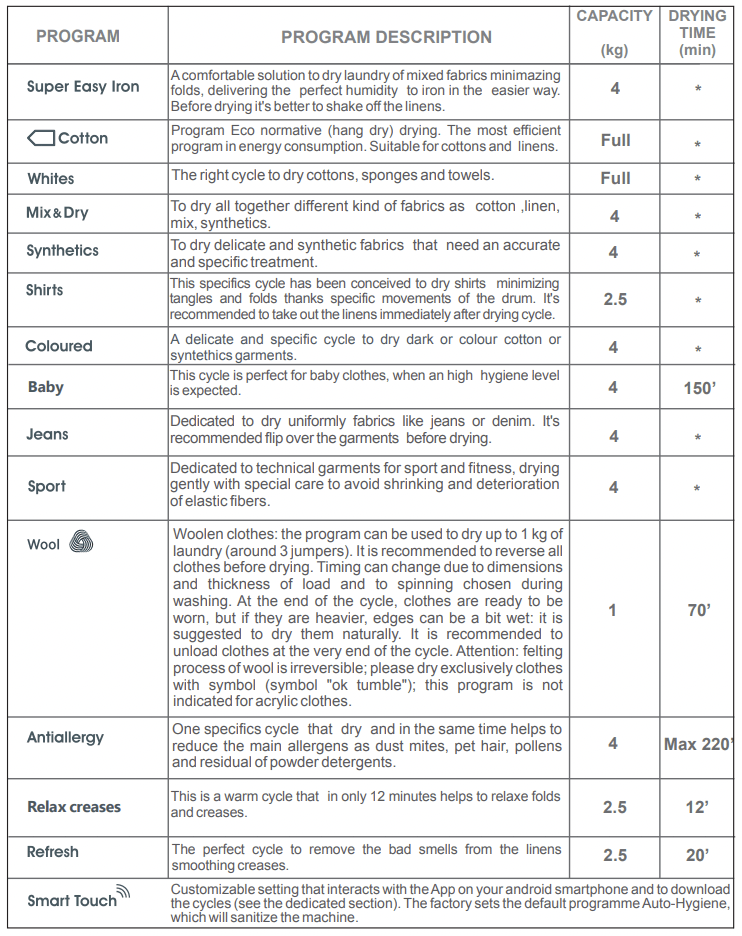
* The real duration of drying cycle depends by the starting humidity level of the laundry due to spin speed, type and amount of load, cleanliness of filters and ambient temperature.
FUNCTIONS
The main functions available using the App are:
● Voice Assistant – A guide to help you choose the ideal cycle with only three voice inputs (clothes/fabrics, colour, drying level).
● Cycles – To download and launch new drying programmes.
● Smart Care – Smart Check-up and troubleshooting guide.
● My Statistics – Drying statistics and tips for a more efficient use of your machine.
HOW TO USE SMART TOUCH
FIRST TIME - Machine registration
Enter the "Settings" menu of your Android smartphone and activate the NFC function inside the "Wireless & Networks" menu.
Depending on the smartphone model and its Android OS version, the process of the NFC activation may be different. Refer to the smartphone manual for more details.
● Turn the knob to the Smart Touch position to enable the sensor on the dashboard.
● Open the App, create the user profile and register the appliance following the instructions on the phone display or the "Quick Guide" attached on the machine.
NEXT TIME – Regular usage
- Every time you want to manage the machine through the App, first you have to enable the Smart Touch mode by turning the knob to the Smart Touch indicator.
- Make sure you have unlocked your phone from stand-by mode) and you have activated the NFC function; then, follow the steps mentioned earlier.
- If you want to start a dry cycle, load the laundry and close the door.
- Select the desired function in the App (e.g.: starting a programme, the Smart Checkup cycle, update statistics, etc…).
- Follow the instructions on the phone display, KEEPING IT ON the Smart Touch logo on the machine dashboard, when requested to do so by the App.
NOTES:
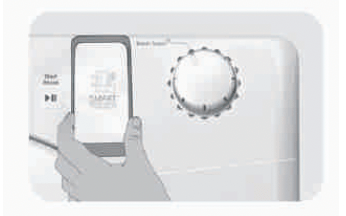
Place your smartphone so that the NFC antenna on its back matches the position of the Smart Touch logo on the appliance (as illustrate below).
If you do not know the position of your NFC antenna, slightly move the smartphone in a circular motion over the Smart Touch logo until the App confirms the connection. In order for the data transfer to be successful, it is essential TO KEEP THE SMARTPHONE ON THE DASHBOARD DURING THESE THE FEW SECONDS OF THE PROCEDURE; a message on the device will inform about the correct outcome of the operation and advise you when it is possible to move the smartphone away
Thick cases or metallic stickers on your smartphone could affect or prevent the transmission of data between machine and telephone. If necessary, remove them.
The replacement of some components of the smartphone (e.g. back cover, battery, etc...) with non-original ones, could result in the NFC antenna removal, preventing the full use of the App.
The management and the control of the machine via App is only possible "by proximity": it is therefore not possible to perform remote operations (e.g.: from another room; outside of the house).
TROUBLESHOOTING
FOR SMART TOUCH MODELS
The Candy simply-Fi app has a Smart Check-up function that allows you to confirm the functionality and status of the product at any time. To use the Candy simply-Fi APP you will need an Android smartphone with NFC technology.
More info can be found on the App.
If the display of the machine is showing an error (by a code or blinking LEDs), you should turn on the App on your Android smartphone, with NFC on, selecting "Read the error" on the "Help on line" menu. Place your smartphone against the Smart Touch logo on the control panel. You should now be able to read the fault directory to solve the issue.
What Might be the Cause of...
Defects you can remedy yourself
Before calling service for technical advice please run through the following checklist. A charge will be made if the machine is found to be working or has been installed incorrectly or used incorrectly. If the problem persists after completing the recommended checks, please call Service, they may be able to assist you over the telephone.
Time display to end could change during drying cycle. The time to end is continuously checked during the drying cycle and the time is adjusted to give the best estimation time. The displayed time may increase or decrease during the cycle and this is normal.
Drying time is too long/clothes are not dry enough…
● Have you selected the correct drying time/programme?
● Were the clothes too wet? Were the clothes thoroughly wrung or spindried?
● Does the filter need cleaning?
● Is the dryer overloaded? The dryer does not operate…
● Is there a working electricity supply to the dryer? Check using another appliance such as a table lamp.
● Is the plug properly connected to the mains supply?
● Is there a power failure?
● Has the fuse blown?
● Is the door fully closed?
● Is the dryer switched on, both at the mains supply and at the machine?
● Has the drying time or the programme been selected?
● Has the machine been switched on again after opening the door?
The dryer is noisy…
● Switch off the dryer and contact GIAS Service for advice.
The Indicator is on…
● Does the filter need cleaning?
The Indicator is on…
● Does the water container need emptying?