Documents: Go to download!
User Manual
- User Manual - (English)
- Quick start guide - (English)
- User Manual - (French)
- User Manual - (Spanish)
- Leaflet - (English)
- Connections and setup
- Guided Setup
- The Home screen
- Benefits of connecting
- Setting up Antenna TV
- Using your TV
- More settings
Table of contents
User Gudie Philips 32PFL4664/F7 LCD TV
Connections and setup
Connecting an antenna, cable, or satellite box
- If you are using an antenna, CATV cable without a set-top box, or a cable or satellite box that has only an antenna output, connect a 75-ohm coaxial cable (not provided) from the device to the ANT/CABLE input on the TV.
- Tip: If you are using an antenna with a 300-ohm twin-lead cable, you need to use a 300-to75-ohm adapter (not provided) to adapt the twin-lead cable to a connection that is compatible with the TV’s antenna input.
- Tip: If you receive your TV stations through a set top box from a cable or satellite TV provider, connect it to the TV using the best connection method available. From most to least desirable:
HDMI® input – Digital HD and SD video
- AV input – analog SD video
- Antenna input – analog SD video using NTSC
- Connecting external equipment with a composite AV video cable
- If the best connection available on your device is AV or composite video output, connect it to the TV using a composite AV cable (not provided). Composite AV cables typically have three
RCA-type plugs on each end, color coded as follows:
- Yellow – Video
- Red – Audio, right channel
- White or black – Audio, left channel
Connect each plug to the corresponding connector on the device and on the TV.
- Select models have an AV Input that looks like a headphone jack. Use the breakout cable included) to adapt this input to the three RCA-type plugs on your composite cable.
Connecting external equipment with an HDMI® cable
- If possible, connect your devices using HDMI® cables (not provided). They help to provide the best video quality and also carry audio signals, so that only one cable is needed.
- For better picture quality, we recommend that you use cables designated as High Speed HDMI® Cables.
Tip:
- You might need to configure the device to send its signal through its HDMI® connector.
- The connector labeled HDMI (ARC) or HDMI IN (ARC) has the additional ability to use the audio return channel to send digital audio to a receiver or sound bar, as explained in
Connecting an AV receiver or digital sound bar.
- Connecting headphones or analog sound bar to the TV
- You can connect headphones or an analog sound bar (not provided) to the TV’s headphone jack.
Tip:
- Inserting a plug in the headphone jack disables the sound from the TV’s built-in speakers.
Warning:
- Loud noise can damage your hearing. When using headphones, use the lowest volume setting on your headphones that still lets you hear the sound.
- Select models also have an audio line out connection that is not affected by TV volume or mute settings and does not disable the TV speakers.
- Use this connection when you want to use your amplifier or sound bar to control the TV volume. To turn off the TV’s built-in speakers, in the Home screen menu, navigate to Settings > Audio > TV speakers and change the setting.
- Connecting headphones to the Roku Enhanced Voice
Remote
- Select Roku TVs come with the Roku Enhanced Voice Remote. On these models, you can connect headphones to the jack on the left side of the remote.
Tip:
- Inserting a plug in the remote’s headphone jack disables the sound from the TV’s built-in speakers or attached receiver or sound bar.
- The volume and mute controls on the right side of the remote adjust the volume level of the connected headphones.
Warning:
- Loud noise can damage your hearing. When using headphones, use the lowest volume setting on your headphones that still lets you hear the sound.
- You might notice that connecting headphones to your remote shortens the remote’s battery life somewhat.
Connecting an AV receiver or digital sound bar
- You can enjoy Dolby Audio™ multichannel sound from your TV if you connect a digital amplifier or sound bar (not provided) in either of two ways:
- Digital optical audio out (S/PDIF) – Connect a TOSLINK optical cable (not provided) from the TV to the Optical input on your receiver or sound bar.
- HDMI® ARC – Connect an HDMI® cable (not provided) from the HDMI (ARC) connector to the
- HDMI® input on your receiver or sound bar. This connection uses the Audio Return Channel
- ARC) feature of the HDMI® specification to output sound from the TV to a compatible device. To use this feature, you must configure the TV to enable HDMI® ARC, as explained in
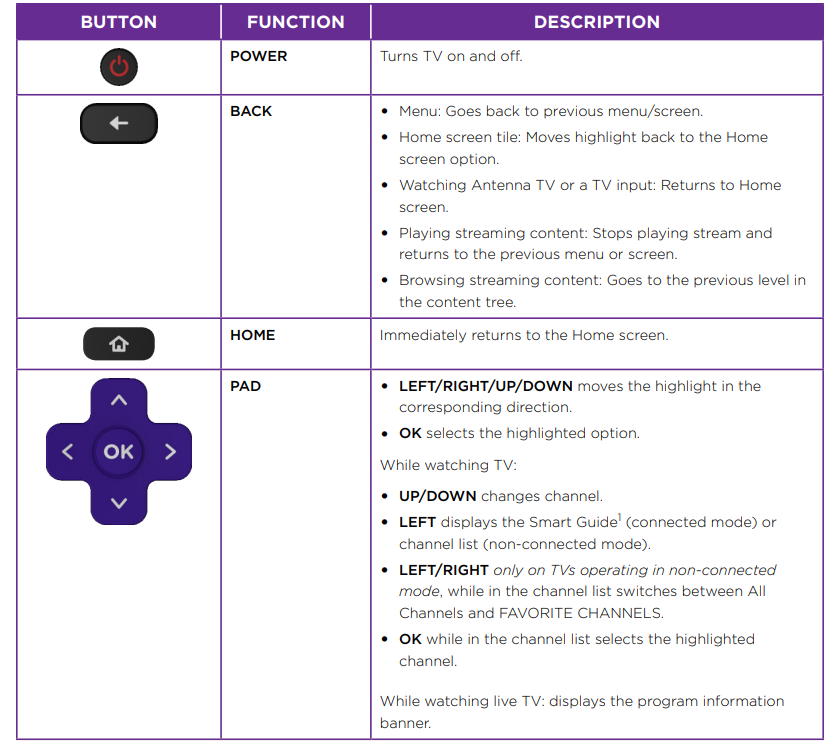
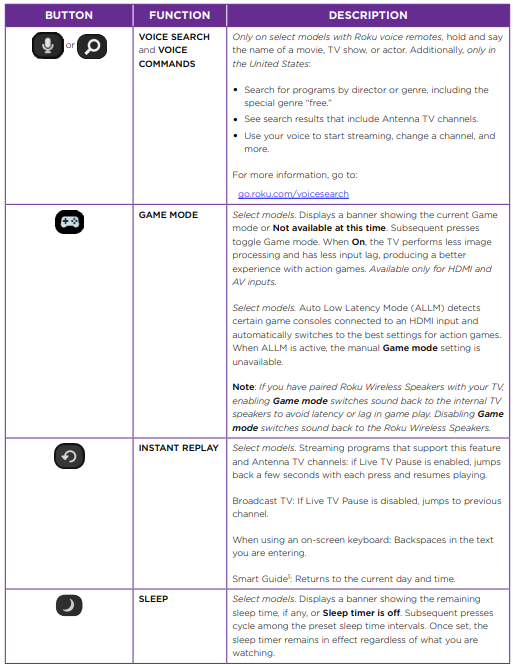
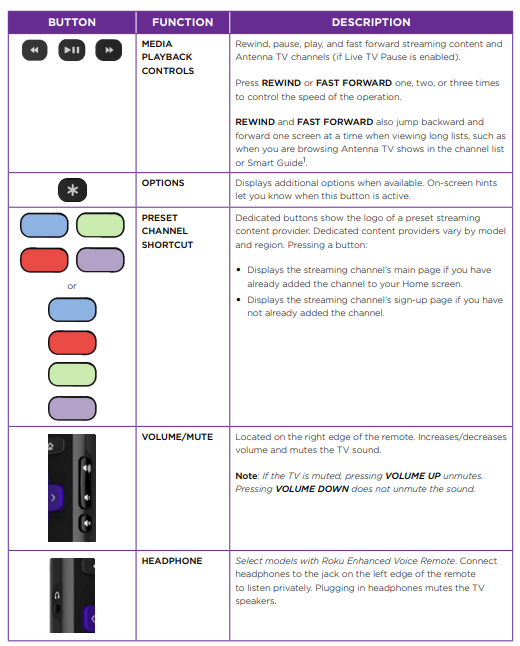
Roku TV remote
Guided Setup
Starting Guided Setup
- To start Guided Setup, press the POWER button on the remote to turn on your TV.
Note:
- Guided Setup normally runs only once, the first time you turn on your TV. If you need to run Guided Setup again, you’ll have to perform a factory reset, as explained in Factory reset everything.
When you first turn on your TV, it will take a few seconds to get itself ready. You’ll notice the following things happening:
- The status indicator blinks every time the TV is busy doing something; in this case it’s powering up and getting ready for you.
- The power-on screen appears and the status indicator blinks slowly for a few more seconds. The power-on screen shows a brand logo while the TV starts up.
- After a few seconds, Guided Setup starts
Network connection
- After you select Set up for home use, the TV prompts you to make a network connection.
- If your TV has both wired and wireless connections, you’ll see the following screen.
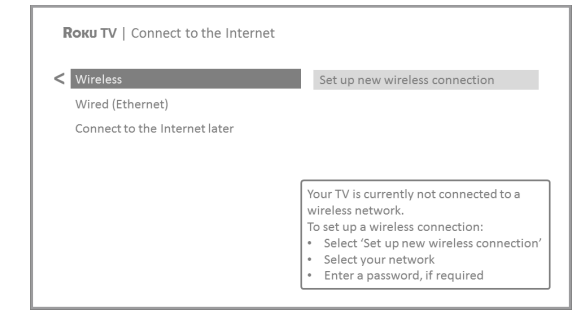
Wireless connection
- Highlight Set up new wireless connection and press OK. The
- TV prompts you through wireless setup. Skip ahead to the next step for help with the process.
Wired connection
- Highlight Connect to wired network and press OK. The TV immediately attempts to connect to your wired network, your local network, and then the Internet. Go to Step 9 to continue with Guided Setup.
Connect to the Internet later
- If you don’t want to connect to the Internet right now, you can skip this step and use the TV to watch Antenna TV channels, play games, and watch DVDs.
- When you’re ready to connect, it’s easy. We’ll show you how in Benefits of connecting.
Note:
- If you decide not to connect, Guided Setup skips ahead to setting up the devices that you’ve connected to your TV. Jump ahead to Connect your devices to complete Guided Setup
Other options
Connect to the Internet later
- If you don’t want to connect to the Internet right now, you can skip this step and use the TV to watch Antenna TV channels, play games, and watch DVDs. When you’re ready to connect, it’s easy. We’ll show you how in Benefits of connecting.
Note:
- If you decide not to connect, Guided Setup skips ahead to setting up the devices that you’ve connected to your TV. Jump ahead to Connect your devices to continue.
Scan again / Scan again to see all networks
- The name of this option depends on the number of wireless networks within range. o Scan again appears if the list already shows all available wireless networks within range.
- If you don’t see your wireless network name in the list, you might need to adjust the location of your wireless router or the TV, turn on your router, or make other changes.
- When everything is ready, select Scan again to see if your network name now appears in the list. o Scan again to see all networks appears if there are more wireless networks than the strongest ones it initially listed. If you don’t see your wireless network name in the list, this option displays the complete lis
- If you still don’t see your network name, you might have your router configured to provide wireless service as a private network.”
Note:
- Highlighting either of these options displays an informational panel with the unique media access control (MAC) address of your Roku TV. You will need the
- MAC address if your wireless router is configured to use MAC address filtering.
Private network
- If your wireless network name is hidden, it won’t appear in the list.
- Select Private network to display an on-screen keyboard and use it to enter your network name. Unless you changed the factory-set network name, you can find the name (also called SSID) on a label on the router.
Tip:
- Wireless networks that are password-protected display a “padlock” icon adjacent to the name. This icon enables you to know that you are going to be prompted to enter a password after you select that network.
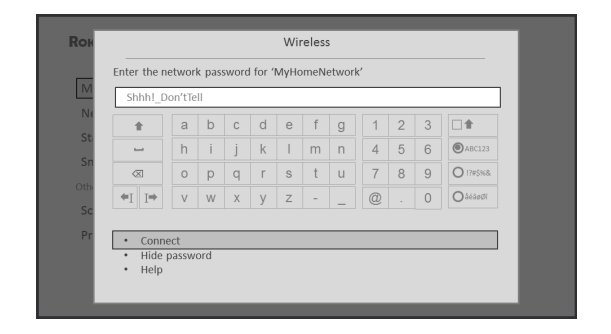
The Home screen

- Typical connected Home screen
- Home screen menu—shows options available to you when you are on the Home screen.
- Highlighted option—press OK on the remote to select.
- TV input tiles—select an input to watch the connected device.
- Streaming channel and app tiles—select a tile to go to the indicated streaming channel or application.
- Options hint—press on the remote for options when this symbol is present.
- Next screen hint—press the RIGHT arrow on the remote to see the next screen.
Personalize your Home screen
- There are many things you can do to personalize your Home screen and make it just right for you and your family:
- Only in connected mode: Add streaming channels by using the Streaming Channels menu option to browse the Roku Channel Store.
- Only in connected mode: Change the screen theme by going to Settings > Themes to find and pick one to suit your mood.
- Only in connected mode on U.S. models: hide Featured Free or hide Movie Store and
TV Store.
- Remove a tile by highlighting it and pressing
- Then highlight Remove input or
- Remove channel and press OK.
- Move a tile by highlighting it and pressing
- Then highlight Move input or Move channel and press OK. Use the arrows to move the tile, and then press OK to lock it in its new location.
- Rename a TV input tile by highlighting it and pressing
- Then highlight Rename input and press OK. Highlight a new name in the list, and then press OK to assign that name to the tile.
- Rather than using the predefined names and icons, you can set a custom name and icon. To do so, scroll up or down to highlight Set custom name & icon
Benefits of connecting
Make any night a movie night
- Thousands of movies to choose from, across all major streaming movie channels like Netflix,
- Crackle, and more1
- You’ll never run out of something new to watch.
- Get in the groove
- Stream endless hours of music from free and subscription-based channels like Deezer and
- TuneIn. With almost instant access to thousands of music artists, your favorite beats are just as close as your remote.
Explore your passions
- In addition to popular streaming channels like, NHL, Sky News and Google Play, your Roku TV also offers hundreds of streaming channels to fuel your passions—including fitness, cooking, religion, outdoors, International programming and much more.
- Enjoy FREE trials of popular channels
- Your Roku TV comes loaded with special offers, including free trials (if eligible) from popular streaming channels like Netflix, Hopster, Acorn TV, and many more. REMEMBER THAT YOU
MUST CANCEL BEFORE THE FREE TRIAL ENDS TO AVOID SUBSCRIPTION FEES.
- Take advantage of awesome features
- Powerful, voice-enabled search helps you use English language voice commands to find movies and TV shows by title and actor, and, in the United States, by director name across multiple streaming channels. Only in the United States, search results also include Antenna
- TV programs airing in your region as well.
- Automatic account linking keeps track of supported streaming subscriptions on other Roku devices, so that you won’t have to re-enter your user name and password when adding the same channel on your newly-activated Roku TV.
More Ways
- Watch only in the United States, gives you recommendations about the show you are watching on the Antenna TV,
- HDMI, or AV input, gives you options to stream the current show from the beginning, the entire season, or the entire series, and recommends other shows with similar themes. It also uses the shows you watch to display ads that are more relevant to you
Setting up Antenna TV
Status indicator
- Your TV has a single status indicator. It goes on and off and blinks in different ways depending on the status of the TV, as shown in the following table

Opting in to Smart TV experience (U.S. only)
- Only in connected mode in the United States, the first time you select Antenna TV, an HDMI input, or AV input, your TV offers to enable the Smart TV experience
- If you decide to enable it at this time, you’re all set to enjoy its recommendations and features.

- The Smart TV experience uses automatic content recognition (ACR) and other technology to collect information about what you watch through your Antenna TV, and on devices like media players and cable boxes connected to the HDMI or AV inputs.
- Opting in means that you give permission to analyze the programs you watch for the purpose of making recommendations, as well showing ads that are more relevant to you.
- If you decide not to enable the Smart TV experience at this first opportunity, you can enable it later.
- Or, if you decide you’d rather not use the feature, you can disable it, but be aware that previously collected information is retained and not deleted.
Changing channels
- To change channels, you can do any of the following:
- Press the UP arrow to change to the next higher channel.
- Press the DOWN arrow to change to the next lower channel.
- Press the LEFT arrow to display the channel list (in non-connected mode) or Smart
- Guide1 in connected mode), and then press the arrow keys to select the channel or show you want to watch. Press REWIND and FAST FORWARD to move through the list one page at a time. When you’ve highlighted the channel or show you want to watch, press OK. (If you decide you don’t want to change channels, press the BACK button).
- Only if Live TV Pause is not enabled, press to jump to the previous channel. Press again to return to the channel you were watching before you pressed .
Note:
- If the button is not available on your remote, you can use this feature
Using your TV
Using Live TV Pause
- If you have used the Roku remote to watch streaming channels, using Live TV Pause should be very familiar to you.
- While watching a digital Antenna TV channel, press PLAY/PAUSE to pause or play the content. After the TV program has been paused for 90 minutes, the TV resumes playing.
- After watching a channel for a while, press REWIND to jump back up to the point where you first started watching the channel, up to 90 minutes.
- After pausing or rewinding, press FAST FORWARD to jump ahead up to the point where you are once again watching the live TV program.
- Press FAST FORWARD or REWIND repeatedly to cycle through 1x, 2x, and 3x skip speeds. Press INSTANT REPLAY to play back the last several seconds of the program.
- When the program is paused, press the LEFT and RIGHT arrows to move forward and backward through the program approximately 10 seconds per press. Small frames appear across the screen to identify your location in the program.
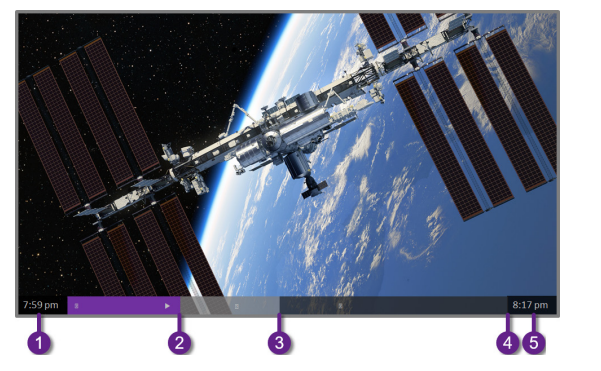
- Mark your favorite channels
- In non-connected mode, you can make any channel a favorite whenever you’re watching
Antenna TV channels.
- Press the LEFT arrow to display the channel list. Notice that the words All channels appear at the top of the channel list.
- Scroll up or down to highlight a channel that you want to make a favorite.
- Press . At this point, you’ll see two options:
- Add to favorites
Back
- With Add to favorites highlighted, press OK. A symbol appears adjacent to the channel to indicate that it is now a favorite.
- Repeat these steps to add more favorite channels.
Surf only your favorite channels
- In non-connected mode, after you’ve marked one or more channels as favorites, you can switch to your favorite channels whenever you’re watching Antenna TV channels.
- Press the LEFT arrow to display the channel list.
- Press the LEFT or RIGHT arrow once to switch to Favorites. Notice that the word
- Favorites appears at the top of the channel list.
- Highlight a channel and press OK to select one of the channels in the Favorites channel list, or wait a few moments until the channel list disappears.
- Press the UP or DOWN arrow to change to the previous or next favorite channel. Each channel you select in this way is a favorite channel. Your channel surfing is limited to favorite channels only.
Navigating the Smart Guide
- To switch to a program that is currently in progress, highlight it, and then press OK.
- To return to the current time after navigating to a different time slot, press REPLAY .
- To return to the currently airing program without causing a channel change, press
- BACK.
- To see More Ways to Watch, highlight any show that has a purple asterisk (), and then press .
Favorite channels in the Smart Guide
- The Smart Guide organizes your favorite channels at the top of the program list for convenient access. It does this automatically as you use your TV over several days.
- If you would prefer not to have a favorites section in the Smart Guide, you can turn this feature off.
Turn off favorite channels
- From the Home screen menu, navigate to Settings > TV inputs > Antenna TV >
- Favorite channels.
- Highlight Enable ‘Favorite channels’.
- Press OK to clear the check mark.
Using More Ways to Watch
- As you use More Ways to Watch, be aware that you’ll only see suggestions on your TV when all of the following conditions are met:
- Your TV is operating in connected mode in the United States.
- If you are watching shows through and HDMI or AV input, you’ve enabled Smart TV experience. (If you are watching Antenna TV channels, this setting does not matter.)
- The program you’re watching contains the information needed to identify it. Note that some programs, such as the daily news, typically do not activate More Ways to Watch.
- At least one participating streaming channel offers the movie or TV show you are watching, or other episodes, or more shows like the one you are watching.
- If all of these conditions are met, you can view the suggestions. More Ways to Watch recommendations appear in several places:
- When watching the HDMI and AV inputs, you’ll see a More Ways to Watch notification in the lower right corner of the screen for a few seconds unless you have disabled
Enable auto notifications.
- After this banner disappears, you can restore the More Ways to Watch prompt by pressing OK.
- Playing content from USB storage devices
- Only in connected mode, your Home screen has the Roku Media Player tile. Otherwise, the
- Home screen has the USB Media Player tile. You can play personal music, video, and photo files from a personal USB flash drive or hard disk connected to the TV’s USB port.
- To use this feature, make sure your media files are compatible with the Roku/USB Media
- Player. To see the latest list of supported formats, view Help in the Media Player1
- The Roku/ USB Media Player displays supported file types only, and hides file types it knows it cannot play.
More settings
Guest Mode
- Only in connected mode, when you enable Guest Mode, your guests can sign in to subscription channels using their own account credentials instead of using yours. Your guests’ credentials are then automatically removed on the date they specify.
- By enabling Guest Mode, your guests won’t have access to your personal streaming channel accounts and won’t be able use your Roku account to make purchases. Instead, your guests can safely access their own subscription channels. And they won’t have to remember to sign out before they leave.
To enable Guest Mode:
- From the Home screen menu, navigate to Settings > System > Guest Mode.
- Select Enter Guest Mode.
- Use the on-screen keypad to enter your Roku account PIN.
- Select OK to confirm and put the TV into Guest Mode.
To disable Guest Mode:
- Press the Home button to return to the Home screen menu.
- Navigate to Settings > System > Guest Mode.
- Select Exit Guest Mode.
- Use the on-screen keypad to enter your Roku account PIN.
- Select OK and confirm that you want to disable Guest Mode.
- After you disable Guest Mode, all of your original settings are restored and your channels are reinstalled. You might need to sign in to your subscription channels again to access your content.
Note:
- Any game data that was stored on your Roku device is not restored.
Network settings
- If needed, you can change your network settings at any time. For example, if you change the name of your wireless network (its SSID) or its password, you will need to change your TV’s settings so that it can continue to connect. Also, if you decided not to connect to the Internet in Guided Setup, you can use network settings to connect at a later time.
- To change network settings, from the Home screen menu, navigate to Settings > Network, and then press the RIGHT arrow. At this point, you can choose the following options:
About
- Lists important information about your current network connection, such as status, connection type, IP addresses, and MAC address. This information is often useful when contacting customer support with connection issues.
Check connection
- Select your existing network connection type, and then press OK to start checking the network connection. The TV uses your current network information to reconfirm the wireless or wired network connection to the local network and the Internet connection.
Set up connection
- Select a network connection type, and then select the option to set up a new connection. Follow the on-screen instructions to complete the network connection. For help with each of the steps, see Network connection.
Time settings
- You can change time settings to suit your preferences. You can find the following settings by navigating from the Home screen menu to Settings > System > Time:
Sleep timer
- Set a time delay after which the TV will automatically shut off.
- This setting reflects the setting you can make in the Options menu from any TV input, as explained in Options menu settings. Note that the sleep timer setting is not input specific.
Time zone
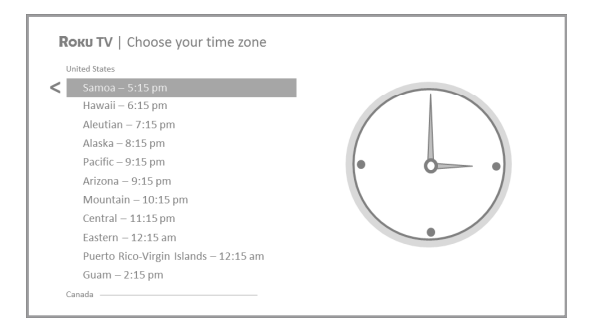
- Select whether to set the time zone automatically or manually, and if set manually, select your current time zone.
- Typically, a TV connected to the Internet can discover its own time zone automatically, and a TV that is not connected to the Internet must be set manually.
- Initially, this setting is made when you set up the TV tuner, as explained in Setting up Antenna TV. Correct time zone information is needed to correctly display program data.
Clock format
- Select whether to display time in a 12-hour or 24-hour format, or to turn off time display. This setting is available only on TVs that are connected to the Internet.
- Non-connected TVs do not display the time
Scan again for Antenna TV channels
- There will be times when you need to create a new channel list. For example, you:
Change cable providers
- Reorient your TV antenna
- Move to a different city with different channels
- Whenever you need to update your TV channel list, you can repeat the channel scan.
Tip:
- Repeat the channel scan from time to time to make sure you are receiving all of the latest channels.
- Broadcasters add and remove channels, move channels to different parts of the spectrum, and change the power levels of their channels periodically.
Note:
- Repeating the tuner channel scan unhides all hidden channels.
To repeat the channel scan, from the Home screen menu, navigate to Settings > TV inputs
- Antenna TV > Scan again for channels.
- Then select Start finding channels to begin the channel scan process.
- The screens and options that appear during this process are identical to those described in How do I set up the TV tuner?
HDMI® mode (4K models only)
- On 4K (UHD) TVs, you can independently configure each HDMI® input to match the capabilities of the connected device. From the Home screen menu, navigate to Settings > TV inputs, and then select an enabled HDMI® input. Next, select HDMI mode and then select one of the following settings:
- Auto – Let the TV determine the best setting. Use this option unless your HDMI® device does not correctly communicate its HDMI® version compatibility.
- HDMI 1.4 – Configure the input for compatibility with HDMI® version 1.4, which supports a maximum refresh rate of 30 Hz at full UHD resolution. Most HDMI® devices will work correctly with the TV in this mode.
- HDMI 2.0 – Configure the input for compatibility with HDMI® version 2.0, which supports a maximum refresh rate of 60 Hz at full UHD resolution. You must use this mode to view
- HDR content from the device connected to this HDMI® input. However, note that many older HDMI® devices do not work correctly when the TV’s HDMI® input is set to this mode.
Control by mobile apps
- You can choose the level of control you want to allow your TV to accept from external devices, such as smart phones, tablets, and virtual assistants. Device connect settings enable other devices, including the Roku Mobile App, to control your TV over the local area network in your home.
- To adjust the level of external control access:
- From the Home screen menu, navigate to Settings > System > Advanced system settings > Control by mobile apps.
Select Network access.
- Choose one of the following settings:
- Default – Devices can connect only through a private network address, and accept commands only from other private network addresses on your home network. This setting is suitable for most cases, including use of the Roku mobile app on your smartphone.
- Permissive – Devices can connect under all conditions, but accept commands only from private network addresses or the same subnetwork within your home network.
- This setting might be required when attempting to operate the TV from a thirdparty application, for example, one of the Internet of Things (IoT) applications such as ifttt.com.
- Disabled – Device connection is completely disabled. The TV does not
- Turning off the TV speakers for home theater use
- When you use your TV with a sound bar or an external amplifier and speakers, you’ll probably want to turn off the internal TV speakers.
- To turn off the TV’s built-in speakers, in the Home screen menu, navigate to Settings > Audio >
- TV speakers and change the setting.
Tip:
- The TV’s internal speakers can be enabled and disabled automatically as needed by system audio control, as described in Enable system audio control. Using the headphone jack also turns off the internal speakers.
Setting up a digital audio connection
- To take advantage of your TV’s advanced audio capabilities, connect it to an external amplifier, receiver, or sound bar by using either of these two digital audio connections:
- HDMI ARC – The HDMI® Audio Return Channel enables the TV to output digital audio on one of its HDMI® connectors. The connected amplifier can also function simultaneously as an input source to the TV, if needed. To use the ARC capability, you must connect an HDMI® cable from your amplifier’s HDMI® ARC connector to the HDMI ARC connector on the TV. You also must: o Be sure your HDMI® cable is certified by HDMI®. o Enable HDMI ARC under Settings > System > Control other devices (CEC), as explained in Enable HDMI® ARC.
- SPDIF optical – The SPDIF optical connector outputs a digital audio signal.
- To use the optical output, connect a TOSLINK optical cable from the amplifier to the Optical or SPDIF connector on the TV.
- Note: Dolby Audio™ supporting Dolby Digital Plus™ format is not available through the SPDIF optical output. This format is only available through the HDMI® ARC connection.
See other models: MG3750/60 243S5LDAB/27 DVDR520H/37 466706 43PFL4901/F7
