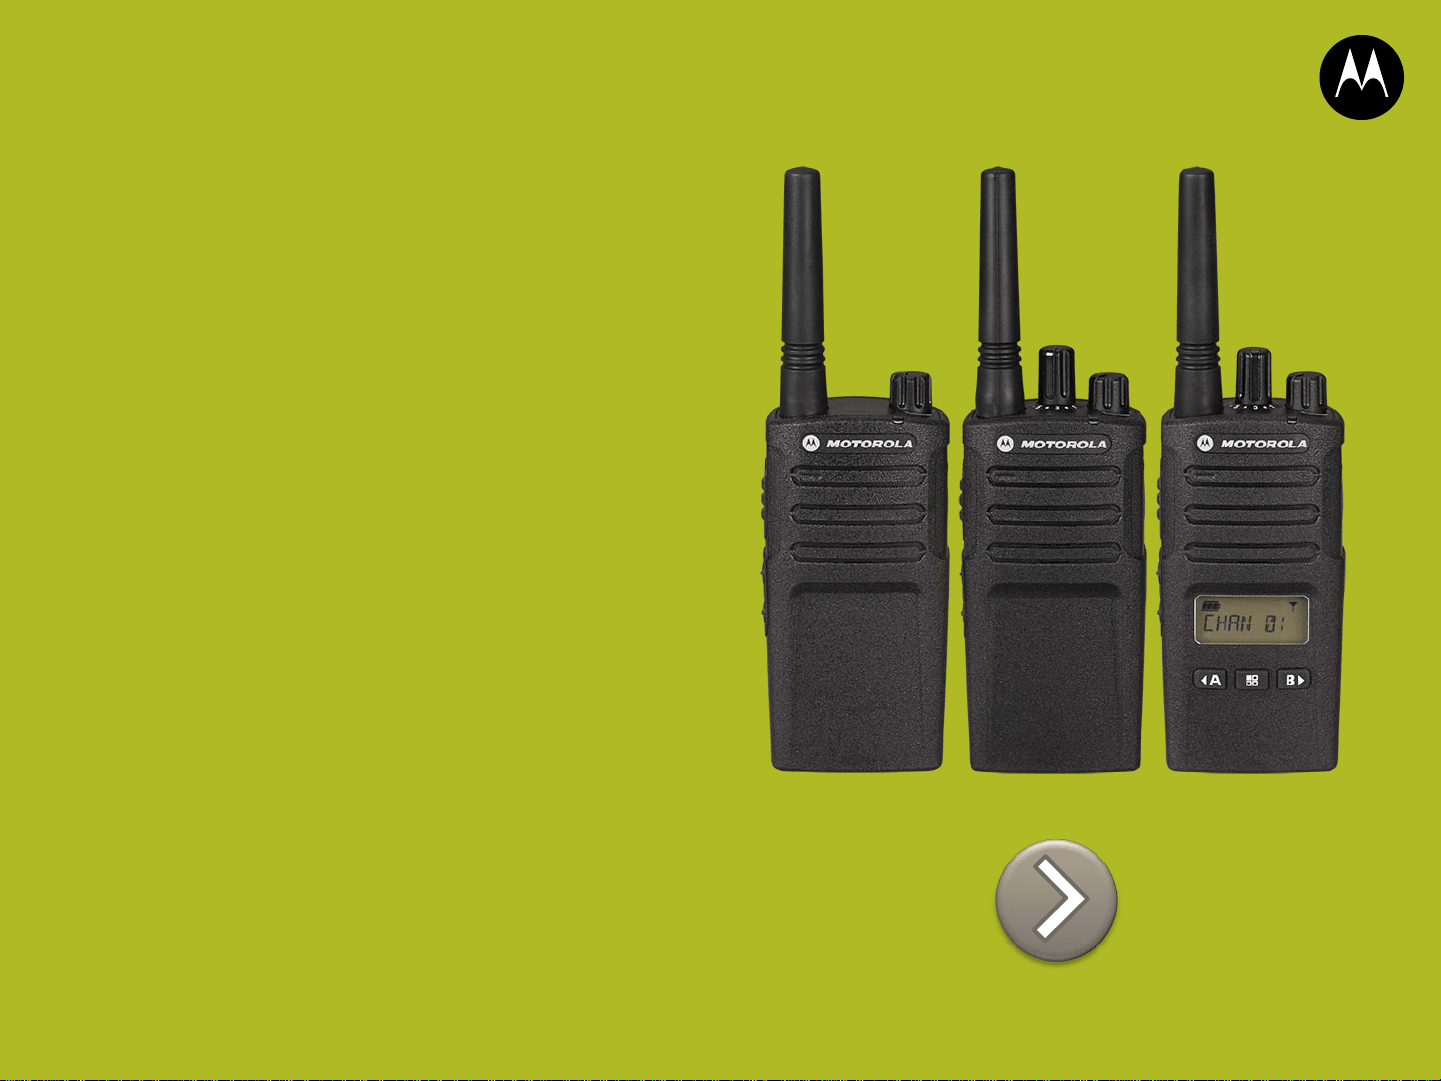
QUICK REFERENCE
GUIDE FOR
RADIO FEATURES
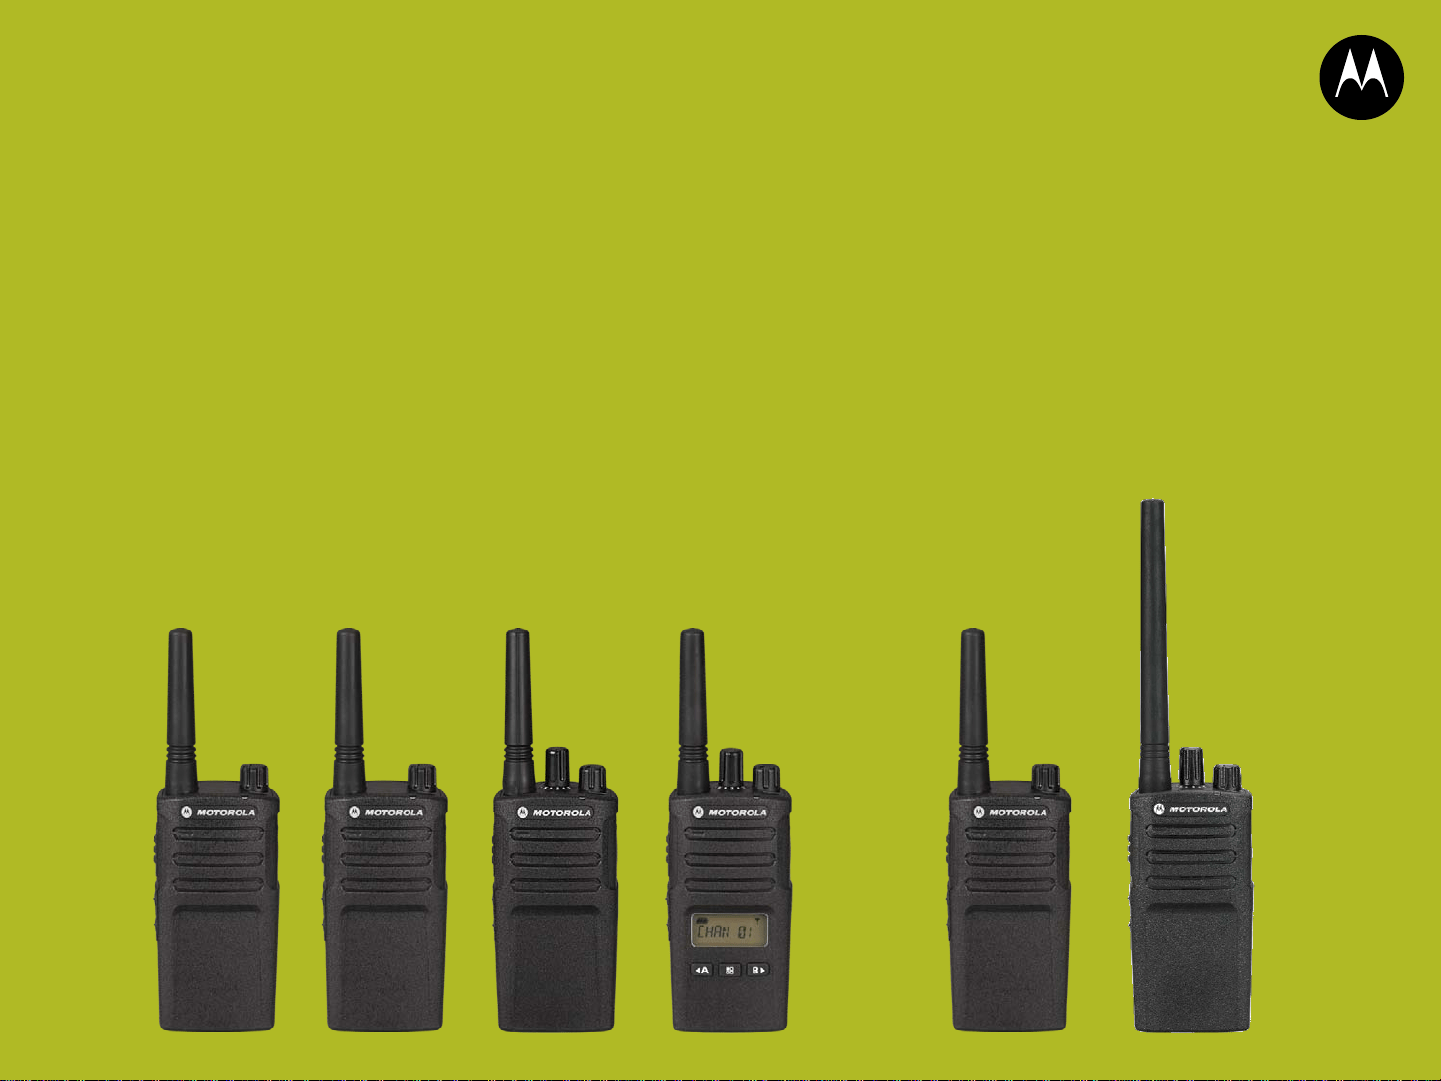
RM SERIES
BUILT TOUGH
TO DO
BUSINESS
BETTER
MOTOROLA, MOTO, MOTOROLA SOLUTIONS and the Stylized M Logo are trademarks or registered trademarks of Motorola Trademark Holdings, LLC and are used under license.
All other trademarks are the property of their respective owners. © 2013 Motorola Solutions, Inc. All rights reserved. Specifications are subject to change without notice. All specifications
shown are typical.

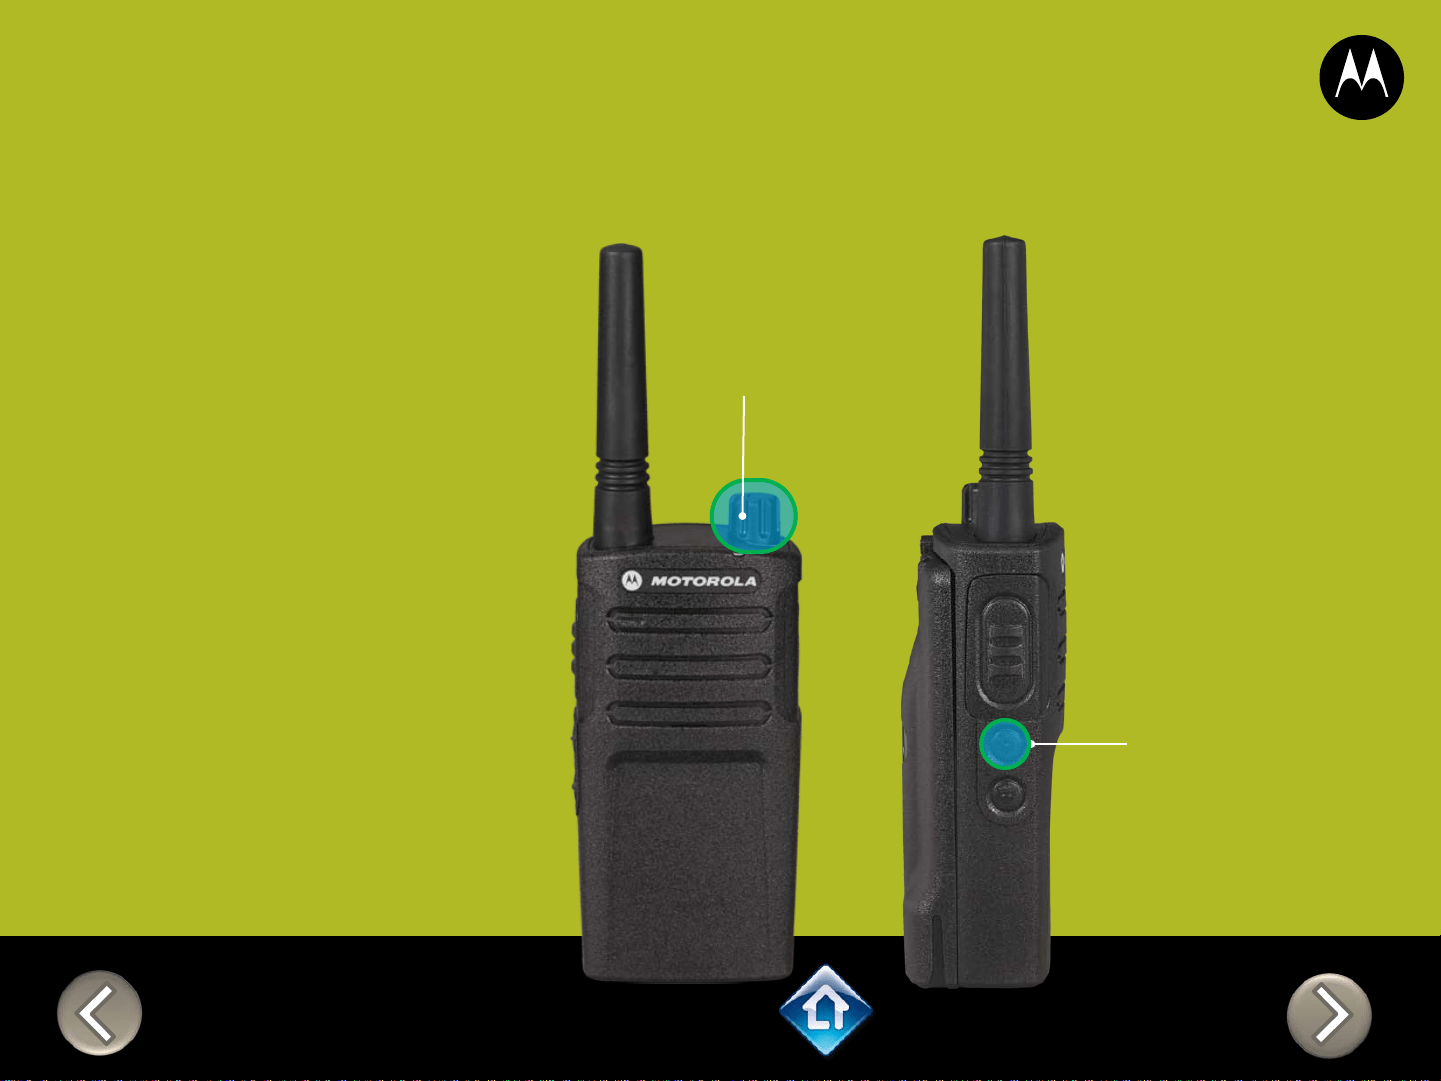
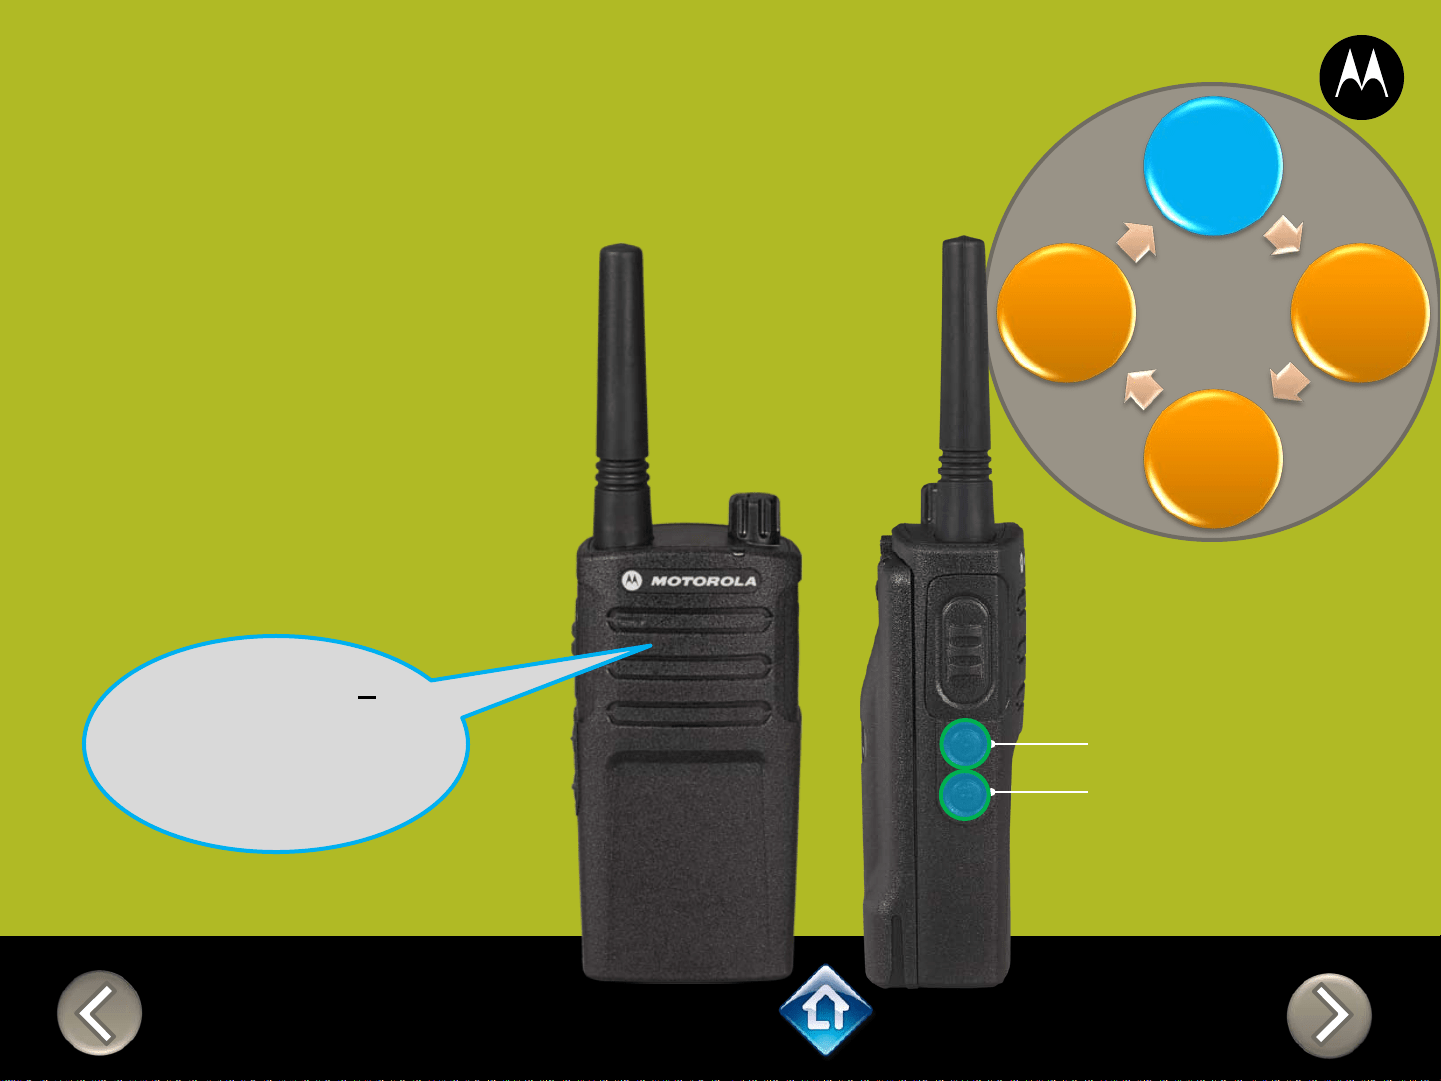
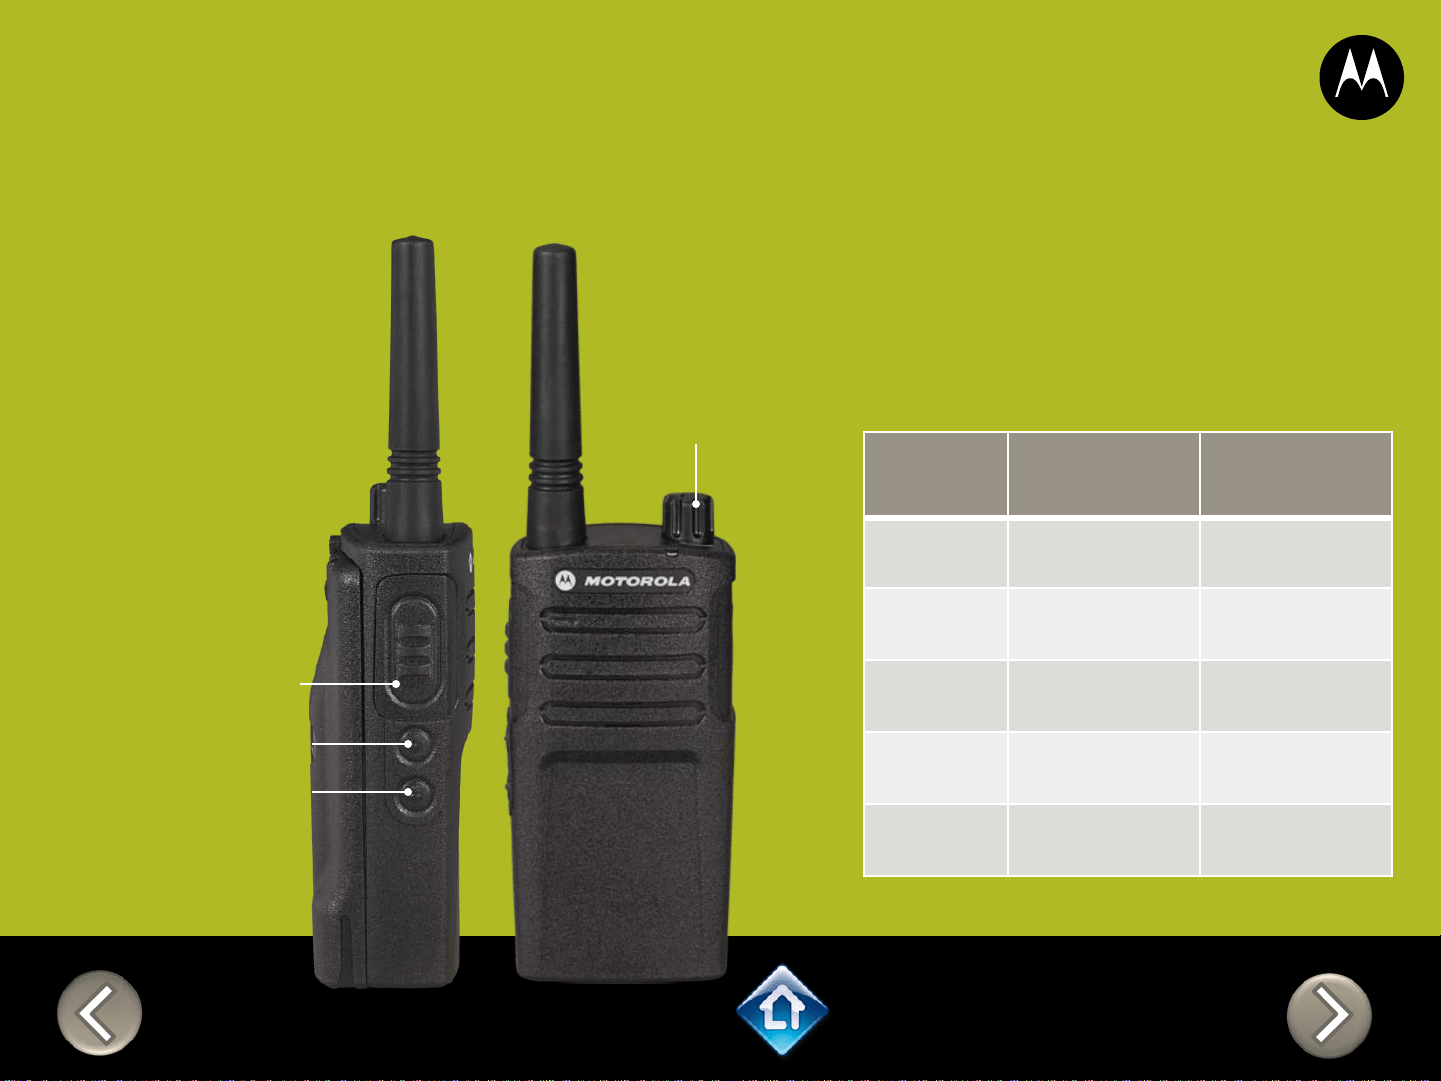
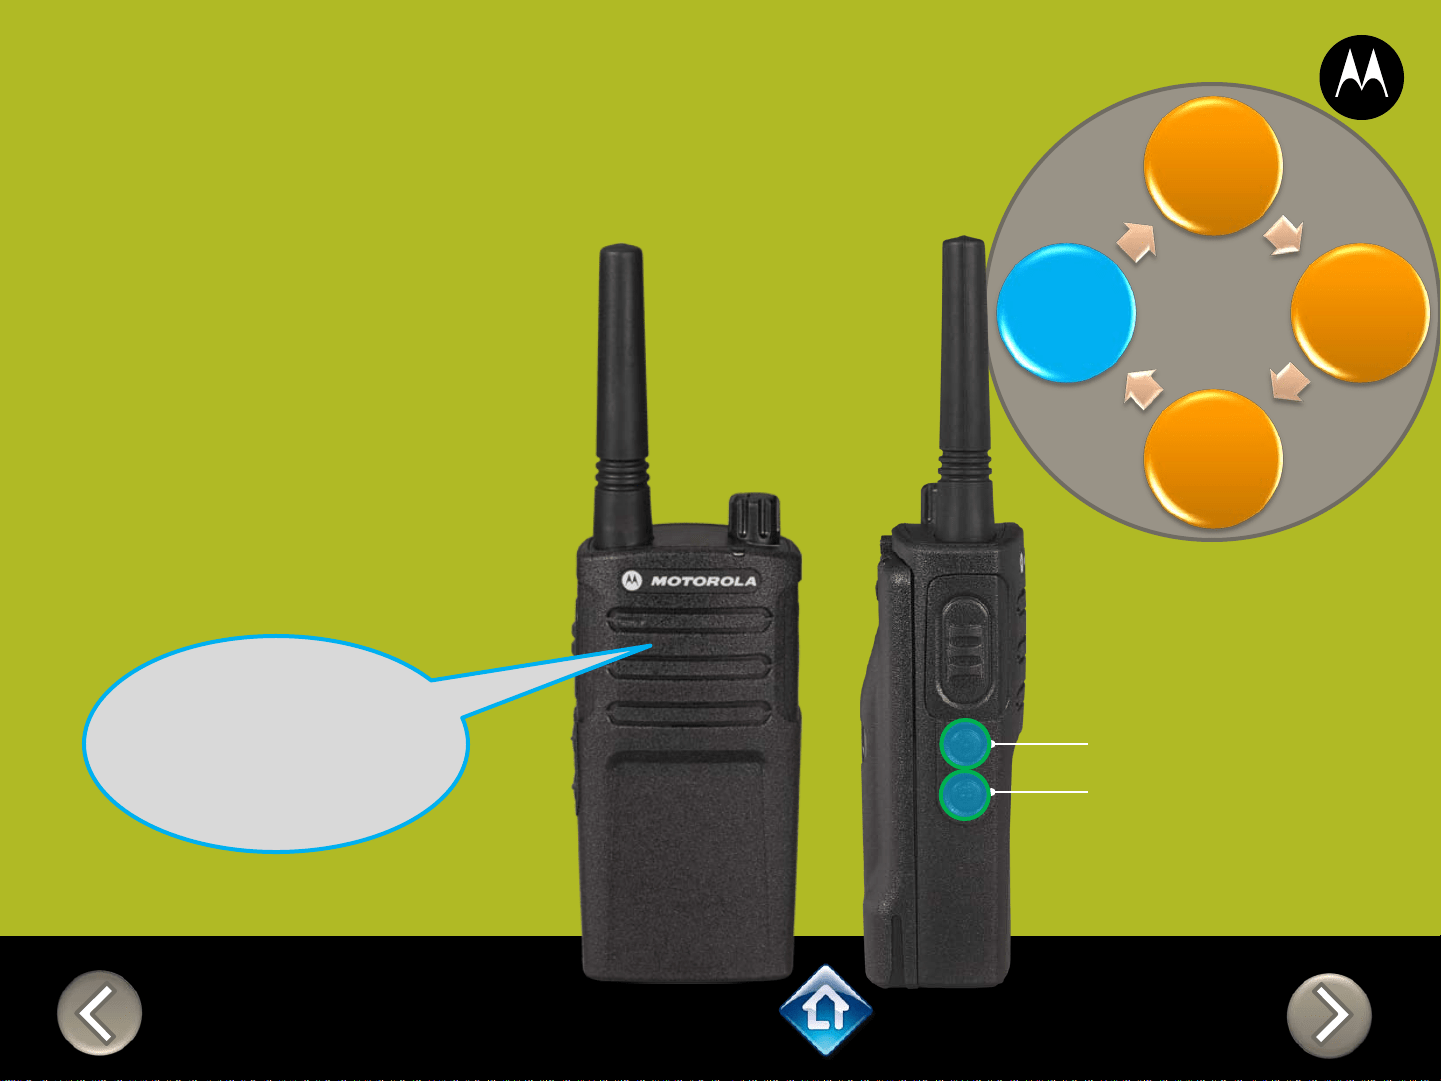
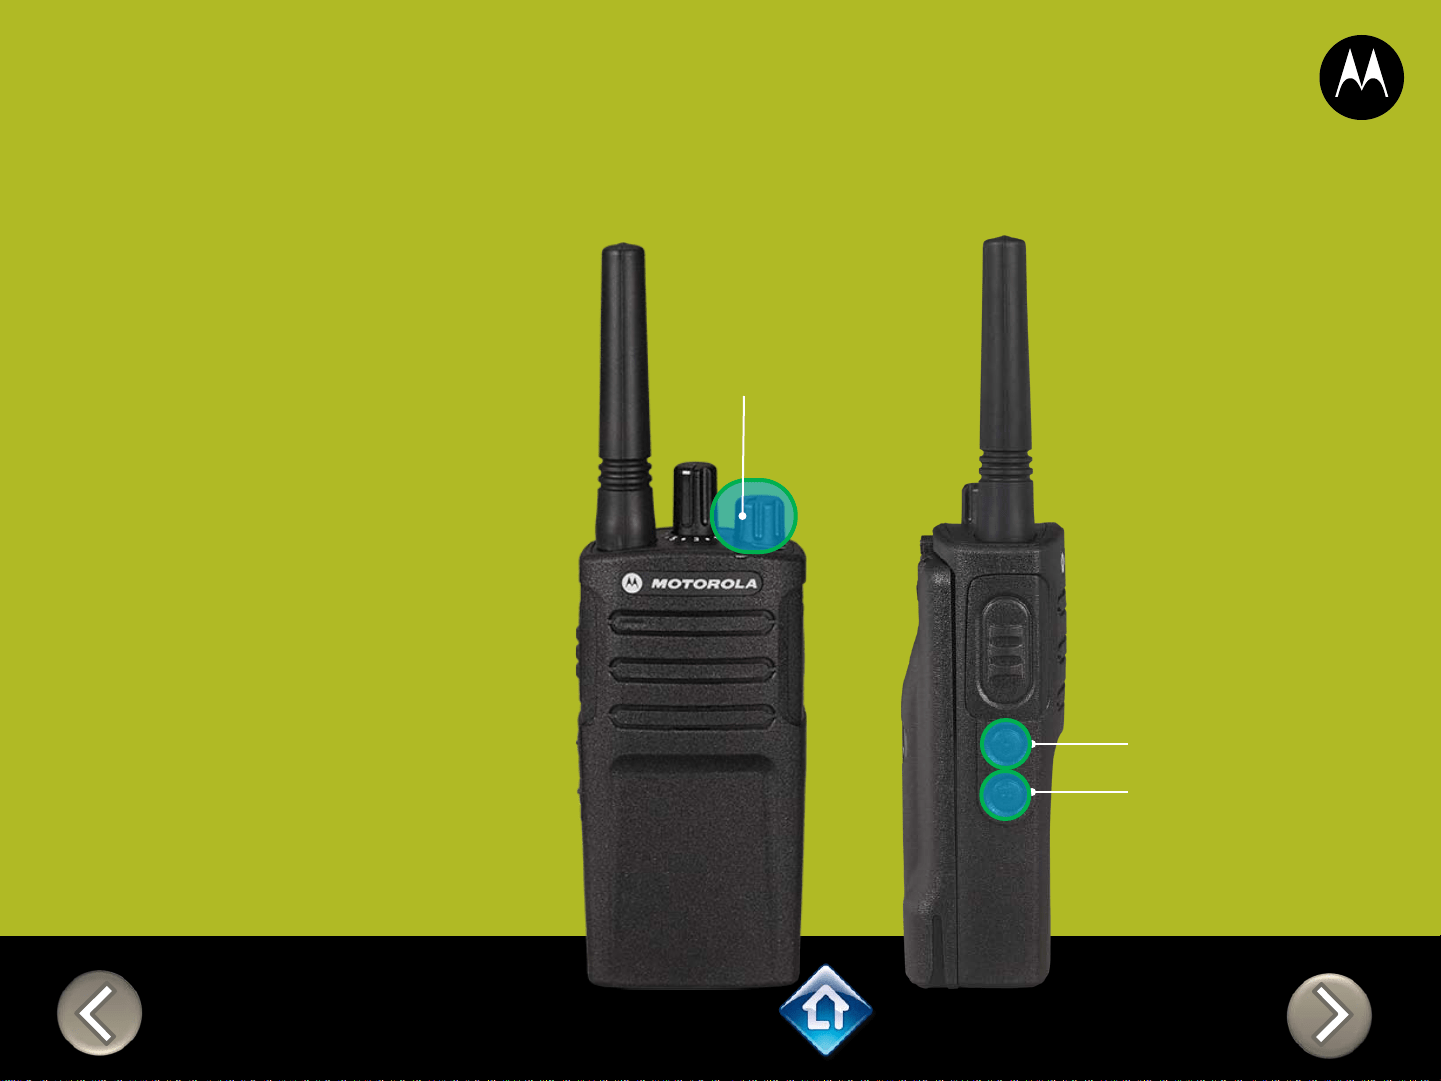
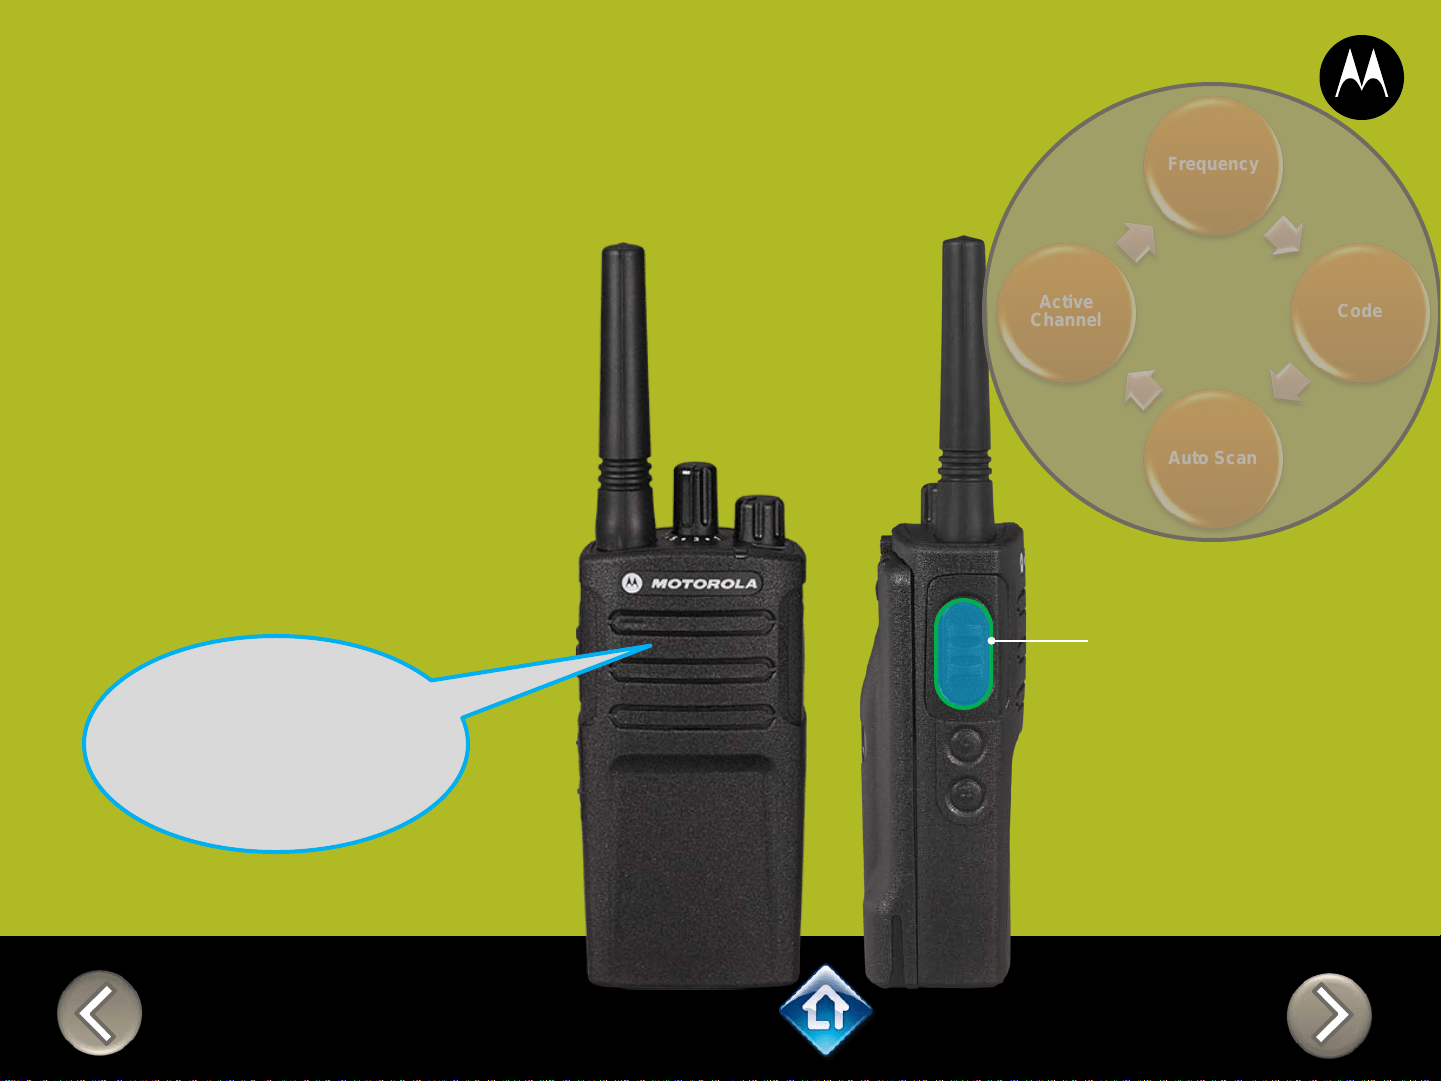
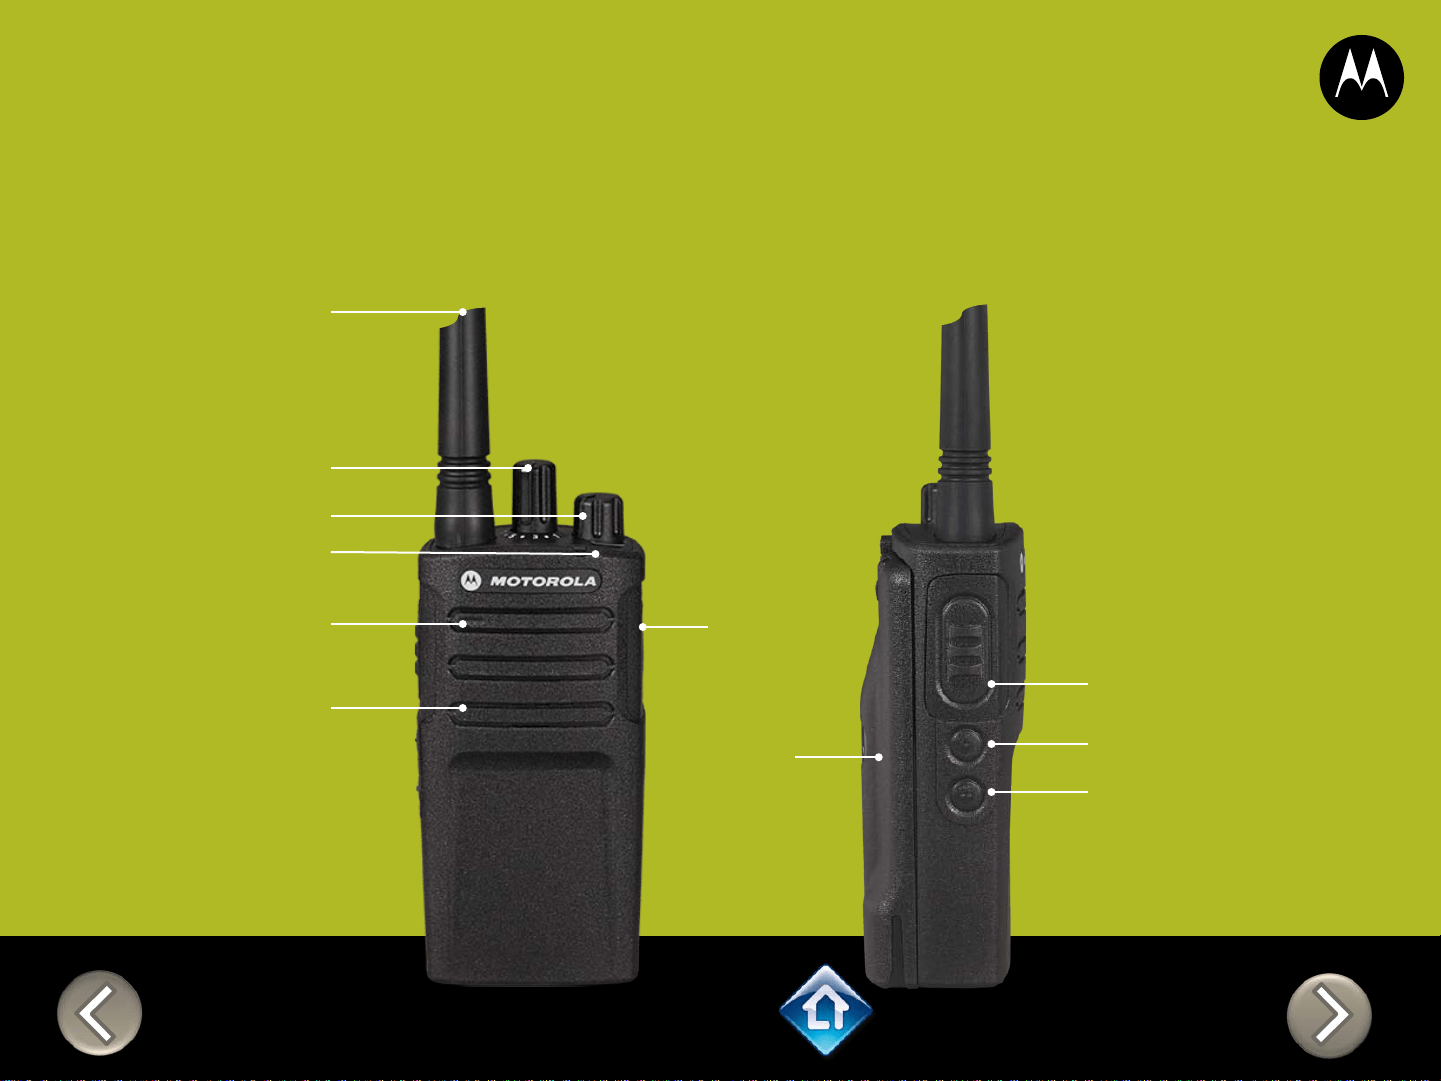
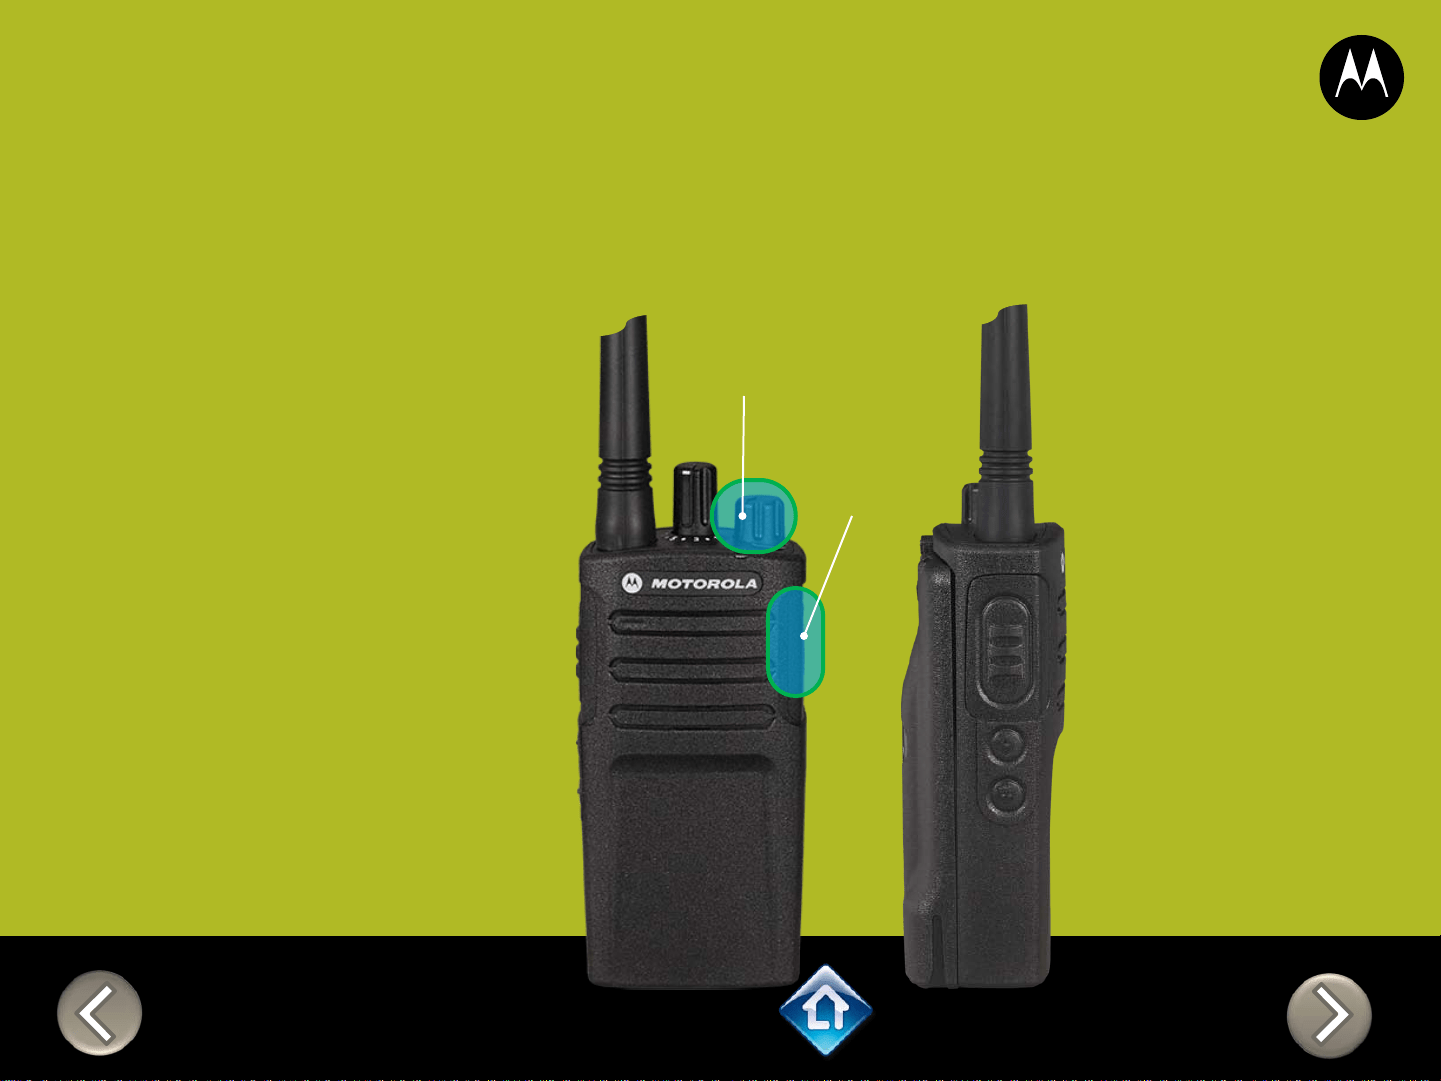
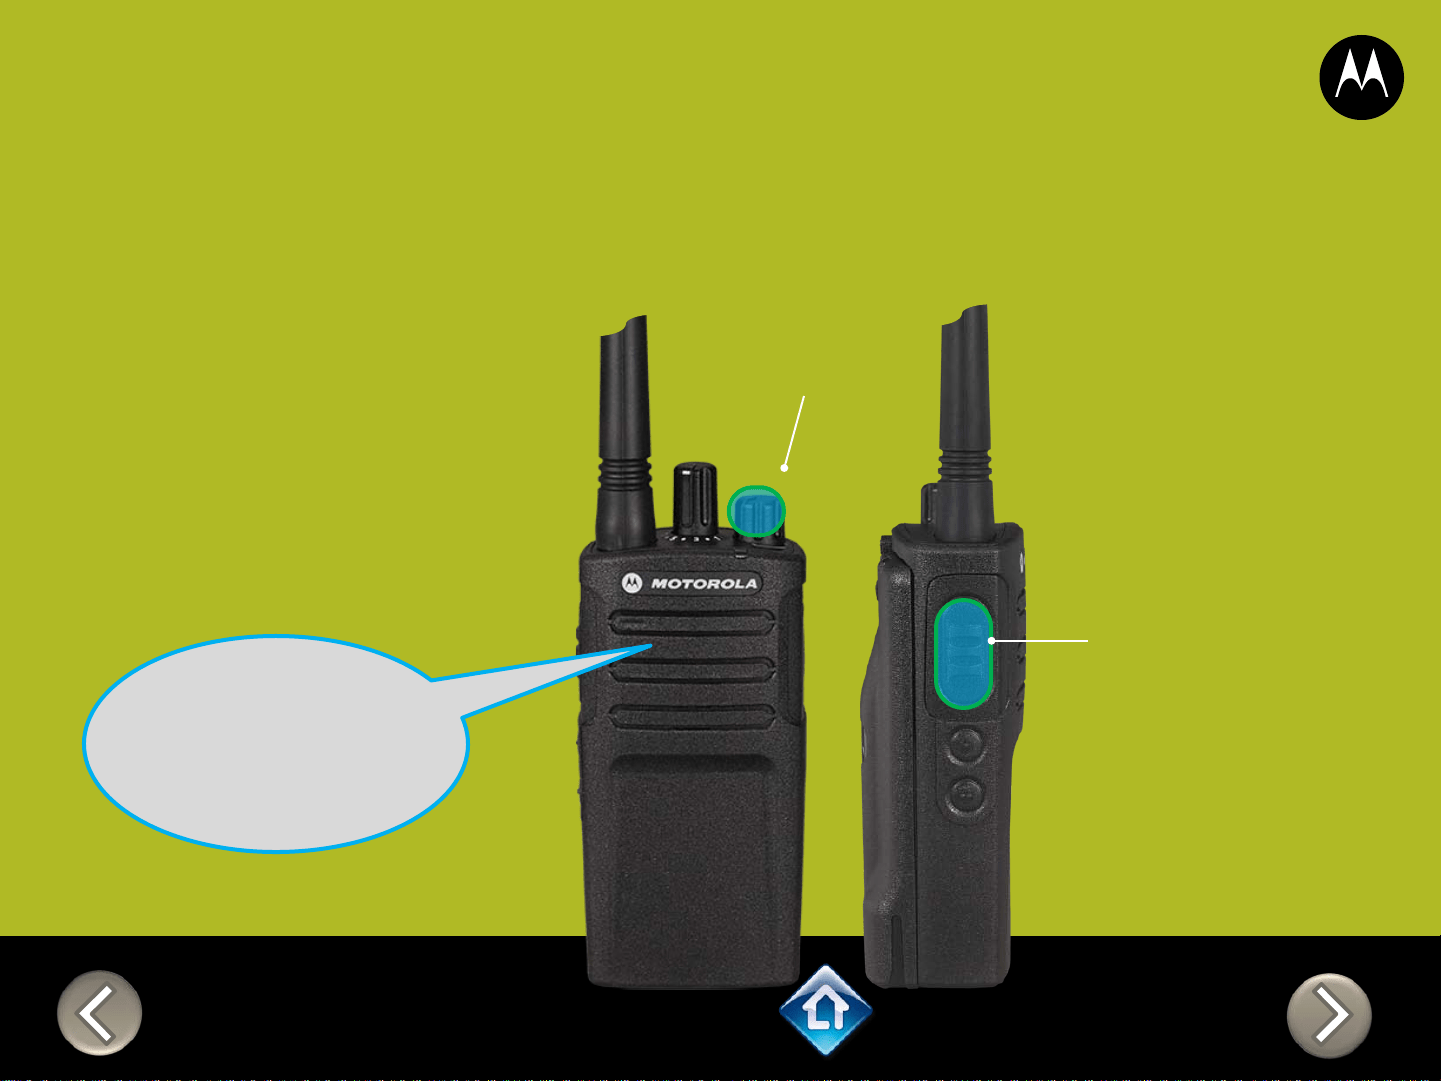
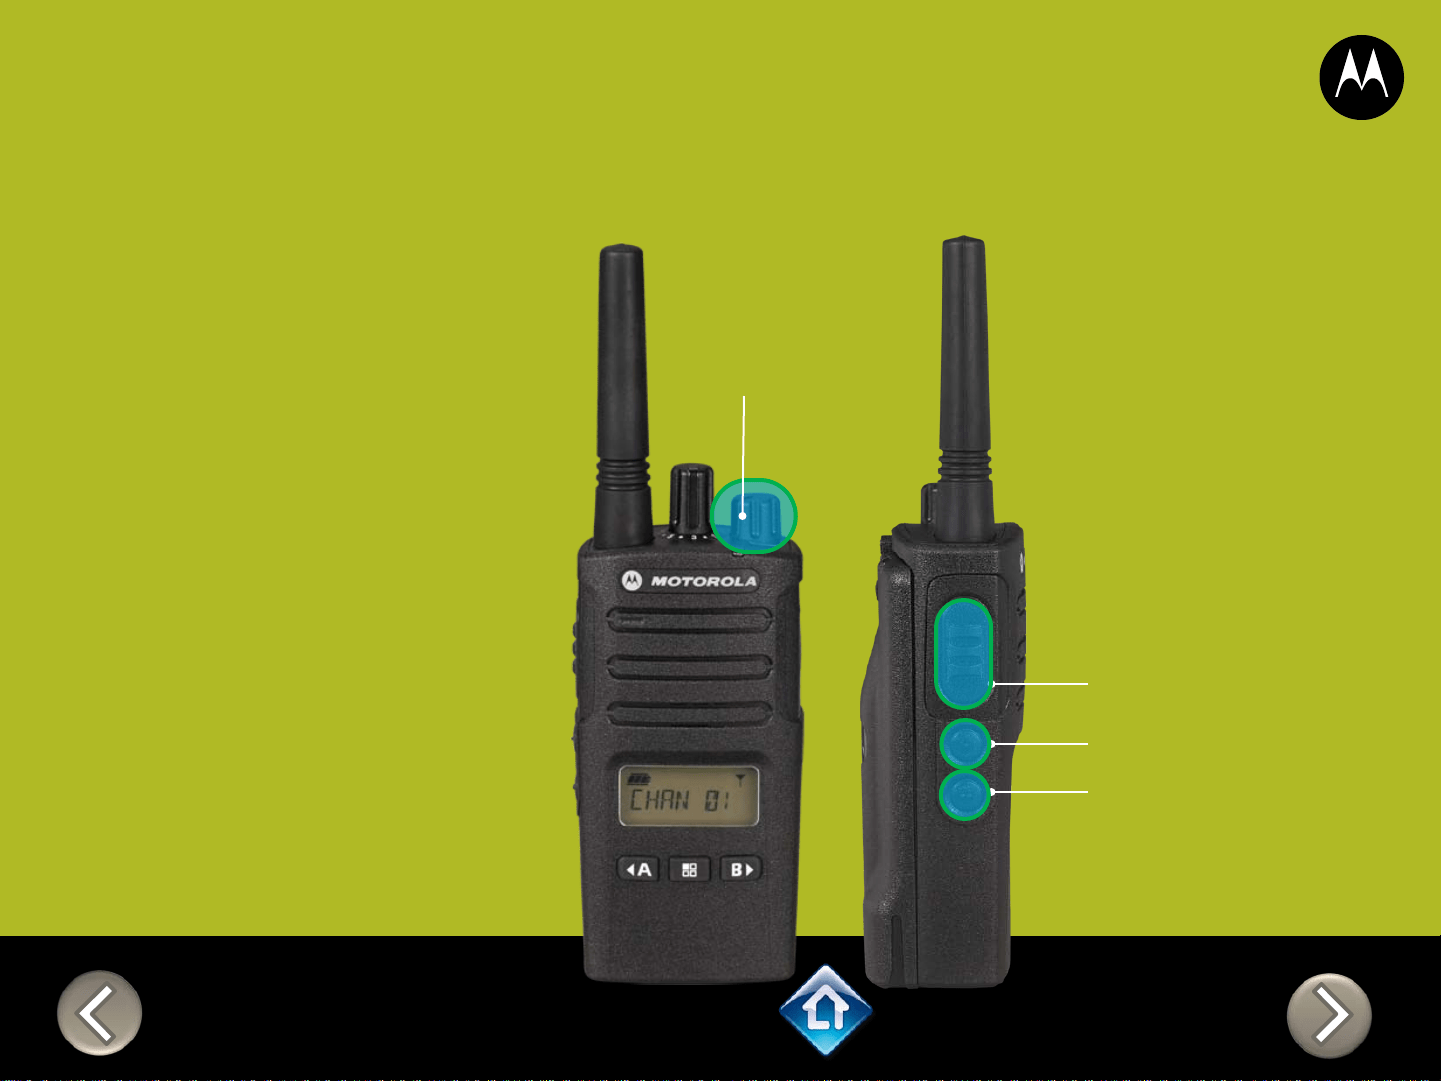
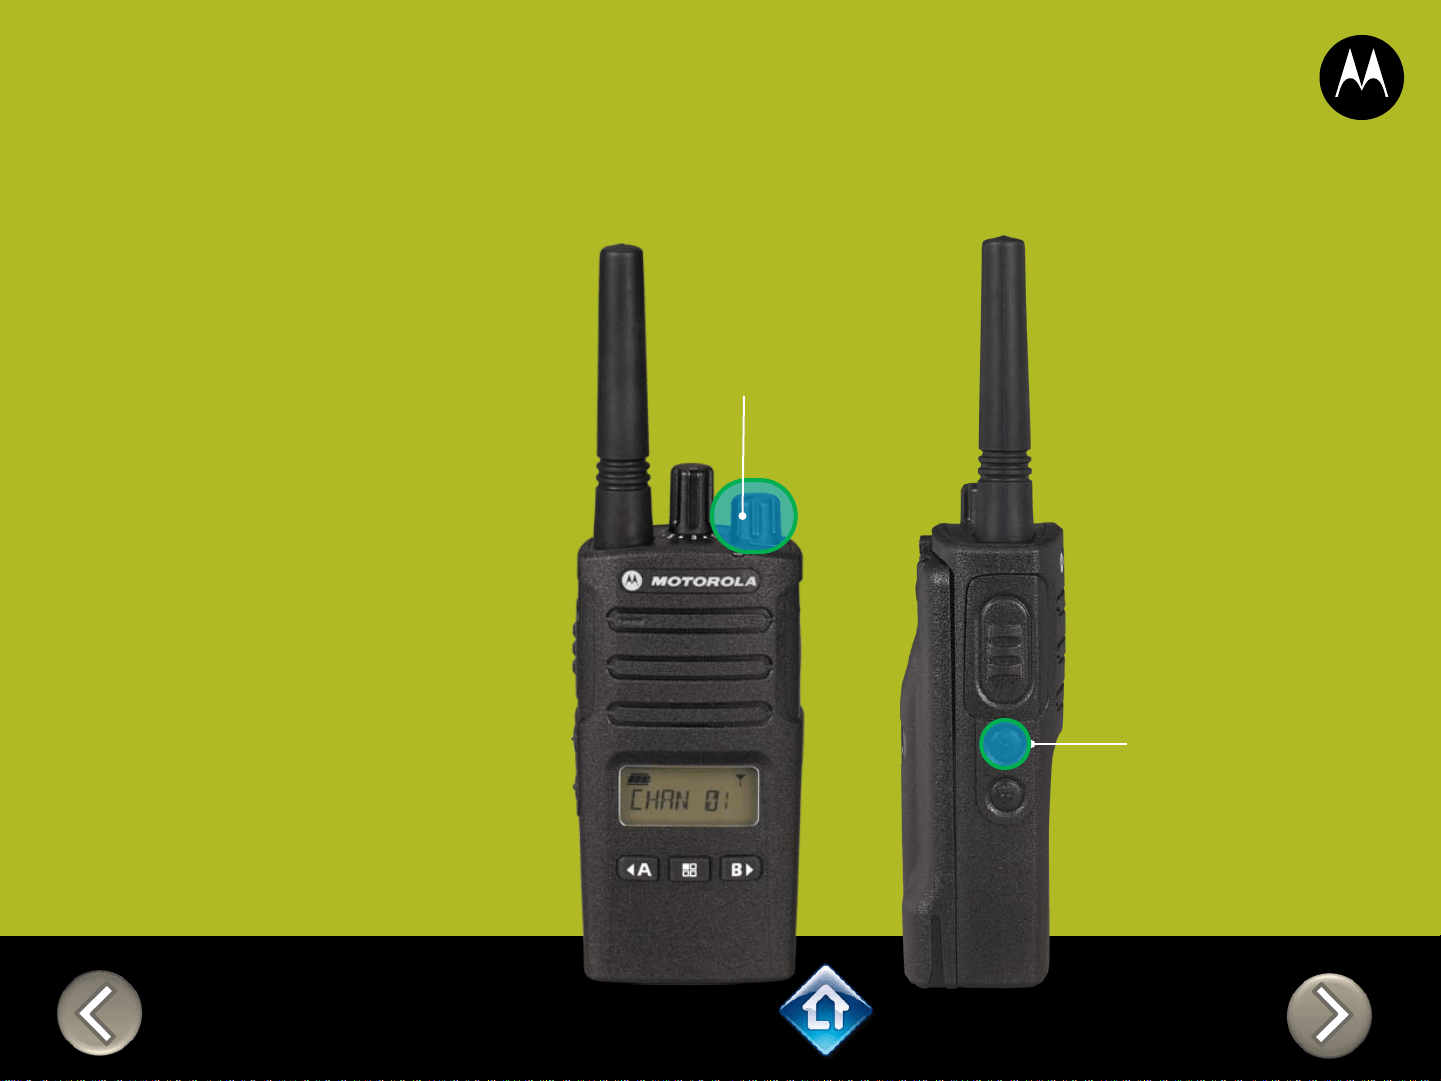
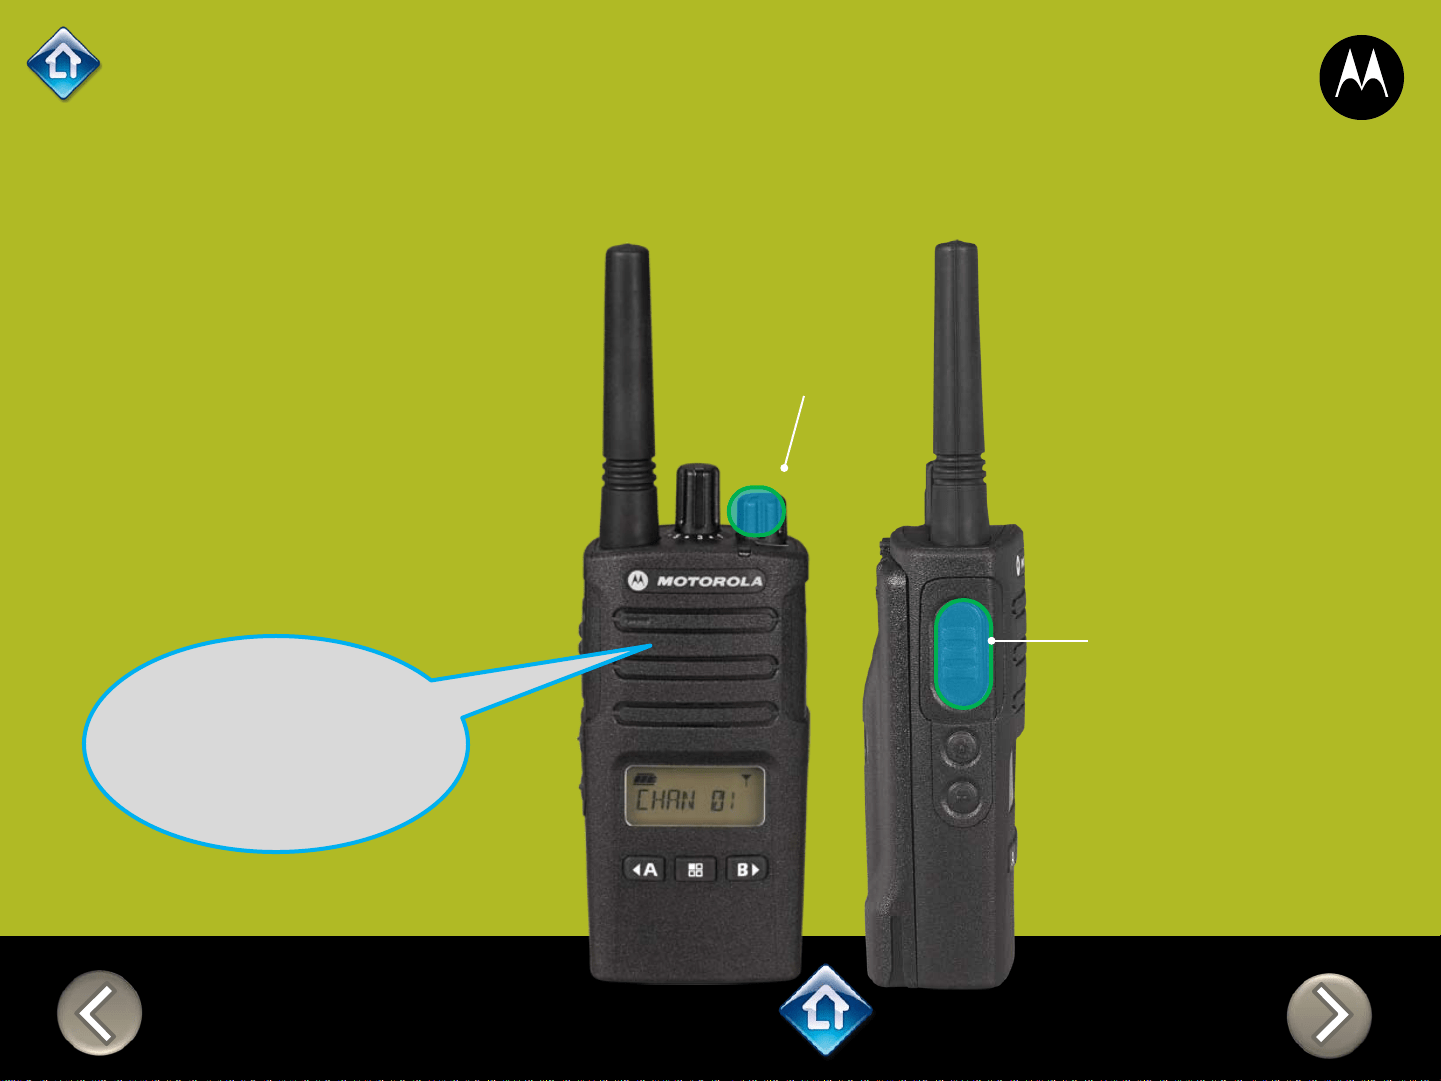
Power Up Audio:
Battery level +
Channel
PTT (Push-to-Talk)
Button
SB1 – Monitor Button
SB2 – Channel Down
RMU2040
DEFAULT VALUES
Channel Voice Prompt: On
Active Channels: 2
Battery Save: On
CHAN FREQ CODE
1 2 - 464.5500 1 – 67.0 Hz
2 8 - 467.9250 1 – 67.0 Hz
3* 5 - 467.8500 1 – 67.0 Hz
4* 6 - 467.8750 1 – 67.0 Hz
*When channels are enabled

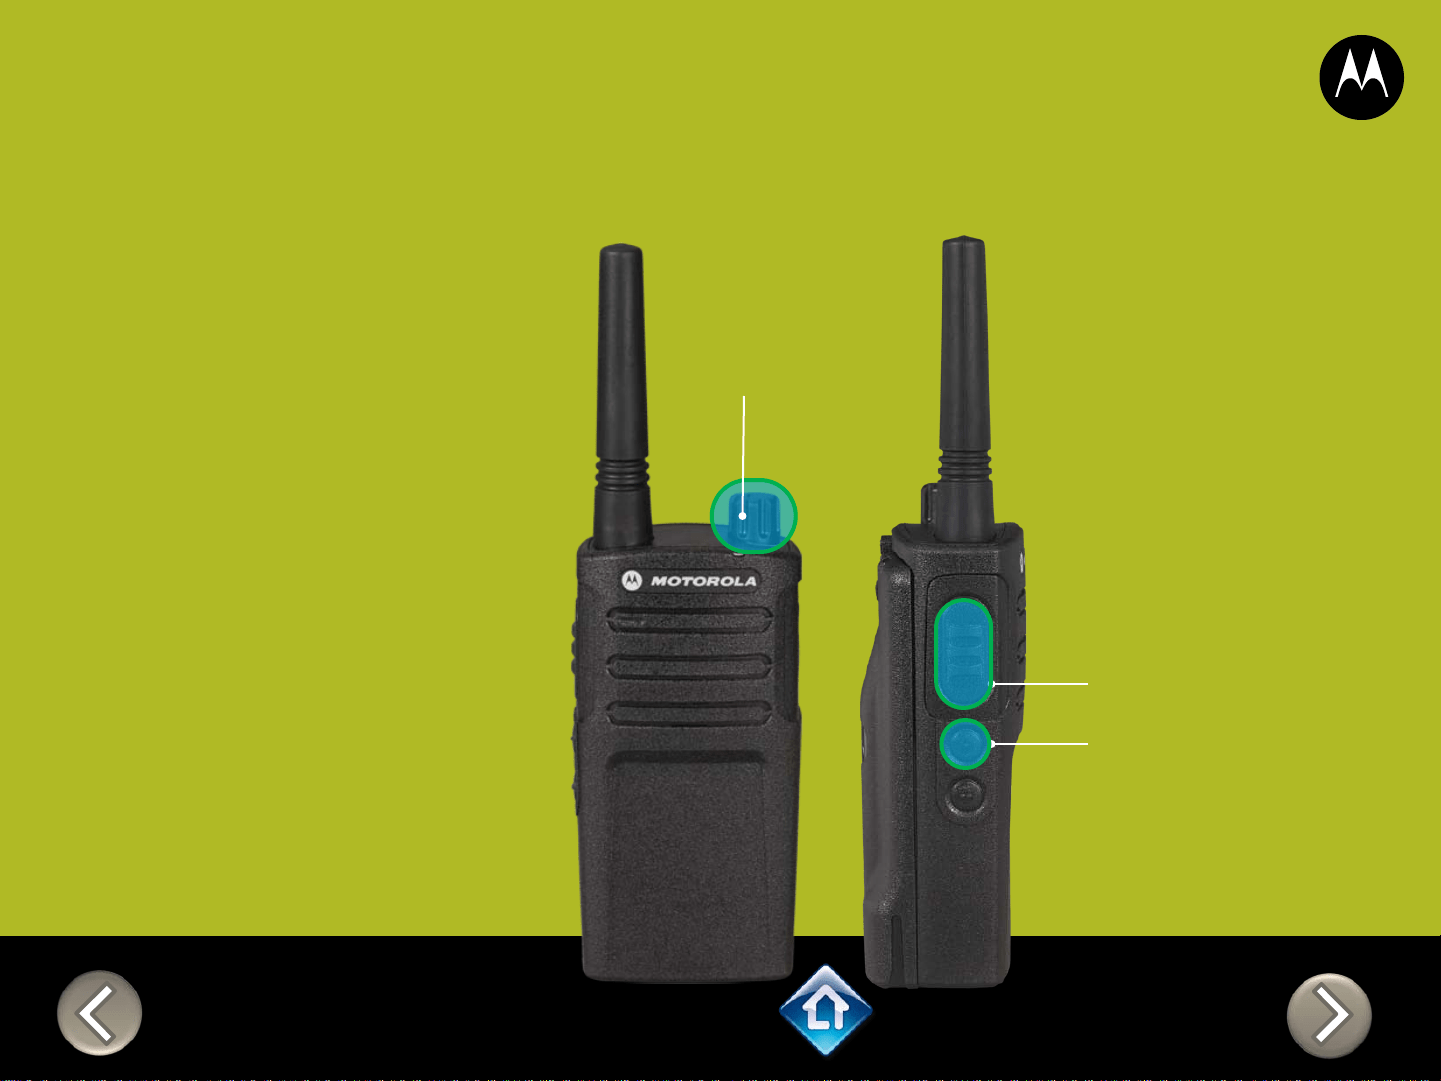
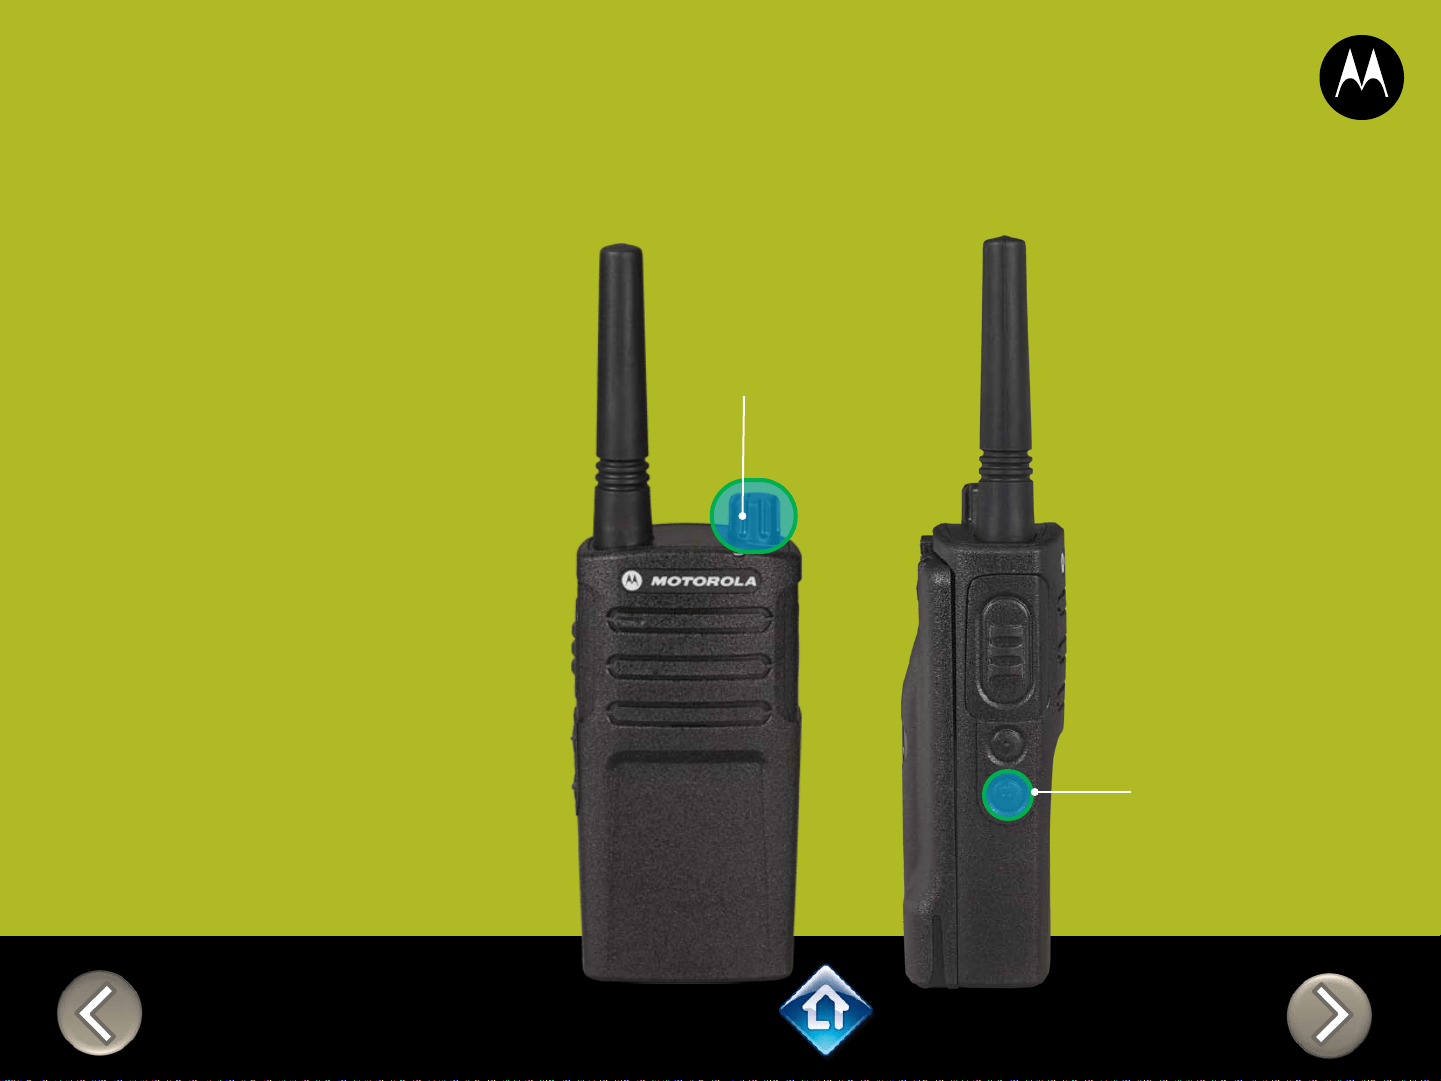
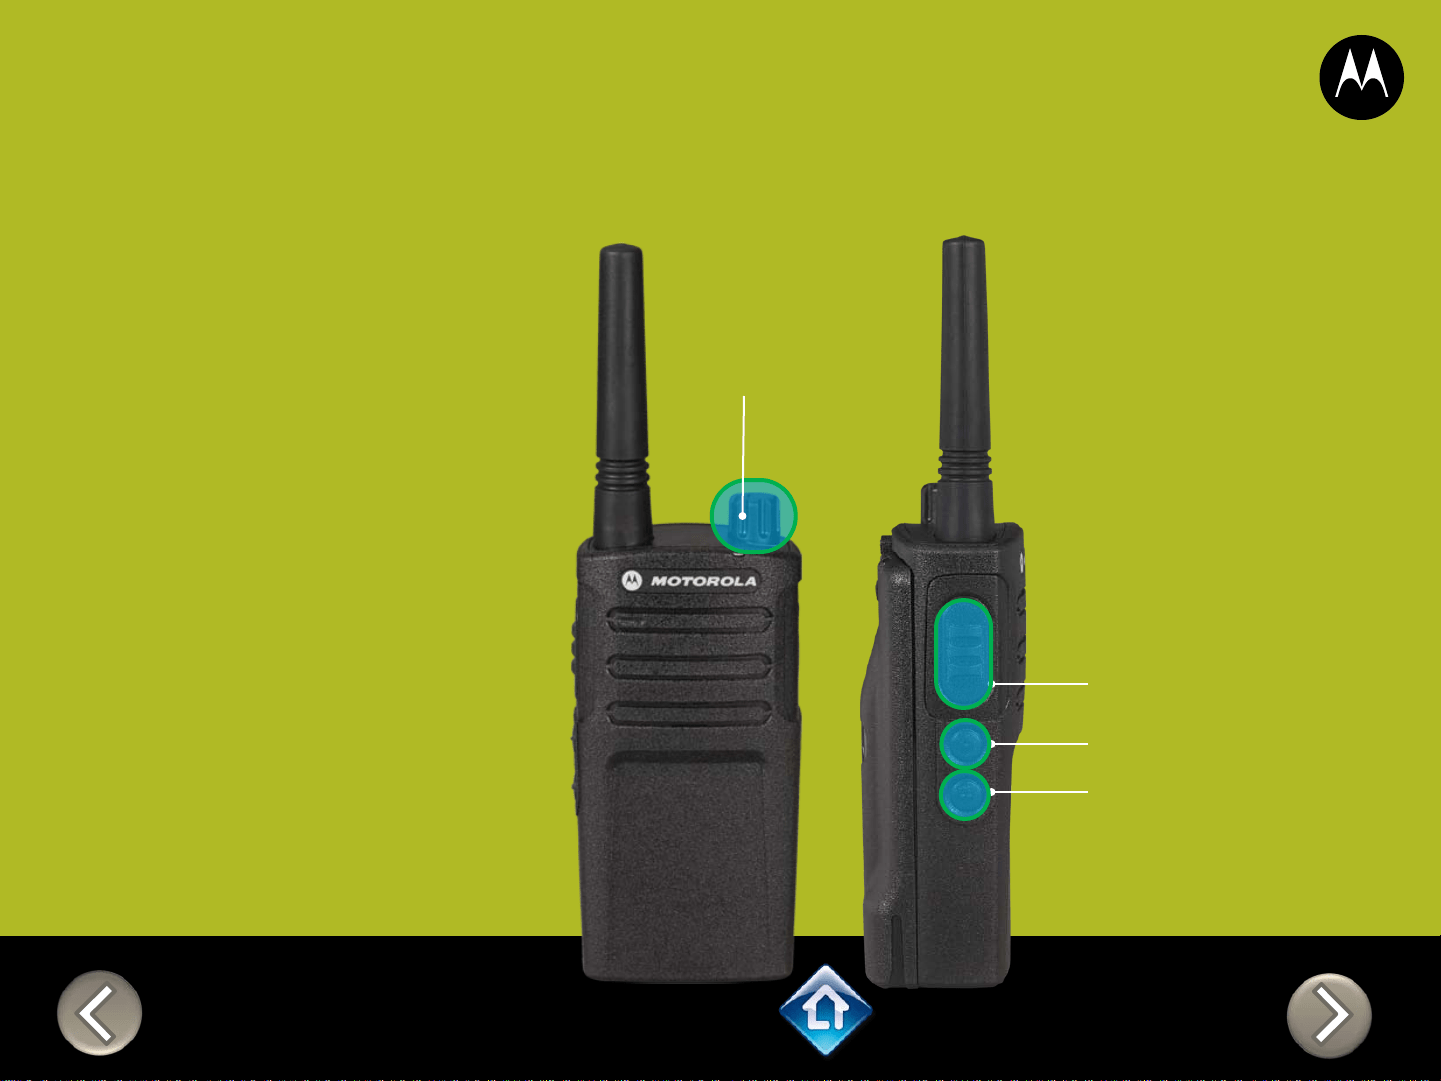
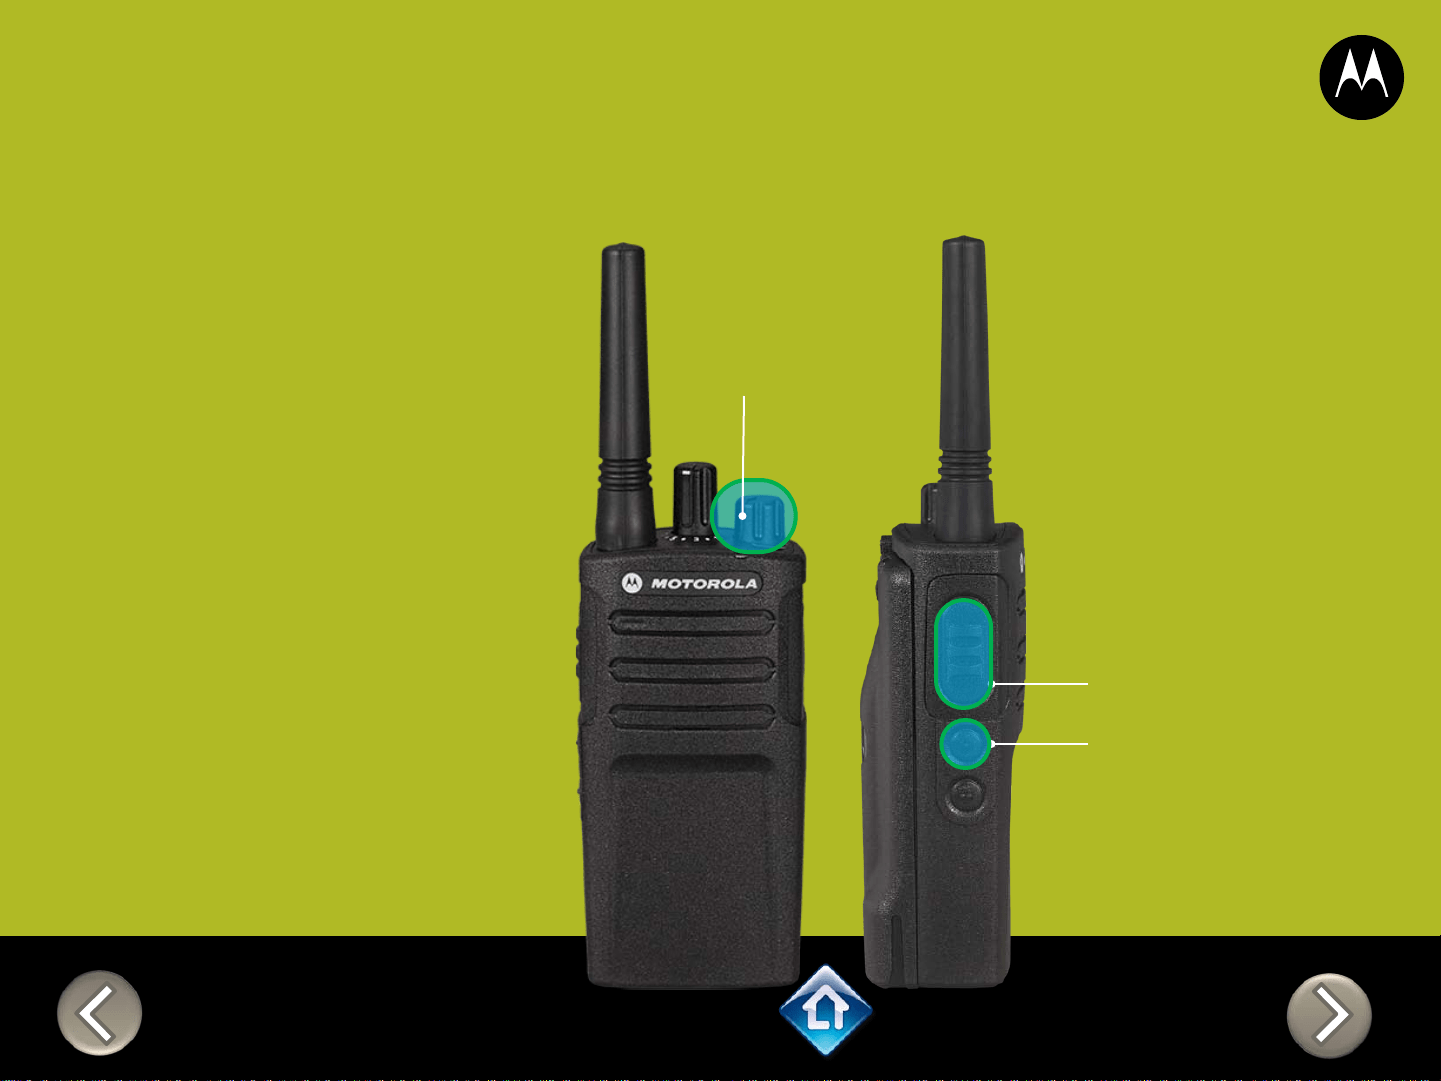
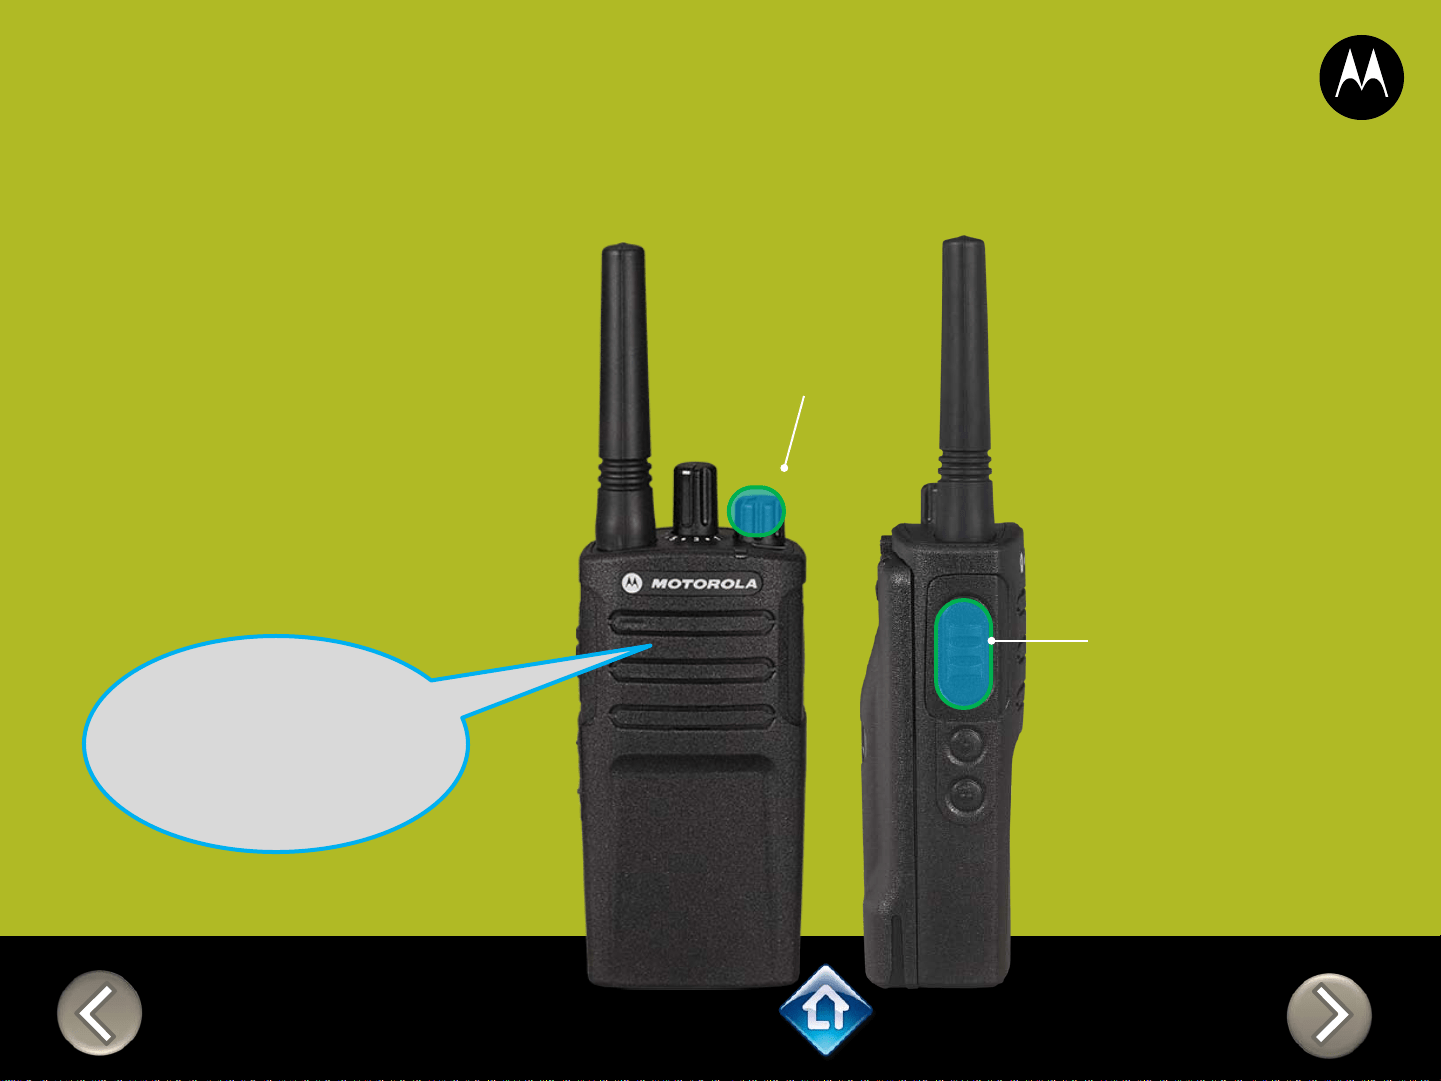
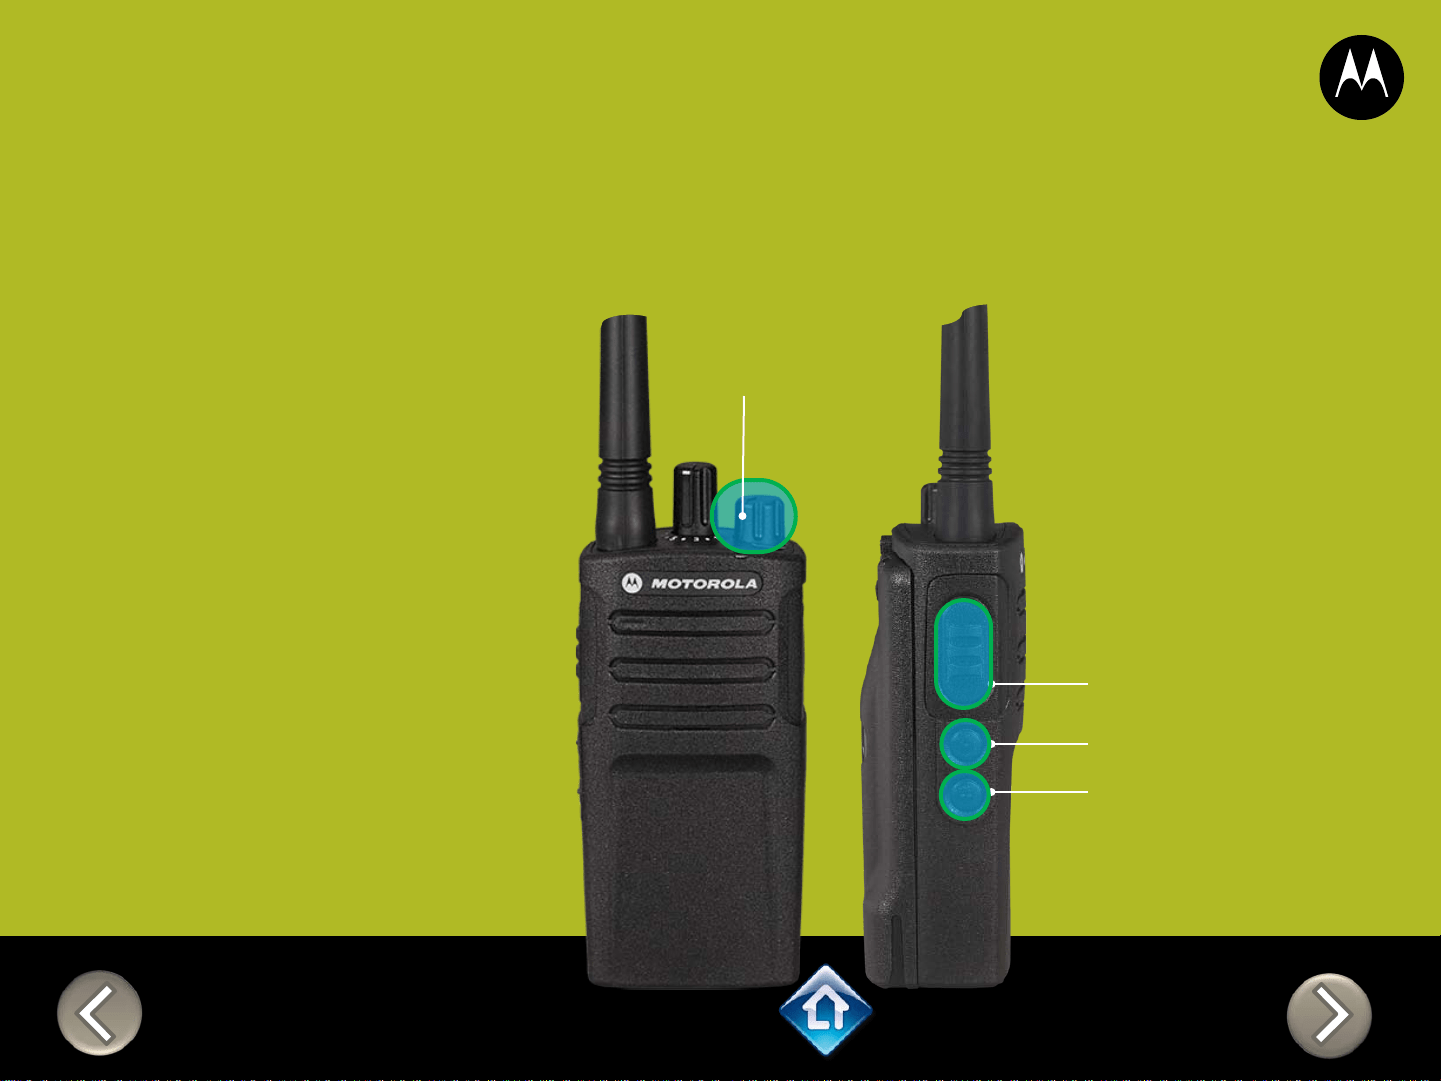
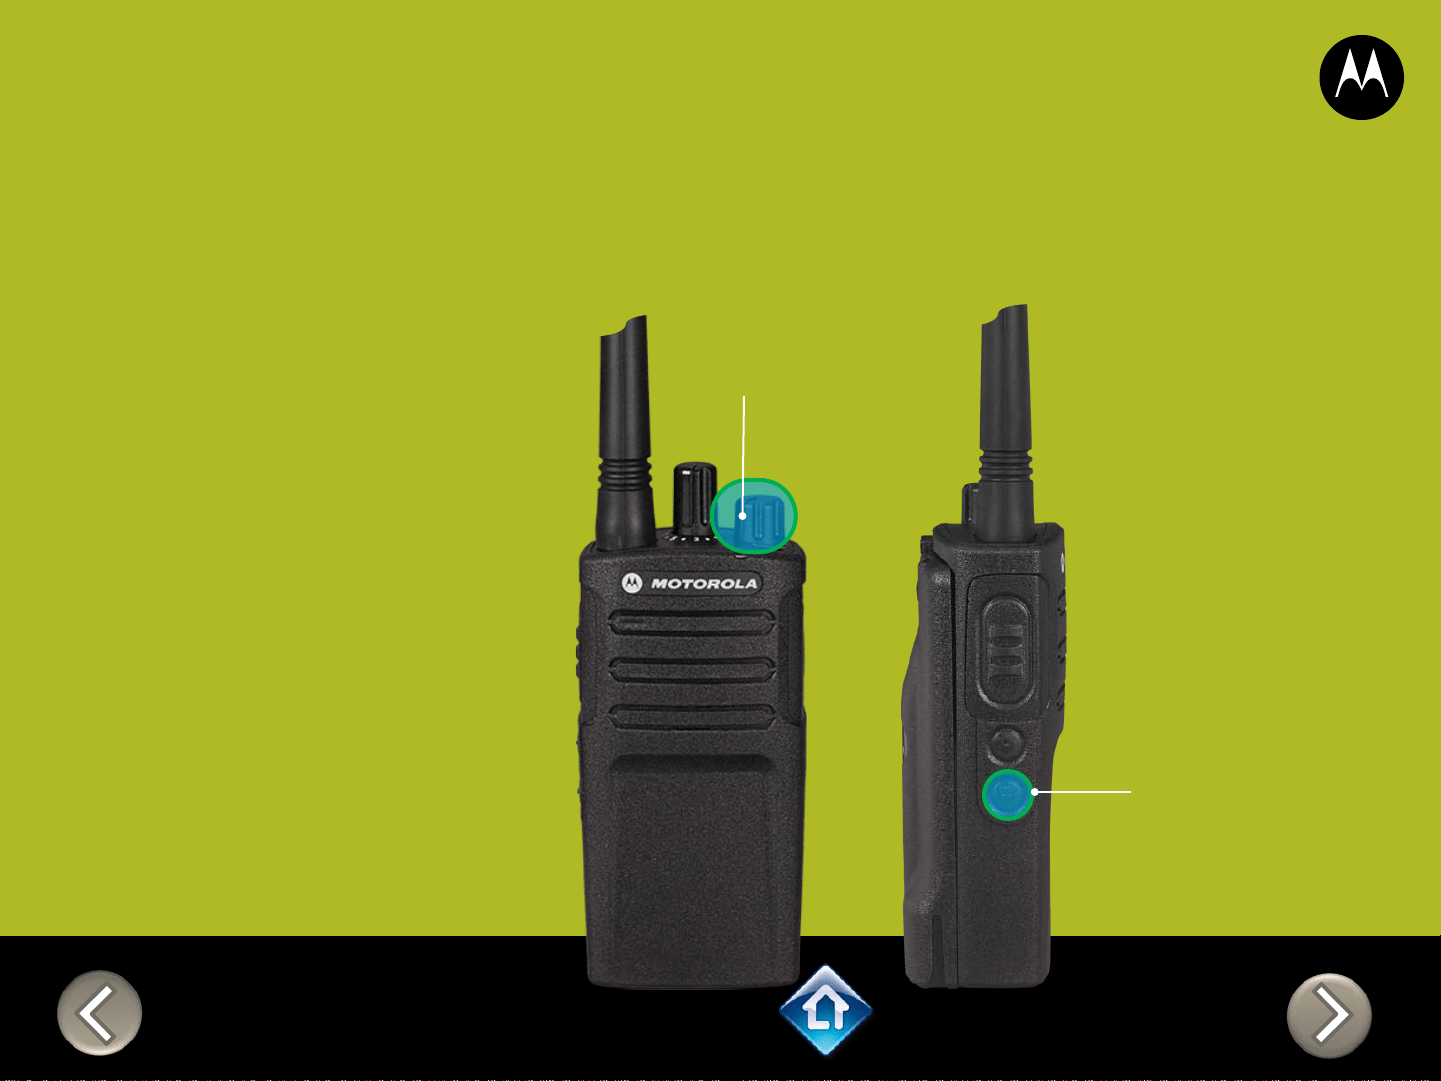
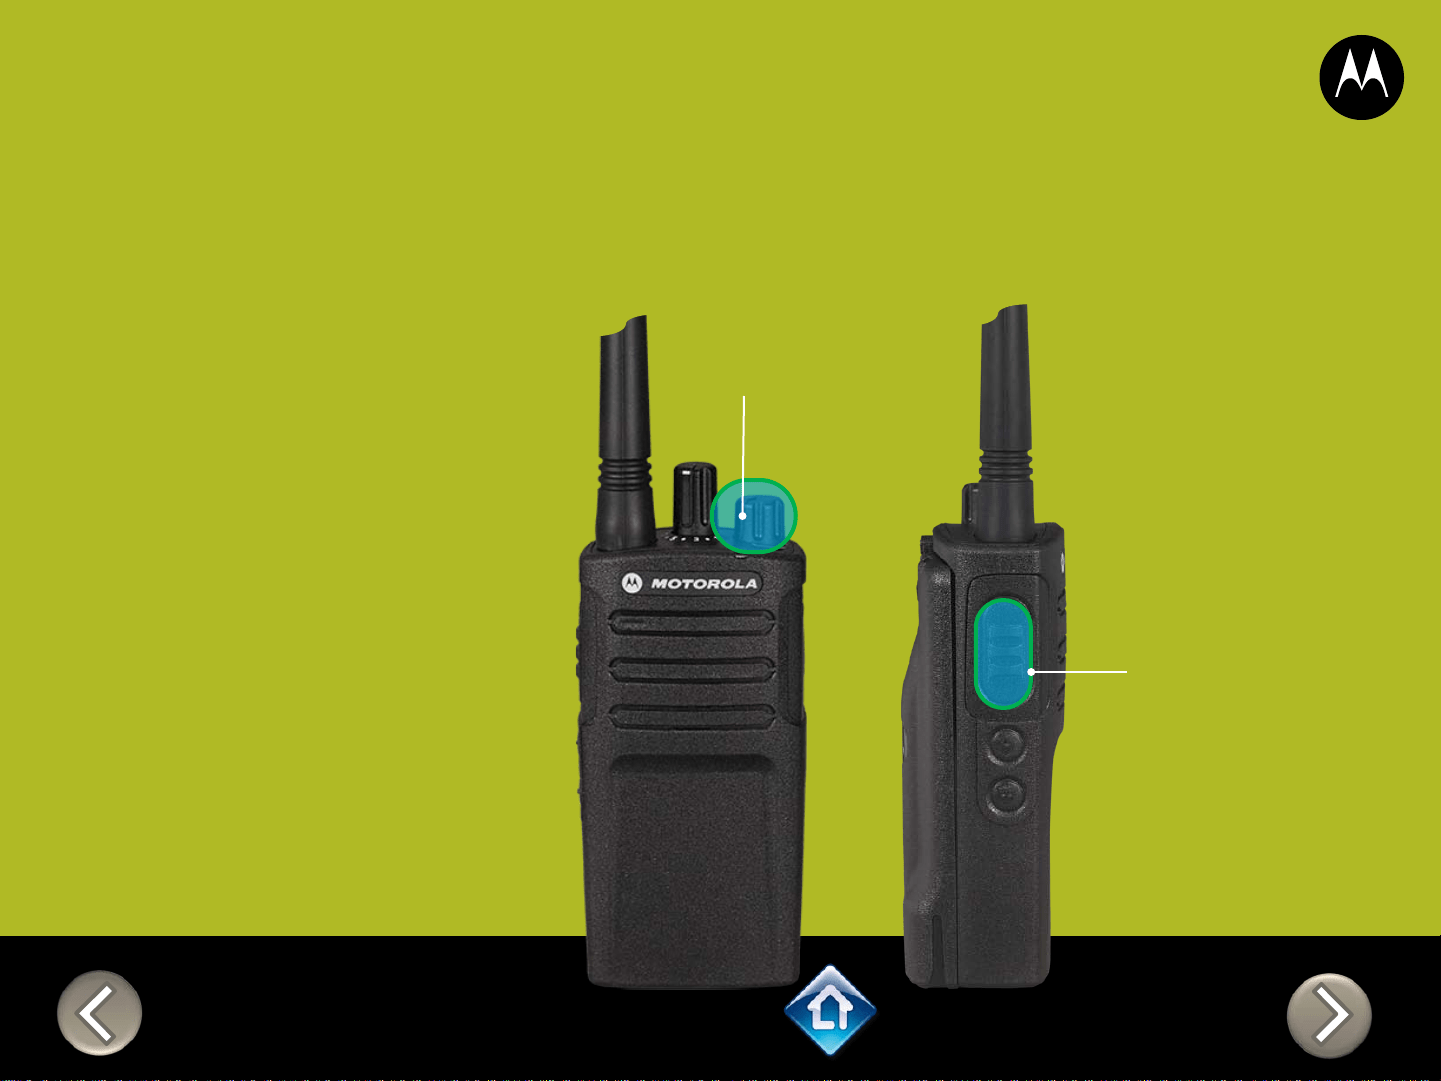
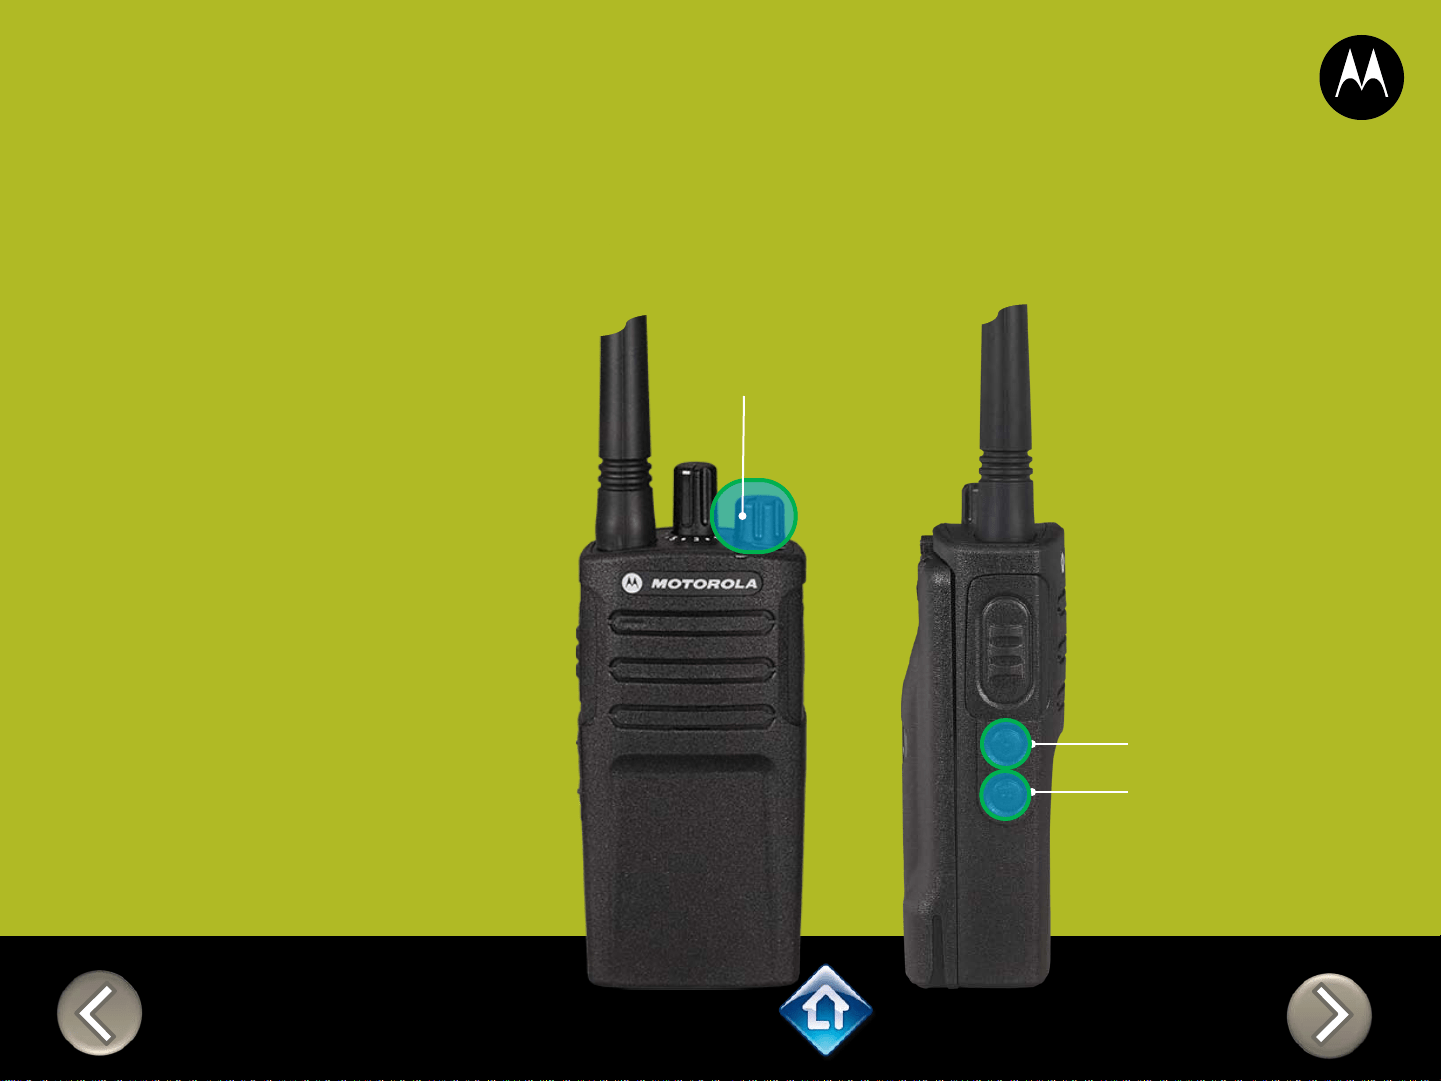
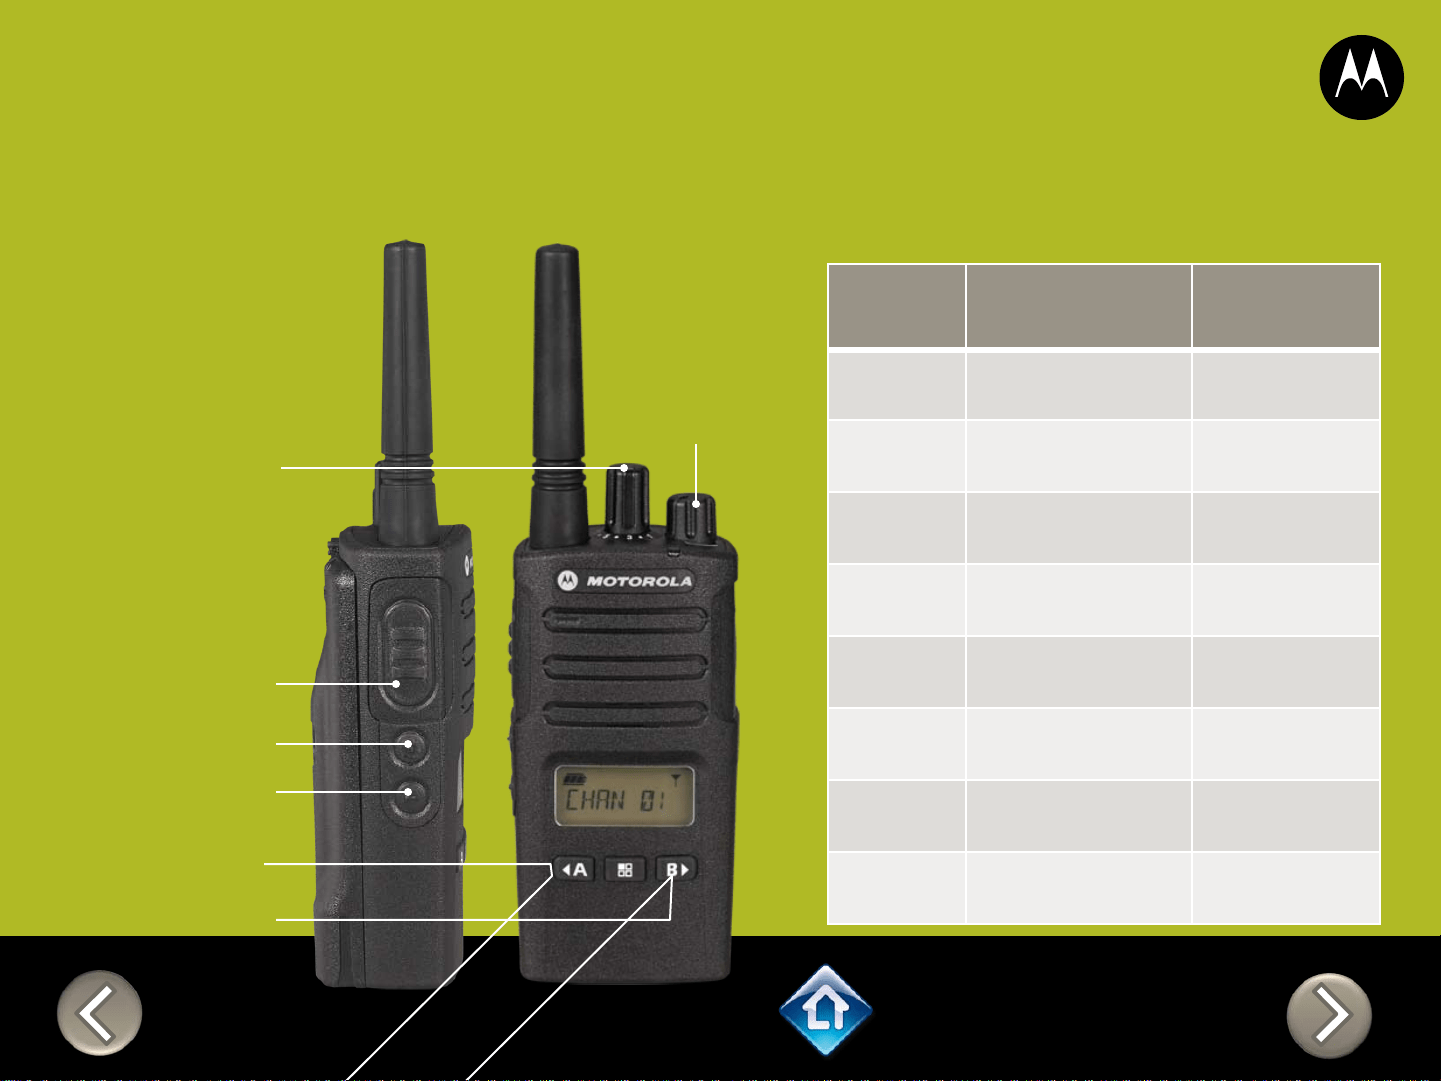
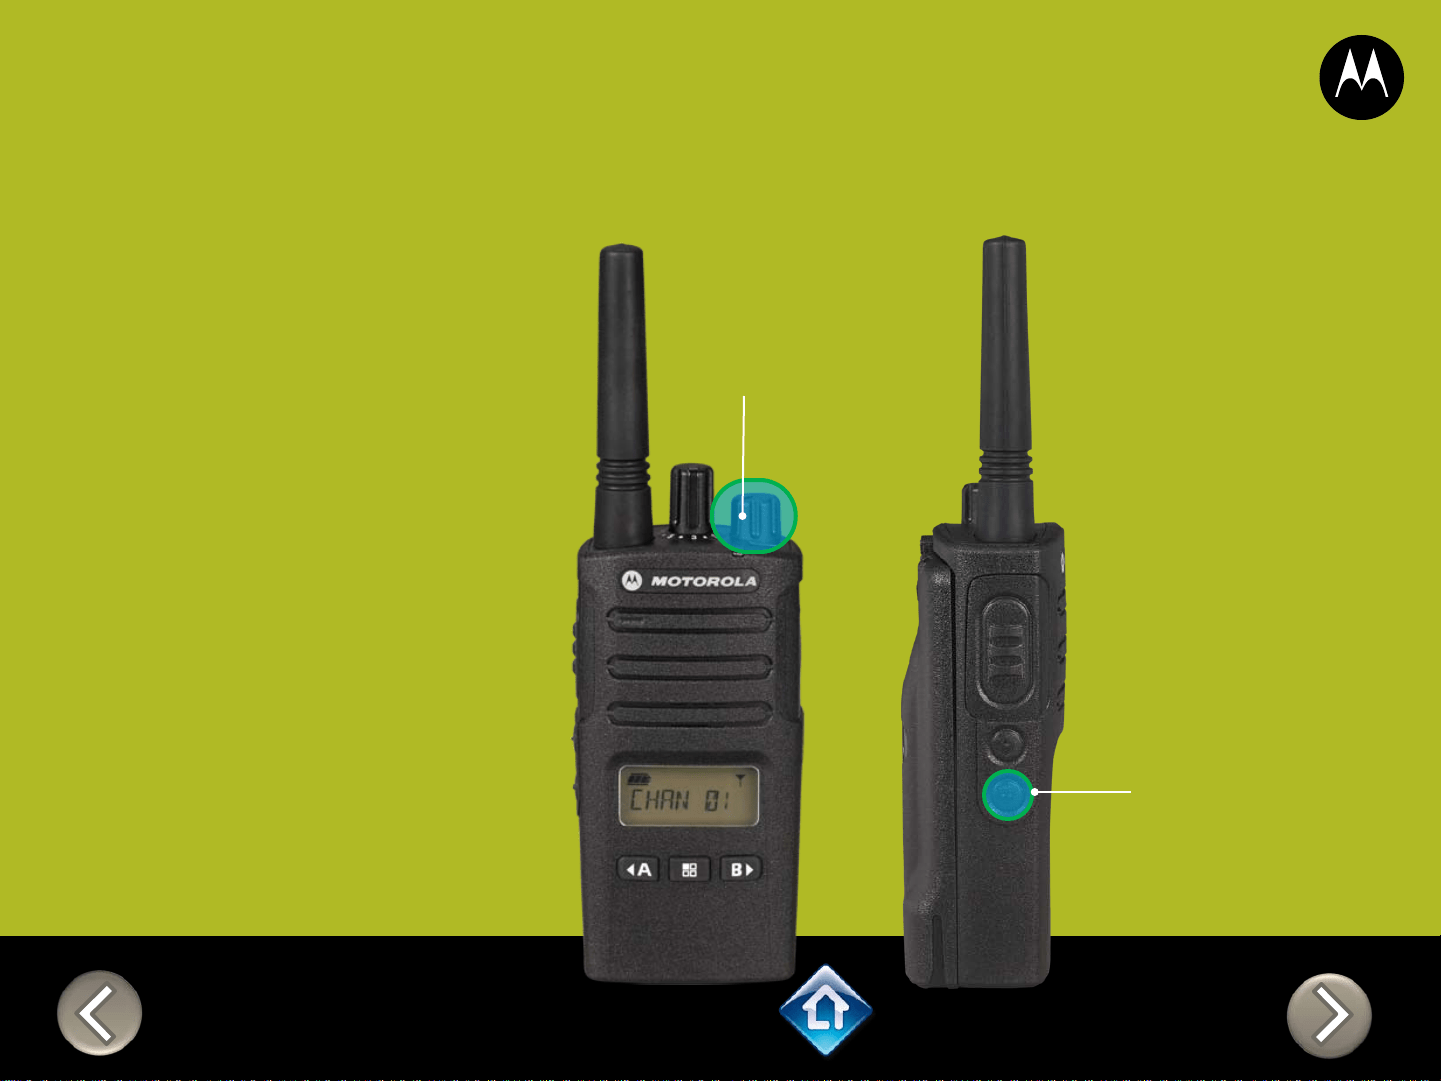
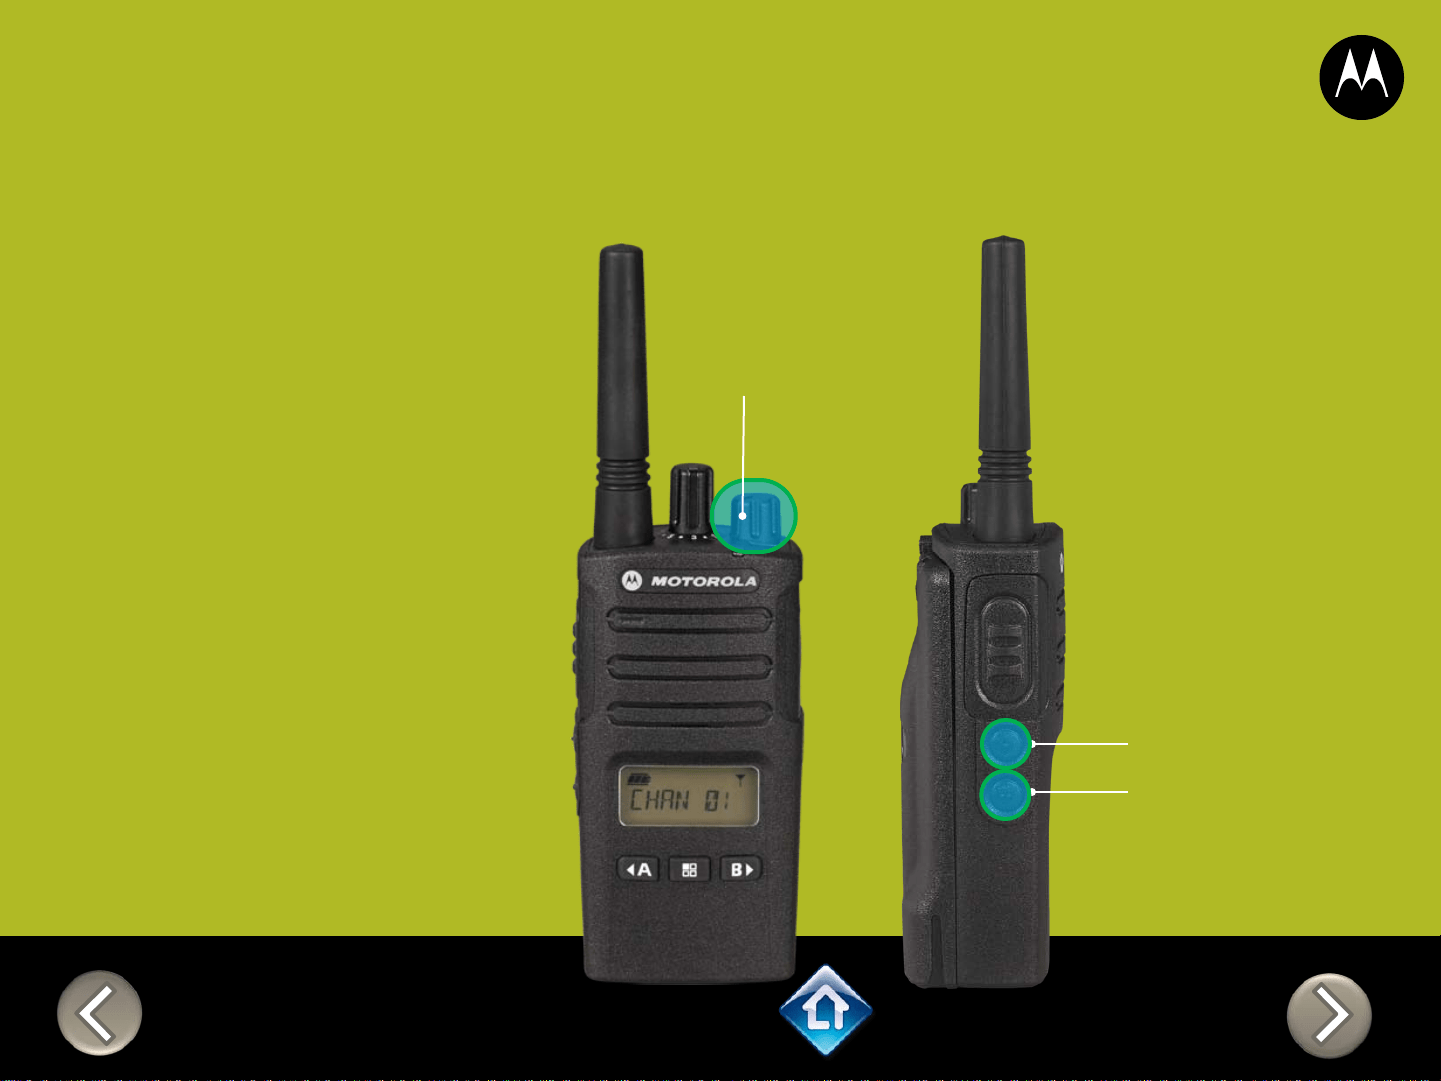
PTT (Push-to-Talk)
Button
SB1 – Monitor Button
SB2 – Channel Select
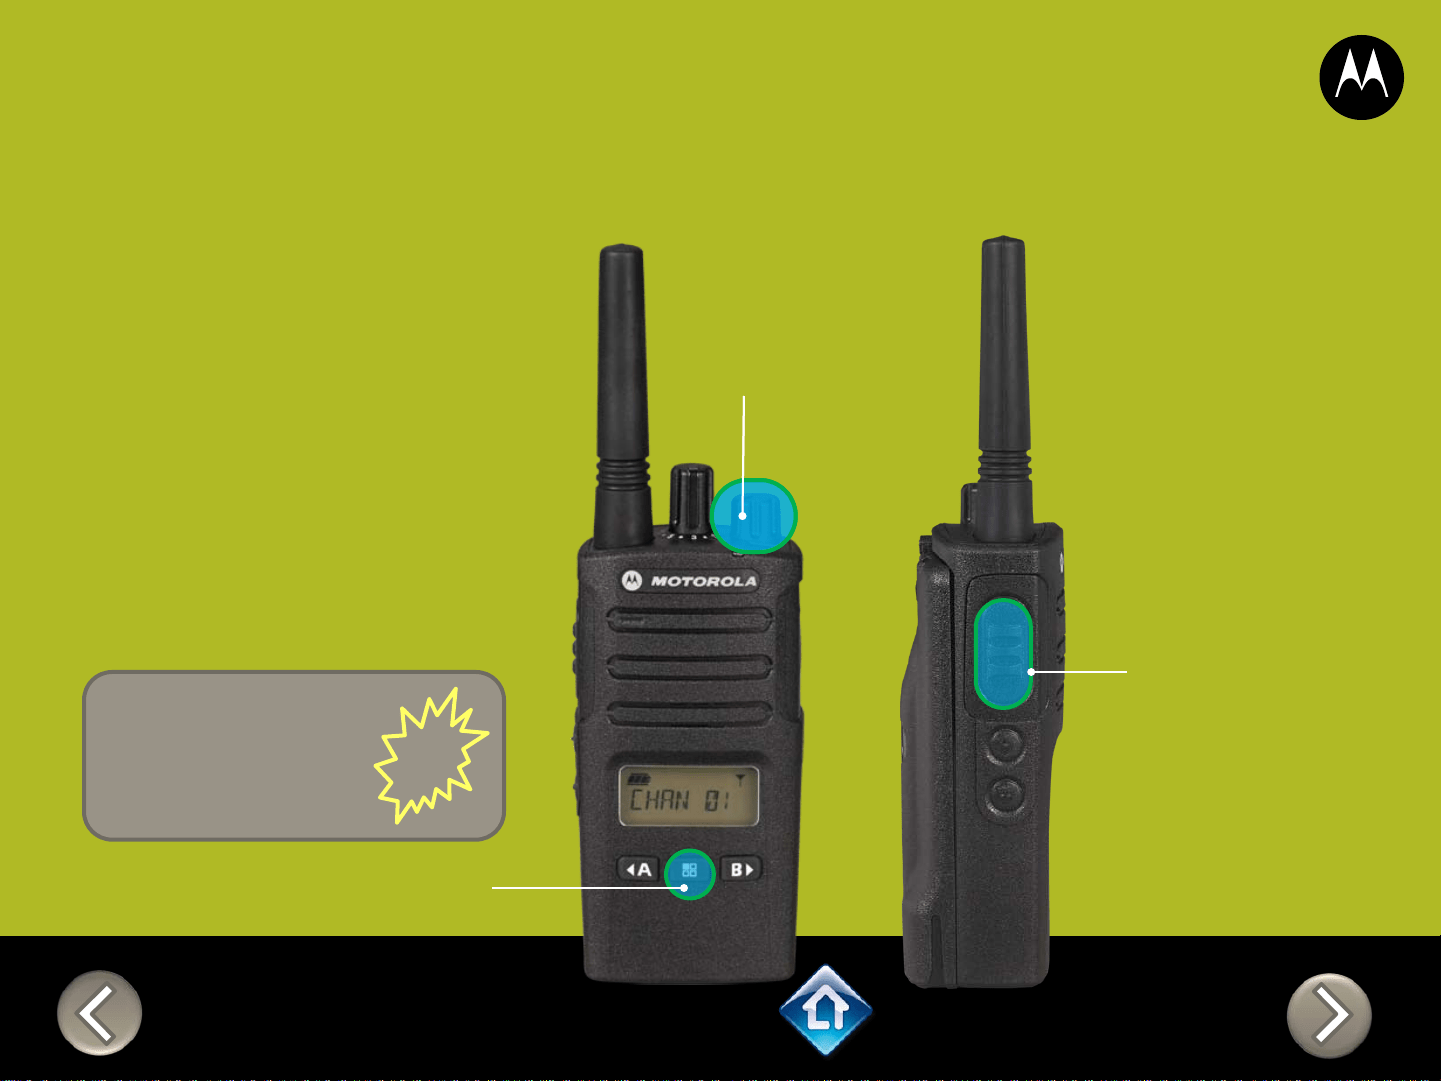
RM SERIES
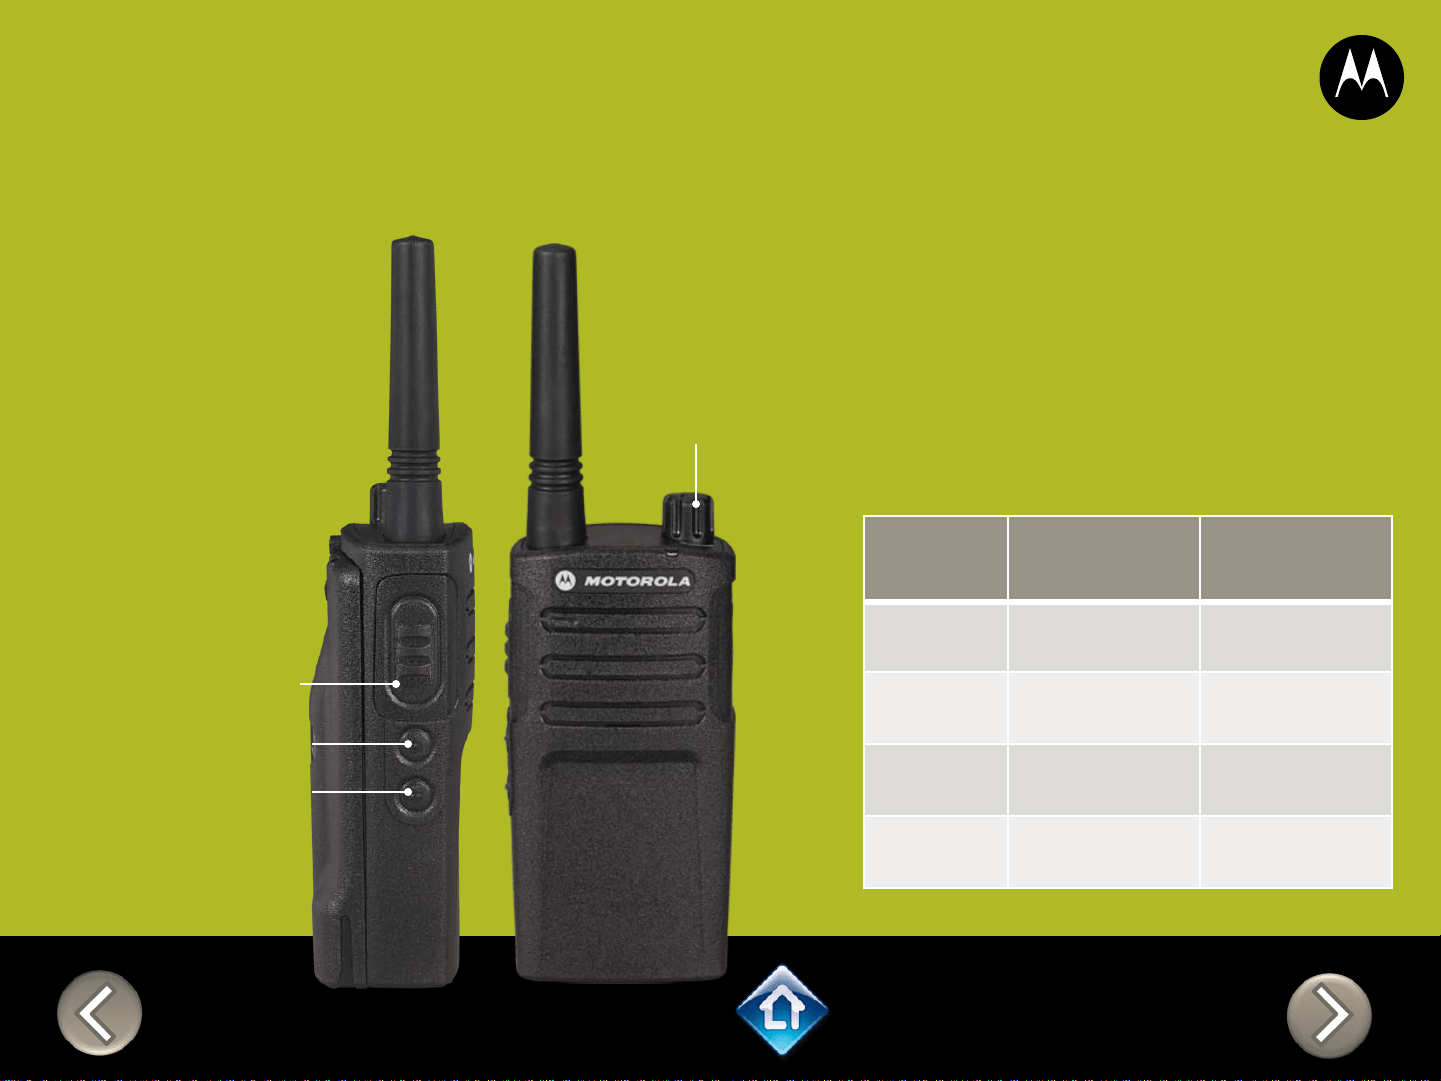
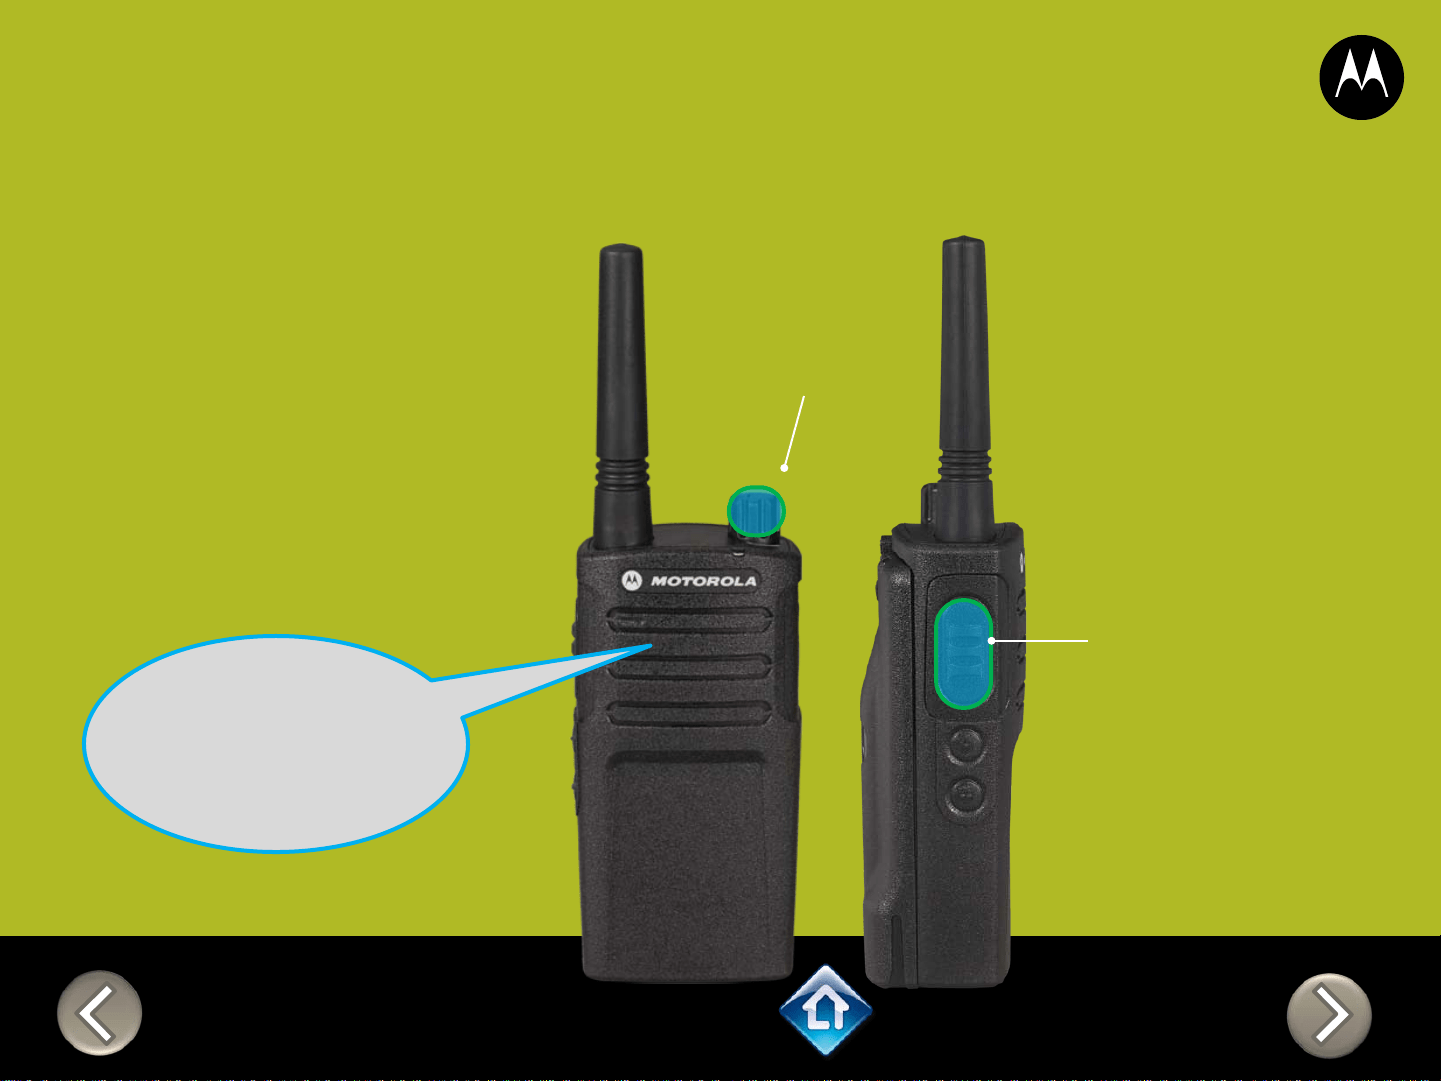
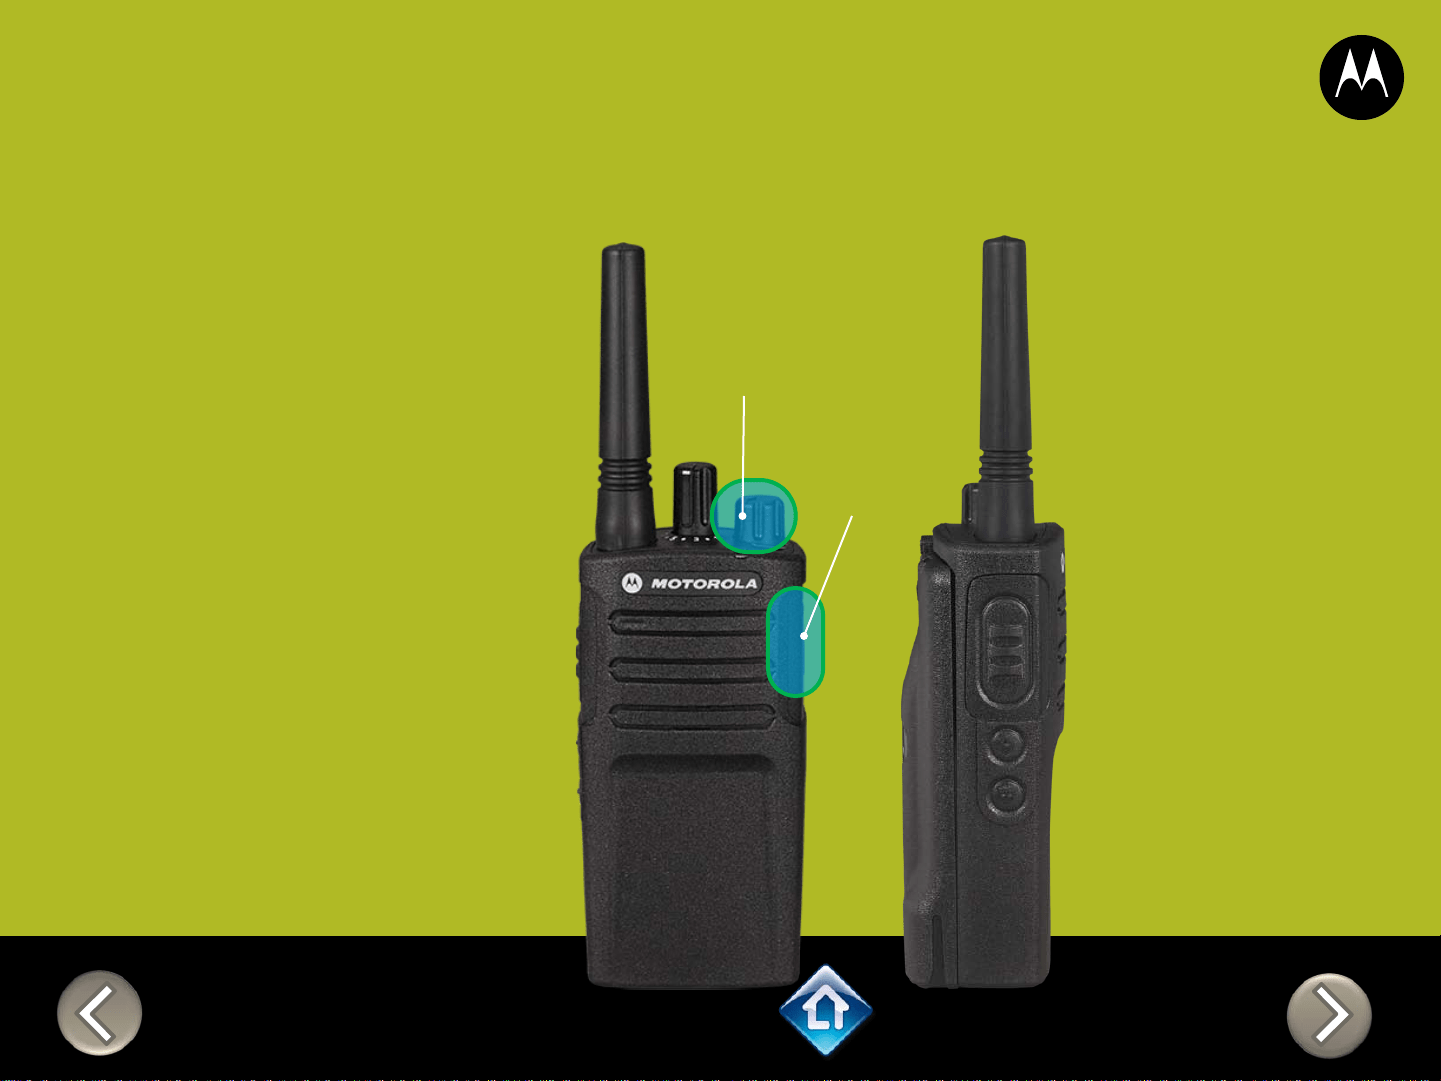
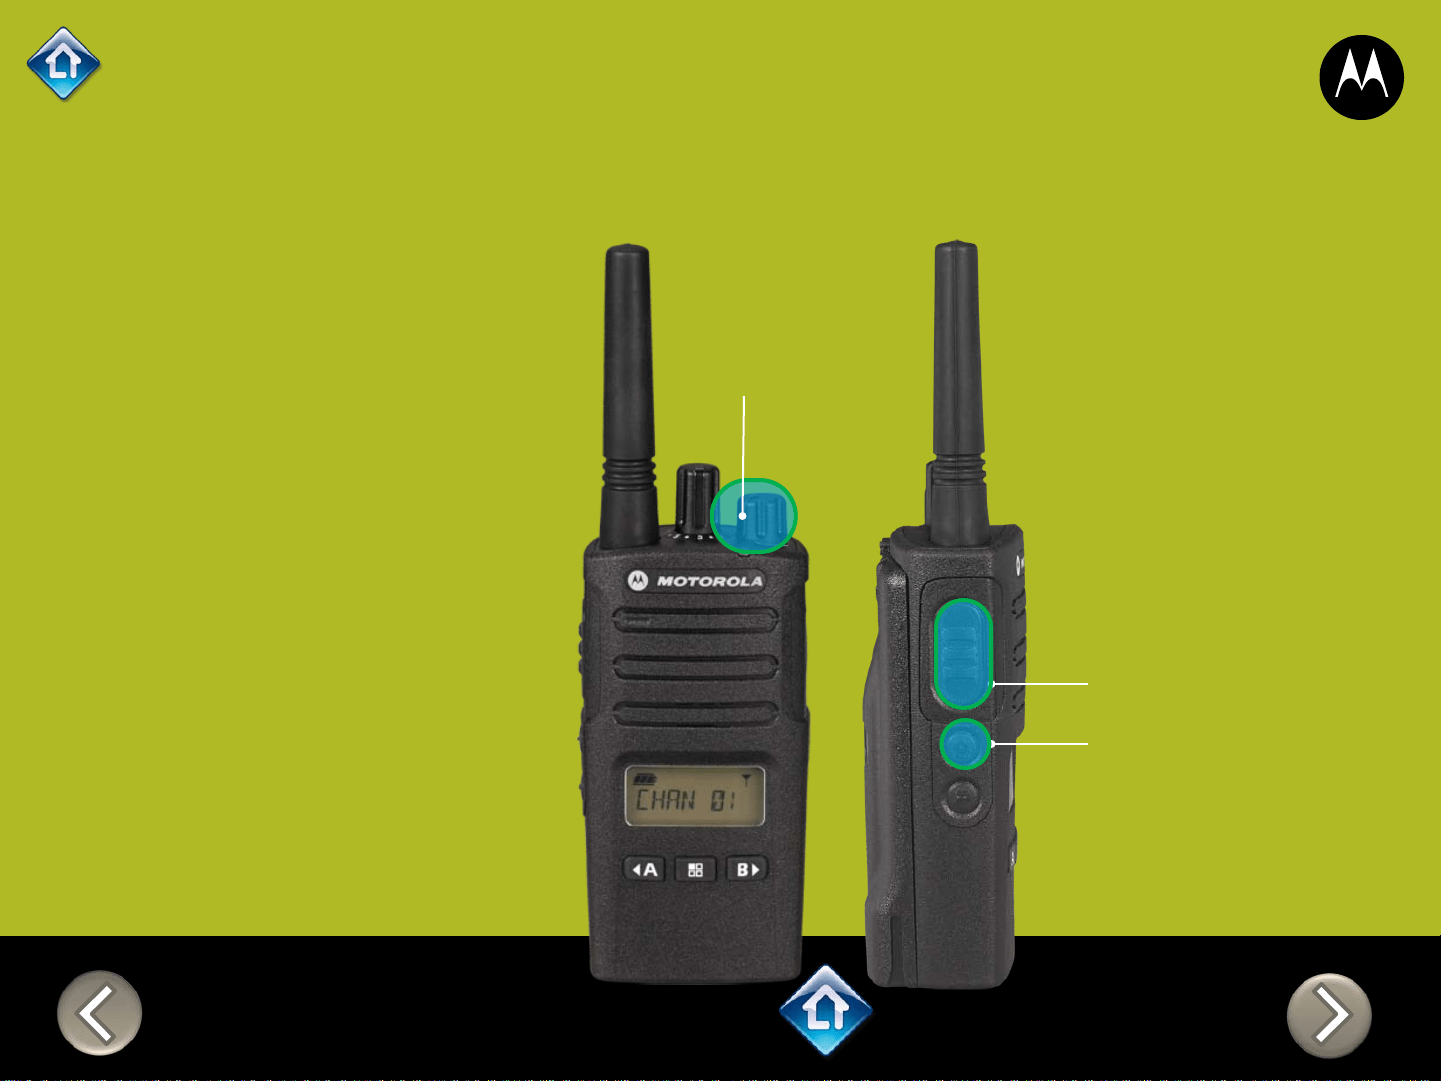
Factory Settings Reset
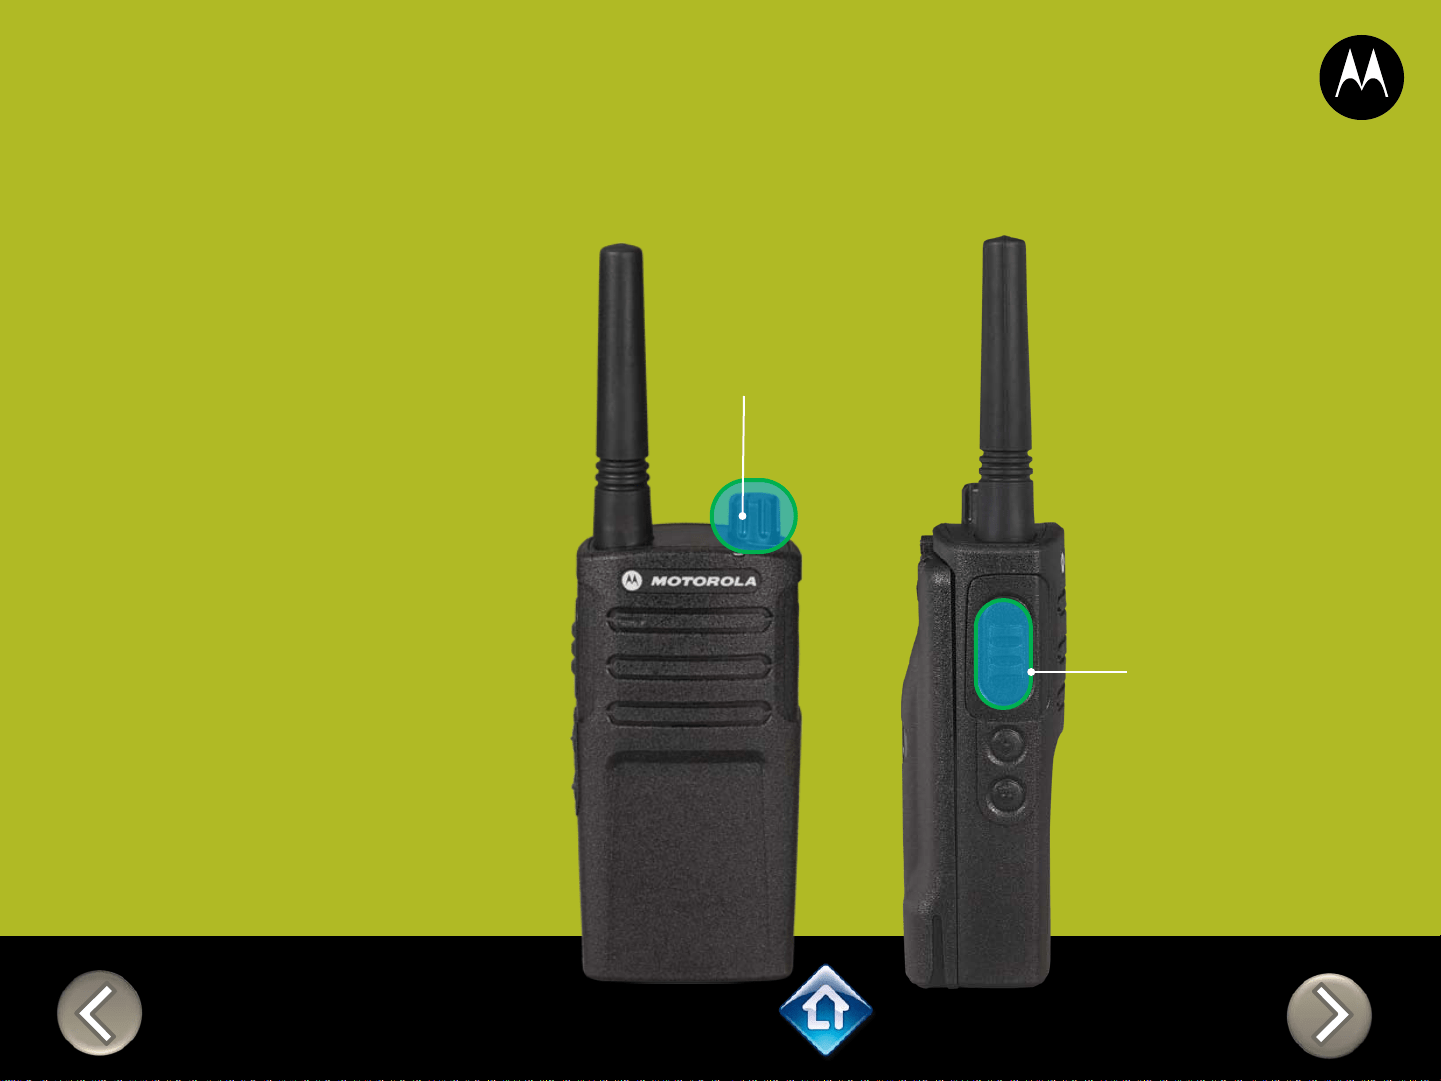
On/Off
Volume Knob
To reset radio to
Factory default
settings, Power up
with SB1, SB2 &
PTT pressed at the
same time.
Please note that all
channels will revert to
default frequencies.
Applies to
RMU2040 / RMU2043 / RMM2050


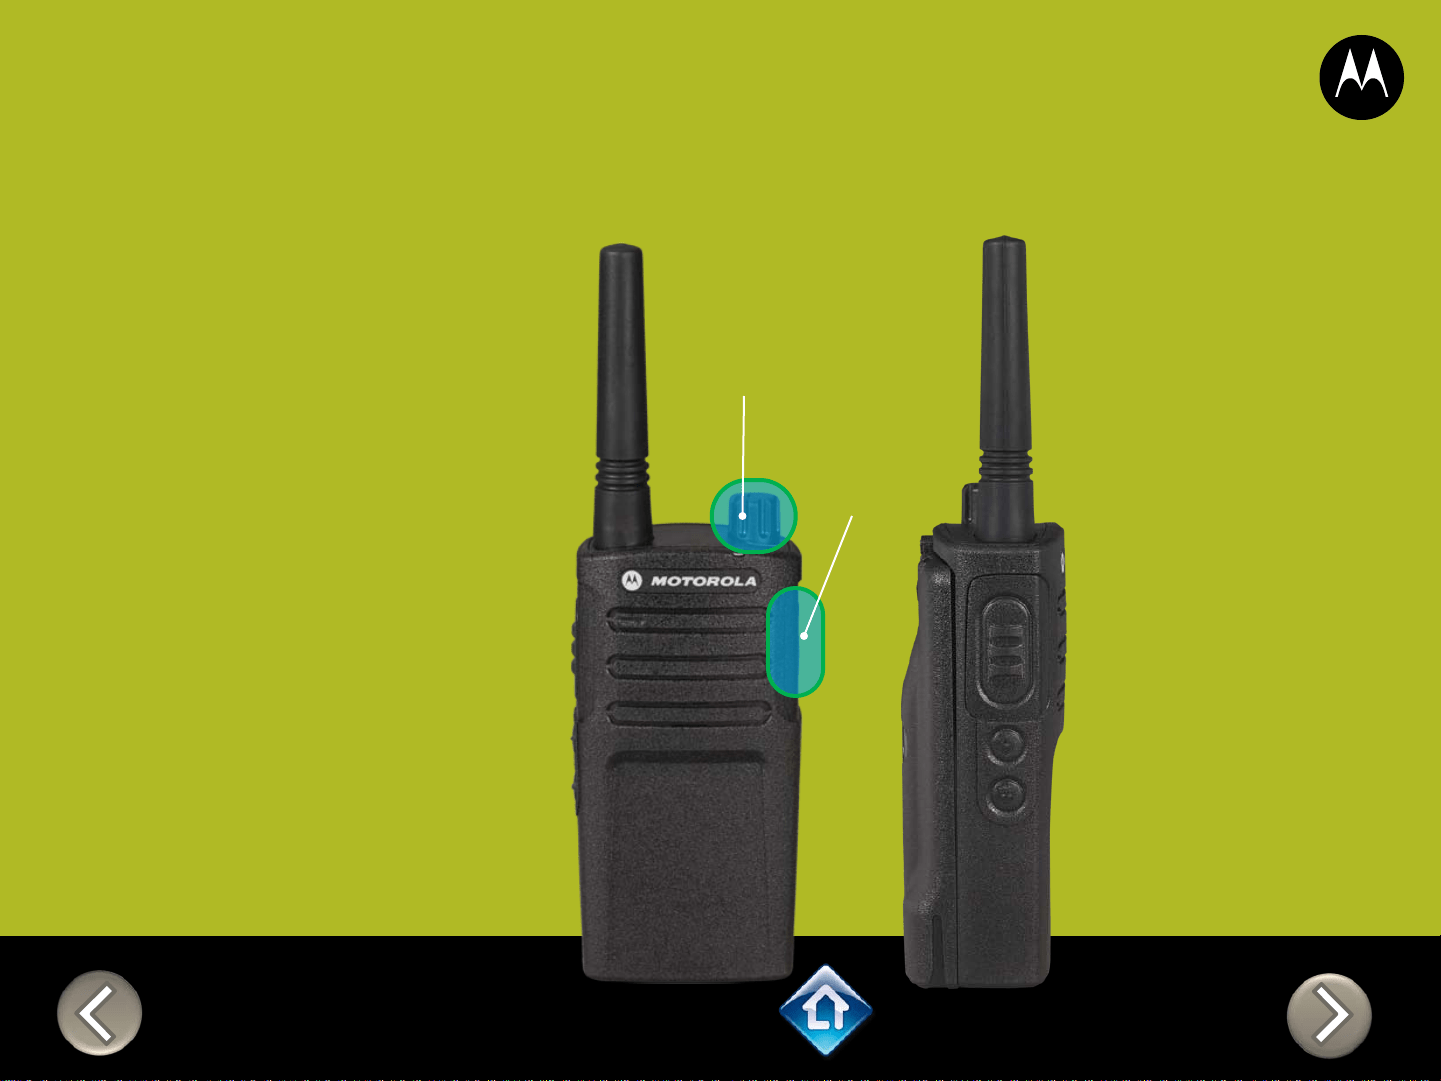
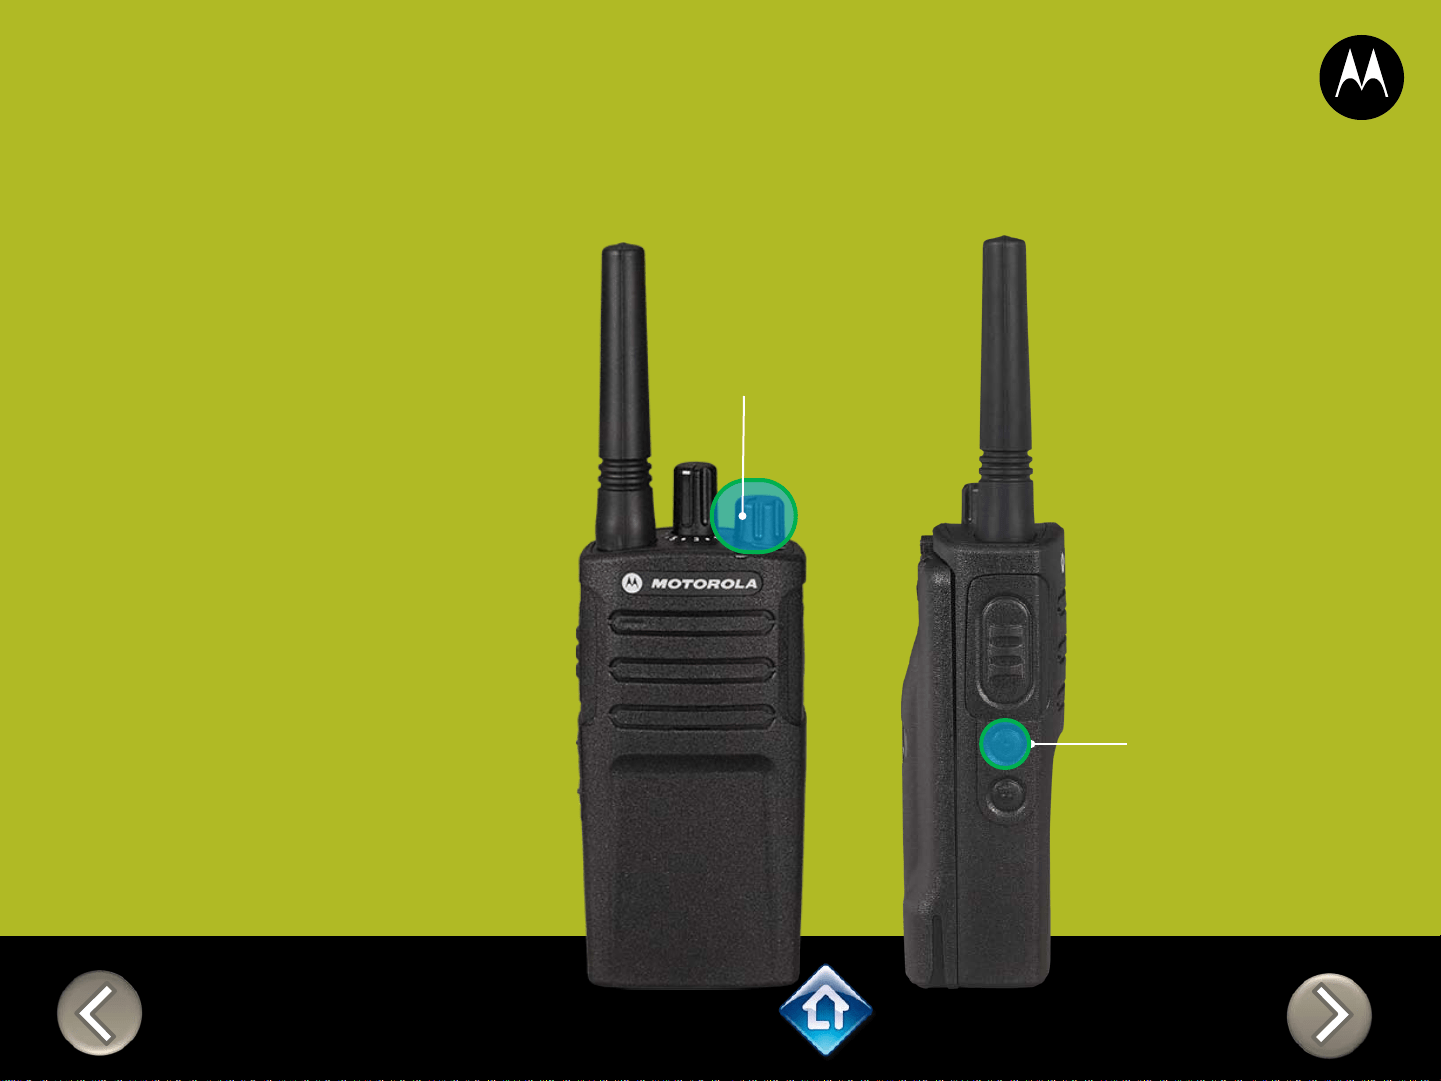
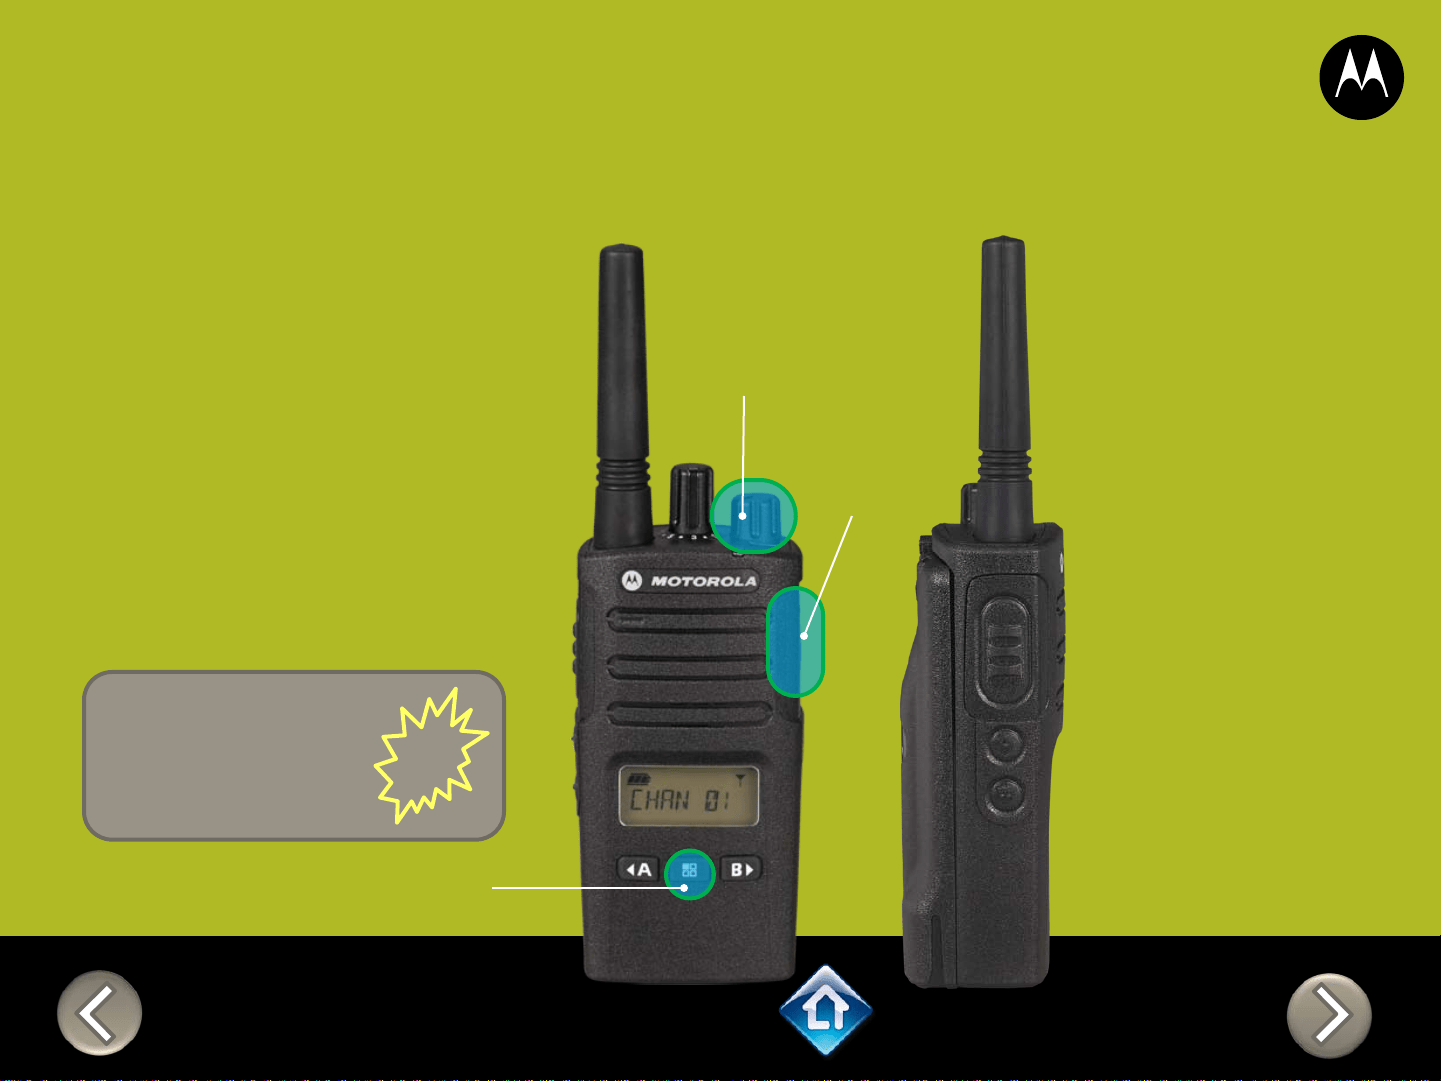
3) On/Off
Volume Knob
2) Attach
VOX
accessory
RM SERIES
External VOX hands free
Applies to
RMU2040 / RMU2043 / RMM2050
To enable voice activated
(VOX) accessories,
1. Use the Customer
Programming Software
(CPS) to change the Vox
Level of the radio
2. Attach a VOX supported
accessory
3. Power up with VOX
accessory attached

On/Off
Volume Knob
SB1 – Monitor Button
SB2 – Channel Select
RM SERIES
Power up Audio Announcement
To cycle through the Power
up Audio Announcement
options power the radio while
pressing SB1 + SB2 at the
same time.
OPTIONS:
1. Battery level + Channel #
2. Channel #
3. Silent
Applies to
RMU2040 / RMU2043 / RMM2050


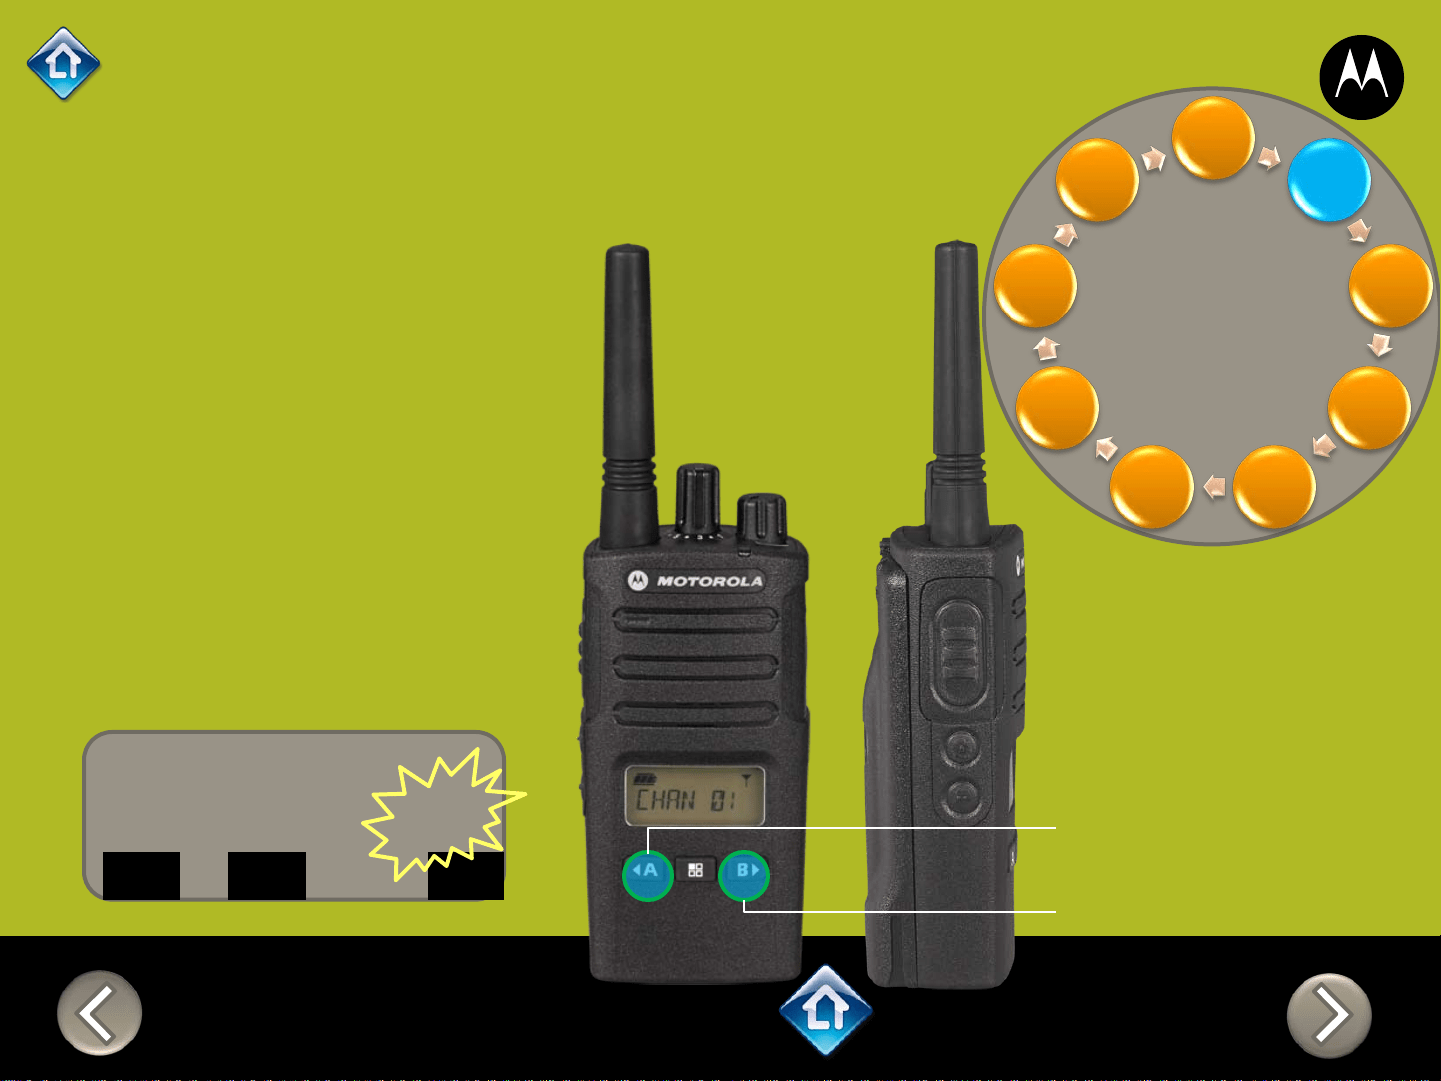
CH 1
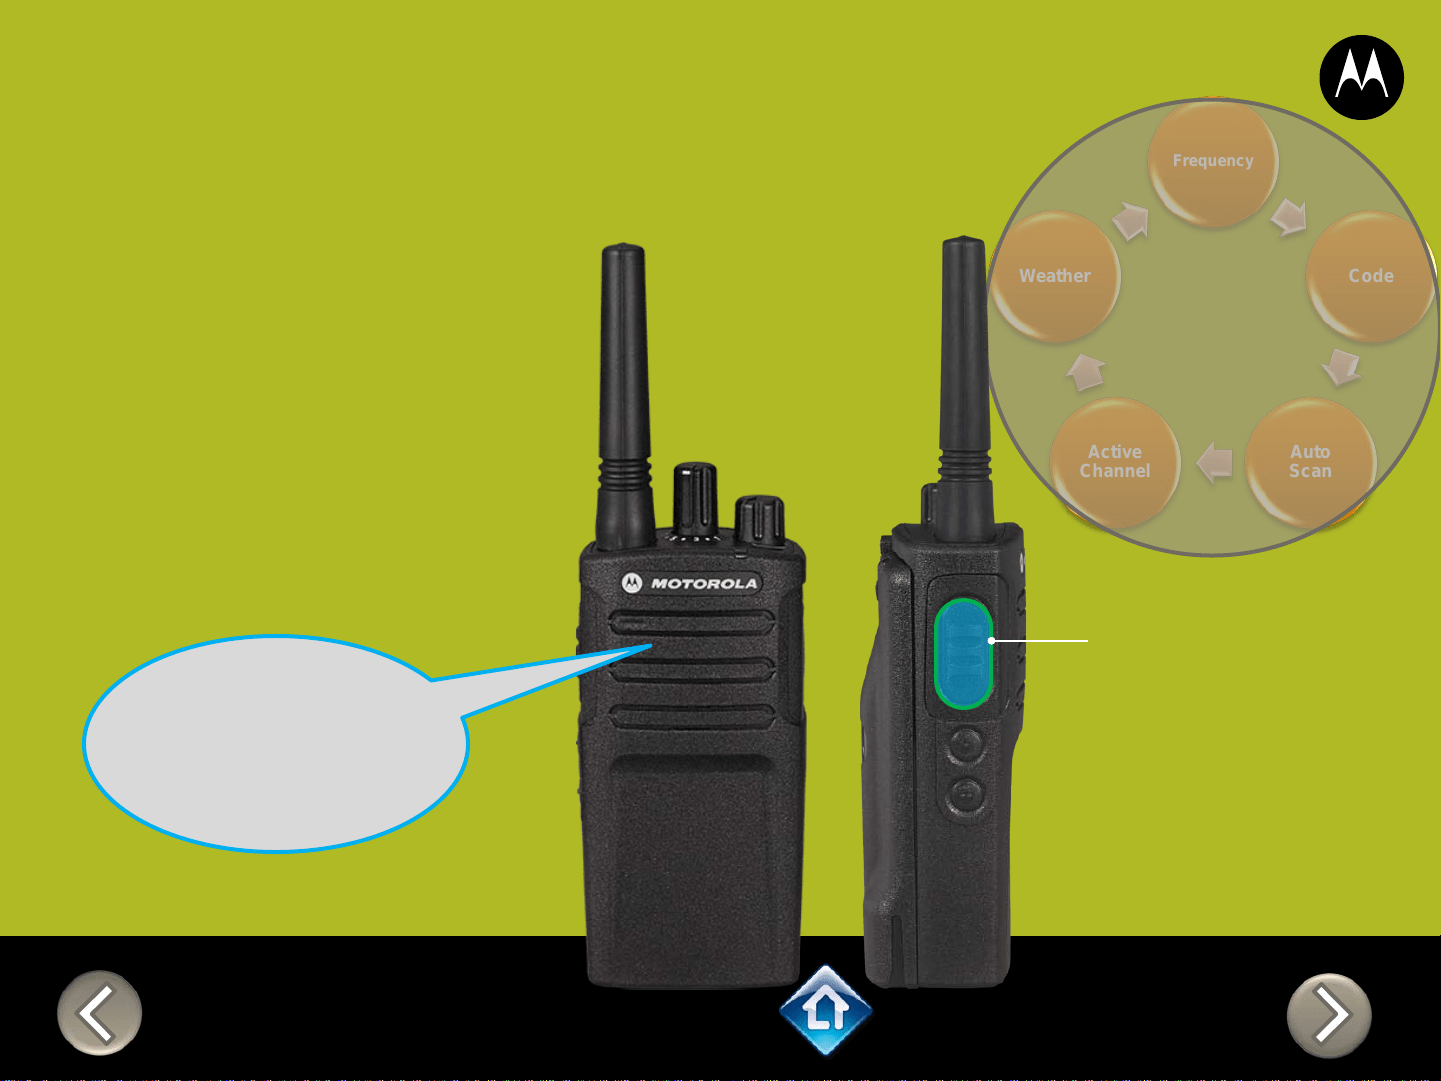
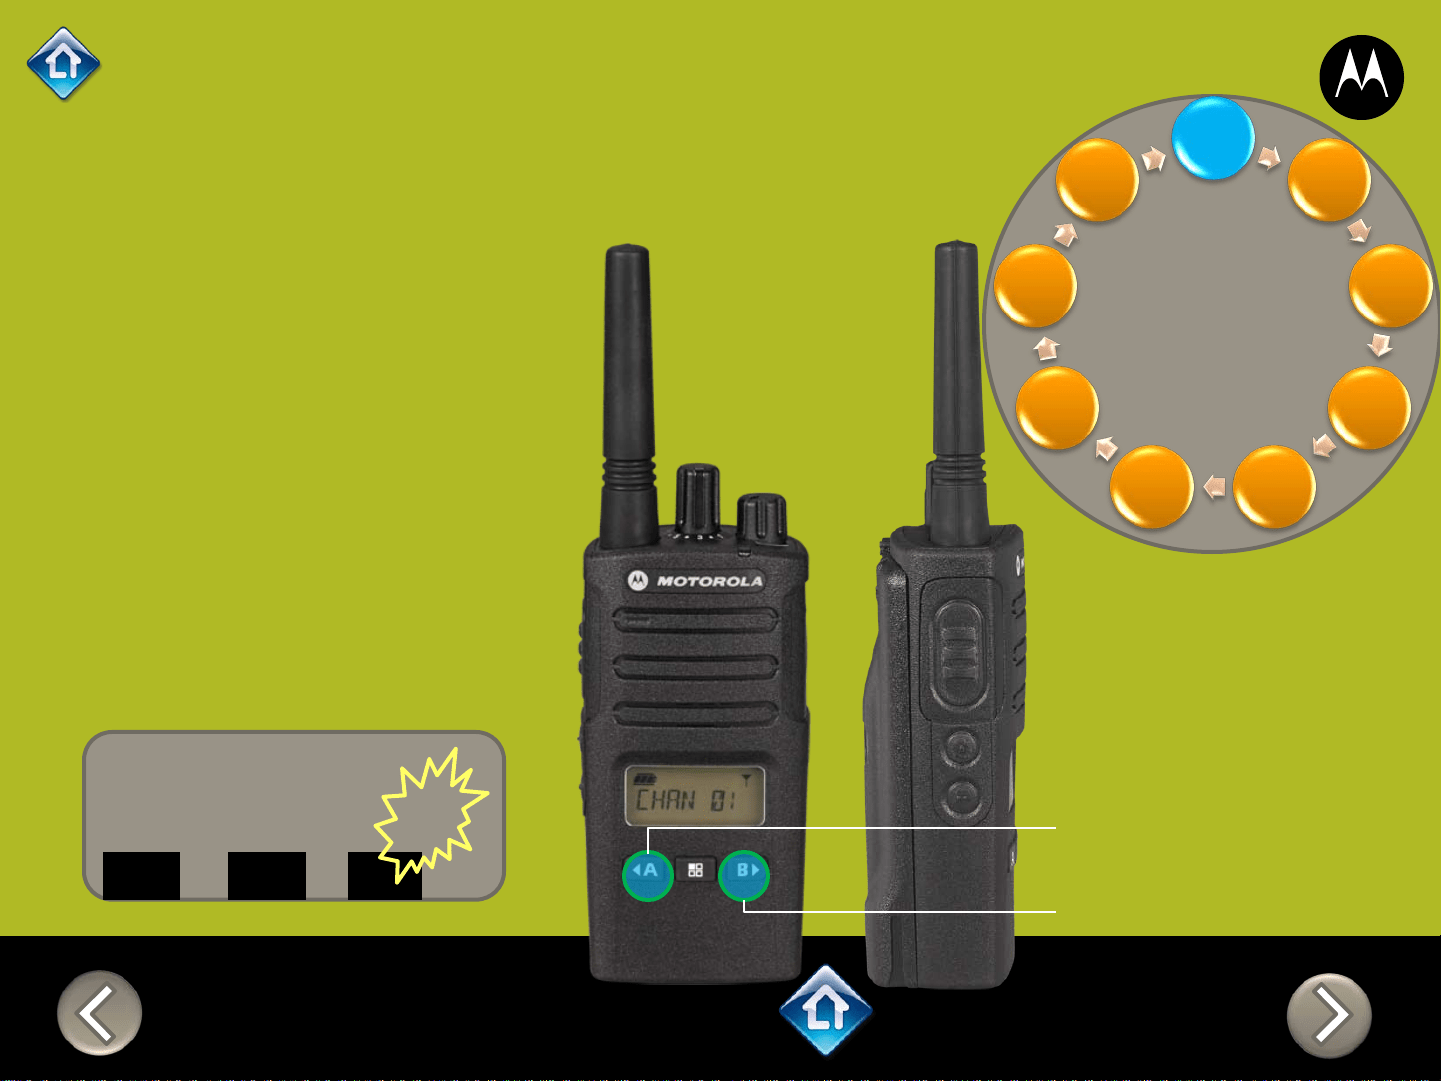
RM SERIES
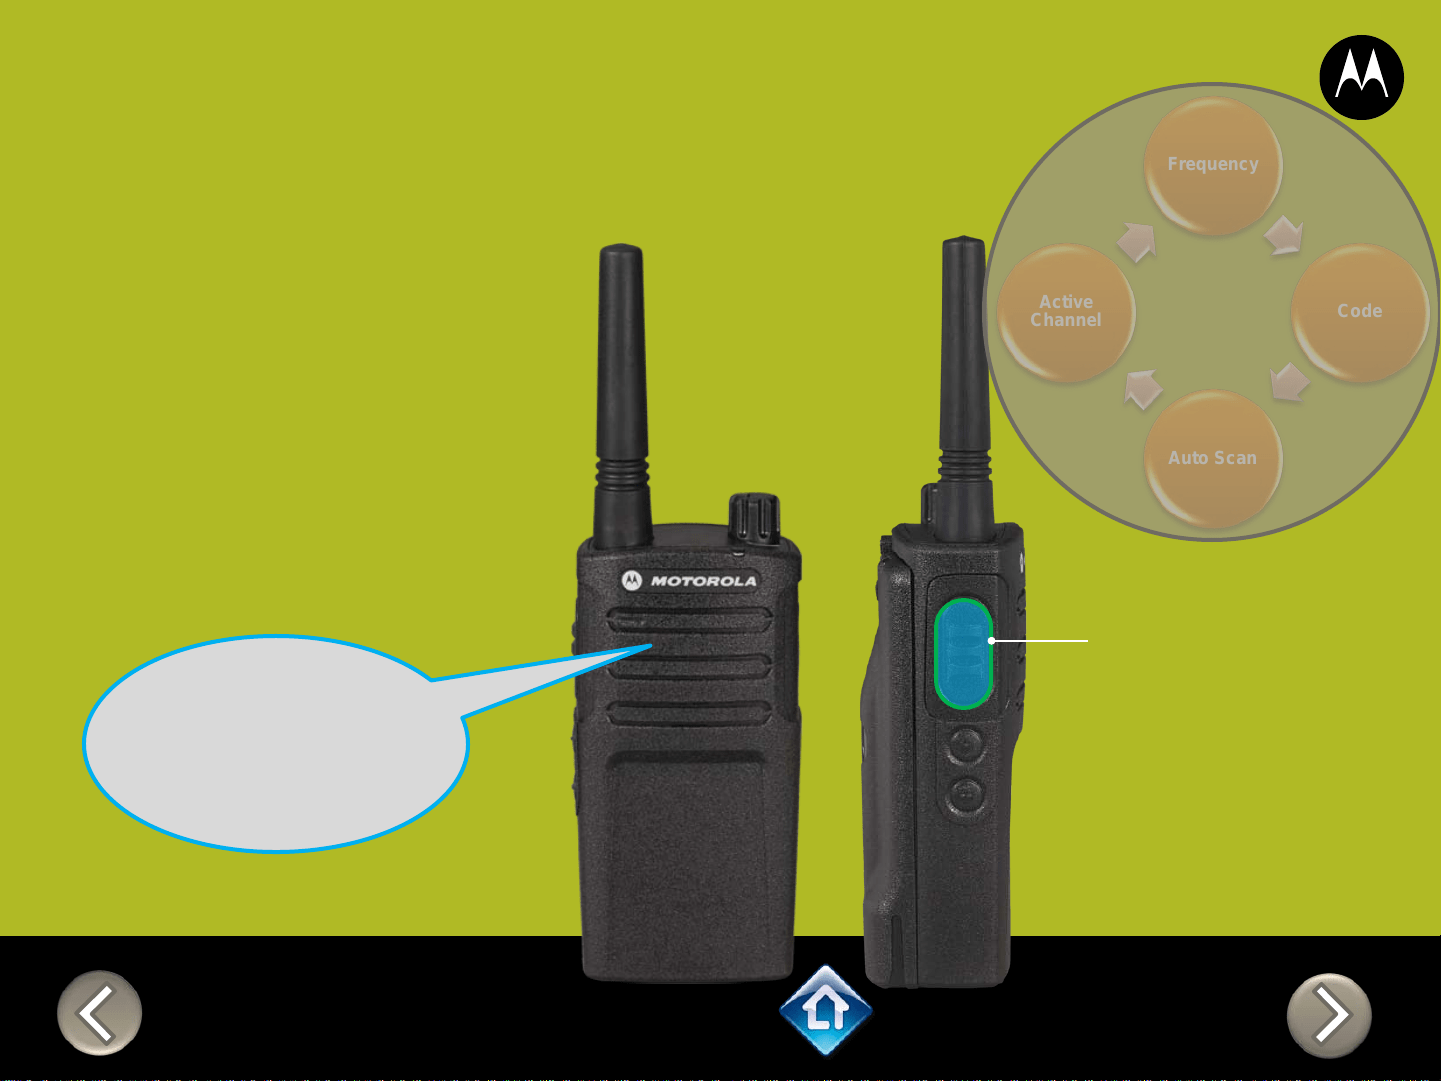
Advanced Configuration
1) Press PTT to cycle
through to the Auto
Scan menu
2) Enable / disable by
pressing SB1 or
SB2
“Auto Scan
Disabled, To
change press
side button 1 or
2”
SB1 – Monitor Button
SB2 – Channel Select
Frequency
Code
Auto Scan
Active
Channel
Applies to
RMU2040 / RMU2043 / RMM2050

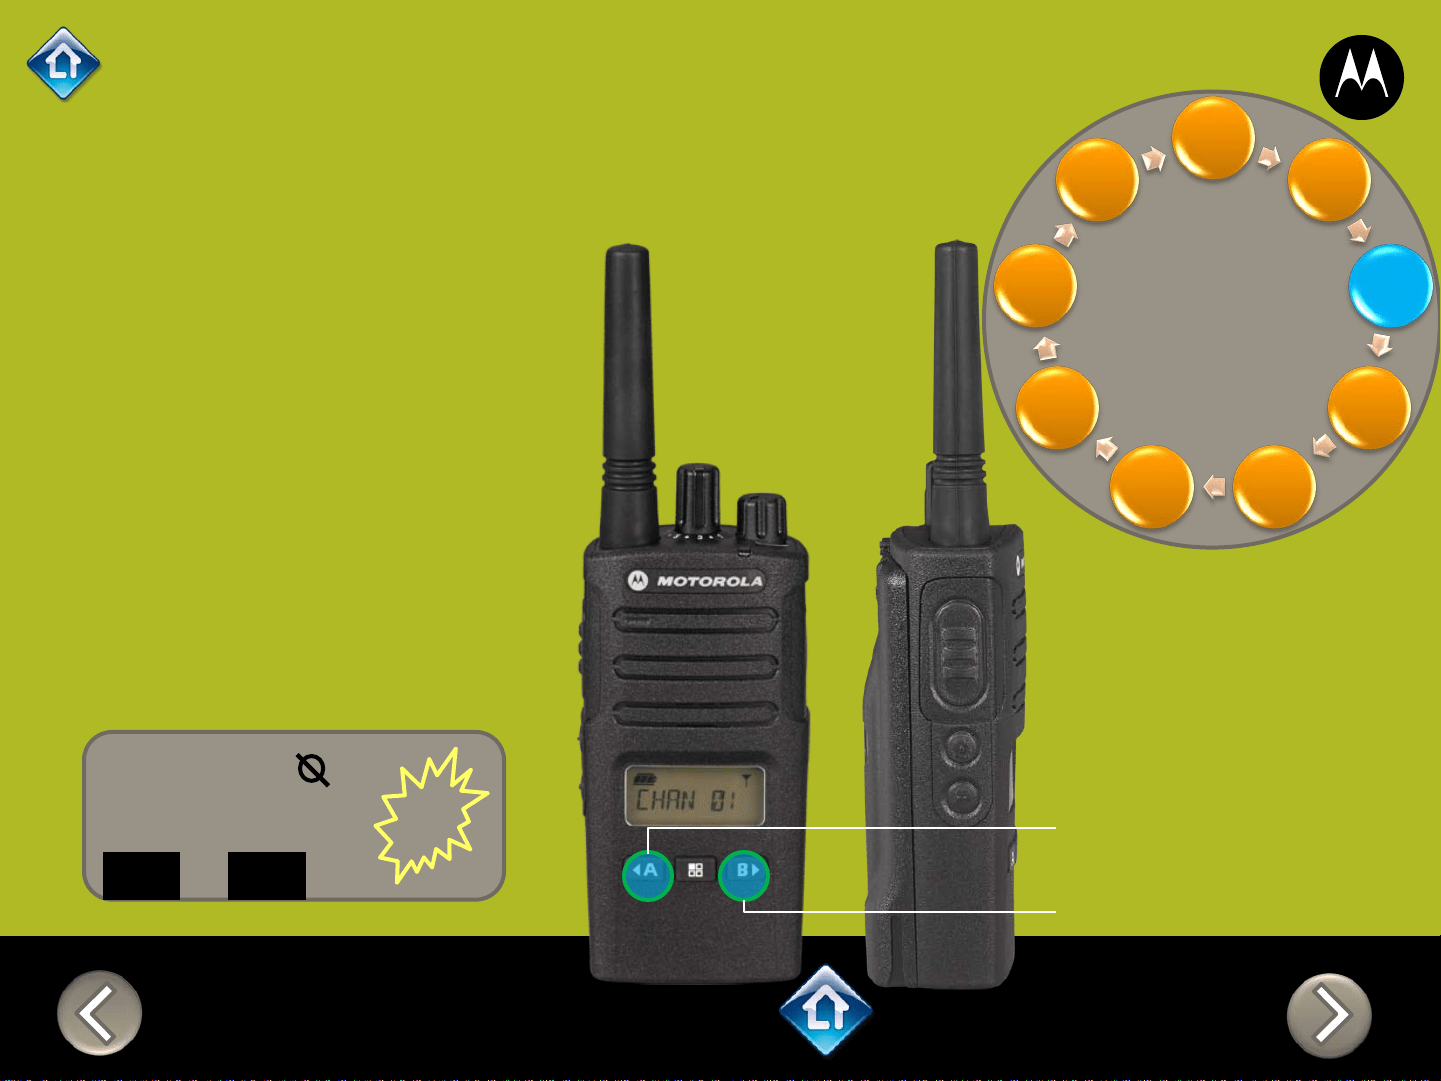
CH 1
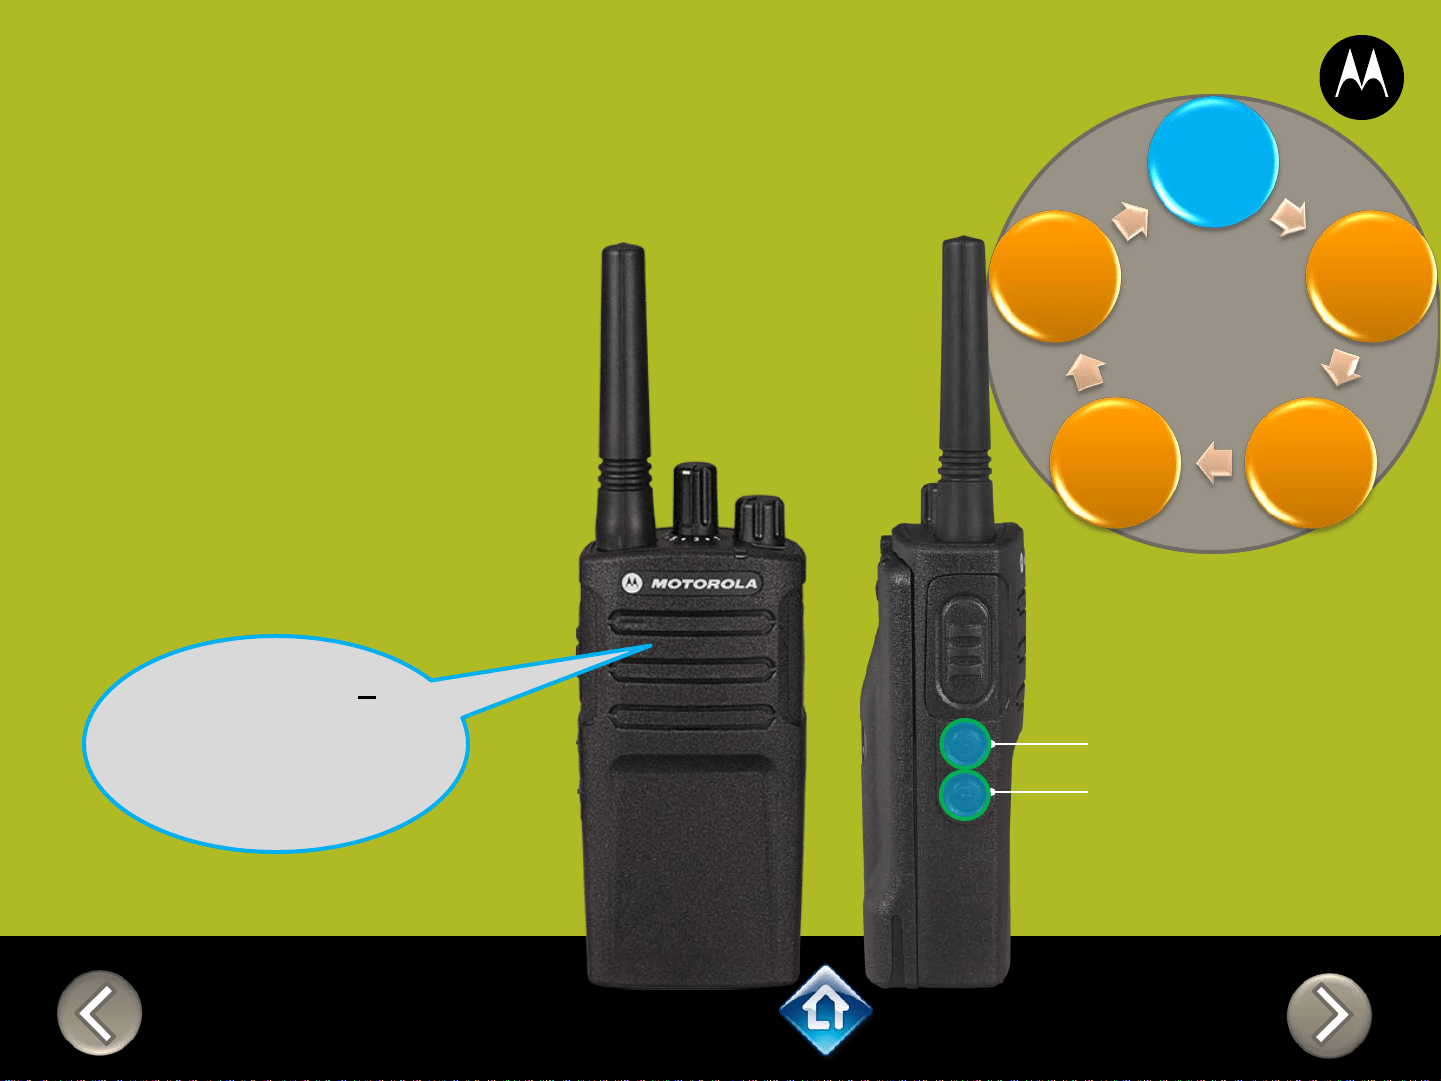
RM SERIES
Advanced Configuration
1) Press PTT to cycle
through to the
Active Channel
menu
2) Add / remove
channels by
pressing SB1 or
SB2
“Active Channels
2, To change
press side
button 1 or 2”
SB1 – Monitor Button
SB2 – Channel Select
Frequency
Code
Auto Scan
Active
Channel
Applies to
RMU2040 / RMU2043 / RMM2050

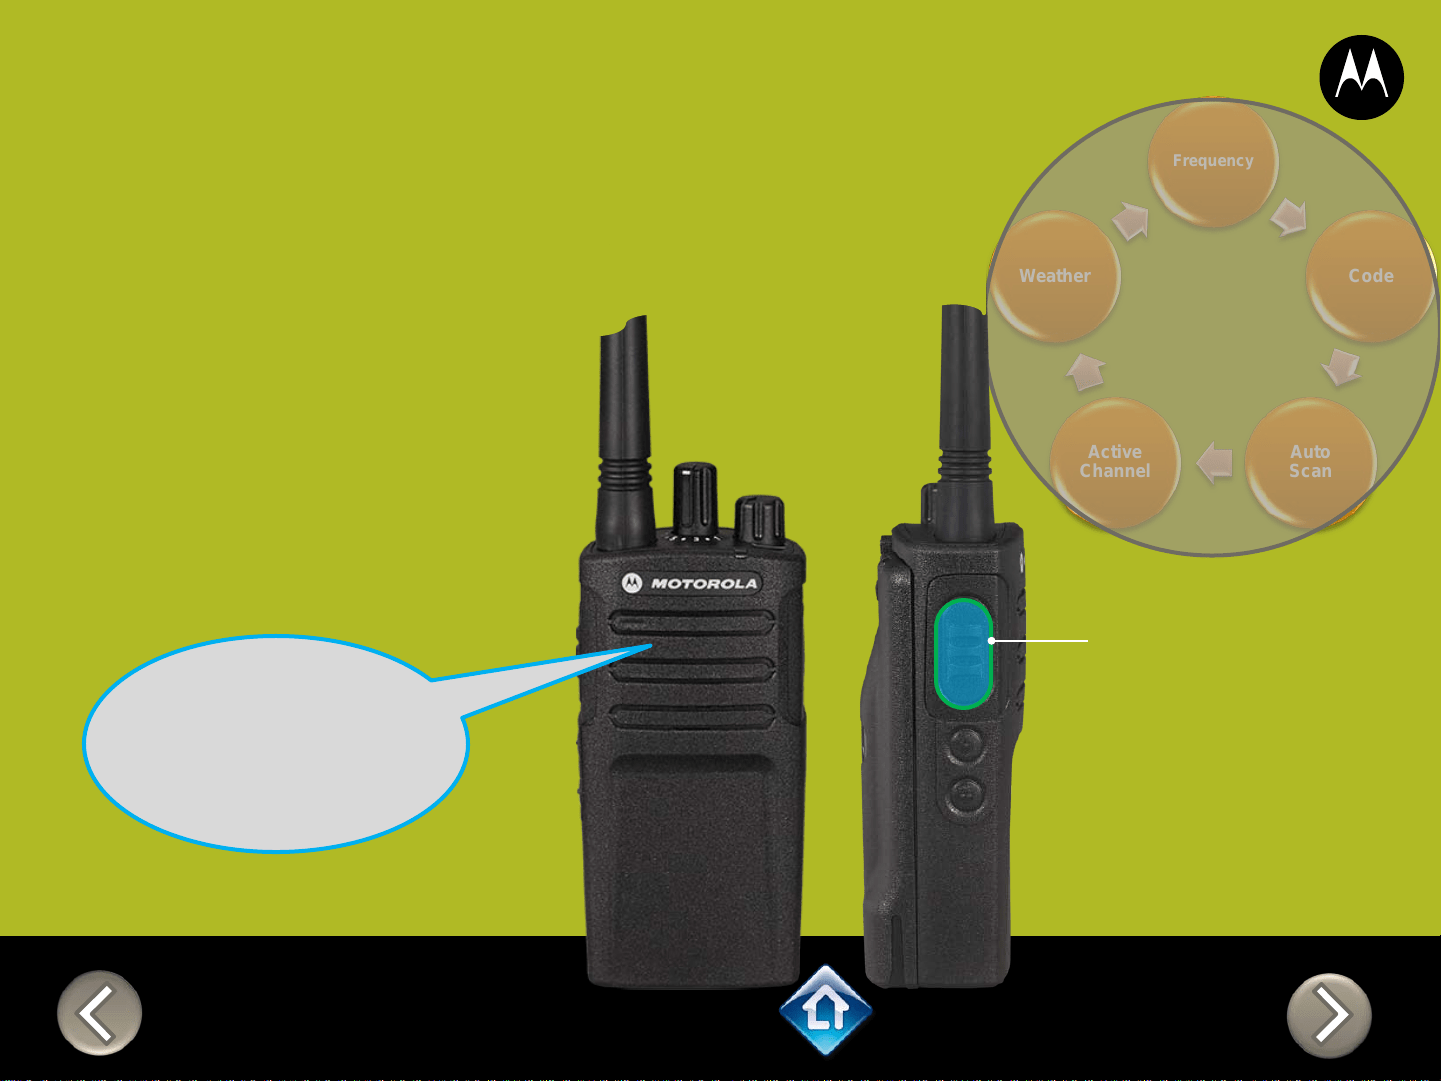
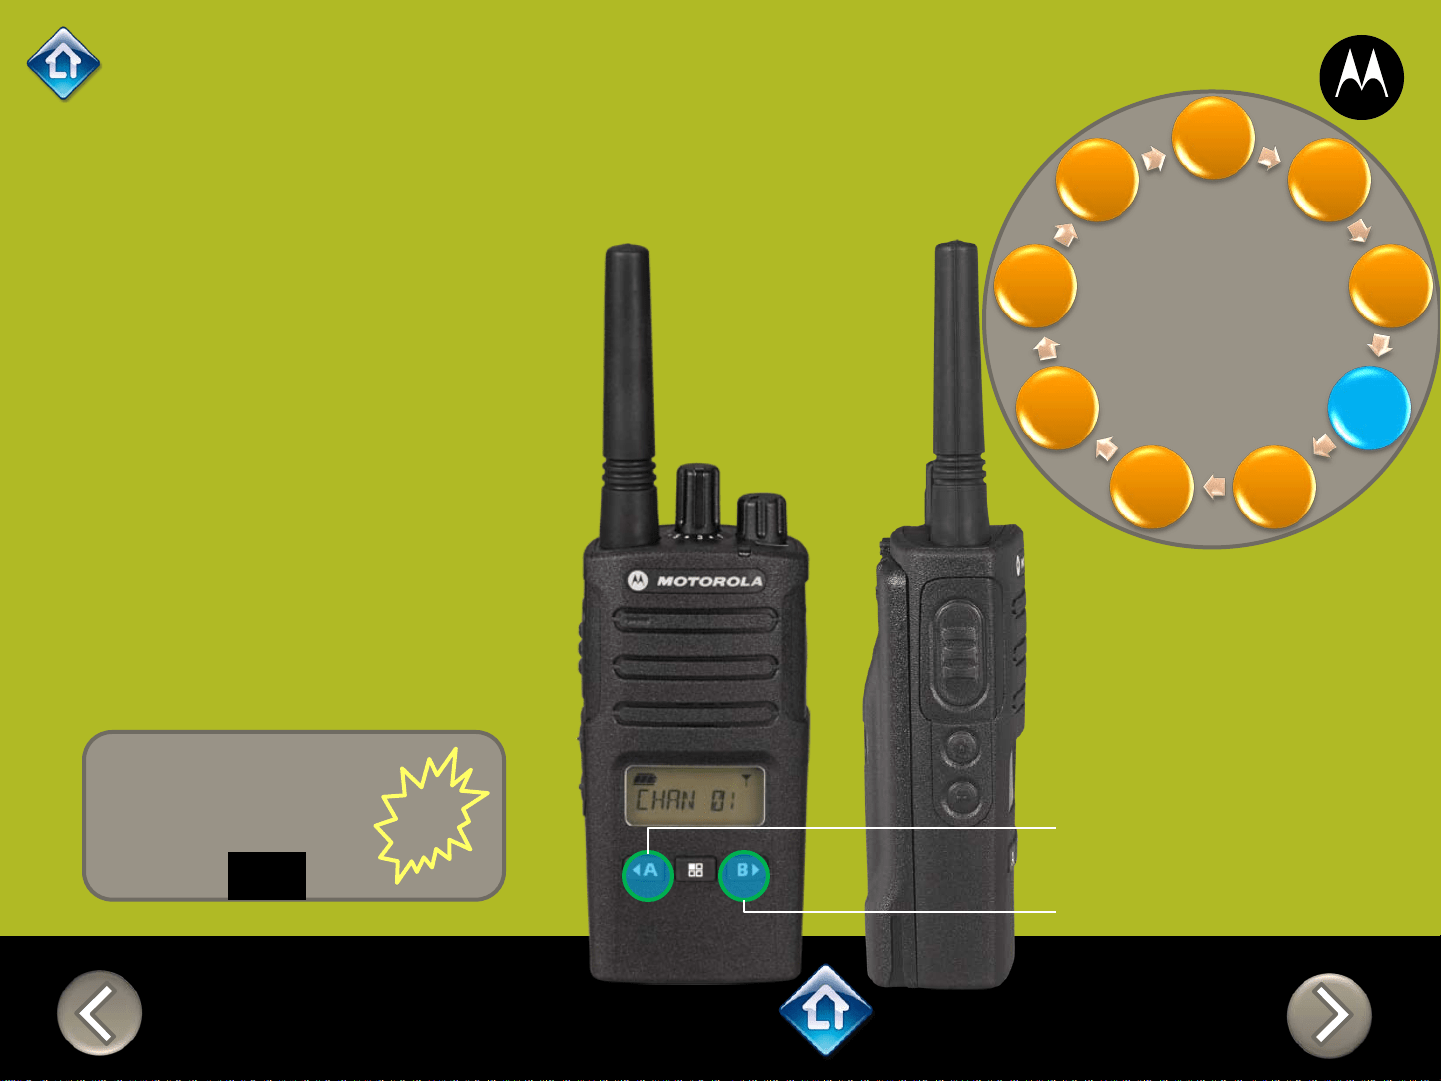
RM SERIES
Advanced Configuration
Frequency
Code
Auto Scan
Active
Channel
PTT (Push-to-Talk)
Button
1) Press PTT to cycle
through the Advanced
Configuration Menu until
you hear the channel
number
2) Select another channel to
configure by pressing SB1
or SB2
“Channel 1”
CH 2
3) Press PTT to
cycle through the
Advanced
Configuration
Menu options for
Channel 2
Applies to
RMU2040 / RMU2043 / RMM2050

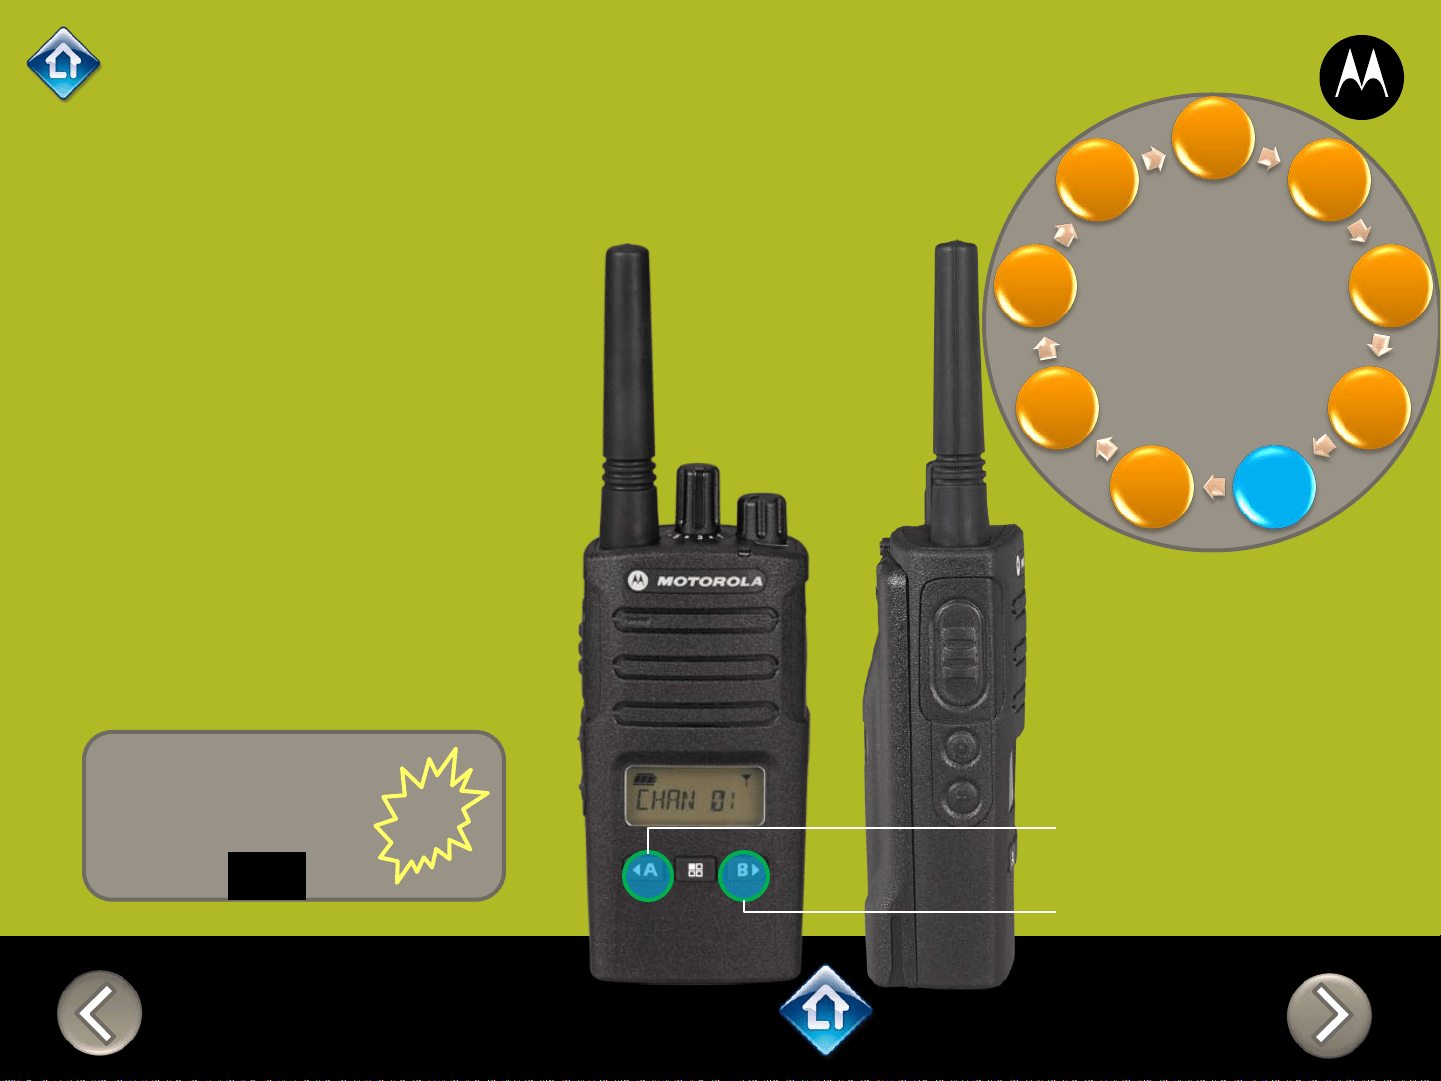
RM SERIES
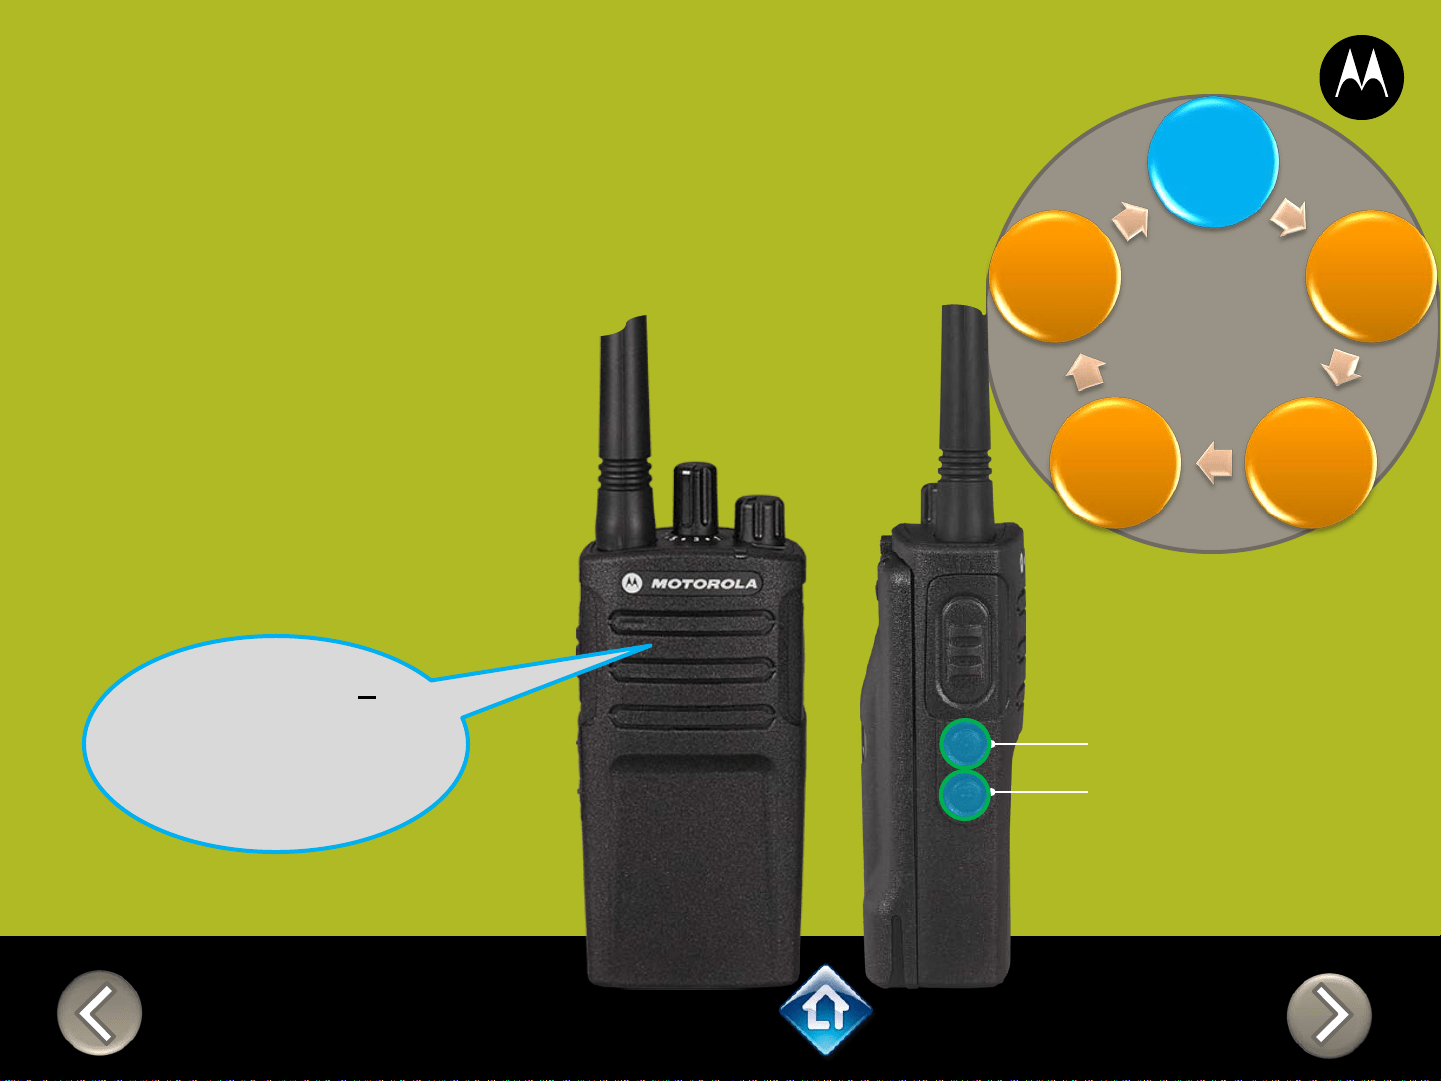
Advanced Configuration
2) PTT (Push-to-Talk)
Button
To exit Advanced Configuration
you can:
1) Power cycle the radio.
Or
2) Press and hold PTT until you
cycle back to top of
programming menu and hear
a ‘beep” then press and hold
PTT until you hear Power up
Audio
“Battery level
high, Channel 1”
Applies to
RMU2040 / RMU2043 / RMM2050
1) Power button


Power Up Audio:
Battery level +
Channel
PTT (Push-to-Talk)
Button
SB1 – Monitor Button
SB2 – Channel Down
RMU2043
DEFAULT VALUES
Channel Voice Prompt: On
Active Channels: 2
Battery Save: On
CHAN FREQ CODE
1 1 - 458.6625 1 – 67.0 Hz
2 2 – 469.2625 1 – 67.0 Hz
3* 1 - 458.6625 2 – 71.9 Hz
4* 2 - 469.2625 2 – 71.9 Hz
*When channels are enabled


PTT (Push-to-Talk)
Button
SB1 – Monitor Button
SB2 – Channel Select
RM SERIES
Factory Settings Reset
On/Off
Volume Knob
To reset radio to
Factory default
settings, Power up
with SB1, SB2 &
PTT pressed at the
same time.
Please note that all
channels will revert to
default frequencies.
Applies to
RMU2040 / RMU2043 / RMM2050


3) On/Off
Volume Knob
2) Attach
VOX
accessory
RM SERIES
External VOX hands free
To enable voice activated
(VOX) accessories,
1. Use the Customer
Programming Software
(CPS) to change the Vox
Level of the radio
2. Attach a VOX supported
accessory
3. Power up with VOX
accessory attached
Applies to
RMU2040 / RMU2043 / RMM2050


On/Off
Volume Knob
SB1 – Monitor Button
SB2 – Channel Select
RM SERIES
Power up Audio Announcement
To cycle through the Power
up Audio Announcement
options power the radio while
pressing SB1 + SB2 at the
same time.
OPTIONS:
1. Battery level + Channel #
2. Channel #
3. Silent
Applies to
RMU2040 / RMU2043 / RMM2050


CH 1
RM SERIES
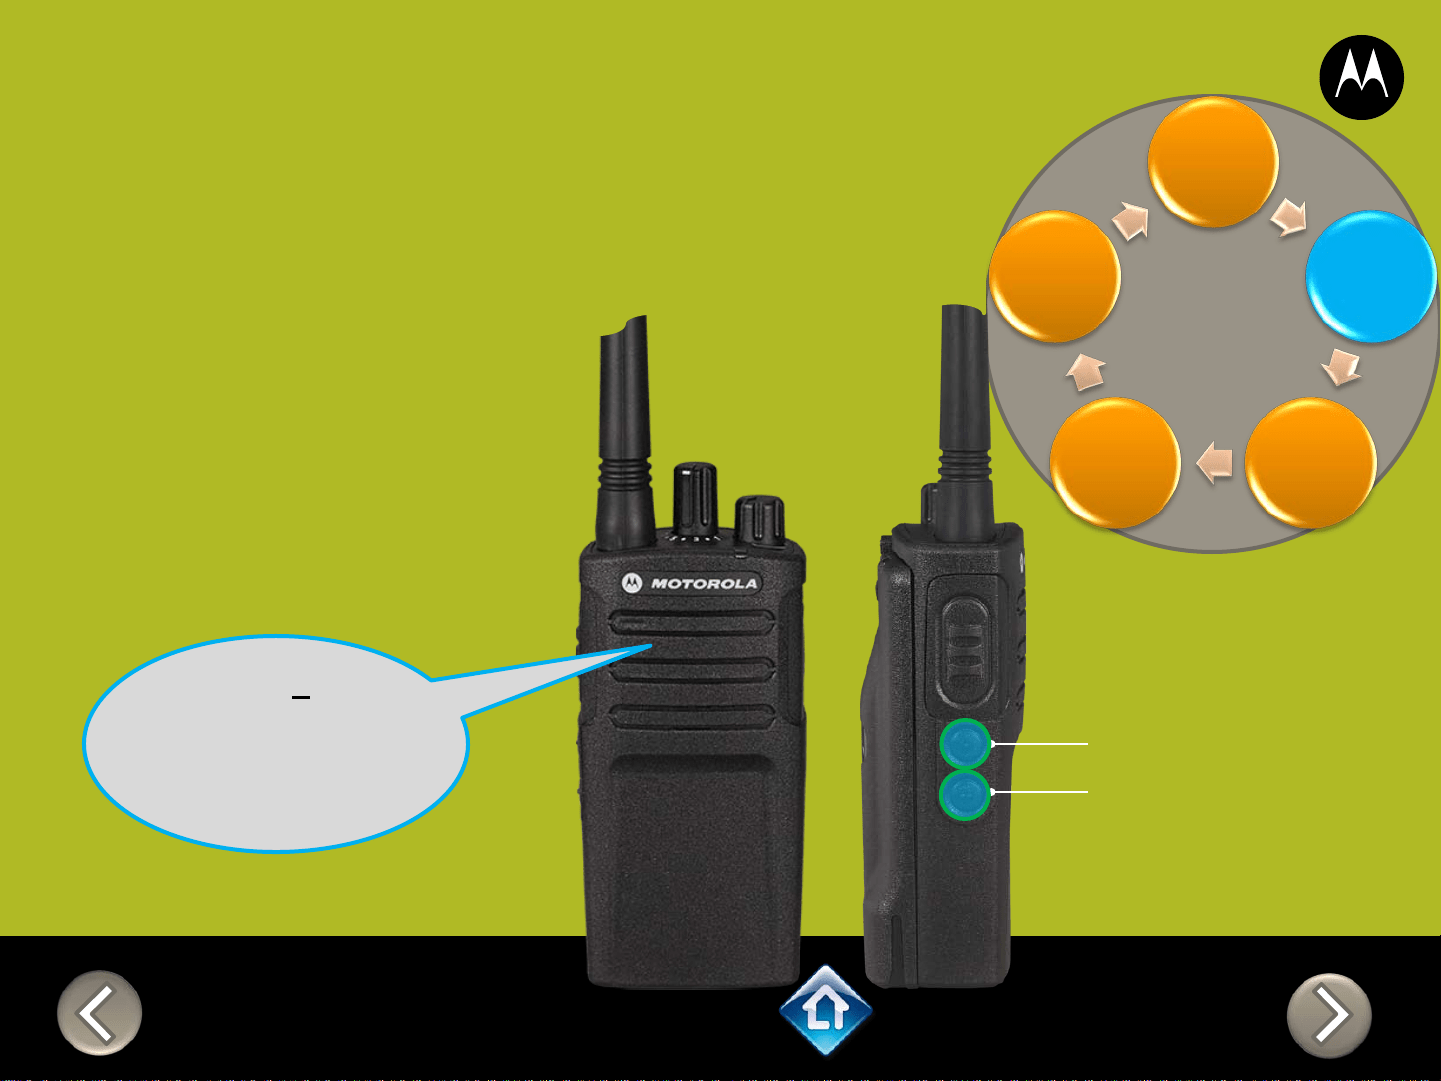
Advanced Configuration
1) Press PTT to cycle
through to the Auto
Scan menu
2) Enable / disable by
pressing SB1 or
SB2
“Auto Scan
Disabled, To
change press
side button 1 or
2”
SB1 – Monitor Button
SB2 – Channel Select
Frequency
Code
Auto Scan
Active
Channel
Applies to
RMU2040 / RMU2043 / RMM2050

CH 1
RM SERIES
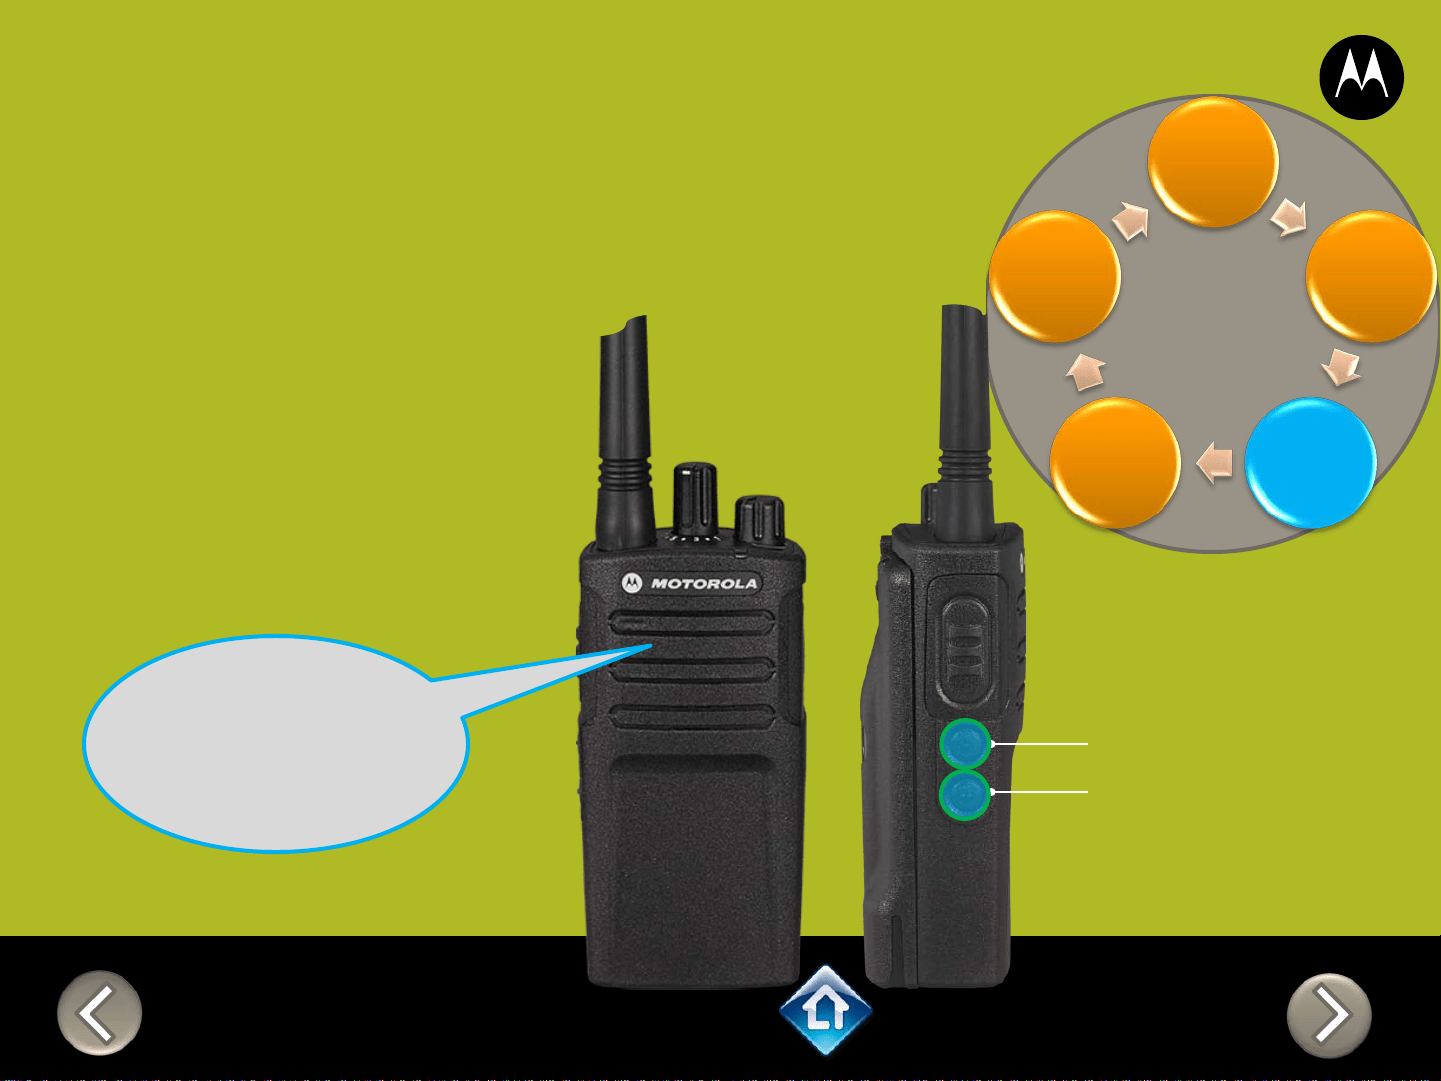
Advanced Configuration
1) Press PTT to cycle
through to the
Active Channel
menu
2) Add / remove
channels by
pressing SB1 or
SB2
“Active Channels
2, To change
press side
button 1 or 2”
SB1 – Monitor Button
SB2 – Channel Select
Frequency
Code
Auto Scan
Active
Channel
Applies to
RMU2040 / RMU2043 / RMM2050
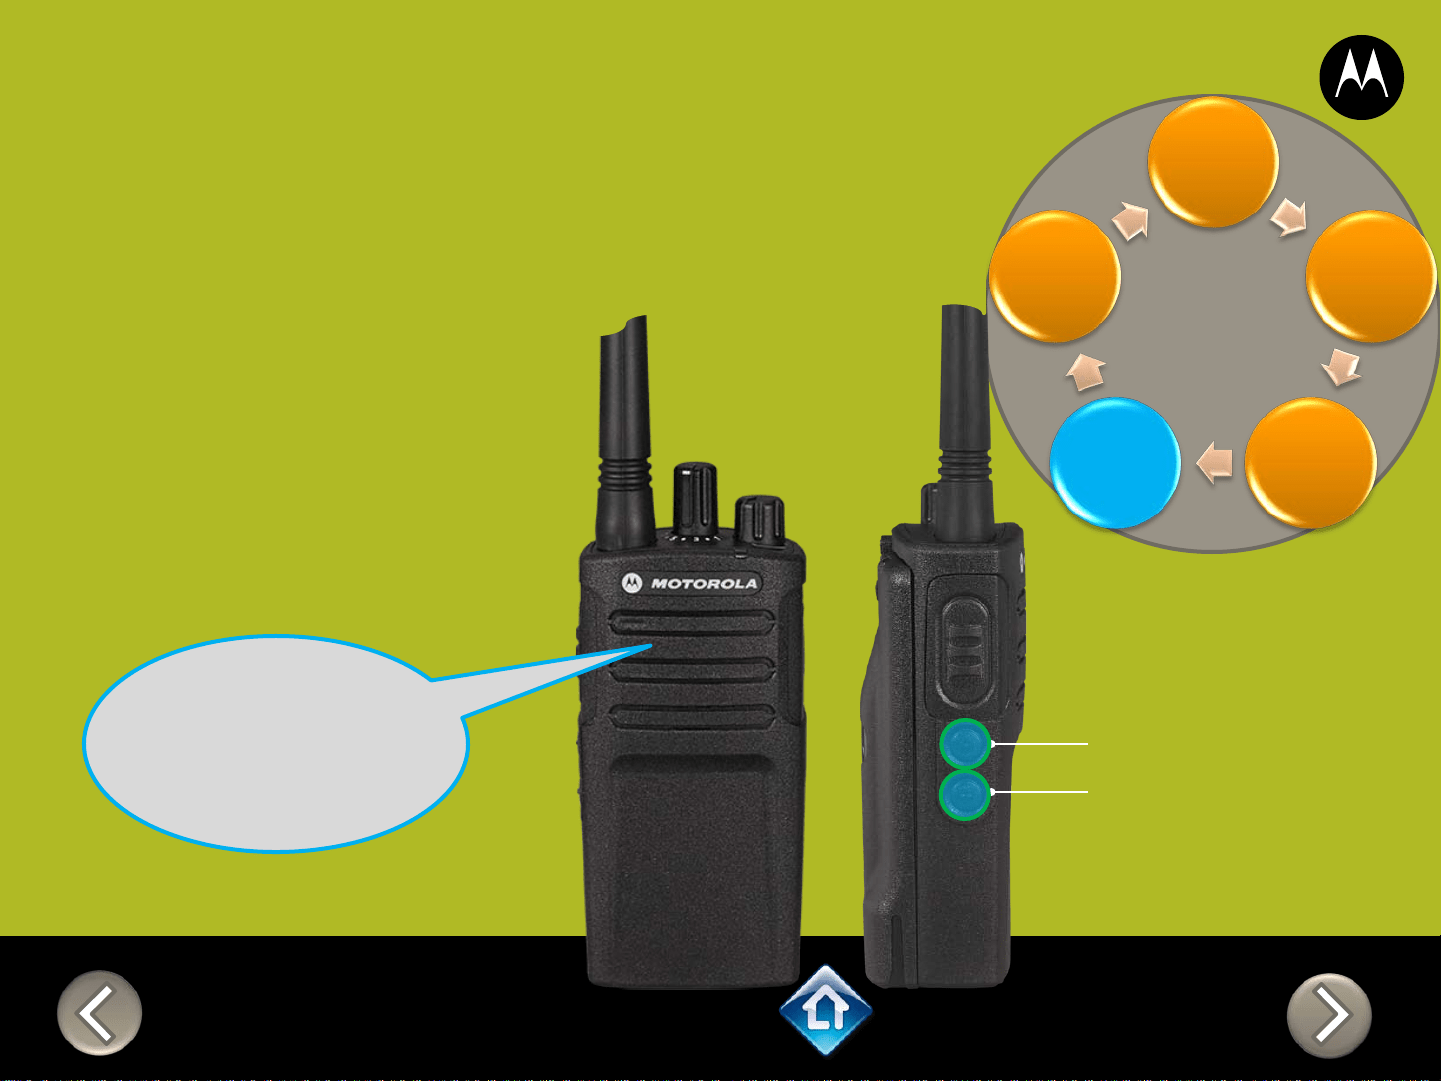
RM SERIES
Advanced Configuration
Frequency
Code
Auto Scan
Active
Channel
PTT (Push-to-Talk)
Button
1) Press PTT to cycle
through the Advanced
Configuration Menu until
you hear the channel
number
2) Select another channel to
configure by pressing SB1
or SB2
“Channel 1”
CH 2
3) Press PTT to
cycle through the
Advanced
Configuration
Menu options for
Channel 2
Applies to
RMU2040 / RMU2043 / RMM2050
RM SERIES
Advanced Configuration
2) PTT (Push-to-Talk)
Button
“Battery level
high, Channel 1”
Applies to
RMU2040 / RMU2043 / RMM2050
To exit Advanced Configuration
you can:
1) Power cycle the radio.
Or
2) Press and hold PTT until you
cycle back to top of
programming menu and hear
a ‘beep” then press and hold
PTT until you hear Power up
Audio
1) Power button

Power Up Audio:
Battery level +
Channel
PTT (Push-to-Talk)
Button
SB1 – Monitor Button
SB2 – Channel Down
RMM2050
DEFAULT VALUES
Channel Voice Prompt: On
Active Channels: 5
Battery Save: On
CHAN FREQ CODE
1 154.7000 1 – 67.0 Hz
2 154.6000 1 – 67.0 Hz
3 151.8200 1 – 67.0 Hz
4 151.8800 1 – 67.0 Hz
5 151.9400 1 – 67.0 Hz

PTT (Push-to-Talk)
Button
SB1 – Monitor Button
SB2 – Channel Select
RM SERIES
Factory Settings Reset
On/Off
Volume Knob
To reset radio to
Factory default
settings, Power up
with SB1, SB2 &
PTT pressed at the
same time.
Please note that all
channels will revert to
default frequencies.
Applies to
RMU2040 / RMU2043 / RMM2050

3) On/Off
Volume Knob
2) Attach
VOX
accessory
RM SERIES
External VOX hands free
Applies to
RMU2040 / RMU2043 / RMM2050
To enable voice activated
(VOX) accessories,
1. Use the Customer
Programming Software
(CPS) to change the Vox
Level of the radio
2. Attach a VOX supported
accessory
3. Power up with VOX
accessory attached


On/Off
Volume Knob
SB1 – Monitor Button
SB2 – Channel Select
RM SERIES
Power up Audio Announcement
To cycle through the Power
up Audio Announcement
options power the radio while
pressing SB1 + SB2 at the
same time.
OPTIONS:
1. Battery level + Channel #
2. Channel #
3. Silent
Applies to
RMU2040 / RMU2043 / RMM2050


CH 1
RM SERIES
Advanced Configuration
1) Press PTT to cycle
through to the Auto
Scan menu
2) Enable / disable by
pressing SB1 or
SB2
“Auto Scan
Disabled, To
change press
side button 1 or
2”
SB1 – Monitor Button
SB2 – Channel Select
Frequency
Code
Auto Scan
Active
Channel
Applies to
RMU2040 / RMU2043 / RMM2050
CH 1
RM SERIES
Advanced Configuration
1) Press PTT to cycle
through to the
Active Channel
menu
2) Add / remove
channels by
pressing SB1 or
SB2
“Active Channels
2, To change
press side
button 1 or 2”
SB1 – Monitor Button
SB2 – Channel Select
Frequency
Code
Auto Scan
Active
Channel
Applies to
RMU2040 / RMU2043 / RMM2050

RM SERIES
Advanced Configuration
Frequency
Code
Auto Scan
Active
Channel
PTT (Push-to-Talk)
Button
1) Press PTT to cycle
through the Advanced
Configuration Menu until
you hear the channel
number
2) Select another channel to
configure by pressing SB1
or SB2
“Channel 1”
CH 2
3) Press PTT to
cycle through the
Advanced
Configuration
Menu options for
Channel 2
Applies to
RMU2040 / RMU2043 / RMM2050

RM SERIES
Advanced Configuration
2) PTT (Push-to-Talk)
Button
“Battery level
high, Channel 1”
Applies to
RMU2040 / RMU2043 / RMM2050
To exit Advanced Configuration
you can:
1) Power cycle the radio.
Or
2) Press and hold PTT until you
cycle back to top of
programming menu and hear
a ‘beep” then press and hold
PTT until you hear Power up
Audio
1) Power button


RMU2080
DEFAULT VALUES
PTT (Push-to-Talk)
Button
SB1 – Monitor Button
SB2 – Scan/Nuisance
Ch Delete
Power Up Audio:
Battery level +
Channel
Channel Selector
Channel Voice Prompt: On
Active Channels: 7
Battery Save: On
Weather Channel: On
CHAN FREQ CODE
1 2 – 464.5500 1 – 67.0 Hz
2 8 – 467.9250 1 – 67.0 Hz
3 5 – 467.8500 1 – 67.0 Hz
4 6 – 467.8750 1 – 67.0 Hz
5 10 – 461.0625 1 – 67.0 Hz
6 12 – 461.1125 1 – 67.0 Hz
7 14 – 461.1625 1 – 67.0 Hz
8* 16 – 461.2125 1 – 67.0 Hz
*When channels are enabled


PTT (Push-to-Talk)
Button
SB1 – Monitor Button
SB2 – Channel Select
RM SERIES
Factory Settings Reset
On/Off
Volume Knob
To reset radio to
Factory default
settings, Power up
with SB1, SB2 &
PTT pressed at the
same time.
Please note that all
channels will revert to
default frequencies.
Applies to RMU2080 / RMV2080


3) On/Off
Volume Knob
2) Attach
VOX
accessory
RM SERIES
External VOX hands free
Applies to RMU2080 / RMV2080
To enable voice activated
(VOX) accessories,
1. Use the Customer
Programming Software
(CPS) to change the Vox
Level of the radio
2. Attach a VOX supported
accessory
3. Power up with VOX
accessory attached
On/Off
Volume Knob
SB1 – Monitor Button
SB2 – Channel Select
RM SERIES
Power up Audio Announcement
To cycle through the Power
up Audio Announcement
options power the radio while
pressing SB1 + SB2 at the
same time.
OPTIONS:
1. Battery level + Channel #
2. Channel #
3. Silent
Applies to RMU2080 / RMV2080
CH 1
RM SERIES
Advanced Configuration
1) Press PTT to cycle
through to the Auto
Scan menu
2) Enable / disable by
pressing SB1 or
SB2
SB1 – Monitor Button
SB2 – Channel Select
Frequency
Code
Auto
Scan
Active
Channel
Weather
“Auto Scan
Disabled, To
change press
side button 1 or
2”
Applies to RMU2080 / RMV2080
CH 1
RM SERIES
Advanced Configuration
1) Press PTT to cycle
through to the
Active Channel
menu
2) Add / remove
channels by
pressing SB1 or
SB2
“Active Channels
2, To change
press side
button 1 or 2”
SB1 – Monitor Button
SB2 – Channel Select
Frequency
Code
Auto
Scan
Active
Channel
Weather
Applies to RMU2080 / RMV2080
CH 1
RM SERIES
Advanced Configuration
1) Press PTT to cycle
through to the
Active Channel
menu
2) Enable / disable by
pressing SB1 or
SB2
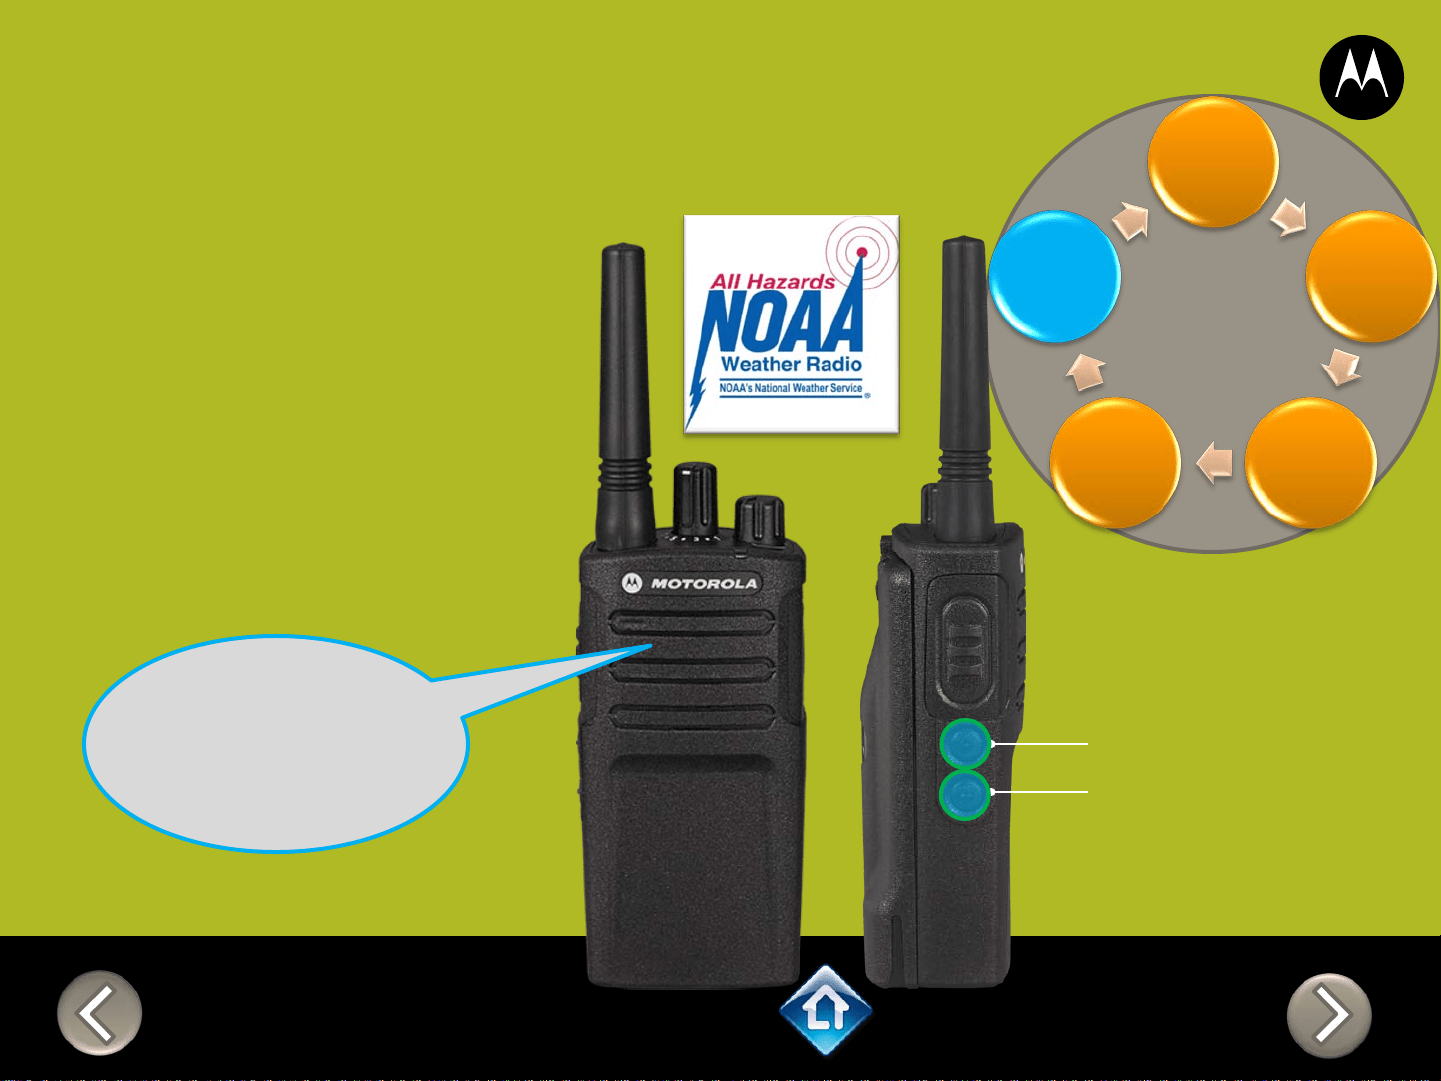
“Weather
Enabled, To
change press
side button 1 or
2”
SB1 – Monitor Button
SB2 – Channel Select
Frequency
Code
Auto
Scan
Active
Channel
Weather
Applies to RMU2080 / RMV2080
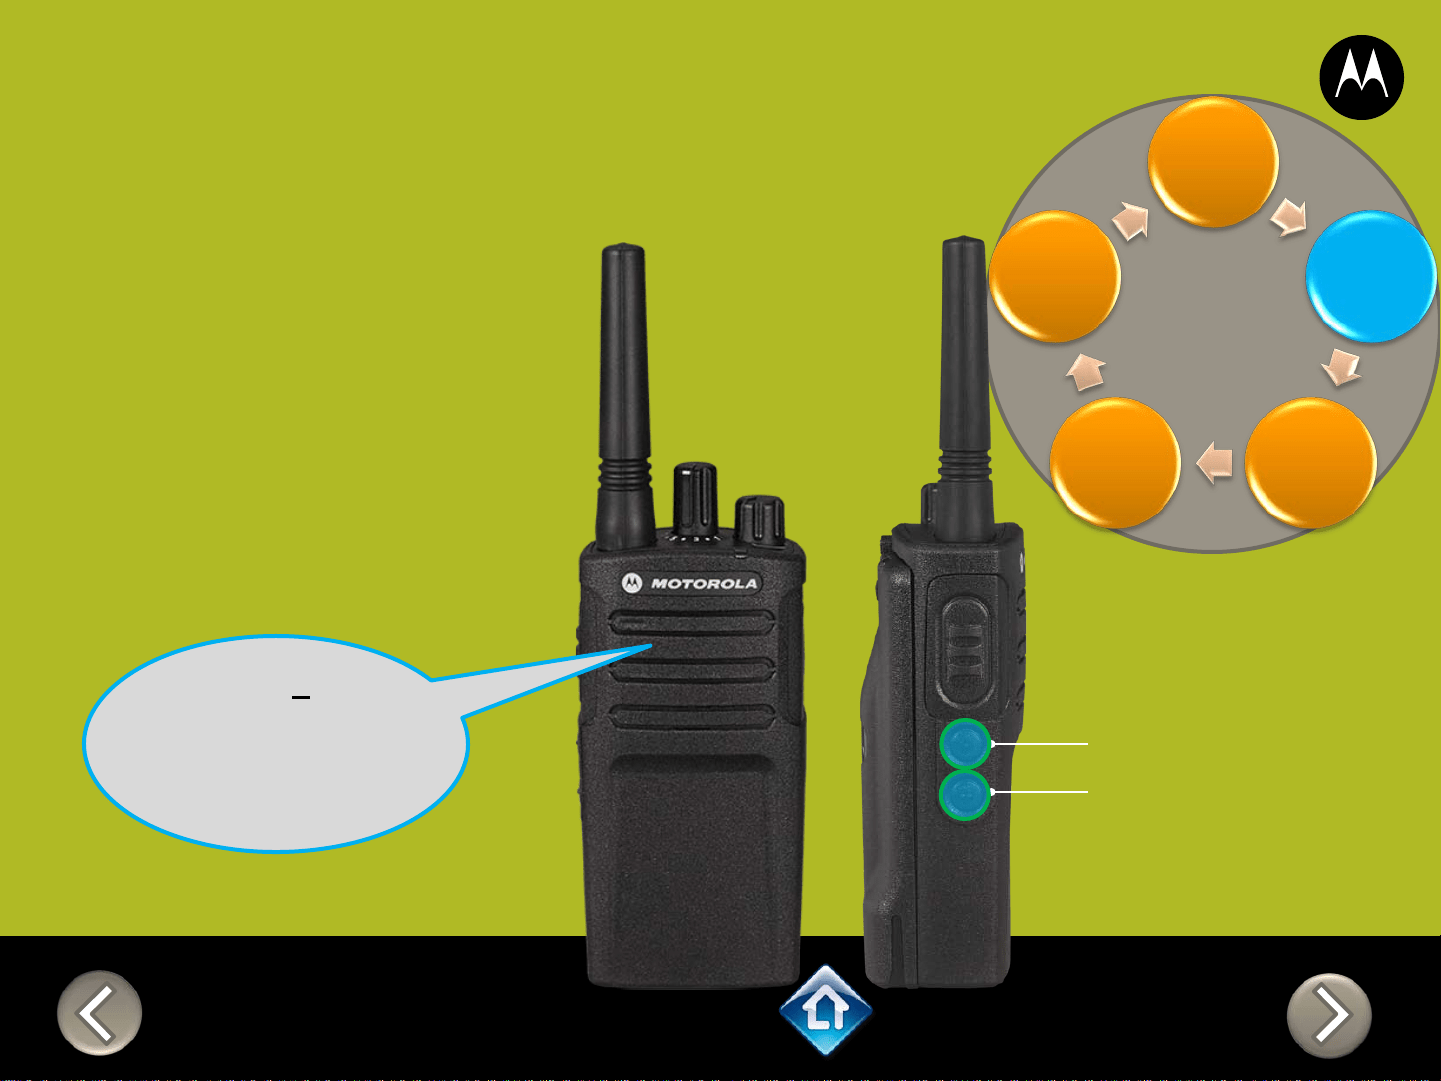
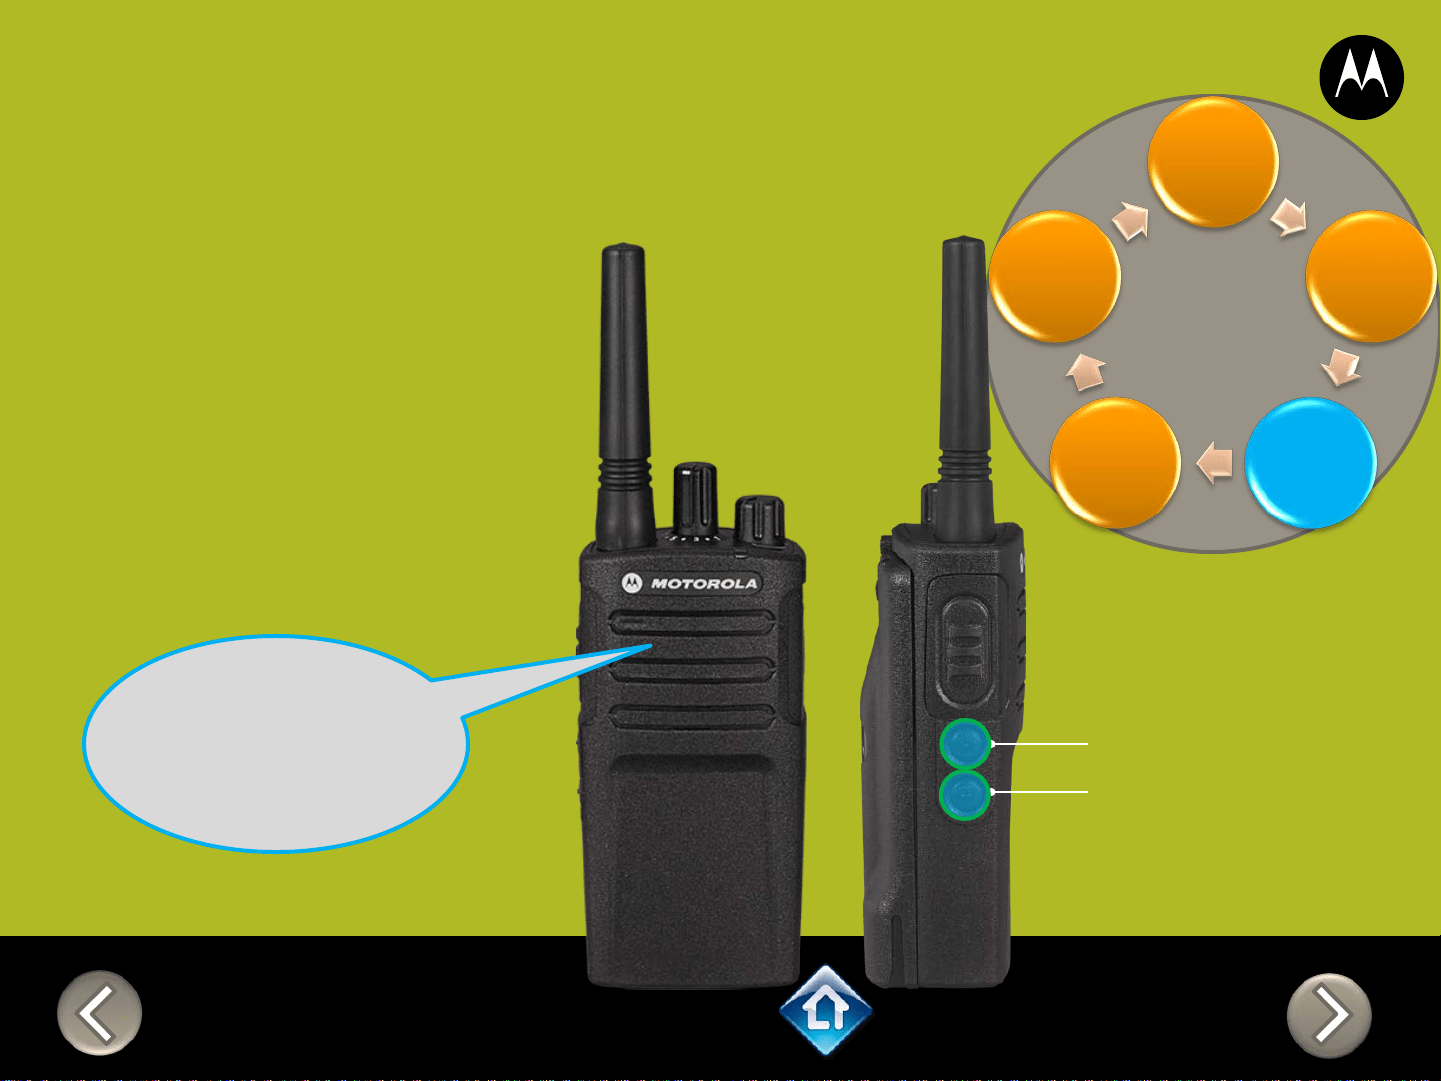
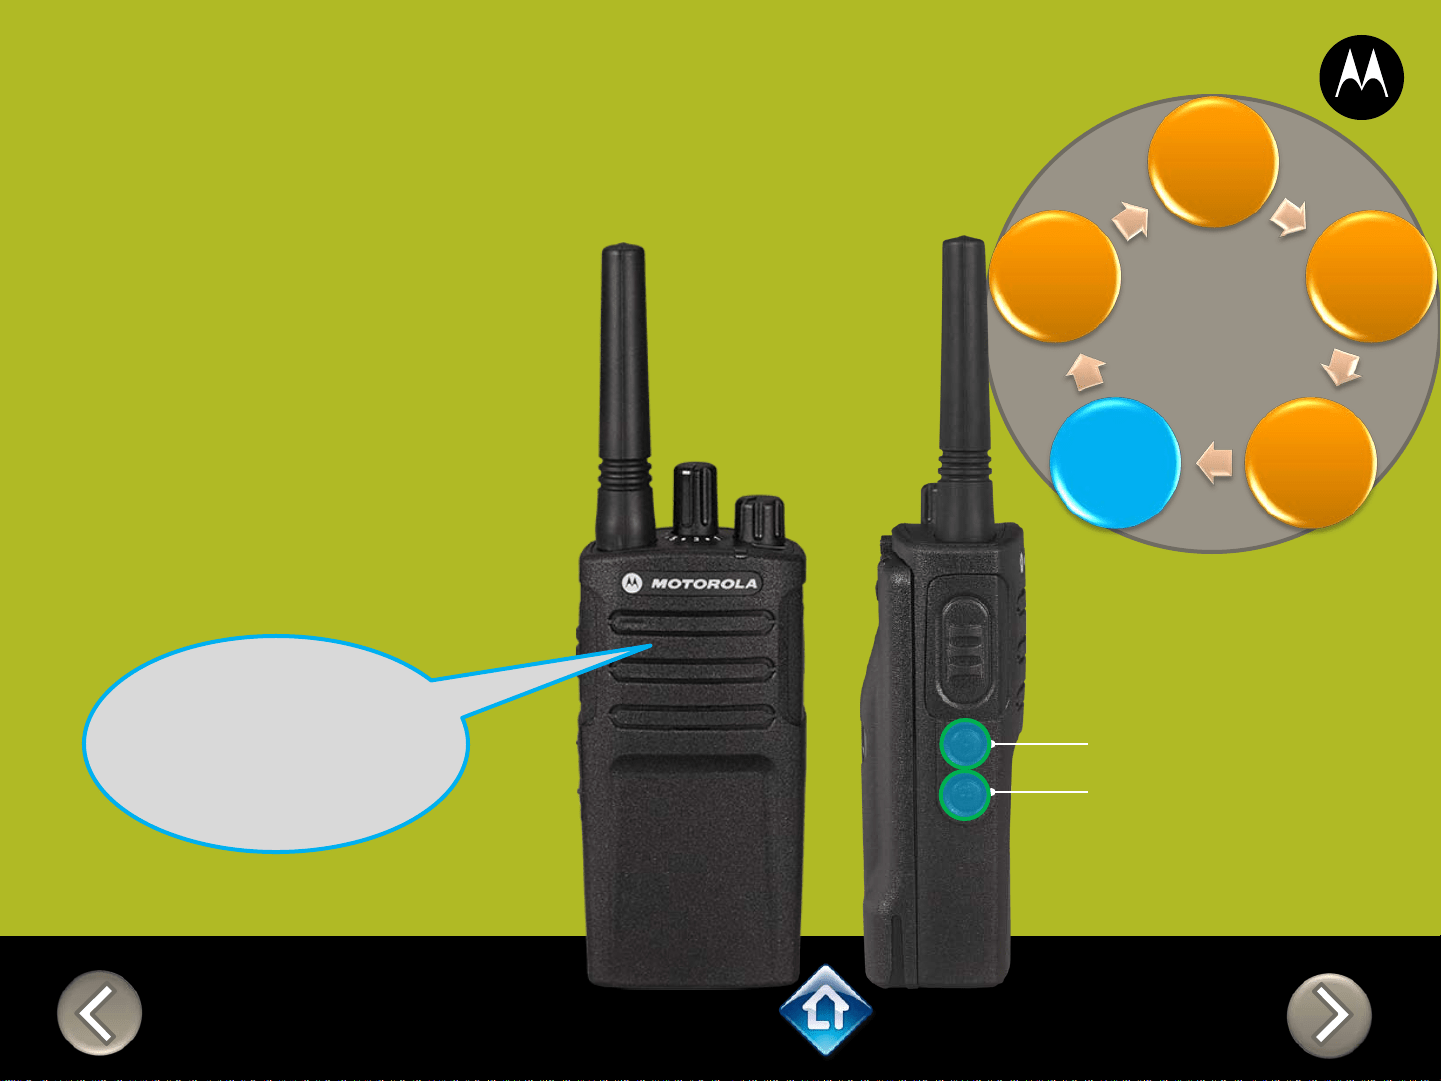
RM SERIES
Advanced Configuration
Frequency
Code
Auto Scan
Active
Channel
PTT (Push-to-Talk)
Button
1) Press PTT to cycle
through the Advanced
Configuration Menu until
you hear the channel
number
2) Select another channel to
configure by pressing SB1
or SB2
“Channel 1”
CH 2
3) Press PTT to
cycle through the
Advanced
Configuration
Menu options for
Channel 2
Applies to RMU2080 / RMV2080
RM SERIES
Advanced Configuration
2) PTT (Push-to-Talk)
Button
“Battery level
high, Channel 1”
Applies to RMU2080 / RMV2080
To exit Advanced Configuration
you can:
1) Power cycle the radio.
Or
2) Press and hold PTT until you
cycle back to top of
programming menu and hear
a ‘beep” then press and hold
PTT until you hear Power up
Audio
1) Power button

PTT (Push-to-Talk)
Button
SB1 – Monitor Button
SB2 – Scan/Nuisance
Ch Delete
Power Up Audio:
Battery level +
Channel
Channel Selector
Channel Voice Prompt: On
Active Channels: 7
Battery Save: On
Weather Channel: On
CHAN FREQ CODE
1 20 – 154.4900 1 – 67.0 Hz
2 21 – 154.5150 1 – 67.0 Hz
3 1 – 151.6250 1 – 67.0 Hz
4 2 – 151.9550 1 – 67.0 Hz
5 10 – 151.5125 1 – 67.0 Hz
6 12 – 151.6850 1 – 67.0 Hz
7 15 – 151.7750 1 – 67.0 Hz
8* 26 – 158.4000 1 – 67.0 Hz
*When channels are enabled
RMV2080
DEFAULT VALUES
PTT (Push-to-Talk)
Button
SB1 – Monitor Button
SB2 – Channel Select
RM SERIES
Factory Settings Reset
On/Off
Volume Knob
To reset radio to
Factory default
settings, Power up
with SB1, SB2 &
PTT pressed at the
same time.
Please note that all
channels will revert to
default frequencies.
Applies to RMU2080 / RMV2080
3) On/Off
Volume Knob
2) Attach
VOX
accessory
RM SERIES
External VOX hands free
Applies to RMU2080 / RMV2080
To enable voice activated
(VOX) accessories,
1. Use the Customer
Programming Software
(CPS) to change the Vox
Level of the radio
2. Attach a VOX supported
accessory
3. Power up with VOX
accessory attached

On/Off
Volume Knob
SB1 – Monitor Button
SB2 – Channel Select
RM SERIES
Power up Audio Announcement
To cycle through the Power
up Audio Announcement
options power the radio while
pressing SB1 + SB2 at the
same time.
OPTIONS:
1. Battery level + Channel #
2. Channel #
3. Silent
Applies to RMU2080 / RMV2080

CH 1
RM SERIES
Advanced Configuration
1) Press PTT to cycle
through to the Auto
Scan menu
2) Enable / disable by
pressing SB1 or
SB2
SB1 – Monitor Button
SB2 – Channel Select
Frequency
Code
Auto
Scan
Active
Channel
Weather
“Auto Scan
Disabled, To
change press
side button 1 or
2”
Applies to RMU2080 / RMV2080
CH 1
RM SERIES
Advanced Configuration
1) Press PTT to cycle
through to the
Active Channel
menu
2) Add / remove
channels by
pressing SB1 or
SB2
“Active Channels
2, To change
press side
button 1 or 2”
SB1 – Monitor Button
SB2 – Channel Select
Frequency
Code
Auto
Scan
Active
Channel
Weather
Applies to RMU2080 / RMV2080

CH 1
RM SERIES
Advanced Configuration
1) Press PTT to cycle
through to the
Active Channel
menu
2) Enable / disable by
pressing SB1 or
SB2
“Weather
Enabled, To
change press
side button 1 or
2”
SB1 – Monitor Button
SB2 – Channel Select
Frequency
Code
Auto
Scan
Active
Channel
Weather
Applies to RMU2080 / RMV2080
RM SERIES
Advanced Configuration
Frequency
Code
Auto Scan
Active
Channel
PTT (Push-to-Talk)
Button
1) Press PTT to cycle
through the Advanced
Configuration Menu until
you hear the channel
number
2) Select another channel to
configure by pressing SB1
or SB2
“Channel 1”
CH 2
3) Press PTT to
cycle through the
Advanced
Configuration
Menu options for
Channel 2
Applies to RMU2080 / RMV2080
RM SERIES
Advanced Configuration
2) PTT (Push-to-Talk)
Button
“Battery level
high, Channel 1”
Applies to RMU2080 / RMV2080
To exit Advanced Configuration
you can:
1) Power cycle the radio.
Or
2) Press and hold PTT until you
cycle back to top of
programming menu and hear
a ‘beep” then press and hold
PTT until you hear Power up
Audio
1) Power button

Button A – Call Tone
Button B - Backlight
RMU2080d
DEFAULT VALUES
PTT (Push-to-Talk)
Button
SB1 – Monitor Button
SB2 – Scan/Nuisance
Ch Delete
Power Up Audio:
Battery level +
Channel
Channel Voice Prompt: On
Active Channels: 7
Battery Save: On
Weather Channel: On
CHAN FREQ CODE
1 2 – 464.5500 1 – 67.0 Hz
2 8 – 467.9250 1 – 67.0 Hz
3 5 – 467.8500 1 – 67.0 Hz
4 6 – 467.8750 1 – 67.0 Hz
5 10 – 461.0625 1 – 67.0 Hz
6 12 – 461.1125 1 – 67.0 Hz
7 14 – 461.1625 1 – 67.0 Hz
8* 16 – 461.2125 1 – 67.0 Hz
*When channels are enabled
Channel Selector
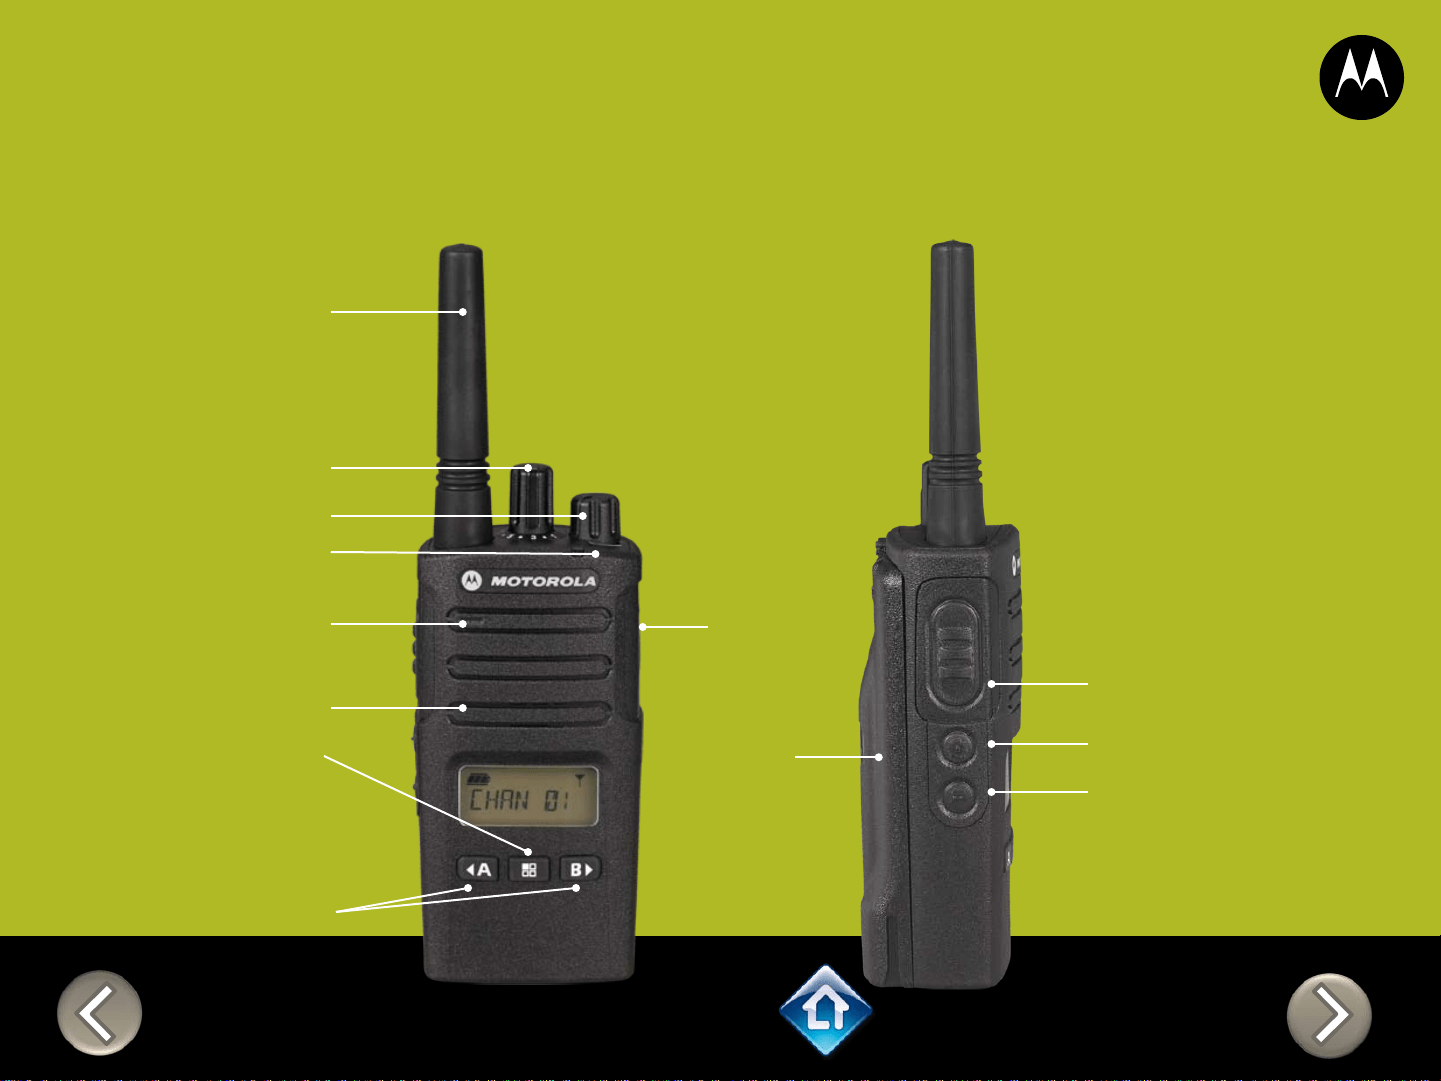
Menu button
Use to lock keypad
Front Buttons
Use < and > to scroll
up/down menu settings
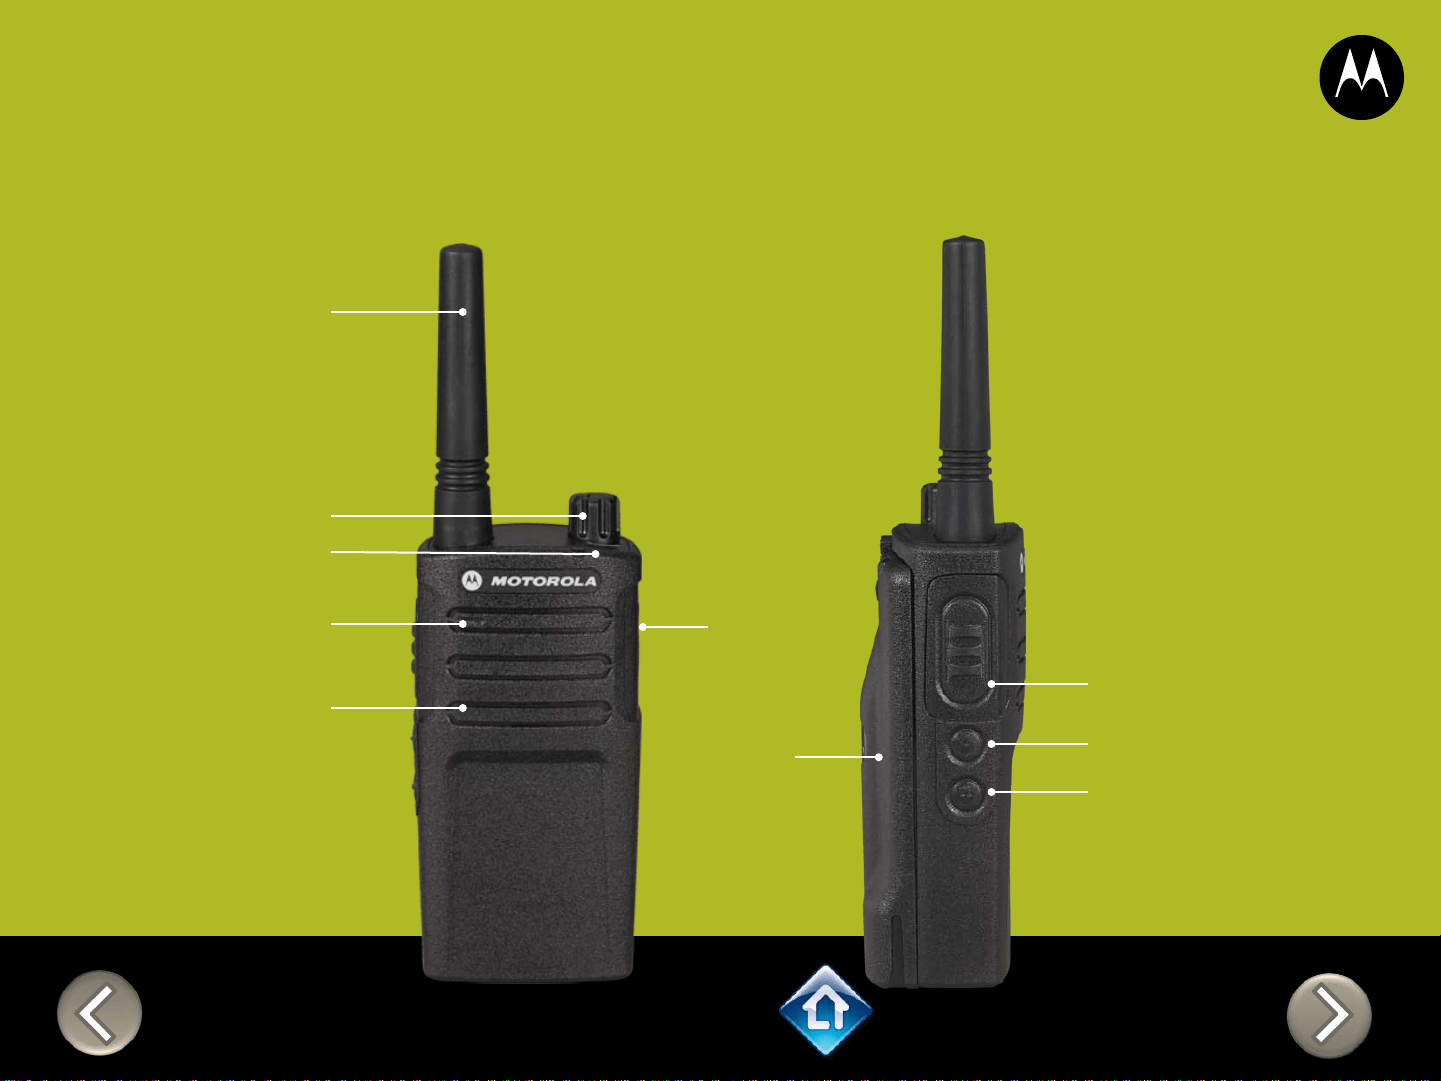
RM SERIES
DISPLAY RADIO FEATURES
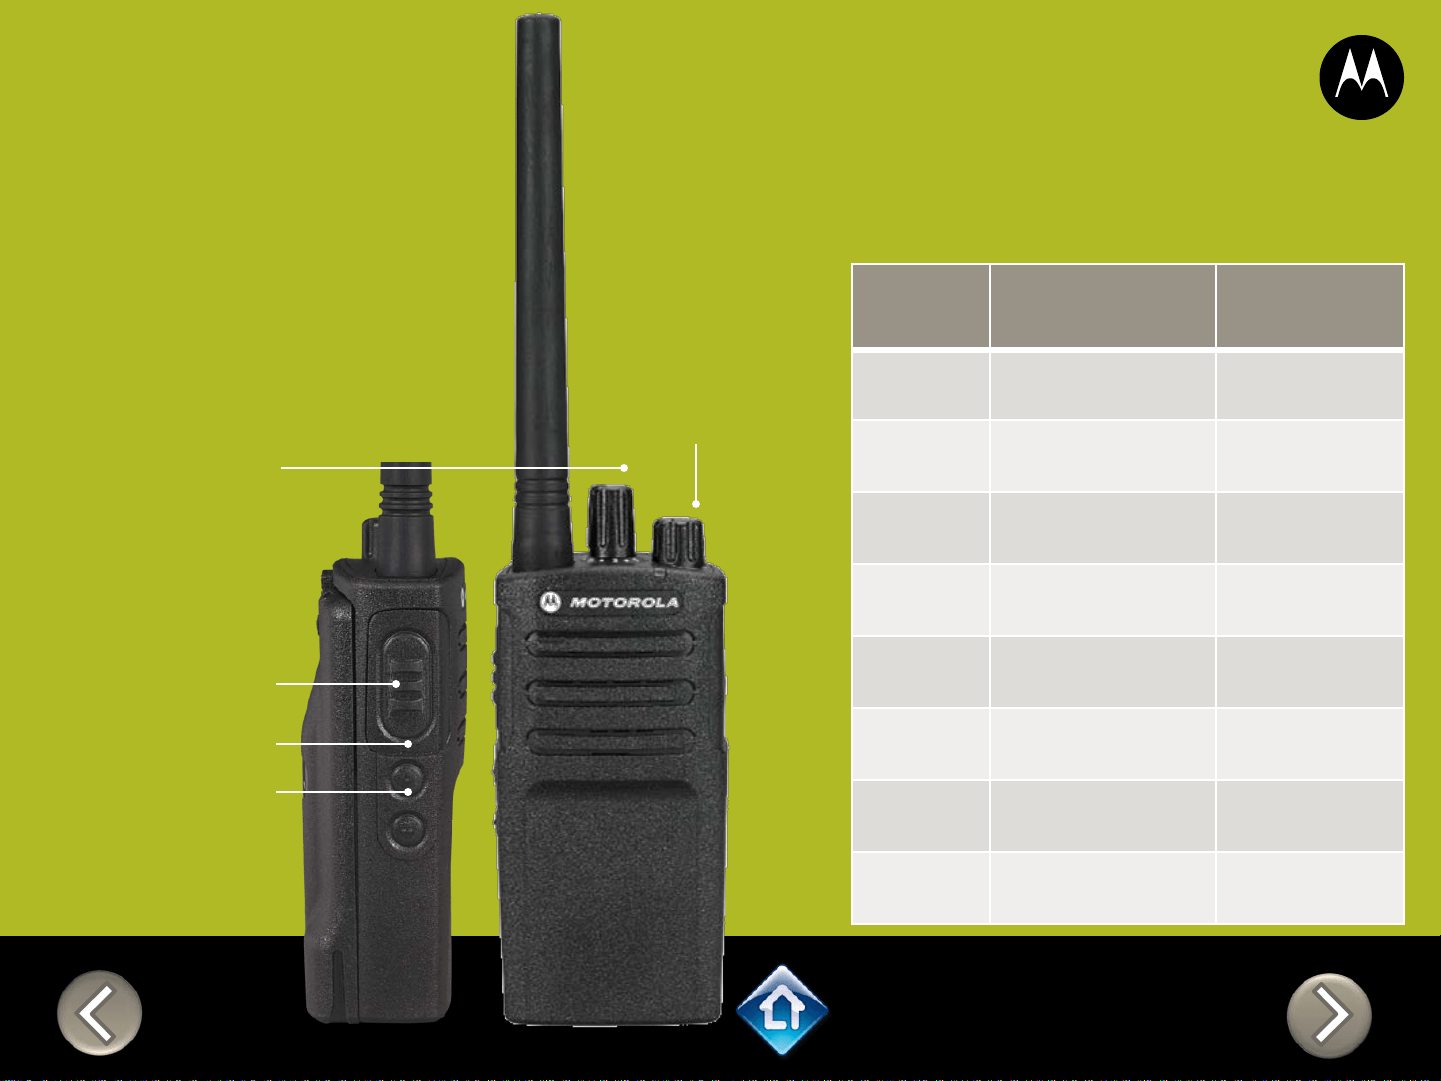
Lithium Ion
Battery
PTT (Push-to-Talk)
Button
SB1 – Monitor Button
SB2 – Channel Select
Rugged Speaker Grill
Microphone
Antenna
On/Off Volume Knob
LED Indicator
Accessory
Connector
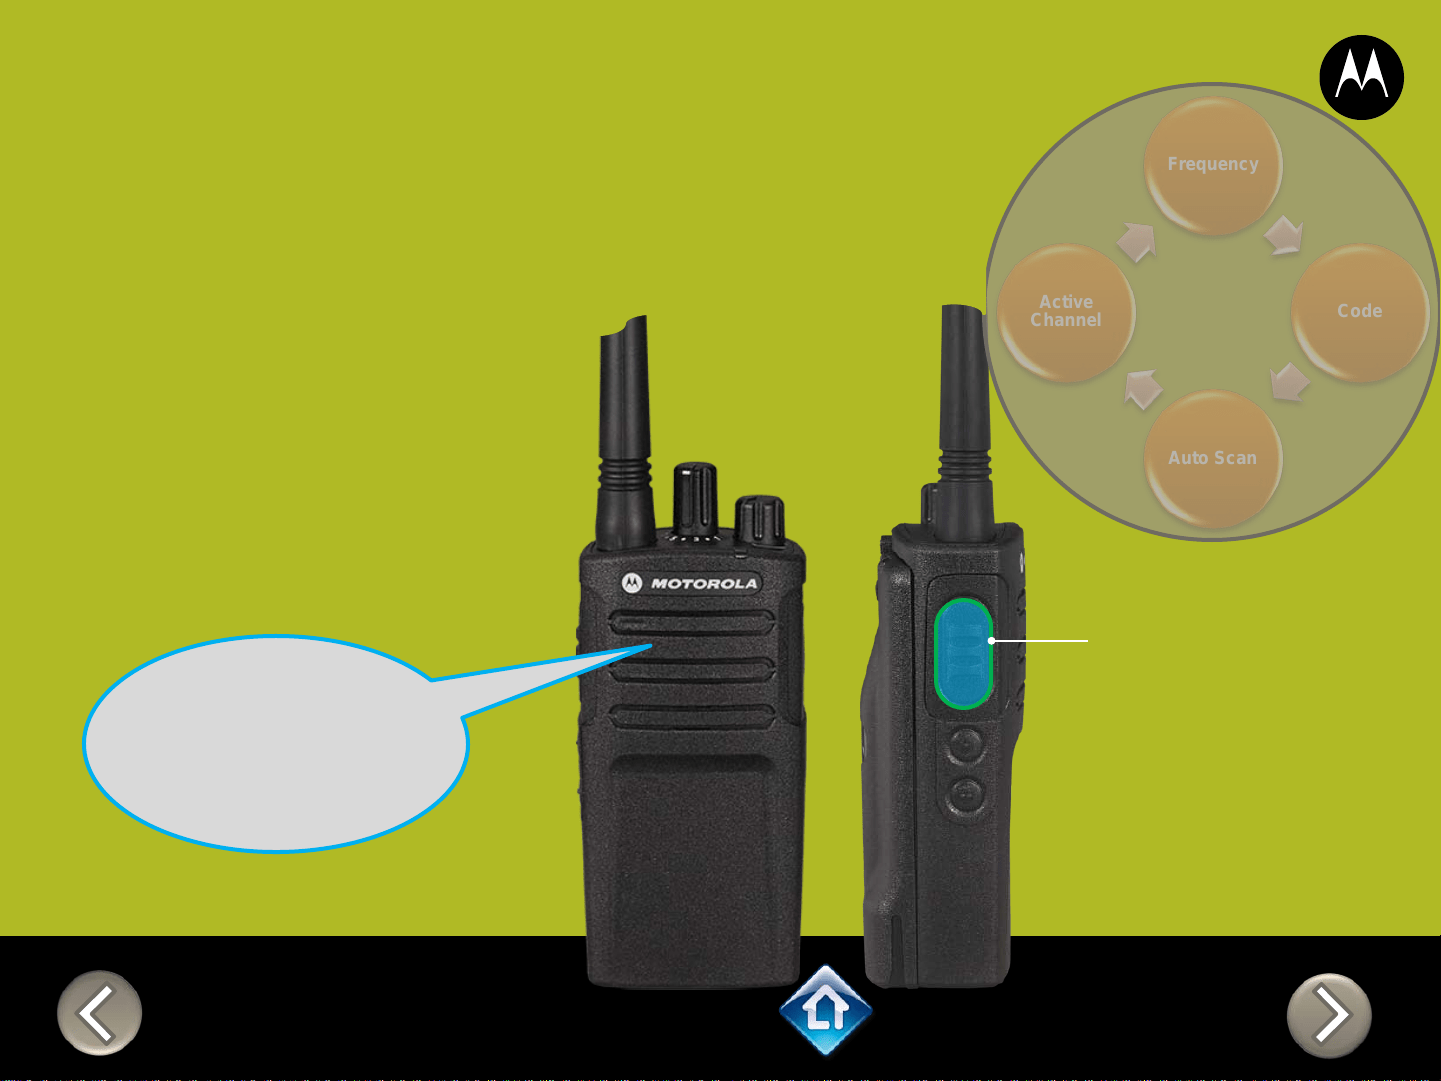
Channel Selector
Applies to RMU2080d

Freque
ncy
Code
Scram
ble
Active
Chann
el
Call
Tone
Radio
Mic
Sens
ACC
Mic
Sens
Auto
Scan
Weath
er
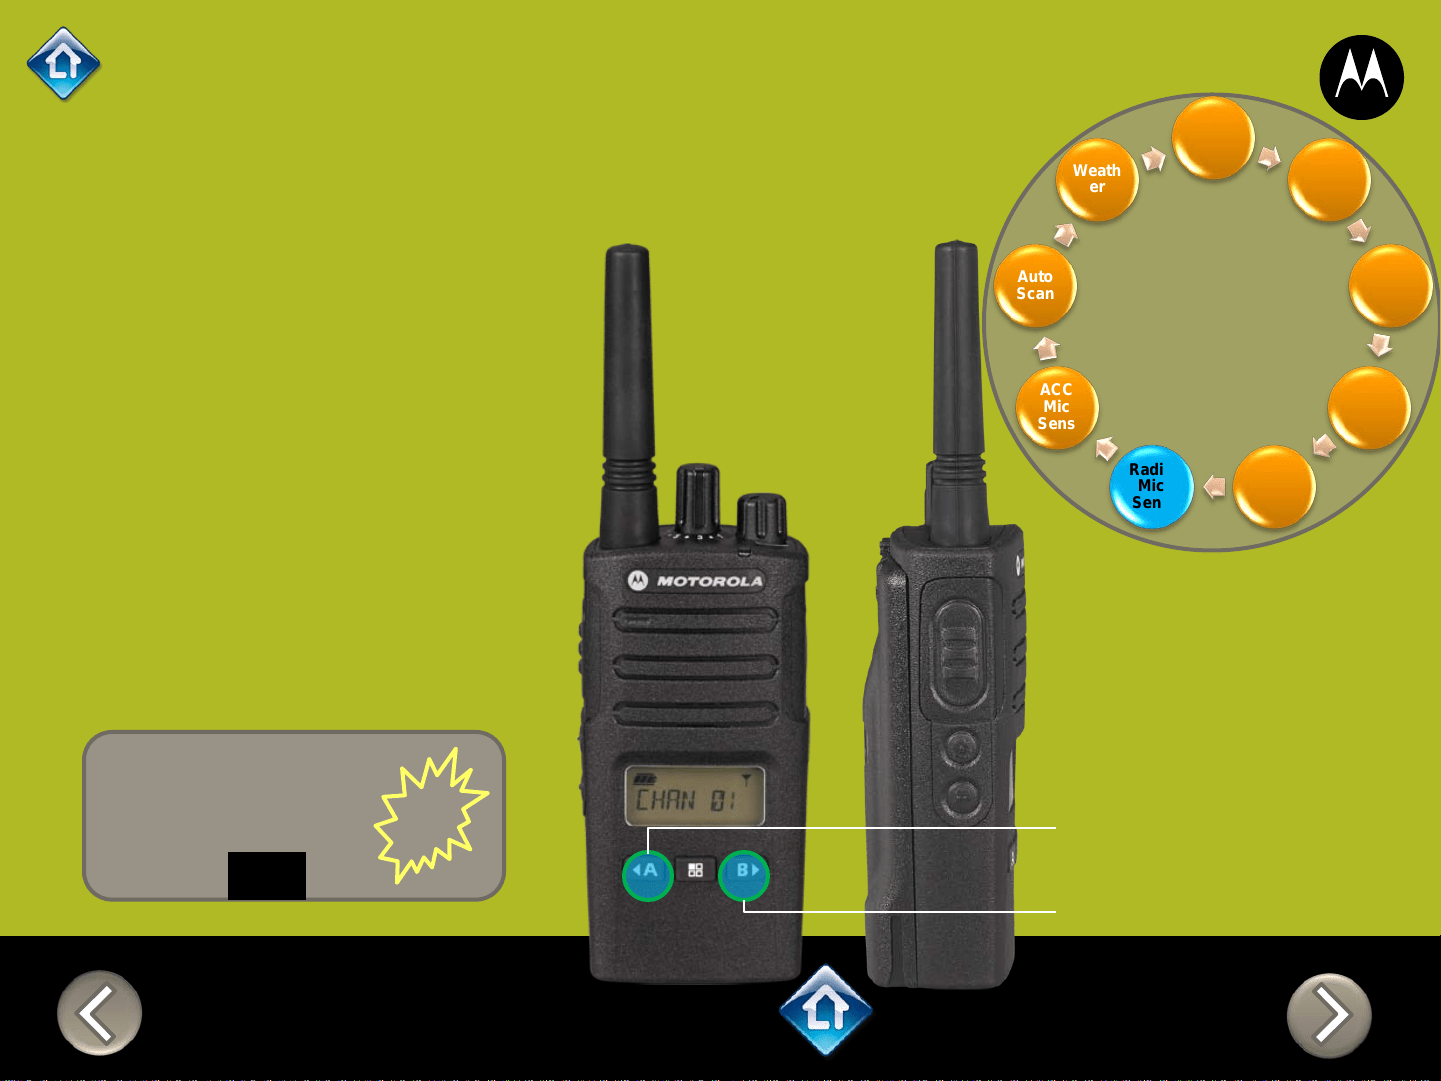
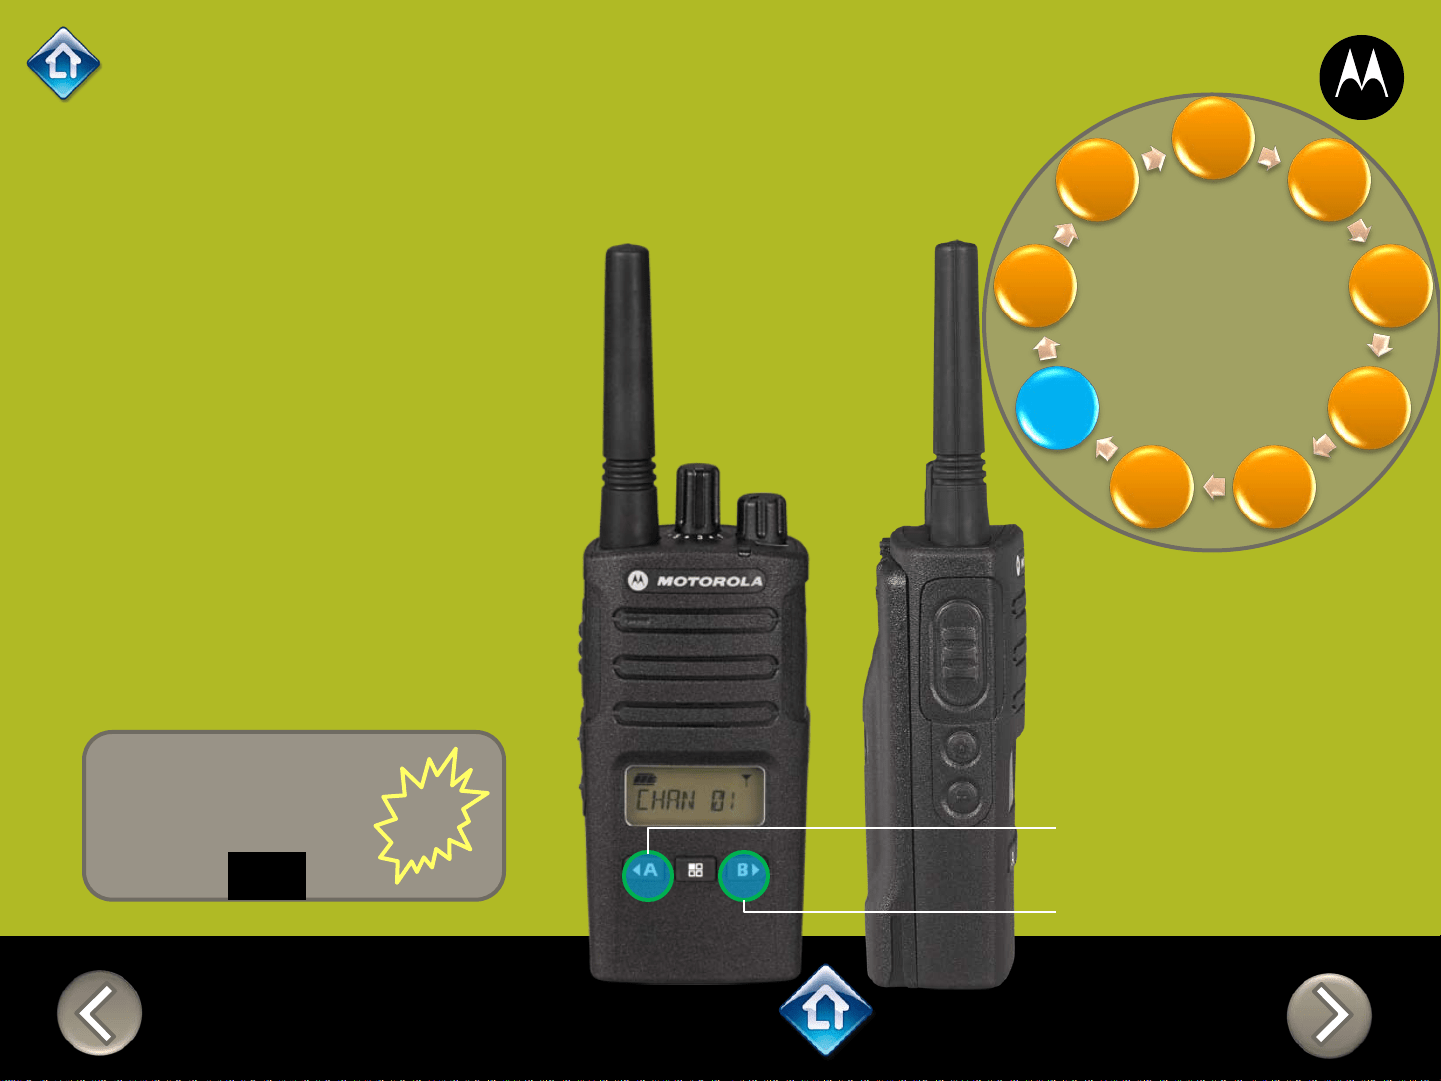
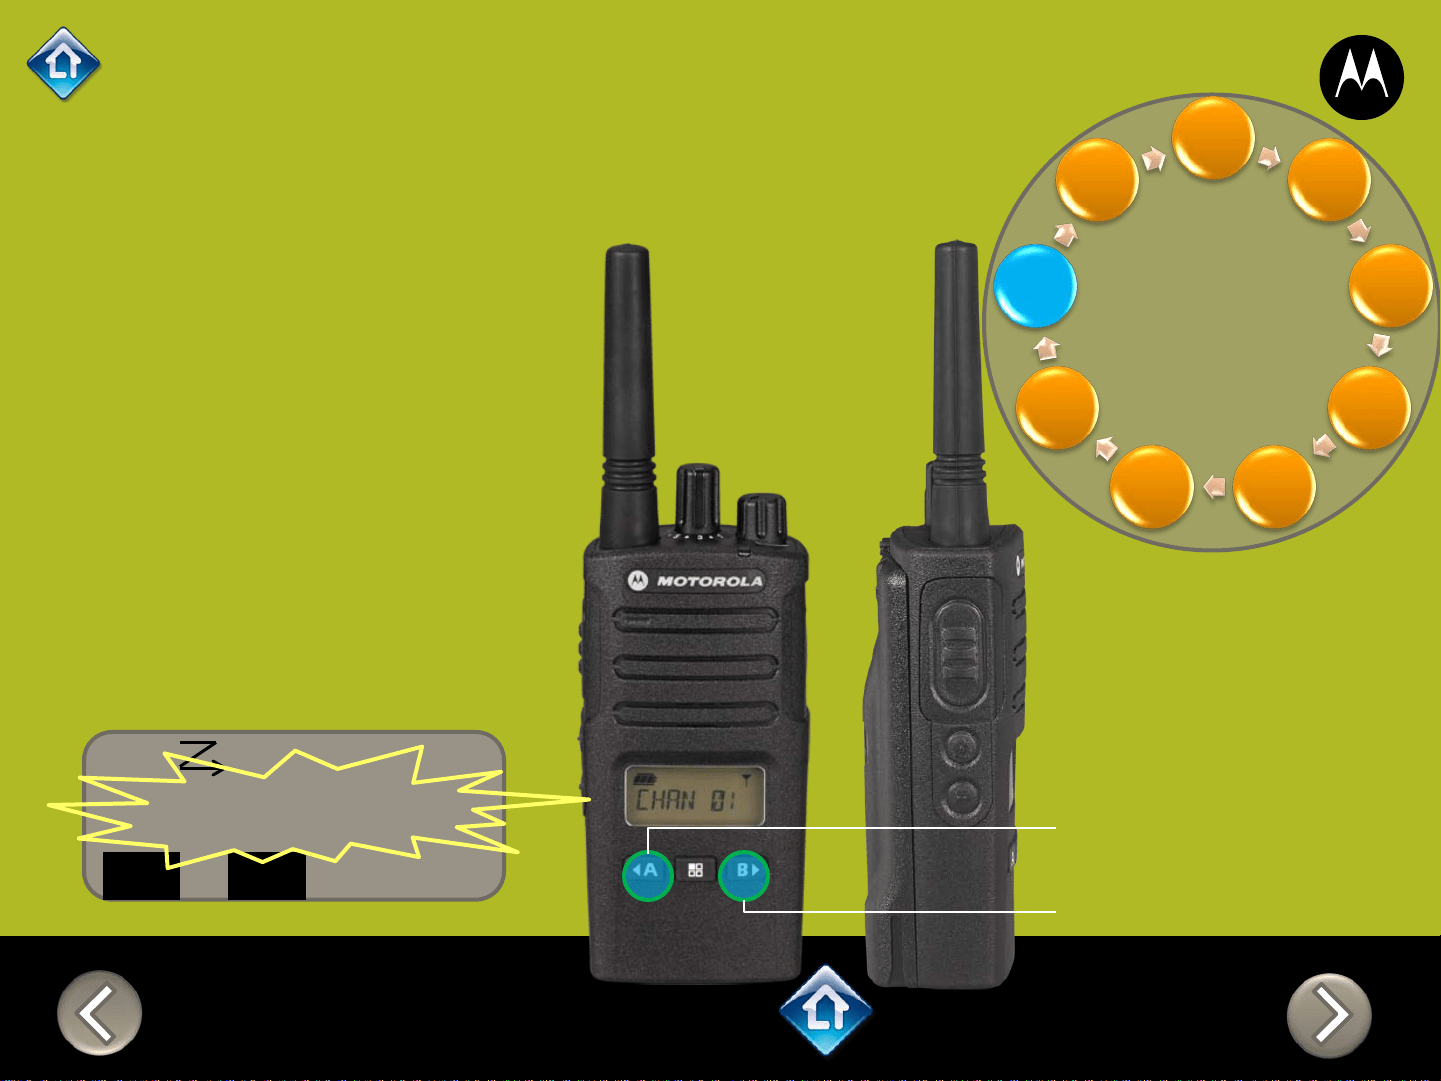
RM SERIES
Advanced Configuration
1) The display blinks
and an icon PROG
appears to denote
programming mode
PTT (Push-to-Talk)
Button
2) Press PTT to
cycle through the
Advanced
Configuration
Menu options
“Channel X”
Applies to RMU2080d
CHAN 01
CH 1
CH 1
RM SERIES
Advanced Configuration
1) Press PTT to cycle
through to the Code
Menu
2) Select from the list
of pre-programmed
codes
< A – Decrease
B > – Increase
01 RX 001
CHAN
PROG CODE
Freque
ncy
Code
Scram
ble
Active
Chann
el
Call
Tone
Radio
Mic
Sens
ACC
Mic
Sens
Auto
Scan
Weath
er
Applies to RMU2080d
CH 1
RM SERIES
Advanced Configuration
1) Press PTT to cycle
through to the
Scramble menu
2) Select 0 to disable
or assign a
scramble code from
1 - 4
< A – Decrease
B > – Increase
01 0
CHAN
PROG
Freque
ncy
Code
Scram
ble
Active
Chann
el
Call
Tone
Radio
Mic
Sens
ACC
Mic
Sens
Auto
Scan
Weath
er
Applies to RMU2080d
RM SERIES
Advanced Configuration
1) Press PTT to cycle
through to the Call
Tone menu
2) Select 0 to disable
or assign a Call
tone from 1 - 3
TONE 0
PROG
CH 1
Freque
ncy
Code
Scram
ble
Active
Chann
el
Call
Tone
Radio
Mic
Sens
ACC
Mic
Sens
Auto
Scan
Weath
er
< A – Decrease
B > – Increase
Applies to RMU2080d
CH 1
Freque
ncy
Code
Scram
ble
Active
Chann
el
Call
Tone
Radio
Mic
Sens
ACC
Mic
Sens
Auto
Scan
Weath
er
RM SERIES
Advanced Configuration
< A – Decrease
B > – Increase
IMIC 2
PROG
1) Press PTT to cycle
through to the
Radio Internal
Microphone
sensitivity menu
2) Default value is
Medium (2) you can
select Low (1) or
High (3) by pressing
<A or B>
Applies to RMU2080d
CH 1
RM SERIES
Advanced Configuration
< A – Decrease
B > – Increase
Freque
ncy
Code
Scram
ble
Active
Chann
el
Call
Tone
Radio
Mic
Sens
ACC
Mic
Sens
Auto
Scan
Weath
er
MIC 2
PROG
1) Press PTT to cycle
through to the
Accessory
Microphone
sensitivity menu
2) Default value is
Medium (2) you can
select Low (1) or
High (3) by pressing
<A or B>
Applies to RMU2080d
CH 1
Freque
ncy
Code
Scram
ble
Active
Chann
el
Call
Tone
Radio
Mic
Sens
ACC
Mic
Sens
Auto
Scan
Weath
er
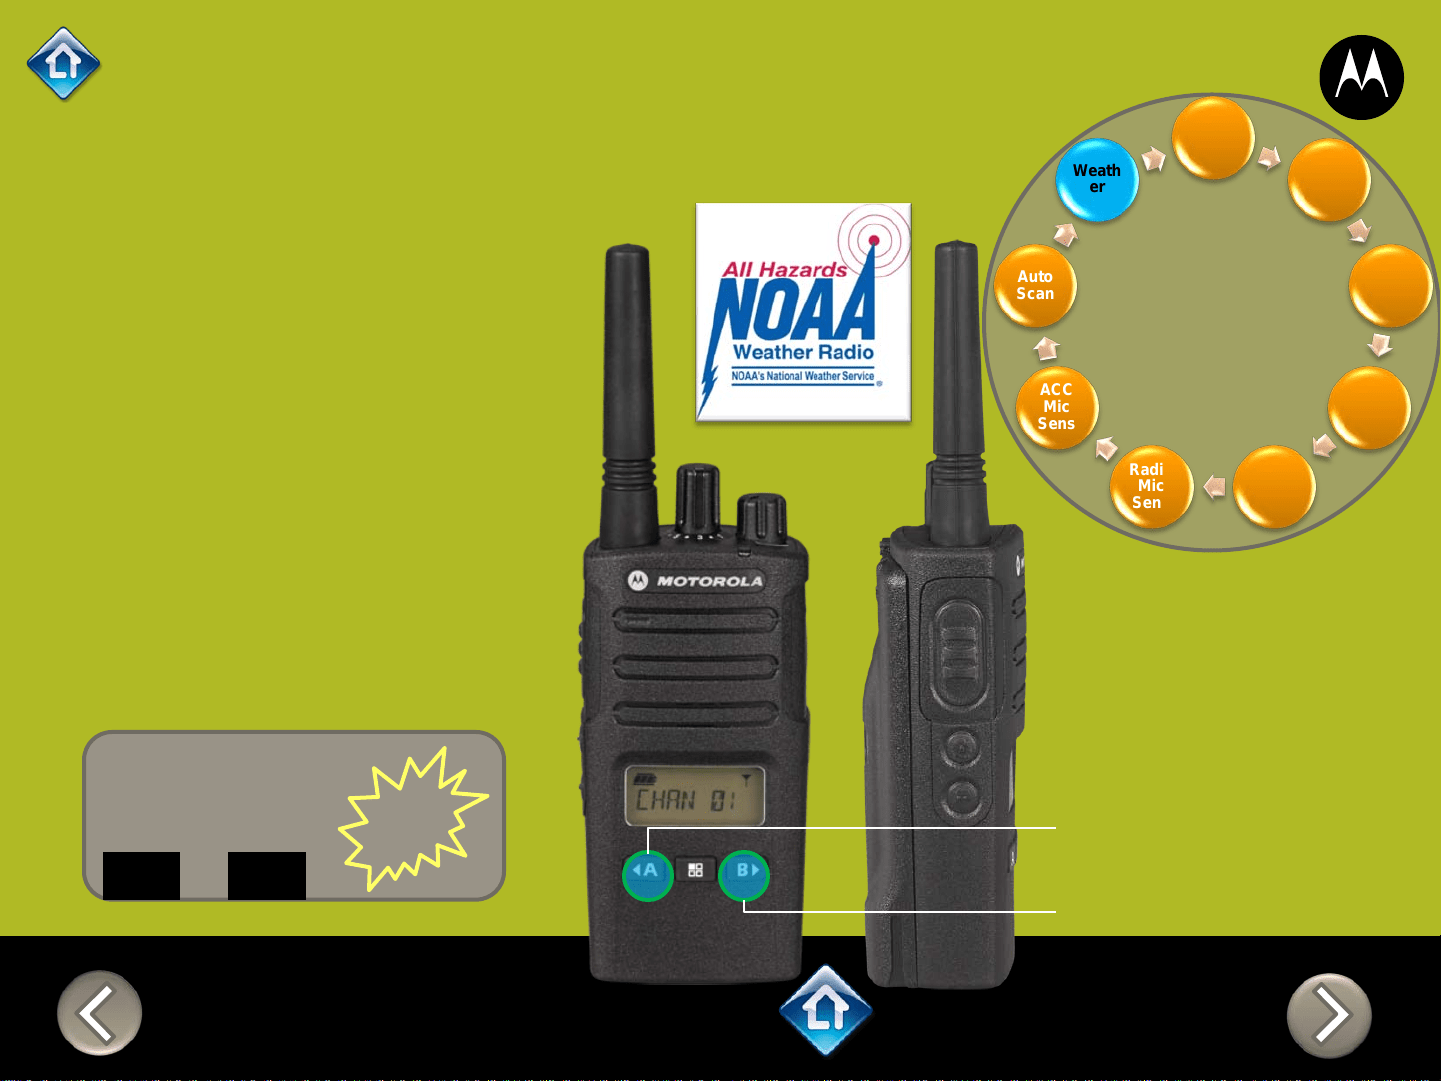
RM SERIES
Advanced Configuration
< A – Decrease
B > – Increase
01 - WX OFF
PROG
1) Press PTT to cycle through
to the Weather menu.
Channel 8 comes factory
programmed as the
Weather Channel
2) Any channel can be
assigned to receive
Weather alerts by pressing
<A or B> to enable / disable
CHAN
Applies to RMU2080d

Freque
ncy
Code
Scram
ble
Active
Chann
el
Call
Tone
Radio
Mic
Sens
ACC
Mic
Sens
Auto
Scan
Weath
er
RM SERIES
Advanced Configuration
PTT (Push-to-Talk)
Button
1) After you finish
configuring the current
channel you can select
another channel to
configure by using the
Channel selector
“Channel 2”
2) Press PTT to
cycle through the
Advanced
Configuration
Menu options for
Channel 2
Channel Selector
CH 2
Applies to RMU2080d
RM SERIES
Advanced Configuration
2) PTT (Push-to-Talk)
Button
“Battery level
high, Channel 1”
Applies to RMU2080d
To exit Advanced Configuration
you can:
1) Power cycle the radio.
Or
2) Press and hold PTT until you
cycle back to top of
programming menu and hear
a ‘beep” then press and hold
PTT until you hear Power up
Audio
1) Power button