Owners' Guide Televisions
Get started
Features
- DTV / TV / CATV
You can use your remote control to select channels which are broadcast in Digital format and conventional Analog format. Also, cable subscribers can access their cable TV channels.
- Information display
You can display the title, contents and other information of the current program on the TV screen.
- AutoProgram
This unit automatically scans and memorizes channels available in your area, eliminating difficult setup procedures.
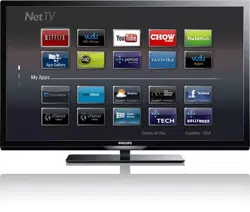
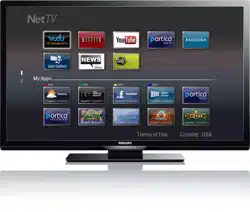
- Net TV
This unit lets you enjoy Internet services. Use the remote control to browse the Net TV pages. You can play movies and much more, all from your TV screen.
- Child lock
This feature allows you to block children’s access to inappropriate programs.
- Closed Caption decoder Built-in
Closed Caption decoder displays text for Closed Caption supported programs.
- MTS / SAP tuner
Audio can be selected from the remote control.
- Auto Standby
If there is no Input signal and no operation for 15 minutes, the unit will go into Standby mode automatically.
- Sleep timer
You can set the unit to go into Standby mode after a specific amount of time.
- Choices for on-screen language
Select your on-screen language: English, Spanish or French.
- Stereo sound function
- PLL frequency synthesized tuning
Provides free and easy channel selection and lets you tune directly to any channel using the number and decimal point “•” buttons on the remote control.
- Various adjustment for picture and sound
Customizes image quality suitable for your room and sets your sound preference.
- EasyLink via HDMI link
EasyLink allows your other HDMI link devices to be controlled by the HDMI cable connected to your TV.
- HDMI Input
- HDMI-DVI Input
If your video device has DVI Output jack, use an HDMI-DVI conversion cable to connect the unit.
- Component Video Input
- PC Input
- AV Input
- USB terminal
The picture (JPEG), music (MP3) and video files stored on a USB Memory Stick can be played back on this unit.
- Digital Audio Output
- Headphone Audio Output
Remote control
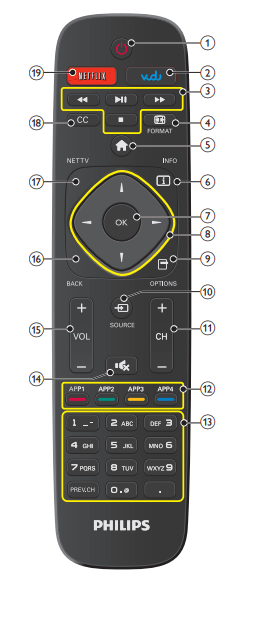
 (POWER)
Turns the TV On from Standby or Off to Standby- VUDU
Access to VUDU directly.
- EasyLink(HDMI CEC) buttons
 Searches Backward or Forward through the disc.
 Starts, pauses or resumes playback.
 Stops the Disc playback.
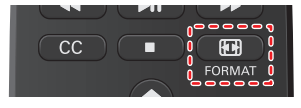
 FORMAT
Adjusts the Picture size on the TV screen. (MENU )
Displays the main menu. INFO
INFO
Displays Information about the current program- OK
Press to decide the command of setting when the Home menu is displayed.
 (NAVIGATION buttons)
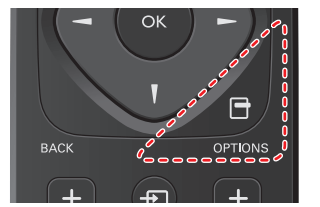
Moves the cursor, Selects the On-screen Menu items. OPTIONS
Displays a list of menu items applicable to the highlighted object SOURCE
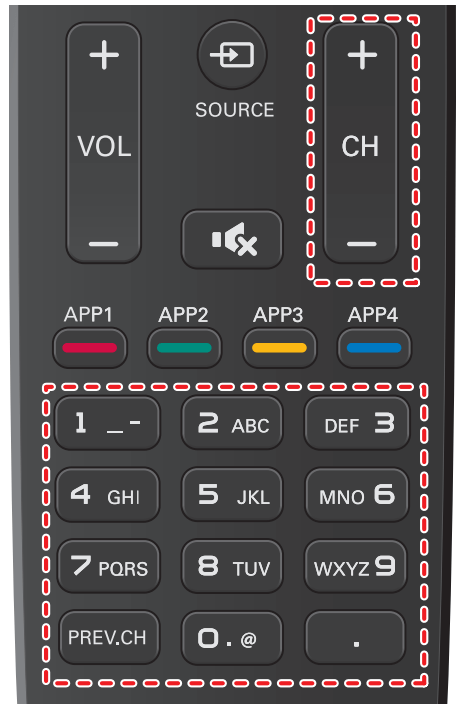
Selects Connected devices- CH + / −
Selects a Channel
- Apps (APP1 / APP2 / APP3 / APP4) buttons
Works as direct access to user specified net apps
- 0 − 9 (NUMBER buttons)
Used to enter a Channel / Program number.
• (DOT) Use with 0 - 9 to select digital channels. For example, to enter 2.1, press

PREV.CH Returns to the previously viewed Channel.

(MUTE) Turns the Sound On and Off.- VOL + / −
Adjusts the Volume.
- BACK
Returns to the previous Menu operation.
- NET TV
Access to Net TV menu directly.
- CC
Displays the audio portion of programming as text superimposed over the video.
- NETFLIX
Access to Netflix directly
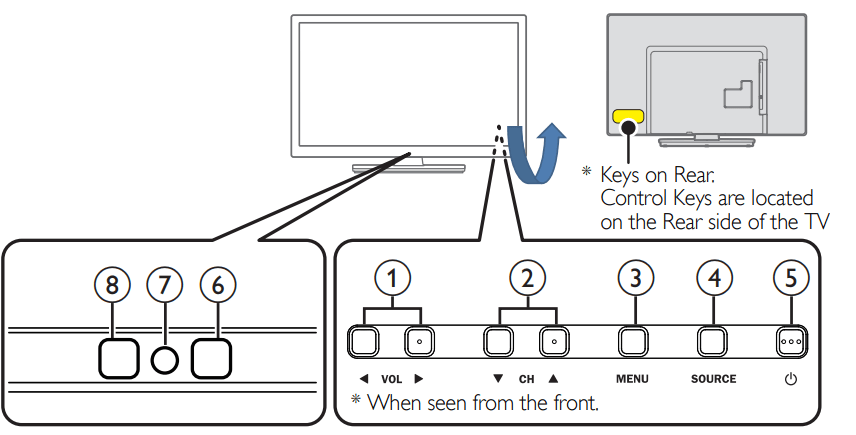
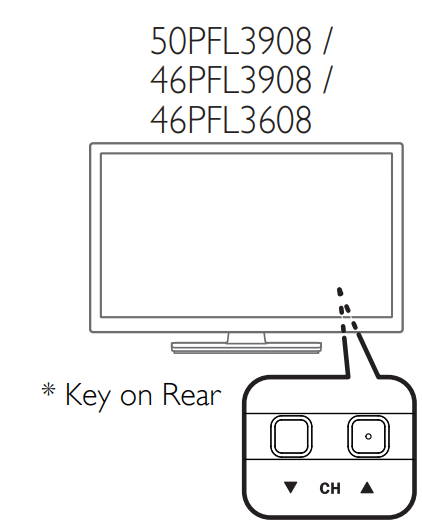
Control panel
50PFL3908 / 46PFL3908 / 46PFL3608
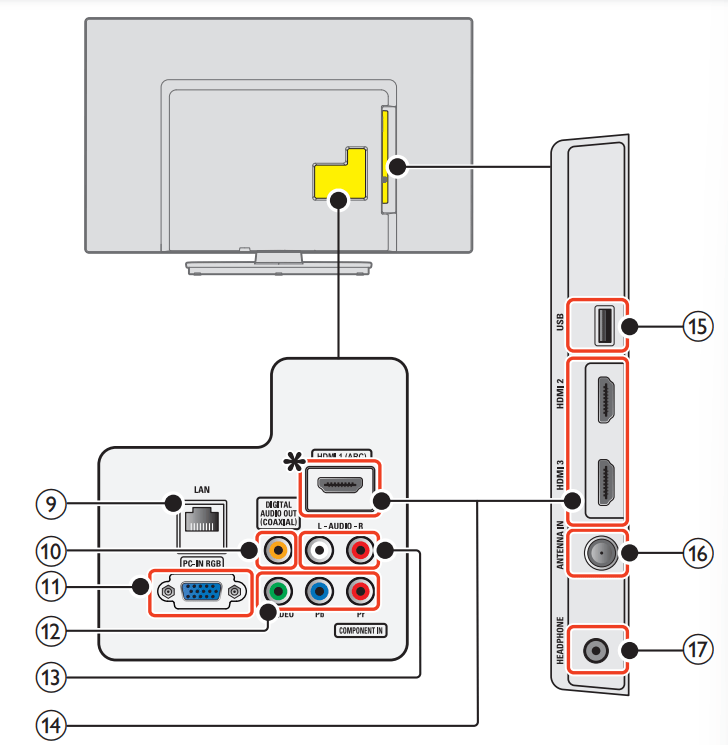
Terminals
- VOL ◄/►
Adjusts the Volume. In the Menu screen, moves the Cursor Left (◄) / Right (►).
VOL ◄ : Volume Down
VOL ► : Volume Up
- CH ▲/▼
Selects a Channel. In the Menu screen, moves the Cursor Up (▲) /Down (▼).
- MENU
Opens the Main On-screen Menu.
- SOURCE
Selects Connected devices.
 (POWER)
Turns the TV On and Off- Remote Control Sensor
Receives IR signal from Remote control.
- Power On / Standby Indicator
(On : lights in white, Standby : no light)
- Ambient Light Sensor
Alters the brightness of the TV screen automatically by detecting your room lighting level. Do not block this Light Sensor window to allow proper operation.
- Ethernet port
For Internet connection using an Ethernet cable with an RJ-45 connector
- Digital Audio Output jack
Digital Audio (S/PDIF) Output to home theaters and other Digital Audio systems.
- PC Input jack
VGA cable connection for PC.
- Component (Y/Pb/Pr) / Composite Video (VIDEO) Input jacks for VIDEO
Composite Video Input (VIDEO) jack is a shared jack with Component Video Input (Y) jack.
- Analog Audio (L/R) Input jacks
Connect Analog Audio signals from;
– HDMI-DVI / Analog Audio (L/R) jacks signal
– Component Video / Analog Audio (L/R) jacks signal
– Composite Video / Analog Audio (L/R) jacks signal
– PC Connection / Analog Audio (L/R) jacks signal with Stereo mini 3.5mm plug Audio cable on PC
- HDMI Input jack(s)
Digital audio and video Input from high definition Digital devices such as DVD / Blu-ray disc players, cable / satellite set-top boxes, PC’s.
For HDMI 1 only In addition to normal HDMI and HDMI-DVI functionality, it outputs TV Audio to an HDMI-ARC-compliant device, such as a home theater system.
- USB terminal
Data Input from USB Memory Stick only.
Do not connect any device to this terminal such as; Digital camera, keyboard, mouse, etc.
- 75 ohm Cable / Antenna connection
Signal Input from an antenna or cable / satellite set-top boxes.
- Headphone Audio Output jack
Headphone 3.5mm stereo jack for personal listening
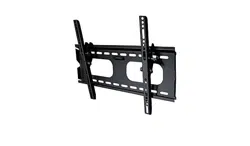
Connecting the antenna or the cable
Be sure your antenna or other device is connected properly before plugging in the AC power cord.
If you connect to an antenna through RF cable
Any DTV programs that are broadcasted in your area can be received for free through an antenna connection
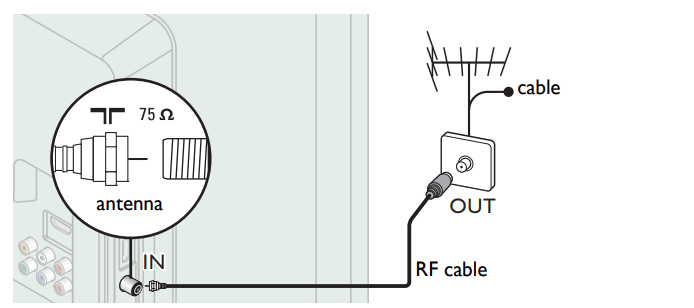
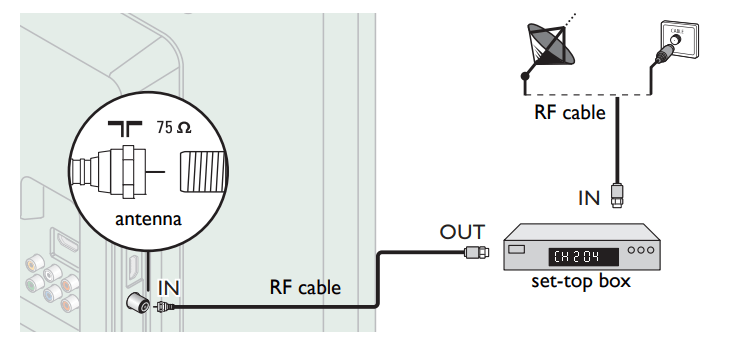
If you connect a set-top box through RF cable
If the TV is connected to a cable / satellite set-top box via a coaxial connection, set the TV to channel 3, 4 or the channel specified by the service provider
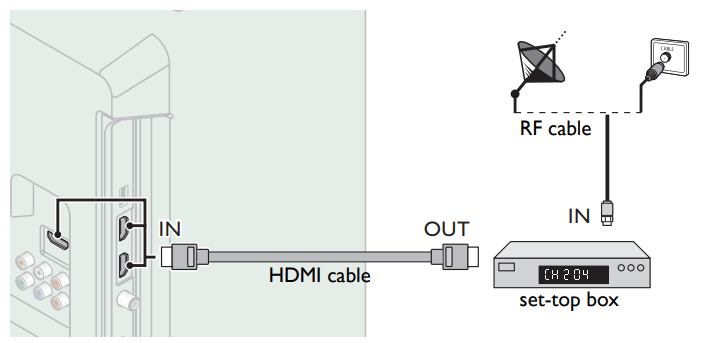
If you connect a set-top box through HDMI
If the TV is connected to a cable / satellite set-top box via HDMI, make sure you select the correct Source by using  SOURCE.
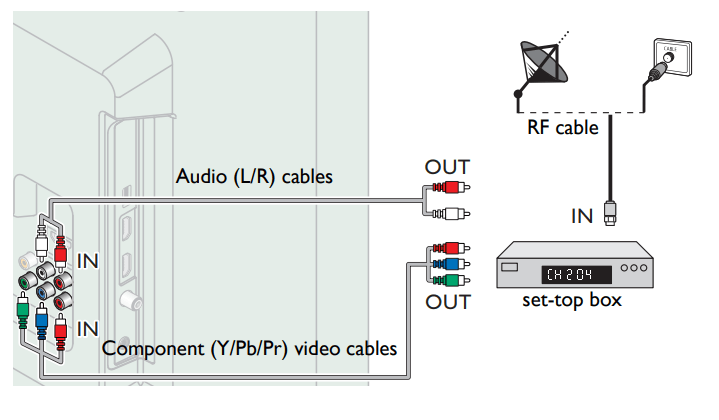
If you connect a set-top box through Component Video Input
If the TV is connected to a cable / satellite set-top box via Component Video Input, make sure you select the correct Component Video Source by using  SOURCE.
Connecting your devices
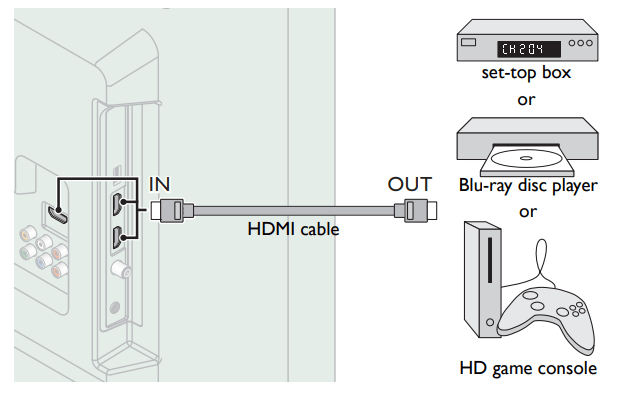
HDMI Digital connection
HDMI connection offers the highest picture quality. HDMI (High-Definition Multimedia Interface) transports high definition Digital video and multi-channel Digital Audio through a single cable.
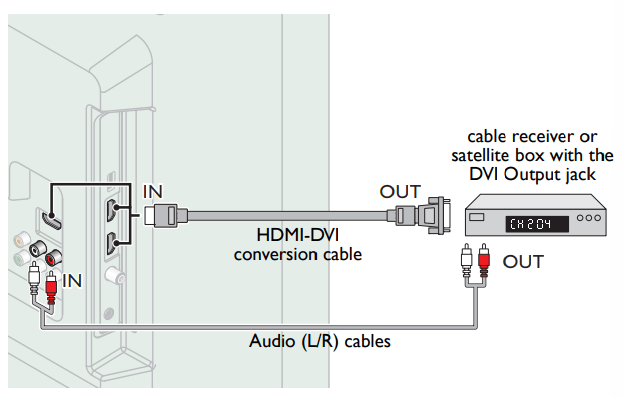
HDMI-DVI connection
This unit can be connected to your device that has a DVI terminal. Use an HDMI-DVI conversion cable for this connection and it requires audio cable for Analog Audio signal as well.
Note
- Use an HDMI cable with the HDMI logo (a certified HDMI cable). High Speed HDMI cable is recommended for the better compatibility.
For HDMI connection
- The unit accepts 480i / 480p / 720p / 1080i, 1080p 24/30/60Hz of video signals, 32kHz / 44.1kHz and 48kHz of audio signals.
- This unit accepts 2 channel Audio signal (LPCM) only.
- This unit accepts only signals in compliance with EIA861.
For HDMI-DVI connection
- The unit accepts 480i, 480p, 720p, 1080i and 1080p video signals.
- HDMI-DVI connection requires separate audio connections as well and the audio signals are output as Analog (L/R) Audio.
- DVI does not display 480i image which is not in compliance with EIA/CEA-861/861B.
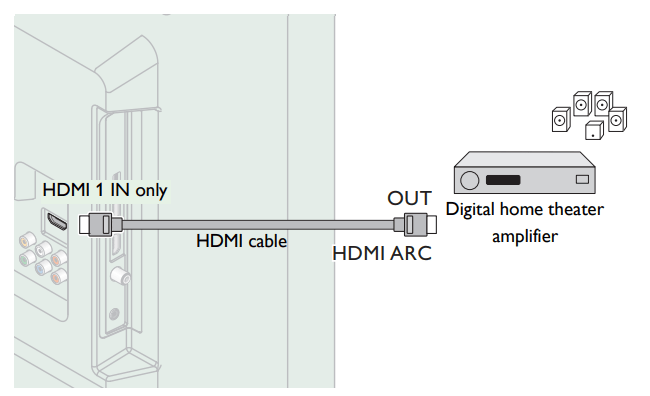
HDMI-ARC connection
HDMI-ARC allows you to use EasyLink to output TV Audio directly to a connected Audio device, without the need for an additional Digital Audio cable.
Note
- The HDMI 1 connector is HDMI Audio Return Channel (ARC) compliant. Use it to output Digital Audio to an HDMI home theater system.
- Be sure that the device is HDMI CEC and ARC compliant and that the TV is connected to the device using an HDMI cable attached to HDMI-ARC connectors.
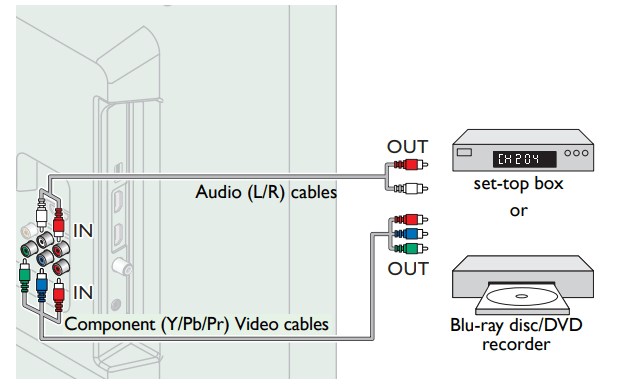
Component Analog Video Connection
Component Analog Video connection offers better picture quality for video devices connected to the unit.
If you connect to the unit’s Component Video (Y/Pb/Pr) Input jacks, connect Analog Audio cables to the Analog Audio (L/R) Input jacks.
Note
- The unit accepts 480i / 480p / 720p and 1080i of video signals for this connection.
Composite Analog Video Connection
Composite Analog Video connection offers standard picture quality for video devices connected to the unit.
If you connect to the unit’s Composite Video (Y/VIDEO) Input jack, connect audio cables to the Audio (L/R) Input jacks. When the Audio is monaural, then only connect to the Audio L Input jack.
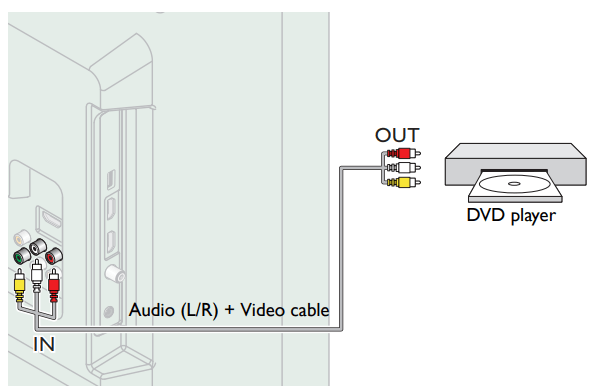
Note
- With this unit, yellow cable must be connected to Y (green) jack of Component Video Input jacks.
- Whenever you connect to the Composite Video Input jack (Y/VIDEO), you must disconnect the Component Video Input jacks (Pb and Pr). If you leave those jacks connected, it may cause of an unstable picture.
- Only the left loudspeaker reproduces sound for mono equipment. Use a mono to stereo adapter (not supplied) for sound reproduction via all internal loudspeakers.
Connecting the TV to the Internet using an Ethernet cable
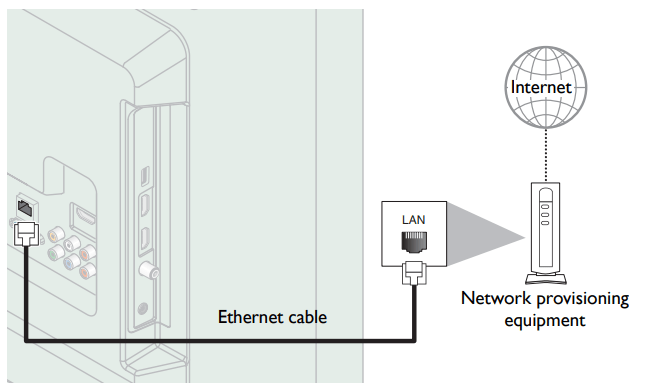
Note
- Please purchase shielded Ethernet cables at your local store and use them when you connect to network equipment.
- After connecting an Ethernet cable, set up necessary network settings. Network ➟ p.37
- Do not insert any cable other than an Ethernet cable to the Ethernet port to avoid damaging the unit.
- If your telecommunications equipment (modem, etc.) does not have broadband router functions, connect a broadband router.
- If your telecommunications equipment (modem, etc.) has broadband router functions but there is no vacant port, use a hub.
- For a broadband router, use a router which supports 10BASE-T / 100BASE-TX.
- Do not connect your PC directly to the Ethernet port of this unit.
Connecting the TV to the Internet using a wireless LAN
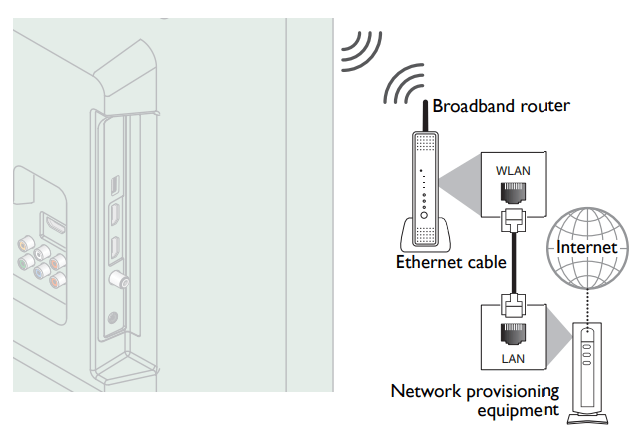
Note
- After you made the wireless connection, set up necessary network settings. Network ➟ p.37
- Use a Wireless LAN Access Point (AP) (e.g. wireless router) which supports IEEE 802.11 b/g/n. (n is recommended for stable operation of the wireless network.)
- This unit does not support Ad-hoc mode.
- Other radio devices or obstacles may cause interference to the wireless network connection.
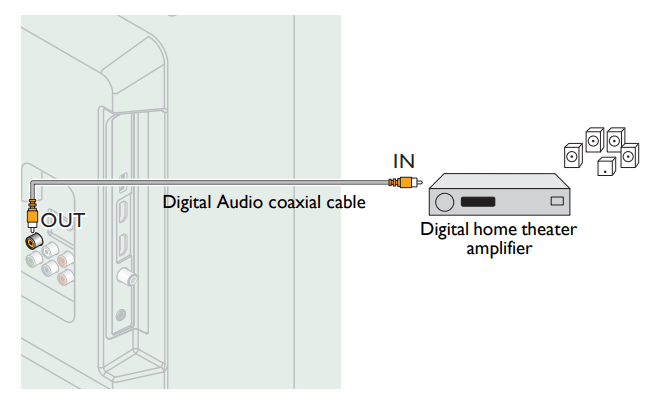
Digital Audio Output Connection
If you connect this unit to an external Digital Audio device, you can enjoy multi-channel audio like 5.1ch Digital broadcasting sound. Use a Digital Audio coaxial cable to connect the unit to external Digital Audio devices.
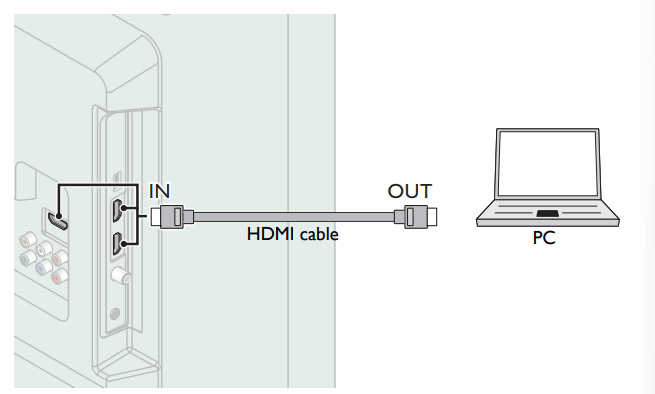
PC connection
HDMI connection
This unit can be connected to your PC that has a HDMI terminal. Use an HDMI cable for this Digital connection.
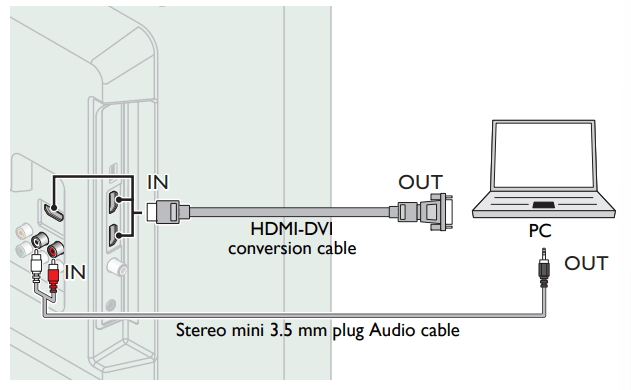
HDMI-DVI connection
This unit can be connected to your PC that has a DVI terminal. Use an HDMI-DVI conversion cable for this Video Digital connection and it requires Stereo mini 3.5mm plug Audio cable for Analog Audio signal as well.
VGA connection
This unit is equipped with a PC Input jack. If you connect this unit to your PC, you can use this unit as a PC monitor.
Use a VGA cable for this Video connection and it requires a Stereo mini 3.5mm plug Audio cable for Analog Audio signal as well.

The following video signals can be displayed
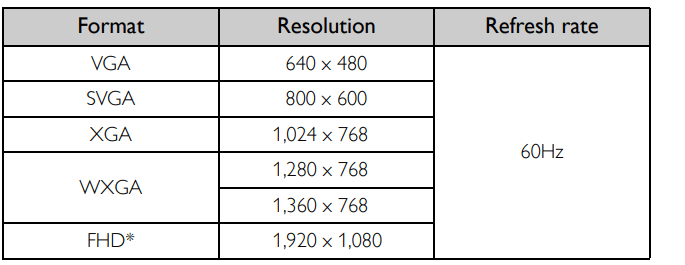
Other formats or non-standard signals will not be displayed correctly. * 50PFL3908 / 46PFL3908 / 46PFL3608 / 40PFL4908 / 39PFL2908 / 39PFL2608 only.
Note
- Please purchase the VGA cable or HDMI-DVI conversion cable that has a ferrite core.
- The following operations may reduce noise.
– Attach a ferrite core to the AC power cord of your PC.
– Unplug the AC power cord and use the built-in battery of your PC.
- Use an HDMI cable with the HDMI logo (a certified HDMI cable). High Speed HDMI cable is recommended for the better compatibility.
- The unit accepts 480i, 480p, 720p, 1080i and 1080p video signals.
- HDMI-DVI connection requires separate audio connections as well and the audio signals are output as Analog (L/R) Audio.
- DVI does not display 480i image which is not in compliance with EIA/CEA-861/861B
Initial setup
This section will guide you through the unit’s initial setting which includes selecting a language for your on-screen menu, country, location and AutoProgram, which automatically scans and memorizes viewable channels. You can also set the network connection in this setting.
Before you begin:
Make sure the unit is connected to antenna or cable.
- After making all the necessary connections, press to Turn On the unit.
• It may take a few moments to Turn On the unit for the first time.
• Initial setup menu appears automatically after the unit is Turned On.
- Use ▲▼ to select the on-screen language, country, TV placement, location on the right side of the TV screen, then press OK.
• You must set Home in location setting. Otherwise, Picture and Sound settings you adjusted will not be memorized after the unit goes into Standby mode.
- Use ▲▼ to select the signal type.
• If the TV is connected to a cable box or satellite set-top box, select the 2nd one and skip to step 5.
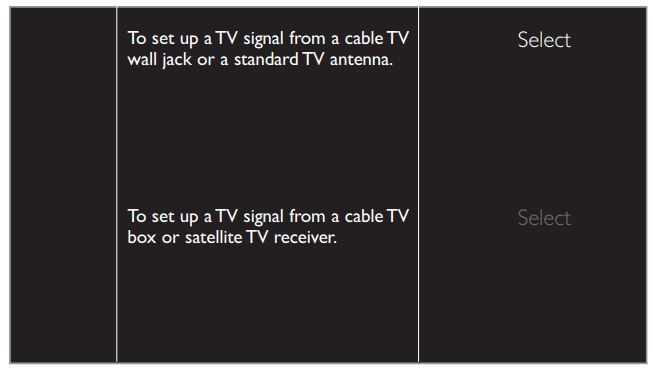
- Use ▲▼ to select Antenna for TV channels or Cable for CATV channels, then press OK.
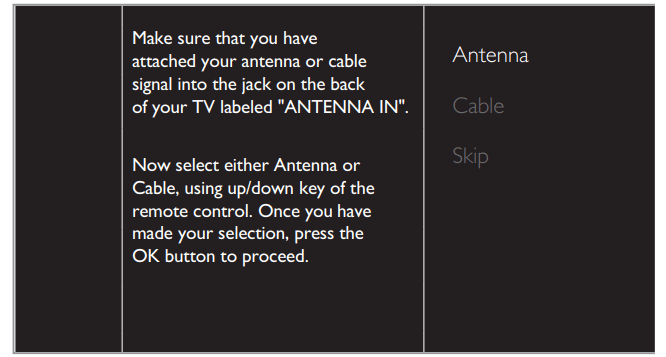
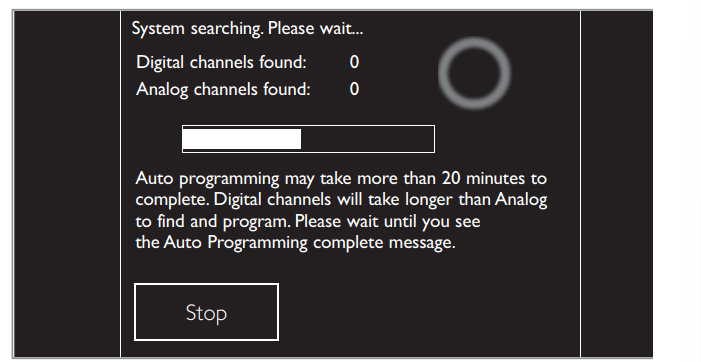
– When Antenna is selected, the TV detects antenna signals. It searches for DTV and Analog TV channels available in your area.
– When Cable is selected, the TV detects signals supplied by cable. It searches for DTV, Analog TV and Cable channels available in your area.
• Autoprogram will begin.
- After the channel installation is completed, Network setup screen will appear. Use ▲▼ to select Wireless or Wired, then press OK.
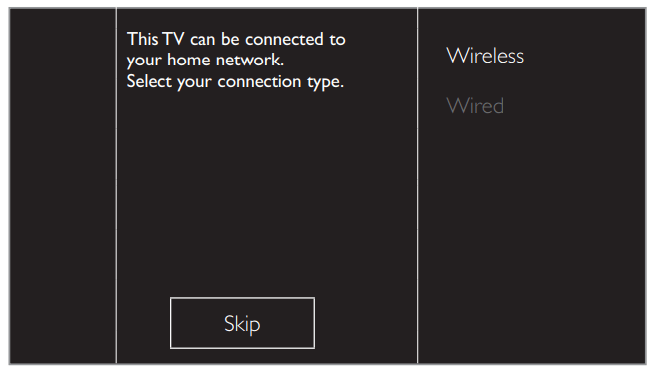

• If you have a router with WPS function, select Wireless and use ▲▼ to select Easy Connect, then press OK.
- Follow the on-screen instructions to complete the installation.
• When you select On in the selection screen of Auto software update. A message will appear if there is the latest software on the network server
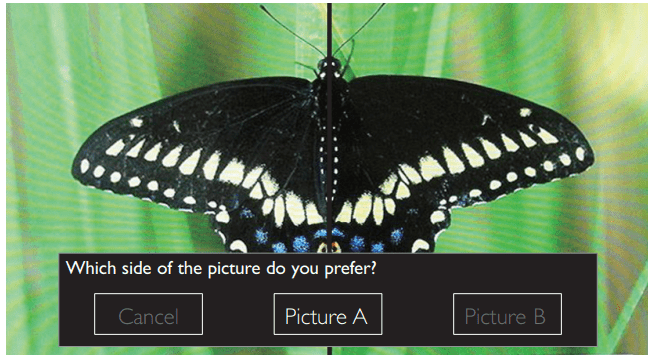
- Use ◄► to select Start, then press OK to begin Settings assistant.
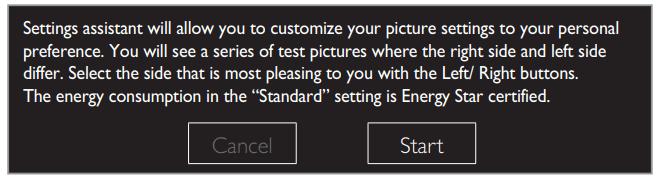
- Press ◄ or ► 5 times to select the side of the pictures that is the most pleasing to you, then press OK.
- Use ◄► to select your preferred energy efficiency level, then press OK

- Use ◄► to select your preferred sound setting, then press OK .

- Press OK to finish Settings assistant .

• Network updates will appear after Connection test succeeds. Use ◄► to select Yes, then press OK .
• When the initial setup is completed, the lowest memorized channel with the confirmation message will be displayed on the TV screen.
Note
- If you are not receiving a signal from your cable service, contact the Cable provider.
- If you press
 during autoprogram, this setup of TV channels will be cancelled.
- The initial AutoProgram function can be executed for either Antenna or Cable only once. When you change the connection (Antenna / Cable), select Autoprogram again. ➟ p.34
Use your TV
Switching on your TV and putting it in Standby mode
50PFL3908 / 46PFL3908 / 46PFL3608
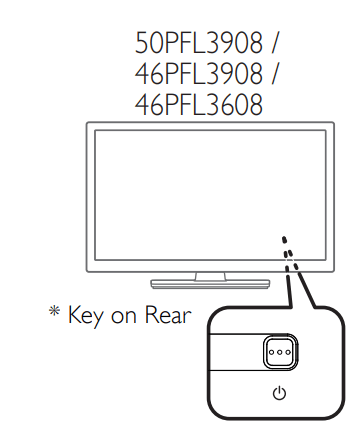
To Turn the TV On from Standby or Off to Standby

- Press
 (3 raised dots on the Rear panel or Front panel or the Remote control).
Note
- Energy consumption contributes to air and water pollution. When the AC power cord is plugged in, your TV consumes energy. Your TV has very low standby power consumption.
Adjusting volume
50PFL3908 / 46PFL3908 / 46PFL3608
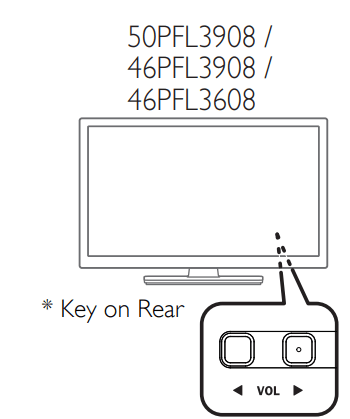
To decrease or increase volume
- Press VOL ◄ / ► (1 raised dot on the Rear panel) or Front panel or press VOL + / − on the Remote control.
VOL ◄ : Volume Down
VOL ► : Volume Up
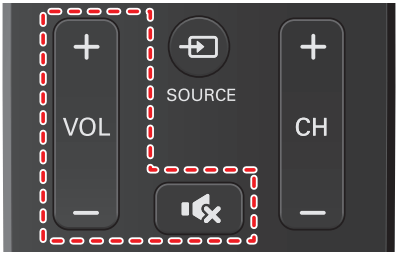
To mute or unmute sound
- Press
 on the remote control to mute the sound.
- Press
 again or VOL + / − to recover the original sound.
Switching channels
50PFL3908 / 46PFL3908 / 46PFL3608
To select Channels by using CH ▼/▲ or CH + / −
- Press CH ▼ (Down) / ▲ (Up - 1 raised dot on the Rear panel or Front panel) or press CH + / − on the Remote control.
To select Channels by using the NUMBER buttons
Digital TV operation
- For Digital channels, press a number followed by a dot “•” and the corresponding sub channel number.
– When selecting Digital channel 11.1 Be sure to press • before entering the subchannel number

Analog/Cable TV operation
– When selecting cable or Analog channel 11

Press PREV.CH to return to the previously viewed channel.
Note
- To select the non-memorized channels, use the NUMBER buttons.
- Channel not available or No Signal will appear on the TV screen after the subchannel broadcast is over.
- Audio Only message will appear on the TV screen, when you receive only sound signal.
* On the 46” & 50” TV’s All CONTROL Keys are located on the Rear (lower right) side of the unit as viewed from the Front.
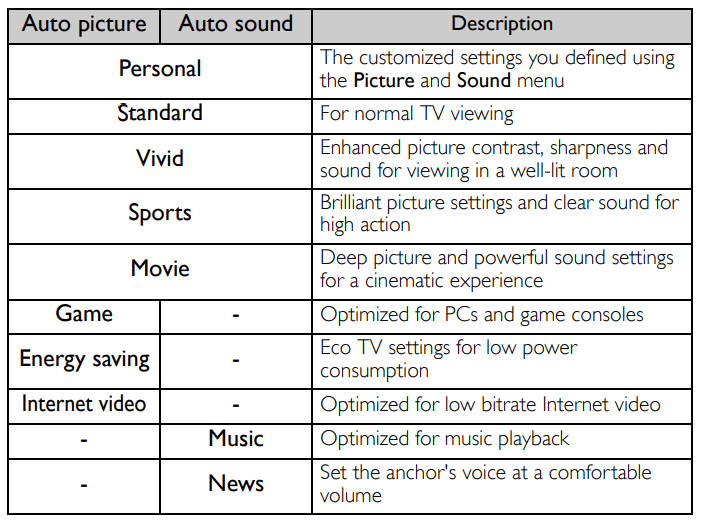
Using auto mode
- Press
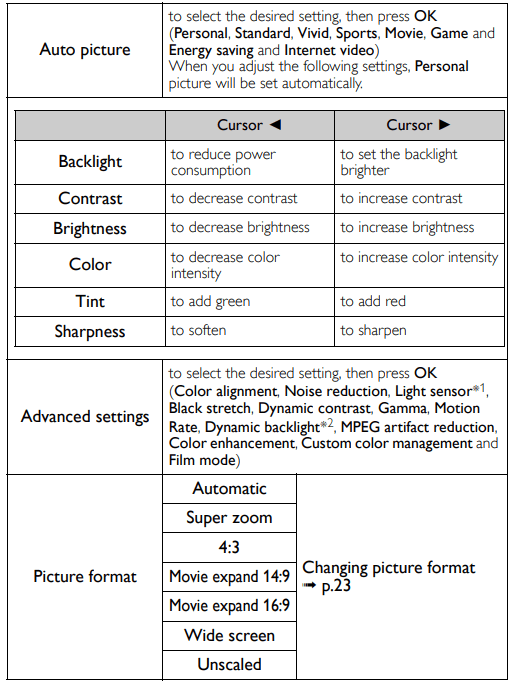
 OPTIONS and select Auto picture or Auto sound to set your TV to a predefined picture and sound setting.
- Use ▲▼ to select one of the following settings:
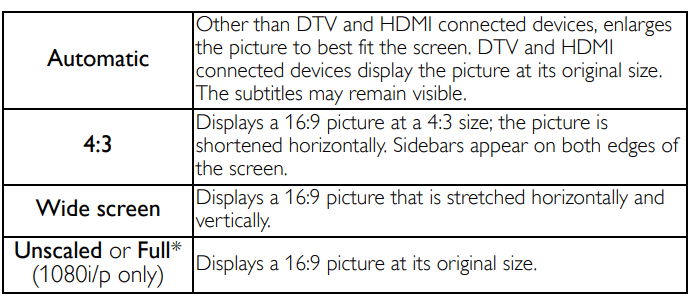
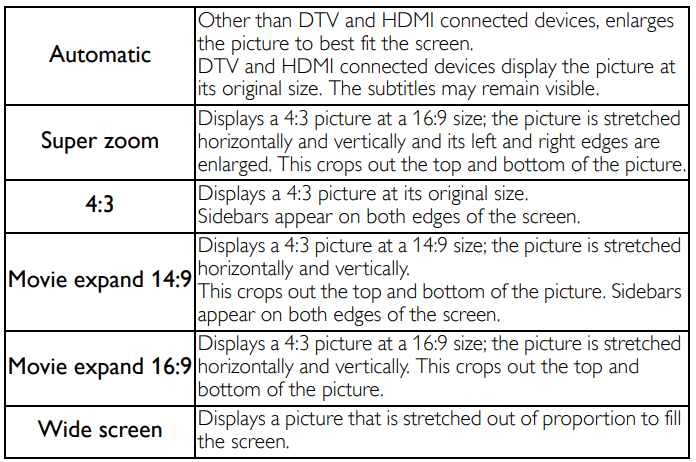
Changing picture format
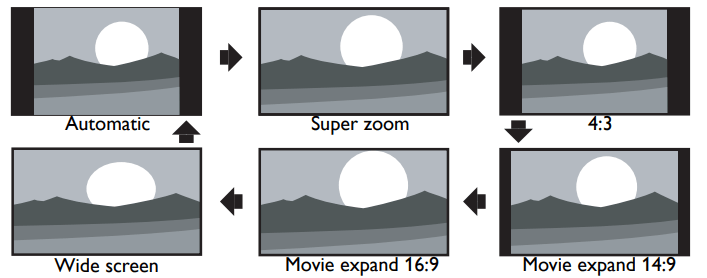
Display modes can be selected when your TV receives a 16:9 or 4:3 video signal.
Three types of display modes can be selected for a PC Input signal.
Press  FORMAT repeatedly to switch the TV aspect ratio.
For 16:9 video signal
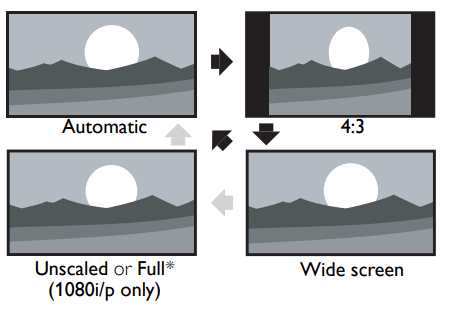
* This part differs depending on the product you have.
- "Unscaled" for 50PFL3908, 46PFL3908, 46PFL3608, 40PFL4908, 39PFL2908, 39PFL2608.
- "Full" for 32PFL4908, 29PFL4908.
For 4:3 video signal
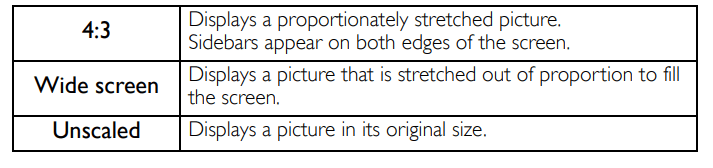
For PC Input signal

- This unit can also be connected to your PC that has a DVI terminal. Use an HDMI-DVI conversion cable for this Video connection and it requires Stereo mini 3.5mm plug Audio cable for Analog Audio signal as well.
- Refer to 16:9 video signal on this page if PC has HDMI Output.
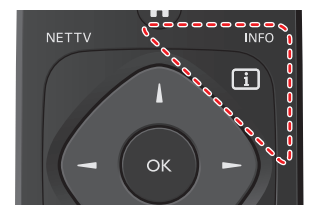
TV screen information
You can display the currently selected channel or other information such as the aspect ratio on the TV screen. In the Digital mode, the detailed broadcasting information for the current off-the-air channel such as program title and program guides are displayed.
- Press
 INFO.
INFO.
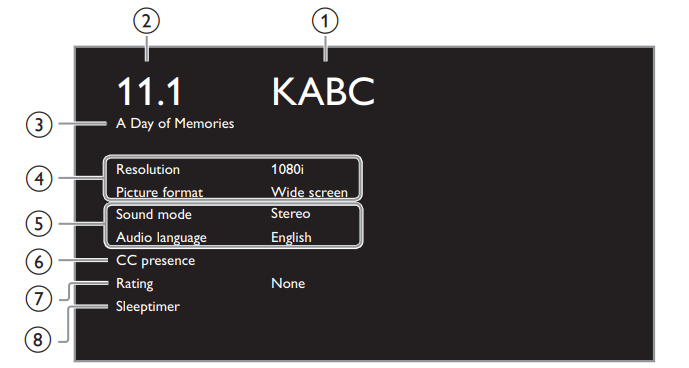
1. broadcast station ➟ p.20
2. channel number / Input mode
Switching channels
Watching channels from an external device ➟ p.21
3. program title (for DTV only)
4. program’s image aspect ratio
Changing picture format ➟ p.23
5. audio language (DTV) / audio mode (Analog TV) Sound ➟ p.29
6. CC (not available if Closed Caption is set to Off) Caption settings ➟ p.30
7. child lock rating Child and ratings lock ➟ p.31
8. remaining time of sleeptimer Sleeptimer ➟ p.31
- Press
 INFO to hide the information.
Note
- While the program guide is displayed, the Closed Caption function is interrupted.
- The information display will automatically disappear in 5 seconds.
Use more of your TV
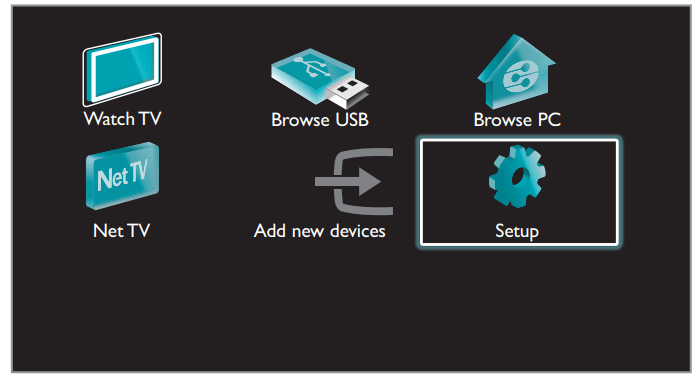
This section describes the overview of the Setup menu displayed when you press  (MENU) and use ▲▼◄► to select Setup.
The Setup menu consists of the function setting items below.
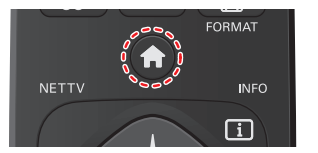
- Press
 (MENU) to display the Home menu.
- Use ▲▼◄► to select Setup, then press OK.
- Use ▲▼ to select the desired menu and an item, then press OK or use ▲▼◄► to determine the setting
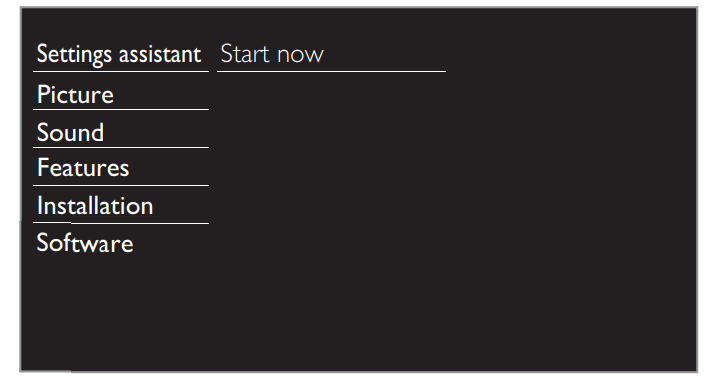
Settings assistant
Before you begin:
You must Set Home in Location. ➟ p.35
Otherwise, personalized Picture and Sound settings will not be Memorized after the unit goes into Standby mode.
- Press
 (MENU) and use ▲▼◄► to select Setup then press OK.
- Use ▲▼ to select Settings assistant, then press OK.
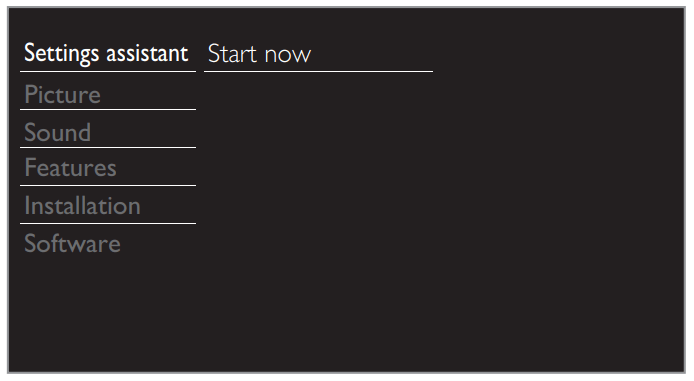
- Press OK to begin Settings assistant.
- Follow steps 8 to 11 in Initial setup.➟ p.18
Picture
Before you begin:
You must Set Home in Location. ➟ p.35
Otherwise, personalized Picture and Sound settings will not be Memorized after the unit goes into Standby mode.
- Press
 (MENU) and use ▲▼◄► to select Setup then press OK.
- Use ▲▼ to select Picture, then press OK
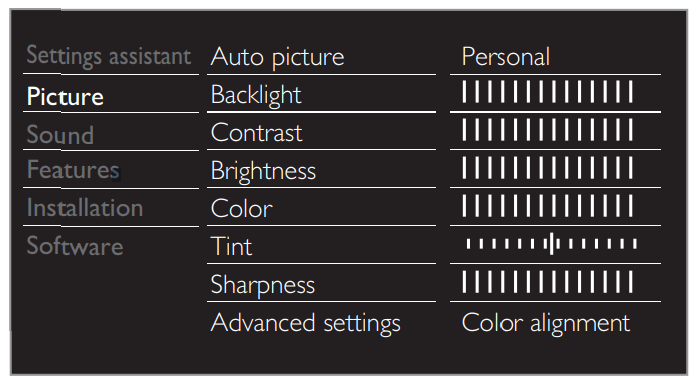
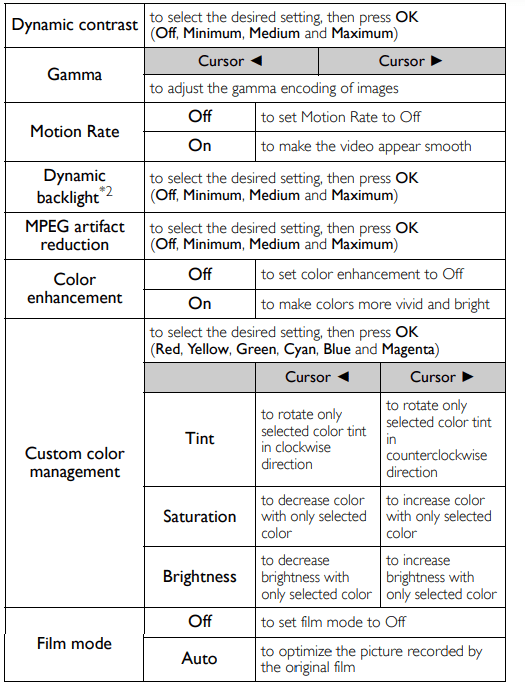
- Use ▲▼◄► to select the item you want to adjust, then press OK.
• The following picture settings can be configured. Depending on the format of the picture Source, some picture settings are not available.
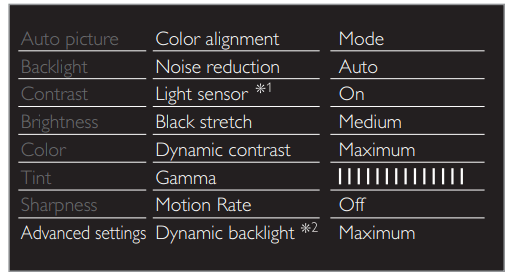
You can set a particular about picture quality in Advanced settings.
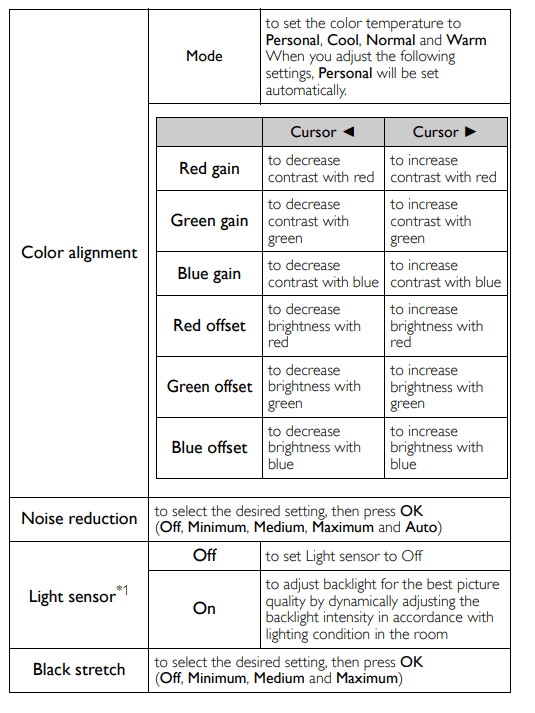
Note
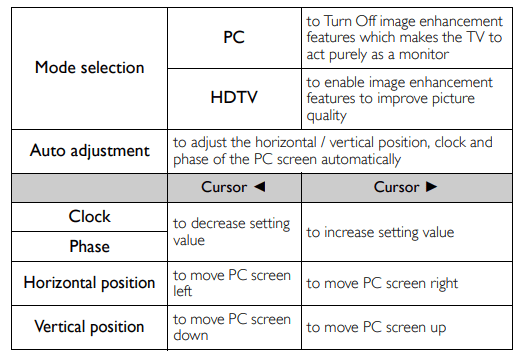
- Mode selection is available only if
– the external Input modes are selected HDMI 1, HDMI 2 or HDMI 3.
– the connected HDMI device is outputting a video signal.
- Adjusts backlight for the best picture quality by dynamically adjusting the backlight intensity in accordance with lighting condition in the room when Light sensor*1 is set to On. Please ensure the room lighting is stable and the light sensor is not blocked.
*1 50PFL3908 / 46PFL3908 / 46PFL3608 / 40PFL4908 / 39PFL2908 / 39PFL2608 only.
*2 50PFL3908 / 46PFL3908 / 46PFL3608 / 40PFL4908 only.
Sound
Before you begin:
You must set Home in Location. ➟ p.35
Otherwise, personalized Picture and Sound settings will not be memorized after the unit goes into Standby mode.
- Press
 (MENU) and use ▲▼◄► to select Setup then press OK.
- Use ▲▼ to select Sound, then press OK

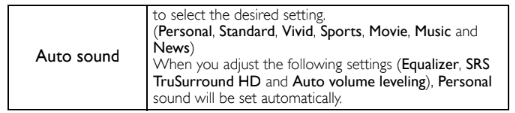
- Use ▲▼◄► to select the item you want to adjust, then press OK.
The following sound settings can be configured. Depending on the format of the broadcasting, some sound settings are not available.
Adjust the tonal quality for each frequency

Adjust the speakers to suit your listening preference.

Digital TV operation
You can select the Audio language while your TV is receiving the Digital broadcasting.

Analog/Cable TV operation
You can select Main or SAP while your TV is receiving the Analog broadcasting that has the SAP (Second Audio Program). (It differs depending on the program.)

When you set to Main in Alternate audio above, you can select Mono or Stereo if the Analog broadcasting is sending the MTS (Multichannel television sound).

This selects sound modes for more spatial or surround sound reproduction.

This function keeps a constant loudness differential between the TV commercials and the programs.

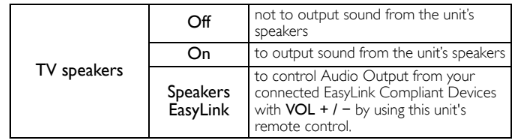
You can select the Audio Output from the unit’s speakers or not. If your amplifier is HDMI link function compatible and connected by an HDMI cable to this unit, some sound operations such as volume up can be
changed by using this unit’s remote control. Make sure Master EasyLink is set to On. ➟ p.36
Adjust headphone volume.

You can set the digital audio output format from SPDIF/ARC.

If a channel or Input device is too loud or too soft, navigate to that channel or Input device

Note
- Alternate audio and Mono/Stereo are not available when you watching TV programs with a cable box or satellite set-top box connected through an HDMI cable or Component / Composite Video cables.
Features
- Press
 (MENU) and use ▲▼◄► to select Setup then press OK.
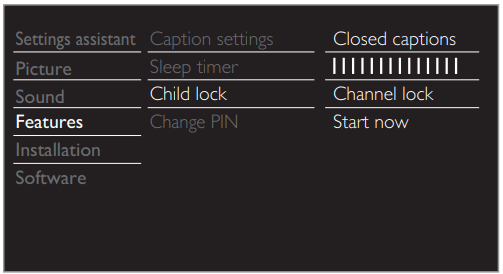
- Use ▲▼ to select Features, then press OK.
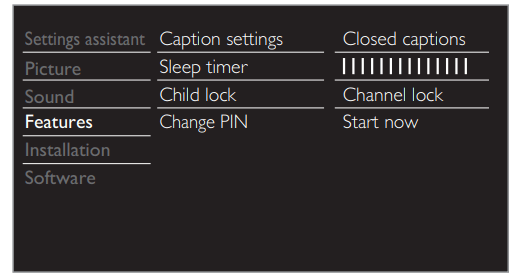
- Adjust the following items.
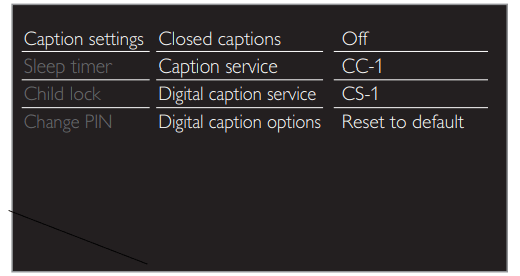
Caption settings
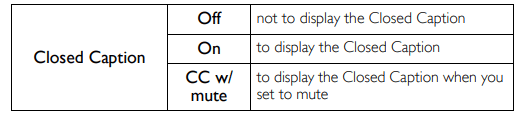
Closed Captioning displays the audio portion of programming as text superimposed over the video.
- Use ▲▼ to select Caption settings, then press OK.
Note
• You can cycle through the Closed Caption settings by pressing CC.
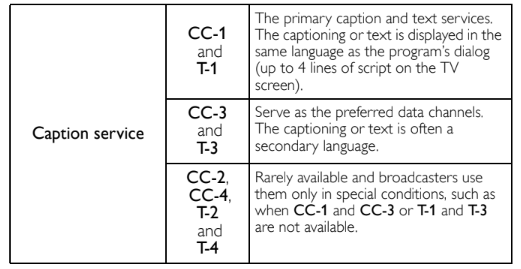
Digital TV operation
In addition to the basic Closed Caption, DTV has its own Closed Caption called Digital caption service. Use this menu to change the settings for Digital caption service.

You can choose the size, font, color, background and other characteristics of the caption text.
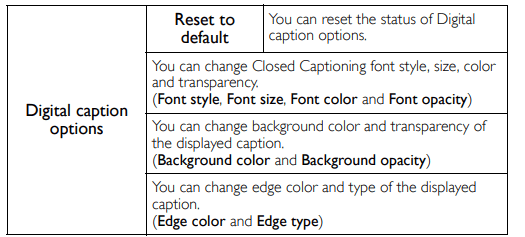
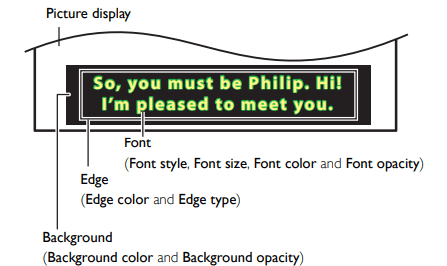
- Review your setting choice made below by looking in the upper left corner of the displayed setting box (not all selections show the differences selected).
Analog/Cable TV operation
There are 3 display modes according to programs:
| Paint-on |
Displays input characters on the TV screen immediately. |
| Pop-on |
Once characters are stored in memory, they are displayed all at once. |
| Roll-up |
Displays the characters continuously by scrolling (max. 4 lines). |
Note
- Digital caption service that you can switch differs depending on the broadcast description.
- Closed Captioning service may not be controlled by this unit’s menu options if you are watching television through an external cable or satellite set-top box. In which case you will need to use the menu options on the external set-top box to control Closed Captioning.
- The captions do not always use correct spelling and grammar.
- Not all TV programs and product commercials include Closed Caption information. Refer to your area TV program listings for the TV channels and times of Closed Caption shows. The captioned programs are usually noted in the TV listings with service marks such as CC.
- Not all captioning services are used by a TV channel during the transmission of a Closed Caption program.
- Closed Caption will NOT be displayed when you are using an HDMI or a Component (except for 480i) connection.
- To show the Closed Caption on your TV screen, broadcast signal must contain the Closed Caption data.
- Not all TV programs and commercials have the Closed Caption or all types of the Closed Caption.
- Captions and texts may not exactly match the TV voice.
- Changing channels may delay the Closed Caption for a few seconds.
- Adjusting or muting the volume may delay the Closed Caption for a few seconds.
- Abbreviations, symbols and other grammatical shortcuts may be used in order to keep pace with the on-screen action. This is not a malfunction.
- The caption or text characters will not be displayed while the Home menu or functions display is shown.
- If a black box appears on the TV screen, this means that the Closed Caption is set to the text mode. To clear the box, select CC-1, CC-2, CC-3 or CC-4.
- If the unit receives poor quality television signals, the captions may contain errors or there might be no captions at all. Some possible causes of poor quality signals are: – Automobile ignition noise – Electric motor noise – Weak signal reception – Multiplex signal reception (ghosts or screen flutter) – Data dropout and Pixelation (for DTV only)
- The unit retains the Closed Caption setting if the power fails.
- When the unit receives special effects playback signal (e.g. Search, Slow and Still) from a VCR’s video Output channel (ch3 or ch4), the unit may not display the correct caption or text.
- The EUT setting that satisfies § 79.102 (e) is as follows: Font: Mono-font Character size: Large
Sleeptimer
Sleep timer can set the unit to go into Standby mode after an incremental period of time.
- Use ▲▼ to select Sleeptimer, then press OK.
- Use ► repeatedly to change the amount of time (increases the time by 5 minutes up to 180 minutes).
• Each press of ◄ will decrease the time by 5 minutes.
• Press  INFO once to call up the display for checking the remaining time.
• To cancel the sleep timer, press ► repeatedly until “ 0 ” is displayed.
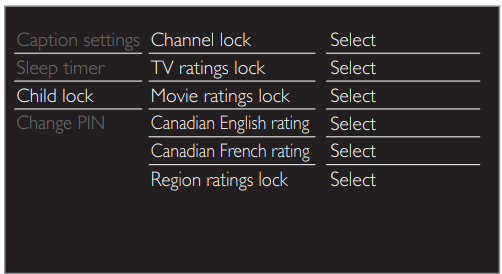
Child and ratings lock
You can prevent your children from watching certain programs or certain channels by locking the TV controls and by using ratings.
- Use ▲▼ to select Child lock, then press OK.
- Use the NUMBER buttons to enter the 4-digit numbers for your PIN code.
• When you have not set up your PIN code, enter 0, 0, 0, 0.
• When the PIN code is correct, Child lock menu is displayed.
See the following description for setting each item.
Note
- When you select the higher rating and set it to , the lower ratings will be blocked automatically.
- When you set the All to , all ratings return to automatically.
- Region ratings lock will be available when the unit receives a Digital broadcast using the new rating system.
- To block any inappropriate programs, set your limits in TV ratings lock, Movie ratings lock and Region ratings lock.
- For the United States, the unit may download the Region Ratings Lock Table, if required.
- The Canadian rating systems on this unit are based on CEA-766-A and CRTC policy
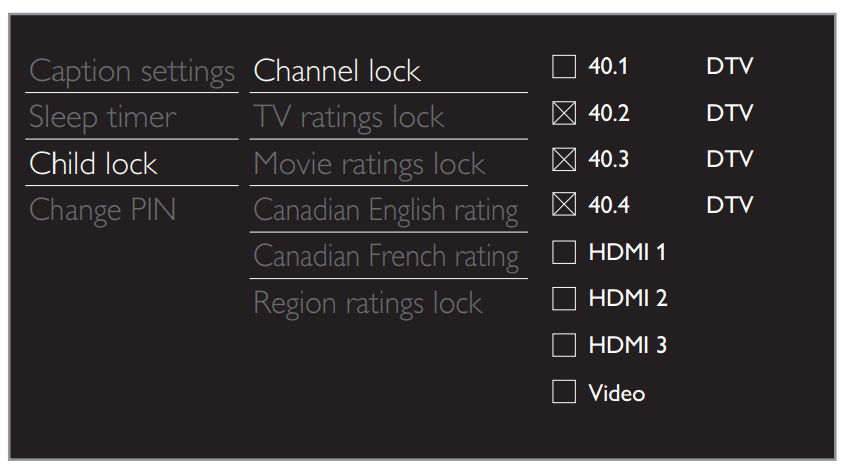
Channel lock
Particular channels or external Input modes can be invisible in this function.
3 Use ▲▼ to select Channel lock, then press OK.
4 Use ▲▼ to select the particular channels or external Input, then press OK repeatedly to switch between view and block.
 indicates that the channel or Input Source is locked.
 indicates that the channel or Input Source is not locked.
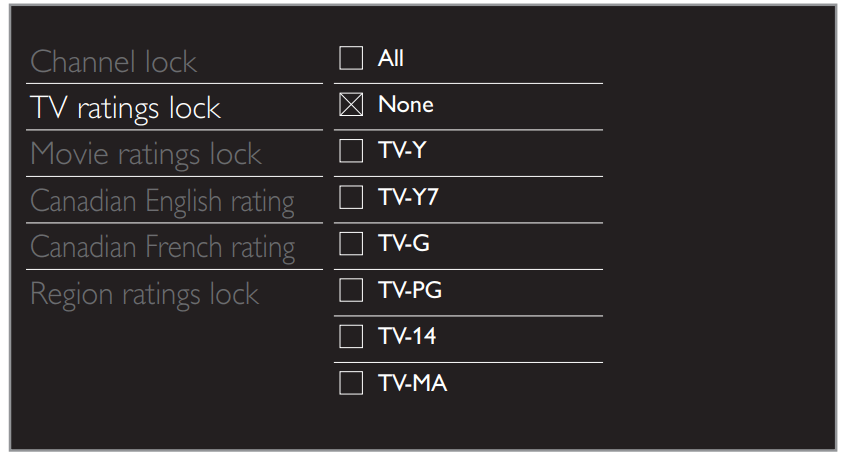
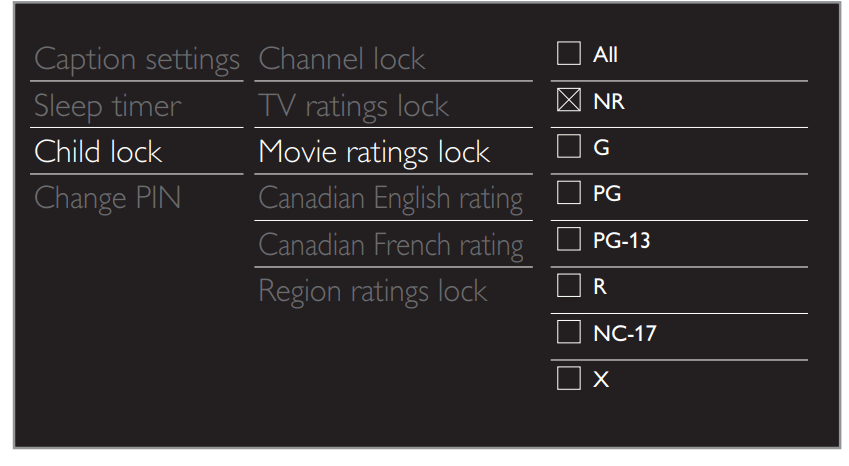
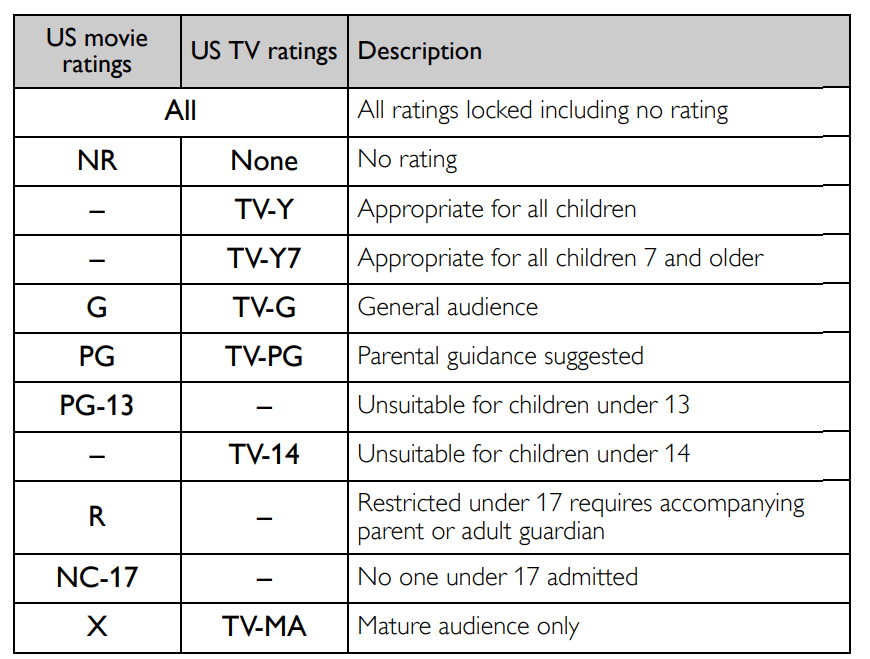
Setting TV and movie ratings
Movie ratings lock is the rating system created by MPAA. TV ratings lock has controlled access to individual programs based on their age ratings and content rating.
3 Use ▲▼ to select TV ratings lock or Movie ratings lock, then press OK.
4 Use ▲▼ to select the desired rating, then press OK repeatedly to switch between view and block.
 indicates that the rating is locked.
 indicates that the sub rating is locked.
 indicates that the rating is not locked.
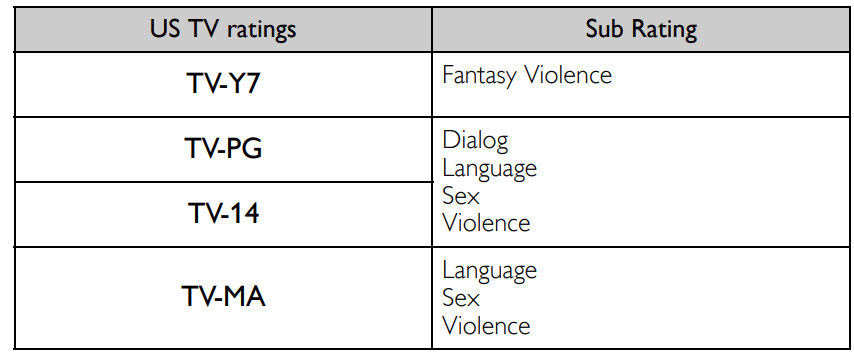
TV ratings lock
Movie ratings lock
To set the sub ratings
For TV ratings lock, you can further set the sub ratings to block specific elements of programming. To set the sub ratings, follow the step below.
Use ▲▼◄► to select the desired rating, then press OK repeatedly to switch between  and
and  .
.
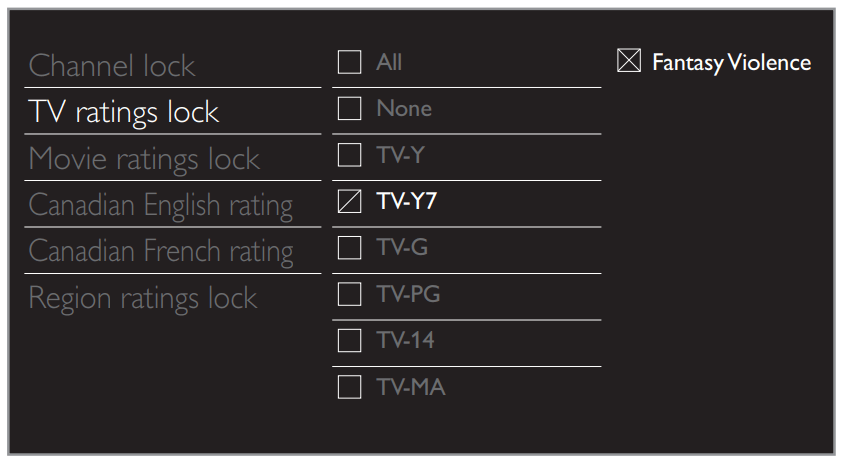
Note
- Blocked sub rating will appear beside the main rating category in TV ratings lock menu.
- You cannot block a sub rating if the main rating is set to
 .
.
- Changing the category to
 or
or  automatically changes all its sub ratings to the same (
  or
or  )
)
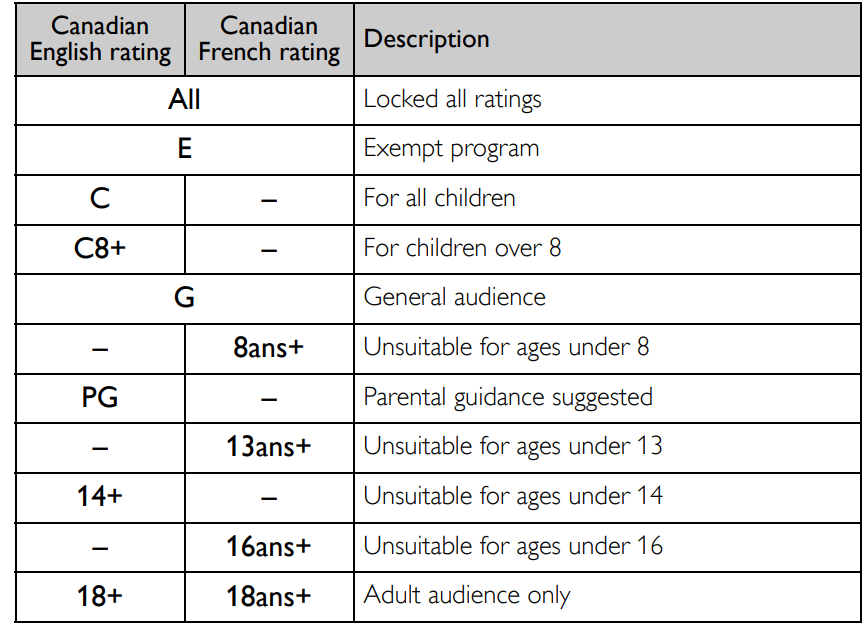
Canadian English or Canadian French ratings
You can select the rating for Canadian English or Canadian French broadcasting.
3 Use ▲▼ to select Canadian English rating or Canadian French rating, then press OK.
4 Use ▲▼ to select the desired rating, then press OK repeatedly to switch between view and block.
 indicates that the rating is locked.
 indicates that the rating is not locked
Change PIN
Although the default PIN code (0000) is supplied with the unit, you can set your own PIN code.
1 Use ▲▼ to select Change PIN, then press OK.
2 Press the NUMBER buttons to enter the new 4-digit PIN code.
- Enter PIN code again to confirm.

Note
- Make sure new PIN code and confirm PIN code must be exactly the same. If they are different, the space is cleared for reentering.
- If you have forgotten your PIN code, enter 0711 to reset the PIN code.
Useful tips
FAQ
| Question |
Answer |
| My remote control does not work. What should I do? |
- Check the antenna or cable connection to the main unit.
- Check the batteries of the remote control.
- Check if there is an obstacle between the infrared sensor window and the remote control.
- Test the signal Output use IR Signal Check. ➟ p.52 If okay, then possible infrared sensor trouble.
- Aim the remote control directly at the infrared sensor window on the front of the unit.
- Reduce the distance to the unit.
- Re-insert the batteries with their polarities (+/–) as indicated.
- When there is an infrared-equipped device such as PC near this unit, it may interrupt the remote control signal of this unit. Move the infrared-equipped device away from this unit, change the angle of the infrared sensor or Turn Off the infrared communication function
|
| How come the Initial setup appears every time I Turn On this unit? |
- Make sure to complete the initial setup before the unit goes into Standby mode.
|
| Why can I not watch some RF signal TV programs. |
- Autoprogram must be completed when you set up the unit for the first time or move it to a location where previously unavailable channels are broadcast.
- Make sure Autoprogram has been completed. ➟ p.34
- The selected channel may not be broadcasting.
- When Autoprogram is interrupted and not completed, some channels will not be received. Make sure to complete the Autoprogram. ➟ p.34
- The selected channel cannot be viewed by the Child and ratings lock setting. ➟ p.31
- The unit requires some kind of antenna Input. An indoor antenna (Digital or VHF / UHF), an external antenna (Digital or VHF / UHF) or an RF coaxial cable from your wall Cable / Satellite set-top box needs to be plugged into the unit.
|
| How come there is no image from the connected external devices? |
- Check if the correct Input mode is selected by pressing
 SOURCE. Watching channels from an external device. ➟ p.21 SOURCE. Watching channels from an external device. ➟ p.21
- Check the antenna, cable or other Input connection to the unit.
- When using the Component Video connection check that the Green (Y), Blue (Pb/Cb) and Red (Pr/Cr) connectors are connected to their corresponding colored jacks on the unit.
|
| When I enter a channel number, it changes automatically. |
- Many Digital channels have alternate channel numbers. The unit changes the numbers automatically to the ones signifying the broadcasting station channel number. These basic numbers used for previous Analog broadcasts. (e.g., Input ch# 30 automatically changes to ch# 6.1)
|
| Why are captions not displayed entirely? Or, captions are delayed behind the dialog. |
- Captions that are delayed a few seconds behind the actual dialog are common for live broadcasts. Most captioning production companies can display a dialog to maximum of 220 words per minute. If a dialog exceeds that rate, selective editing is used to insure that the captions remain up-to date with the current TV screen dialog
|
| How can I set the clock? |
- There is no clock function on this unit.
|
| I cannot change the Child lock setting because my PIN code no longer works. |
- lthough the default PIN code (0000) is supplied with the unit, the PIN code will be required once you set a PIN code in Child and ratings lock. ➟ p.31 When you forget your PIN code, enter 0711 in Change PIN to reset the PIN code. ➟ p.33
|
| How come the “Software update failed.” message appears when I Turn On this unit? |
- The unit will not work correctly unless the software upgrade is completed. Try Recovery update. ➟ p.41
|
Troubleshooting
If the unit does not perform properly when operated as instructed in this User Manual, check the following Troubleshooting tips and all connections once before calling for service
Power
No power
- Make sure the AC power cord is plugged in.
- Make sure that the AC outlet supplies the proper voltage, plug another electrical appliance into the AC outlet to ensure that the AC outlet operates normally.
- If a power failure occurs, unplug the AC power cord for 1 minute to allow the unit to reset itself.
Remote
Control buttons do not work.
- Press only one button at a time. Do NOT press more than one button at the same time.
- Ensure that no buttons on the remote control are depressed and move freely.
Universal remote control does not work properly.
- Refer to the user manual of the universal remote control for the Philips code.
Picture
Power is ON but no screen image.
- Check whether the connection of the antenna, cable receiver or satellite box is connected correctly.
- Check whether all the cables to the unit are connected to the correct Output jack of your device like Blu-ray / DVD recorder.
- Make sure that the selected Input mode is connected to the working Input jack.
- Check if your computer is NOT in sleep mode when the Input mode of this unit is in PC mode. Tap any key on the keyboard to wake up your computer.
- Check if the correct input mode is selected by pressing
 SOURCE.
No color
- View other TV channels. The problem might be limited to the broadcasting station or weak signal strength.
- Adjust Color in Picture settings. ➟ p.27
Picture poor, sound OK
- Electrical interference from nearby appliances may affect picture quality when viewing an off-the-air low power NTSC analog broadcast signal.
- Adjust Contrast and Brightness in Picture settings. ➟ p.27
- View other TV channels. The problem might be limited to the broadcasting station or weak signal strength.
- For the best picture quality, watch “High Definition” wide screen programs. If the HD content is not available, watch “Standard Definition” programs instead.
You see noise or trash on the screen.
- When the capabilities of the unit exceed the capabilities of the Digital broadcasting, the signal will be increased to match the capabilities of the display of the unit. This may cause noise or trash. When viewing an off-the-air low power NTSC Analog broadcast signal may show noise or trash on the screen.
Unusual picture appears and the TV does not operate.
- Press the power button first. If it does not solve, follow the procedure below.
1 Press the buttons on the remote control in the order shown below.

2 Unplug the AC power cord once, and wait for 1 minute, and then plug it in again.
Picture & Sound
No picture or sound
- Check if the Power is on.
- Check whether all the cables to the unit are connected to the correct Output jack of your device like Blu-ray / DVD recorder.
- View other TV channels. The problem might be limited to the broadcasting station or weak signal strength.
- Unplug the AC power cord and wait for about 1 minute, then plug the AC power cord and Turn On the unit again.
- Check whether the connection of the Antenna or Cable / Satellite set-top box is connected correctly.
- Make sure that the selected Input mode is connected to the working Input jack.
- Check if your computer is NOT in sleep mode when the Input mode of this unit is in PC mode. Tap any key on the keyboard to wake up your computer.
- Make sure that the sound is not muted. Press
 (MUTE) so that the volume bar and current volume level will appear on the TV screen.
- Make sure that the volume is NOT set to 0 or
 If so, use VOL + / − to adjust to the desired volume.
- Make sure that the headphone is NOT connected to the Headphone Audio Output jack.
- Make sure that the TV speakers is NOT set to Off
Adjusted Picture or Sound settings are not effective every time the unit is turned On.
- You must set to Home in Location. ➟ p.35 Otherwise, the settings you adjusted will not be memorized after the unit goes into Standby mode.
You see a distorted picture or hear an unusual sound.
- You may be getting NTSC TV signal (not HDTV signal) interference from electrical appliances, automobiles, motorcycles or fluorescent lights.
- Try moving the unit to another location to see if this is the cause of the problem.
Ghosts, lines or streaks in picture.
- Electrical interference from nearby appliances may affect picture quality when viewing an off-the-air low power NTSC analog broadcast signal.
- View other TV channels. The problem might be limited to the broadcasting station or weak signal strength.
Sound
No sound, distorted sound or incorrect Audio Sound is heard when using the HDMI-DVI connections.
- Make sure that the Analog Audio signals from the HDMI-DVI device are connected to the Analog Audio Input L/R jacks.
- When using Component Analog Video, Composite Analog Video or PC VGA Video make sure that the Analog Audio (L/R) connectors are mounted into the Audio (L/R) Input jacks.
Sound poor, picture OK
- View other TV channels. The problem might be limited to the broadcasting station or weak signal strength.
- Check if the audio cable is connected incorrectly.
You switch to a different Input and the volume changes.
- This unit will memorize the volume level from the last time you adjusted it.
- If the volume of the sound from another device is higher or lower, then the loudness will change.
- Make sure Auto volume leveling is set to On. ➟ p.29
Child and Rating Lock
Forgotten PIN code.
- Enter “0711” to clear your password.
Screen
You switch to a different Input and the screen size changes.
- This unit will memorize the viewing mode from the last time you used the particular input modes.
The display image does not cover the entire screen.
- If you are using the unit as a PC monitor, make sure that Horizontal position and Vertical position in Picture are set correctly. ➟ p.27
- If you are watching TV or using the Composite Video, Component Video or HDMI with 480i Input, press
 FORMAT repeatedly to switch various screen modes.
Different color marks on the TV screen.
- View other TV channels. The problem might be limited to the broadcasting station, missing data or pixelation.
Captions
Captions are displayed as a white box. No caption is displayed in the closed caption-supported program.
- Interference from buildings or weather conditions may cause captioning to be incomplete if watching Analog TV (NTSC) signals.
- Broadcasting station may shorten the program to insert advertisements. The closed caption decoder cannot read the information of the shortened program.
- Captions that are delayed a few seconds behind the actual dialog are common for live broadcasts. Most captioning production companies can display a dialog to maximum of 220 words per minute. If a dialog exceeds that rate, selective editing is used to insure that the captions remain up-to date with the current TV screen dialog.
Black box is displayed on the TV screen.
- The text mode is selected for caption. Select CC-1, CC-2, CC-3, or CC-4.
Software update
“Software update failed.” message appears when the unit is turned On.
- The unit will not work correctly unless the software upgrade is completed. Try Recovery update. ➟ p.41
Network
Cannot connect to the network.
- Check if the Ethernet cable connection is properly made. Turn On the modem or broadband router.
- Check the network settings.
- Check if the broadband router and/or modem is correctly connected.
Sometimes video quality is poor when using the wireless LAN.
- The wireless network connection quality varies depending on the distance or obstacles (e.g. wall, basement, 2nd floor) between the TV Wireless LAN Adapter and the wireless router (access point), from other wireless networks, and brand and type of the wireless router (access point). When using the Wireless LAN of the TV, it is suggested to place the wireless router as close as possible to the Television.
Wireless LAN connection fails or wireless connection is poor.
- Check the installation location of the TV and wireless router (access point). Signal quality may be affected for the following reasons.
- Interference of other wireless devices, microwaves, fluorescent lights, etc., are placed nearby.
- There are floors or walls between the wireless router and TV.
- If the problems continue even after checking the above, try making a wired LAN connection.
Cannot use the wireless connection.
- Check if the Wireless LAN Access Point (AP) (e.g. wireless router) is oriented properly or not placed too close between them.
- Once you have activated the wireless connection please wait 30 seconds for the connection to be established after Turning On the unit, before trying to access network features such as Net TV.
Cannot use Netflix feature.
- Netflix is available only in the United States and Canada.
- Check if the network connection is properly made.
Cannot use Hulu Plus feature.
- Hulu Plus is available only in the United States.
- Check if the network connection is properly made.
Cannot add movies or TV episodes to the Instant Queue.
Even though the speed of the Internet connection improves during playback, the picture quality of Netflix streaming movie does not improve.
- The picture quality does not change during playback. It differs depending on the speed of Internet connection at the time of loading.
Cannot use VUDU feature.
- VUDU is available only in the United States, Canada and Mexico.
- Check if the network connection is properly made.
Cannot rent or buy movies / TV episodes on VUDU.
- Log into your account at http://my.vudu.com and check your payment information.
The picture quality of streaming movie (Netflix, Hulu Plus, Film Fresh or VUDU) is poor.
- Check the speed of your Internet connection. You need speeds of at least 8 Mbps to this player for high quality uninterrupted playback.
Streaming movie (Netflix, Hulu Plus, Film Fresh or VUDU) often stops or starts buffering during playback.
- Contact your Internet service provider to troubleshoot your Internet connection for speed and line quality. Consistent line quality and speed are very important for Internet video playback.
Cannot connect to the network while my PC is connected to the network.
- Check the content of your Internet service contract to see if your Internet Service Provider prevents multiple terminals connecting at the same time.
Cannot use Easy connect (WPS) to connect to the Access Point.
- Connect the unit to the Access Point using Scan or Manual entry mode. If the Access Point’s security mode is set to WEP*, change the setting to WPA or WPA2 (recommended), then try Easy connect (WPS) again. (For Access Point configuration, please consult its user manual or manufacturer.) * WEP is not recommended to be used due to its Major security flaws. Change the Security protocol on the wireless router to WPA or WPA2 (recommended) mode.
Folder or files stored on DLNA home media server are not displayed in the file list or cannot be played back.
- Check the setting on your home media server. (Refer to the user manual of the home media server.)
- Check the network connection and settings.
Cannot use Film Fresh feature.
- Film Fresh is available only in the United States.
- Check if the network connection is properly made.
Cannot use Pandora feature.
- Check if the network connection is properly made.
- Pandora is available only in the United States.
- You must create a Pandora account and activate this unit. Activating Pandora ➟ p.48
The audio of Internet radio station interrupted.
- vTuner server, station or the Internet connection is busy. The bit rate of the station is high.
Cannot play back Internet radio.
- Check if the network connection is properly made.
- Check the firewall setting of the modem or router.
- For some stations, playback is not available on this unit.
The quality of the Internet radio audio is poor or noise occurs during playback of Internet station.
- The bit rate of the station is low.
Cannot get into the PC's screen even the Philips Wirelessconnect is launched.
- Make sure if the network connection is connected properly.
- Check if your PC runs Philips Wirelessconnect.
- Make sure your TV and PC are connected on the same network.
I have a 1.8GHz CPU but Wirelessconnect does not work on my PC.
- For smooth operation of your PC while Philips Wirelessconnect is running you need a mainstream dual core processor from Intel® or AMD. Intel® : Core™2 Duo or Core™ i3/5/7 @ 1.8GHz or higher. AMD : Athlon™ II X2, Turion™ II Dual-Core or Phenom™ X2 @ 2GHz or higher
Note
- The LCD screen is manufactured to provide many years of useful life. Occasionally a few non active pixels may appear as a fixed point of blue, green or red. This is not to be considered a defect in the LCD screen.
- Some functions are not available in specific modes, but this is not a malfunction. Read the description in this User Manual for more details on correct operations.