25-in-1 Rice & Multi-Cooker
www.groupseb.com
EN
ID
ZH
15
6
8
2
3
4
16
13
12
10
11
14
15
9
7
13a
12a
13e
12d
12b
12e
12c
12f
12g
13b
13f
13c
13g
13d
13h
15
6
8
2
3
4
16
13
12
10
11
14
15
9
7
13a
12a
13e
12d
12b
12e
12c
12f
12g
13b
13f
13c
13g
13d
13h
5 6 7
12
13 14 15 16
a
b
17
a
b
18 19
1 2 3
MAX.
10 cups
8
9 1110
10 cups
MAX.
4

5
EN
5 6 7
12
13 14 15 16
a
b
17
a
b
18 19
1 2 3
MAX.
10 cups
8
9 1110
10 cups
MAX.
4
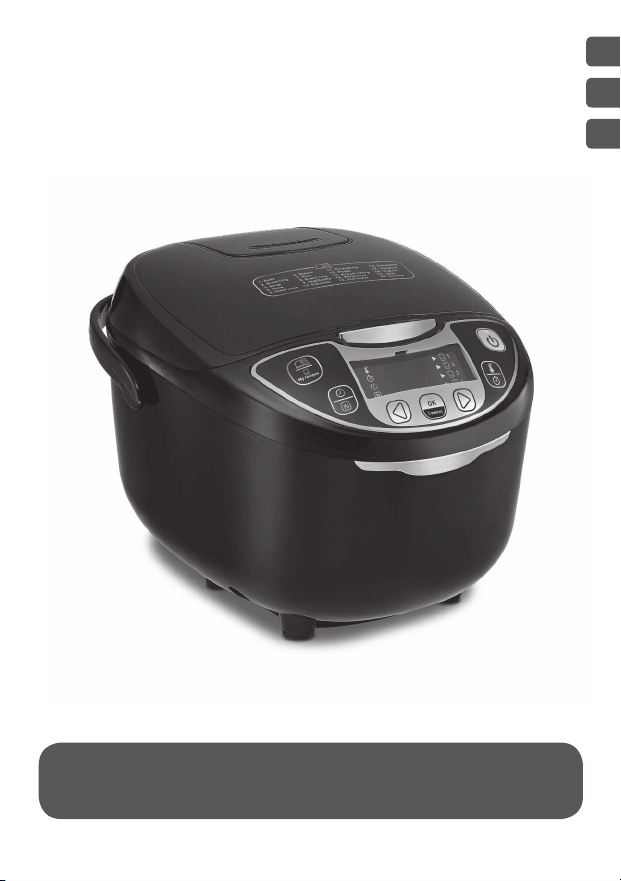
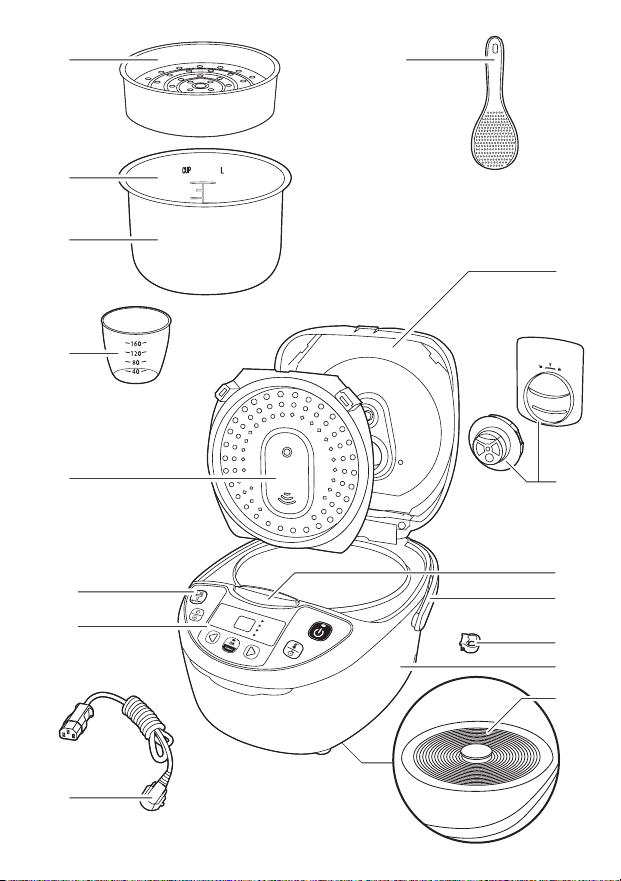
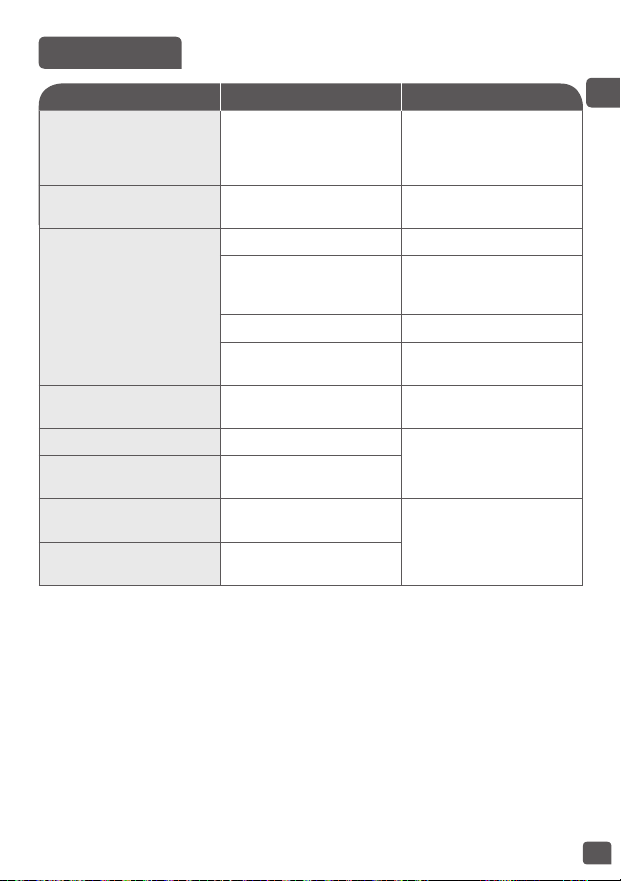
DESCRIPTION
BEFORE THE FIRST USE
1 Steam basket
2 Measurements for water and rice
3 Removable ceramic bowl
4 Measuring cup
5 Rice spoon
6 Lid
7 Removable inner steam shield
8 Micro pressure valve
9 Lid opening button
10 Handle
11 Rice spoon holder
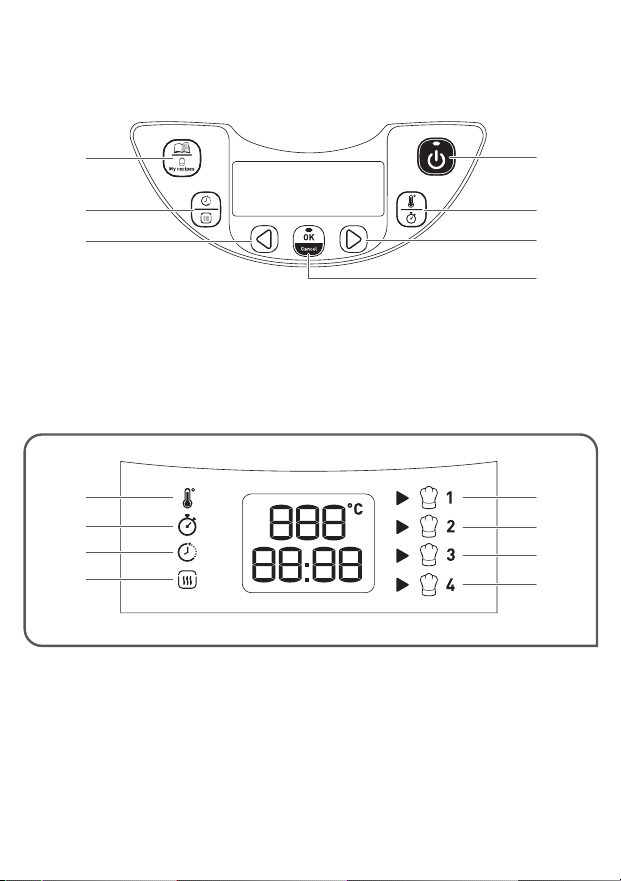
12 Control panel
a “MENU/MY RECIPES” key
b “DELAYED START/KEEP
WARM” key
c “<” key - time decrease
d “START/STOP” key
e “TIME/TEMPERATURE” key
f “>” key - time increase
g “OK/CANCEL” key
13 Display indicators
a “TEMPERATURE” indicator
b “TIME” indicator
c “DELAYED START” indicator
d “KEEP WARM” indicator
e “DIY 1” indicator
f “DIY 2” indicator
g “DIY 3” indicator
h “DIY 4” indicator
14 Housing
15 Heating element
16 Power cord
Unpack the appliance
• Remove the appliance from the packaging and unpack all the accessories
and printed documents.
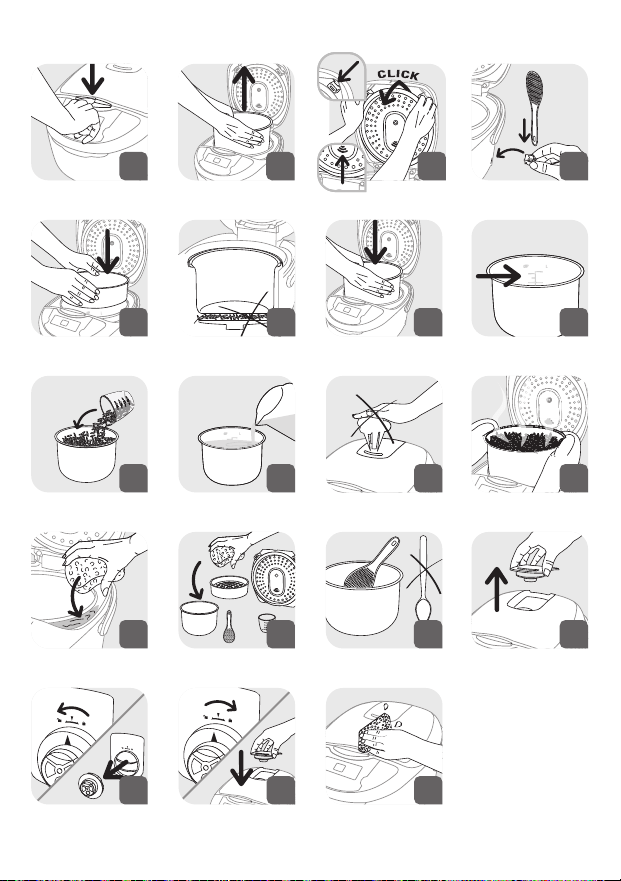
• Open the lid by pushing the opening button located on the housing –
fig.1.
Read the instructions and carefully follow the operating method.
Clean the appliance
• Remove the ceramic bowl – fig.2, the steam shield and the pressure
valve – fig.3a and 3b.
• Clean the bowl, the valve and the steam shield with a sponge and
dishwashing liquid.
• Wipe the outside of the appliance and the lid with a damp cloth.
• Dry off carefully.
• Put all the elements back in their original position. Install the steam
shield in the right positions on the top lid of machine. Then, put the
steam shield behind the 2 ribs and push it on the top until it’s fixed.
Install the detachable cord into the socket on the cooker base.
• Insert the spoon holder on the base of the appliance – fig.4.

6
THE APPLIANCE
PREPARATION BEFORE COOKING
• This multicooker is equipped with 25 cooking programs: Bake, Browning,
Soup, Stew, Slow Cook, Steam, Rice, Sushi Rice, Risotto, Oatmeal,
Dumpling, Pasta, Bread Rising, Baby Food, Sterilizer, Omelette, Dessert,
Yogurt, Jam and Reheat. The multicooker also features an adjustable
timer and delayed start.
• When the power cord is installed into the power outlet and into the
socket on the cooker base, the appliance will ring a long sound “Beep”,
all the indicators on the control panel will light up for an instant. Then
the screen display will show “--”, all the indicators will switch off. The
appliance enters into standby mode, you can select the menu functions
as you wish.
• At the end of the cooking period, the appliance will automatically
switch over to keep warm which will last up to 24h (depending on the
functions).
• Do not touch the heating element when the product is connected or
after cooking.
• Do not carry the product in use or just after cooking.
• This appliance is only intended for indoor use.
• Start/Stop button function. Press the button once for a short time
to stop the cooking process but leave the machine on for additional
cooking or Keep Warm. Hold the button down to completely turn off the
appliance if all cooking is complete.
Measuring the ingredients - Max capacity of the bowl
• The measurement markings on the inside of the bowl are given in cups,
these are used for measuring the amount of water when cooking rice.
• The plastic measuring cup provided with your appliance is for measuring
rice and not water. 1 level measuring cup of rice weighs about 150 g.
• Users may reduce or increase water according to types of rice and their
preference of taste.
• As the voltage varies in different areas, slight spillover of rice and water
is a normal phenomenon.
• The maximum quantity of water + rice should not exceed the highest
mark inside the bowl.
Never add ingredients or water higher than the highest level mark.

7
EN
When cooking rice
• Before cooking, measure the rice with measuring cup and rinse the rice.
• Put the rinsed rice into the bowl and fill it with water to the corresponding
water level (The measurements in cups).
• The water quantity can be adjusted depending on your taste.
When steam cooking
• The quantity of water must be appropriate and always be lower than
the steam basket bottom. Do not exceed the marking “ ” indicate in
the bowl.
• Exceeding this level may cause overflows during use.
• Place the steam basket onto the bowl – fig.5.
• Add the ingredients in the basket.
FOR ALL FUNCTIONS
• Carefully wipe the outside of the bowl (especially the bottom). Make
sure that there are no foreign residues or liquid underneath the bowl
and on the heating element – fig.6.
• Place the bowl into the appliance, making sure that it is correctly
positioned – fig.7.
• Make sure that the steam shield is correctly in position.
• Close the lid in place with a “click” sound.
• Plug the power cord into the socket on the base and then plug the other
end of the power cord into the power outlet.
• Do not switch on the appliance until all the above stages have been
completed.
Never place your hand on the steam vent during cooking, as there is a
danger of burns – fig.11.
• You can cancel sound beeps by a long press on “Menu” key. All the beeps
are cancelled except the one for start and end cooking. To reactivate
sounds, have again a long press on “Menu” key.
If you wish to change the selected cooking menu because of an error,
press “OK/CANCEL” key and re-choose the menu you want.
• The cooking time table gives you all the information for each function
(time, automatic keep warm, delayed start, lid position ...)
Only use the inner bowl provided with the appliance.
Do not pour water or put ingredients in the appliance without the
bowl inside.
Never use reheat or keep warm menu to defrost food.

8
FC22+ 25 in 1
Programs
Cooking Time Delayed Start Temperature Lid Position
Automatic
Keep Warm
Automatic Manuel Default Range Adjustable Range Adjustable Default Range (°C) Closed Open
1 Bake 1 45 min 5min - 4 h 5 min Cooking time ~ 24 h 5 min 150 - • •
2 Browning 1 15 min 5min - 90min 1 min - - 160 - • • •
3 Soup 1 1 h 5min - 3 h 5 min Cooking time ~ 24 h 5 min 100 - • •
4 Stew Stew/Beans 1 h20 min 20min - 9 h 5 min Cooking time ~ 24 h 5 min 100 - • •
5 Slow cook 1 4 h 20min - 9 h 5 min Cooking time ~ 24 h 5 min 90 - • •
6 Steam 1 30 min 5min - 3 h 5 min Cooking time ~ 24 h 5 min 100 - • •
7 Rice 1 Automatic Automatic - Cooking time ~ 24 h 5 min Automatic - • •
8 Sushi rice 1 Automatic Automatic - Cooking time ~ 24 h 5 min Automatic - • •
9 Pilaf/Risotto 1 Automatic Automatic - Cooking time ~ 24 h 5 min Automatic - • •
10 Oatmeal 1 20 min 5min - 2 h 1 min Cooking time ~ 24 h 5 min 100 - • • •
11 Dumpling
Boiling/
Dumpling
15 min 1min - 3 h 5 min - - 100 - • •
12 Pasta 1 12 min 1min - 3 h 1 min - - 100 - • •
13 Bread rising 1 1 h 5min - 9 h 5 min - - 40 - •
14 Baby food 1 45 min 5min - 2 h 5 min Cooking time ~ 24 h 5 min 100 - • • 1 h max
15 Sterilizer 1 1 h 5min - 3 h 5 min Cooking time ~ 24 h 5 min 100 - •
16 Omelette 1 15 min 5min - 1 h 1 min Cooking time ~ 24 h 5 min 160 - • • •
17 Dessert 1 50 min 5min - 2 h 5 min Cooking time ~ 24 h 5 min 150 - •
18 Yogurt 1 8 h 1 h - 24 h 30 min - - 38 - •
19 Jam 1 1 h 5min - 3 h 5 min Cooking time ~ 24 h 5 min 105 - •
20 Reheat 1 20 min 5min - 1 h 1 min - - 100 - • •
21 Keep warm 1 - - - - - 75 - • •
22-
25
My recipes 4 30 min
1min - 9 h
1 min - - 100
40-100 • • •
1min - 2 h 110-160 • • •

9
EN1 - BAKE FUNCTION
2 - BROWNING FUNCTION
• Press “Menu” key to enter into menu selection. Then press “<” or “>” key
to choose the menu number 1 and press “OK” to validate your choice.
• The default cooking time flickers on the screen, you can adjust your
cooking time by pressing “< “or “>” key. Then press “OK” or “Start” key to
start the cooking.
• The multicooker enters into “Bake” cooking status. The lights of “Start”
and “OK” light up, the appliance sounds a beep and the screen displays
the remaining time.
• At the end of cooking, the buzzer will beep three times, the multicooker
will enter keep warm status, the “Keep Warm” indicator appears on the
display and the screen display the keep warm time. The lights of “OK”
and “Start” are lighting during keep warm.
• To stop the keep warm, press “Start/Stop” key. You can also cancel the
keep warm by a long press on “OK/Cancel” key.
Note: Always use this function with oil and food. With oil only, it may
cause a failure or danger.
• Press “Menu” key to enter into menu selection. Then press “<” or “>” key
to choose the menu number 2 and press “OK” to validate your choice.
• The default cooking time flickers on the screen, you can adjust your
cooking time by pressing “< “or “>” key. Then press “OK” or “Start” key to
start the cooking.
• The multicooker enters into “Browning” cooking status. The lights of
“Start” and “OK” light up, the appliance sounds a beep and the screen
displays the remaining time.
• At the end of cooking, the buzzer will beep three times, the multicooker
will enter keep warm status, the “Keep Warm” indicator appears on the
display and the screen display the keep warm time. The lights of “OK”
and “Start” are lighting during keep warm.
• To stop the keep warm, press “Start/Stop” key. You can also cancel the
keep warm by a long press on “OK/Cancel” key.
• It is important to make sure that the inner steam shield is well dried
and that there is no residue of water in the joint to avoid any risk of
projection or explosion of hot oil during the close of the lid.
• Use 2 or 3 soup spoon of oil maximum.

10
3 - SOUP FUNCTION
4 - STEW FUNCTION
• Press “Menu” key to enter into menu selection. Then press “<” or “>” key
to choose the menu number 3 and press “OK” to validate your choice.
• The default cooking time flickers on the screen, you can adjust your
cooking time by pressing “< “or “>” key. Then press “OK” or “Start” key to
start the cooking.
• The multicooker enters into “Soup” cooking status. The lights of “Start”
and “OK” light up, the appliance sounds a beep and the screen displays
the remaining time.
• At the end of cooking, the buzzer will beep three times, the multicooker
will enter keep warm status, the “Keep Warm” indicator appears on the
display and the screen display the keep warm time. The lights of “OK”
and “Start” are lighting during keep warm.
• To stop the keep warm, press “Start/Stop” key. You can also cancel the
keep warm by a long press on “OK/Cancel” key.
• Press “Menu” key to enter into menu selection. Then press “<” or “>” key
to choose the menu number 4 and press “OK” to validate your choice.
• The default cooking time flickers on the screen, you can adjust your
cooking time by pressing “< “or “>” key. Then press “OK” or “Start” key to
start the cooking.
• The multicooker enters into “Stew” cooking status. The lights of “Start”
and “OK” light up, the appliance sounds a beep and the screen displays
the remaining time.
• At the end of cooking, the buzzer will beep three times, the multicooker
will enter keep warm status, the “Keep Warm” indicator appears on the
display and the screen display the keep warm time. The lights of “OK”
and “Start” are lighting during keep warm.
• To stop the keep warm, press “Start/Stop” key. You can also cancel the
keep warm by a long press on “OK/Cancel” key.

11
EN5 – SLOW COOK FUNCTION
6 – STEAM FUNCTION
• Press “Menu” key to enter into menu selection. Then press “<” or “>” key
to choose the menu number 5 and press “OK” to validate your choice.
• The default cooking time flickers on the screen, you can adjust your
cooking time by pressing “< “or “>” key. Then press “OK” or “Start” key to
start the cooking.
• The multicooker enters into “Slow Cook” cooking status. The lights of
“Start” and “OK” light up, the appliance sounds a beep and the screen
displays the remaining time.
• At the end of cooking, the buzzer will beep three times, the multicooker
will enter keep warm status, the “Keep Warm” indicator appears on the
display and the screen display the keep warm time. The lights of “OK”
and “Start” are lighting during keep warm.
• To stop the keep warm, press “Start/Stop” key. You can also cancel the
keep warm by a long press on “OK/Cancel” key.
• Press “Menu” key to enter into menu selection. Then press “<” or “>” key to
choose the menu number 6 and press “OK” to validate your choice.
• The default cooking time flickers on the screen, you can adjust your
cooking time by pressing “< “or “>” key. Then press “OK” or “Start” key to
start the cooking.
• The multicooker enters into “Steam” cooking status. The lights of “Start”
and “OK” light up, the appliance sounds a beep and the screen displays
the remaining time.
• At the end of cooking, the buzzer will beep three times, the multicooker
will enter keep warm status, the “Keep Warm” indicator appears on the
display and the screen display the keep warm time. The lights of “OK”
and “Start” are lighting during keep warm.
• To stop the keep warm, press “Start/Stop” key. You can also cancel the
keep warm by a long press on “OK/Cancel” key.
Note : the level of water indicated in the bowl allows a steam cooking
for 1 hour maximum. If you need to cook longer, it is necessary to put
more water in the bowl.
12
7 – RICE FUNCTION
8 – SUSHI RICE FUNCTION
• Pour the required quantity of rice into the bowl using the measuring cup
provided – fig.9. Then fill with cold water up to the corresponding “CUP”
mark printed in the bowl – fig.10.
• Close the lid.
Note: Always add the rice first otherwise you will have too much water.
• Press “Menu” key to enter into menu selection. Then press “<” or “>” key
to choose the menu number 7 and press “OK” to validate your choice.
• Then press “OK” or “Start” key to start the cooking.
• The multicooker enters into “Rice” cooking status. The lights of “Start”
and “OK” light up. The appliance sounds a beep and the screen displays
.
• At the end of cooking, the buzzer will beep two times, the multicooker
will start to simmer and the screen will count down the simmering time.
• At the end of simmering, the buzzer will beep three times, the multicooker
will enter keep warm status, the “Keep Warm” indicator appears on the
display and the screen display the keep warm time. The lights of “OK”
and “Start” are lighting during keep warm.
• To stop the keep warm, press “Start/Stop” key. You can also cancel the
keep warm by a long press on “OK/Cancel” key.
• Press “Menu” key to enter into menu selection. Then press “<” or “>” key
to choose the menu number 8 and press “OK” to validate your choice.
• Then press “OK” or “Start” key to start the cooking.
• The multicooker enters into “Sushi Rice” cooking status. The lights of
“Start” and “OK” light up. The appliance sounds a beep and the screen
displays .
• At the end of cooking, the buzzer will beep two times, the multicooker
will start to simmer and the screen will count down the simmering time.
• At the end of simmering, the buzzer will beep three times, the multicooker
will enter keep warm status, the “Keep Warm” indicator appears on the
display and the screen display the keep warm time. The lights of “OK”
and “Start” are lighting during keep warm.
• To stop the keep warm, press “Start/Stop” key. You can also cancel the
keep warm by a long press on “OK/Cancel” key.

13
EN9 – PILAF / RISOTTO FUNCTION
COOKING RICE TABLES (PROGRAMS 7 / 8 / 9)
• Press “Menu” key to enter into menu selection. Then press “<” or “>” key
to choose the menu number 9 and press “OK” to validate your choice.
• Then press “OK” or “Start” key to start the cooking.
• The multicooker enters into “Pilaf / Risotto” cooking status. The lights of
“Start” and “OK” light up. The appliance sounds a beep and the screen
displays .
• At the end of cooking, the buzzer will beep two times, the multicooker
will start to simmer and the screen will count down the simmering time.
• At the end of simmering, the buzzer will beep three times, the multicooker
will enter keep warm status, the “Keep Warm” indicator appears on the
display and the screen display the keep warm time. The lights of “OK”
and “Start” are lighting during keep warm.
• To stop the keep warm, press “Start/Stop” key. You can also cancel the
keep warm by a long press on “OK/Cancel” key.
• The table below gives a guide to cook different types of rice. For best
results, we recommend using ordinary rice rather than ‘easy cook’ type
of rice which tends to give a stickier rice and may adhere to the base.
With other types of rice, such as brown or wild rice, the quantities of
water need adjustment.
• To cook 1 cup of white rice (serves 2 small or 1 large portion), use 1
measuring cup of white rice and then add one and a half measuring cup
of water. With some types of rice it is normal for a little rice to stick on
the base when cooking 1 cup of rice.
• The maximum quantity of water + rice should not exceed the highest
mark inside the bowl – fig.8. Depending on the type of rice, quantities
of water may need adjustment.
14
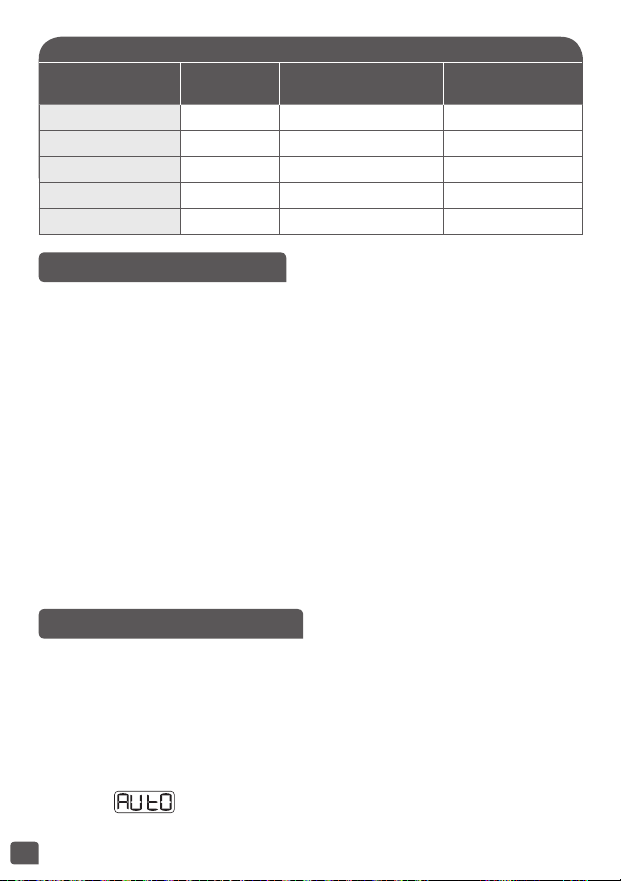
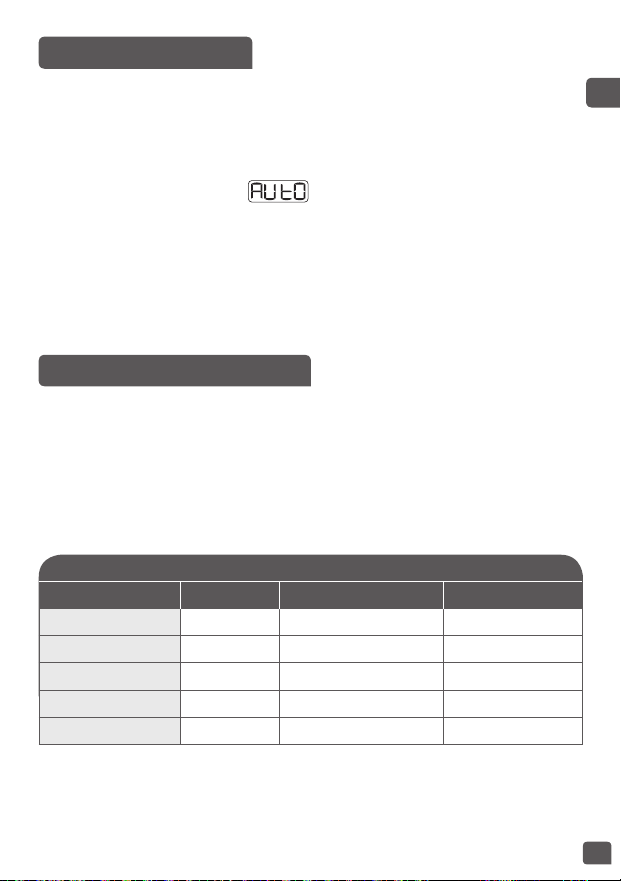
COOKING GUIDE FOR RICE
Rice measurement
in cups
Weight of
rice
Water measurement in
the bowl (+ rice)
Serves
2 300 g 2 cup mark 2pers.-4pers.
4 600 g 4 cup mark 4pers.-8pers.
6 900 g 6 cup mark 6pers.-12pers.
8 1200 g 8 cup mark 8pers.-16pers.
10 1500 g 10 cup mark 10pers.-20pers.
10 – OATMEAL FUNCTION
11 – DUMPLING FUNCTION
• Press “Menu” key to enter into menu selection. Then press “<” or “>” key
to choose the menu number 10 and press “OK” to validate your choice.
• The default cooking time flickers on the screen, you can adjust your
cooking time by pressing “< “or “>” key. Then press “OK” or “Start” key to
start the cooking.
• The multicooker enters into “Oatmeal” cooking status. The lights of
“Start” and “OK” light up, the appliance sounds a beep and the screen
displays the remaining time.
• At the end of cooking, the buzzer will beep three times, the multicooker
will enter keep warm status, the “Keep Warm” indicator appears on the
display and the screen display the keep warm time. The lights of “OK”
and “Start” are lighting during keep warm.
• To stop the keep warm, press “Start/Stop” key. You can also cancel the
keep warm by a long press on “OK/Cancel” key.
• Once the oatmeal is cooked, it should be consumed within 1 hour.
• Press “Menu” key to enter into menu selection. Then press “<” or “>” key
to choose the menu number 11 and press “OK” to validate your choice.
• The default cooking time flickers on the screen, you can adjust your
cooking time by pressing “< “or “>” key. Then press “OK” or “Start” key to
start the cooking.
• The multicooker enters into “Dumpling” cooking status. The lights of
“Start” and “OK” light up, the appliance sounds a beep and the screen
displays during the boiling phase. The lid should remain closed
during this step.
15
EN
12 – PASTA FUNCTION
• Press “Menu” key to enter into menu selection. Then press “<” or “>” key
to choose the menu number 12 and press “OK” to validate your choice.
• The default cooking time flickers on the screen, you can adjust your
cooking time by pressing “< “or “>” key. Then press “OK” or “Start” key to
start the cooking.
• The multicooker enters into “Pasta” cooking status. The lights of “Start”
and “OK” light up, the appliance sounds a beep and the screen displays
during the boiling phase. The lid should remain closed during
this step.
• When the water is boiling, the multicooker beeps five times, it indicates
you that you have to add the pasta. Open the lid and put the pasta
inside the bowl.
• Let the lid open and press “OK” or “Start” key to start the Pasta cooking.
The lights of “Start” and “OK” light up, the appliance sounds a beep and
the screen displays the remaining time.
• At the end of cooking, the buzzer will beep three times.
• There is no keep warm for Pasta function.
Warning : the lid must be open during pasta cooking.
• When the water is boiling, the multicooker beeps five times, it indicates
you that you have to add the dumpling. Open the lid and put the
dumpling inside the bowl.
• Let the lid open and press “OK” or “Start” key to start the Dumpling
cooking. The lights of “Start” and “OK” light up, the appliance sounds a
beep and the screen displays the remaining time.
• At the end of cooking, the buzzer will beep three times.
• There is no keep warm for Dumpling function.
Warning : the lid must be open during dumpling cooking.

16
13 – BREAD RISING FUNCTION
• Press “Menu” key to enter into menu selection. Then press “<” or “>” key
to choose the menu number 13 and press “OK” to validate your choice.
• The default cooking time flickers on the screen, you can adjust your
cooking time by pressing “< “or “>” key. Then press “OK” or “Start” key to
start the cooking.
• The multicooker enters into “Bread Rising” cooking status. The lights of
“Start” and “OK” light up, the appliance sounds a beep and the screen
displays the remaining time.
• At the end of cooking, the buzzer will beep three times.
• There is no keep warm for Bread Rising function.
14 – BABY FOOD FUNCTION
• Press “Menu” key to enter into menu selection. Then press “<” or “>” key
to choose the menu number 14 and press “OK” to validate your choice.
• The default cooking time flickers on the screen, you can adjust your
cooking time by pressing “< “or “>” key. Then press “OK” or “Start” key to
start the cooking.
• The multicooker enters into “Baby Food” cooking status. The lights of
“Start” and “OK” light up, the appliance sounds a beep and the screen
displays the remaining time.
• At the end of cooking, the buzzer will beep three times, the multicooker
will enter keep warm status, the “Keep Warm” indicator appears on the
display and the screen display the keep warm time. The lights of “OK”
and “Start” are lighting during keep warm.
• To stop the keep warm, press “Start/Stop” key. You can also cancel the
keep warm by a long press on “OK/Cancel” key.
• For Food safety reason, only 1 hour of keep warm is available.
Note : Once the baby food is cooked, it should be consumed within 1
hour.

17
EN15 – STERILIZER FUNCTION
• Press “Menu” key to enter into menu selection. Then press “<” or “>” key
to choose the menu number 15 and press “OK” to validate your choice.
• The default cooking time flickers on the screen, you can adjust your
cooking time by pressing “< “or “>” key. Then press “OK” or “Start” key to
start the cooking.
• The multicooker enters into “Sterilizer” cooking status. The lights of
“Start” and “OK” light up, the appliance sounds a beep and the screen
displays the remaining time.
• At the end of cooking, the buzzer will beep three times.
• There is no keep warm for sterilizer function.
• Baby bottles and containers must be previously filled with water before
bed them in the bowl to avoid the formation of air bubbles which could
alter the sterilization.
16 – OMELETTE FUNCTION
• Press “Menu” key to enter into menu selection. Then press “<” or “>” key
to choose the menu number 16 and press “OK” to validate your choice.
• The default cooking time flickers on the screen, you can adjust your
cooking time by pressing “< “or “>” key. Then press “OK” or “Start” key to
start the cooking.
• The multicooker enters into “Omelette” cooking status. The lights of
“Start” and “OK” light up, the appliance sounds a beep and the screen
displays the remaining time.
• At the end of cooking, the buzzer will beep three times, the multicooker
will enter keep warm status, the “Keep Warm” indicator appears on the
display and the screen display the keep warm time. The lights of “OK”
and “Start” are lighting during keep warm.
• To stop the keep warm, press “Start/Stop” key. You can also cancel the
keep warm by a long press on “OK/Cancel” key.

18
17 – DESSERT FUNCTION
• Press “Menu” key to enter into menu selection. Then press “<” or “>” key
to choose the menu number 17 and press “OK” to validate your choice.
• The default cooking time flickers on the screen, you can adjust your
cooking time by pressing “< “or “>” key. Then press “OK” or “Start” key to
start the cooking.
• The multicooker enters into “Dessert” cooking status. The lights of
“Start” and “OK” light up, the appliance sounds a beep and the screen
displays the remaining time.
• At the end of cooking, the buzzer will beep three times.
• There is no keep warm for Dessert function.
18 – YOGURT FUNCTION
• Press “Menu” key to enter into menu selection. Then press “<” or “>” key
to choose the menu number 18 and press “OK” to validate your choice.
• The default cooking time flickers on the screen, you can adjust your
cooking time by pressing “< “or “>” key. Then press “OK” or “Start” key to
start the cooking.
• The multicooker enters into “Yogurt” cooking status. The lights of “Start”
and “OK” light up, the appliance sounds a beep and the screen displays
the remaining time.
• At the end of cooking, the buzzer will beep three times.
• There is no keep warm for Yogurt function.
• Oven-proof glass containers can be used in the multicooker when
making yogurt.

19
ENCHOICE OF INGREDIENTS FOR YOGURT
Milk
What milk should you use?
All our recipes (unless otherwise stated) are prepared using cow’s milk. You
can use plant milk such as soy milk for example as well as sheep or goat’s
milk but, in this case, the firmness of the yogurt may vary depending on
the milk used. Raw milk or long-life milks and all the milks described below
are suitable for your appliance:
• Long-life sterilized milk: UHT whole milk results in firmer yogurt. Using
semi-skimmed milk will result in less firm yogurt. However, you can use
semi-skimmed milk and add one or two tablespoons of powdered milk.
• Pasteurized milk: this milk gives a more creamy yogurt with a little bit
of skin on the top.
• Raw milk (farm milk): this must be boiled. It is also recommended to
let it boil for a long time. It would be dangerous to use this milk without
boiling it. You must then leave it to cool before using it in your appliance.
Culturing using yogurt prepared with raw milk is not recommended.
• Powdered milk: using powdered milk will result in very creamy yogurt.
Follow the instructions on the manufacturer’s box.
Choose a whole milk, preferably long-life UHT.
Raw (fresh) or unpasteurized milk must be boiled then cooled and
needs the skin removing.

20
The ferment
For yogurt
This is made either from:
• One shop-bought natural yogurt with the longest expiration date
possible; your yogurt will therefore contain more active ferment for a
firmer yogurt.
• From a freeze-dried ferment. In this case, follow the activation time
specified on the ferment instructions. You can find these ferments in
supermarkets, pharmacies and in certain health product stores.
• From one of your recently prepared yogurt – this must be natural and
recently prepared. This is called culturing. After five culturing processes,
the used yogurt loses active ferments and therefore risks giving a less
firm consistency. You then need to start again using a store bought
yogurt or freeze-dried ferment.
If you have boiled the milk, wait until it has reached room temperature
before adding the ferment.
Too high a heat may destroy the properties of your ferment.
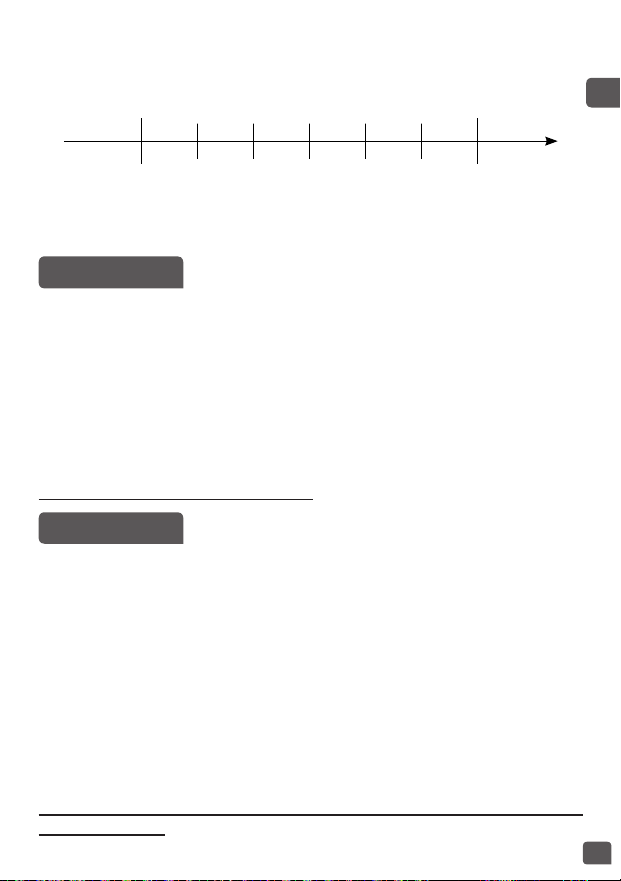
Fermentation time
• Your yogurt will need between 6 and 12 hours of fermentation,
depending on the basic ingredients and the result you want to achieve.
Liquidity
6h 7h 8h 9h 10h 11h 12h
Sweet Acidic
Firm
• Once the yogurt cooking process is finished, the yogurt should be placed
in a refrigerator for at least 4 hours and it can be kept max 7 days in
refrigerator.

21
EN19 – JAM FUNCTION
20 – REHEAT FUNCTION
• Press “Menu” key to enter into menu selection. Then press “<” or “>” key
to choose the menu number 19 and press “OK” to validate your choice.
• The default cooking time flickers on the screen, you can adjust your
cooking time by pressing “< “or “>” key. Then press “OK” or “Start” key to
start the cooking.
• The multicooker enters into “Jam” cooking status. The lights of “Start”
and “OK” light up, the appliance sounds a beep and the screen displays
the remaining time.
• At the end of cooking, the buzzer will beep three times.
• There is no keep warm for Jam function.
Warning : the lid must be open during jam cooking.
• Press “Menu” key to enter into menu selection. Then press “<” or “>” key
to choose the menu number 20 and press “OK” to validate your choice.
• The default cooking time flickers on the screen, you can adjust your
cooking time by pressing “< “or “>” key. Then press “OK” or “Start” key to
start the cooking.
• The multicooker enters into “Baby Food” cooking status. The lights of
“Start” and “OK” light up, the appliance sounds a beep and the screen
displays the remaining time.
• At the end of cooking, the buzzer will beep three times, the multicooker
will enter keep warm status, the “Keep Warm” indicator appears on the
display and the screen display the keep warm time. The lights of “OK”
and “Start” are lighting during keep warm.
• To stop the keep warm, press “Start/Stop” key. You can also cancel the
keep warm by a long press on “OK/Cancel” key.
Repeat use of “reheating” in case of excessive rice or too little rice
during cooking will result in burnt rice at the bottom.
Reheating cold rice may cause a burnt smell.
Never use reheat function to defrost food.

22
MY RECIPES FUNCTION (DIY)
“My recipe” function has been developed to remember your favourite
cooking choices.
• Press “My recipes” key 2 times to enter into DIY menu. The indicator
lights red. It is possible to change the DIY program from 1 to 4
by pressing “<” or “>” key.
• The screen displays the default cooking time and the default cooking
temperature. Both can be adjustable for DIY.
• If you want to adjust the default parameters, press on the “Time/
Temperature” key.
• The fist press allow to change the cooking temperature which is
flickering, the temperature indicator is lighting. Press “<” or “>” key to
adjust the cooking temperature. Then press “OK” or “Time/Temperature”
key to validate.
• Then you can change your cooking time which is flickering, the time
indicator is lighting. Adjust your cooking time by pressing “<” or “>” key.
Press “OK” or “Time/Temperature” key to start the cooking.
• The lights of “Start” and “OK” light up, the appliance sounds a beep and
the screen displays the remaining time. The indicator of the selected
DIY is lighting.
• At the end of cooking, the buzzer will beep three times, the multicooker
will enter keep warm status, the “Keep Warm” indicator appears on the
display and the screen display the keep warm time. The lights of “OK”
and “Start” are lighting during keep warm.
If the temperature is under 70°C, the keep warm is not available
If the temperature is up to 70°C, the keep warm is allowed.
• To stop the keep warm, press “Start/Stop” key. You can also cancel the
keep warm by a long press on “OK/Cancel” key.
• The Delayed Start is available only if the setting temperature is higher
than 90°C.

23
ENKEEP WARM FUNCTION
DELAYED START FUNCTION
Manual Keep warm
To start a manual keep warm, press 2 times on the “Keep Warm” key. The
“Keep Warm” indicator appears on the display, the multicooker sounds a
beep and the screen display the keep warm time
Automatic keep warm:
The multicooker will enter “keep warm” status automatically at the end of
the cooking (certain menus are excluded). The multicooker will beep three
times, the multicooker will enter automatically into keep warm status
with the “Keep Warm” indicator turning on and the screen will display the
keep warm time.
To cancel an automatic keep warm cycle, press the “Keep Warm” key
for 5 consecutive seconds, the appliance will sound a long beep. The
keep warm indicator will flicker 3 times and lights off.
To resume the keep warm process press the “Keep Warm” key again
for 5 consecutive seconds, the appliance will sound a long beep. The
keep warm indicator will flicker 3 times and lights off.
• The delayed start time corresponds to the time for end of cooking.
• To use the delayed start function, choose a cooking program and the
cooking time first (certain menus are excluded). Then press “Delayed
start” key, the multicooker sounds a beep, the” Delayed start” indicator
lights on and the cooking time is flickering.
• The default preset time will change depending on the selected cooking
time.
• Press the “>” button to increase the time. Press “OK” key to validate. The
multicooker sounds a beep and the “Delayed Start” indicator will remain
on the display. The lights of “Start” and “OK” light on and the time start
to decrease.
• When the timer achieve to the cooking time, the “Delayed start”
indicator turns off and the “Time” indicator lights on. The multicooker
beeps three times, the lights of “Start” and “OK” light on and the screen
displays the remaining cooking time.

24
ON COMPLETION OF COOKING
MISCELLANEOUS INFORMATION
CLEANING AND MAINTENANCE
• Open the lid – fig.1.
• Use a pot holder or oven mitt to remove the cooking bowl and steam
tray - fig.12.
• Serve food using the plastic spoon provided with your appliance.
• Food will keep warm for up to 24 hours.
• Press “Keep Warm/Cancel” key to finish the keep warm status.
• Unplug the appliance.
• The appliance has a memory function. In case of power failure, the
multicooker will memorize the cooking state right before the failure,
and it will continue the cooking process if the power is resumed within
2 seconds. If the power failure lasts for more than 2 seconds, the
multicooker will cancel previous cooking and return to standby status.
• Please do not open the lid during cooking in order to ensure the cooking
efficiency.
• Always make sure the multicooker is unplugged and completely cooled
down before cleaning and maintenance.
• It is strongly advised to clean the appliance after each use with a
sponge – fig.13.
Bowl, steam basket (fig.14)
• Use hot water and dishwashing soap and a sponge to clean the bowl
and the steam basket. Scouring powders and metal sponges are not
recommended.
• If food is stuck to the bottom, you may put water in the bowl to soak for
a while before washing.
• Dry the bowl carefully.
• The bowl and the steam basket are also dishwasher safe.

25
EN
Taking care of the bowl
• For the bowl, carefully follow the instructions below:
• To ensure the maintenance of bowl quality, it is recommended not to
cut food in it.
• Make sure you put the bowl back into the multicooker.
• Use the plastic spoon provided or a wooden spoon and not a metal type
so as to avoid damaging the bowl surface – fig.15.
• To avoid any risk of corrosion, do not pour vinegar into the bowl.
• The color of the bowl surface may change after using for the first time or
after longer use. This change in color is due to the action of steam and
water and does not have any effect on the use of the multicooker, nor is it
dangerous for your health. It is perfectly safe to continue using it.
Cleaning the micro pressure valve
• When cleaning the micro-pressure valve, remove it from the lid – fig.16
and open it by rotating in the direction of “open” – fig.17a and 17b.
After cleaning it, wipe it dry and meet the two triangle in the two parts
together and rotate it in the direction of “close”, then put it back on the
lid of the multicooker – fig.18a and 18b.
Cleaning and care of the other parts of the appliance
• Unplug the appliance before cleaning.
• Clean the outside of the multicooker – fig.19, the inside of the lid –
fig.14 and the cord with a damp cloth and wipe dry. Do not use abrasive
products.
• Do not use water to clean the interior of the appliance body as it could
damage the heat sensor.

26
Remark: if inner bowl is deformed, do not use it anymore and get a
replacement from the authorized service center.
TECHNICAL TROUBLESHOOTING GUIDE
Malfunction description Causes Solutions
Any indicator light is off
and no heat.
Appliance is not plugged in.
Plug in appliance. If the
lights still don’t come on
and there is no heat then
send the appliance to an
authorized service center
for repair.
An indicator light is off but
the appliance is heating.
Indicator light damaged.
Send to authorized service
center for repair.
Abnormal steam leakage
during use.
Lid is not closed well.
Open and close again
the lid.
Micro pressure valve not
well positioned.
Stop cooking (unplug the
product) and check that
the valve is secure (2 parts
locked together) and well
positioned.
Lid or micro pressure valve
gasket is damaged.
Send to authorized service
center for repair.
The steam shield is
incorrectly positioned.
Remove and insert the
steam shield in correct
position, re-start cooking.
Rice is half cooked or takes
too long to cook.
Too much or not enough
water compared to rice
quantity.
Refer to table for water
quantity.
Rice half cooked or takes
too long too cook.
Not sufficiently simmered.
Send to the authorized
service center for repair.
Automatic keep warm fails
(product stays in cooking
program, or no heating).
E0
The sensor on the top
circuit is open or there is a
short circuit
Stop the appliance and
restart the program. If the
problem repeats, please
send to the authorized
service center for repair.
E1
The sensor on the bottom
circuit is open or there is a
short circuit.

27
ZH
描述
初次使用前
1 蒸盤
2 水量和米量刻度
3 可拆式陶瓷內鍋
4 量杯
5 飯勺
6 煲蓋
7 可拆式蒸汽隔
8 微壓閥
9 開蓋按鈕
10 手挽
11 飯勺架
12 控制板
a 「MENU/MY RECIPES」
(選單/我的食譜)鍵
b 「DELAYED START/KEEP
WARM」(延遲開始/
保溫)鍵
c 「<」鍵 - 減少時間
d 「START/STOP」(開始/
停止)鍵
e 「TIME/
TEMPERATURE」(時間/
溫度)鍵
f 「>」鍵 - 增加時間
g 「OK/CANCEL」
(OK/取消)鍵
13 螢幕指示燈
a 「TEMPERATURE」
(溫度指示)指示燈
b 「TIME」(時間)指示燈
c 「DELAYED START」
(延遲開始)指示燈
d 「KEEP WARM」
(保溫)指示燈
e 「DIY 1」(自訂1)指示燈
f 「DIY 2」(自訂1)指示燈
g 「DIY 3」(自訂1)指示燈
h 「DIY 4」(自訂1)指示燈
14 外殼
15 發熱元件
16 電源線
拆開包裝
• 拆開包裝,取出電飯煲,並取出所有配件及印刷品。
• 按下煲外的開蓋按鈕,打開煲蓋– 圖1。
小心閱讀以下指引,並按照所示方法操作。
清洗電飯煲
• 拆出陶瓷內鍋 - 圖2、蒸汽隔及微壓閥圖3a及3b。
• 用海綿及洗潔精清洗內鍋、微壓閥及蒸汽隔。
• 用濕布擦拭機身表面及蓋。
• 小心擦乾。
• 將所有組件放回原位。將蒸汽隔裝在電飯煲頂蓋正確的位置。然後
將蒸汽隔放在兩個勾位後,並向下按直至固定為止。將可拆式電線
插入電飯煲底座插頭。
• 將飯勺架裝在本裝置底部 - 圖4。

28
電飯煲
準備烹調
• 本多功能電飯煲有25種煮食程式﹕焗、煎封、湯羹、炆煮、慢煮、
蒸煮、煮飯、壽司飯、意大利飯、燕麥粥、水餃、意大利麵、麵包
發酵、嬰兒餐、消毒、奄列、甜品、乳酪、果醬、翻熱。本多功能
電飯煲亦有定時器及延遲開始功能。
• 當電源線接上電源以及煲底的插座後,本裝置會發出一聲長「嗶」
,然後控制板上所有指示燈都會亮起一段時間。然後螢幕會顯示
「--」,所有指示燈熄滅。本裝置會進入待機模式,你可以按喜好
選擇選單上的功能。
• 烹調時間結束時,本裝置會自己轉至保溫模式,並維持24小時(視
乎功能)。
• 插上電源或烹調完成後,請勿觸摸電飯煲發熱元件。
• 請勿在烹調進行期間或剛好結束時拿起電飯煲。
• 本產品只適合室內使用。
• 「Start/Stop」(開始/停止)鍵功能。短按按鈕一次,停止烹調程
序,但維持電源,以進行額外烹調或保溫。所有烹調完成後,按住
按鈕,完全關閉本裝置。
量度材料份量 - 內鍋的最高容量
• 內鍋內的刻度以杯為單位。刻度可幫助量度煮飯時的水量。
• 裝置所附的塑膠量杯是用作量度米,並非量度水。一平杯米約重
150克。
• 用家可根據米類以及喜好口味增減水量。
• 由於不同區域的電壓有差異,飯和水可能會輕微濺出,此乃正常現
象。
• 米和水的總量最多不應超過內鍋內側最高水位線。
材料或水切勿超過最高刻度。
煮飯時
• 煮飯前請先用量杯量米,然後洗米。
• 洗好的米放入內鍋,然後加水至相應水位(刻度以杯為單位)
• 水量可按個人喜好調整。
蒸煮時
• 水量必須適當,且須低於蒸籠底高度。切勿超過內鍋所示的「 」
刻度。
• 超過此水平有可能導致操作期間材料溢出。

29
ZH
• 將蒸籠放在內鍋上 - 圖5。
• 將材料放在籠上。
所有功能皆適用的指示
• 小心擦拭內鍋外面部分(特別是底部)。確定內鍋底下或發熱元件上
無任何殘餘食材或液體 - 圖6。
• 將內鍋放進電飯煲,確定位置妥當 - 圖7。
• 確定蒸汽隔已放置妥當。
• 關上煲蓋,確定飯煲有發出一下「咔」聲。
• 電源線插入底部的插座,再將另一端接上電源。
• 除非已完成以上程序,否則切勿開啟飯煲。
切勿在烹調期間將手放近蒸汽排放口,以免燙傷-圖11。
• 長按「Menu」(選單)鍵可取消「嗶」聲。此時除烹調開始及結
束的聲響外,所有「嗶」聲都會取消。長按「Menu」(選單)鍵
可重新啟動「嗶」聲。
如想更改誤選的烹調功能,請按「OK/CANCEL」(OK/取消)鍵,然
後重新選擇你所需的功能。
• 烹調時間表上有每個功能相關的所有資料(時間、自動保溫、延遲
開始、煲蓋位置……)
只可使用隨電飯煲提供的內鍋。
未裝置內鍋前請勿將水或食材放進電飯煲內。
切勿用翻熱或保溫功能解凍食物。

30
FC22+ 25 in 1
程式
烹調時間 延遲開始 溫度 煲蓋位置 自動保溫
自動 手動 預設 範圍 可調校 範圍 可調校 預設 範圍(°C) 關閉 打開
1 焗 1 45 分鐘 5 分鐘 - 4 小時 5 分鐘 烹調時間 ~ 24 小時 5 分鐘 150 - • •
2 煎封 1 15 分鐘 5 分鐘 - 90 分鐘 1 分鐘 - - 160 - • • •
3 湯羹 1 1 小時 5 分鐘 - 3 小時 5 分鐘 烹調時間 ~ 24 小時 5 分鐘 100 - • •
4 炆煮 燉/豆
1 小時 20
分鐘
20分鐘 - 9 小時 5 分鐘 烹調時間 ~ 24 小時 5 分鐘 100 - • •
5 慢煮 1 4 小時 20分鐘 - 9 小時 5 分鐘 烹調時間 ~ 24 小時 5 分鐘 90 - • •
6 蒸煮 1 30 分鐘 5 分鐘 - 3 小時 5 分鐘 烹調時間 ~ 24 小時 5 分鐘 100 - • •
7 煮飯 1 自動 自動 - 烹調時間 ~ 24 小時 5 分鐘 自動 - • •
8 壽司飯 1 自動 自動 - 烹調時間 ~ 24 小時 5 分鐘 自動 - • •
9 肉飯/意大利飯 1 自動 自動 - 烹調時間 ~ 24 小時 5 分鐘 自動 - • •
10 麥片 1 20 分鐘 5 分鐘 - 2 小時 1 分鐘 烹調時間 ~ 24 小時 5 分鐘 100 - • • •
11 水餃
煮食/
水餃
15 分鐘 1 分鐘 - 3 小時 5 分鐘 - - 100 - • •
12 意大利麵 1 12 分鐘 1 分鐘 - 3 小時 1 分鐘 - - 100 - • •
13 麵包發酵 1 1 小時 5 分鐘 - 9 小時 5 分鐘 - - 40 - •
14 嬰兒餐 1 45 分鐘 5 分鐘 - 2 小時 5 分鐘 烹調時間 ~ 24 小時 5 分鐘 100 - • • 1 小時 上限
15 消毒 1 1 小時 5 分鐘 - 3 小時 5 分鐘 烹調時間 ~ 24 小時 5 分鐘 100 - •
16 奄列 1 15 分鐘 5 分鐘 - 1 小時 1 分鐘 烹調時間 ~ 24 小時 5 分鐘 160 - • • •
17 甜品 1 50 分鐘 5 分鐘 - 2 小時 5 分鐘 烹調時間 ~ 24 小時 5 分鐘 150 - •
18 乳酪 1 8 小時 1 小時 - 24 小時 30 小時 - - 38 - •
19 果醬 1 1 小時 5 分鐘 - 3 小時 5 分鐘 烹調時間 ~ 24 小時 5 分鐘 105 - •
20 翻熱 1 20 分鐘 5 分鐘 - 1 小時 1 分鐘 - - 100 - • •
21 保溫 1 - - - - - 75 - • •
22-
25
我的食譜 4 30 小時
1 分鐘 - 9 小時
1 分鐘 - - 100
40-100 • • •
1 分鐘 - 2 小時 110-160 • • •

31
ZH
1 - 焗功能
2 - 煎封功能
• 按「Menu」(選單)鍵進入選單。按「<」或「>」鍵選1號,按
「OK」確認選擇。
• 預設的烹時間會在螢幕上閃動,按「<」或「>」鍵可調校烹調時
間。按「OK」或「Start」(開始)鍵開始烹調。
• 本多功能電飯煲進入「Bake」(焗)烹調狀態。「Start」(開始)
及「OK」燈會亮起,本裝置會發出一聲「嗶」,然後螢幕顯示剩餘
時間。
• 烹調完畢,會有發出三次「嗶」聲,電飯煲會進入保溫狀態,
「Keep Warm」(保溫)指示燈亮起,螢幕會開始計算保溫時間。保
溫期間「OK」及「Start」(開始)指示燈會亮起。
• 按「Start/Stop」(開始/停止)鍵可停止保溫狀態。另外亦可長按
「OK/Cancel」(OK/取消)鍵取消保溫。
注意:使用此功能必須放入油和食物。如只放油,可能會導致功能無
效或發生危險。
• 按「Menu」(選單)鍵進入選單。按「<」或「>」鍵選2號,按
「OK」確認選擇。
• 預設的烹時間會在螢幕上閃動,按「<」或「>」鍵可調校烹調時
間。按「OK」或「Start」(開始)鍵開始烹調。
• 本多功能電飯煲進入「Browning」(煎封)烹調狀態。「Start」
(開始)及「OK」燈會亮起,本裝置會發出一聲「嗶」,然後螢幕
顯示剩餘時間。
• 烹調完畢,會有發出三次「嗶」聲,電飯煲會進入保溫狀態,
「Keep Warm」(保溫)指示燈亮起,螢幕會開始計算保溫時間。保
溫期間「OK」及「Start」(開始)指示燈會亮起。
• 按「Start/Stop」(開始/停止)鍵可停止保溫狀態。另外亦可長按
「OK/Cancel」(OK/取消)鍵取消保溫。
• 重要事項﹕ 請確定蒸汽隔已乾透,而且連接部分無殘留水分,以免
熱油在煲蓋關上後彈起或爆炸。
• 食油以2或3湯匙為上限。

32
3 - 湯羹功能
4 - 炆煮功能
• 按「Menu」(選單)鍵進入選單。按「<」或「>」鍵選3號,按
「OK」確認選擇。
• 預設的烹時間會在螢幕上閃動,按「<」或「>」鍵可調校烹調時
間。按「OK」或「Start」(開始)鍵開始烹調。
• 本多功能電飯煲進入「Soup」(湯羹)烹調狀態。「Start」(開
始)及「OK」燈會亮起,本裝置會發出一聲「嗶」,然後螢幕顯示
剩餘時間。
• 烹調完畢,會有發出三次「嗶」聲,電飯煲會進入保溫狀態,
「Keep Warm」(保溫)指示燈亮起,螢幕會開始計算保溫時間。保
溫期間「OK」及「Start」(開始)指示燈會亮起。
• 按「Start/Stop」(開始/停止)鍵可停止保溫狀態。另外亦可長按
「OK/Cancel」(OK/取消)鍵取消保溫。
• 按「Menu」(選單)鍵進入選單。按「<」或「>」鍵選4號,按
「OK」確認選擇。
• 預設的烹時間會在螢幕上閃動,按「<」或「>」鍵可調校烹調時
間。按「OK」或「Start」(開始)鍵開始烹調。
• 本多功能電飯煲進入「Stew」(炆煮)烹調狀態。「Start」(開
始)及「OK」燈會亮起,本裝置會發出一聲「嗶」,然後螢幕顯示
剩餘時間。
• 烹調完畢,會有發出三次「嗶」聲,電飯煲會進入保溫狀態,
「Keep Warm」(保溫)指示燈亮起,螢幕會開始計算保溫時間。保
溫期間「OK」及「Start」(開始)指示燈會亮起。
• 按「Start/Stop」(開始/停止)鍵可停止保溫狀態。另外亦可長按
「OK/Cancel」(OK/取消)鍵取消保溫。

33
ZH
5 - 慢煮功能
6 - 蒸煮功能
• 按「Menu」(選單)鍵進入選單。按「<」或「>」鍵選5號,按
「OK」確認選擇。
• 預設的烹時間會在螢幕上閃動,按「<」或「>」鍵可調校烹調時
間。按「OK」或「Start」(開始)鍵開始烹調。
• 本多功能電飯煲進入「Slow Cook」(慢煮)烹調狀態。「Start」
(開始)及「OK」燈會亮起,本裝置會發出一聲「嗶」,然後螢幕
顯示剩餘時間。
• 烹調完畢,會有發出三次「嗶」聲,電飯煲會進入保溫狀態,
「Keep Warm」(保溫)指示燈亮起,螢幕會開始計算保溫時間。保
溫期間「OK」及「Start」(開始)指示燈會亮起。
• 按「Start/Stop」(開始/停止)鍵可停止保溫狀態。另外亦可長按
「OK/Cancel」(OK/取消)鍵取消保溫。
• 按「Menu」(選單)鍵進入選單。按「<」或「>」鍵選6號,按
「OK」確認選擇。
• 預設的烹時間會在螢幕上閃動,按「<」或「>」鍵可調校烹調時
間。按「OK」或「Start」(開始)鍵開始烹調。
• 本多功能電飯煲進入「Steam」(蒸煮)烹調狀態。「Start」(開
始)及「OK」燈會亮起,本裝置會發出一聲「嗶」,然後螢幕顯示
剩餘時間。
• 烹調完畢,會有發出三次「嗶」聲,電飯煲會進入保溫狀態,
「Keep Warm」(保溫)指示燈亮起,螢幕會開始計算保溫時間。保
溫期間「OK」及「Start」(開始)指示燈會亮起。
• 按「Start/Stop」(開始/停止)鍵可停止保溫狀態。另外亦可長按
「OK/Cancel」(OK/取消)鍵取消保溫。
注意﹕ 內鍋所標示的水位最多可容許1小時的蒸煮時間。如要烹調更
長時間,必須加更多水。
34
7 - 煮飯功能
8 - 壽司飯功能
• 用電飯煲附送的量杯將所需的米倒入內鍋中 - 圖9。然後將凍水加入
至內鍋中相應的水位 - 圖10。
• 蓋上煲蓋。
注意:煮飯時要先放米再放水,否則水量會太多。
• 按「Menu」(選單)鍵進入選單。按「<」或「>」鍵選7號,按
「OK」確認選擇。
• 按「OK」或「Start」(開始)鍵開始烹調。
• 本多功能電飯煲進入「Rice」(煮飯)烹調狀態。「Start」(開
始)及「OK」指示燈會亮起。本裝置會發出一聲「嗶」,同時螢幕
顯示 。
• 烹週完畢,會發出兩次「嗶」聲,電飯煲會進入慢火烹調狀態,螢
幕會開始倒數慢火烹調時間。
• 慢火烹調完畢,會發出三次「嗶」聲,電飯煲會進入保溫狀態,
「Keep Warm」(保溫)指示燈亮起,螢幕會開始計算保溫時間。保
溫期間「OK」及「Start」(開始)指示燈會亮起。
• 按「Start/Stop」(開始/停止)鍵可停止保溫狀態。另外亦可長按
「OK/Cancel」(OK/取消)鍵取消保溫。
• 按「Menu」(選單)鍵進入選單。按「<」或「>」鍵選8號,按
「OK」確認選擇。
• 按「OK」或「Start」(開始)鍵開始烹調。
• 本多功能電飯煲進入「Sushi Rice」(壽司飯)烹調狀態。
「Start」(開始)及「OK」指示燈會亮起。本裝置會發出一聲「
嗶」,同時螢幕顯示 。
• 烹週完畢,會發出兩次「嗶」聲,電飯煲會進入慢火烹調狀態,螢
幕會開始倒數慢火烹調時間。
• 慢火烹調完畢,會發出三次「嗶」聲,電飯煲會進入保溫狀態,
「Keep Warm」(保溫)指示燈亮起,螢幕會開始計算保溫時間。保
溫期間「OK」及「Start」(開始)指示燈會亮起。
• 按「Start/Stop」(開始/停止)鍵可停止保溫狀態。另外亦可長按
「OK/Cancel」(OK/取消)鍵取消保溫。
35
ZH
飯類烹調指南
以杯為單位的米量 白米重量 內鍋中的水位(加入米) 可供享用人數
2 300克 2杯刻度 2人 – 4人
4 600克 4杯刻度 4人 – 8人
6 900克 6杯刻度 6人 – 12人
8 1200克 8杯刻度 8人 – 16人
10 1500克 10杯刻度 10人 – 20人
9 - 肉飯/意大利飯功能
米類烹調表(程式 7 / 8 / 9)
• 按「Menu」(選單)鍵進入選單。按「<」或「>」鍵選9號,按
「OK」確認選擇。
• 按「OK」或「Start」(開始)鍵開始烹調。
• 本多功能電飯煲進入「Pilaf / Risotto」(肉飯/意大利飯)烹調狀
態。「Start」(開始)及「OK」指示燈會亮起。本裝置會發出一
聲「嗶」,同時螢幕顯示 。
• 烹週完畢,會發出兩次「嗶」聲,電飯煲會進入慢火烹調狀態,螢
幕會開始倒數慢火烹調時間。
• 慢火烹調完畢,會發出三次「嗶」聲,電飯煲會進入保溫狀態,
「Keep Warm」(保溫)指示燈亮起,螢幕會開始計算保溫時間。保
溫期間「OK」及「Start」(開始)指示燈會亮起。
• 按「Start/Stop」(開始/停止)鍵可停止保溫狀態。另外亦可長按
「OK/Cancel」(OK/取消)鍵取消保溫。
• 以下表格提供不同米類的烹調指引為達到最佳效果,我們建議使
用普通米,不使用「快熟」米,因為快熟米的黏性較強,有可能黏
底。至於其他米類,例如糙米或野米,所用水量須要調整。
• 煮1杯白米(等於2小份或1大份)時,每1量杯白米配1.5量杯水。
某些米類在只煮一杯時會有少量黏底的情況,此乃正常。
• 米和水的總量最多不應超過內鍋內側最高水位線 - 圖8。須根據米類
的不同調校水量。

36
10 - 燕麥粥功能
11 - 水餃功能
• 按「Menu」(選單)鍵進入選單。按「<」或「>」鍵選10號,按
「OK」確認選擇。
• 預設的烹時間會在螢幕上閃動,按「<」或「>」鍵可調校烹調時
間。按「OK」或「Start」(開始)鍵開始烹調。
• 本多功能電飯煲進入「Oatmeal」(燕麥粥)烹調狀態。「Start」
(開始)及「OK」燈會亮起,本裝置會發出一聲「嗶」,然後螢幕
顯示剩餘時間。
• 烹調完畢,會有發出三次「嗶」聲,電飯煲會進入保溫狀態,
「Keep Warm」(保溫)指示燈亮起,螢幕會開始計算保溫時間。保
溫期間「OK」及「Start」(開始)指示燈會亮起。
• 按「Start/Stop」(開始/停止)鍵可停止保溫狀態。另外亦可長按
「OK/Cancel」(OK/取消)鍵取消保溫。
• 麥片煮好後,須在1小時內食用。
• 按「Menu」(選單)鍵進入選單。按「<」或「>」鍵選11號,按
「OK」確認選擇。
• 預設的烹時間會在螢幕上閃動,按「<」或「>」鍵可調校烹調時
間。按「OK」或「Start」(開始)鍵開始烹調。
• 本多功能電飯煲進入「Dumpling」(水餃)烹調狀態。「Start」
(開始)及「OK」燈會亮起,本裝置會發出一聲「嗶」,然後在煮
沸期間螢幕會顯示 。在這期間煲蓋會保時關閉。
• 當水沸時,多功能電飯煲會發出五聲「嗶」,提示要放入水餃。打
開煲蓋,放入水餃。
• 保持煲蓋打開,按「OK」或「Start」(開始)鍵,開始烹調水
餃。「Start」(開始)及「OK」燈會亮起,本裝置會發出一聲「
嗶」,然後螢幕顯示剩餘時間。
• 烹調結束時,會發出三次「嗶」聲。
• 水餃功能並不會保溫。
警告﹕ 烹調水餃時煲蓋必須打開。

37
ZH
13 - 麵包發酵功能
• 按「Menu」(選單)鍵進入選單。按「<」或「>」鍵選13號,按
「OK」確認選擇。
• 預設的烹時間會在螢幕上閃動,按「<」或「>」鍵可調校烹調時
間。按「OK」或「Start」(開始)鍵開始烹調。
• 本多功能電飯煲進入「Bread Rising」(麵包發酵)烹調狀態。
「Start」(開始)及「OK」燈會亮起,本裝置會發出一聲「嗶」
,然後螢幕顯示剩餘時間。
• 烹調結束時,會發出三次「嗶」聲。
• 麵包發酵功能並不會保溫。
12 - 意大利麵功能
• 按「Menu」(選單)鍵進入選單。按「<」或「>」鍵選12號,按
「OK」確認選擇。
• 預設的烹時間會在螢幕上閃動,按「<」或「>」鍵可調校烹調時
間。按「OK」或「Start」(開始)鍵開始烹調。
• 本多功能電飯煲進入「Pasta」(意大利麵)烹調狀態。「Start」
(開始)及「OK」燈會亮起,本裝置會發出一聲「嗶」,然後在煮
沸期間螢幕會顯示 。在這期間煲蓋會保時關閉。
• 當水沸時,多功能電飯煲會發出五聲「嗶」,提示要放入意粉。打
開煲蓋,放入意粉。
• 保持煲蓋打開,按「OK」或「Start」(開始)鍵,開始烹調意
粉。「Start」(開始)及「OK」燈會亮起,本裝置會發出一聲「
嗶」,然後螢幕顯示剩餘時間。
• 烹調結束時,會發出三次「嗶」聲。
• 意粉功能並不會保溫。
警告﹕ 烹調意粉時煲蓋必須打開。

38
14 - 嬰兒餐功能
• 按「Menu」(選單)鍵進入選單。按「<」或「>」鍵選14號,按
「OK」確認選擇。
• 預設的烹時間會在螢幕上閃動,按「<」或「>」鍵可調校烹調時
間。按「OK」或「Start」(開始)鍵開始烹調。
• 本多功能電飯煲進入「Baby Food」(嬰兒餐)烹調狀態。「Start」
(開始)及「OK」燈會亮起,本裝置會發出一聲「嗶」,然後螢幕
顯示剩餘時間。
• 烹調完畢,會有發出三次「嗶」聲,電飯煲會進入保溫狀態,
「Keep Warm」(保溫)指示燈亮起,螢幕會開始計算保溫時間。保
溫期間「OK」及「Start」(開始)指示燈會亮起。
• 按「Start/Stop」(開始/停止)鍵可停止保溫狀態。另外亦可長按
「OK/Cancel」(OK/取消)鍵取消保溫。
• 為保食物安全,保溫時間只有1小時。
注意:嬰兒餐煮好後,須在1小時內食用。
15 - 消毒功能
• 按「Menu」(選單)鍵進入選單。按「<」或「>」鍵選15號,按
「OK」確認選擇。
• 預設的烹時間會在螢幕上閃動,按「<」或「>」鍵可調校烹調時
間。按「OK」或「Start」(開始)鍵開始烹調。
• 本多功能電飯煲進入「Sterilizer」(消毒)烹調狀態。「Start」(
開始)及「OK」燈會亮起,本裝置會發出一聲「嗶」,然後螢幕顯
示剩餘時間。
• 烹調結束時,會發出三次「嗶」聲。
• 消毒功能並不會保溫。
• 嬰兒奶樽或容器在放在鍋底前必須先注滿水,以免產生氣泡,影響
消毒效果。

39
ZH
17 - 甜品功能
• 按「Menu」(選單)鍵進入選單。按「<」或「>」鍵選17號,按
「OK」確認選擇。
• 預設的烹時間會在螢幕上閃動,按「<」或「>」鍵可調校烹調時
間。按「OK」或「Start」(開始)鍵開始烹調。
• 本多功能電飯煲進入「Dessert」(甜品)烹調狀態。「Start」(
開始)及「OK」燈會亮起,本裝置會發出一聲「嗶」,然後螢幕顯
示剩餘時間。
• 烹調結束時,會發出三次「嗶」聲。
• 甜品功能並不會保溫。
18 - 乳酪功能
• 按「Menu」(選單)鍵進入選單。按「<」或「>」鍵選18號,按
「OK」確認選擇。
• 預設的烹時間會在螢幕上閃動,按「<」或「>」鍵可調校烹調時
間。按「OK」或「Start」(開始)鍵開始烹調。
• 本多功能電飯煲進入「Yogurt」(乳酪)烹調狀態。「Start」(開
始)及「OK」燈會亮起,本裝置會發出一聲「嗶」,然後螢幕顯示
剩餘時間。
• 烹調結束時,會發出三次「嗶」聲。
• 乳酪功能並不會保溫。
• 製作乳酪時可在本多功能電飯煲裏使用焗爐用玻璃容器。
16 - 奄列功能
• 按「Menu」(選單)鍵進入選單。按「<」或「>」鍵選16號,按
「OK」確認選擇。
• 預設的烹時間會在螢幕上閃動,按「<」或「>」鍵可調校烹調時
間。按「OK」或「Start」(開始)鍵開始烹調。
• 本多功能電飯煲進入「Omelette」(奄列)烹調狀態。「Start」
(開始)及「OK」燈會亮起,本裝置會發出一聲「嗶」,然後螢幕
顯示剩餘時間。
• 烹調完畢,會有發出三次「嗶」聲,電飯煲會進入保溫狀態,
「Keep Warm」(保溫)指示燈亮起,螢幕會開始計算保溫時間。保
溫期間「OK」及「Start」(開始)指示燈會亮起。
• 按「Start/Stop」(開始/停止)鍵可停止保溫狀態。另外亦可長按
「OK/Cancel」(OK/取消)鍵取消保溫。

40
選用乳酪的材料
牛奶
應該使用什麼牛奶?
所有食譜(除非特別指明)都是用牛奶製作。你亦可使用植物奶(例
如豆奶)或羊奶,然而這樣乳酪的結實程度會根據所用的奶而有所不
同。鮮奶或可長期保存的牛奶,以至所有下列牛奶都適合在這飯煲使
用﹕
• 可長期保存的牛奶﹕使用超高溫法處理(UHT)的全脂牛奶可令乳
酪更結實。半脫脂奶會降低所製乳酪的結實度。然而可在半脫脂奶
中加入兩湯匙奶粉。
• 經巴士德消毒的牛奶﹕ 這種奶所製的乳酪會有更多奶油;頂部會有
一層薄膜。
• 鮮奶(農場牛奶)﹕ 這種牛奶必須先煮沸。建議讓其沸騰一段長時
間。這種牛奶未經煮沸或會有危險。煮沸後必須放在飯煲內冷卻後
才使用。不建議使用由鮮奶製成的乳酪進行發酵。
• 奶粉沖成的牛奶﹕ 使用這種奶,所製成的乳酪奶油會非常多。遵守
製造商在包裝上所印的指引。
請選用全脂奶,最好是經高溫處理過、可長久保存的。
鮮奶或未經巴士德法消毒的牛奶必須先煮沸然後冷卻,再移除頂層薄
膜。
發酵劑
乳酪
獲得的方法有以下幾種﹕
• 市面有售的天然乳酪,盡量選最長的保鮮期;這樣乳酪會含有較多
發酵劑,可令乳酪更結實。
• 急凍乾發酵劑。請遵照說明所指示的時間喚醒發酵劑。這些發酵劑
可在超級市場、藥房、某些健康食品店購得。
• 近期自製的乳酪——必須是天然而且近期製作。這個過程稱為培養
(Culturing)。經過五道培養程序後,舊乳酪的有效發酵劑會流
失,因此有可能令新製成的乳酪不夠結實。因此你須要加入急凍乾
發酵劑再次啟動發酵程序。
如果牛奶已經煮沸,須在加入發酵劑前冷卻至室溫。
溫度太高會破壞發酵劑的性能。
41
ZH
發酵時間
• 乳酪的發酵時間介乎6至12小時,視乎所用的材料以及想要達到的
效果。
流動性
6小時 7小時 8小時 9小時 10小時 11小時 12小時
甜 酸
結實
• 當乳酪的烹調程序完成後,必須將乳酪放入雪櫃至少4小時;最多可
放7日。
19 - 果醬功能
20 - 翻熱功能
• 按「Menu」(選單)鍵進入選單。按「<」或「>」鍵選19號,按
「OK」確認選擇。
• 預設的烹時間會在螢幕上閃動,按「<」或「>」鍵可調校烹調時
間。按「OK」或「Start」(開始)鍵開始烹調。
• 本多功能電飯煲進入「Jam」(果醬)烹調狀態。「Start」(開
始)及「OK」燈會亮起,本裝置會發出一聲「嗶」,然後螢幕顯示
剩餘時間。
• 烹調結束時,會發出三次「嗶」聲。
• 果醬功能並不會保溫。
警告﹕ 烹調果醬時煲蓋必須打開。
• 按「Menu」(選單)鍵進入選單。按「<」或「>」鍵選20號,按
「OK」確認選擇。
• 預設的烹時間會在螢幕上閃動,按「<」或「>」鍵可調校烹調時
間。按「OK」或「Start」(開始)鍵開始烹調。
• 本多功能電飯煲進入「Baby Food」(嬰兒餐)烹調狀態。
「Start」(開始)及「OK」燈會亮起,本裝置會發出一聲「嗶」
,然後螢幕顯示剩餘時間。
• 烹調完畢,會有發出三次「嗶」聲,電飯煲會進入保溫狀態,
「Keep Warm」(保溫)指示燈亮起,螢幕會開始計算保溫時間。保
溫期間「OK」及「Start」(開始)指示燈會亮起。
• 按「Start/Stop」(開始/停止)鍵可停止保溫狀態。另外亦可長按
「OK/Cancel」(OK/取消)鍵取消保溫。
烹調時如果米太多或太少,重複使用「reheating」(翻熱)功能會
令飯「焦底」。

42
翻熱冷飯或會產生焦味。
切勿用翻熱或保溫功能解凍食物。
我的食譜功能(自訂)
「My Recipe」(我的食譜)功能可保存你最喜受的烹調方式。
• 按「My Recipe」(我的食譜)鍵2次,進入DIY選單。 指示
燈會發出紅光。按「<」或「>」鍵可由1至4選擇DIY程式。
• 螢幕顯示預設的烹調時間及預設烹調溫度。兩者在DIY程式中都可
調校。
• 如要調校預設中的參數,可按「Time/Temperature」(時間/溫
度)鍵。
• 按一下後,烹調溫度會閃爍,示意可以更改,同時溫度指示燈
會亮起按「<」或「>」鍵調校烹調溫度。按「OK」或「Time/
Temperature」(時間/溫度)鍵確認。
• 然後可更改烹調時間(閃爍中),此時「Time」指示燈正亮起。按
「<」或「>」鍵調校烹調時間。按「OK」或「Start」(開始)鍵
開始烹調。
• 「Start」(開始)及「OK」燈會亮起,本裝置會發出一聲「嗶」
,然後螢幕顯示剩餘時間。所選「DIY」(自訂)程式的指示燈會
亮起。
• 烹調完畢,會有發出三次「嗶」聲,電飯煲會進入保溫狀態,
「Keep Warm」(保溫)指示燈亮起,螢幕會開始計算保溫時間。保
溫期間「OK」及「Start」(開始)指示燈會亮起。
溫度低於70°C時,不能選擇保溫功能。
溫度達70°C時,可選擇保溫功能。
• 按「Start/Stop」(開始/停止)鍵可停止保溫狀態。另外亦可長按
「OK/Cancel」(OK/取消)鍵取消保溫。
• 設定的溫度須超過90°C才可選擇「Delayed Start」(延遲開始)。
保溫功能
手動保溫
按「Keep Warm」(保溫)鍵2次可啟動手動保溫。此時螢幕的
「Keep Warm」(保溫)指示燈會亮起,發出一聲「嗶」;螢幕會
顯示保溫時間。

43
ZH
延遲開始功能
• 烹調將在延遲開始時間後結束。
• 要使用延遲開始功能,請先選取烹調程式和烹調時間(某些程式除
外)。按「Delayed start」(延遲開始)鍵,本多功能電飯煲會發
出一聲「嗶」,「Delayed start」(延遲開始)指示燈會亮起;烹
調時間會閃爍。
• 預設的預定時間會因應所選的烹調時間而改變。
• 按「>」鍵增加時間。按「OK」鍵確認。電飯煲會發出一聲「嗶」
,「Delayed start」(延遲開始)指示燈會在螢幕上一直顯示。
「Start」(開始)及「OK」指示燈會亮起,時間開始減少。
• 當計時器到達烹調時間時,「Delayed start」(延遲開始)指示燈
會熄滅;「Time」(時間)指示燈會亮起。電飯煲會發出三聲「
嗶」;「Start」(開始)及「OK」指示燈會亮起;螢幕顯示剩餘
烹調時間。
烹調完畢時
其他資料
• 打開煲蓋 - 圖1。
• 使用隔熱器或隔熱手套取出內鍋及蒸籠 - 圖12。
• 用飯煲所附的膠匙盛出食物。
• 食物的保溫時間可長達24小時。
• 按「Keep warm/Cancel」(保溫/取消)鍵結束保溫狀態。
• 拔掉電器插頭。
• 本裝置有記憶功能。如果發生停電,本多功能電飯煲會在斷電前一刻
記下煮食狀態;如果電力在2秒內恢復,烹調程序會繼續。如果斷電
時間超過2秒,本多功能電飯煲會取消上一次烹調,回到待機狀態。
• 為確保烹調效率,烹調時請勿打開煲蓋。
自動保溫﹕
烹調結束後,飯煲會自動進入保溫狀態(某些程式除外)。飯煲會發
出三聲「嗶」,然後自動進入保溫狀態;「Keep Warm」(保溫)
指示燈會亮起;螢幕會顯示保溫時間。
持續按「Keep Warm」(保溫)鍵5秒可取消自動保溫周期,此時會
發出一聲長「嗶」。保溫指示燈會閃三次然後熄滅。
持續按「Keep Warm」(保溫)鍵5秒可繼續自動保溫周期,此時會
發出一聲長「嗶」。保溫指示燈會閃三次然後熄滅。

44
清潔及保養
• 清潔與保養電飯煲前,請確定電源已拔除,而且電飯煲已徹底冷
卻。
• 建議每次使用後都用海綿清潔 - 圖13。
內鍋,蒸盤(圖14)
• 用熱水及洗潔精和海綿清洗內鍋及蒸籠。不建議使用砂粉及鋼絲
刷。
• 如有食物黏在鍋底,可在清洗前先浸水一段時間。
• 小心擦乾內鍋。
• 內鍋及蒸籠可放入洗碗機。
小心處置內鍋
• 請按照以下指示小心清洗內鍋:
• 為保養內鍋質素,建議避免在裏面切食物。
• 確保有將內鍋放回電飯煲內。
• 使用附送的膠勺或木勺, 盡量避免使用金屬器具,以免損壞內鍋表
面 - 圖15。
• 為防止腐蝕,請勿將醋加入內鍋中。
• 初次使用或多次使用後,內鍋表面的顏色可能會產生變化。這是由
蒸汽及水所造成,不會影響電飯煲的使用,亦不會對人體有害。此
乃絕對正常安全,可繼續使用。
清理微壓閥
• 清洗時,請將微壓閥從煲蓋上取下 - 圖16,並沿「開啓」方向旋轉
以將其打開 - 圖17a 及17b.清洗完畢後,擦乾微壓閥,並對準兩個
配件上的三角形,沿「關閉」方向旋轉,然後將其放回電飯煲蓋。
- 圖18a 及 18b.
電飯煲其他配件的清洗及保養
• 清洗前拔除裝置電源。
• 用濕布擦拭電飯煲外部 - 圖19、煲蓋內側 - 圖14 及電源線,然後擦
乾。切勿使用腐蝕性或具磨損性的清潔產品。
• 切勿用水清洗電飯煲內部,以免損壞熱力感應器。.
45
ZH
如內鍋變形,切勿使用,請到授權服務中心替換。
技術疑難排解
異常情況描述 原因 解決辦法
有指示燈未亮而且不加
熱。
裝置未插上電源。
插上電源。如果指示燈仍
然未亮而且不加熱,請將
飯煲送交授權服務中心
維修。
指示燈熄滅但飯煲有加
熱。
指示燈已損壞。 送交授權服務中心維修。
裝置運作期間蒸汽洩漏的
方式不正常。
煲蓋未關妥。 打開蓋再蓋上。
微壓閥未放好。
停止烹調(拔掉電源線)並檢
查閥是否穩固(兩部分互相
緊鎖)和安放妥當。
蓋或微壓閥墊片損壞。 送交授權服務中心維修。
蒸汽隔的位置不正確。
拆除蒸汽隔,再放回正確
位置,重新開始烹調。
米半熟或烹調時間太長。
相對於米量放水太多或
太少。
參閱使用水量表。
米半熟或烹調時間太長。 未充分燘煮。
送交授權服務中心維修。
自動保溫失靈(電飯煲停留
在烹調模式,或不加熱)
E0
頂部電路的感應器已打
開,或發生了短路。
停止使用電飯煲,重新啟
動程式。如問題持續,請
送交授權服務中心維修。
E1
底部電路的感應器已打
開,或發生了短路。

46
DESKRIPSI
SEBELUM PENGGUNAAN PERTAMA
1 Keranjang kukus
2 Ukuran untuk air dan beras
3 Mangkuk keramik dapat
dilepas
4 Gelas ukur
5 Sendok beras
6 Tutup
7 Pelindung kukus dalam dapat
dilepas
8 Katup tekanan mikro
9 Tombol pembuka tutup
10 Pegangan
11 Penahan sendok beras
12 Panel kontrol
a Tombol “MENU/MY
RECIPES”
b Tombol “DELAYED START/
KEEP WARM”
c Tombol “<” - waktu turun
d Tombol “START/STOP”
e Tombol “TIME/
TEMPERATURE”
f Tombol “>” - waktu naik
g Tombol “OK/CANCEL”
13 Indikator tampilan
a Indikator “TEMPERATURE”
b Indikator “TIME”
c Indikator “DELAYED START”
d Indikator “KEEP WARM”
e Indikator “DIY 1”
f Indikator “DIY 2”
g Indikator “DIY 3”
h Indikator “DIY 4”
14 Housing
15 Elemen pemanas
16 Kabel daya
Buka kemasan perkakas
• Ambil perkakas dari kemasan dan buka kemasan semua aksesori dan
dokumen cetak.
• Buka tutup dengan menekan tombol pembuka yang terletak pada
housing - gbr. 1.
Baca petunjuk dan ikuti metode pengoperasian dengan saksama.
Bersihkan perkakas
• Lepaskan mangkuk keramik – gbr. 2, pelindung kukus dan katup tekanan
– gbr.3a dan 3b.
• Bersihkan mangkuk, katup, dan pelindung kukus dengan spons dan
cairan pencuci perkakas
• Lap bagian luar perkakas dan tutup dengan kain lembap.
• Keringkan dengan hati-hati.

47
ID
PERKAKAS
• Pemasak multiguna ini dilengkapi dengan 25 program memasak:
Memanggang, Mencokelatkan, Sup, Semur, Masak Lambat, Kukus, Nasi,
Nasi Sushi, Risotto, Oatmeal, Dumpling, Pasta, Pengembangan Roti,
Makanan Bayi, Sterilisasi, Omelette, Makanan Penutup, Yogurt, Selai,
dan Memanaskan Kembali. Pemasak multiguna ini juga menampilkan
pengatur waktu yang dapat disesuaikan dan penundaan start.
• Ketika kabel daya dipasang ke dalam outlet daya dan ke dalam soket
pada dasar pemasak, perkakas akan berbunyi “Bip” yang panjang,
semua indikator pada panel kontrol akan menyala seketika. Lalu
tampilan layar akan memperlihatkan “--”, semua indikator akan mati.
Perkakas masuk ke mode siaga, Anda dapat memilih fungsi menu yang
diinginkan.
• Pada akhir periode pemasakan, perkakas akan secara otomatis beralih
ke menjaga tetap hangat yang akan berlangsung hingga 24 jam
(tergantung pada fungsi).
• Jangan menyentuh elemen pemanas saat produk dihubungkan atau
setelah memasak.
• Jangan mengangkat produk yang sedang dipakai atau tepat setelah
memasak.
• Perkakas ini hanya ditujukan untuk penggunaan di dalam ruangan.
• Fungsi tombol Start/Stop. Tekan tombol sekali sebentar saja untuk
menghentikan proses memasak tetapi membiarkan mesin menyala
untuk memasak tambahan atau Menjaga Tetap Hangat. Tahan tombol
ke bawah untuk mematikan sepenuhnya perkakas jika semua proses
memasak selesai.
• Pasang semua elemen kembali ke posisi awalnya. Pasang pelindung
kukus pada posisi yang benar di tutup atas dari mesin. Lalu, pasang
pelindung kukus di balik 2 rusuk dan dorong ke atas hingga pas. Pasang
kabel yang dapat dilepas ke dalam soket pada dasar pemasak.
• Masukkan penahan sendok pada dasar perkakas – gbr. 4.

48
PERSIAPAN SEBELUM MEMASAK
Mengukur bahan - Kapasitas maks. mangkuk
• Tanda ukuran di bagian dalam mangkuk diberikan dalam tanda gelas,
tanda ini digunakan untuk mengukur jumlah air ketika memasak nasi.
• Gelas ukur plastik yang diberikan bersama perkakas Anda adalah
untuk mengukur beras dan bukan air. Beras sebanyak 1 level gelas ukur
berbobot sekitar 150 g.
• Pengguna dapat mengurangi atau menambah air menurut jenis beras
dan pilihan selera mereka.
• Karena voltase berbeda-beda di berbagai area, sedikit limpahan beras
dan air adalah fenomena normal.
• Jumlah air + beras maksimum tidak boleh melebihi tanda tertinggi di
dalam mangkuk.
Jangan pernah menambahkan bahan atau air lebih tinggi ketimbang
tanda level tertinggi.
Saat memasak nasi
• Sebelum memasak, ukur beras dengan gelas ukur dan cuci beras.
• Masukkan beras yang telah dicuci ke dalam mangkuk dan isi dengan air
hingga level air terkait (Ukuran dalam gelas).
• Jumlah air dapat disesuaikan tergantung selera Anda.
Saat mengukus
• Jumlah air harus tepat dan selalu lebih rendah ketimbang bagian
bawah keranjang kukus. Jangan melebihi tanda “ ” yang ditunjukkan
di dalam mangkuk.
• Melebihi level ini dapat mengakibatkan luapan selama penggunaan.
• Letakkan keranjang kukus ke dalam mangkuk – gbr. 5.
• Tambahkan bahan ke dalam keranjang.

49
ID
UNTUK SEMUA FUNGSI
• Dengan hati-hati lap bagian luar mangkuk (khususnya bagian bawah).
Pastikan tidak ada residu asing atau cairan di bawah mangkuk dan di
atas elemen pemanas – gbr. 6.
• Letakkan mangkuk ke dalam perkakas, pastikan diletakkan pada posisi
yang benar – gbr. 7.
• Pastikan pelindung kukus terpasang dengan benar.
• Tutupkan tutup pada tempatnya dengan bunyi “klik”.
• Colokkan kabel daya ke dalam soket pada dasar dan lalu colokkan
ujung kabel daya lainnya ke dalam outlet daya.
• Jangan menyalakan perkakas hingga semua tahapan di atas telah
diselesaikan.
Jangan pernah meletakkan tangan di atas lubang kukus selama
memasak, karena bisa terbakar – gbr. 11.
• Anda dapat menghentikan bunyi bip dengan menekan lama tombol
“Menu”. Semua bip dihentikan kecuali pada saat mulai dan selesai
memasak. Untuk mengaktifkan kembali bunyi, tekan lama kembali
tombol “Menu”.
Jika Anda ingin mengubah menu memasak yang dipilih karena eror,
tekan tombol “OK/CANCEL” dan pilih kembali menu yang diinginkan.
• Tabel waktu memasak memberikan semua informasi untuk setiap
fungsi (waktu, otomatis menjaga tetap hangat, penundaan start, posisi
tutup ...)
Hanya gunakan mangkuk dalam yang disediakan bersama perkakas.
Jangan menuangkan air atau meletakkan bahan ke dalam perkakas
tanpa mangkuk di dalamnya.
Jangan pernah menggunakan menu memanaskan kembali atau
menjaga tetap hangat untuk menghilangkan bunga es makanan.

50
FC22+ 25 dalam 1
Program
Waktu Memasak Penundaan Start Temperatur Posisi Tutup
Otomatis
Menjaga Tetap
Hangat
Otomatis Manual Default Kisaran
Dapat
Disesuaikan
Kisaran
Dapat
Disesuaikan
Default
Kisaran
(°C)
Tutup Buka
1 Memanggang 1 45 mnt 5 mnt - 4 jam 5 mnt Waktu memasak ~ 24 jam 5 mnt 150 - • •
2 Mencokelatkan 1 15 mnt 5 mnt - 90 mnt 1 mnt - - 160 - • • •
3 Sup 1 1 jam 5 mnt - 3 jam 5 mnt Waktu memasak ~ 24 jam 5 mnt 100 - • •
4 Semur
Semur/Kacang-
kacangan
1 jam 20
mnt
20 mnt - 9 jam 5 mnt Waktu memasak ~ 24 jam 5 mnt 100 - • •
5 Masak lambat 1 4 jam 20 mnt - 9 jam 5 mnt Waktu memasak ~ 24 jam 5 mnt 90 - • •
6 Kukus 1 30 mnt 5 mnt - 3 jam 5 mnt Waktu memasak ~ 24 jam 5 mnt 100 - • •
7 Nasi 1 Otomatis Otomatis - Waktu memasak ~ 24 jam 5 mnt Otomatis - • •
8 Nasi sushi 1 Otomatis Otomatis - Waktu memasak ~ 24 jam 5 mnt Otomatis - • •
9 Pilaf/Risotto 1 Otomatis Otomatis - Waktu memasak ~ 24 jam 5 mnt Otomatis - • •
10 Oatmeal 1 20 mnt 5 mnt - 2 jam 1 mnt Waktu memasak ~ 24 jam 5 mnt 100 - • • •
11 Dumpling Merebus/ Dumpling 15 mnt 1 mnt - 3 jam 5 mnt - - 100 - • •
12 Pasta 1 12 mnt 1 mnt - 3 jam 1 mnt - - 100 - • •
13 Pengembangan Roti 1 1 jam 5 mnt - 9 jam 5 mnt - - 40 - •
14 Makanan bayi 1 45 mnt 5 mnt - 2 jam 5 mnt Waktu memasak ~ 24 jam 5 mnt 100 - • • 1 jam maks.
15 Sterilisasi 1 1 jam 5 mnt - 3 jam 5 mnt Waktu memasak ~ 24 jam 5 mnt 100 - •
16 Omelette 1 15 mnt 5 mnt - 1 jam 1 mnt Waktu memasak ~ 24 jam 5 mnt 160 - • • •
17 Makanan Penutup 1 50 mnt 5 mnt - 2 jam 5 mnt Waktu memasak ~ 24 jam 5 mnt 150 - •
18 Yogurt 1 8 jam 1 jam - 24 jam 30 mnt - - 38 - •
19 Selai 1 1 jam 5 mnt - 3 jam 5 mnt Waktu memasak ~ 24 jam 5 mnt 105 - •
20 Memanaskan Kembali 1 20 mnt 5 mnt - 1 jam 1 mnt - - 100 - • •
21 Menjaga Tetap Hangat 1 - - - - - 75 - • •
22-
25
Resep saya 4 30 mnt
1 mnt - 9 jam
1 mnt - - 100
40-100 • • •
1 mnt - 2 jam 110-160 • • •

51
ID
1 - FUNGSI MEMANGGANG
2 - FUNGSI MENCOKELATKAN
• Tekan tombol “Menu” untuk masuk ke dalam pemilihan menu. Lalu
tekan tombol “<” atau “>” untuk memilih menu nomor 1 dan tekan “OK”
untuk memvalidasi pilihan Anda.
• Waktu memasak default berkedip di layar, Anda dapat menyesuaikan
waktu memasak dengan menekan tombol “<“ atau “>”. Lalu tekan
tombol “OK” atau “Start” untuk mulai memasak.
• Pemasak multiguna masuk ke dalam status memasak “Bake”. Lampu
“Start” dan “OK” menyala, perkakas berbunyi bip dan layar menampilkan
waktu tersisa.
• Pada akhir memasak, bel akan berbunyi bip tiga kali, pemasak multiguna
akan memasuki status menjaga tetap hangat, indikator “Keep Warm”
muncul di tampilan dan layar menampilkan waktu menjaga tetap
hangat. Lampu “OK” dan “Start” menyala selama menjaga tetap
hangat.
• Untuk menghentikan menjaga tetap hangat, tekan tombol “Start/
Stop”. Anda juga dapat membatalkan menjaga tetap hangat dengan
menekan lama tombol “OK/Cancel”.
Catatan: Selalu gunakan fungsi ini dengan minyak dan makanan. Jika
minyak saja, dapat menyebabkan kegagalan atau bahaya.
• Tekan tombol “Menu” untuk masuk ke dalam pemilihan menu. Lalu
tekan tombol “<” atau “>” untuk memilih menu nomor 2 dan tekan “OK”
untuk memvalidasi pilihan Anda.
• Waktu memasak default berkedip di layar, Anda dapat menyesuaikan
waktu memasak dengan menekan tombol “<“ atau “>”. Lalu tekan
tombol “OK” atau “Start” untuk mulai memasak.
• Pemasak multiguna masuk ke dalam status memasak “Browning”.
Lampu “Start” dan “OK” menyala, perkakas berbunyi bip dan layar
menampilkan waktu tersisa.
• Pada akhir memasak, bel akan berbunyi bip tiga kali, pemasak multiguna
akan memasuki status menjaga tetap hangat, indikator “Keep Warm”
muncul di tampilan dan layar menampilkan waktu menjaga tetap
hangat. Lampu “OK” dan “Start” menyala selama menjaga tetap hangat.
• Untuk menghentikan menjaga tetap hangat, tekan tombol “Start/
Stop”. Anda juga dapat membatalkan menjaga tetap hangat dengan
menekan lama tombol “OK/Cancel”.

52
3 - FUNGSI SUP
4 - FUNGSI SEMUR
• Tekan tombol “Menu” untuk masuk ke dalam pemilihan menu. Lalu
tekan tombol “<” atau “>” untuk memilih menu nomor 3 dan tekan “OK”
untuk memvalidasi pilihan Anda.
• Waktu memasak default berkedip di layar, Anda dapat menyesuaikan
waktu memasak dengan menekan tombol “<“ atau “>”. Lalu tekan
tombol “OK” atau “Start” untuk mulai memasak.
• Pemasak multiguna masuk ke dalam status memasak “Soup”. Lampu
“Start” dan “OK” menyala, perkakas berbunyi bip dan layar menampilkan
waktu tersisa.
• Pada akhir memasak, bel akan berbunyi bip tiga kali, pemasak multiguna
akan memasuki status menjaga tetap hangat, indikator “Keep Warm”
muncul di tampilan dan layar menampilkan waktu menjaga tetap
hangat. Lampu “OK” dan “Start” menyala selama menjaga tetap hangat.
• Untuk menghentikan menjaga tetap hangat, tekan tombol “Start/
Stop”. Anda juga dapat membatalkan menjaga tetap hangat dengan
menekan lama tombol “OK/Cancel”.
• Tekan tombol “Menu” untuk masuk ke dalam pemilihan menu. Lalu
tekan tombol “<” atau “>” untuk memilih menu nomor 4 dan tekan “OK”
untuk memvalidasi pilihan Anda.
• Waktu memasak default berkedip di layar, Anda dapat menyesuaikan
waktu memasak dengan menekan tombol “<“ atau “>”. Lalu tekan
tombol “OK” atau “Start” untuk mulai memasak.
• Pemasak multiguna masuk ke dalam status memasak “Stew”. Lampu
“Start” dan “OK” menyala, perkakas berbunyi bip dan layar menampilkan
waktu tersisa.
• Pada akhir memasak, bel akan berbunyi bip tiga kali, pemasak multiguna
akan memasuki status menjaga tetap hangat, indikator “Keep Warm”
muncul di tampilan dan layar menampilkan waktu menjaga tetap
hangat. Lampu “OK” dan “Start” menyala selama menjaga tetap hangat.
• Penting untuk memastikan bahwa pelindung kukus dalam dikeringkan
dengan benar dan tidak ada sisa air di dalam sambungan untuk
menghindari risiko cipratan atau ledakan minyak panas selama
penutupan tutup.
• Gunakan 2 atau 3 sendok sup minyak paling banyak.

53
ID
5 – FUNGSI MEMASAK LAMBAT
6 – FUNGSI KUKUS
• Tekan tombol “Menu” untuk masuk ke dalam pemilihan menu. Lalu
tekan tombol “<” atau “>” untuk memilih menu nomor 5 dan tekan “OK”
untuk memvalidasi pilihan Anda.
• Waktu memasak default berkedip di layar, Anda dapat menyesuaikan
waktu memasak dengan menekan tombol “<“ atau “>”. Lalu tekan
tombol “OK” atau “Start” untuk mulai memasak.
• Pemasak multiguna masuk ke dalam status memasak “Slow Cook”.
Lampu “Start” dan “OK” menyala, perkakas berbunyi bip dan layar
menampilkan waktu tersisa.
• Pada akhir memasak, bel akan berbunyi bip tiga kali, pemasak multiguna
akan memasuki status menjaga tetap hangat, indikator “Keep Warm”
muncul di tampilan dan layar menampilkan waktu menjaga tetap
hangat. Lampu “OK” dan “Start” menyala selama menjaga tetap
hangat.
• Untuk menghentikan menjaga tetap hangat, tekan tombol “Start/
Stop”. Anda juga dapat membatalkan menjaga tetap hangat dengan
menekan lama tombol “OK/Cancel”.
• Tekan tombol “Menu” untuk masuk ke dalam pemilihan menu. Lalu
tekan tombol “<” atau “>” untuk memilih menu nomor 6 dan tekan “OK”
untuk memvalidasi pilihan Anda.
• Waktu memasak default berkedip di layar, Anda dapat menyesuaikan
waktu memasak dengan menekan tombol “<“ atau “>”. Lalu tekan
tombol “OK” atau “Start” untuk mulai memasak.
• Pemasak multiguna masuk ke dalam status memasak “Steam”.
Lampu “Start” dan “OK” menyala, perkakas berbunyi bip dan layar
menampilkan waktu tersisa.
• Pada akhir memasak, bel akan berbunyi bip tiga kali, pemasak multiguna
akan memasuki status menjaga tetap hangat, indikator “Keep Warm”
muncul di tampilan dan layar menampilkan waktu menjaga tetap
hangat. Lampu “OK” dan “Start” menyala selama menjaga tetap
hangat.
• Untuk menghentikan menjaga tetap hangat, tekan tombol “Start/
Stop”. Anda juga dapat membatalkan menjaga tetap hangat dengan
menekan lama tombol “OK/Cancel”.
54
7 - FUNGSI NASI
8 - FUNGSI NASI SUSHI
• Tuangkan jumlah beras yang diperlukan ke dalam mangkuk
menggunakan gelas ukur yang disediakan – gbr. 9. Lalu isi dengan air
dingin hingga tanda "CUP" terkait yang tertera di dalam mangkuk –
gbr. 10.
• Tutup tutupnya.
Catatan: Selalu masukkan berasnya dulu, jika tidak akan kebanyakan
air.
• Tekan tombol “Menu” untuk masuk ke dalam pemilihan menu. Lalu
tekan tombol “<” atau “>” untuk memilih menu nomor 7 dan tekan “OK”
untuk memvalidasi pilihan Anda.
• Lalu tekan tombol “OK” atau “Start” untuk mulai memasak.
• Pemasak multiguna masuk ke dalam status memasak “Rice”. Lampu
“Start” dan “OK” menyala. Perkakas berbunyi bip dan layar menampilkan
.
• Pada akhir memasak, bel akan berbunyi bip dua kali, pemasak
multiguna akan mulai mendidih dan layar akan menghitung mundur
waktu pendidihan.
• Pada akhir memasak, bel akan berbunyi bip tiga kali, pemasak multiguna
akan memasuki status menjaga tetap hangat, indikator “Keep Warm”
muncul di tampilan dan layar menampilkan waktu menjaga tetap
hangat. Lampu “OK” dan “Start” menyala selama menjaga tetap hangat.
• Untuk menghentikan menjaga tetap hangat, tekan tombol “Start/
Stop”. Anda juga dapat membatalkan menjaga tetap hangat dengan
menekan lama tombol “OK/Cancel”.
• Tekan tombol “Menu” untuk masuk ke dalam pemilihan menu. Lalu
tekan tombol “<” atau “>” untuk memilih menu nomor 8 dan tekan “OK”
untuk memvalidasi pilihan Anda.
• Lalu tekan tombol “OK” atau “Start” untuk mulai memasak.
• Untuk menghentikan menjaga tetap hangat, tekan tombol “Start/
Stop”. Anda juga dapat membatalkan menjaga tetap hangat dengan
menekan lama tombol “OK/Cancel”.
Catatan: level air yang ditunjukkan di dalam mangkuk memungkinkan
mengukus selama 1 jam maksimum. Jika Anda perlu memasak lebih
lama, penting untuk menuangkan lebih banyak air ke dalam mangkuk.

55
ID
9 – FUNGSI PILAF/RISOTTO
• Tekan tombol “Menu” untuk masuk ke dalam pemilihan menu. Lalu
tekan tombol “<” atau “>” untuk memilih menu nomor 9 dan tekan “OK”
untuk memvalidasi pilihan Anda.
• Lalu tekan tombol “OK” atau “Start” untuk mulai memasak.
• Pemasak multiguna masuk ke dalam status memasak “Pilaf/Risotto”.
Lampu “Start” dan “OK” menyala. Perkakas berbunyi bip dan layar
menampilkan .
• Pada akhir memasak, bel akan berbunyi bip dua kali, pemasak
multiguna akan mulai mendidih dan layar akan menghitung mundur
waktu pendidihan.
• Pada akhir memasak, bel akan berbunyi bip tiga kali, pemasak multiguna
akan memasuki status menjaga tetap hangat, indikator “Keep Warm”
muncul di tampilan dan layar menampilkan waktu menjaga tetap
hangat. Lampu “OK” dan “Start” menyala selama menjaga tetap hangat.
• Untuk menghentikan menjaga tetap hangat, tekan tombol “Start/
Stop”. Anda juga dapat membatalkan menjaga tetap hangat dengan
menekan lama tombol “OK/Cancel”.
• Pemasak multiguna masuk ke dalam status memasak “Sushi Rice”.
Lampu “Start” dan “OK” menyala. Perkakas berbunyi bip dan layar
menampilkan .
• Pada akhir memasak, bel akan berbunyi bip dua kali, pemasak
multiguna akan mulai mendidih dan layar akan menghitung mundur
waktu pendidihan.
• Pada akhir memasak, bel akan berbunyi bip tiga kali, pemasak multiguna
akan memasuki status menjaga tetap hangat, indikator “Keep Warm”
muncul di tampilan dan layar menampilkan waktu menjaga tetap
hangat. Lampu “OK” dan “Start” menyala selama menjaga tetap hangat.
• Untuk menghentikan menjaga tetap hangat, tekan tombol “Start/
Stop”. Anda juga dapat membatalkan menjaga tetap hangat dengan
menekan lama tombol “OK/Cancel”.
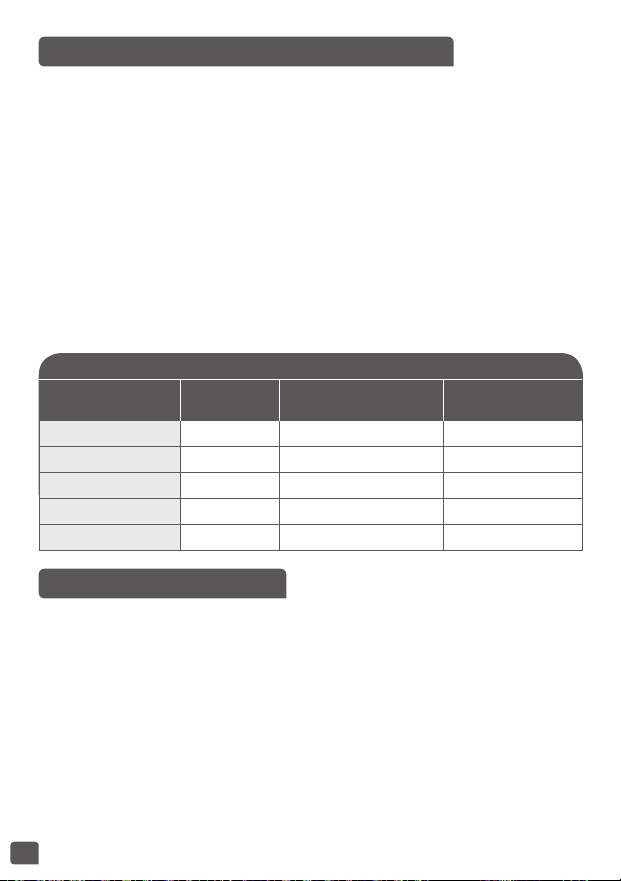
56
PEDOMAN MEMASAK NASI
Ukuran beras dalam
gelas
Bobot beras
Ukuran air di dalam
mangkuk (+ beras)
Porsi
2 300 g tanda gelas 2 2 - 4 orang
4 600 g tanda gelas 4 4 - 8 orang
6 900 g tanda gelas 6 6 - 12 orang
8 1200 g tanda gelas 8 8 - 16 orang
10 1500 g tanda gelas 10 10 - 20 orang
10 – FUNGSI OATMEAL
• Tekan tombol “Menu” untuk masuk ke dalam pemilihan menu. Lalu
tekan tombol “<” atau “>” untuk memilih menu nomor 10 dan tekan
“OK” untuk memvalidasi pilihan Anda.
• Waktu memasak default berkedip di layar, Anda dapat menyesuaikan
waktu memasak dengan menekan tombol “<“ atau “>”. Lalu tekan
tombol “OK” atau “Start” untuk mulai memasak.
• Pemasak multiguna masuk ke dalam status memasak “Oatmeal”.
Lampu “Start” dan “OK” menyala, perkakas berbunyi bip dan layar
menampilkan waktu tersisa.
TABEL MEMASAK NASI (PROGRAMS 7 / 8 / 9)
• Tabel di bawah memberikan pedoman untuk memasak berbagai jenis
beras. Untuk hasil terbaik, kami merekomendasikan menggunakan
beras biasa ketimbang jenis beras 'mudah masak' yang cenderung
menghasilkan nasi yang lebih lengket dan dapat menempel pada
dasar. Dengan beras jenis lainnya, seperti beras merah atau beras liar,
jumlah air perlu disesuaikan.
• Untuk memasak 1 gelas beras putih (penyajian 2 porsi kecil atau 1
porsi besar), gunakan 1 gelas ukur beras putih dan lalu tambahkan
satu setengah gelas ukur air. Dengan beberapa jenis beras, normal bila
sedikit nasi melekat pada dasar ketika memasak 1 gelas beras.
• Jumlah air + beras maksimum tidak boleh melebihi tanda tertinggi
di dalam mangkuk – gbr. 8. Tergantung pada jenis beras, jumlah air
mungkin perlu disesuaikan.

57
ID
11 – FUNGSI DUMPLING
• Tekan tombol “Menu” untuk masuk ke dalam pemilihan menu. Lalu
tekan tombol “<” atau “>” untuk memilih menu nomor 11 dan tekan
“OK” untuk memvalidasi pilihan Anda.
• Waktu memasak default berkedip di layar, Anda dapat menyesuaikan
waktu memasak dengan menekan tombol “<“ atau “>”. Lalu tekan
tombol “OK” atau “Start” untuk mulai memasak.
• Pemasak multiguna masuk ke dalam status memasak “Dumpling”.
Lampu “Start” dan “OK” menyala, perkakas berbunyi bip dan layar
menampilkan selama fase pendidihan. Tutup harus tetap
tertutup selama langkah ini.
• Saat air mendidih, pemasak multiguna berbunyi bip lima kali, ini
menunjukkan Anda harus memasukkan dumpling. Buka tutupnya dan
masukkan dumpling ke dalam mangkuk.
• Biarkan terbuka dan tekan tombol “OK” atau “Start” untuk mulai
memasak Dumpling. Lampu “Start” dan “OK” menyala, perkakas
berbunyi bip dan layar menampilkan waktu tersisa.
• Pada akhir memasak, bel akan berbunyi bip tiga kali.
• Tidak ada menjaga tetap hangat untuk fungsi Dumpling.
Peringatan: tutup harus dibuka selama pemasakan dumpling.
• Pada akhir memasak, bel akan berbunyi bip tiga kali, pemasak multiguna
akan memasuki status menjaga tetap hangat, indikator “Keep Warm”
muncul di tampilan dan layar menampilkan waktu menjaga tetap
hangat. Lampu “OK” dan “Start” menyala selama menjaga tetap
hangat.
• Untuk menghentikan menjaga tetap hangat, tekan tombol “Start/
Stop”. Anda juga dapat membatalkan menjaga tetap hangat dengan
menekan lama tombol “OK/Cancel”.
• Setelah oatmeal masak, harus dikonsumsi dalam 1 jam.
12 – FUNGSI PASTA
• Tekan tombol “Menu” untuk masuk ke dalam pemilihan menu. Lalu
tekan tombol “<” atau “>” untuk memilih menu nomor 12 dan tekan
“OK” untuk memvalidasi pilihan Anda.
• Waktu memasak default berkedip di layar, Anda dapat menyesuaikan
waktu memasak dengan menekan tombol “<“ atau “>”. Lalu tekan
tombol “OK” atau “Start” untuk mulai memasak.

58
13 – FUNGSI PENGEMBANGAN ROTI
• Tekan tombol “Menu” untuk masuk ke dalam pemilihan menu. Lalu
tekan tombol “<” atau “>” untuk memilih menu nomor 13 dan tekan
“OK” untuk memvalidasi pilihan Anda.
• Waktu memasak default berkedip di layar, Anda dapat menyesuaikan
waktu memasak dengan menekan tombol “<“ atau “>”. Lalu tekan
tombol “OK” atau “Start” untuk mulai memasak.
• Pemasak multiguna masuk ke dalam status memasak “Bread Rising”.
Lampu “Start” dan “OK” menyala, perkakas berbunyi bip dan layar
menampilkan waktu tersisa.
• Pada akhir memasak, bel akan berbunyi bip tiga kali.
• Tidak ada menjaga tetap hangat untuk fungsi Pengembangan Roti.
14 – FUNGSI MAKANAN BAYI
• Tekan tombol “Menu” untuk masuk ke dalam pemilihan menu. Lalu
tekan tombol “<” atau “>” untuk memilih menu nomor 14 dan tekan
“OK” untuk memvalidasi pilihan Anda.
• Waktu memasak default berkedip di layar, Anda dapat menyesuaikan
waktu memasak dengan menekan tombol “<“ atau “>”. Lalu tekan
tombol “OK” atau “Start” untuk mulai memasak.
• Pemasak multiguna masuk ke dalam status memasak “Baby Food”.
Lampu “Start” dan “OK” menyala, perkakas berbunyi bip dan layar
menampilkan waktu tersisa.
• Pemasak multiguna masuk ke dalam status memasak “Pasta”. Lampu
“Start” dan “OK” menyala, perkakas berbunyi bip dan layar menampilkan
selama fase pendidihan. Tutup harus tetap tertutup selama
langkah ini.
• Saat air mendidih, pemasak multiguna berbunyi bip lima kali, ini
menunjukkan Anda harus memasukkan pasta. Buka tutupnya dan
masukkan pasta ke dalam mangkuk.
• Biarkan terbuka dan tekan tombol “OK” atau “Start” untuk mulai
memasak Pasta. Lampu “Start” dan “OK” menyala, perkakas berbunyi
bip dan layar menampilkan waktu tersisa.
• Pada akhir memasak, bel akan berbunyi bip tiga kali.
• Tidak ada menjaga tetap hangat untuk fungsi Pasta.
Peringatan: tutup harus dibuka selama pemasakan pasta.

59
ID
• Pada akhir memasak, bel akan berbunyi bip tiga kali, pemasak multiguna
akan memasuki status menjaga tetap hangat, indikator “Keep Warm”
muncul di tampilan dan layar menampilkan waktu menjaga tetap
hangat. Lampu “OK” dan “Start” menyala selama menjaga tetap
hangat.
• Untuk menghentikan menjaga tetap hangat, tekan tombol “Start/
Stop”. Anda juga dapat membatalkan menjaga tetap hangat dengan
menekan lama tombol “OK/Cancel”.
• Untuk alasan keamanan makanan, menjaga tetap hangat hanya
tersedia 1 jam.
Catatan: Setelah makanan bayi masak, harus dikonsumsi dalam 1
jam.
15 – FUNGSI STERILISASI
• Tekan tombol “Menu” untuk masuk ke dalam pemilihan menu. Lalu
tekan tombol “<” atau “>” untuk memilih menu nomor 15 dan tekan
“OK” untuk memvalidasi pilihan Anda.
• Waktu memasak default berkedip di layar, Anda dapat menyesuaikan
waktu memasak dengan menekan tombol “<“ atau “>”. Lalu tekan
tombol “OK” atau “Start” untuk mulai memasak.
• Pemasak multiguna masuk ke dalam status memasak “Sterilizer”.
Lampu “Start” dan “OK” menyala, perkakas berbunyi bip dan layar
menampilkan waktu tersisa.
• Pada akhir memasak, bel akan berbunyi bip tiga kali.
• Tidak ada menjaga tetap hangat untuk fungsi Sterilisasi.
• Wadah dan botol bayi harus sebelumnya diisi air sebelum
meletakkannya ke dalam mangkuk untuk menghindari pembentukan
gelembung udara yang dapat mengubah sterilisasi.
16 – FUNGSI OMELETTE
• Tekan tombol “Menu” untuk masuk ke dalam pemilihan menu. Lalu
tekan tombol “<” atau “>” untuk memilih menu nomor 16 dan tekan
“OK” untuk memvalidasi pilihan Anda.
• Waktu memasak default berkedip di layar, Anda dapat menyesuaikan
waktu memasak dengan menekan tombol “<“ atau “>”. Lalu tekan
tombol “OK” atau “Start” untuk mulai memasak.
• Pemasak multiguna masuk ke dalam status memasak “Omelette”.
Lampu “Start” dan “OK” menyala, perkakas berbunyi bip dan layar
menampilkan waktu tersisa.

60
17 – FUNGSI MAKANAN PENUTUP
• Tekan tombol “Menu” untuk masuk ke dalam pemilihan menu. Lalu
tekan tombol “<” atau “>” untuk memilih menu nomor 17 dan tekan
“OK” untuk memvalidasi pilihan Anda.
• Waktu memasak default berkedip di layar, Anda dapat menyesuaikan
waktu memasak dengan menekan tombol “<“ atau “>”. Lalu tekan
tombol “OK” atau “Start” untuk mulai memasak.
• Pemasak multiguna masuk ke dalam status memasak “Dessert”.
Lampu “Start” dan “OK” menyala, perkakas berbunyi bip dan layar
menampilkan waktu tersisa.
• Pada akhir memasak, bel akan berbunyi bip tiga kali.
• Tidak ada menjaga tetap hangat untuk fungsi Makanan Penutup.
18 – FUNGSI YOGURT
• Tekan tombol “Menu” untuk masuk ke dalam pemilihan menu. Lalu
tekan tombol “<” atau “>” untuk memilih menu nomor 18 dan tekan
“OK” untuk memvalidasi pilihan Anda.
• Waktu memasak default berkedip di layar, Anda dapat menyesuaikan
waktu memasak dengan menekan tombol “<“ atau “>”. Lalu tekan
tombol “OK” atau “Start” untuk mulai memasak.
• Pemasak multiguna masuk ke dalam status memasak “Yogurt”.
Lampu “Start” dan “OK” menyala, perkakas berbunyi bip dan layar
menampilkan waktu tersisa.
• Pada akhir memasak, bel akan berbunyi bip tiga kali.
• Tidak ada menjaga tetap hangat untuk fungsi Yogurt.
• Wadah kaca tahan oven harus digunakan dalam pemasak multiguna
saat membuat yogurt.
• Pada akhir memasak, bel akan berbunyi bip tiga kali, pemasak multiguna
akan memasuki status menjaga tetap hangat, indikator “Keep Warm”
muncul di tampilan dan layar menampilkan waktu menjaga tetap
hangat. Lampu “OK” dan “Start” menyala selama menjaga tetap
hangat.
• Untuk menghentikan menjaga tetap hangat, tekan tombol “Start/
Stop”. Anda juga dapat membatalkan menjaga tetap hangat dengan
menekan lama tombol “OK/Cancel”.

61
ID
PILIHAN BAHAN UNTUK YOGURT
Susu
Susu apa yang seharusnya digunakan?
Semua resep kami (kecuali disebutkan lain) disiapkan menggunakan
susu sapi. Anda dapat menggunakan susu nabati seperti susu kedelai
contohnya, demikian juga susu domba atau kambing namun, dalam
hal ini, kekenyalannya dapat bervariasi tergantung pada susu yang
digunakan. Susu mentah atau susu tahan lama dan semua susu yang
dijelaskan di bawah ini sesuai untuk perkakas Anda:
• Susu sterilisasi tahan lama: Susu UHT murni menghasilkan yogurt
yang lebih kenyal. Menggunakan susu semi-skim akan menghasilkan
yogurt yang kurang kenyal. Namun, Anda dapat menggunakan susu
semi-skim dan menambahkan satu atau dua sendok makan susu bubuk.
• Susu pasteurisasi: susu ini memberikan yogurt yang lebih berkrim
dengan sedikit kulit di atasnya.
• Susu mentah (susu peternakan): ini harus direbus. Juga
direkomendasikan untuk merebusnya dalam waktu lama. Akan
berbahaya untuk menggunakan susu ini tanpa merebusnya. Kemudian
Anda harus mendinginkannya sebelum menggunakannya dalam
perkakas Anda. Kulturisasi menggunakan yogurt yang disiapkan
dengan susu mentah tidak direkomendasikan.
• Susu bubuk: menggunakan susu bubuk akan menghasilkan yogurt
yang sangat berkrim. Ikuti petunjuk pada kotak produsen.
Pilih susu murni, lebih disukai UHT tahan lama.
Susu mentah (segar) atau non-pasteurisasi harus direbus lalu
didinginkan dan membutuhkan pembuangan kulit.
Fermen
Untuk yogurt
Ini terbuat dari:
• Sebuah yogurt natural yang bisa dibeli di toko dengan tanggal
kedaluwarsa paling lama; oleh sebab itu, yogurt akan berisi lebih
banyak fermen aktif untuk yogurt yang lebih kenyal.
• Dari sebuah fermen yang dibeku-keringkan. Dalam hal ini, ikuti
waktu aktivasi yang disebutkan pada petunjuk fermen. Anda dapat
menemukan fermen ini di supermarket, apotek, dan toko-toko produk
kesehatan tertentu.

62
• Dari salah satu yogurt yang baru saja disiapkan – ini harus natural
dan baru saja disiapkan. Ini disebut kulturisasi. Setelah lima proses
kulturisasi, yogurt yang digunakan kehilangan fermen aktif dan oleh
karenanya berisiko memberikan konsistensi yang kurang padat. Maka
Anda perlu mulai lagi menggunakan fermen yang dibeli di toko atau
fermen yang dibeku-keringkan.
Jika Anda telah merebus susu, tunggu hingga mencapai suhu ruangan
sebelum menambahkan fermen.
Panas yang terlalu tinggi dapat menghancurkan sifat-sifat fermen.
Waktu fermentasi
• Yogurt Anda akan membutuhkan waktu fermentasi antara 6 dan 12
jam, tergantung pada bahan dasar dan hasil yang ingin Anda capai.
Cair
6 jam 7 jam 8 jam 9 jam 10 jam 11 jam 12 jam
Manis Asam
Padat
• Setelah proses memasak yogurt selesai, yogurt harus diletakkan dalam
kulkas selama sedikitnya 4 jam dan dapat disimpan hingga maks. 7 hari
di dalam kulkas.

63
ID
19 – FUNGSI SELAI
20 – FUNGSI PEMANASAN KEMBALI
• Tekan tombol “Menu” untuk masuk ke dalam pemilihan menu. Lalu
tekan tombol “<” atau “>” untuk memilih menu nomor 19 dan tekan
“OK” untuk memvalidasi pilihan Anda.
• Waktu memasak default berkedip di layar, Anda dapat menyesuaikan
waktu memasak dengan menekan tombol “<“ atau “>”. Lalu tekan
tombol “OK” atau “Start” untuk mulai memasak.
• Pemasak multiguna masuk ke dalam status memasak “Jam”. Lampu
“Start” dan “OK” menyala, perkakas berbunyi bip dan layar menampilkan
waktu tersisa.
• Pada akhir memasak, bel akan berbunyi bip tiga kali.
• Tidak ada menjaga tetap hangat untuk fungsi Selai.
Peringatan: tutup harus dibuka selama pemasakan selai.
• Tekan tombol “Menu” untuk masuk ke dalam pemilihan menu. Lalu
tekan tombol “<” atau “>” untuk memilih menu nomor 20 dan tekan
“OK” untuk memvalidasi pilihan Anda.
• Waktu memasak default berkedip di layar, Anda dapat menyesuaikan
waktu memasak dengan menekan tombol “<“ atau “>”. Lalu tekan
tombol “OK” atau “Start” untuk mulai memasak.
• Pemasak multiguna masuk ke dalam status memasak “Baby Food”.
Lampu “Start” dan “OK” menyala, perkakas berbunyi bip dan layar
menampilkan waktu tersisa.
• Pada akhir memasak, bel akan berbunyi bip tiga kali, pemasak multiguna
akan memasuki status menjaga tetap hangat, indikator “Keep Warm”
muncul di tampilan dan layar menampilkan waktu menjaga tetap
hangat. Lampu “OK” dan “Start” menyala selama menjaga tetap
hangat.
• Untuk menghentikan menjaga tetap hangat, tekan tombol “Start/
Stop”. Anda juga dapat membatalkan menjaga tetap hangat dengan
menekan lama tombol “OK/Cancel”.
Penggunaan berulang-ulang “pemanasan kembali” dalam hal
kelebihan nasi atau terlalu sedikit nasi akan menyebabkan kerak nasi
di dasar.
Memanaskan kembali nasi dingin dapat menyebabkan bau terbakar.
Jangan pernah menggunakan menu memanaskan kembali untuk
menghilangkan bunga es makanan.

64
FUNGSI RESEP SAYA (DIY)
Fungsi “My recipe” telah dikembangkan untuk mengingat pilihan
memasak favorit Anda.
• Tekan tombol “My recipe” 2 kali untuk masuk ke dalam menu DIY.
Indikator menyala merah. Dimungkinkan untuk mengubah
program DIY dari 1 ke 4 dengan menekan tombol “<” atau “>”.
• Layar menampilkan waktu memasak default dan suhu memasak
default. Keduanya dapat diatur untuk DIY.
• Jika Anda ingin mengatur parameter default, tekan pada tombol
“Time/Temperature”.
• Menekan pertama memungkinkan untuk mengubah suhu memasak
yang berkedip, indikator suhu menyala. Tekan tombol “<” atau “>”
untuk menyesuaikan suhu memasak. Lalu tekan tombol “OK” atau
“Time/Temperature” untuk memvalidasi.
• Lalu Anda dapat mengubah waktu memasak yang berkedip, indikator
waktu menyala. Sesuaikan waktu memasak dengan menekan tombol
“<” atau “>”. Tekan tombol “OK” atau “Time/Temperature” untuk mulai
memasak.
• Lampu “Start” dan “OK” menyala, perkakas berbunyi bip dan layar
menampilkan waktu tersisa. Indikator dari DIY yang dipilih menyala.
• Pada akhir memasak, bel akan berbunyi bip tiga kali, pemasak multiguna
akan memasuki status menjaga tetap hangat, indikator “Keep Warm”
muncul di tampilan dan layar menampilkan waktu menjaga tetap
hangat. Lampu “OK” dan “Start” menyala selama menjaga tetap
hangat.
Jika suhu di bawah 70°C, menjaga tetap hangat tidak tersedia
Jika suhu di atas 70°C, menjaga tetap hangat dimungkinkan
• Untuk menghentikan menjaga tetap hangat, tekan tombol “Start/
Stop”. Anda juga dapat membatalkan menjaga tetap hangat dengan
menekan lama tombol “OK/Cancel”.
• Penundaan Start tersedia hanya jika suhu pengaturan lebih tinggi dari
90°C.

65
ID
FUNGSI MENJAGA TETAP HANGAT
FUNGSI PENUNDAAN START
Menjaga Tetap Hangat Secara Manual
Untuk mulai menjaga tetap hangat secara manual, tekan 2 kali pada
tombol “Keep Warm”. Indikator “Keep Warm” muncul pada tampilan,
pemasak multiguna berbunyi bip dan layar menampilkan waktu menjaga
tetap hangat
Menjaga Tetap Hangat Secara Otomatis
Pemasak multiguna akan memasuki status “Keep Warm” secara otomatis
pada akhir memasak (kecuali pada beberapa menu). Pemasak multiguna
akan berbunyi bip tiga kali, pemasak multiguna akan secara otomatis
masuk ke status menjaga tetap hangat dengan indikator “Keep Warm”
menyala dan layar akan menampilkan waktu menjaga tetap hangat.
Untuk membatalkan siklus otomatis menjaga tetap hangat, tekan
tombol “Keep Warm” selama 5 detik berturut-turut, perkakas akan
berbunyi bip panjang. Indikator menjaga tetap hangat akan berkedip
3 kali dan lampu mati.
Untuk mengembalikan proses menjaga tetap hangat, tekan tombol
“Keep Warm” kembali selama 5 detik berturut-turut, perkakas akan
berbunyi bip panjang. Indikator menjaga tetap hangat akan berkedip
3 kali dan lampu mati.
• Waktu mulai yang ditunda berhubungan dengan waktu selesai
memasak.
• Untuk menggunakan fungsi penundaan start, pilih program memasak
dan waktu memasak terlebih dulu (kecuali pada beberapa menu). Lalu
tekan tombol “Delayed start”, pemasak multiguna berbunyi bip, lampu
indikator “Delayed start” menyala dan waktu memasak berkedip.
• Waktu preset default akan berubah tergantung pada waktu memasak
yang dipilih.
• Tekan tombol “>” untuk menaikkan waktu. Tekan tombol “OK” untuk
memvalidasi. Pemasak multiguna akan berbunyi bip dan indikator
“Delayed Start” akan tetap pada tampilan. Lampu “Start” dan “OK”
menyala dan waktu mulai turun.
• Ketika pengatur waktu mencapai waktu memasak, lampu indikator
“Delayed start” mati dan indikator “Time” menyala. Pemasak multiguna
berbunyi bip tiga kali, lampu “Start” dan “OK” menyala dan layar
menampilkan waktu memasak tersisa.

66
SAAT SELESAI MEMASAK
INFORMASI LAIN-LAIN
MEMBERSIHKAN DAN MEMELIHARA
• Buka tutup – gbr. 1.
• Gunakan penahan panci atau sarung tangan oven untuk melepaskan
mangkuk memasak dan baki kukus - gbr. 12.
• Sajikan makanan menggunakan sendok plastik yang diberikan bersama
perkakas Anda.
• Makanan akan terjaga tetap hangat hingga 24 jam.
• Tekan tombol “Keep Warm/Cancel” untuk menyelesaikan status
menjaga tetap hangat.
• Cabut colokan perkakas.
• Perkakas ini memiliki fungsi memori. Jika terjadi kegagalan daya,
pemasak multiguna akan mengingat keadaan sebelum terjadi
kegagalan, dan akan melanjutkan proses memasak jika daya telah
kembali dalam 2 detik. Jika kegagalan daya terjadi selama lebih dari
2 detik, pemasak multiguna akan membatalkan proses memasak
sebelumnya dan kembali ke status siaga.
• Harap jangan membuka tutup selama proses memasak untuk
memastikan efisiensi memasak.
• Selalu pastikan colokan pemasak multiguna telah dicabut dan
sepenuhnya dingin sebelum membersihkan dan memelihara.
• Sangat disarankan untuk membersihkan perkakas setelah setiap
penggunaan dengan spons – gbr. 13.
Mangkuk, keranjang kukus (gbr. 14)
• Gunakan air panas dan sabun cuci dan spons untuk membersihkan
mangkuk dan keranjang kukus. Bubuk gosok dan spons logam tidak
dianjurkan.
• Jika makanan menempel di bagian bawah, Anda dapat menuangkan
air ke dalam mangkuk untuk merendam sebelum mencucinya.
• Keringkan mangkuk dengan hati-hati.
• Mangkuk dan keranjang kukus juga aman dicuci dengan mesin cuci.

67
ID
Merawat mangkuk
• Untuk mangkuknya, ikuti petunjuk di bawah ini dengan saksama:
• Untuk memastikan pemeliharaan kualitas mangkuk, direkomendasikan
untuk tidak memotong makanan di dalamnya.
• Pastikan Anda memasang kembali mangkuk ke dalam pemasak
multiguna.
• Gunakan sendok plastik yang disediakan atau sendok kayu dan
bukan yang berjenis logam untuk menghindari kerusakan permukaan
mangkuk – gbr. 15.
• Untuk menghindari risiko korosi, jangan menuangkan cuka ke dalam
mangkuk.
• Warna permukaan mangkuk dapat berubah setelah penggunaan
pertama kalinya atau setelah penggunaan dalam waktu lama.
Perubahan warna ini karena uap dan air dan tidak berpengaruh pada
penggunaan pemasak multiguna, atau membahayakan kesehatan
Anda. Sangat aman untuk tetap menggunakannya.
Membersihkan katup tekanan mikro
• Saat membersihkan katup tekanan mikro, lepaskan dari tutupnya –
gbr. 16 dan buka dengan memutar ke arah “open” – gbr. 17a dan 17b.
Setelah membersihkannya, lap hingga kering dan pertemukan dua
segitiga dalam dua bagian bersama-sama dan putar ke arah “close”,
lalu pasang kembali tutup pemasak multiguna – gbr.18a dan gbr. 18b.
Membersihkan dan memelihara bagian lain dari perkakas
• Cabut colokan perkakas sebelum membersihkan.
• Bersihkan bagian luar pemasak multiguna – gbr. 19, bagian dalam
tutup – gbr. 14 dan kabel dengan kain lembap dan lap hingga kering.
Jangan menggunakan produk abrasif.
• Jangan menggunakan air untuk membersihkan bagian dalam badan
perkakas karena dapat merusak sensor panas.

68
Catatan: jika mangkuk bagian dalam cacat, jangan menggunakannya
lagi dan dapatkan mangkuk pengganti dari pusat layanan resmi.
PEDOMAN PEMECAHAN MASALAH TEKNIS
Deskripsi malfungsi Penyebab Solusi
Lampu indikator mati dan
tidak ada pemanasan.
Perkakas tidak
dicolokkan.
Colokkan perkakas. Jika lampu
masih tidak menyala dan tidak
ada panas maka kirimkan
perkakas ke pusat layanan resmi
untuk diperbaiki.
Lampu indikator mati tetapi
perkakas memanas.
Lampu indikator rusak.
Kirimkan ke pusat layanan resmi
untuk diperbaiki.
Kebocoran uap abnormal
selama penggunaan.
Tutup tidak tertutup
dengan benar.
Buka dan tutup kembali
tutupnya.
Katup tekanan mikro
tidak terpasang
dengan benar.
Berhenti memasak (cabut colokan
produk) dan periksa apakah katup
telah aman (2 bagian terkunci
bersama) dan dalam posisi benar.
Gasket tutup atau katup
tekanan mikro rusak
Kirimkan ke pusat layanan resmi
untuk diperbaiki.
Pelindung uap tidak
dipasang dengan
benar.
Lepas dan masukkan pelindung
uap dalam posisi yang benar,
mulai kembali memasak.
Nasi setengah masak dan
membutuhkan waktu lama
untuk memasak.
Terlalu banyak
atau tidak cukup air
dibandingkan dengan
jumlah beras.
Lihat pada tabel untuk jumlah
air.
Nasi setengah masak dan
membutuhkan waktu lama
untuk memasak.
Tidak cukup mendidih.
Kirimkan ke pusat layanan resmi
untuk diperbaiki.
Menjaga tetap hangat
secara otomatis gagal
(produk tetap dalam posisi
memasak, atau tidak ada
pemanasan).
E0
Sensor pada sirkuit
bagian atas terbuka
atau ada sirkuit pendek
Hentikan perkakas dan mulai
kembali program. Jika masalah
berulang, harap mengirimkan
ke pusat layanan resmi untuk
diperbaiki.
E1
Sensor pada sirkuit
bagian bawah terbuka
atau ada sirkuit pendek

EN p. 5 – 26
ZH p. 27 – 45
ID p. 46 – 68
NC00138825-02
EN
ZH
ID