
Owner’s
Manual
French Door,
Bottom-Freezer
Built-In Refrigerators
224D3548P001
49-60699-1
11-14 GE
monogram.com

2
Introduction
Your new Monogram refrigerator makes an eloquent statement of style, convenience and kitchen
planning flexibility. Whether you chose it for its purity of design, practical storage arrangements
RUDVVLGXRXVDWWHQWLRQWRGHWDLO³RUIRUDOORIWKHVHUHDVRQV³\RX·OOILQGWKDW\RXU0RQRJUDP
UHIULJHUDWRU·VVXSHULRUEOHQGRIIRUPDQGIXQFWLRQZLOOGHOLJKW\RXIRU\HDUVWRFRPH
The Monogram refrigerator was designed to provide the flexibility to blend in with your kitchen
cabinetry. Decorative door insert panels allow it to match your kitchen cabinets or blend with your
kitchen decor.
Since the Monogram refrigerator is a built-in product, custom panels are required on the front of the
Monogram refrigerator. Consult your kitchen designer or cabinetmaker for your customized look.
The information on the following pages will help you operate and maintain your refrigerator properly.
If you have any other questions, visit our Website at: monogram.com
Contents
Consumer Services
Important Phone Numbers ....................19
Model and Serial Numbers ......................3
Performance Data Sheet ......................17
Problem Solver ............................15, 16
Product Registration ............................3
Safety Instructions ........................... 4–7
State of California
Water Treatment Device Certificate ............18
Warranty .............................Back Cover
Care and Cleaning
&OHDQLQJ³2XWVLGHDQG,QVLGH ..................13
Light Bulb Replacement ...................... 14
Master Light Switch ............................13
Vacation ......................................13
Operating Instructions
Automatic Icemaker ...........................10
Sabbath Mode Product Kit, ZSAB1 .............10
Shelves ........................................12
Storage Pans ..................................11
Temperature Controls ..........................8
Water Filter Cartridge ...........................9
Before
using
your
refrigerator
Read this manual carefully. It is intended to
help you operate and maintain your new
refrigerator properly.
Keep it handy for answers to your questions.
,I\RXGRQ·WXQGHUVWDQGVRPHWKLQJRUQHHG
more help, there is a list of toll-free consumer
service numbers included in the back section
of this manual.
OR
Visit our Website at: monogram.com
Consumer Information
Bottom Freezer Refrigerator

3
Write
down the
model
& serial
numbers
<RX·OOVHHWKHPRQDODEHOLQVLGHWKHIUHVKIRRG
compartment under the storage drawers on the
right side.
Before sending in this card, please write these
numbers here:
Model Number
Serial Number
Use these numbers in any correspondence or
service calls concerning your refrigerator.
If you
received a
damaged
refrigerator
Immediately contact the dealer (or builder) that
sold you the refrigerator.
Save time
& money
Before you request service, check the Problem
Solver in the back of this manual.
It lists causes of minor operating problems that
you can correct yourself.
Installation
Location
• Do not install the refrigerator where the
temperature will go below 60°F (16°C) because
it will not run often enough to maintain proper
temperatures.
• Do not install the refrigerator where the
temperature will go above 100°F (37°C)
because it will not perform properly.
• Do not install the refrigerator in a location ex-
posed to water (rain, etc.) or direct sunlight.
• Install it on a floor strong enough to support it
fully loaded.
If you need
service
To obtain service, see the Consumer Services
page in the back of this manual.
:H·UHSURXGRIRXUVHUYLFHDQGZDQW\RXWREH
pleased. If for some reason you are not happy
with the service you receive, here are steps to
follow for further help.
For customers in the USA:
FIRST, contact the people who serviced your
appliance. Explain why you are not pleased.
In most cases, this will solve the problem.
NEXT, if you are still not pleased, write all the
GHWDLOV³LQFOXGLQJ\RXUSKRQHQXPEHU³WR
Manager, Customer Relations
GE Appliances
Appliance Park
Louisville, KY 40225
For customers in Canada:
FIRST, contact the people who serviced your
appliance. Explain why you are not pleased.
In most cases, this will solve the problem.
NEXT, if you are still not pleased, write all the
GHWDLOV³LQFOXGLQJ\RXUSKRQHQXPEHUWR
Manager, Consumer Relations
Mabe Canada Inc.
1 Factory Lane, Suite 310
Moncton, N.B. E1C 9M3
Consumer Information
Bottom Freezer Refrigerator
4
,03257$176$)(7<,16758&7,216
READ AND SAVE THESE INSTRUCTIONS
This is the safety alert symbol. This symbol alerts you to potential hazards that can kill or hurt you
and others. All safety messages will follow the safety alert symbol and the word “DANGER”, “WARNING”,
RU´&$87,21µ7KHVHZRUGVDUHGHILQHGDV
Indicates a hazardous situation which, if not avoided, will result in death or serious injury.
Indicates a hazardous situation which, if not avoided, could result in death or serious injury.
Indicates a hazardous situation which, if not avoided, could result in minor or moderate injury.
WARNING
DANGER
CAUTION
IMPORTANT SAFETY INSTRUCTIONS
To reduce the risk of fire, explosion, electric shock, or injury when using your
refrigerator follow these basic safety precautions:
WARNING
REFRIGERATOR SAFETY INFORMATION
• Use this appliance only for its intended purpose
DVGHVFULEHGLQWKLV2ZQHU·V0DQXDO
• This fresh-food refrigerator must be properly
installed in accordance with the Installation
Instructions before it is used.
• Do not allow children to climb, stand or hang on
the shelves in the fresh-food refrigerator. They
could damage the fresh-food refrigerator and
seriously injure themselves.
• Do not store or use gasoline or other flammable
vapors and liquids in the vicinity of this or any
other appliance.
• Keep fingers out of the “pinch point” areas:
clearances between the door and between the door
and cabinet are necessarily small. Be careful closing
the door when children are in the area.
• Unplug your fresh-food refrigerator before
cleaning or making repairs.
NOTE: We strongly recommend that any servicing
be performed by a qualified individual.
• Before replacing a burned-out light bulb, the
IUHVKIRRGUHIULJHUDWRUVKRXOGEHWXUQHG2))RU
unplugged in order to avoid contact with a live wire
filament. (A burned-out light bulb may break when
being replaced.)
REFRIGERANTS
All refrigeration products contain
refrigerants, which under federal law must
be removed prior to product disposal.
If you are getting rid of an old refrigeration
product, check with the company handling
the disposal about what to do.
WARNING
DANGER: RISK OF CHILD ENTRAPMENT
Child entrapment and suffocation are not
problems of the past. Junked or abandoned
refrigeration products are still dangerous…
even if they will sit for “just a few days.” If
you are getting rid of your old appliance,
please follow these instructions to help
prevent accidents.
Before You Throw Away Your Old
Refrigeration Product:
• Take off the doors.
• Leave the shelves in place so that children
may not easily climb inside.

5
,03257$17(6,16758&7,216'(6e&85,7e
Les enfants pris au piège ou morts
G·DVSK\[LHVRQWWRXMRXUVG·DFWXDOLWp
/HVDSSDUHLOVGHUpIULJpUDWLRQDEDQGRQpV
sont toujours aussi dangereux, même
VLRQQ·DWWHQGTXH´TXHOTXHMRXUVµSRXU
V·HQGpEDUDVVHU6LYRXVQHJDUGH]SDVYRWUH
ancien appareil, veuillez suivre les directives
FLGHVVRXVDILQGHSUpYHQLUOHVDFFLGHQWV
Avant de vous débarasser de votre vieux
appareil de réfrigération :
'pPRQWH]OHVSRUWHV
• Laissez les clayettes en place afin
G·HPSrFKHUOHVHQIDQWVGHJULPSHU
jO·LQWpULHXU
RÉFRIGÉRANTS
7RXVOHVDSSDUHLOVGHUpIULJpUDWLRQ
contiennent des refrigerants qui,
FRQIRUPpPHQWDX[ORLVIpGpUDOHV
GRLYHQWrWUHHQOHYpVDYDQWWRXWH
pOLPLQDWLRQGHO·DSSDUHLO
6LYRXVYRXVGpEDUUDVVH]GHYLHX[
DSSDUHLOVGHUpIULJpUDWLRQYpULILH]
DXSUqVGHODVRFLpWpTXLV·RFFXSHGH
OHXUpOLPLQDWLRQFHTXHYRXVGHYH]IDLUH
LIRE ET CONSERVER CES INSTRUCTIONS
IMPORTANTES CONSIGNES DE SÉCURITÉ
3RXUUpGXLUHOHULVTXHG·LQFHQGLHG·H[SORVLRQGHFKRFpOHFWULTXHRXGHEOHVVXUHV
ORUVTXHYRXVXWLOLVH]YRWUHUpIULJpUDWHXUYHXLOOH]VXLYUHFHVFRQVLJQHVGHVpFXULWp
AVERTISSEMENT
&HV\PEROHUHSUpVHQWHXQHDOHUWHGHVpFXULWp&HV\PEROHYRXVDYLVHGHGDQJHUVSRVVLEOHVSRXYDQWFDXVHU
ODPRUWGHVEOHVVXUHVRXDXWUHV7RXVOHVPHVVDJHVGHVpFXULWpVHURQWSUpFpGpVGXV\PEROHG·DOHUWHGHVpFXULWp
ainsi que des mots « DANGER », « AVERTISSEMENT » ou « MISE EN GARDE ». Ces messages sont les suivants :
6LJQDOHXQHVLWXDWLRQTXLSUpVHQWHXQGDQJHULPPLQHQWHWTXLVLHOOHQ·HVWSDVpYLWpHHQWUDvQHUDGHVEOHVVXUHV
graves, voire la mort.
6LJQDOHXQHVLWXDWLRQTXLSUpVHQWHXQGDQJHULPPLQHQWHWTXLVLHOOHQ·HVWSDVpYLWpHSHXWHQWUDvQHUGHV
blessures graves, voire la mort.
.
6LJQDOHXQHVLWXDWLRQTXLSUpVHQWHXQGDQJHULPPLQHQWHWTXLVLHOOHQ·HVWSDVpYLWpHSHXWHQWUDvQHUGHV
blessures mineures ou graves.
CONSIGNES DE SÉCURITÉ POUR LE RÉFRIGÉRATEUR
AVERTISSEMENT
DANGER
AVERTISSEMENT
AVERTISSEMENT
RISQUES POUR LES ENFANTS
• N’utilisez l’appareil que pour son usage prévu, comme
GpFULWGDQVOHSUpVHQWPDQXHO
• Installez le réfrigérateur pour denrées fraîches
conformément aux directives d’installation avant de
l’utiliser.
• Ne laissez pas les enfants grimper, s’asseoir, se tenir
debout ni se pendre aux clayettes du réfrigérateur
pour denrées fraîches. Ils pourraient endommager
OHUpIULJpUDWHXUSRXUGHQUpHVIUDvFKHV et se blesser
gravement.
• N’entreposez et n’utilisez pas d’essence ou autres
vapeurs et liquides inflammables à proximité de cet
appareil ou de tout autre appareil électroménager.
• Éloignez les doigts des parties du réfrigérateur où
l’on peut facilement se pincer : les espaces entre les
portes et entre les portes et les placards sont toujours
pWURLWV6R\H]SUXGHQWORUVTXHYRXVIHUPH]OHVSRUWHVGH
O·DSSDUHLOHQSUpVHQFHGHVHQIDQWV
• Débranchez votre réfrigérateur pour denrées fraîches
avant de le nettoyer et de le réparer.
REMARQUE : Nous vous recommandons vivement de
FRQILHUWRXWHUpSDUDWLRQjXQWHFKQLFLHQTXDOLILp
• Avant de remplacer une ampoule grillée, le
UpIULJpUDWHXUSRXUGHQUpHVIUDvFKHVGRLWrWUHGpEUDQFKp
DILQG·pYLWHUWRXWFRQWDFWDYHFXQILOVRXVWHQVLRQ8QH
DPSRXOHJULOOpHSHXWVHEULVHUSHQGDQWO·RSpUDWLRQ
6
,03257$176$)(7<,16758&7,216
CONNECTING ELECTRICITY
WARNING
Electrical Shock Hazard.
Plug into a grounded 3-prong outlet
Do not remove the ground prong
Do not use an adapter
Failure to follow these instructions can result in death, fire, or electrical shock.
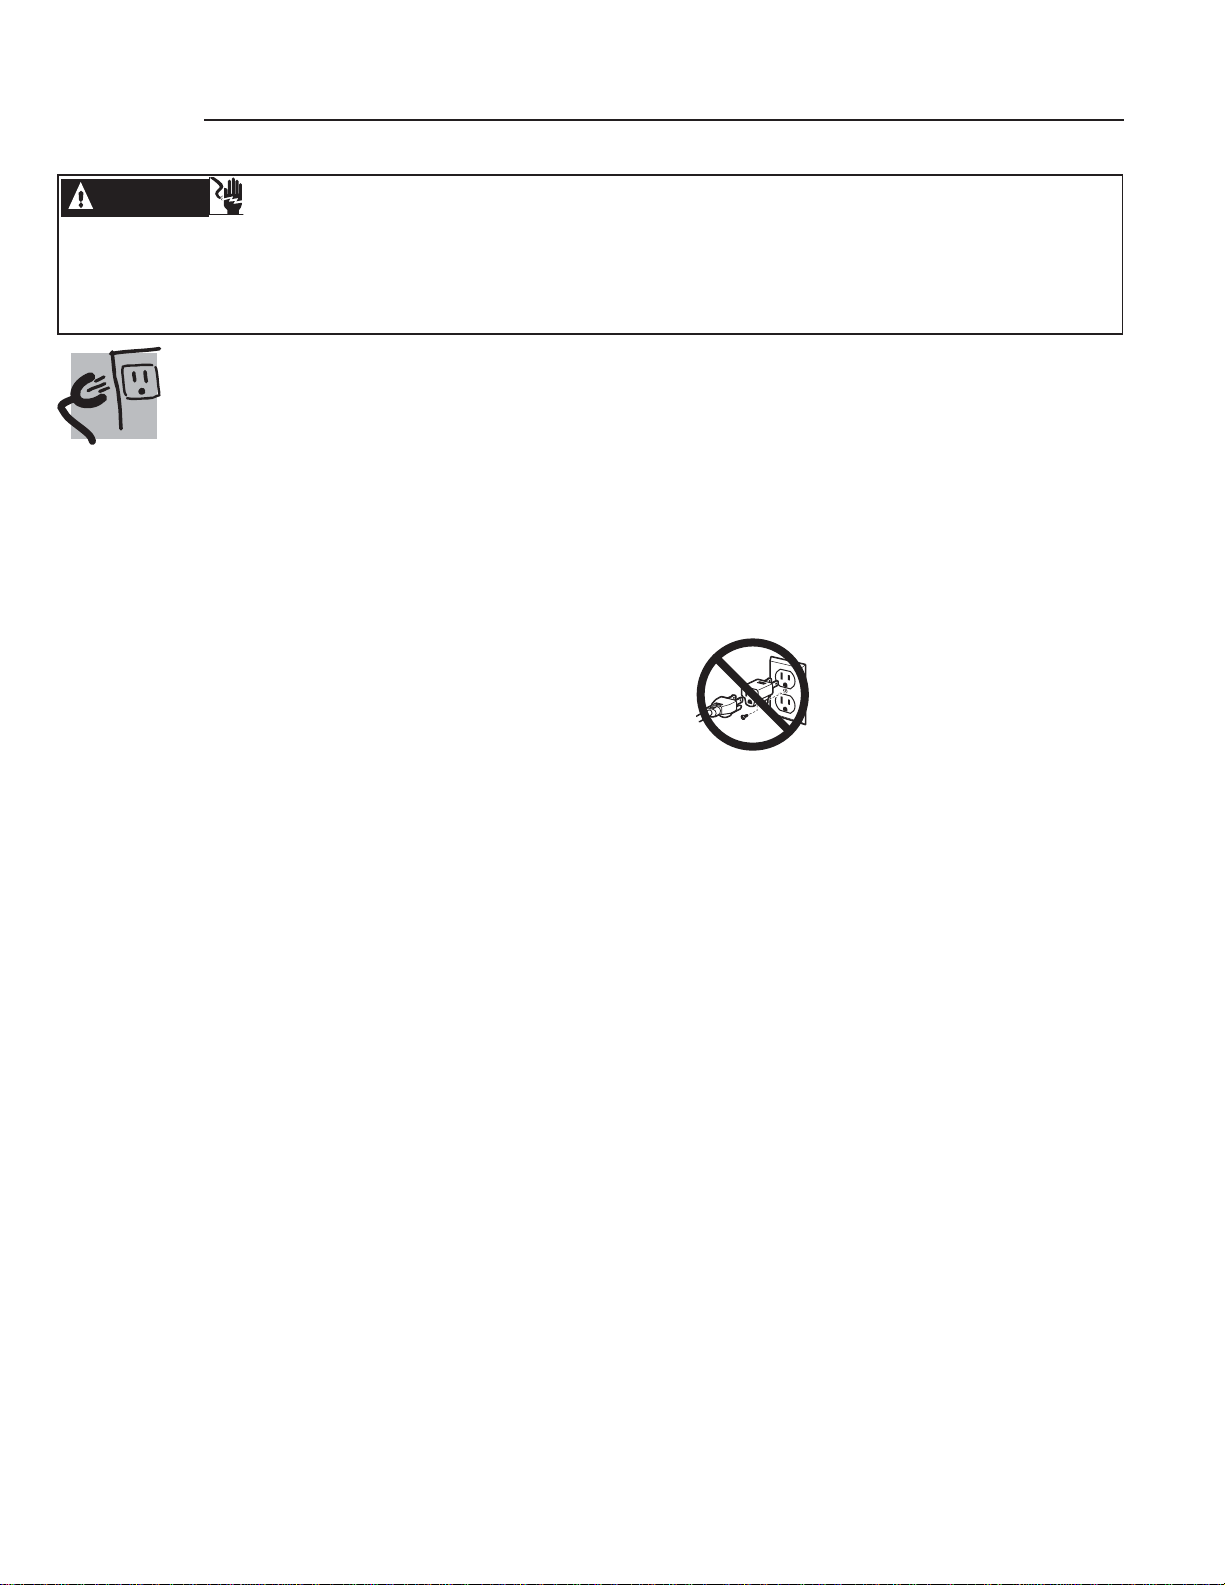
Do not, under any circumstances, cut or remove the third (ground) prong from the power cord.
For personal safety, this appliance must be properly grounded.
The power cord of this appliance is equipped with a
3-prong (grounding) plug which mates with a standard
3-prong (grounding) wall outlet to minimize the
possibility of electric shock hazard from this appliance.
Have the wall outlet and circuit checked by a qualified
electrician to make sure the outlet is properly grounded.
Where a standard 2-prong wall outlet is encountered, it
is your personal responsibility and obligation to have it
replaced with a properly grounded 3-prong wall outlet.
Do not use an adapter.
Use of a GFI (Ground Fault Interrupter) is not
recommended for the fresh-food refrigerator.
The refrigerator should always be plugged into its own
individual electrical outlet which has a voltage rating
that matches the rating plate. This provides the best
performance and also prevents overloading house
wiring circuits which could cause a fire hazard from
overheated wires.
Never unplug your refrigerator by pulling on the power
cord. Always grip plug firmly and pull straight out from
the outlet.
Repair or replace immediately all power cords that have
become frayed or otherwise damaged. Do not use a
cord that shows cracks or abrasion damage along its
length or at either end.
When moving the refrigerator away from the wall, be
careful not to roll over or damage the power cord.
SAVE THESE INSTRUCTIONS
7
CONSERVEZ CES DIRECTIVES
,03257$17(6,16758&7,216'(6e&85,7e
Ne coupez pas ou n’enlevez pas, sous aucun prétexte, la troisième broche de mise à la terre du cordon
d’alimentation. Pour des raisons de sécurité, cet appareil doit être correctement mis à la terre.
/HFRUGRQG·DOLPHQWDWLRQGHFHWDSSDUHLOHVWpTXLSpG·XQH
ILFKHjWURLVEURFKHVSRXUXQHPLVHjODWHUUHTXLV·DGDSWH
à la prise de courant standard à 3 broches (pour une mise
jODWHUUHSRXUPLQLPLVHUOHVULVTXHVGHFKRFVpOHFWULTXHV
par cet appareil.
)DLWHVYpULILHUODSULVHPXUDOHHWOHFLUFXLWpOHFWULTXHSDU
XQpOHFWULFLHQTXDOLILpSRXUV·DVVXUHUTXHOHV\VWqPHHVW
correctement mis à la terre.
'DQVOHFDVG·XQHSULVHELSKDVpHO·LQVWDOODWHXUDOD
UHVSRQVDELOLWpHWO·REOLJDWLRQGHODUHPSODFHUSDUXQH
SULVHWULSKDVpHFRUUHFWHPHQWPLVHjODWHUUH1·XWLOLVH]SDV
G·DGDSWDWHXU
/HUpIULJpUDWHXUGRLWWRXMRXUVrWUHEUDQFKpjVDSURSUH
SULVHpOHFWULTXHG·XQHWHQVLRQQRPLQDOHFRUUHVSRQGDQWj
FHOOHLQGLTXpHVXUVDSODTXHVLJQDOpWLTXH
8QHDOLPHQWDWLRQpOHFWULTXHjYROWV&$+]DYHF
un fusible de 15 ou 20 ampères et une mise à la terre est
QpFHVVDLUH&HFLSHUPHWG·REWHQLUXQPHLOOHXUUHQGHPHQW
HWpYLWHGHVXUFKDUJHUOHVFLUFXLWVpOHFWULTXHVGXGRPLFLOH
TXLULVTXHG·RFFDVLRQQHUXQLQFHQGLHHQVXUFKDXIIDQW
1HGpEUDQFKH]MDPDLVOHUpIULJpUDWHXUHQWLUDQWVXUOH
FRUGRQG·DOLPHQWDWLRQ3UHQH]WRXMRXUVIHUPHPHQWODILFKH
en main et tirez pour la sortir de la prise.
5pSDUH]RXUHPSODFH]LPPpGLDWHPHQWWRXWFRUGRQ
pOHFWULTXHXVpRXHQGRPPDJp1·XWLOLVH]SDVXQFRUGRQ
ILVVXUpRXSUpVHQWDQWGHVGRPPDJHVGXVDX[IURWWHPHQWV
VRLWVXUVDORQJXHXURXDX[H[WUpPLWpV
/RUVTXHYRXVpORLJQH]YRWUHUpIULJpUDWHXUGXPXU
faites attention à ne pas le faire rouler sur le cordon
G·DOLPHQWDWLRQDILQGHQHSDVO·HQGRPPDJHU
BRANCHEMENTS ÉLECTRIQUES
AVERTISSEMENT
Risque de choc électrique.
%UDQFKH]O·DSSDUHLOGDQVXQHSULVHWULSOHDYHFWHUUH
Ne retirez pas la broche de terre.
1·XWLOLVH]SDVG·DGDSWDWHXU
/HQRQUHVSHFWGHFHVLQVWUXFWLRQVSHXWHQWUDvQHUGHVULVTXHVG·LQFHQGLHVGHVFKRFVpOHFWULTXHVRXODPRUW
N’UTILISEZ JAMAIS
UNE PRISE À
ADAPTATEUR POUR LE
RÉFRIGÉRATEUR POUR
DENRÉES FRAÎCHES
À UNE PRISE BIPOLAIRE.
8
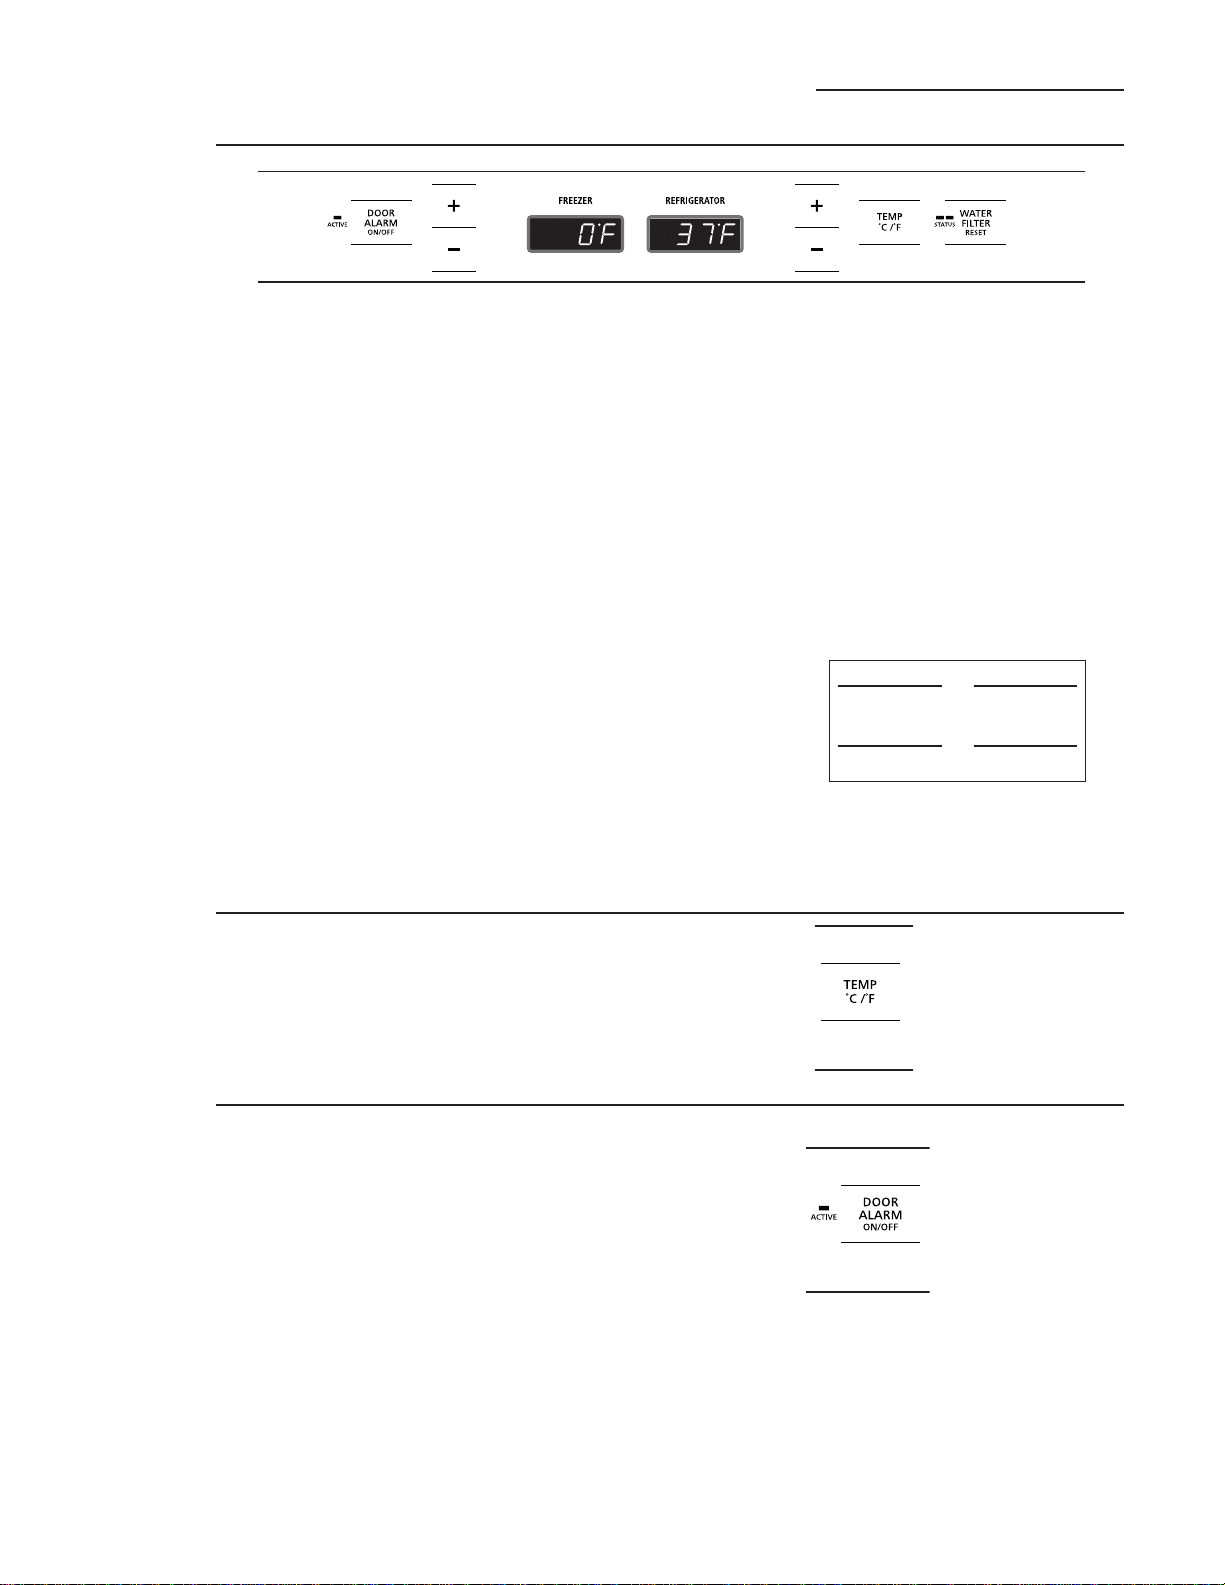
Temperature
controls
The temperature display shows the actual
temperature of the freezer and fresh food
compartments. The actual temperature will vary
from the set temperature based on factors such
as frequency of door opening, amount of food,
defrost cycling and room temperature.
NOTE: Frequent door openings or door left open
for periods of time may increase the internal
temperature of the freezer and fresh food
compartments temporarily.
To turn off the cooling system in both the
freezer and fresh food compartments, press
either + pad until both displays show OFF.
To turn the cooling system on, press either
– pad. The preset temperatures of 0°F and 37°F
will appear in the display.
To check the current temperature setting for
the fresh food or freezer compartment, press
the + or – pad once. After 5 seconds, the display
will return to the actual temperature.
To change the temperature settings, press
the + or – pads to desired temperature set point
for fresh food and freezer separately. Allow
24 hours for the refrigerator to reach the
temperature you have set.
Temperature Ranges
Low High
Fresh Food
Freezer
NOTE:
Setting the controls to OFF stops cooling,
but does not shut off electrical power to the
refrigerator.
Changing
display
temperatures
from °F to °C
To change the temperature display between
Fahrenheit and Celsius, press the Temp °C/°F.
Door
alarm
To turn the Door Alarm feature on, press
the pad once. The ACTIVE light will come on.
To turn it off, press the pad again.
When the DOOR ALARM is active, the alarm will
flash and beep if you keep the door open for
more than 2 minutes.
Preset Settings
Allow 24 hours to reach these preset temperatures.
34°F
1°C
–6°F
–21°C
44°F
7°C
+4°F
–16°C
2SHUDWLQJ,QVWUXFWLRQV
Bottom Freezer Refrigerator
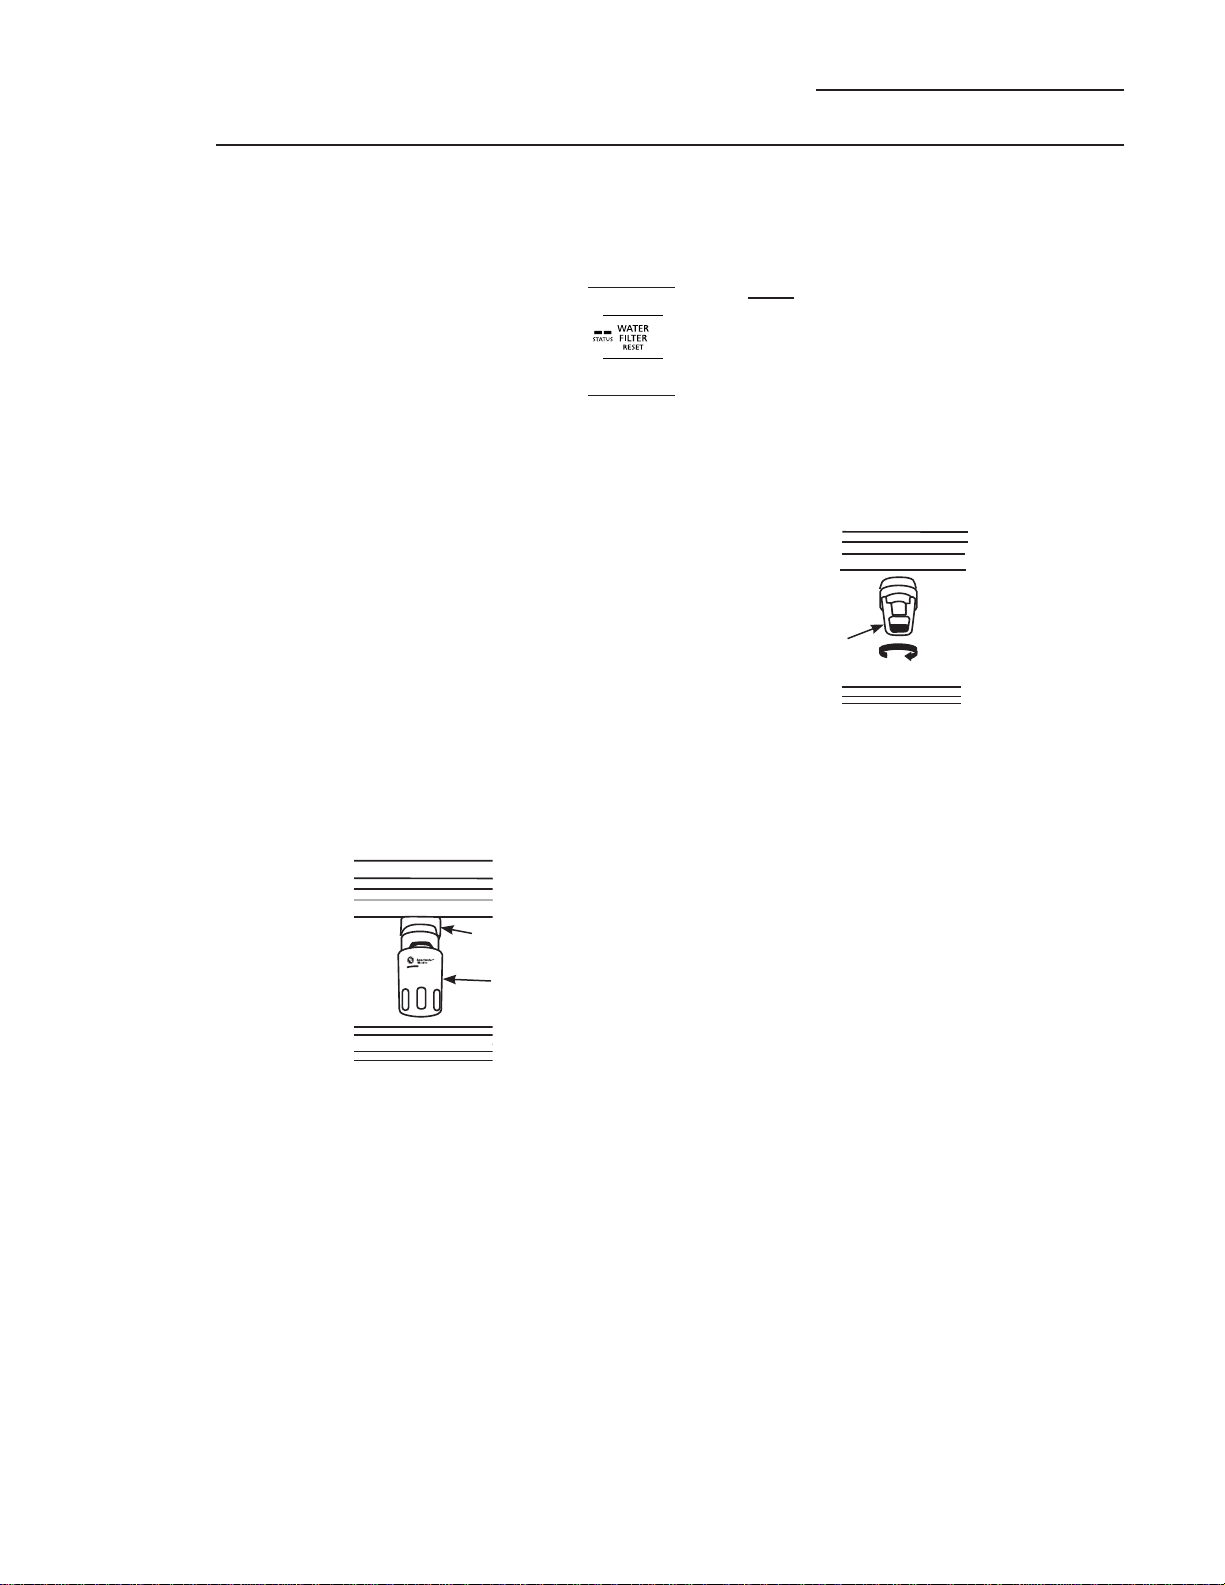
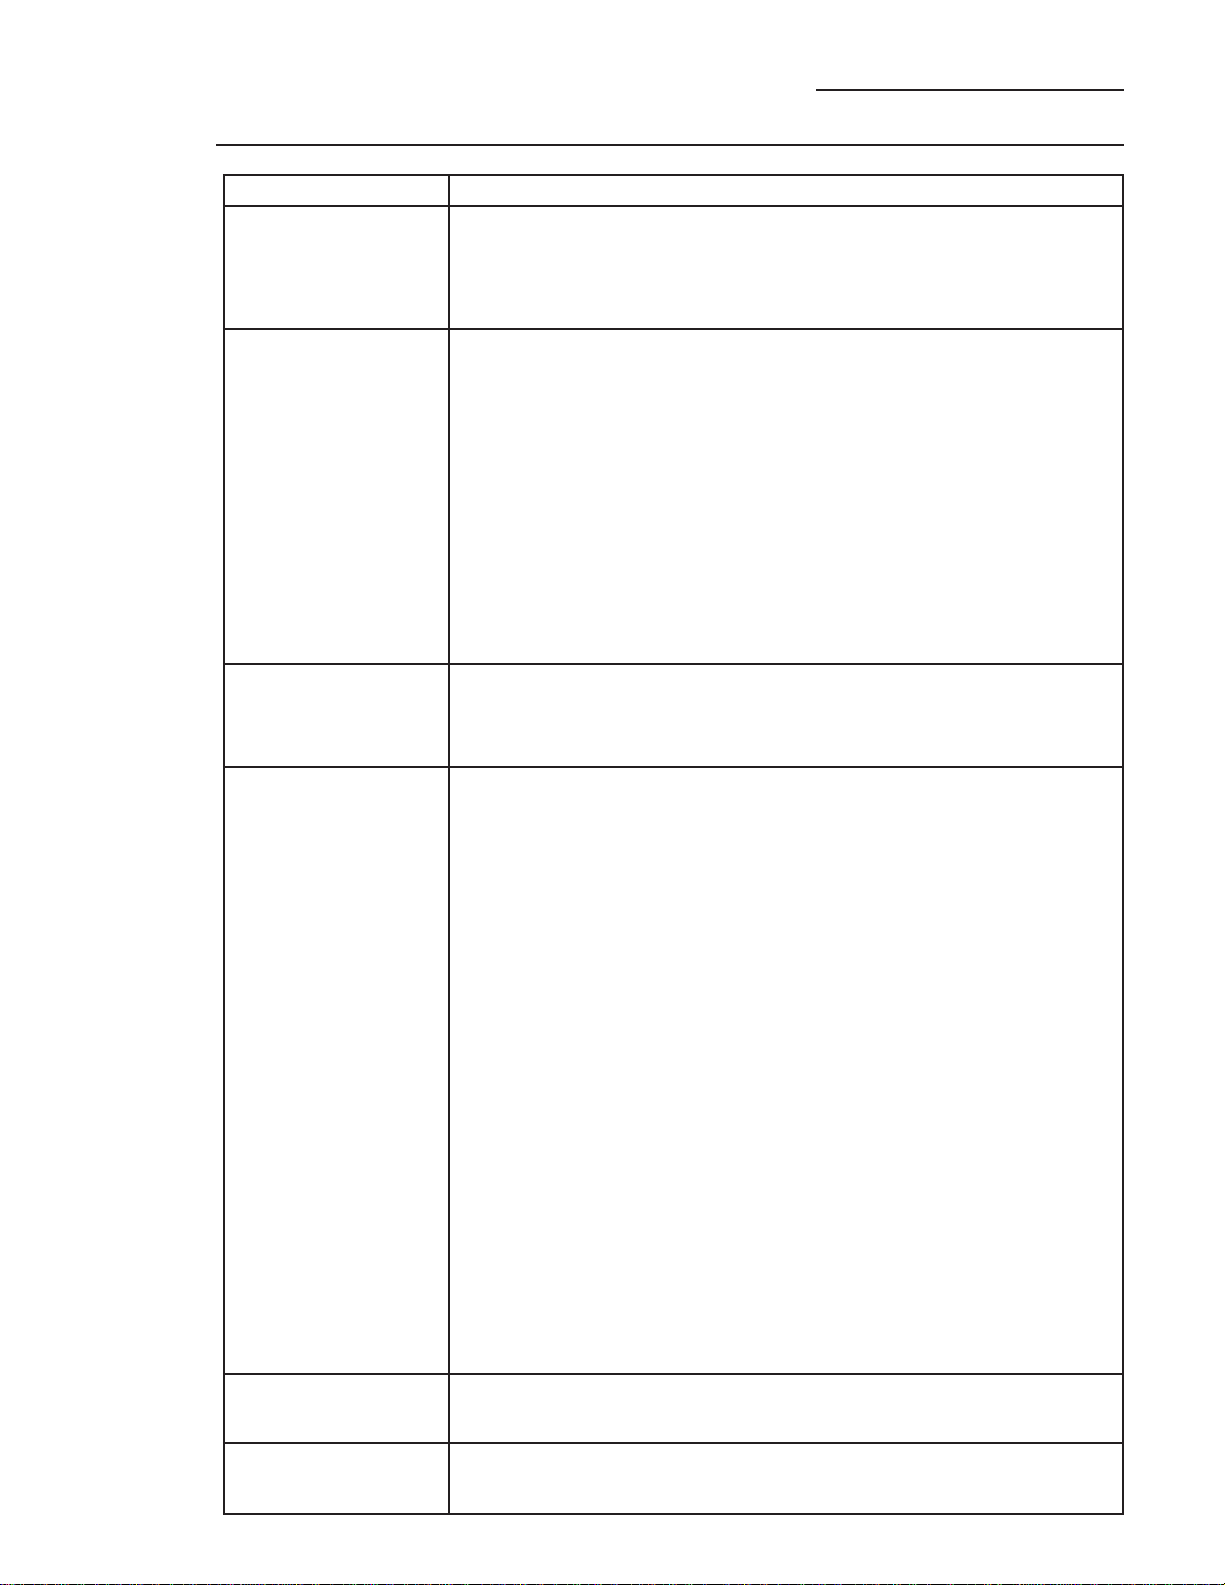
To Reset the Filter Status Light:
Press and hold the RESET pad for 3 seconds.
Filter Bypass Plug:
You must use the filter bypass plug:
a) if you have a household reverse osmosis water
system and/or another form of home water
filtration system
b) if a replacement filter is not available.
The bypass plug and the mini-manual are located
in the top machine compartment.
The icemaker will not operate without the filter
or filter bypass plug installed.
For the maximum benefit of your filtration
system, GE recommends the use of GE branded
SmartWater filters only. Using GE branded filters
in GE and Hotpoint
®
refrigerators provides
optimal performance and reliability. GE branded
SmartWater filters are always the right choice
because they are patented and designed
specifically for GE products.
GE SmartWater filters meet rigorous industry NSF
standards for safety and quality that are important
for products that are filtering your water. GE has
not qualified non-GE branded filters for use in
GE and Hotpoint refrigerators and there is no
DVVXUDQFHWKDWQRQ*(EUDQGHGILOWHUVPHHW*(·V
standards for quality, performance and reliability.
Replacement MWF filters:
To order additional MWF filter cartridges
in the United States, visit our Website
at GEAppliances.com, or call GE Parts
and Accessories, 800.626.2002.
Customers in Canada should consult the yellow
pages for the nearest Mabe Service Center.
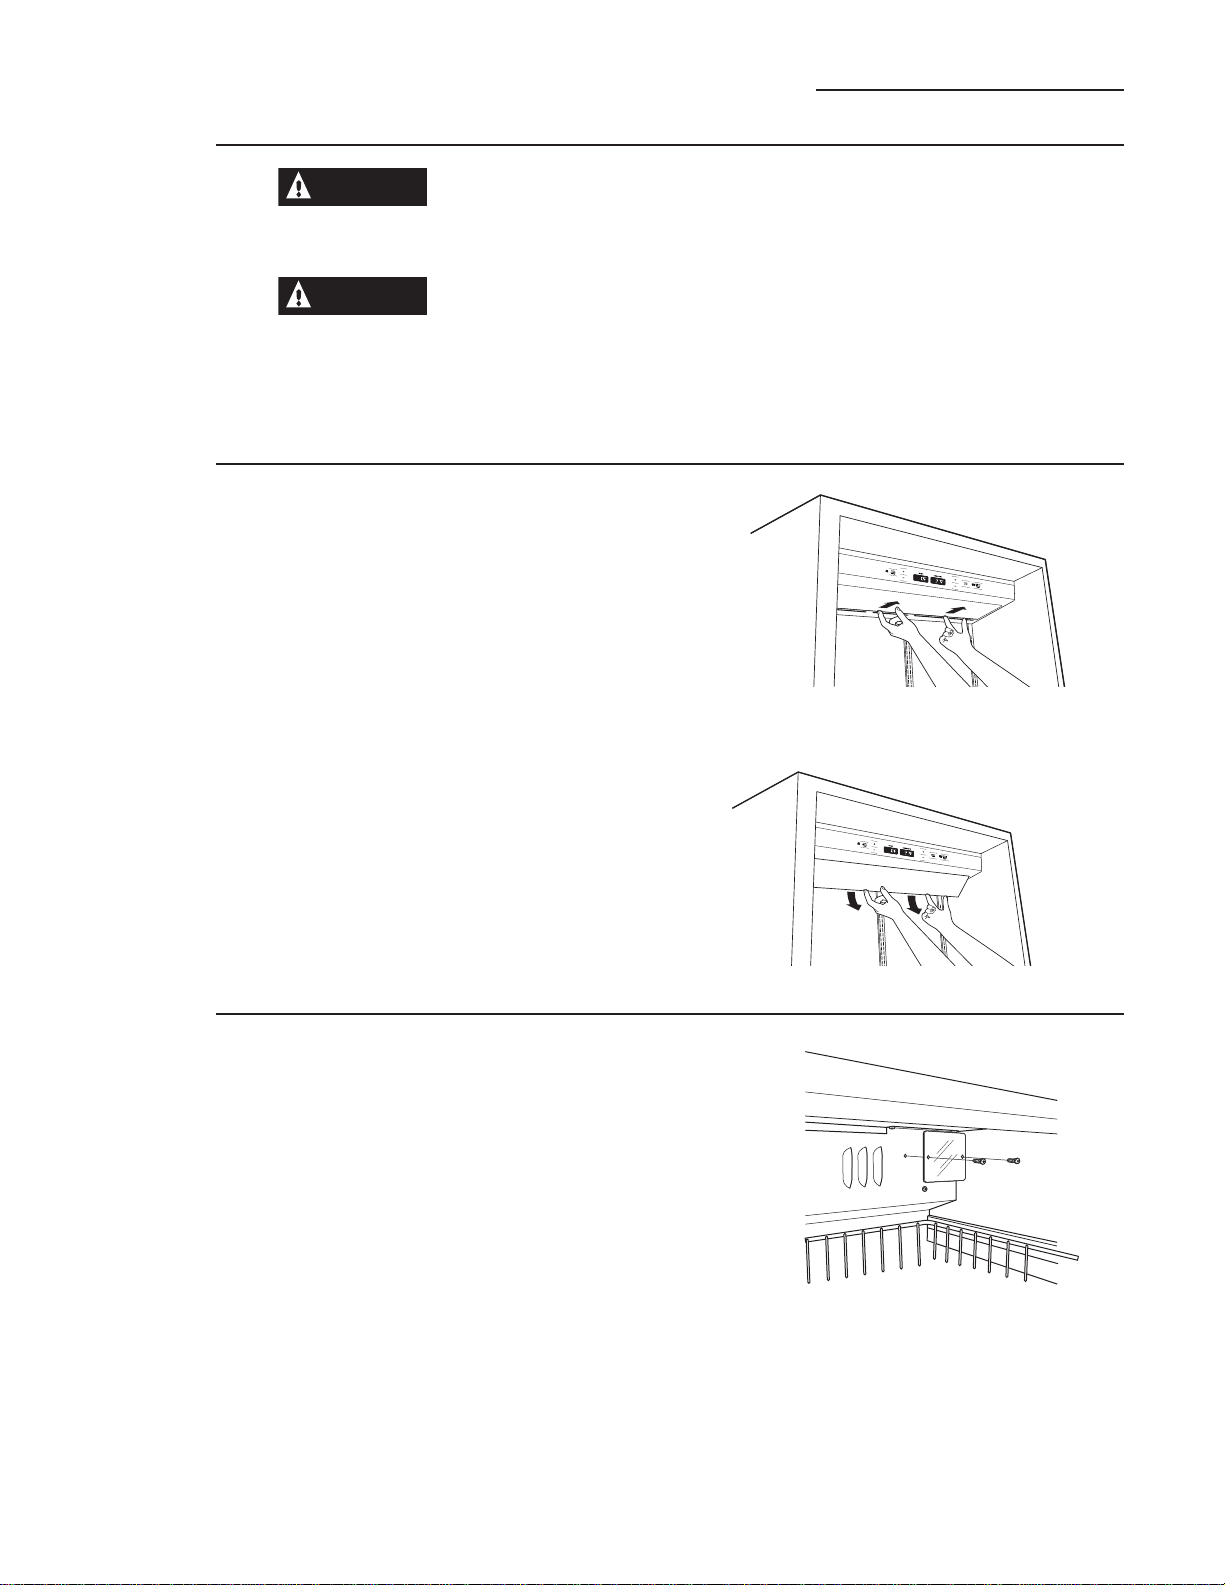
Water filter
cartridge
The water filter cartridge is located behind the grille
panel at the top of the refrigerator. Lift up
the panel to access the cartridge.
When to Replace the Filter:
The filter cartridge is designed
to filter 300 gallons of water.
It should be replaced when the status
light turns red or if you notice the
ice cubes getting hollow or small.
Installing the Filter Cartridge:
1 Raise the grille panel at the top of the
refrigerator.
2 Remove the old cartridge by slowly turning
it to the left. A small amount of water may drip
down. Do not pull down on the cartridge.
3 Fill the new cartridge with water from the
tap to allow for better flow immediately after
installation.
4 Line up the arrow on the cartridge with the
center of the holder. Do not push it up into
the holder.
5
Slowly turn it to the right until the cartridge
stops. It will rotate about 1/4 turn.
DO NOT OVERTIGHTEN.
9
Cartridge
Holder
Slowly turn it to
the right. Do not
overtighten.
Water Filter
Cartridge
Filter
Bypass
Plug
Automatic Icemaker (on some models)
Bottom Freezer Refrigerator
IMPORTANT NOTE: Remove the water filter
to immediately stop any water leak from the
Icemaker/Dispenser system. The water filter
cartridge holder (bracket) acts as a cut-off valve
when the filter is removed and will prevent
further leaking.
Call 1-800-444-1845 to schedule a service call
to repair the leak.

10
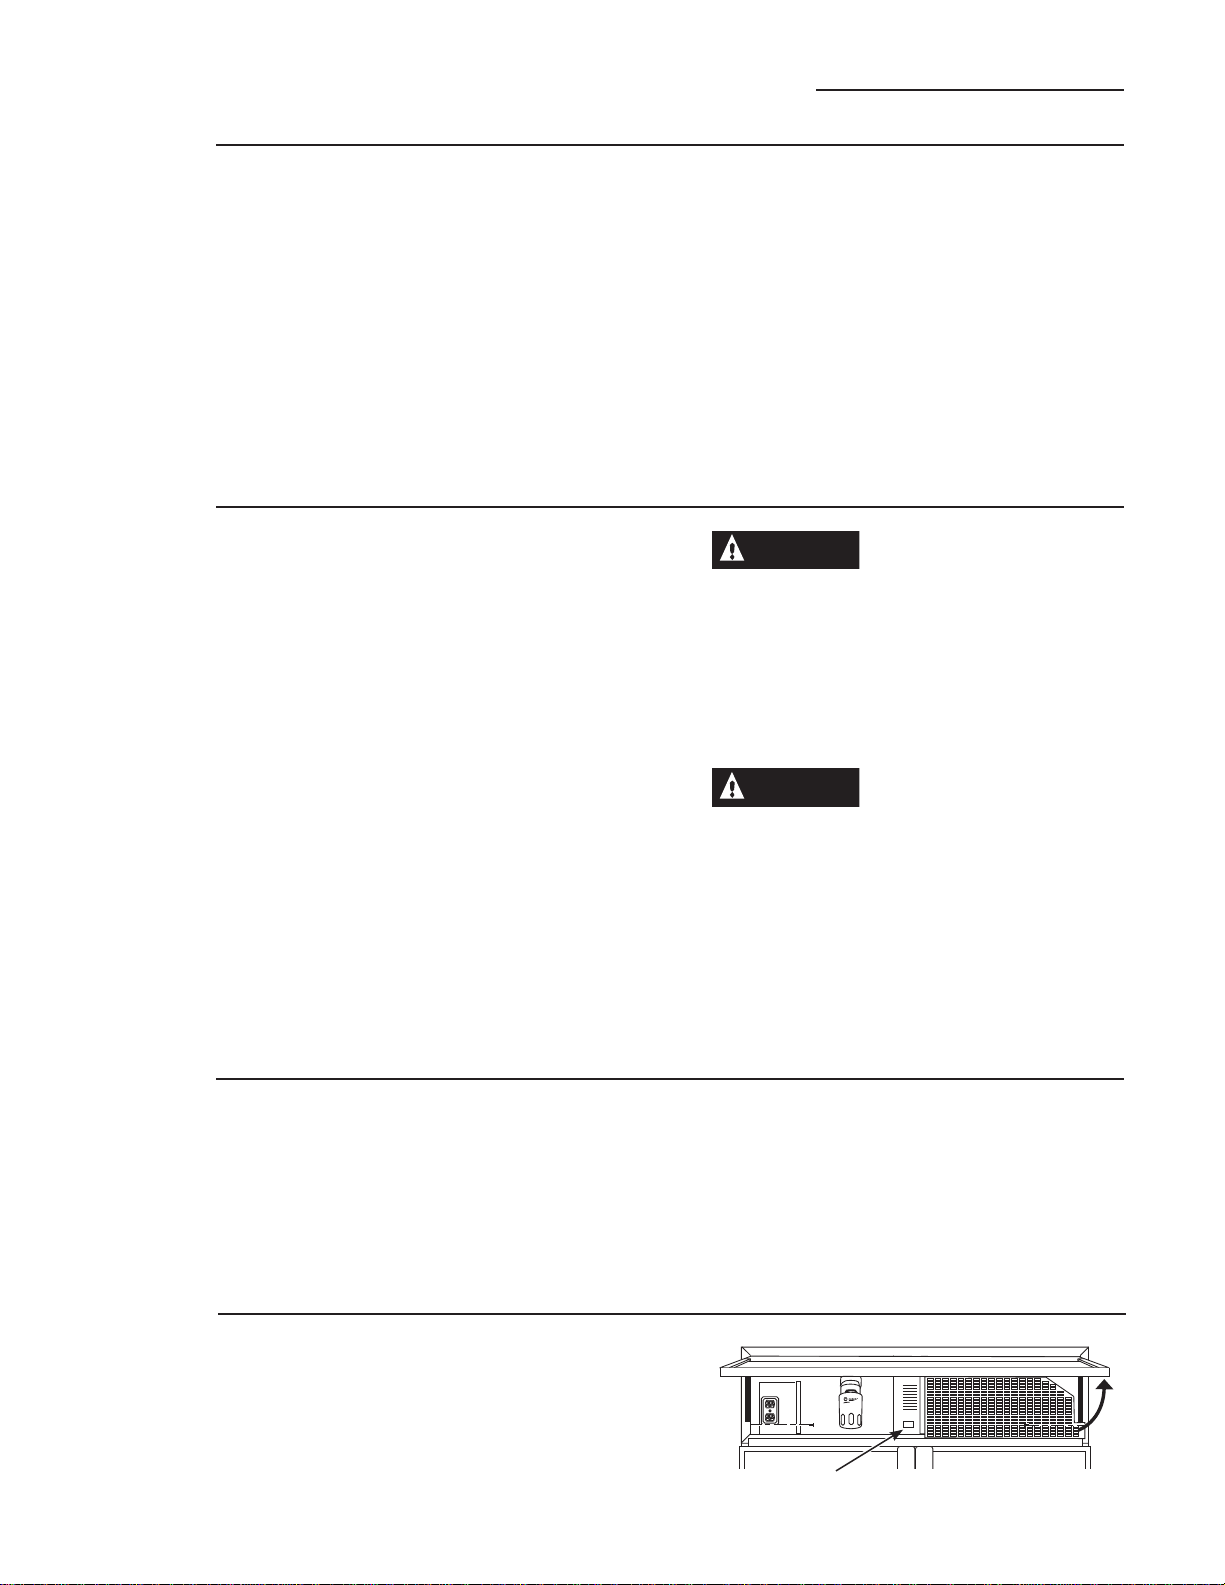
Automatic
icemaker
A newly-installed refrigerator may take
12–24 hours to begin making ice.
7KHLFHPDNHUZLOOSURGXFHVHYHQFXEHVSHUF\FOH³
approximately 15 cycles in a 24-hour period.
If the refrigerator is operated before the water
connection is made to the icemaker, set the power
switch to O (off).
When the refrigerator has been connected to
the water supply, set the power switch to
I
(on).
Throw away the first full bucket of ice to allow
the water line to clear.
Be sure nothing interferes with the sweep of
the feeler arm.
When the bin fills to the level of the feeler arm, the
icemaker will stop producing ice.
It is normal for several cubes to be joined together.
If ice is not used frequently, old ice cubes will
become cloudy, taste stale and shrink.
If ice cubes get stuck in the icemaker, set the power
switch to O (off) and remove the cubes. Set the
power switch to
I
(on) to restart the icemaker.
After the icemaker has been turned on again, there
will be a delay of about 45 minutes before the
icemaker resumes operations.
The ice bucket is conveniently located in the upper
IUHH]HUEDVNHW2FFDVLRQDOO\LFHFXEHVPD\VSLOO
out of the bucket. Should the ice cubes fall to the
bottom of the freezer, they are of no concern; they
will sublimate away harmlessly.
NOTE: In homes with low water pressure, you may
hear the icemaker water valve cycle on several
times when making one batch of ice.
CAUTION
Avoid contact with the moving
parts of the ejector mechanism, or with the
heating element (located on the bottom of the
ice maker) that releases the cubes. Do not place
fingers or hands on the automatic ice making
mechanism while the refrigerator is plugged in.
ATTENTION
eYLWH]OHFRQWDFWDYHFOHV
SLqFHVPRELOHVGXPpFDQLVPHG·pMHFWLRQ
HWO·pOpPHQWFKDXȺDQWVLWXpGDQVOHEDVGH
la machine à glaçons) qui libère les cubes.
Ne placez ni les doigts ni les mains sur le
PpFDQLVPHGHSURGXFWLRQGHJODFHDXWRPDWLTXH
ORUVTXHOHUpIULJpUDWHXUHVWEUDQFKp
Sabbath
Mode
Product Kit
(available at
extra cost)
The Sabbath Mode Product Kit was designed
for use on the Jewish Sabbath and Holidays.
The Sabbath Mode feature makes it possible for
observant Jews to refrigerate and freezer food
during the duration of the holiday.
The Sabbath Mode feature can be set to override
typical reactions to actions in your refrigerator.
While in the Sabbath Mode, your refrigerator will
still operate normally. However, the refrigerator
will not respond to your actions.
While in the Sabbath Mode, you may notice
the fan running when the door is opened;
however, this is not a result of your actions. The
fan will operate at random times. The defrost
heater will continue to defrost the refrigerator
and freezer and will be activated on a timer. The
defrost heater will not defrost as a result of door
openings or any consumer actions.
212))³To activate, raise the top grille
panel, set the Sabbath Mode switch to the
ON position. A green LED light will be visible
below the Sabbath Mode Kit switch. The green
light may not be visible with the top grille panel
closed. If you are not sure if the unit is in Sabbath
Mode, raise the grille panel and
see if the green light is on.
',63/$<6$/$506DQG/,*+76³The main
temperature control, door alarms and lights
will be disabled.
,&(0$.(5³The icemaker will be disabled.
This Sabbath Mode Product Kit can be purchased
from your local appliance dealer. The ZSAB1 Kit
is designed for use with Monogram Built-In
Refrigerators: 36s 42s and 48s Side-by-Side
models manufactured after February 2004 and
36s Bottom-Freezer models manufactured after
April 2004. To locate your nearest dealer, visit
our web site monogram.com or call
1.800.626.2000. In Canada, call 1.800.561.3344.
2UGHU.LW=6$%
NOTE: The Sabbath Mode Product Kit must be
installed by a qualified service technician.
Automatic Icemaker (on some models) and Sabbath Mode Product Kit
Bottom Freezer Refrigerator
Feeler Arm
Power Switch
Icemaker
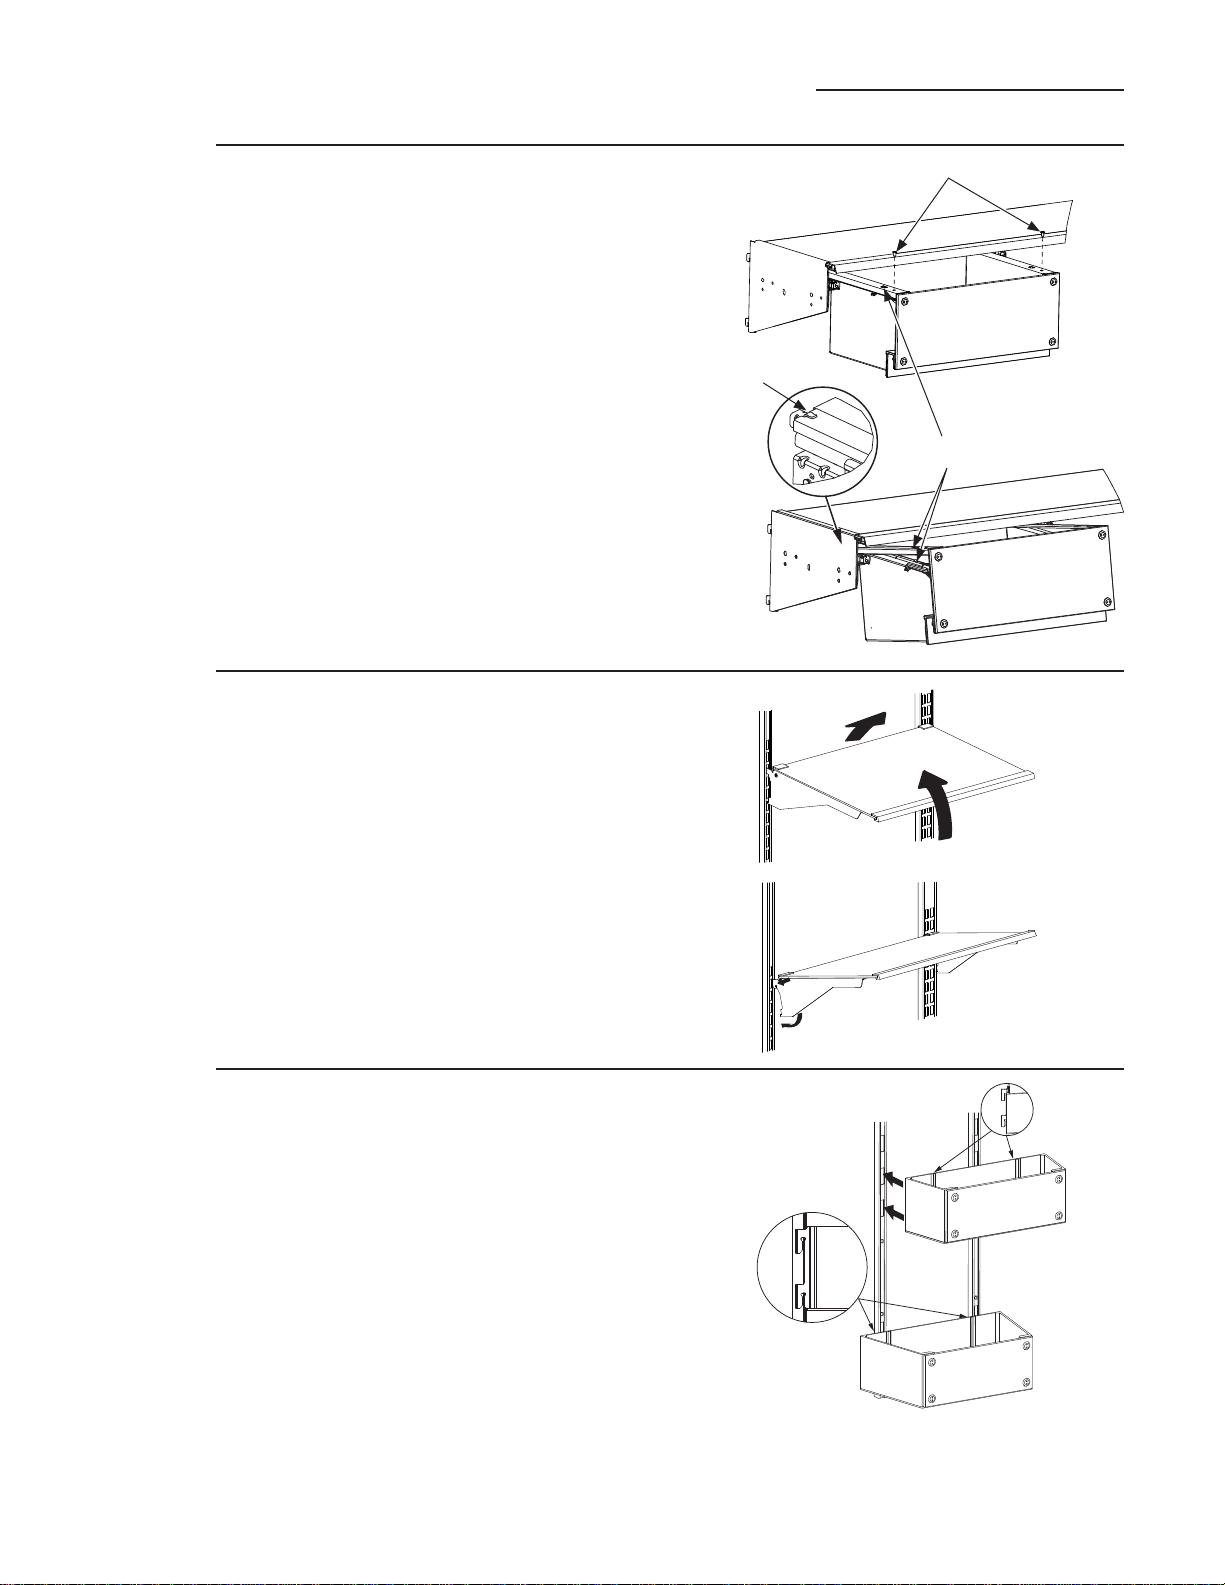
Pan
removal
To remove the pan, pull pan out and, using a
Phillips screwdriver, remove the screws on the
top sides of the pan. Pull up and out on pan. Save
screws.
To replace the pan, extend both left and right
slides, place the pan back onto the slides; there
are hooks on the rear of the slides that the pan
edges will slide under. Lay the pan flat on the
slides - there are two bumps on the slides that
will come through holes on the pan edges to hold
it in place. Using a Phillips screwdriver, replace
the screws on the tops of the pan into the slides.
Push the pan back into position.
Shelves and Bins
Bottom Freezer Refrigerator
11
Adjustable
shelves in the
fresh food
compartment
Tempered glass shelves in the fresh food
compartment enable you to make efficient shelf
DUUDQJHPHQWVWRILW\RXUIDPLO\·VIRRGVWRUDJH
needs.
To remove shelves: Tilt shelf up at front,
then lift it up and out of tracks on rear wall of
refrigerator.
To replace shelves: Select desired shelf height.
With shelf front raised slightly, engage top lugs
in tracks at rear of cabinet. Then lower front of
shelf until it locks into position.
Door
bins
Some door bins are adjustable and can be
moved up and down to meet your storage needs.
NOTE: The deeper door bins must be placed at
the bottom of the door only.
To remove: Lift the bin up and slide it toward you.
Phillips screws
Hook
Bump and
hole
12
Shelves and Bins
Bottom Freezer Refrigerator
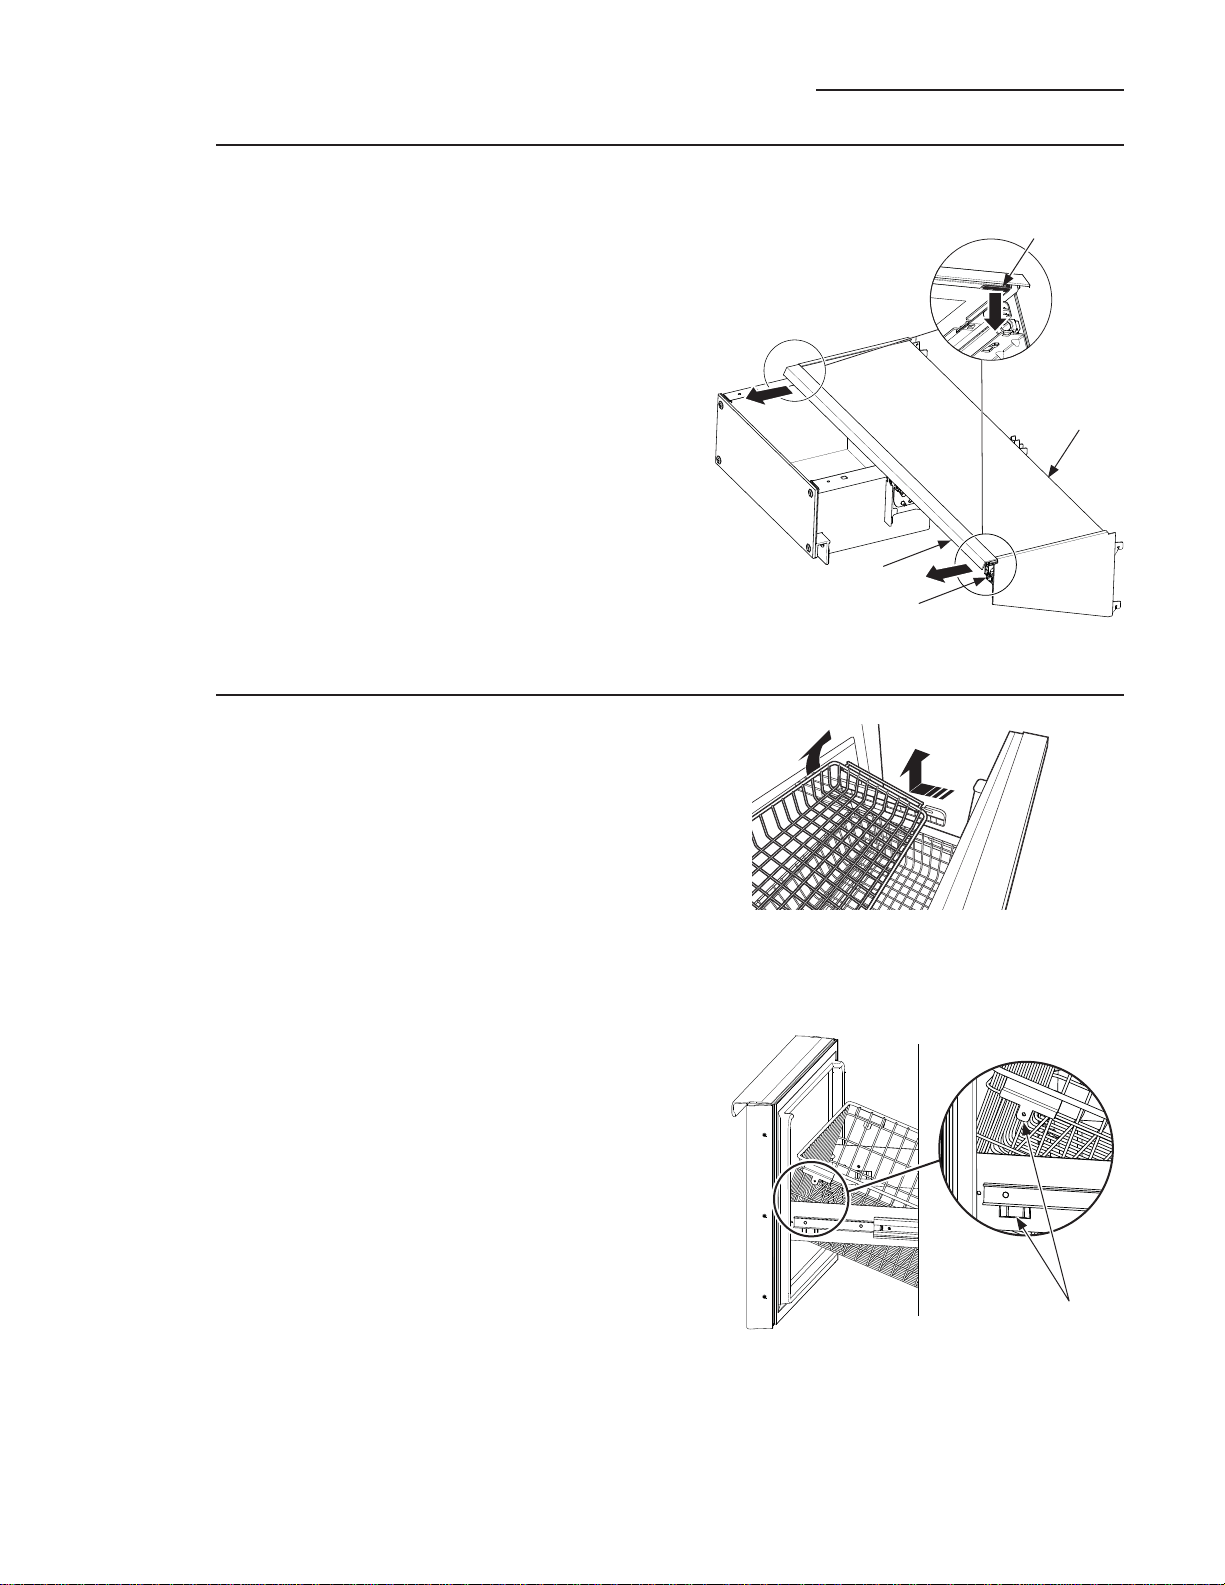
Pan cover
removal
-veg
-deli
Freezer
drawer
with
basket
The glass shelves over the veg and deli pans may
be removed for cleaning.
To remove the pan cover:
1 Extend the pans.
2 Find the lever on either side in the front under
the cover trim.
3 Push the right clip down and gently pull the
edge of the pan cover forward to disengage
the clip. Repeat on the left side.
4 2QFHERWKFOLSVDUHGLVHQJDJHGJHQWO\SXOOWKH
pan cover out of the refrigerator.
To replace the pan cover:
1 Line up the pan cover with the grooves on the
side supports making sure the cover is over
the clips.
2 Gently slide the cover back into place until
clips engage.
Inside the freezer drawer is a wire slide-out
freezer basket.
This basket can be pushed back so items on the
bottom of the freezer drawer can be reached.
To remove the upper freezer basket:
1 2SHQWKHIUHH]HUGUDZHU
2 Lift up the back of the basket, then slide the
basket back until it clears the front hooks.
Ensure that the freezer drawer is fully closed
after each opening to maintain normal
operating performance.
To remove the lower freezer basket:
1 Lift straight up until the tabs on the sides
disengage from the slots on the slide brackets.
2 Rotate the front of the basket about 90° and
pull up and out.
To replace the lower freezer basket:
1 2SHQWKHIUHH]HUGRRUIXOO\
2 Rotate the front of the basket into a vertical
position with the bottom of the basket pointing
toward you.
3 Lower the basket into the freezer
compartment rotating the front down after it
clears the freezer door.
4 Align tabs with slots on slide brackets and
lower basket into place.
To remove upper freezer basket
Tabs fit into slots
on side brackets.
Push down on the lever
and pull cover forward
to disengage the clip
one side at a time.
Lever
Cover trim
Side support
Pan
cover
Cleaning
outside
The door handles and trim. Clean with a cloth
dampened with soapy water. Dry with a soft cloth.
Keep the outside clean. Wipe with a clean
cloth lightly dampened with mild liquid dish
detergent. Dry with a clean, soft cloth.
Do not wipe the refrigerator with a soiled dish
cloth or wet towel. These may leave a residue
that can erode the paint. Do not use scouring
pads, powdered cleaners, bleach or cleaners
containing bleach because these products
can scratch and weaken the paint finish.
6WDLQOHVVVWHHO³The stainless steel doors and
door handles (on some models) can be cleaned
with a commercially available stainless steel
cleaner. Cleaners with oxalic acid such as Bar
Keepers Friend Soft Cleanser™ will remove
surface rust, tarnish and small blemishes. Use
only a liquid cleanser free of grit and rub in the
direction of the brush lines with a damp soft
sponge.
Do not use appliance wax or polish on the
stainless steel.
Cleaning
inside
To help prevent odors, leave an open box
of baking soda in the refrigerator and freezer
compartments.
Turn off power at the circuit breaker or fuse
box before cleaning. If this is not practical, wring
excess moisture out of sponge or cloth when
cleaning around switches, lights or controls.
8VHZDUPZDWHUDQGEDNLQJVRGDVROXWLRQ³
about a tablespoon (15 ml) of baking soda
to a quart (1 liter) of water. This both cleans
and neutralizes odors. Thoroughly rinse
and wipe dry.
Other parts of the refrigerator³LQFOXGLQJ
door gaskets, meat and vegetable drawers,
LFHVWRUDJHELQDQGDOOSODVWLFSDUWV³FDQEH
cleaned the same way. After cleaning the door
gaskets, apply a thin layer of petroleum jelly
to the door gaskets at the hinge side. This helps
keep the gaskets from sticking and bending
out of shape.
CAUTION
Do not clean glass shelves
or covers with warm water when they are cold.
Glass shelves and covers may break if exposed
to sudden temperature changes or impact such
as bumping or dropping. Tempered glass is
designed to shatter into many small pieces if it
breaks.
Do not wash any plastic refrigerator parts in the
dishwasher.
ATTENTION
Ne nettoyez pas les tablettes
RXFRXYHUFOHVHQYHUUHDYHFGHO·HDXFKDXGH
ORUVTX·LOVVRQWIURLGV/HVWDEOHWWHVHWFRXYHUFOHV
HQYHUUHSHXYHQWVHEULVHUV·LOVVRQWH[SRVpV
jXQHYDULDWLRQGHWHPSpUDWXUHVRXGDLQH
RXVRXPLVjXQLPSDFWV·LOVVRQWKHXUWpVRX
pFKDSSpV6·LOVHEULVHOHYHUUHWUHPSpHVWFRQoX
pour se fracturer en un grand nombre de petits
pFODWV
Ne lavez aucune pièce en plastique du
UpIULJpUDWHXUDXODYHYDLVVHOOH
Care and Cleaning
Bottom Freezer Refrigerator
13
Preparing
for
vacation
For long vacations or absences, remove food
and shut off power to the refrigerator at the fuse
box or circuit breaker. Clean the interior with a
baking soda solution of one tablespoon (15 ml)
of baking soda to one quart (1 liter) of water.
Leave the doors open.
For shorter vacations, remove perishable foods
and leave controls at regular settings. However,
if the room temperature is expected to drop
below 60°F (16°C), follow the same instructions
as for long vacations.
Set the icemaker power switch to the O (off)
position and shut off the water supply to
the refrigerator.
Using the
Master Light
switch
This feature turns off the lights in the fresh food
and freezer compartments.
The switch is located behind the grille panel
at the top of the refrigerator. Lift up the panel
to access the switch.
The switch is located on the divider behind the
grille panel.
14
Light bulb
replacement
in the
fresh food
compartment
There are four light bulbs in the top of the
fresh food compartment.
To replace the bulbs:
1 6HWWKH0DVWHU/LJKWVZLWFKLQWKH2))SRVLWLRQ
to turn off the lights. See Using the Master
Light switch.
2 Remove the light shield by placing your fingers
in the openings at the back of the shield. Then,
pull the shield toward you
and swing the back of the shield down.
3 Replace with the same size bulb (40 watt max.).
4 Reinstall the shield and reset the Master Light
VZLWFKWRWKH21SRVLWLRQ
Replacement 40-watt bulbs can be purchased
at your local general retail store, through
GE Parts and Accessories, 800.626.2002,
RUDWPRQRJUDPFRP2UGHUSDUW$
Light bulb
replacement
in the freezer
compartment
To replace a bulb:
1 6HWWKH0DVWHU/LJKWVZLWFKLQWKH2))SRVLWLRQ
to turn off the lights. See Using the Master
Light switch.
2 Remove the freezer light shield by removing
the two screws with a Phillips screwdriver.
3 Replace with the same size bulb (40 watt max.).
4 Reinstall the shield and reset the Master Light
VZLWFKWRWKH21SRVLWLRQ
Replacement 40-watt bulbs can be purchased
at your local general retail store, through
GE Parts and Accessories, 800.626.2002,
RUDWPRQRJUDPFRP2UGHUSDUW$
Care and Cleaning
Bottom Freezer Refrigerator
WARNING
Before replacing a burned-out light bulb, the refrigerator should be unplugged in order
to avoid contact with a live wire filament. (A burned-out light bulb may break when being replaced.)
7XUQLQJWKHFRQWUROWRWKH2))SRVLWLRQGRHVQRWUHPRYHSRZHUWRWKHOLJKWFLUFXLW
AVERTISSEMENT
$YDQWGHUHPSODFHUXQHDPSRXOHJULOOpHOHUpIULJpUDWHXUGRLWrWUHGpEUDQFKp
DILQG·pYLWHUOHFRQWDFWDYHFXQILODPHQWVRXVWHQVLRQ8QHDPSRXOHJULOOpHSHXWVHEULVHUORUVGHVRQ
remplacement.)
/HFRXUDQWGXFLUFXLWGHODODPSHQ·HVWSDVLQWHUURPSXPrPHHQWRXUQDQWOHERXWRQGHODFRPPDQGHGH
WHPSpUDWXUHYHUVODSRVLWLRQOFF (arrêt).
PROBLEM POSSIBLE CAUSE
REFRIGERATOR DOES
NOT OPERATE
May be in defrost cycle when compressor does not operate for about 30
minutes.
7HPSHUDWXUHFRQWUROLQWKH2))SRVLWLRQ
If interior light is not on, refrigerator may not be plugged in at wall outlet.
The fuse is blown/circuit breaker is tripped. Replace fuse or reset the breaker.
MOTOR OPERATES FOR
LONG PERIODS OR
CYCLES ON AND OFF
FREQUENTLY
(Modern refrigerators
with more storage
space and a larger
freezer require more
operating time. They
start and stop often
to maintain even
temperatures.)
Normal when refrigerator is first plugged in. Wait 24 hours for the refrigerator
to completely cool down.
The new variable speed compressor is designed to run for longer periods of
time to optimize efficiency and noise. You may notice the compressor and/
or fan speeds accelerate based upon door openings and/or increased food
loads.
You may hear the fans spinning at high speeds. This happens when the
refrigerator is first plugged in, when the doors are opened frequently or when
a large amount of food is added to the refrigerator or freezer compartments.
The fans are helping to maintain the correct temperatures.
Door left open or package holding door open.
If either door is open for over 3 minutes, you may hear the fans come on in
order to cool the light.
Hot weather or frequent door openings. This is normal.
Temperature controls set at the coldest setting. See Temperature Controls.
THUMPING SOUND
WHEN DOOR IS CLOSED
This is a normal operating sound.
The mechanism that closes the door makes a slight thumping sound as it
passes over its lever point, at approximately 80 degrees.
Closing the door slowly will minimize the sound.
OPERATING SOUNDS Refrigerator is so quiet, that most of the time you will hear low or no operating
noise.
1RUPDOIDQDLUIORZ³RQHIDQEORZVFROGDLUWKURXJKWKHIUHVKIRRGDQGIUHH]HU
FRPSDUWPHQWV³DQRWKHUIDQFRROVWKHFRPSUHVVRUPRWRU
The fans change speeds in order to provide optimal cooling and energy
savings.
7KHVH1250$/VRXQGVZLOODOVREHKHDUGIURPWLPHWRWLPH
– You may hear a whooshing or gurgling sound when the doors close. This is
due to pressure equalizing within the refrigerator.
– A water dripping noise may occur during the defrost cycle as ice melts
from the evaporator and flows into the drain pan.
– The flow of refrigerant through the freezer cooling coils may make a
gurgling noise like boiling water.
– Water dropping on the defrost heater can cause a sizzling, popping or
buzzing sound during the defrost cycle.
– You may hear cracking or popping sounds when the refrigerator is
first plugged in or during/after the defrost cycle. This happens as the
refrigerator cools to the correct temperature.
– Electronic dampers click open and closed to provide optimal cooling and
energy savings.
– The compressor may cause a clicking or chirping sound when attempting
to restart (this could take up to 5 minutes).
– The electronic control board may cause a clicking sound when relays
activate to control refrigerator components.
– Ice cubes dropping into the bin and water running in pipes as icemaker
refills.
– The icemaker water valve will buzz when the icemaker fills with water.
VIBRATION OR
RATTLING (Slight
vibration is normal.)
Refrigerator may not be properly installed.
INTERIOR LIGHT DOES
NOT WORK
No power at outlet.
Light bulb needs replacing. See Care and Cleaning.
0DVWHU/LJKWVZLWFKLVLQWKH2))SRVLWLRQ
Questions?
Use this
problem
solver!
The Problem Solver
Bottom Freezer Refrigerator
15
16
PROBLEM POSSIBLE CAUSE
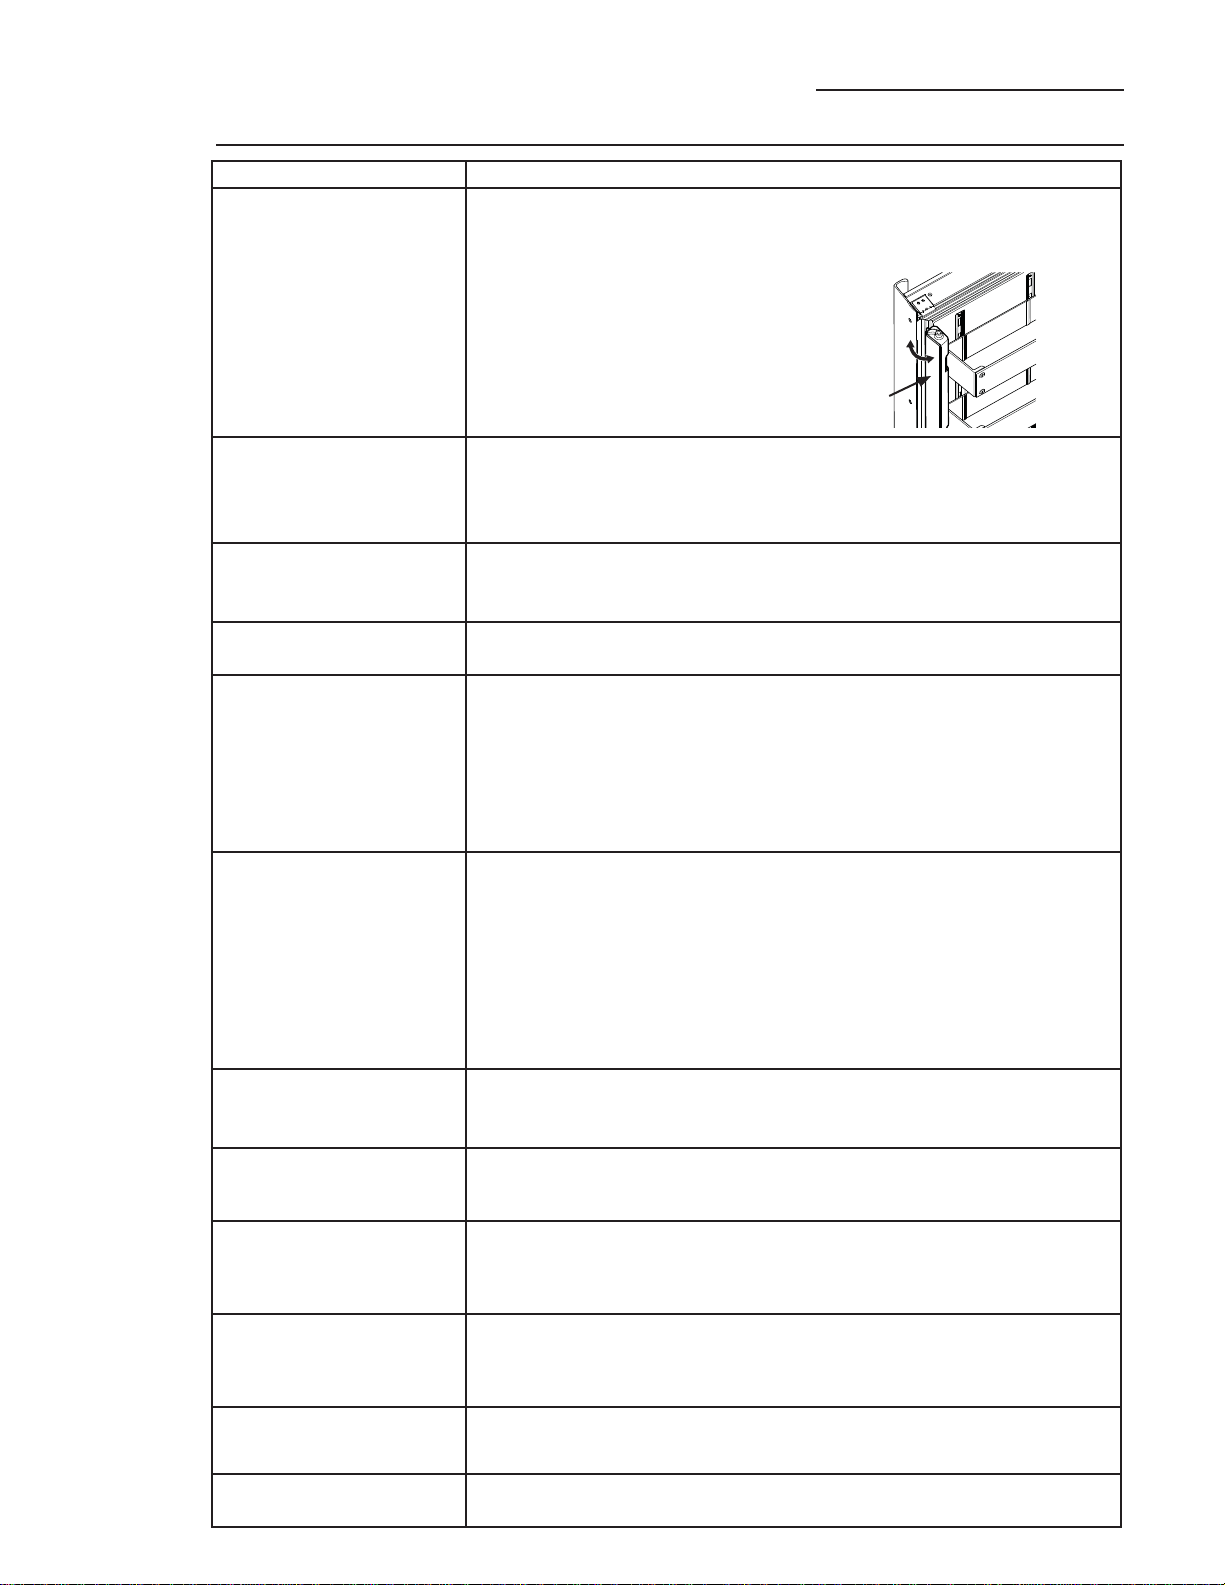
DOOR NOT CLOSING
PROPERLY
Package holding door open.
Check the door gasket; it may be out of position.
Refrigerator not level. See Installation Instructions.
Articulating mullion rotated out of position.
Rotate mullion against door liner and close door
FRESH FOOD FREEZER OR
COMPARTMENT TOO WARM
Temperature controls not set cold enough. See Temperature Controls.
Warm weather or frequent door openings.
Door left open for long time or freezer door left ajar.
Package may be holding door open.
FROST OR ICE CRYSTALS ON
FROZEN FOOD (Frost within
package is normal.)
Door left open or package holding door open.
Frequent or long door openings.
Freezer door left ajar.
SLOW ICE CUBE FREEZING Door may have been left open or freezer door left ajar.
Temperature of freezer compartment too warm.
ICE CUBES HAVE ODOR/
TASTE
2OGFXEHVQHHGWREHGLVFDUGHG
Ice storage bin needs to be emptied and washed.
Unsealed packages in freezer compartment may be transmitting odor/taste
to ice cubes.
Keep open box of baking soda in refrigerator; replace every 3 months.
Interior of refrigerator needs cleaning. See Care and Cleaning.
Poor-tasting incoming water. Replace water filter.
AUTOMATIC ICEMAKER
DOES NOT WORK
Icemaker power switch is in the O (off) position.
Water supply turned off, restricted or not connected. Call your installer for
proper water supply line connection.
Water filter clogged. Replace the filter or use the filter bypass plug.
Freezer compartment too warm.
Piled up cubes in storage bin may cause icemaker to shut off too soon. Level
cubes in bin.
Ice cubes stuck in icemaker. Turn off the icemaker, remove cubes and turn
the icemaker back on.
MOISTURE FORMS ON
OUTSIDE OF REFRIGERATOR
Not unusual during periods of high humidity. Wipe surface dry.
Door left open or package holding door open.
Controlling humidity and temperature in the kitchen with air conditioning.
MOISTURE COLLECTS
INSIDE
In humid weather, air carries moisture into refrigerator when doors are
opened.
Controlling humidity and temperature in the kitchen with air conditioning.
REFRIGERATOR HAS ODOR Foods with strong odors should be tightly covered.
Check for spoiled food.
Interior needs cleaning. See Care and Cleaning.
Keep open box of baking soda in refrigerator; replace every 3 months.
SMALL OR HOLLOW CUBES Water filter clogged. Replace the filter or use the filter bypass plug.
&KHFNIRUDFRQQHFWLRQWRD5HYHUVH2VPRVLVZDWHUV\VWHP,IDQ52LV
connected, remove the water filter and install the original bypass plug that
came with the unit.
CLICKING SOUND WHEN
FREEZER DRAWER IS
OPENED OR CLOSED
This unit is equipped with a hold shut feature, which can be heard when the
drawer front is within 2” of the face of the cabinet.
FREEZER DRAWER NOT
CLOSING PROPERLY
Package holding drawer open.
Drawer hold -shut needs reset, open drawer fully and forcefully close.
Questions?
Use this
problem
solver!
The Problem Solver
Bottom Freezer Refrigerator
Articulating mullion in
position for closing door
17
With the purchase of your new Monogram appliance, receive
the assurance that if you ever need information or assistance
from GE, we’ll be there. All you have to do is call–toll-free!
GE Answer
Center
®
In the USA:
800.626.2000
Whatever your question about any Monogram major appliance, GE Answer Center
®
information
VHUYLFHLVDYDLODEOHWRKHOS<RXUFDOO³DQG\RXUTXHVWLRQ³ZLOOEHDQVZHUHGSURPSWO\DQG
courteously. Call the GE Answer Center
®
Monday to Friday, 8 a.m. to 10 p.m. EST, and Saturday, 8
a.m. to 7. p.m. EST.
OR
Visit our Website at: monogram.com
In Canada, call 1.800.561.3344.
In-Home Repair
Service
In the USA:
800.444.1845
In Canada:
1.800.561.3344
A GE consumer service professional will provide expert repair service, scheduled at a time
WKDW·VFRQYHQLHQWIRU\RX7RVFKHGXOHVHUYLFHFDOO0RQGD\WR)ULGD\DPWRSP(67
or Saturday and Sunday, 8 a.m. to 6 p.m. EST. Many GE Consumer Service company- operated
ORFDWLRQVRIIHU\RXVHUYLFHWRGD\RUWRPRUURZRUDW\RXUFRQYHQLHQFH2XUIDFWRU\WUDLQHG
WHFKQLFLDQVNQRZ\RXUDSSOLDQFHLQVLGHDQGRXW³VRPRVWUHSDLUVFDQEHKDQGOHGLQMXVWRQH
visit.
In Canada: Monday through Friday, 7 a.m. to 8 p.m., and Saturday, 8 a.m. to 5 p.m. EST
Service Contracts
In the USA:
800.626.2224
In Canada:
1.800.561.3344
You can have the secure feeling that GE Consumer Service will still be there after your
ZDUUDQW\H[SLUHV3XUFKDVHD*(FRQWUDFWZKLOH\RXUZDUUDQW\LVVWLOOLQHIIHFWDQG\RX·OOUHFHLYHD
VXEVWDQWLDOGLVFRXQW:LWKDPXOWLSOH\HDUFRQWUDFW\RX·UHDVVXUHGRIIXWXUHVHUYLFHDW
WRGD\·VSULFHV
Parts and
Accessories
In the USA:
800.626.2002
In Canada:
1.800.561.3344
Individuals qualified to service their own appliances can have parts or accessories sent directly
to their home. The GE parts system provides access to over 47,000 parts…and all GE Genuine
Renewal Parts are fully warranted. VISA, MasterCard and Discover cards are accepted.
User maintenance instructions contained in this manual cover procedures intended to be
performed by any user. Other servicing generally should be referred to qualified service
personnel. Caution must be exercised, since improper servicing may cause unsafe operation.
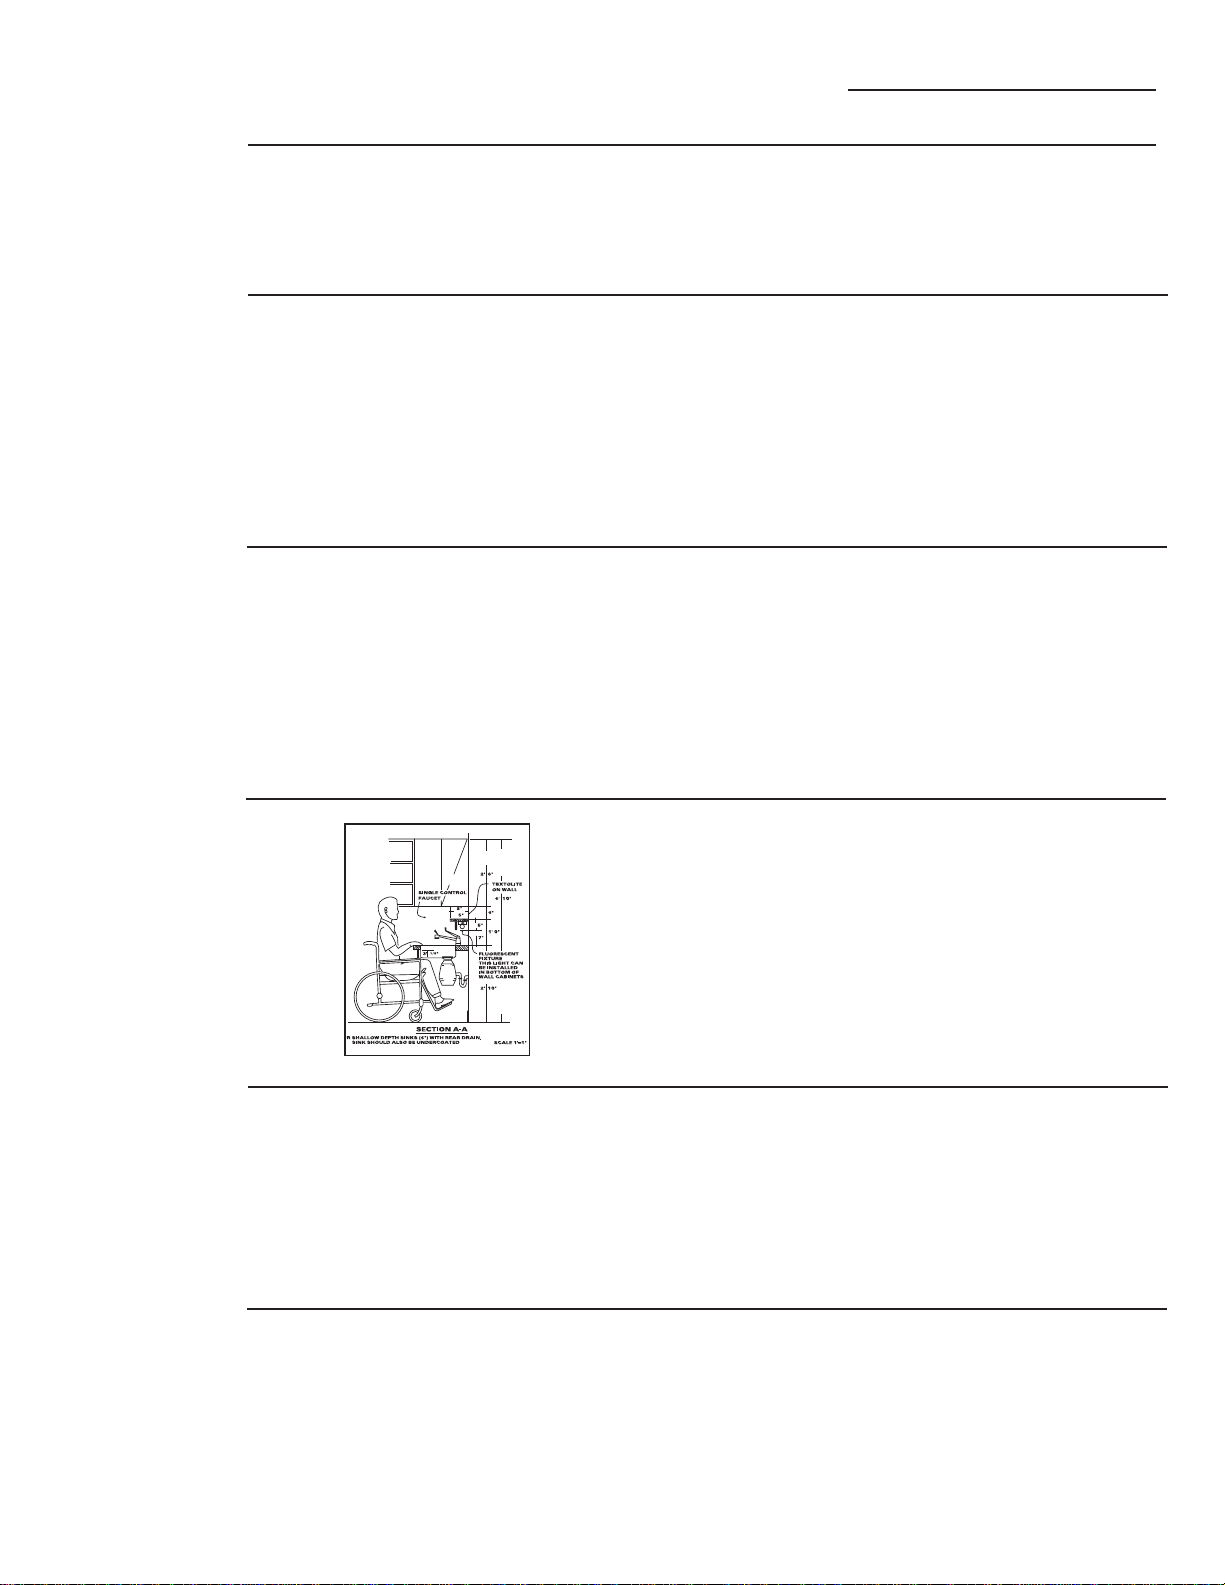
For Customers
With Special
Needs…
In the USA:
800.626.2000
GE offers Braille controls for a variety of GE appliances, and
a brochure to assist in planning a barrier-free kitchen for persons
with limited mobility.
Consumers with impaired hearing or speech who have access to
a
TDD or a conventional teletypewriter may call 800.TDD.GEAC
(800.833.4322) to request information or service.
Consumer Services
Bottom Freezer Refrigerator
Some states/provinces do not allow the exclusion or limitation of incidental or consequential damages,
so the above limitation or exclusion may not apply to you. This warranty gives you specific legal rights, and you
may also have other rights which vary from state to state/province to province. To know what your legal rights
DUHLQ\RXUVWDWHSURYLQFHFRQVXOW\RXUORFDORUVWDWHSURYLQFLDOFRQVXPHUDIIDLUVRIILFHRU\RXUVWDWH·V$WWRUQH\
General.
Warrantor in USA: General Electric Company,
Louisville, KY 40225
Warrantor in Canada: Mabe Canada Inc.
Warranty
Bottom Freezer Refrigerator
YOUR MONOGRAM REFRIGERATOR WARRANTY
Staple sales slip or canceled check here. Proof of original
purchase date is needed to obtain service under warranty.
WHAT IS
COVERED
From the Date
of the Original
Purchase
LIMITED TWO-YEAR WARRANTY
For two years from date of original purchase, we will provide, free of charge, parts and service labor in your home
to repair or replace any part of the refrigerator that fails because of a manufacturing defect.
LIMITED FIVE-YEAR WARRANTY
For five years from date of original purchase, we will provide, free of charge, parts and service labor
in your home to repair or replace any part of the sealed refrigerating system (the compressor, condenser,
evaporator and all connecting tubing) that fails because of a manufacturing defect.
LIMITED ADDITIONAL SIXTH- THROUGH TWELFTH-YEAR WARRANTY ON THE SEALED SYSTEM
For the sixth through twelfth year from the date of the original purchase, we will provide, free of charge,
replacement parts for any part of the sealed refrigerating system (the compressor, condenser, evaporator and
all connecting tubing) that fails because of a manufacturing defect. You pay for the service trip to your home
and for service labor charges.
LIMITED THIRTY-DAY WARRANTY ON WATER FILTER CARTRIDGE (Water filter, if included)
From the date of the original purchase we will provide, free of charge, replacement parts for any part of the
water filter cartridge that fails because of a manufacturing defect. During this limited thirty-day warranty,
we will also provide, free of charge, a replacement water filter cartridge.
This warranty is extended to the original purchaser and any succeeding owner for products purchased for
ordinary home use in the 48 mainland states, Hawaii, Washington, D.C. or Canada. If the product is located in an
area where service by a GE Authorized Servicer is not available, you may be responsible for a trip charge or you
may be required to bring the product to an Authorized GE Service location for service. In Alaska the warranty
is the same except that it is LIMITED because you must pay to ship the product to the service shop or for the
VHUYLFHWHFKQLFLDQ·VWUDYHOFRVWVWR\RXUKRPH
All warranty service will be provided by our Factory Service Centers or by our authorized Customer Care
®
servicers during normal working hours.
Should your appliance need service, during warranty period or beyond, in the USA call 800.444.1845.
In Canada: 800.561.3344. Please have your serial number and model number available when calling for service.
WHAT IS NOT
COVERED
• Service trips to your home to teach you how
to use the product.
• Replacement of house fuses or resetting of circuit
breakers.
• Damage to the product caused by accident, fire,
floods or acts of God.
• Failure of the product if it is used for other than its
intended purpose or used commercially.
•
Damage to finish, such as surface rust, tarnish, or
small blemishes not reported within 48 hours of
delivery.
• Improper installation, delivery or maintenance.
If you have an installation problem, contact
your dealer or installer. You are responsible for
providing adequate electrical, plumbing and other
connecting facilities.
• Replacement of the light bulbs, if included, or
water filter cartridge, if included, other than as
noted above.
• Replacement of the water filter cartridge, if
included, due to water pressure that is outside
the specified operating range or due to excessive
sediment in the water supply.
• Loss of food due to spoilage (in the USA only).
• Incidental or consequential damage caused by
possible defects with this appliance.
• Product not accessible to provide required
service.
• Damage caused by a non-GE brand water filter.
224D3548P001
49-60699-1
Printed in the United States
11-14 GE
(;&/86,212),03/,(':$55$17,(6³<RXUVROHDQGH[FOXVLYHUHPHG\LVSURGXFWUHSDLUDVSURYLGHGLQ
this Limited Warranty. Any implied warranties, including the implied warranties of merchantability or
fitness for a particular purpose, are limited to one year or the shortest period allowed by law.
GE
Appliances
Appliance Park
Louisville, KY 40225
GEA
pp
liances.com

