Loading ...
Loading ...
Loading ...
Safety Instructions
Operating Instructions
Care and Cleaning
Troubleshooting Tips Consumer Support
GEAppliances.com
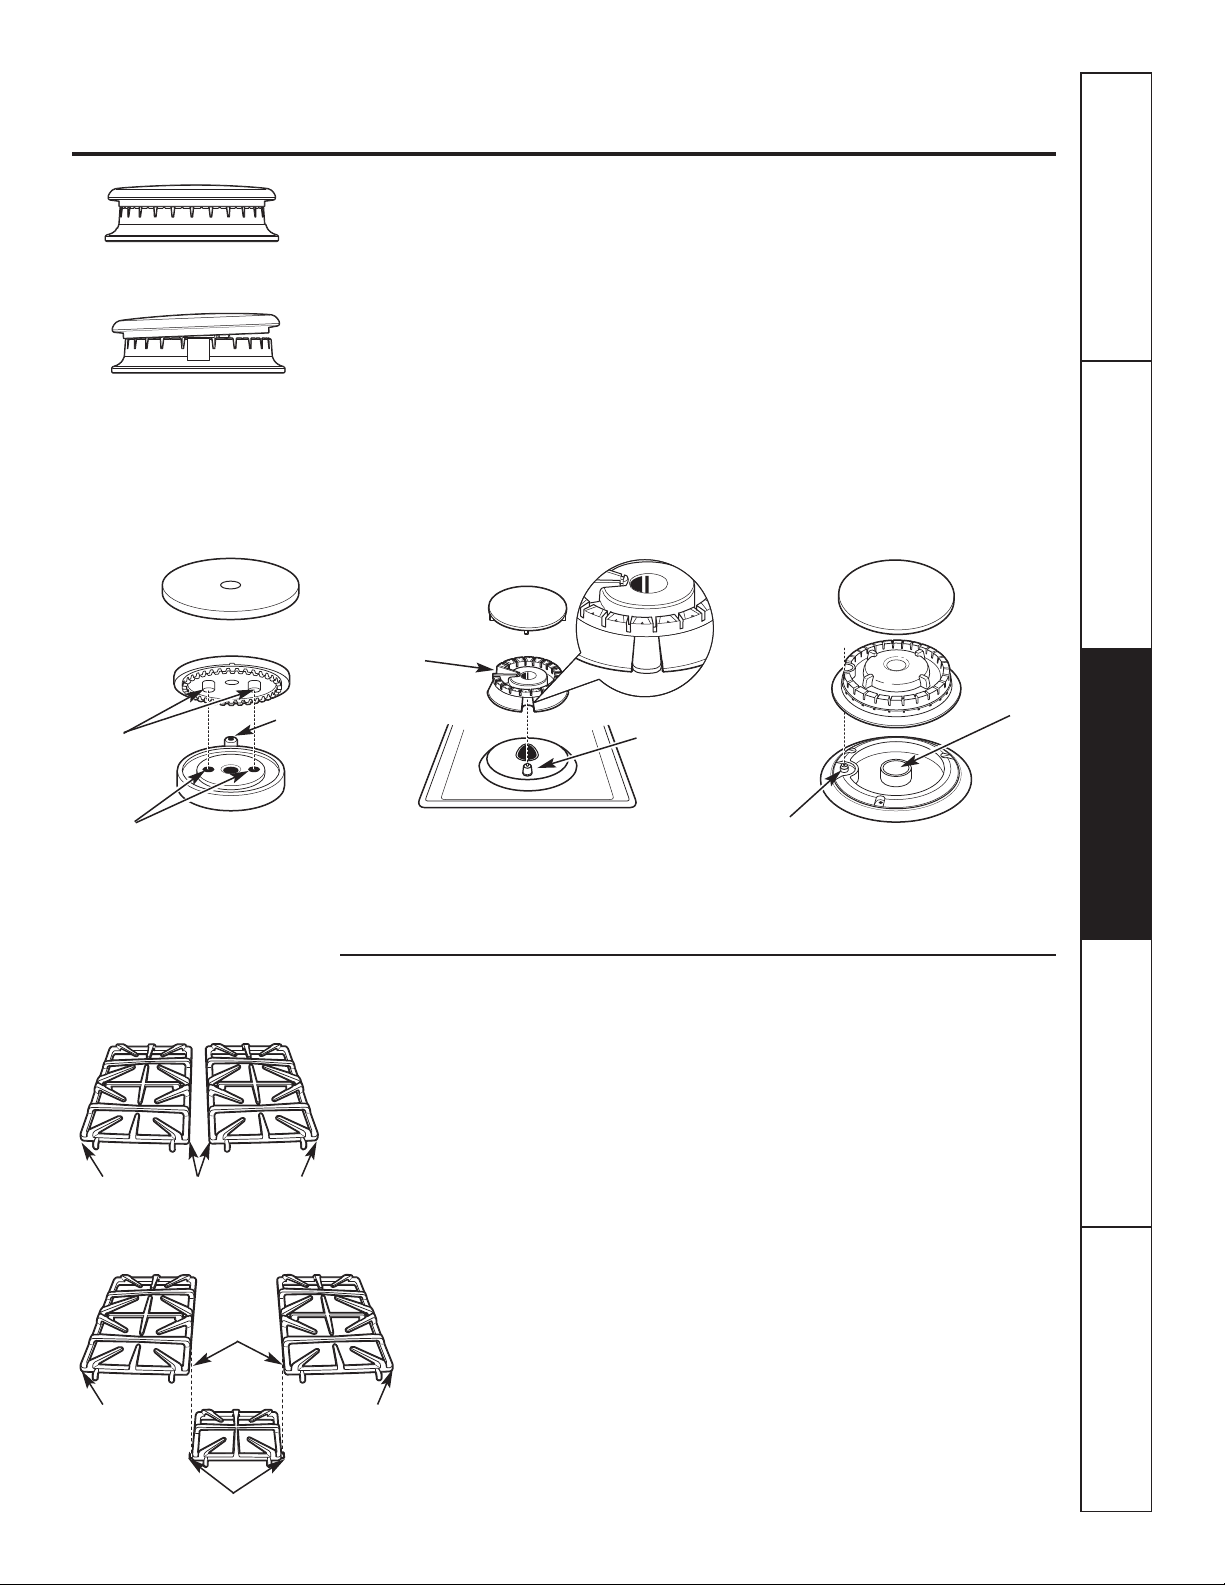
Burner Head and Cap Replacement
Replace the burner head onto the
burner base, making sure that the head is
properly oriented over the burner base
and the electrode. Make sure to place the
correct burner head on the correct
burner base and that the burner head sits
level on the burner base. The burner
heads are not interchangeable.
Replace the burner cap onto the burner
head, making sure to place the correct
burner cap on the correct burner head.
The burner caps are not interchangeable.
Also, make sure that the burner caps are
properly seated on the burner heads.
JGP328, JGP330, JGP628, JGP630,
JGP933, JGP945, JGP963, JGP975
JGP940 and JGP970 (all burners)
JGP933 and JGP963
(right front burner only)
Make sure the slot in the burner head is positioned
over the electrode. The burner cap has three
to four pins. When replacing the cap, make sure
none of the pins sits in the stability chamber.
Make sure the hole in the burner head assembly
is positioned over the electrode and that the burner
head is fully inserted inside the burner base. A
small gap between the base and head is normal.
Burner cap
Burner head
Burner base
Electrode
Burner Grates
Your cooktop has professional style
grates. These grates are designed for
specific positions. These grates should
only be used in their proper positions;
they should not be interchanged. For
your convenience, the undersides of
the left and right grates are marked
“OUTSIDE” and “INSIDE”. Make sure
that the sides marked “OUTSIDE” are
facing the outer edge of the cooktop and
the sides marked “INSIDE” are
facing each other. All grates
should touch once they are
fully assembled on the
cooktop surface.
For cooktops with three grates,
make sure that the tabs on
either side of the center grate
fit into the slots located on the
“INSIDE” edge of the side
grates.
Lift the burner grates out only when
cool. Grates should be washed regularly
and, of course, after spillovers. Wash
them in the dishwasher or in hot, soapy
water and rinse with clean water. When
replacing the grates, be sure they are
positioned securely over the burners.
Although they are durable, the grates will
gradually lose their shine, regardless of
the best care you can give them. This is
due to their continual exposure to high
temperatures. You will notice this sooner
with lighter color grates.
Do not operate a burner for an extended
period of time without cookware on the
grate. The finish on the grate may chip
without cookware to absorb the heat.
NOTE: Do not clean the grates in a
self-cleaning oven.
(On some models)
“OUTSIDE”
edge
“OUTSIDE”
edge
“INSIDE”
edges
11
Burner cap not properly seated
Burner cap properly seated
Locator
pins
Pin
indentations
Burner
base
Electrode
Burner head
Burner cap
Make sure the pins in the burner heads match
the burner base indentations and that they are
properly seated in them by rotating the heads
until they are level.
JGP945 and JGP975
(right front burner only)
Burner cap
Burner head
assembly
Burner
base
Electrode
Stability
chamber
(On some models)
“OUTSIDE”
edge
“OUTSIDE”
edge
“INSIDE”
edges
Tabs
Orifice
Loading ...
Loading ...
Loading ...