Search
Home
Bookmarks
Brands
Articles
About us
Home
GE - General Electric
GE - General Electric HTS17CBDJRCC User Manual
Page 21
User Manual - Page 21
For HTS17CBDJRCC.
Page 21/64
Page 1
Page 2
Page 3
Page 4
Page 5
Page 6
Page 7
Page 8
Page 9
Page 10
Page 11
Page 12
Page 13
Page 14
Page 15
Page 16
Page 17
Page 18
Page 19
Page 20
Page 21
Page 22
Page 23
Page 24
Page 25
Page 26
Page 27
Page 28
Page 29
Page 30
Page 31
Page 32
Page 33
Page 34
Page 35
Page 36
Page 37
Page 38
Page 39
Page 40
Page 41
Page 42
Page 43
Page 44
Page 45
Page 46
Page 47
Page 48
Page 49
Page 50
Page 51
Page 52
Page 53
Page 54
Page 55
Page 56
Page 57
Page 58
Page 59
Page 60
Page 61
Page 62
Page 63
Page 64
Contents
Table of Contents
Search
Previous
Next
Troubleshooting
Bookmarks
Loading ...
Loading ...
Loading ...
Cut here
For refrigerators installed in Canada
21
Loading ...
Loading ...
Loading ...
<
18
19
20
21
22
23
>
File type: PDF
File name: hts17cbdhrbb.pdf
File size: 1.69 MB
File Language: English
Pages: 64
Author: GE - General Electric
Updated: 2023-05-28
Download File
Table of Contents
×
English
2
Safety Instructions
2
Operating Instructions
3
Automatic Icemaker
5
Automatic Icemaker (on Some Models)
5
Care And Cleaning
6
Cleaning The Outside
6
Moving The Refrigerator
6
Cleaning The Inside
6
Condenser
6
Light Bulb Replacement
6
Preparing For Vacation
6
Preparing To Move
6
Energy Smart Models
3
Shelves
4
HalfWidth Shelves
4
FullWidth Shelves
4
Step Shelf (on Some Models)
4
Storage Drawers
5
Snacks Drawer
5
Fruit And Vegetable Drawers
5
Adjustable Humidity Drawer (on Some Models)
5
Drawer And Cover Removal
5
Twin Drawer Shelf
5
Temperature Controls
4
Installation Instructions
7
Preparing To Install The Refrigerator
7
BEFORE YOU BEGIN
7
WATER SUPPLY TO THE ICEMAKER
7
REFRIGERATOR LOCATION
7
CLEARANCES
7
ROLLERS AND LEVELING LEGS
7
Reversing The Door Swing
11
IMPORTANT NOTES
11
TOOLS REQUIRED
11
BEFORE YOU START
11
REMOVE THE FREEZER DOOR
11
REMOVE THE FRESH FOOD DOOR
12
REVERSING THE HARDWARE
12
REVERSING THE DOOR HANDLES
13
REHANGING THE DOORS
14
Water Line Installation
8
BEFORE YOU BEGIN
8
WHAT YOU WILL NEED
8
SHUT OFF THE MAIN WATER SUPPLY AND UNPLUG REFRIGERATOR
9
DRILL THE HOLE FOR THE VALVE
9
FASTEN THE SHUTOFF VALVE
9
ROUTE THE TUBING
9
CONNECT THE TUBING TO THE VALVE
9
FLUSH OUT THE TUBING
9
CONNECT THE TUBING TO THE REFRIGERATOR
10
TURN THE WATER ON AT THE SHUTOFF VALVE
10
PLUG IN THE REFRIGERATOR
10
START THE ICEMAKER
10
CONNECTING ENERGY SMART APPLIANCE
15
REMOVE LABEL OVER INTERCONNECT CABLE CONNECTOR ON ACCESS COVER
15
CONNECT APPLIANCE TO ACM
15
PLACE ACM
15
Troubleshooting Tips
16
Before You Call For Service
16
Normal Operating Sounds
16
Consumer Support
18
Consumer Support
64
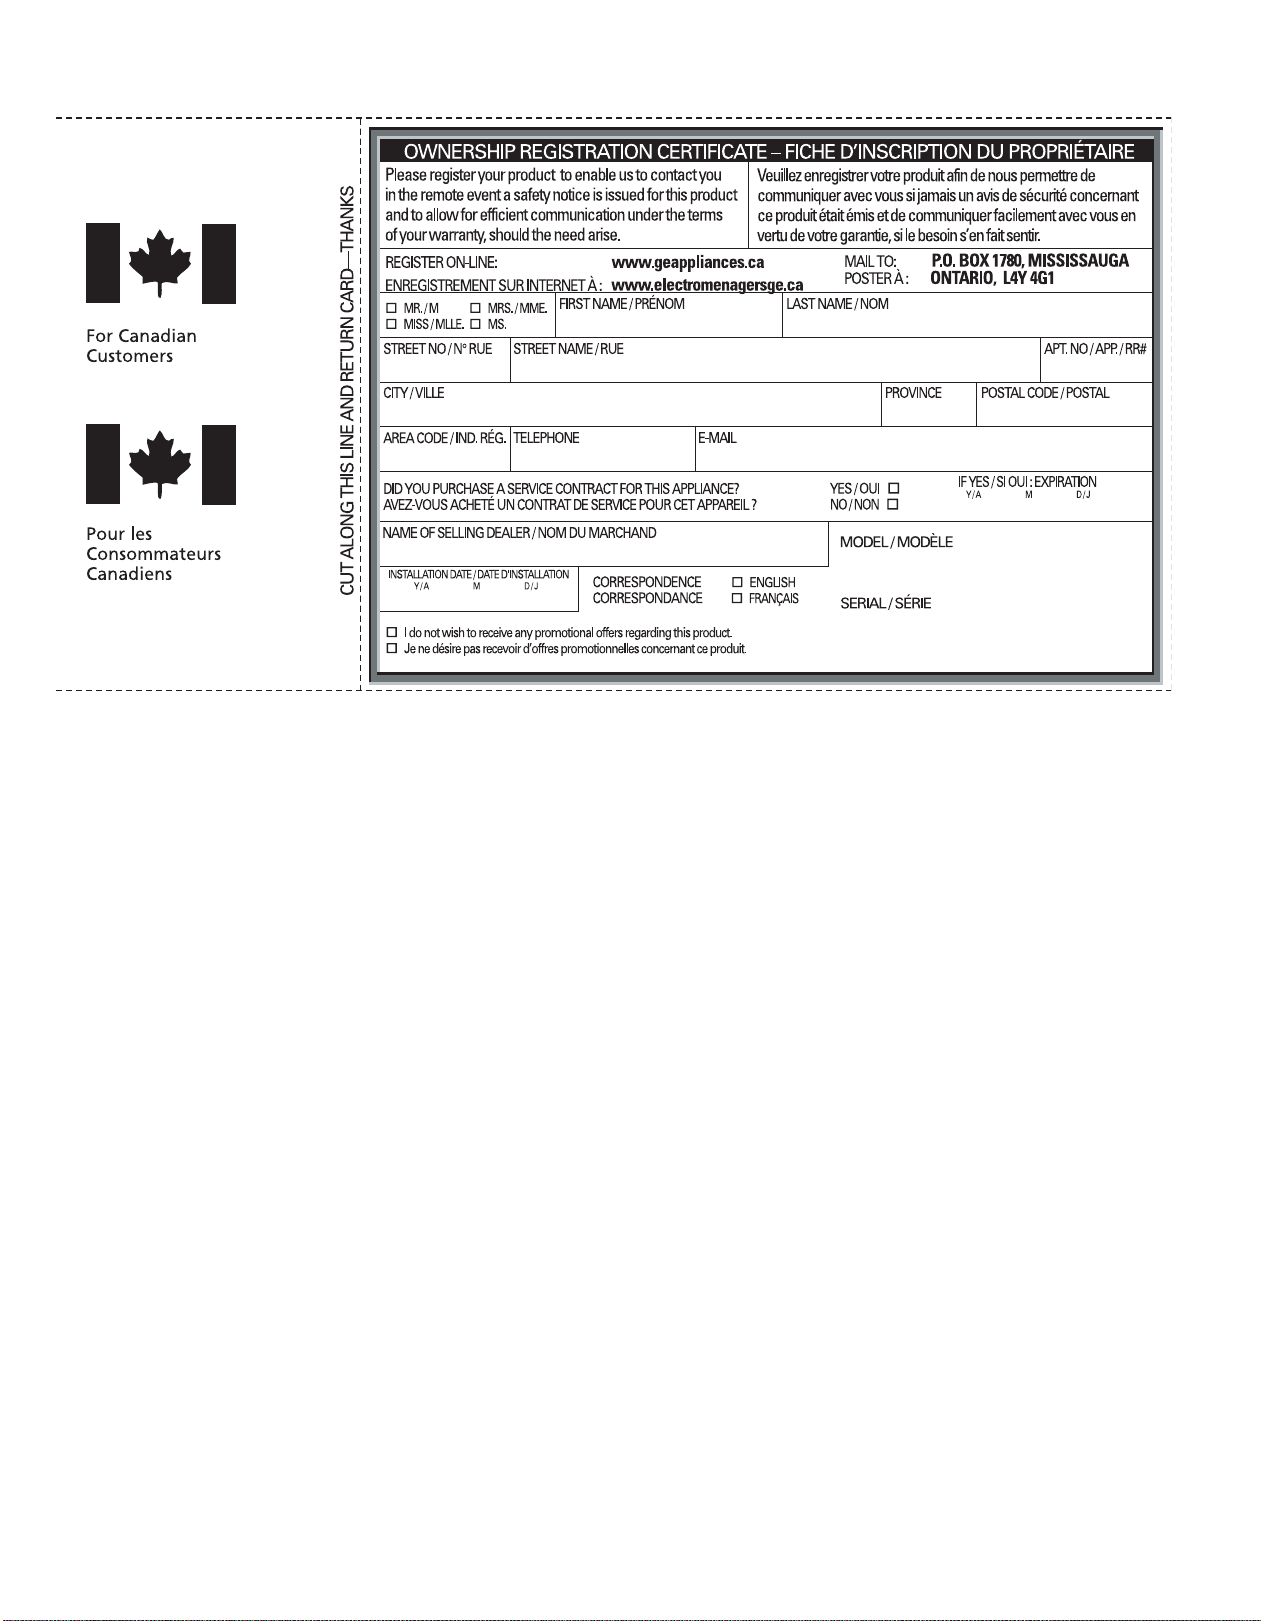
Product Registration(Canadian)
20
Product Registration (U.S.)
19
Warranty For Canadian Customers
18
Warranty For U.S.Customers
22
French
23
Spanish
45
Search:
×
Search