Documents: Go to download!
- Owner's manual - (English, French, Spanish)
- USING THE DISHWASHER
- CARE AND CLEANING
- TROUBLESHOOTING TIPS
Table of contents
USER MANAL Dishwasher
USING THE DISHWASHER
Getting started
1. Load Dishwasher
For best dishwashing results, follow the loading guidelines found in the Loading section. No pre-rinsing of normal food soil is required. Scrape off hard soils, including bones, toothpicks, skins, and seeds. Remove leafy vegetables, meat trimmings, and excessive amounts of grease or oil.
2. Add Detergent
Add needed amount of detergent to the detergent dispenser. Use detergent such as Finish® Quantum® Automatic Dishwashing Detergent. See Dispensers section.
3. Add Rinse Agent
Add rinse agent such as Finish® Jet-Dry® Rinse Aid to the rinse agent dispenser. See Dispensers section.
NOTE: The use of rinse aid can further enhance the dishwasher’s drying performance.
4. Select Cycle
Press the Select Cycle pad for the desired wash cycle. The light next to the Select Cycle pad will be lit to indicate which wash cycle has been selected.
NOTE: Cycle times vary based on soil level, water temperature, and options selected
The cycle may be selected with the door in the open position. The cycle will not start until the Start pad is pushed and the door is closed within 4 seconds.
| AutoSense (on some models) | This cycle automatically senses the soil level and adjusts the wash cycle accordingly. |
| Heavy | This cycle is meant for heavily soiled dishes, cookware, pots, or pans with dried-on or baked-on soils. Everyday dishes are safe to be used in this cycle. |
| Normal | This cycle is meant for daily, regular, or typical use to completely wash a full load of normally soiled dishes and is designed to conserve both water and energy. Normal was used to rate the energy efficiency of this dishwasher. |
| 1 Hour | This cycle is for light to medium soiled dishes and takes about 1 hour. It is safe for china and crystal with no options selected. |
| Rinse (on some models) | For rinsing partial loads that will be washed later. Do not use detergent. Detergent is not dispensed during the rinse cycle. |
5. Select Options
The light by the selected pad will be lit to indicate which Option has been selected
| Wash Temp Boost (on some models) | This option increases the temperature to help clean heavily soiled dishes and will increase the cycle time by 20 to 50 minutes. Option may be turned On or Off during the wash cycle. This option will also improve dry performance on the Normal cycle. |
| Steam Sani (on some models) |
This option has several functions. Steam is introduced at the beginning of the cycle to help with heavily soiled and/or dried-on, bakedon soils and for sanitization of dishware along with improving dry performance by raising the water temperature in the final rinse. The cycle length will vary depending on the temperature of your inlet water. This option MUST be selected PRIOR to starting the cycle. Available with Heavy, AutoSense and Normal cycles. NOTE: This option is monitored for sanitization requirements. If the cycle is interrupted during or after the main wash portion or if the incoming water temperature is so low that adequate water heating cannot be achieved, the sanitizing conditions may not be met. In these cases, the Sanitized light will not illuminate at the end of the cycle. Utilizing this option will modify the cycle to meet the requirements of Section 6, NSF 184 for soil removal and sanitization efficacy. NOTE: NSF certified residential dishwashers are not intended for licensed food establishments. |
| Heated Dry |
This option can be selected by pressing the Dry button once to illuminate the Heated light. This setting will greatly improve your dry performance for daily, regular or typical dishes. The heated dry option will typically add 48 minutes to your cycle time. This option is not available with the Rinse cycle. NOTE: The use of rinse aid can further enhance the dishwasher’s drying performance. Heated Dry was selected to rate the energy efficiency of this dishwasher. |
| Dry Boost |
This option can be selected by pressing the Dry button twice to illuminate the Boost light. This option will add additional time to your heated dry option, further enhancing the dishwasher’s drying performance for difficult to dry items. NOTE: The use of rinse aid can further enhance the dishwasher’s drying performance. |
| Heated Dry Off |
Shuts off the drying option. Dishes air dry naturally and energy is saved. Opening the door at the end of the cycle can improve drying performance. NOTE: The use of rinse aid can further enhance the dishwasher’s drying performance |
| Bottle Jets (on some models) | This option increases the time that the bottle jets are on and may add up to 23 minutes to the cycle time. Use this to wash difficult to clean, dishwasher safe baby bottles, sport bottles, tall coffee cups, etc. See use recommendations in the Loading section. |
| Wash Zones (on some models) | Selecting either the Upper or Lower Wash Zones will target dishwashing of just one rack. This will shorten the cycle time and conserve energy. This option should be used when dishes are placed in only one rack. |
| Delay Hours (on some models) | Delays the start of a wash cycle up to 8 to 12 hours depending on model. Press Delay Hours, to select the number of hours, then press Start one time and close door to begin countdown. The cycle will start once allotted time has expired. |
| Control Lock |
You can lock the controls to prevent selections from being made. You can also lock the controls after you have started a cycle to prevent cycle changes. For example, children cannot accidentally start the dishwasher by pressing pads with this option selected. To LOCK/UNLOCK the dishwasher control, depending on the model, press and hold the Dry and Steam pads, or on some models the Select Cycle pad for 3 seconds. The Lock Controls light, or on some models the Light and Rinse cycle lights will turn on to indicate the control is locked and will turn off to indicate the control is unlocked. |
6. Start Dishwasher
| Start | Door can be open to select the desired options. Press the Start pad and close the door within 10 seconds to start the cycle or begin the Delay Hours countdown. The wash cycle will begin shortly after closing the door. If the door is open, the illuminated lights will turn off if a pad is not pressed within two minutes. To activate the display, close and open the door or press any pad. |
| Interrupt or Pause | To interrupt or pause a dish cycle, slowly open the door. Opening the door will cause the wash cycle to pause. The dishwasher will beep every minute to remind you to close the door. To restart or resume the cycle, press Start, and close the door within 4 seconds. |
| Cancel | To cancel a wash cycle, press and hold the Start pad for 3 seconds and close door. The dishwasher will drain, emit a beep sound, and the wash cycle light will turn OFF. |
7. Cycle Indicator Lights and Sounds
| Sanitized | Displayed at end of the cycle when Wash Temp Sani (Sanitize) has been selected and dishwasher has met requirements for sanitization. See Wash Temp Sani (Sanitize), for complete description. Opening the door or pressing any key while the door is closed will turn off the light. |
| Clean | Displayed when a wash cycle is complete. The light stays ON as a reminder that the dishes are clean. Opening the door or pressing any key while the door is closed will turn the light off. |
| Sabbath/ Door Wake Up Mode (on some models) | To turn this option ON/OFF, press and hold the Start and Wash Temp pads for 5 seconds, close the door and wait 3 minutes for the dishwasher to go into sleep mode. In the OFF mode, the control display, control sounds, and interior lights (on some models) will not respond to the door opening/closing. This mode can be used when observing certain religious holidays such as the Sabbath. To activate the control and interior lights (on some models), press any button. |
Dispensers
Check the Water Temperature
The entering water should be at least 120°F (49°C) and not more than 150°F (66°C) for effective cleaning and to prevent dish damage. Check the water temperature with a candy or meat thermometer.
Turn on the hot water faucet nearest the dishwasher, place the thermometer in a glass and let the water run continuously into the glass until the temperature stops rising.
Use a Rinse Agent
Rinse agents, such as Finish® Jet-Dry® Rinse Aid are designed for great drying action and to protect against spots and film build-up on your dishes, glasses, flatware, cookware, and plastic.
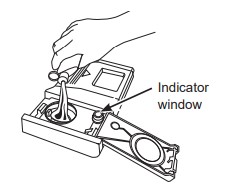
Filling the Rinse Agent
Dispenser The rinse agent dispenser holds 3.5 oz. (104 ml) of rinse agent. Under normal conditions, this will last approximately one month.
|
 |
Rinse Aid Setting
| The amount of rinse agent released into the final wash can be adjusted. If water drops or hard water spots remain on dishes after the dry cycle, increase the setting. | 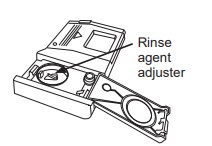 |
To adjust the setting
| Open the Rinse Agent dispenser door; then turn the adjuster clockwise to increase the amount of rinse agent, counterclockwise to reduce the amount of rinse agent. | 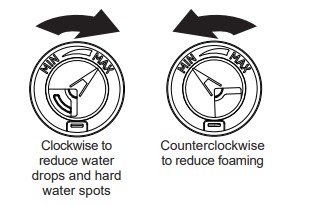 |
Loading
For best dishwashing results, follow these loading guidelines. Features and appearance of racks and silverware baskets may vary from your model.
Upper Rack
The upper rack is primarily for glasses, cups, and saucers. For best wash performance, tilt cup and glass openings toward the center of the rack. Other items such as pots, pans, and plates may be placed in the upper rack. This is also a secure place for dishwasher-safe plastic items. The upper rack can be used for odd sized utensils. Sauce pans, mixing bowls, and other similarly shaped items should be placed face down for best wash performance. Ensure small plastic items are secure so that they cannot fall on the heater at the bottom of the dishwasher, potentially damaging the item.
IMPORTANT: Ensure items in the upper rack do not interfere with the 3rd Rack (on some models) when loading and unloading.
IMPORTANT: Ensure that items do not protrude through the bottom of the rack or silverware basket where they will block the rotation of the middle spray arm. This could result in noise during operation and/or poor wash performance.
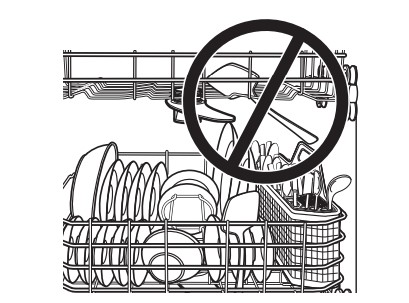
| On some models, the upper rack may be adjusted to accommodate larger items. To adjust the upper rack, fully extend the upper rack and lift the front of the rack so that the rack roller wheels clear the end hooks on the front of the rails. Continue to pull the rack until the remaining rack roller wheels clear the end hook. Select the set of rollers on the side of the rack that provides the desired height, and reinstall the upper rack by aligning the rack roller wheels on the end hook and rack rails – Ensure that there are roller wheels above and below the rack rails. Failure to properly align the wheels onto the end hook and rails may result in the rack falling from the dishwasher. | 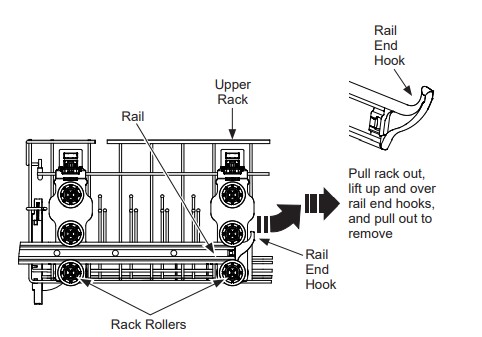 |
|
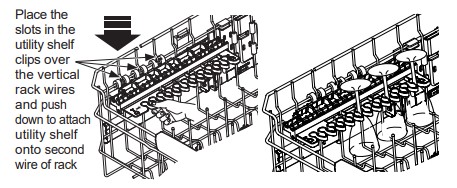
To add flexibility in loading, the stem safe shelf (on some models) may be placed in the up or down position or unfolded and placed in the lower unfolded position. The shelf may also be used to secure stemware such as wine glasses. Because these stemware items come in various sizes, slowly push the rack in to ensure the items do not bump into the edges of the dishwasher, which may cause damage to the items. |
 |
CARE AND CLEANING
Control Panel
To clean the control panel, use a lightly dampened cloth. Then dry thoroughly.
Exterior Door Panel
Before cleaning the front panel, make sure you know what type of panel you have. Refer to the last two letters of your model number. You can locate your model number on the left-hand tub wall just inside the door. If your model number ends with BB, CC, WW, SA, ES, DS or TS then you have a painted door panel. If your model number ends with SS, then you have a Stainless Steel door panel. If your model number ends with II, then you have an Integrated door panel.
Follow the instructions below for cleaning the door panel for your specific model.
Painted Door Panel (model numbers ending in BB– black, CC–bisque, WW–white, SA-silver, ES-slate, DS-black slate or TS-black stainless steel)
Use a clean, soft, lightly dampened cloth, then dry thoroughly.
Do not use scouring pads or powered cleaners because these products can scratch the finish.
Stainless Steel Door Panel (model numbers ending in SS)
For cleaning rust and tarnish, cleaners with oxalic acid such as Bar Keepers Friend Soft Cleanser™ will remove rust, tarnish and small blemishes. Use only a liquid cleanser free of grit and rub in the direction of the brush lines with a damp soft sponge. Do not use appliance wax or polish on the stainless steel.
For other blemishes and marks, use Stainless Steel Magic or a similar product using a clean soft cloth. Do not use appliance wax, polish, bleach or products containing chlorine on Stainless Steel. You can order Stainless Steel Magic # WX10X29 through GE Appliances Parts by calling 877.959.8688. In Canada, call 800-661-1616.
Integrated Door Panel (model numbers ending in II)
This is a custom installed door panel, and you will need to refer to the cabinet manufacturers recommendations for proper cleaning.
Dishwasher Interior
To clean and de-odorize your dishwasher, use citric acid or Finish® Dishwasher Cleaner, a detergent additive. Finish® Dishwasher Cleaner will break up mineral deposits, and remove hard water film and stains. You can order citric acid GE Appliances kit # WD35X151 through GE Appliances Parts by calling 877-959-8688 or visiting GEApplianceparts.com. In Canada, call 800-661-1616. You can purchase Finish® Dishwasher Cleaner at your local grocery store.
Stainless Steel Inner Door and Tub
The stainless steel used to make the dishwasher tub and inner door provides the highest reliability available in a GE Appliances dishwasher. If the dishwasher tub or inner door should be scratched or dented during normal use, they will not rust or corrode. These surface blemishes will not affect their function or durability.
Filters
Inspect and clean the filters periodically. This should be done every other month or more depending on usage. If there is a decrease in wash performance or dishes feel gritty, this is also an indication the filters need to be cleaned.
Ultra-Fine Filter
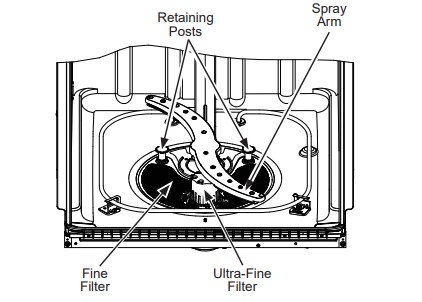
To clean the Ultra-Fine Filter, remove the bottom rack. Twist the Ultra-Fine Filter counterclockwise and lift to remove. Rinse filter with warm soapy water and use a sponge to carefully remove any stubborn particles. Scrubbing with scouring pads or brushes can damage the filter. Once cleaned, replace the Ultra-Fine Filter, and twist it clockwise to lock in place.
Fine Filter
To clean the Fine Filter (mesh plate), remove the bottom rack. Remove the Ultra-Fine Filter.
Twist each of the two retaining posts located toward the back bottom of the tub counterclockwise, and remove the Fine Filter. Rinse filter with warm soapy water. Scouring pads or brushes can scratch the filter surface but a soft brush or sponge may be needed to remove stubborn soils or calcium deposits caused by hard water. Once cleaned, replace the Fine Filter and the Ultra-Fine Filter. Twist the two retaining posts clockwise to lock in place.
Protect Against Freezing
If your dishwasher is left in an unheated place during the winter, ask a service technician to:
- Turn off electrical power to the dishwasher. Remove fuses or trip circuit breaker.
- Turn off the water supply and disconnect the water inlet line from the water valve.
- Drain water from the water inlet line and water valve. (Use a pan to catch the water.)
- Reconnect the water inlet line to the water valve.
Does Your Dishwasher Have an Air Gap?
An air gap protects your dishwasher against water backing up into it if a drain clogs. The air gap is not a part of the dishwasher. It is not covered by your warranty. Not all plumbing codes require air gaps, so you may not have one.
The air gap is easy to clean.
- Turn off the dishwasher and lift off the air gap cover.
- Remove the plastic cap under the cover and clean with a toothpick.
- Replace the cap and cover when the air gap is clean.
TROUBLESHOOTING TIPS
| Problem | Possible Cause | What To Do |
|---|---|---|
| Start status indicator light flashing | The door was opened or the cycle was interrupted. | Press the Start pad once and close the door within 4 seconds to start the dishwasher. Press the Start pad a second time when the dishwasher is running only if you wish to cancel the cycle |
| Dishwasher BEEPS once every minute (on some models) | This is a reminder that your dishwasher door has been left open during operation. It will continue beeping until you press Start and close the door. | Press Start and close the door. |
| Beeping at the end of the cycle (on some models) | This is normal. Dishwasher will beep twice at the end of the cycle. | To turn off the double beep indicator (or re-activate it if it was previously turned off), press the Heated Dry pad 5 times within 3 seconds. A triple beep will sound to indicate the end-of-cycle beep option has been turned on or off. |
| Dishes and flatware not clean | Ultra-Fine Filter or Fine Filter is clogged | See the Care and Cleaning section. |
| Low inlet water temperature | Make sure inlet water temperature is correct (see the USING THE DISHWASHER section). Turn on the hot water faucet nearest the dishwasher, let run until the water temperature stops rising. Then start the dishwasher and turn off the faucet. This ensures the entering water is hot. Select Wash Temp Boost if available. | |
| Water pressure is temporarily low | Turn on a faucet. Is water coming out more slowly than usual? If so, wait until pressure is normal before using your dishwasher. Normal water pressure to the dishwasher should be 20-120 psi. | |
| Air gap or disposer clogged | Clean the air gap or flush the disposer. | |
| High drain loop or air gap not installed | Refer to the Installation Instructions for proper drain line installation. | |
| Improper rack loading . | Make sure large dishware does not block the detergent dispenser or the wash arms. See the Loading section | |
| Poor performing detergent | Use a highly rated detergent such as Finish® Quantum® Automatic Dishwashing Detergent. | |
| Spots and filming on glasses and flatware | Extremely hard water |
Use rinse agents such as Finish® Jet-Dry® Rinse Aid to prevent spots and prevent new film build-up. If water is extremely hard, a softener may be required. |
| Low inlet water temperature | Make sure water temperature is at least 120°F (49°C). | |
| Overloading or improper loading of the dishwasher | Load dishwasher as shown in the Loading section. | |
| Old or damp powder detergent | Make sure detergent is fresh. Use a highly rated detergent such as Finish® Quantum® Automatic Dishwashing Detergent. | |
| Rinse agent dispenser empty | Refill with rinse agent such as Finish® Jet-Dry® Rinse Aid. | |
| Too little or low performing detergent | Make sure you use the proper amount of highly rated detergent. | |
| Cloudiness on glassware | Combination of soft water and too much detergent | This is called etching and is permanent. To prevent this from happening, use less detergent if you have soft water. Wash glassware in the shortest cycle that will get it clean. |
| Low performing phosphatefree detergent | See A white film on glassware, dishware and the interior in this TROUBLESHOOTING section. | |
| Water temperature entering the dishwasher exceeds 150°F (66°C) | This could be etching. Lower the water heater temperature. | |
| Suds in the tub | Wrong detergent |
Use only automatic dishwasher detergents to avoid sudsing. Finish® Quantum® Automatic Dishwashing Detergent has been approved for use in all GE Appliances dishwashers. To remove suds from the tub, open the dishwasher and let suds dissipate. Pump out water by pressing Start and close the door. Wait 30 seconds. Open the door, press and hold Start for 3 seconds, and close the door. Repeat if necessary. |
| Rinse agent was spilled | Always wipe up rinse agent spills immediately. | |
| Detergent left in dispenser cups | Dishes are blocking the detergent cup | Reposition the dishes, so the water from the lower spray arm can flush the detergent cup. See the Loading section. Reposition dishware that may be keeping the dispenser cup door from opening. See the Loading section. |
| Black or gray marks on dishes | Aluminum utensils have rubbed against dishes | Remove marks with a mild, abrasive cleaner. |
| Dishes don’t dry | Low inlet water temperature |
Make sure inlet water temperature is at least 120°F. Select Heated Dry or Dry Boost. Use Wash Temp Boost. Select a higher cycle, such as Steam Sani or Heavy. |
| Rinse agent dispenser is empty | Check the rinse agent dispenser and fill as required. | |
| Additional drying time is needed |
Leave door closed after the Clean light appears to allow the fan to run an additional 90 minutes (on some models). Note: If you open the door, this fan extension will be cancelled. |
|
| Cycle selection | If using Light cycle which uses lower water temperature and thus limited dry performance, switch to a different cycle. | |
| Cycle completion | Allow cycles to fully complete. See Long cycle times in this Troubleshooting Tips section | |
| Long cycle times | Dishwasher washes by alternating mid and lower spray arms | Longer cycles are normal. For best wash and dry performance, let cycle complete. |
| Soil level | The turbidity sensor senses how much soil is on the dishes. Heavy soiled dish loads will add more time to the cycle. This is normal function. For best wash and dry performance, allow cycle to complete. | |
| Control panel responded to inputs but dishwasher never filled with water | Door may not be completely closed | Make sure the door is firmly closed. |
| Water valve may be turned off | Make sure water valve (usually located under the sink) is turned on. | |
| Flood float may be stuck | Remove Ultra-Fine filter and lightly tap the piece under the ultra fine filter that looks like a dome. Replace the filter. | |
| Stained tub interior | Some tomato-based foods can cause reddish stains | Use of the Steam Sani cycle (on some models) after adding the dish to the load can decrease the level of staining. |
| Tea or coffee stains | Remove the stain by hand, using a solution of 1/2 cup bleach and 3 cups warm water. NOTE: Do not use bleach on stainless steel inner door. | |
| An overall yellow or brown film can be caused by iron deposits in water | A special filter in the water supply line is the only way to correct this problem. Contact a water softener company. | |
| White film on inside surface— hard water minerals | GE Appliances recommends Finish® Jet-Dry® Rinse Aid to help prevent hard water mineral deposits from forming. Run dishwasher with citric acid to remove mineral deposits. Citric acid (Part number: WD35X151) can be ordered through GE Appliances Parts. See back cover for ordering information. Alternatively, purchase Finish® Dishwasher Cleaner and follow the directions on the label. | |
| Dishwasher won’t run | Fuse is blown or circuit breaker is tripped | Replace fuse or reset circuit breaker. Remove any other appliances from the circuit. |
| Power is turned off | In some installations, the power to the dishwasher is provided through a wall switch, often located next to the disposer switch. Make sure it is on. | |
| Control panel is locked | Unlock control panel. See the Getting started section. | |
| Control panel lights go off when you’re setting controls | Time too long between touching of selected buttons | Each pad must be touched within 30 seconds of the others. To relight, touch any pad again or open the door and unlock (top control). |
| Water standing in the bottom of the tub | Air gap is clogged | Clean the air gap. See the Care and Cleaning section. |
| High drain loop or air gap not installed | Refer to the Installation Instructions for proper drain line installation. | |
| Water won’t pump out of the tub | Drain is clogged |
If you have an air gap, clean it. See the Care and Cleaning section. If the dishwasher drains into a disposer, run disposer clear. Check to see if your kitchen sink is draining well. If not, you may need a plumber. |
| Steam | This is normal | Warm, moist air comes through the vent during drying and when water is being pumped out. This is necessary for drying. |
| Sanitized light does not illuminate at the end of the cycle | The door was opened and the cycle was interrupted during final rinse | Do not interrupt the cycle by opening the door during the wash cycle. |
| The incoming water temperature was too low | Raise the water heater temperature to between 120°F and 150°F. | |
| Noise |
Normal operating sounds: Beeping at the end of the cycle (on some models) Detergent cup opening Water entering dishwasher Motor stops and starts at various times during cycle Spray arms start and stop at various times Drain pump sounds during pump out Drain pump starts and stops several times during each drain |
These are all normal. No action is required |
| Rattling dishes when the spray arm rotates | Make sure dishes are properly loaded. See the Loading section. | |
| Rattling silverware against door during wash | Tall utensils may be placed in the upper rack to avoid bumping against inner door during wash cycle. | |
| A white film on glassware, dishware and the interior | This problem is likely caused by a low quality phosphate-free dishwasher detergent |
To remove the white film, run your dishes through a dishwasher cycle with citric acid. Use a WD35X151 citric acid kit found online. Otherwise, use Finish® Dishwasher Cleaner found at your local grocery store. Pour the citric acid in the detergent cup and close the cover. Place the filmed but otherwise clean glassware and dishware in the dishwasher. Leave silverware and other metal items out of the dishwasher. Turn the dishwasher on and let it run through a complete cycle without detergent. The glassware, dishware, and dishwasher should come out film free. Alternatively, a vinegar rinse may be used. Pour 1 cup of vinegar into dishwasher just after the detergent cup opens and let the dishwasher complete its cycle. This may be repeated several times a year as needed. The use of a rinse agent such as Finish® Jet-Dry® Rinse Aid may help minimize a repeat build up of film. Also, the use of a highly rated detergent such as Finish® Quantum® Automatic Dishwashing Detergent will help prevent film build-up. |
See other models: AEW05LQW1 AZ85H18EACM1 DFE28JSHBSS WVSR1060G6WW FCM5DMAWH
