

2
Important recommendations
Safety instructions
• Please read these instructions carefully before first use. This product has been designed for domestic use only. Any
commercial use, inappropriate use or failure to comply with the instructions, the manufacturer accepts no
responsibility and the guarantee will not apply.
• For your safety, this appliance conforms to the applicable standards and regulations (Low Voltage, Electomagnetic
Compatibility, Environmental Directives, as applicable...).
• Your steam generator is an electrical appliance. It should be used under normal conditions. It is intended for
domestic use only.
• Your generator is fitted with 2 safety systems:
- a pressure release valve which, in the event of a malfunction, releases any excess steam;
- a thermal fuse to prevent the appliance from overheating.
• Always plug your steam generator into:
- an electrical installation with voltage between 220-240V.
- an earthed socket.
Connecting to the wrong voltage may cause irreparable damage to the appliance and will invalidate your
guarantee.
• If you are using a mains extension lead, ensure that it is correctly rated (10A) with an earth, and is fully extended.
• Completely unwind the power cord from its storage space before connecting to an earthed socket.
• If the electric power cord or the iron-unit is damaged, it must be replaced by an Approved Service Centre in order
to prevent any danger.
• Do not unplug the appliance by pulling on the cord.
Always unplug your appliance:
- before rinsing the anti-scale valve or before filling the water tank,
- before cleaning your generator,
- after each use.
• The appliance must be used and placed on a flat, stable, heat-resistant surface. When you place the iron on the
iron rest, make sure that the surface on which you place it is stable. For best results use a vented ironing board to
prevent water spots on the clothes and to avoid steam venting sideways.
• This appliance is not intended for use by persons (including children) with reduced physical, sensory or mental
capabilities, or lack of experience and knowledge, unless they have been given supervision or instruction
concerning use of the appliance by a person responsible for their safety.
• Children should be supervised to ensure that they do not play with the appliance.
• Never leave the appliance unattended :
- when it is connected to the mains,
- until it has cooled down (around 1 hour).
• The soleplate and generator iron-rest can become very hot and cause burns: never touch these parts.
Never touch the electric cords with the soleplate of the iron.
• Your appliance gives off steam which can cause burns. Handle your iron carefully, particularly when using the
vertical steam function. Never direct the steam towards persons or animals.
• Before unscrewing the anti-scale valve cap, wait until the generator is cold (unplugged for more than 2 hours).
• If you lose or damage the anti-scale valve cap, have it replaced by an approved Service Centre.
• Never immerse your steam generator in water or any other liquid. Never hold it under the water tap.
• The appliance must not be used if it has fallen to the floor, shows evidence of damage, leaks or fails to function
correctly. Never dismantle your appliance. To avoid any danger, have it inspected in an approved service centre.
PLEASE KEEP THIS INSTRUCTION LEAFLET IN A SAFE PLACE
1800126451 GV84XX G0 GTH3_110x154 14/06/12 09:04 Page2

3
EN
FR
EL
TH
AR
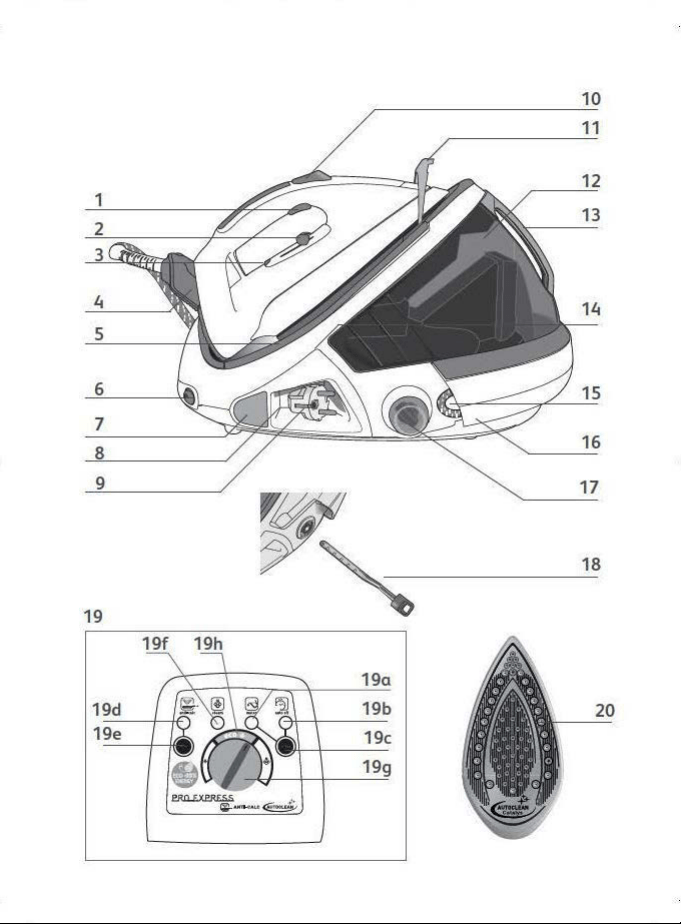
Description
1. Steam control button
2. Iron temperature control slide
3. Iron thermostat light
4. Ultracord system (depending on model)
5. Iron rest
6. Illuminated on / off switch
7. Electric cord rewind button (depending on model)
8. Power cord storage space
9. Power cord and plug
10. Turbo button (depending on model)
11. Lock-System hoop (depending on model)
12. Removable water tank
13. Removable water tank handle
14. Steam generator boiler (in the base unit)
15. Iron-base steam cord
16. Slide storage place for the steam cord
17. Anti-scale valve cap
18. Anti-scale valve
19. Control panel
a. “Water tank empty” light
b. “Auto off” light
c. Restart button
d. “Anti-calc” light
e. “Reset” button
f. “Steam ready” light
g. Steam output control dial
h. Zone ECO
20. Autoclean Soleplate
Locking system for retaining the iron on the base - Lock-system
(depending on model)
• Your steam generator maybe equipped with a retaining hoop which locks the iron on its base for
easier transport and storage – fig.1:
- Locking – fig.2
- Unlocking – fig.3
• To carry your steam generator by the iron handle:
- Place the iron on the iron rest of the generator and raise the retaining hoop over the iron until it
locks into place (audible click) – fig.2.
- Grasp the handle of the iron to carry your steam generator – fig.1.
• Ironing Board: due to the powerful steam output, a mesh type ironing board must be used to
allow any excess steam to escape and to avoid steam venting sideways.
Preparation
What water may be used ?
• Tap water :
Your appliance has been designed to function using untreated tap water. If your water is very hard, we recommend
you use a mix of 50% untreated tap water and 50% distilled water available in most shops.
• Types of water not to use :
Heat concentrates the elements contained in water during evaporation. The types of water listed below may contain
organic waste, mineral or chemical elements that can cause spitting, brown staining or premature wear of the
appliance: water from clothes dryers, scented or softened water, water from refrigerators, batteries, air conditioners,
rain water, boiled, filtered or bottled water. These types of water should not be used in your TEFAL iron. Also only
use distilled water as advised above.
• Always remember :
Never use rainwater or water containing additives (like starch, fragrance or water from domestic appliances). Such
additives can affect the steam properties and at high temperature, form deposits in the steam generator chamber
which are likely to stain your washing.
Filling the water tank
• Place your steam generator on a flat, stable, horizontal heat-resistant surface. For best results use
a vented ironing board to prevent water spots on the clothes and to avoid steam venting
sideways.
• Remove the water tank by pulling on the handle (at the front of the generator) – fig.4.
• Fill the tank with water, taking care not to exceed the maximum level – fig.6. and fig.7.
• Slide the tank back into its housing until its “clicks” into place – fig.5.
1800126451 GV84XX G0 GTH3_110x154 14/06/12 09:04 Page3
7
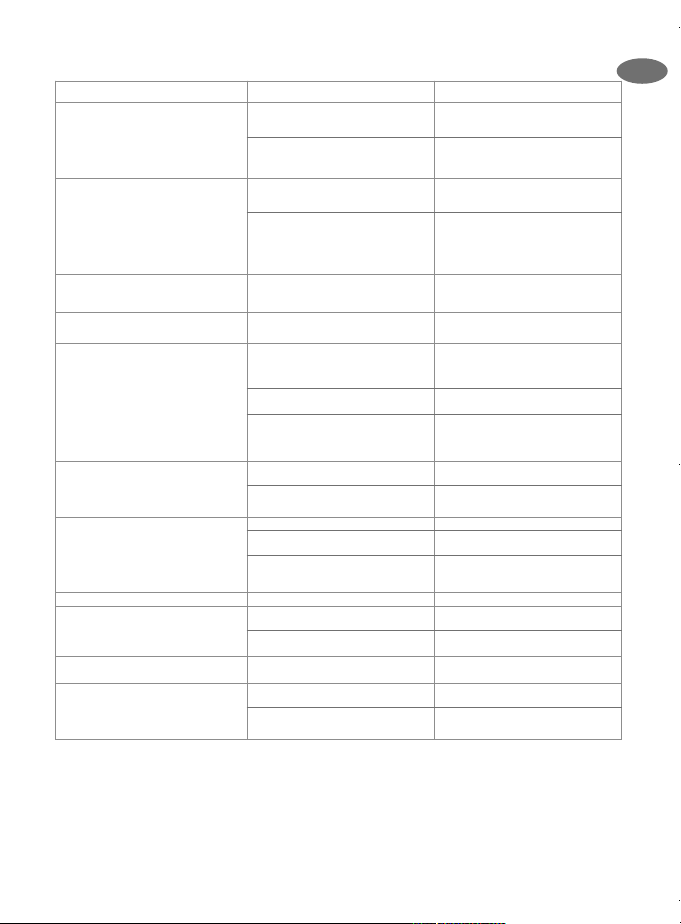
Problems
C auses
Solutions
The generator does not come on and the
thermostat light and the on/off switch are not
illuminated.
The appliance is not switched on.
The “auto off” system is activated.
Check that your appliance is correctly
plugged in and press the illuminated on/off
switch.
Press the "Restart" button or push the steam
control trigger.
Water runs out of the holes in the soleplate. Water has condensed in the pipes because
you are using steam for the first time or you
have not used it for some time.
The soleplate is not hot enough.
Press on the steam control button away from
your ironing board until the iron produces
steam.
Decrease the steam output while ironing at
low temperature (steam output control dial
on the control panel). Wait for the thermostat
light to go out before activating the steam
control button.
Water streaks appear on the linen. Your ironing board is saturated with water
because it is not suitable for use with a steam
generator.
Make sure you have a vented/mesh ironing
board
White streaks come through the holes in the
soleplate.
Your boiler has a build-up of scale because it
has not been rinsed out regularly.
Rinse the anti-scale valve (see the “descaling
your generator” section).
Brown streaks come through the holes in the
soleplate and stain the linen.
You are using chemical descaling agents or
additives in the water for ironing.
Fabric fibres have accumulated in the holes of
the soleplate and are burning.
Your linen is not rinsed sufficiently or you
have ironed a new garment before washing it.
Never add this type of product in the water
tank or in the boiler (see for what water may
be used). Contact an Approved Service
Centre.
Clean the soleplate with a non-metallic
sponge. Vacuum the holes from time to time.
Ensure linen is rinsed thoroughly to remove
any soap deposits or chemicals on new
garments which may be sucked up by the
iron.
The soleplate is dirty or brown and may stain
the linen.
You are ironing at too high a temperature.
You are using starch.
See our recommendations regarding
temperature control setting.
Always spray starch on the reverse side of the
fabric to be ironed.
There is no steam or there is little steam. The water tank is empty (red light on).
The steam output control dial is set at
minimum.
The soleplate temperature is set to the
maximum.
Fill the water tank.
Increase the steam output (control dial on
the control panel).
The generator is working but steam is very
hot and dry. As a consequence, it is less
visible.
The red “water tank empty” light is on. The water tank is empty. Fill the water tank.
Steam escapes from the anti-scale valve plug The anti-scale valve plug has not been
tightened correctly.
The anti-scale valve plug is damaged.
Tighten the anti-calc valve plug correctly.
Contact an Approved Service Centre to order
a new anti-scale valve.
Steam or water escapes under the appliance. The generator is faulty. Stop using the generator and contact an
Approved Service Centre.
The soleplate is scratched or damaged. You have placed your iron flat on a metallic
rest-plate.
You have cleaned your soleplate with an
abrasive or metal pad.
Always place your iron on its base or on the
iron rest plate.
Refer to the section « clean the soleplate ».
EN
FR
EL
TH
AR
A problem with your generator ?
HELPLINE:
If you have any problems or queries please call our Customer Relations team first for expert help and advice:
0845 602 1454 - UK
(01) 677 4003 - ROI
or consult our website - www.tefal.co.uk
1800126451 GV84XX G0 GTH3_110x154 14/06/12 09:04 Page7
8
1800126451 GV84XX G0 GTH3_110x154 14/06/12 09:04 Page8
9
1800126451 GV84XX G0 GTH3_110x154 14/06/12 09:04 Page9

10
ΣηµαντικC> συµβουλC>
ΟδηγEε> ασφαλεEα>
• ∆ιαβστε προσεκτικ τι οδηγε χρσεω πριν χρησιµοποισετε για πρτη φορ τη συσκευ σα: η κατασκευστρια
εταιρεα δεν φρει καµα ευθνη σε περπτωση µη τρηση των οδηγιν αυτν.
• Για την ασφλει σα, η παροσα συσκευ χει κατασκευαστε σµφωνα µε τα ισχοντα πρτυπα και κανονισµο
(Οδηγε για Χαµηλ τση, Ηλεκτροµαγνητικ Συµβαττητα, Περιβλλον ...).
• Η γενντρια ατµο σα εναι ηλεκτρικ συσκευ: πρπει να χρησιµοποιεται σε κανονικ συνθκε χρση.
Προορζεται αποκλειστικ για οικιακ χρση.
• ∆ιαθτει 2 συστµατα ασφλεια:
µια βαλβδα που αποτρπει κθε υπερπεση, και σε περπτωση δυσλειτουργα, επιτρπει τη διαφυγ του
πλεονσµατο ατµο,
µια θερµικ ασφλεια για την αποφυγ κθε υπερθρµανση.
• Συνδετε πντα τη γενντρια ατµο σα:
σε ηλεκτρικ εγκατσταση τη οποα η τση εναι µεταξ
220-240V
.
σε ηλεκτρικ πρζα µε γεωση.
Κθε σφλµα σνδεση µπορε να προκαλσει µη ανατρψιµη βλβη και ακυρνει την εγγηση. Εν χρησιµοποισετε
καλδιο επκταση, βεβαιωθετε τι η πρζα εναι διπολικ I0A µε αγωγ γεωση.
• Τραβξτε ξω λο το καλδιο ρεµατο προτο το συνδσετε σε ηλεκτρικ πρζα µε γεωση.
• Αν το καλδιο τη βση του σδερου χουν υποστε ζηµι πρπει επειγντω να αντικατασταθον απ να
εξουσιοδοτηµνο κντρο σρβι τη Tefal για να αποφευχθε κθε κνδυνο.
• Μην αποσυνδετε τη συσκευ απ το ρεµα τραβντα το καλδιο.
Πντα αποσυνδετε τη συσκευ απ το ρεµα:
προτο γεµσετε το δοχεο ξεπλνετε τον λβητα,
προτο την καθαρσετε,
µετ απ κθε χρση.
• Η συσκευ πρπει να χρησιµοποιεται και να εναι τοποθετηµνη πνω σε σταθερ επιφνεια. ταν τοποθετετε το
σδερο στη βση του, βεβαιωθετε τι η βση βρσκεται πνω σε σταθερ επιφνεια.
• Η παροσα συσκευ δεν προορζεται για χρση απ τοµα (συµπεριλαµβανοµνων των παιδιν) των οποων οι
σωµατικ, αισθητριε πνευµατικ ικαντητ του εναι µειωµνε, τοµα που στερονται εµπειρα γνση,
χωρ την επβλεψη εν ατµου, το οποο θα εναι υπεθυνο για την ασφλει του, καθ και την τρηση των
οδηγιν που αφορον στη χρση τη συσκευ.
• Εναι υποχρεωτικ η επβλεψη των παιδιν στε να διασφαλιστε τι δεν θα χρησιµοποισουν τη συσκευ ω παιχνδι.
• Μην αφνετε ποτ τη συσκευ χωρ επβλεψη:
εν αυτ εναι συνδεδεµνη στο ρεµα,
εν δεν χει κρυσει για περπου 1 ρα.
• Η πλκα του σδερο σα και η πλκα τη βση που τοποθετετε το σδερο βση µπορε να φτσουν σε εξαιρετικ
υψηλ θερµοκρασε, και να προκαλσουν εγκαµατα: µην τι αγγζετε. Μην αγγζετε τα καλδια ρεµατο µε την
πλκα του σδερου.
• Η συσκευ σα εκπµπει ατµ που µπορε να προκαλσει εγκαµατα. Χρησιµοποιστε το σδερο µε προσοχ, ειδικ
στο κθετο σιδρωµα. Μην κατευθνετε τον ατµ προ ανθρπου ζα.
• Για να ξεβιδσετε την τπα εκκνωση του λβητα, βεβαιωθετε πντα τι η γενντρια ατµο εναι ετε κρα ετε
αποσυνδεδεµνη απ το ρεµα για περισστερο απ 2 ρε.
• Κατ το ξπλυµα του λβητα, µην τον γεµζετε κατευθεαν κτω απ τη βρση.
• Εν χσετε χαλσετε την τπα εκκνωση του λβητα, προµηθευτετε µια καινοργια απ να Εξουσιοδοτηµνο
Κντρο Εξυπηρτηση.
• Ποτ µην βυθζετε την γενντρια ατµο σε νερ σε οποιοδποτε λλο υγρ. Ποτ µην την τοποθετετε κτω απ την
βρση.
• Η συσκευ δεν πρπει να χρησιµοποιηθε εν χει πσει, παρουσιζει εµφανε βλβε, χει διαρρο εµφανζει
σφλµατα λειτουργα. Μην αποσυναρµολογετε ποτ τη συσκευ σα: πηγανετ την για εξταση σε να
Εξουσιοδοτηµνο Κντρο Εξυπηρτηση, προκειµνου να αποφγετε κθε κνδυνο.
Παρακαλούμε, φυλάξτε το παρόν εγχειρίδιο χρήστη
1800126451 GV84XX G0 GTH3_110x154 14/06/12 09:04 Page10
11
Περιγραφη
1. ∆ιακπτη ατµο
2. Διακόπτης ρθµιση θερµοκρασα του σδερου
3. νδειξη θερµοσττη
4. Σστηµα Ultracord (ανλογα µε το µοντλο)
5. Bση σδερου
6. Φωτειν διακπτη λειτουργα ON/OFF
7. Πλκτρο τυλγµατο ηλεκτρικο καλωδου (ανλογα
µε το µοντλο)
8. Χρο αποθκευση ηλεκτρικο καλωδου
9. Καλδιο ρεµατο
10. Πλκτρο Turbo (ανλογα µε το µοντλο)
11. γκιστρο ασφλιση τη γενντρια στη βση
(ανλογα µε το µοντλο)
12. ∆οχεο νερο.
13. Λαβ εξαγωγ και επανατοποθτηση του
αποσπµενου δοχεου
14. Μπόϊλερ (µσα στην µονδα βση)
15. Καλδιο σδερου/βση
16. Θση αποθκευση του καλωδου ατµο.
17. Καπκι συλλκτη αλτων
18. Συλλκτη αλτων
19. Πνακα ρυθµσεων
a. Φωτειν νδειξη τι το δοχεο νερο εναι δειο.
b. Φωτειν νδειξη AutoOff (αυτµατη
διακοπ λειτουργα)
c. Πλκτρο Restart (λειτουργα)
d. Φωτειν νδειξη AntiCalc (καθαρισµο απ τα
λατα)
e. Πλκτρο Reset
f. Φωτειν νδειξη τι ο ατµ εναι τοιµο.
g. Πλκτρο ρθµιση παροχ ατµο.
h. Οικολογική ζώνη
20. Αυτοκαθαριζόμενη πλάκα
ΣGστηµα ασφBλιση> του σEδερου στην βBση (ΣGστηµα ασφBλιση>)
• Η γενντρια ατµο σα διαθτει να γκιστρο ασφλιση που κλειδνει το σδερο στη βση
του για µεγαλτερη ευκολα στην µεταφορ και στην αποθκευση εικ.1:
Ασφλιση εικ.2.
Απασφλιση εικ.3.
• Για να µεταφρετε την γενντρια απ την λαβ του σδερου:
τοποθετεστε το σδερο στην βση τη γενντρια και ανασηκστε το γκιστρο ασφλιση µχρι
να ακοσετε το κλικ εικ.2.
Μεταφρετε την γενντρι σα κρατντα την απ την λαβ του σδερου εικ.1.
ΠΡΟΕΤΟΙΜΑΣΙΑ
Τι εEδο> νεροG πρCπει να χρησιµοποιH ?
• Νερό βρύσης:
Η συσκευή σας σχεδιάστηκε για να λειτουργεί με νερό της βρύσης. Αν το νερό σας είναι πολύ σκληρό, αναμίξτε
50% νερό της βρύσης και 50% απιονισμένο νερό του εμπορίου. Σε κάποιες παραθαλάσσιες περιοχές, η
περιεκτικότητα του νερού σε άλατα μπορεί να είναι υψηλή. Σε αυτή την περίπτωση, χρησιμοποιήστε
αποκλειστικά απιονισμένο νερό.
• Αποσκληρυντικό νερού
Υπάρχουν πολλοί τύποι αποσκληρυντικών νερού που μπορεί να χρησιμοποιηθούν στην κεντρική μονάδα ατμού.
Ωστόσο, ορισμένα αποσκληρυντικά νερού, ιδιαίτερα όσα χρησιμοποιούν χημικά προϊόντα όπως το αλάτι, είναι
δυνατό να προκαλέσουν λευκού ή καφετί λεκέδες, ιδίως στην περίπτωση των φίλτρων νερού. Αν συναντήσετε
αυτό το πρόβλημα, σας συνιστούμε να χρησιμοποιήσετε ακατέργαστο νερό βρύσης ή εμφιαλωμένο νερό. Μόλις
αλλαχτεί το νερό, θα απαιτούνται πολλές χρήσεις για να λυθεί το πρόβλημα. Συνιστάται να δοκιμάσετε τη
λειτουργία ατμού για πρώτη φορά σε ένα χρησιμοποιημένο πανί, το οποίο να μπορείτε στη συνέχει να πετάξετε,
προκειμένου να μην προκαλέσετε ζημιές στα ρούχα σας.
• Μην ξεχνάτε:
Δεν πρέπει να χρησιμοποιείτε ποτέ νερό βροχής ή νερό που περιέχει πρόσθετα (όμως άμυλο, αρώματα ή νερό
προερχόμενο από οικιακές συσκευές). Τα πρόσθετα αυτά είναι δυνατό να επηρεάσουν τις ιδιότητες του ατμού
και, σε υψηλή θερμοκρασία, να σχηματίσουν, μέσα στο διαμέρισμα δημιουργίας ατμού, εναποθέσεις, οι οποίες
ενδέχεται να λερώσουν τα ρούχα σας.
ΓεµEστε το δοχεEο νεροG
• Τοποθετστε τη γενντρια σε επιφνεια σταθερ και οριζντια που δεν εναι ευασθητη στη
θερµτητα.
• Αφαιρστε το αποσπµενο δοχεο νερο µε τη βοθεια τη λαβ (η οποα βρσκεται στο
µπροστιν µρο τη γενντρια ατµο) εικ.4.
• Γεµστε το δοχεο νερο χωρ να ξεπερσετε το αντατο σηµεο εικ.6. και εικ.7.
• Ξανατοποθετστε το µχρι τρµα µσα στην υποδοχ του ω του ακοσετε να χαρακτηριστικ
κλικ εικ.5.
EN
FR
EL
TH
AR
1800126451 GV84XX G0 GTH3_110x154 14/06/12 09:04 Page11
15
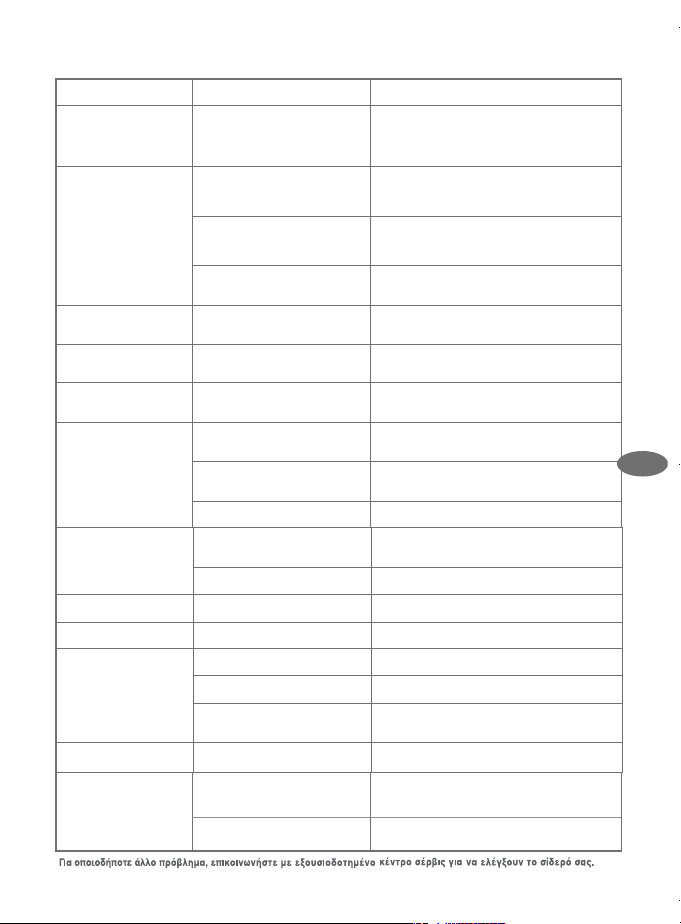
Πρβληµα µε τη γενντρια ατµο σα ?
Προβλµατα
Αιτε
Λσει
Η γενντρια ατµο δεν λειτουργε
και η νδειξη του θερµοσττη
διακπτη ON/OFF δεν ανβουν.
Η συσκευ δεν εναι συνδεδεµνη στο
ρεµα.
Βεβαιωθετε τι η συσκευ εναι σωστ συνδεδεµνη στο ρεµα
και πατστε τον φωτειν διακπτη λειτουργα ON/OFF.
Τρχει νερ απ τι οπ τη
πλκα.
Το νερ εναι συµπυκνωµνο µσα στου
σωλνε επειδ χρησιµοποιετε τον ατµ για
πρτη φορ δεν τον χετε χρησιµοποισει
για µεγλο χρονικ διστηµα.
Πατστε τον διακπτη ατµο µακρι απ τη σιδερστρα σα,
µχρι του το σδερο να εκπµψει ατµ.
Η πλκα δεν εναι αρκετ ζεστ. Ελαχιστοποιστε την παροχ ατµο ταν σιδερνετε σε χαµηλ
θερµοκρασα (πλκτρο ρθµιση που βρσκεται πνω στον
πνακα οργνων). Περιµνετε ω του η νδειξη του σδερου
σβσει προτο χρησιµοποισετε τον διακπτη ατµο.
Ο θερµοσττη σα χει απορυθµιστε:η
θερµοκρασα εναι πντα υπερβολικ
χαµηλ.
Επικοινωνστε µε να Εξουσιοδοτηµνο Κντρο Εξυπηρτηση.
Σταγνε νερο εµφανζονται
πνω στα ροχα.
Η σιδερστρα σα χει γεµσει µε νερ. Σιγουρευτετε τι η σιδερστρα σα εναι κατλληλη (µε
πλγµα που αποτρπει την υγροποηση).
Βγανουν σπρε σταγνε απ
τι οπ τη πλκα.
Ο λβητ σα εκκρνει λατα επειδ δεν
τον καθαρζετε τακτικ.
Ξεπλνετε το συλλκτη (βλπε Λ Αφαιρστε εκολα τα λατα
απ τη γενντρια ατµο).
Βγανουν καφ σταγνε απ τι
οπ τη πλκα και λερνουν τα
ροχα.
Χρησιµοποιετε πρσθετα υλικ χηµικ
προντα αφαλτωση στο νερ που
σιδερνετε.
Ποτ µην προσθτετε οποιοδποτε προν στο δοχεο νερο
µσα στο λβητα.
Η πλκα εναι βρµικη καφ και
µπορε να λερσει τα ροχα.
Π πλκα εναι χαραγµνη
χαλασµνη.
Χρησιµοποιετε υψηλτερη θερµοκρασα
απ αυτν που χρειζεται.
∆ιαβστε τι οδηγε µα σχετικ µε τη ρθµιση τη
θερµοκρασα.
Τα ροχα σα δεν χουν ξεπλυθε σωστ
σιδερσατε να καινοργιο ροχο προτο
το πλνετε.
Βεβαιωθετε τι τα ροχα χουν ξεπλυθε σωστ στε να χουν
αποµακρυνθε τα ενδεχµενα υπολεµµατα απορρυπαντικο
τα χηµικ προντα απ τα καινοργια ροχα.
Χρησιµοποιετε προν κολλαρσµατο.
λατε το σδερfi σα οριζfiντια πνω σε
µεταλλικ επιφνεια τοποθτηση
σιδερσατε πνω σε φερµουρ.
Καθαρσατε τη πλκα του σδερου µε να
λειαντικfi µεταλλικfi σφουγγαρκι.
Ψεκστε πντα το προν κολλαρσµατο στην ανποδη
πλευρ του υφσµατο που σιδερνετε.
οποθετετε πντα το σδερfi σα πνω στη βση του.
Αποφεγετε να σιδερνετε πνω σε φερµουρ.
Ανατρξτε στο κεφλαιο Καθαρισµfi τη πλκα.
∆εν εκπµπεται πια ατµ.
Εκπµπεται λγο ατµ.
Το αποσπµενο δοχεο νερο εναι δειο (η
κκκινη νδειξη εναι αναµµνη).
Γεµστε το αποσπµενο δοχεο νερο. Βεβαιωθετε τι το
αποσπµενο δοχεο νερο εναι τοποθετηµνο σωστ µχρι να
ακουστε το κλικ.
Η παροχ ατµο χει οριστε στο καττατο
εππεδο.
Αυξστε την παροχ ατµο (πλκτρο ρθµιση που βρσκεται
πνω στον πνακα οργνων).
Γεµσατε το δοχεο νερο και δεν
εκπµπεται ατµ.
Το δοχεο δεν χει τοποθετηθε σωστ. Βεβαιωθετε τι το αποσπµενο δοχεο νερο εναι
τοποθετηµνο σωστ µχρι να ακουστε το κλικ.
χει ανψει η κκκινη νδειξη
"δειο δοχεο".
Το αποσπµενο δοχεο νερο εναι δειο. Γεµστε το αποσπµενο δοχεο νερο.
Βγαίνει ατμός από τη καπάκι
συλλογής αλάτων.
Ο συλλέκτης αλάτων δεν έχει βιδωθεί
σωστά.
Βιδώστε το συλλέκτη αλάτων σωστά.
Ο συλλέκτης αλάτων έχει φθαρεί. Επικοινωνήστε με ένα εξουσιοδοτημένο κέντρο
σέρβις.
Η γεννήτρια ατμού είναι ελαττωματική. Μην χρησιμοποιείτε την γεννήτρια ατμού σας και
επικοινωνήστε με ένα εξουσιοδοτημένο κέντρο σέρβις.
Βγανει ατµ νερ κτω απ
τη βση.
Η συσκευ εναι ελαττωµατικ. Μην χρησιµοποισετε λλο τη συσκευ σα και επικοινωνστε
µε να Εξουσιοδοτηµνο Κντρο Εξυπηρτηση.
EN
FR
EL
TH
AR
1800126451 GV84XX G0 GTH3_110x154 14/06/12 09:04 Page15
16
1800126451 GV84XX G0 GTH3_110x154 14/06/12 09:04 Page16
17
1800126451 GV84XX G0 GTH3_110x154 14/06/12 09:04 Page17
30
03/2012
1800126451 GV84XX G0 GTH3_110x154 14/06/12 09:04 Page30