Documents: Go to download!
- Owner's manual - (English, Spanish)
- Operating Instructions
- Care and cleaning
- TROUBLESHOOTING TIPS
Table of contents
User Manual
Operating Instructions
Using the oven controls.

1 Bake Pad
Press to select the bake function.
2 Broil Hi/Lo Pad
Press to select the broil function.
3 Convection Bake Pad
Press to select baking with the convection function.
4 Convection Roast Pad
Press to select roasting with the convection function.
5 Start Pad
Must be pressed to start any cooking or cleaning function.
6 Display
Shows the time of day, oven temperature, whether the oven is in the bake, broil or self-cleaning mode and the times set for the timer or automatic oven operations.
If "F- and a number or letter" flash in the display and the oven control signals, this indicates a function error code. Press the Clear/Off pad. Allow the oven to cool for one hour. Put the oven back into operation. If the function error code repeats, disconnect the power to the oven and call for service.
If your oven was set for a timed oven operation and a power outage occurred, the clock and all programmed functions must be reset.
The time of day will flash in the display when there has been a power outage.
7 Self Clean Std/Low Pad
Press to select self-cleaning function. See the Using the self-cleaning oven section.
8 Oven Light On/Off Pad
Press to turn the oven light on or off.
9 Delay Start Pad
Use along with Cooking Time or Self Clean Std/Low pads to set the oven to start and stop automatically at a time you set.
10 Cooking Time Pad
Press and then press the number pads to set the amount of time you want your food to cook. The oven will shut off automatically when the cooking time has run out, unless the Cook and Hold feature was set.
11 Clear/Off Pad
Press to cancel ALL oven operations except the clock and timer.
12 Clock Pad
Press before setting the clock.
13 Number Pads
Use to set any function requiring numbers such as the time of day on the clock, the timer, the oven temperature, the internal food temperature, the start time and length of operation for timed baking and self-cleaning.
14 Kitchen Timer On/Off Pad
Press to select the timer feature.
15 Probe Pad
Press when using the probe to cook food.
16 Warm Pad
Press to keep hot, cooked foods warm.
17 Proof Pad
Press to select a warm environment useful for rising yeast-leavened products
Using the oven.
Aluminum Foil
Do not use aluminum foil to line oven bottoms. The foil will trap heat below and upset the performance of the oven. Foil can melt and permanently damage the oven bottom. Damage from improper use of aluminum foil is not covered by the product warranty.
Foil may be used to catch spills by placing a sheet on alower rack, several inches below the food. Do not use more foil than necessary and never entirely cover an oven rack with aluminum foil. Keep foil at least 1-1/2" from oven walls to prevent poor heat circulation.
Standard Racks
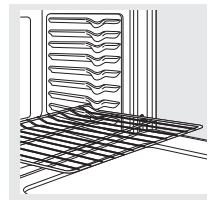
When placing and removing cookware, pull the rack out to the bump (stop position) on the rack support.
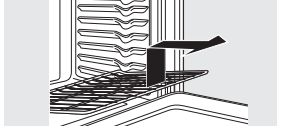
To remove a rack, pull it toward you, tilt the front end up and pull it out.
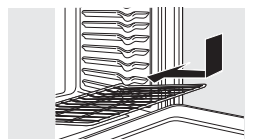
To replace, place the curved end of the rack (stop-locks) onto the oven supports, tilt up the front of the rack and push the rack in.
Extension Racks
When placing and removing cookware, always pull the rack out by its upper front rail to its fully open position.
NOTE: Do not extend the rack quickly. Food may slide off the front of the rack.
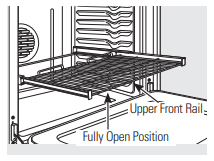
To remove the rack
- Make sure the rack is pushed all the way into the oven.
- Pull both release levers toward the front of the rack, hold them and slide the rack toward you to the bump (stop position)on the rack support.
- Firmly grasp both sides of the rack frame and the sliding rack, tilt the front end up and pull it out.
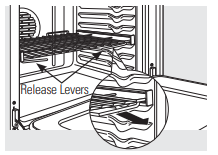
NOTE: When handling the extension rack,do not allow the sliding portion to fall open. This can damage the slides.
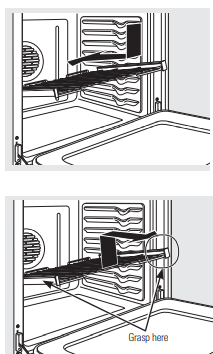
To replace the rack:
- Firmly grasp both sides of the rack frame and the sliding rack.
- Place the curved end of the rack (stop-locks) onto the oven supports, tilt up the front of the rack and push it in as far as it will go.
CAUTION: never use the rack when its frame is not fully inserted in the oven and locked into position.
- When the rack is properly installed and locked into position, the locking side paddles on the rack frame will click- lock into place on the oven supports. If the side paddles did not click-lock into position, repeat the steps above and make sure the side paddles have been correctly cleaned and lubricated. See Extension Rack in the Care and cleaning section.
- Do not place the extension rack in the highest position in the oven.
Preheating and Pan Placement
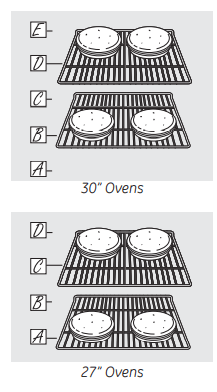
Preheat the oven if the recipe calls for it. Preheating is necessary for good results when baking cakes, cookies, pastry and breads.
To preheat, set the oven at the correct temperature. The control will beep when the oven is preheated and the display will show your set temperature. This may take approximately 10-15 minutes.
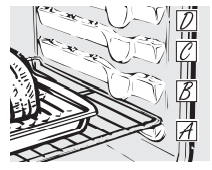
Baking and roasting results will be better if the rack is positioned so that food is centered in the oven cavity as much as possible. Angel food cake is the exception and should be placed on the bottom oven rack [Rack A). Follow package directions on prepackaged and frozen foods for pan placement.
Pans should not touch each other or the walls of the oven. Leave approximately1-1/2” from the oven walls. If you need to use two racks, stagger the pans so one is not directly above the other.
Please note that extension racks position food higher in the oven. An extension rack should be placed one position lower than a flat rack would be so the food is in the same location.
For 27" Ovens: If baking four cake layers at the same time, place two layers on rack A and two layers on rack C.
For 30" Ovens: If baking four cake layers at the same time, place two layers on rack B and two layers on rack D.
Stagger pans on the rack so one is not directly above the other.
How to Set the Oven for Baking or Roasting
NOTE A cooling fan may automatically turn on and off to cool internal parts. This is normal, and the fan may continue to run even after the oven is turned off
- Press the Bake pad.
- Press the number pads to set the desired temperature.
- Press the Start pad.
- Check food for doneness at minimum time on recipe. Cook longer if necessary.
- Press the Off pad when cooking is complete.
How to Set the Oven for Broiling
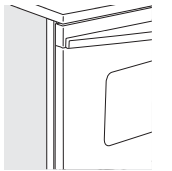
Close the door. Always broil with the door closed.
1 Place the meat or fish on a broiler grid in a broiler pan.
2 Follow suggested rack positions in the Broiling Guide.
The size, weight, thickness, starting temperature and your preference for doneness will affect broiling times. This guide is based on meats at refrigerator temperature.
3 Press the Broil Hi/Lo pad once for HI Broil.
To change to LO Broil, press the Broil Hi/Lo pad again.
4 Press the Start pad.
5 When broiling is finished, press the Clear/0Off pad.
Using the clock, timer and control lockout.

Make sure the clock is set to the correct time of day.
To Set the Clock
The clock must be set to the correct time of day for the automatic oven timing functions to work properly. The time of day cannot be changed during a timed baking or self-cleaning cycle.
- Press the Clock pad.
- Press the number pads.
- Press the Start pad.

The timer is a minute timer only.
The timer does not control oven operations. The maximum setting on the timer is 9 hours and 59 minutes.
To Set the Timer
1 Press the Kitchen Timer On/Off pad.
2 Press the number pads until the amount of time you want shows in the display. For example, to set 2 hours and 45 minutes, press 2, 4 and 5 in that order. If you make a mistake, press the Kitchen Timer On/Off pad and begin again.
3 Press the Start pad.
After pressing the Start pad, SET disappears; this tells you the time is counting down, although the display does not change until one minute has passed. Seconds will not be shown in the display until the last minute is counting down.
4 When the timer reaches :00, the control will beep 3 times followed by one beep every 6 seconds until the Kitchen Timer On/Off pad is pressed.
The 6-second tone can be canceled by following the steps in the Special features of your oven control section under Tones at the End of a Timed Cycle.
To Reset the Timer
If the display is still showing the time remaining, you may change it by pressing the Kitchen Timer On/Off pad, then press the number pads until the time you want appears in the display.
If the remaining time is not in the display (clock, delay start or cooking time are in the display), recall the remaining time by pressing the Kitchen Timer On/Off pad and then pressing the number pads to enter the new time you want.
To Cancel the Timer
Press Kitchen Timer On/Off pad twice.

Control Lockout
Your control will allow you to lock out the touch pads so they cannot be activated when pressed.
NOTE: On double oven models, this activates this feature for both ovens.
To lock/unlock the controls:
- Press the 9 and 0 pads at the same time for 3 seconds, until the display shows LOC ON.
- To unlock the control, press the 9 and 0 pads at the same time for 3 seconds, until the display shows LOC OFF.
When this feature is on and the touch pads are pressed, the control will beep and the display will show LOC ON.
NOTES:
- The control lockout mode affects all touch pads. No touch pads will work when this feature is activated
- The adjustment will be retained in memory after a power failure.
Using the timed baking and roasting features. (on some models)
On double oven models, you can use timed baking in one oven while using self-clean in the other, you can also use timed baking in both ovens at the same time.
NOTE: Foods that spoil easily—such as milk, eggs, fish, stuffings, poultry and pork—should not be allowed to sit for more than 1 hour before or after cooking. Room temperature promotes the growth of harmful bacteria. Be sure that the oven light is off because heat from the bulb will speed harmful bacteria growth.
How to Set an Immediate Start and Automatic Stop
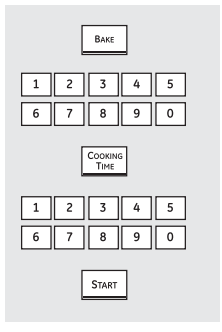
The oven will turn on immediately and cook for a selected length of time. At the end of the cooking time, the oven will turn off automatically.
Make sure the clock shows the correct time of day.
1 Press the Bake pad.
2 Using the number pads, enter the desired temperature.
3 Press the Cooking Time pad.
NOTE: If your recipe requires preheating, you may need to add additional time to the length of the cooking time.
4 Using the number pads, enter the desired baking time. The oven temperature and the cooking time set that you entered will be displayed.
NOTE: If you want your food to be kept warm for up to 3 hours after the cooking function is finished, press the Warm pad once.
5 Press the Start pad.
The display will show the changing temperature (starting at 100°F) and the cooking time. The display starts changing once the temperature reaches 100°F.
NOTE: On double oven models, when using both ovens at the same time, the times showing in the display will be for the last oven set To display the time set for the first oven set,press the Cooking Time pad for that oven.
The oven will continue to cook for the programmed amount of time, then shut off automatically unless the warmer feature was
Press the Clear/Off pad to clear the display.
How to Set a Delayed Start and Automatic Stop
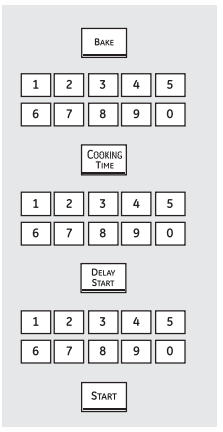
You can set the oven control to delay-start the oven, cook for a specific length of time and then turn off automatically.
Make sure the clock shows the correct time of day.
1 Press the Bake pad.
2 Using the number pads, enter the desired temperature.
3 Press the Cooking Time pad.
NOTE: If your recipe requires preheating, you may need to add additional time to the length of the cooking time.
4 Using the number pads, enter the desired baking time.
5 Press the Delay Start pad.
6 Using the number pads, enter the time of day you want the oven to turn on and start cooking.
NOTE: If you want your food to be kept warm for up to 3 hours after the cooking function is finished, press the Warm pad once.
7 Press the Start pad.
NOTE: An attention tone will sound if you are using timed baking and do not press the Start pad after entering the baking temperature.
If you would like to check the times you have set, press the Delay Start pad to check the start time you have set or press the Cooking Time pad to check the length of cooking time you have set.
When the oven turns on at the time of day you have set, the display will show the changing temperature (starting at 100°F) and the cooking time. The display starts changing once the temperature reaches 100°F.
NOTE: On double oven models, when using both ovens at the same time, the times showing in the display will be for the last oven set To display the time set for the first oven set, press the Delay Start or the Cooking Time pad for that oven.
The oven will continue to cook for the programmed amount of time, then shut off automatically unless the warmer feature was set.
Press the Clear/Off pad to clear the display.
Using the probe.
For many foods, especially roasts and poultry, internal food temperature is the best test for doneness. The temperature probe takes the guesswork out of roasting by cooking foods to the exact doneness you want.
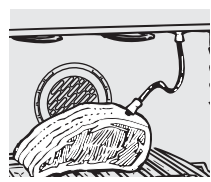
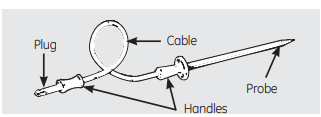
The temperature probe has a skewer-like probe at one end and a plug at the other end that goes into the outlet in the oven.
NOTE: Some double oven models have a probe in the upper oven only.
Use of probes other than the one provided with this product may result in damage to the probe.
Use the handles of the probe and plug when inserting and removing them from the meat and outlet.
- To avoid damaging your probe, do not use tongs to pull on the cable when removing it.
- To avoid breaking the probe, make sure food is completely defrosted before inserting.
- To prevent possible burns, do not unplug the probe from the outlet until the oven has cooled
- Never leave your probe inside the oven during a self-cleaning cycle.
- Do not store the probe in the oven.
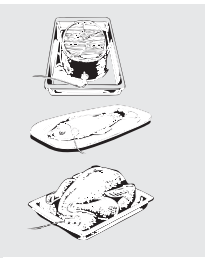
After preparing the meat and placing it on a trivet or on a broiler pan grid, follow these directions for proper probe placement.
- Lay the probe on the outside of the meat along the top or side and mark with your finger where the edge of the meat comes to on the probe. The point should rest in the center of the thickest meaty part of the roast.
- Insert the probe completely into the meat, up to the handle. It should not touch bone, fat or gristle.
For roasts with no bone, insert the probe into the meatiest part of the roast. For bone-in ham or lamb, insert the probe into the center of the lowest large muscle or joint.
Insert the probe into the center of dishes such as meat loaf or casseroles. When cooking fish, insert the probe from just above the gill into the meatiest areq, parallel to the backbone.
Insert the probe into the meatiest part of the inner thigh from below and parallel to the leg of a whole turkey.
How to Set the Oven For Roasting When Using the Probe
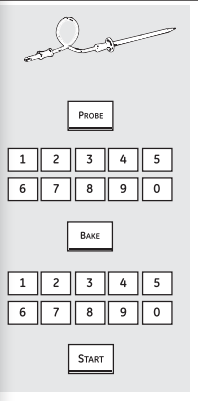
1 Insert the probe into the meat.
2 Plug the probe into the outlet in the oven. Make sure it's pushed all the way in. Close the oven door.
3 Press the Probe pad.
4 Press the number pads to set the desired internal food or meat temperature. The maximum internal temperature for the food that you can set is 200°F.
5 Press the Bake pad.
6 Press the number pads to set the desired oven temperature.
7 Press the Start pad.
The display will flash if the probe is inserted into the outlet and you have not set a probe temperature and pressed the Start pad.
When the oven starts to heat, the word LO will be in the display.
After the internal temperature of the meat reaches 100°F, the changing internal temperature will be shown in the display.
8 When the internal temperature of the meat reaches the number you have set, the probe and the oven turn off and the oven control signals. To stop the signal, press the Clear/Off pad. Use hot pads to remove the probe from the food. Do not use tongs to pull on it—they might damage it.
To change the oven temperature during the Roast cycle, press the Bake pad and then the number pads to set the new temperature.
- If the probe is removed from the food before the final temperature is reached, a tone will sound and the display will flash until the probe is removed from the oven.
- You can use the timer even though you cannot use timed oven operations.
Using the proofing and warming features (on some models).
How to Set the Oven for Proofing
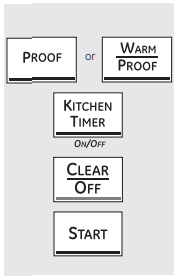
1 Place the covered dough in the oven on rack Bor C.
NOTE: For best results, cover the dough with a cloth or with greased plastic wrap (the plastic may need to be anchored underneath the container so the oven fan will not blow it off).
2 Press the Proof pad once or the Warm/ Proof pad twice and then the Start pad.
The display will read Prf (proof).
The oven interior light turns on and remains on during proofing.
The proofing feature automatically provides the optimum temperature for the proofing process, and therefore does not have a temperature adjustment.
3 Set the Kitchen Timer for the minimum proof time.
4 When proofing is finished, press the Clear/ Off pad.
- To avoid lowering the oven temperature and lengthening proofing time, do not open the oven door unnecessarily.
- Check bread products early to avoid over- proofing.
NOTE:
- Do not use the proofing mode for warming food or keeping food hot The proofing oven temperature is not hot enough to hold foods at safe temperatures. Use the Warm feature to keep hot food warm.
- Proofing will not operate when oven is above 125°F. "HOT" will show in the display.
How to Set the Oven for Warming (on some models)
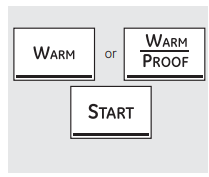
The warm feature keeps cooked foods warm for up to 3 hours after a timed function is finished, or warm can be activated to keep hot, cooked foods warm. This feature is not designed to reheat cold food.
To use this feature, press the Warm or Warm/Proof pad once and then the Start pad.
To activate this feature for use after Timed
Baking or Roasting, press the Warm or Warm/Proof pad while programming the oven and before pressing Start.
To Crisp Stale Items
- Place food in low-sided dishes or pans.
- For best results, place the food items in a single layer. Do not stack
- Leave them uncovered.
- Check crispness after 20-30 minutes. Add time as needed.
IMPORTANT NOTES:
- Food should be kept hot in its cooking container or transferred to a heat-safe serving dish.
- For moist foods, cover them with an oven- safe lid or foil.
- Fried or crisp foods do not need to be covered, but can become too dry if warmed for too long.
- Repeated opening of the door allows the hot air to escape and the food to cool.
- Allow extra time for the temperature inside the oven to stabilize after adding items.
- With large loads it may be necessary to cover some of the cooked food items.
- Remove serving spoons, etc., before placing containers in the oven.
- Do not use plastic containers, lids or plastic wrap.
- CAUTION: Plastic containers, lids or plastic wrap will melt if placed in the oven. Melted plastic may not be removable and is not covered under your warranty.
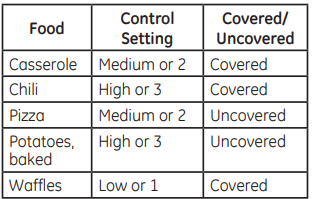
Using the convection oven. (on some models)
Convection Bake
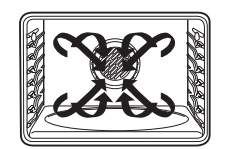
NOTE: The convection fan will cycle on and off while cooking to best distribute hot air in the oven.
The convection oven fan shuts off when the oven door is opened. DONQT leave the door open for long periods of time while using convection cooking or you may shorten the life of the convection heating element.
In a convection oven, a fan circulates hot air over, under and around the food.
This circulating hot air is evenly distributed throughout the oven cavity. As a result, foods are evenly cooked and browned—often in less time with convection heat.
- Ideal for evenly browned baked foods cooked on multiple racks.
- Good for large quantities of baked foods.
- Good results with cookies, biscuits, muffins, brownies, cupcakes, cream puffs, sweet rolls, angel food cake and bread.
The convection fan circulates the heated air evenly over and around the food.
Multi-Rack Convection Baking
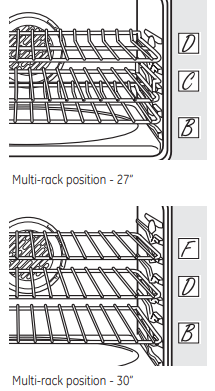
When convection baking with only 1 rack, follow the rack positions recommended in the Using the oven section.
Because heated air is circulated evenly throughout the oven, foods can be baked with excellent results using multiple racks.
Multi-rack baking may increase cook times slightly for some foods but the overall result is time saved. Cookies, muffins, biscuits and other quickbreads give very good results with multi- rack baking.
For 27" Ovens: When baking on 3 racks, place one rack in the second (B) position, one in the third (C) position and one in the fourth (D) position.
For two-rack baking, place one rack in the secind (B) rack position. Place the other rack in the third (C) rack position.
For 30” Ovens: When baking on 3 racks, place one rack in the second (B) position, one in the fourth (D) position and one in the sixth (F) position.
For two-rack baking, place one rack in the second (B) rack position. Place the other rack in the fourth (D) rack position.
NOTE: Please note that extension racks position food higher in the oven. An extension rack should be placed one position lower than a flat rack would be so the food is in the same location.
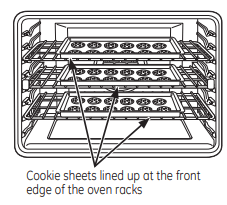
For best results when baking multiple racks of cookies, line up the front of the cookie sheets with the front edge of the racks.
Adapting Recipes...
You can use your favorite recipes in the convection oven.
When convection baking, reduce baking temperature by 25°F or activate the Auto Recipe™ Conversion feature. See Auto Recipe™ Conversion in the Special features of your oven control section.
- Use pan size recommended.
- Some package instructions for frozen casseroles or main dishes have been developed using commercial convection ovens. For best results in this oven, preheat the oven and use the temperature on the package.
Convection Roast
- Good for large tender cuts of meat, uncovered.
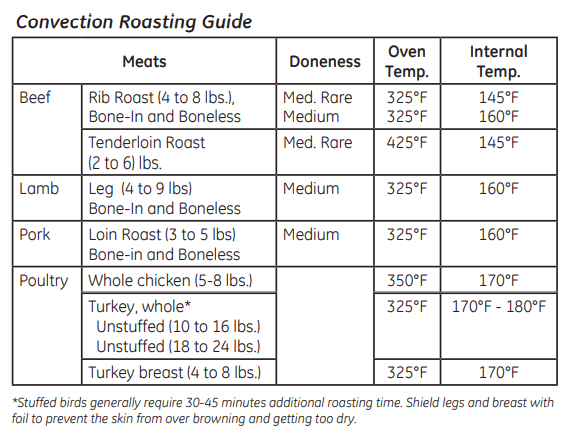
The convection fan circulates the heated air evenly over and around the food. Meat and poultry are browned on all sides as if they were cooked on a rotisserie. Heated air will be circulated over, under and around the food being roasted. The heated air seals in juices quickly for a moist and tender product while, at the same time, creating a rich golden brown exterior.
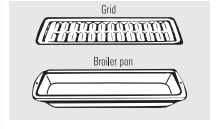
When you are convection roasting it is important that you use a broiler pan and grid for best convection roasting results. The pan is used to catch grease spills and the grid is used to prevent grease spatters.
Cookware for Convection Cooking
Before using your convection oven, check to see if your cookware leaves room for air circulation in the oven. If you are baking with several pans, leave space between them. Also, be sure the pans do not touch each other or the walls of the oven.
Paper and Plastic
Heat-resistant paper and plastic containers that are recommended for use in regular ovens can be used in convection ovens. Plastic cookware that is heat-resistant to temperatures of 400°F can also be used.
Metal and Glass
Any type of cookware will work in your convection oven. However, metal pans heat the fastest and are recommended for convection baking.
- Darkened or matte-finished pans will bake faster than shiny pans.
- Glass or ceramic pans cook more slowly.
For recipes like oven-baked chicken, use a pan with low sides. Hot air cannot circulate well around food in a pan with high sides.
How to Set the Oven for Convection Baking or Roasting
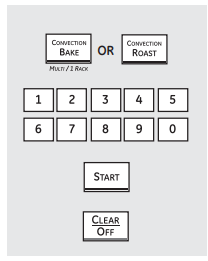
1 Press the Convection Bake pad or the Convection Roast pad.
2 Press the number pads to set the desired oven temperature.
3 Press the Start pad.
To change the oven temperature, press the Convection Bake or Convection Roast pad and then the number pads to set the new temperature.When the oven starts to heat, the changing temperature, starting at 100°F, will be displayed. When the oven reaches the temperature you set, 3 beeps will sound.
4 Press the Clear/Off pad when finished.
- You will hear a fan while cooking with convection. The fan will stop when the door is opened, but the heat will not turn off.
- You may hear the oven clicking during baking. This is normal.
How to Set the Oven for Convection Roasting when Using the Probe
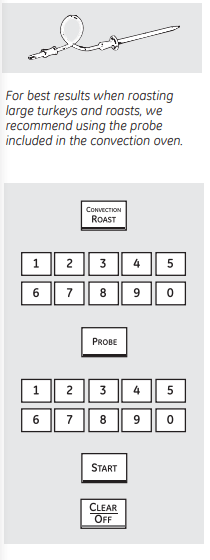
The display will flash PROBE and the oven control will signal if the probe is inserted into the outlet, and you have not set a probe temperature and pressed the Start pad.
- Place the rack in the lowest positioposition. (A) Insert the probe into the meat..
- Plug the probe into the outlet in the oven. Make sure it is pushed all the way in. Close the oven door.
- Press the Convection Roast pad.
- Press the number pads to set the desired oven temperature.
- Press the Probe pad.
- Press the number pads to set the desired internal meat temperature.
- Press the Start pad.
When the oven starts to heat, the word LO will be in the display.
After the internal temperature of the meat reaches 100°F, the changing internal temperature will be shown in the display.
8. When the internal temperature of the meat reaches the number you have set, the probe and the oven turn off and the oven control signals. To stop the signal, press the Clear/Off pad. Use hot pads to remove the probe from the food. Do not use tongs to pull on it—they might damage it.
CAUTION: To prevent possible burns, do not unplug the probe from the oven outlet until the oven has cooled. Do not store the probe in the oven.
NOTE:
- If the probe is removed from the food before the final temperature is reached, a tone will sound and the display will flash until the probe is removed from the oven.
- You will hear a fan while cooking with this feature. The fan will stop when the door is opened, but the heat will not turn off.
- You can use the timer even though you cannot use timed oven operations.
- You will not be able to use the probe in the upper oven during timed oven operations. This is because, with the probe, you are cooking by temperature rather than time.
Using the self-cleaning oven.
Before a Clean Cycle
We recommend venting your kitchen with an open window or using a ventilation fan or hood during the first self-clean cycle.
Remove any broiler pan, broiler grid, probe, dll cookware and any foil from the oven.
Note: Porcelain-coated oven racks may remain in the oven during the self-cleaning cycle without being damaged. The shiny, silver-colored oven racks may be cleaned in the self-cleaning oven. However, they will darken in color, loose their luster and become hard to slide.
Soil on the front frame of the range and outside the gasket on the door will need to be cleaned by hand. Clean these areas with hot water, soap-filled steel-wool pads, or cleansers such as Soft Scrub (R). Rinse well with clean water and dry.
Do not use abrasives or oven cleaners. Clean the top, sides and outside of the oven door with soap and water.
Do not clean the gasket. The fiberglass material of the oven door gasket cannot withstand abrasion. It is essential for the gasket to remain intact. If you notice it becoming worn or frayed, replace it
Make sure the oven light bulb cover is in place and the oven light is off.
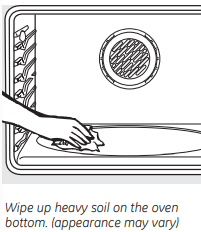
Wipe up sugary spillovers and acidic spillovers such as lemon juice, tomato sauce, or milk based sauces. Porcelain enamel is acid resistant, not acid proof. The procelain finish may discolor if acidic or sugary spills are not wiped up prior to a self-cleancycle.
IMPORTANT: The health of some birds is extremely sensitive to the fumes given off during the self-cleaning cycle of any oven. Move birds to another well-ventilated room.
- On double oven models, you can set a clean cycle in both ovens at the same time. The last oven set will automatically delay its start until the end of the first oven’s clean cyde.
- On 27” double oven models, both ovens lock when one is set to Clean. Both will unlock when all clean cycles have completed
- On 30” double oven models, you can use timed baking in one oven and self-clean the other at the same time.
CAUTlON: Never place cooking utensils or any other items on the oven floor. There is a heating element beneath the oven floor. Placing items on the oven floor may cause the oven to overheat, resulting in damage to the oven and risk of damage or fire to cabinets.
How to Set the Oven for Cleaning
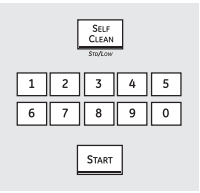
1 Press the Self Clean Std/Low pad once for a 4-hour dean time or twice for a 3-hour clean time.
A 3-hour self-clean time is recommended for use when cleaning small, contained spills. A self-clean time of 4 hours or longer is recommended for a dirtier oven.
2 If a time other than 4 hours or 3 hours is needed, use the number pads and enter the desired clean time.
You can change the clean time to any time between 3 hours and 5 hours, depending on how dirty your oven is.
3 Press the Start pad.
The door locks automatically. The display will show the clean time remaining. It will not be possible to open the oven door until the temperature drops below the lock temperature and the LOCKED light goes off.
When the LOCKED light goes off, you will be able to open the door.
- The words LOCKED will flash and the oven control will signal if you set the clean cycle and forget to close the oven door.
- To stop a dean cycle, press the Clear/ Off pad. When the LOCKED light goes off indicating the oven has cooled below the locking temperature, you will be able to open the door.
How to Delay the Start of Cleaning
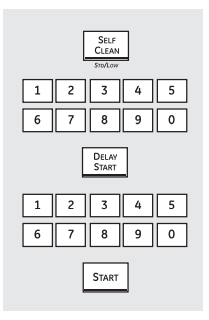
1 Press the Self Clean Std/Low pad once for a 4-hour clean time or twice for a 3-hour clean time.
A 3-hour self-clean time is recommended for use when cleaning small, contained spills. A self-clean time of 4 hours or longer is recommended for a dirtier oven.
2 If a time other than 4 hours or 3 hours is needed, use the number pads and enter the desired clean time.
You can change the clean time to any time between 3 hours and 5 hours, depending on how dirty your oven is.
3 Press the Delay Start pad.
4 Using the number pads, enter the time of day you want the clean cycle to start.
5 Press the Start pad.
The door locks automatically. The display will show the start time. It will not be possible to open the oven door until the temperature drops below the lock temperature and the LOCKED light goes off.
When the LOCKED light goes off, you will be able to open the door.
NOTE: On double oven models, you can set a delay clean in both ovens at the same time. The second oven set will automatically delay the start of cleaning until the end of the first oven's clean cycle.
To recall the start time of the second oven set, press the Delay Start pad on the controls for the second oven.
After a Clean Cycle
You may notice some white ash in the oven.
Wipe it up with a damp cloth after the oven cools.
If white spots remain, remove them with a soap- filled steel-wool pad and rinse thoroughly with a vinegar and water mixture. These deposits are usually a salt residue that cannot be removed by the clean cycle.
A white discoloration may appear after cleaning if acidic or sugary foods were not wiped up before the clean cycle. This is normal and will NOT affect performance.
If the oven is not clean after one clean cycle, repeat the cycle.
- You cannot set the oven for cooking until the oven is cool enough for the door to unlock.
- While the oven is self-cleaning, you can press the Clock pad to display the time of day. To return to the clean countdown, press the Self Clean Std/Low pad.
Standard Racks
If they become hard to slide, wipe their side edges and the oven rack supports with cooking oil.
Extension Rack
If it becomes difficult to slide or if the release levers become difficult to use, see Extension Rack in the Care and Cleaning section. Do not spray extension rack with cooking spray or other lubricant sprays.
If it becomes hard to remove or replace, wipe the oven rack supports with cooking cil. Do not wipe cooking oil on the slides.
NOTE: After the first self-clean cycle, the gray stainless steel surfaces will change color on enameled extension racks. This is normal. It is not recommended to self-clean nickel extension racks as the whole rack will discolor because of the self- clean temperatures.
Special features of your oven control.
Your new touch pad control has additional features that you may choose to use. The following are the features and how you may activate them.
The special feature modes can only be activated while the display is showing the time of day. They remain in the control's memory until the steps are repeated.
When the display shows your choice, press the Start pad. The special features will remain in memory after a power failure, except for the Sabbath feature, which will have to be reset.
12-Hour Shutoff
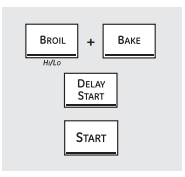
With this feature, should you forget and leave the oven on, the control will automatically turn off the oven after 12 hours during baking functions or after 3 hours during a broil function.
If you wish to turn OFF this feature, follow the steps below.
- Press the Bake and Broil Hi/Lo pads (on double oven models, use the upper oven controls) at the same time for 3 seconds, until the display shows SF.
- Press the Delay Start pad until no shdn (no shutoff) appears in the display.
- Press the Start pad to activate the no shutoff and leave the control set in this special features mode.
NOTE: On double oven models, this activates this special feature for both ovens.
12-Hour, 24-Hour or Clock Blackout
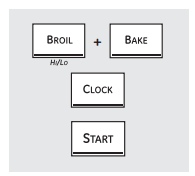
Your control is set to use a 12-hour clock.
If you would prefer to have a 24-hour military time clock or black out the clock display, follow the steps below.
- Press the Bake and Broil Hi/Lo pads (on double oven models, use the upper oven controls) at the same time for 3 seconds, until the display shows SF.
- Press the Clock pad once. The display will show 12 hr. If this is the choice you want, press the Start pad.
Press the Clock pad again to change to the 24-hour military time clock. The display will show 24 hr. If this is the choice you want, press the Start pad.
Press the Clock pad again to black out the clock display. The display will show OFF. If this is the choice you want, press the Start pad.
NOTE: If the clock is in the black-out mode, you will not be able to use the Delay Start function.
Fahrenheit or Celsius Temperature Selection
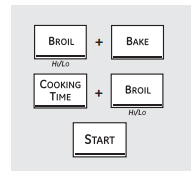
Your oven control is set to use the Fahrenheit temperature selections, but you may change this to use the Celsius selections.
- Press the Bake and Broil Hi/Lo pads (on double oven models, use the upper oven controls) at the same time for 3 seconds, until the display shows SF.
- Press the Broil Hi/Lo and Cooking Time pads at the same time. The display will show F (Fahrenheit).
- Press the Broil Hi/Lo and Cooking Time pads again at the same time. The display will show C (Celsius).
- Press the Start pad.
NOTE: On double oven models, the new setting will be displayed for both ovens.
Tones at the End of a Timed Cycle
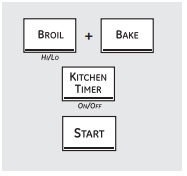
At the end of a timed cycle, 3 short beeps will sound followed by one beep every 6 seconds until the Clear/Off pad is pressed. This continuous 6-second beep may be canceled.
To cancel the 6-second beep:
- Press the Bake and Broil Hi/Lo pads (on double oven models use the upper oven controls) at the same time for 3 seconds, until the display shows SF.
- Press the Kitchen Timer On/Off pad. The display shows CON BEEP continuous beep). Press the Kitchen Timer On/Off pad again. The display shows BEEP. (This cancels the one beep every 6 seconds)
- Press the Start pad.
NOTE: On double oven models, this cancels the end-of-cycle tone for both ovens.
Auto Recipe™ Conversion (on some models)
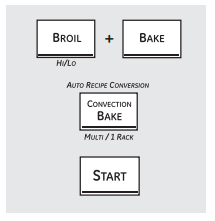
When using convection bake, the Auto Recipe™ Conversion feature will automatically convert entered regular baking temperatures to convection baking temperatures.
Once the feature is activated, the display will show the actual converted (reduced) temperature. For example, if you enter a regular recipe temperature of 350°F and press the Start pad the display will show CON and the converted temperature of 325°F.
NOTE: This feature does not convert convection bake cooking times, only regular baking temperatures.
To activate the feature:
- Press the Bake and Broil Hi/Lo pads (on double oven models, use the upper oven controls) at the same time for 3 seconds, until the display shows SF.
- Press the Convection Bake pad. The display will show CON OFF. Press the Convection Bake pad again. The display will show CON ON.
- Press the Start pad.
To deactivate the feature, repeat steps 1-3 above but press the Start pad when CON OFF is in the display.
Using the Sabbath Feature.
(Designed for use on the Jewish Sabbath and Holidays.)
The Sabbath feature can be used for baking/roasting only. It cannot be used for convection, broiling, self-cleaning or Delay Start cooking.
NOTE: The oven light comes on automatically {on some models) when the door is opened and goes off when the door is closed The bulb may be removed. See the Oven Light Replacement section. On models with a light switch on the control panel, the oven light may be turned on and left on.
How to Set for Regular Baking/Roasting
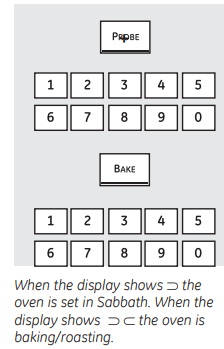
Make sure the clock shows the correct time of day and the oven is off.
- Press and hold both the Bake and Broil Hi/Lo pads, at the same time, until the display shows SF.
- Tap the Delay Start pad until SAb bAtH appears in the display
- Touch the Start pad and
 will appear in the display.
 - Touch the Bake pad. No signal will be given
- Using the number pads, enter the desired temperature between 170°F and 550°F. No signal or temperature will be given
- Touch the Start pad
- After a random delay period of approximately 30 seconds to 1 minute,
 will appear in the display indicating that the oven is baking/ roasting. If
  doesn't appear in the display, start again at Step 4.
To adjust the oven temperature, touch the Bake pad, enter the new temperature using the number pads, and touch the Start pad
NOTE: The Clear/Offand Cooking Time pads cre active during the Sabbath feature
How to Set for Timed Baking/Roasting - Immediate Start and Automatic Stop
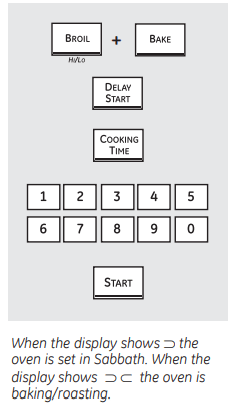
Make sure the clock shows the correct time of day ond the oven is off.
- Press and hold both the Bake cnd Broil Hi/Lo pads, at the same time, until the display shows SF.
- Touch the Start pad and
 will appear in the display.
 - Touch the Cooking Time pad
- Touch the number pads to set the desired length of cooking time between 1 minute and 9 hours and 99 minutes. The cooking time that you entered will be displayed
- Touch the Start pad
- Touch the Bake pad. No signal will be given
- Using the number pads, enter the desired temperature. No signal or temperature will be given
- Touch the Start pad
- After a random delay period of approximately 30 seconds to 1 minute,
 will appear in the display indicating that the oven is baking/ roasting. If
  doesn't appear in the display, start again at Step 7
To adjust the oven temperature, touch the Bake pad, enter the new temperature using the number pads and touch the Start pad
When cooking is finished, the display will change from  to
to  and 0:00 will appear, indicating that the oven has turned OFF but is still set in Sabbath Remove the cooked food
How to Exit the Sabbath Feature
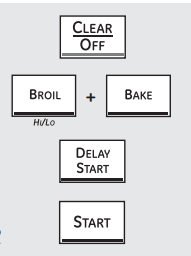
- Touch the Clear/Off pad
- If the oven is cooking, wait for a random delay period of approximately 30 seconds to 1 minute, until only
 is in the display.
 - Press and hold both the Bake and Broil Hi/Lo pads, at the same time, until the display shows SF.
- Tap the Delay Start pad until 12 shdn or no shdn appears in the display. 12 shdn indicates that the oven will automatically turn off after 12 hours. no shdn indicates that the oven will not automatically turn off.
- Touch the Start pad
NOTE: If a power outage occurred while the oven was in Sabbath, the oven will automatically turn off and stay off even when the power returns. The oven control must be reset
Care and cleaning
How to Remove Protective Shipping Film and Packaging Tape
Carefully grasp a comer of the protective shipping film with your fingers and slowly peel it from the appliance surface. Do not use any sharp items to remove the film. Remove all of the film before using the appliance for the first time.
To assure no damage is done to the finish of the product, the safest way to remove the adhesive from packaging tape on new appliances is an application of a household liquid dishwashing detergent. Apply with a soft cloth and allow to soak.
NOTE: The adhesive must be removed from all parts. It cannot be removed if it is baked on.
Oven Light Bulb Replacement
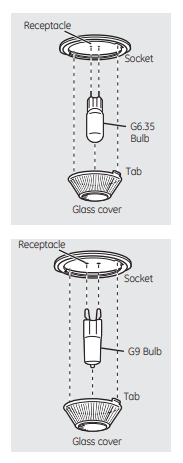
To remove:
- Turn the glass cover counterclockwise 1/4 turn until the tabs of the glass cover clear the grooves of the socket. Wearing latex gloves may offer a better grip.
- Using gloves or a dry cloth, remove the bulb by pulling it straight out.
IMPORTANT: Remove the bulb to determine the kind needed as a replacement.
To replace:
1 Replace the bulb with the same type of bulb that was removed. Your model will have one of the three types shown.
For appliance bulb, use a new 40-watt appliance bulb. A 40-watt appliance bulb is smaller than a standard 40-watt household bulb.
For halogen bulbs, use a new 120/130- volt halogen bulb, not to exceed 50 watts. Determine the correct replacement bulb by checking the bulb terminals. Bulbs with 2 straight pin terminals are G6.35 bulbs. Bulbs with 2 looped terminals are G9 bulbs. (Do not interchange.) Be sure the replacement bulb is rated 120 volts or 130 volts (NOT 12 volts).
Using gloves or a dry cloth, remove the bulb from its packaging. Do not touch the bulb with bare fingers. Oil from skin will damage the bulb and shorten its life.
Push the bulb straight into the receptacle all the way.
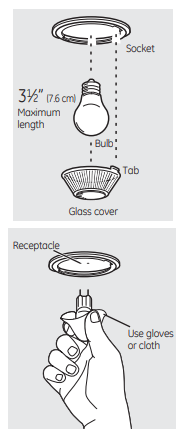
2 Place the tabs of the glass cover into the grooves of the socket. Turn the glass cover clockwise 1/4 turn,
For improved lighting inside the oven, clean the glass cover frequently using a wet cloth. This should be done when the oven is completely cool.
3 Reconnect electrical power to the oven.
Cleaning the Oven Door
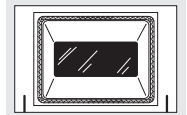
To clean the inside of the door:
- Because the area inside the gasket is cleaned during the self-clean cycle, you do not need to clean this by hand.
- The area outside the gasket and the door liner can be cleaned with a soap- filled or plastic scouring pad, hot water and detergent. Rinse well with a vinegar and water solution.
To clean the outside of the door:
- Use soap and water to thoroughly clean the top, sides and front of the oven door. Rinse well. You may also use a glass cleaner to on the outside of the door. Do not let water drip into the vent openings.
- If any stain on the door vent trim is persistent, use a soft abrasive cleaner and a sponge-scrubber for best results.
- Spillage of marinades, fruit juices, tomato sauces and basting materials containing acids may cause discoloration and should be wiped up immediately. When surface is coal, clean and rinse.
- Do not use oven cleaners, cdeaning powders or harsh abrasives on the clean the glass outside of the door.
Lift-Off Oven Door
The door is very heavy. Be careful when removing and lifting the door.
Do not lift the door by the handle.
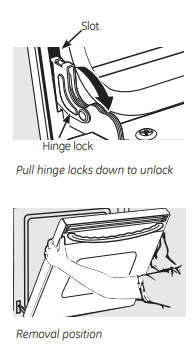
To remove the door.
- Fully open the door.
- Pull the hinge locks down toward the door frame, to the unlocked position. A tool, such as a small flat-blade screwdriver, may be required.
- Firmly grasp both sides of the door at the top.
- Close door to the door removal position see illustration).
- Lift door up and out until the hinge arm is clear of the slot.
To replace the door:
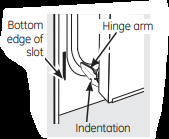
- Firmly grasp both sides of the door at the top.
- With the door at the same angle as the removal position, seat the indentation of the hinge arm into the bottom edge of the hinge slot. The notch in the hinge arm must be fully seated into the bottom of the slot.
- Fully open the door. If the door will not fully open, the indentation is not seated correctly in the bottom edge of the slot.
- Push the hinge locks up against the front frame of the oven cavity, to the locked position.
- Close the oven door.
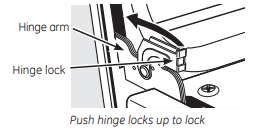
Probe

The temperature probe may be cleaned with soap and water or a soap-filled scouring pad. Cool the temperature probe before cleaning. Scour stubborn spots with a soap-filled scouring pad, rinse and dry.
- Do not immerse the temperature probe in water.
- Do not store the temperature probe in the oven.
Extension Rack

Porcelain enamel surfaces of the extension rack may be cleaned by hand with an abrasive cleaner or steel wool.
Do not use a steel wool pad to clean stainless steel surfaces of the extension rack; it will scratch the surface. See Stainless Steel Surfaces in this Care and cleaning section.
NOTE: Do not clean in a dishwasher.
NOTE: Porcelain-coated oven racks may remain in the oven during the self-cleaning cycle without being damaged. The shiny, silver- colored oven racks may be cleaned in the self-cleaning oven. However, they will darken in color, lose their luster and become hard to slide.
If the rack becomes hard to remove or replace, wipe the oven rack supports with cooking cil. Do not wipe cooking oil on the slides.
If the rack becomes difficult to slide or if the release levers become difficult to use, the rack may need to be lubricated using the Graphite Lubrication shipped with your oven. To order additional Graphite Lubrication, call our National Parts Center at 800.626.2002 and reference WB02710303.
To lubricate the slides:
NOTE: Do not spray extension rack with cooking spray or other lubricant sprays.
1 Remove the rack from the oven. See Extension Rack in the Using the oven section.
2 Fully extend the rack on a table or countertop. Newspaper may be placed underneath the rack for easy cleanup.

3 If there is debris in the slide tracks, wipe it away using a paper towel.
NOTE: Any graphite lubricant wiped away must be replaced.
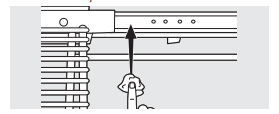
4 Shake the graphite lubricant before opening it Starting with the left slide mechanism of the rack, place four (4) small drops of lubricant on the two (2) bottom tracks of the slide close to the bearing carriers.
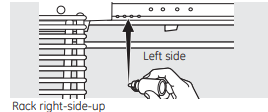
5 Repeat for the right slide mechanism of the rack.
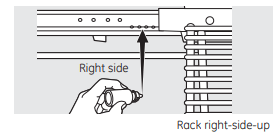
6 Open and close the rack several times to distribute the lubricant.
7 Replace the cap on the lubricant and shake it again. Turn the rack over and repeat steps 3, 4,5 and 6.
8 Close the rack, turn rack right-side-up and place in the oven. See Extension Rack in the Using the oven section.
To lubricate the release levers:
Shake lubricant and apply to the moving parts of the release levers and paddle mechanisms.
Control Panel
It's a good idea to wipe the control panel after each use. Clean with mild soap and water or vinegar and water, rinse with clean water and polish dry with a soft cloth. When cleaning, the control panel should be at room temperature and not in direct sunlight.
Do not use abrasive cleansers, strong liquid cleansers, plastic scouring pads or oven cleaners on the control panel—they will damage the finish. A 50/50 solution of vinegar and hot water works well.
Stainless Steel Surfaces (on some models)
Do not use a steel wool pad; it will scratch the surface.
To clean the stainless steel surface, use warm sudsy water or a stainless steel cleaner or polish. Always wipe the surface in the direction of the grain. Follow the cleaner instructions for cleaning the stainless steel surface.
TROUBLESHOOTING TIPS
Control signals after entering cooking time or delay starstart
- You forgot to enter a bake temperature or cleaning
- Press the Bake pad and desired temperature or the Self Clean Std/Low pad and desired clean time.
Food does not hake properly
- Ovan controls improperly sat
- See the Using the oven section.
- Rack position is incorrect or rack is not level.
- See the Using the oven section.
- Oven temperature needs adjustment.
- See the Adjust the oven thermostat—Do it yourself! section.
Food does not broil properly
- Oven door is open.
- Close the door. This model is designed for closed door broiling only. Always broil with the door closed.
- Oven controls improperly set.
- Make sure you press the Broil Hi/Lo pade.
- Improper rack position being used.
- See the Broiling Guide.
- Food being cooked in a hot pan.
- For best results, use a pan designed for broiling. Make sure it is cool.
- Cookware not suited for broiling.
- Unplug and remove the probe from the oven.
- In some areas the power (voltage) may be low.
- Preheat the broil element for 10 minutes.
- Broil for the longest period of time recommended in the Broiling Guide.
Clock and timer do not work
- A fuse in your home may be blown or the circuit breaker tripped.
- Replace the fuse or reset the circuit breaker.
- Oven controls improperly set.
- See the Using the clock, timer and control lockout section.
Oven light does not work
- Light bulb is loose or defective.
- Tighten or replace the bulb.
- Pad operating light is broken.
- Call for service.
Extension rack is noisy and/or difficult to slide
- The rack was cleaned in the self-clean cycle and now needs to be lubricated.
- See Extension Rack in the Care and cleaning section.
- Do not spray with cooking spray or other lubricant sprays.
- Bearings have become misaligned due to handling.
- Install the rack in the oven (see Extension Rack in the Using the oven section) and pull firmly on the sliding portion until it reaches full extension. This will reset the bearings to their proper position.
Release levers on extension rack become difficult to use
- The rack was cleaned in the self-clean cycle, or the original lubrication was removed by cleaning.
- Shake and apply the graphite lubrication, shipped with your oven, onto the moving parts of the release levers and paddle mechanisms. Do not spray with cooking spray or other lubricant sprays.
Oven temperature too hot or too cold
- Oven temperature needs adjustment.
- See the Adjust the oven thermostat—Do it yourself section.
Oven will not to work
- A fuse in your home may be blown or the circuit Replace the fuse or reset the circuit breaker. breaker tripped.
- Replace the fuse or reset the circuit breaker.
- Oven controls improperly set.
- See the Using the Oven section.
Oven will not self-clean
- The temperature is too high to set a self-clean operation.
- Allow the oven to cool and reset the controls
- Oven controls improperly set.
- See Using the seft -cleaning Oven section.
- The probe is plugged into the outlet in the oven.
- Remove the probe from the oven.
Crackling" or "popping" sound
- This is the sound of the metal heating and cooling during both the cooking and cleaning functions.
- This is normal.
Excessive smoking during clean cycle
- Excessive soil or grease.
- Press the Cancel/Off pad. Open the windows to rid the room of smoke. Wait until the LOCKED light goes off. Wipe up the excess soil and reset the clean cycle.
Oven door will not open after a clean cycle
- Oven too hot.
- Allow the oven to cool below locking temperature.
Oven not clean after a clean cycle
- Oven controls improperly set.
- See Using the seft -cleaning oven section.
- Oven was heavily soiled.
- Clean up heavy spillovers before starting the clean cycle.Heavily soiled ovens may need to self-clean again or for a longer period of time.
"LOCKED " flashes in the display
- The self-clean cycle has been selected but the door is not closed.
- Close the oven door.
LOCKED light is on when you want to cook
- The oven door is locked because the temperature inside the oven has not dropped below the locking temperature.
- Press the Cancel/Off pad. Allow the oven to cool.
- In a 27” double oven, both. doors lock when one oven is in Clean.
- Wait until the oven is done cleaning or cancel Clean by pressing the Clear/Off pad. Allow the oven to cool.
F- and a number or letter” flash in the display
- You have a function error code.
- Press the Cancel/Off pad. Allow the oven to cool for one hour. Put the oven back into operation.
- If the function code repeats.
- Disconnect all power to the oven for at least 30 seconds and then reconnect power. If the function error code repeats, call for service.
Display goes blank
- A fuse in your home may be blown or the circuit breaker tripped.
- Replace the fuse or reset the circuit breaker.
- The clock is turned off.
- See the Special features of your oven control section.
Display flashes
- Power failure.
- Reset the clock.
Unable to get the display to show “SF"
- Reset the clock.
- Oven control pads were not pressed properly.
- The Bake and Broil Hi/Lo pads (on double oven models, use the upper oven controls) must be pressed at the same time and held for 3 seconds.
“PROBE" appears in the display
- This is reminding you to enter a probe temperature after plugging in the probe.
- Enter a probe temperature.
Power outage, clock flashes
- Power outage or surge.
- Reset the clock. If the oven was in use, you must reset it by pressing the Clear/Off pad, setting the clock and resetting any cooking function.
Steam from the vent
- When using the convection feature, it is normal to see steam coming out of the oven vent. As the number of racks or amount of food being cooked increases, the amount of visible steam will increase.
- This is normal.
"Burning" or "oily" odor emitting from the vent
- This is normal in a new oven and will disappear in time.
- To speed the process, set a self-clean cycle for a minimum of 3 hours. See the Cleaning the Oven section.
Strong odor
- An odor from the insulation around the inside of the oven is normal for the first few clean cycle. times the oven is used.
- This is temporary .
Fan noise
- A cooling fan or a convection fan (depending on the function you are using) may automatically turn on..
- This is normal. The cooling fan will turn on to cool internal parts. It may run for up to 1-½ hours after the oven is turned off. The convection fan will cycle on and off until the function is over or the door is opened.
See other models: ZIS420NMA JBP21BH4CT GDT665SGN0BB GSD5300G00BB AHH12AWW1
