Loading ...
Loading ...
Loading ...
26 27
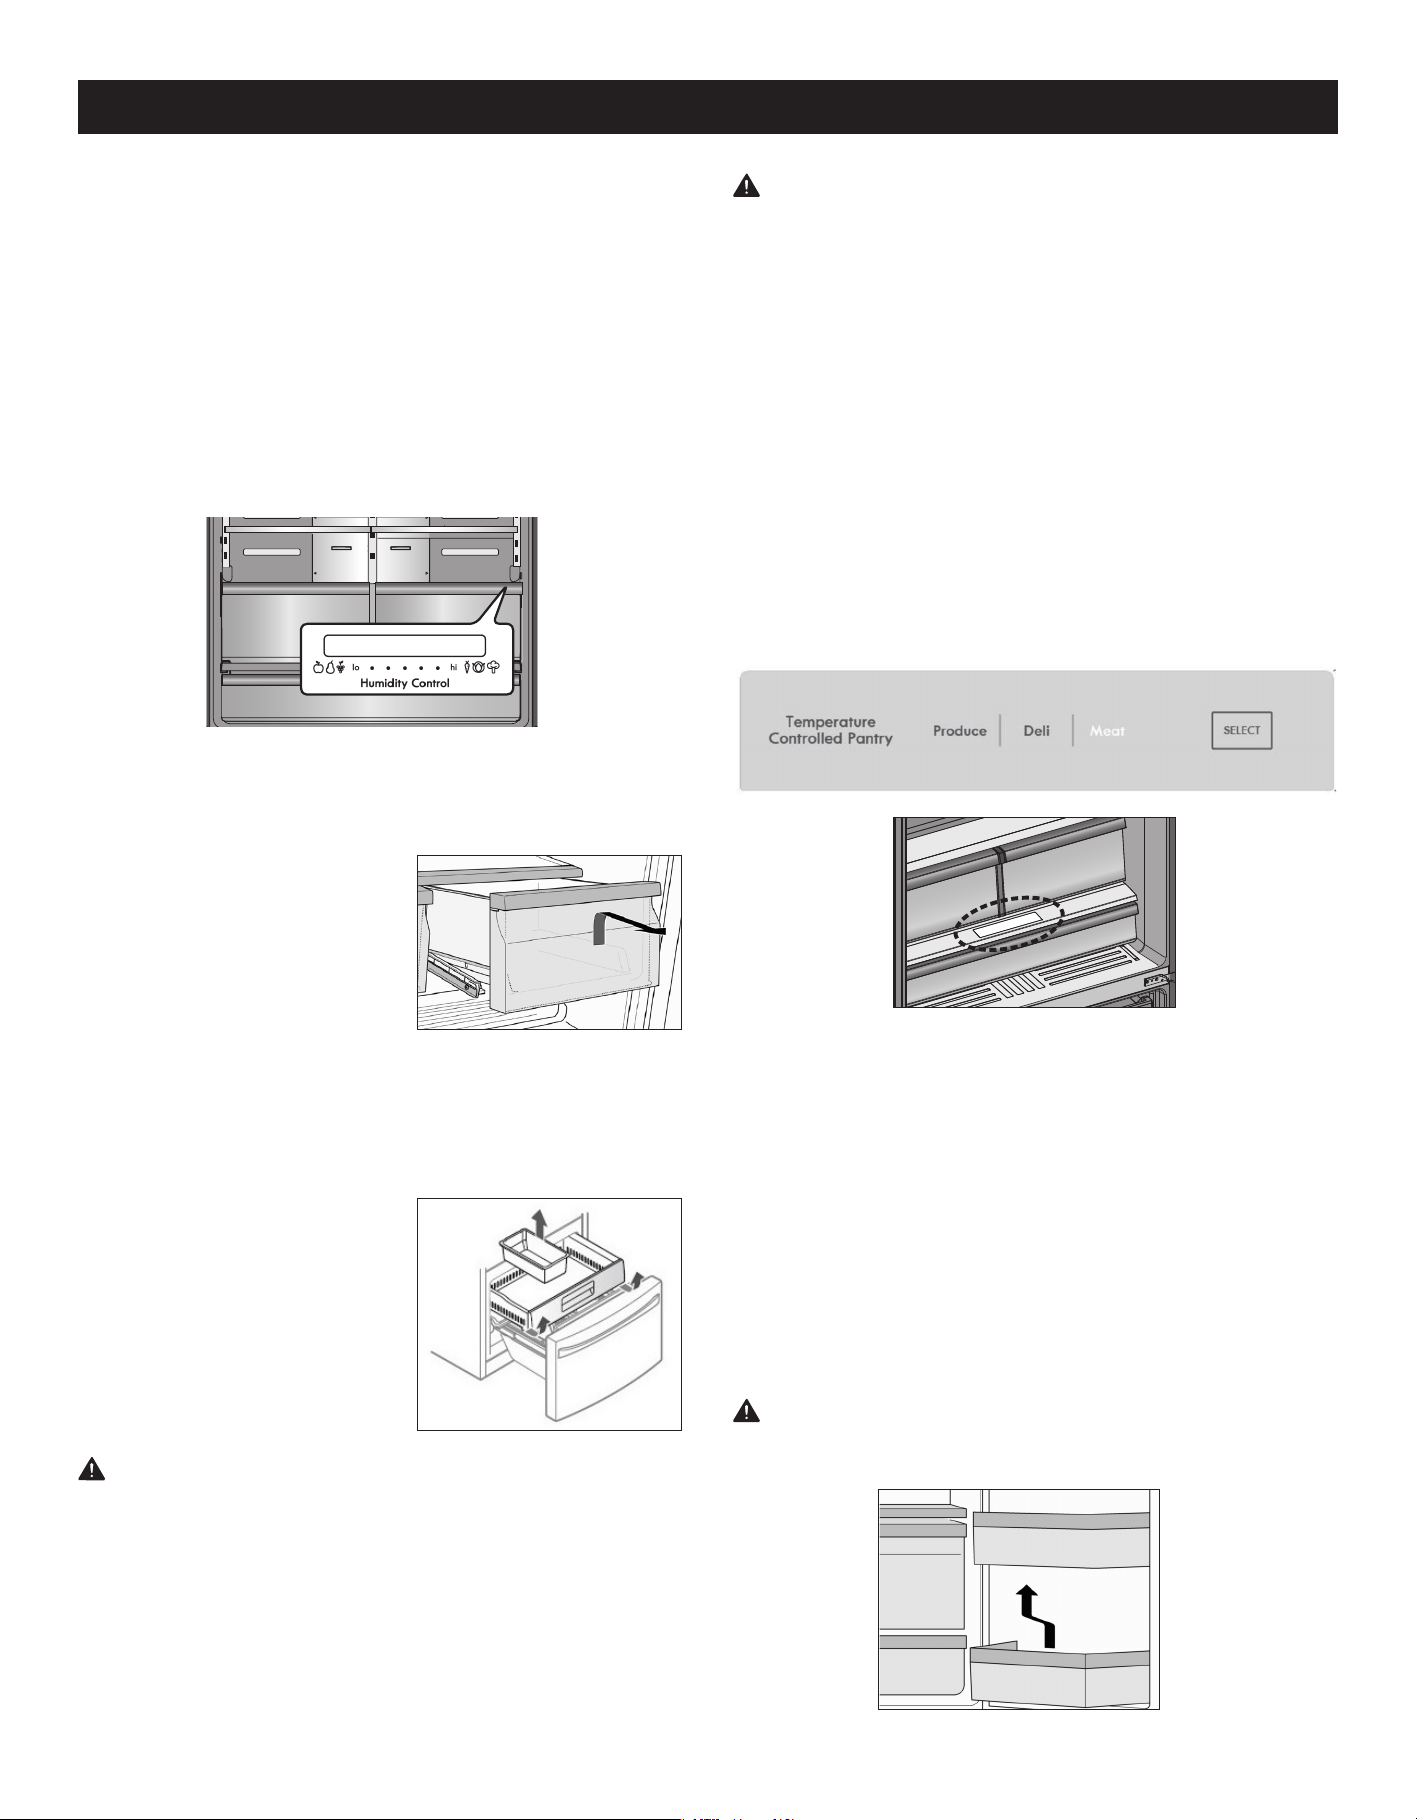
HUMIDITY CONTROLLED CRISPER
The crispers provide fresher tasting fruit and vegetables
by letting you easily control humidity inside the drawer.
You can control the amount of humidity in the moisture
sealed crispers crispers by adjusting the control to any
setting between
VEGETABLES
and
FRUIT
.
- Slide the Humidity Control toward “hi” to keep moist air
in crisper for best storage of fresh, leafy vegetables.
- Slide the Humidity Control toward “lo” to release moist
air from crisper for best storage of fruit.
REMOVING THE HUMIDITY CONTROLLED CRISPER
1.
To remove, pull the drawer
out to full extension.
2.
Lift the front of the crisper
up, then pull it straight out.
3.
To install, slightly tilt up the front, insert the drawer into
the frame and push it back into place.
FREEZER SECTION
PULLOUT FREEZER DRAWER
1.
To remove, pull the freezer
drawer out to full extension.
Lift out the ice bin if present.
Tilt the front of the pullout
freezer drawer up and then
lift drawer out.
CAUTION
: Pinch hazard! Keep hands and feet clear
of the bottom of the freezer drawer when opening and
closing.
2.
To replace, hold pullout freezer drawer with back
angled down. Insert the back rollers over the front edge
of the runers built into the sides of the freezer cabinet.
Slide the drawer back and into place. Fit ice bin back
into pullout freezer drawer.
WARNING
: When the pullout drawer is removed, there
is enough room in the lower freezer drawer for a child or
pet to crawl inside. To prevent accidental child and pet
entrapment or suffocation risk, DO NOT allow children or
pets to touch or go near the lower freezer drawer.
Temperature Controlled Pantry Drawer
(model 7330* only)
The Temperature Controlled Pantry Drawer provides
storage space with a variable temperature control that
can keep the compartment colder than the refrigerator
section. This drawer can be used for large party trays, deli
items, and beverages. (This drawer should not be used for
vegetables that require high humidity).
Press Select button to choose between Produce, Deli or
Meat.
26 page same with 7304*, but
Temp control zone added
The Temperature Controlled Pantry Drawer provides storage space with a variable temperature control that can keep the
compartment colder than the refrigerator section. This drawer can be used for large party trays, deli items, and
beverages. (This drawer should not be used for vegetables that require high humidity).
P
ress Select button to choose between Produce, Deli or Meat.
T
emperature Controlled Pantry Drawer
DOOR BIN
The door bins are removable for easy cleaning and
adjustment.
1.
To remove the bin, simply lift the bin up and pull
straight out.
2.
To replace the bin, slide it in above the desired support
and push down until it snaps into place.
NOTE:
Some bins may vary in appearance and will
only fit in one location.
CAUTION
: Do not overfill or pack items too tightly
into door bins. Doing so may cause damage to the bin
or personal injury if items are removed with excessive
force.
en-us
15
Temperature unit
The temperature can be displayed in
degrees Fahrenheit (°F) or
Celsius (°C).
After the appliance is switched on, the
temperature appears in degrees
Fahrenheit (°F).
To set the temperature unit:
Press ”alarm/lock” for 2 seconds.
The ”Panel lock” symbol appears.
Press and hold ”super/quick ice” for
15 seconds until the temperature unit
switches.
Refrigerator
compartment
WARNING
Risk of explosion!
Never store products containing
flammable propellants (such as
spray cans) or explosive or easily
combustible substances in the
appliance.
Bottles containing a high
percentage of alcohol must be
tightly sealed and stored in an
upright position.
The refrigerator compartment
temperature can be adjusted between
35 °F (+2 °C) and 46 °F (+8 °C).
We recommend a setting of 39 °F
(+4 °C).
Perishable foods should not be stored
at temperatures higher than 39 °F
(+4 °C).
Using the refrigerator
compartment
For storage of ready meals, cakes
and pastries, canned food,
condensed milk, cheese, spreads,
sauces, dips and eggs.
Follow these guidelines
when storing food:
- Allow warm food and drinks to cool
down outside the appliance.
- Place food in airtight containers to
prevent it from losing its flavor or
drying out.
- To prevent poor air circulation in
the appliance, do not block
ventilation openings with food.
- Avoid contact of oil and grease with
plastic parts and door seal.
Vita Fresh
compartment
(not included on all models)
The temperature inside the Vita Fresh
compartment is kept at almost 32 °F
(0 °C). The low temperature provides
optimum storage conditions for
perishable food.
Food can be stored much longer in
the Vita Fresh compartment than in
the regular refrigerator compartment
without losing its freshness.
The Vita Fresh compartment is
covered by a special humidity filter.
The special humidity filter optimizes
the humidity in the Vita Fresh
compartment. Depending on how full
the Vita Fresh compartment is, the
humidity can reach up to 90 percent
which is ideal for all garden and field
products such as vegetables,
lettuces, herbs and fruit.
Vita Fresh is suitable for:
Basically any food that is fresh and is
to be kept fresh longer, such as meat
and meat products, fresh fish,
seafood, milk, butter, soft cheese,
cottage cheese, fruit and vegetables.
Vita Fresh is not suitable for:
Fruit and vegetables sensitive to cold,
such as tropical fruits, avocados,
papayas, passion fruit, eggplant,
cucumbers, bell peppers as well as
fruit that has to ripen, green tomatoes
and potatoes.
When buying food, please
note:
The ”freshness at purchase” is
important for the storage life of your
food. In general, the fresher the
products are when placed in the
Vita Fresh compartments, the longer
they will stay fresh. Therefore, when
purchasing food, always check how
fresh it is.
Removing the Vita Fresh
drawers
1. Pull out the Vita Fresh drawers as
far as possible.
2. Lift up the front of the Vita Fresh
drawers and pull them out.
3. Inserting the Vita Fresh drawers:
Insert the Vita Fresh drawers into
the rail and push toward the back.
en-us
16
Deli drawer
The temperature in the deli drawer is
kept at a constant temperature just
below freezing. This provides
optimum storage conditions for meat
and meat products, fish, seafood,
dairy products as well as hard and
soft cheese.
NOTICE
Never store foods that are sensitive
to cold in the deli drawer.
Removing the deli drawer
1. Pull out the deli drawer as far as
possible.
2. Lift up the front of the deli drawer
and pull it out.
3. Inserting the drawer: Insert the deli
drawer into the rail and push
toward the back.
Variable interior
design
Glass shelves
The adjustable glass shelves can be
removed.
You can pull out the adjustable glass
shelves and place them at varying
heights.
Removing a glass shelf
Lift up and pull the shelf toward you.
Unhook and then remove the shelf.
Installing the glass shelf
Lift up the front of the shelf and insert
the hooks into the openings at the
desired height. Lower the front of the
shelf.
Small top glass shelf
The glass shelf can be removed and
placed in the holder underneath the
ice maker. This provides room to
place taller items such as tall bottles
next to the ice maker.
Door storage compartments
To remove door storage
compartments:
Lift door compartment and take it out.
To install door storage
compartments:
Place the compartment above the
bracket at the desired height and
press down.
Butter and cheese
compartment
Raise the cover on the butter and
cheese compartment.
To remove the butter and cheese
compartment:
Lift up the compartment and take it
out.
To install the butter and cheese
compartment:
Place the compartment above the
bracket at the desired height and
press down.
Egg compartment
USING YOUR REFRIGERATOR
F706-10(�)(Kenmore).indd 27 2019-03-04 �� 10:40:29
Loading ...
Loading ...
Loading ...