User manual Television
Connections and setup
Before initial setup
Protect against power surges
- Connect all components before you plug any power cords into the wall outlet or power strip.
- NEVER plug your TCL Roku TV into an outlet that is controlled by a wall switch.
- Turn off the TV before you connect or disconnect any cables.
- Make sure all antennas and cables are properly grounded. Refer to the Important Safety Instructions.
Safety information
- Prevent TV from overheating by placing in an area with good ventilation.
- Do not block ventilation holes on the TV. Position the TV so air can circulate freely on all sides.
- Do not stack objects on the TV.
- If you place the TV on a stand, make sure you allow adequate ventilation.
- If you connect an audio receiver or amplifier to the TV, place it on the top shelf so the heated air will not overheat the TV.
Avoid audio interference
- Position cables properly; insert each cable firmly into the designated jack.
- Route all cables down one side of the back of the TV instead of straight down the middle.
- If your antenna uses 300-ohm twin lead cables, do not coil the cables.
- Keep twin lead cables away from audio/video cables.
Avoid direct light
Do not place the TV where sunlight or room lighting is directed toward the screen. Use soft or indirect lighting.
Set up your new TV
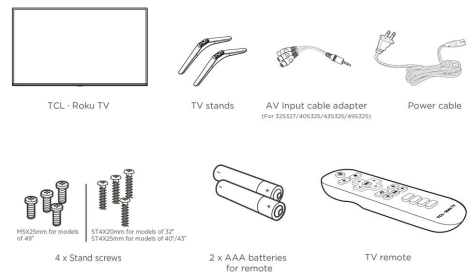
Open the box and remove the TV and other items. Be careful, the TV is heavy! We strongly recommend that two people unbox the TV.
Be sure to check all the foam packaging as the stands from some TV’s are stored in the foam for protection.
What’s in the box
To mount on a wall
If you are mounting your TCL Roku TV to the wall, do not attach the TV base stand or TV stand column.
To mount your TV to the wall, purchase the one of the following VESA wall mounts:
- 32" model VESA 100 x 100, M4 x 8mm screws
- 40" model VESA 100 x 100, M6 x 12mm screws
- 43" model VESA 100 x 100, M6 x 12mm screws
- 49" model VESA 200 x 200, M6 x 12mm screws
The VESA number is the horizontal and vertical measurement of the mounting holes.
For example, 100 x 200 indicates that the mounting holes are spaced 100mm horizontally and 200mm vertically.
Follow the directions supplied with the wall mount to mount the TV to the wall.
Caution: Your wall mount must be able to bear a minimum of five times the TVs net weight to avoid damage. Note: The wall mount bracket and the screws are not included
To use the stand
Your TCL Roku TV comes without the stands attached so that you can choose to use the stands or mount your TV to a wall using a wall mount (sold separately). If you want to mount your TV to the wall, don’t attach the stand legs.
A – Place the TV face down on a soft, cushioned surface on a table. The bag the TV was packed in makes a good cushion. Position the TV so that the stand, when attached, will hang over the edge of the table.
B – Take out the two plastic covers from the stand holes at the bottom of the TV.
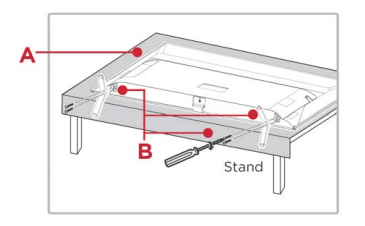
C – Put the column of the stands into the TV, align the stands with the screw holes located on the TV.
D – Secure the stands to the TV with four (4) screws.
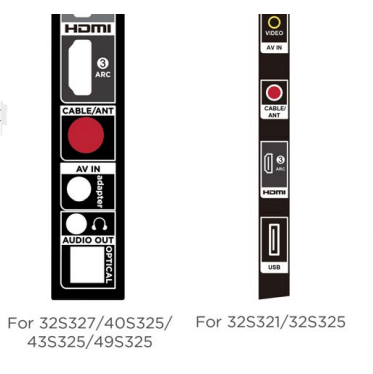
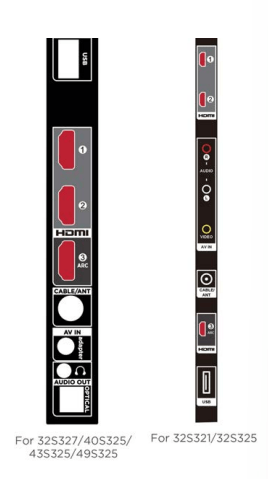
Connecting an antenna, cable, or satellite box
If you are using an antenna, CATV cable without a set-top box, or a cable or satellite box that has only an antenna output, connect a 75-ohm coaxial cable (not provided) from the device to the ANT/CABLE input on the TV.
Tip: If you are using an antenna with a 300 ohm twin-lead cable, you need to use a 300-to-75 ohm adapter (not provided) to adapt the twin-lead cable to a connection that is compatible with the TV’s antenna input.
Tip: If you receive your TV stations through a set top box from a cable or satellite TV provider, connect it to the TV using the best connection method available. From most to least desirable:
- HDMI® input – Digital HD and SD video
- AV input – analog SD video
- Antenna input – analog SD video using NTSC
Connecting external equipment with a composite AV video cable
If the best connection available on your device is AV or composite video output, connect it to the TV using a composite AV cable (not provided). Composite AV cables typically have three RCA-type plugs on each end, color coded as follows:
- Yellow – Video
- Red – Audio, right channel
- White or black – Audio, left channel
Connect each plug to the corresponding connector on the device and on the TV.
Note: Select models have an AV Input that looks like a headphone jack. Use the breakout cable (included) to adapt this input to the three RCA-type plugs on your composite cable.
Connecting external equipment with an HDMI® cable
If possible, connect your devices using HDMI® cables (not provided). They help to provide the best video quality and also carry audio signals, so that only one cable is needed. For better picture quality, we recommend that you use cables designated as High Speed HDMI® Cables.
Tip: You might need to configure the device to send its signal through its HDMI® connector.
The connector labeled HDMI IN (ARC) has the additional ability to use the audio return channel to send digital audio to a receiver or sound bar, as explained in Connecting an AV receiver or digital sound bar.
Connecting headphones or analog sound bar to the TV
You can connect headphones or an analog sound bar (not provided) to the TV’s headphone jack.
Tip: Inserting a plug in the headphone jack disables the sound from the TV’s built-in speakers.
Warning: Loud noise can damage your hearing. When using headphones, use the lowest volume setting on your headphones that still lets you hear the sound.
Select models also have an audio line out connection that is not affected by TV volume or mute settings and does not disable the TV speakers. Use this connection when you want to use your amplifier or sound bar to control the TV volume. To turn off the TV’s built-in speakers, in the Home screen menu, navigate to Settings > Audio > TV speakers and change the setting.
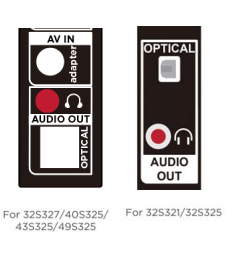
Connecting an AV receiver or digital sound bar
You can enjoy Dolby Audio™ multichannel sound from your TV if you connect a digital amplifier or sound bar (not provided) in either of two ways:
- Digital optical audio out (S/PDIF) – Connect a TOSLINK optical cable (not provided) from the TV to the Optical input on your receiver or sound bar.
- HDMI® ARC – Connect an HDMI® cable (not provided) from the HDMI (ARC) connector to the HDMI® input on your receiver or sound bar. This connection uses the Audio Return Channel (ARC) feature of the HDMI® specification to output sound from the TV to a compatible device. To use this feature, you must configure the TV to enable HDMI® ARC, as explained in Enable HDMI® ARC.

Preparing for Internet connectivity
If you want to watch streaming content and take advantage of the cool features of your TCL Roku TV, connect it to the Internet through a wireless modem/router or a wireless access point (not provided). The TV has a built-in wireless LAN adapter.
Note: The TV supports only its internal wireless network adapter—it does not support the use of a USB network adapter.
Select 4K models have wired in addition to wireless network connectivity. To use the wired network connection, connect an RJ-45 Ethernet cable (not provided) from the jack on the back of your TV to your network router or switch. The wired connection supports both 10 Base-T and 100 Base-T Ethernet.
AC power
Plug your TV into a power outlet. You can tell that the TV has power because the status indicator lights up when the TV is off.
The topic Status indicator explains how the status indicator shows what is happening with the TV.
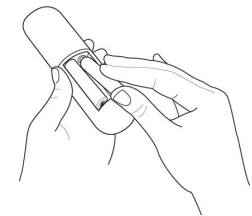
Roku remote batteries
Open the back of your Roku remote and insert the included batteries, observing the proper orientation as indicated in the battery compartment. Reattach the back cover.
TCL Roku TV remote
Use the following information to identify the buttons on your Roku remote.
Note: Certain remote buttons and features vary by model. Your remote might not have all buttons or features listed.
- If your remote has a microphone button
 just below the purple pad, then you have a Roku Voice Remote.
- If your remote has a headphone jack on its left edge, then you have a Roku Enhanced Voice Remote.
The Roku voice remotes have additional capabilities as described in the following table.
 POWER
POWER
 BACK
BACK
- Menu: Goes back to previous menu/screen.
- Home screen tile: Moves highlight back to the Home screen option.
- Watching Antenna TV or a TV input: Returns to Home screen.
- Playing streaming content: Stops playing stream and returns to the previous menu or screen.
- Browsing streaming content: Goes to the previous level in the content tree.
 HOME
HOME
- Immediately returns to the Home screen.
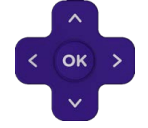 PAD
PAD
- LEFT/RIGHT/UP/DOWN moves the highlight in the corresponding direction.
- OK selects the highlighted option.
While watching TV:
- UP/DOWN changes channel.
- LEFT displays the Smart Guide (connected mode) or channel list (non-connected mode).
- LEFT/RIGHT only on TVs operating in nonconnected mode, while in the channel list switches between All Channels and FAVORITE CHANNELs.
- OK while in the channel list selects the highlighted channel.
While watching live TV: displays the program information banner.
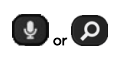 VOICE SEARCH and VOICE COMMANDS
- VOICE COMMANDS Only in the United States on select models with Roku voice remotes. Hold and say the name of a movie, TV show, actor, or director to search across many streaming and Antenna TV channels. Say a command to start streaming, change a channel, and more. For more information, go to:
go.roku.com/voicesearch
 GAME MODE
- Select models. Displays a banner showing the current Game mode or Not available at this time. Subsequent presses toggle Game mode. When On, the TV performs less image processing and has less input lag, producing a better experience with action games. Available only for HDMI and AV inputs.
 INSTANT REPLAY
- Select models. Streaming programs that support this feature and Antenna TV channels: if Live TV Pause is enabled, jumps back a few seconds with each press and resumes playing.
Broadcast TV: If Live TV Pause is disabled, jumps to previous channel.
When using an on-screen keyboard: Backspaces in the text you are entering.
Smart Guide: Returns to the current day and time.
 SLEEP
SLEEP
- Select models. Displays a banner showing the remaining sleep time, if any, or Sleep timer is off. Subsequent presses cycle among the preset sleep time intervals. Once set, the sleep timer remains in effect regardless of what you are watching
 MEDIA PLAYBACK CONTROLS
- Rewind, pause, play, and fast forward streaming content and Antenna TV channels (if Live TV Pause is enabled).
Press REWIND or FAST FORWARD one, two, or three times to control the speed of the operation.
REWIND and FAST FORWARD also jump backward and forward one page at a time when viewing long lists, such as when you are browsing Antenna TV shows in the channel list or Smart Guide (U.S. only).
 OPTIONS
- Displays additional options when available. On-screen hints let you know when this button is active.
 PRESET CHANNEL SHORTCUT
Dedicated buttons show the logo of a preset streaming content provider. Dedicated content providers vary by model and region. Pressing a button:
- Displays the streaming channel’s main page if you have already added the channel to your Home screen.
- Displays the streaming channel’s sign-up page if you have not already added the channel.
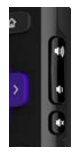 VOLUME/MUTE
- Located on the right edge of the remote. Increases/decreases volume and mutes the TV sound.
Note: If the TV is muted, pressing VOLUME UP unmutes. Pressing VOLUME DOWN does not unmute the sound
Guided Setup
With the preliminaries out of the way, it’s time to turn on your TV. As the TV starts for the first time, it leads you through Guided Setup, which configures the TV before you start to use it.
During Guided Setup, you’ll:
- Answer a few questions
- Provide network connection information
- Get a software update
- Link your TV to your Roku account.
- Connect devices such as a DVD player, game console, or cable box.
Starting Guided Setup
To start Guided Setup, press the POWER button on the remote to turn on your TV.
Note: Guided Setup normally runs only once, the first time you turn on your TV. If you need to run Guided Setup again, you’ll have to perform a factory reset, as explained in Factory reset everything.
When you first turn on your TV, it will take a few seconds to get itself ready. You’ll notice the following things happening:
1. The status indicator blinks every time the TV is busy doing something; in this case it’s powering up and getting ready for you.
2. The power-on screen appears and the status indicator blinks slowly for a few more seconds. The power-on screen shows a brand logo while the TV starts up.
3. After a few seconds, Guided Setup starts.
Completing Guided Setup
Follow these steps to complete Guided Setup. At this point, you should be seeing the Language screen.
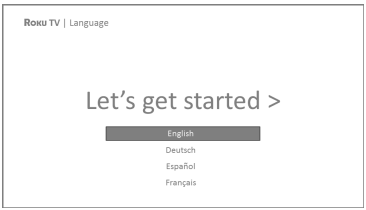
1. Only on models that have a Roku voice remote: A few moments after the Let’s get started screen appears, Guided Setup starts the pairing process for the voice remote. (You’ll know if you have this type of remote because it will have microphone or search button just below the down arrow on the purple pad.) If the voice remote does not pair automatically, follow the instructions on the screen to complete the pairing process.
Tip: On TVs sold in the United States, if you are blind or visually impaired, you can activate Audio Guide, a text-to-speech screen reader to help you navigate the TV’s menus and commands. To enable the Audio Guide, press the  button on the remote four times in rapid succession. Repeat to disable Audio Guide. (The button is located directly below the directional pad on the right side of the Roku remote.)
Note: If you enabled Audio Guide, choosing any language other than English disables it.
2. Press the DOWN arrow on the remote to highlight your preferred language, and then press OK or the RIGHT arrow.
3. Some models have a country selection screen: If you don’t see this screen, skip ahead to the next step. If you see this screen, select your country.
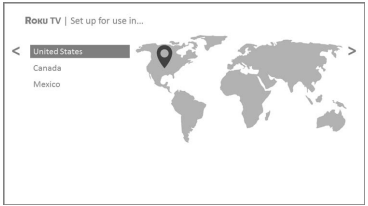
Note: If you enabled Audio Guide, choosing any country other than United States disables it
4. Press OK or the RIGHT arrow on the remote to go to the next screen:
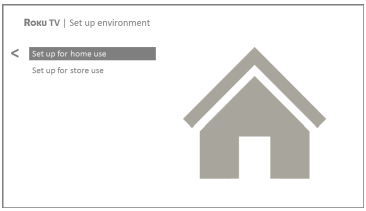
Note: Some models show the title First things first instead of Set up environment.
5. Press OK to select Set up for home use. This is the right choice for enjoying your TV at home. It provides energy saving options as well as access to all features of the TV.
Note: Store mode configures the TV for retail display and is not recommended for any other use. In store mode, some features of the TV are missing or limited. To switch from one mode to the other, you have to perform a factory reset as explained in Factory reset everything, and then repeat Guided Setup.
Network connection
After you select Set up for home use, the TV prompts you to make a network connection. If your TV has both wired and wireless connections, you’ll see the following screen.

6. Only models that display the Connect to the Internet screen: Make a selection:
- Wireless connection – Highlight Set up new wireless connection and press OK. The TV prompts you through wireless setup. Skip ahead to the next step for help with the process.
- Wired connection – Highlight Connect to wired network and press OK. The TV immediately attempts to connect to your wired network, your local network, and then the Internet. Go to Step 9 to continue with Guided Setup.
- Connect to the Internet later – If you don’t want to connect to the Internet right now, you can skip this step and use the TV to watch Antenna TV channels, play games, and watch DVDs. When you’re ready to connect, it’s easy. We’ll show you how in Benefits of connecting.
Note: If you decide not to connect, Guided Setup skips ahead to setting up the devices that you’ve connected to your TV. Jump ahead to Connect your devices to complete Guided Setup
7. On models that have wireless only, or models with both wired and wireless and you’ve selected Wireless: The TV scans for the wireless networks within range and displays them in order, with the strongest signals first. In addition to your own wireless signal, the TV might pick up signals from your neighbors.
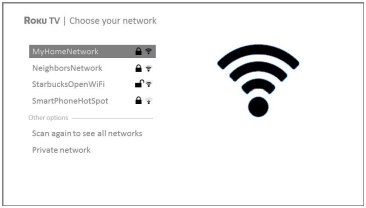
Press the UP or DOWN arrows to highlight the name of your wireless network, and then press OK to select it.
Note: Some networks, such as those often found in dorm rooms, hotels, and other public places, require you to read and agree to terms, enter a code, or provide identifying information before letting you connect to the Internet. If your TCL Roku TV detects that you are connecting to such a network, it prompts you through the connection process using your compatible smartphone or tablet to provide the needed information. For more information, see Using your TV in a hotel or dorm room.
8. Only if you select a password protected wireless network: An on-screen keyboard appears. Use the keyboard to enter the network password.

After you submit your wireless network password, the TV displays progress messages as it connects to your wireless network, your local network, and the Internet.
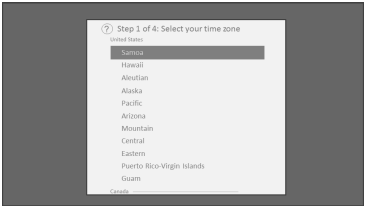
9. Only if your TV cannot get the correct time zone and current time from your network service provider: Use the UP and DOWN arrows to highlight your time zone, and then press OK.
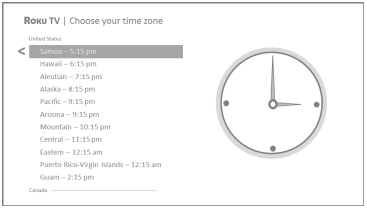
Tip: Your TV needs to know the local time zone so that it can correctly display information about the program you are currently watching. If the TV is unable to automatically determine the local time zone, it prompts you to choose your time zone from a list.
As soon as the TV is able to connect to the Internet, it downloads and installs its first software update, and then restarts.
Tip: Your TV automatically checks for updates periodically. These updates provide new features and improve your overall experience with the TV. After an update, you might notice that some Options have moved, and that there are new options or features. This User Guide describes version 8.0. To determine your current TCL Roku TV software version, go to Settings > System > About after you complete Guided Setup. You can download an updated User Guide that matches your TCL Roku TV software version from the TCL Roku TV web site.
Activation
After the TV restarts, it displays the Activation screen:
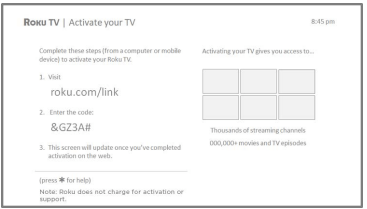
10. Using a compatible computer, tablet, or smartphone with an Internet connection, go to the web address displayed on the screen and enter the code that appears on your screen.
After you log in or create your Roku account, the link page suggests that you select some streaming channels. After you confirm your selections, the TV gets an acknowledgement, and then adds your preexisting and newly-selected streaming channels to your TCL Roku TV. This process is automatic and takes a few moments—a little longer if you already have a lot of streaming channels to add.
Tip: Streaming channels from all Roku streaming devices associated with your account are synchronized periodically, so that all of your Roku streaming devices have the same set of streaming channels (subject to compatibility with the device)
Connect your devices
Next, Guided Setup helps you set up the external devices that you want to use with it, such as a cable box, Blu-ray™ player, or game console.
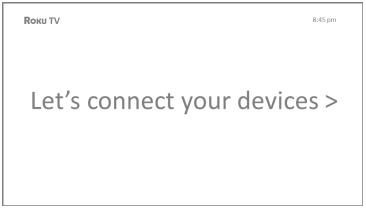
11. Press OK or the RIGHT arrow to proceed:
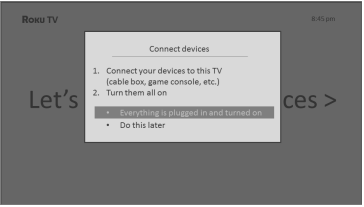
12. Connect all the devices you plan to use with your TV, turn them all on, and then select Everything is plugged in and turned on. The TV now takes you step by step through each of its inputs and asks what kind of device you have connected. On each input that has a connected and active device, you can see its picture and hear its sound.
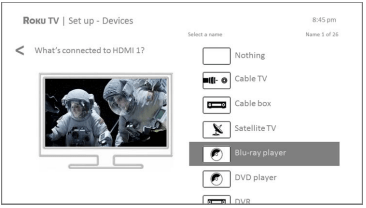
13. Press the UP or DOWN arrows to highlight the label you want to associate with the input. If you are not using the input, select Nothing, and the input won’t appear on the Home screen.
14. While setting up your devices, rather than using the predefined names and icons, you can set a custom name and icon. To do so, scroll up or down to highlight Set custom name & icon, and then press OK. Follow the instructions on the screen to enter a name and select an icon for the input. See Rename inputs for more information.
Note: If you have renamed the inputs, you cannot use voice commands to switch inputs. Voice commands can only switch among inputs that have their original names, such as “AV,” and “HDMI 1.”
15. Repeat the previous step for each input.
You’re done with Guided Setup.
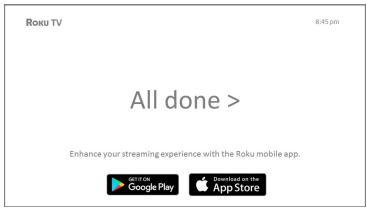
Note: Some TCL Roku TVs, depending on where you live and other factors, show you an introductory video filled with some great hints and tips. If you’re not interested in viewing this video, press  on the remote to return to the TCL Roku TV Home screen.
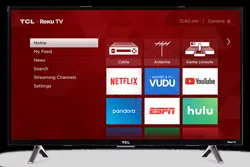
Whenever you press on the remote, the Home screen greets you.
From here, you can explore everything your TV has to offer. Press the arrow keys to move around, and press OK to select a highlighted item. We’ve designed the TV to encourage you to explore, and you can probably figure out most of the capabilities and settings on your own. If you have any questions or difficulties, you can find answers and solutions in this guide.
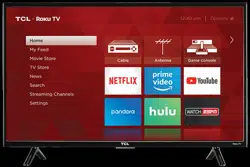
Setting up Antenna TV
In addition to the other entertainment possibilities of your TCL Roku TV, you may also want to watch broadcast channels from an antenna or cable TV service connected to the ANT input. On your TCL Roku TV, you watch broadcast TV in much the same way you watch other entertainment choices. You select a tile—in this case, the Antenna TV tile—from the Home screen.
The first time you select the Antenna TV tile, you have to set up the TV tuner. Setting up the TV tuner scans for active channels and adds them to your Antenna TV channel list.
How do I set up the TV tuner?
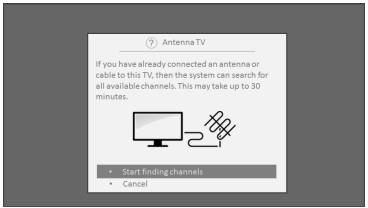
- Make sure your antenna (not provided) or TV cable is connected to the TV’s ANT/CABLE input.
- On the Home screen, select the Antenna TV tile.
- Read the simple on-screen instructions, and then select Start finding channels.
4. If prompted, select your time zone. You’ll only need to do this if the TV can’t figure out your time zone from your Internet connection.
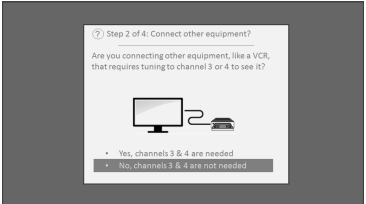
5. When prompted, select whether to add analog channels 3 and 4. These channels enable you to connect older set top boxes, VCRs, or game consoles.
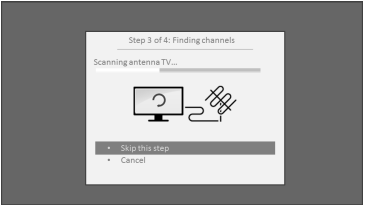
6. Wait while your TV scans for Antenna TV stations…
… and then cable TV channels.
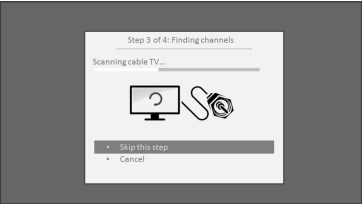
Scanning for channels can take several minutes.
Tip: If you use a set-top box to receive cable TV channels (and don’t have your cable connected directly to the TV’s ANT input), you can save time by skipping the cable TV portion of the channel scan.
7. When the channel scans finish, the TV shows the number of channels it added.
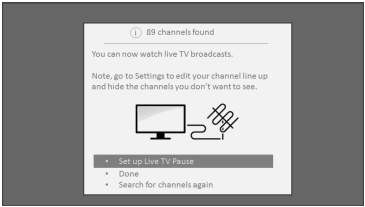
8. Only in connected mode, you have the option of setting up Live TV Pause. The topic Pausing Live TV explains how to set up and use this feature. If you don’t 45 want to set up Live TV Pause, or if this option is not available to you, select Done to start watching Live TV.
Tip: Repeat the channel scan from time to time to make sure you are receiving all of the latest channels. Broadcasters add and remove channels, move channels to different parts of the spectrum, and change the power levels of their channels periodically. Your antenna reception and picture quality depend on the position of your antenna and on your location relative to the antennas of broadcasters in your area.
Note: You’ll have to repeat the channel scan if you remove and re-add the Antenna TV tile from the Home screen or perform a factory reset. To repeat the channel scan, go to Settings > TV inputs > Antenna TV > Scan again for channels > Start finding channels.
Now, you’re ready to watch Antenna TV! While you’re watching, try the following tips:
- Press the UP and DOWN arrows to change channels.
- Press the LEFT arrow to display the channel list (non-connected mode) or Smart Guide (connected mode), and then use the UP and DOWN arrows to select a channel to watch. Or press REWIND or FAST FORWARD to jump through the channel list or Smart Guide a page at a time.
- Press OK to display information about the current program.
- Press
 to see options for picture and sound settings.
- Only on models that have a Roku voice remote, hold down or
 , and then say the name of a movie, TV show, actor, or director. The TV displays the result and the streaming channels that offer the requested content. Only in the United States, the results also include shows on Antenna TV channels.
Note: If you do not have a Roku voice remote, you can use the Roku mobile app to search. For more information, see Getting and using the Roku mobile app
Using your TV
Standby mode energy savings
When you turn off your TV, it remains in a higher power mode for a few minutes, after which it goes into a very low power standby mode. If you turn on the TV again before it has entered the very low power mode, it turns on immediately. After the TV goes into the lower power standby mode, it takes a few seconds longer to start up.
Only in connected mode on TVs that do not have an Energy Star® rating, you can optionally enable Fast TV start. When this option is enabled, your TV starts up almost immediately regardless of how long it has been turned off, but uses somewhat more power in standby mode. For more information, see Fast TV start.
Opting in to Smart TV experience (U.S. only)
Only in connected mode in the United States, the first time you select Antenna TV, an HDMI input, or AV input, your TV offers to enable the Smart TV experience. If you decide to enable it at this time, you’re all set to enjoy its recommendations and features.
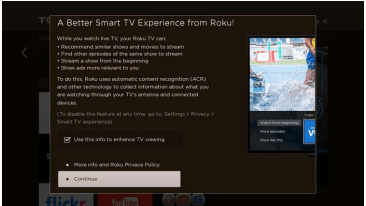
The Smart TV experience uses automatic content recognition (ACR) and other technology to collect information about what you watch through your Antenna TV, and on devices like media players and cable boxes connected to the HDMI or AV inputs. Opting in means that you give permission to analyze the programs you watch for the purpose of making recommendations, as well showing ads that are more relevant to you.
If you decide not to enable the Smart TV experience at this first opportunity, you can enable it later. Or, if you decide you’d rather not use the feature, you can disable it, but be aware that previously collected information is retained and not deleted.
Disable Smart TV experience
If you decide you want to disable Smart TV experience, follow these steps:
- From the Home screen, go to Settings > Privacy > Smart TV experience.
- Navigate to the right to highlight Use info from TV inputs.
- Press OK on the remote to clear the check box.
Disable Auto Notifications
If you want to keep the Smart TV experience enabled, but you do not want to see notifications while you are watching shows, you can disable notifications. To do so, follow these steps:
- From the Home screen, go to Settings > Privacy > Smart TV experience.
- Navigate to the right to highlight Use info from TV inputs.
- Press DOWN on the remote to highlight Enable auto notifications.
- Press OK on the remote to clear the check box.
Note: These settings do not affect recommendations for More Ways to Watch that you see in the Smart Guide when watching Antenna TV channels. Those recommendations come from the Smart Guide and do not rely on ACR technology.
Smart Guide (U.S. only)
Only in connected mode in the United States, use the Smart Guide to find over-the-air TV shows through the Antenna TV input. The Smart Guide lets you scroll through all TV channels (except those you have hidden, if any). You can see all the shows from today, the previous 7 days, and the upcoming 14 days.
The ability to see shows that have already aired during the previous week enables you to use More Ways to Watch to catch up on missed movies or episodes by selecting them from one of the streaming channels. Your clue that there are More Ways to Watch a show is a purple asterisk ( ) next to the program name in the guide.
For example, you might turn on your TV at 10 minutes past the hour and discover you are missing the current episode of Empire. But, there is a purple asterisk next to the show title, so you can press and find that there are several streaming channels where you can watch the current episode from the beginning. You also can find more episodes of Empire, and other shows that have a similar theme.
Note: A paid subscription or other payments may be required for some channels.
To view the Smart Guide, press the LEFT arrow. The Smart Guide opens showing the name of the current program highlighted, and a lot more information.
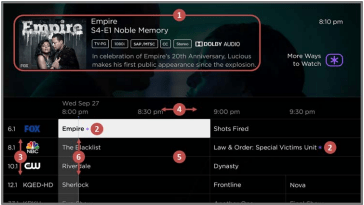
- Program information for the highlighted show. See Viewing program information for details.
- More Ways to Watch indicator. See More Ways to Watch for more information.
- Channel list. Navigate with the UP and DOWN arrows.
- Time slots. Navigate with the LEFT and RIGHT arrows. Use the FF and REW buttons to skip ahead or back 24 hours.
- Program list
- Progress bar showing the approximate time with respect to the time slots.
As you navigate, notice that the Smart Guide shows a light gray background for programs and portions of programs that have already aired. It shows a black background for programs and portions of programs that have not yet aired. The line dividing these two zones is the progress bar.
Favorite channels in the Smart Guide
The Smart Guide organizes your favorite channels at the top of the program list for convenient access. It does this automatically as you use your TV over several days. If you would prefer not to have a favorites section in the Smart Guide, you can turn this feature off.
Turn off favorite channels
- From the Home screen menu, navigate to Settings > TV inputs > Antenna TV > Favorite channels.
- Highlight Enable ‘Favorite channels’.
- Press OK to clear the check mark.
Enabling Live TV Pause
You can start setting up Live TV Pause in any of the following ways:
- Go to Settings > TV inputs > Antenna TV > Live TV Pause, and then select Enable.
- After completing a channel scan, select Set up Live TV Pause from the available options.
- Press Play/Pause on the Roku remote while watching a digital Antenna TV channel.
- Highlight the Antenna TV tile on the Home screen, press
 on the remote, and then select Enable Live TV Pause.
After starting setup of Live TV Pause in any of these ways, the TV prompts you through the steps needed to enable this feature. Setup takes only a few moments.
Note: Use of a USB hub is not supported.
Using Live TV Pause
If you have used the Roku remote to watch streaming channels, using Live TV Pause should be very familiar to you.
- While watching a digital Antenna TV channel, press PLAY/PAUSE to pause or play the content. After the TV program has been paused for 90 minutes, the TV resumes playing.
- After watching a channel for a while, press REWIND to jump back up to the point where you first started watching the channel, up to 90 minutes.
- After pausing or rewinding, press FAST FORWARD to jump ahead up to the point where you are once again watching the live TV program.
- Press FAST FORWARD or REWIND repeatedly to cycle through 1x, 2x, and 3x skip speeds. Press INSTANT REPLAY
 to play back the last several seconds of the program.
- When the program is paused, press the LEFT and RIGHT arrows to move forward and backward through the program approximately 10 seconds per press. Small frames appear across the screen to identify your location in the program.
Note: If the button is not available on your remote, you can use the Roku mobile app. For more information, see Getting and using the Roku mobile app.
Whenever you use any of the Live TV Pause features, the TV momentarily displays a progress bar:
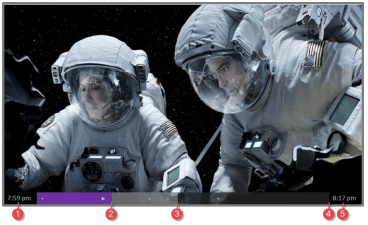
- Time at current playback position.
- Current playback position
- Extent of pause time, representing the amount of time this channel has been buffered, up to 90 minutes.
- 90 minute mark, representing the maximum extent of pause time.
- Current time.
The progress bar also displays tick marks at each half hour point, to help you locate the boundaries where one show ends and a new one begins.
Notes about Live TV Pause
- You can use Live TV Pause only with digital broadcast and cable channels received through the TV’s ANT input (ATSC and Clear QAM channels).
- Changing channels erases and restarts the Live TV Pause buffer.
- Returning to the Home screen, selecting another input, or turning off the TV erases and resets the Live TV Pause buffer.
- Removing the USB drive erases the Live TV Pause buffer.
Playing content from local network media servers
Only in connected mode, your TV can play personal video, music, and photo files from a media server on your local network. Media servers include personal computers running media server software such as Plex or Windows Media Player, network file storage systems that have built-in media server software, and other devices that implement the specifications of the Digital Living Network Alliance. Some servers do not fully implement the DLNA specification but are UPNP (Universal Plug and Play) compatible. The Roku Media Player will connect to them as well.
Some media servers can convert files into Roku compatible formats. DRM-protected content is not supported.
Using your TV in a hotel or dorm room
Hotels, school dorms, conference facilities, and similar locations with public wireless Internet access often require you to interact with a web page to authenticate your access. These types or networks are called restricted public networks . When you select a network of this type, the TV automatically detects that additional information is needed and prompts you through using another wireless device to supply the requested information.
About using your TV on a restricted public network
Here are some points to keep in mind when using your TV on a restricted public network:
- Using your TCL Roku TV on a hotel or dorm room network requires wireless availability and a network-connected smartphone, tablet, or computer to authenticate access to your wireless access point.
- You will need your TCL Roku TV remote.
- Some content might be limited or unavailable if you try to connect outside your home country due to geo-filtering.
Getting your TCL Roku TV on line on a restricted public network
1. Either during Guided Setup or after using the Settings > Network menu to set up a new connection, the TV automatically detects that you are connecting to a restricted network and displays the following prompt:
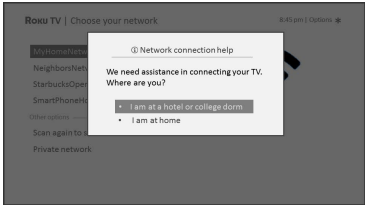
Tip: Your TV can connect to a restricted network only if Enable ‘Device connect’ is selected in Settings > System > Advanced system settings. (Device connect is enabled by default, but if you have disabled it, the TV cannot complete the connection.)
Note: Device connect is not present if the TV is in non-connected mode.
2. After selecting the correct network, highlight I am at a hotel or college dorm, and then press OK. The TV prompts you to use your smartphone, tablet, or laptop to complete the connection.
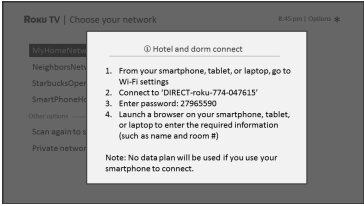
3. Use a phone, tablet, or wireless-enabled computer to detect wireless networks. In most cases, you can simply open the device’s Wi-Fi Settings or Network Settings screen to start scanning. Note: The phone, tablet, or computer must be on the same wireless network to which you are connecting the TV.
4. Connect to the network named on your TV screen. The actual network name varies. Note: The previous step connects your smartphone, tablet, or computer directly to the TV. No connection charges apply and the connection does not impact your device’s data plan.
5. The wireless connection process prompts you for a password. Enter the password as shown on the TV screen. The actual password varies.
6. Start the web browser on your smartphone, tablet, or computer. When you attempt to open any web page, the restricted connection will prompt you for whatever information it needs. In most cases, you must agree to terms and 68 conditions, provide identifying information, or enter a password, PIN, or room number to proceed. The information requested depends on the organization that controls the wireless connection.
7. After you enter the requested information, the TV automatically proceeds to complete its connection and resumes normal operation.
8. If the TV prompts you to link to your Roku account, use your smartphone, tablet, or computer to complete the pairing operation and activate your TCL Roku TV.
Roku voice remotes (select models only)
Only on TVs with the Roku voice remotes: The following topics explain how to get the most out of your TV when it includes a Roku Voice Remote or Roku Enhanced Voice Remote.
Re-pairing your Roku voice remote
The Roku voice remotes operate with wireless radio-frequency signals and must be paired with your TV. You initially paired the remote when you set up your TV during Guided Setup. But if your remote loses its pairing with the TV for some reason, you can easily re-pair it using either of the following methods:
- Remove the battery cover from the back of the remote.
- Press and hold down the pairing button for 3 seconds or longer, until the adjacent LED lights up.
- Do one of the following:
- Turn on the TV using the power button on the TV side or back panel. Pairing occurs as the TV starts up.
- Use the Roku mobile app or a different remote to navigate to Settings > Remote > Pair remote.
Tip: If the remote fails to pair with the TV, try installing new batteries. Also, it’s helpful to hold the remote within two to three feet of the TV to ensure successful pairing.
Checking the Roku voice remote battery level
You can check the condition of the batteries in your Roku voice remote at any time by navigating to Settings > Remote > Battery level. The resulting screen displays not only the battery level, but also other information that can be useful when you need technical support with your remote.
Tip: When you first turn on the TV, a battery level indicator appears in the upper right corner of the screen for a few seconds.
Finding your Roku Enhanced Voice Remote
Only on TVs with the Roku Enhanced Voice Remote, when your remote has found its way down into the sofa cushions or your dog has hidden it in the corner, you can use the Find Remote feature to find out where it’s hiding. This feature has a limited range, and is designed to find your Enhanced Voice Remote somewhere in the same room as the TV.
Select Find Remote on the Settings > Remote menu to see brief instructions on how to activate the Find Remote feature. Note, however, that selecting this option doesn’t actually activate the feature. Here are the complete instructions:
Activate Find Remote
- If your TV has a joystick-style control, press to the Left or Right to open the Inputs menu, and then press Right to scroll down to Find Remote.
- If your TV has a column of labeled panel buttons, press the INPUT button to open the Inputs menu, and then press the INPUT button again until you highlight Find Remote.
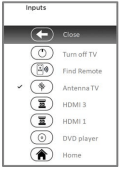
A moment or two after highlighting Find Remote, the Roku Enhanced Voice Remote starts playing your selected Find Remote sound to let you know where it is hiding. The sound automatically stops after a minute, or after you find the remote and press any button.
Changing and previewing the Enhanced Voice Remote finder sound
Only on TVs with the Roku Enhanced Voice Remote, you can customize the sound your remote makes when you use the Find Remote feature. To customize the sound, navigate to Settings > Remote > Change remote finder sound. Select the sound you want to use from the available settings.
To preview the sound you have chosen, select Preview remote finder sound, and then hold down OK on the remote to play the sound. When you release the OK button, the sound will stop.
Adjusting TV settings
You can adjust most picture and sound settings while you are watching a program by pressing to open the Options menu. There are some additional picture and sound settings in the Settings menu.
In most cases, the changes you make apply only to the input you are using. Antenna TV, the separate HDMI® inputs, and the AV input each have their own settings that the TV remembers when you return to that input. The TV also separately remembers the settings you specify while viewing streaming content.
Settings menu
Use the Settings menu to adjust overall TV settings. Press  to go to the Home screen, and then navigate to Settings > TV picture settings.
You can adjust the following overall TV picture settings from the Settings screen:
- TV brightness – Provide a better viewing experience in darker or brighter rooms. Increases or decreases the TV’s general brightness across all TV inputs. Note: This setting is identical to the TV brightness setting you can access in the Options menu while watching a program.
- HDR notification – On select models only: Controls whether the TV displays a notification in the upper right corner of the screen for a few seconds when HDR or Dolby Vision content begins to play.
- On – The TV displays a notification when HDR or Dolby Vision content begins to play.
- Off – The TV does not display a notification when HDR or Dolby Vision content begins to play.
Note: This setting does not affect the HDR or Dolby Vision notification that always appears in the program information banner. Press OK while watching a show to open the program information banner.
- Settings per input – Lists each TV input. Select an input, and then press to display the Options menu where you can adjust the input’s settings while watching a live picture and listening to the sound from that input.
Tip: You don’t have to go to the Settings menu first—you can display an input’s Options menu and adjust its settings whenever you are watching the input by pressing .
Options menu
The Options menu for each TV input provides many settings for controlling the appearance of the picture and the quality of the audio. To view the Options menu, press Þ whenever you are watching a TV input or streaming a video (except when you are viewing the program information banner). The Options menu is a panel that appears over the left side of the screen:

Typical Options menu
To adjust the settings on the Options menu, press the UP or DOWN arrow to highlight a setting, and then press the LEFT or RIGHT arrow to change the setting. You’ll see the changes you make right away in picture appearance or audio quality.
Tip: When you highlight a setting, the header text explains the effect of its current value. When you begin to adjust a setting, the other options are hidden so you can see more of the screen. Even though the other settings are hidden, you can move the highlight up or down to adjust the other settings. As soon as you press the UP or DOWN arrow, the other settings become visible again.
Options menu settings
- TV brightness – Affects the overall brightness of the picture. This setting applies across the entire TV; that is, to all TV inputs and is identical to the TV brightness setting under Settings > TV picture settings.
- Picture mode – Provides picture presets for various viewing preferences. This setting applies to the currently-selected input only.
- Picture size – Adjusts the aspect ratio of the picture, enabling you to view a picture in its original format, or zoom or stretch it to fill the screen. The Auto setting has been found to produce the best picture in most cases.
- Audio effect – Adjusts the sound quality output from the TV speakers. This setting applies across the entire TV; that is, to all TV inputs. It does not affect the sound quality for headphones, HDMI (ARC), or SPDIF (TOSLINK) connectors.
- Sleep timer – Sets a timer that turns off the TV after the specific amount of time. This setting remains in effect even if you stop watching the current input.
- Closed captioning – Controls when you see captions. This setting is only offered for Antenna TV, the AV input, and streaming videos. Any set value remains in effect across only these inputs.
- Antenna TV – Set captions to off, always on, on only when the TV sound is muted, or on only during instant replay (when Live TV Pause has been enabled).
- AV input – Set captions to off, always on, or on only when the TV sound is muted.
- Streaming video channel – For streaming content that provides closed captions, set captions to off, always on, on only when the TV sound is muted, or on only during instant replay (for streaming content that supports instant replay). Note that some streaming channels have other methods for turning captions on and off. In these cases, the Closed captioning option does not appear on the Options menu.
Note: If the button is not available on your remote, you can use this feature in the Roku mobile app. For more information, see Getting and using the Roku mobile app
- Captioning track – Only in Canada: Selects which caption track to display when Closed Captioning is on. This setting remains in effect on all inputs that provide captions. Note: Only in the United States, the Captioning track setting is located under Accessibility.
- SAP – Selects whether to play a secondary audio program or multichannel television sound, and which choice to play. This setting applies only to Antenna TV on digital channels.
- Advanced audio settings – Only on select models: Shows the Advanced audio settings menu.
- Advanced picture settings – Shows the Advanced picture settings menu.
Tip: To dismiss the Options menu, just wait a few seconds without pressing any buttons. Or press again to dismiss the menu immediately
Sonic Emotion settings
When you turn on Sonic Emotion from the Advanced audio settings menu, these additional settings become available:

- Dialog Enhancement – Enhances your ability to hear and understand dialog in the program.
- Bass Enhancement – Enhances the low frequency sound component in the program.
- Absolute 3D Sound – Simulates sound from multiple speakers that would otherwise require installation of a surround sound audio system.
Advanced audio settings menu options – DTS TruSurround
- Audio effect – Select from among various preset audio modes to improve speech, make music sound its best, boost bass or treble, or simulate a theater. Use Reset audio settings, described below, to return the input’s current settings to their original values.
- DTS TruSurround –Simulates surround sound that otherwise would require installation of a surround sound audio system. Sometimes, the effect interferes with dialog clarity. Use the Dialog Clarity option to compensate.
- Dialog Clarity – Available only when DTS TruSurround is On. Choose among Low, Medium, and High settings to improve the clarity of dialog when you are using the TruSurround feature.
- TruVolume – Minimizes annoying volume fluctuations in programs.
- Reset audio settings – Returns DTS TruSurround, Dialog Clarity, and TruVolume settings, to their default settings for the selected Audio effect.
Advanced audio settings menu options – Sonic Emotion Premium
- Audio effect – Select from among various preset audio modes to improve speech, make music sound its best, boost bass or treble, or simulate a theater. Use Reset audio settings, described below, to return the input’s current settings to their original values.
- Sonic Emotion Premium – Displays a menu with individual Sonic Emotion audio settings, as described in Sonic Emotion.
- Reset audio settings – Returns Sonic emotion settings to their default settings for the selected Audio effect.
Changing privacy settings
Note: Privacy settings are not present on TVs operating in non-connected mode.
Advertising
Only in connected mode, by default your TV uses an advertising identifier to track your TV usage. You can change the privacy settings on your TV in two ways: resetting the advertising identifier and limiting ad tracking.
Reset the advertising identifier
Resetting the advertising identifier clears the prior usage history that your TV stores, and then begins tracking again. From that point forward, your new usage patterns affect the advertisements you see on your TV.
- From the Home screen menu, navigate to Settings > Privacy > Advertising.
- Highlight Reset advertising identifier. Press to view more information about this option. When you finishing reading the information, press OK to close the More Information window.
- Press OK to reset the advertising identifier, and then press OK again to dismiss the verification message.
Limit ad tracking
You can limit Roku’s tracking of your usage behavior by limiting ad tracking. When you do, your TV will display ads that are not personalized based on your TV’s advertising identifier.
- From the Home screen menu, navigate to Settings > Privacy > Advertising.
- Highlight Limit ad tracking. Press to view more information about this option. When you finish reading the information, press OK to close the More Information window.
- Press OK to select the Limit ad tracking check box.
Note: If you perform a factory reset and then reconnect your TV, ad tracking is restored until you repeat these steps.
My Feed
Only in connected mode, use My Feed to find out when you can watch movies coming soon, and to get updates on movies, TV shows, and actors that you are following.
Movies Coming Soon
My Feed gives you updates on your list of movies that are coming soon to theaters. With My Feed, you’ll know when your favorite movie is ready to stream, the channels it is on, and how much it will cost.
Select the movies you want to follow by going to My Feed > Movies Coming Soon. You’ll then see a list of newly released movies that are not yet available on Roku streaming devices. Select a movie, and then select Follow this movie on Roku. When you return to the main My Feed screen, you’ll see banners for each of your newly-followed movies along with banners for movies and TV shows you’re already following.
Movies, TV shows, and people
In addition to following movies coming soon, you can follow any movie, TV show, or actor across top streaming channels. To follow a program, use the Search feature to find the movie, TV show, or name that you want to follow, and then select Follow this movie/TV show/person on Roku. For more information, see Searching for something to watch.
Note: The TV takes a bit of time to update your newly-followed shows. Until it finds at least one channel offering the movie, the content banner in My Feed shows Check back later for updates.
My Feed alerts you any time a movie or TV show you are following becomes available on another channel and whenever its price changes. A number in parentheses next to My Feed in the Home screen menu means that My Feed has updated information that you haven’t viewed yet. For example, if three of your followed shows have updates, you’ll see My Feed (3).
Note: When a movie or TV show you are following becomes available, the streaming channel offering the movie might require that you subscribe or pay a fee to view it.
Searching for something to watch
Keyboard search using the remote
1. Select Search on the Home screen menu. The Search screen has a keyboard grid and initially displays instructions—a set of icons representing search categories and a list of participating provider tiles. Tip: If you don’t see the instructions, navigate to the end of the list of recent searches and select Clear recent search selections.
2. Use the arrow keys to navigate the on-screen keyboard, entering a few characters of the search term. With each additional character you enter, you narrow down the search, making the search results more relevant. You’ll often see the results you are seeking after entering only a few letters.
3. When you see the show you are searching for, navigate to the right to highlight it.
Voice Search from a Roku voice remote
Only in the United Stated with models that have a Roku Voice Remote or Roku Enhanced Voice Remote:
1. Press and hold the search button, either  or
or  .
.
2. Say the name of a movie, TV show, actor, or director. The TV lists the results of your search across many streaming and Antenna TV channels. An icon next to each search result shows the category of the result (movie, TV show, actor).
3. Press the RIGHT arrow to move the highlight into the list of search results.
4. Press the UP and DOWN arrows to scroll through the list of search results to highlight the item you want to view.
Searching from the Roku mobile app
Use the free Roku mobile app on your compatible smartphone or tablet to make searching even faster. Use your mobile device’s keypad to type more quickly and easily than with the on-screen keyboard on your TV. Only in the United States, you also can search simply by touching the Voice Search icon and saying the name of the movie, TV show, actor or director, streaming channel, or game.
When you use the Roku mobile app to search, search results are shown on your mobile device instead of on the TV screen. When you make a selection from the search results, the TV starts playing the selected program.
For more information, see Getting and using the Roku mobile app.
I found a show, now what?
Now that you’ve highlighted the show, movie, actor, game, or streaming channel you were looking for, press the RIGHT arrow.
If your search result was an actor, director, or other item that does not represent a single item of content, you’ll see another list to narrow down your search. Continue highlighting results and pressing the RIGHT arrow until you find a single, viewable content item.
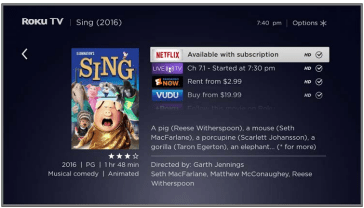
- The channel logo appears to the left of each result.
- Only in the United States, a LIVE TV logo indicates a program that is available on Antenna TV. Shows currently playing live appear at the top of the list. Shows airing in the future appear at the bottom of the list. Selecting a LIVE TV result switches the TV to that channel regardless of whether the program is currently in progress.
- An HD logo means that the content is available in high-definition.
- The checked circle adjacent to the title means you have already added the streaming channel.
If your search result was a game or a streaming channel, you’ll see detailed information, images, and available actions, such as a list of streaming channels and the cost of getting the item or channel.
Note: Some channels may require a paid subscription.
Follow on Roku
Rather than watch the show you found in Search, you can add it to My Feed and wait until it’s available on a particular streaming channel or available at a better price. From the search results screen, select Follow on Roku. Then go to My Feed periodically to check for updates to each of your followed movies, TV shows, or people. For more information, see My Feed.
Recent Searches
The next time you use Roku Search, the Search screen displays a list of recent search selections in place of the search instructions.
Using the recent search selections list makes it easy to quickly get to a previously found item, for example, to find another movie with the same actor, or another TV show in the same series.
Using the Roku Channel Store
Only in connected mode, the Streaming Channels menu option takes you to the Roku Channel store, where you can add new subscription based and free streaming channels to your TV.
Tip: You also can search for streaming channels by using the Search option, as explained in Searching for something to watch.
To make it easier to find what you want, the streaming channels in the Roku Channel Store are categorized by topic. Press the UP and DOWN arrows to highlight the category you want, and then press the RIGHT arrow to move the highlight into the grid of streaming channel tiles.
When you find a streaming channel you want to add or learn more about, highlight it and press OK to display more details.
- If the streaming channel you are adding is free, you can select Go to channel to start watching it immediately.
- If there is a one-time or recurring fee associated with using the streaming channel, you must agree to the terms and conditions, accept the fee, and—if you created one when you activated your TCL Roku TV, enter your Roku PIN code to authorize the charges.
- If you already have a subscription to the streaming channel—for example, you already subscribe to Netflix or you receive HBO through your cable TV provider—you must complete a different, simple authorization step to add the streaming channel.
You need only complete the authorization or activation step one time, when you initially add the streaming channel. After that, you simply select the streaming channel tile from your Home screen to start watching. (Channel and content availability is subject to change. Charges may apply to your selection.)
Tip: New streaming channels are added continuously to the Roku Channel Store, so be sure to check back every now and then for new options.
Note: If you don’t remember your PIN, or if want to change whether you need to use a PIN to make purchases on your Roku account, see Changing your Roku Channel Store PIN preference
Customizing your TV
Add TV inputs
As you use your TV, you might find that you need to add a TV input tile that you did not add during Guided Setup. To add a TV input:
- From the Home screen menu, navigate to Settings > TV inputs. Notice that the list of inputs is divided into two sections: Inputs being used and Inputs not used.
- Press the UP or DOWN arrows to highlight an input in the Inputs not used section of the list.
- Press the RIGHT arrow to move the highlight to Set up input.
- Press OK to add the input.
- Press to return to the Home screen. Notice that the input has been added to the top of the Home screen. If you want to move the input tile to a different position in the grid, see Rearrange tiles.
Add streaming channels
You can add streaming channels by searching in the Roku Channel Store. New streaming channels are added to the bottom of the Home screen. If you want to move the channel tile to a different position in the grid, see Rearrange tiles.
Rename inputs
Rather than trying to remember that your Blu-ray™ player is connected to HDMI 1 and your game console is connected to HDMI 3, you can rename the TV inputs to match the connected device.
Note: Renaming an input also changes the icon associated with it.
To rename an input, you can either:
- Highlight the input tile in the Home screen, and then press to display a list of options. From the list of options, select Rename input. Then select a new name and icon.
or
- From the Home screen, navigate to Settings > TV inputs. On the TV inputs screen, select the input you want to rename, select Rename, and then choose a new name and icon from the provided list.
Rather than using the predefined names and icons, you can set a custom name and icon. To do so, scroll up or down to highlight Set custom name & icon, and then press OK. Follow the instructions on the screen to enter a name and select an icon for the input.
Press to return to the Home screen. The new name and icon are now in effect.
Remove unwanted tiles
It’s easy to remove unused TV inputs and unwanted channel or app tiles. For example, if you never use the HDMI 3 input, or if you don’t like the weather app you added from the Roku Channel Store, you can remove them from your Home screen.
Note: You also can remove the Antenna TV tile if you never use the TV tuner. But be aware that removing the Antenna TV tile also deletes the channel list. You’ll have to set up the TV tuner again next time you want to view Antenna TV. Instructions for setting up the TV tuner can be found in Setting up Antenna TV.
- To remove any tile, highlight the input tile in the Home screen, and then press to display a list of options. From the list of options, select Remove input. In the screen that follows, confirm you want to remove the input.
- Alternatively, to remove a TV input tile from the Home screen, navigate to Settings > TV inputs. On the TV inputs screen, select the input you want to remove, and then select Remove > Confirm. Then press to return to the Home screen.
Change themes
Only in connected mode, another way to customize your TV is to change its theme. The theme establishes the look and feel of the TV through colors, designs, and fonts. Some themes require payment.
To change the theme, in the Home screen menu navigate to Settings > Themes. In the Themes screen, choose from the following options:
- My themes – Highlight a theme, and then press OK to switch to that theme.
- Get more themes – Highlight this option at the bottom of the My Themes list, and then press OK to shop for new themes.
- Custom settings – Turn Featured themes on or off. When Featured themes is on, the TV automatically switches to featured themes—like certain holiday-inspired themes —for a limited time whenever Roku makes them available, and then switches back to your selected theme when the featured theme expires. When off, the TV uses your selected theme.
More settings
Changing network settings
If needed, you can change your network settings at any time. For example, if you change the name of your wireless network (its SSID) or its password, you will need to change your TV’s settings so that it can continue to connect. Also, if you decided not to connect to the Internet in Guided Setup, you can use network settings to connect at a later time.
To change network settings, from the Home screen menu, navigate to Settings > Network, and then press the RIGHT arrow. At this point, you can choose the following options:
- About – Lists important information about your current network connection, such as status, connection type, IP addresses, and MAC address. This information is often useful when contacting customer support with connection issues.
- Check connection – Select your existing network connection type, and then press OK to start checking the network connection. The TV uses your current network information to reconfirm the wireless or wired network connection to the local network and the Internet connection.
- Set up connection – Select a network connection type, and then select the option to set up a new connection. Follow the on-screen instructions to complete the network connection. For help with each of the steps, see Network connection.
Note: Some networks, such as those found in dorm rooms, hotels, and other public places, may require you to read and agree to terms, enter a code, or provide identifying information before letting you connect to the Internet. For more information, see Using your TV in a hotel or dorm room.
Changing ZIP Code
Only in connected mode, your TV needs to know your ZIP Code so that it can display the correct channels and program guide information. It attempts to determine your ZIP Code by using information from your Internet connection; however, the information available from this source is not always accurate. To ensure you have the most accurate program guide information, use the ZIP Code option to enter your correct ZIP Code.
To set your correct ZIP code, from the Home screen menu, navigate to Settings > System > ZIP Code, and then pressing the RIGHT arrow. Use the on-screen number pad to select each of the digits of your ZIP Code, and then select OK.
Changing time settings
You can change time settings to suit your preferences. You can find the following settings by navigating from the Home screen menu to Settings > System > Time:
- Sleep timer – Set a time delay after which the TV will automatically shut off. This setting reflects the setting you can make in the Options menu from any TV input, as explained in Options menu settings. Note that the sleep timer setting is not input specific.
- Time zone – Select whether to set the time zone automatically or manually, and if set manually, select your current time zone. Typically, a TV connected to the Internet can discover its own time zone automatically, and a TV that is not connected to the Internet must be set manually. Initially, this setting is made when you set up the TV tuner, as explained in Setting up Antenna TV. Correct time zone information is needed to correctly display program data.
- Clock format – Select whether to display time in a 12-hour or 24-hour format, or to turn off time display. This setting is available only on TVs that are connected to the Internet. Non-connected TVs do not display the time
Scanning for Antenna TV channels again
There will be times when you need to create a new channel list. For example, you:
• Change cable providers
• Reorient your TV antenna
• Move to a different city with different channels
Whenever you need to update your TV channel list, you can repeat the channel scan.
Tip: Repeat the channel scan from time to time to make sure you are receiving all of the latest channels. Broadcasters add and remove channels, move channels to different parts of the spectrum, and change the power levels of their channels periodically.
Note: Repeating the tuner channel scan unhides all hidden channels.
To repeat the channel scan, from the Home screen menu, navigate to Settings > TV inputs > Antenna TV > Scan again for channels. Then select Start finding channels to begin the channel scan process. The screens and options that appear during this process are identical to those described in How do I set up the TV tuner?
Setting the HDMI® mode (4K models only)
On 4K (UHD) TVs, you can independently configure each HDMI® input to match the capabilities of the connected device. From the Home screen menu, navigate to Settings > TV inputs, and then select an enabled HDMI® input. Next, select HDMI mode and then select one of the following settings:
- Auto – Let the TV determine the best setting. Use this option unless your HDMI® device does not correctly communicate its HDMI® version compatibility.
- HDMI 1.4 – Configure the input for compatibility with HDMI® version 1.4, which supports a maximum refresh rate of 30 Hz at full UHD resolution. Most HDMI® devices will work correctly with the TV in this mode.
- HDMI 2.0 – Configure the input for compatibility with HDMI® version 2.0, which supports a maximum refresh rate of 60 Hz at full UHD resolution. You must use this mode to view HDR content from the device connected to this HDMI® input. However, note that many older HDMI® devices do not work correctly when the TV’s HDMI® input is set to this mode.
Using the TV in a home theater
Your TV has several features that make it an ideal TV for a home theater. But you might not notice them because they remain in the background until you decide to use them.
Turning off the speakers
When you use your TV with a sound bar or an external amplifier and speakers, you’ll probably want to turn off the internal TV speakers.
To turn off the TV’s built-in speakers, in the Home screen menu, navigate to Settings > Audio > TV speakers and change the setting.
Tip: The TV’s internal speakers can be enabled and disabled automatically as needed by system audio control, as described in Enable system audio control. Using the headphone jack also turns off the internal speakers.
Controlling other devices through CEC
Consumer Electronics Control (CEC) enables your TV and other CEC-compatible home entertainment devices to control one another in various ways. First, the CECcompatible devices must “discover” one another and report their capabilities. After this, one device can control another according to the features you enable. For example, playing a disc on a Blu-ray™ player could switch the TV to the Blu-ray™ player’s input. Or, powering off the TV could also power off the Blu-ray™ player and the home theater receiver.
Discover connected CEC devices
To discover CEC devices:
- Make sure that your CEC-compatible devices are connected to the TV with a suitable High Speed HDMI® Cable that supports HDMI® ARC and CEC control.
- Turn on each device and make sure all devices are CEC enabled. Tip: Some manufacturers have their own branded names for CEC functionality, so you might need to read the product documentation to correctly identify the CEC features of the device.
- On the TV’s Home screen menu, navigate to Settings > System > Control other devices (CEC) and then select Search for CEC devices. Press OK to repeat the discovery process, if necessary.
When finished, the TV displays a list of CEC devices that are connected to each HDMI® input, as well as any devices that had previously been connected. The TV remembers the names of multiple CEC devices even when they are no longer connected. If the list is longer than the allowed space, press to see a complete list in a scrollable window.
Restarting the TV
You can restart the TV when necessary. Restarting has the same effect as unplugging the TV power and then plugging it in again.
To restart the TV, navigate to Settings > System > Power, and then select System restart. Highlight Restart, and then press OK to confirm restart.
While the TV restarts, the screen goes dark for a few seconds, and then displays the startup screen for a few more seconds. When the restart operation completes, the TV displays the activity you selected in Power on settings.
Care and Cleaning
- Caution: Turn off your TV before cleaning.
- Clean the TV as needed using a soft lint-free cloth. Be sure to occasionally dust the ventilation slots in the cabinet to help assure adequate ventilation.
- IMPORTANT: Never use strong cleaning agents, such as ammonia-based cleaners, or abrasive powder. These types of cleaners will damage the TV.
The TV’s screen may be cleaned with a soft, lint-free cloth as well. Take care not to scratch or mar the screen. If necessary, you may use a cloth dampened with warm water. While cleaning, do not spray liquid directly on the screen, or allow liquid to run down the screen and inside the TV. Also, never place drinks or vases with water on top of the TV. This could increase the risk of fire, shock hazard or damage to the TV.