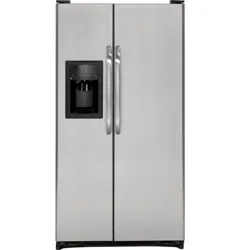
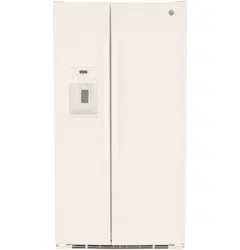
User manual Refrigerator
How to install features.
(Not all features are on all models.)
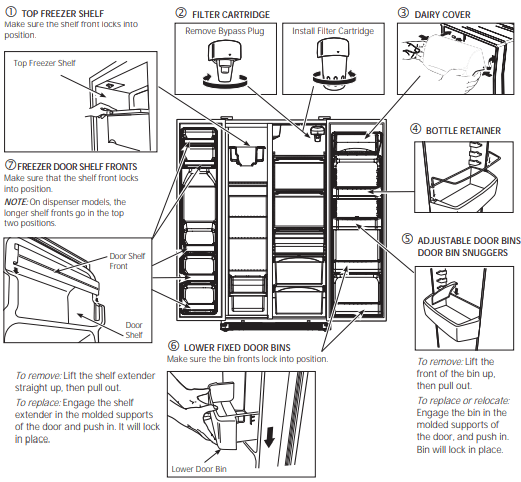
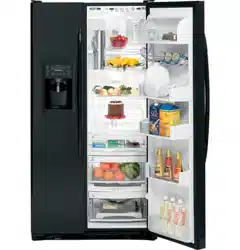
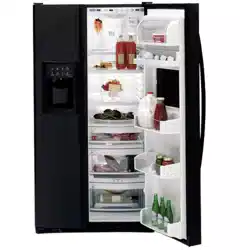
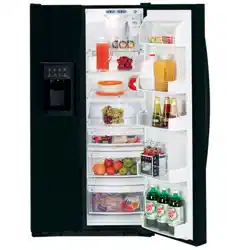
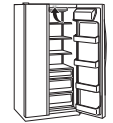
About the shelves and bins.
(Not all features are on all models.)
Rearranging the Shelves
Refrigerator Shelves:
To Remove
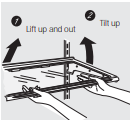
To Replace
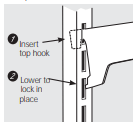
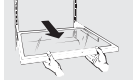
Freezer Pan:
To Remove
Remove the pan by pulling it forward, lifting up the front and sliding it past the stop location.
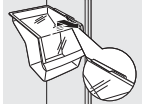
Freezer Shelves:
To Remove
Slide-Out Spillproof Shelf (on some models)
The slide-out spillproof shelf allows you to reach items stored behind others. The special edges are designed to help prevent spills from dripping to lower shelves.
NOTE: Make sure you push the shelves all the way back in before you close the door.

Spillproof Shelves (on some models)
Spillproof shelves have special edges to help prevent spills from dripping to lower shelves.
About the crispers and pans.
(Not all features are on all models.)
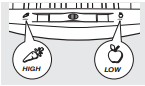
Adjustable Humidity Crispers and Snack Pan (on some models)
Slide the control all the way to the High setting to provide high humidity recommended for most vegetables.
Slide the control all the way to the Low setting to provide lower humidity levels recommended for most fruits.
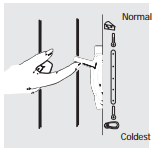
Convertible Meat Pan (on some models)
The convertible meat pan has its own cold air duct to allow a stream of cold air from the freezer compartment to flow around the pan.
The variable temperature control regulates the air flow from the freezer compartment.
Set control lever up to convert the pan to normal refrigerator temperature and provide extra vegetable storage space. Cold air duct is turned off. Variable settings between these extremes can be selected.
Set control lever down to the coldest setting to store fresh meats. If lever is left in meat position for a long period of time, some frost may form on the inside of the pan.
When replacing the crispers, make sure you slide them through the crisper guides.
Crisper Removal
Crispers can easily be removed by tilting up slightly and pulling past stop location.
If the door prevents you from taking out the crispers, the refrigerator will need to be rolled forward until the door opens enough to slide the crispers out. In some cases, when you roll the refrigerator out, you will need to move the refrigerator to the left as you roll it out.
About the controls on the refrigerator.
Your controls will look like one of the following:
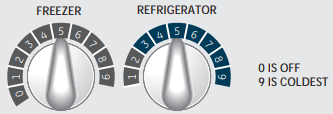
Startup Steps for Proper Temperature Control
STEP 1—Set Fresh Food Control on "S.”
STEP 2—Set Freezer Control on"5"
STEP 3-WAIT 12 HOURS for temperature to stabilize.
STEP 4—If a change is needed. move the control one number at a time and allow 12 hours for temperature to stabilize.

Energy Smart™ Override

Press the Energy Smart™ pad for 3 seconds to override the Energy Smart™ feature. The LED above the pad will flash multiple times to confirm a successful override of the feature. This will disable the feature from altering the performance of your unit for 18 hours. Eighteen hours after the feature has been disabled, the Energy Smart™ feature will continue normal operation.
To Change Temperature Control Setting with Touch Pads:
Freezer setting is on the left side of the display.
Refrigerator setting is on the right side of the display.
- Press the Warmer or Colder pad for compartment and direction desired
- Present control setting number wil illuminate.
- Each time the pad is touched. compartment setting changes one number.
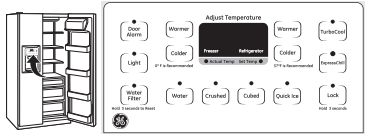
The temperature controls are preset in the factory at 37°F for the refrigerator compartment and 0°F for the freezer compartment. Allow 24 hours for the temperature to stabilize to the preset recommended settings.
The temperature controls can display both the SET temperature as well as the actual temperature in the refrigerator and freezer. The actual temperature may vary slightly from the SET temperature based on usage and operating environment.
NOTE: Turning the refrigerator to the 0 (off) setting via the controls does not shut off electrical power to the refrigerator. Control settings will vary based on personal preferences, usage and operating conditions and may require more than one adjustment.
About Energy Smart™ Models Controls
Energy Smart™ is located on the controls of models equipped with the feature, as shown in the image.
What Energy Smart™ Does
If the ACM (Appliance Communication Module) is connected to your refrigerator and is receiving utility rate information, then Energy Smart™ feature alters the performance of the refrigerator. It minimizes energy consumption when directed by the NucleusTM (separately purchased device) or Smart Meter. The Energy SmartTM feature can cause changes in refrigerator or freezer compartment temperatures and can cause changes in the rate of ice cube production.
A display of 1 is warmest and 9 is the coldest setting.
To Turn Cooling Off:
To stop cooling in the refrigerator and freezer compartments, first repeatedly press the Warmer pad for the freezer until its display continuously flashes “1”. Then, using the refrigerator control, repeatedly press Warmer until both displays flash “0”. “0” in both displays turns off the cooling system. On some models, it may be necessary to set only one control to 0 to turn off cooling in both compartments.
NOTE: Turning the refrigerator to the 0 (off) setting via the controls does not shut off electrical power to the refrigerator. Control settings will vary based on personal preferences, usage and operating conditions and may require more than one adjustment.
Locking the Dispenser (on some models)

Press the Lock pad for 3 seconds to lock the dispenser and control panel.
To unlock, press and hold the key pads again for 3 seconds.
Setting either or both controls to OFF stops cooling in both the freezer and refrigerator compartments, but does not shut off electrical power to the refrigerator.
NOTE: The refrigerator is shipped with protective film covering the temperature controls. If this film was not removed during installation, remove it now.
About the ice and water dispenser.
(On some models.)
To Use the Dispenser
Select 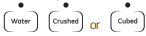
Press the glass gently against the top of the dispenser cradle.
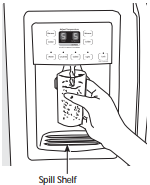
The spill shelf is not self-draining. To reduce water spotting, the shelf and its grille should be cleaned regularly.
Locking the Dispenser (on some models)
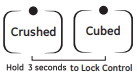
Press the Crushed and Cubed key pads for 3 seconds to lock the dispenser and control panel. To unlock, press and hold the key pads again for 3 seconds.
CAUTION Never put fingers or any other objects into the ice crusher discharge opening.

This pad turns the night light in the dispenser on and off. The light also comes on when the dispenser cradle is pressed. If this light burns out, it should be replaced with a 6 watt maximum, 12 volt DC bulb.
Ice Storage Drawer on Dispenser Models
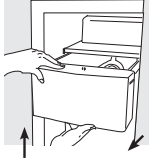
To remove:
Slide the icemaker power switch to the OFF position. Pull the drawer straight out and then lift past the stop position.
To replace:
When replacing the drawer, make sure to push it firmly into place. If it does not go all the way back, remove it and rotate the drive mechanism 1/4 turn. Then push the drawer back again.

Important Facts About Your Dispenser
- Do not add ice from trays or bags to the storage bin. It may not crush or dispense well.
- Avoid overfilling glass with ice and use of narrow glasses. Backed-up ice can jam the chute or cause the door in the chute to freeze shut. If ice is blocking the chute, poke it through with a wooden spoon.
- Beverages and foods should not be quick-chilled in the ice storage bin. Cans, bottles or food packages in the storage bin may cause the icemaker or auger to jam.
- To keep dispensed ice from missing the glass, put the glass close to, but not touching, the dispenser opening.
- Some crushed ice may be dispensed even though you selected Cubed. This happens occasionally when a few cubes have been left in the crusher.
- After crushed ice is dispensed, some water may drip from the chute.
- Sometimes a small mound of snow will form on the door in the ice chute. This condition is normal and usually occurs when you have dispensed crushed ice repeatedly. The snow will eventually evaporate.
- The first glass of water dispensed may be warmer than the following ones. This is normal.
- Dispensed water is not ice cold. For colder water, simply add crushed ice or cubes before dispensing water.
About the automatic icemaker
It is normal for several cubes to be joined together
If ice is not used frequently, old ice cubes will become cloudy, taste stale, and shrink.
Icemaker Accessory Kit
If your refrigerator did not come already equipped with an automatic icemaker, an icemaker accessory kit is available at extra cost. Check the back of the refrigerator for the specific icemaker kit needed for your model.
About the automatic icemaker.
A newly-installed refrigerator may take 12–24 hours to begin making ice
Automatic Icemaker (on some models)
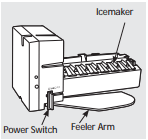
When the refrigerator has been connected to the water supply, slide the power switch to the ON position.
The icemaker will fill with water when it cools to 15°F. When the bin fills to the level of the feeler arm, the icemaker will stop producing ice.
Be sure nothing interferes with the sweep of the feeler arm.
Throw away the first few batches of ice to allow the water line to clear.
The icemaker will produce seven cubes SHUF\FOH³DSSUR[LPDWHO\���²��� cubes in a 24-hour period, depending on freezer compartment temperature, room temperature, number of door openings and other use conditions.
You will hear a buzzing sound each time the icemaker fills with water.
About the water filter cartridge. (On some models.)
Water filter cartridge
The water filter cartridge is located in the back upper right corner of the refrigerator compartment.
When to replace the filter on models with a replacement indicator light
There is a replacement indicator light for the water filter cartridge on the dispenser. This light will turn orange to tell you that you need to replace the filter soon.
The filter cartridge should be replaced when the replacement indicator light turns red or if the flow of water to the dispenser or icemaker decreases.
When to replace the filter on models without a replacement indicator light
The filter cartridge should be replaced every six months or earlier if the flow of water to the dispenser or icemaker decreases.
Removing the filter cartridge
If you are replacing the cartridge, first remove the old one by slowly turning it to the left. Do not pull down on the cartridge. A small amount of water may drip down.
CAUTION: To reduce the risk associated with property damage due to water leakage, read and follow instructions before installation and use of this system. Installation and use MUST comply with all state and local plumbing codes.
Installing the filter cartridge

- Fill the replacement cartridge with water from the tap to allow for better flow from the dispenser immediately after installation.
- Line up the arrow on the cartridge and the cartridge holder. Place the top of the new cartridge up inside the holder. Do not push it up into the holder
- Slowly turn it to the right until the filter cartridge stops. DO NOT OVERTIGHTEN. As you turn the cartridge, it will automatically raise itself into position. The cartridge will move about a ½ turn.
- Run water from the dispenser for 1-1/2 gallons (about three minutes) to clear the system and prevent sputtering.
- Press and hold the RESET WATER FILTER pad (on some models) on the dispenser for three seconds.
NOTE: A newly installed water filter cartridge may cause water to spurt from the dispenser.
Filter bypass plug
You must use the filter bypass plug when a replacement filter cartridge is not available. The dispenser and the icemaker will not operate without the filter or filter bypass plug.
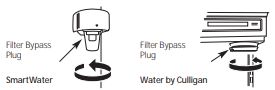
To use the filter bypass plug on Water by Culligan™ models, you must first remove the filter adaptor from the cartridge holder by turning it to the left.
WARNING
To reduce the risk associated with choking, do not allow children under 3 years of age to have access to small parts during the installation of this product. The disposable filter cartridge should be replaced every 6 months at the rated capacity, or sooner if a noticeable reduction in flow rate occurs.
For the maximum benefit of your filtration system, GE recommends the use of GE-branded filters only. Using GE-branded filters in GE and Hotpoint® refrigerators provides optimal performance and reliability. GE filters meet rigorous industry NSF standards for safety and quality that are important for products that are filtering your water. GE has not qualified non-GE-branded filters for use in GE and Hotpoint refrigerators and there is no assurance that non-GE-branded filters meet GE's standards for quality, performance and reliability.
Customers in Canada should consult the yellow pages for the nearest Camco Service Center.
Care and cleaning of the refrigerator.
Cleaning the Outside
The dispenser drip area, (on some models) beneath the grille, should be wiped dry. Water left in this area may leave deposits. Remove the deposits by adding undiluted vinegar to the well. Soak until the deposits disappear or become loose enough to rinse away.
The dispenser cradle (on some models). Before cleaning, lock the dispenser by pressing and holding the Lock pad for 3 seconds. Clean with warm water and baking soda solution - about a tablespoon (15 ml) of baking soda to a quart (1 l) of water. Rinse thoroughly and wipe dry.
The door handles and trim. Clean with a cloth dampened with soapy water. Dry with a soft cloth.
Keep the outside clean. Wipe with a clean cloth lightly dampened with kitchen appliance wax or mild liquid dish detergent. Dry and polish with a clean, soft cloth.
The stainless steel door panels and handles
The stainless steel panels can be cleaned with a commercially available stainless steel cleaner or a similar product using a clean, soft cloth. Do not use appliance wax, polish, bleach or products containing chlorine on stainless steel doors and handles.
For best results, GE recommends using stainless steel cleaner PM10X311 with the WX10X307 polishing cloth, or for convenience the SS cleaning wipes, part number WX10X10001.
Do not wipe the refrigerator with a soiled dish cloth or wet towel. These may leave a residue that can erode the paint. Do not use scouring pads, powdered cleaners, bleach or cleaners containing bleach because these products can scratch and weaken the paint finish.
Cleaning the Inside
To help prevent odors, leave an open box of baking soda in the refrigerator and freezer compartments.
Unplug the refrigerator before cleaning. If this is not practical, wring excess moisture out of sponge or cloth when cleaning around switches, lights or controls.
Use warm water and baking soda solution - about a tablespoon (15 ml) of baking soda to a quart (1 l) of water. This both cleans and neutralizes odors. Rinse and wipe dry.
After cleaning the door gaskets, apply a thin layer of petroleum jelly to the door gaskets at the hinge side. This helps keep the gaskets from sticking and bending out of shape.
Drain opening in freezer compartment. During yearly cleaning, remove bottom freezer pan and flush a solution of baking soda - 1 teaspoon ( 5ml) and 2 cups ( 500 ml) of hot ( not boiling) water - through the drain line with the help of a meat baster. This will help eliminate odor and reduce the likelihood of a clogged drain line. If drain becomes clogged, use a meat baster and baking soda solution to force the clog through the drain line.
Avoid cleaning cold glass shelves with hot water because the extreme temperature difference may cause them to break. Handle glass shelves carefully. Bumping tempered glass can cause it to shatter. Do not wash any plastic refrigerator parts in the dishwasher.
Behind the Refrigerator
Be careful when moving the refrigerator away from the wall. All types of floor coverings can be damaged, particularly cushioned coverings and those with embossed surfaces.
Pull the refrigerator straight out and return it to position by pushing it straight in. Moving the refrigerator in a side direction may result in damage to the floor covering or refrigerator.
When pushing the refrigerator back, make sure you don’t roll over the power cord or icemaker supply line (on some models).
Preparing for Vacation
For long vacations or absences, remove food and unplug the refrigerator. Clean the interior with a baking soda solution of one tablespoon (15 ml) of baking soda to one quart (1 l) of water. Leave the doors open.
Slide the icemaker power switch to the OFF position and shut off the water supply to the refrigerator.
Preparing to Move
Secure all loose items such as grille, shelves and drawers by taping them securely in place to prevent damage.
Be sure the refrigerator stays in an upright position during moving.
Replacing the Light Bulbs
NOTE: Turning the refrigerator to the 0 (off) setting via the controls does not shut off electrical power to the refrigerator.
- Unplug the refrigerator.
- Remove the shelf just below the light shield.
- Replace with an appliance bulb of the same or lower wattage.
- Reinstall the shelf and plug the refrigerator back in.
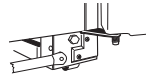
Installation Instructions
ROLLERS
The rollers have 3 purposes:
- Rollers adjust so the door closes easily when opened about halfway.
- Rollers adjust so the refrigerator is firmly positioned on the floor and does not wobble.
- Rollers allow you to move the refrigerator away from the wall for cleaning.
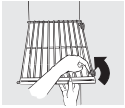
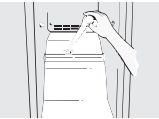
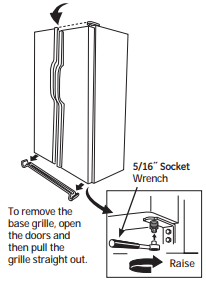
To adjust the rollers, remove the base grille by pulling it out at the bottom.
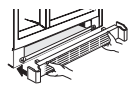
Turn the roller adjusting screws clockwise to raise the refrigerator, counterclockwise to lower it. Use an adjustable wrench (3/8ļ hex head bolt) or pliers.
To replace base grille, line up the clips on back of grille between the bar and the bottom of the cabinet. Push forward until grille snaps into place.
DOOR ALIGNMENT
After leveling, make sure that doors are even at the top.
To make the doors even, adjust the refrigerator door.
- Using a 5/16" socket wrench, turn the door adjusting screw to the right to raise the door, to the left to lower it. (A nylon plug, embedded in the threads of the pin, prevents the pin from turning unless a wrench is used.)
- After one or two turns of the wrench, open and close the refrigerator compartment door and check the alignment at the top of the doors.
INSTALLING THE WATER LINE
BEFORE YOU BEGIN
Recommended copper water supply kits are WX8X2, WX8X3 or WX8X4, depending on the amount of tubing you need. Approved plastic water supply lines are GE SmartConnect™ Refrigerator Tubing (WX08X10002, WX08X10006, WX08X10015 and WX08X10025).
When connecting your refrigerator to a GE Reverse Osmosis Water System, the only approved installation is with a GE RVKit. For other reverse osmosis water systems, follow the manufacturer’s recommendations.
If the water supply to the refrigerator is from a Reverse Osmosis Water Filtration System AND the refrigerator also has a water filter, use the refrigerator’s filter bypass plug. Using the refrigerator’s water filtration cartridge in conjunction with the RO filter can result in hollow ice cubes and slower water flow from the water dispenser.
This water line installation is not warranted by the refrigerator or icemaker manufacturer. Follow these instructions carefully to minimize the risk of expensive water damage.
Water hammer (water banging in the pipes) in house plumbing can cause damage to refrigerator parts and lead to water leakage or flooding. Call a qualified plumber to correct water hammer before installing the water supply line to the refrigerator.
To prevent burns and product damage, do not hook up the water line to the hot water line.
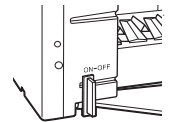
If you use your refrigerator before connecting the water line, make sure the icemaker power switch is in the OFF position.
Do not install the icemaker tubing in areas where temperatures fall below freezing.
All installations must be in accordance with local plumbing code requirements.
1. SHUT OFF MAIN WATER SUPPLY
2. DRILL THE HOLE FOR THE VALVE
Choose a location for the valve that is easily accessible. It is best to connect into the side of a vertical water pipe. When it is necessary to connect into a horizontal water pipe, make the connection to the top or side, rather than at the bottom, to avoid drawing off any sediment from the water pipe.
Drill a 1/4” hole in the water pipe ( even if using a self - piercing valve) using a sharp bit. Remove any resulting from driling the hole in the pipe. Take care not to allow water to drain into the drill. rare to drill a 1/4" hole may result in reduced ice production or smaller cubes.
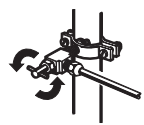
3 FASTEN THE SHUTOFF VALVE
Fasten the shutoff valve to the cold water pipe with the pipe clamp.
Tighten the clamp screws until the sealing washer begins to swell.
NOTE: Do not overtighten or you may crush the tubing.
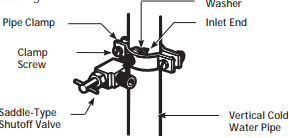
NOTE: Commonwealth of Massachusetts Plumbing Codes 248CMR shall be adhered to. Saddle valves are illegal and use is not permitted in Massachusetts. Consult with your licensed plumber.
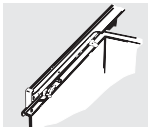
4 ROUTE THE TUBING
Route the tubing between the cold water line and the refrigerator.
Route the tubing through a hole drilled in the wall or floor (behind the refrigerator or adjacent base cabinet) as close to the wall as possible.
NOTE: Be sure there is sufficient extra tubing to allow the refrigerator to move out from the wall after installation.
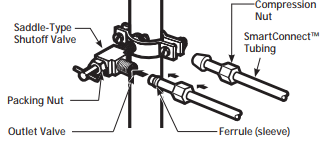
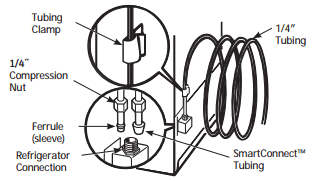
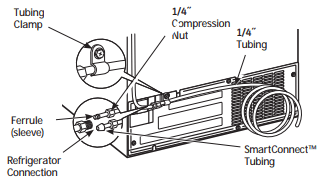
5 CONNECT THE TUBING TO THE VALVE
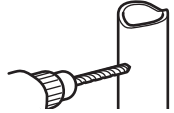
Place the compression nut and ferrule (sleeve) for copper tubing onto the end of the tubing and connect it to the shutoff valve.
Make sure the tubing is fully inserted into the valve. Tighten the compression nut securely.
For plastic tubing from a GE SmartConnect™ Refrigerator Tubing kit, insert the molded end of the tubing into the shutoff valve and tighten compression nut until it is hand tight, then tighten one additional turn with a wrench. Overtightening may cause leaks.
NOTE: Commonwealth of Massachusetts Plumbing Codes 248CMR shall be adhered to. Saddle valves are illegal and use is not permitted in Massachusetts. Consult with your licensed plumber.
6 FLUSH OUT THE TUBING
Turn the main water supply on and flush out the tubing until the water is clear.
7. CONNECT THE TUBING TO THE REFRIGERATOR
NOTES:
- Before making the connection to the refrigerator, be sure the refrigerator power cord is not plugged into the wall outlet.
- If your refrigerator does not have a water filter, we recommend installing one if your water supply has sand or particles that could clog the screen of the refrigerator’s water valve. Install it in the water line near the refrigerator. If using a GE SmartConnect™ Refrigerator Tubing kit, you will need an additional tube (WX08X10002) to connect the filter. Do not cut plastic tube to install filter.
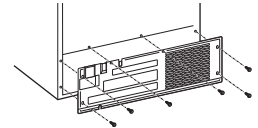
Some models have the refrigerator connection at the end of tubing located outside the compressor compartment access cover. On other models, the compressor compartment access cover must be removed in order to access the refrigerator connection at the water valve.
On models using the refrigeration connection at the water valve, remove the plastic flexible cap.
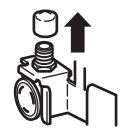
Place the compression nut and ferrule (sleeve) onto the end of the tubing as shown. On a GE SmartConnect™ Refrigerator Tubing kit, the nuts are already assembled to the tubing.
Insert the end of the tubing into the refrigerator connection as far as possible. While holding the tubing, tighten the fitting.
For plastic tubing from a GE SmartConnect™ Refrigerator Tubing kit, insert the molded end of the tubing into the refrigerator connection and tighten the compression nut until it is hand tight, then tighten one additional turn with a wrench. Overtightening may cause leaks.
Fasten the tubing into the clamp provided as shown to keep it in position. You may need to pry open the clamp.
One of the illustrations below will look like the connection on your refrigerator.
8. TURN THE WATER ON AT THE SHUTOFF VALVE
Tighten any connections that leak.
Reattach the access cover.
9 PLUG IN THE REFRIGERATOR
Arrange the coil of tubing so that it does not vibrate against the back of the refrigerator or against the wall. Push the refrigerator back to the wall.
10 START THE ICEMAKER
Slide the icemaker power switch to the ON position. The icemaker will not begin to operate until it reaches its operating temperature of 15°F (-9°C) or below. It will then begin operation automatically if the icemaker power switch is in the ON position.
Normal operating sounds.
HUMMM...

- The new high efficiency compressor may run faster and longer than your old refrigerator and you may hear a high-pitched hum or pulsating sound while it is operating.
- Sometimes the refrigerator runs for an extended period, especially when the doors are opened frequently. This means that the Frost Guard™ feature is working to prevent freezer burn and improve food preservation.
- You may hear a whooshing sound when the doors close. This is due to pressure equalizing within the refrigerator.
WHIR!

- You may hear the fans spinning at high speeds. This happens when the refrigerator is first plugged in, when the doors are opened frequently or when a large amount of food is added to the refrigerator or freezer compartments. The fans are helping to maintain the correct temperatures.
- If either door is open for over 3 minutes, you may hear the fans come on in order to cool the light bulbs.
- The fans change speeds in order to provide optimal cooling and energy savings.
CLICKS, POPS, CRACKS and CHIRPS
- You may hear cracking or popping sounds when the refrigerator is first plugged in. This happens as the refrigerator cools to the correct temperature.
- Electronic dampers click open and closed to provide optimal cooling and energy savings.
- The compressor may cause a clicking or chirping sound when attempting to restart (this could take up to 5 minutes).
- The electronic control board may cause a clicking sound when relays activate to control refrigerator components.
- Expansion and contraction of cooling coils during and after defrost can cause a cracking or popping sound.
- On models with an icemaker, after an icemaking cycle, you may hear the ice cubes dropping into the ice bucket.
WATER SOUNDS

- The flow of refrigerant through the freezer cooling coils may make a gurgling noise like boiling water.
- Water dropping on the defrost heater can cause a sizzling, popping or buzzing sound during the defrost cycle.
- A water dripping noise may occur during the defrost cycle as ice melts from the evaporator and flows into the drain pan.
- Closing the door may cause a gurgling sound due to pressure equalization.
Before you call for service…
Refrigerator does not operate
- Refrigerator in defrost cycle.
Wait about 30 minutes for defrost cycle to end.
- Freezer control in 0 (off) position
Move the freezer control to a lower temperature setting.
- Refrigerator is unplugged.
Push the plug completely into the outlet.
- The fuse is blown/circuit breaker is tripped.
Replace fuse or reset the breaker.
- Energy Smart™ feature is altering refrigerator performance
Wait about 2 hours for normal operation to continue.
Refrigerator or freezer compartment too warm
- Temperature control not set cold enough.
See About the controls.
- Warm weather or frequent door openings.
Set the temperature control one step colder. See About the controls.
Check to see if package is holding door open.
- Energy Smart™ feature is altering refrigerator performance
See About Energy Smart™ Models.
Vibration or rattling
- Front rollers need adjusting.
See Rollers. Slight vibration is normal.
Motor operates for long periods or cycles on and off frequently. (Modern refrigerators with more storage space and a larger freezer require more operating time. They start and stop often to maintain even temperatures.)
- Front rollers need adjusting.
See Rollers. Slight vibration is normal.
- Normal when refrigerator is first plugged in.
Wait 24 hours for the refrigerator to completely cool down.
- Often occurs when large amounts of food are placed in refrigerator.
This is normal.
Check to see if package is holding door open.
- Hot weather or frequent door openings.
This is normal.
- Temperature controls set at the coldest setting.
See About the controls.
Frost or ice crystals on frozen food (frost within package is normal)
Check to see if package is holding door open.
- Too frequent or too long door openings.
Divider between refrigerator and freezer compartments feels warm
- Automatic energy saver system circulates warm liquid around front edge of freezer compartment.
This helps prevent condensation on the outside.
Automatic icemaker does not work on some models)
- Icemaker power switch is in the OFF position.
Slide the power switch to the ON position.
- Water supply turned off or not connected.
See Installing the water line.
- Freezer compartment too warm.
Wait 24 hours for the refrigerator to completely cool down.
- Piled up cubes in the storage bin cause icemaker to shut off.
Level cubes by hand.
- Ice cubes stuck in icemaker.
Turn off the icemaker, remove cubes and turn the icemaker back on.
Ice cubes have odor/taste
- Ice storage bin needs cleaning.
Empty and wash bin. Discard old cubes.
- Food transmitting odor/taste to ice cubes.
Wrap foods well.
- Interior of refrigerator needs cleaning.
See Care and cleaning.
Small or hollow cubes
Replace filter cartridge with new cartridge or with plug.
Check to see if package is holding door open.
- Temperature control not set cold enough.
See About the controls.
- Energy Smart™ feature is altering refrigerator performance
See About Energy Smart™ Models.
Door not closing properly
- Door gasket on hinge side sticking or folding over.
Apply petroleum jelly on face of gasket.
Orange glow in freezer
This is normal.
Cube dispenser does not work (on some models)
- Icemaker or water supply turned off.
Turn on icemaker or water supply.
- Ice cubes are frozen to icemaker feeler arm.
Remove cubes.
- Irregular ice clumps in storage container.
Break up with fingertip pressure and discard remaining clumps.
Freezer may be too warm. Adjust the freezer control to a colder setting, one position at a time, until clumps do not form.
Dispenser is LOCKED.
Press and hold the Lock pad for 3 seconds.
Water has poor taste/odor on some models)
- Water dispenser has not been used for a long time.
Dispense water until all water in system is replenished.
Water in first glass is warm (on some models)
- Normal when refrigerator is first installed.
Wait 24 hours for the refrigerator to completely cool down.
- Water dispenser has not been used for a long time.
Dispense water until all water in system is replenished
- Water system has been drained.
Allow several hours for replenished supply to chill.
Water dispenser does not work (on some models)
- Water supply line turned off or not connected.
See Installing the water line.
Replace filter cartridge or remove filter and install plug.
- Air may be trapped in the water system.
Press the dispenser arm for at least two minutes.
Press and hold the Lock pad for 3 seconds.
Water spurting from dispenser
- Newly-installed filter cartridge.
Run water from the dispenser for 3 minutes (about 11 /2 gallons).
Water is not dispensed
- Water in reservoir is frozen.
Call for service.
No water or ice cube production
- Supply line or shut off valve is clogged.
Call a plumber.
Replace filter cartridge or remove filter and install plug.
Press and hold the Lock pad for 3 seconds.
Refrigerator has odor
- Foods transmitting odor to refrigerator.
Foods with strong odors should be tightly wrapped.
Keep an open box of baking soda in the refrigerator; replace every three months.
See Care and cleaning.
- Defrost water drainage system needs cleaning.
See Care and cleaning.
Moisture forms on outside of refrigerator
- Not unusual during periods of high humidity.
Wipe surface dry.
Moisture collects inside
- Too frequent or too long door openings.
Interior light does not work
Replace fuse or reset the breaker.
See Replacing the light bulbs.
Water on kitchen floor or on bottom of freezer
- Drain in the bottom of the freezer clogged.
See Care and cleaning.
Poke ice through with a wooden spoon.
Hot air from bottom of refrigerator
- Normal air flow cooling motor. of refrigerator In the refrigeration process, it is normal that heat be expelled in the area under the refrigerator. Some floor coverings are sensitive and will discolor at these normal and safe temperatures.
Cubed Ice was selected but Crushed Ice was dispensed (on some models)
- Last setting was Crushed Ice
A few cubes were left in the crusher from the previous setting. This is normal.
Frequent “buzzing” sound
- Icemaker power switch is in the ON position but the water supply to the refrigerator has not been connected.
Slide the power switch to the OFF position. Keeping it in the ON position will damage the water valve.