
3
Ú Table of contents
[en]Instruction manual
Safety precautions .....................................................................4
Before installation ...............................................................................4
Information for your safety ................................................................4
Causes of damage .............................................................................4
Energy and environment tips....................................................5
Saving energy......................................................................................5
Environmentally-friendly disposal.....................................................5
Your new appliance.................................................................... 5
Control panel .......................................................................................5
Operating modes ................................................................................6
Shelf positions .....................................................................................7
NeffLight® ............................................................................................7
Accessories .........................................................................................7
Before using the appliance for the first time ........................... 8
Setting the language ..........................................................................8
Setting the water hardness ...............................................................8
Altitude calibration ..............................................................................8
Setting the clock .................................................................................8
Cleaning the appliance......................................................................9
Operating the appliance ............................................................9
Switching on the appliance...............................................................9
Selects the operating mode and temperature ..............................9
Filling and emptying the water tank ............................................. 10
Switching off the appliance............................................................ 11
After each steam-assisted use ...................................................... 11
Automatic safety cut-out ................................................................. 11
Changing the basic settings ................................................... 11
Electronic clock........................................................................ 12
Clock display .................................................................................... 12
Timer .................................................................................................. 13
Cooking time .................................................................................... 13
End of operation .............................................................................. 13
Preset operation............................................................................... 13
Setting the clock .............................................................................. 13
Rapid heat up................................................................................... 14
Checking, correcting or deleting settings ................................... 14
Childproof lock .........................................................................14
Lock.................................................................................................... 14
Permanent lock ................................................................................ 14
Baking .......................................................................................15
Baking in tins and on trays ............................................................ 15
Baking on two or more levels ....................................................... 15
Baking table for basic doughs/cake mixtures........................... 15
Baking table for fresh meals and frozen
convenience products..................................................................... 16
Tips and tricks.................................................................................. 17
Roasting ....................................................................................18
Open roasting................................................................................... 18
Roasting with a lid ........................................................................... 18
Roasting table .................................................................................. 18
Tips and tricks.................................................................................. 19
Low-temperature cooking .......................................................20
Using Low-temperature cooking ................................................... 20
Table for Low-temperature cooking ............................................. 20
Tips and tricks.................................................................................. 20
Grilling....................................................................................... 21
Circo-roasting ................................................................................... 21
Radiant grilling ................................................................................. 21
Dough proving.......................................................................... 23
Yeast dough ..................................................................................... 23
Yoghurt .............................................................................................. 24
Steam ........................................................................................ 24
Steam cooking ................................................................................. 24
VarioSteam - steam-assisted cooking ......................................... 24
Automatic programmes.................................................................. 26
Reheat - warming using steam ............................................... 28
Defrosting ................................................................................. 29
Defrosting with CircoTherm®........................................................ 29
Defrost ............................................................................................... 29
Preserve .................................................................................... 29
Cleaning and care .................................................................... 30
Cleaning the appliance exterior.................................................... 30
Cleaning the cooking compartment............................................. 31
Descaling .......................................................................................... 31
Self-cleaning surface....................................................................... 32
EasyClean®...................................................................................... 32
Removing and fitting the appliance door.................................... 33
Cleaning the door panels............................................................... 34
Cleaning the cooking compartment ceiling................................ 34
Cleaning the hook-in racks............................................................ 34
Cleaning the telescopic shelves ................................................... 35
Faults and repairs .................................................................... 35
Replacing the oven light bulb ....................................................... 36
Changing halogen bulbs ................................................................ 36
Changing the door seal.................................................................. 37
After-sales service ................................................................... 37
E number and FD number ............................................................. 37
Test dishes................................................................................ 38
Produktinfo
Additional information on products, accessories, replacement
parts and services can be found at www.neff-
international.com and in the online shop www.neff-
eshop.com

4
ã=Safety precautions
Read these instructions for use
carefully. Please keep the
instructions for use and installation
instructions in a safe place. If the
appliance changes owners, the
instructions should always be
included.
Before installation
Damage during transport
Check the appliance for damage after unpacking it. Do not
connect the appliance if it has been damaged in transit.
Electrical connection
Only a licensed expert may connect the appliance. You will lose
your warranty entitlement in the event of any damage caused
by incorrect connection.
Information for your safety
This appliance is intended for domestic use only. This
appliance must only be used for food preparation. Only operate
the appliance in frost-free rooms.
Adults and children must not operate the appliance without
supervision,
■ if they are physically or mentally incapable of doing so or
■ if they have insufficient knowledge or experience.
Never let children play with the appliance.
Risk of burning!
Never touch the internal surfaces of the cooking compartment
or the heating elements when they are hot. Open the appliance
door carefully. Hot steam may escape. Small children must be
kept at a safe distance from the appliance.
Risk of fire!
Never store combustible items in the cooking compartment.
Never open the appliance door if smoke can be seen in the
appliance. Switch off the appliance. Pull out the mains plug or
disconnect the fuse in the fuse box.
Risk of short circuit!
Never trap connecting cables of electrical appliances in the hot
appliance door. The cable insulation could melt.
Risk of scalding!
The water in the water tank may become very hot if you
continue to operate the appliance. Empty the water tank after
each use of the appliance with steam operation.
Risk of scalding!
Never pour water into the cooking compartment when it is hot.
This will create hot steam.
Risk of scalding!
Hot steam may escape when the appliance door is opened.
Open the appliance door carefully during or after operating the
appliance. When opening the door, do not lean over it. Ensure
that, depending on the temperature, steam is not visible.
Risk of scalding!
Hot steam is generated in the cooking compartment. Steam is
generated in particular in the area around the steam inlet (top
right in the cooking compartment). Do not reach into the
cooking compartment while using the appliance with steam
operation. You may burn yourself.
Risk of injury and risk of fire!
Only fill the water tank with water or with the descaling solution
that is recommended by us.
Do not pour any flammable liquids (e.g. alcoholic drinks) into
the water tank.
Due to hot surfaces, vapours from flammable liquids may catch
fire in the cooking compartment (explosion). The appliance
door may spring open. Hot steam and jets of flame may
escape.
Risk of burning!
Never prepare food containing large quantities of drinks with a
high alcohol content. Alcoholic vapours can catch fire in the
cooking compartment. Only use small quantities of drinks with
a high alcohol content and take care when opening the
appliance door.
Risk of burning!
Never remove hot accessories or ovenware from the cooking
compartment without oven gloves.
Risk of electric shock!
Incorrect repairs are dangerous. Repairs may only be carried
out by one of our trained aftersales engineers. If the appliance
is defective, pull out the mains plug or switch off the appliance
at the circuit breaker in the fuse box. Call the aftersales
service.
Causes of damage
Caution!
■ Do not place accessories on the cooking compartment floor.
Do not line the cooking compartment floor with foil of any
kind or greaseproof paper. Do not place ovenware on the
cooking compartment floor if a temperature of over 50 ºC is
set.This will cause heat accumulation. The baking and
roasting times will no longer be correct and the enamel will
be damaged.
■ Never pour water into the cooking compartment when it is
hot. This will create steam. The temperature change can
damage the enamel.
■ Do not store moist food in the closed cooking compartment
for long periods. This will damage the enamel.
■ When baking very moist fruit flan, do not put too much on the
baking tray. Fruit juice dripping from the baking tray leaves
stains that cannot be removed. If possible, use the deeper
universal pan.

5
■ Only leave the cooking compartment to cool with the door
closed. Even if the appliance door is only slightly open, the
fronts of adjacent units may be damaged over time.
■ If the oven seal is very dirty, the oven door will no longer
close properly when the oven is in use. The fronts of adjacent
units could be damaged. Always keep the oven seal clean.
■ Do not stand or sit on the open oven door. Do not place
cookware or accessories on the oven door.
■ Do not carry or hold the appliance by the door handle. The
door handle cannot support the weight of the appliance, and
could break.
■ Aluminium foil in the cooking compartment must not come
into contact with the door panel. This could cause permanent
discolouration of the door panel.
■ Ovenware must be heat and steam resistant. Silicone baking
tins are not suitable for combined operation with steam.
■ Do not use ovenware that shows signs of rust. Even the
smallest spots of rust can lead to corrosion in the cooking
compartment.
■ Hot water can damage the pump. Only fill the water tank with
cold water.
■ Do not allow descaling solution to come into contact with the
control panel or other sensitive surfaces. These will damage
the surfaces. If this does happen, remove the descaling
solution immediately with water.
■ Do not clean the water tank in the dishwasher. Otherwise, the
water tank will be damaged. Clean the water tank with a soft
cloth and commercially available detergent.
Energy and environment tips
Here you can find tips on how to save energy when baking and
roasting and how to dispose of your appliance properly.
Saving energy
Only preheat the oven if this is specified in the recipe or in the
operating instruction tables.
Use dark, black lacquered or enamelled baking tins. They
absorb the heat particularly well.
Open the appliance door as little as possible during cooking,
baking or roasting.
It is best to bake several cakes one after the other. The cooking
compartment is still warm. This may reduce the baking time for
the second cake.
For longer cooking times, you can switch the oven off
10 minutes before the end of the cooking time and use the
residual heat to finish cooking.
Environmentally-friendly disposal
Dispose of packaging in an environmentally-friendly manner.
Your new appliance
In this section, you will find information on
■ the control panel
■ the operating modes
■ the shelf positions
■ the NeffLight®
■ accessories
Control panel
This appliance complies with European Directive
2002/96/EC on Waste Electrical and Electronic
Equipment (WEEE). The directive gives a framework for
the collection and recycling of old appliances, which is
valid across the EU.
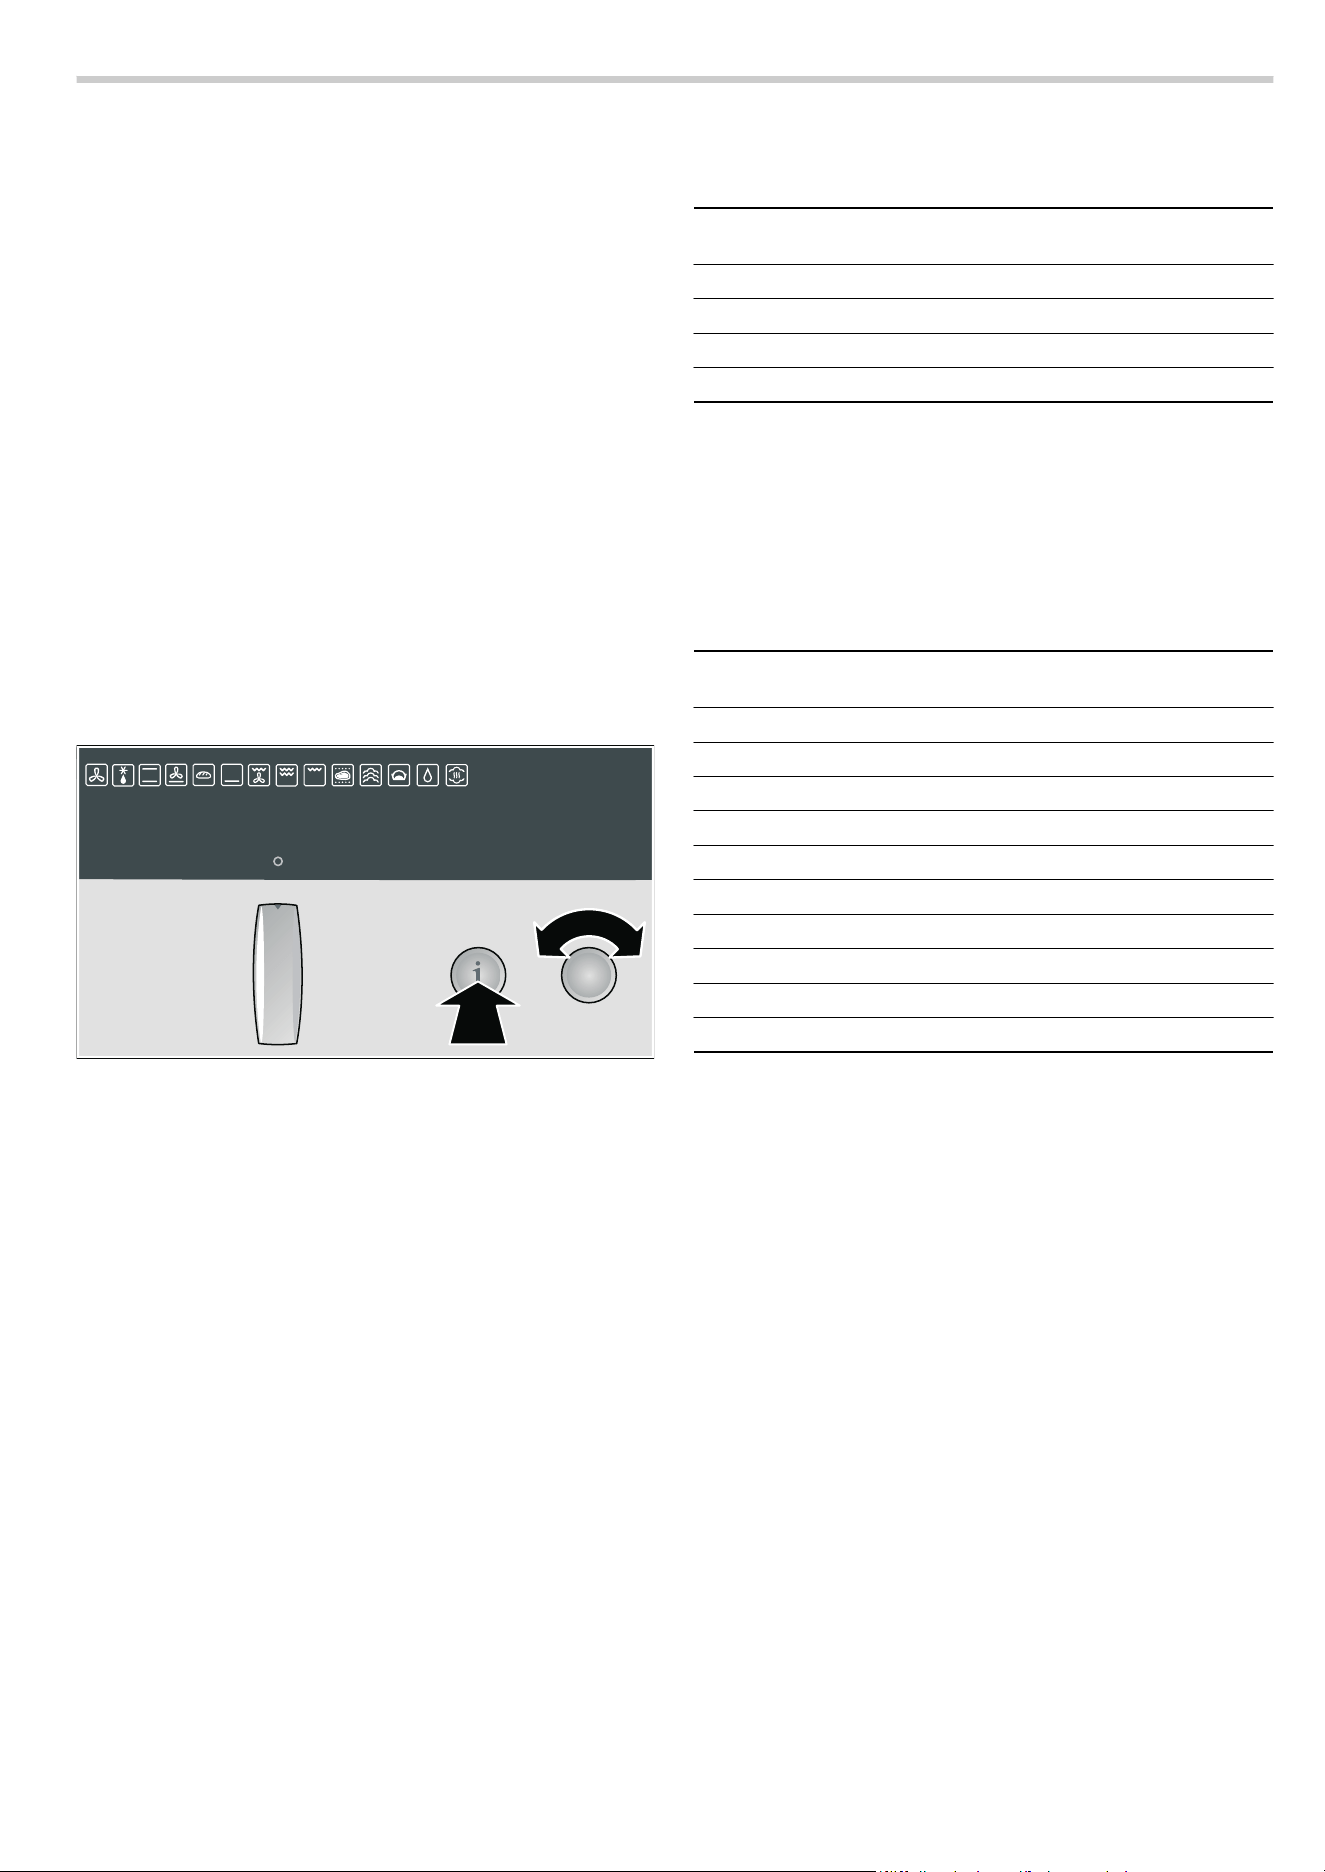
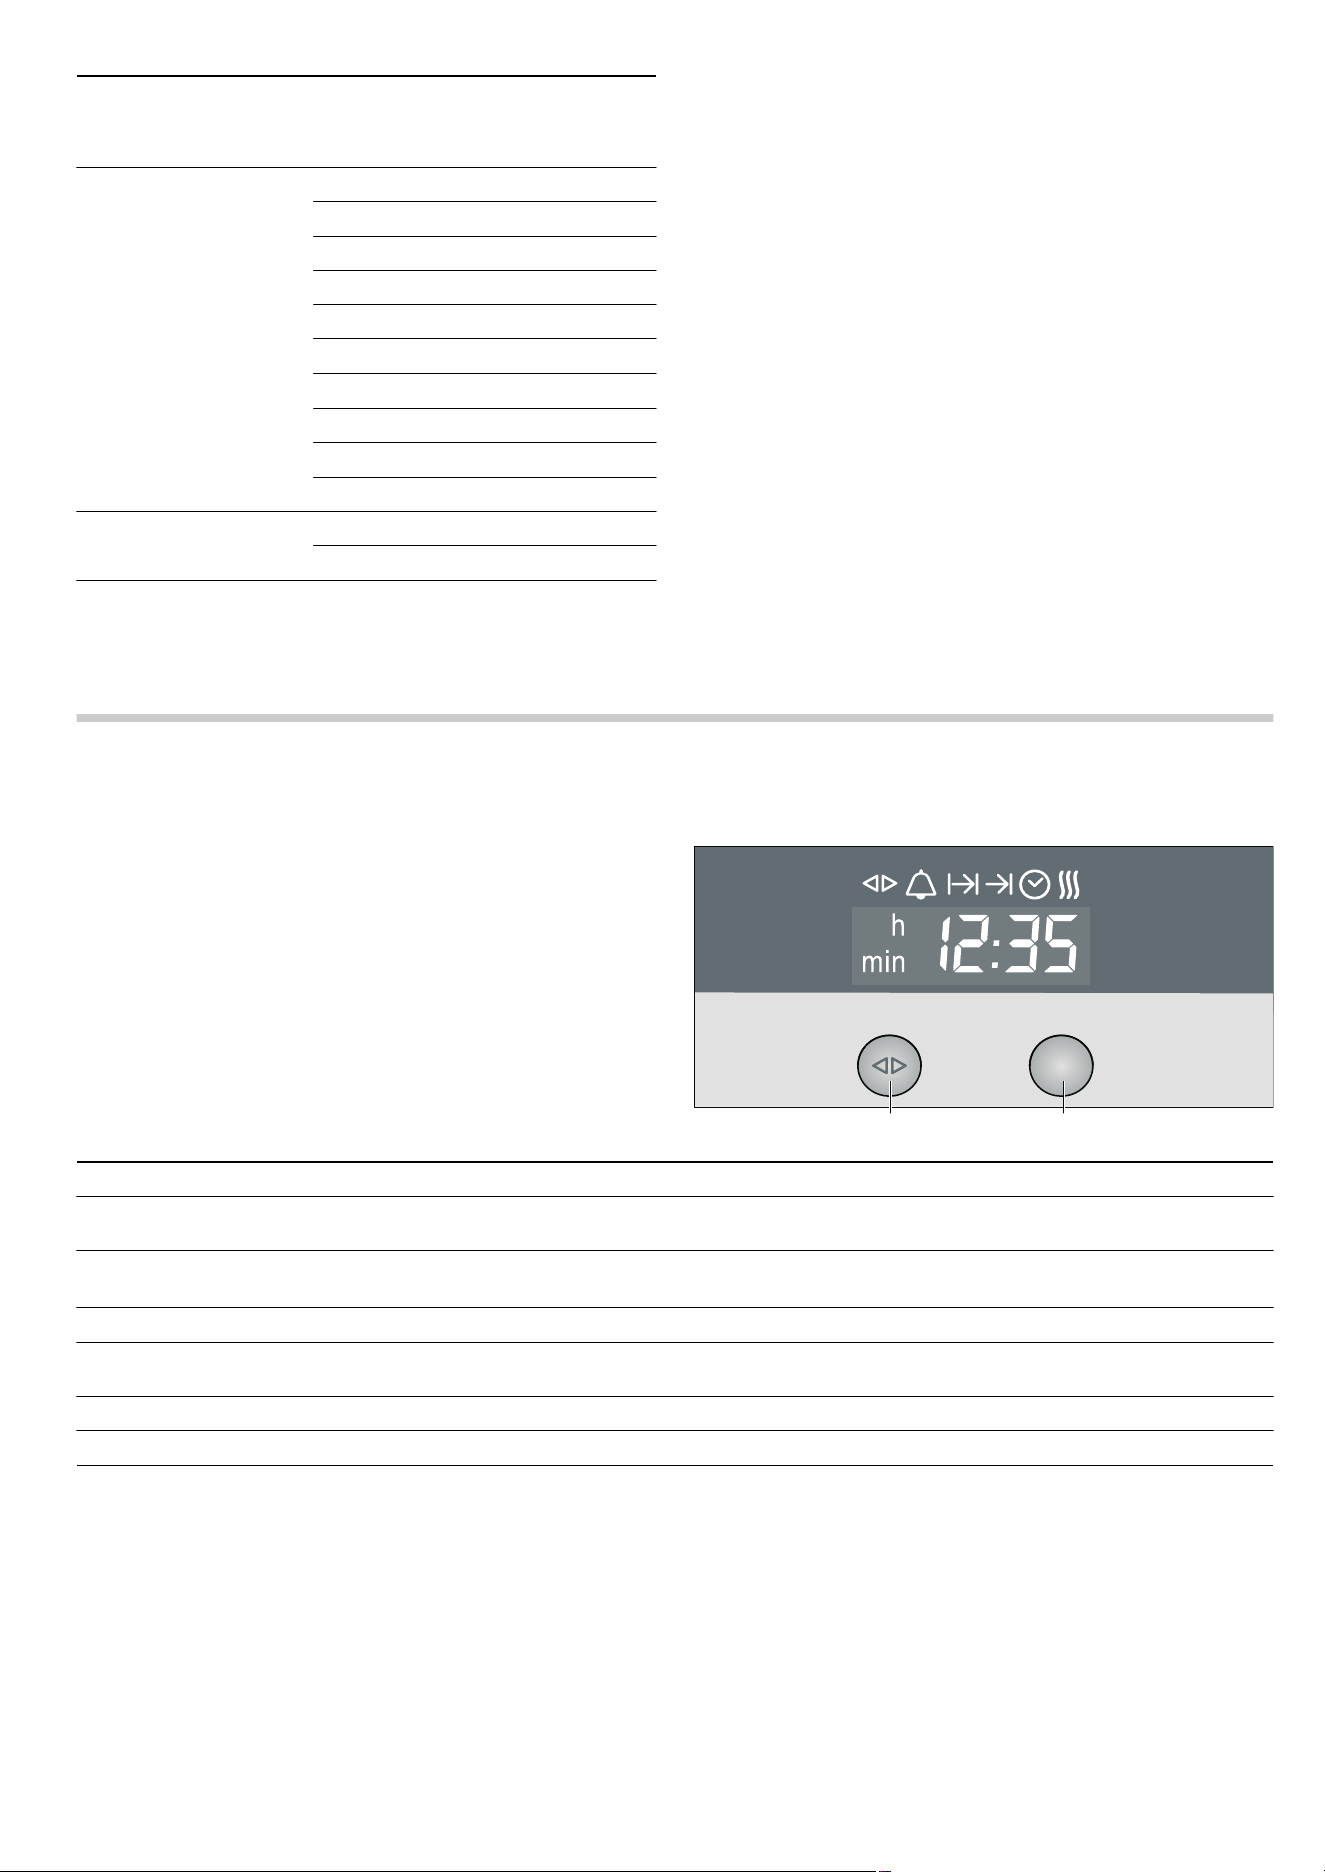
6WRS
3
6WDUW
:DWHUWDQN
2SHUDWLQJPRGHVHOHFWRU
5RWDU\VHOHFWRU ,QIREXWWRQ
7HPSHUDWXUHVHOHFWRU
%XWWRQV
(OHFWURQLFFORFN
7H[WGLVSOD\ 7HPSHUDWXUHGLVSOD\
&ORFNIXQFWLRQ
EXWWRQ

6
Pop-out operating knob
The rotary, temperature and operating mode selectors can all
be popped out. Push the required operating knob to pop it in or
out.
Operating modes
Here is an overview of the operating modes of your appliance.
Control element Use
Operating mode selector Switches the appliance on and off
Selects the required operating mode
Water tank For steam-assisted applications (see section: Filling and emptying the water tank)
Electronic clock (rapid heat up)
KJ
Clock function button Selects the required clock function or Rapid heat up
(see section: Electronic clock)
Rotary selector: Makes settings within a clock function or activates Rapid heat up (see section: Electronic
clock)
Temperature display (Basic settings)
±
Info button Press briefly: calls up additional information, e.g. displays the current temperature during
heating up
Press and hold: calls up the Basic settings menu (see section: Changing the Basic set-
tings)
Temperature selector Sets the temperature
Changes the settings in the Basic settings menu
(see section: Changing the Basic settings)
Buttons
i
Navigation button Switches between the different lines of the text display. The settings are saved as you do
so. If the
M symbol lights up in the text display, there are further selection options. Press
the
i navigation button to move to these.
X
Programme button Calls up automatic programmes with steam-assisted cooking
(see section: Steam).
Ÿ
VarioSteam button Sets the desired steam intensity
(see section: VarioSteam - steam-assisted cooking)
Í
Descaling button Descales the appliance
ƒ
Start button Starts operation
„
Stop button Short press: stops operation (pause)
Press and hold: ends operation
Operating mode Use
3
CircoTherm® For baking and roasting on one or more levels
A
Defrost For gentle defrosting of pieces of meat, bread and delicate pastries (e.g. cream gateau)
%
Top/bottom heat For baking and roasting on one level. Especially suitable for cakes with moist toppings
(e.g. cheesecake)
0
Circotherm intensive For pre-prepared frozen products and dishes which require a lot of heat from underneath
(see section: Baking)
ë
Bread-baking For baked goods which need to be baked at high temperatures
$
Bottom heat For food and baked goods which should form a crust or require more browning on the
underside. Only activate Bottom heat for a short time at the end of the baking time.
4
Circo-roasting For poultry and larger pieces of meat
+
Full-surface grill For large amounts of flat, small items for grilling (e.g. steaks, sausages)
(
Centre-area grill For small amounts of flat, small items for grilling (e.g. steaks, bread)

7
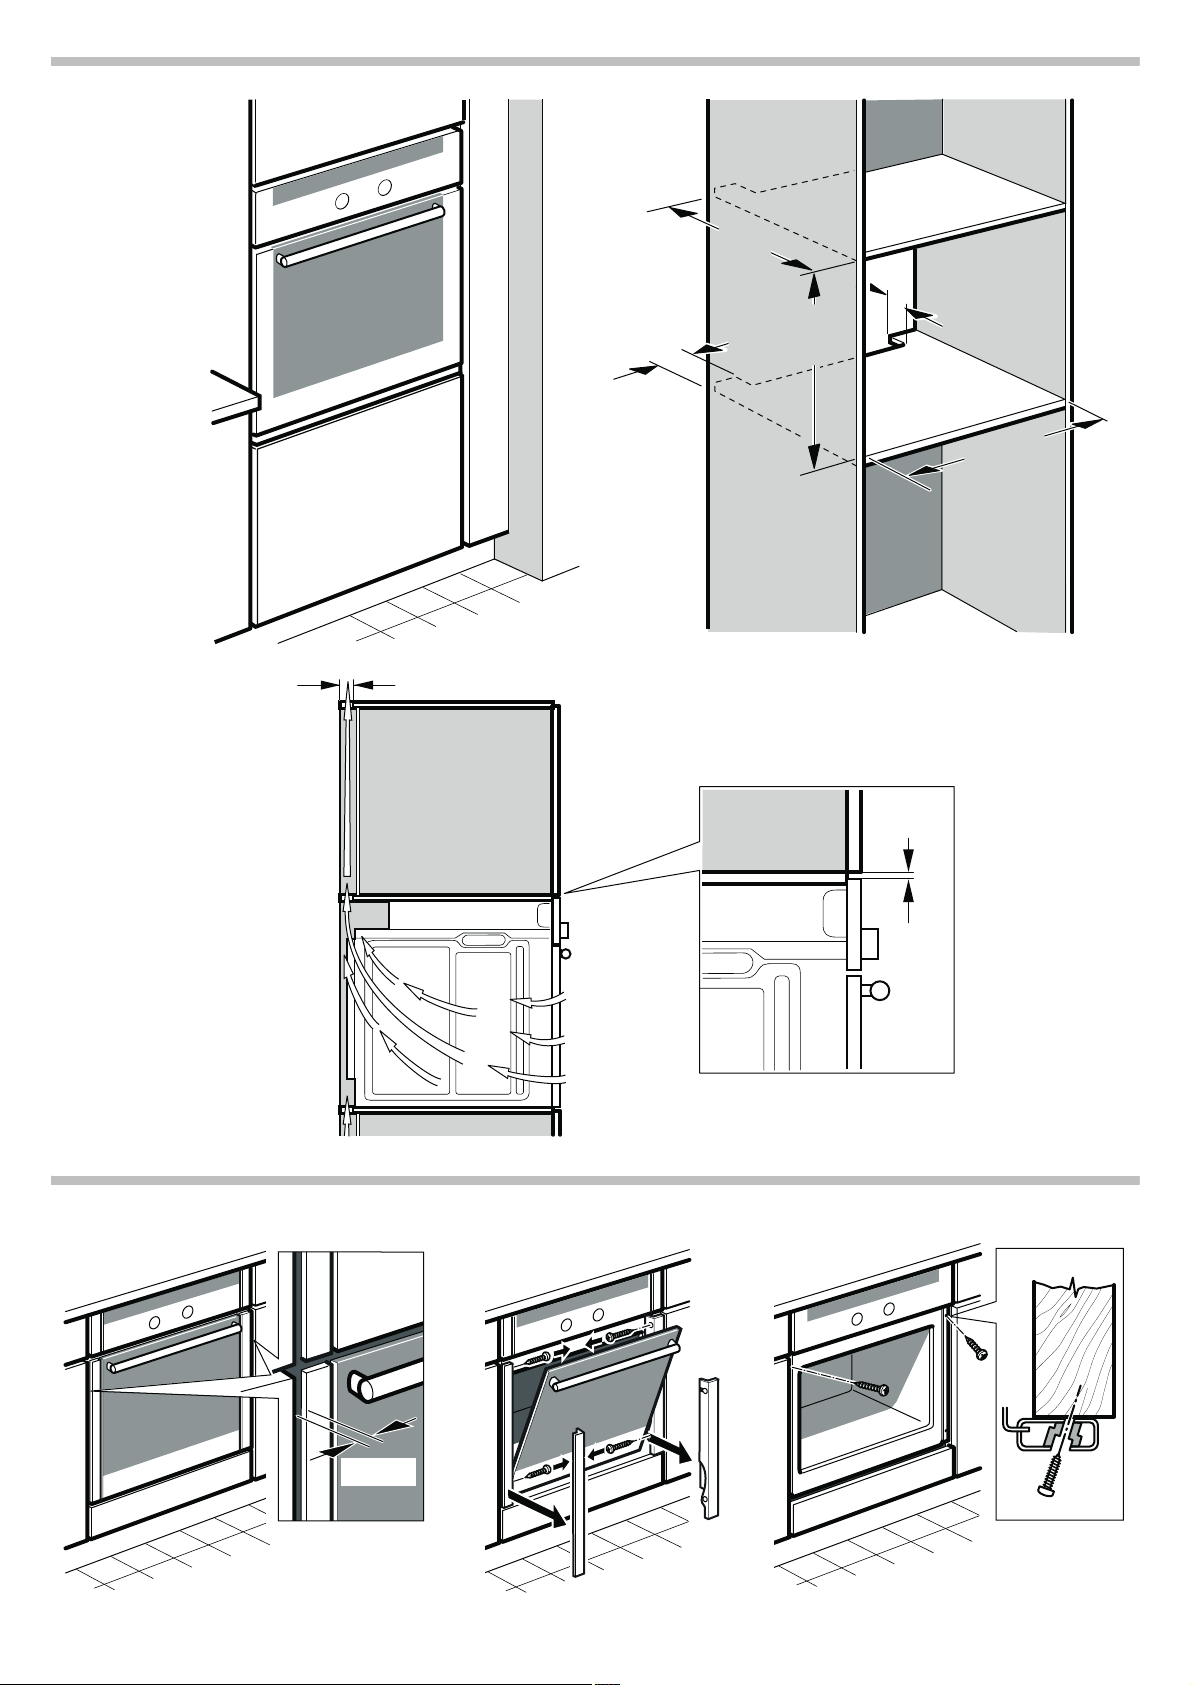
Shelf positions
The cooking compartment has four shelf heights. The shelf
positions are counted from the bottom up.
ã=Risk of burns!
The telescopic shelves become hot when the appliance is in
use. Take special care not to get burnt when they are pulled
out.
The individual shelf units can be inserted into your preferred
shelf positions. This simple insertion system allows flexible and
quick handling when changing shelves.
Note: Do not use shelf height 2 when baking and roasting
with CircoTherm®. This will adversely affect air circulation and
your baking and roasting results will not be as good.
NeffLight®
Your appliance is equipped with a NeffLight®. The NeffLight®
consists of two halogen bulbs and a system of mirrors which
help to brightly illuminate the cooking compartment.
Door contact switch
The NeffLight® switches off when the appliance door is opened
and on when the door is closed.
Saving energy
You can switch off the NeffLight® in order to save energy. To
do this, you must move the door contact switch. This is located
in the gap in between the appliance door and the bottom right
of the kitchen unit.
To switch off the NeffLight®:
Slide the door contact switch to the right.
To switch on the NeffLight®:
Slide the door contact switch to the left.
Accessories
The following accessories are supplied with your appliance:
You can obtain further accessories from specialist retailers:
Note: The baking tray or universal pan may become distorted
during use. This is caused by the considerable temperature
differences acting on the accessories. This may happen when
only a part of the accessory is covered with food or when
frozen items such as pizza have been placed on the accessory.
/
Low-temperature cooking For tender pieces of meat, that are to be cooked medium/medium-rare or à point
é
Steam cooking For gentle preparation of vegetables, meat and fish
ê
Dough proving For preparing yeast dough and yoghurt
>
Oven cleaning Makes cleaning the cooking compartment easier
ä
Reheat For plated meals and baked items
Cooked food is gently reheated using steam. The food does not dry out.
Operating mode Use
Baking sheet, enamelled
for baking tray bakes and small
pastries
Flat wire rack
for roasting in a roasting dish and
for grilling
Enamelled universal pan
for baking moist cakes, roasting,
grilling and collecting dripping
liquids
Stepped wire rack with cut-out
for baking in baking dishes,
roasting in roasting dishes and
grilling
Accessories Order no.
Mega system steamer N8642X0
System steamer N8642X0EU
Universal pan, enamelled Z1232X0
Universal pan, non-stick Z1233X0
Universal pan with wire rack Z1242X0
Glass pan Z1262X0
Roasting pan, enamelled Z1272X0
Baking tray, aluminium Z1332X0
Baking tray, enamelled Z1342X0
Baking tray, non-stick Z1343X0
Pizza tray Z1352X0
Wire rack, stepped with cut-out Z1432X0
Wire rack, flat Z1442X0
Roasting tray, enamelled, two-piece Z1512X0
VarioCLOU® telescopic shelf with full exten-
sion
Z1785X2
Bread-baking stone Z1912X0
Universal roasting dish, enamelled Z9930X0
8
Before using the appliance for the first time
Once your new appliance has been connected, "Select
language" appears in the text display. Before you can use the
appliance, you must make some settings:
■ Set the language
■ Set the water hardness
■ Calibrate the altitude
■ Set the time of day
■ Clean the appliance before using it for the first time.
Note: You can correct these settings at any time. To change
the language, water hardness and altitude calibration,
see section: Changing basic settings; to change the time, see
section: Electronic clock.
Setting the language
"Select language English" is preset. If necessary, set another
language for the text display.
1.Turn the temperature selector until the language you require
appears on the text display.
2.Press and hold the ± info button for 3 seconds.
Your setting is saved. "Water hardness 3 - hard" appears in
the text display.
Setting the water hardness
Caution!
The appliance may become damaged due to the use of
unsuitable liquids.
Do not use distilled water, highly chlorinated tap water
(> 40 mg/l) or other liquids.
Only use cold, fresh tap water, softened water or uncarbonated
mineral water.
"Water hardness 3 - hard" is preset. Change this setting if your
water is softer.
You can use the test strip supplied to determine the water
hardness, or you can ask your water supplier.
Notes
■ If your water is very hard, we recommend that you use
softened water.
■ If you use only softened water, you can set your appliance to
"Water hardness (softened)".
■ If you use mineral water, set the hardness to "Water hardness
3 - hard".
■ If you use mineral water, you must only use non-carbonated
mineral water (see section "Filling and emptying the water
tank").
1.Use the temperature selector to set the water hardness.
2.Press and hold the ± info button for 3 seconds.
Your setting is saved. "Altitude calibration 0 - 300 m" is
shown in the text display.
Altitude calibration
The altitude range is preset to "0 - 300m". Change this setting if
the location of your appliance is at a higher or lower altitude.
1.Use the temperature selector to set the altitude range.
2.Press and hold the ± info button for 3 seconds.
Your setting is saved.
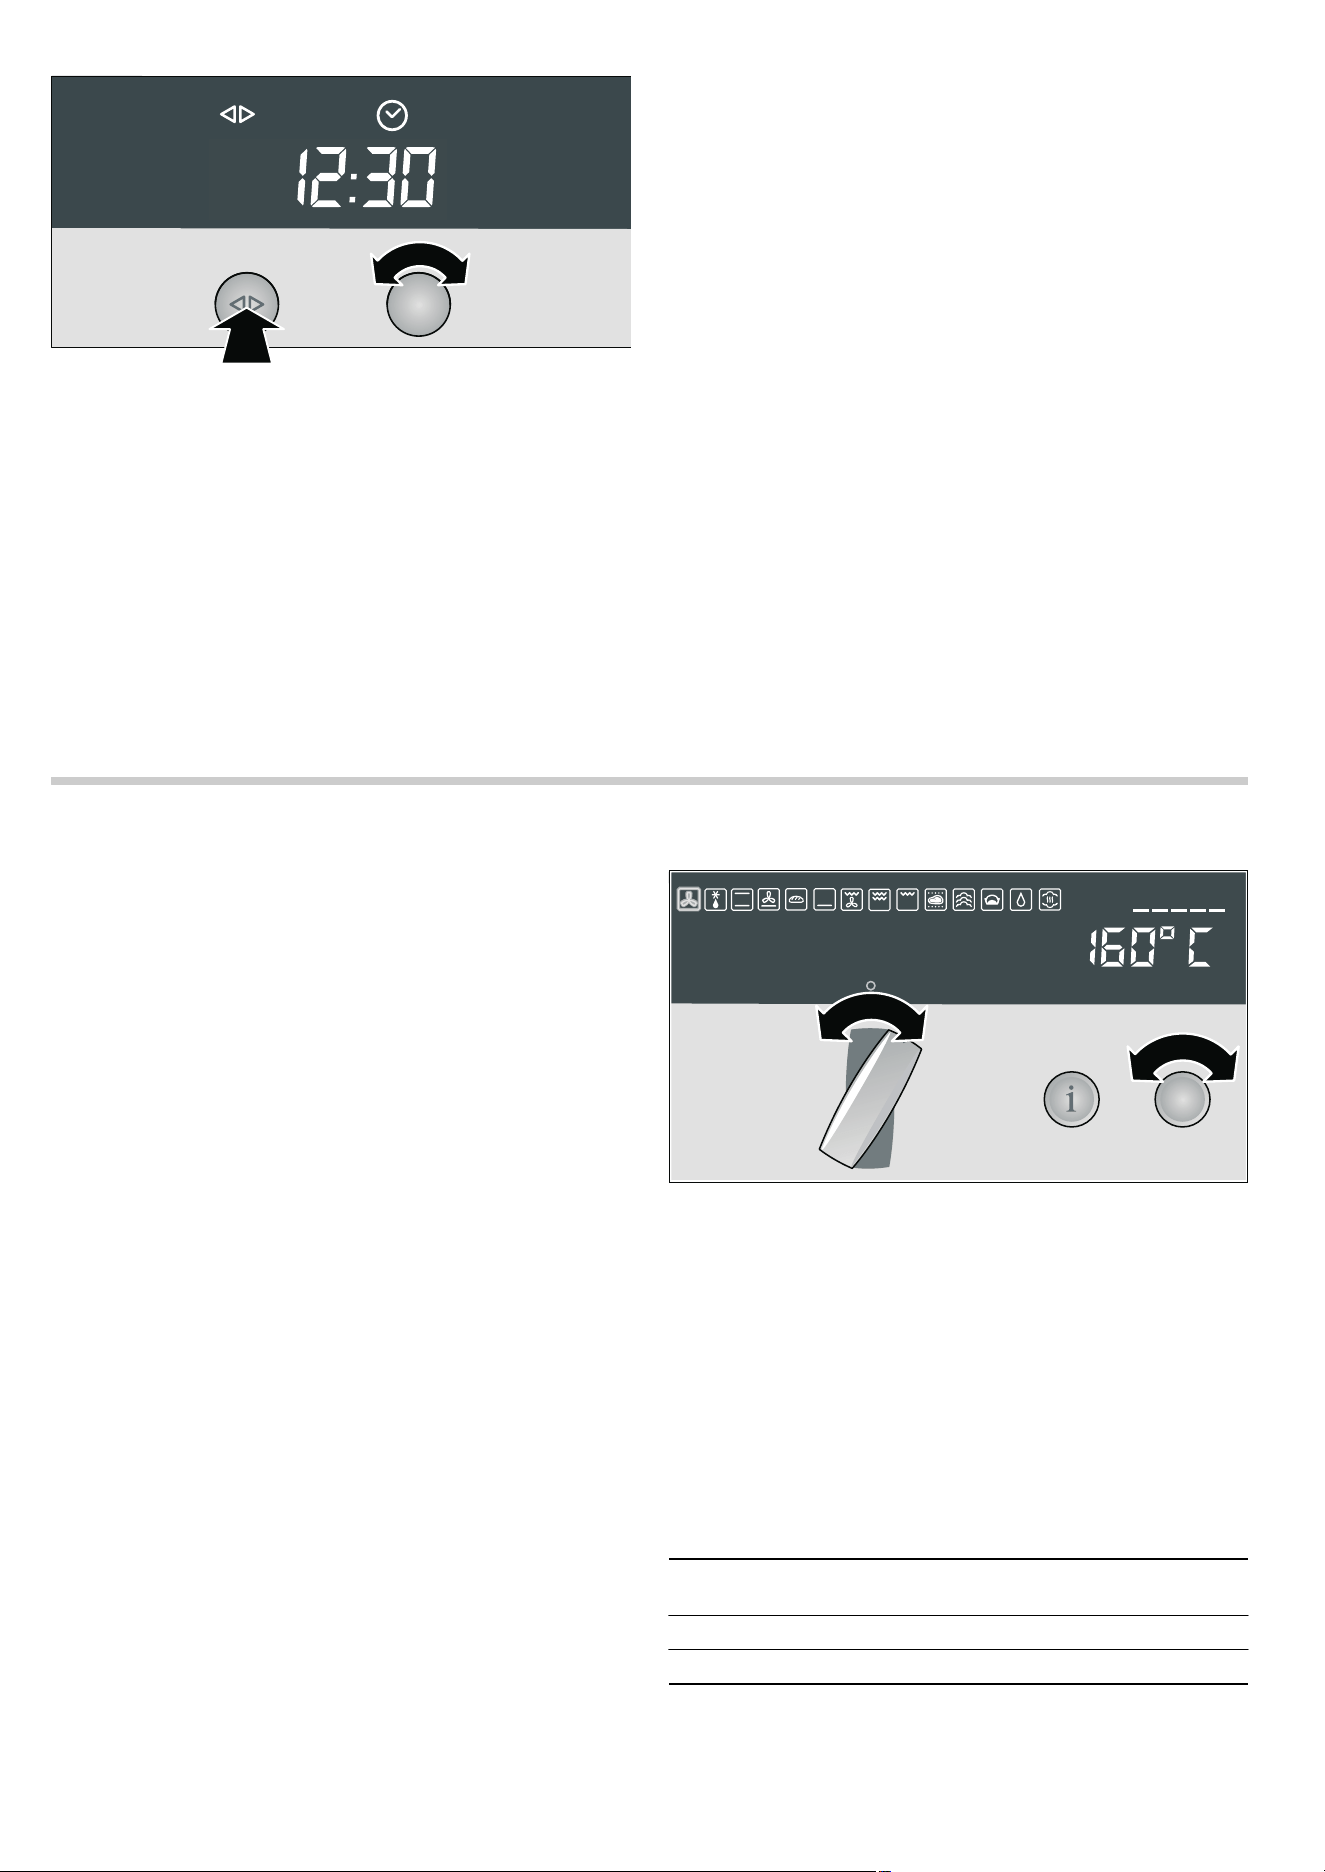
Setting the clock
Note: When you press the KJ clock function button, you have
3 seconds to set the clock using the rotary selector. Should this
have been insufficient for you, you can amend the clock time
later.
‹:‹‹ flashes in the clock display.
1.Briefly press the KJ clock function button to go to the
setting mode.
The
KJ and 3 symbols light up. ‚ƒ:‹‹ appears in the
clock display.
2.Set the current time using the rotary selector.
Your setting is accepted after 3 seconds.
Changing the clock
To subsequently change the time, press the
KJclock function
button repeatedly until the
KJ and 3 symbols light up again.
Change the time with the rotary selector.
6HOHFWODQJXDJH
(QJOLVK
Water hardness Setting symbol (temperature
display)
softened
™†‹
1 soft
™†‚
2 medium
™†ƒ
3 hard
™†„
Altitude range Setting symbol (temperature
display)
below 0 m
™‡‹
0 - 300m
™‡‚
300 - 600m
™‡ƒ
600 - 900m
™‡„
900 - 1200m
™‡…
1200 - 1500m
™‡†
1500 - 1800m
™‡‡
1800 - 2100m
™‡ˆ
2100 - 2400m
™‡‰
above 2400m
™‡Š
9
Cleaning the appliance
Clean your appliance before using it for the first time.
1. Remove the accessories from the cooking compartment.
2. Completely remove any residual packaging (e.g. chips of
polystyrene) from the cooking compartment.
3. Clean the accessories and cooking compartment with hot
soapy water (see section: Cleaning and care).
4. Fill the water tank with 400 ml water (see section: Filling and
emptying the water tank).
5. Slide in the water tank all the way.
6. Switch on the appliance. To do this, press the operating
mode selector so that it pops out (see section: Operating the
appliance).
The appliance is then ready for use.
7. Use the operating mode selector to set % Top/bottom heat.
8. Use the temperature selector to set the temperature to
240 °C.
9. Press the Ÿ VarioSteam button repeatedly until "High steam
intensity" appears in the text display (see section:
VarioSteam - steam-assisted cooking).
10.Press the ƒ Start button.
11.Switch off the appliance if the water tank is empty. To do
this, turn the operating mode selector to the
Û off position
and push it in.
The remaining water will be pumped out of the evaporator
system.
12.Emptying the water tank (see section: Filling and emptying
the water tank)
13.Afterwards, wipe the cooled cooking compartment with hot,
soapy water.
Note: Remove limescale marks with a cloth soaked in
vinegar, then wipe over with clean water and rub dry with a
soft cloth.
14.Clean the outside of the appliance with a soft, damp cloth
and soapy water.
Operating the appliance
In this section, you can read about
■ how to switch your appliance on and off
■ how to select an operating mode and temperature
■ how to fill and empty the water tank
■ when your appliance switches off automatically
Switching on the appliance
Press the operating mode selector to make it pop out.
This switches on the appliance, and it is now ready for use.
"Appliance is ready for use" and "Oven light" appear in the text
display.
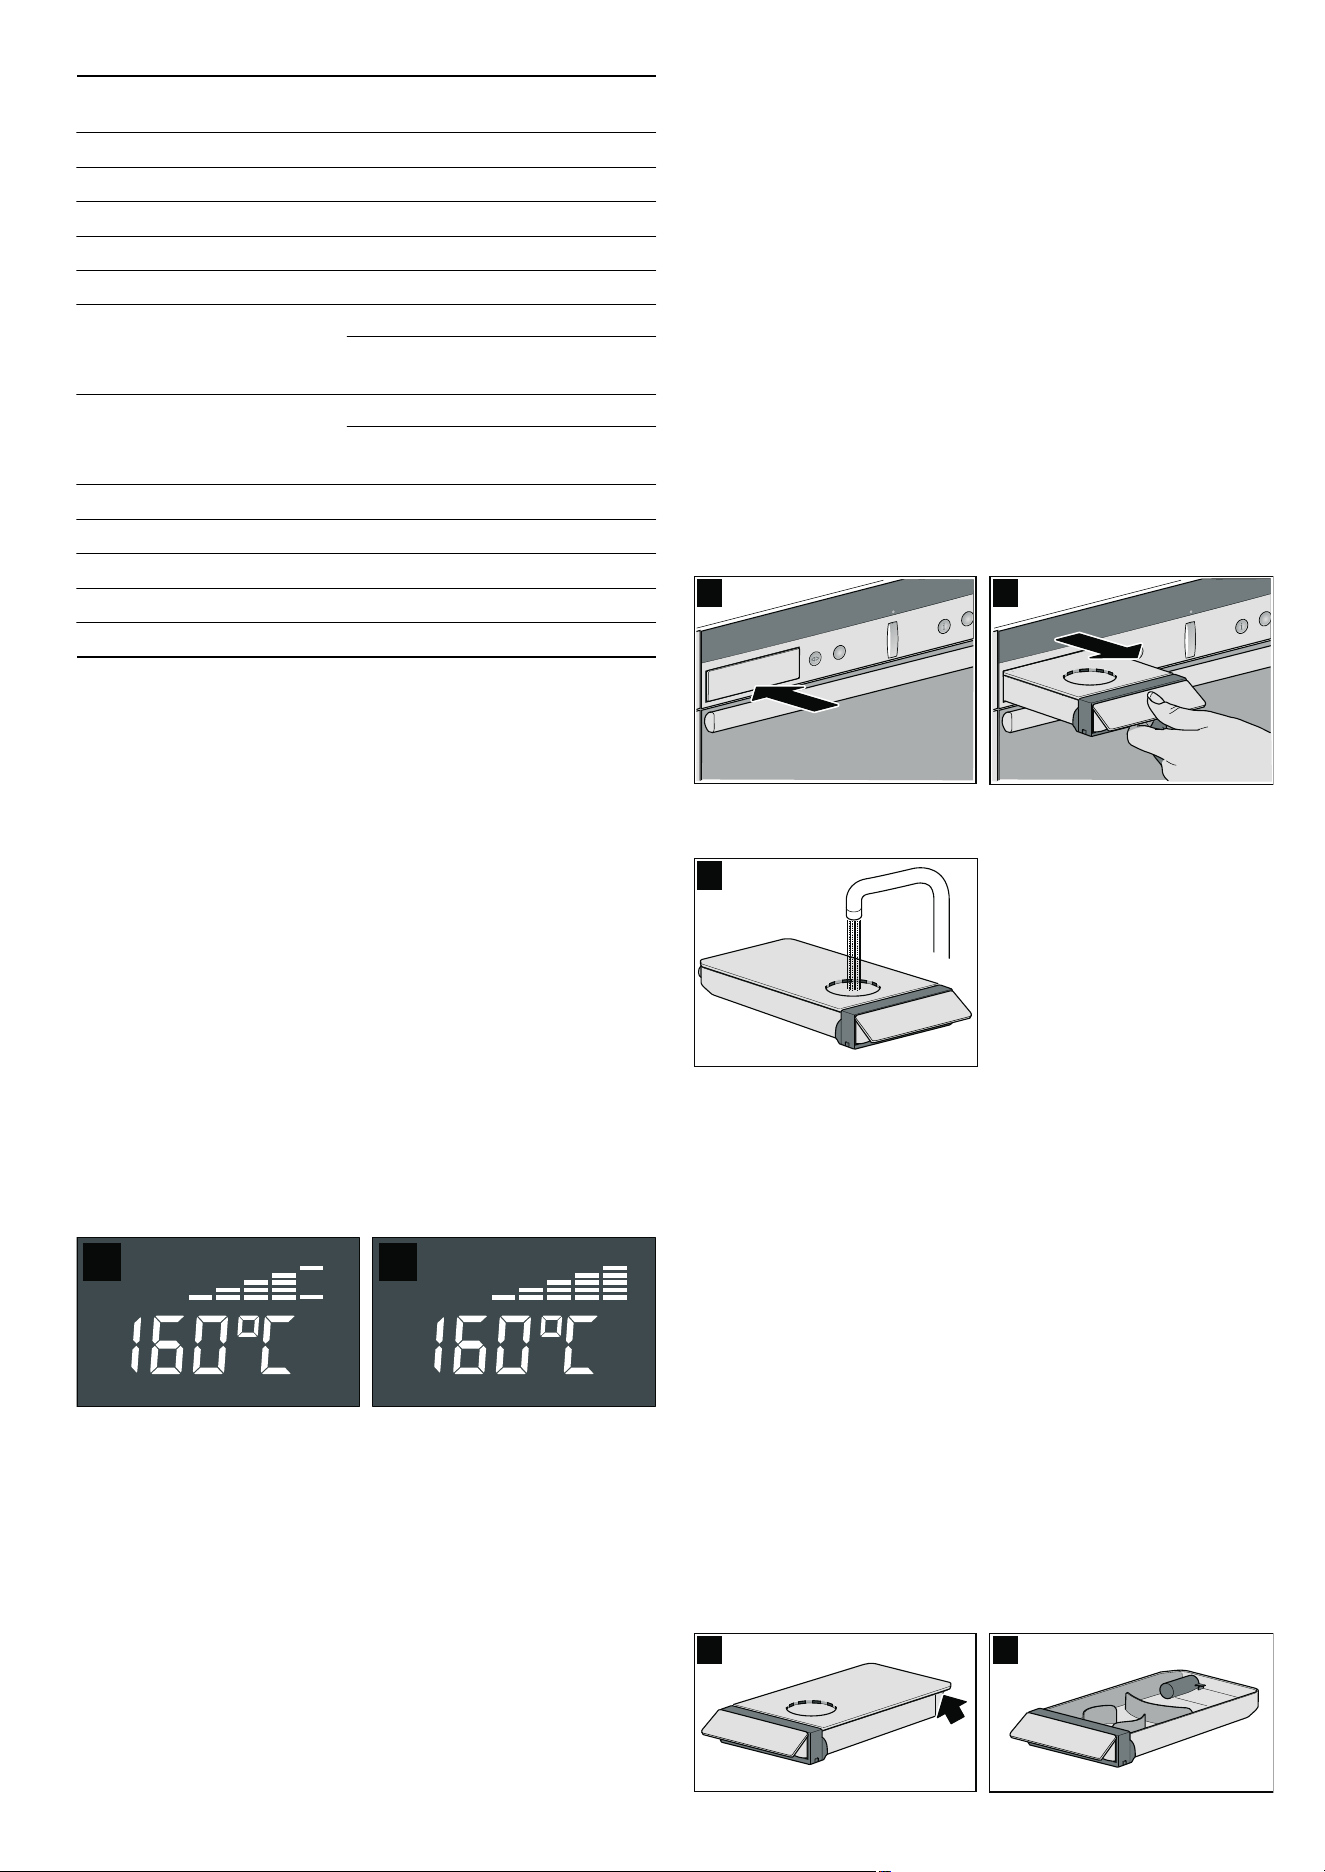
Selects the operating mode and temperature
ã=Risk of scalding!
The water in the water tank may become very hot if you
continue to operate the appliance. Empty the water tank after
each steam-assisted application.
Notes
■ The / Low-temperature cooking, é Steam cooking, ê
Dough proving and
> EasyClean® operating modes can
only be started once the appliance has cooled down. There
must be no residual heat shown in the temperature display
(neither
• nor œ).
■ For cooking with steam, you must fill the water tank (see
section: Filling and emptying the water tank).
1. Switch on the appliance.
2. Turn the operating mode selector until the desired operating
mode appears on the text display.
3. Turn the temperature selector to change the default
temperature.
Note: If no default temperature is displayed, the temperature
of your selected operating mode is set permanently. You
cannot change this temperature.
4. Press the ƒ Start button.
Notes
■ Depending on the operating mode that you have selected,
you will hear a pumping noise after the operation has started.
The appliance is checking whether the pumps are working
correctly.
■ If you cannot start a steam-assisted application, check
whether the water tank has been filled and fully inserted.
Operating mode Default temper-
ature in °C
Temperature
range in °C
3 CircoTherm®*
160 40 - 200
A Defrost
Fixed setting
A A A
* You can activate steam for this operating mode
** Turn the temperature selector beyond 275 °C.
‚Ÿ£ appears
in the temperature display
&LUFR7KHUP
10
Changing the operating mode
1.Turn the operating mode selector until the desired operating
mode is selected.
2.Turn the temperature selector to change the temperature.
3.Press the ƒ Start button.
Current temperature
Press the
± info button. The current temperature appears for
3seconds.
Note: The current temperature can only be displayed with
operating modes with a default temperature.
Heating indicator
The heating indicator displays the rising temperature in the
cooking compartment.
■ Temperature reached (figure A)
■ Appliance reheating (figure B)
Filling and emptying the water tank
ã=Risk of injury and risk of fire!
Only fill the water tank with water or with the descaling solution
that is recommended by us.
Do not pour any flammable liquids (e.g. alcoholic drinks) into
the water tank.
Due to hot surfaces, vapours from flammable liquids may catch
fire in the cooking compartment (explosion). The appliance
door may spring open. Hot steam and jets of flame may
escape.
Caution!
The appliance may become damaged due to the use of
unsuitable liquids.
Do not use distilled water, highly chlorinated tap water
(> 40 mg/l) or other liquids.
Only use cold, fresh tap water, softened water or uncarbonated
mineral water.
Notes
■ If you use mineral water, set the water hardness to hard.
■ For hygiene reasons, a reminder message will appear after
the appliance is switched off if the water tank has not been
emptied. The reminder message goes out once the water
tank is empty.
Filling the water tank
Fill the water tank before each use with steam assistance.
1.Press lightly on the centre of the lower edge of the water tank
(picture A).
2.Pull out the water tank (picture B).
3.Fill the water tank with cold water up to the "max" mark
(picture C).
4.Slide in the water tank all the way.
Refilling the water tank
If the water tank is empty, a signal sounds. "Fill water tank and
slide in fully" appears in the display. Steam-assisted operation
is interrupted.
1.Pull out the water tank.
2.Fill the water tank up to the "max" mark and slide it in fully.
The steam-assisted operation continues.
Emptying the water tank
Empty the water tank after each steam-assisted use of the
appliance.
1.Turn the operating mode selector back to the Û off position
and push it in.
"Pumping-out" appears in the text display and
˜ž© (pumping
out) appears in the temperature display. The remaining water
in the evaporator system is pumped back into the water tank.
After the pumping, "Pumping-out finished" appears.
2.Pull out the water tank slowly and level.
3.Remove the cover (Picture A).
4.Empty the water tank (Picture B).
% Top/bottom heat*
170 50 - 275
0 Circotherm intensive*
220 50 - 275
ë Bread-baking*
200 180 - 220
$ Bottom heat
200 50 - 225
4 Circo-roasting*
170 50 - 250
+ Full-surface grill
+ Full-surface grill (inten-
sive)**
220 50 - 275
Fixed setting
( Centre-area grill
( Centre-area grill (inten-
sive)**
180 50 - 275
Fixed setting
/ Low-temperature cooking
Fixed setting
ü ü ü
é
Steam cooking
Fixed setting
¨©¨
ê
Dough proving
Fixed setting
A ƒ A
>
EasyClean®
Fixed setting
“’†
ä
Reheat
120 80 - 180
Operating mode Default temper-
ature in °C
Temperature
range in °C
* You can activate steam for this operating mode
** Turn the temperature selector beyond 275 °C.
‚Ÿ£ appears
in the temperature display
$ %
$ %
&
$ %

11
5. Thoroughly dry the water tank recess and the water tank.
6. Slide in the water tank.
Switching off the appliance
ã=Risk of scalding!
When you open the appliance door, hot steam can escape.
Open the appliance door carefully after cooking.
Note: The appliance has a cooling fan. After the appliance is
switched off, the cooling fan may continue to run.
1. Turn the operating mode selector back to the Û off position
2. Press the operating mode selector in so that it stays in.
The appliance switches off.
Note: If the appliance is switched off after a steam-assisted
operation, you will hear a pumping sound. The appliance is
pumping the remaining water out of the evaporator system
back into the water tank. "Pumping-out" appears in the text
display. Only empty the water tank once "Pumping-out finished"
is displayed.
You can see in the temperature display whether there is high or
low residual heat in the cooking compartment.
Turning off the operation
Press and hold the
„ Stop button. The appliance turns off the
current operation. The appliance is not switched off. You can
now start a different operating mode.
Interrupting and continuing an operation (Pause)
Briefly press the
„ Stop button. The appliance interrupts the
current operation. Press the
ƒ Start button to continue the
paused operation.
After each steam-assisted use
1. Switch off the appliance.
The remaining water is pumped out of the evaporator system
and back into the water tank. "Pumping-out" appears in the
text display.
2. Only empty the water tank once "Pumping-out finished" has
been displayed.
3. Empty and wash the water tank, and leave it to dry with the lid
open.
4. Wipe the cooled cooking compartment down with a soft
cloth.
5. Remove any dirt from the cooking compartment.
Note: Remove limescale marks with a cloth soaked in
vinegar, then wipe with clean water and rub dry with a soft
cloth.
Automatic safety cut-out
The automatic safety cut-out is only activated if you have not
made any settings on your appliance for a prolonged period.
You can adjust the period of time after which your appliance
shuts off.
"Safety cut-out" appears in the text display and
‹‹‹ flashes in
the temperature display. Appliance operation is interrupted.
Turn the operating mode selector to the
Û position to
deactivate it.
Changing the basic settings
Your appliance has various basic settings, which are preset at
the factory. You can change these basic settings as required.
1. Switch on the appliance.
2. Press and hold the ± info button for 3 seconds to go to the
basic settings menu.
The text display shows "Select language: English". If the
appliance controls are locked, you must unlock them first.
3. Press the ± info button repeatedly until the current basic
setting for the relevant submenu is displayed on the text
display (e.g. "Audible signal off").
4. Using the temperature selector, set the required basic setting
within a submenu (e.g. "Audible signal 2 minutes").
5. Press and hold the ± info button for 3 seconds.
Your basic setting is saved.
Note: If nothing is entered after 15 seconds, the Basic settings
menu is automatically closed. "Appliance is ready for use"
appears in the text display.
You can change the following basic settings:
Temperature
display
Text display Meaning
•
Residual heat
high
Residual heat high
(above 120 °C)
œ
Residual heat
low
Residual heat low
(between 60 °C and 120 °C)
Basic settings menu
Submenu Basic setting Setting
symbol
Language Select language
Childproof lock Appliance unlocked
™‚‹
Appliance locked
™‚‚
Appliance perma-
nently locked
™ƒ‚
Audible signal Audible signal off
™„‹
Audible signal
30 seconds
™„‚
Audible signal
2 minutes
™„ƒ
Audible signal
10 minutes
™„„
Adjust individually*
AÙÙÙØÙÙÙ@ ™…...
Water hardness softened
™†‹
1-soft
™†‚
2-medium
™†ƒ
3-hard
™†„
12
Electronic clock
In this section, you can read about
■ how to set the timer
■ how to switch off your appliance automatically
■ how to switch your appliance on and off automatically
(preset operation)
■ how to set the time
■ find out how to activate rapid heat up
Clock display
Notes
■ When you set a clock function, the time interval increases
when you set higher values (e.g. cooking time up to
‚:‹‹œ to
the minute, using
‚:‹‹œ
to the nearest 5 minutes).
■ For the Q minute minder, x cooking time, y end of
operation and preselection mode clock functions, a signal
sounds when the settings have elapsed and the
Q or y
symbol flashes. To cancel the audible signal before it ends,
press the
KJ clock function button.
■ Briefly press the KJ clock function button to select a clock
function. You then have 3 seconds to set the selected clock
function. After this time, the setting mode is exited
automatically.
Switching the clock display on and off
1.Press and hold the KJclock function button for 6 seconds.
The clock display switches off. If a clock function is active,
the associated symbol remains lit.
2.Press the KJclock function button briefly.
The clock display switches on.
Altitude calibration below 0 m
™‡‹
0 - 300 m
™‡‚
300 - 600 m
™‡ƒ
600 - 900 m
™‡„
900 - 1200 m
™‡…
1200 - 1500 m
™‡†
1500 - 1800 m
™‡‡
1800 - 2100 m
™‡ˆ
2100 - 2400 m
™‡‰
above 2400 m
™‡Š
Restore factory settings Do not restore
™ˆ‹
Restore
™ˆ‚
* You can use this basic setting to adjust the browning level for
all automatic programmes (see section: Automatic pro-
grammes).
Basic settings menu
Submenu Basic setting Setting
symbol
&ORFNIXQFWLRQEXWWRQ 5RWDU\VHOHFWRU
Clock function Use
Q
Timer You can use the minute minder as an egg timer or a kitchen timer. The appliance does
not switch on or off automatically
x
Cooking time The appliances switches off automatically after a cooking time setting has elapsed
(e.g.
‚:„‹ hours)
y
End of operation
The appliance switches off automatically at a set time (e.g.
‚ƒ:„‹ )
Preset operation The appliance switches on and off automatically. Cooking time and end of operation
have been combined.
3
Clock Setting the clock
f
Rapid heat up Shortens the heat up time
13
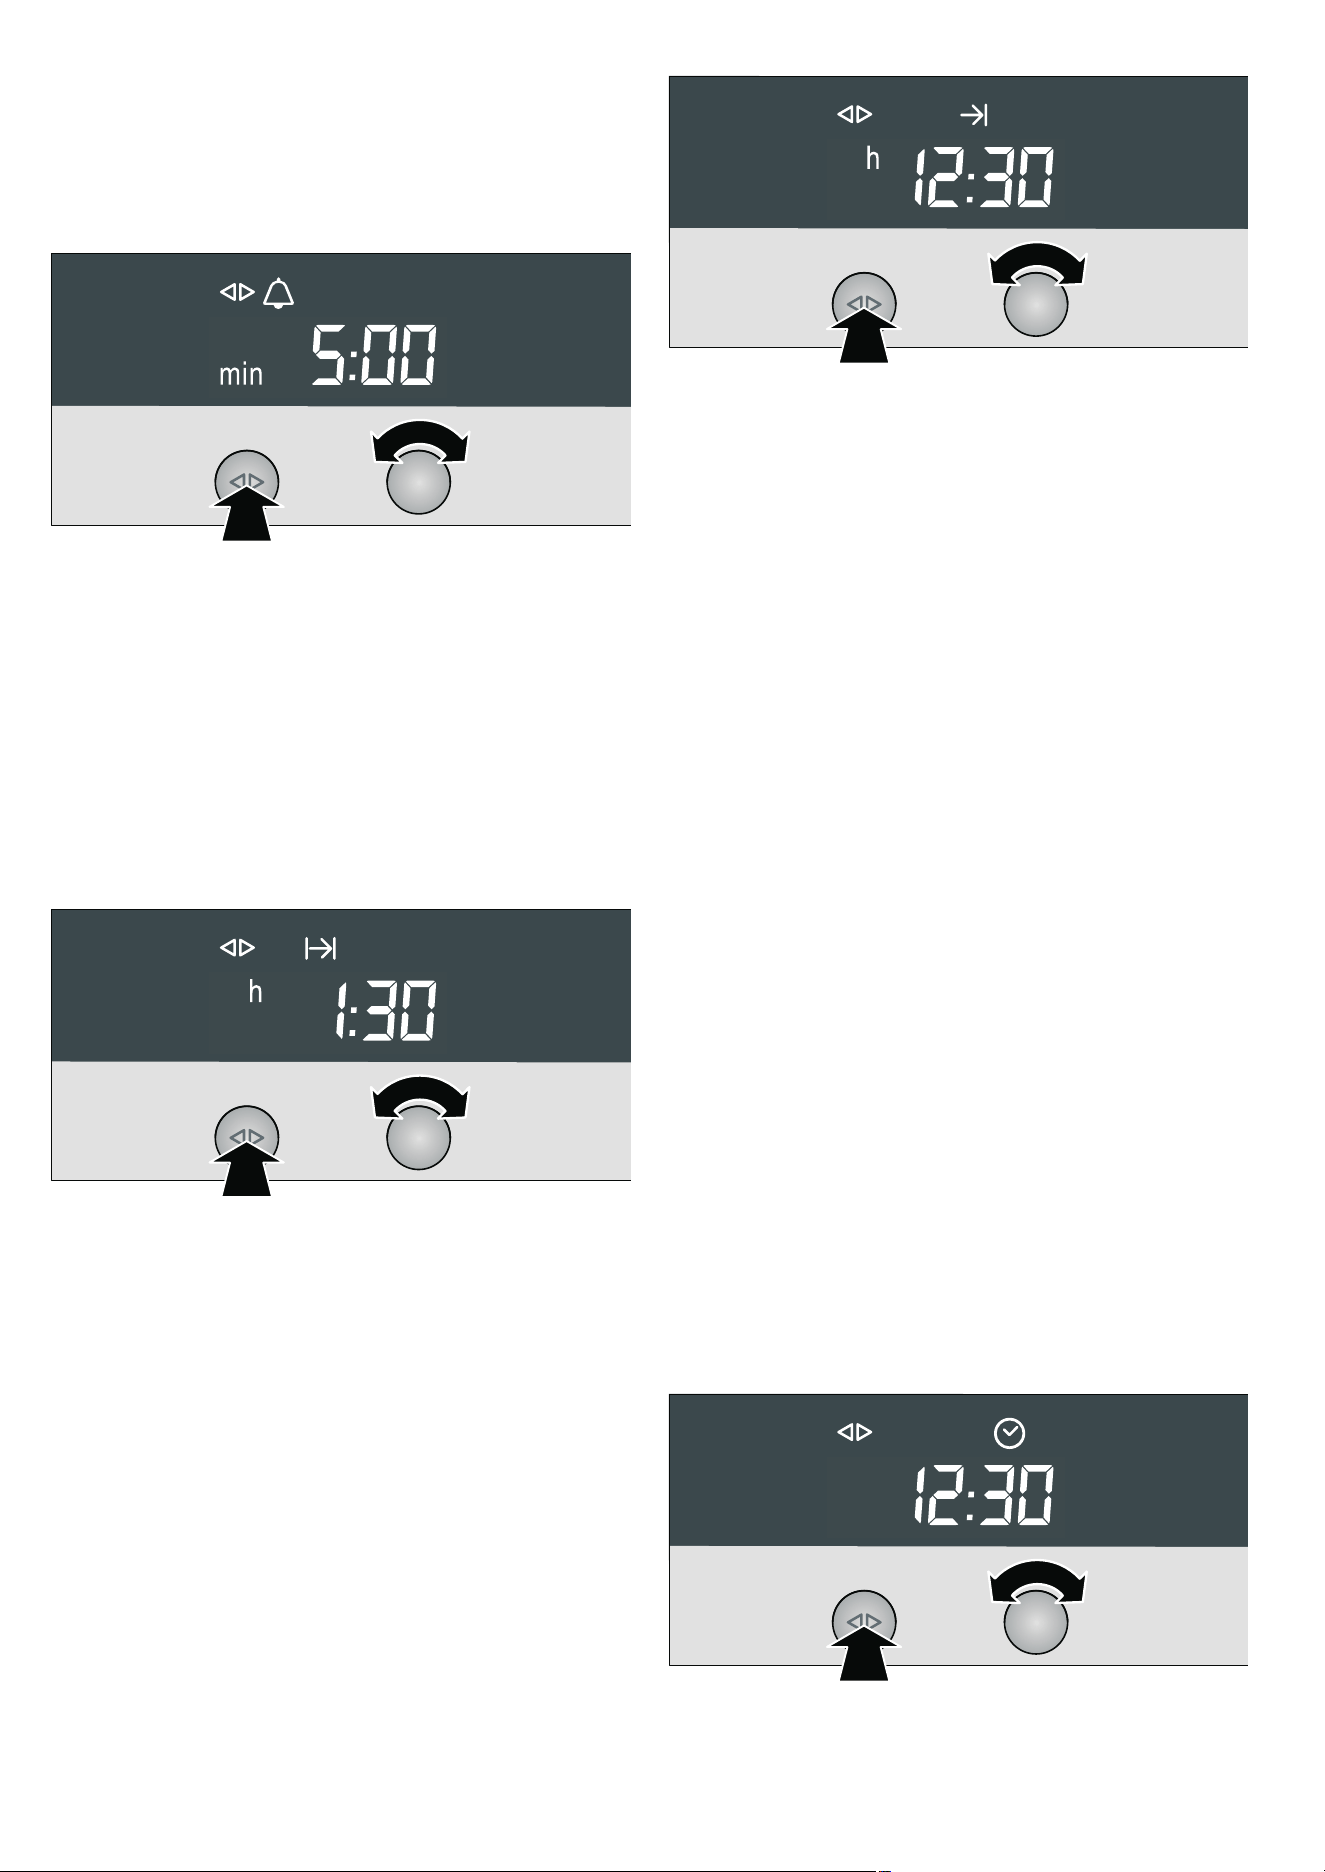
Timer
1. Press the KJclock function button repeatedly until the KJ
and
Q symbols light up.
2. Set the duration using the rotary selector (e.g. †:‹‹ minutes).
The setting is applied automatically. Then the clock is
displayed again and the minute minder starts counting down.
Cooking time
Automatic switch-off after a cooking time setting has elapsed.
1. Set the operating mode and temperature.
2. Press the KJ clock function button repeatedly until the KJ
and
x symbols light up.
3. Set the cooking time with the rotary selector
(e.g.
‚:„‹ hours).
The setting is applied automatically. The time of day is then
displayed again.
4. Press the ƒ Start button.
The appliance heats up and the set cooking time starts
counting down.
Once the cooking time has elapsed, the appliance switches off
automatically.
Turn the operating mode selector to the
Û position and push it
in.
End of operation
Automatic switch-off at a set time.
1. Set the operating mode and temperature.
2. Press the KJ clock function button repeatedly until the KJ
and
y symbols light up.
3. Set the end of operation using the rotary selector
(e.g.
‚ƒ:„‹ o'clock).
The setting is applied automatically. The time of day is then
displayed again.
4. Press the ƒ Start button.
The appliance heats up.
Once the cooking time has elapsed, the appliance switches off
automatically.
Turn the operating mode selector to the
Û position and push it
in.
Preset operation
The appliance switches on automatically, then switches off
automatically at the time preselected for the end of operation.
To set this function, combine the cooking time and end of
operation clock functions.
Bear in mind that food which spoils easily should not be left in
the cooking compartment for too long.
1. Set the operating mode and temperature.
2. Press the KJ clock function button repeatedly until the KJ
and
x symbols light up.
3. Set the cooking time with the rotary selector
(e.g.
‚:„‹ hours).
The setting is applied automatically.
4. Press the KJ clock function button repeatedly until the KJ
and
y symbols light up.
5. Set the end of operation using the rotary selector
(e.g.
‚ƒ:„‹ o'clock).
6. Press the ƒ Start button.
The appliance switches off and waits until the appropriate
time to switch on (
‚‚:‹‹ in the example). The appliance
switches off automatically at the time set for the end of
operation (
‚ƒ:„‹ ). A signal sounds and the y symbol
flashes.
7. Turn the operating mode selector to the Û position and push
it in.
Setting the clock
You can only change the clock when no other clock function is
active.
1. Press the KJ clock function button repeatedly until
the
KJand 3 symbols light up.
2. Set the clock using the rotary selector.
The setting is applied automatically.

14
Rapid heat up
Depending on the appliance features, you can reduce the
preheat time for the
3 Hot air and ë Bread-baking operating
modes if the set temperature is higher than 100 °C.
Note: During Rapid heat up, do not place any food in the
cooking compartment until the
f symbol goes out.
1.Set the operating mode and temperature.
2.Press the KJ clock function button repeatedly until the KJ
and
f symbols light up and Πis displayed in the clock
display.
3.Turn the rotary selector clockwise.
Ž is displayed in the clock display and the f symbol lights
up. Rapid heat up is activated.
4.Press the ƒ Start button.
The appliance heats up.
After reaching the set temperature, Rapid heat up switches off.
The
f symbol goes out.
Checking, correcting or deleting settings
1.To check your settings, press the KJ clock function button
repeatedly until the corresponding symbol lights up.
2.If necessary, you can correct your setting using the rotary
selector.
3.If you wish to cancel your setting, turn the rotary selector anti-
clockwise to the original value.
Childproof lock
In this section, you can read about
■ how to lock your appliance
■ how to lock your appliance permanently
Lock
Once it has been locked, the appliance cannot be switched on
accidentally or by unauthorised users (e.g. by children playing).
To switch the appliance on again, you must unlock it. After
appliance operation, the appliance is not automatically locked.
Lock it again if necessary or activate the permanent lock.
Locking the appliance
1. Switch on the appliance.
2.Press and hold the ± info button until™‚‹ (Appliance
unlocked) appears.
3.Turn the temperature selector until ™‚‚ (Appliance locked)
appears.
4.Press and hold the ± info button until the‚ symbol appears.
Note: If you try to switch the locked appliance on, -
†-
(Appliance locked) appears.
Unlocking the appliance
1.Press and hold the ± info button until™‚‚ (Appliance locked)
appears.
2.Turn the temperature selector until ™‚‹ (Appliance
unlocked) appears.
3.Press and hold the ± info button until the ‚ symbol goes
out.
Permanent lock
Once it has been permanently locked, the appliance cannot be
switched on accidentally or by unauthorised users (e.g. by
children playing).
To switch the appliance on, you must interrupt the permanent
lock briefly. After you have switched your appliance off, it locks
again automatically.
Locking the appliance permanently
1.Switch on the appliance.
2.Press and hold the ± info button until™‚‹ (Appliance locked)
appears.
3.Turn the temperature selector until™ƒ‚ (Appliance
permanently locked) appears.
4.Press and hold the ± info button for 3 seconds.
Your appliance will be locked after 30 seconds. The
‚ symbol appears.
Note: If you try to switch the locked appliance on, -
†˜ -
(Appliance permanently locked) appears.
Interrupting permanent lock
1.Press and hold the ± info button until ™ƒ‚ (Appliance
permanently locked) appears.
2.Turn the temperature selector until ™ƒ‹ (Appliance unlocked
once) appears.
3.Press and hold the ± info button until the ‚ symbol goes
out.
The permanent lock is interrupted.
4.Switch the appliance on within 30 seconds.
After switching it off, the permanent lock is reactivated after
30 seconds.
Unlocking the appliance permanently
1.Press and hold the ± info button until ™ƒ‚ (Appliance
permanently locked) appears.
2.Turn the temperature selector until ™ƒ‹ (Appliance unlocked
once) appears.
3.Press and hold the ± info button until the ‚ symbol goes
out.
4.Within 30 seconds, press and hold the info button ± again for
3seconds.
5.Turn the temperature selector until™‚‹ (Appliance unlocked)
appears.
6.Press and hold the ± info button for 3 seconds.
The appliance is permanently unlocked.
15
Baking
In this section, you will find information on
■ Baking tins and trays
■ Baking on two or more levels
■ Baking basic doughs and cake mixtures (baking table)
■ Baking pre-prepared frozen products and freshly prepared
meals (baking table)
■ Tips and tricks for baking
Note: Do not use shelf height 2 when baking with 3
CircoTherm®. The air circulation would be impaired and this
will have a negative effect on your baking.
Baking in tins and on trays
Baking tins
We recommend that you use dark baking tins made from metal.
Tinplate and glass dishes increase the baking time required
and the cake will not brown evenly. If you wish to bake using
tinplate tins and
% Top/bottom heat, you should use shelf
height 1.
If you wish to use silicone baking tins, use the information and
recipes provided by the manufacturer as a guide. Silicone
baking tins are often smaller than normal tins. The amount of
mixture and recipe instructions may differ.
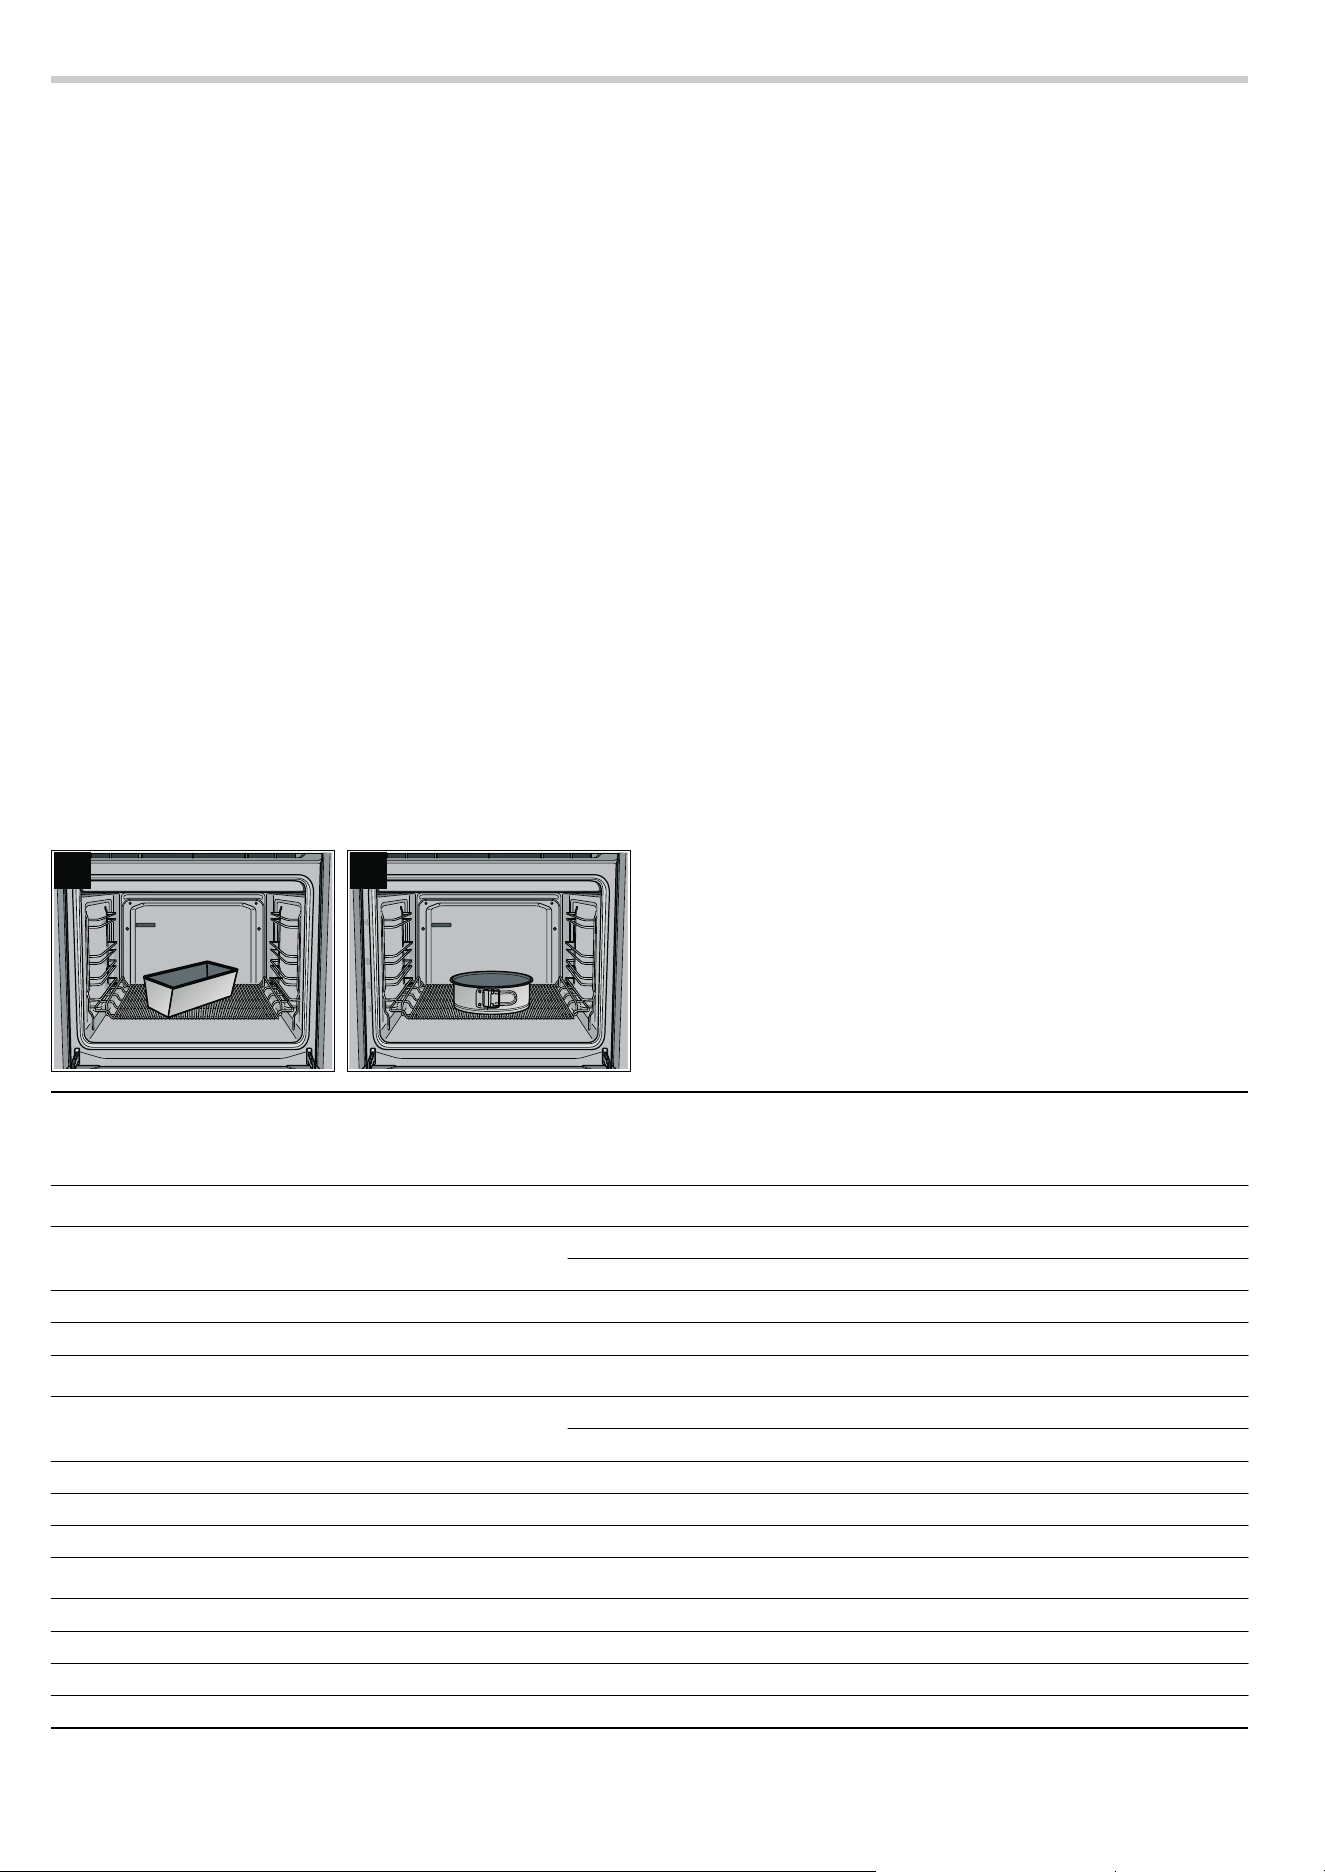
If you are baking on one level with
3 CircoTherm®, always
place a loaf tin diagonally (Fig. A) and a round tin in the centre
of the stepped wire rack (Fig. B).
Baking trays
We recommend that you only use original baking trays, as
these have been optimally designed for the cooking
compartment and the operating modes.
Always slide the baking tray or the universal pan in carefully as
far as it will go and make sure that the sloping edge is facing
the appliance door.
Use the universal pan if you are baking moist cakes, so that the
cooking compartment does not get dirty.
Baking on two or more levels
If you are baking on several levels, you should preferably use
baking trays and insert these at the same time.
Bear in mind that your items may brown at different rates on
each level. The items on the top level will brown more quickly
and can be taken out earlier.
If you wish to bake on two levels using a baking tray and a
universal pan, you should insert the baking tray at shelf
height 3 and the universal pan at shelf height 1.
Baking table for basic doughs/cake mixtures
The values in the table are guidelines and apply to enamelled
baking trays and dark baking tins. The values may vary
depending on the type and amount of dough/mixture and on
the baking tin.
We recommend that you set the lower of the specified
temperatures the first time. Lower temperatures will generally
allow more even browning.
If you are baking according to your own recipe, use similar
recipes in the table as a guide.
Observe the notes in the table about preheating.
$
%
CircoTherm® 3 Top/bottom heat %
Basic dough Shelf
height
Tempera-
ture in °C
Baking time in
minutes
Shelf
height
Tempera-
ture in °C
Rich sponge mixture
Tray bakes with topping 1 160 - 170 30 - 45 3 170 - 180
1 + 3 150 - 160 40 - 50 - -
Springform cake tin/loaf tin 1 150 - 160 60 - 80 2 160 - 170
Flan tin 1 160 - 170 20 - 35 2 170 - 180
Shortcrust pastry
Tray bake with dry topping, e.g. crumble 1 160 - 170 45 - 70 3 180 - 190
1 + 3 160 - 170 60 - 80 - -
Tray bake with moist topping, e.g. egg custard 1 150 - 170 60 - 80 - -
Springform cake tin, e.g. sponge base cheesecake 1 150 - 160 50 - 90 2 160 - 180
Flan tin 1 150 - 160* 20 - 35 2 170 - 180*
Sponge mixture
Swiss roll 1 180 - 190* 10 - 15 3 190 - 200*
Flan tin 1 160 - 170 20 - 30 2 160 - 170
Sponge (6 eggs) 1 150 - 160 30 - 45 2 160 - 170
Sponge (3 eggs) 1 150 - 160* 20 - 30 2 160 - 170*
* Preheat oven

16
Baking table for fresh meals and frozen
convenience products
Circotherm intensive 0 is particularly suitable for freshly
prepared dishes that require a lot of heat from underneath and
for frozen convenience products.
Notes
■ Use the universal pan for frozen products
■ Line the universal pan with greaseproof paper or with special
grease absorbing paper if you are baking frozen potato
products
■ Only use greaseproof paper that is suitable for the selected
temperature
■ Spread chips out in a single layer
■ Turn frozen potato products half way through the baking time
■ Only season frozen potato products after they have finished
baking
■ Leave a little space between bread rolls when crisping them
up. Do not place too many on a baking tray
■ Do not use frozen products with freezer burn
■ Do not use frozen products that are heavily frosted
■ Follow the manufacturer's instructions.
■ You cannot bake on more than one level with CircoTherm
intensive
The values in the table are guidelines and apply to enamelled
baking trays. The values may vary depending on the type and
amount of dough/mixture and on the baking tin.
We recommend that you set the lower of the specified
temperatures the first time. Lower temperatures will generally
allow more even browning.
If you are baking according to your own recipe, use similar
recipes in the table as a guide.
Observe the notes in the table about preheating.
Yeast dough
Tray bake with dry topping, e.g. crumble 1 160 - 170 40 - 60 3 170 - 180
1 + 3 160 - 170 45 - 65 - -
Savarin/plaited loaf (500 g) 1 160 - 170 30 - 40 3 170 - 180
Springform cake tin 1 160 - 170 30 - 40 2 160 - 170
Ring cake tin 1 160 - 170 35 - 45 2 170 - 180
CircoTherm®
3 Top/bottom heat %
Small baked items Shelf
height
Tempera-
ture in °C
Baking time in
minutes
Shelf
height
Tempera-
ture in °C
Yeast dough 1 160 - 170 20 - 25 3 170 - 180
1 + 3 160 - 170 20 - 30 - -
Meringue mixture 1 80 100 - 130 3 80
1 + 3 80 150 - 170 - -
Puff pastry 1 190 - 200* 20 - 30 3 200 - 210*
1 + 3 190 - 200* 25 - 35 - -
Choux pastry 1 190 - 200* 25 - 35 3 200 - 210*
1 + 3 190 - 200* 30 - 40 - -
Sponge mixture, e.g. muffins 1 150 - 160* 25 - 35 3 160 - 170*
1 + 3 150 - 160* 25 - 35 - -
Shortcrust pastry, e.g. butter biscuits 1 140 - 150* 15 - 20 3 140 - 150*
1 + 3 130 - 140* 20 - 30 - -
1 + 3+ 4 130 - 140* 20 - 35 - -
* Preheat oven
CircoTherm®
3 Top/bottom heat %
Basic dough Shelf
height
Tempera-
ture in °C
Baking time in
minutes
Shelf
height
Tempera-
ture in °C
* Preheat oven
Bread-baking ë Circotherm intensive 0
Dishes Shelf
height
Tempera-
ture in °C
Baking time in
minutes
Shelf
height
Tempera-
ture in °C
Pizza, fresh 1 190 - 210* 20 - 30 1 180 - 200
1 + 3 180 - 190 35 - 45 - -
Tarte flambée 1 190 - 210* 15 - 25 1 200 - 220
Quiche 1 180 - 200 50 - 60 1 170 - 190
Tart 1 180 - 200* 30 - 45 1 190 - 210
Swiss flan 1 180 - 190* 45 - 55 1 170 - 190
* Preheat oven

17
Tips and tricks
Potato gratin made from raw potatoes 1 180 - 200 50 - 60 1 170 - 190
Strudel, frozen 1 190 - 210 35 - 45 1 180 - 200
Pizza, frozen
Pizza with thin base 1 180 - 200 10 - 20 1 200 - 220
1 + 3 180 - 190 20 - 30 - -
Pizza with deep-pan base 1 180 - 200 20 - 30 1 180 - 200
1 + 3 180 - 190 25 - 35 - -
Potato products
Chips 1 190 - 210 15 - 25 1 210 - 230
1 + 3 180 - 190 25 - 35 - -
Croquettes 1 180 - 200 15 - 25 1 200 - 220
Rösti (stuffed potato pockets) 1 180 - 200 15 - 25 1 200 - 220
Baked goods
Part-baked bread rolls/baguettes 1 180 - 200 5 - 15 1 180 - 200
Bread rolls/baguette, frozen 1 180 - 200 5 - 15 1 200 - 220
Bread rolls/baguette, part baked, frozen 1 180 - 200 10 - 20 1 180 - 200
Pretzel dough, frozen 1 180 - 190 15 - 20 1 170 - 190
Processed portions, frozen
Fish fingers 1 180 - 200 15 - 20 1 190 - 210
Veggie burgers 1 180 - 200 20 - 30 1 200 - 220
Bread-baking
ë Circotherm intensive 0
Dishes Shelf
height
Tempera-
ture in °C
Baking time in
minutes
Shelf
height
Tempera-
ture in °C
* Preheat oven
The cake is too light in colour Check the shelf height.
Check whether you have used the bakeware that we have recommended.
Place your tin on the wire rack and not on the baking tray.
If the shelf height and the bakeware are correct, then you should either extend the bak-
ing time or increase the temperature.
The cake is too dark Check the shelf height.
If the shelf height is correct, you should either shorten the baking time or reduce the
temperature.
The cake is unevenly browned in the bak-
ing tin
Check the shelf height.
Check the temperature.
Make sure that your baking tin is not placed directly in front of the air outlets in the rear
wall of the cooking compartment.
Check that the baking tin is in the correct position on the wire rack.
The cake on the baking tray is unevenly
browned
Check the shelf height.
Check the temperature.
If you are baking on several levels, take out the baking trays at different times.
When baking small items, make sure that they are the same size and thickness.
The cake is too dry Set a slightly higher temperature and a slightly shorter baking time.
The cake is too moist in the centre Set a slightly lower temperature.
Note: Higher temperatures do not necessarily mean shorter baking times (cooked on
the outside, but not on the inside). Select a longer baking time and allow the cake mix-
ture to prove for longer. Add less liquid to the mixture.
With very moist cakes, e.g. fruit flans, a lot
of steam is generated in the cooking com-
partment which condenses on the appli-
ance door.
If you briefly and carefully open the appliance door (once or twice, or more often for
longer baking times), you can let the steam out of the cooking compartment and con-
siderably lessen the condensation.
The cake collapses when you take it out of
the oven
Use less liquid for the mixture.
Set a longer baking time or a slightly lower temperature.

18
Roasting
In this section, you will find information on
■ roasting in general
■ roasting without a lid
■ roasting with a lid
■ roasting meat, poultry and fish (roasting table)
■ tips and tricks for roasting
ã=There is a risk of injury if you use roasting dishes that
are not heat-resistant!
Only use roasting dishes that are marked as being suitable for
use in the oven.
Do not use shelf height 2 when roasting with
3 CircoTherm®.
The air circulation would be impaired and this will have a
negative effect on your roast.
Open roasting
For open roasting, a roasting dish without a lid is used.
When you are roasting with
% Top/bottom heat, you should
turn the roast approximately half to two thirds of the way
through the roasting time.
Roasting in the universal pan
Juices escape from the roasting meat and are collected in the
universal pan. You can use these juices as the basis for a tasty
gravy.
Deglaze the pan of the juices with hot water, stock, wine or
similar. Bring to the boil, thicken with cornflour, season and
pass through a sieve if necessary.
You can also cook side dishes (e.g. vegetables) at the same
time as roasting meat in the universal pan.
For smaller joints, you can use a smaller roasting dish instead
of the universal pan. Place this directly on the wire rack.
Roasting in the universal pan with stepped wire rack
Place the stepped wire rack on the universal pan and slide
them in together at the same shelf height.
For fatty meat and poultry, add
X to ¼ litre water to the
universal pan, depending on the size and type of the joint.
While the meat is roasting, the liquid in the roasting dish will
evaporate. Pour in more hot water if required.
Roasting in the universal pan with roasting sheet
The roasting sheet reduces dirt in the cooking compartment.
Place the roasting sheet in the universal pan and slide them in
together at the same shelf height.
Dripping fat and meat juices are caught in the universal pan.
Roasting with a lid
This method is particularly suitable for pot roasts.
Place the joint in the roasting dish. Add water, wine, vinegar or
similar for the braising liquid. Place the lid on the dish, place
the dish on the wire rack and slide it into the cooking
compartment.
While the meat is roasting, the liquid in the roasting dish will
evaporate. Pour in more hot water if required.
Roasting table
The roasting time and temperature depend on the size, height,
type and quality of the item.
As a general rule: the larger the item, the lower the temperature
and the longer the roasting time.
Coat lean meat with fat or oil as required and cover it with strips
of bacon.
The information in the table is a guideline, and relates to items
cooked without a lid. The values may vary depending on the
type and quantity of the meat and on the roasting dish.
You should set the lower of the specified temperatures the first
time. Lower temperatures will generally allow more even
browning.
At the end of the roasting time, switch the oven off and leave
the roast to rest for approximately 10 minutes in the cooking
compartment with the door closed. The recommended rest time
is not included in the given roasting times.
The information in the table is for food placed in a cold oven
and for meat/fish taken directly from the refrigerator.
The specified baking time is not correct For small items, check the quantity on the baking tray. The items must not be touching
each other.
Frozen products are not browned evenly
after baking
Check whether the frozen product is unevenly browned before baking. This uneven
browning will remain after the baking time.
Frozen products are not browned, not
crispy or the specified time is not correct
Remove ice from frozen products before baking. Do not use frozen products that are
heavily frosted
Saving energy Only preheat the appliance when it is specified in the baking table that you should do
so.
Use dark baking tins as these absorb the heat better.
Make use of the residual heat with longer baking times and switch the oven off
5 10 minutes before the end of the baking time.

19
Tips and tricks
CircoTherm® 3 Top/bottom heat %
Item Shelf
height
Tempera-
ture in °C
Roasting time in
minutes
Shelf
height
Tempera-
ture in °C
Meat loaf made from 500 g meat 1 170 - 180 60 - 70 2 200 - 210
Pork
Smoked pork 1 160 - 170 70 - 80 2 190 - 210
Fillet, medium (400 g) 1 170 - 180 30 - 45 3 200 - 230
Roast with rind (1.5 kg) 1 160 - 170 120 - 150 2 200 - 220
Roast with rind (2.5 kg) 1 160 - 170 150 - 180 2 190 - 210
Joint, marbled, without rind, e.g. neck (1.5 kg) 1 160 - 170 100 - 130 2 190 - 210
Joint, marbled, without rind, e.g. neck (2.5 kg) 1 160 - 170 120 - 150 2 180 - 200
Roast, lean (1 kg) 1 170 - 180 70 - 90 2 180 - 200
Roast, lean (2 kg) 1 170 - 180 80 - 100 2 180 - 200
Beef
Fillet, medium (1 kg) 1 180 - 190 45 - 65 2 200 - 220
Sirloin, medium rare (1.5 kg) 1 180 - 190 30 - 45 2 200 - 220
Pot roast (1.5 kg)** 1 170 - 180 120 - 150 2 200 - 220
Pot roast (2.5 kg)** 1 170 - 180 150 - 180 2 190 - 210
Veal
Joint/breast of veal (1.5 kg) 1 160 - 170 90 - 120 2 180 - 200
Joint/breast of veal (2.5 kg) 1 160 - 170 120 - 150 2 170 - 190
Knuckle 1 160 - 170 100 - 130 2 190 - 210
Lamb
Leg, boned 1 180 - 190 70 - 110 2 200 - 220
Loin on the bone 1 180 - 190* 40 - 50 2 200 - 220*
Loin, boned 1 180 - 190* 30 - 40 2 200 - 220*
Poultry
Chicken, whole (1 kg) 1 170 - 180 60 - 70 2 200 - 220
Duck, whole (2 3 kg) 1 150 - 160 90 - 120 2 190 - 210
Goose, whole (3 4 kg) 1 150 - 160 130 - 180 2*** 180 - 200
Game
Joint/leg of roe venison, boned (1.5 kg) 1 160 - 170 90 - 120 2 190 - 210
Wild boar joint (1.5 kg) 1 160 - 170 120 - 140 2 190 - 210
Joint of venison (1.5 kg) 1 160 - 170 100 - 120 2 190 - 210
Rabbit 1 160 - 170 70 - 80 2 180 - 200
Fish
Fish, whole (300 g) 1 160 - 170 30 - 40 2 180 - 200
Fish, whole (700 g) 1 160 - 170 40 - 50 2 180 - 200
* Preheat oven
** Roast pot roasts with a lid on the roasting dish
*** Use shelf height 1 for tall items
Crust too thick and/or roast too dry Reduce the temperature or shorten the roasting time.
Check the shelf height.
Crust too thin Increase the temperature or switch on the grill briefly at the end of the roasting time.
The meat is not cooked right through Remove any accessories that are not required from the cooking compartment.
Increase the roasting time.
Check the core temperature of the joint using a meat thermometer.
Steam in the cooking compartment is con-
densing on the appliance door
The steam dries during the course of the cooking. If there is an excessive volume of
steam, you can carefully open the door briefly to dissipate the steam more quickly.

20
Low-temperature cooking
In this section, you will find information on
■ Low-temperature cooking /
■ Tips and tricks
Low-temperature cooking is a method of cooking slowly at low
temperatures, and is also known as slow cooking.
Low-temperature cooking is ideal for all prime cuts of meat (e.g.
tender portions of beef, veal, pork, lamb and poultry) that are to
be cooked medium/medium rare or "à point". The meat will
remain succulent and tender.
Using Low-temperature cooking
Notes
■ Only use fresh, clean meat
■ The meat will always look pink on the inside after Low-
temperature cooking. This does not mean that the cooking
time was too short
■ Only use boned meat
■ Do not use defrosted meat
■ You can also use seasoned or marinated meat
■ Always use shelf height 1 for Low-temperature cooking
■ Do not cover the meat while it is cooking in the cooking
compartment
■ Do not turn pieces of meat during the low-temperature
cooking process
■ The size, thickness and type of meat will have a significant
influence on the searing and low-temperature cooking times
■ The properties of the pan and the heat output of the hotplate
can influence the searing time
■ Do not use the Low-temperature cooking mode together with
the Preselection mode clock function
Only switch the Low-temperature cooking mode on when the
cooking compartment has completely cooled down (room
temperature).
If "Not possible" appears in the text display when the Low-
temperature cooking mode is switched on and
• or œ and üüü
appear alternately in the temperature display, the cooking
compartment has not cooled down completely.
Wait until the cooking compartment has cooled down and
switch Low-temperature cooking on again.
1.Place a glass or porcelain plate on a wire rack and insert at
shelf height 1 to warm the plate.
2.Switch on / Low-temperature cooking.
"Please wait" appears in the text display during the heating
up phase (15 - 20 minutes).
3.Remove fat and sinews from the meat.
4.Sear the meat on all sides to seal the meat and to create a
roasted flavour.
5.When a signal sounds and "In operation" appears on the text
display, place the meat on the glass or porcelain plate in the
cooking compartment.
6.Take out the meat at the end of the cooking time and switch
off the appliance.
Note: Meat cooked at a low temperature does not need to rest,
and can easily be kept warm at a low temperature.
Table for Low-temperature cooking
The information in the table contains only guide values. The
searing time is for searing in a hot pan with fat.
Place the duck breast in a cold pan and fry the skin side first.
Following Low-temperature cooking, insert at shelf height 3 and
grill at 250 °C for 3 5 minutes until crispy.
You can find information on how to proceed, further instructions
and recipes in the accompanying cookbook.
Tips and tricks
Searing in
minutes
Low-tem-
perature
cooking in
minutes
Pork
Fillet, whole (approx. 500 g) 5 - 6 100 - 120
Loin (approx. 1 kg, 4 - 5 cm thick) 5 - 6 120 - 150
Medallions (5 cm thick) 3 - 4 45 - 60
Loin steaks (2 3 cm thick) 2 - 3 30 - 45
Beef
Fillet, whole (1.5 kg) 6 - 7 160 - 200
Sirloin
(approx. 1.5kg, 5-6cm thick)
6 - 7 180 - 210
Centre-cut rump (6 - 7 cm thick) 6 - 7 240 - 300
Medallions (5 cm thick) 3 - 4 60 - 80
Rump steak (3 cm thick) 3 - 4 50 - 70
Steak-cut rump (3 cm thick) 3 - 4 50 - 70
Veal
Fillet, whole (approx. 800 g) 4 - 5 150 - 180
Flank (approx. 2 kg, 8 - 9 cm thick) 6 - 7 360 - 420
Centre-cut rump
(approx. 1.5kg, 4-5cm thick)
6 - 7 240 - 300
Medallions (4 cm thick) 3 - 4 70 - 90
Lamb
Loin, boned (approx. 200 g) 2 - 3 30 - 40
Leg, boned, tied (approx. 1 kg) 6 - 7 240 - 300
Poultry
Chicken breast (150 - 200 g)* 4 - 5 90 - 120
Duck breast (300 - 400 g)** 10 - 12** 70 - 90**
Turkey breast (1 kg)* 4 - 5 150 - 180
Turkey steaks (2 - 3 cm)* 3 - 4 40 - 60
* well-done
** see the note below
Meat cooked at a low
temperature cools
down too quickly
Serve on warmed plates with a very
hot sauce
Keeping meat cooked
at a low temperature
warm
Switch on
% Top/bottom heat and set
the temperature to 60 °C. Small
pieces of meat can be kept warm for
up to 45 minutes and large pieces for
up to 2 hours
21
Grilling
In this section, you will find information on
■ Grilling in general
■ Circo-roasting 4
■ Radiant grilling (Full-surface + and Centre-area grill ()
Caution!
Material damage due to effect of heat: The temperature
generated in the cooking compartment is very high. Keep the
appliance door closed when using the grill. Never grill with the
appliance door open.
Notes
■ Always use the wire rack and the universal pan when grilling
■ Place the wire rack in the universal pan and slide them both
in at the height specified in the grilling table
■ Always place the food to be grilled in the centre of the wire
rack
■ If you are grilling more than one piece of meat, make sure
that they are the same sort of meat and that they are of
similar thickness and weight.
Circo-roasting
The 4 Circo-roasting operating mode is particularly suitable for
poultry or meat (e.g. roast pork with crackling) that is to be
crispy.
Turn large items of food after approximately half to two-thirds of
the grilling time.
Pierce duck and goose skin under the wings and legs to allow
the fat to escape.
Depending on the food you are cooking, the cooking
compartment may become very dirty when you cook food on
the wire rack using Circo-roasting. You should therefore clean
the cooking compartment after every use so that the dirt does
not burn on.
The information in the table are guidelines and apply to the
enamelled universal pan with wire rack. The values may vary
depending on the type and amount of food to be grilled.
You should set the lower of the specified temperatures the first
time. Lower temperatures will generally allow more even
browning.
At the end of the cooking time, switch the grill off and leave the
food to stand for approximately 10 minutes in the cooking
compartment with the door closed. The recommended standing
time is not included in the grilling times specified.
The values are for food placed in a cold oven and for meat
taken directly from the refrigerator.
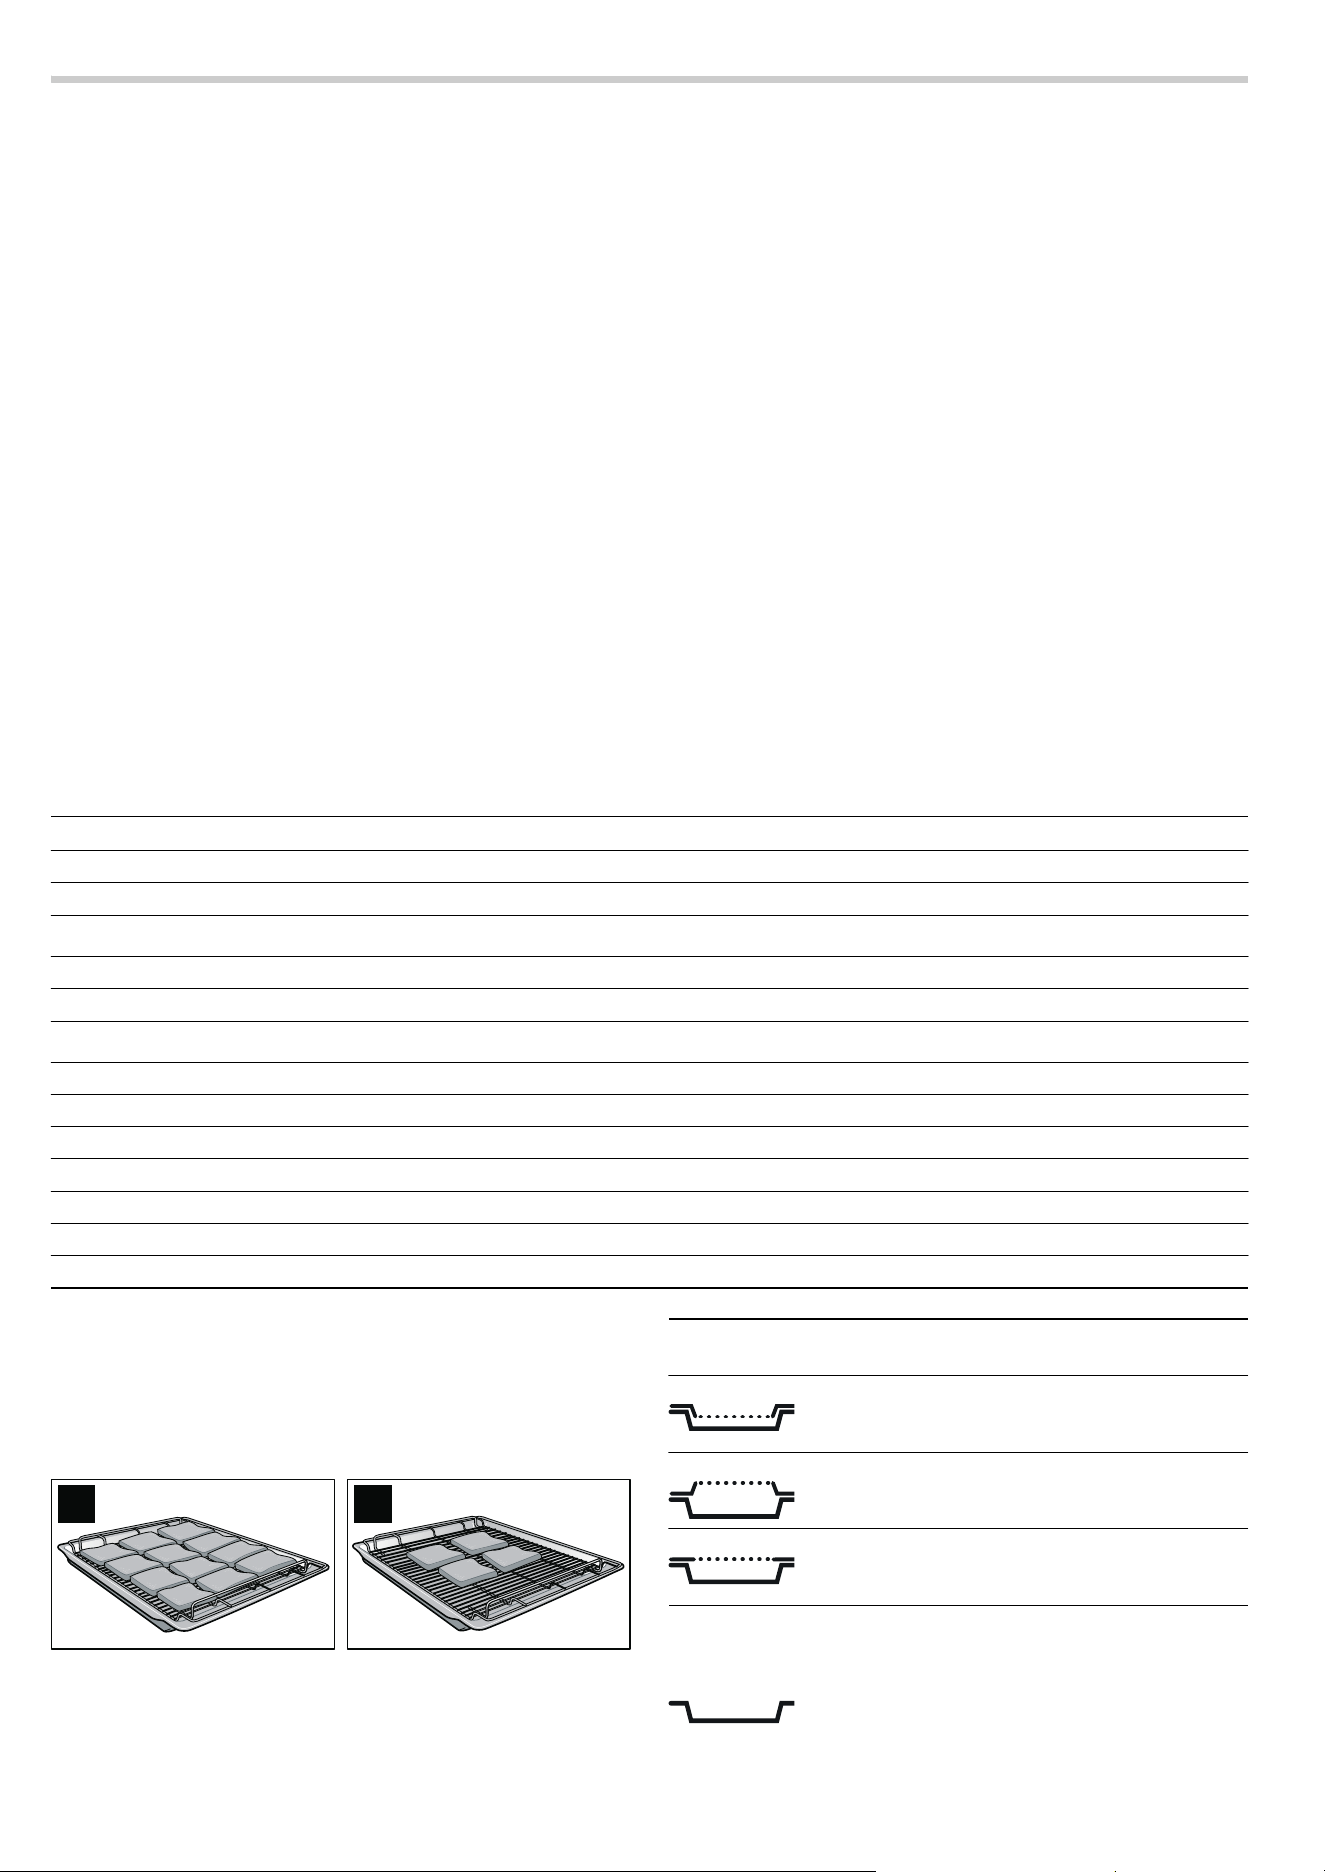
Radiant grilling
For grilling large quantities of flat items, use the + Full-surface
grill (Fig. A).
For grilling small quantities of flat items, use the
( Centre-area
grill. Place the food to be grilled in the centre of the wire rack
(Fig. B). You will save energy by using the centre-area grill.
Brush the items to be grilled with a little oil to taste.
Turn the items after half to two-thirds of the grilling time.
You can influence the grilling result by changing the type or
position of the wire rack.
Note: Always use the universal pan in the standard position
(not the other way up).
Grilled food Shelf height Temperature in °C Grilling time in minutes
Sirloin, medium (1.5 kg) 2 220 - 240 40 - 50
Leg of lamb, boned, medium 2 170 - 190 120 - 150
Pork
Joint of pork with rind 2 170 - 190 140 - 160
Pork knuckle 2 180 - 200 120 - 150
Poultry (unstuffed)
Chicken halves (1 or 2 halves) 2 210 - 230 40 - 50
Chicken, whole (1 or 2 chickens) 2 200 - 220 60 - 80
Duck, whole (2 - 3 kg) 2 180 - 200 90 - 120
Duck breast 3 230 - 250 30 - 45
Goose, whole (3 4 kg) 1 150 - 170 130 - 160
Goose breast 2 160 - 180 80 - 100
Goose leg 2 180 - 200 50 - 80
$ %
Wire rack posi-
tion
Use
Place the stepped wire rack in the universal
pan with the step pointing downwards: suita-
ble for items that should be well-done
Place the stepped wire rack in the universal
pan with the step pointing upwards: suitable
for grill items that should be rare to medium
Using the flat wire rack, you can select an
intermediate height and grill more items than
on the wire rack with cut-out alone

22
Full-surface grill table
+
The information in the table contains only guide values. The
values may vary depending on the type and amount of food to
be grilled. They are for food placed in a cold oven and for meat
taken directly from the refrigerator.
Centre-area grill
( table
The information in the table contains only guide values. The
values may vary depending on the type and amount of food to
be grilled. They are for food placed in a cold oven and for meat
taken directly from the refrigerator.
Grilled food Shelf
height
Tempera-
ture in °C
Grilling time
in minutes
Notes
Toast with topping 3 220 10 - 15 The shelf height should be adapted to the height of
the topping
Vegetables 4
‚Ÿ£
15 - 20
Sausages 4 250 10 - 14 Prick skins
Pork
Fillet steaks, medium-sized
(3 cm thick)
4
‚Ÿ£
12 - 15 The cooking result can be influenced by the position
of the wire rack
Steak, well-done (2 cm thick) 4
‚Ÿ£
15 - 20
Beef
Fillet steaks (3 - 4 cm thick) 4
‚Ÿ£
15 - 20 The grilling time can be increased or shortened
depending on how well-done the meat should be
Tournedos 4
‚Ÿ£
12 - 15
Lamb
Fillets 4
‚Ÿ£
8 - 12 The grilling time can be increased or shortened
depending on how well-done the meat should be
Chops 4
‚Ÿ£
10 - 15
Poultry
Chicken drumsticks 3 250 25 - 30 Piercing the skin will prevent blisters from forming dur-
ing grilling
Small chicken portions 3 250 25 - 30
Fish
Steaks 4 220 15 - 20 The pieces should be of equal thickness
Chops 4 220 15 - 20
Whole fish 3 220 20 - 25
Grilled food Shelf
height
Tempera-
ture in °C
Grilling time
in minutes
Notes
Toast with topping 3 220 12 - 18 The shelf height should be adapted to the height of
the topping
Vegetables 4
‚Ÿ£
15 - 20
Sausages 4 250 12 - 16 Prick skins
Poultry
Chicken drumsticks 3 250 35 - 45 Piercing the skin will prevent blisters from forming dur-
ing grilling
Small chicken portions 3 250 30 - 40
Fish
Steaks 4 230 15 - 20 The pieces should be of equal thickness
Chops 4 230 15 - 20
Whole fish 3 230 20 - 25

23
Dough proving
In this section, you will find information on
■ Dough proving ê
■ preparing yeast dough and yoghurt
Only switch on Dough proving once the cooking compartment
has completely cooled down (to room temperature).
If "Not possible" appears in the text display when the Dough
proving setting is switched on and
• or œ and -‹- appear
alternately in the temperature display, the cooking compartment
has not cooled down completely.
Wait until the cooking compartment has cooled down and
switch Dough proving on again.
Do not use Dough proving together with the Preselection mode
clock function.
Yeast dough
Notes
■ Always allow yeast doughs to prove twice. See the table for
information about the 1st and 2nd proving.
■ Condensation is produced while the appliance is in
operation. The door panel steams up and water collects on
the base of the cooking compartment. The condensation
evaporates during the subsequent baking process.
■ The yeast dough can be baked directly after the 2nd proving
process.
■ You can find information on how to proceed, further
instructions and recipes in the accompanying cookbook.
Proving yeast dough
1. Switch on the appliance.
2. Fill the water tank.
3. Slide in the water tank all the way.
4. Place the dish in the centre of the wire rack and slide in at
shelf position 1.
5. Select ê Dough proving with the operating mode selector.
6. Select dough proving setting ƒ or „ with the temperature
selector.
Note: The dough proving setting to be selected depends on
the dough and the quantity of flour. See the table for
information about this.
7. Press the ƒ Start button.
The proving process is controlled automatically. The
temperature setting is fixed.
Note: Do not switch off Dough proving after the 1st proving.
The information in the table is only a guideline. The proving
time may vary depending on the type and quantity of the
ingredients.
Yeast dough Steps in the prov-
ing process
Dough
proving
Shelf height Proving
time in
minutes
Notes
Pizza dough 1st proving
„
1 20 30 Place the bowl on the wire rack
2nd proving
ƒ
1 10 - 15 Roll out on a baking tray
Light bread dough, e.g. white bread, wheat bread
1st proving
„
1 30 40 Place the bowl on the wire rack
Bread, without a tin 2nd proving
„
1 or 2* 15 25 Place on the baking tray
Bread, in loaf tin 2nd proving
„
1 or 2* 15 - 20 Place on the wire rack
Bread rolls 2nd proving
ƒ
1 or 2* 10 - 15 Place on the baking tray
Flatbread 2nd proving
ƒ
1 or 2* 15 - 20 Place on the baking tray
Medium to heavy bread dough, e.g. multi-grain rye bread, wholemeal bread
1st proving
„
1 30 45 Place the bowl on the wire rack
Bread, without a tin 2nd proving
„
1 or 2* 20 30 Place on the baking tray
Bread, in loaf tin 2nd proving
„
1 or 2* 20 30 Place on the wire rack
Bread rolls 2nd proving
ƒ
1 or 2* 10 - 15 Place on the baking tray
Heavy bread dough
1st proving
„
1 30 45 Place the bowl on the wire rack
Bread, without a tin 2nd proving
„
1 or 2* 20 30 Place on the baking tray
Bread, in loaf tin 2nd proving
„
1 or 2* 20 30 Place on the wire rack
Sweet yeast dough
1st proving
ƒ
1 20 - 40 Place the bowl on the wire rack
Plaited loaf, not filled 2nd proving
ƒ
1 15 - 20 Place on the baking tray
Small yeast-leavened cakes,
not filled
2nd proving
ƒ
1 10 - 15 Place on the baking tray
Small yeast-leavened cakes,
filled
2nd proving
ƒ
1 10 - 15 Place on the baking tray
* Use the shelf height at which your yeast dough will be baked

24
Yoghurt
1.Remove accessories and hook-in racks, telescopic shelves
or separate fitting systems.
2.Heat 1 litre of long-life milk (3.5 % fat) or fresh pasteurised
milk to 40 °C
or
Bring 1 litre of fresh milk to the boil once and allow to cool
down to 40 °C.
3.Add 150 g of set yoghurt to the warm milk, stir in and fill the
jars or bowls evenly. Do not pour more than 200 ml into any
single container.
4.Cover the filled containers with a suitable lid or cling film.
5.Distribute the containers over the entire cooking
compartment floor, evenly spaced out.
6.Select ê Dough proving with the operating mode selector.
7.Set dough proving setting‚ with the temperature selector.
The set dough proving setting appears in the temperature
display.
8.Press the ƒ Start button.
The proving process is controlled automatically. The
temperature setting is fixed.
9.After 8 hours, switch off the appliance and place the
containers in the refrigerator for at least 15 hours.
Steam
You can cook food using steam in various ways:
■ Steaming with the Mega System steamer
■ Cooking with VarioSteam
■ Cooking with the automatic programmes
Steam cooking
The é Steam cooking operating mode can only be used in
conjunction with the Mega System steamer (available as a
special accessory from specialist retailers).
Only switch Steam cooking on when the cooking compartment
has cooled down completely (room temperature).
If "Not possible" appears on the text display when you switch
on the Steam cooking operating mode and
• and ¨©¨ appear
alternately in the temperature display, the cooking compartment
has not cooled down completely.
Wait until the cooking compartment has cooled down and
switch Steam cooking on again. The Steam cooking process is
controlled automatically.
Notes
■ Only use the Steam cooking operating mode for steaming.
■ Only use the Mega System steamer for steaming.
■ Do not use Steam cooking together with the preselection
mode clock function.
■ You will find further useful information in the instruction
manual included with the Mega System steamer.
VarioSteam - steam-assisted cooking
When you cook with VarioSteam, steam is introduced into the
cooking compartment at various intervals and with varying
degrees of intensity. This gives you a better cooking result.
Your food:
■ becomes crispy on the outside
■ develops a shiny surface
■ is succulent and tender on the inside
■ only undergoes a minimum reduction in volume
You set the combination of operating mode and steam intensity
that you want. You can set the steam intensity to low, medium
or high for the following operating modes:
■ CircoTherm3
■ % Top/bottom heat
■ 0 Circotherm intensive
■ ë Bread-baking
■ Circo-roasting4
Note: Use the information in the table to select a suitable
operating mode and steam intensity.
Switching on VarioSteam
1.Switch on the appliance.
2.Fill the water tank.
3.Slide in the water tank all the way.
4.Select the operating mode.
5.Set the temperature or the Dough proving setting
6.Press the Ÿ VarioSteam button repeatedly until the required
steam intensity appears in the text display.
7.Start appliance operation.
Switching off VarioSteam
Press the
Ÿ VarioSteam button repeatedly until the steam
intensity (low, medium, high) goes out in the text display.
Appliance operation continues without steam.
VarioSteam table
Example: Joint of pork with crackling
1.Set Step 1.
■ Operating mode: 3 CircoTherm
■ Temperature: 100 °C
■ Steam intensity: high
■ Cooking time: 25 - 35 minutes
Baked items in tins,
e.g. Bundt cake
2nd proving
ƒ
1 15 - 20 Place on the wire rack
Fat-rich yeast doughs, e.g. stollen, panettone
1st proving
ƒ
1 40 60 Place the bowl on the wire rack
Baked without a tin 2nd proving
ƒ
1 30 - 50 Place on the baking tray
Baked in a tin 2nd proving
ƒ
1 30 - 50 Place on the wire rack
Yeast dough Steps in the prov-
ing process
Dough
proving
Shelf height Proving
time in
minutes
Notes
* Use the shelf height at which your yeast dough will be baked

25
2. After 25 - 35 minutes, set Step 2.
■ Change the temperature to 170 °C
■ Cooking time: 60 - 75 minutes
3. After 60 - 75 minutes, set Step 3.
■ Change the operating mode to 4 Circo-roasting
■ Change the temperature to 200 °C
■ Switch off the Steam intensity
■ Cooking time: 20 - 30 minutes
4. After 20 - 30 minutes, switch off the appliance.
Food Steps Shelf
height
Operat-
ing mode
Temperature
in °C/Dough
proving
Steam
intensity
Cooking time
in minutes
Notes
Cakes and pastries
Genoese sponge cake (6
eggs)
-1
3
150 160 low 30 - 40
Genoese sponge cake (3
eggs)
-1
3
150 160 low 25 35
Flan base made from
Genoese sponge
-1
3
150 160 low 20 30
Victoria sponge cake in tin - 1
3
150 160 low 50 - 70
Flan base made from Victoria
sponge
-1
3
150 160 low 20 30
Small cakes made from Vic-
toria sponge mixture, e.g.
muffins
-1
3
150 160 low 25 35
Plaited loaf - 1
3
150 160 medium 35 45
Yeast-leavened Bundt cake - 1
3
160 170 medium 35 45
Yeast-leavened currant cake - 1
3
160 170 medium 30 - 40
Small yeast-leavened cakes - 3
%
170 180 medium 20 30
Choux pastry (cream puffs/
éclairs)
-1
3
200 220* low 25 35
Puff pastry slices - 1
3
200 220* low 15 25
Vol au vents, not filled - 1
3
200 220* high 8 - 10
Apple tart - 1
0
190 210 high 35 45
Strudel, fresh - 1
3
170 180 high 50 - 60
Strudel, frozen - 1
0
180 190 medium 35 45
Bread
Bread rolls Step 1 1
ê ƒ
- 20 25
Step 2 1
ë
190 200 high 20 25
Flatbread Step 1 1
ê ƒ
- 20 30
Step 2 1
ë
200 medium 25 35
Pasty Step 1 1
ê ƒ
- 20 30
Step 2 1
ë
200 high 25 35
Bread dough 750 - 1000 g Step 1 1
ê „
- 15 25
Step 2 1
ë
220 high 10 - 15
Step 3 1
ë
180 - 20 - 30
Bread dough 1000 - 1250 g Step 1 1
ê „
- 15 25
Step 2 1
ë
220 high 10 - 15
Step 3 1
ë
180 - 20 30
Bread dough 1250 - 1500 g Step 1 1
ê „
- 15 25
Step 2 1
ë
220 high 10 - 15
Step 3 1
ë
180 - 35 45
Pork
Joint of pork with crackling
(1.5 kg)
Step 1 1
3
100 high 25 35 Place the joint with
the rind-side up; do
not turn
Step 2 1
3
170 high 60 75
Step 3 1
4
200 - 20 30
* Preheat the appliance

26
Automatic programmes
In this section, you will learn
■ how to set a programme
■ hints and tips on the programmes
■ Programme table
The automatic programmes enable you to prepare food very
easily. All programmes are designed for cooking on one level.
The cooking result can vary according to the size and quality of
the food.
Ovenware
Use the suggested ovenware. All meals have been tested using
this ovenware. The cooking result may change if you use
different ovenware.
Amount/ weight
The automatic programmes require the weight of the food. With
individual pieces, always enter the weight of the largest. The
total weight must be within the specified weight range.
Starting and ending a programme
Select the appropriate programme from the programme table.
Each programme operates with steam-assistance. A
programme can only be started if the cooking compartment
has completely cooled down (to room temperature).
Example
You want to prepare three fresh chicken drumsticks (150 g,
180 g and 200 g):
■ "Poultry" programme group
■ "Chicken portions, fresh" programme
1.Turn the operating mode selector to the Û off position.
2.Fill the water tank.
3.Slide in the water tank all the way.
4.Press the X programme button.
The first programme group is shown on the text display.
5.Turn the operating mode selector until the desired
programme group (e.g. Poultry) appears on the text display.
Pork neck joint (1.5 kg) - 1
3
160 medium 100 120
Turn after
^ to Z of
the time
Pork neck joint (2.5 kg) - 1
3
160 medium 130 - 150
Turn after
^to Zof
the time
Pork knuckle Step 1 1
3
100 high 40 50 Place with the rind-
side up
Step 2 1
4
160 high 40 50
Step 3 1
4
190 - 20 30
Smoked pork 1
3
180 190 medium 130 - 150 Do not turn
Poultry, not stuffed
Poultry portions - 1
4
190 210 medium 25 - 45 Do not turn
Chicken, whole (1 kg) Step 1 1
3
170 180 high 20 25
Turn after
Z the
cooking time
Step 2 1
4
190 200 - 35 - 40
Duck, whole (2 - 3 kg) Step 1 1
3
150 160 medium 70 90
Turn after
Z the
cooking time
Step 2 1
4
180 - 30 - 40
Goose, whole (3 4kg) Step 1 1
3
150 medium 110 - 120 Place with the
breast-side down;
turn after step 1
Step 2 1
4
180 medium 20 30
Step 3 1
4
180 - 30 - 40
Fish
Fish bakes - 2
%
180 high 30 - 40
Fish portions (up to 300 g) - 1
3
160 170 high 20 30
Fish fillets - 1
3
150 160 high 15 25
Fish, whole (up to 1000 g) - 1
3
160 170 high 40 50
Miscellaneous
Potato gratin made from raw
potatoes
-2
%
180 200 high 50 - 60
Savoury flan - 1
0
190 210 medium 15 25
Onion tart - 1
0
180 190 high 30 - 40
Bakes made from precooked
ingredients
-2
%
170 180 medium 35 45
Food Steps Shelf
height
Operat-
ing mode
Temperature
in °C/Dough
proving
Steam
intensity
Cooking time
in minutes
Notes
* Preheat the appliance
3
%UHDG
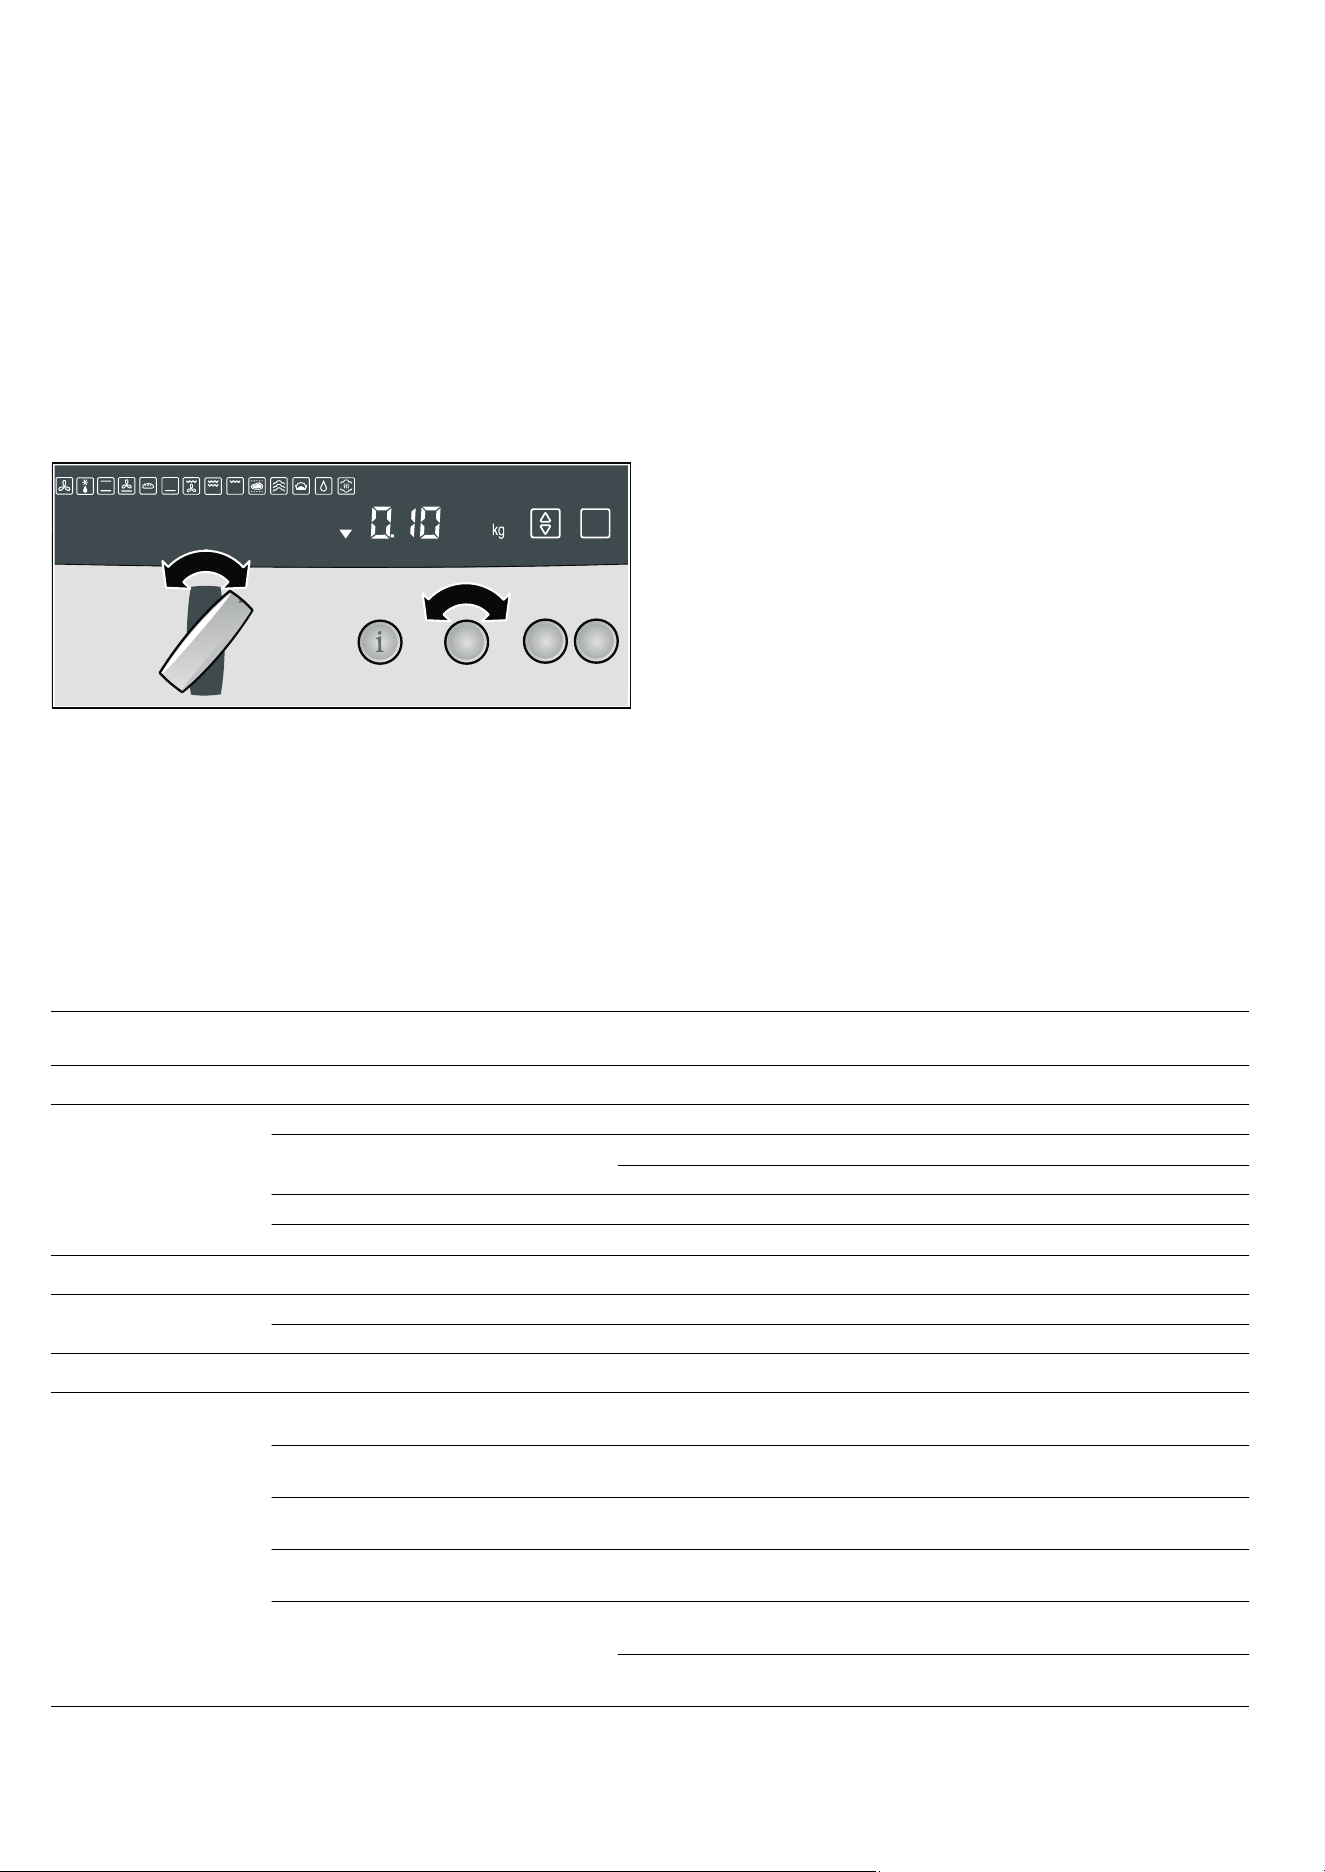
27
6. Press the i navigation button.
The first programme in the programme group is shown on
the text display.
7. Turn the operating mode selector until the desired
programme (e.g. Chicken portions, fresh) appears.
A suggested weight appears in the temperature display (e.g.
0.1 kg).
Note: If no suggested weight is displayed, press the
i
navigation button. You have further options to choose from
and you can use the operating mode selector to select them.
If you want to go back to the programme groups, press
the
i navigation button repeatedly until the last selected
programme group appears.
8. Turn the temperature selector to set the weight for the
heaviest piece (in the example: 200 g).
Note: Press the
± info button to receive information about the
accessories.
9. Press the i navigation button.
The
AÙÙÙØÙÙÙ@ scale appears in the text display.
If required, adjust the level of browning for your food.
Turn the operating mode selector to change the setting on
the scale:
■ Anti-clockwise = lower level of browning, degree to which
the food is cooked
■ Clockwise = higher level of browning, degree to which the
food is cooked
Note: In the Basic settings menu, you can adjust the
browning level for all automatic programmes (see section:
Changing basic settings).
10.Press the ƒ Start button.
No preheating indicator appears. A signal sounds once the
programme is completed. The programme is finished.
11.Switch off the appliance.
Notes
■ If you want to call up the programme length, press and hold
the
KJ clock function button until the KJ and x symbols
light up.
■ If you want to stop the programme (pause), briefly press
the
„ Stop button. Press the ƒ Start button to continue the
programme.
■ If you want to cancel the programme, then press and hold
the
„ Stop button.
Programme table
In this section you will find all the programme groups and the
programmes they contain. Read the instructions before
preparing food using a programme.
Notes
■ With individual pieces, always enter the weight of the largest
piece.
■ Follow the instructions about turning and cutting. They are
shown in the text display.
3
&KLFNHQSRUWLRQVIUHVK
3RXOWU\
Programme group Programme Selection Weight range in
kg
Accessories Shelf
position
Bread
White bread
1, 3
Without a tin 0.50 - 2.00 Baking tray 1
Wheat bread/mixed wheat bread
1, 3
Without a tin 0.50 - 2.00 Baking tray 1
In loaf tin 0.80 - 2.00 Wire rack 1
Multi-grain rye bread with yeast
1, 3
In loaf tin 0.80 - 2.00 Wire rack 1
Flatbread
3
- 0.40 - 1.00 Baking tray 1
Cakes & pastries
Plaited loaf, not filled/savarin
3
- 0.50 - 1.50 Baking tray 1
Sponge cake - 0.30 - 0.70 Wire rack 1
Meat
Joint of pork with crackling - 0.70 - 2.50 Universal pan with
wire rack
1
Pork neck joint, boned, fresh - 0.70 - 2.50 Universal pan with
wire rack
1
Smoked pork, boned/rolled roasting
joint
- 0.70 - 2.00 Universal pan with
wire rack
1
Beef loin, fresh Medium 0.80 - 1.50 Universal pan with
wire rack
1
Sirloin, fresh Medium 0.80 - 1.80 Universal pan with
wire rack
1
Rare 0.80 - 1.80 Universal pan with
wire rack
1
1
The instruction "Cut into the bread" is displayed. Press the ƒ Start button to confirm the instruction.
2
The instruction "Turn" is displayed. Press the ƒ Start button to confirm the instruction.
3
The second dough-proving phase is included in the programme sequence.

28
Reheat - warming using steam
With the ä Reheat operating mode, you can gently reheat food
that has already been cooked or crisp up day-old bread. Steam
is switched on automatically. The Reheat operating mode is not
suitable for defrosting
ã=Risk of burns!
Plates and dishes may become very hot. Take plates and
dishes out of the cooking compartment using an oven glove.
Notes
■ Condensation is produced while the appliance is in
operation. The door panel steams up and water collects on
the base of the cooking compartment. Depending on the
temperature, the cooking compartment will dry out.
■ Do not cover food while it is being reheated.
■ The reheating time depends on the type and quantity of the
food and the accessories used.
■ We recommend that you use dishes that are as wide and flat
as possible.
■ Do not use cold dishes, as this will prolong the reheating
process.
■ Only use heat-resistant dishes.
■ If possible, only reheat similar types of food of the same size
at one time.
■ Dry the appliance after reheating (see section: After every
steam-assisted cooking operation)
Reheating plated meals
Arrange the individual components of the meal (e.g. pasta,
vegetables and meat) on a warm plate (room temperature).
Note: The time required depends on the item in the meal with
the longest reheating time (e.g. meat).
The details given in the table are guidelines. Always use shelf
height 1 for reheating food.
Only preheat your appliance if it is recommended in the table.
Poultry
Whole chicken, fresh
2
- 0.70 - 1.50 Universal pan with
wire rack
1
Chicken portions, fresh - 0.05 - 0.80 Universal pan with
wire rack
1
Goose/duck, unstuffed, fresh
2
- 1.30 - 4.50 Universal pan with
wire rack
1
Fish
Fish fillet - 0.20 - 0.50 Universal pan with
wire rack
1
Whole fish - 0.30 - 1.00 Flat, open dish
with wire rack
1
Programme group Programme Selection Weight range in
kg
Accessories Shelf
position
1
The instruction "Cut into the bread" is displayed. Press the ƒ Start button to confirm the instruction.
2
The instruction "Turn" is displayed. Press the ƒ Start button to confirm the instruction.
3
The second dough-proving phase is included in the programme sequence.
Food Shelf height Temperature in°C Cooking time in minutes
Reheating cooked food
Plated meal (meat and accompaniment, 1 portion) 1 100 120 25 - 30
Plated meal (pasta with sauce, 1 portion) 1 100 120 10 - 20
Pasta/rice (1 portion) 1 80 - 100 10 - 20
Pasta/rice (500 - 1000 g) 1 80 - 100 20 - 30
Unpeeled boiled potatoes 1 100 120 20 - 30
Boiled potatoes 1 100 120 15 25
Vegetables 1 100 120 20 - 30
Bake, savoury 1 120 140 20 - 30
Bake, sweet 1 120 140 20 - 30
Heating baked goods
Bread rolls/baguette, frozen, prebaked 1 160 - 180 10 - 20
Bread rolls/baguette, vacuum packed 1 180* 10 - 20
Sweet bread rolls 1 160 - 180 10 - 20
Sweet bread rolls, frozen 1 150 - 170 15 25
Plaited loaf, not filled 1 150 - 170 15 25
* Preheat the appliance

29
Defrosting
In this section, you can read about
■ how to defrost using 3 CircoTherm®
■ how to use the A Defrost operating mode
Defrosting with CircoTherm®
Use 3 CircoTherm® to defrost and cook frozen products.
Notes
■ Frozen products that have been defrosted (meat in particular)
require shorter cooking times than fresh products
■ The cooking time for frozen meat increases by the defrosting
time
■ Always defrost frozen poultry before cooking so that you can
remove the giblets
■ Cook frozen fish at the same temperatures as fresh fish
■ You can place large quantities of ready made frozen
vegetables in aluminium dishes in the cooking compartment
at the same time
■ Use shelf height 1 when defrosting on one level, and shelf
heights 1 + 3 when using two levels
■ Observe the instructions on the packaging when using frozen
foods.
Defrost
Using defrost setting A you can defrost delicate pastries
particularly well (e.g. cream cakes).
1. Switch on the A Defrost operating mode.
2. Defrost the frozen food for 25-45 minutes, depending on type
and size.
3. Remove the frozen food from the cooking compartment and
let it thaw for 30 - 45 minutes.
With small quantities (pieces), the defrosting time is shortened
to 1520 minutes and the extended defrosting time is shortened
to 1015 minutes.
Preserve
ã=Risk of injury!
Preserving jars containing incorrectly preserved food can burst.
Please observe the following instructions:
■ Fruit and vegetables must be fresh and in good condition
■ Only use clean and undamaged preserving jars
■ The preserving jars must not touch each other in the cooking
compartment during preserving
With
3 CircoTherm® , the cooking compartment can be used
to preserve the contents of up to six ½, 1 or 1½ litre preserving
jars at the same time.
Notes
■ For each preserving process, only use preserving jars that
are the same size and contain the same food.
■ Pay attention to cleanliness when preparing and closing the
preserving jars.
■ Only use heat resistant rubber rings.
■ You cannot preserve the following food in your appliance: the
contents of tin cans, meat, fish or pie filling.
Preparing fruit
1. Wash fruit and, depending on the type, peel, remove the
seeds and finely chop.
2. Fill the preserving jars with fruit up to approx. 2 cm below the
rim.
3. Fill the preserving jars with hot, skimmed sugar solution
(approx.
Y l for a one litre jar).
To one litre water:
■ approx. 250 g sugar for sweet fruit
■ approx. 500 g sugar for sour fruit
Preparing vegetables
1. Wash vegetables and depending on the type, clean and finely
chop.
2. Fill the preserving jars with vegetables up to approx. 2 cm
below the rim.
3. Fill the preserving jars immediately with hot, boiled water.
Quiche 1 140 - 150 10 - 20
Pizza 1 140 - 150 10 - 20
Heating convenience products
Lasagne, chilled (400 g) 1 140 - 150 20 - 30
Lasagne, chilled (1000 g) 1 140 - 150 25 35
Pizza, frozen, with deep-pan base 1 180 20 - 30
Pizza baguette, frozen 1 180 20 - 30
Food Shelf height Temperature in°C Cooking time in minutes
* Preheat the appliance
Frozen meals Tempera-
ture in °C
Defrosting
time in min-
utes
Raw frozen products/ foods 50 30 - 90
Bread/Bread rolls (750 - 1,500 g) 50 30 - 60
Dry, frozen tray bakes 60 45 - 60
Moist, frozen tray bakes 50 50 - 70
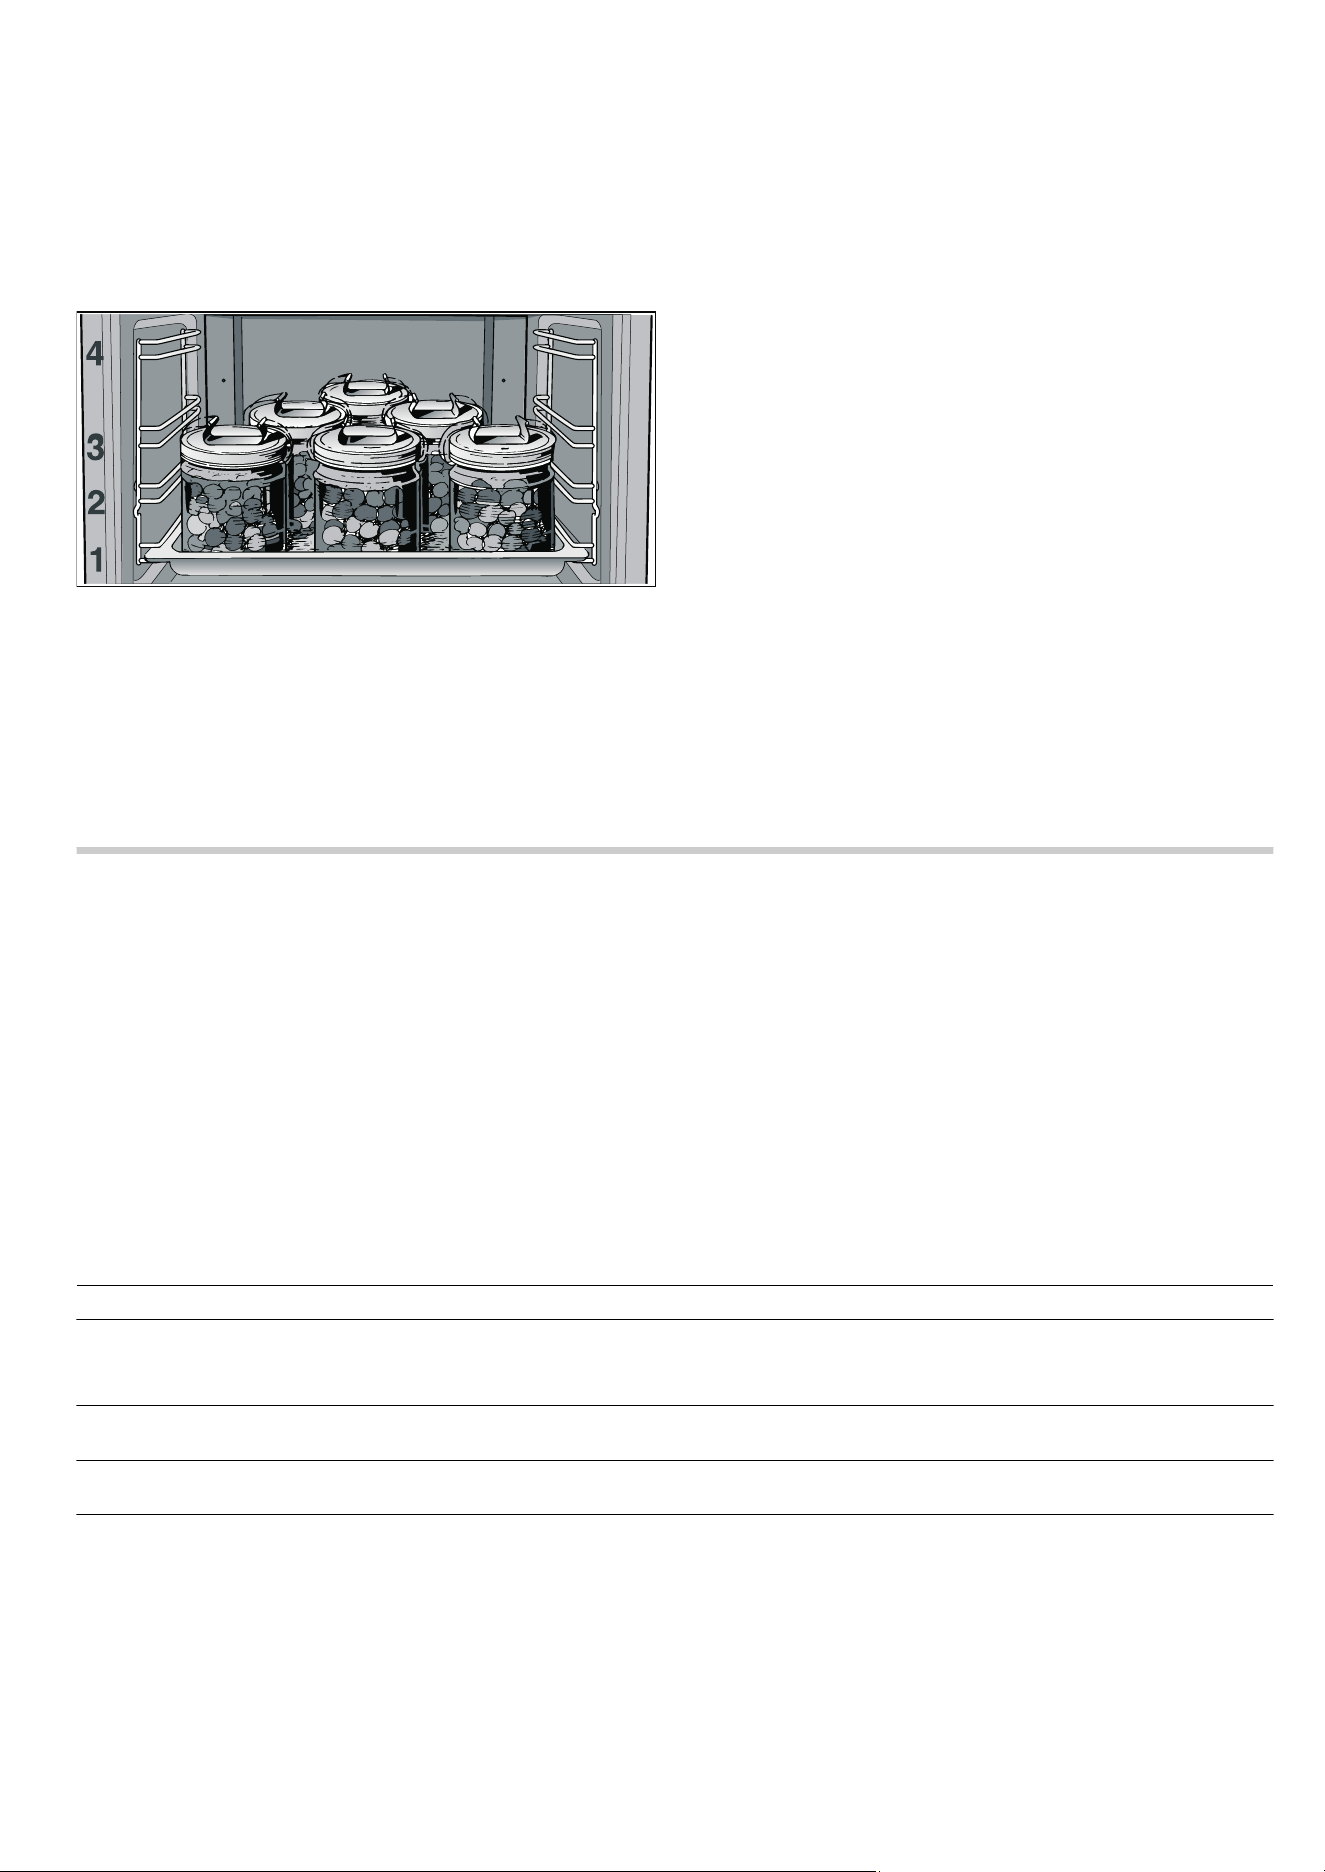
30
Closing the preserving jars
1.Wipe the rims of the preserving jars with a clean, damp cloth.
2.Put a wet rubber ring and lid in place and close the jars with
the clips.
Starting the preserving process
1.Insert the universal pan at shelf height 1.
2.Position the preserving jars in a triangle without them
touching each other.
3.Pour ½ litre of hot water (approx. 80 °C) into the universal
pan.
4.Set 3 CircoTherm® at 160 °C.
■ Preserving jars containing ½ or 1 litre will start to bubble
after approx. 50 minutes
■ Preserving jars containing 1½ litres will start to bubble after
approx. 60 minutes
Ending the preserving process
For fruit, gherkins and tomato purée:
1.Turn off the appliance, once all preserving jars are bubbling.
2.Allow the preserving jars to stand in the closed cooking
compartment for several minutes longer.
■ Raspberries, strawberries, cherries or gherkins: approx.
5-10minutes
■ Other fruit: approx. 10 - 15 minutes
■ Tomato or apple purée: approx. 15 - 20 minutes
For vegetables:
1.Reduce the temperature to 100 °C once all the preserving
jars are bubbling. Allow the preserving jars to continue
bubbling for approx.60 minutes in the closed cooking
compartment.
2.Switch off the appliance.
3.Allow the preserving jars to stand in the closed cooking
compartment for approx. 15 - 30 minutes longer.
Removing the preserving jars
1.Place the preserving jars on a clean cloth, cover and protect
from draughts.
2.Remove clips only when the jars are cold.
Cleaning and care
In this section, you will find information on
■ cleaning and care of your appliance
■ Cleaning agents and aids
■ Descaling
■ Self-cleaning surfaces in the cooking compartment
■ Oven cleaning aid
ã=Risk of short circuit!
Do not use high-pressure cleaners or steam jet cleaners to
clean your appliance.
Caution!
Surface damage due to incorrect cleaning: Do not use any
■ harsh or abrasive cleaning agents
■ cleaning agents that contain alcohol
■ abrasive cleaning aids such as steel wool or scourers.
Observe the specifications in the tables.
Note: Highly recommended cleaning and care products can be
purchased through our after-sales service. Observe the
manufacturer's instructions.
Cleaning the appliance exterior
Appliance part/surface Cleaning agent/aid
Stainless steel surfaces Apply commercially available washing-up liquid with a soft, damp cloth or chamois; dry
with a soft cloth.
Use cleaners for matted stainless steel if very dirty.
Painted surfaces Apply commercially available washing-up liquid with a soft, damp cloth or chamois; dry
with a soft cloth.
Glass surfaces Apply commercially available washing-up liquid with a soft, damp cloth or chamois; dry
with a soft cloth.
Door panels Use a commercially available glass cleaner or washing-up liquid with a soft, damp
cloth or chamois; dry with a soft cloth.
The inner door panel on the appliance door has a coating which reduces the tempera-
ture and reflects the heat. The view through the appliance door is not impaired by this.
When the appliance door is open this coating can have the effect of a light-coloured
film. This is part of the design and is not due to any quality defect.

31
Cleaning the cooking compartment
Caution!
Risk of damaging the surface. Do not clean the appliance while
still warm, even if using oven cleaners specially intended for
this purpose.
Notes
■ Enamel is baked on at very high temperatures during
manufacture. This can cause some slight colour variation.
This is normal and does not affect proper functioning.
■ The edges of thin trays cannot be completely enamelled. As
a result, these edges can be rough. Anti-corrosion protection
is still guaranteed, however.
Keeping the appliance clean
To avoid getting the cooking compartment dirty,
■ clean the cooking compartment after each use, as dirt will
bake on the next time it is heated up, and this can only be
removed with difficulty
■ always remove flecks of limescale, grease, starch and
albumin (e.g. egg white) immediately
■ use 3 CircoTherm® whenever possible. This operating
mode creates less dirt
■ Use the universal pan to bake very moist cakes
■ use suitable ovenware when roasting (e.g. roasting dish) or a
roasting sheet (see section: Accessories)
Descaling
You can descale your appliance at any time. However, you
must descale the appliance at regular intervals. Otherwise, you
will not be able to continue cooking using steam. The lit
Í symbol reminds you to do this.
After starting steam-assisted operation, the
Í symbol lights up
and "No. of uses until descaling required 5" appears for a short
time in the text display. This number tells you how many steam-
assisted operations (e.g. 5) you can still run before you must
descale your appliance. You can therefore prepare for the
descaling in good time.
The descaling programme (duration approx. 40 minutes)
consists of the following sequences:
■ Descaling
■ 1st rinse
■ 2nd rinse
For hygiene reasons, the descaling programme must be run
through completely so that the appliance can be ready for
operation again. It cannot be interrupted using the
„ Stop
button.
If the descaling process is interrupted (for example, due to a
power failure or because the appliance is switched off), you are
prompted to continue with the descaling programme after the
appliance is switched back on. The programme continues by
repeating the interrupted process (for example, 1st rinse).
Caution!
■ Damage to the appliance: Only use the descaling tablets
that are recommended by us to descale the appliance. Other
descalers may damage the appliance.
Ordering descaling tablets through after-sales service:
Product no. 310967
Ordering descaling tablets through the retail trade: Product
no. TZ60002
■ Risk of surface damage: Do not allow descaling solution to
come into contact with the control panel or other sensitive
surfaces. If this does happen, remove the descaling solution
immediately with water.
Start the descaling programme.
The descaling programme can only be started once the
cooking compartment has completely cooled down. There must
be no residual heat (
œ or •) shown in the display.
If you have cooked using steam immediately before descaling,
you must first switch the appliance off so that the residual water
is pumped out of the evaporator system.
1. Dissolve the descaling tablets in water to make a descaling
solution.
Note: Follow the manufacturer's instructions for the descaling
tablets.
2. Switch on the appliance.
Water tank Use standard washing-up liquid, dry with a soft cloth and allow to dry off with the lid
open.
Thoroughly rub the seal on the lid until dry after every use.
Caution!
Damage to the water tank: Do not clean the water tank in the dishwasher. Clean the
water tank with standard washing-up liquid.
Tank recess Rub dry with a soft cloth after every use
Appliance part/surface Cleaning agent/aid
Appliance part Cleaning agent/aid
Enamel surfaces (smooth surfaces) To facilitate cleaning, you can switch on the interior lighting and detach the appliance
door if necessary.
Apply commercially available washing-up liquid or a vinegar solution with a soft, damp
cloth or chamois; dry with a soft cloth.
Loosen baked on food residues with a damp cloth and detergent.
We recommend using oven cleaning gel if the oven is very dirty. This can be applied
neat to the affected area.
Leave the cooking compartment open to dry after cleaning.
Self-cleaning surfaces (rough surfaces) Please see the notes in section: Self-cleaning surfaces
Door seal Hot soapy water
Hook-in rack/telescopic shelf Hot soapy water
Accessories Soak in hot soapy water, clean with a brush and sponge or wash in the dishwasher.
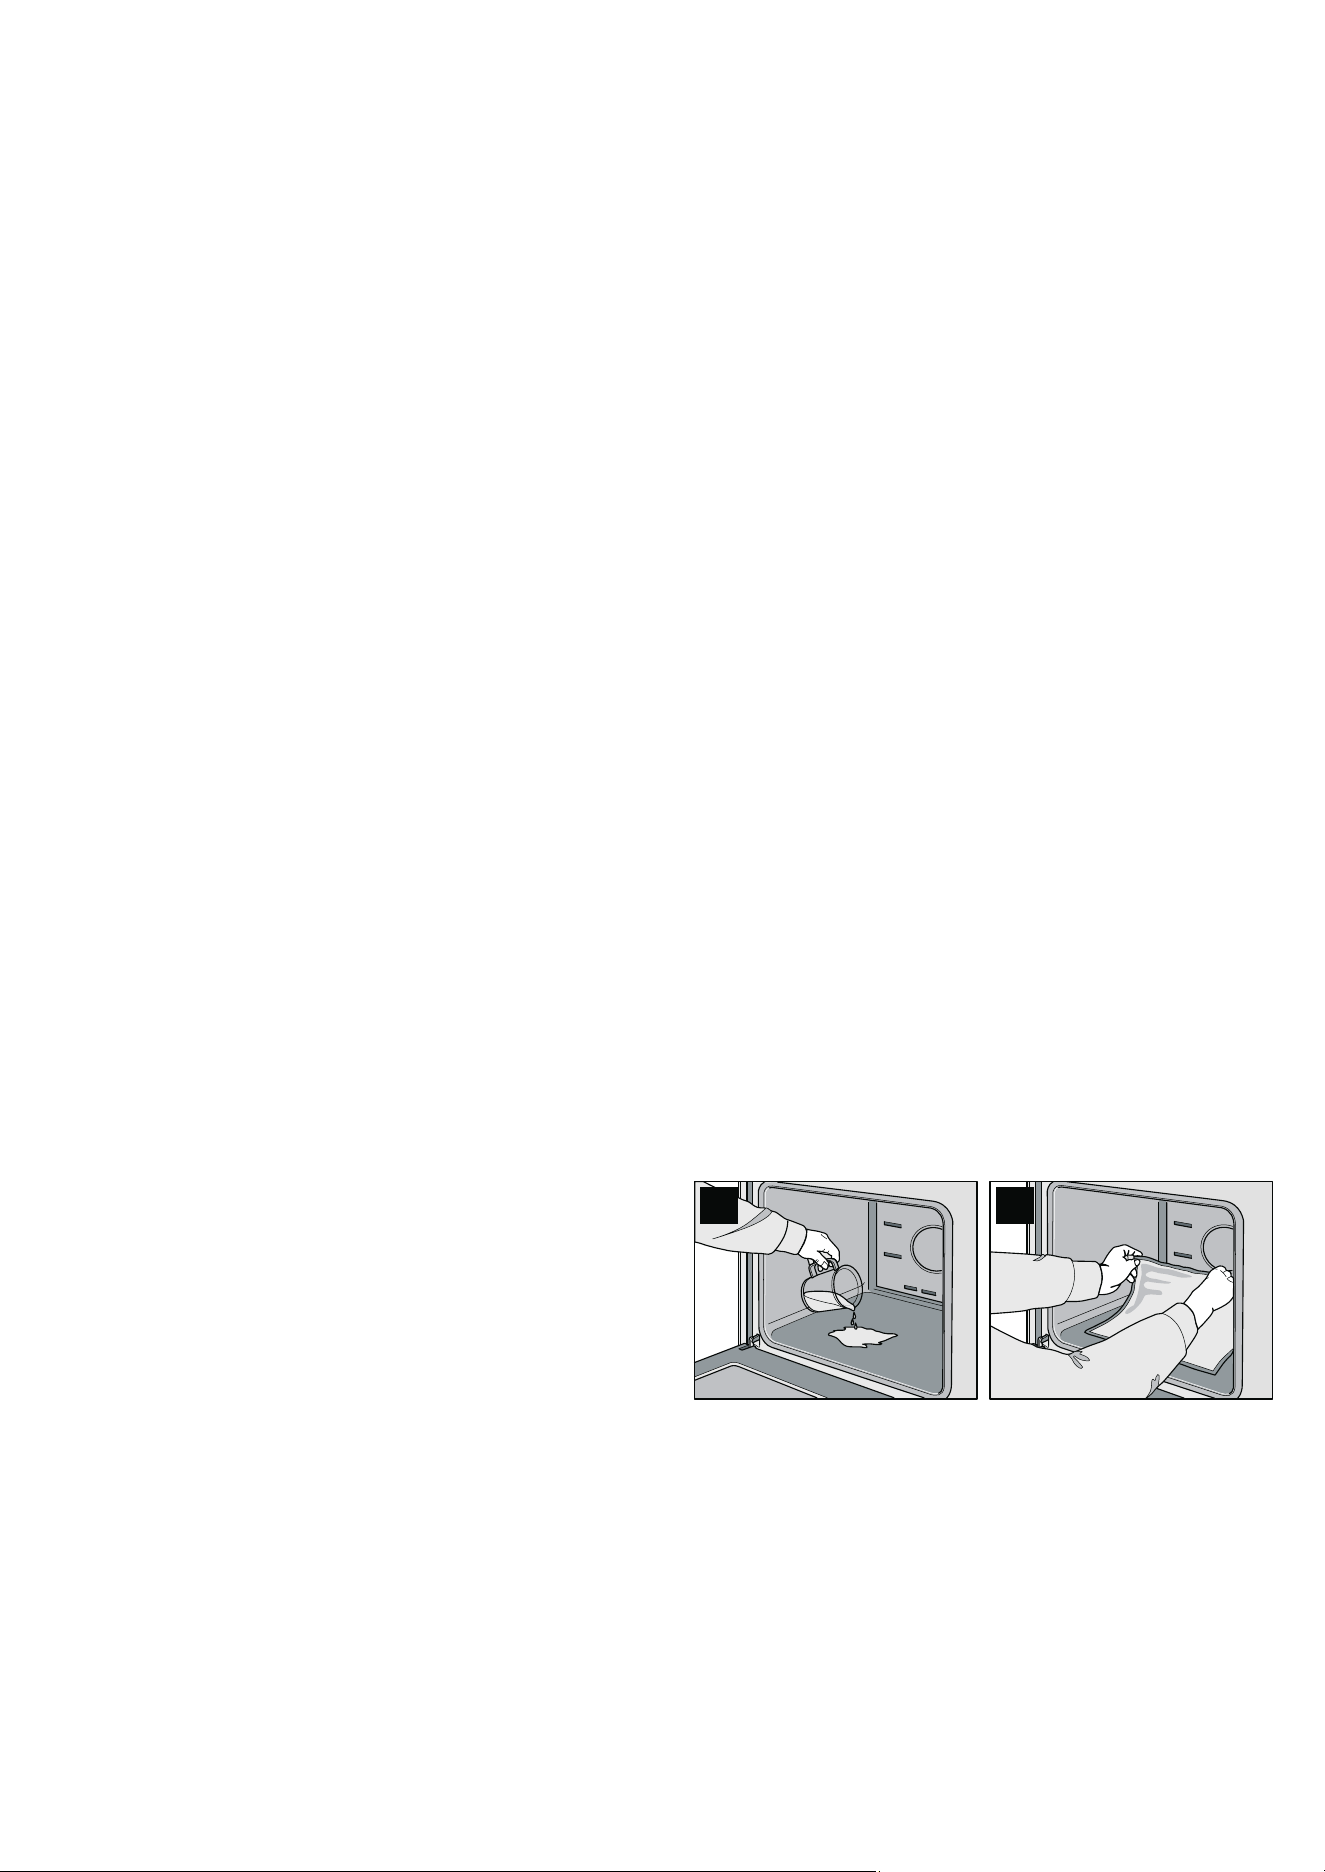
32
3.Press and hold the Í descaling button for 3 seconds.
"Pour descaling solution into tank and press Start button" and
š†™ are displayed.
4.Fill the water tank with 400 ml of descaling solution and slide
it in fully. Dispose of the rest of the descaling solution and
rinse with water.
5.Press the ƒ Start button.
The
ƒ symbol lights up The descaling starts.
Notes
■ If the water tank has not been filled, a signal sounds and the
Descale programme does not start. Fill the water tank with
the descaling solution and slide it in fully.
■ If a signal sounds and the ƒ symbol flashes, this indicates
that the
ƒ Start button has not been pressed. Press the
ƒ Start button.
■ The clock display shows how long the Descale programme
has left to run.
1st rinse
After the descaling is complete, a signal sounds and "Empty
tank and refill with fresh water" is displayed in the text display.
1.Empty the water tank, rinse it out thoroughly and fill it with
400 ml fresh water.
2.Slide in the water tank all the way.
"1st rinse" and
§ü‚ are displayed (rinsing1 = 1st rinse). The
ƒ symbol flashes.
3.Press the ƒ Start button.
The
ƒ symbol lights up The appliance starts rinsing.
After the 1st rinse is complete, a signal sounds and "Empty
tank and refill with fresh water" is displayed in the text display.
2nd rinse
1.Empty the water tank, thoroughly rinse it and fill it with 400 ml
fresh water.
2.Slide in the water tank all the way.
"2nd rinse" and
§ü ƒ are displayed (rinsing2 = 2nd rinse). The
ƒ symbol flashes.
3.Press the ƒ Start button.
The
ƒ symbol lights up The appliance starts rinsing.
After the 2nd rinse is complete, a signal sounds and "Empty
tank and clean" and "Descaling complete" are displayed in the
text display.
Removing the remaining water
1.Empty and thoroughly rinse out the water tank.
2.Switch off the appliance.
Self-cleaning surface
The back wall of the cooking compartment is coated with self-
cleaning enamel. This coating absorbs and disintegrates
splashes from baking and roasting while the oven is in
operation.
Large splashes only disappear after the oven has been used
several times.
Discolouration on the rear wall does not affect the self-cleaning
function.
Caution!
Damage to surfaces on self-cleaning areas due to applying
oven cleaner.Never clean the self-cleaning surfaces with oven
cleaner.
If oven cleaner accidentally gets onto self-cleaning surfaces,
remove it immediately with a sponge and plenty of water.
Caution!
Damage to surfaces on self-cleaning areas due to the use of
abrasive and acidic cleaning agents and aids.
Do not use cleaning agents containing abrasive substances or
acids.
Do not use abrasive cleaning aids such as steel wool or
scourers.
EasyClean®
Your appliance comes with an > EasyClean® function to
make cleaning the cooking compartment easier. An
automatically controlled vaporisation of soapy water loosens
residues and makes it easier to remove them afterwards.
In the case of persistent dirt, you can
■ allow the soapy water to penetrate for a while before
switching on EasyClean
■ rub detergent onto the dirty surfaces before switching on the
cleaning aid
■ repeat the EasyClean® function once the cooking
compartment has cooled
Preparation and switching on
EasyClean® only starts when the cooking compartment is cool.
ã=Risk of scalding and surface damage!
Never pour water into the cooking compartment when it is hot.
Water vapour will be created and the enamel may be damaged
because of the change in temperature.
1.Remove the accessories from the cooking compartment.
2.Carefully pour 0.4 litres of water (not distilled water) with
some detergent into the base trough of the cooking
compartment (Fig. A).
3.Close the appliance door.
4.Switch on EasyClean®.
"EasyClean in operation" appears in the text display and
“’†
in the temperature display.
If, after EasyClean is switched on, "Not possible" appears in
the text display and
œ or • and “’† appear alternately in the
temperature display, the cooking compartment has not
completely cooled down.
Wait until the cooking compartment has cooled down and
switch EasyClean® on again.
Once EasyClean® has finished, the cooking compartment
light switches on and "EasyClean complete" appears in the
text display. A signal sounds.
5.Press the clock function button to exit the clock function.
Cleaning up and switching off
Do not leave the remaining water in the cooking compartment
for a long time (e.g. overnight).
1.Open the appliance door and remove the remaining water
with an absorbent sponge cloth (Fig. B).
2.Clean the cooking compartment with a sponge cloth, a soft
brush or a plastic saucepan scrubber.
Note: You can remove any remaining, persistent residue with
a glass scraper for glass ceramic.
3.Remove limescale with a cloth soaked in vinegar, then wipe
with clean water and rub dry with a soft cloth. Remember to
dry under the door seal.
4.Turn the operating mode selector back to the Û position.
$ %
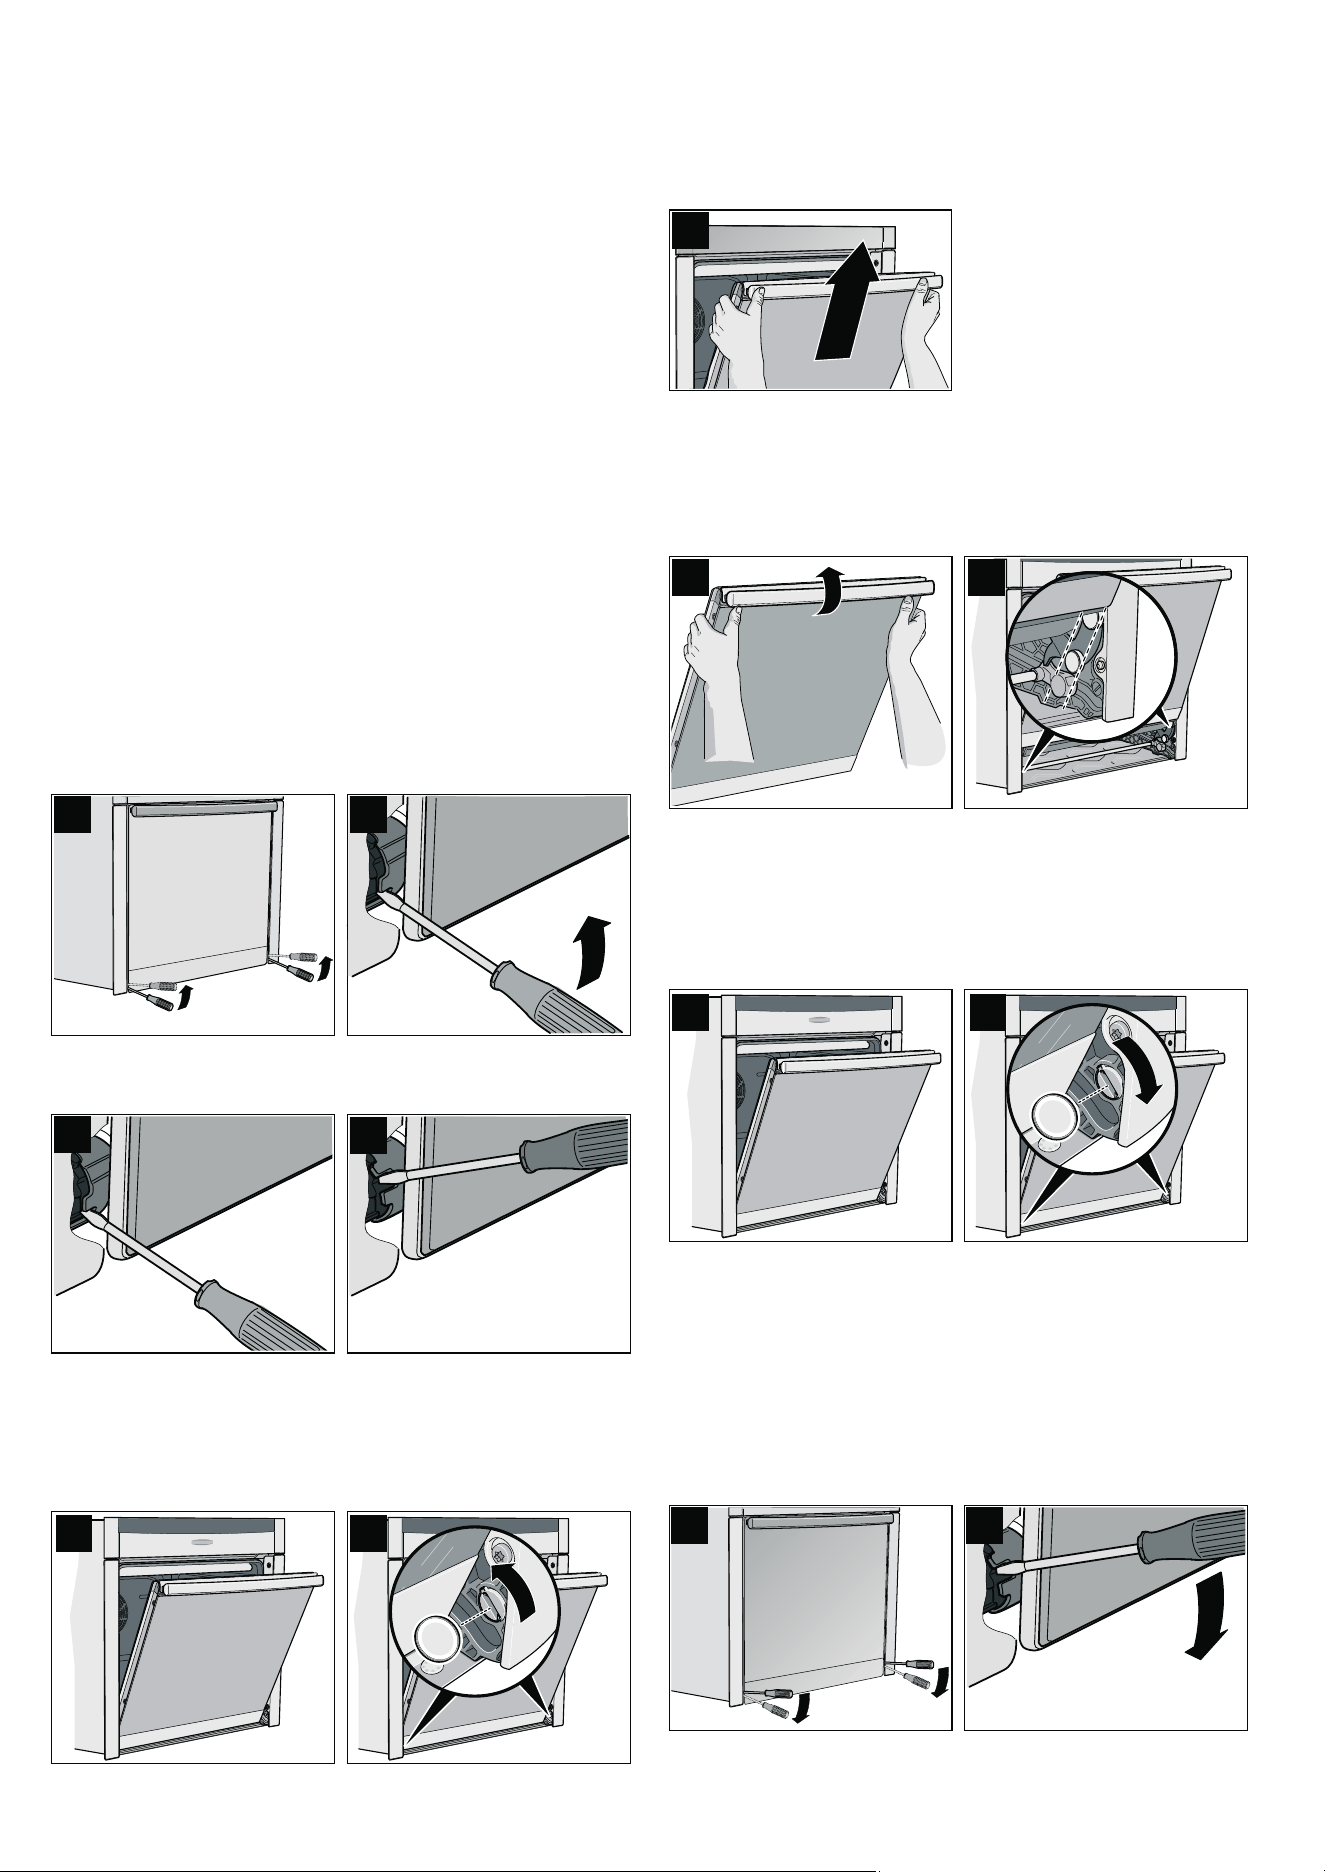
33
5. After cleaning, leave the appliance door ajar in the stop
position (approx. 30°) for approx. 1 hour to allow the enamel
surfaces in the cooking compartment to dry thoroughly.
Rapid drying
1. After cleaning, leave the appliance door ajar in the stop
position (approx. 30°).
2. Set 3 CircoTherm® at 50 °C.
3. After 5 minutes, switch off the appliance and close the
appliance door.
Removing and fitting the appliance door
You can remove the appliance door to clean it more
thoroughly.
ã=Risk of injury!
The hinges of the appliance door may snap shut with great
force. Always fully turn the two locks for fitting and removing the
appliance door.
ã=Risk of injury!
If the appliance door has been removed without turning both
locking levers to their limit stops, the hinge may snap shut. Do
not reach into the hinge. Call the aftersales service.
Removing the appliance door
1. Open the left and right-hand hinge lock (Fig. A).
To do this, push the hinge lock (Fig. B) fully upwards on both
sides with a screwdriver.
Hinge lock closed (Fig. C)
Hinge lock open (Fig. D)
2. Open the appliance door a little (Fig. E).
3. Using a coin, fully turn both the left and right-hand locks on
the inside of the appliance at the bottom (Fig. F).
Left lock: clockwise
Right lock: anti-clockwise
4. Close the appliance door a little, until you feel the locks
engage.
The door can now no longer be opened or closed.
5. Lift the door handle slightly using both thumbs and lift out the
appliance door (Fig. G).
Fitting the appliance door
1. Hold the appliance door and raise the door handle slightly
with both thumbs (Fig. A).
2. Fit the appliance door in the left and right-hand guide rollers
simultaneously (Fig. B).
3. Ensure that the appliance door does not tilt unevenly and that
it is properly fitted in place (Fig. C).
4. Use a coin to release both locks on the appliance door
(Fig. D).
Left lock: anti-clockwise
Right lock: clockwise
5. Open the appliance door a little wider and then close it.
ã=Risk of injury from hinge locks which have not been
properly closed!
The appliance door may detach itself. You may be injured
and the appliance door damaged. After refitting the door,
always close the left and right-hand hinge locks.
6. Close the left and right-hand hinge locks (Fig. E).
To do this, push the hinge lock (Fig. F) fully downwards on
both sides with a screwdriver.
$
%
&
'
(
)
*
$
%
& '
)
(
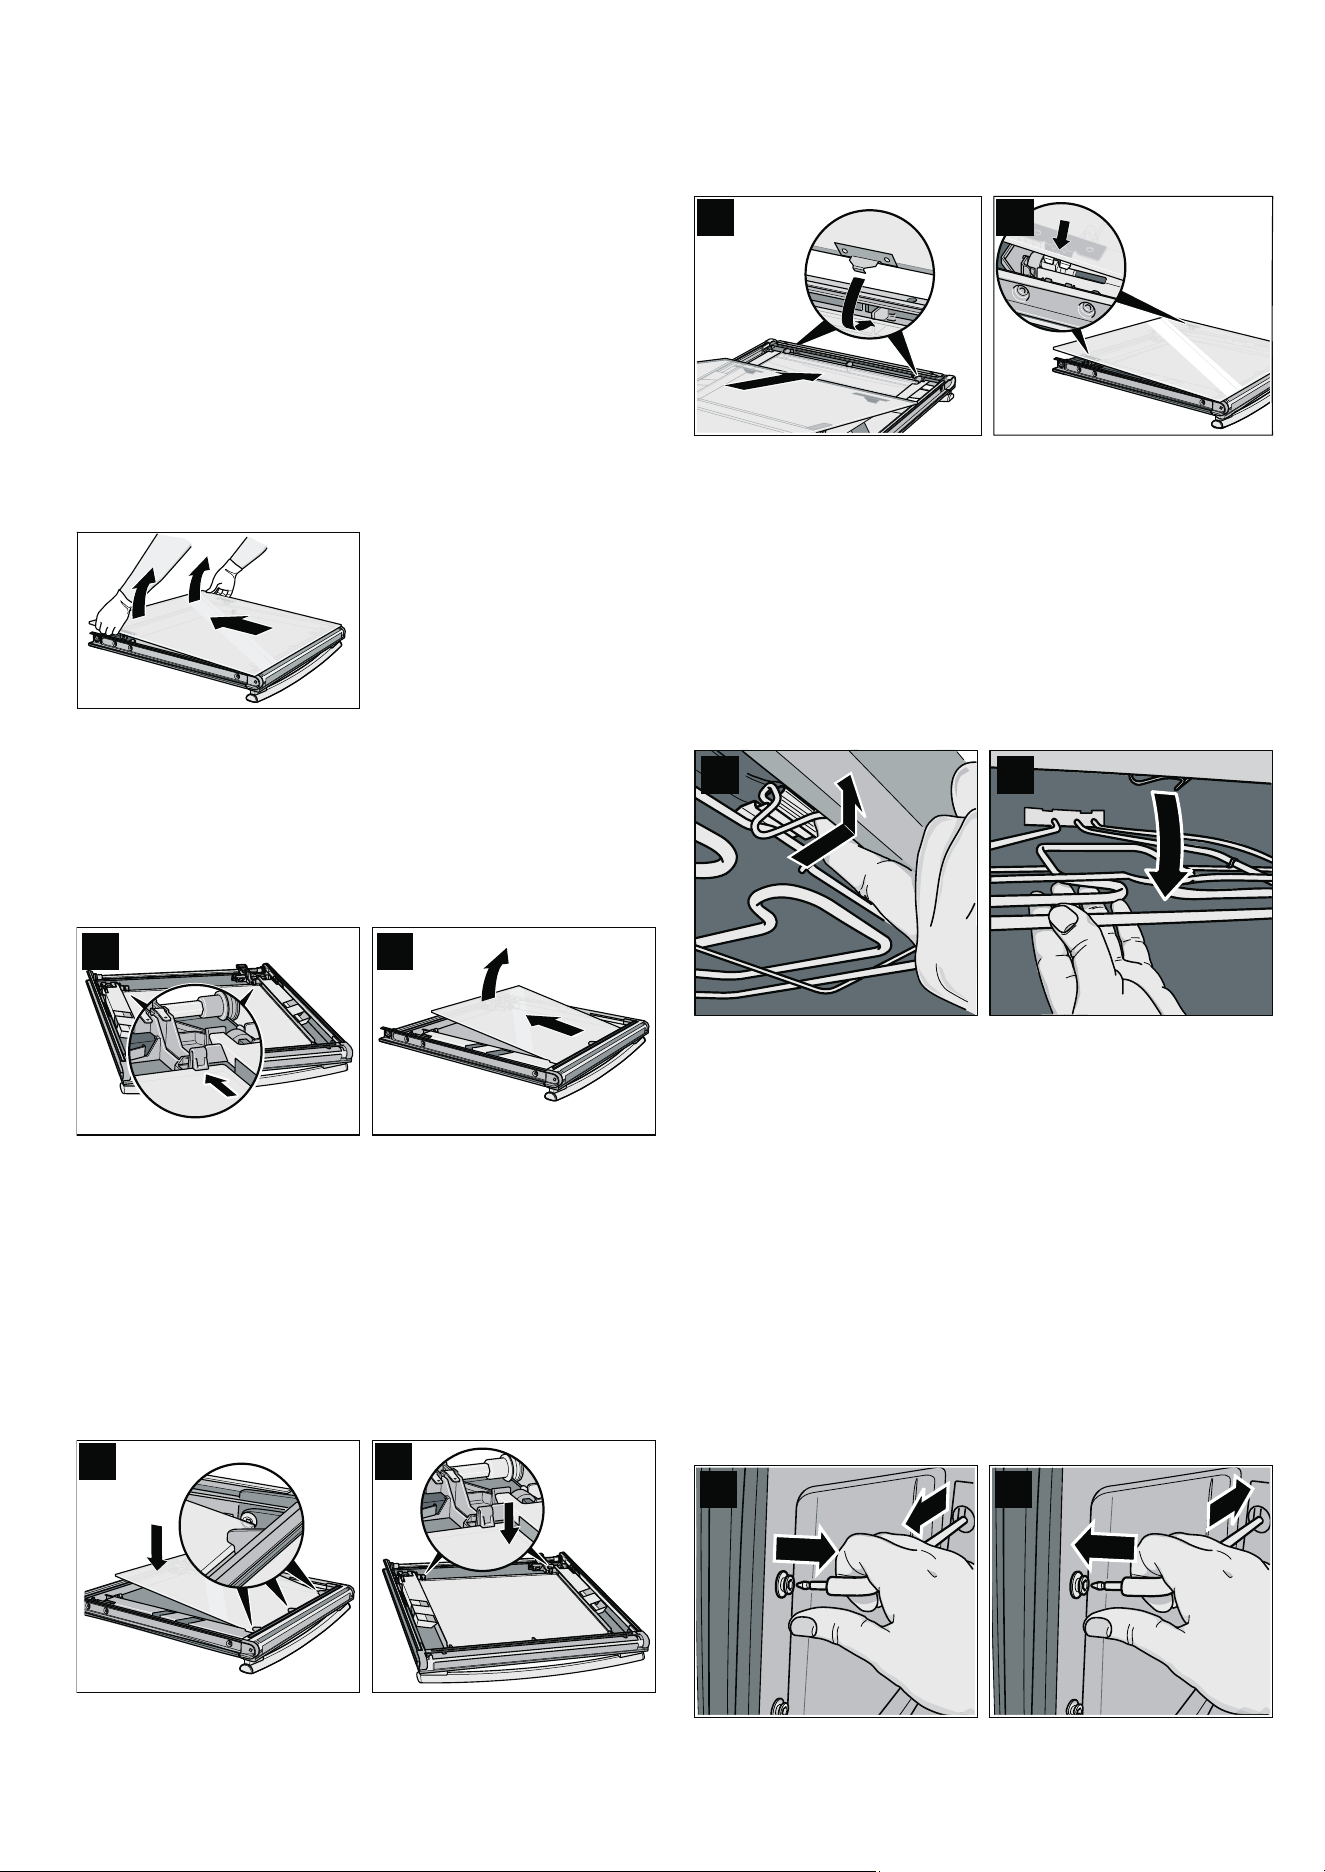
34
Cleaning the door panels
To facilitate cleaning, you can remove the door panels from the
appliance door.
ã=Risk of injury!
The components inside the appliance door may have sharp
edges. Take care not to cut yourself. Wear protective gloves.
ã=Risk of injury!
The appliance must not be used again until the door panels
and appliance door have been correctly fitted.
Removing the door panel
1.Unhook the appliance door and lay it on a soft, clean surface
with the front side facing downwards (see section: Removing
and installing the appliance door).
2.Disengage and pull out the door panel from the latch on the
appliance door by lifting slightly.
Removing the intermediate panel
Before removing, make a note of the position in which the
intermediate panel is fitted, so that you do not refit it the wrong
way round later.
1.Press the left and right holders in the direction of the arrow
(Fig. A) and disengage the intermediate panel.
2.Raise and pull out the intermediate panel (Fig. B).
Cleaning
Clean the door panels with glass cleaner and a soft cloth.
Caution!
Do not use any sharp or abrasive medium or a glass scraper.
The glass could be damaged.
Fitting the intermediate panel
1.Insert the intermediate panel into the three supports (Fig. A).
2.Press on the intermediate panel on the left and right next to
the holders until it engages in the holders (Fig. B).
Fitting the door panel
1.Insert the door panel into the two supports (Fig. A).
2.Press on the door panel on the left and right next to the
holders until it engages in the holders (Fig. B).
Cleaning the cooking compartment ceiling
The grill element can be folded down to allow quick and easy
cleaning of the cooking compartment ceiling.
ã=Risk of burning due to hot components in the cooking
compartment!
Wait until the cooking compartment has cooled down.
1.Pull the grill element retaining bracket towards the front and
push it upwards until you hear the grill element disengage
(figure A).
2.Hold the grill element and fold it downwards (figure B).
3.Clean the cooking compartment ceiling.
4.Pull the retaining bracket towards the front and keep it
pushed upwards.
5.Fold the grill element upwards, until it clicks into place.
Cleaning the hook-in racks
You can remove the hook-in racks for easier cleaning.
ã=Risk of burning due to hot components in the cooking
compartment!
Wait until the cooking compartment has cooled down.
1.Pull out and detach the hook-in rack at the front (Fig. A).
2.Clean the hook-in rack with washing-up liquid and a sponge
or brush.
3.After cleaning, refit the hook-in rack in the reverse order
(Fig. B).
$
%
$
%
$
%
$%
$
%
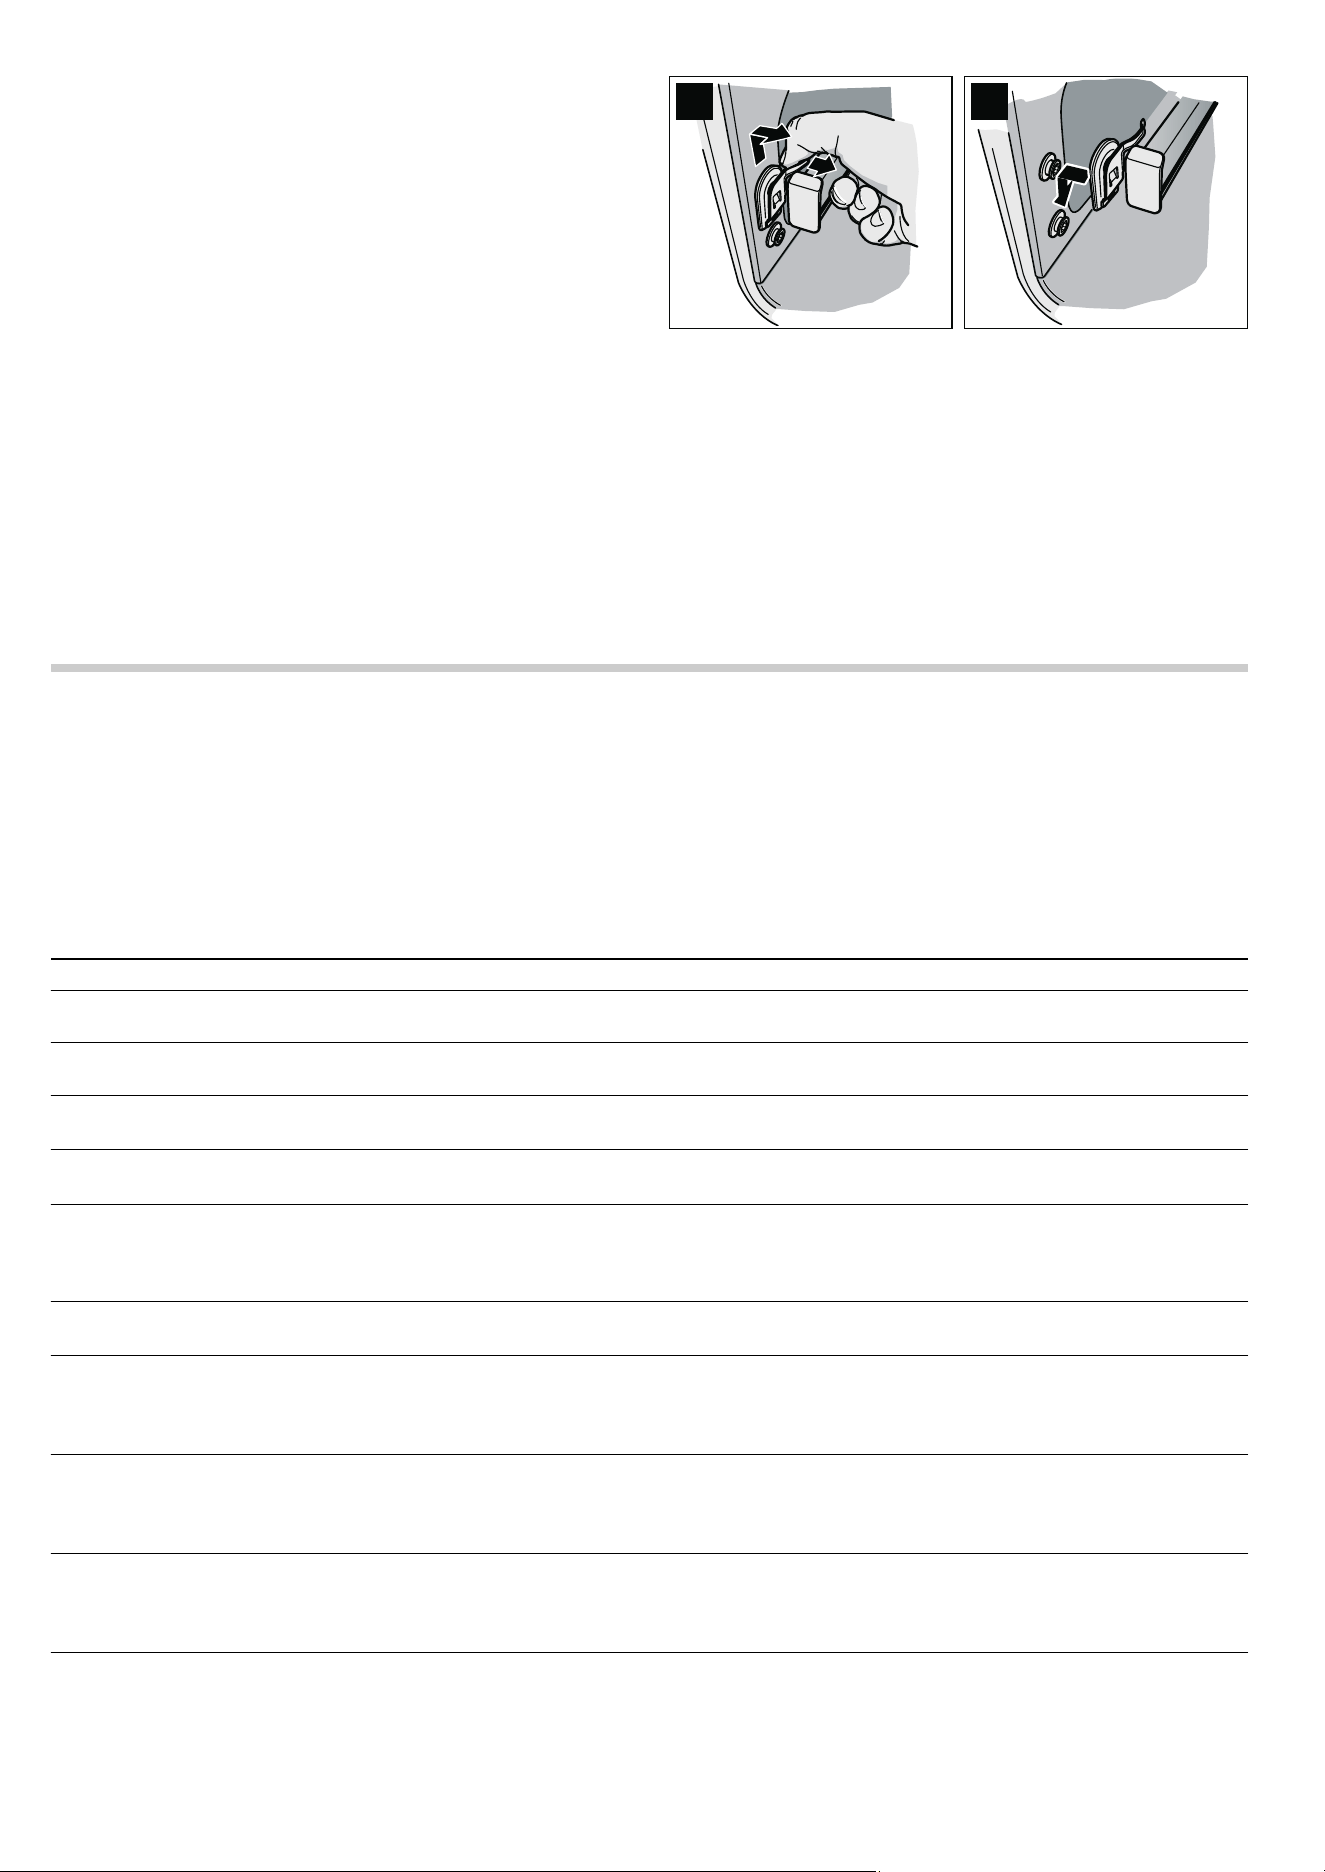
35
Cleaning the telescopic shelves
You can unhook the telescopic shelves for easier cleaning.
ã=Risk of burning due to hot components in the cooking
compartment!
Wait until the cooking compartment has cooled down.
Removing the telescopic shelves
1. Hold the flat spring (Fig. A).
2. Move the telescopic shelf upwards at the front and unhook it
to the side.
3. Pull out the telescopic shelf at the back.
Cleaning the telescopic shelves
Clean the telescopic shelves with washing-up liquid and a
sponge or brush.
Hooking in the telescopic shelves
1. Insert the telescopic shelf at the rear as far as it will go.
2. Insert the telescopic shelf at the front from the top and push it
down until it engages (Fig. B).
3. Push telescopic shelves to the limit stop and close appliance
door.
Faults and repairs
It is not always necessary to call the after-sales service.
Sometimes, you can find a remedy yourself. You will find some
tips for troubleshooting in the following table.
ã=Risk of electric shock!
■ Work on the appliance electronics may only be performed by
a specialist.
■ Always disconnect the appliance from the power supply
when work is carried out on the electronics. Switch off the
circuit breaker or remove the fuse from your household fuse
box.
$
%
Problem Possible cause Remedial action
Electrical function is faulty (e.g. indicator
lamps do not light up)
Fuse defective Check fuses in the fuse box and replace if nec-
essary
Liquid or runny dough runs to one side Appliance not installed level Check the appliance installation (see
the Installation instructions)
‹:‹‹ flashes in the clock display
There was a power cut
Press the KJ clock function button, reset the
clock (see section: Electronic clock)
‹:‹‹ flashes on the clock display, "rrr"
appears on the temperature display
The power supply was interrupted
while the appliance was in operation
Press the KJ clock function button, reset the
clock (see section: Electronic clock)
The appliance prompts you to descale or
to run the 1st or 2nd rinse
The power supply was interrupted or
the appliance was switched off dur-
ing the descaling process
After you have switched the appliance back on,
repeat the process that was interrupted (e.g.
1st rinse) and then continue with the descaling
process.
"E011" appears in the clock display. Permanent assignment of a button Cancel the permanent assignment of the button
and press the
KJ clock function button
"EXXX" appears in the clock display,
e.g. E300
Internal fault in the appliance elec-
tronics
Press the
KJ clock function button. If the mes-
sage does not go out, pull out the mains plug
and plug it back in again after approx.
10 seconds
It is not possible to operate the appliance,
"Appliance locked" appears on the text
display,
D and -†- appear on the temper-
ature display.
The appliance has been locked Deactivate the lock (see section: Childproof
lock)
It is not possible to operate the appliance,
“Appliance permanently locked" appears
on the text display,
D and †˜ appear on
the temperature display.
The appliance controls are locked
permanently
Deactivate the permanent lock
(see section: Childproof lock)
The appliance does not heat up, the two
dots flash on the clock display
‚‡‹©
appears in the temperature display, for
example
A button combination was actuated
Turn the operating mode selector to the
Û off
position, press and hold the
± info button for
3 seconds, then press and hold the
KJ clock
function button for 4 seconds, then press and
hold the
± info button again for 3 seconds
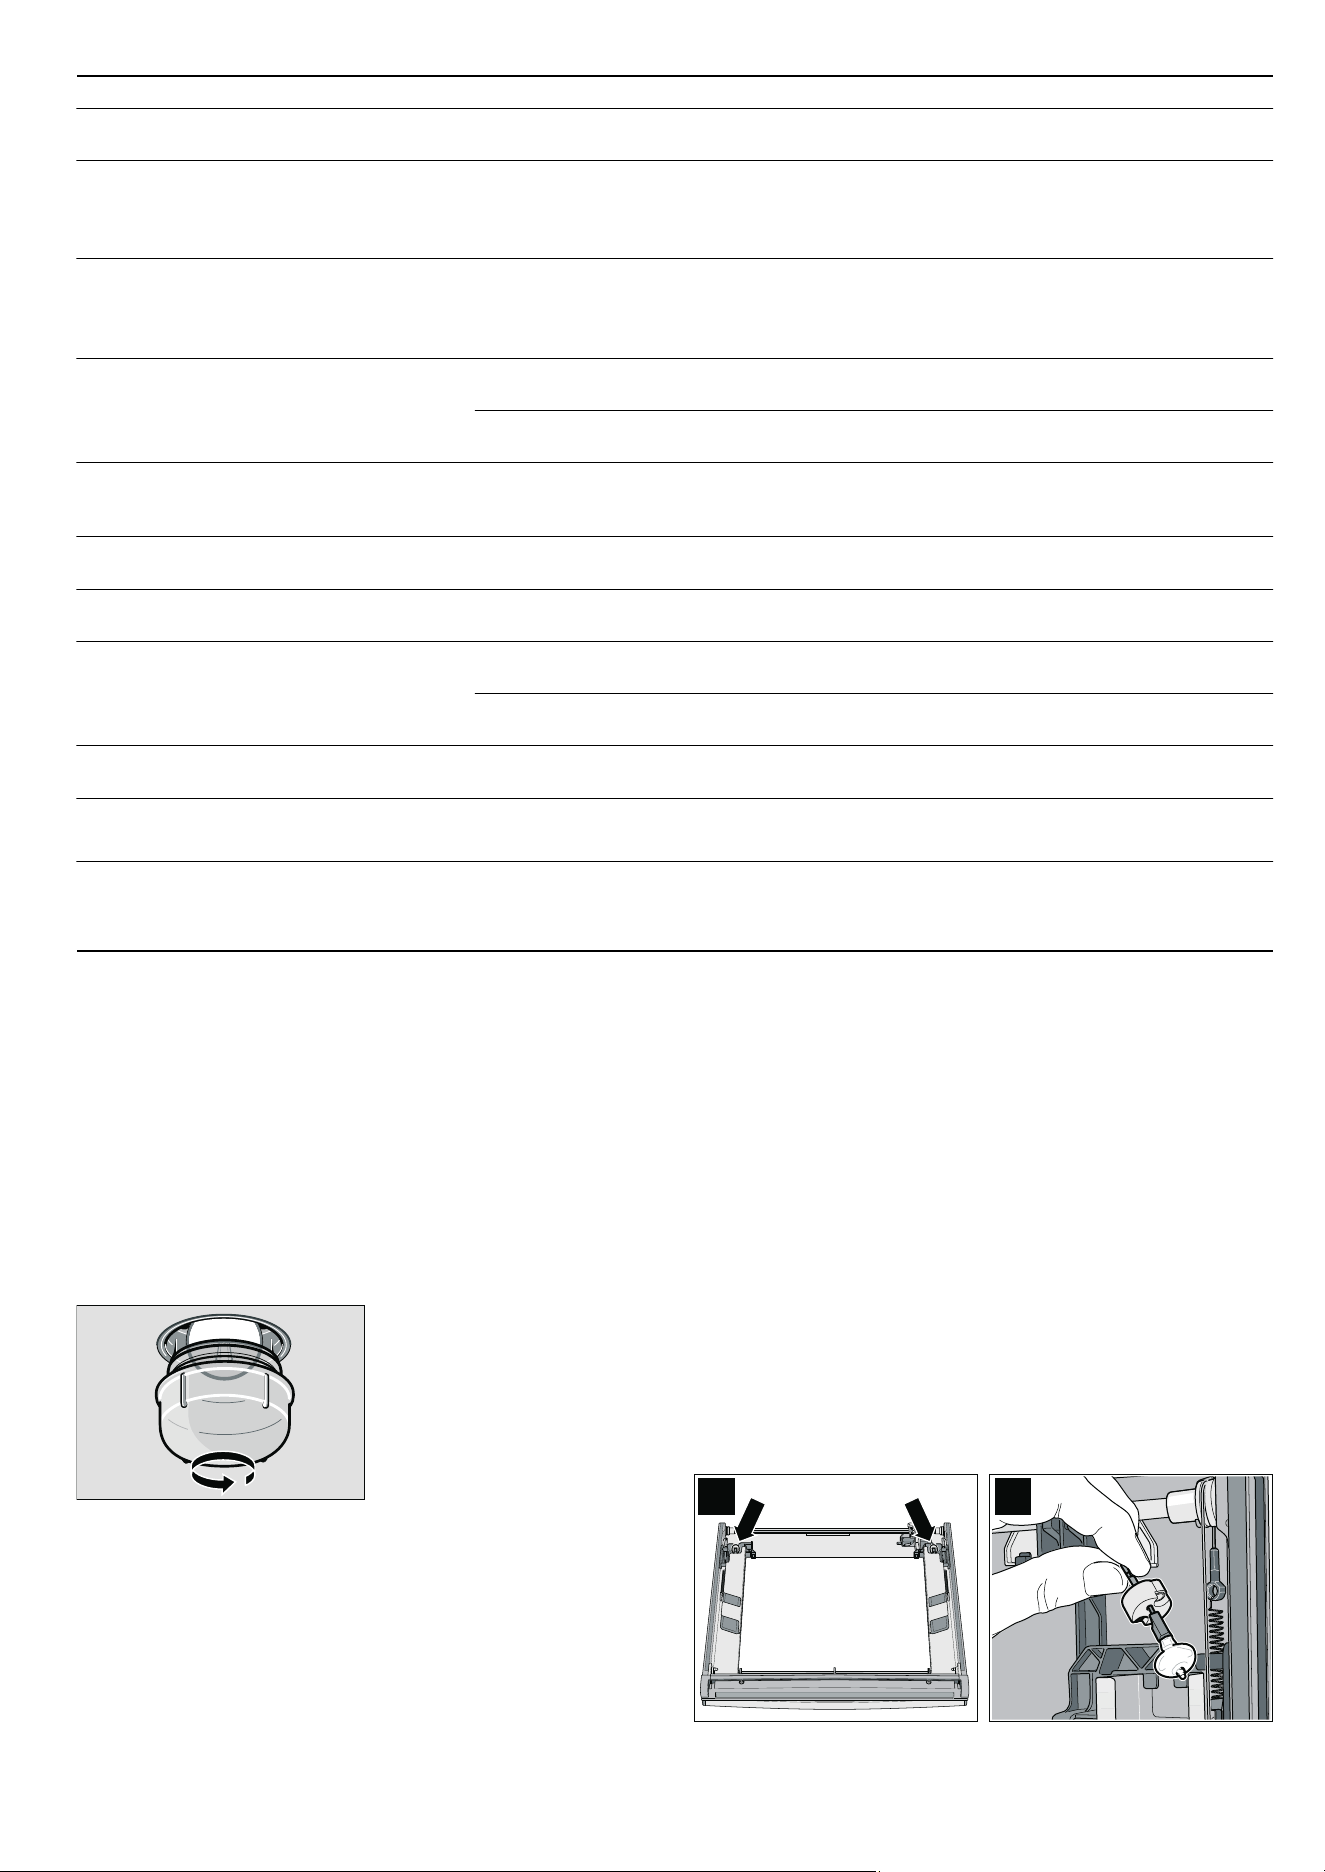
36
Replacing the oven light bulb
Replace faulty oven light bulbs.
You can obtain replacement light bulbs from customer service
or specialist retailers: E14, 220 - 240 V, 40 W, heat resistant to
300 °C. Only use these oven light bulbs.
ã=Risk of electric shock !
Disconnect the appliance from the power supply. Switch off the
circuit breaker or remove the fuse from the household fuse box.
1.Place a tea towel in the cold cooking compartment to prevent
damage.
2.Turn the glass cover anticlockwise and remove it.
3.Replace the oven light bulb with a bulb of the same type.
4.Screw on the glass cover again.
5.Remove the tea towel and switch on the circuit breaker.
Note: If the glass cover cannot be unscrewed: use rubber
gloves to turn it. You can order a special removal tool through
the after-sales service (order no. 613634)
Changing halogen bulbs
Replace faulty halogen bulbs. You can obtain replacement light
bulbs from the after-sales service or from specialist retailers:
Osram Ministar Axial Reflector 12 V - GY 6.35; 20 W. Only use
these bulbs.
ã=Risk of burns!
Halogen bulbs become very hot when switched on. When
replacing them, wait until the bulb has cooled down.
Caution!
Clouding in halogen bulbs: Do not touch halogen bulbs with
bare fingers. This causes oils to get onto the glass which are
then burnt on and cloud the glass. Use a clean cloth to change
the bulb.
1.Remove the appliance door (see section: Removing and
refitting the appliance door).
2.Remove the door panel (see section: Cleaning the door
panels).
The halogen bulbs are located on the left- and right-hand
sides next to the door hinges (Fig. A).
3.Unclip the bulb fitting and halogen bulb from the holder and
remove it (Fig. B).
4.Change the halogen bulb. Use a clean cloth.
Electronically controlled functions are mal-
functioning
Energy surges (e.g. lightning strike) Reset the function concerned
Once you have switched on an operating
mode,
• or œ appears on the temperature
display, and “Not possible" appears on the
text display
The appliance has not cooled down
fully
Wait until the appliance has cooled down, then
switch on the operating mode again
The appliance has switched off automati-
cally. "Safety switch-off" appears in the text
display,
‹:‹‹ flashes in the temperature
display
The appliance has switched off to
protect itself from overheating
Turn the operating mode selector back to the
Û
position
Smoke is generated during roasting or
grilling
Fat is burning on the grill element Continue grilling or roasting until the fat on the
grill element is burnt away
Wire rack or universal pan inserted
incorrectly
Place the wire rack in the universal pan and
insert them together at a lower shelf height
Higher levels of condensation are gener-
ated in the cooking compartment
Normal occurrence (e.g. when bak-
ing cakes with very moist toppings
or roasting a large joint)
Open the appliance door briefly from time to time
during operation
Enamelled accessories have light, matt
marks
Normal occurrence caused by drip-
ping meat or fruit juices
Not possible
Door panels are misted up Normal occurrence caused by tem-
perature differences
Heat the appliance up to 100 °C and then switch
off again after 5 minutes
Cooked dishes turn out too moist or too
dry when cooking with steam-assisted
applications
The wrong altitude has been set Check the altitude range in the Basic settings
menu and adjust if necessary
The wrong steam intensity was
selected
Select a higher or lower steam intensity
The appliance requires frequent descaling The water hardness has been set
too high
Check the water hardness in the Basic settings
menu and adjust if necessary
"E870" appears in the temperature display The pump has pumped air several
times in succession
Press the
KJ clock function button.
Fill the water tank and slide it fully in
"E8XX" appears in the temperature display The steam-assisted function is mal-
functioning
Press the
KJ clock function button.
Note: Applications without steam assistance are
ready for operation
Problem Possible cause Remedial action
$
%
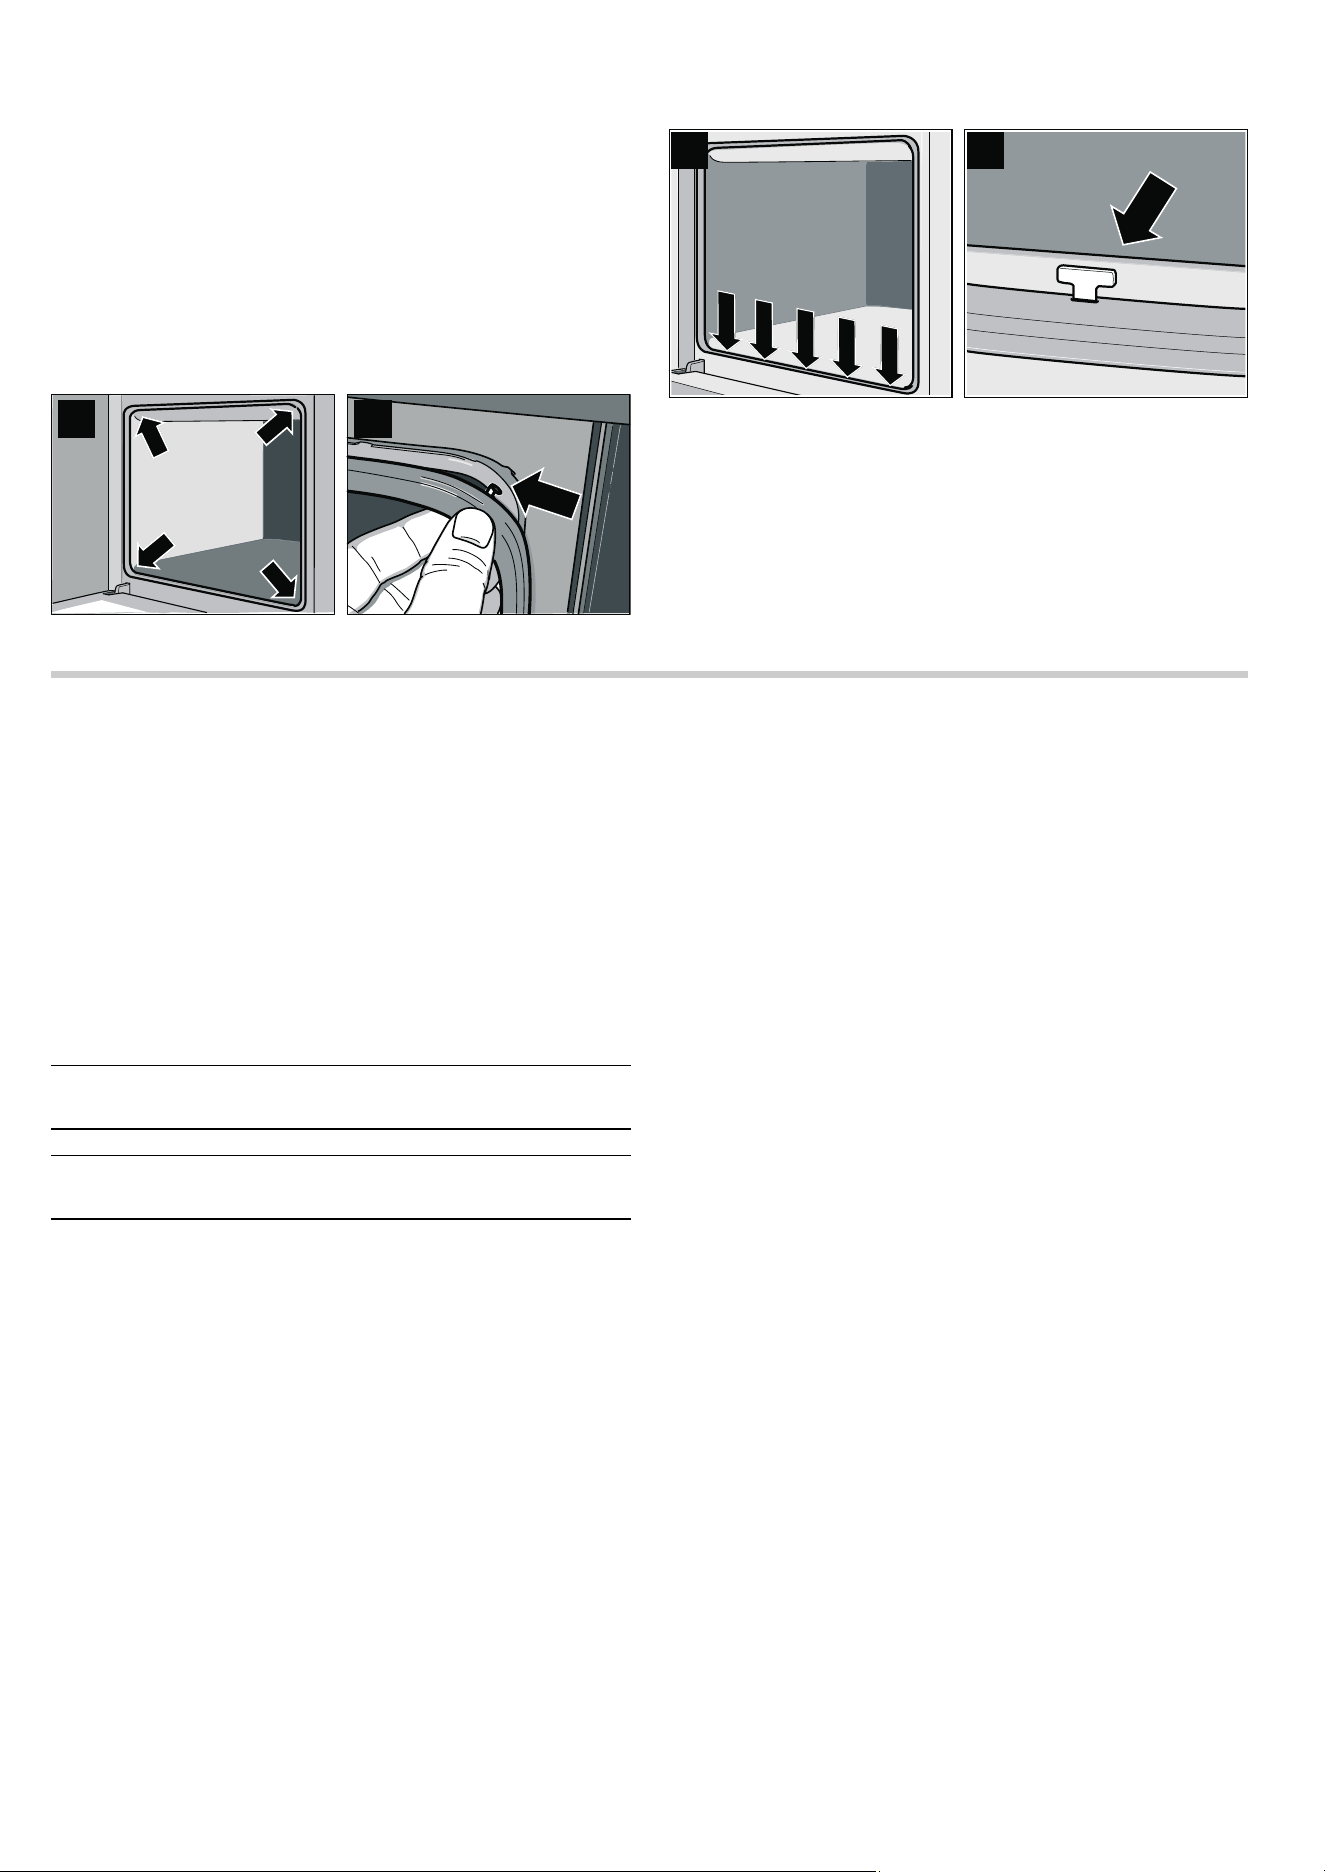
37
5. Insert the halogen bulb and bulb fitting into the appliance
door.
6. Fit the door panel and appliance door.
Changing the door seal
If the door seal is defective, it must be replaced. Replacement
seals for your appliance can be obtained from the after-sales
service.
Unhooking the door seal
The door seal is fixed in nine places.
1. Unhook (Fig. B) the door seal at four points (Fig. A).
2. Hook the door seal in at five further points (Fig. C) by turning
the hooks slightly (Fig. D).
Hooking in the door seal
1. Hook (Fig. B) the door seal in at four points (Fig. A).
2. Hook the door seal in at five further points (Fig. C) by turning
it slightly (Fig. D).
3. Check that the door seal is seated correctly.
After-sales service
Our after-sales service is there for you if your appliance needs
to be repaired. We will always find the right solution in order to
avoid unnecessary visits from a service technician.
E number and FD number
When calling us, please give the product number (E no.) and
the production number (FD no.) so that we can provide you with
the correct advice. The rating plate containing these numbers
can be found on the right-hand side of the oven door. You can
make a note of the numbers of your appliance and the
telephone number of the after-sales service in the space below
to save time should it be required.
Please note that there will be a fee for a visit by a service
technician in the event of a malfunction, even during the
warranty period.
Please find the contact data of all countries in the enclosed
customer service list.
To book an engineer visit and product advice
Trust the expertise of the manufacturer, and rest assured that
the repair will be carried out by trained service technicians
using original spare parts for your domestic appliance.
$ %
& '
E no.
FD no.
After-sales service
O
GB 0844 8928989
Calls from a BT landline will be charged at up to
3 pence per minute. A call set-up fee of up to 6 pence
may apply.
IE 01450 2655
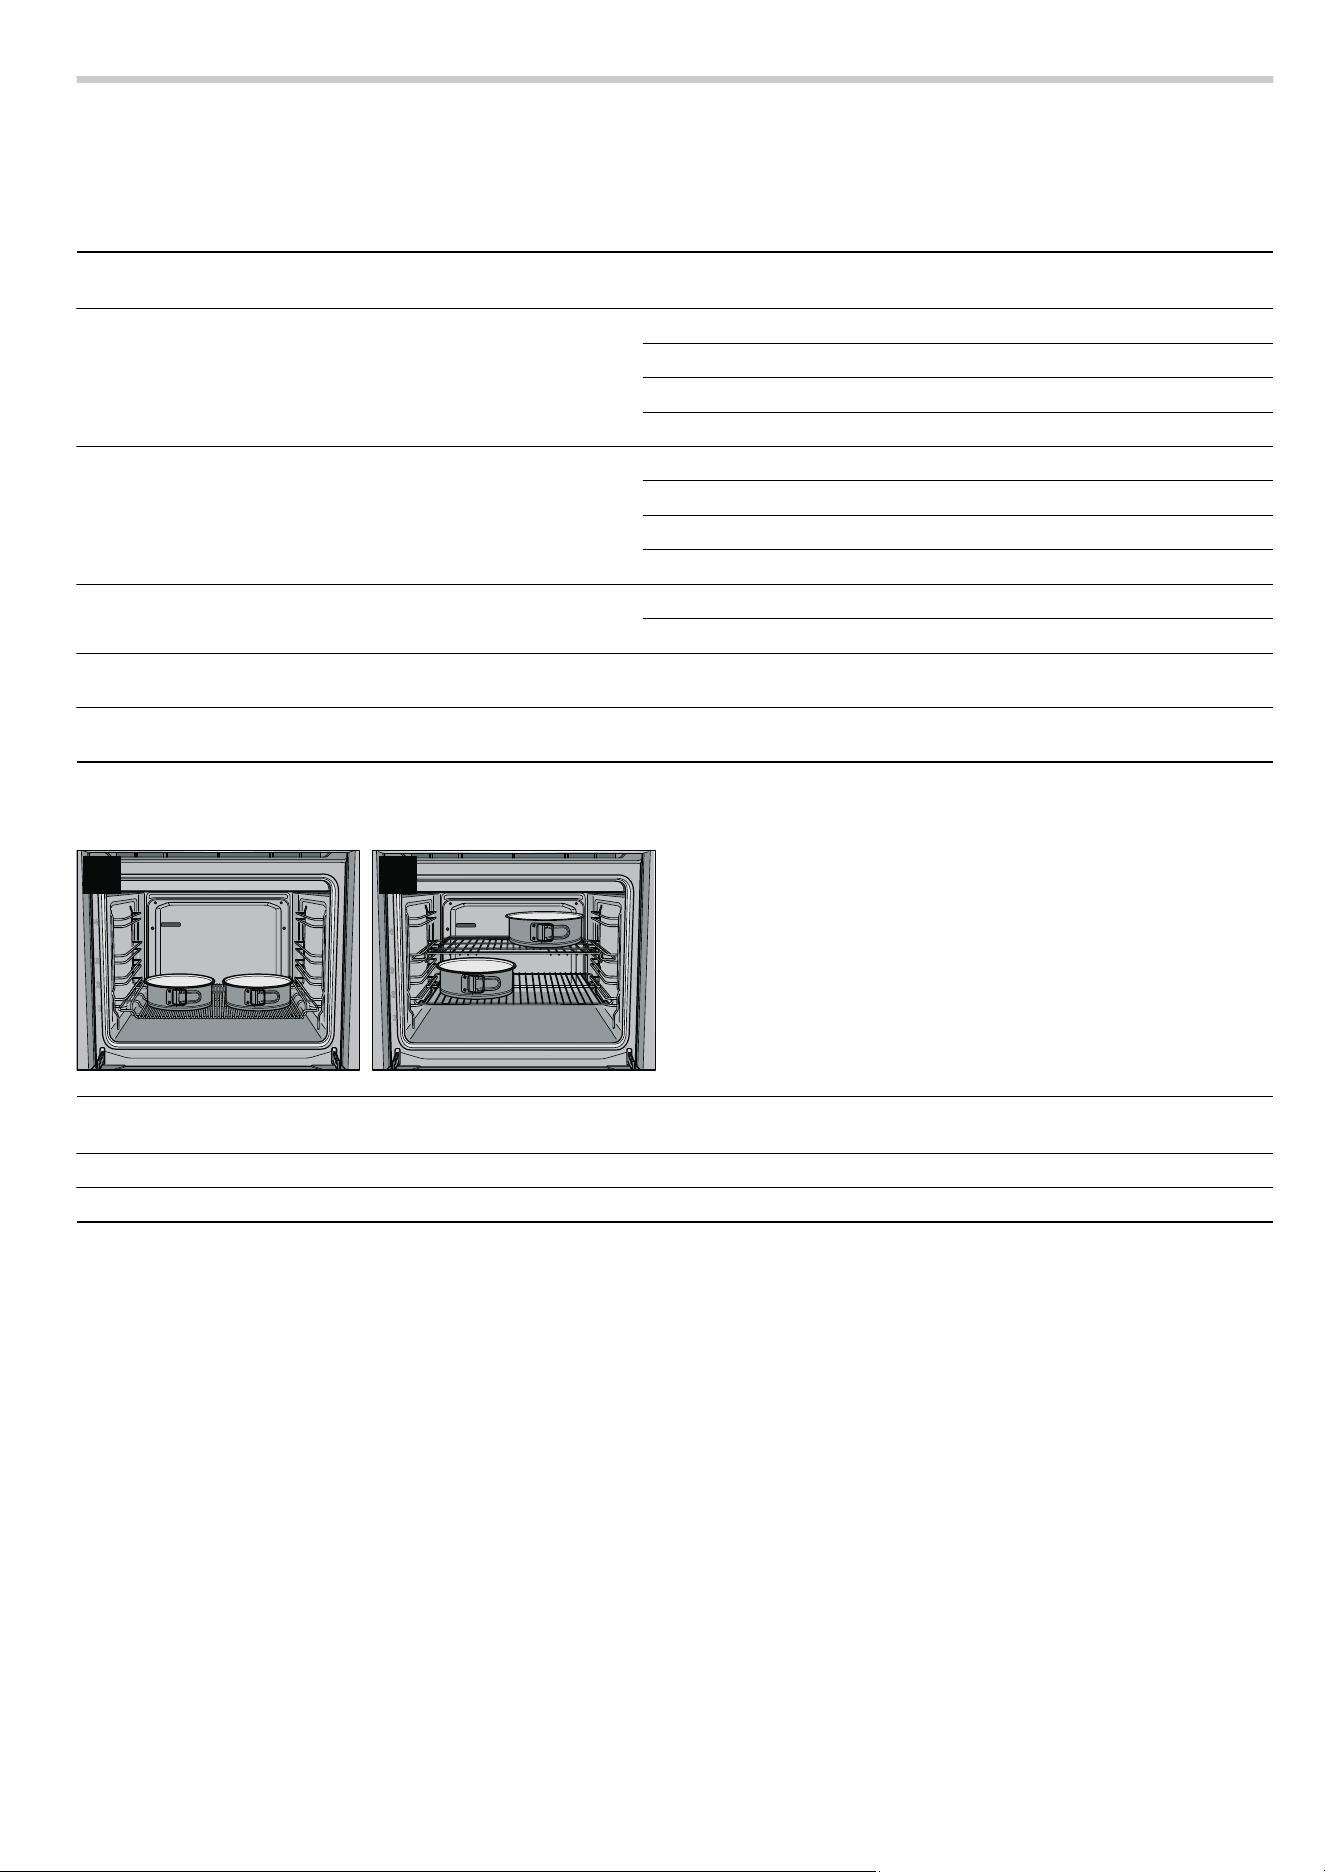
38
Test dishes
Test dishes tested to standard EN 50304/EN 60350 (2009)
and IEC 60350. Please note the information in the tables about
preheating. The table values do not include Rapid heat up.
Baking Shelf height Operating
mode
Temperature
in °C
Baking time in
minutes
Viennese whirls 3
%
140 - 150* 25 - 35
1
3
140 - 150* 20 - 30
1 + 3
3
140 - 150* 20 - 40
1 + 3 + 4
3
130 - 150* 30 - 50
Small cakes (20 per tray) 3
%
160 - 170** 20 - 35
1
3
150 - 160** 20 - 30
1 + 3
3
150 - 160** 25 - 35
1 + 3 + 4
3
150 - 160** 25 - 35
Hot water sponge cake 2
%
160 - 170* 25 - 35
1
3
150 - 160* 25 - 35
Double crust apple pie (tinplate tins next to one another,
figure A)
1
0
170 - 180* 75 - 85
Double crust apple pie (black tins placed diagonally across
from each other, figure B)
1 + 3
3
170 - 180* 65 - 80
* Preheat oven
** Preheat for 10 minutes
$ %
Grilling Shelf height Operating
mode
Temperature in °C Grilling time in
minutes
Toast (universal pan + flat wire rack) 4
+ ‚Ÿ£*
1 - 2
Beef steaks x 12 (universal pan + flat wire rack) 4
+ ‚Ÿ£
20 - 25**
* Preheat for 10 minutes
** turn over after
Z of the cooking time


911212
*9000456401*
9000456401
Constructa Neff
Vertriebs-GmbH
Carl-Wery-Straße 34
D-81739 München