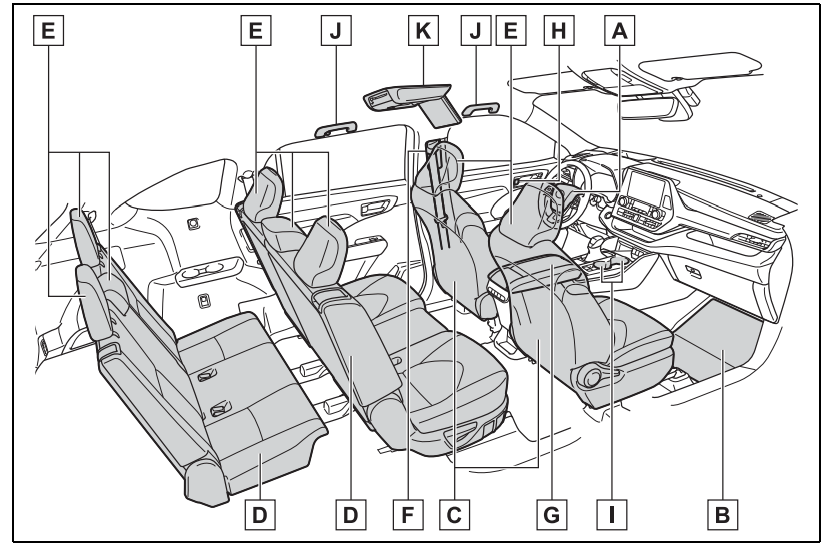
Inside rear view mirror*2 Digital Rearview Mirror*2
Garage door opener switches*2
*1:The illustration shows the front, but they are also equipped in the rear.
*2:If equipped
Before driving
Key information
Keys- The keys
The following keys are provided with the vehicle.
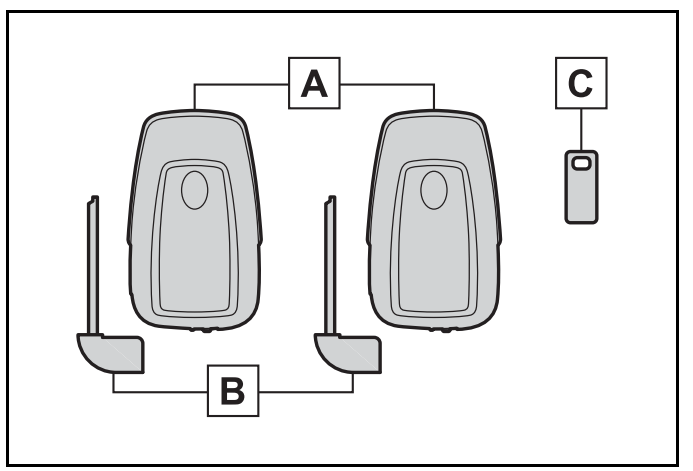
[A] Electronic keys
Operating the smart key system
Operating the wireless remote control function
[B] Mechanical keys
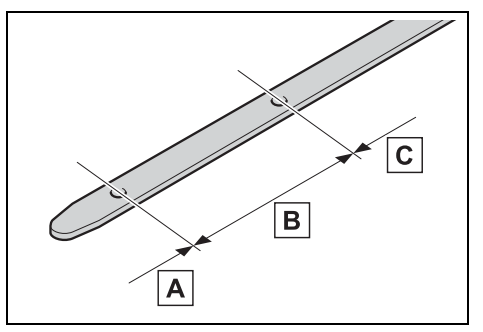
[C] Key number plate *
When riding in an aircraft
When bringing an electronic key onto an aircraft, make sure you do not press any buttons on the electronic key while inside the aircraft cabin. If you are carrying an electronic key in your bag, etc., ensure that the buttons are not likely to be pressed accidentally. Pressing a button may cause the electronic key to emit radio waves that could interfere with the operation of the aircraft.
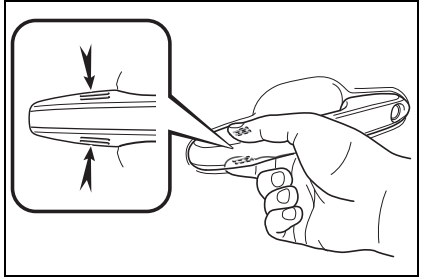
Electronic key battery depletion
The standard battery life is 1 to 2 years.
If the battery becomes low, an alarm will sound in the cabin when the engine is stopped.
To reduce key battery depletion when the electronic key is to not be used for long periods of time, set the electronic key to the battery-saving mode. (→P.135)
As the electronic key always receives radio waves, the battery will become depleted even if the electronic key is not used. The following symptoms indicate that the electronic key battery may be depleted. Replace the battery when necessary.
The smart key system or the wire-less remote control does not operate.
The detection area becomes smaller.
The LED indicator on the key sur-face does not turn on.
To avoid serious deterioration, do not leave the electronic key within 3 ft. (1 m) of the following electrical appliances that produce a magnetic field:
TVs
Personal computers
Cellular phones, cordless phones and battery chargers
Recharging cellular phones or cordless phones
Table lamps
Induction cookers
Replacing the battery→P.436
Confirmation of the registered key number
The number of keys already registered to the vehicle can be confirmed. Ask your Toyota dealer for details.
If “A New Key has been Registered Contact Your Dealer for Details” is shown on the multi-information display
This message will be displayed each time the driver’s door is opened when the doors are unlocked from the outside for approximately 10 days after a new electronic key has been registered.
If this message is displayed but you have not had a new electronic key registered, ask your Toyota dealer to check if an unknown electronic key (other than those in your possession
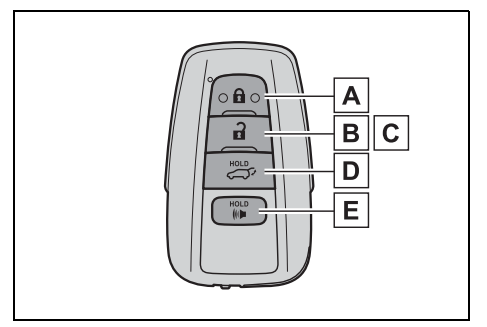
Wireless remote control
The electronic keys are equipped with the following wireless remote control:
Locks the doors (→P.117)
Unlocks the doors (→P.117)
Opens the windows*1 and moon roof*1, 2 (→P.117)
Opens and closes the power back door*2 (→P.124)
Sounds the alarm
*1:These settings must be customized at your Toyota dealer.
*2:If equipped
Theft deterrent panic mode
When or longer than about one second, an alarm will sound intermittently and the vehicle lights will flash to deter any person from trying to break into or damage your vehicle.
To stop the alarm, press any button on the electronic key.
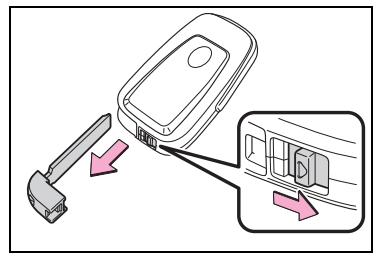
Using the mechanical key
To take out the mechanical key, slide the release button and take the key out.
The mechanical key can only be inserted in one direction, as the key only has grooves on one side. If the key cannot be inserted in a lock cylinder, turn it over and re-attempt to insert it.
When required to leave the vehicle’s key with a parking attendant
After using the mechanical key, store it in the electronic key. Carry the mechanical key together with the electronic key. If the electronic key battery is depleted or the entry function does not operate properly, you will need the mechanical key. (→P.489)
When required to leave the vehicle’s key with a parking attendant
Lock the glove box as circumstances demand. (→P.367)
Remove the mechanical key for your own use and provide the attendant with the electronic key only.
If you lose your mechanical keys →P.487
If a wrong key is used
The key cylinder rotates freely, isolated from the internal mechanism.
Opening, closing and locking the doors
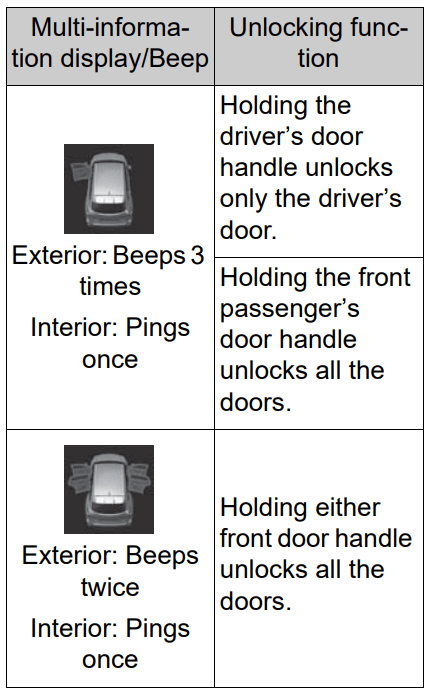
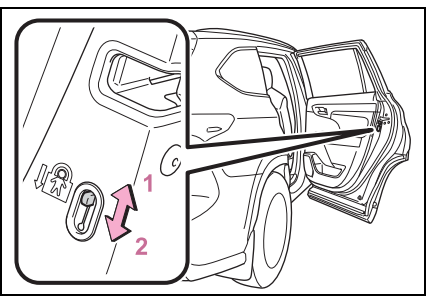
Side doors: The vehicle can be locked and unlocked using the entry function, wireless remote control or door lock switches.
Unlocking and locking the doors from the outside
Smart key system
Carry the electronic key to enable this function.
Grip the driver’s door handle to unlock the door. Holding the driver’s door handle for approximately 2 seconds unlocks all the doors. Grip the front passenger’s door handle to unlock all the doors.* Make sure to touch the sensor on the back of the handle. The doors cannot be unlocked for 3 seconds after the doors are locked. * : The door unlock settings can be changed. (→P.117, 521)
Touch the lock sensor (the indentation on the upper part of the front door handle) to lock all the doors.
Check that the door is securely locked.
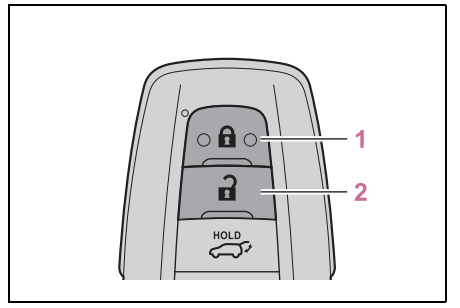
Wireless remote control
Locks all the doors Check that the door is securely locked.
Unlocks all the doors Pressing the button unlocks the driver’s door. Pressing the button again within 5 seconds unlocks the other doors. Press and hold to open the windows*1 and moon roof*1, 2
*1: This setting must be customized at your Toyota dealer.
*2: If equipped
Switching the door unlock function
It is possible to set which doors the entry function unlocks using the wireless remote control.
Turn the engine switch off.
When the indicator light on the key surface is not on, press and hold , or for approximately 5 seconds while pressing and holding .
The setting changes each time an operation is performed, as shown below. (When changing the setting continuously, release the buttons, wait for at least 5 seconds, and repeat step 2.)
For vehicles with an alarm: To prevent unintended triggering of the alarm, unlock the doors using the wireless remote control and open and close a door once after the settings have been changed. (If a door is not opened within 60 seconds after is pressed, the doors will be locked again and the alarm will automatically be set.)
In case that the alarm is triggered, immediately stop the alarm. (→P.73)
Impact detection door lock release system
In the event that the vehicle is subject to a strong impact, all the doors are unlocked. Depending on the force of the impact or the type of accident, however, the system may not operate.
Operation signals
A buzzer sounds and the emergency flashers flash to indicate that the doors have been locked/unlocked. (Locked: Once; Unlocked: Twice)
A buzzer sounds to indicate that the windows and the moon roof* or panoramic moon roof* are operating.
* : If equipped
Security feature
If a door is not opened within approximately 60 seconds after the vehicle is unlocked, the security feature automatically locks the vehicle again.
When the door cannot be locked by the lock sensor on the surface of the front door handle
If the door will not lock even when the topside sensor area is touched, try touching both the topside and underside sensor areas at the same time.
When gloves are being worn, remove the gloves.
Door lock buzzer
If an attempt to lock the doors using the smart key system is made when a door is not fully closed, a buzzer will sound continuously for 5 seconds. Fully close the door to stop the buzzer, and lock the doors again.
Setting the alarm (if equipped)
Locking the doors will set the alarm system. (→P.73)
Conditions affecting the operation of the smart key system or wireless remote control →P.135
If the smart key system or the wireless remote control does not operate properly
Use the mechanical key to lock and unlock the doors. (→P.489)
Replace the key battery with a new one if it is depleted. (→P.436)
If the battery is discharged
The doors cannot be locked and unlocked using the smart key system or wireless remote control. Lock or unlock the doors using the mechanical key. (→P.489)
Rear seat reminder function
In order to remind you not to forget luggage, etc. in the rear seat, when the engine switch is turned off after any of the following conditions are met, a buzzer will sound and a message will be displayed on the multi-information display for approximately 6 seconds.
The engine is started within 10 minutes after opening and closing a rear door.
A rear door has been opened and closed after the engine was started.
However, if a rear door is opened and then closed within approximately 2 seconds, the rear seat reminder function may not operate.
The rear seat reminder function determines that luggage, etc. has been placed in a rear seat based on opening and closing of a rear door.
Therefore, depending on the situation, the rear seat reminder function may not operate and you may still forget luggage, etc. in the rear seat, or it may operate unnecessarily.
The rear seat reminder function can be enabled/disabled. (→P.521)
Customization
Some functions can be customized. (→P.521)
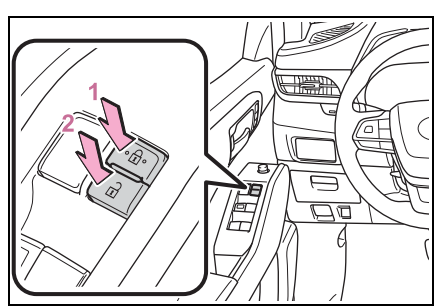
Unlocking and locking the doors from the inside
Door lock switches
Locks all the doors
Unlocks all the doors
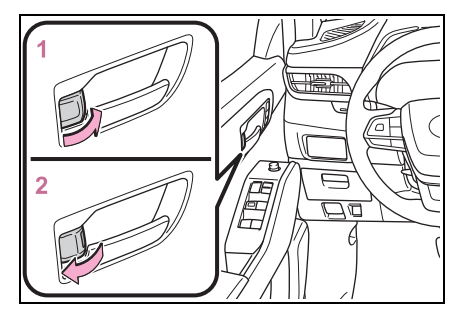
Inside lock buttons
Locks the door
Unlocks the door
The front doors can be opened by pulling the inside handle even if the lock buttons are in the lock position.
Locking the front doors from the outside without a key
Move the inside lock button to the lock position.
Close the door.
The door cannot be locked if the engine switch is in ACC or ON, or the electronic key is left inside the vehicle.
The key may not be detected correctly and the door may be locked.
Open door warning buzzer
If a door or the hood is not fully closed, a buzzer will sound when the vehicle speed reaches 3 mph (5 km/h).
The open door(s) or hood is displayed on the multi-information display.
Rear door child-protector lock
The door cannot be opened from inside the vehicle when the lock is set.
Unlock
Lock
These locks can be set to prevent children from opening the rear doors. Push down on each rear door switch to lock both rear doors.
Automatic door locking and unlocking systems
The following functions can be set or canceled:
For instructions on customizing, refer to P.521.
Function
Operation
Speed linked door locking function
All doors are automatically locked when vehicle speed is approximately 12 mph (20 km/h) or higher.
Shift position linked door locking function
All doors are automatically locked when shifting the shift lever out of P.
Shift position linked door unlocking function
All doors are automatically unlocked when shifting the shift lever to P.
Driver’s door linked door unlocking function
All doors are automatically unlocked when driver’s door is opened.
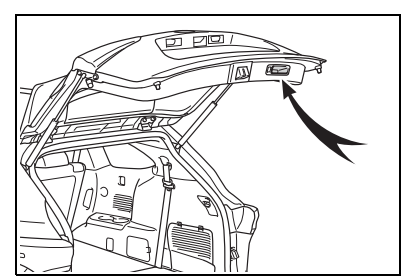
Back door: The back door can be locked/unlocked and opened/closed by the following procedures.
WARNING
Do not allow a child to open or close the back door.
Doing so may cause the back door to move unexpectedly, or cause the child’s hands, arms, head, or neck to be caught by the closing back door.
Operating the back door
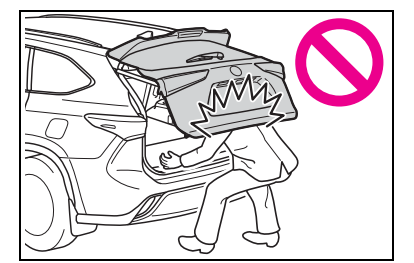
Observe the following precautions. Failure to do so may cause parts of the body to be caught, resulting in death or serious injury.
Remove any heavy loads, such as snow and ice, from the back door before opening it. Failure to do so may cause the back door to suddenly shut again after it is opened.
When opening or closing the back door, thoroughly check to make sure the surrounding area is safe.
If anyone is in the vicinity, make sure they are safe and let them know that the back door is about to open or close.
Use caution when opening or closing the back door in windy weather as it may move abruptly in strong wind.
Vehicles without a power back door: The back door may suddenly shut if it is not opened fully. It is more difficult to open or close the back door on an incline than on a level surface, so beware of the back door unexpectedly opening or closing by itself. Make sure that the back door is fully open and secure before using the luggage compartment.
Vehicles with a power back door: The back door may suddenly shut if it is not opened fully while on a steep incline. Make sure that the back door is secured before using the luggage compartment.
When closing the back door, take extra care to prevent your fingers, etc., from being caught.
When closing the back door, make sure to press it lightly on its outer surface. If the back door handle is used to fully close the back door, it may result in hands or arms being caught.
WARNING
Do not pull on the back door damper stay (vehicles without a power back door) (→P.124) or back door spindle (vehicles with a power back door) (→P.131) to close the back door, and do not hang on the back door damper stay (vehicles without a power back door) or back door spindle (vehicles with a power back door).
Doing so may cause hands to be caught or the back door damper stay (vehicles without a power back door) or back door spindle (vehicles with a power back door) to break, causing an accident.
If a heavy object is attached to the back door, it may suddenly shut again after being opened, causing someone’s hands, arms, head or neck to be caught and injured. Do not attach any accessories other than genuine Toyota parts to the back door.
Unlocking and locking the back door from the outside
Smart key system
Carry the electronic key to enable this function.
Unlocks all the doors The doors cannot be unlocked for 3 seconds after the doors are locked.
Locks all the doors Check that the door is securely locked.
Wireless remote control→P.117
Operation signals→P.118
Unlocking and locking the back door from the inside
Door lock switches→P.120
Opening/closing the back door (vehicles without a power back door)
Opening the back door
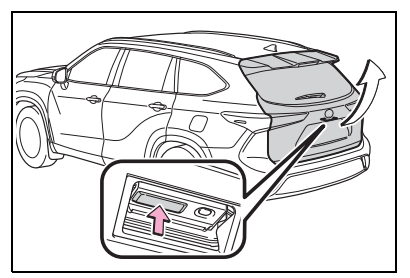
Raise the back door while pushing up the back door opener switch.
Closing the back door
Lower the back door using a back door handle, and then push the back door from the outside to close it.
Be careful not to pull the back door sideways when using a handle.
Open door warning buzzer →P.120
NOTICE
Back door damper staysThe back door is equipped with damper stays that hold the back door in place.
Observe the following precautions. Failure to do so may cause damage to the back door damper stay, resulting in malfunction.
Do not attach any foreign objects, such as stickers, plastic sheets, or adhesives to the damper stay rod.
Do not touch the damper stay rod with gloves or other fabric items.
Do not attach any accessories other than genuine Toyota parts to the back door.
Do not place your hand on the damper stay or apply lateral forces to it.
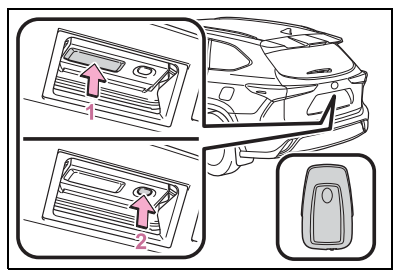
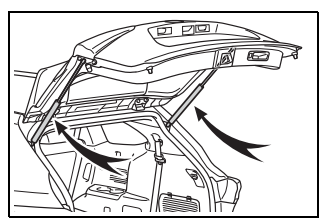
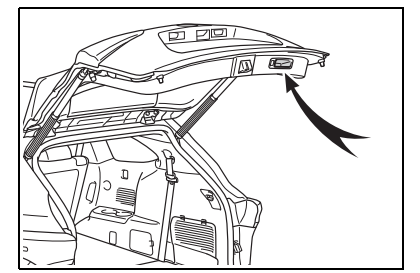
Opening/closing the back door (vehicles with a power back door)
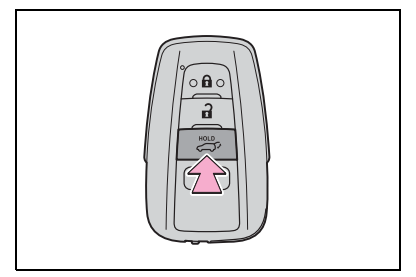
Opening/closing the back door using the wireless remote control
Press and hold the switch.
Pressing the switch while the back door is opening/closing will stop the operation. Pressing and holding the switch again will operate the back door in the opposite direction.
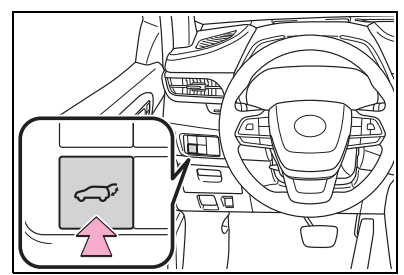
Opening/closing the back door using the power back door switch on the instrument panel
Press and hold the switch.
Unlock the back door before operating.
Pressing the switch while the back door is opening/closing will stop the operation. Pressing and holding the switch again will operate the back door in the opposite direction.
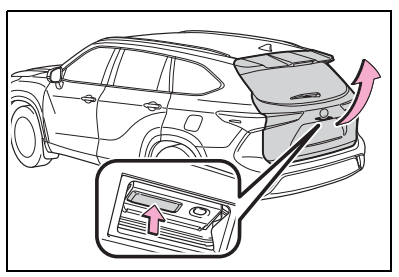
Opening the back door using the back door opener switch
When the back door is unlocked: Press the back door opener switch.
When the back door is locked: While carrying the electronic key on your person, press the back door opener switch.
Pressing the switch while the back door is opening/closing will stop the operation. Pressing the switch again will open the back door.
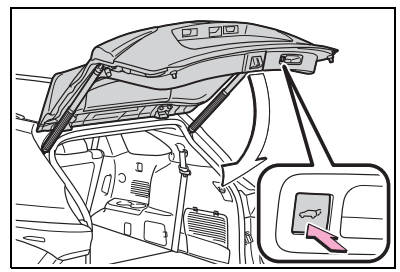
Opening/closing the back door using the power back door switch on the back door
Press the switch.
Pressing the switch while the back door is opening/closing will stop the operation. Pressing the switch again will operate the back door in the opposite direction.
Closing the back door using the back door handle
Lower the back door using the back door handle, then a buzzer sounds and the back door automatically closes.
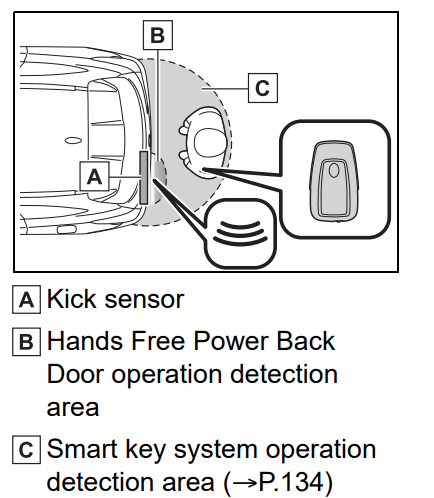
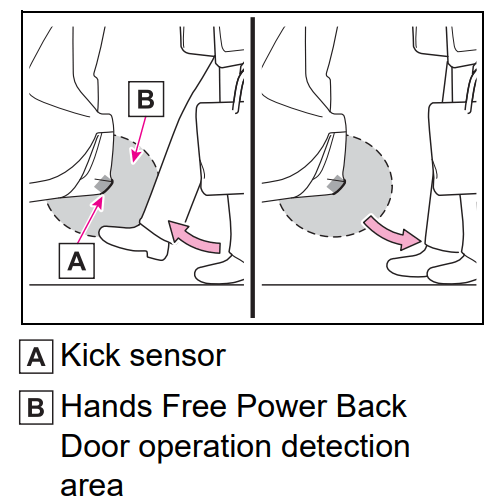
Opening/closing the back door using the kick sensor (vehicles with a Hands Free Power Back Door)
Vehicles without tow hitch
The Hands Free Power Back Door enables automatic opening and closing of the power back door by putting your foot near the lower center part of the rear bumper and moving it away from the rear bumper.
Vehicles with tow hitch
The Hands Free Power Back Door enables automatic opening and closing of the power back door by putting your foot near the lower left side of the rear bumper and moving it away from the rear bumper.
The center of the Hands Free Power Back Door sensor is indicated by the . mark.
While carrying an electronic key, stand within the smart key system operation range, approximately 13.8 to 21.7 in. (35 to 55 cm) from the rear bumper.
Vehicles without tow hitch
Vehicles with tow hitch
2. Perform a kick operation by moving your foot to within approximately 3.9 in. (10 cm) of the rear bumper and then pulling it back.
Perform the entire kick operation within 1 second.
The back door will not start operating while a foot is detected under the rear bumper.
Operate the Hands Free Power Back Door without contacting the rear bumper with your foot.
If another electronic key is in the cabin or luggage compartment, it may take slightly longer than normal for the operation to occur.
3. When the kick sensor detects that your foot is pulled back, a buzzer will sound and the back door will automatically fully open/close.
If kick operation is performed while the back door is opening/closing, the back door will stop the operation. Perform a kick operation again will operate the back door in the opposite direction.
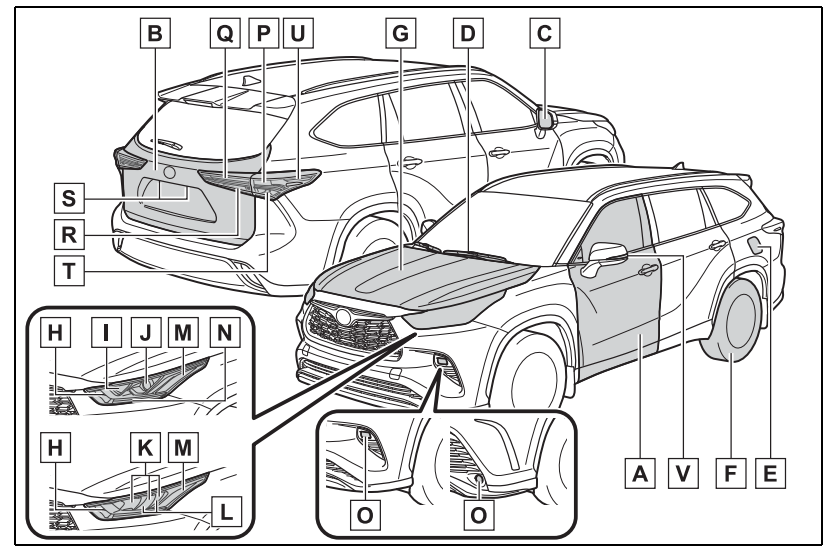
Interior features
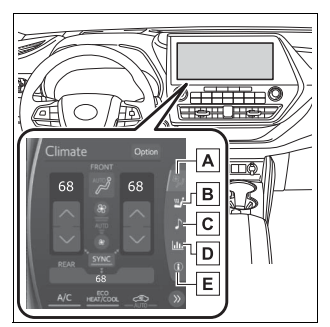
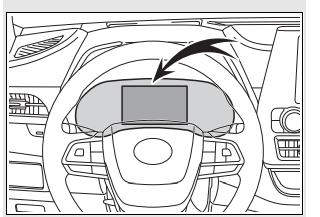
Toyota multi-opera tion touch*
*: Vehicle with the 12.3-inch display
The Toyota multi-operation touch allows a screen, such as the air conditioning control screen, and the navigation screen to be displayed and operated simultaneously.
Toyota multi-operation touch overview
The following functions can be displayed and operated on the toyota multi-operation touch.
Operate a switch to change the displayed function screen.
The displayed function can also be changed by performing an up or down flick operation on the Toyota multi-operation touch.
Select to display the air conditioning control screen. (→P.348, 358)
Select to display the seats climate screen. (→P.361, 362)
Select to display the audio control screen.*
Select to display the fuel consumption screen. (→P.108)
2WD models: Select to display the setting screen. (→P.335) AWD models: Select to display the vehicle information screen. (→P.88)
*: Refer to the “NAVIGATION AND MULTIMEDIA SYSTEM OWNER'S MANUAL”.
Toyota multi-operation touch operation
Moving screens on the Toyota multi-operation touch
Selecting « or » to change its displayed position on the Toyota multi-operation touch.
The screen position can also be changed by perform a left or right flick operation on a screen.
Displaying a screen in full screen
Selecting < or > on the energy monitor/consumption screen or vehicle information screen will display that screen in full screen.
Select < or > to return to the split-screen display.
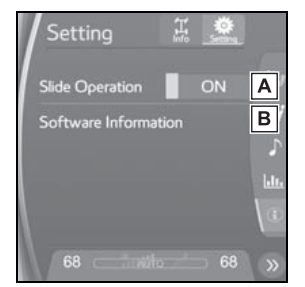
Toyota multi-operation touch settings
AWD models: Select “Setting” on the vehicle information screen to display the setting screen
Select slide operation on/off
Display the software information
Maintenance and care
Maintenance requirements: To ensure safe and economical driving, day-to-day care and regular maintenance are essential. It is the owner’s responsibility to perform regular checks. Toyota recommends the following maintenance:
Repair and replacement
It is recommended that genuine Toyota parts be used for repairs to ensure performance of each system. If non-Toyota parts are used in replacement or if a repair shop other than a Toyota dealer performs repairs, confirm the warranty coverage.
Allow inspection and repairs to be performed by a Toyota dealer
Toyota technicians are well-trained specialists and are kept up to date with the latest service information. They are well informed about the operation of all systems on your vehicle.
Keep a copy of the repair order. It proves that the maintenance that has been performed is under warranty coverage. If any problem should arise while your vehicle is under warranty, your Toyota dealer will promptly take care of it.
General maintenance: General maintenance should be performed on a daily basis. This can be done by yourself or by a Toyota dealer.
Scheduled maintenance: Scheduled maintenance should be performed at specified intervals according to the maintenance schedule. For details about maintenance items and schedules, refer to the “Scheduled Maintenance Guide” or “Owner’s Manual Supplement”.
General maintenance
Engine compartment
Items
Check points
Battery
Check the connections. (→P.416)
Brake fluid
Is the brake fluid at the correct level? (→P.416)
Engine coolant
Is the engine coolant at the correct level? (→ P.415)
Engine oil
Is the engine oil at the correct level? (→P.412)
Exhaust system
There should not be any fumes or strange sounds.
Radiator/con-
denser
The radiator and condenser should be free from foreign objects. (→P.416)
Washer fluid
Is there sufficient washer fluid? (→P.418)
Vehicle interior
Items
Check points
Accelerator
pedal
The accelerator pedal should move smoothly (without uneven pedal effort or catching).
Automatic transmission “Park” mechanism
When parked on a slope and the shift lever is in P, is the vehicle securely stopped?
Brake pedal
Does the brake pedal move smoothly?
Does the brake pedal have appropriate clearance from the floor?
(→ P.504)
Does the brake pedal have the correct amount of free play?
(→ P.504)
Brakes
The vehicle should not pull to one side when the brakes are applied.
The brakes should work effectively.
The brake pedal should not feel spongy.
The brake pedal should not get too close to the floor when the brakes are applied.
Head
restraints
Do the head restraints move smoothly and lock securely?
Horn
Works properly?
Indica-
tors/buzzers
Do the indicators and buzzers function properly?
Lights
Do all the lights come on?
Are the headlights aimed correctly? (→P.440)
Parking brake
Does the parking brake switch operate normally?
When parked on a slope and the parking brake is on, is the vehicle securely stopped?
Seat belts
Do the seat belts operate smoothly?
The seat belts should not be damaged.
Seats
Do the seat controls operate properly?
Steering wheel
Does the steering wheel rotate smoothly?
Does the steering wheel have the correct amount of free play?
There should not be any strange sounds coming from the steering wheel.
Vehicle exterior
Items
Check points
Doors
Do the doors operate smoothly?
Engine hood
Does the engine hood lock system work properly?
Fluid leaks
There should not be any signs of fluid leakage after the vehicle has been parked.
Tires
Is the tire inflation pressure correct?
The tires should not be damaged or excessively worn.
Have the tires been rotated according to the maintenance schedule?
The wheel nuts should not be loose.
Windshield wipers/rear window wiper
The wiper blades should not show any signs of cracking, splitting, wear, contamination or deformation.
The wiper blades should clear the windshield/rear window without streaking or skipping.
Your vehicle may not pass the I/M test in the following situations:
When the battery is disconnected or discharged
Readiness codes that are set during ordinary driving are erased.
Also, depending on your driving habits, the readiness codes may not be completely set.
When the fuel tank cap is loose
The malfunction indicator lamp comes on indicating a temporary malfunction and your vehicle may not pass the I/M test.
When the malfunction indicator lamp still remains on after several driving trips
The error code in the OBD system will not be cleared unless the vehicle is driven 40 or more times.
If your vehicle does not pass the I/M test
Contact your Toyota dealer to prepare the vehicle for re-testing.
Do-it-yourself maintenance
Do-it-yourself service precautions: If you perform maintenance by yourself, be sure to follow the correct procedure as given in these sections.
Maintenance
Items
Parts and tools
Battery condition (→ P.416)
Warm water
Baking soda
Grease
Conventional wrench (for terminal clamp bolts)
Brake fluid level (→ P.416)
FMVSS No.116 DOT 3 or SAE J1703 brake fluid
Rag or paper towel
Funnel (used only for adding brake fluid)
Engine coolant level (→ P.415)
“Toyota Super Long Life Coolant” or a similar high quality ethylene glycol-based non-silicate, non-amine, non-nitrite and non-borate coolant with long-life hybrid organic acid technology For the U.S.A.: “Toyota Super Long Life Coolant” is pre-mixed with 50% coolant and 50% deionized water. For Canada: “Toyota Super Long Life Coolant” is pre-mixed with 55% coolant and 45% deionized water.
Funnel(used only for adding coolant)
Engine oil level (→ P.412)
“Toyota Genuine Motor Oil” or equivalent
Rag or paper towel
Funnel(used only for adding engine oil)
Fuses
(→ P.438)
Fuse with same amperage rating as original
Headlight aim (→ P.440)
Phillips-head screwdriver
Light bulbs (→ P.441)
Bulb with same number and wattage rating as original
Phillips-head screwdriver
Flathead screwdriver
Wrench
Radiator and condenser (→ P.416)
—
Tire inflation pressure (→ P.431)
Tire pressure gauge
Compressed air source
Washer fluid (→ P.418)
Water or washer fluid containing antifreeze (for winter use)
Funnel (used only for adding water or washer fluid)
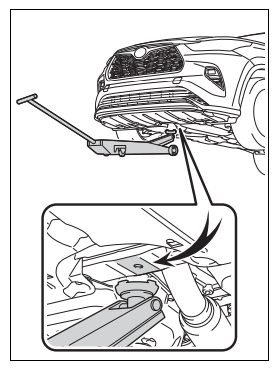
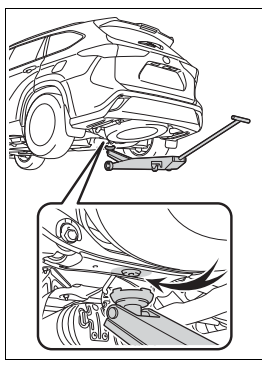
Positioning a floor jack: When using a floor jack, follow the instructions in the manual provided with the jack and perform the operation safely. When raising your vehicle with a floor jack, position the jack correctly. Improper placement may damage your vehicle or cause injury.
Location of the jack point
Front
Rear
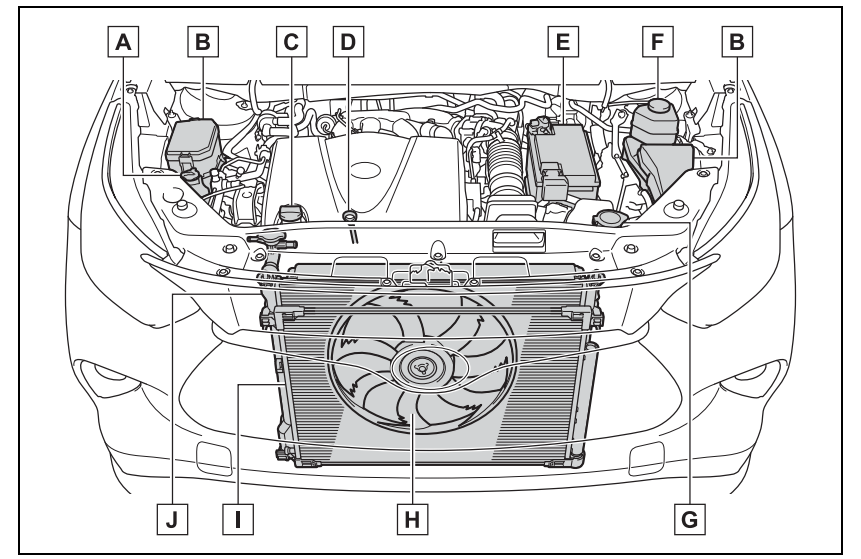
Engine compartment
Components
Engine coolant reservoir (→ P.415)
Fuse boxes (→ P.438)
Engine oil filler cap (→ P.413)
Engine oil level dipstick (→ P.412)
Battery (→ P.416)
Brake fluid reservoir (→ P.416)
Washer fluid tank (→ P.418)
Electric cooling fan
Condenser (→ P.416)
Radiator (→ P.416)
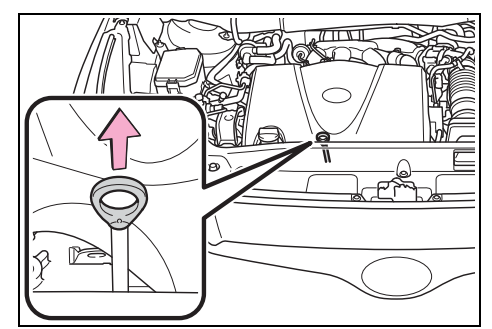
Checking and adding the engine oil
With the engine at operating temperature and turned off, check the oil level on the dipstick.
Checking the engine oil
Park the vehicle on level ground. After warming up the engine and turning it off, wait more than 5 minutes for the oil to drain back into the bottom of the engine.
Holding a rag under the end, pull the dipstick out.
Wipe the dipstick clean.
Reinsert the dipstick fully.
Holding a rag under the end, pull the dipstick out and check the oil level.
Low
Normal
Excessive The shape of the dipstick may differ depending on the type of vehicle or engine.
Wipe the dipstick and reinsert it fully.
Checking the oil type and preparing the item needed
Make sure to check the oil type and prepare the items needed before adding oil.
If the oil level is below or near the low level mark, add engine oil of the same type as that already in the engine.
Remove the oil filler cap by turning it counterclockwise.
Add engine oil slowly, checking the dipstick.
Install the oil filler cap by turning it clockwise.
Engine oil consumption
A certain amount of engine oil will be consumed while driving. In the following situations, oil consumption may increase, and engine oil may need to be refilled in between oil maintenance intervals.
When the engine is new, for example directly after purchasing the vehicle or after replacing the engine
If low quality oil or oil of an inappropriate viscosity is used
When driving at high engine speeds or with a heavy load, when towing, or when driving while accelerating or decelerating frequently
When leaving the engine idling for a long time, or when driving frequently through heavy traffic
If the oil is spilled on the engine cover
To prevent the engine cover from being damaged, remove any engine oil from the engine cover as soon as possible using a neutral detergent.
Do not use an organic solvent such as brake cleaner.
After changing the engine oil
The engine oil maintenance data should be reset. Perform the following procedures:
4.2 inch display
Press or of the meter control switch to select .
Press or of the meter control switch, select and then press and hold .
Press or of the meter control switch, select “Oil Maintenance” and then press .
Select “Yes” and press .
A message will be displayed on the multi-information display when the reset procedure has been completed.
7 inch display
Press or of the meter control switch to select .
Press or of the meter control switch, select and then press and hold .
Press or of the meter control switch, select “Oil Maintenance” and then press .
Select “Yes” and press .
A message will be displayed on the multi-information display when the reset procedure has been completed.
When trouble arises
Essential information
Emergency flashers The emergency flashers are used to warn other drivers when the vehicle has to be stopped on the road due to a breakdown, etc.
Operating instructions
Press the switch. All the turn signal lights will flash. To turn them off, press the switch once again.
Emergency flashers
If the emergency flashers are used for a long time while the engine is not operating, the battery may discharge.
If any of the SRS airbags deploy (inflate) or in the event of a strong rear impact, the emergency flashers will turn on automatically.
The emergency flashers will turn off automatically after operating for approximately 20 minutes. To manually turn the emergency flashers off, press the switch twice.
(The emergency flashers may not turn on automatically depending on the force of the impact and conditions of the collision.)
If your vehicle has to be stopped in an emer gency
Only in an emergency, such as if it becomes impossible to stop the vehicle in the normal way, stop the vehicle using the following procedure:
Stopping the vehicle
1 Steadily step on the brake pedal with both feet and firmly depress it.
Do not pump the brake pedal
repeatedly as this will increase the
effort required to slow the vehicle.
2 Shift the shift lever to N.
► If the shift lever is shifted to N
3 After slowing down, stop the vehicle in a safe place by the road.
4 Stop the engine.
► If the shift lever cannot be shifted to N
3 Keep depressing the brake pedal with both feet to reduce vehicle speed as much as possible.
4 To stop the engine, press and hold the engine switch for 2 consecutive seconds or more, or press it briefly 3 times or more in succession.
5 Stop the vehicle in a safe place by the road.
If the vehicle is trapped in rising water: In the event the vehicle is submerged in water, remain calm and perform the following.
Remove the seat belt first.
If the door can be opened, open the door and exit the vehicle.
If the door can not be opened, open the window using the power window switch and exit the vehicle through the window.
If the window can not be opened using the power window switch, remain calm, wait until the water level inside the vehicle rises to the point that the water pressure inside of the vehicle equals the water pressure outside of the vehicle, and then open the door and exit the vehicle.
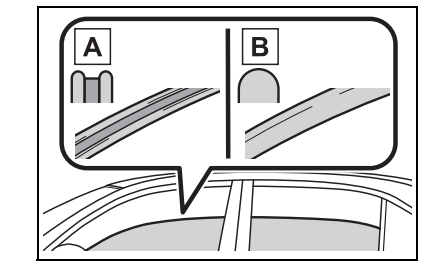
How to distinguish laminated glass: When looking from the cross-sectional view point, laminated glass is two sheets of glass pasted together.
Laminated glass
Tempered glass
Steps to take in an emergency
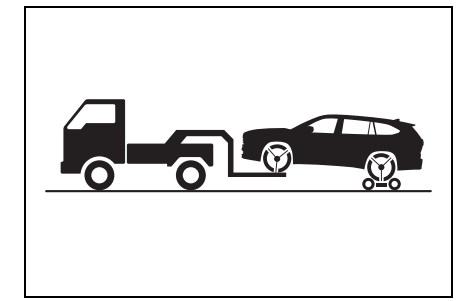
If your vehicle needs to be towed
If towing is necessary, we recommend having your vehicle towed by your Toyota dealer or commercial towing service, using a wheel-lift type truck or flatbed truck. Use a safety chain system for all towing, and abide by all state/provincial and local laws. If towing your vehicle with a wheel-lift type truck from the front, the vehicle’s rear wheels and axles must be in good conditions. (→ P.455) If they are damaged, use a towing dolly or flatbed truck.
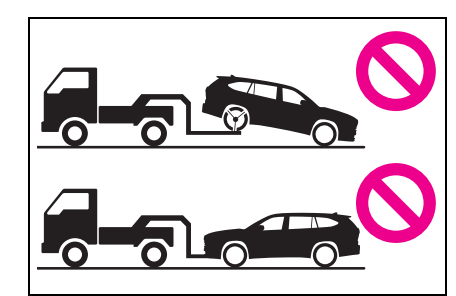
When towing the vehicle
► 2WD models
Be sure to transport the vehicle with the front wheels raised or with all four wheels raised off the ground. If the vehicle is towed with the front wheels contacting the ground, the drivetrain and related parts may be damaged.
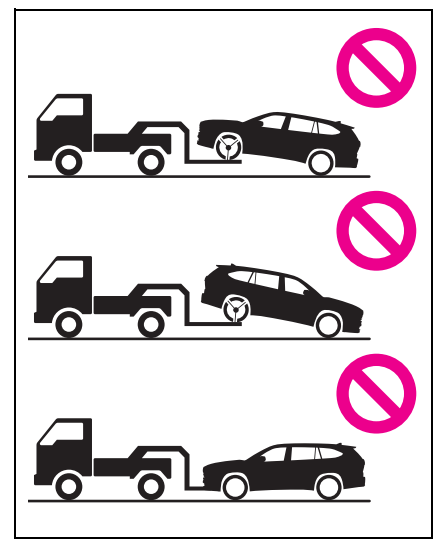
► AWD models
Be sure to transport the vehicle with all four wheels raised off the ground. If the vehicle is towed with the tires contacting the ground, the drivetrain or related parts may be damaged, the vehicle may fly off the truck.
Situations when it is necessary to contact dealers before towing
The following may indicate a problem with your transmission. Contact your Toyota dealer or commercial towing service before towing.
The engine is running but the vehicle does not move.
The vehicle makes an abnormal sound.
Towing with a wheel-lift type truck
From the front (2WD models)
Release the parking brake.
Turn automatic mode off. (→ P.212)
From the front (AWD models)
Use a towing dolly under the rear wheels.
From the rear
Use a towing dolly under the front wheels.
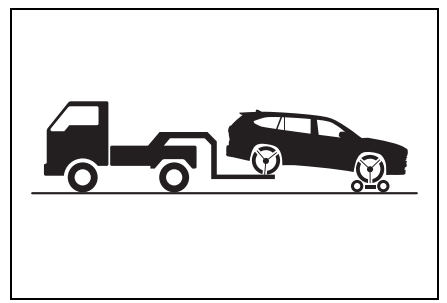
Using a flatbed truck
When using a flat-bed truck to transport the vehicle, use tire strapping belts. Refer to the owner's manual of the flat-bed truck for the tire strapping method.
In order to suppress vehicle movement during transportation, set the parking brake and turn the engine switch off.
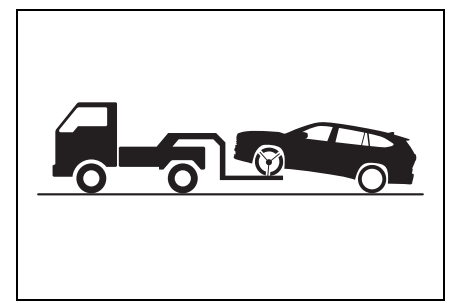
Emergency towing
A driver must be in the vehicle to steer and operate the brakes.
The vehicle’s wheels, drive train, axles, steering and brakes must be in good condition.
If you think something is wrong: If you notice any of the following symptoms, your vehicle probably needs adjustment or repair. Contact your Toyota dealer as soon as possible.
Visible symptoms
Fluid leaks under the vehicle (Water dripping from the air conditioning after use is normal.)
Flat-looking tires or uneven tire wear
Engine coolant temperature gauge needle continually points higher than normal
Audible symptoms
Changes in exhaust sound
Excessive tire squeal when cornering
Strange noises related to the suspension system
Pinging or other noises related to the engine
Operational symptoms
Engine missing, stumbling or running roughly
Appreciable loss of power
Vehicle pulls heavily to one side when braking
Vehicle pulls heavily to one side when driving on a level road
Loss of brake effectiveness, spongy feeling, pedal almost touches the floor
Fuel pump shut off system: To minimize the risk of fuel leakage when the engine stalls or when an airbag inflates upon collision, the fuel pump shut off system stops the supply of fuel to the engine.
Restarting the engine
Follow the procedure below to restart the engine after the system is activated.
Turn the engine switch to ACC or turn it OFF.
Restart the engine
If a warning light turns on or a warning buzzer sounds: Calmly perform the following actions if any of the warning lights comes on or flashes. If a light comes on or flashes, but then goes off, this does not necessarily indicate a malfunction in the system. However, if this continues to occur, have the vehicle inspected by your Toyota dealer.
Actions to the warning lights or warning buzzers
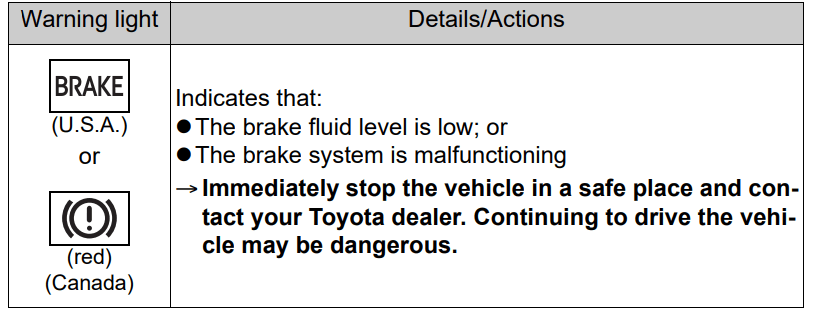
Brake system warning light
Brake system warning light
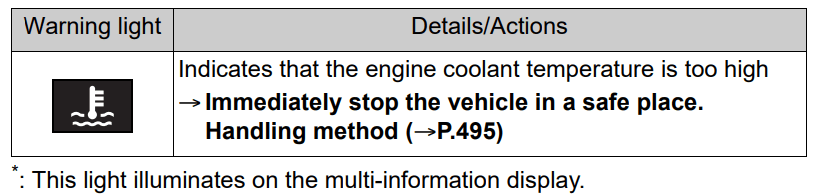
High coolant temperature warning light* (warning buzzer)
* : This light illuminates on the multi-information display
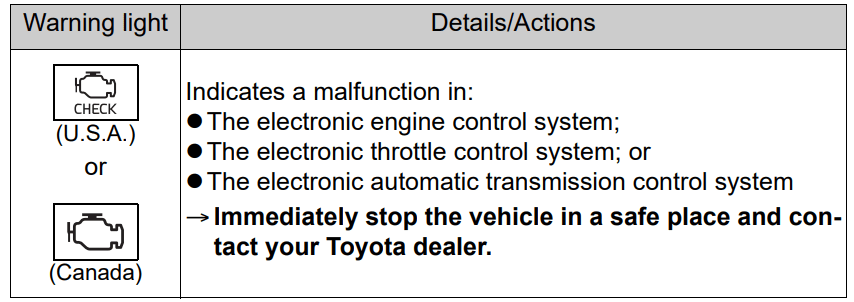
Malfunction indicator lamp
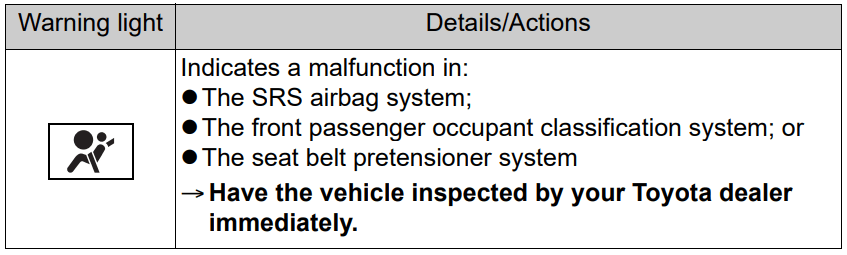
SRS warning light
ABS warning light
Brake Override System warning light/Drive-Start Control warning light* (warning buzzer)
* : This light illuminates on the multi-information display.
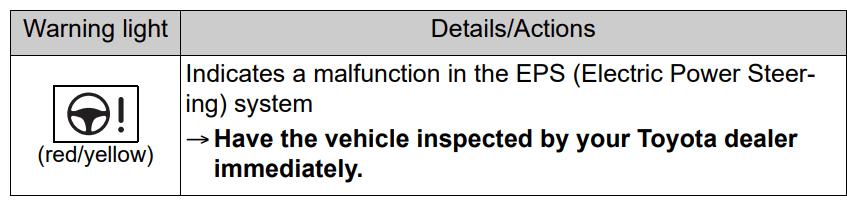
Electric power steering system warning light (warning buzzer)
Low fuel level warning light
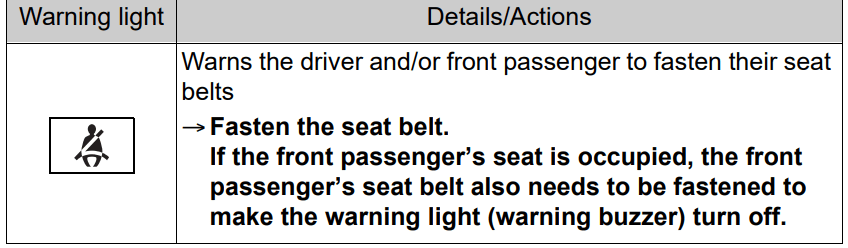
Driver’s and front passenger’s seat belt reminder light (warning buzzer)*
* : Driver’s seat belt warning buzzer:
The driver’s seat belt warning buzzer sounds to alert the driver that his or her seat belt is not fastened. Once the engine switch is turned to ON, the buzzer sounds. If the seat belt is still unfastened, the buzzer sounds intermittently for a certain period of time after the vehicle reaches a certain speed.
Front passenger’s seat belt warning buzzer:
The front passenger’s seat belt warning buzzer sounds to alert the front passenger that his or her seat belt is not fastened. If the seat belt is unfastened, the buzzer sounds intermittently for a certain period of time after the vehicle reaches a certain speed.
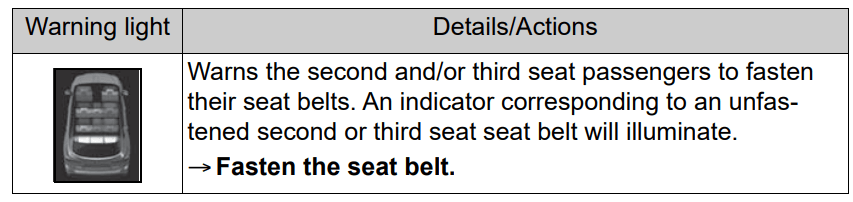
Rear passengers’ seat belt reminder light*1 (warning buzzer)*2
*1:This light illuminates on the multi-information display.
*2:Rear passengers’ seat belt warning buzzer:
The rear passengers’ seat belt warning buzzer sounds to alert the rear passenger that his or her seat belt is not fastened. If the seat belt is unfastened, the buzzer sounds intermittently for a certain period of time, after the seat belt is fastened and unfastened and the vehicle reaches a certain speed.
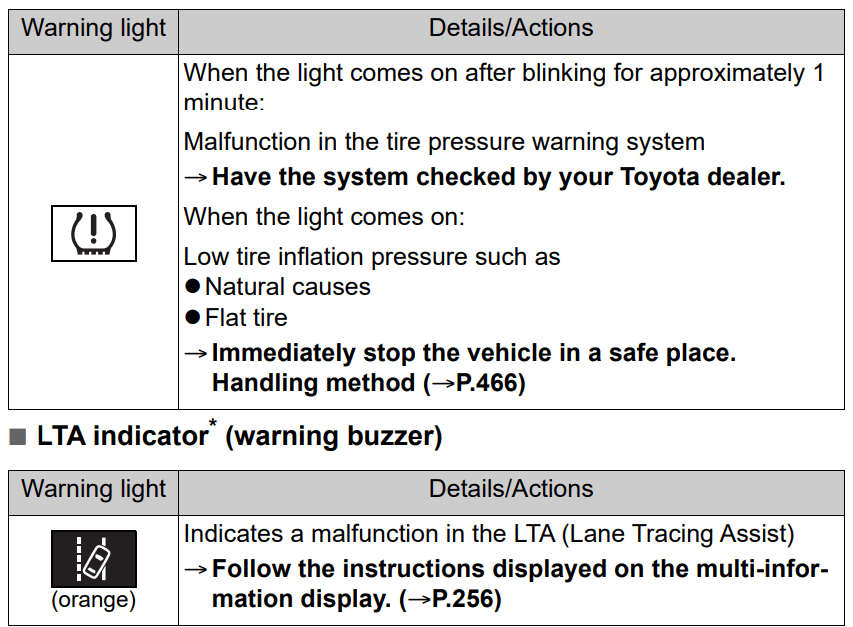
Tire pressure warning light
* : This light illuminates on the multi-information display
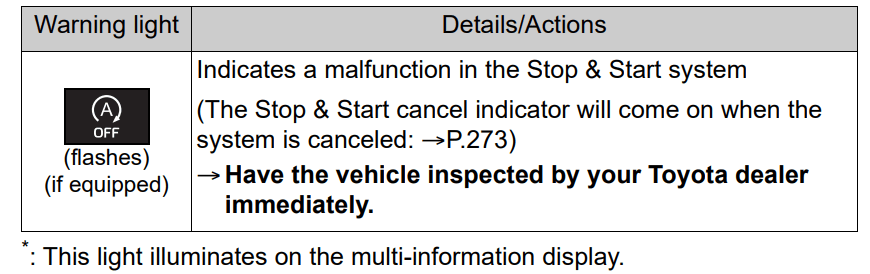
Stop & Start cancel indicator*
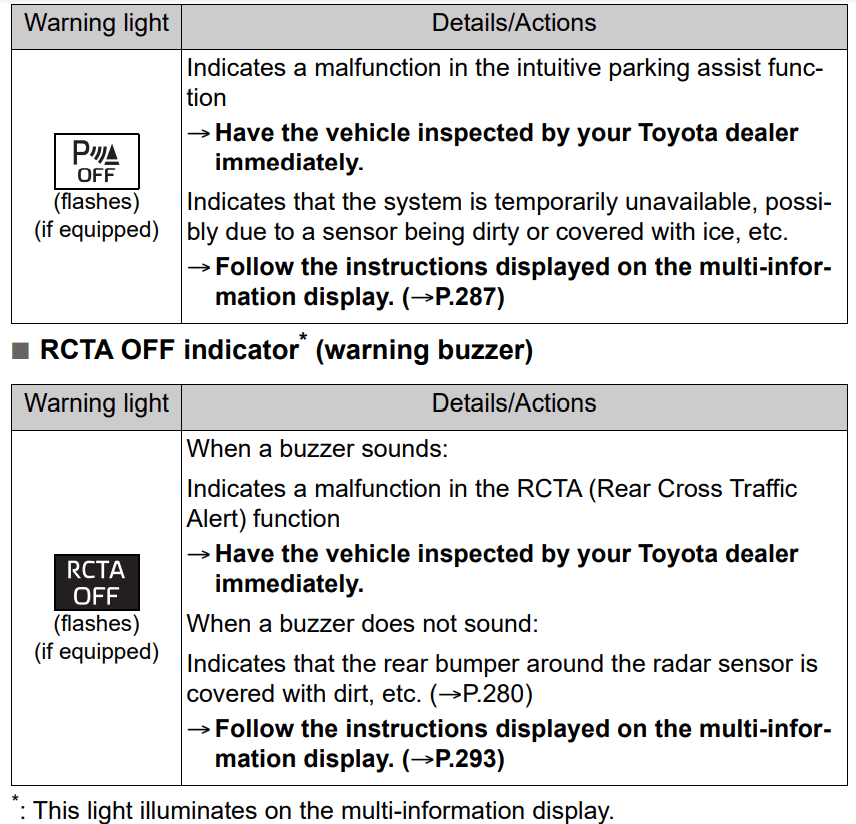
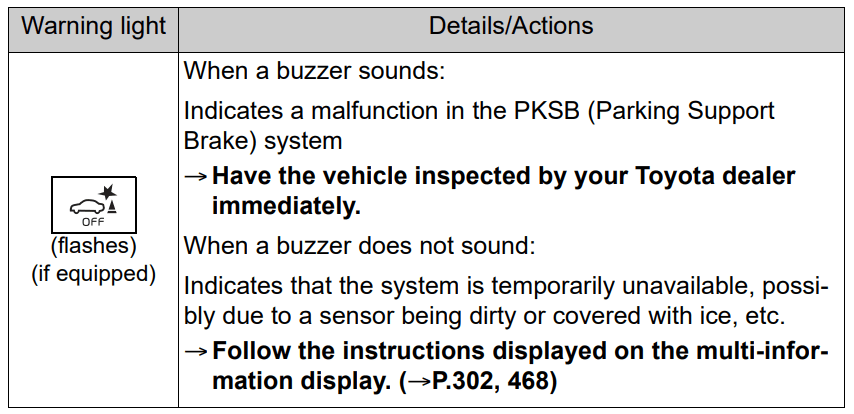
Intuitive parking assist OFF indicator (warning buzzer)
PKSB OFF indicator (warning buzzer)
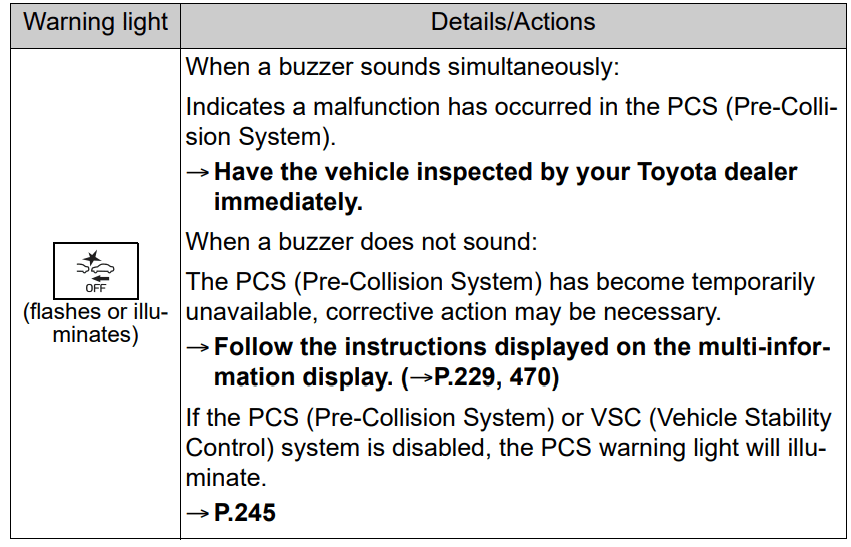
PCS warning light
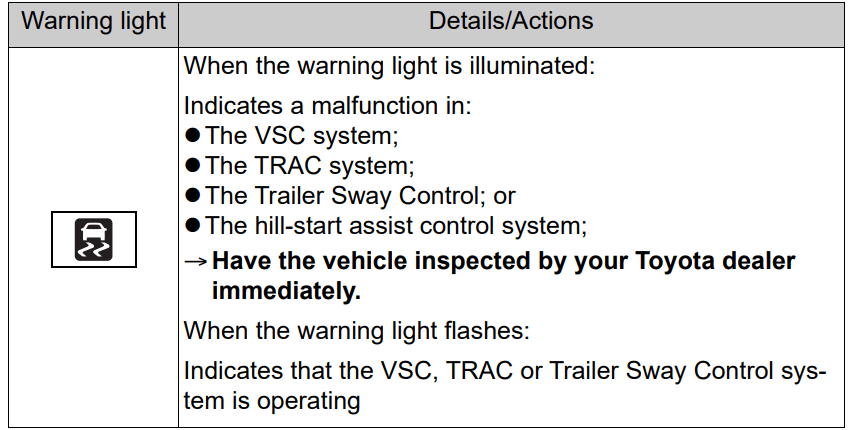
Slip indicator
Warning buzzer
In some cases, the buzzer may not be heard due to being in a noisy location or audio sound.
Front passenger detection sensor, seat belt reminder and warning buzzer
If luggage is placed on the front passenger seat, the front passenger detection sensor may cause the warning light to flash and the warning buzzer to sound even if a passenger is not sitting in the seat.
If a cushion is placed on the seat, the sensor may not detect a passenger, and the warning light may not operate properly.
SRS warning light This warning light system monitors the airbag sensor assembly, front impact sensors, side impact sensors (front), side impact sensors (front door), side impact sensors (rear), driver’s seat position sensor, driver’s seat belt buckle switch, front passenger occupant classification system (ECU and sensors), “PASS AIR BAG ON” indicator light, “PASS AIR BAG OFF” indicator light, front passenger’s seat belt buckle switch, driver’s seat belt pretensioner, front passenger’s seat belt pretensioner and force limiter, airbags, interconnecting wiring and power sources. (→P.34)
If the malfunction indicator lamp comes on while driving
First check the following:
Is the fuel tank empty?
If it is, fill the fuel tank immediately.
Is the fuel tank cap loose?
If it is, tighten it securely.
The light will go off after several driving trips.
If the light does not go off even after several trips, contact your Toyota dealer as soon as possible.
Electric power steering system warning light (warning buzzer)
When the battery charge becomes insufficient or the voltage temporarily drops, the electric power steering system warning light may come on and the warning buzzer may sound.
When the tire pressure warning light comes on
Inspect the tires to check if a tire is punctured.
If a tire is punctured: →P.472
If none of the tires are punctured: Turn the engine switch off then turn it to ON. Check if the tire pressure warning light comes on or blinks.
If the tire pressure warning light blinks for 1 minute then stays on
There may be a malfunction in the tire pressure warning system. Have the vehicle inspected by your Toyota dealer immediately.
If the tire pressure warning light comes on
After the temperature of the tires has lowered sufficiently, check the inflation pressure of each tire and adjust them to the specified level.
If the warning light does not turn off even after several minutes have elapsed, check that the inflation pressure of each tire is at the specified level and perform initialization. (→P.426)
If the warning light does not turn off several minutes after the initialization has been performed, have the vehicle inspected by your Toyota dealer immediately.
The tire pressure warning light may come on due to natural causes
The tire pressure warning light may come on due to natural causes such as natural air leaks and tire inflation pressure changes caused by tem¬ perature. In this case, adjusting the tire inflation pressure will turn off the warning light (after a few minutes).
When a tire is replaced with a spare tire
Vehicles with a compact spare tire: The compact spare tire is not equipped with a tire pressure warning valve and transmitter. If a tire goes flat, the tire pressure warning light will not turn off even though the flat tire has been replaced with the spare tire. Replace the spare tire with the repaired tire and adjust the tire inflation pressure. The tire pressure warning light will go off after a few minutes.
Vehicles with a full-size spare tire: The spare tire is also equipped with a tire pressure warning valve and transmitter. The tire pressure warning light will turn on if the tire inflation pressure of the spare tire is low. If a tire goes flat, the tire pressure warning light will not turn off even though the flat tire has been replaced with the spare tire.
Replace the spare tire with the repaired tire and adjust the tire inflation pressure. The tire pressure warning light will go off after a few minutes.
Conditions that the tire pressure warning system may not function properly → P.422
When the electric power steering system warning light comes on
When the light comes on yellow, the assist to the power steering is restricted. When the light comes on red, the assist to the power steering is lost and handling operations of the steering wheel become extremely heavy.
When steering wheel operations are heavier than usual, grip the steering wheel firmly and operate it using more force than usual.
If the tire pressure warning light comes on
Be sure to observe the following precautions.
Failure to do so could cause a loss of vehicle control and result in death or serious injury.
Stop your vehicle in a safe place as soon as possible. Adjust the tire inflation pressure immediately.
Vehicles with a compact spare tire: If the tire pressure warning light comes on even after tire inflation pressure adjustment, it is probable that you have a flat tire. Check the tires. If a tire is flat, change it with the spare tire and have the flat tire repaired by the nearest Toyota dealer.
Avoid abrupt maneuvering and braking.
If the vehicle tires deteriorate, you could lose control of the steering wheel or the brakes.
If a blowout or sudden air leakage should occur
The tire pressure warning system may not activate immediately.
Maintenance of the tires
Each tire, including the spare (if provided), should be checked monthly when cold and inflated to the inflation pressure recommended by the vehicle manufacturer on the vehicle placard or tire inflation pressure label (tire and load information label). (If your vehicle has tires of a different size than the size indicated on the vehicle placard or tire inflation pressure label [tire and load information label], you should determine the proper tire inflation pressure for those tires.)
As an added safety feature, your vehicle has been equipped with a tire pressure monitoring system (TPMS-tire pressure warning system) that illuminates a low tire pressure telltale (tire pressure warning light) when one or more of your tires is significantly under-inflated. Accordingly, when the low tire pressure telltale (tire pressure warning light) illuminates, you should stop and check your tires as soon as possible, and inflate them to the proper pressure. Driving on a significantly under-inflated tire causes the tire to overheat and can lead to tire failure. Under-inflation also reduces fuel efficiency and tire tread life, and may affect the vehicle’s handling and stopping ability.
WARNING
Please note that the TPMS (tire pressure warning system) is not a substitute for proper tire maintenance, and it is the driver’s responsibility to maintain correct tire pressure, even if under-inflation has not reached the level to trigger illumination of the TPMS low tire pressure telltale (tire pressure warning light).
Your vehicle has also been equipped with a TPMS (tire pressure warning system) malfunction indicator to indicate when the system is not operating properly. The TPMS (tire pressure warning system) malfunction indicator is combined with the low tire pressure telltale (tire pressure warning light). When the system detects a malfunction, the telltale will flash for approximately one minute and then remain continuously illuminated. This sequence will continue upon subsequent vehicle start-ups as long as the malfunction exists. When the malfunction indicator is illuminated, the system may not be able to detect or signal low tire pressure as intended.
TPMS (tire pressure warning system) malfunctions may occur for a variety of reasons, including the installation of replacement or alternate tires or wheels on the vehicle that prevent the TPMS (tire pressure warning system) from functioning properly. Always check the TPMS (tire pressure warning system) malfunction telltale after replacing one or more tires or wheels on your vehicle to ensure that the replacement or alternate tires and wheels allow the TPMS (tire pressure warning system) to continue to function properly.
If a wdisplayedarning message is: The multi-information display shows warnings of system malfunctions, incorrectly performed operations, and messages that indicate a need for maintenance. When a message is shown, perform the correction procedure appropriate to the message.
Additionally, if a warning light comes on or flashes at the same time that a warning message is displayed, take the appropriate corrective action for the warning light. HP.458)
If a warning message is displayed again after the appropriate actions have been performed, contact your Toyota dealer.
Messages and warnings
The warning lights and warning buzzers operate as follows depending on the content of the message. If a message indicates the need for inspection by a dealer, have the vehicle inspected by your Toyota dealer immediately.
Warning light
Warning
buzzer*
Warning
-
Sounds
Indicates an important situation, such as when a system related to driving is malfunctioning or that danger may result if the correction procedure is not performed
Indicates a situation, such as when damage to the vehicle or danger may result
Comes on or flashes
Sounds
Indicates an important situation, such as when the systems shown on the multi-information display may be malfunctioning
-
Does not sound
Indicates a condition, such as malfunction of electrical components, their condition, or indicates the need for maintenance
Indicates a situation, such as when an operation has been performed incorrectly, or indicates how to perform an operation correctly
* : A buzzer sounds the first time a message is shown on the multi-information display
Warning messages
The warning messages explained below may differ from the actual messages according to operation conditions and vehicle specifications.
Warning buzzer
In some cases, the buzzer may not be heard due to being in a noisy location or audio sound.
If “Engine Oil Level Low Add or Replace” is displayed
The engine oil level is low. Check the level of the engine oil, and add if necessary.
This message may appear if the vehicle is stopped on a slope. Move the vehicle to a level surface and check to see if the message disappears.
If “Engine Stopped Steering Power Low” is displayed
This message is displayed if the engine is stopped while driving.
When steering wheel operations are heavier than usual, grip the steering wheel firmly and operate it using more force than usual.
If “Shift to P when Parked” is displayed
This message is displayed when the driver’s door is opened without turning the engine switch off with the shift lever in any position other than P. Change the shift lever to P.
If “Auto Power OFF to Conserve Battery” is displayed
Power was cut off due to the automatic power off function. Next time when starting the engine, increase the engine speed slightly and maintain that level for approximately 5 minutes to recharge the battery.
If “Headlight System Malfunction Visit Your Dealer” is displayed
The following systems may be malfunctioning. Have the vehicle inspected by your Toyota dealer immediately.
The LED headlight system (if AFS [Adaptive Front-lighting System] equipped)
The automatic headlight leveling system (if equipped)
Automatic High Beam
If “Radar Cruise Control Unavailable” is displayed
The dynamic radar cruise control with full-speed range system cannot be used temporarily. Use the system when it becomes available again.
If a message that indicates the malfunction of front camera is displayed
The following systems may be suspended until the problem shown in the message is resolved. (→P.233, 464)
PCS (Pre-Collision system)
LTA (Lane Tracing Assist)
Automatic High Beam
RSA (Road Sign Assist) (if equipped)
Dynamic radar cruise control with full-speed range
If a message that indicates the malfunction of radar sensor is displayed
The following systems may be suspended until the problem shown in the message is resolved. (→P.233, 464)
PCS (Pre-Collision system)
LTA (Lane Tracing Assist)
Dynamic radar cruise control with full-speed range
If “AWD System Overheated Switching to 2WD Mode” or “AWD System Overheated 2WD Mode Engaged” is displayed (AWD models)
This message may be displayed when driving under extremely high load conditions.
Drive the vehicle at low speeds or stop the vehicle in a safe place with the engine running until the message is cleared.
If the message is not cleared, have the vehicle inspected by your Toyota dealer.
If “Check Fuel Cap” is displayed
The fuel tank cap is not properly installed. Correctly install the fuel tank cap.
If “Maintenance Required Soon” is displayed
Indicates that all maintenance according to the driven distance on the maintenance schedule* should be performed soon.
Comes on approximately 4500 miles (7200 km) after the message has been reset. If necessary, perform maintenance. Please reset the message after the maintenance is performed. (→P.403)
*: Refer to the separate “Scheduled Maintenance Guide” or “Owner’s Manual Supplement” for the maintenance interval applicable to your vehicle.
If “Maintenance Required Visit Your Dealer” is displayed
Indicates that all maintenance is required to correspond to the driven distance on the maintenance schedule*.
Comes on approximately 5000 miles (8000 km) after the message has been reset. (The indicator will not work properly unless the message has been reset.) Perform the necessary maintenance. Please reset the message after the maintenance is performed. (→ P.403)
Refer to the separate “Scheduled Maintenance Guide” or “Owner’s Manual Supplement” for the maintenance interval applicable to your vehicle.
If “Oil Maintenance Required Soon” is displayed
Indicates that the engine oil should be scheduled to be changed.
Check the engine oil and change it if necessary. After changing the engine oil, make sure to reset the message. (→P.414)
If a message that indicates the need for visiting your Toyota dealer is displayed
The system or part shown on the multi-information display is malfunctioning. Have the vehicle inspected by your Toyota dealer immediately.
If a message that indicates the need for referring to Owner’s Manual is displayed
If any of the following messages are shown on the multi-information display, it may indicate a malfunction. Immediately stop the vehicle and contact your Toyota dealer.
"Braking Power Low Stop in a Safe Place See Owner's Manual”
"Oil Pressure Low Stop in a Safe Place See Owner's Manual”
“Charging System Malfunction Stop in a Safe Place See Owner's Manual”
If “Smart Key System Malfunction See Owner's Manual” is shown on the multi-information display, it may indicate a malfunction. Have the vehicle inspected by your Toyota dealer immediately.
If any of the following messages are shown on the multi-information display, follow the instructions.
"Engine Coolant Temp High Stop in a Safe Place See Owner's Manual” (→P.495)
"High Transmission Fluid Temp See Owner's Manual” (→P.206)
If you have a flat tire: Your vehicle is equipped with a spare tire. The flat tire can be replaced with the spare tire. For details about tires: →P.419
Before jacking up the vehicle
Stop the vehicle in a safe place on a hard, flat surface.
Set the parking brake.
Shift the shift lever to P.
Stop the engine.
Turn on the emergency flashers. (→P.450)
For vehicles with power back door: Turn off the power back door system. (→P.521)
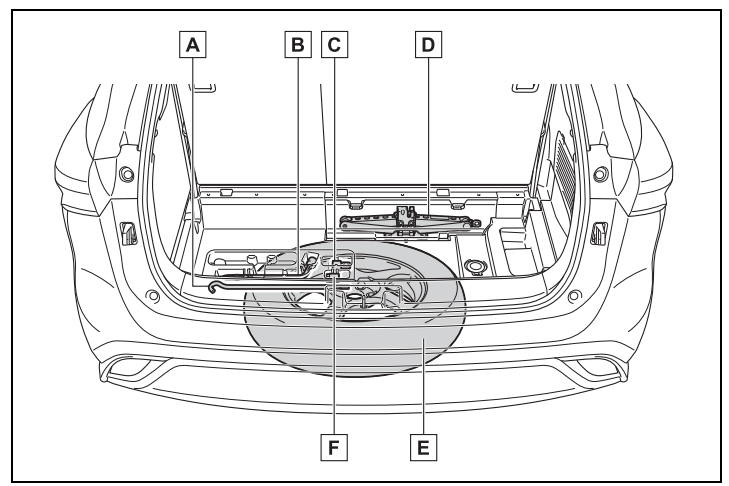
Location of the spare tire, jack and tools
Jack handle
Wheel nut wrench
Adapter socket
Jack
Spare tire
Wheel lock key (if equipped)
Wheel lock nut (if equipped): When replacing tires on a vehicle with wheel lock nuts, use the following procedures to remove and install the wheel lock nuts. The wheel lock key is stored in the tray inside the luggage compartment. Always return the wheel lock key to its original position after use, so that it does not get lost. (→P.473)
Removal
For ease of removal, the wheel lock nut should always be the first one loosened.
Place the wheel lock key on top of the wheel lock nut, turning until the wheel lock key and wheel lock nut patterns engage.
Place the wheel nut wrench on the wheel lock key, and while applying pressure on the wheel lock key, loosen the wheel lock nut.
Installation
For ease of installation, the wheel lock nut should always be the last one tightened.
By hand, install a wheel lock nut on each wheel.
Place the wheel lock key on top of the wheel lock nut, turning until the wheel lock key and wheel lock nut patterns engage.
Place the wheel nut wrench on the wheel lock key, and while applying pressure on the wheel lock key, tighten the wheel lock nut to the recommended torque.
If the vehicle becomes stuck: Carry out the following procedures if the tires spin or the vehicle becomes stuck in mud, dirt or snow:
Recovering procedure
Stop the engine. Shift the shift lever to P and set the parking brake.
Remove the mud, snow or sand from around the front wheels.
Place wood, stones or some other material under the front wheels to help provide traction.
Restart the engine.
Shift the shift lever to D or R and release the parking brake. Then, while exercising caution, depress the accelerator pedal.
Q: My first servicing is coming up for my 21 Highlander and was told by the dealer that they don’t change the oil for the first servicing. I tried to confirm that in the manual but wasn’t able to find it. Is this right? I have always before had the oil changed on the first service.
 or longer than about one second, an alarm will sound intermittently and the vehicle lights will flash to deter any person from trying to break into or damage your vehicle.
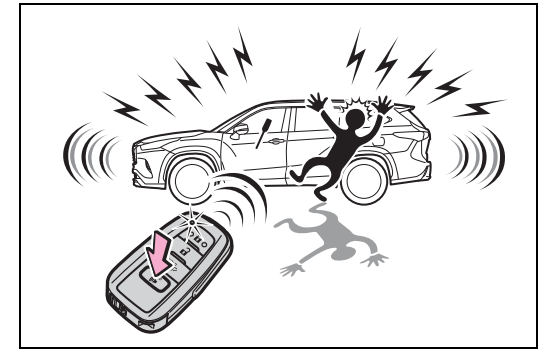
 ,
, or
or for approximately 5 seconds while pressing and holding
 .
.

 . mark.
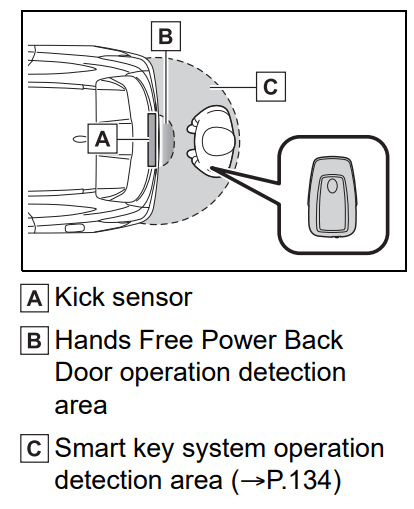
 or
or  of the meter control switch to select
  .
. or
or of the meter control switch, select
 and then press and hold
 .
.


 to turn off TRAC