de Gebrauchs- und
Montageanleitung
en Operating and
Fitting Instructions
it Istruzioni per l’uso e
l’installazione
de
en
it
E 3544 . .

2
de Seite 03–050
en
page 51 – 090
it
pagina 91 – 130
Noch Fragen? Sie erreichen uns:
€ 0,12/min. DTAG
Postfach 83 0101 Quellenstraße 2 Per Telefon:
D-81701 München A-1100 Wien Für Österreich:
Fax: +49 (0) 89 / 45 90-35 32 Fax: +43 (0) 1/ 6 05 75-5 12 60 Tel: 08 10 / 70 04 00
Internet: www.neff.de Internet: www.neff.at zum Regionaltarif

3
Inhaltsverzeichnis
Worauf Sie achten müssen . . . . . . 4
Verpackung und Altgeräte . . . . . . . . 4
Vor dem Einbau . . . . . . . . . . . . . . . . 5
Sicherheitshinweise . . . . . . . . . . . . . 5
Ursachen für Schäden . . . . . . . . . . . 7
Ihr neuer Herd . . . . . . . . . . . . . . . . 8
Das Bedienfeld . . . . . . . . . . . . . . . . 8
Funktionswähler . . . . . . . . . . . . . . . . 8
Temperaturwähler . . . . . . . . . . . . . . 9
Einschubhöhen . . . . . . . . . . . . . . . . 9
Zubehör . . . . . . . . . . . . . . . . . . . . . 10
Vor dem ersten Benutzen . . . . . . . 11
Vorreinigung . . . . . . . . . . . . . . . . . . 11
Ausheizen . . . . . . . . . . . . . . . . . . . . 11
Sicherheit der Brenner . . . . . . . . . . . 11
Nachreinigung . . . . . . . . . . . . . . . . . 11
Tageszeit . . . . . . . . . . . . . . . . . . . . . 11
Kochen . . . . . . . . . . . . . . . . . . . . . . 12
Wahl der Kochtöpfe . . . . . . . . . . . . . 12
Zünden und Regeln der Brenner . 13
Elektronikuhr . . . . . . . . . . . . . . . . . 14
Das Bedienfeld . . . . . . . . . . . . . . . . 14
Sonderfunktionen . . . . . . . . . . . . . . 14
Kurzzeitwecker . . . . . . . . . . . . . . . . 15
Zeitschaltautomatik . . . . . . . . . . . . . 15
Backofen-Funktionen . . . . . . . . . . 17
Backofen ein- und ausschalten . . 20
Schnellaufheizung . . . . . . . . . . . . . . 20
Backen . . . . . . . . . . . . . . . . . . . . . . 21
Backtabelle . . . . . . . . . . . . . . . . . . . 22
Backen mit der Pizzastufe . . . . . . . . 24
Inhaltsverzeichnis
Tipps und Tricks . . . . . . . . . . . . . . . 25
Braten . . . . . . . . . . . . . . . . . . . . . . . 26
Brattabelle . . . . . . . . . . . . . . . . . . . . 28
Grillen . . . . . . . . . . . . . . . . . . . . . . . 29
Rundum-Grillen . . . . . . . . . . . . . . . . 29
Thermogrillen . . . . . . . . . . . . . . . . . . 30
Flächengrillen . . . . . . . . . . . . . . . . . . 31
Auftauen und Garen . . . . . . . . . . . 32
Einkochen . . . . . . . . . . . . . . . . . . . 34
Reinigen und Pflegen . . . . . . . . . . 36
Wichtige Hinweise . . . . . . . . . . . . . . 36
Katalytische Backofenverkleidung . . 38
EasyClean
®
-Reinigungssystem . . . . 39
Aus- und Einhängen
der Backofentür . . . . . . . . . . . . . . . . 41
Heizkörper absenken . . . . . . . . . . . . 42
Einhängegitter . . . . . . . . . . . . . . . . . 42
Teleskopauszüge . . . . . . . . . . . . . . . 43
Störungen und Reparaturen . . . . . 44
Was ist, wenn etwas
nicht funktioniert? . . . . . . . . . . . . . 45
Prüfgerichte . . . . . . . . . . . . . . . . . . . 47
Montageanleitung
Für den Installateur
und Küchenfachmann
Wichtige Hinweise . . . . . . . . . . . . . 48
Einbauen . . . . . . . . . . . . . . . . . . . . 49
4
Worauf Sie achten müssen
Lesen Sie bitte sorgfältig diese Gebrauchsanleitung.
Nur dann können Sie Ihren Herd sicher und richtig
bedienen.
Diese Gebrauchsanleitung gilt für mehrere Geräte-
Ausführungen. Es ist möglich, dass einzelne
Ausstattungsmerkmale beschrieben sind, die nicht
auf Ihr Gerät zutreffen.
Heben Sie die Gebrauchs- und die Montagean-
leitung gut auf. Wenn Sie das Gerät weitergeben,
legen Sie die Anleitung bei.
Verpackung und Ihr neues Gerät wurde auf dem Weg zu Ihnen durch
Altgerät
die Verpackung geschützt. Alle eingesetzten
Materialien sind umweltverträglich und wieder
verwertbar. Bitte helfen Sie mit und entsorgen Sie die
Verpackung umweltgerecht.
Altgeräte sind kein wertloser Abfall. Durch umwelt-
gerechte Entsorgung können wertvolle Rohstoffe
wiedergewonnen werden.
Bevor Sie das Altgerät entsorgen, machen Sie es
unbrauchbar oder kennzeichnen Sie es mit einem
Aufkleber „Achtung Schrott!”
Dieses Gerät ist entsprechend der europäischen
Richtlinie 2002/96/EG über Elektro- und
Elektronik-Altgeräte (waste electrical and electronic
equipment – WEEE) gekennzeichnet.
Die Richtlinie gibt den Rahmen für eine EU-weit
gültige Rücknahme und Verwertung der Altgeräte
vor.
Über aktuelle Entsorgungswege informieren Sie sich
bitte bei Ihrem Fachhändler oder bei Ihrer Gemeinde-
verwaltung.
5
Sicherheitshinweise Dieses Gerät ist nur für den privaten Haushalt
bestimmt.
Benutzen Sie den Herd ausschließlich zum
Zubereiten von Speisen.
Heißer Backofen Die Backofentür vorsichtig öffnen. Es kann heißer
Dampf austreten.
Nie die heißen Backofen-Innenflächen und die
Heizelemente berühren. Verbrennungsgefahr!
Halten Sie Kinder grundsätzlich fern.
Nie brennbare Gegenstände im Backofen
aufbewahren. Nie brennbare Gegenstände auf das
Kochfeld legen. Brandgefahr!
Nie Anschlusskabel von Elektrogeräten auf die
heißen Kochstellen legen.
Nie Anschlusskabel von Elektrogeräten in der heißen
Backofentür einklemmen. Die Kabelisolierung kann
schmelzen. Kurzschluss-Gefahr!
Achtung: Die Auszugschienen werden bei Betrieb
des Backofens heiß.
Besondere Vorsicht vor Verbrennungen im
herausgezogenen Zustand.
Entfernen Sie Rückstände der Verpackung z. B.
Styroporteilchen vollständig aus dem Backofen.
Verwenden Sie das Gerät nicht zum Heizen.
Vor dem Einbau
Transportschäden Prüfen Sie das Gerät nach dem Auspacken. Bei
einem Transportschaden dürfen Sie das Gerät nicht
anschließen.
Elektrischer Anschluss Nur ein konzessionierter Fachmann darf das Gerät
anschließen. Bei Schäden durch falschen Anschluss
haben Sie keinen Anspruch auf Garantie.

6
Belüftung Die Benutzung eines Gaskochgerätes führt zu
einer Wärme- und Feuchtigkeitsbildung im
Aufstellungsraum. Auf gute Belüftung der Küche
achten: Die natürlichen Belüftungsöffnungen
offenhalten oder eine mechanische Lüftungs-
einrichtung (Dunstabzugshaube) vorsehen.
Eine intensive und langandauernde Benutzung des
Gerätes kann eine zusätzliche Belüftung, z. B. eine
erhöhte Leistung der gegebenenfalls vorhandenen
mechanischen Lüftungseinrichtung, erforderlich
machen.
Gas-Geräte dürfen nicht in Fahrzeugen oder
Schiffen installiert werden.
Brennerdeckel Legen Sie die Brennerdeckel vor Gebrauch der
Kochstellenbrenner exakt auf.
Betreiben Sie die Kochstellenbrenner nur mit
aufgesetztem Kochgut.
Bei Betrieb mit Flüssiggas (Propan/Butan) müssen Sie alle Verbindungen
zwischen Flasche und Gerät absolut dicht herstellen.
Lassen Sie den Druckminderer der Flüssiggasflasche
in regelmäßigen Abständen überprüfen und die
Anschlussteile der Flüssiggasversorgung regelmäßig
warten.
Überzeugen Sie sich anhand des Typenschildes, ob
Ihr Gerät auf die örtlichen Gasverhältnisse
abgestimmt ist.
Bei Nichtbeachtung besteht die Möglichkeit einer
Gasverpuffung, oder Brandgefahr.
Die Bedienknebel dürfen nicht abgezogen werden,
auch nicht zur Reinigung (Berührungsschutz).
Reparaturen Unsachgemäße Reparaturen sind gefährlich.
Stromschlag-Gefahr!
Nur ein von uns geschulter Kundendienst-Techniker
darf Reparaturen durchführen.
Wenn das Gerät defekt ist, die Sicherung im
Sicherungskasten ausschalten und die Gaszufuhr
abstellen.
Rufen Sie den Kundendienst.

7
Ursachen für
Schäden
Backbleche, Alufolie oder Schieben Sie auf dem Backofenboden kein
Geschirr auf dem Backblech ein. Legen Sie ihn nicht mit Alufolie aus.
Backofenboden Stellen Sie kein Geschirr auf den Backofenboden.
Es entsteht ein Wärmestau. Die Back- und
Bratzeiten stimmen nicht mehr und das Email wird
beschädigt.
Einschubteile Einschubteile vorsichtig einschieben um
Beschädigungen zu vermeiden.
Backpapier Legen Sie Backpapier beim Arbeiten mit der
Heißluft-Funktion * nicht lose in den Backofen
(z. B. beim Aufheizen).
Das Heißluftgebläse kann das Papier ansaugen.
Das kann zu Beschädigungen von Heizung und
Gebläse führen.
Wasser im Backofen Gießen Sie nie Wasser in den heißen Backofen.
Es können Emailschäden entstehen.
Obstsaft Belegen Sie das Blech bei sehr saftigem Obstkuchen
nicht zu üppig. Obstsaft, der vom Backblech tropft,
hinterlässt Flecken, die Sie nicht mehr entfernen
können.
Verwenden Sie besser die tiefere Universalpfanne.
Auskühlen mit offener Lassen Sie den Backofen nur im geschlossenen
Backofentür Zustand auskühlen. Klemmen Sie nichts in der
Backofentür ein. Auch wenn Sie die Backofentür nur
einen Spalt breit öffnen, können benachbarte
Möbelfronten mit der Zeit beschädigt werden.
Stark verschmutzte Ist die Backofentürdichtung stark verschmutzt,
Backofentürdichtung schließt die Backofentür bei Betrieb nicht mehr
richtig. Die angrenzenden Möbelfronten können
beschädigt werden. Halten Sie die Backofentür-
dichtung sauber.
Backofentür als Sitzfläche Stellen oder setzen Sie sich nicht auf die
Backofentür.
Pflege und Reinigung Verwenden Sie keine Hochdruckreiniger oder
Dampfstrahler.
Kochstellen Bitte beachten Sie die dem Kochfeld beiliegende
Gebrauchsanleitung.
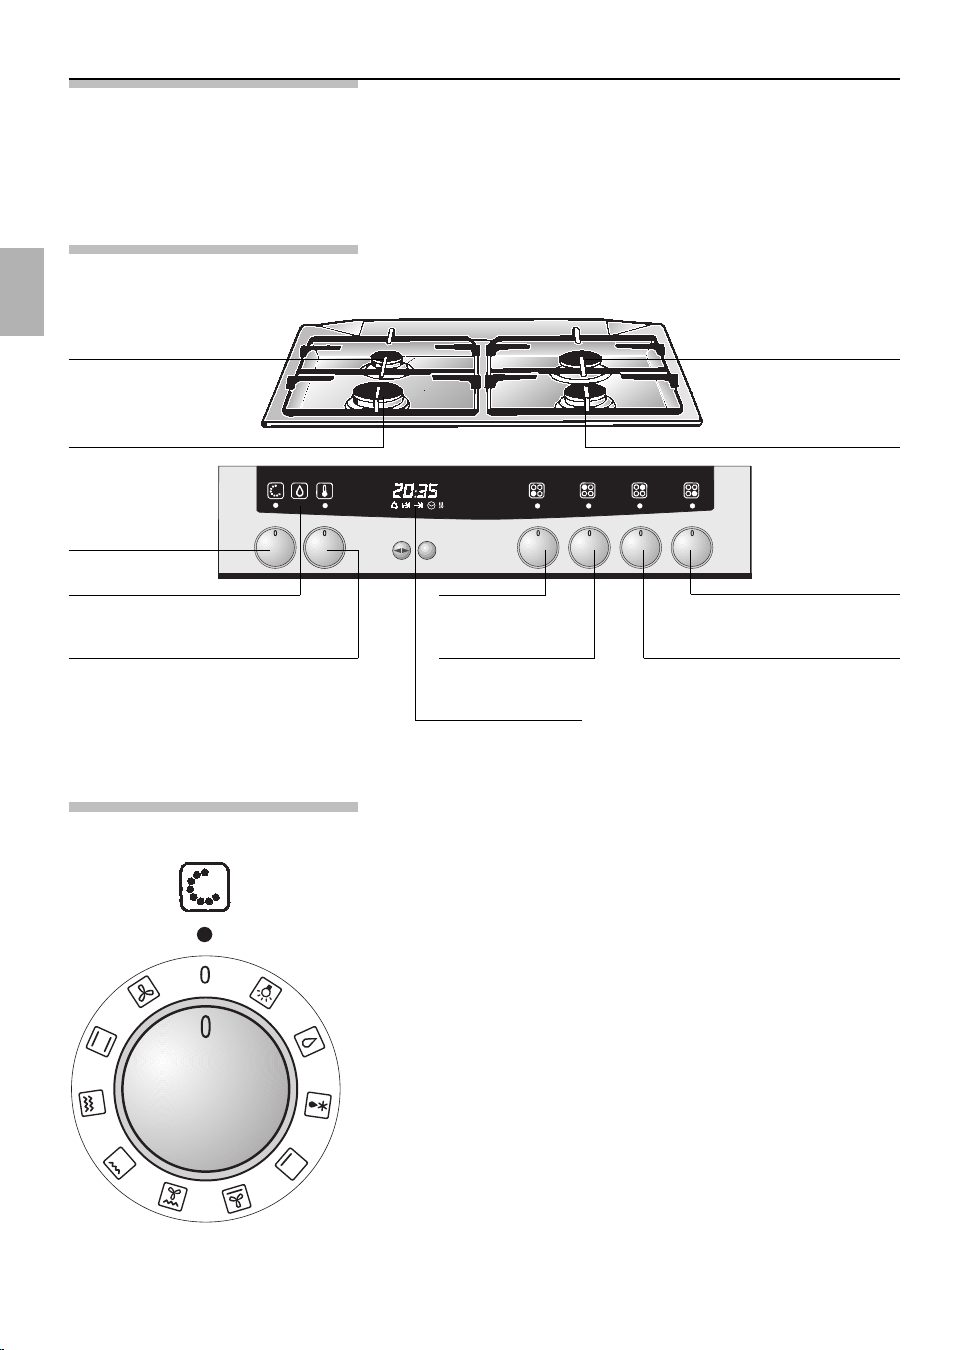
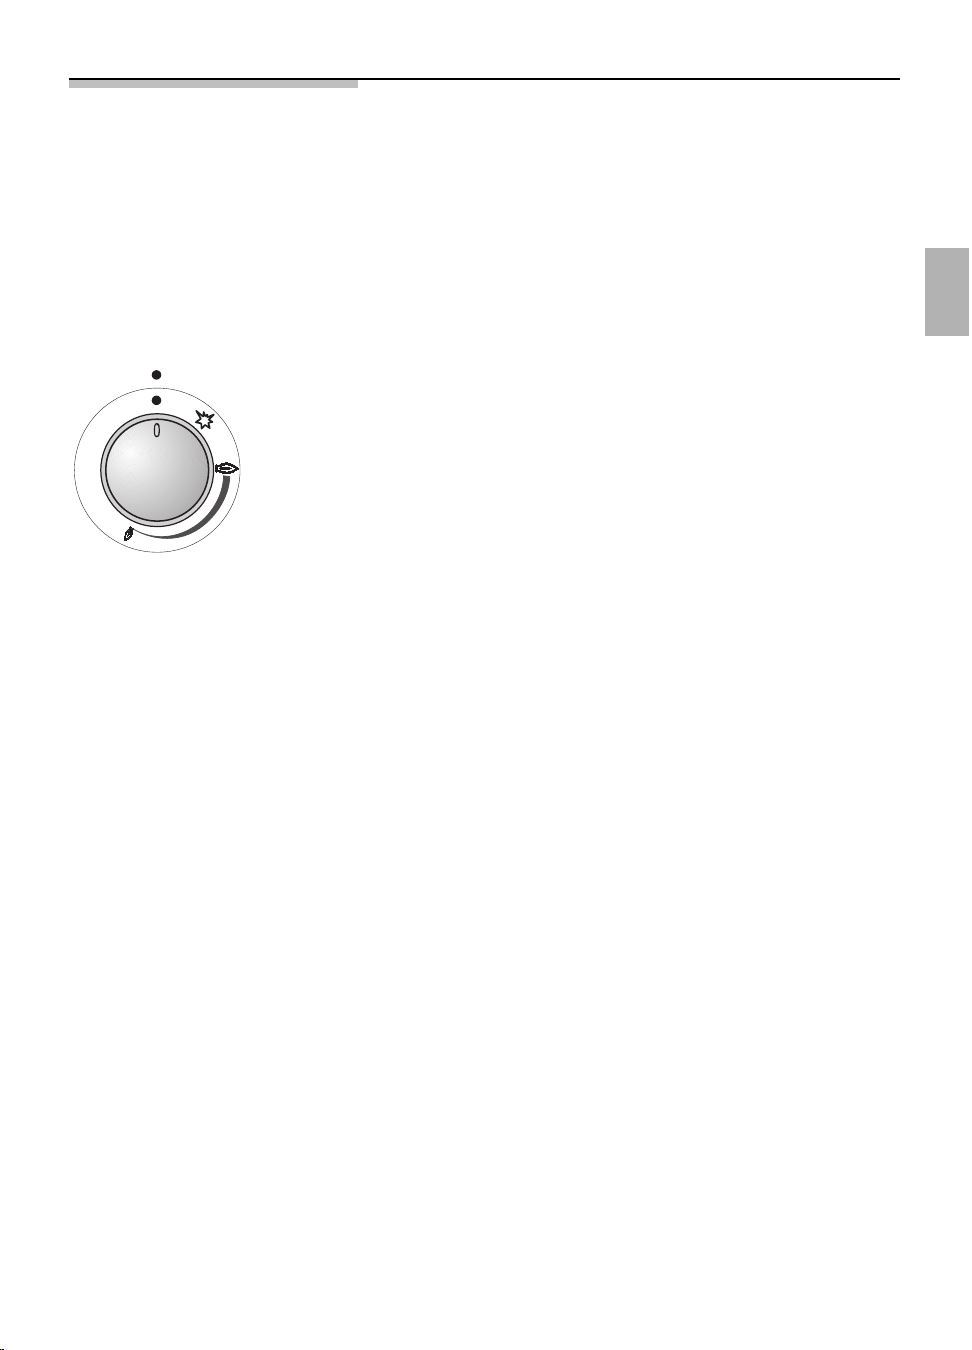
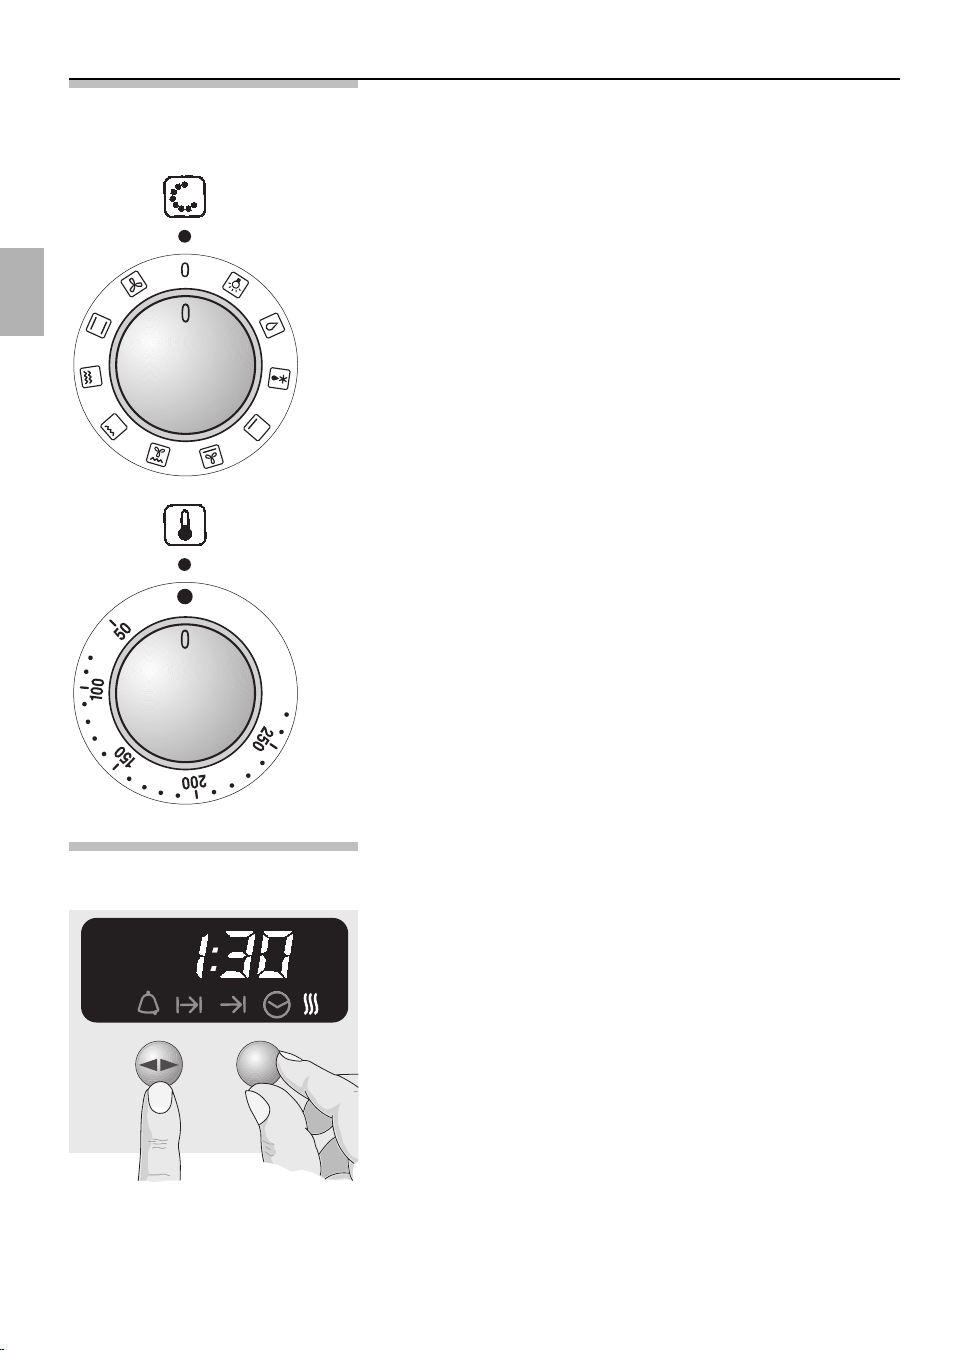
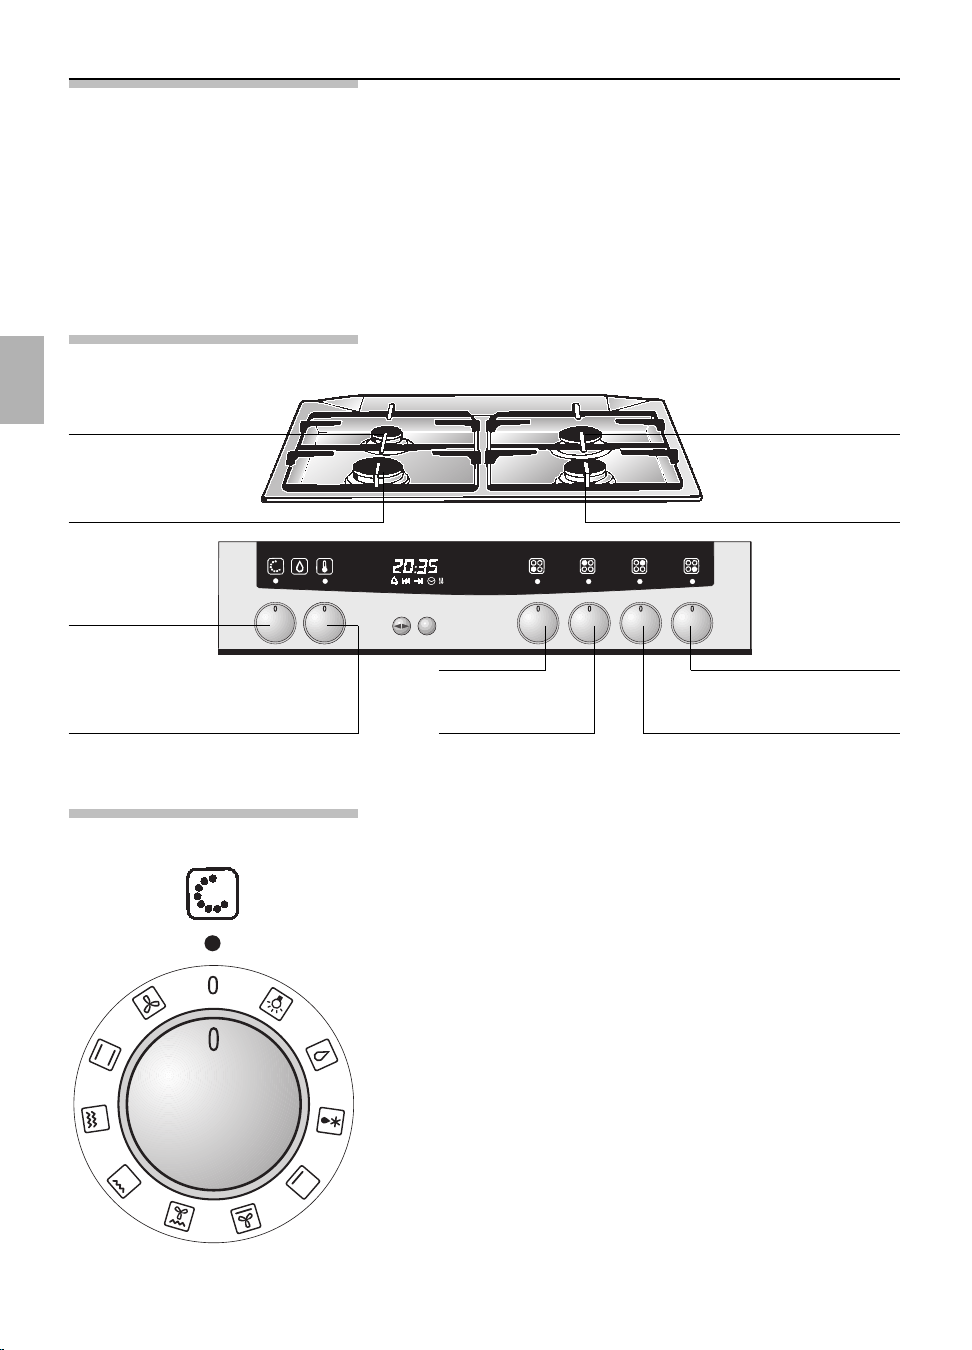
Funktionswähler Mit dem Funktionswähler stellen Sie die Heizart für
den Backofen ein.
Stellungen
*
CircoTherm Heißluft
/
Ober-/Unterhitze
(
Grill groß
)
Grill klein
,
Thermogrillen
&
Pizzastufe
.
Unterhitze
e
Auftaustufe
d
EasyClean
®
-Reinigungssystem
$
Backofenbeleuchtung
8
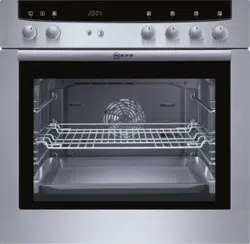
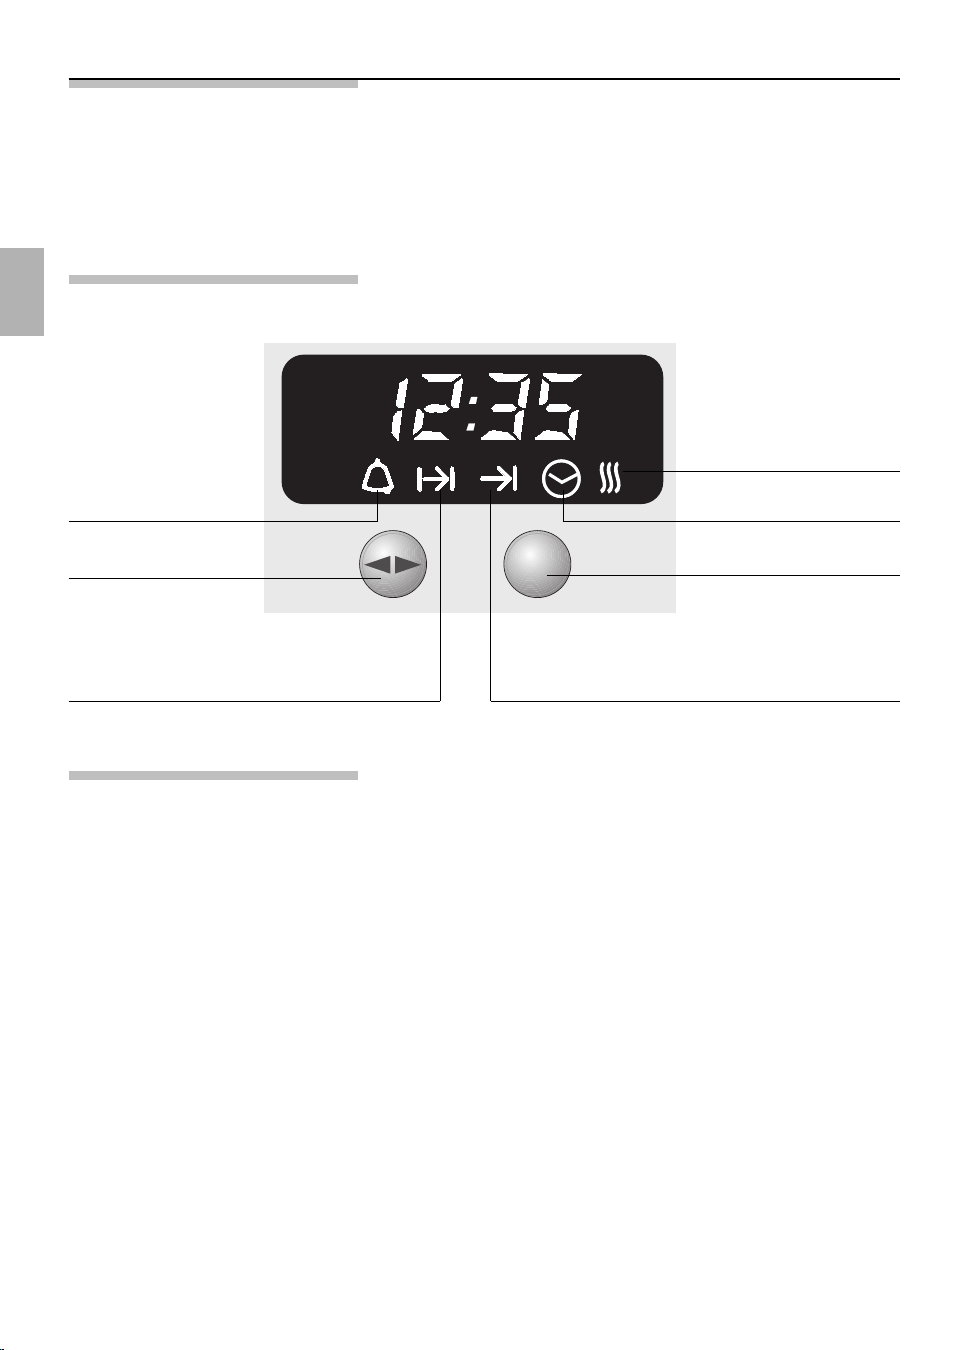
Ihr neuer Herd Hier lernen Sie Ihr neues Gerät kennen. Wir erklären
Ihnen das Bedienfeld mit den Schaltern und
Anzeigen. Sie erhalten Informationen zu den
Heizarten und dem beigelegten Zubehör.
Das Bedienfeld
Anzeigelampe für
EasyClean
®
-Reinigungssystem
Funktions-
wähler
Schalter für
Kochstelle D
Schalter für
Kochstelle C
Schalter für
Kochstelle B
Schalter für
Kochstelle A
Temperaturwähler
mit Anzeigelampe
Sparbrenner B Normalbrenner C
Normalbrenner DStarkbrenner A
Elektronikuhr
9
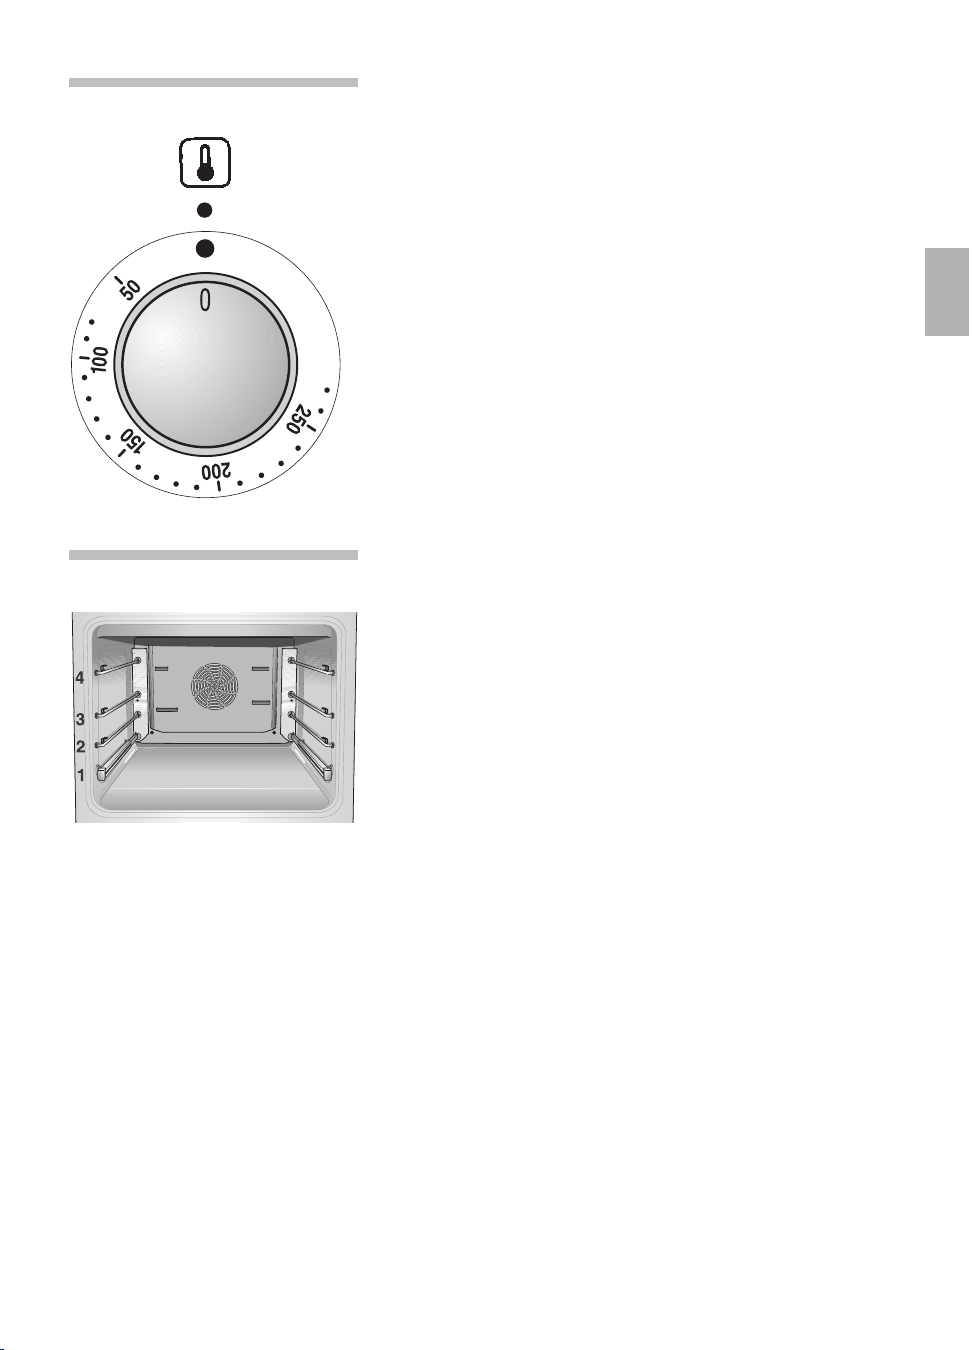
Temperaturwähler
Stellungen:
50 –275
Temperatur in °C.
Einschubhöhen Ihr Backofen ist mit 4 Einschubhöhen ausgestattet.
Die Einschubhöhen werden von unten nach oben
gezählt.
Sie sind am Backofen gekennzeichnet.
Beim Arbeiten mit Heißluft-Funktion
*
Einschubhöhe »2« nicht benutzen, damit die
Luftumwälzung nicht beeinträchtigt wird.
Die Einhängegitter und Teleskopschienen können in
die von Ihnen bevorzugte Einschubhöhe eingesetzt
werden.
Das einfache Steck-System ermöglicht Ihnen eine
flexible und schnelle Handhabung beim Wechseln
der Einhängegitter und Teleskopschienen.
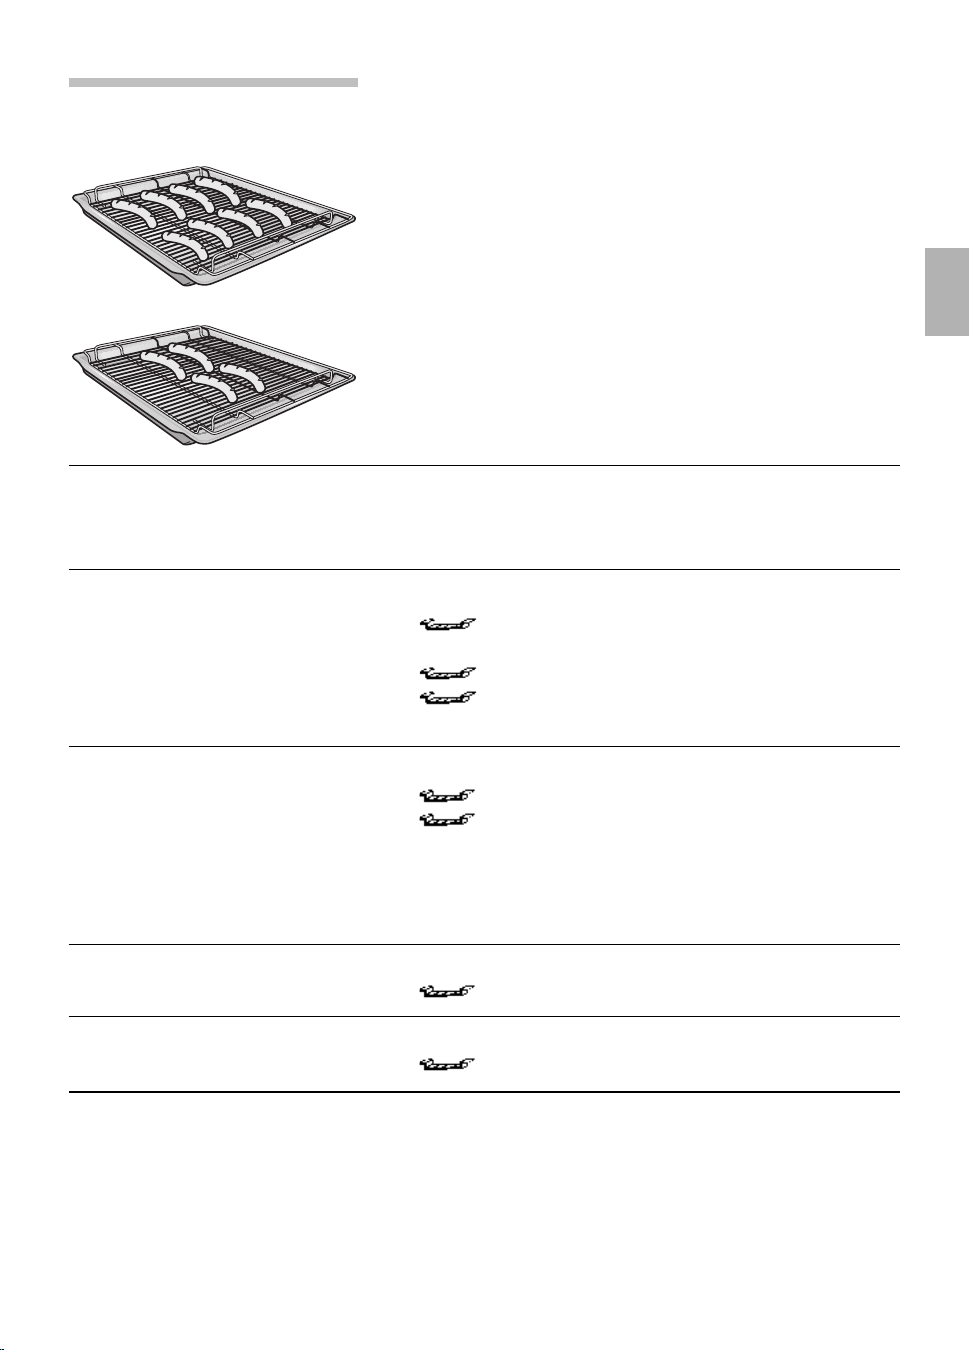
Zubehör Ihr Backofen ist mit folgendem Zubehör
ausgestattet:
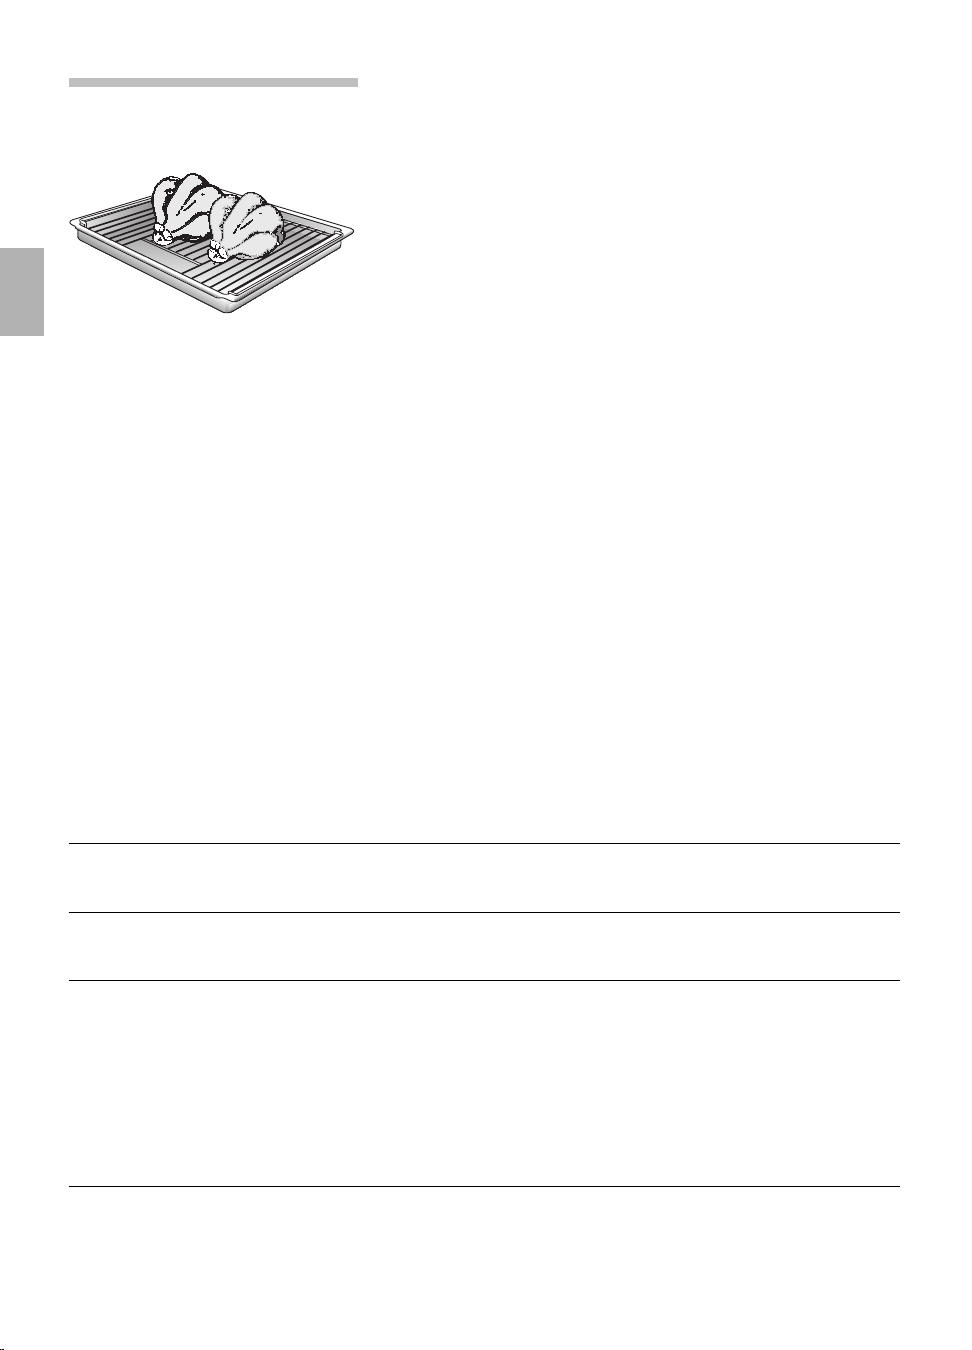
Universalpfanne mit Rost Rost
Backblech Email
Weiteres Zubehör erhalten Sie im Fachhandel: Bestell-Nr.
Hinweis:
Backblech oder Universalpfanne können sich während des Backofenbetriebes
verziehen. Ursache dafür sind große Temperaturunterschiede auf dem Zubehör.
Sie können entstehen, wenn nur ein Teil des Zubehörs belegt wurde oder
Tiefgefrorenes, wie z. B. Pizza auf das Zubehör gegeben wurden.
Der Verzug geht bereits während des Backens, Bratens oder Grillens wieder zurück.
Universalpfanne Antihaftbeschichtung
Auflaufpfanne
Backblech Alu
Backblech Email
Backblech Antihaftbeschichtung
Back-/Bratrost gekröpft
Back-/Bratrost engmaschig
Bratenblech
Nachrüstsatz Einzelteleskop
System-Dampfgarer
Brotbackstein
Universalpfanne
Z 1232 X0
Z 1233 X0
Glaspfanne Z 1262 X0
Z 1272 X0
Z 1332 X0
Z 1342 X0
Z 1343 X0
Pizzaform Z 1352 X0
Z 1432 X0
Z 1442 X0
Z 1512 X0
Z 1784 X0
N 8642 X0
Z 1912 X0
Universalbräter Z 9930 X0
10
Vor dem ersten Benutzen
Vorreinigung Entnehmen Sie das Zubehör aus dem Backofen.
Entfernen Sie Rückstände der Verpackung, z. B.
Styroporteilchen vollständig aus dem Backofen.
1. Reinigen Sie das Gerät außen mit einem
weichen feuchten Tuch.
2. Entnehmen Sie Einhängegitter und
Teleskopschienen aus dem Backofen.
3. Reinigen Sie den Backofen und das Zubehör
mit heißer Spüllauge.
Beachten Sie die dem Gas-Kochfeld beiliegende
Anleitung.
Ausheizen Bevor Sie das Gerät zum ersten Mal benutzen,
müssen Sie an der Elektronikuhr die Tageszeit
einstellen.
Heizen Sie den Backofen leer ca. 30 Minuten lang
auf.
Wählen Sie dazu Ober-/Unterhitze bei 240° C.
Nachreinigung Reinigen Sie den Backofen mit heißer Spüllauge.
Montieren Sie Einhängegitter und Teleskopschienen.
Sicherheit der Alle Kochstellenbrenner sind so gesichert, dass die
Brenner
Gaszufuhr bei Verlöschen der Flamme unterbrochen
wird. Die Sicherung erfolgt thermoelektrisch.
Sind die die Kochstellenbrenner in Betrieb, ist ein
Rauschen hörbar.
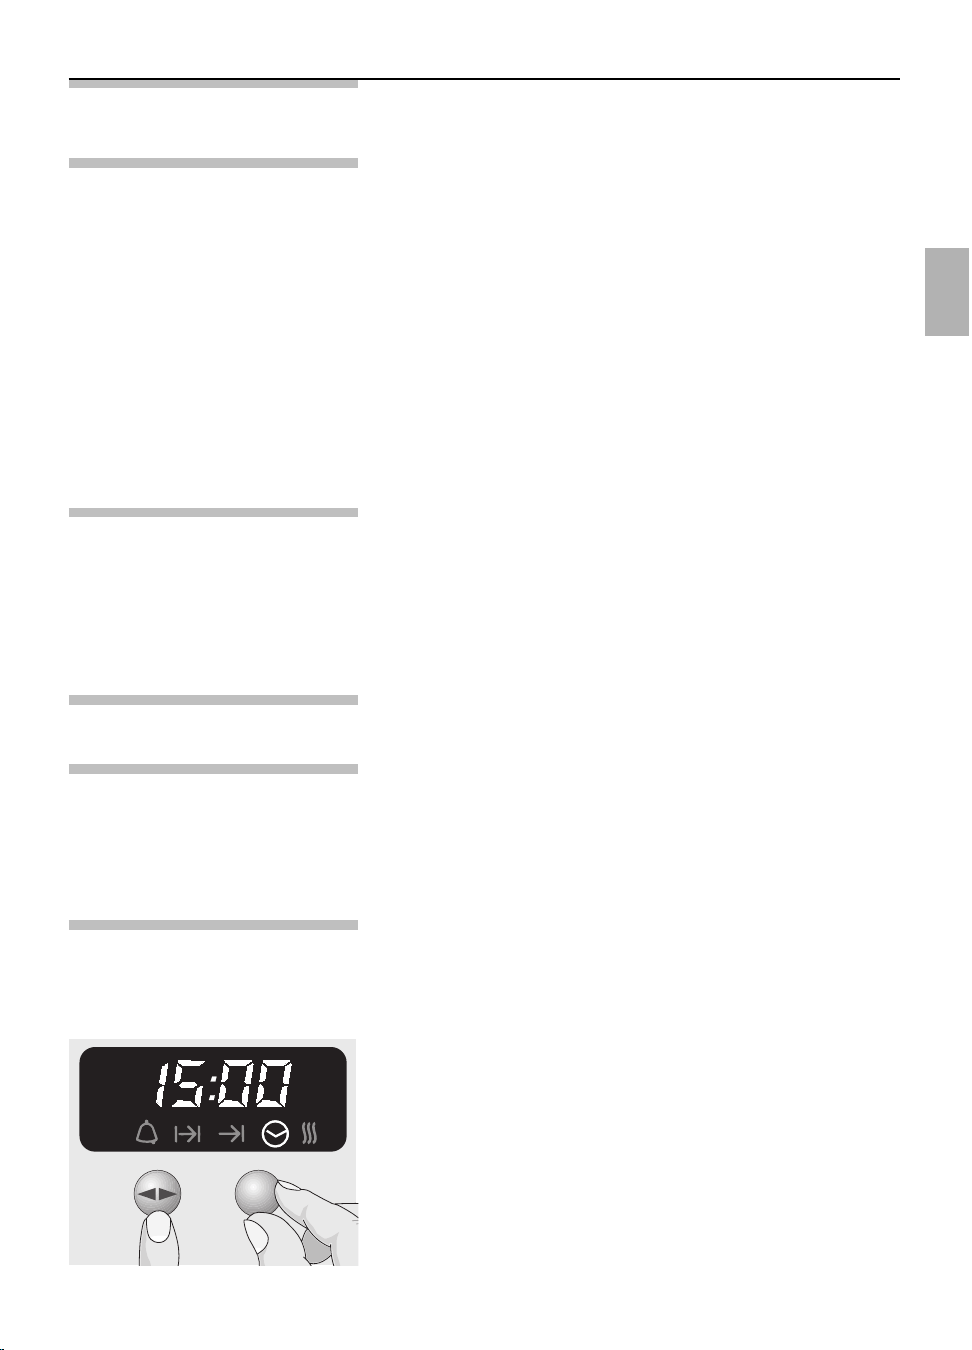
Tageszeit Nach dem elektrischen Anschluss des Gerätes oder
nach einem Stromausfall blinkt die Anzeige 0:00.
Einstellen Drücken Sie die Taste
>
und stellen Sie am
Drehknopf die aktuelle Tageszeit ein
(Beispiel 15:00 Uhr).
Zum Korrigieren der Tageszeit drücken Sie die
Taste > bis das Symbol
#
blinkt.
Dann stellen Sie die Tageszeit ein.
Hinweis: Die Tageszeit kann nicht korrigiert werden,
wenn keine Automatikfunktion eingestellt ist
(Löschen siehe Elektronikuhr).
11
12
Kochen
Wahl der Kochtöpfe
und ihre Anordnung
Richtig! Stellen Sie den Topf immer mitten auf die
Kochstellenbrenner.
Benutzen Sie nur Töpfe und Pfannen mit einem
ebenen Boden.
Wählen Sie die Topfdurchmesser passend zum
Kochstellenbrenner (siehe Tabelle).
– geringer Gasverbrauch
– optimale Kochzeit
– günstige Anordnung
Falsch! Topf-Durchmesser zu klein.
Flamme der Kochstellenbrenner brennt über den
Boden der Töpfe hinaus.
Topf ragt über den Rand der Einbaukochmulde
hinaus.
– hoher Gasverbrauch
– schlechte Anordnung
Brenner
Starkbrenner
Normalbrenner
Sparbrenner
Belastung in kW
Kochmulde
2,85
1,85
1,10
2,90
1,70
1,00
240 bis 260 mm
200 bis 220 mm
120 bis 180 mm
Glaskeramik-
Kochmulde
Topf-Durchmesser
Zünden und Regeln der Brenner
Die Zugehörigkeit der Schalter zu den Brennern
erkennen Sie aus der Gerätebeschreibung und an
den Symbolen auf der Hahnblende.
Das Zünden der Brenner wird Ihnen durch eine
elektrische Funkenzündung erleichtert.
Kochstellenbrenner Die Regelung ist zwischen Großstellung und
Kleinstellung stufenlos möglich.
g = Großstellung
f = Kleinstellung
Zünden mit der elektrischen
1. Drücken Sie den entsprechenden Schalter ein
Funkenzündung und drehen ihn nach links auf Großstellung.
Die elektrische Funkenzündung arbeitet so lange
der Schalter eingedrückt ist.
2. Halten Sie nach dem Zünden der Flamme den
Knebel noch ca. 5 Sekunden eingedrückt.
3. Drücken Sie vor dem Loslassen den Schalter
noch einmal kräftig ein.
4. Erfolgt keine Zündung oder verlischt die Flamme,
wiederholen Sie den Zündvorgang nach
ca. 3 Sekunden.
5. Zum Ausschalten der Brenner drehen Sie den
Schalter nach rechts auf Nullstellung.
Zünden mit Streichholz oder
1. Drücken Sie den entsprechenden Schalter ein,
ähnlichem Hilfsmittel drehen ihn nach links auf Großstellung und
zünden den Brenner mit dem Streichholz.
2. Halten Sie den Schalter noch ca. 5 Sekunden
eingedrückt.
3. Verlischt die Flamme, wiederholen Sie den
Zündvorgang nach ca. 3 Sekunden.
4. Zum Ausschalten der Brenner drehen Sie den
Schalter nach rechts auf Nullstellung.
13
14
Elektronikuhr Sie können die Elektronikuhr mit einer Hand
bedienen. Dazu müssen Sie nach einem Druck der
Funktionstaste die Zeit am Drehknopf einstellen.
Einstellungen sind möglich, solange die Funktions-
anzeige blinkt (~ 4 Sekunden).
Das Bedienfeld
Kurzzeitwecker
Betriebszeit-Dauer Betriebszeit-Ende
Drehknopf
Kann durch leichtes
Drücken aus- bzw.
eingerastet werden.
Tageszeit
Schnellaufheizung
Funktionstaste
Sonderfunktionen
Ausblendung der Anzeige 1. Drücken Sie 7 Sekunden lang die Taste >.
Nach dieser Zeitspanne wird die Anzeige dunkel,
die Tageszeit läuft im Hintergrund weiter.
2. Zum Einschalten der Anzeige drücken Sie kurz
auf die Taste >.
Schnellaufheizung Die Schnellaufheizung
s kann über die Uhr
eingestellt werden (siehe Abschnitt Backofen
Ein- und Ausschalten).
Nachtabdunkelung der Zwischen 22.00 Uhr und 6.00 Uhr wird die
Anzeige Anzeige automatisch abgedunkelt.
15
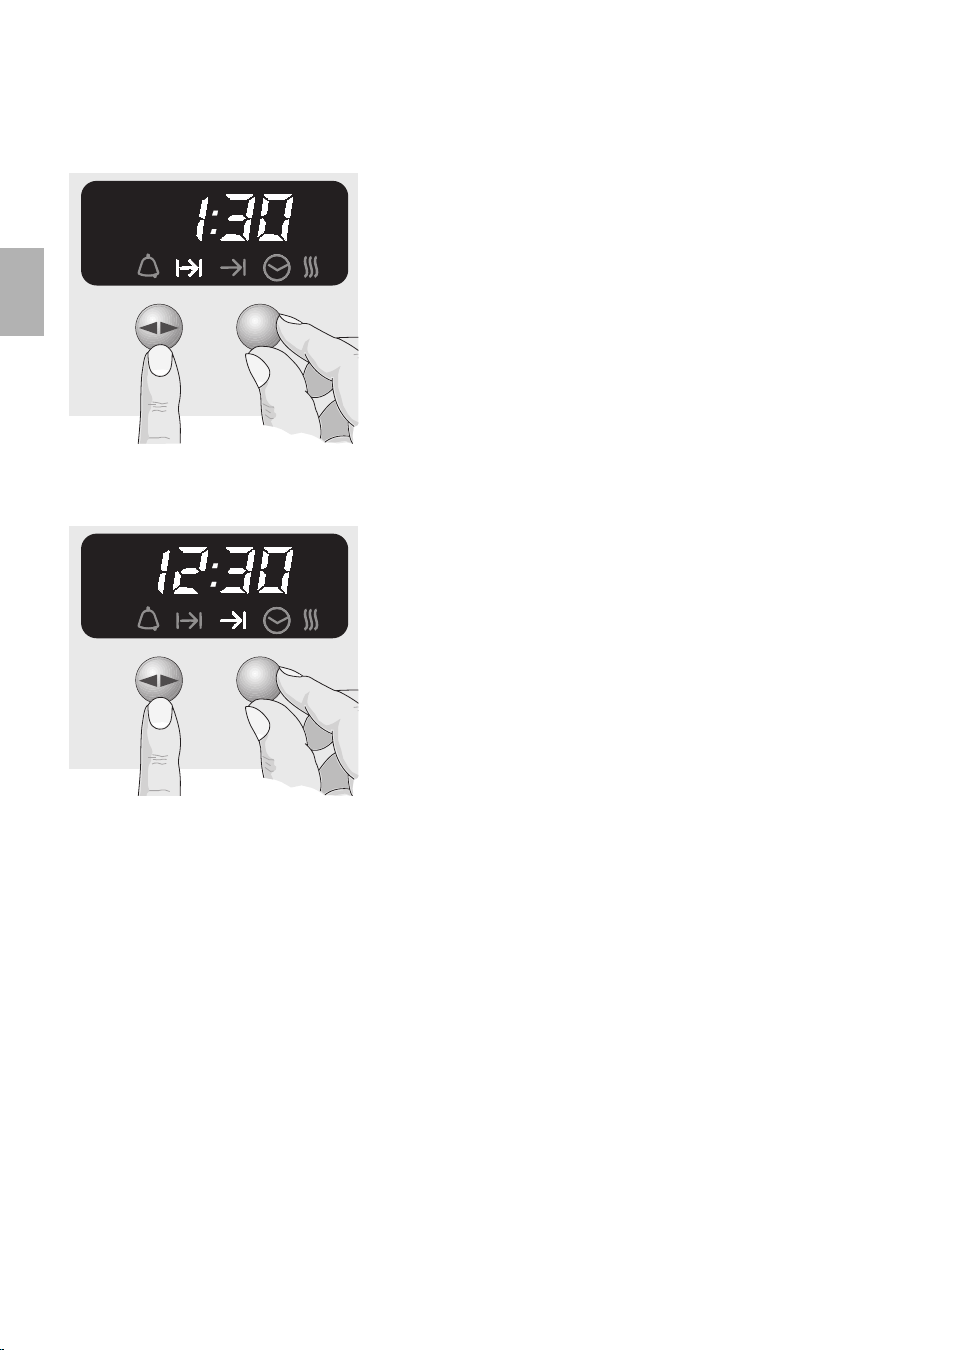
Zeitschaltautomatik Sie können den Backofen über die Elektronikuhr
ein- bzw. ausschalten.
Automatisches Ausschalten Das Backen oder Braten beginnt sofort.
1. Wählen Sie das Heizsystem und die
Backofentemperatur.
2. Drücken Sie die Taste > bis das Symbol ?
blinkt und stellen Sie die Betriebszeit-Dauer am
Drehknopf ein
(Beispiel: 1 Stunde und 30 Minuten).
Nach dem Einstellen wird nach ca. 4 Sekunden
die aktuelle Uhrzeit angezeigt.
Das Symbol ? signalisiert den Automatikbetrieb.
3. Nach Ablauf der Dauer
(Beispiel: 1 Stunde und 30 Minuten)
ertönt ein Signal und die Anzeige ! blinkt.
Der Backofen wird automatisch abgeschaltet.
Zum vorzeitigen Beenden des Signaltons drücken
Sie die Taste >.
4. Schalten Sie den Backofen aus.
5. Zum Beenden des Automatikbetriebes drücken
Sie nochmals auf die Taste >.
Kurzzeitwecker 1. Drücken Sie die Taste > und stellen die Zeit ein
(Beispiel: 5 Minuten).
Nach dem Einschalten wird die restliche Zeit
angezeigt.
2. Nach Ablauf der Zeit ertönt ein Signal und die
Anzeige
,
blinkt. Zum vorzeitigen Beenden des
Signaltons drücken Sie die Taste >.
16
Automatische Ein- und Das Backen oder Braten beginnt für die eingestellte
Ausschalten Dauer zu einem von Ihnen gewählten späteren
Zeitpunkt.
1. Wählen Sie das Heizsystem und die
Backofentemperatur.
2. Drücken Sie die Taste > bis das Symbol ?
blinkt und stellen Sie die Betriebszeit-Dauer am
Drehknopf ein
(Beispiel: 1 Stunde und 30 Minuten).
3. Drücken Sie die Taste > bis das Symbol !
blinkt und stellen Sie das Betriebszeit-Ende am
Drehknopf ein (Beispiel: 12:30 Uhr).
Nach dem Einstellen wird nach ca. 4 Sekunden
die aktuelle Uhrzeit angezeigt.
Das Symbol ! signalisiert den Automatikbetrieb.
4. Der Backofen wird mit der eingestellten Zeit
automatisch eingeschaltet (Beispiel: 11:00 Uhr),
und ausgeschaltet (Beispiel: 12:30 Uhr).
5. Nach Ablauf der Dauer ertönt ein Signal und
das Symbol ! blinkt. Zum vorzeitigen Beenden
des Signaltons drücken Sie die Taste >.
6. Schalten Sie den Backofen aus.
7. Zum Beenden des Automatikbetriebes drücken
Sie nochmals auf die Taste >.
Kontrollieren, Korrigieren und 1. Um Ihre Einstellungen zu kontrollieren drücken Sie
Löschen von Einstellungen auf die Taste > bis das Symbol blinkt.
2. Bei Bedarf können Sie die Einstellungen am
Drehknopf korrigieren.
3. Wenn Sie Ihre Einstellungen löschen wollen,
drehen Sie die eingestellte Zeit auf
0:00 zurück,
und schalten den Backofen aus.
Hinweise Für Zeitschaltautomatik eigenen sich solche
Gerichte am besten, die wenig Aufmerksamkeit
erfordern.
Kurzzeitwecker und Betriebszeit-Ende können
max. 24 Stunden vorprogrammiert werden.
Ablesen der Einstellungen ist durch Drücken der
Taste
> jederzeit möglich.

17
Backofen-Funktionen
CircoTherm Heißluft Durch das Heizsystem in der Backofenrückwand
wird die erwärmte Luft im Backofen umgewälzt,
wodurch ein besonders guter Wärmeübergang auf
das Back- oder Bratgut erreicht wird.
Vorteile:
–Backen und Braten bis zu 3 Ebenen gleichzeitig
möglich (Hinweis siehe Tabelle)
– geringe Verschmutzung des Backofens
– kurze Aufheizzeiten
– niedrige Backofentemperaturen
Ober- und Unterhitze Durch oben und unten im Backofen angeordnete
(Konventionelles System) Heizkörper wird die Wärme auf das Back- oder
Bratgut übertragen.
Backen und Braten ist nur auf einer Einschubhöhe
möglich.
Vorteile:
– Backen von Kuchen mit feuchtem Belag, Pizza,
Quiche
Flächengrill Durch den Heizkörper an der Backofendecke wird
die Wärme erzeugt und auf das Grillgut übertragen.
– besonders geeignet für flache, kleine Fleisch-
stücke z. B. Steaks, Würstchen, Fisch, Gemüse
und Toast.
Grill groß Vorteile:
– gesamte Grillfläche wird heiß
– besonders geeignet für große Mengen
Grill klein Vorteile:
– nur der mittlere Teil der Grillfläche wird heiß
– besonders geeignet für kleine Mengen
–Energieeinsparung
*
/
(
)

18
Thermogrillen Beim Thermogrillen werden abwechselnd der
Flächengrill und das Gebläse ein- und ausgeschaltet.
Die durch den Flächengrill erzeugte Wärme wird
durch das Gebläse gleichmäßig im Backraum
verteilt.
Vorteile:
– besonders geeignet für Geflügel und größere
Fleischstücke.
Unterhitze Hier wird nur der Heizkörper an der Unterseite des
Backofens eingeschaltet.
Vorteile:
– besonders geeignet für Speisen und Backwaren
die an der Unterseite zusätzlich eine stärkere
Bräunung oder Kruste erhalten sollen.
Nur kurz vor dem Ende der Back- oder Bratzeit
anwenden.
Pizzastufe Bei der Pizzastufe wird die Unterhitze zur CircoTherm
Heißluft zugeschaltet.
Vorteile:
– frische Zubereitung mit hohem „Saftanteil”,
z. B. Pizza und saftiger Kuchen mit krosser
Unterseite.
– besonders geeignet für Tiefkühlprodukte,
z. B. Pizza, Pommes usw.
Auftaustufe Ein Ventilator in der Backofenrückwand wirbelt die
Luft im Backofen um die gefrorene Speise.
Das Gebläse läuft ohne Heizung.
Vorteil:
– schonendes Auftauen
–Tiefgekühlte Fleischstücke, Geflügel, Brot und
Kuchen tauen gleichmäßig auf.
,
.
&
e

19
EasyClean
®
-Reinigungssystem
Um Ihnen die Reinigung des Backofens zu
erleichtern ist Ihr Gerät mit einer Reinigungshilfe
ausgestattet. Durch eine automatisch gesteuerte
Verdampfung von Reinigungslösung weichen die
Schmutzrückstände auf dem Email durch Wärme
und Wasserdampf auf und lassen sich anschließend
leichter entfernen.
Nähere Angaben siehe „Reinigen und Pflegen”.
Vorteile:
– leichtere Backofenreinigung
– Schonung der Emailflächen des Backofens
– umweltfreundlich
Schnellaufheizung Hinweis
zuschaltbar nur bei CircoTherm Heißluft.
d
s
20
Backofen ein- und ausschalten
Bevor Sie Ihren Backofen einschalten entscheiden
Sie, welches Heizsystem Sie benutzen möchten.
Einschalten:
1. Stellen Sie den Funktionswähler auf das
gewählte System ein.
2. Stellen Sie den Temperaturwähler auf die
erforderliche Temperatur ein.
(Temperaturangaben siehe Back-/Brattabellen).
Die eingestellte Temperatur wird automatisch
geregelt.
Die Anzeigelampe leuchtet beim Einschalten des
Backofens und bei jedem Nachheizen.
Ausschalten:
Zum Ausschalten drehen Sie den Temperaturwähler
und den Funktionswähler auf 0.
Hinweis:
Das Gerät ist mit einem Kühlgebläse ausgestattet.
Es läuft nach dem Abschalten des Backofens so
lange nach, bis der Backofen abgekühlt ist.
Schnellaufheizung Einschalten:
Nach dem Einschalten des Backofens kann bei
Heißluft die Schnellaufheizung s über die Uhr
zugeschaltet werden. Drücken Sie die Taste > bis
das Symbol
s blinkt. Nach ca. 4 Sekunden schaltet
die Schnellaufheizung s ein.
Das Symbol s leuchtet während des Aufheizens.
Es erlischt nach dem Erreichen der eingestellten
Temperatur und ein Signal ertönt.
Vorzeitiges Löschen:
Drücken Sie die Taste
> bis das Symbol s
blinkt. Löschen Sie die Schnellaufheizung mit dem
Drehknopf.
21
Backen
Backen in Backformen Stellen Sie die Backformen immer in die Mitte
des Rostes.
Wir empfehlen dunkle Backformen aus Metall.
Hinweise Das Bräunungsergebnis können Sie durch
Verändern der Temperatureinstellung beeinflussen.
Für helle Backformen aus dünnwandigem Material
oder für Glasformen verlängert sich die Backzeit und
der Kuchen bräunt nicht so gleichmäßig.
Fällt ein Kuchen nach dem Herausnehmen
zusammen, wählen Sie eventuell eine längere
Backzeit oder stellen Sie die Temperatur etwas
niedriger ein.
Backen auf Backblechen Die Abschrägung des Backbleches muss immer zur
Backofentür zeigen.
Einschubteile vorsichtig einschieben um
Beschädigungen zu vermeiden.
Schieben Sie Backbleche immer bis zum Anschlag
ein.
Verwenden Sie nur Originalbleche.
Backen in Weißblechformen
* CircoTherm Heißluft Einschubhöhe 1
/ Ober-/Unterhitze Einschubhöhe 1
Wird der Kuchen unten zu dunkel:
Überprüfen Sie die Einschubhöhe. Verkürzen Sie
die Backzeit und wählen Sie eventuell eine niedrigere
Temperatur.
Wird der Kuchen unten zu hell:
Überprüfen Sie die Einschubhöhe. Verlängern Sie
die Backzeit, wählen Sie eine niedrigere Temperatur
oder verwenden Sie eine Schwarzblechform.
Stellen Sie Backformen oder hohes Gebäck nicht
direkt vor die Backofenrückwand.

22
CircoTherm
*
Ober- und Unterhitze
/
Gebäckart Einschub- Temperatur Backdauer Einschub- Temperatur
höhe in ° C Minuten höhe in ° C
Rührteige
Blechkuchen mit Belag
1 Blech 1 160 – 170 30 – 045 3 170 – 180
2 Bleche 1 + 3 150 – 160 40 – 050 – –
Kuchen in runder
Form / Kasten 1 160 – 170 60 – 080 2 160 – 170
Obst-Tortenboden 1 160 – 170 20 – 035 2 170 – 180
Mürbeteige
Blechkuchen mit trockenem Belag
z. B. Streusel
1 Blech 1 160 – 170 45 – 065 3 180 – 190
2 Bleche 1 + 3 160 – 170 60 – 075 – –
Blechkuchen mit feuchtem Belag
z. B. Rahmguß
1 Blech 1 150 – 170 60 – 080 – –
Kuchen in Form 1 160 – 170 60 – 100 2 170 – 180
Obst-Tortenboden
(vorheizen) 1 160 – 170 20 – 035 2 190 – 200
Biskuitteige
Biskuitrolle (vorheizen) 1 180 – 190 10 – 015 3 200 – 210
Obst-Tortenboden 1 160 – 170 20 – 030 2 170 – 180
Biskuittorte (6 Eier) 1 160 – 170 30 – 045 2 160 – 170
Biskuittorte (3 Eier) 1 170 – 180 20 – 035 2 170 – 180
Backtabelle
Die Angaben in der Tabelle sind Richtwerte, gültig für emaillierte Backbleche und
dunkle Backformen.
Die Werte können je nach Art und Menge des Teiges und je nach Backform variieren.
Hinweise in der Tabelle zum Vorheizen beachten.
Wir empfehlen beim ersten Versuch, die niedrigere der angegebenen Temperaturen
einzustellen. Grundsätzlich ergibt die niedrigere Temperatur eine gleichmäßigere
Bräunung.
Wenn Sie nach eigenen Rezepten backen, orientieren Sie sich an
ähnlichen Gebäcken in der Tabelle.

23
CircoTherm
*
Ober- und Unterhitze
/
Gebäckart Einschub- Temperatur Backdauer Einschub- Temperatur
höhe in ° C Minuten höhe in ° C
Hefeteig
Blechkuchen mit trockenem Belag
z. B. Streusel
1 Blech 1 170 – 180 035 – 050 3 180 – 190
2 Bleche 1 + 3 170 – 180 045 – 060 – –
Blechkuchen mit feuchtem Belag
z. B. Rahmguß
1 Blech 1 150 – 170 060 – 080 3 170 – 190
Hefekranz und -zopf
(500 g Mehl) 1 160 – 170 035 – 045 3 170 – 180
Kuchen niedere Form 1 160 – 170 030 – 045 2 170 – 180
Kuchen hohe Form 1 160 – 170 030 – 045 2 170 – 180
Kleingebäck
Baiser 1 80 100 – 130 3 80 – 90
Blätterteig (vorheizen)
1 Blech 1 180 – 200 020 – 030 3 200 – 210
2 Bleche 1 180 – 200 025 – 035 – –
Brandteig (vorheizen)
1 Blech 1 180 – 200 025 – 035 3 200 – 210
2 Bleche 1 + 3 180 – 200 030 – 040 – –
Rührteig (z. B. Muffins)
1 Blech 1 150 – 160 020 – 030 2 170 – 180
2 Bleche 1 + 3 160 – 170 025 – 035 – –
Mürbeteig (z. B. Butterplätzchen)
1 Blech 1 140 – 150 015 – 020 3 140 – 150
2 Bleche 1 + 3 140 – 150 015 – 020 – –
3 Bleche 1 + 3 + 4 140 – 150 020 – 025 – –
Pikantes
Pizza (vorheizen)
1 Blech 1 180 – 200 025 – 040 3 200 – 220
2 Bleche 1 + 3 170 – 190 030 – 040 – –
Quiche (vorheizen) 1 180 – 190 040 – 050 2 210 – 230
Brot (vorheizen) 1 200 – 220 10 – 15 2 220 – 240
Anbacken 1 220 010 – 015 2 240
Fertigbacken 1 180 – 200 045 – 050 2 200 – 220

24
Backen mit der Pizzastufe &
Die Angaben in der Tabelle sind Richtwerte, gültig für emaillierte Backbleche.
Die Werte können je nach Art und Menge des Teiges und je nach Backform variieren.
Hinweise in der Tabelle zum Vorheizen beachten.
Wir empfehlen beim ersten Versuch, die niedrigere der angegebenen Temperaturen
einzustellen. Grundsätzlich ergibt die niedrigere Temperatur eine gleichmäßigere
Bräunung.
Wenn Sie nach eigenen Rezepten backen, orientieren Sie sich an
ähnlichen Gebäcken in der Tabelle.
Die Angaben beziehen sich auf das Einschieben in den kalten Backofen.
Geschirr Einschub- Temperatur Dauer
höhe in ° C Minuten
Gericht
Pizza Backblech 1 180 – 200 30 – 40
Flammkuchen Backblech 1 190 – 210 20 – 30
Tarte Tarte- oder Springform
aus Weißblech 1 180 – 200 30 – 45
Quiche Tarte- oder Springform
aus Weißblech 1 190 – 200 40 – 50
Quarktorte Springform 1 160 – 170 60 – 80
Schweizer Wähe Backblech 1 210 – 230 50 – 60
Strudel Backblech 1 190 – 210 40 – 50
Tiefgekühlte Fertigprodukte*
Pizza** Rost belegt mit
mit dünnem Boden Backpapier 1 190 – 210 10 – 20
Pizza** Rost belegt mit
mit dickem Boden Backpapier 1 180 – 200 15 – 25
Kartoffelprodukte**
(z. B. Pommes frites) Universalpfanne 1 200 – 220 15 – 25
Backwaren** Rost belegt mit
(z. B. Brötchen) Backpapier 1 200 – 220 05–15
Strudel** Backblech 1 200 – 220 25 – 45
* Herstellerangaben beachten
** Backofen vorheizen
Weitere Hinweise und Rezepte können Sie dem beiliegenden Kochbuch entnehmen.

25
Tipps und Tricks
Der Blechkuchen ist unten Nehmen Sie nicht benötigte Backbleche oder die
zu hell Universalpfanne aus dem Backofen.
Der Formkuchen ist unten Schieben Sie Backformen nicht auf dem Backblech
zu hell sondern auf dem Rost ein.
Kuchen oder Gebäck sind Schieben Sie Kuchen oder Gebäck höher ein.
unten zu dunkel
Der Kuchen ist zu trocken Stellen Sie die Backofentemperatur etwas höher ein.
Wählen Sie die Backzeit etwas kürzer.
Der Kuchen ist innen zu Stellen Sie die Backtemperatur etwas niedriger ein
feucht Merke: Backzeiten können Sie durch höhere
Temperaturen nicht verkürzen (außen gar, innen roh).
Backzeit etwas länger wählen, Kuchenteig länger
gehen lassen. Weniger Flüssigkeit in den Teig geben.
Form- oder Kastenkuchen Stellen Sie die Backform nicht direkt vor die
sind bei CircoTherm hinten Luftaustritte an der Backofenrückwand.
zu dunkel
Bei sehr feuchtem Backgut Durch kurzzeitiges, vorsichtiges Öffnen der Back-
z.B. Obstkuchen entsteht ofentür (1 bis 2 mal, bei langer Backzeit öfter)
viel Wasserdampf im können Sie den Wasserdampf dem Backofen
Backofen, der sich an der entziehen und dadurch die Wasserbildung wesentlich
Backofentür niederschlägt. vermindern.
Stark ungleichmäßig Einschubhöhe überprüfen.
gebräunt bei CircoTherm
Fällt ein Kuchen nach Weniger Flüssigkeit verwenden.
dem Herausnehmen
zusammen
Zum Energie sparen Heizen Sie nur vor, wenn es in der Backtabelle
angegeben ist.
Dunkle Backformen nehmen die Hitze besser auf.
Nachwärme: Bei längeren Backzeiten können Sie
den Backofen 5 – 10 Minuten vor Ende der Backzeit
ausschalten.
26
Braten Legen Sie den Rost in die Universalpfanne ein
und schieben Sie gemeinsam in dieselbe
Einschubhöhe ein.
Fleisch kann besonders wirtschaftlich bei einem
Gewicht von über 750 g im Backofen gebraten
werden.
Braten im offenen Geschirr Spülen Sie die Universalpfanne bzw. das Bratge-
schirr mit Wasser aus und legen Sie das Fleisch ein.
Geben Sie für fettes Fleisch und Geflügel je nach
Größe und Art des Bratens
1
/
8
bis
1
/
4
Liter Wasser
in die Universalpfanne. Bei Bedarf heißes Wasser
nachgießen. Bestreichen Sie mageres Fleisch nach
Belieben mit Fett oder belegen Sie es mit
Speckstreifen.
Eine schmackhafte Soße ergibt der Fond (Bratensaft)
der sich in der Universalpfanne bildet. Löschen Sie
den Fond mit heißem Wasser ab, kochen Sie ihn auf,
binden ihn mit Speisestärke, schmecken ihn ab und
gießen Sie ihn wenn nötig durch ein Sieb.
Schieben Sie den Braten in den kalten Backofen
(Vorheizen nicht nötig – Energieeinsparung).
Braten im geschlossenen
Geschirr Legen Sie das Fleisch in einen Bratentopf, decken
Sie es mit einem passenden Deckel ab und
schieben Sie es auf dem Rost in den Backofen.
Wir empfehlen Rinderbraten im geschlossenen
Bratentopf zuzubereiten.
Braten auf dem Bratenblech
(Als Sonderzubehör im
Fachhandel erhältlich). Legen Sie das Bratenblech in die Universalpfanne
ein. Das Bratenblech vermindert das Verschmutzen
des Backofens.
Abtropfendes Fett und Bratensaft werden in der
Universalpfanne aufgefangen.
Mit dem Bratenblech können Sie entgegen der
Temperaturangabe eine etwas höhere Temperatur
einstellen, wenn das Bratgut besonders knusprig
werden soll.

27
Hinweise Große, hohe Braten, Gans, Pute, Ente
= Lange Bratdauer, niedrige Temperatur
Mittelgroße, niedrige Braten
= Mittlere Bratdauer, mittlere Temperatur
Kleine, flache Braten
= Kurze Bratdauer, hohe Temperatur
Bratdauer je cm Fleischhöhe ohne Knochen
ca. 13 – 15 Minuten
Bratdauer je cm Fleischhöhe mit Knochen
ca. 15 – 18 Minuten
Wir empfehlen beim ersten Versuch die niedrigere
der angegebenen Temperaturen einzustellen.
Grundsätzlich ergibt die niedrigere Temperatur eine
gleichmäßigere Bräunung.
Wir empfehlen beim Braten mit
/ den Braten
nach ca. der Hälfte bzw. zwei Drittel der Bratdauer
zu wenden.
Verwenden Sie nur Bratgeschirr mit hitzebeständigen
Griffen.
Bereiten Sie große Braten ohne Rost direkt in der
Universalpfanne zu.
Kleinere Bratenstücke können Sie auf Alu-Folie
braten. Dazu die Alu-Folie zu einer Form mit hoch-
gestellten Kanten formen und auf den Rost legen.
Belassen Sie nach dem Ende der Bratzeit den
Braten noch ca. 10 Minuten im abgeschalteten,
geschlossenen Backofen.
Das Fleisch ist innen Stellen Sie die Brattemperatur etwas niedriger ein.
nicht gar Merke: Bratzeiten können Sie durch höhere
Temperaturen nicht verkürzen (außen gar, innen roh).
Bratzeiten etwas länger wählen.
Bei sehr feuchtem Bratgut, Durch kurzzeitiges, vorsichtiges Öffnen der Back-
z. B. mit Wasser zubereiteten ofentür (1 bis 2 mal, bei langer Bratzeit öfter) können
Braten, entsteht viel Wasser- Sie den Wasserdampf dem Backofen entziehen und
dampf im Backofen der sich dadurch die Wasserbildung wesentlich vermindern.
an der Backofentür nieder-
schlägt.

28
CircoTherm
*
Ober- und Unterhitze
/
Bratgut Einschub- Temperatur Bratdauer Einschub- Temperatur
höhe in ° C Minuten höhe in ° C
Schwein
Braten mit Schwarte
(z. B. Schulter od. Haxe) 1 160 – 170 100 – 130 2 200 – 220
Braten/Rollbraten 1 160 – 170 90 – 120 2 190 – 210
Kasseler 1 160 – 170 70 – 80 2 190 – 210
Schweinefilet 1 170 – 180 30 – 45 3 200 – 230
Hackbraten 1 170 – 190 60 – 70 2 190 – 210
Rind
Filet 1 180 – 190 45 – 65 2 200 – 220
Roastbeef (rosa) 1 180 – 190 30 – 45 2 200 – 220
Kalb
Braten/-brust 1 160 – 170 90 – 120 2 180 – 200
Haxe 1 160 – 170 100 – 130 2 190 – 210
Lamm
Keule 1 180 – 190 70 – 110 2 200 – 220
Rücken 1 160 – 170 90 – 120 2 200 – 220
Geflügel
Hähnchen 1 kg 1 170 – 180 60 – 70 2 200 – 220
Ente 1 160 – 170 90 – 120 2 190 – 210
Gans 4 kg 1 150 – 160 130 – 180 2 180 – 200
(1 bei hohem
Gargut)
Wild
Rehrücken 1 160 – 170 90 – 120 2 200 – 220
Rehbraten 1 160 – 170 90 – 120 2 190 – 210
Schwein-/Hirschbraten 1 160 – 170 100 – 120 2 190 – 210
Fische 1 160 – 170 30 – 40 2 180 – 200
Weitere Hinweise und Rezepte können Sie dem beiliegenden Kochbuch entnehmen.
Brattabelle Die Angaben in der Tabelle sind Richtwerte.
Die Werte können je nach Art und Menge und je
nach dem Bratgeschirr variieren.

29
Grillen Beim Grillen ist Vorsicht geboten.
Kinder grundsätzlich fernhalten.
Hinweise Grillen Sie bei geschlossener Backofentür.
Die Grilltemperaturen sind regelbar.
Verwenden Sie immer den Rost und die Universal-
pfanne.
Legen Sie das Grillgut immer auf die Mittes des
Rostes.
Schaltet sich der Grillheizkörper automatisch aus,
wurde der Überhitzungsschutz wirksam.
Der Grillheizkörper schaltet sich nach kurzer Zeit
wieder ein.
Legen Sie den Rost in die Universalpfanne ein.
Schieben Sie in die angegebene Einschubhöhe
ein.
Rundum-Grillen
Grillen mit Die Grillzeiten für das Rundum-Grillen sind
CircoTherm Heißluft * Richtwerte. Die Werte können je nach Art und
Menge des Grillgutes variieren.
Ein Wenden des Grillgutes ist nicht erforderlich.
Hinweise auf Vorheizen beachten.
Grillgut Temperatureinstellung Einschubhöhe Grillzeit
Schweinesteak 180 – 190° C (vorheizen) 3 115 – 120 Min.
Schweinehaxen 170° C (mit Bratenblech bis 190° C) 3 100 – 130 Min.
Rindersteak 190° C (vorheizen) 3 ca. 15 Min.
Hacksteak 180 – 190° C 3 125 – 130 Min.
Hähnchen 170 – 180° C 3 160 – 170 Min.
Weitere Hinweise und Rezepte können Sie dem beiliegenden Kochbuch entnehmen.
30
Thermogrillen , Für besonders knuspriges Geflügel oder Braten
(Schweinebraten mit Schwarte).
Verwenden Sie den Rost und die Universalpfanne.
Wenden Sie große Braten nach ca. der Hälfte der
Grillzeit.
Stellen Sie Glasgeschirr nach dem Grillen nicht auf
eine kalte oder nasse Unterlage, sondern auf ein
trockenes Küchentuch, damit das Glas nicht
zerspringt.
Beim Thermogrillen auf dem Rost kann je nach
Grillgut eine stärkere Backofenverschmutzung
auftreten. Reinigen Sie daher den Backofen nach
jedem Benutzen, um das Einbrennen der
Verschmutzung zu vermeiden.
Wenden Sie ganzes Geflügel nach ca. zwei Drittel
der Grillzeit. Stechen Sie bei Ente und Gans die Haut
unter den Flügeln ein, damit das Fett gut ausbraten
kann.
Lassen Sie den fertigen Braten noch ca. 10 Minuten
im abgeschalteten, geschlossenen Backofen ruhen.
Die Angaben in den Tabellen sind Richtwerte. Die
Werte können je nach Art und Menge des Grillgutes
variieren und gelten für das Einschieben in den
kalten Backofen.
Grillgut Gewicht Geschirr Temperatur- Einschub- Grillzeit
einstellung höhe
Schweinebraten Rost/Uni-
mit Schwarte 2 kg versalpfanne 170 – 190° C 2 130 – 140 Min.
Geflügel
Halbe Hähnchen ca. 400 g Rost/Uni- 200 – 220° C 2 140 – 150 Min.
1–3 Stück pro Stück versalpfanne
Ganze Hähnchen ca. 1 kg Rost/Uni- 200 – 210° C 2 155 – 165 Min.
1–3 Stück pro Stück versalpfanne
Gans ca. 4 kg Rost/Uni- 150 – 170° C 2 140 – 160 Min.
versalpfanne
31
Flächengrillen Für flache kleinere Gerichte.
Verwenden Sie immer den Rost und die
Universalpfanne.
Wenden Sie das Grillgut nach ca. zwei Drittel der
Zeit.
Streichen Sie den Rost und das Grillgut nach
Belieben leicht mit Öl ein.
Die Angaben in den Tabellen sind Richtwerte. Die
Werte können je nach Art und Menge des Grillgutes
variieren und gelten für das Einschieben in den
kalten Backofen.
Grillgut Temperatur- Ein- Rost- Grillzeit Bemerkungen
einstellung schub- lage 1. Seite 2. Seite
höhe
Schwein
Filetsteaks max. 4 08–11 Min. 6 – 09 Min.
(2 – 2,5 cm)
Kammsteaks 250° C 4 11 – 14 Min. 9 – 12 Min.
Bratwürste 250° C 4 07–10 Min. 5 – 07 Min. Leicht
einschneiden
Rind Je nach
Filetsteaks max. 4 10 – 13 Min. 6 – 09 Min. gewünschtem
Tournedos max. 4 09–12 Min. 5 – 08 Min. Gargrad können
Grillzeiten
verkürzt oder
verlängert
werden.
Toast
mit Belag max. 2 oder 3 06–09 Min. –
Fisch
Kleine Fische 220° C 3 12 – 15 Min. 9 – 12 Min. Wenden
(
)

32
Auftauen und Garen
Auftauen mit
CircoTherm Heißluft
*
Wichtige Hinweise Verwenden Sie zum Auftauen und Garen von
Gefrier- oder Tiefkühlprodukten nur CircoTherm
Heißluft.
Beachten Sie bei allen tiefgekühlten
Lebensmitteln grundsätzlich die Angaben des
Herstellers.
Aufgetaute Gefrier- oder Tiefkühlprodukte (vor
allem Fleisch) benötigen generell kürzere Garzeiten
als frische Produkte, weil das Frosten eine Art
Vorgaren bewirkt.
Wird gefrorenes Fleisch in den Backofen gegeben,
verlängert sich die Garzeit um die Auftauzeit.
Tauen Sie Tiefkühl-Geflügel vor dem Garen immer
auf, um die Innereien entfernen zu können.
Garen Sie Tiefkühl-Fisch mit den gleichen
Temperaturen wie Frisch-Fisch.
Sie können Tiefkühl-Fertigmenüs in Alu-Portions-
schalen in größeren Mengen gleichzeitig in den
Backofen geben.
Einschubhöhen Bei 1 Blech: Einschubhöhe 1
Bei 2 Blechen: Einschubhöhe 1 + 3.
Zeitangaben sind Richtwerte, die von der Form
und Menge der Tiefkühlprodukte beeinflusst werden.

33
Auftauen und Garen Tauen Sie rohe Tiefkühlprodukte oder Lebens-
mittel aus einem Gefriergerät bei 50° C auf.
Bei höheren Auftautemperaturen besteht die Gefahr
des Austrocknens.
Tauen Sie in Alufolie oder geschlossenen
Alubehältern verpackte Tiefkühl-Gerichte bei
130 – 140° C auf.
Tiefkühl-Backwaren bei 100 – 140° C auftauen und
wärmen. Bestreichen Sie Brot, Brötchen oder Hefe-
gebäck dünn mit Wasser, damit die Kruste schöner
wird.
Tauen Sie trockene Tiefkühl-Blechkuchen bei
160 – 170° C, 20 – 30 Minuten auf.
Tauen Sie feuchte Tiefkühl-Blechkuchen (mit
Obstbelag) bei 160 – 170° C, 30 – 50 Minuten auf.
Dazu packen Sie die Kuchen in Alufolie ein. damit
der Belag nicht abtrocknet.
Tiefkühl-Toast (fertig belegt) bei 160 – 170° C,
ca. 20 Minuten auftauen und toasten.
Tiefkühl-Pizza:
Beachten Sie bitte die Angaben der Hersteller.
Auftaustufe
e Besonders geeignet für empfindliche Gebäcke
(z. B. Sahnetorten).
Drehen Sie den Funktionswähler auf Stellung
e.
Tauen Sie Gebäck je nach Größe und Art
25 – 45 Minuten auf.
Danach nehmen Sie es aus dem Backofen und
lassen es 30 – 45 Minuten nachtauen.
Bei kleinen Mengen (Stückchen) verkürzt sich die
Auftauzeit auf 15 – 20 Minuten und die Nachtauzeit
auf 10 – 15 Minuten.

34
Einkochen von Obst und Gemüse
Einkochen mit
CircoTherm Heißluft
*
Im Backofen können Sie die Inhalte von bis zu
sechs Einweckgläser mit
1
/
2
, 1 oder 1
1
/
2
Liter
gleichzeitig einkochen.
Hinweise Obst und Gemüse müssen frisch und in einwand-
freiem Zustand sein.
Beim Vorbereiten und Verschließen ist Sauberkeit
oberstes Gebot.
Verwenden Sie nur Einweckgläser, die einwandfrei
sauber und unbeschädigt sind.
Verwenden Sie nur Gummiringe, die hitzebeständig
sind.
Inhalte von Blechdosen oder festverschraubten
Gläsern müssen Sie im Einkochtopf oder -kessel
einkochen.
Diese Gefäße müssen wähend dem Einkochen im
Wasser schwimmen.
Vorbereiten von Obst Obst waschen, je nach Art schälen, entkernen,
zerteilen und in Einweckgläser bis ca. 2 cm unter
den Rand einfüllen.
Einweckgläser mit heißer, abgeschäumter Zucker-
lösung auffüllen (ca.
1
/
3
Liter für ein Literglas) und
verschließen.
Auf 1-Liter Wasser:
bei süßem Obst ca. 250 g Zucker
bei saurem Obst ca. 500 g Zucker
Sehr hartes Obst einige Minuten in der Zuckerlösung
vorgaren oder im Schnellkochtopf vorbehandeln.
Vorbereiten von Gemüse Gemüse waschen, putzen, je nach Art zerteilen und
in Einweckgläser einfüllen.
Einweckgläser sofort mit heißem, abgekochtem
Wasser auffüllen und verschließen.

35
Verschließen der Gläser Wischen Sie die Ränder der Einweckgläser mit
einem sauberen feuchten Tuch ab. Legen Sie die
Gummiringe und Deckel nass auf und verschließen
Sie die Gläser mit einer Klammer.
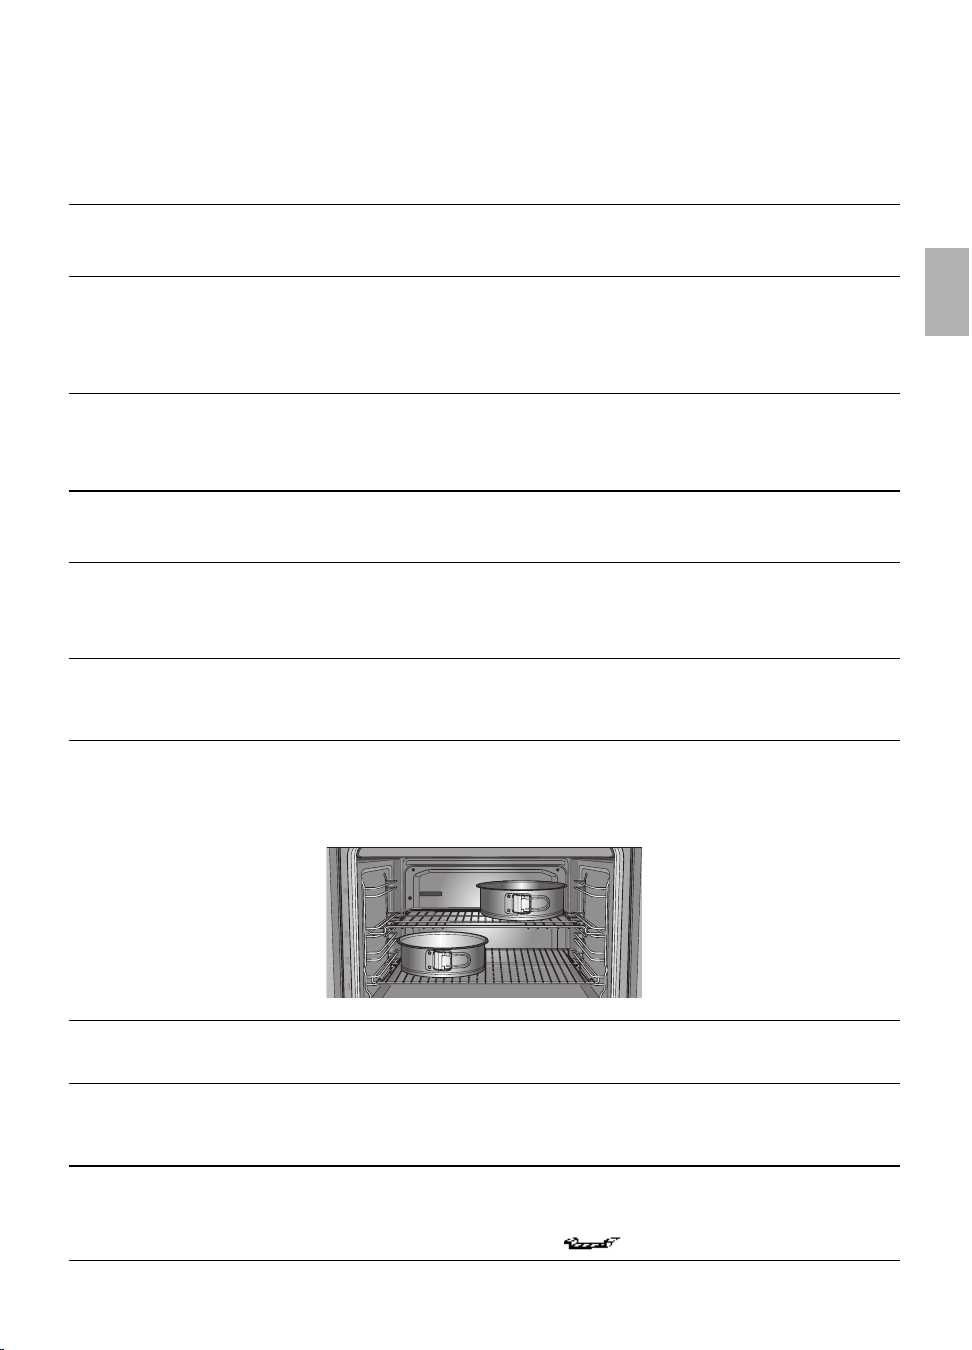
Einsetzen der Gläser Schieben Sie die Universalpfanne
in Einschubhöhe 1 ein.
Stellen Sie die Einweckgläser im Dreieck auf
(siehe Abb.), dabei ca. 5 cm Abstand zur
Backofenrückwand halten.
Stellen Sie die Einweckgläser so in die Universal-
pfanne, dass sie sich nicht berühren.
Gießen Sie
1
/
2
l heißes Wasser (ca. 80° C) in die
Universalpfanne.
Entnehmen der Gläser Stellen Sie die Gläser auf ein saugfähiges Tuch,
decken Sie sie ab und schützen Sie sie vor
Zugluft.
Entfernen Sie die Klammern erst nach dem
Erkalten der Gläser.
Obst, Gurken und Tomatenmark Gemüse (jedoch keine Gurken)
1
Gläser einsetzen (siehe oben) 1 Gläser einsetzen (siehe oben)
2
Funktion
*
wählen und auf
ca. 160° C einstellen.
2
Funktion
*
wählen und auf
ca. 160° C einstellen.
3
Das hintere Glas und das rechte Glas
in der zweiten Reihe perlen zuerst.
Gläser mit
1
/
2
+1 l nach ca. 50 Minuten
Gläser mit 1
1
/
2
l nach ca. 60 Minuten.
Sobald die anderen Gläser zu perlen
beginnen, Backofen ausschalten.
4
4
Gläser noch einige Minuten im
geschlossenen Backofen belassen.
– Himbeeren, Erdbeeren
Kirschen, Gurken: 05–10 Min.
– Anderes Obst: 10 – 15 Min.
–Tomatenmark,
Apfelmus: 15 – 20 Min.
Gläser im geschlossenen Backofen
ca. 60 Minuten weiterperlen lassen.
Backofen ausschalten.
Gläser noch ca. 15 – 30 Minuten im
geschlossenen Backofen belassen.
3
Das hintere Glas und das rechte Glas
in der zweiten Reihe perlen zuerst.
Gläser mit
1
/
2
+1 l nach ca. 50 Minuten
Gläser mit 1
1
/
2
l nach ca. 60 Minuten.
Sobald die anderen Gläser zu perlen
beginnen, Backofentemperatur auf
100° C zurückstellen.

Reinigen und Pflegen
Wichtige Hinweise Verwenden Sie zum Reinigen keine Scheuermittel,
keine scharfen Mittel und keine kratzenden
Gegenstände.
Kratzen Sie eingebrannte Speisenrückstände nicht
ab, sondern weichen Sie diese mit einem feuchten
Tuch und Spülmittel auf.
Besonders empfehlenswerte Reinigungsprodukte
können über den Kundendienst bezogen werden.
Gerät aussen
Edelstahl-/Aluminiumfront Tragen Sie handelsübliche Spülmittel auf einen
weichen, feuchten Lappen oder Fensterleder auf.
Verwenden Sie keine aggressiven Reiniger,
kratzende Schwämme oder grobe Reinigungstücher.
Bei starker Verschmutzung verwenden Sie
handelsübliche Reiniger für mattierte
Edelstahl-/Aluminiumoberflachen.
Bitte Herstellerhinweise beachten.
Email und Glas Tragen Sie handelsübliche Spülmittel auf einen
weichen, feuchten Lappen oder Fensterleder auf.
Backofentürscheibe Die Innenscheibe der Backofentür hat zum
Absenken der Temperatur eine Beschichtung zur
Reflektion der Wärme.
Die Sicht durch das Backofentürfenster wird
dadurch nicht beeinträchtigt.
Bei geöffneter Backofentür kann diese Beschichtung
wie ein heller Belag wirken. Das ist technisch bedingt
und stellt keinen Qualitätsmangel dar.
Kochfeld Dem Kochfeld liegt eine gesonderte Gebrauchs-
anleitung bei.
Beachten Sie alle dort angegebenen Reinigungs-
hinweise.
Backofen Reinigen Sie den Backofen nach jedem Gebrauch,
insbesondere nach dem Braten oder Grillen.
Verschmutzungen brennen beim nächsten Aufheizen
ein.
Nach dem Einbrennen lassen sich die
Verschmutzungen nur noch schwer entfernen.
36

37
Hinweise:
Um Verschmutzungen zu vermeiden verwenden Sie:
• CircoTherm Heißluft. Beim Arbeiten mit
CircoTherm Heißluft ist die Verschmutzung
geringer als bei den anderen Betriebsarten.
• zum Backen von sehr feuchten Kuchen
die Universalpfanne.
• zum Braten geeignetes Geschirr (Bräter).
Zur leichteren Reinigung
können Sie die Backofenlampe einschalten und die
Backofentür aushängen.
Zum Reinigen der Backofenfront (hinter der
Backofentür) sollten Sie die Backofentürdichtung
aushängen.
Emailflächen im Backofen Verwenden Sie heiße Spüllauge oder Essigwasser.
Bei starker Verschmutzung verwenden Sie am
besten Backofenreiniger.
Wir empfehlen Backofenreiniger in Gelform, weil
dieser gezielt aufgetragen werden kann.
Führen Sie keine Warmreinigung mit speziell
dafür vorgesehenen Backofenreinigern durch.
Lassen Sie den Backofen nach der Reinigung zum
Trocknen geöffnet.
Übrigens:
Email wird bei sehr hohen Temperaturen eingebrannt.
Dadurch können geringe Farbunterschiede
entstehen. Das ist normal und hat keinen Einfluss auf
die Funktion. Behandeln Sie solche Verfärbungen
nicht mit harten Scheuerkissen oder scharfen
Reinigern.
Kanten dünner Bleche lassen sich nicht voll
emaillieren. Sie können deshalb rau sein. Der
Korrosionsschutz ist gewährleistet.

38
Katalytische
Backofenverkleidung
Selbstreinigende Flächen Die Rückwand ist mit selbstreinigendem Email
im Backofen beschichtet. Sie reinigt sich selbst, während der
Backofen im Betrieb ist.
Größere Spritzer verschwinden erst nach
mehrmaligem Betrieb des Backofens.
Reinigen Sie die selbstreinigende Rückwand nie mit
Backofenreiniger.
Eine leichte Verfärbung des Emails hat auf die
Selbstreinigung keinen Einfluss.
39
EasyClean
®
-
Um Ihnen die Reinigung des Backofens zu
Reinigungssystem
d
erleichtern, ist Ihr Gerät mit einer Reinigungshilfe
ausgestattet. Durch eine automatisch gesteuerte
Verdampfung von Reinigungslösung weichen die
Schmutzrückstände auf dem Email durch Wärme
und Wasserdampf auf und lassen sich anschließend
leichter entfernen.
Achtung:
Gießen Sie kein kaltes Wasser in den heißen
Backofen.
Die Reinigungshilfe kann nur bei vollständig
abgekühltem Backofen eingeschaltet werden.
Verwenden Sie nur normales Leitungswasser, kein
destilliertes Wasser.
Einschalten:
1. Entfernen Sie das Backblech und die
Universalpfanne aus dem Backofen. Der Grillrost
kann im Backofen bleiben.
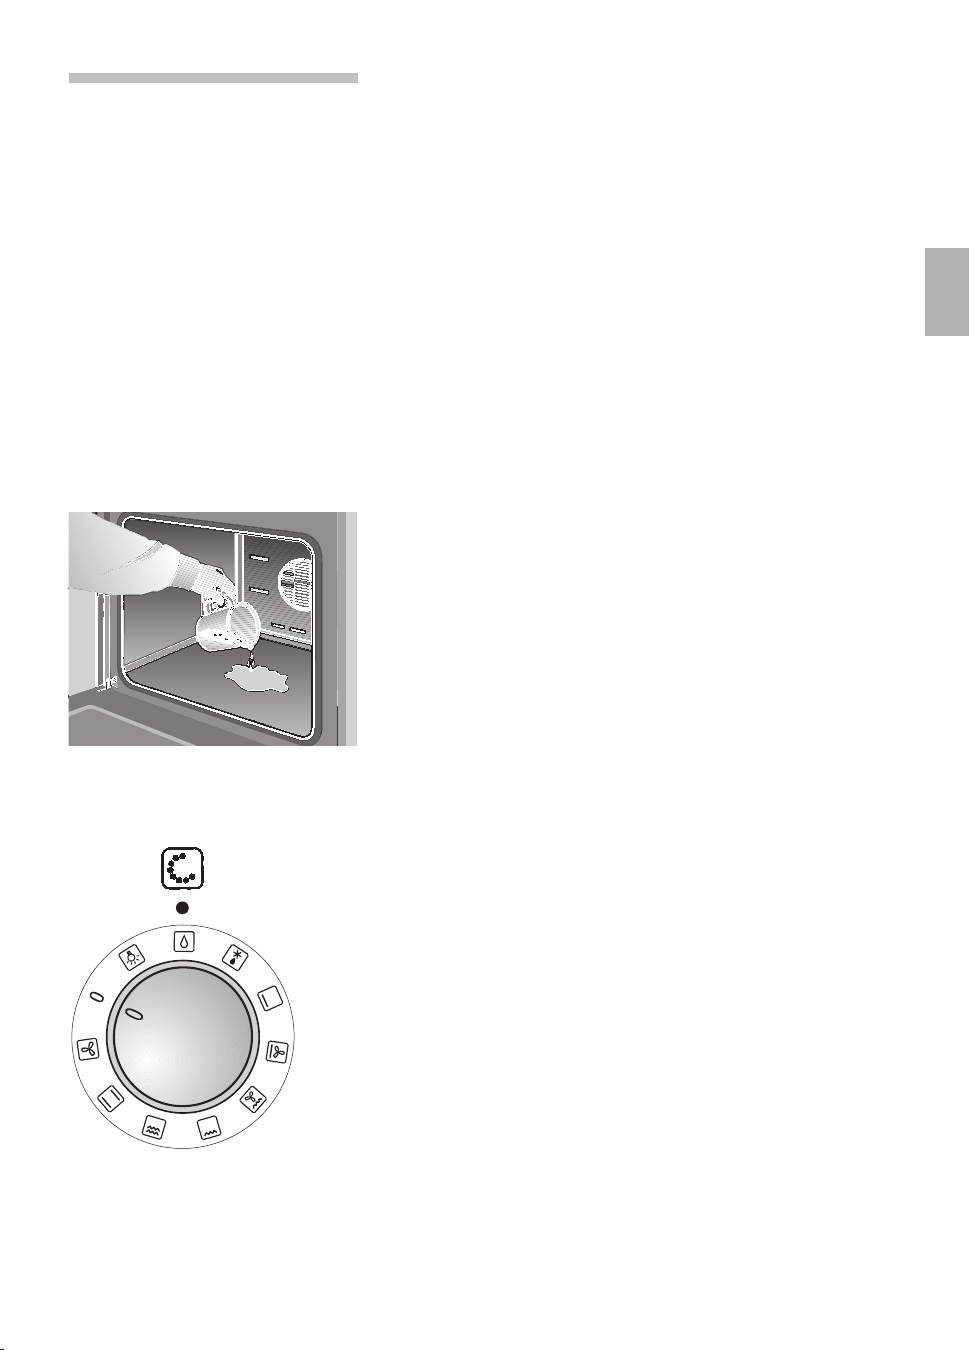
2. Füllen Sie vorsichtig in die Bodenwanne des
Backofens ca. 0,4 Liter Wasser mit etwas
Spülmittel ein.
Bei stärkerer Verschmutzung können Sie die
Spüllauge einige Zeit vor dem Einschalten
einwirken lassen.
3. Schließen Sie die Backofentür.
4. Drehen Sie den Funktionswähler auf Position d.
Die Anzeigelampen für Backofenreinigung und
für Backofentemperatur leuchten. Nach Ablauf
der Aufheizzeit (4 Minuten) geht die Anzeigelampe
für die Backofentemperatur aus. Nach weiteren
17 Minuten ist das Programm beendet.
Es ertönt ein Signal.
Ausschalten:
Drehen Sie den Funktionswähler auf 0.
Die Anzeigelampe für Backofenreinigung erlischt.
40
Nach dem Abschalten der Hinweis:
Reinigungshilfe Lassen Sie das Restwasser nicht längere Zeit,
z. B. über Nacht im Backofen.
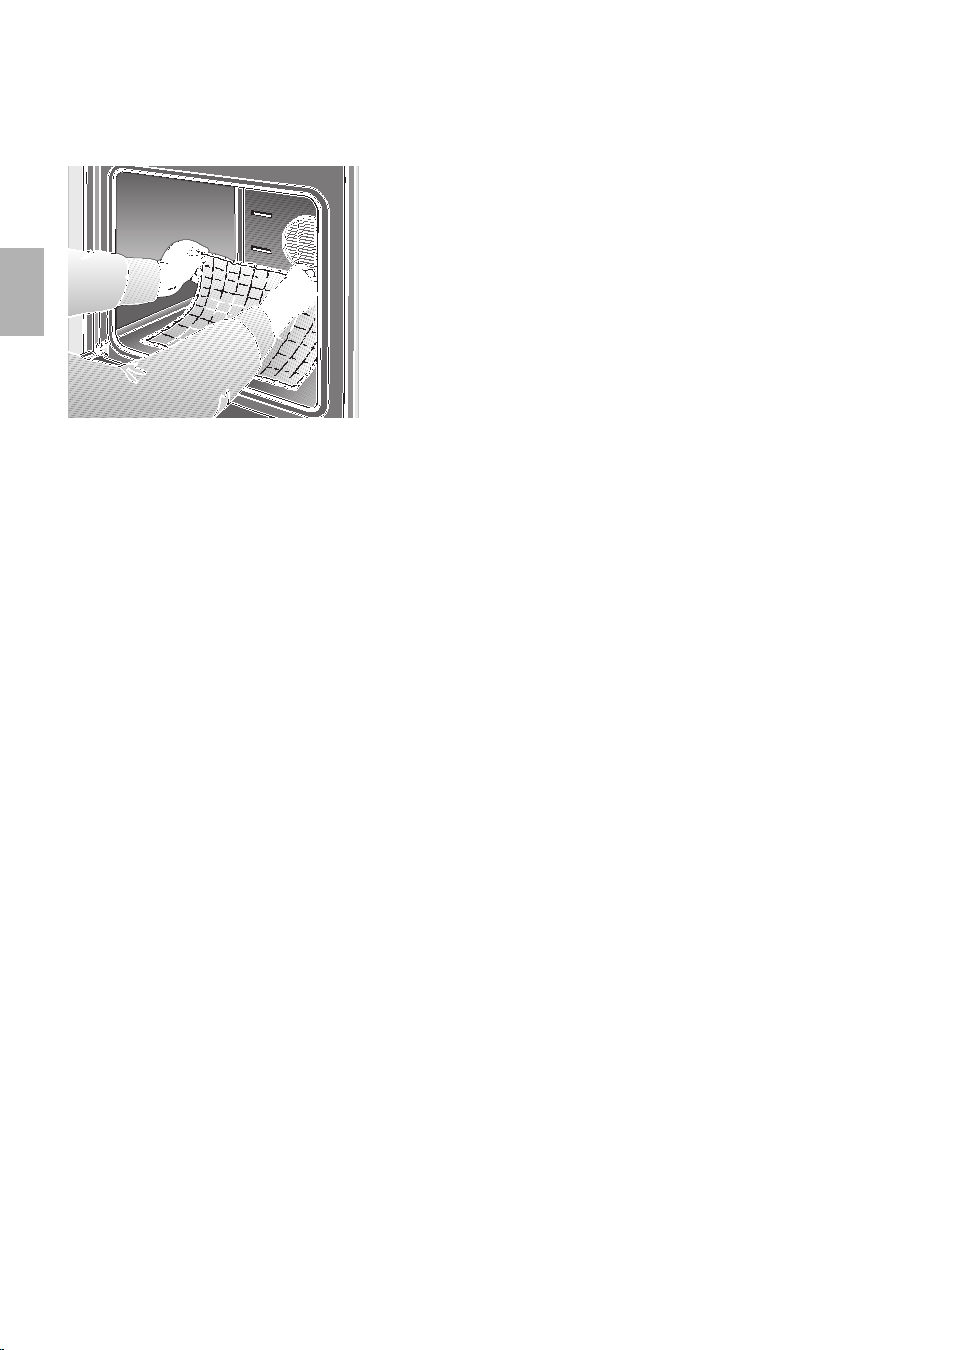
1. Öffnen Sie die Backofentür und nehmen Sie das
Restwasser mit einem großen saugfähigen
Schwammtuch auf.
2. Reinigen Sie den Backofen mit dem laugen-
getränkten Schwammtuch, einer weichen
Bürste, oder einem Topfreiniger aus Plastik.
Noch vorhandene, hartnäckige Rückstände
können Sie mit einem Glasschaber (für Glas-
keramik) entfernen.
Achtung: Den Glasschaber vorsichtig handhaben
und nicht zu flach aufsetzen, das Email könnte
zerkratzen.
3. Kalkränder können Sie mit einem essiggetränkten
Tuch entfernen.
4. Wischen Sie mit klarem Wasser nach und reiben
Sie mit einem weichen Tuch trocken (bitte auch
unter der Backofentürdichtung).
Hinweise:
Bei stärkerer Verschmutzung können Sie den
Vorgang nach Abkühlen des Backofens
wiederholen.
Bei starker Verschmutzung mit Fett, nach dem
Braten oder Grillen, empfehlen wir die verschmutzten
Stellen vor dem Einschalten der Reinigungshilfe mit
Spülmittel einzureiben.
Lassen Sie die Backofentür nach der Reinigung noch
ca. 1 Stunde in Raststellung ca. 30° schräg geöffnet,
damit die Emailflächen des Backofens gut
abtrocknen können.
Schnelltrocknung
1. Stellen Sie die Backofentür bis zur Raststellung
ca. 30° schräg.
2. Stellen Sie den Funktionswähler auf Position *
und den Temperaturwähler auf 50° C.
Dauer: 5 Minuten.
3. Danach stellen Sie den Funktionswähler und den
Temperaturwähler wieder auf 0.
41
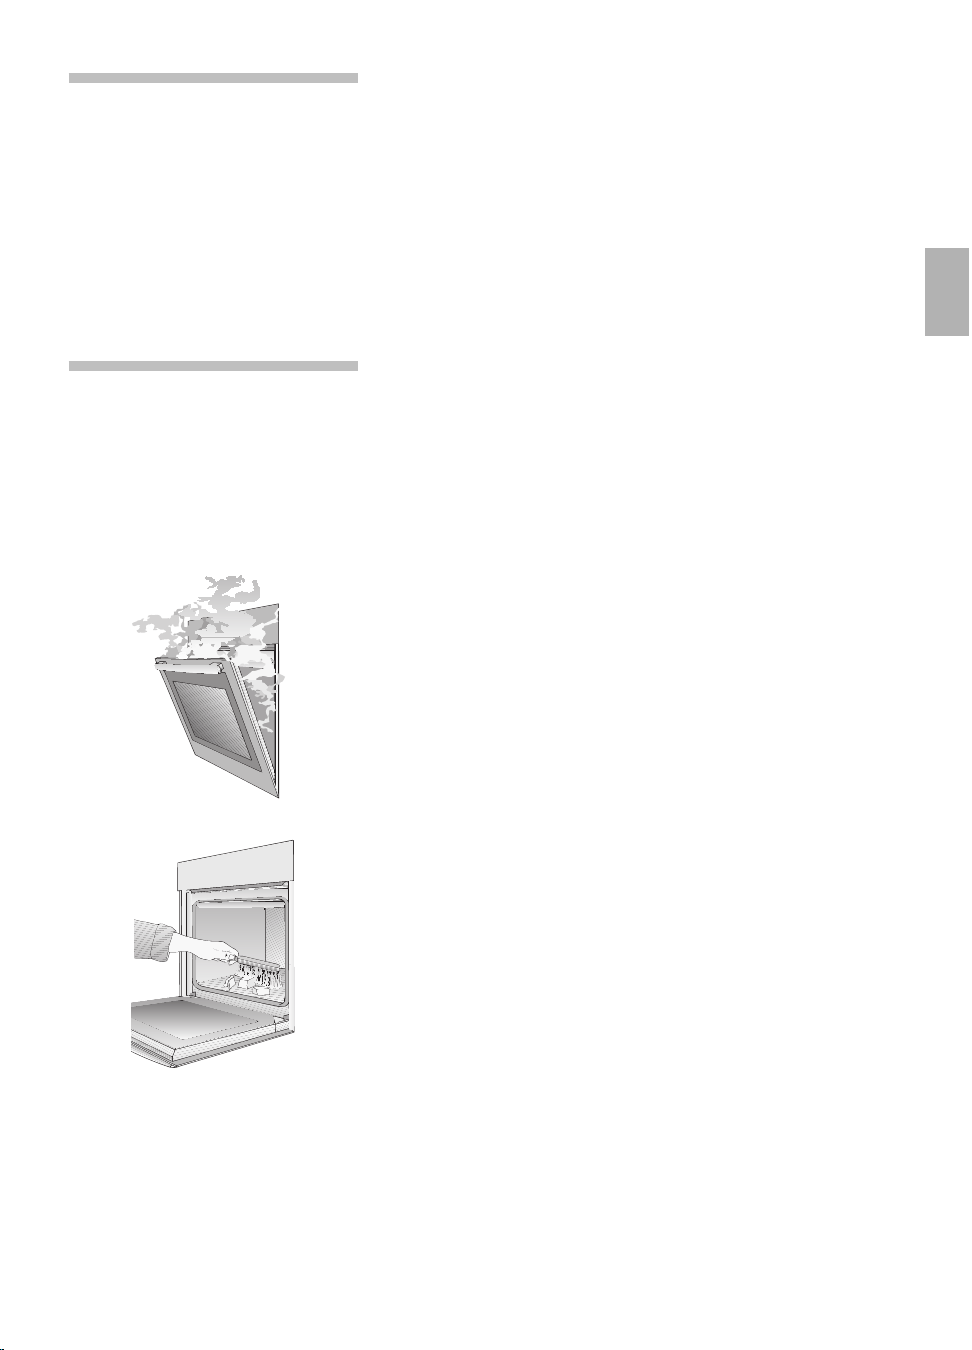
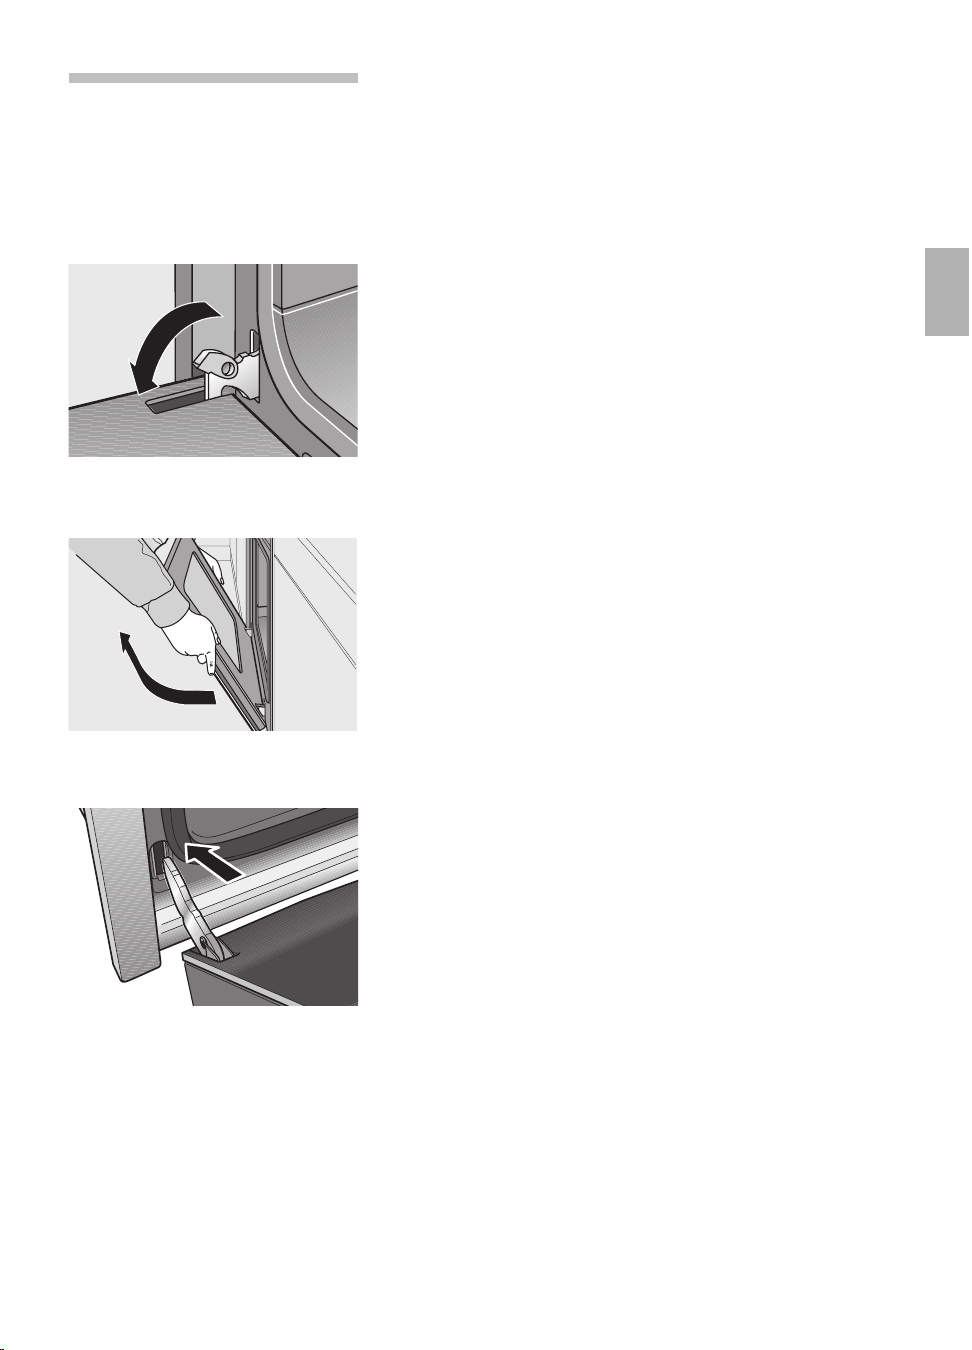
Aus- und Einhängen
der Backofentür
Backofentür Hinweis: Zur bequemeren Reinigung nach der
automatischen Reinigungshilfe bietet Ihnen das Gerät
folgende Möglichkeiten.
Aushängen
Achten Sie darauf, dass Sie nicht ins Scharnier
greifen. Verletzungsgefahr!
1. Öffnen Sie die Backofentür ganz.
2. Klappen Sie die Sperrhebel links und rechts
ganz auf.
3. Stellen Sie die Backofentür schräg, bis Sie einen
Widerstand spüren. Mit beiden Händen links und
rechts anfassen, etwas weiter schließen und
herausziehen.
Einhängen
1. Setzen Sie beide Scharniere in die Halterungen
links und rechts ein und schwenken Sie die
Backofentür nach unten.
2. Klappen Sie die Sperrhebel links und rechts
ganz zu.
3. Schließen Sie die Backofentür.
42
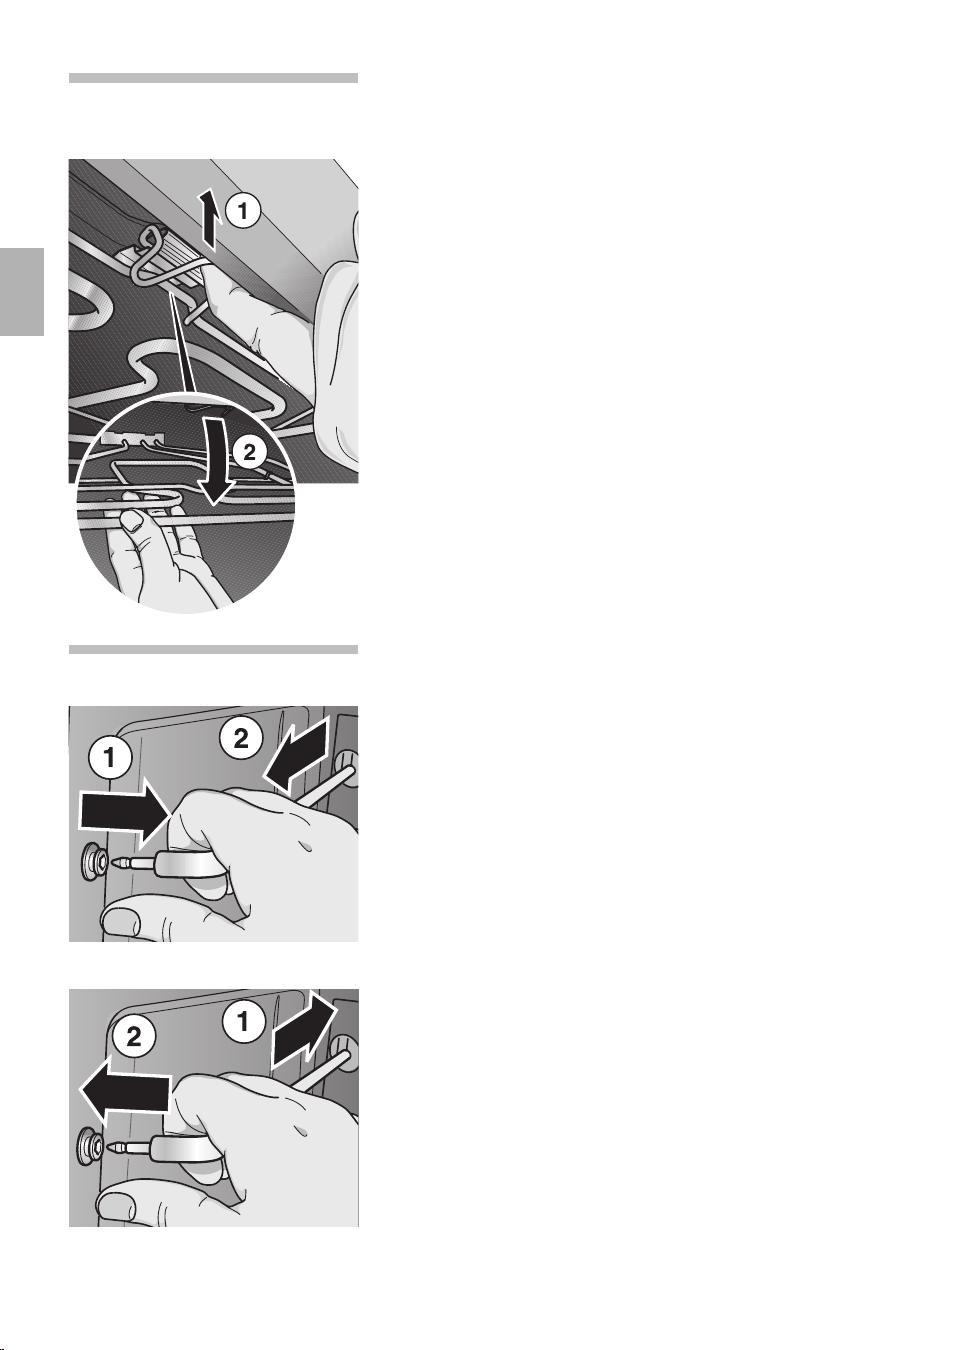
Heizkörper
absenken
Damit Sie die Backofendecke besser reinigen
können, klappen Sie den Grillheizkörper herunter.
Achtung: Der Heizkörper muss abgekühlt sein.
1. Drücken Sie den Haltebügel nach oben, bis er
hörbar ausrastet.
2. Halten Sie den Heizkörper fest und klappen Sie
ihn nach unten.
Nach dem Reinigen
Klappen Sie den Heizkörper wieder nach oben.
Ziehen Sie den Haltebügel nach vorne und drücken
Sie ihn nach oben bis er einrastet.
Einhängegitter
Aushängen
1. Ziehen Sie das Einhängegitter aus der
Lagerbuchse heraus.
2. Hängen Sie das Einhängegitter aus.
Reinigen Sie die Einhängegitter mit Spülmittel und
Spülschwamm oder mit einer Bürste.
Einhängen
Nach der Reinigung, montieren Sie die Einhänge-
gitter in umgekehrter Reihenfolge.
43
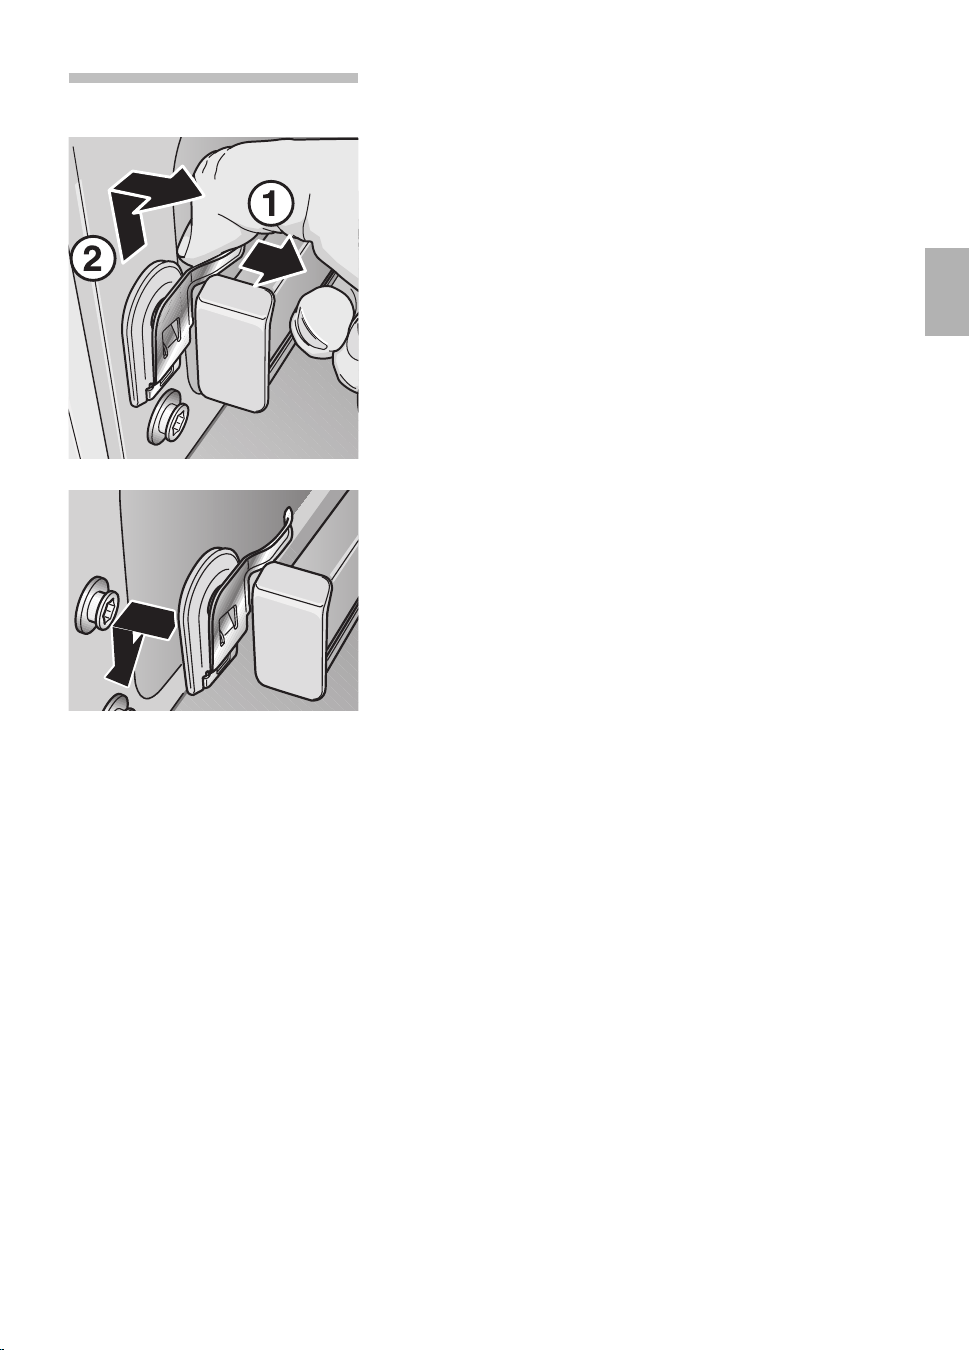
Teleskopauszüge Aushängen
1. Ziehen Sie die Blattfeder.
2. Halten Sie die Blattfeder und schieben Sie den
Teleskopauszug nach oben.
Ziehen Sie den Teleskopauszug hinten heraus.
Reinigen Sie die Teleskopauszüge mit Spülmittel
und Spülschwamm.
Einhängen
Stecken Sie den Teleskopauszug hinten ein.
Schieben Sie den Teleskopauszug in die Führung
und drücken Sie ihn nach unten bis er einrastet.
Schieben Sie die Teleskopauszüge immer bis zum
Anschlag ein.
Schließen Sie die Backofentür erst dann, wenn alle
Teleskopauszüge eingeschoben sind.
Achtung: Die Teleskopauszüge werden bei Betrieb
des Backofens heiß. Besondere Vorsicht vor
Verbrennungen im herausgezogenen Zustand.
44
Störungen und Reparaturen
Bei Störungen oder Reparaturen, die Sie nicht
selbst beheben können, ist der Kundendienst für
Sie da.
Anschriften siehe Kundendienststellenverzeichnis.
Achtung: Es kostet Ihr Geld, wenn Sie wegen eines
Bedienfehlers den Kundendienst rufen.
E-Nummer und Sie finden diese Angaben auf dem Geräteschild.
FD-Nummer Das Geräteschild finden Sie hinter der Backofentür,
links unten am seitlichen Rand des Backofens.
Bei Kundendienstfällen bitte angeben:
E-Nr. FD
Austauschen der Achtung: Gerät stromlos machen!
Backofenlampe Durch Betätigen des Sicherungsautomaten, oder
durch Herausdrehen der Sicherungen im
Sicherungskasten Ihrer Wohnung.
1. Legen Sie ein Geschirrtuch in den kalten
Backofen, um Schäden zu vermeiden.
2. Schrauben Sie die Lampenabdeckung durch
Linksdrehen ab.
3. Lampe ersetzen.
–Typ Glühlampe E 14, 220 – 240 Volt, 40 Watt,
hitzebeständig bis 300° C.
–Die Glühlampe erhalten Sie beim Kunden-
dienst oder beim Fachhandel.
Austauschen der
Backofentürdichtung Nehmen Sie die defekte Backofentürdichtung durch
einfaches Aushängen ab.
Die neue Backofentürdichtung erhalten Sie beim
Kundendienst.

45
Was ist wenn?
Nicht immer ist der Ruf nach dem Kundendienst
erforderlich. In Manchen Fällen können Sie selbst
Abhilfe schaffen. In der nachfolgenden Tabelle
finden Sie einige Tipps.
Grundsätzlicher Hinweis:
Arbeiten an der Geräte-Elektronik dürfen nur von
einem Fachmann ausgeführt werden. Vor Beginn
solcher Arbeiten muss das Gerät unbedingt stromlos
gemacht werden: Durch Betätigen des Sicherungs-
automaten, oder durch Herausdrehen der
Sicherungen im Sicherungskasten Ihrer Wohnung.
was ist . . . Mögliche Ursache Abhilfe
. . . wenn die elektrische Sicherung defekt Sicherung im Sicherungskasten prüfen
Funktion generell gestört ist, und bei Defekt austauschen.
z. B. die Anzeigelampen
plötzlich nicht mehr leuchten?
. . . wenn sich Flüssigkeit oder Gerät nicht waagrecht Einbau überprüfen.
dünnflüssiger Teig stark ein- aufgestellt oder
seitig verteilen? eingebaut.
. . . wenn der Backofen plötz- Elektronikuhr ist auf Elektronikuhr auf Betrieb ohne Zeit-
lich nicht mehr funktioniert? Zeitschaltautomatik schaltautomatik einstellen:
eingestellt. 1. Taste : drücken.
2. Betriebszeit-Dauer
? auf 0:00
zurückstellen.
. . . wenn der Backofen plötz- Stromzufuhr war kurz- Tageszeit neu einstellen.
lich nicht mehr funktioniert und zeitig unterbrochen.
die Elektronikuhr blinkend 0:00
anzeigt?
. . . wenn eine Störung von Energetische Impulse Entsprechende Funktionen neu
elektronisch gesteuerten (z. B. Blitzschlag). einstellen.
Funktionen auftritt?
. . . wenn nach dem Einschalten Temperatur ist noch zu Backofen vor dem Benutzen der
der Reinigungshilfe die Anzeige- hoch, z. B. durch Reinigungshilfe vollständig
lampe für Backofentemperatur längere Benutzung des abkühlen lassen.
nicht rot aufleuchtet? Backofens.
Anzeigelampe defekt. Austausch durch einen autorisierten
Fachmann.
46
was ist . . . Mögliche Ursache Abhilfe
. . . wenn beim Braten oder Zu hohe Brattemperatur.
Grillen Qualm entsteht?
Rost oder Universal- Rost in Universalpfanne legen und
pfanne falsch einge- zusammen in eine Einschubhöhe
schoben. schieben.
. . . wenn emaillierte Einschub- Normale Erscheinung Nicht möglich.
teile mattierte, helle Flecken durch abtropfenden
haben? Fleischsaft.
. . . wenn Backofentürscheibe Normale Erscheinung. Backofen ca. 5 Minuten bei 100° C
oder -fenster beschlägt? Beruht auf vorhandenem einschalten.
Temperaturunterschied.
. . . wenn im Backofen verstärkt Normale Erscheinung, Backofentür während des Backens ab
Kondenswasser auftritt? z. B. bei Kuchen mit und zu kurz öffnen, Kondenswasser
sehr feuchtem Belag nach dem Betrieb aufwischen.
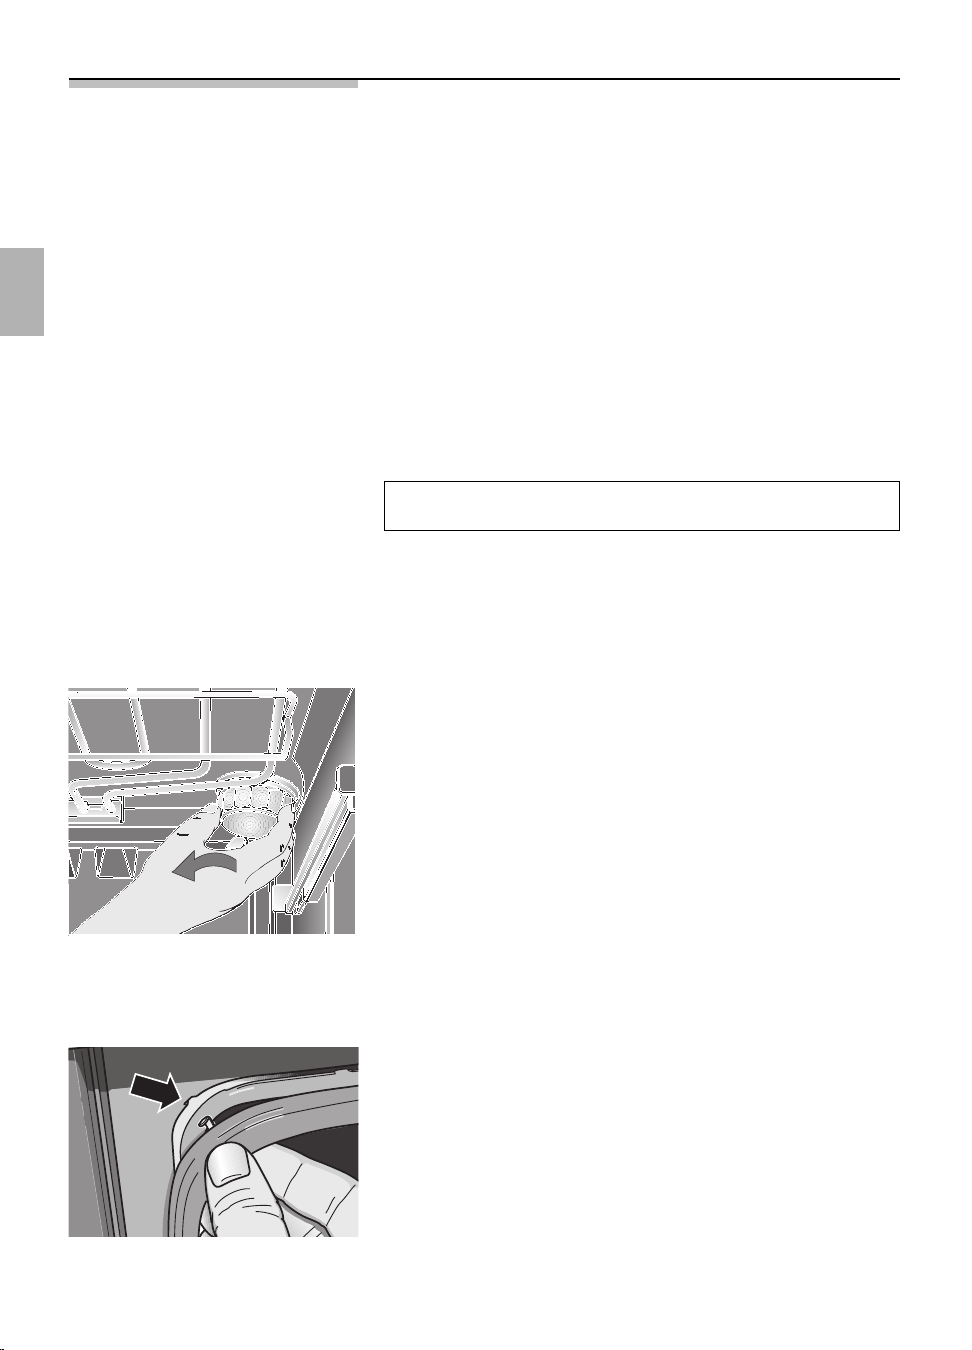
(Obst) oder großen Braten.
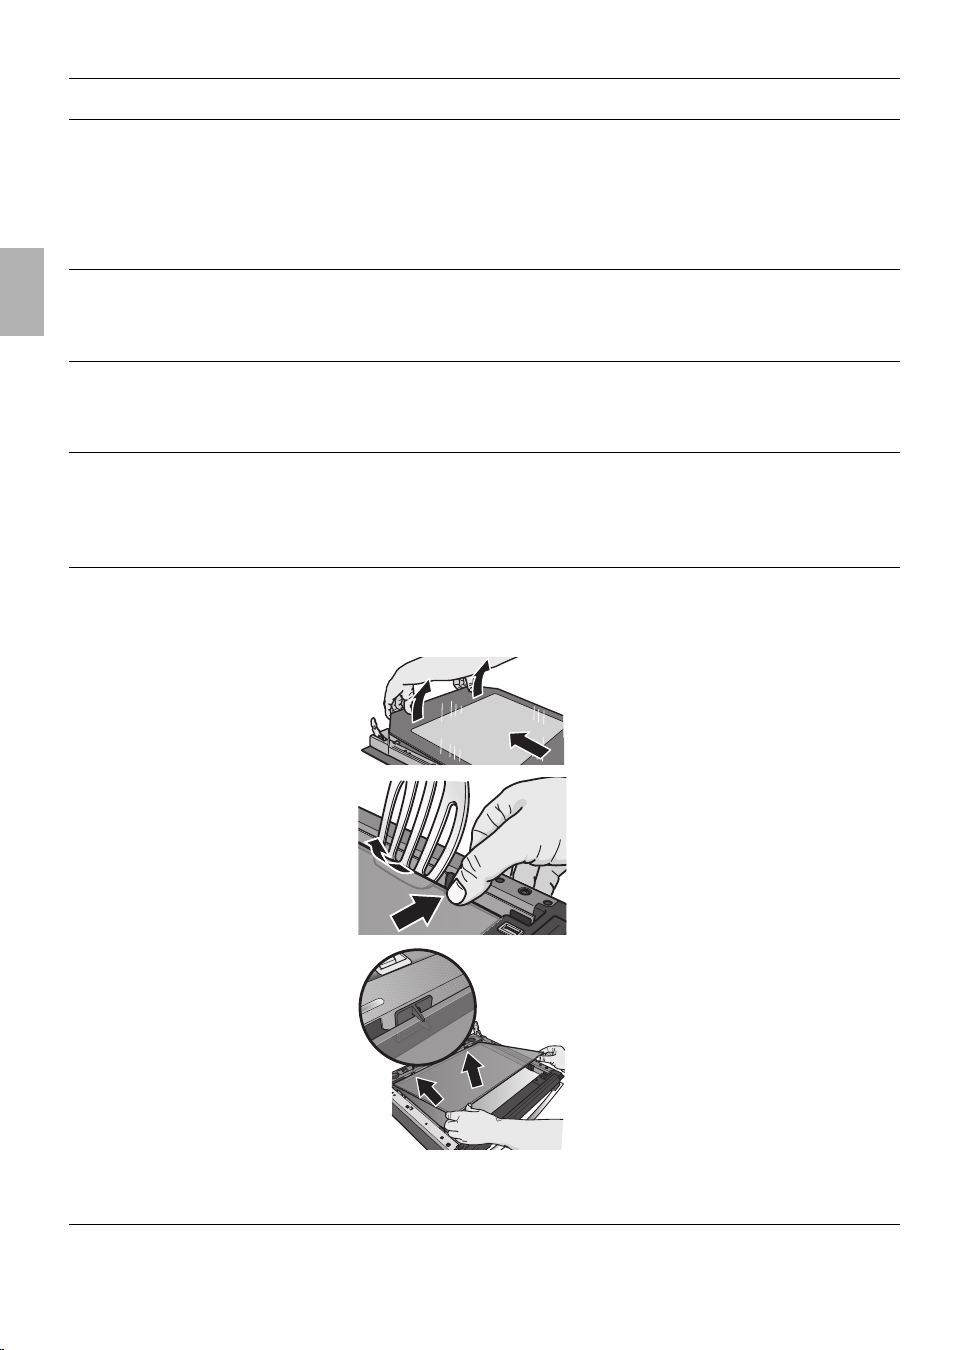
. . . wenn nach längerem Normale Verschmutzung Backofentür aushängen und mit der
Gebrauch die Backofentür- Vorderseite nach unten auf eine
scheiben innen verschmutzt sind? weiche, saubere Unterlage legen.
Türglas neben den Scharnieren
anfassen, ausrasten und leicht
anheben. Ziehen Sie das Türglas
Richtung Scharniere ab.
Innentürglas an einer Seite mit dem
Daumen den Halteklips eindrücken
z. B. mit dem Bratenwender
ausrasten, dann die andere Seite.
Montage nach dem Reinigen:
Innentürglas in die Aufnahme
einsetzen. Erst die rechte Seite und
dann die andere Seite einrasten.
Türglas einhängen und durch Drücken
neben den Scharnieren einrasten.
47
Backen Betriebsart Einschub- Temperatur Backdauer
höhe in ° C in Min.
Spritzgebäck (vorheizen)
/ 3140–150 25 – 35
* 1140–160 20 – 40
* 1 + 3 140 – 150 25 – 35
* 1 + 3 + 4 130 – 150 35 – 55
Small Cakes
/ 3160–170 20 – 30
* 1 + 3 160 – 170 25 – 35
* 1 + 3 + 4 160 – 170 25 – 35
Wasserbiskuit (vorheizen)
/ 2160–170 25 – 35
* 1160–170 25 – 35
Hefeblechkuchen / 3170–180 45 – 55
* 1160–170 50 – 60
* 1 + 3 160 – 170 60 – 70
Gedeckter Apfelkuchen
& 1170–180 65 – 75
Formen nebeneinander auf den Rost stellen
Gedeckter Apfelkuchen
* 1 + 3 170 – 180 60 – 75
(vorheizen)
Formen diagonal versetzt einschieben
Grillen Betriebsart Einschub- Temperatur Grilldauer
höhe in ° C in Min.
Toast (10 Min. vorheizen)
( 4 275 0,5 – 1,0
Universalpfanne mit flachem Rost
Beefsteaks ( 4 250 1. Seite 11 – 15
12 Stück 2. Seite 09–13
Universalpfanne mit Rost
Prüfgerichte Nach Norm DIN 44547 und EN 60350
Beachten Sie die Hinweise zum Vorheizen.
Die Tabellenwerte gelten ohne Schnellaufheizung
s.

48
Montageanleitung
Für den Installateur und
Küchenfachmann!
Wichtige Hinweise
Verpackungsmaterial ordnungsgemäß
entsorgen.
Backofentürgriff nicht zum Transport
und Einbau des Gerätes benutzen.
Achtung: Anschluss und Inbetrieb-
nahme dürfen nur von einem
autorisierten Fachmann vorgenommen
werden.
Für den Anschluss ist ein
Netzanschlusskabel H05RR-F 3x1,5
9
zu verwenden.
Nennaufnahme, Nennspannung und
Typen-Nr. des Gerätes: siehe Geräte-
schild, hinter der Backofentür, links
unten am seitlichen Rand des
Backofens.
Das Typenschild befindet sich an der
Seitenwand des Gerätes.
Die elektrische Sicherheit des Gerätes
ist nur gewährleistet, wenn das
Schutzleitersystem der Hausinstallation
vorschriftsmäßig installiert ist.
Bei Reparaturen das Gerät generell
stromlos machen.
Anschließbare Einbaumulden HSE-6PA4030
HSE-6PA3W30
HSE-6PL4030
Das ordnungsgemäß eingebaute Gerät
muss nach allen Seiten so abgedeckt
sein, dass eine Berührung auch von
betriebsisolierten Teilen nicht möglich ist.
Die Abdeckung darf nur mit Hilfe von
Werkzeugen abnehmbar sein.
49
Möbelprogramme Für den Einbauherd sind Herdumbau-
schränke aller Küchenprogramme
verwendbar. Bei den Herdumbau-
schränken müssen Furniere oder
Kunststoffbeläge mit hitzebeständigem
Kleber (90° C) verarbeitet sein. Sind
Kunststoffbeläge oder Kleber nicht
genügend temperaturbeständig, so
kann sich der Belag verformen oder
lösen.
Einbauen des Herdes
Achtung Das Gerät darf nur an einer Seite neben
einem Hochschrank oder einer hohen
Wand eingebaut werden. die Höhe an
der gegenüberliegenden Seite darf die
der Arbeitsfläche, in der die Kochmulde
eingebaut ist, nicht überschreiten.
Der seitliche Abstand der Kochmulde
zu einem Hochschrank und der zur
Rückwand muss der Montageanleitung
für die Einbau-Kochmulde entsprechen,
dort angegebene Schutzklasse für
Erwärmung beachten.
Der Einbau des Herdes darf nur im
stromlosen Zustand erfolgen.
Zum Beispiel durch Ausschalten der
Sicherung in der Hausinstallation.
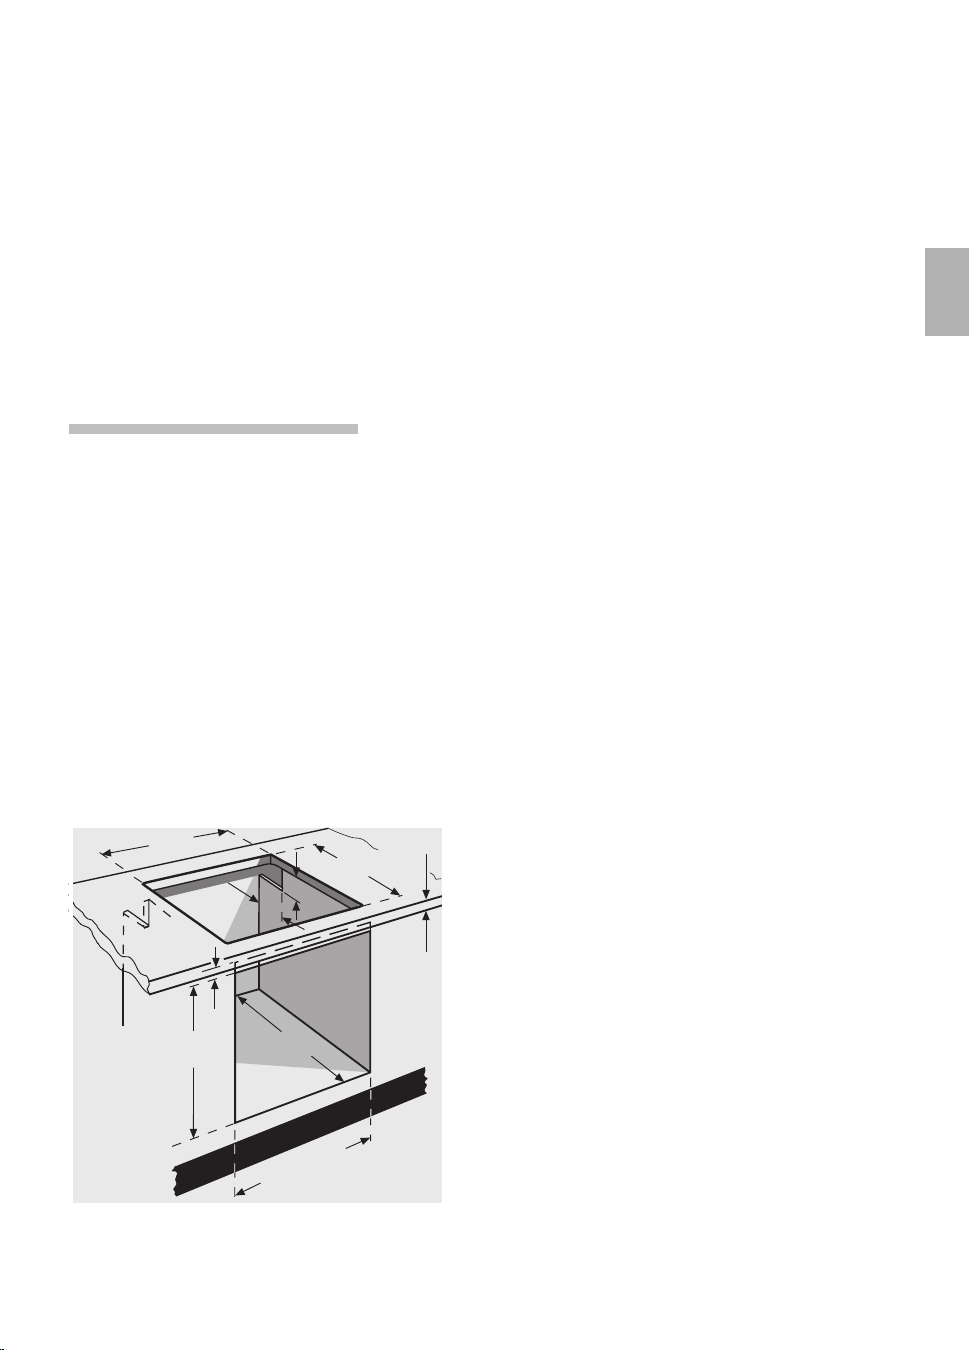
Arbeitsplattenausschnitt für Einbau-
Kochmulde muss vorhanden sein
(siehe Montageanleitung Einbau-
Kochmulde).
560
490
100
100
30-50
585
550
m
ind.
mind. 560
15
50
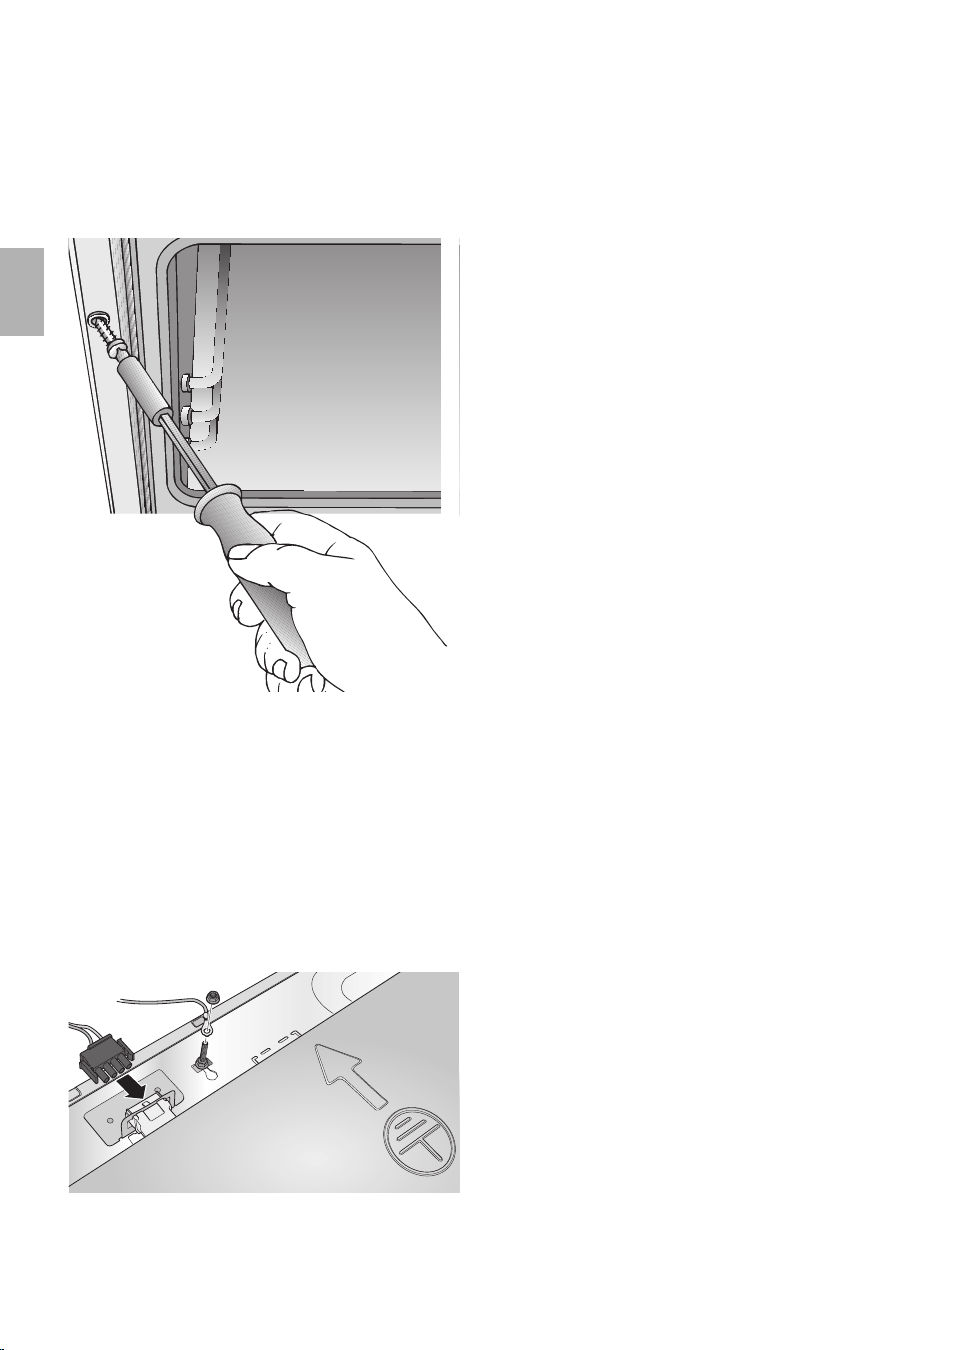
Einbauen 1. Einbauherd in die Einbauöffnung des
Umbauschrankes einschieben und
waagerecht ausrichten.
Wichtig für Funktion und Sicherheit:
Einbauherd vollständig einschieben.
2. Backofentür öffnen und Einbauherd
an den seitlichen Leisten mit je einer
Schraube am Umbauschrank
befestigen. Die zwei Schrauben (sie
liegen dem Einbauherd in einer Tüte bei)
müssen beim Einschrauben leicht
schräg nach außen angesetzt werden.
Verwenden Sie bitte nur diese
Schrauben.
3. Prüfen, ob der Einbauherd fest und
waagerecht eingebaut ist und die
angegebenen Einbaumaße angehalten
sind.
Bei Geräten mit Teleskopauszug
dürfen sich die Auszugschienen
nicht selbsttägig bewegen.
Bei Geräten mit automatischer
Reinigungshilfe darf nach dem
Einfüllen von 0,4 Liter Flüssigkeit
in den Backofenboden die Flüssigkeit
nicht vorne überschwappen.
4. Elektrischer Anschluss zwischen
Einbauherd und Schutzkontakt-
Steckdose, über Netz-Anschluss-
stecker herstellen.
5. Elektrischer Anschluss zwischen
Einbauherd und Kochmulde, über
Anschlussstecker und Buchsen-
leiste mit Erdungskabel herstellen.
6. Kochmulde einbauen.
Die dem Gerät beiliegende
Montageanleitung unbedingt
beachten.
7. Funktionskontrolle.

51
Table of contents
Important Information . . . . . . . . . . 52
Packaging and old appliances . . . . . 52
Before installation . . . . . . . . . . . . . . 53
Safety information . . . . . . . . . . . . . . 53
Reasons for damage . . . . . . . . . . . . 55
Your new cooker . . . . . . . . . . . . . . 56
The control panel . . . . . . . . . . . . . . . 56
Function selector . . . . . . . . . . . . . . . 56
Temperature selector . . . . . . . . . . . . 57
Shelf positions . . . . . . . . . . . . . . . . . 57
Accessories . . . . . . . . . . . . . . . . . . 58
Before using your Appliance
for the first time . . . . . . . . . . . . . . . 59
Preliminary cleaning . . . . . . . . . . . . . 59
Initial burn-in . . . . . . . . . . . . . . . . . . 59
Subsequent cleaning . . . . . . . . . . . . 59
Safety off the burners . . . . . . . . . . . 59
Time of day . . . . . . . . . . . . . . . . . . . 59
Cooking . . . . . . . . . . . . . . . . . . . . . 60
Selection of the cooking pots . . . . . 60
Igniting and regulating the burners . . 61
Electronic clock . . . . . . . . . . . . . . . 62
The control panel . . . . . . . . . . . . . . . 62
Special functions . . . . . . . . . . . . . . . 62
Minute timer . . . . . . . . . . . . . . . . . . 63
Automatic timer . . . . . . . . . . . . . . . . 63
Description of Oven Features . . . . 65
Switching the oven ON and OFF . 68
Rapid heat up . . . . . . . . . . . . . . . . . 68
Inhaltsverzeichnis
Baking . . . . . . . . . . . . . . . . . . . . . . 69
Cooking Tips and Helpful Hints . . . . 70
Roasting . . . . . . . . . . . . . . . . . . . . . 71
Grilling . . . . . . . . . . . . . . . . . . . . . . 73
Circo-roasting . . . . . . . . . . . . . . . . . 74
Surface grilling . . . . . . . . . . . . . . . . . 74
Defrosting and Cooking . . . . . . . . 75
Cleaning and Care . . . . . . . . . . . . . 77
Important cleaning basics . . . . . . . . 77
Catalytic oven surfaces . . . . . . . . . . 79
EasyClean
®
system
(oven cleaning system) . . . . . . . . . . 80
Removing/installing
the oven door . . . . . . . . . . . . . . . . . 82
Heating elements . . . . . . . . . . . . . . . 83
Shelf supports . . . . . . . . . . . . . . . . . 83
Telescopic pull-outs . . . . . . . . . . . . . 84
Service and Repair information . . 85
Trouble-shooting Guide . . . . . . . . . 86
Assembly Instructions
For the fitter
and kitchen expert
Important Instructions . . . . . . . . . . 88
Installation . . . . . . . . . . . . . . . . . . . 89
52
Important information
Before using your new appliance, please read these
Instructions for Use carefully. They contain important
information concerning your Personal safety as well
as on use and care of the appliance.
The Instructions for Use apply to several versions of
this appliance. Accordingly, you may find
descriptions of individual features that do not apply
to your specific appliance.
Please keep the operating and installation
instructions in a safe place; this important
documentation may also be of use to a possible
subsequent owner.
Packaging and Your new appliance was protected by suitable
old appliances
packaging while it was on its way to you. All materials
used for this purpose are environmentally friendly and
can be recycled. Please make a contribution to
protecting the environment by disposing of the
packaging appropriately.
Old appliances are not worthless rubbish.
Environmentally-conscious recycling can reclaim
valuable raw materials.
Before disposing of your old appliance, please make
sure that it is unusable, or label it with a sticker
stating „Caution, scrap”.
This appliance is labelled in accordance with
European Directive 2002/96/EG concerning used
electrical and electronic appliances (waste electrical
and electronic equipment – WEEE). The guideline
determines the framework for the return and
recycling of used appliances as applicable
throughout the EU.
Up-to-date information on how to dispose of your
old appliance and the packaging from the new one
can be obtained from your retailer or local authority.

53
Safety information This appliance is intended for domestic use only.
Only use the cooker for food preparation.
Hot oven Open the oven door carefully. Hot steam may escape.
Never touch the internal surfaces of the oven or the
heating elements. There is a risk of burning.
Children must be kept at a safe distance from the
appliance.
Never store combustible items in the oven.
Risk of fire. Never place flammable objects onto the
hot plates. Fire hazard!
Never place cables of electronic devices onto the hot
plates.
Never clamp leads of electrical appliances in the hot
oven door. The insulation on the leads could melt.
There is a risk of short-circuiting.
Caution: The extension rails heat up during oven
operation. Use special care to avoid burns when
extending the rails.
Remove all packaging remnants, e.g. polystyrene
parts, from the oven.
Do not use the appliance for heating.
Before installation
Transport damage Check the appliance after unpacking it. Do not
connect the appliance if it has been damaged in
transport.
Electrical connection The cooker may only be connected by an approved
specialist. Losses resulting from damage caused by
incorrect connection will invalidate warranty claimes.

54
Ventilation Use of a gas cooking appliance results in heat and
moisture generation in the room where it is set up.
Make certain that the kitchen is well ventilated: keep
the natural ventilation openings open or install a
mechanical ventilation appliance (vapour exhaust
hood).
If you use the appliance intensively and for a long
time, an additional ventilation may be necessary, for
example by opening the window, or an increased
output of the mechanical ventilation appliance if
present.
Never install gas appliances in vehicles.
Burner lid Before using the hotplate burner, place the burner
lid exactly.
Operate the hotplate burner only when food to be
cooked is placed on it.
When using liquid gas (Propane/butane) make all connections between
cylinder and appliance absolutely tight.
Repairs Incorrectly done repairs are dangerous. There is a
risk of electrocution.
Repairs may only be carried out by after-sales
service technicians who have been fully trained by
BSH.
In the case of a defect, switch off (or remove) the
mains fuse in the building electrical system.
Call the after-sales service.

55
Reasons for
damage
Baking tray, aluminium foil Do not place the baking tray on the oven floor.
or dishes on the oven floor Do not cover it with aluminium foil.
Do not place dishes on the oven floor.
This will cause heat accumulation. The baking and
roasting times will no longer be correct and the
enamel will be damaged.
Slide-in accessories To avoid damage, insert slide-in accessories
carefully.
Baking paper If using hot air functions
*, do not place
greaseproof paper loosely in the oven (e.g. when
heating the oven).
The hot-air fan could draw in the paper which may
damage the heater and fan.
Water in the oven Never pour water directly into a hot oven.
This could damage the enamel.
Fruit juice When baking very moist fruit cakes, do not put too
much on the baking sheet. Fruit juice dripping from
the baking sheet leaves stains that cannot be
removed.
It is recommended that you use the deeper universal
pan.
Cooling with the oven door Only leave the oven to cool with the door closed. Do
not allow anything to become trapped in the oven
door. Even if you only leave the oven door open
slightly, the fronts of adjacent units may become
damaged over time.
Very dirty oven seal If the oven seal is very dirty, the oven door will no
longer close properly when the oven is in use.
The fronts of adjacent units could be damaged.
Keep the oven seal clean.
Using the oven door as a Do not stand or sit on the oven door.
seat
Care and cleaning Do not use high-pressure cleaners or steam jets.
Hotplates Please observe the separate operating instructions
that came with your hob.
56
Your new cooker
Here you will learn more about your new oven. The
control panel and its switches and indicators are
explained here. The heating modes and the
accessories included with your oven will be
explained here.
The control panel
Function
selector
Switches for
hotplate D
Switches for
hotplate C
Switches for
hotplate B
Switches for
hotplate A
Temperature selector
with control lamp
Auxiliary burner B Normal burner C
Normal burner DHigh-power burner A
Function selector Use the function selector to select the type of
heating for the oven.
Settings
*
Circotherm
/
Top/bottom heat (conventional heating system)
(
Large area grill
)
Small area grill (energy-saving grill)
,
Circo-roasting
&
Circotherm intensive
.
Bottom heat
e
Defrosting position
d
EasyClean
®
system (Oven cleaning system)
$
Oven light
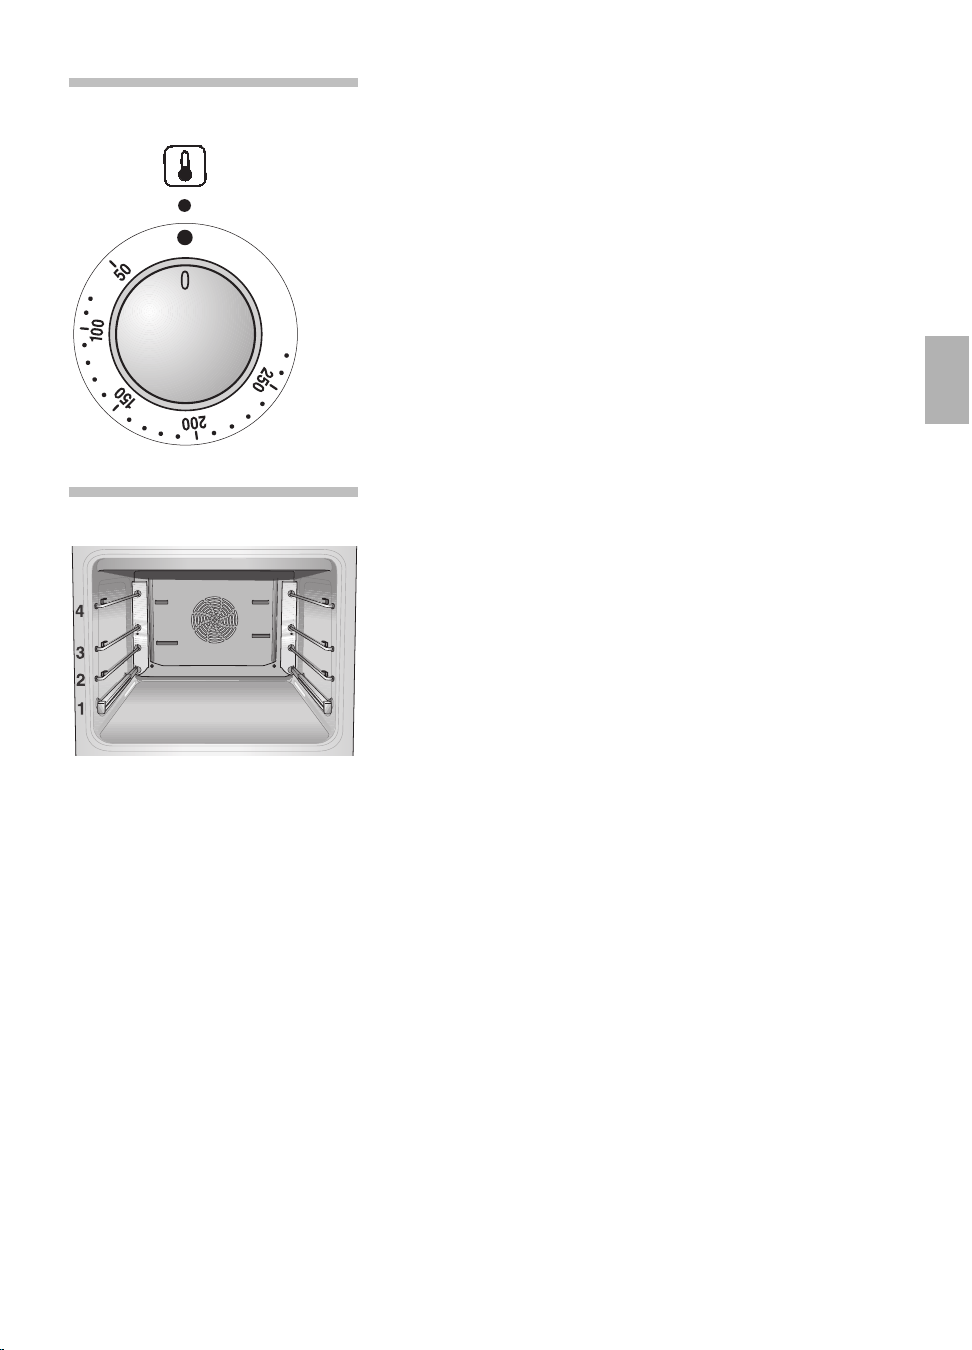
57
Temperature selector
Settings
50 –275
Temperature in °C.
Shelf positions Your oven features 4 shelf position. The shelf
position are counted from bottom to top.
The numbers are marked in the oven.
When using hot air functions
*, do not use shelf
position »2«, in order not to block air circulation.
The shelf supports and telescopic rails can be
inserted at your preferred shelf position.
The simple plug-in system provides you with flexible
and quick handling when changing the shelf
supports and telescopic rails.
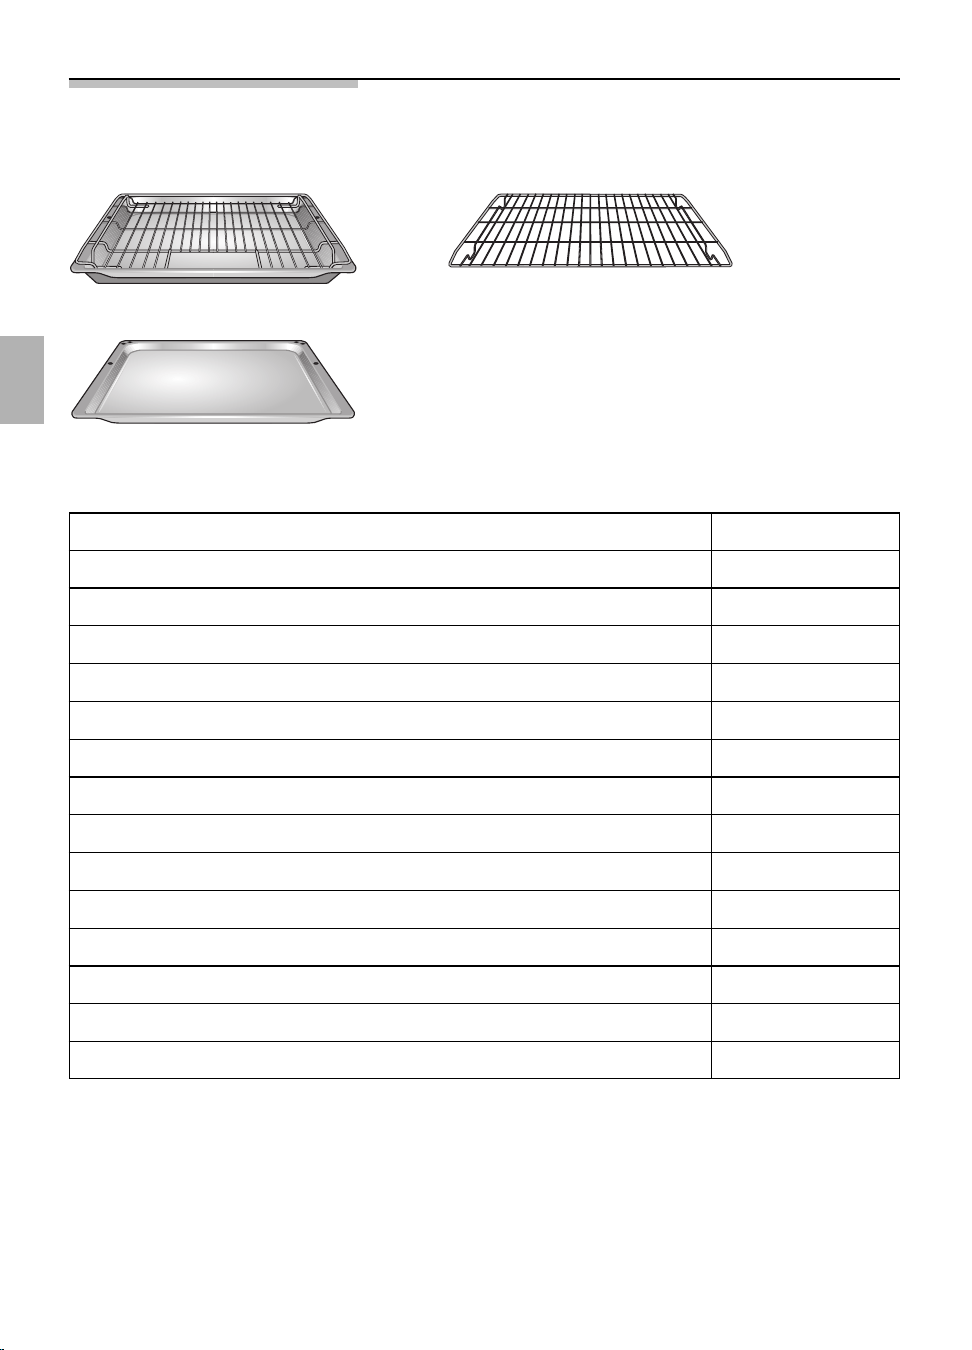
58
Note:
The baking tray or universal pan may distort while the oven is operating. This is cau-
sed by major temperature differences on the utensil. These differences may occur if
only one part of the utensil was covered or if deep-frozen food, e.g. pizza, was placed
on the utensil.
The distortion will subside again during baking, roasting or grilling.
Accessories Your appliance is supplied with:
Universal pan with wire shelf Wire shelf
Baking tray, enamelled
The following accessories can be obtained from a
specialist dealer: Order no.
Universal pan, non-stick
Soufflé pan
Baking tray, aluminium
Baking tray, enamelled
Baking tray, non-stick
Wire shelf, high/low
Wire shelf, close mesh
Roasting tray
Upgrade set – Single Telescope
System steam cooker
Pizza stone
Universal pan
Z 1232 X0
Z 1233 X0
Glass pan Z 1262 X0
Z 1272 X0
Z 1332 X0
Z 1342 X0
Z 1343 X0
Pizza tray Z 1352 X0
Z 1432 X0
Z 1442 X0
Z 1512 X0
Z 1784 X0
N 8642 X0
Z 1912 X0
Universal oval roaster enamelled Z 9930 X0

59
Before using your appliance
for the first time
Preliminary Ta ke the accessories out of the oven.
cleaning
Remove all packaging remnants, e.g. polystyrene
parts, from the oven.
1. Clean the appliance exterior with a soft
moistened cloth.
2. Remove the shelf supports and telescopic rails
from the oven.
3. Clean the oven and the accessories with a hot
detergent solution.
Please observe the operating instructions
furnished with the hob.
Initial burn-in Before using the appliance for the first time, you
must set the time on the electronic clock.
Heat the empty oven for approx. 30 minutes.
Select top and bottom heat at a setting of 240° C.
Subsequent cleaning Clean the oven with a hot detergent solution.
Install the shelf supports and telescopic rails.
Safety of the All hotplate burners are secured in such a way that
burners
the gas feed is interrupted when the flame is
extinguished. This is done thermoelectrically.
If the hotplate burners are on, there is a hissing noise.
Time of day After connecting to the mains, or after a power
failure, the display 0:00 will blink.
Setting the time Press the
>
button and set the current time with
the rotary knob (e.g. 15:00 Uhr).
To correct the time, press the
> button until the
symbol flashes.
Then set the time.
Note: The time cannot be corrected if an automatic
function has been set (see Electronic clock for
cancelling automatic function).
60
Cooking
Selection of the
cooking pots and
their arrangement
Correct! Always place pot in the middle of the
hotplate burner.
Use only pots and pans with a flat
bottom.
Select pot diameter to match the hotplate burner
(see table).
– low gas consumption
– optimal cooking time
–favourable arrangement
Incorrect! Pot diameter too small.
Hotplate burner flame burns beyond the bottom of the
pots.
Pot projects over the edge of the built-in hob.
– High gas consumption
– poor arrangement
Burner
High-speed burner
Normal burner
Simmer burner
Load in kW
Hob
2,85
1,85
1,10
2,90
1,70
1,00
240 bis 260 mm
200 bis 220 mm
120 bis 180 mm
Ceramic hob
Pan base diameer
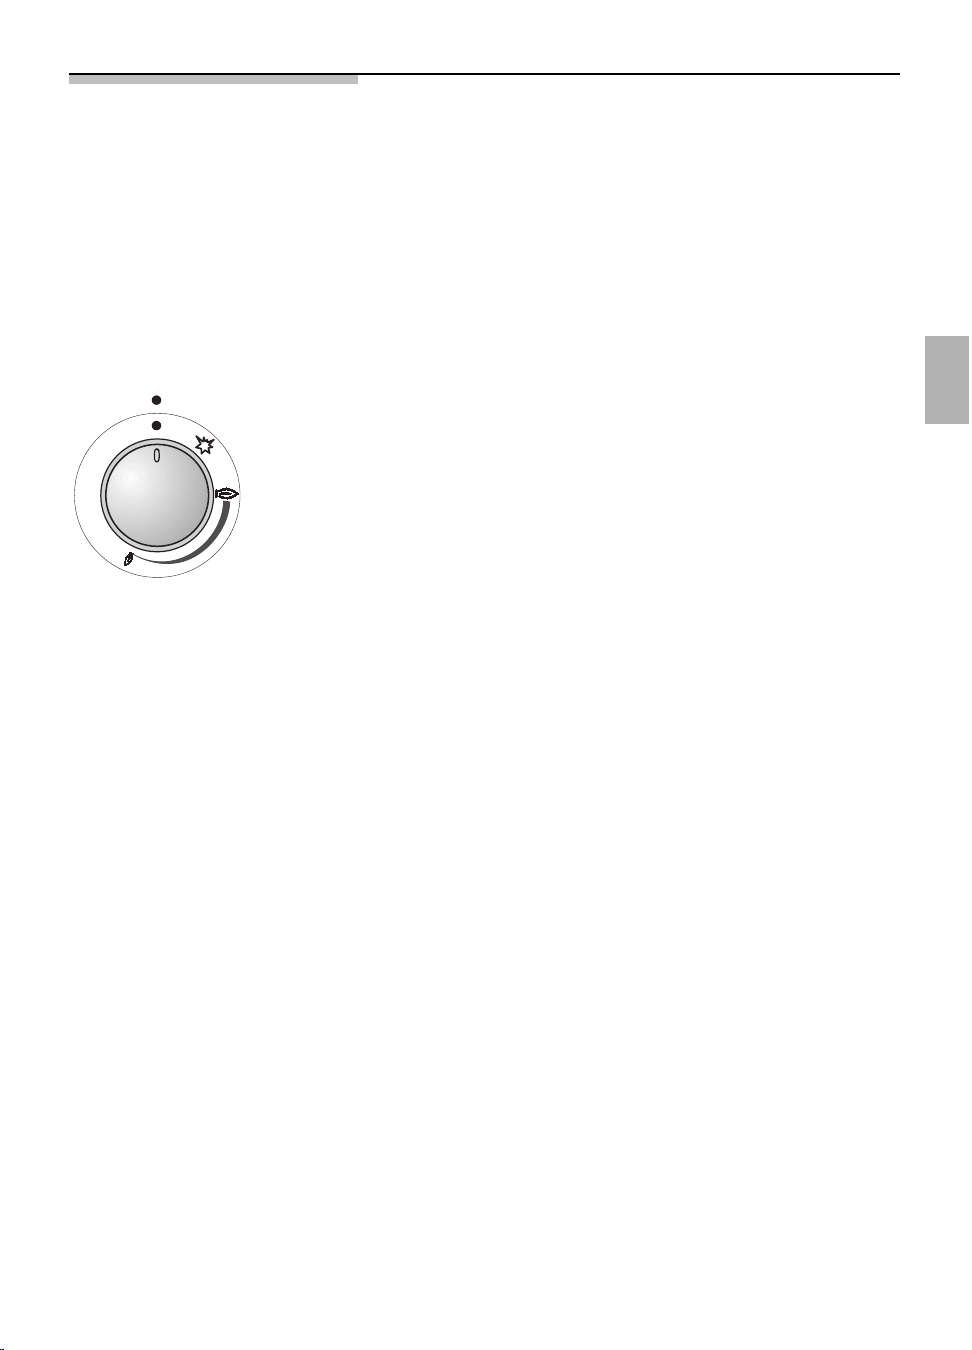
61
Igniting and regulating the burners
The association of the operating elements knobs
can be seen from the appliance description and
recognized from the symbols on the gas cook
screen.
Igniting the burners is facilitated by an electric spark
igniter.
Hotplate burner You can regulate infinitely between the high-power
setting and low setting.
g = large setting
f = small setting
Igniting with the electric
1. Press in the appropriate knob and turn anticlock-
spark igniter wise to high setting.
The electric spark ignition will operate as long as
the knob is pressed in.
2. After igniting the flame, keep knob pressed in for
around 5 seconds.
3. Before releasing, press knob vigorously once
more.
4. If there is no ignition, or the flame goes out,
repeat ignition procedure after around 3 seconds.
5. To switch off the burners, turn knob to the right
to the zero setting.
Igniting with match or
1. Press in the appropriate knob, turn it anticlock-
similar expedient wise to high setting and light the burner with a
match.
2. Keep knob pressed in for around 5 seconds.
3. If the flame goes out, repeat ignition procedure
after around 3 seconds.
4. To switch off the burners, turn knob to the right
to the zero setting.
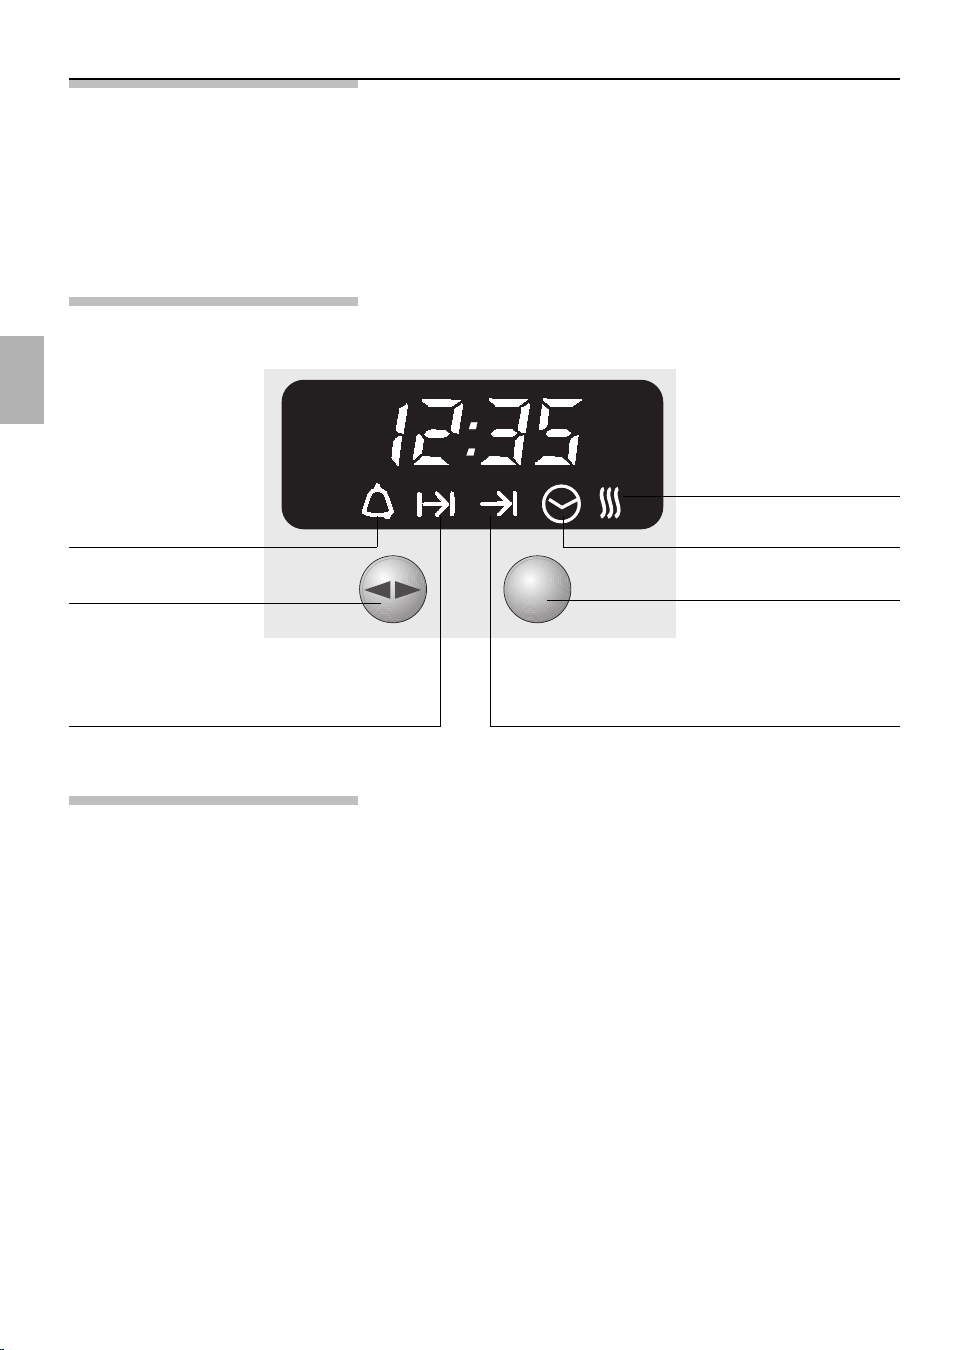
62
Electronic clock
The electronic clock can be operated with one hand;
after pressing the button, set the time with the rotary
knob. Settings can be made for as long as the
function display flashes (~4 seconds).
The control panel
Minute timer
ON time OFF time
Rotary knob
To engage and
disengage, depress
gently
Time of day
Rapid heat up
Function selector
Special functions
Masking out the display 1. Press the > button for 7 seconds.
The display then goes blank and the time
continues running in the background.
2. To switch on the display, briefly press the
> button.
Rapid heating Rapid heating
s can be set with the clock
(see section ”Switching the oven on and off”).
Setting the time See section ”Before using your appliance for the first
time”.
Dimming the display Between 22.00 and 6.00 the display is automatically
dimmed.
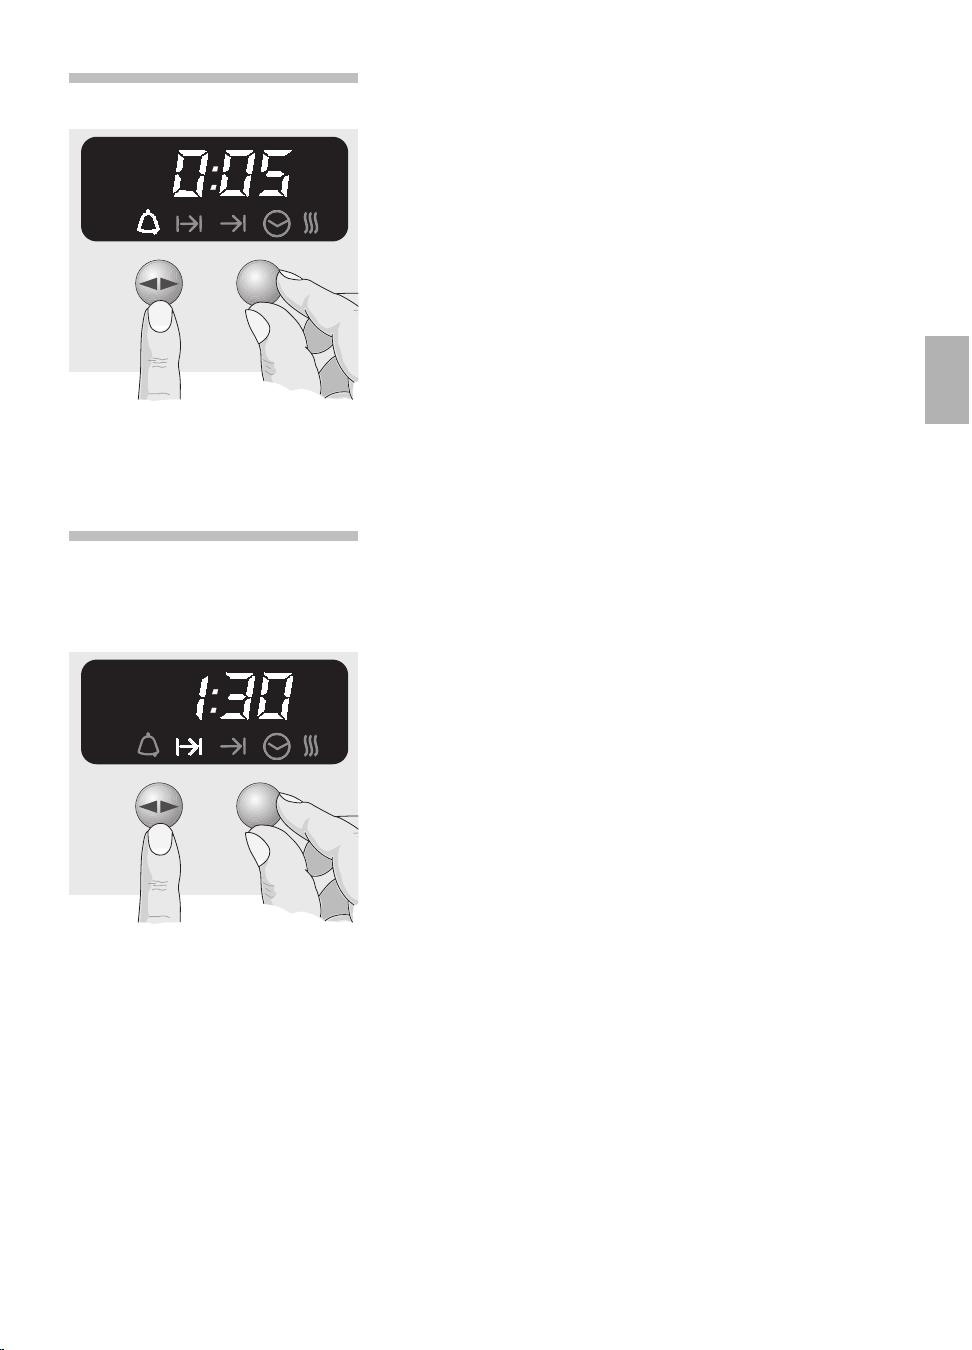
63
Automatic timer You can switch the oven on and off via the electronic
clock.
Automatic switch off If you wish to bake or roast food immediately, it is
only necessary to set the ON time.
1. Select the heating system and the oven
temperature.
2. Press the > button until the ?
symbol flashes and set the ON time with the
rotary knob (example: 1 hour and 30 minutes).
When the setting has been made, the current
time is displayed after approx. 4 seconds.
The ? symbol signals automatic mode.
3. When the time has elapsed (example: 1 hour and
30 minutes), a signal is emitted and the !
display flashes.
The oven switches off automatically.
To stop the signal, press the > button.
4. Switch the oven off.
5. To end automatic mode, press the > button
again.
Minute timer 1. Press the > button and set the cooking time
(e.g. 5 minutes).
When the timer switches on, the remaining time
is displayed.
2. When the time has elapsed, a signal is emitted
and the
,
symbol flashes. To stop the signal,
press the > button.
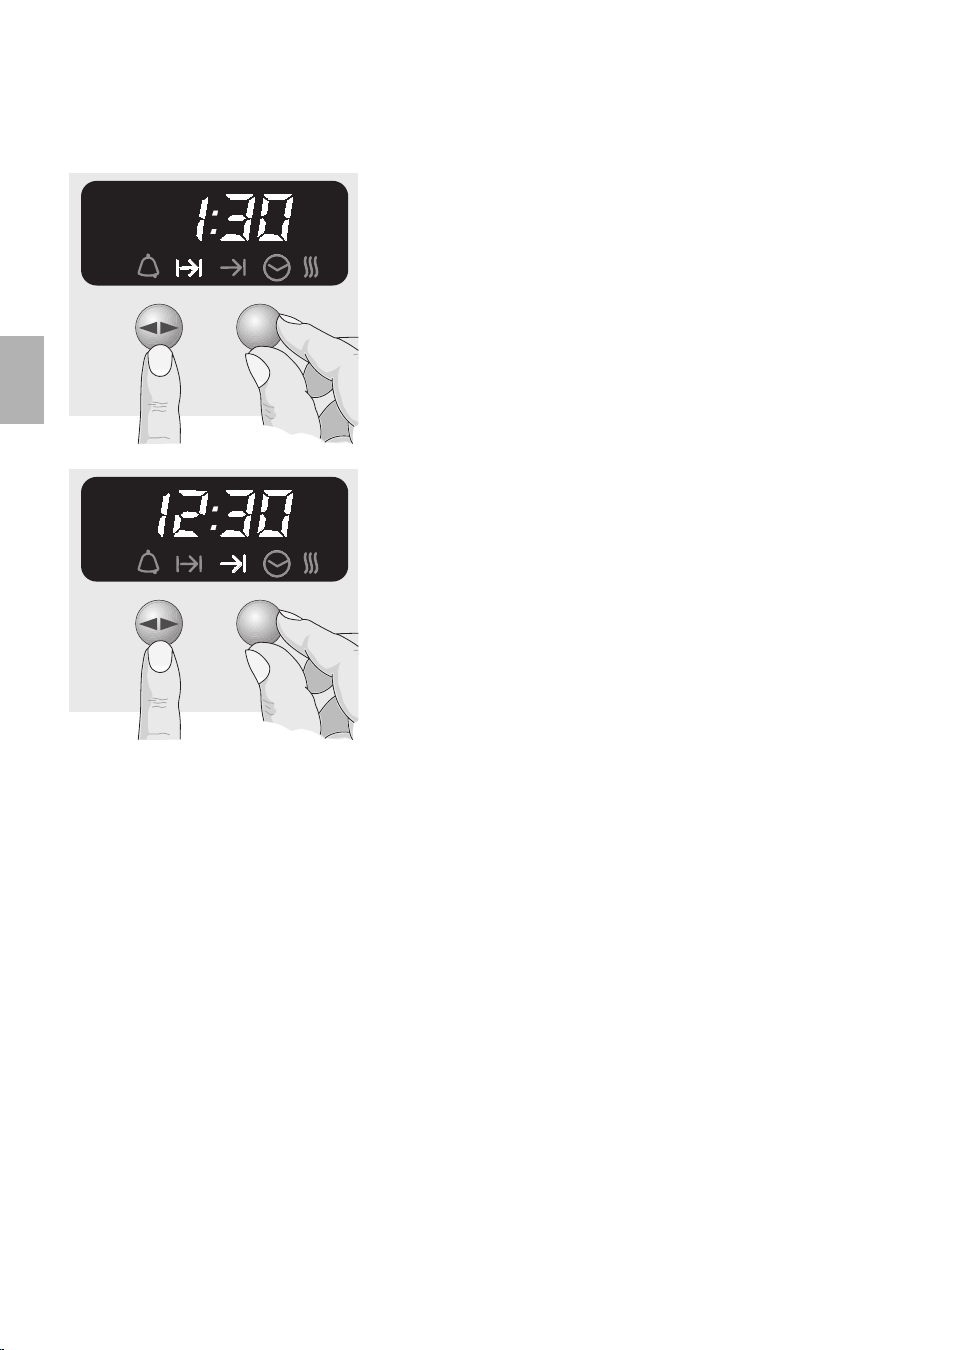
64
Automatic switch on and If the food is to be baked or roasted later on, both
switch off the ON time and OFF time must be set.
1. Select the heating system and the oven
temperature.
2. Press the > button until the ?
symbol flashes and set the ON time with the
rotary knob (example: 1 hour and 30 minutes).
3. Press the > button until the ! symbol flashes
and set the OFF time with the rotary knob
(example: 12:30).
When the setting has been made, the current
time is displayed after approx. 4 seconds.
The ! symbol signals automatic mode.
4. The oven is automatically switched on and off at
the preset times (e.g. 11:00 and 12:30).
5. When the time has elapsed, a signal is emitted
and the ! symbol flashes. To stop the signal,
press the > button.
6. Switch the oven off.
7. To end automatic mode, press the > button.
Checking, correcting and
1. To check your settings, press the > button
cancelling settings until the symbol flashes.
2. If required, correct the settings with the rotary
knob.
3. If you want to cancel your settings, turn the set
time back to 0:00 and switch the oven off.
Note The automatic timer is best used with dishes which
require little attention.
The minute timer and OFF time can be pre-
programmed up to a max. 24 hours.
The settings can be displayed at any time by
pressing the
> button.

65
Description of Oven Features
Circotherm A fan system located in the rear oven wall circulates
the hot air in the oven, achieving an especially
effective heat transfer to the food being baked or
roasted.
Advantages:
– Simultaneous baking and roasting possible on up
to 3 levels
– low soiling of oven interior
– shorter preheating times
– low oven temperatures
Top and bottom heat The food being baked or roasted is exposed to heat
(Conventional heating system) radiation from heating elements located at the top
and bottom of the oven cavity.
Baking and roasting is possible on one shelf position
only.
Advantages:
– Baking of cake with moist filling, pizza, quiche.
Surface grilling The food being prepared is exposed to heat radiation
from the heating element at the top of the oven
cavity.
– Particularly effective with flat, small cuts of meat,
i.e., steaks, sausages, fish, vegetables and toast.
Large area grill Advantages:
– the entire grilling surface heats up
– especially useful with large amounts of food
Small area grill Advantages:
– only the centre area of the grilling surface heats
up
– especially useful with small amounts of food
– energy-saving operation
*
/
(
)

66
Circo-roasting With circo-roasting, the air circulating fan and the
grilling radiators are activated in alternation.
The heat generated by the grilling radiator is evenly
distributed in the oven cavity.
Advantage:
– Particularly effective with poultry and larger cuts
of meal.
Bottom heat With this setting, only the heating element at the
bottom of the oven cavity is activated.
Advantage:
– Particularly useful with dishes and baked goods
that require a distinctive bottom crust or browning.
Use just before the end of the baking or roasting
time.
Circotherm intensive The circotherm intensive adds the bottom heat to the
circotherm.
Advantages:
–Fresh preparation with a high ”juice portion”, e.g.
pizza and juicy cakes with crisp base.
– Especially suited for frozen products, e.g. pizzas,
chips etc.
Defrost A fan in the rear wall of the oven circulates the air in
the oven around the frozen food.
The fan system is running without heating.
Advantages:
– Gentle defrosting.
–Frozen pieces of meat, poultry, bread and cakes
defrost evenly.
,
.
&
e

67
EasyClean
®
system
The oven cleaning function featured in your oven is
(oven cleaning system)
intended to help you keep your oven neat and tidy.
An amount of cleaning solution is vaporised
automatically. The combined effects of heat and
steam soften the soil deposits on the oven wall
enamel and facilitate their removal. For more
information on this function, see the section on
”Cleaning and Care” later in this booklet.
Advantages:
–takes the toil out of oven cleaning
–protects the enamel on interior surfaces
– constitutes an environmentally friendly cleaning
method
Rapid heat up Note
can be switched on with circotherm.
d
s
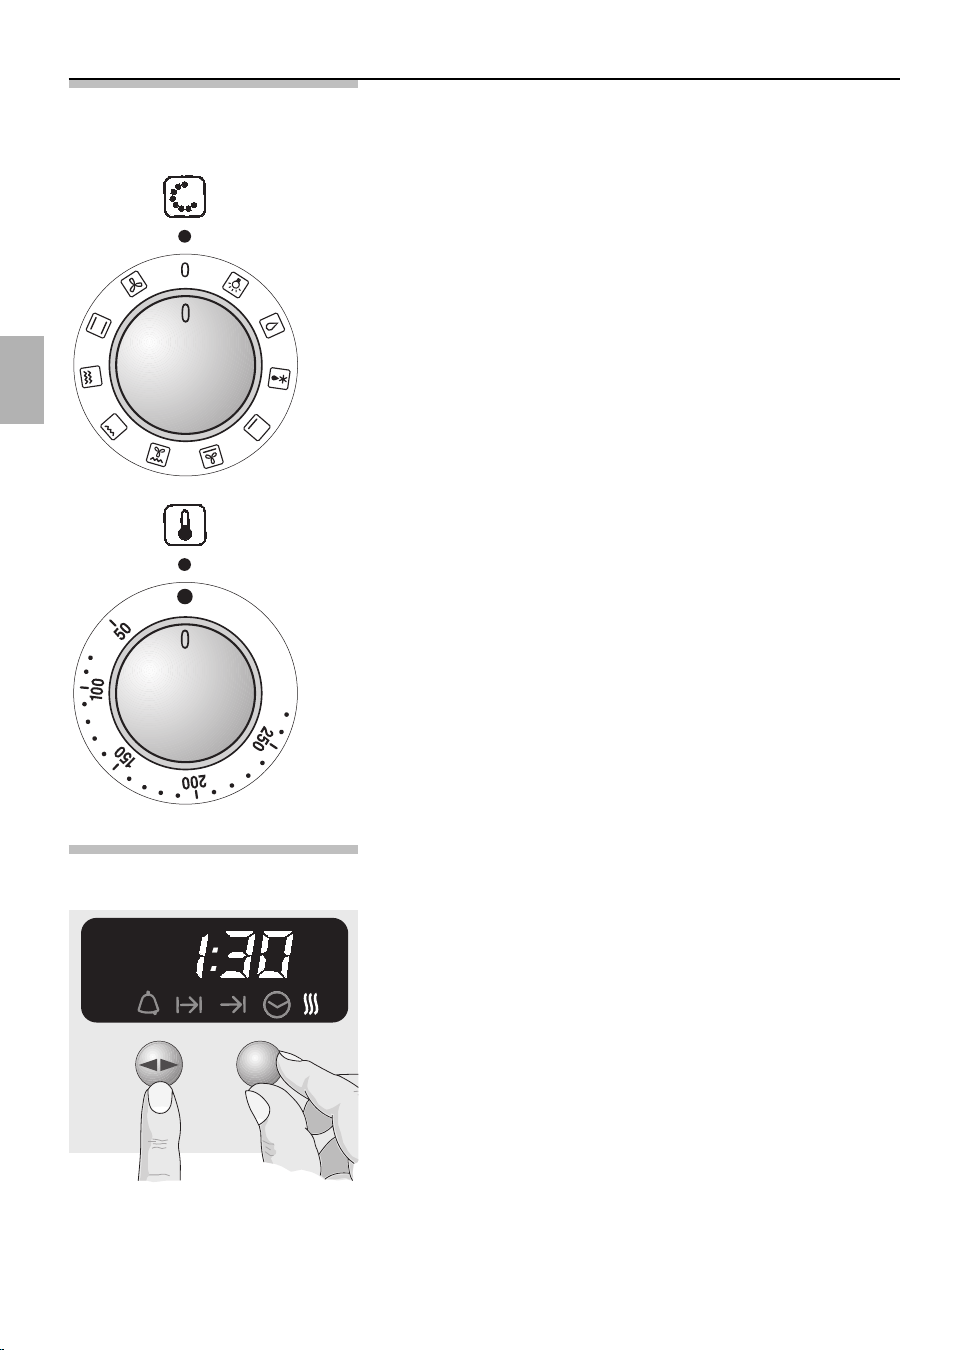
68
Switching the Oven ON and OFF
Before switching on your oven, you should decide
which heating system you wish to use.
Switching the oven ON:
1. Use the function selector to determine the
desired system.
2. Set the temperature control knob to the desired
temperature.
The selected temperature will be controlled
automatically.
The oven temperature control lamp illuminates when
the oven is first switched on, and extinguishes when
the required temperature has been reached.
Switching the oven OFF:
To switch the oven OFF, turn both the temperature
selector and functions selector to the »0« position.
Notes:
The appliance features a cooling fan which runs until
the oven has cooled down.
Rapid heat up Switching the oven ON:
When the oven has been switched on, rapid heating
s can be switched on with hot air via the clock.
Press the > button until the s symbol flashes.
After approx. 4 seconds rapid heat up s switches
on. The
s symbol is lit during the heating-up
process. When the set temperature is reached, the
symbol goes out and a signal sounds.
Early cancelling:
Press the button > until the icon s appears.
Then cancel the rapid heating using the control
knob.
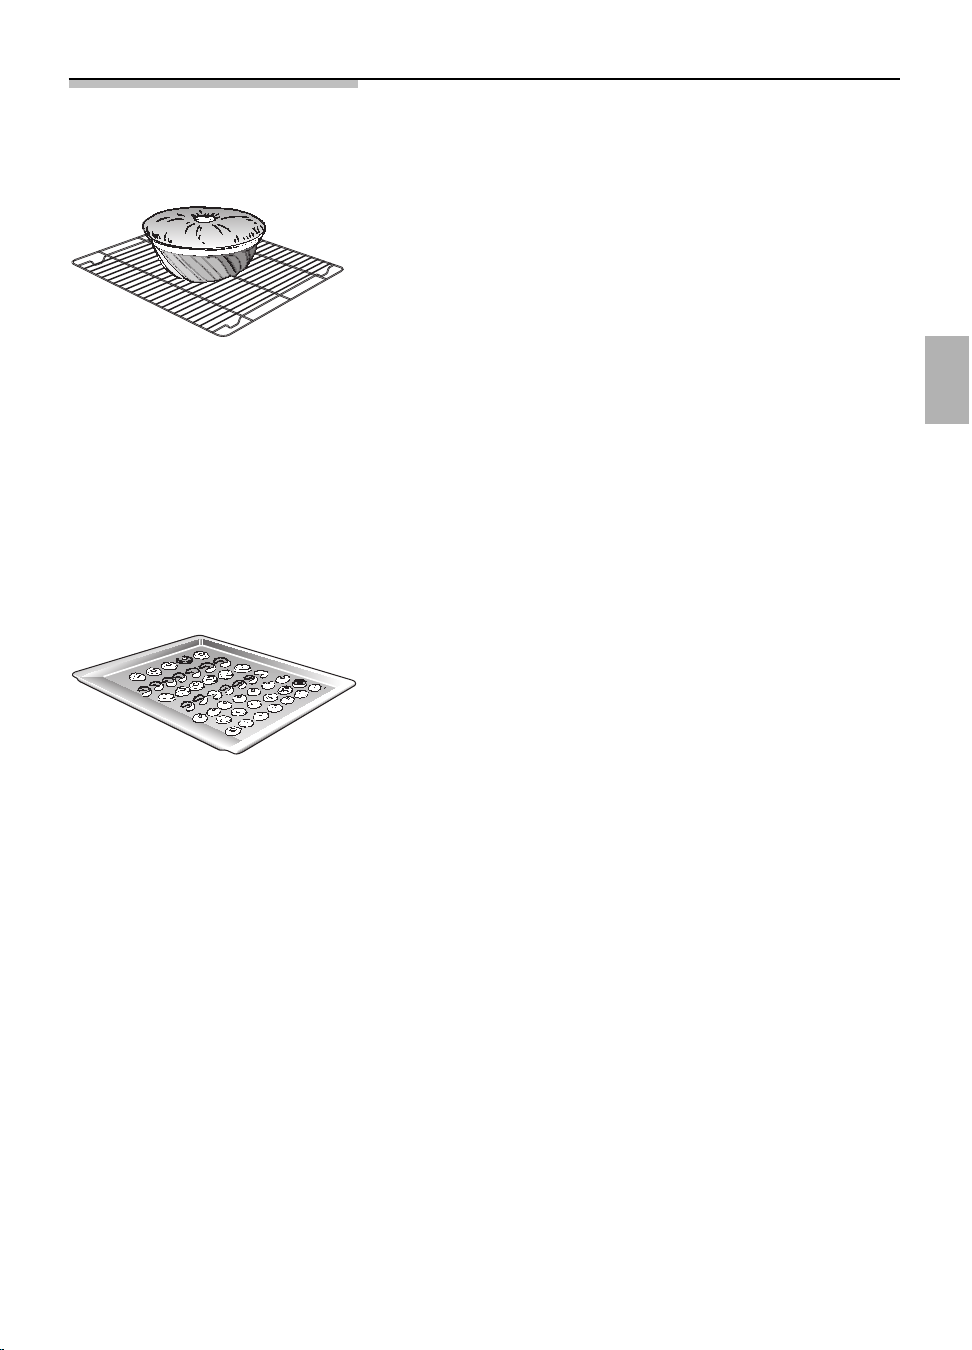
69
Baking
Using baking tins Always place baking tins in the centre of the
baking wire shelf.
We recommend dark metallic baking tins.
Notes Light coloured baking tins made from thin-wall
materials lead to longer baking times and uneven
browning of the cake.
You can influence the degree of browning by
changing the temperature setting.
If a cake collapses after removing it from the oven,
consider using a longer baking time, or use a slightly
lower temperature setting.
Using baking sheets The slanted (handle) end of the baking sheet must
always face the oven door.
To avoid damage, insert slide-in accessories
carefully.
Always fully insert baking sheets into the oven.
Use only original baking sheets.
Using tinplate baking tins
* Circotherm Shelf position 1
/ Top/bottom heat Shelf position 1
If the cake bottom gets too dark:
Check the shelf position. Shorten the baking time,
and possibly use a lower baking temperature.
If the cake bottom stays too light:
Check the shelf position. Increase the baking time,
select a lower temperature, or use a dark metal
baking tin.
Do not place baking tins or high cakes too close
to the rear oven wall.
70
Cooking Tips and Helpful Hints
The bottom of a cake baked Remove from the oven all baking sheets or universal
on a baking sheet stays too pan currently not in use.
light
The bottom of a cake baked Use a wire shelf and not a baking sheet to support
in a tin stays too light the cake tin during baking.
The bottom of cake or Set cake or cookies into a higher set of shelf
cookies gets too dark position.
The cake gets too dry Select a slightly higher oven temperature, and shorter
baking time.
The cake is too moist Choose a slightly lower baking temperature.
on the inside Note: Higher temperatures do not shorten baking
times (done on the outside, raw on the inside).
Choose a slightly longer baking time, allow the dough
to rise slightly longer. Add less liquid to the dough.
When baked with circotherm, Avoid blocking the air vents at the rear wall of the
cake baked in round or oven cavity with the cake tins.
square tins gets too dark
at the rear
Very moist cake dough (e.g. You can let the steam escape from the oven and
fruit cake) causes a lot of thereby reduce the forming of water droplets by
steam to generate in the briefly and carefully opening the oven door (once or
oven that condenses on the twice, in case of longer baking times more often).
oven door.
Very uneven browning when Check the shelf position.
using circotherm
Cake collapses when taken Use less liquid.
out of the oven
To save energy Preheat only if expressly required by the recipe.
Dark baking tins have a higher degree of heat
absorption.
Residual heat: In the case of longer baking times,
you can switch off the oven 5-10 minutes before the
full baking time has elapsed.
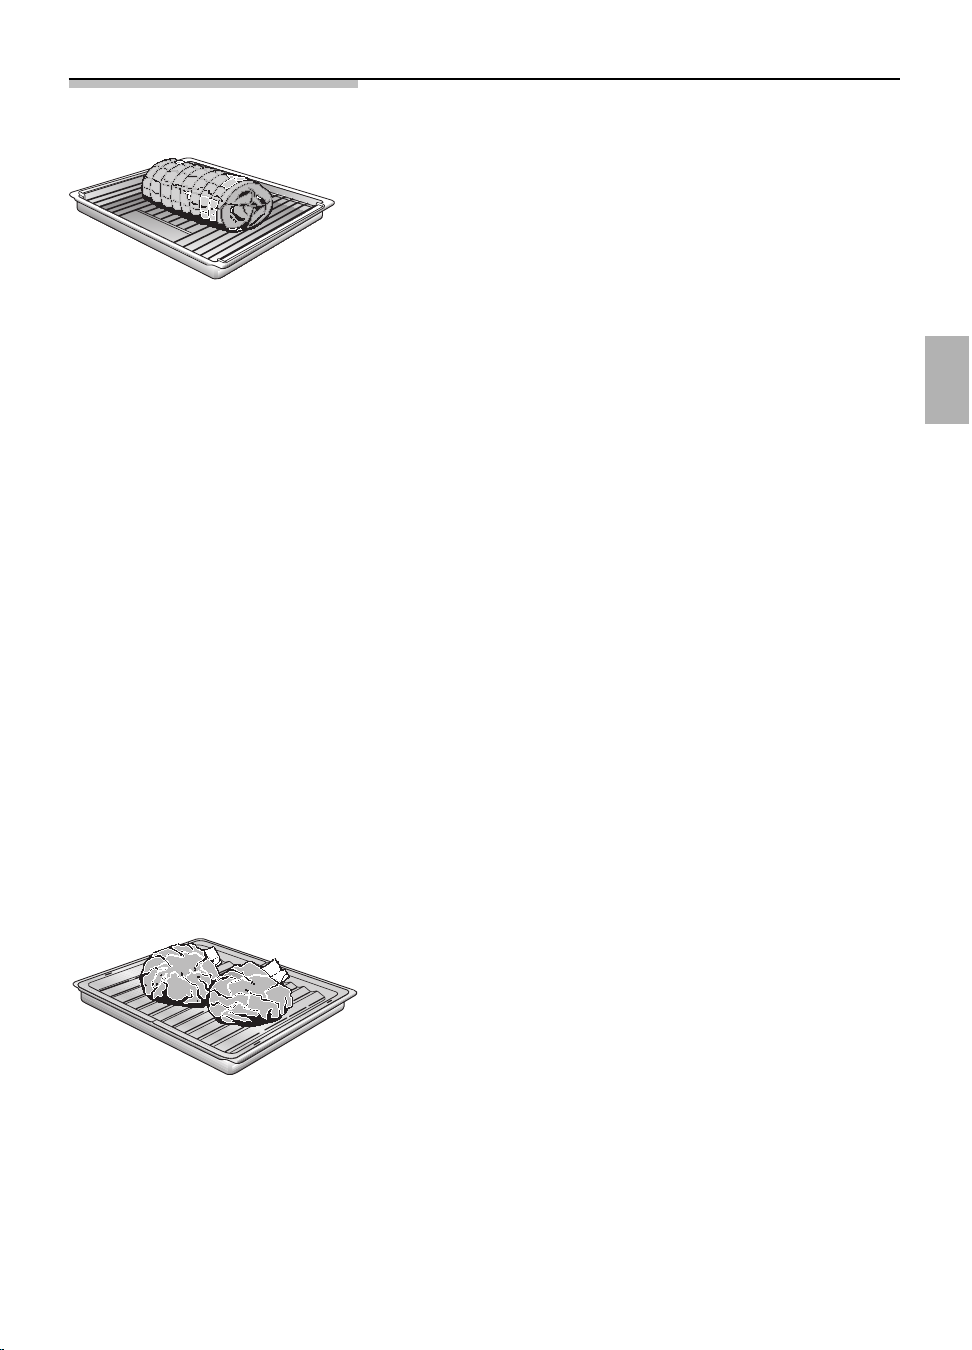
71
Roasting Place the wire shelf in the universal pan and slide
both into the oven at the same shelf position.
Meat can be roasted in the oven in a particularly
economical fashion if the weight of the cut exceeds
750 grams.
Roasting in an uncovered Rinse the universal pan and/or the roaster with
pot water, and place the meat into it.
With fat meat and poultry, pour 125 to 250 ml of
water (to suit the size and kind of roast) into the
universal pan. At your discretion, baste lean meat
with fat, or cover it with bacon strips.
The roast drippings collecting in the universal pan
make a tasty gravy. Dissolve the drippings with hot
water, bring to a boil, thicken with corn starch,
season to taste and, if required, pass it through a
strainer.
No preheating is required. Save energy by putting
the roast into the oven while it is still cold.
Roasting in a covered pot Place the meat into the roasting pot (or Dutch oven),
cover it with a matching lid, and place it on the wire
shelf in the oven. We recommend that beef roast be
prepared in a covered roasting pot.
Roasting on the roasting
sheet Place the roasting sheet into the universal pan.
(Optional accessory available The roasting sheet prevents soiling of the oven.
from your dealer).
Grease and juice drippings from the roast are
collected in the universal pan.

72
Tips Big, high roasts, goose, turkey, duck
= Long roasting times, low temperatures
Medium sized, low roasts
= Medium roasting times, medium temperatures
Small, flat roasts
= Short roasting times, high temperatures
Roasting time per cm of meat height without bones
app. 13-15 minutes
Roasting time per cm of meat height with bones
app. 15-18 minutes
We recommend using the lower of the stated
temperatures first.
In general, the lower temperature ensures a more
even browning.
We recommend turning the roast after half or two
thirds of the roasting time have elapsed when using
the setting
/.
For roasting, use only cookware with oven-proof
handles.
Prepare large roast directly in the universal pan,
without using the wire shelf.
Smaller cuts of meat can be roasted on aluminium
foil. To do so, bend the edges of the foil upward, as
if to form a dish, and place it on the wire shelf.
After the end of the selected roasting time and with
the oven switched OFF, leave the roast in the closed
oven for approx. 10 minutes.
The roast is not done on Use a lower roasting temperature.
the inside Note: Higher temperatures do not shorten roasting
times (done on the outside, raw on the inside).
Choose slightly longer roasting times.
Very moist roasts (e.g. roasts You can let the steam escape from the oven and
prepared with water) cause a thereby reduce the forming of water droplets by
lot of steam to generate in briefly and carefully opening the oven door (once or
the oven that condenses on twice, in case of longer roasting times more often).
the oven door.

73
Grilling Exercise CAUTION when grilling.
Always keep children at a safe distance.
Notes on grilling Always close the oven door when grilling.
The grilling temperatures are variable.
Always use the wire shelf and the universal pan.
Always place food to be grilled in the centre of the
wire shelf.
If the grill element (heating element) switches OFF
automatically, the overheating protection was
activated.
The radiator will be reactivated after a short period
of time.
Place the wire shelf into the universal pan and
slide them together into the same shelf position.
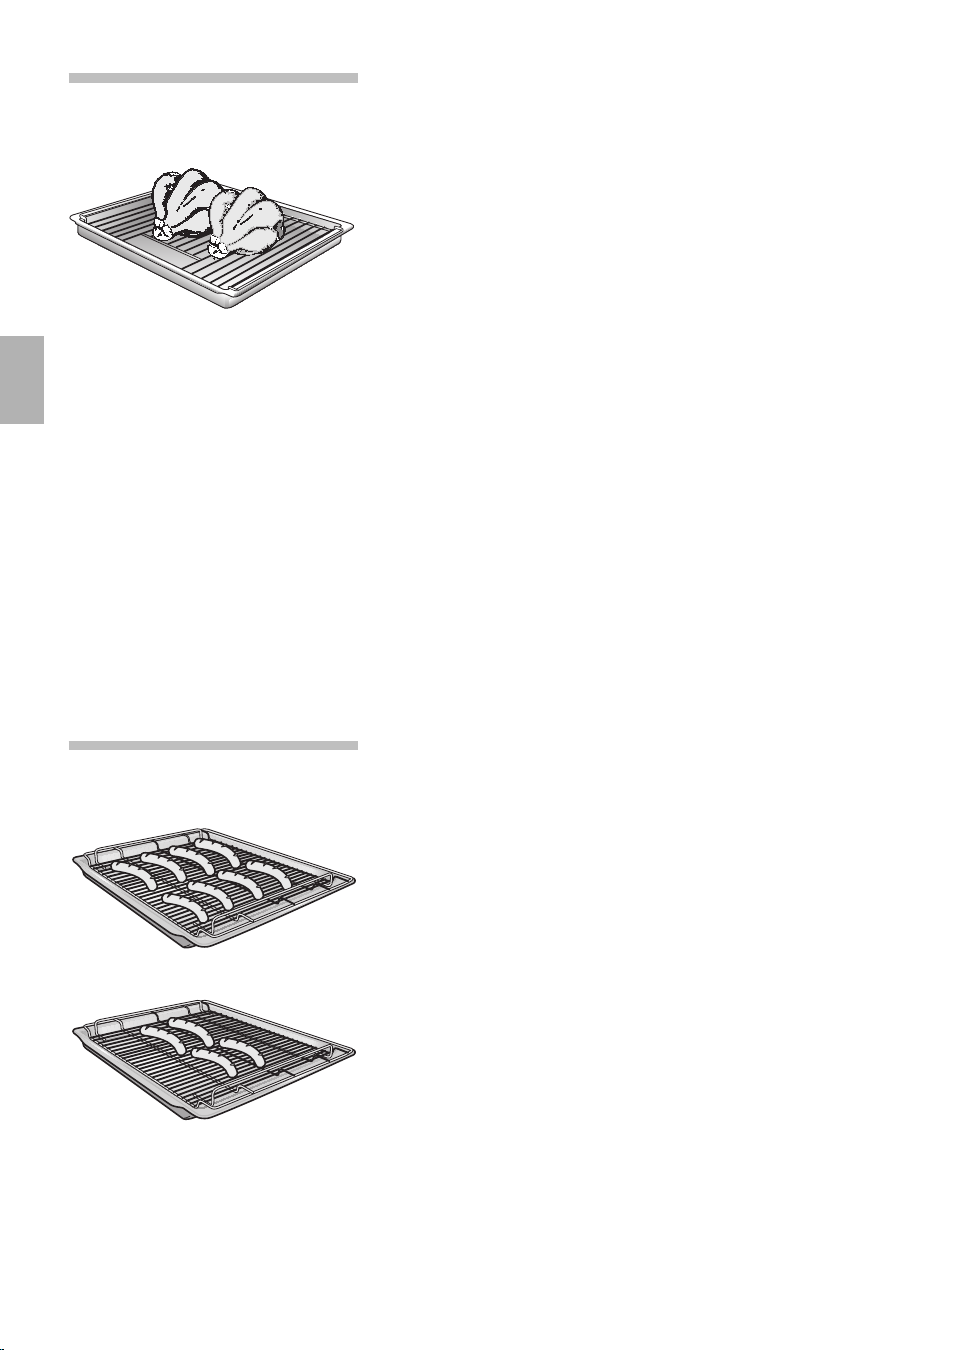
74
Circo-roasting , Use this method for particularly crispy poultry or
roast (e.g., pork roast with rind).
Use the wire shelf and universal pan together. Turn
large roasts after about half of the total grilling time
has elapsed.
To prevent breakage after removing them from the
oven, place glass utensils on a dry kitchen towel
instead of cold or wet surfaces.
Dependent on the type of food being prepared,
combination hot-air and surface grilling can cause an
increased degree of oven soiling. Therefore, to
prevent burning-in of the soil, thorough cleaning of
the oven is recommended after each use.
Whole poultry should be turned after approx.
two-thirds of the cooking time has elapsed.
With duck and goose, pierce the skin under the
wings to allow excess fat to drain off.
After the end of the selected roasting time and with
the oven switched OFF, leave the roast in the closed
oven for approx. 10 minutes.
Surface grilling Used for smaller dishes having little height/thickness.
(
Always use the wire shelf and universal pan together.
Turn the food after approx. two-thirds of the grilling
time has elapsed.
At your discretion, lightly baste the wire shelf and the
food with oil.
)

75
Defrosting and cooking
Defrosting with circotherm *
Important heating system For defrosting and cooking of frozen or deep-
information frozen foods, use only the circotherm heating
system.
With all deep-frozen foods, follow the food
processing company‘s instructions on the
package.
As a rule, defrosted frozen or deep-frozen foods
(especially meats) require less cooking time than
fresh products, since freezing has a pre-cooking
effect.
If frozen meat is placed in the oven, the defrosting
time must be added to the required cooking time.
Always defrost deep-frozen poultry before cooking
because the giblets must be removed.
For cooking deep-frozen fish, use the same
temperatures as for fresh fish.
Deep-frozen ready-to-eat meals in aluminium
dishes may be placed into the oven several at a
time.
Shelf positions With 1 bakings sheet: Shelf position 1
With 2 baking sheets: Shelf positions 1 + 3.
All stated times are approximate guidelines that
vary with the shape and volume of deep-frozen
products.

76
Defrosting and cooking Raw deep-frozen products or foods from a
freezer always defrost at 50° C.
Higher defrosting temperatures may cause the food
to dry out.
Defrost deep-frozen meals packed in aluminium
foil or closed aluminium containers at a setting of
130 – 140° C.
Defrost and warm up deep-frozen baked goods at
100 – 140° C. Brush bread, rolls or yeast pastry
lightly with water to make the crust more appealing.
Defrost dry deep-frozen yeast cakes at
160 – 170° C for 20 – 30 minutes.
Defrost moist deep-frozen yeast cakes (with fruit
topping) at 160 – 170° C for 30 – 50 minutes after
wrapping in aluminium foil to prevent cake from
drying out.
Defrost and toast deep-frozen toast (with topping)
at 160 – 170° C for about 20 minutes.
Frozen pizza:
Please follow the manufacturers’ instructions.
Defrosting position
e Recommended for delicate pastries only
(i.e., whipped-cream gateaus).
Turn the function selector switch to the eposition.
Dependent on size and type of the baked goods,
defrost 25 – 45 minutes, take out of the oven and
allow to stand 30 – 45 minutes.
With smaller amounts (pastries), the defrosting time
is reduced to 15 – 20 minutes and the subsequent
standing time to 10 – 15 minutes.

Cleaning and Care
Important cleaning For cleaning, do not use abrasives, no corrosive
basics
cleaners, and no sharp objects.
Do not scratch off burnt-in food residues, but soak
them off with a moist cloth and dishwashing
detergent.
Cleaning products we particularly recommend can
be purchased from our customer service.
Appliance exterior
Stainless steel/ Use commercially available detergents applied to a
aluminium front soft, moistened cloth or a chamois.
Do not use aggressive cleaning agents, abrasive
sponges, or coarse cleaning cloths.
On heavy soiling use commercial cleaning agents on
matted stainless steel/aluminium surfaces.
Please observe the manufacturer’s instructions.
Enamel and glass Use commercially available detergents applied to a
soft, moistened cloth or a chamois.
Oven door pane The temperature of the pane inside the oven door is
reduced by a heat-reflecting coating.
The reduced temperature ensures that visibility
through the oven door window is not impaired.
When the oven door is open, this coating may have
a bright appearance. This is quite normal and does
not indicate a quality defect.
Hob surface The hob is covered by a special set of operating
instructions.
Please observe all cleaning directions contained in
the instructions.
Oven interior Clean the oven after each use, especially after
roasting or grilling.
Food remnants burn in when the oven is reheated.
The baked in remnants are very difficult to remove
once burnt in.
77

78
Note:
To prevent soiling use:
• CircoTherm hot air. The CircoTherm hot air
mode causes less soiling than the others.
•the universal pan to bake very moist cakes.
• suitable utensils (frying pan) for frying.
For easier cleaning
you can switch on the oven lamp and take off the
oven door.
For cleaning the mating surface of the oven door at
the front of the oven, the door should be removed.
Enamel areas in the oven Use hot soapy water or a vinegar solution.
It is best to use oven cleaner if the oven is very dirty.
Only use oven cleaner in a cold oven.
We recommend cleaning gels because these can be
applied with greater precision.
Do not clean the warm oven with any of the
cleaning products specifically designed for this
purpose.
Leave the oven open so that it can dry after
cleaning.
Note:
Enamel is baked on at very high temperatures.
This can cause some slight colour variation. This is
normal and does not affect the function. Do not use
coarse scouring pads or strong cleaning agents to
remove such discolorations.
The edges of thin trays cannot be completely
enamelled. As a result, these edges can be rough.
Anti-corrosion protection is guaranteed.

79
Catalytic oven
surfaces
Cleaning the catalytic The rear wall of the oven is coated with self-cleaning
surfaces of the oven enamel. The surface cleans itself while the oven is in
operation. Large splashes sometimes only disappear
after the oven has been used several times.
Never use oven cleaner on the back wall of the oven.
Should the enamel become slightly stained, this will
not affect its self-cleaning properties.
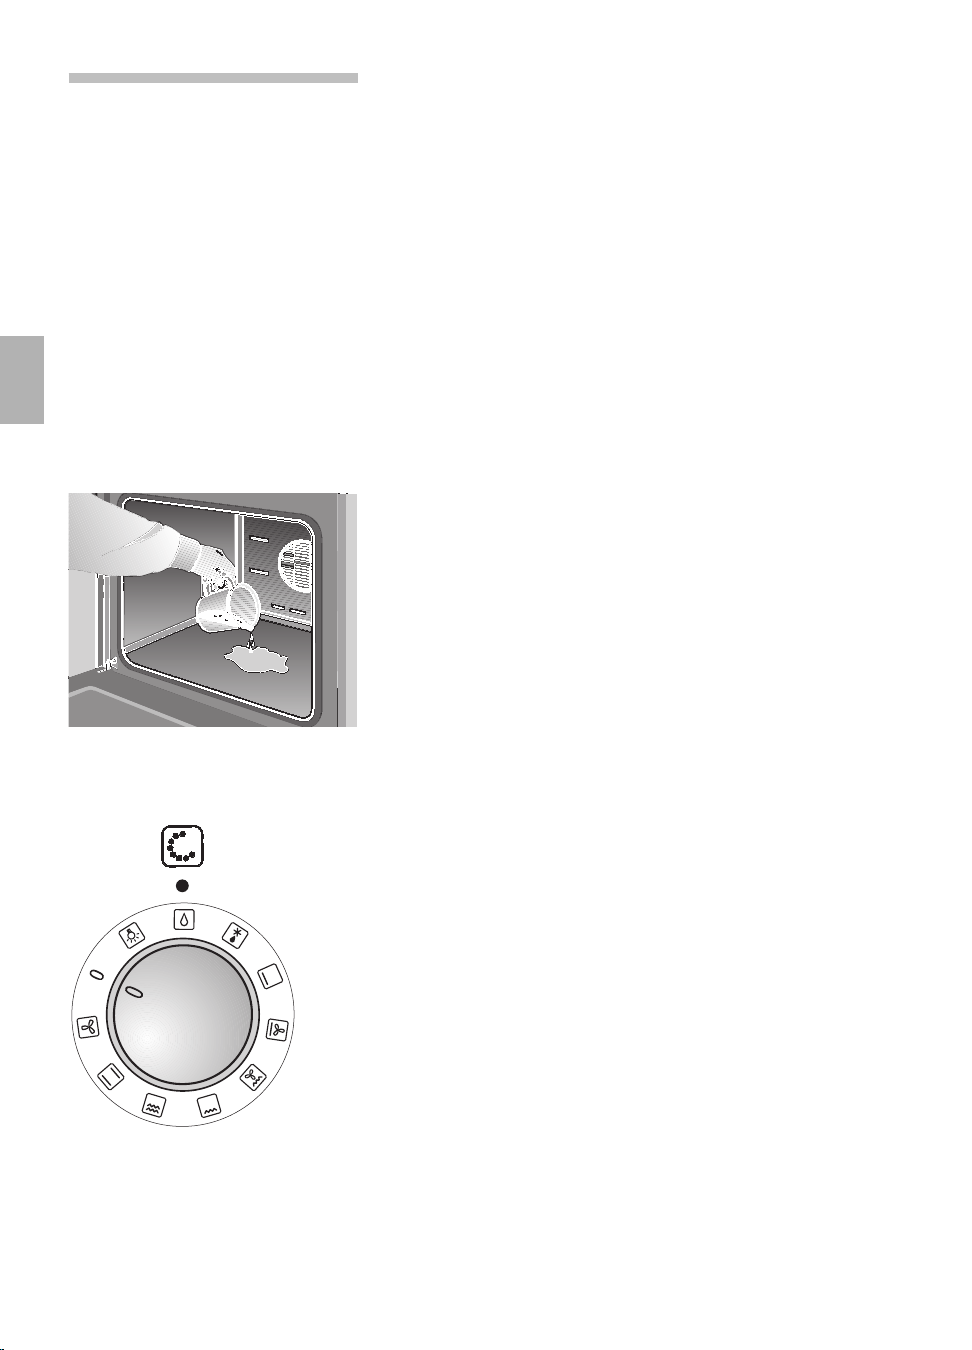
80
EasyClean
®
The oven cleaning function featured in your oven is
System
d
intended to help you keep your oven neat and tidy.
An amount of cleaning solution is vaporised
automatically. The combined effects of heat and
steam soften the soil deposits on the oven wall
enamel and facilitate their removal.
Caution:
Never pour cold water into the oven while it is still
hot.
The cleaning system can only be activated when
the oven has cooled down completely
(room temperature).
Use normal water only, and no distilled water.
Activate oven cleaning:
1. Remove the baking sheet and the universal pan
from the oven. The wire shelf may remain in the
oven.
2. Pour approx. 400 ml of water mixed with a little
dishwashing detergent into the floor pan of the
oven cavity.
In the case of heavy soil build-up, you may wish
to allow the cleaning solution to soak in for a
while before you activate the cleaning function.
3. Close the oven door.
4. Turn the function selector to the dposition.
The oven cleaning and the oven temperature
control lamp are illuminated. After the initial
heating time (approx. 4 minutes) the oven
temperature control lamp extinguishes.
After a further 17 minutes the program cycle is
completed. A buzzer sounds.
Switching the oven OFF:
Turn the function selector to the 0 position.
The oven cleaning control lamp extinguishes.
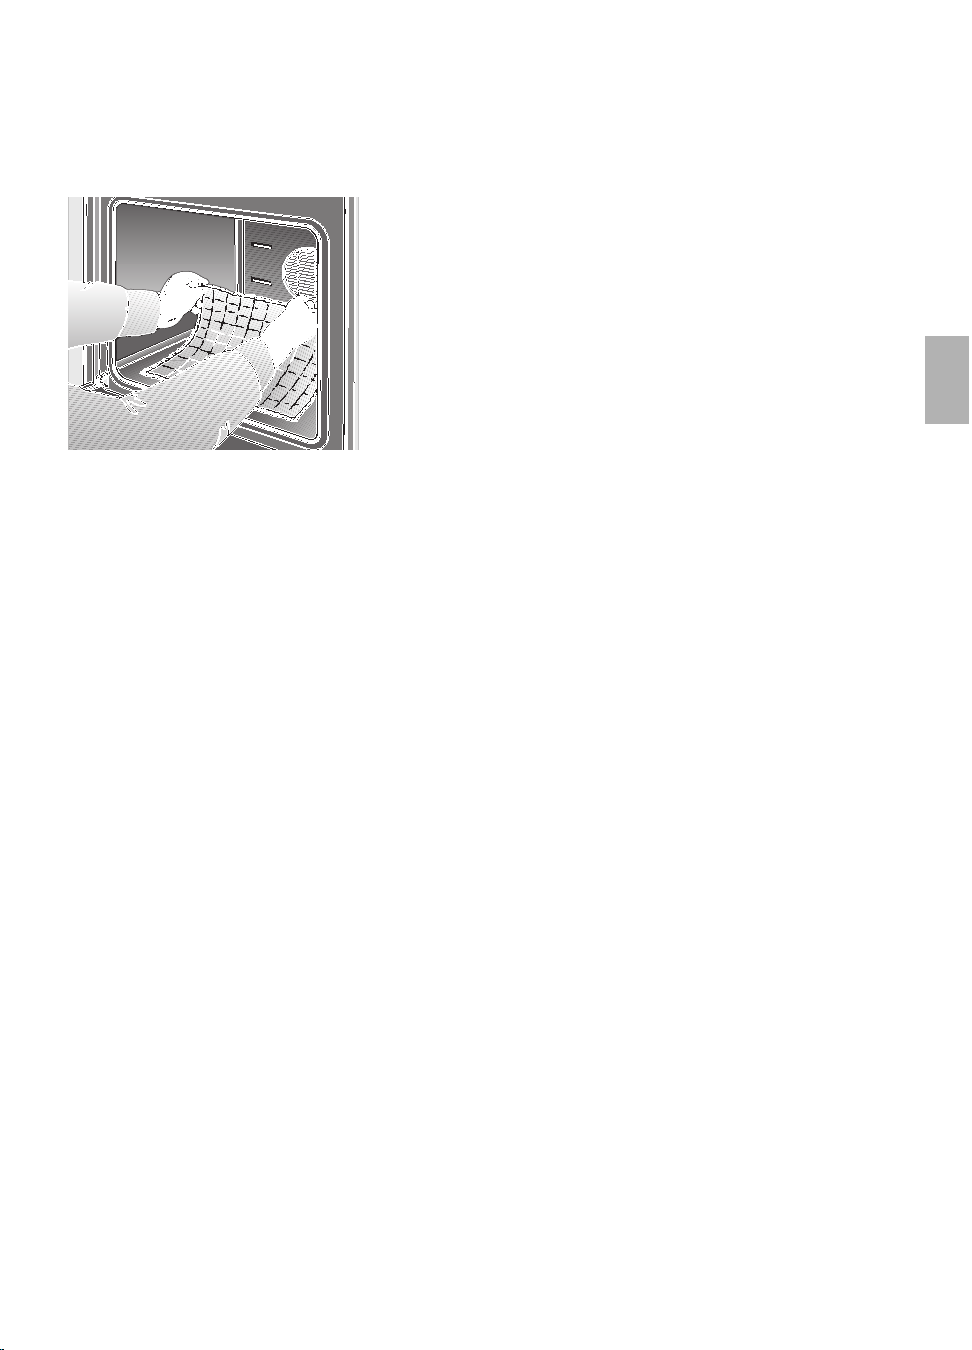
81
After deactivating the oven Cleaning tips:
cleaning function Never leave the residual water in the oven for any
length of time, e.g. overnight.
1. Open the oven door and pick up the remaining
water with a large absorbent sponge cloth.
2. Using the detergent-soaked sponge cloth, a soft
brush or a plastic pot scrubber, wipe of the oven
interior.
Stubborn soil remnants can be removed with a
cleaning scraper for glass-ceramic.
Caution: Use the scraper carefully, and do not
apply the tool at too flat an angle, because the
enamel could be scratched!
3. Calciferous deposits may be removed with a cloth
soaked in vinegar.
4. Wipe clean with clear water and dry with a soft
cloth (do not forget to wipe under the oven door
seal).
Cleaning tips:
If the oven is heavily soiled, the procedure may be
repeated after the oven has cooled.
If the oven is heavily soiled with grease, e.g. after
roasting or grilling, we would recommend rubbing
any stubborn dirt with detergent before activating the
oven cleaning function.
After cleaning, leave the oven door in its slanted
detent position, i.e., at a 30-degree angle, to allow
the interior enamel surfaces to dry thoroughly.
Rapid drying
1. Place the oven door into the slanted detent
position, at an angle of approximately
30 degrees.
2. Turn the function selector to the * position, and
the temperature selector to the 50° C.
Allow oven to heat for 5 minutes.
3. Afterwards return the function selector and the
temperature selector to the »0« position.
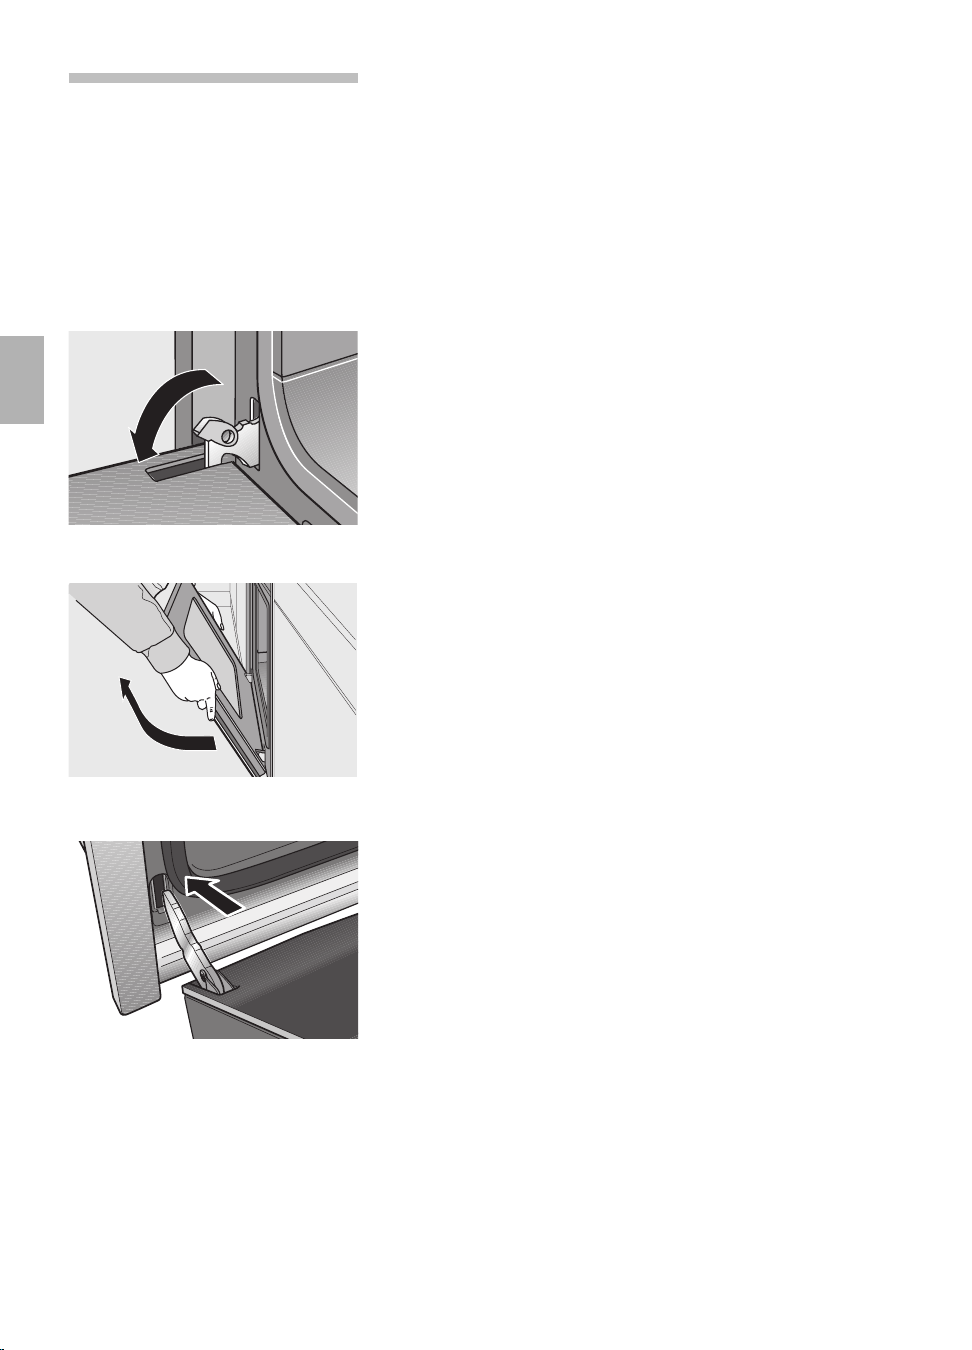
82
Removing/installing
the oven door
Oven door Note: To make the manual cleaning steps following
the automatic oven cleaning function more
convenient, the appliance features the following
options.
Removing the oven door
When pulling the door out, make sure that you
do not reach into the hinge. There is a risk of injury.
1. Fully open the oven door.
2. Move the catch levers on the right and left-hand
sides to the fully open position.
3. Placing the door at an upward angle toward you,
grasp the door with both hands and lift it out of
the hinges toward you.
Hanging the oven door
1. Set both hinges into their respective receptacles
on the left and right, and swing the oven door
downward.
2. Close the catch levers on the left and right.
3. Close the oven door.
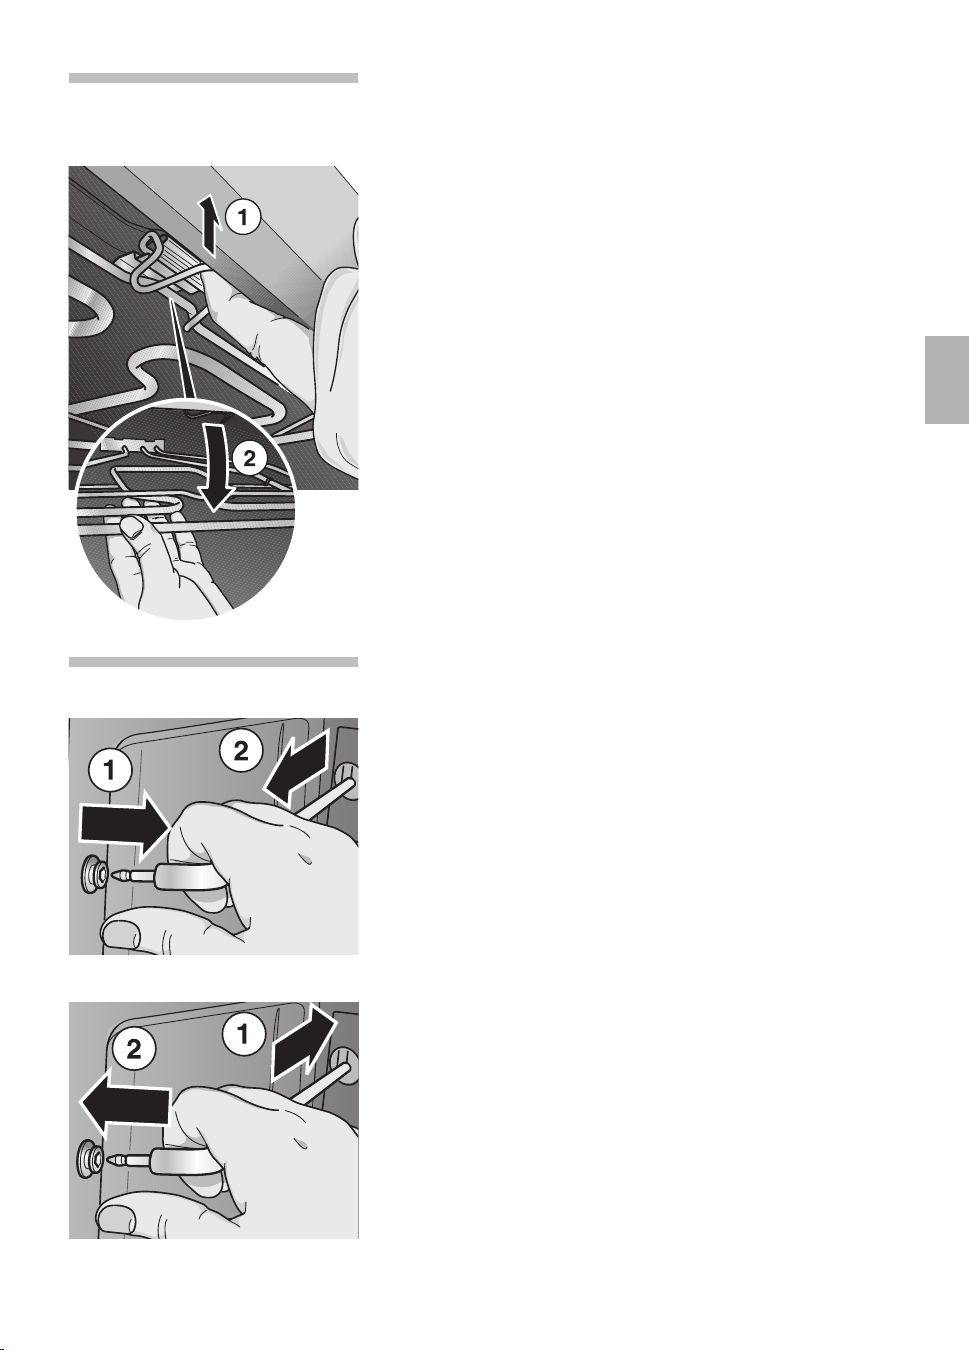
83
Lowering the
In order to clean the oven ceiling more easily turn
heating element
down the grill heating element.
Warning: The heating element must have cooled
down.
1. Press the retaining clip upward until you hear the
click.
2. Hold the heating element and fold it down.
After cleaning
Fold the heating element back up.
Pull the retaining clip forward and press it up until it
clicks into place.
Shelf supports
Removing
1. Pull the shelf support out of its bearing bush.
2. Remove the shelf support.
Clean the shelf support using washing-up liquid and
pan scrapers or brushes.
Attaching
After cleaning, re-install the shelf support, following
the instructions in reverse order.
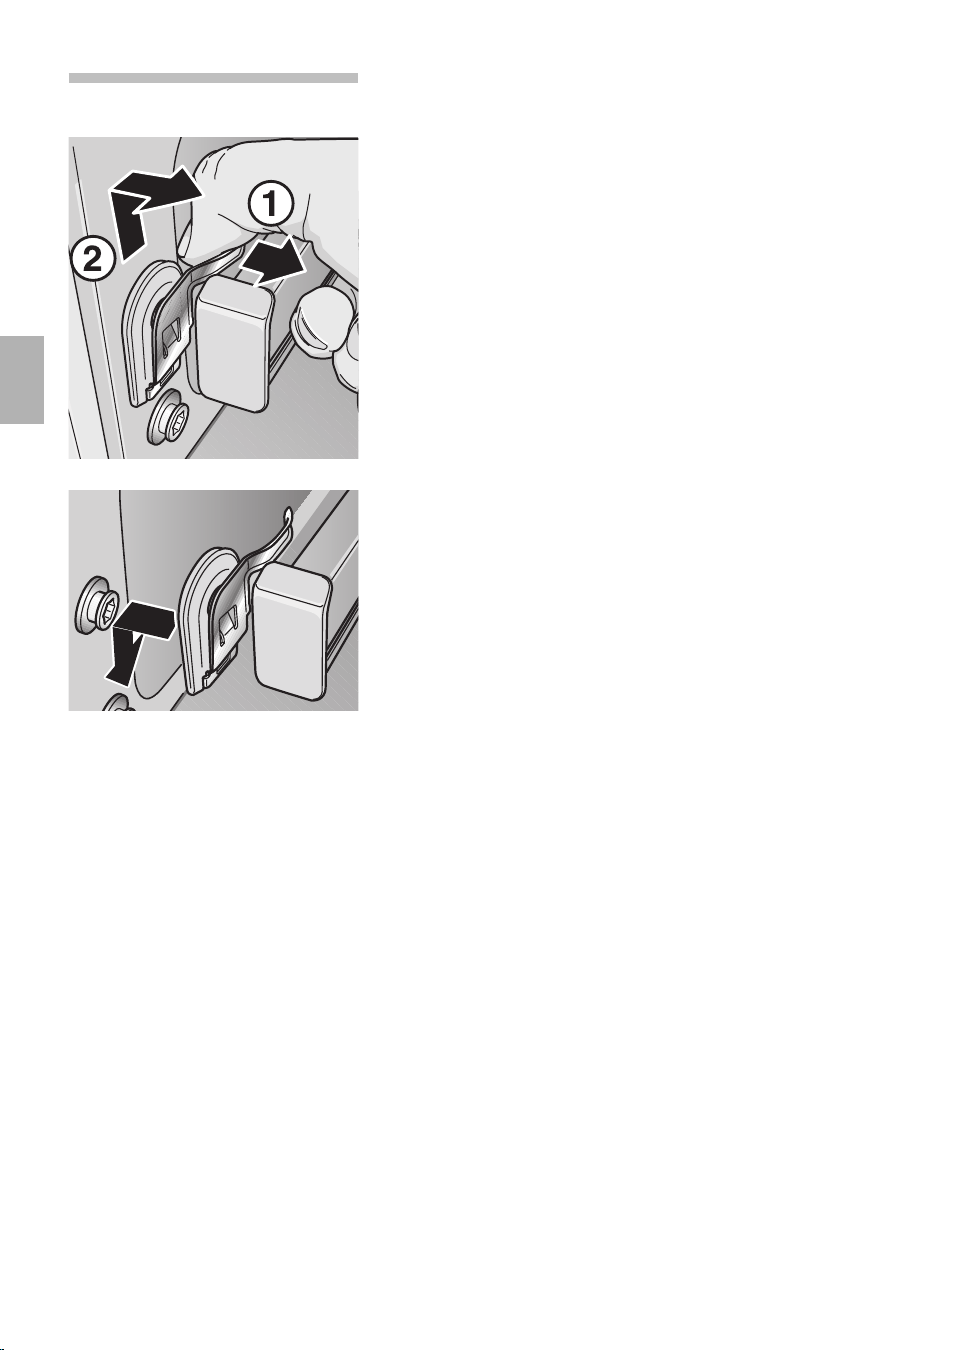
84
Telescopic pull-outs Removing
1. Press the coach spring down.
2. Push the telescope upwards and remove it.
Clean the telescopic pull-outs using washing-up
liquid and pan scrapers or brushes.
Attaching
Insert the telescopic pull-out at the rear.
Insert the telescopic pull-out into the guide and press
down until it locks into position.
Always insert the telescopic pull-outs all the way.
Do not close the oven door until all telescopic
pull-outs have been inserted.
Attention: The telescopic pull-outs become hot
when the oven is on. Risk of burns when the
telescopic pull-outs are pulled out.
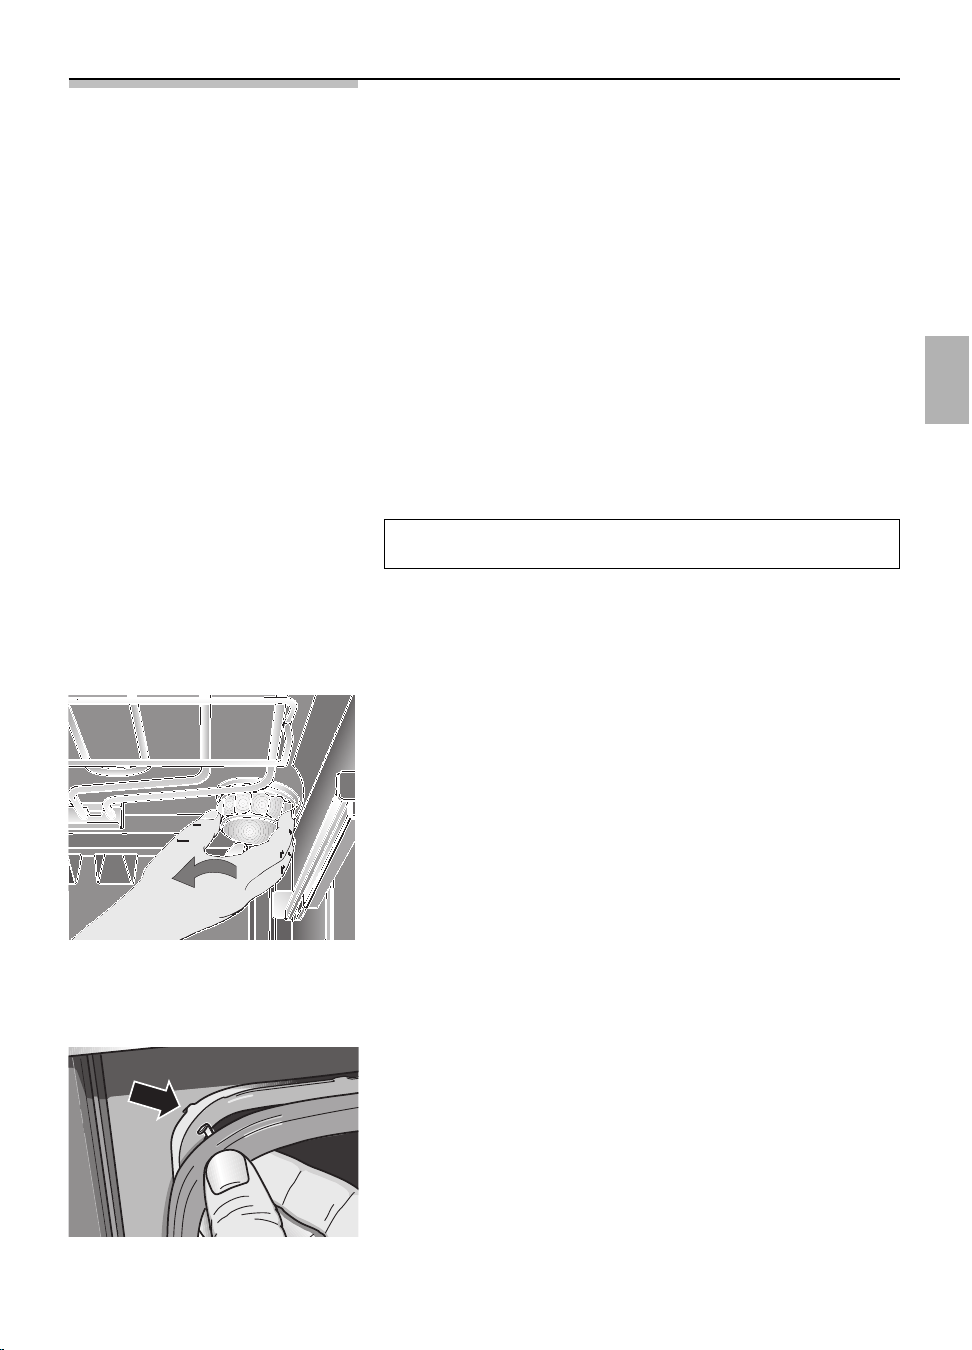
85
Service and Repair Information
In the event of problems or repairs that you cannot
solve or perform yourself, our customer service will
be happy to help. Check the customer service
directory for a customer service facility in your area.
Caution: Calling the customer service because of an
operator error can be very costly!
E No and FD No You can find this information on the appliance’s
nameplate. The nameplate is located on the
appliance, behind the oven door, on the left bottom
edge of the oven.
In the event of a customer service request, please
have the following information handy:
E-Number FD
Replacing the oven light Caution: Unplug the appliance or remove the
fuse! By actuating the miniature circuit-breaker or
by unscrewing the fuses in the fuse box in your
house.
1. To prevent damage, place a dish towel into the
cold oven.
2. Unscrew the lamp cover by turning it
counter-clockwise.
3. Replace the lamp.
–Type: Incandescent bulb E 14, 220 – 240 V,
40 W, heat-resistant to 300° C
–You may obtain this bulb from your customer
service or from your appliance dealer.
Replacing the oven door
seat Remove the defective oven door seal by simply
unhooking it.
You may obtain the new oven door seal from your
customer service.
86
Trouble-shooting Guide
Calling the customer service is not always really necessary. In some cases, you can
remedy the situation yourself. The following table may contain some helpful tips.
Important general safety guidelines:
Service or repair work on the electronic components may only be performed by a
qualified expert. Without exception, prior to starting such repairs, the appliance must
be disconnected from the mains. This may be accomplished by tripping the
automatic fuse or by removing the fuse from the fuse box that controls your flat or
apartment.
Problem Possible cause Remedy
. . . if there is a general failure of Defective fuse Check the fuse in the fuse box, and
all electrical functions, i.e., the replace if required.
control lamps have suddenly
ceased to function.
. . . if liquids or thin viscous The appliance has not Level the appliance using the leveling
dough are distributed at a been placed or installed feet, or check the installation.
visibly uneven thickness? plumb-and-level.
. . . if the oven and the left The electronic clock is Set electronic clock to operation
front hotplate suddenly stop set to an automatic without automatic timer:
functioning? timing cycle. 1. Press the : button.
2. Reset ON time
? to 0:00.
. . . if the oven and the left The power supply was Reset the time of day.
front hotplate suddenly stop briefly interrupted.
functioning and the electronic
clock flashes 0:00?
. . . if electronically control Energy pulses Reset the relevant functions.
functions fail? (e.g. lightning flash).
. . . if the oven cleaning control Temperature inside oven Prior to using the oven cleaning
lamp fails to illuminate after the cavity is still too high, i.e. function, the oven must be allowed to
function has been activated? after prolonged use of cool completely.
the hotplates.
Defective control lamp. Replacement only by an authorised
expert.
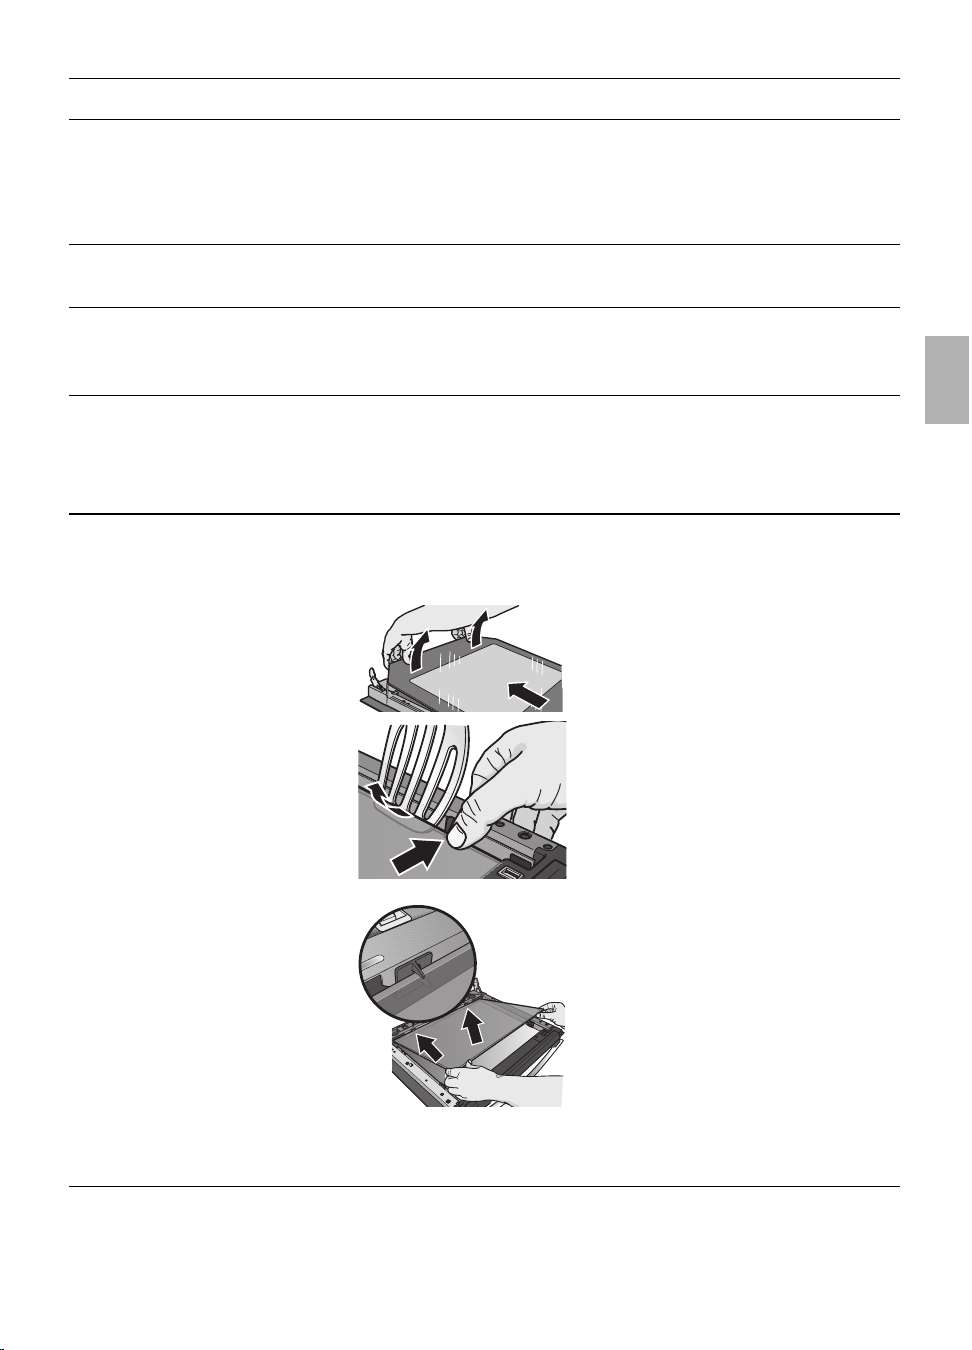
87
Problem Possible cause Remedy
. . . if smoke is generated during Roasting temperature
roasting or grilling? to high.
Wire shelf or universal Place wire shelf into universal pan and
pan slid in incorrectly. insert together in shelf position.
. . . if enamelled slide-in parts Normal occurrence due Not available.
show mat bright stains? to dripping meat juices.
. . . if the glass pane or window Normal occurrence, due Switch on the oven for app.
of the oven door become to existing temperature 5 minutes at 100° C.
clouded? difference.
. . . if the oven shows increasing Normal occurrence, Briefly open the oven door occasionally
condensation water? e.g. in the case of cakes during baking or roasting, wipe up the
with very moist topping condensation water after operation.
(fruit) or roasts.
. . . if the panes of the oven Normal soiling. Remove the oven door and place it
door are dirty on the inside after facing down on a clean and soft
some time of use? surface.
Take hold of the door glass next to the
hinges, disengage and raise slightly.
Remove the door glass towards the
hinges.
Press in the retaining clip with your
thumb on one side and disengage the
inner door glass e.g. with the spatula,
then repeat on the other side.
Installation after cleaning:
Insert inner door glass into the holder.
First engage the right side and then the
other side.
Hang door glass and press down next
to the hinges until it clicks into place.

88
Assembly
Instructions
For the installer and
kitchen expert!
Important installation Properly dispose of packaging
notes
materials.
Do not use oven door handle for
transporting or handling the unit during
installation.
WARNING: Connection and first start
of the appliance may only be performed
by an authorised specialist.
Connection must be made using an
H05RR-F 3x1,5
9
mains connection
cable.
Rated consumption, rated voltage
and type no. of the appliance:
See appliance nameplate behind the
oven door to the left beneath the side
edge of the oven.
The unit's nameplate is located at on
the sidewall of the unit.
Electrical safety of the appliance can
be ensured only if the equipment earth
in the building installation has been
installed according to regulations.
In the case of repairs interrupt all
power connections to the unit.
Connectable built-in hobs HSE-6PA4030
HSE-6PA3W30
HSE-6PL4030
The properly installed appliance must
be covered on all sides in such a
fashion that not even components with
rough insulation are exposed to the
touch. The cover must be removable
with tools only.
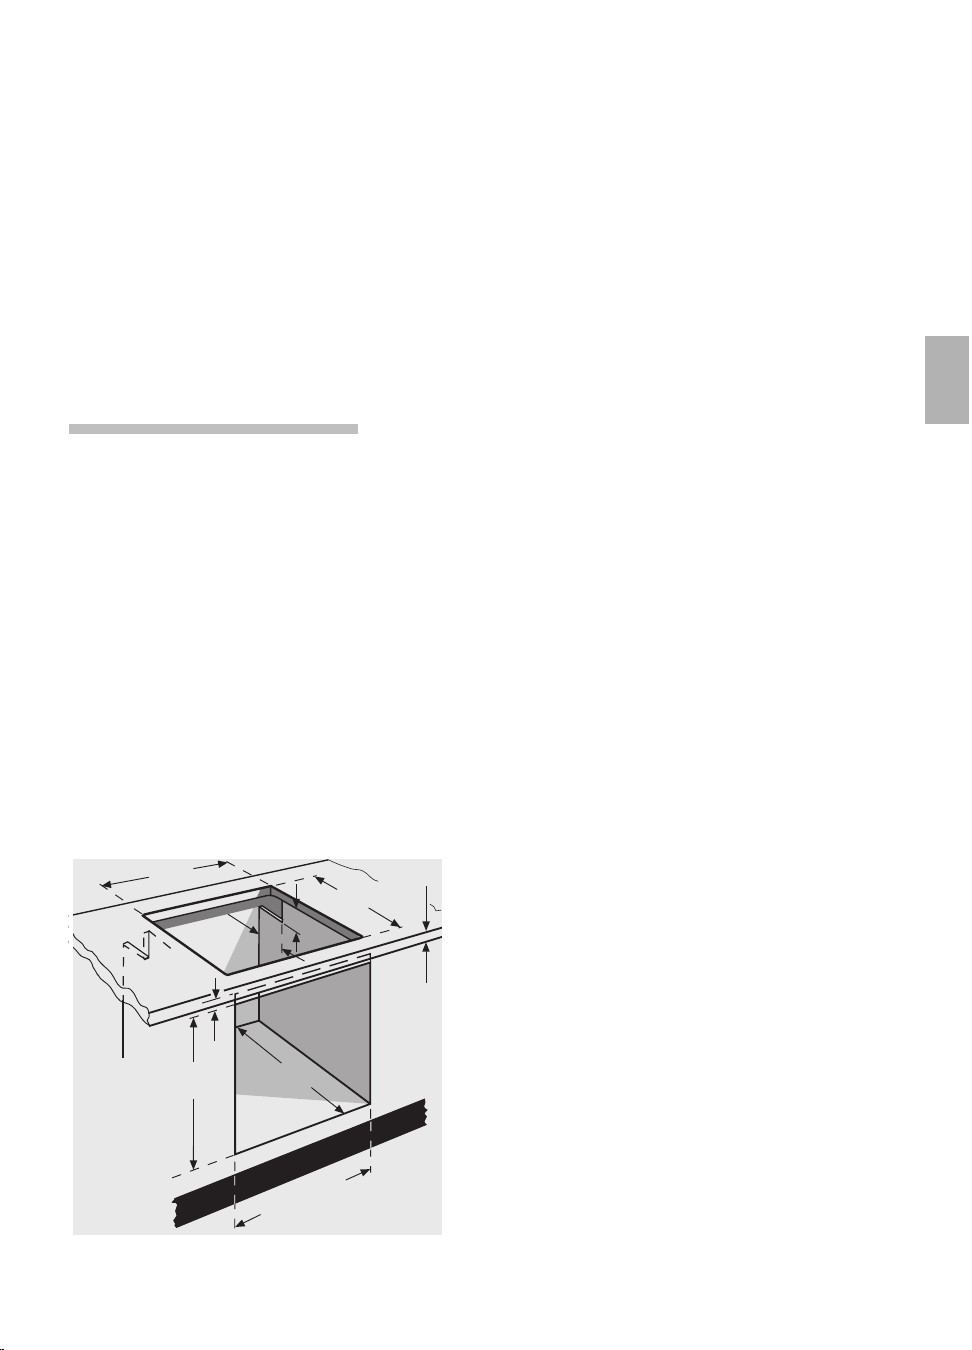
89
Furniture programmes Cooker conversion cabinets from
virtually all lines of kitchen furniture are
suitable for installing the built-in cooker.
However, the veneers or plastic
laminates on the conversion cabinets
must be applied with heat-resistant
cement (90 C). If plastic laminates or
cement are not sufficiently heat-
resistant, warping, bubbling or
detachment of the finish may result.
Installation of the hob
WARNING The appliance may be installed with a
high cabinet or a high wall only on one
side of it. On the respective opposite
side, the height of an adjacent piece of
furnishing may not exceed the height of
the working surface in which the hob is
installed. The distance between the
high wall on the side of the hob and the
rear wall must comply with the
assembly instructions for the built-in
hob. Observe the protection class for
heat exposure as stated in the
assembly instructions.
The range may only be installed in
currentless condition.
For example by turning off the fuse for
the household interior installations.
Work top cut-out for built-in hob must
be present for the built-in hob (see
installation instructions for built-in hob).
560
490
100
100
30-50
585
550
m
ind.
mind. 560
15
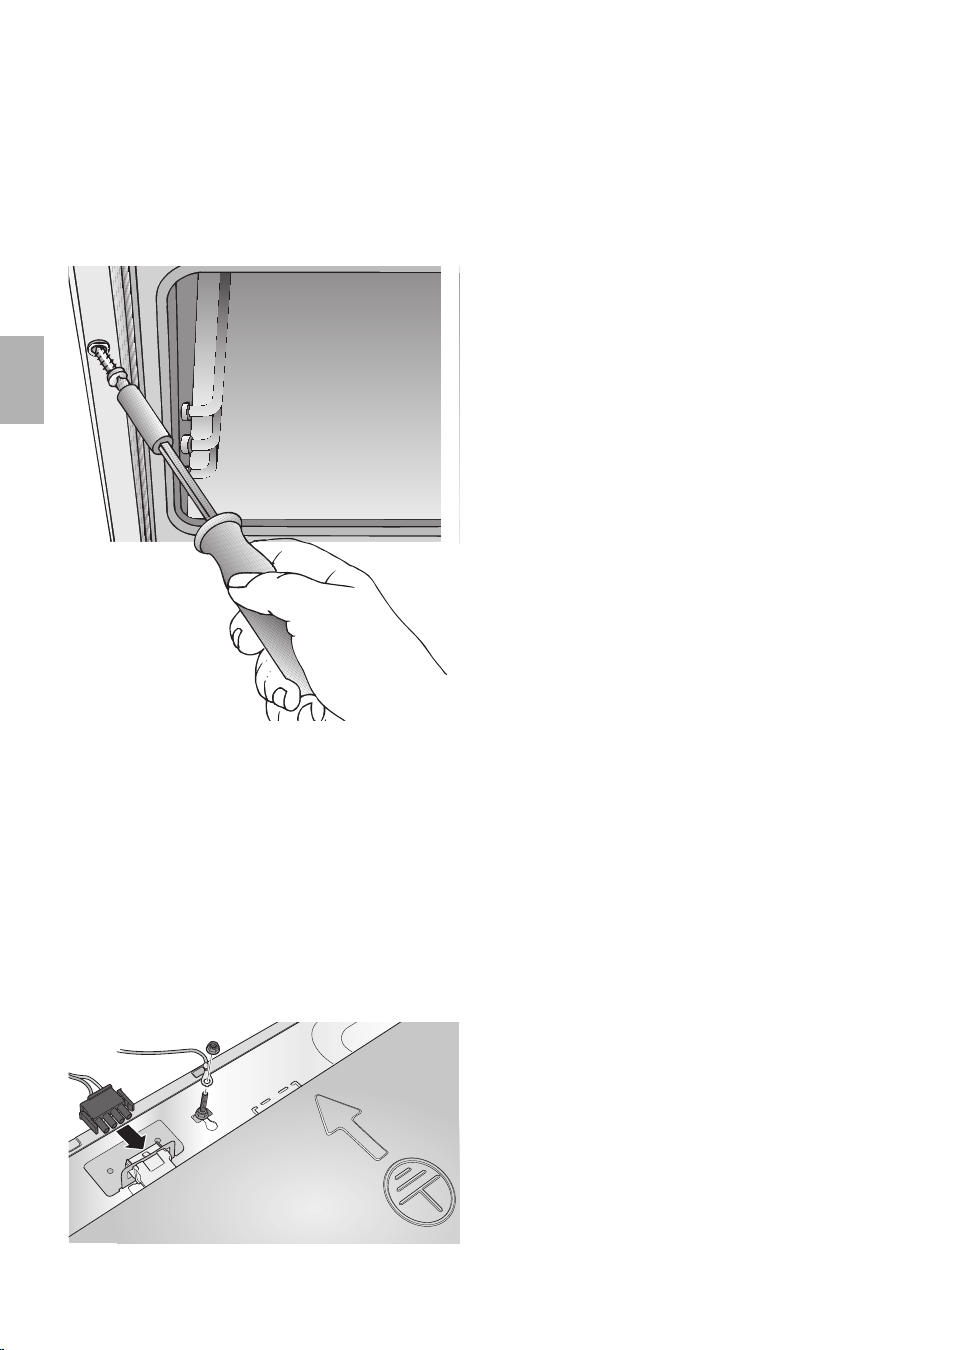
90
Installation 1. Shove the built-in cooker into the
installation opening of the
conversion cabinet and align
horizontally.
Important for function and safety:
Slide in built-in cooker completely.
2. Open oven door and fasten the
built-in cooker to the side strips on
the conversion cabinet with one
screw each. When screwing in the
two screws (enclosed in a bag with
the built-in cooker), ensure that they
are pointing outwards at a slight
angle. Please use these screws only.
3. Check whether the built-in cooker
has been installed solidly and
horizontally and whether the given
installation dimensions have been
observed.
In units featuring telescoping
extensions, these may not move
by themselves.
In units featuring automatic oven
cleaning, after filling 0,4 l of
cleaning solution into the recess
in the oven floor, the liquid must
not spill toward the front.
4. Make the electrical connection
between the built-in cooker and hob
through connection plug and socket
strip with earthing cable.
5. Make electrical connection between
the built-in cooker and safety plug
socket through mains connection
plug.
6. Installing the hob.
Make absolutely certain that
you observe assembly
instructions enclosed to the
appliance.
7. Function control.

91
Indice
Aspetti a cui prestare attenzione . 92
Imballaggio e apparecchio dismesso
.92
Prima del montaggio . . . . . . . . . . . 93
Norme di sicurezza . . . . . . . . . . . . . 93
Cause di danni . . . . . . . . . . . . . . . . 95
La vostra nuova cucina . . . . . . . . 96
Pannello comandi . . . . . . . . . . . . . . 96
Selettore funzioni . . . . . . . . . . . . . . 96
Selettore temperatura . . . . . . . . . . . 97
Altezze d’inserimento . . . . . . . . . . . 97
Accessori . . . . . . . . . . . . . . . . . . . 98
Precede il primo impiego . . . . . . . 99
Pulizia preliminare . . . . . . . . . . . . . . 99
Primo riscaldamento . . . . . . . . . . . . 99
Pulizia successiva . . . . . . . . . . . . . . 99
Sicurezza dei bruciatori . . . . . . . . . . 99
Ora attuale . . . . . . . . . . . . . . . . . . . 99
Cucinare . . . . . . . . . . . . . . . . . . . .100
Scelta delle pentole . . . . . . . . . . . .100
Accensione e regolazione
dei bruciatore . . . . . . . . . . . . . . . . .101
Orologio elettronico . . . . . . . . . . .102
Pannello comandi . . . . . . . . . . . . . .102
Funzioni speciali . . . . . . . . . . . . . . .102
Avvisatore contaminuti . . . . . . . . . .103
Timer automatico . . . . . . . . . . . . . .103
Funzioni del forno . . . . . . . . . . . . .105
Inhaltsverzeichnis
Accendere e spegnere il forno . .108
Riscaldamento rapido . . . . . . . . . . .108
Cottura al forno . . . . . . . . . . . . . .109
Consigli e astuzie . . . . . . . . . . . . . .110
Arrosti al forno . . . . . . . . . . . . . . .111
Cottura al grill . . . . . . . . . . . . . . . .113
Grill con ventola . . . . . . . . . . . . . . .114
Cottura al grill . . . . . . . . . . . . . . . . .114
Scongelare e cuocere . . . . . . . . .115
Pulizia e manutenzione . . . . . . . .117
Avvertenze importanti . . . . . . . . . . .117
Rivestimento catalitico del forno . . .119
Sistema di pulizia EasyClean . . . . .120
Smontaggio e montaggio
della porta del forno . . . . . . . . . . . .122
Elementi riscaldanti . . . . . . . . . . . . .123
Griglia di aggancio . . . . . . . . . . . . .123
Guida telescopica . . . . . . . . . . . . . .124
Guasti e riparazioni . . . . . . . . . . .125
Che fare se qualcosa
non funziona? . . . . . . . . . . . . . . .126
Istruzioni per il montaggio
Per l’installatore
e per il tecnico della cucina
Avvertenze importanti . . . . . . . . .128
Installazione . . . . . . . . . . . . . . . . .129
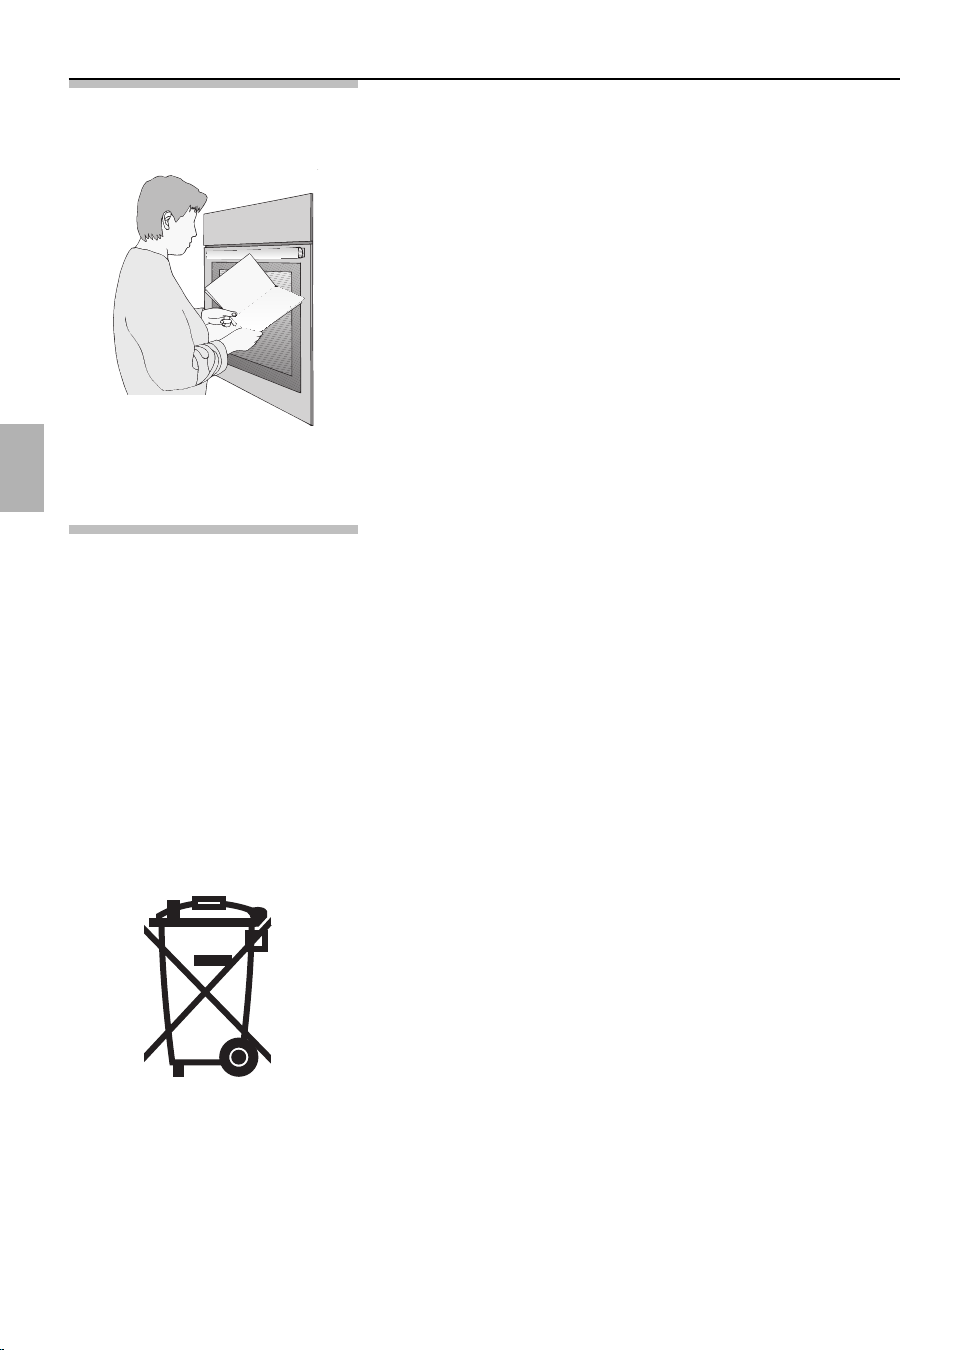
92
Aspetti a cui prestare attenzione
Prima di usare il nuovo apparecchio, leggete
attentamente le istruzioni per l'uso. Esse contengono
informazioni importanti per la Vostra sicurezza,
e anche per l'uso e la manutenzione
dell'apparecchio.
Questo libretto di istruzioni per l'uso è previsto per
più versioni dell'apparecchio. É possibile che siano
descritti singoli particolari della dotazione, che non
riguardano il Vostro apparecchio.
Conservate bene il libretto delle istruzioni per l'uso e
il montaggio, per un eventuale successivo
proprietario.
Imballaggio e L’imballaggio ha protetto il nuovo apparecchio
apparecchio
durante la fase di trasporto. Tutti i materiali utilizzati
sono compatibili con l’ambiente e riciclabili. Si
dismesso
raccomanda di smaltire l’imballaggio conformemente
alle normative vigenti in materia di tutela ambientale.
Gli apparecchi dismessi non sono rifiuti senza valore.
Attraverso uno smaltimento correto, in linea con le
normative per la tutela ambientale, si possono
recuperare materie prime pregiate.
Prima di smaltire l’apparecchio dismesso, renderlo
inservibile oppure contrassegnarlo con un’etichetta
adesiva „Attenzione: rottami”.
Questo apparecchio dispone di contrassegno ai
sensi della direttiva europea 2002/96/CE in materia
di apparecchi elettrici ed elettronici (waste electrical
and electronic equipment – WEEE).
Questa direttiva definisce le norme per la raccolta e il
riciclaggio degli apparecchi dismessi valide su tutto il
territorio dell’Unione Europea.
Informarsi sulle attuali possibilità di smaltimento
presso il proprio rivenditore specializzato oppure
presso il proprio comune.
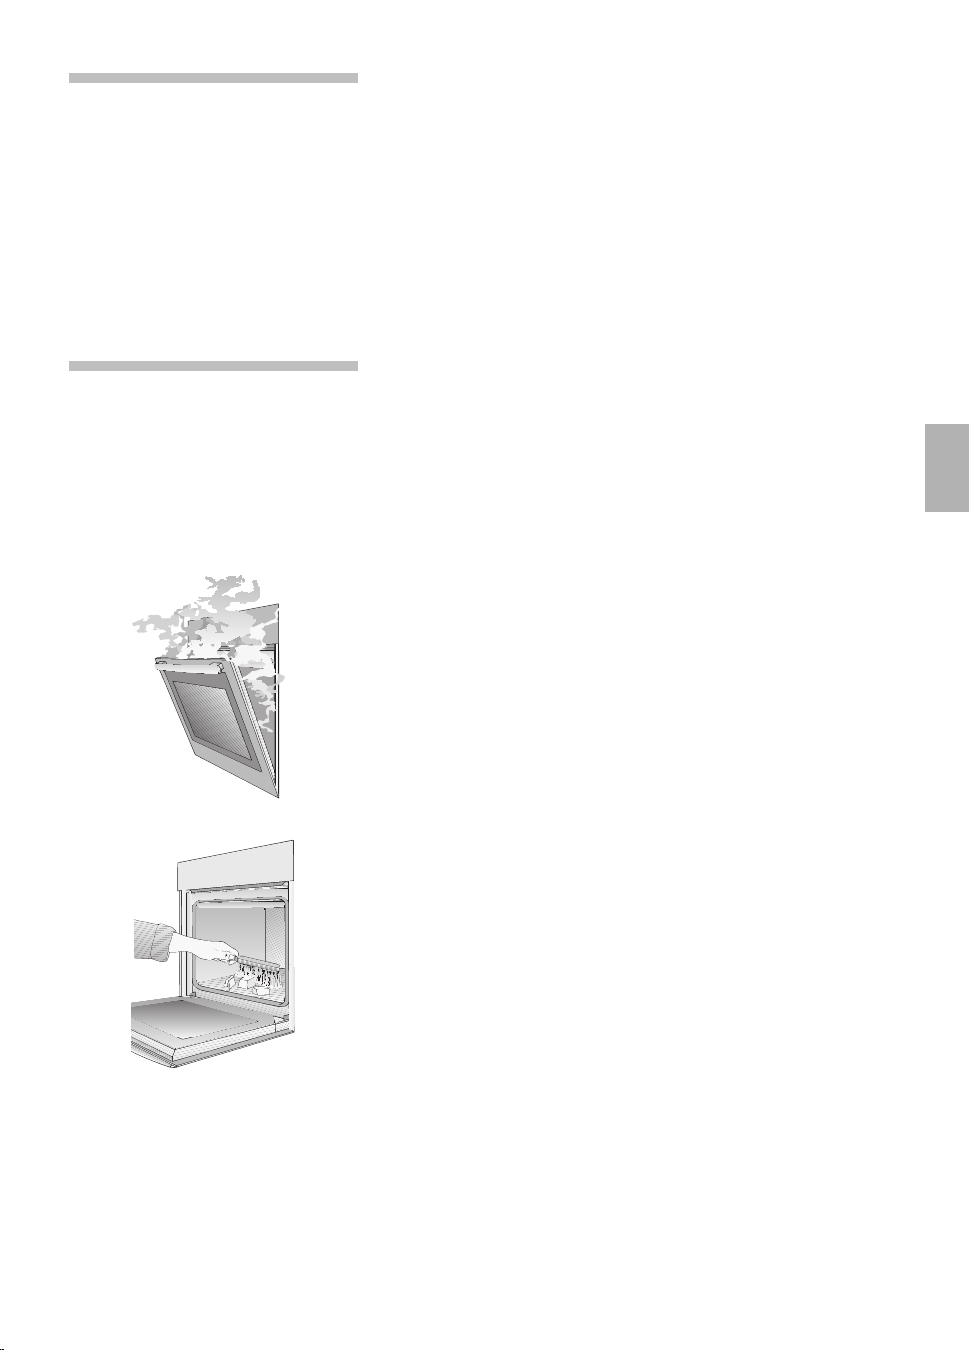
93
Norme di sicurezza Questo apparecchio è stato concepito
esclusivamente per uso domestico.
Si raccomanda di utilizzare il forno esclusivamente
per la preparazione delle pietanze.
Forno caldo Aprire con cautela la porta del forno. Può fuoriuscire
del vapore caldo.
Non toccare mai le superfici interne del forno e gli
elementi riscaldanti, a causa delle loro alte
temperature. Pericolo di scottature!
Tenere lontano i bambini.
Non conservare oggetti infiammabili nel forno.
Non deporre mai oggetti infiammabili sul piano di
cottura. Pericolo d’incendio!
Non deporre mai i cavi d’alimentazione di apparecchi
elettrici sulle zone di cottura calde.
I cavi d’alimentazione degli apparecchi elettrici non
devono mai entrare in contatto con la porta del forno
calda.
L’isolamento del cavo può fondersi.
Pericolo di cortocircuito!
Attenzione: durante il funzionamento del forno le
guide di estrazione si riscaldano.
Fare molta attenzione per evitare scottature quando
sono estratte.
Rimuovere completamente dal forno i residui
dell’imballaggio, per es. i frammenti di polistirolo.
Non usare l’apparecchio per riscaldare
l’ambiente.
Prima del montaggio
Danni imputabili al trasporto Controllare l’apparecchio dopo averlo disimballato.
Non allacciare l’apparecchio se si riscontrano danni
di trasporto.
Collegamento elettrico L’allacciamento della cucina deve essere effettuato
esclusivamente da personale autorizzato. Il diritto alla
garanzia si estingue in caso di danno causato da un
allacciamento errato.

94
Ventilazione L’uso di un apparecchio da cucina a gas porta ad
una formazione di calore e umidità nella camera
dove si trova l’apparecchio. Fare attenzione ad una
buona ventilazione della cucina: tenere aperte le
aperture di ventilazione naturali o prevedere
un’installazione di ventilazione meccanica (cappa
aspiravapore).
Se si usa l’apparecchio intensamente e per lungo
tempo, si può rendere necessaria un’ulteriore
ventilazione, per es. una finestra aperta o una
ventilazione più forte, per es. regolando ad una
potenza maggiore l’installazione di ventilazione
meccanica già prevista.
É vietato installare apparecchi a gas negli autoveicoli.
Coperchietto del Prima dell’uso dei fornelli, fissare con precisione il
bruciatore coperchietto del bruciatore.
Usare il bruciatore solo quando vi sono poggiate
sopra le pentole con le pietanze da cucinare.
Nel caso si usano gas liquidi (propano/butano), rendere ermetici tutti i
collegamenti tra la bombola e l’apparecchio.
Riparazioni Gli interventi di riparazioni effettuati in modo non
conforme rappresentano una fonte di pericolo.
Rischio di scosse elettriche!
Le riparazioni devono essere effettuate
esclusivamente da personale tecnico da noi
adeguatamente istruito.
In caso di cattivo funzionamento, disinserite il
dispositivo di sicurezza nell'impianto domestico.
L’alimentazione del gas deve essere chiusa.
Rivolgersi al servizio di assistenza tecnica.

95
Cause di danni
Teglia da forno, foglio di Non inserire alcuna teglia sul fondo del forno.
alluminio o stoviglie sul Non rivestirlo con fogli di alluminio.
fondo del forno Non mettere alcuna stoviglia sul fondo del forno.
Ciò causerebbe un accumulo di calore. I tempi di
cottura non corrisponderebbero più e lo smalto
verrebbe danneggiato.
Elementi inseribili Per evitare danni, inserire con precauzione gli
elementi.
Carta da forno Quando si utilizza la funzione di riscaldamento aria
calda *, non deporre la carta da forno sciolta nel
forno (per es. durante il riscaldamento).
La ventola dell'aria calda può aspirare la carta.
Questo può causare danni al riscaldamento ed alla
ventola.
Acqua nel forno Non versare mai acqua direttamente nel fono caldo.
Questo potrebbe danneggiare la superficie smaltata
Succo di frutta In caso di dolci alla frutta molto succosi, si consiglia
di non riempire eccessivamente la teglia. Il succo
della frutta che fuoriesce dalla teglia causa la
formazione di macchie indelebili.
Si consiglia di utilizzare la leccarda, che è più
profonda.
Raffreddamento con la Durante il raffreddamento del forno si deve tenere la
porta del forno aperta porta chiusa. Accertarsi che nulla rimanga incastrato
nella porta. Anche se la si lascia soltanto socchiusa,
i mobili adiacenti potrebbero col tempo essere
danneggiati.
Guarnizione del forno Nel caso in cui la guarnizione del forno sia molto
molto sporca sporca, la porta del forno non si chiude più
correttamente. I mobili adiacenti potrebbero
danneggiarsi. Mantenere pulita la guarnizione del
forno.
Porta del forno come Non appoggiarsi né sedersi sulla porta del forno.
superficie d’appoggio
Cura e manutenzione Non utilizzare detergenti ad alta pressione o
dispositivi a getto di vapore.
Zone di cottura Siete pregati di osservare le istruzioni per l'uso
accluse al piano di cottura.
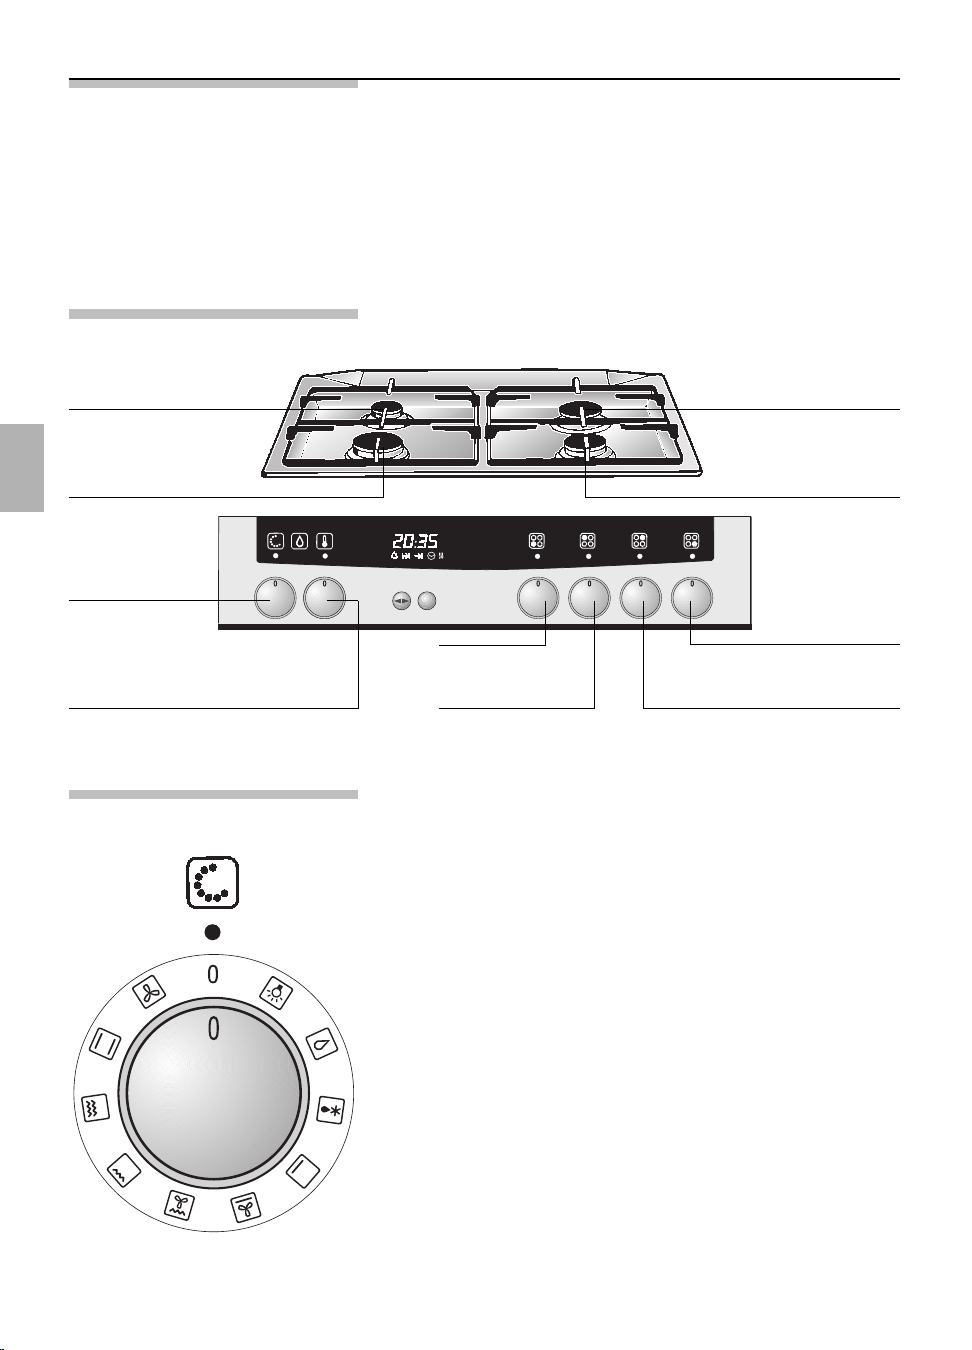
La vostra nuova cucina
Illustriamo qui il vostro nuovo elettrodomestico, con la
descrizione del pannello comandi dotato di interruttori
e display. Si forniscono inoltre informazioni in merito ai
tipi di riscaldamento e agli accessori in dotazione.
Pannello comandi
Selettore
delle funzioni
Selettore per la
piastra D
Selettore per la
piastra C
Selettore per la
piastra B
Selettore per la
piastra A
Selettore della temperatura con
lampada spia
Bruciatori ausiliare B Normalbrenner C
Normalbrenner DBruciatore forte A
Selettore funzioni Servendosi del selettore funzioni impostare il tipo di
riscaldamento per il forno.
Posizioni
*
CircoTherm aria calda
/
Riscaldamento super./infer.
(sistema di riscaldamento convenzionale)
(
Grill superficie grande
)
Grill superficie piccola (grill risparmio energetico)
,
Grill con ventola
&
Funzione cottura pizza
.
Riscaldamento inferiore
e
Grado di scongelamento
d
Sistema di pulizia EasyClean
®
$
Illuminazione forno
96
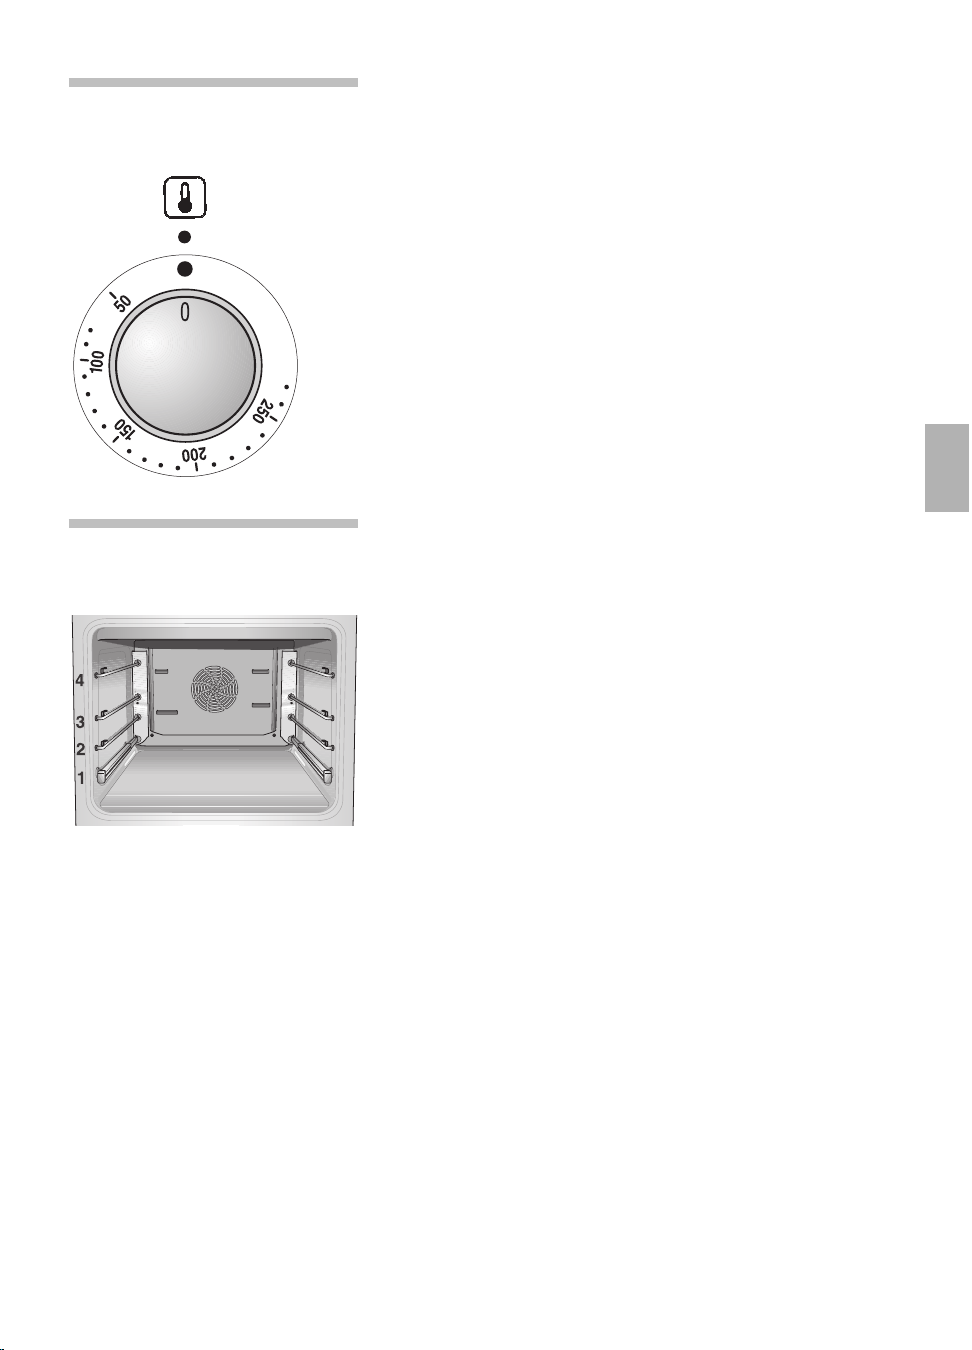
97
Selettore
Posizioni:
temperatura
50 –275
Temperatura in °C.
Altezze Il forno è dotato di 4 altezze d’inserimento.
d’inserimento
Le altezze d’inserimento si contano dal basso
verso l’alto. Esse sono indicate sul forno.
Nel funzionamento con Funzioni aria calda *,
non usare l’altezza d’inserimento »2«, per non
pregiudicare la circolazione dell’aria.
Le griglie di aggancio e le guide telescopiche
possono essere disposte nelle altezze d’inserimento
preferite.
Il semplice sistema ad innesto per mette una
sostituzione flessibile e rapida delle griglie
agganciabili e delle guide telescopiche.
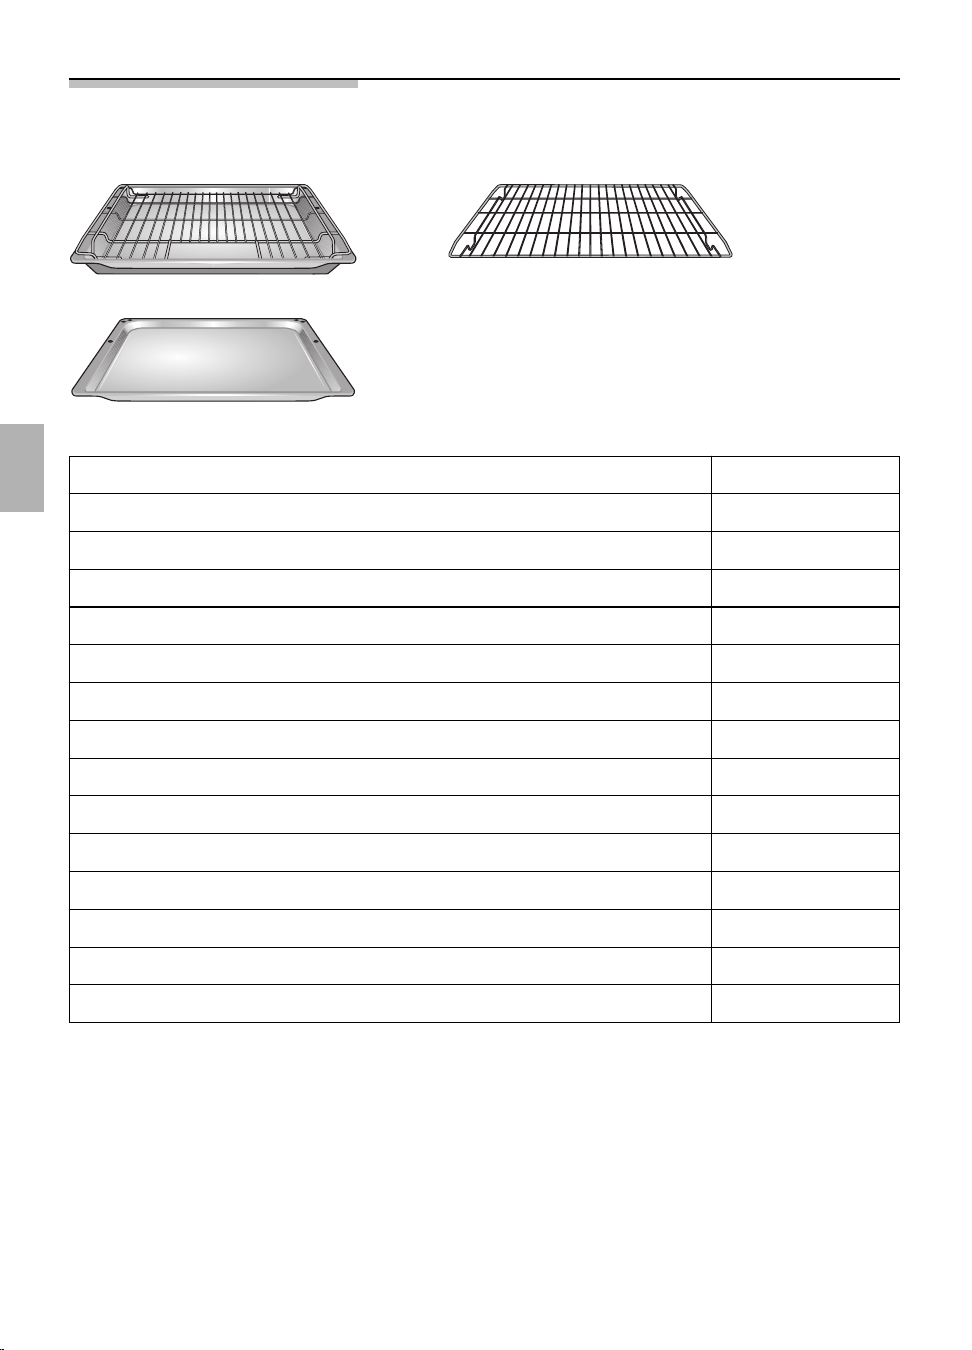
Accessori Fornitura di serie:
Leccarda con griglia Griglia
Teglia da forno smaltata
Troverete altri accessori presso i rivenditori specializzati. Cod. di ordinazione
Avvertenza:
La teglia da forno o la leccarda durante il funzionamento del forno si possono
deformare. Causa di ciò sono le grandi differenze di temperatura sugli accessori.
Queste possono verificarsi quando solo una parte dell’accessorio èstata occupata,
oppure sull’accessorio è stato deposto un prodotto surgelato, come p. es. pizza.
La deformazione si riduce già durante la cottura al forno, l’arrosto o la cottura al grill.
Leccarda con rivestimento antiaderente
Tegame per sformati
Teglia da forno in alluminio
Teglia da forno smaltata
Teglia da forno con rivestimento antiaderente
Griglia per dolci/arrosti con bordo a gomito
Griglia per dolci/arrosti fitta
Vassoio per arrosti
Sistema di cottura a vapore
Mattone per pane
Leccarda
Z 1232 X0
Z 1233 X0
Tegame di vetro Z 1262 X0
Z 1272 X0
Z 1332 X0
Z 1342 X0
Z 1343 X0
Teglia per pizza Z 1352 X0
Z 1432 X0
Z 1442 X0
Z 1512 X0
Kit di completamento guida telescopica singola Z 1784 X0
N 8642 X0
Z 1912 X0
Pentola per arrosti universale smaltada Z 9930 X0
98
99
Precede il primo impiego
Pulizia preliminare Estrarre gli accessori dal forno.
Rimuovere completamente dal forno i residui
dell’imballaggio, per es. i frammenti di polistirolo.
1. Pulite l'apparecchio all'esterno con un panno
morbido, umido.
2. Estrarre dal forno griglie di aggancio e guide
telescopiche.
3. Pulite il forno e gli accessori con una soluzione di
lavaggio ben calda.
Osservate le istruzioni per l'uso accluse al piano di
cottura.
Primo riscaldamento Prima di usare l’apparecchio la prima volta, è
necessario regolare l’orologio elettronico all’ora
attuale.
Riscaldate il forno vuoto per ca. 30 minuti.
Selezionate a questo scopo il riscaldamento
superiore/inferiore a 240° C.
Pulizia successiva Pulite il forno con una soluzione di lavaggio ben
calda.
Montare griglie di aggancio e guide telescopiche.
Sicurezza dei Tutti i bruciatori sono protetti in maniera tale che
bruciatori
l’alimentazione del gas si interrompe quando la
fiamma viene estinta.
Quando i bruciatori dei fornelli sono in funzione, si
sente un frscio.
Ora attuale Dopo l’allacciamento elettrico dell’apparecchio,
oppure dopo un interruzione della corrente, il display
lampeggia inicando 0:00.
Regolazione Premete il tasto
>
e regolate con la manopola l’ora
attuale (esempio: ore 15:00).
Per correggere l’ora attuale, premere il tasto >
finché il simbolo
#
non lampeggia.
Ora regolare l’ora attuale.
Avvertenza: se è stata impostata una funzione
automatica, l’ora attuale non può essere corretta
(cancellare l’orologio elettronico).

100
Cucinare
Scelta delle pentole
da cucinare e loro
coordinamento
Giusto! Posare la pentola sempre nel centro del bruciatore.
Usate solo pentole e tegami con un fondo piano.
Scegliare le pentole il cui diametro é adatto al
bruciatore (vedasi tabella).
–Minor consumo di gas
–Tempo di cottura ottimale
– Coordinamento economico
Sbagliato! Il diametro della pentola é troppo piccolo
La fiamma del bruciatore brucia oltre la base delle
pentole.
La pentola é piú grande del brodo del piano di
cottura.
–Troppo consumo di gas
– Coordinamento sbagliato
Bruciatore
Bruciatore forte
Bruciatore normale
Bruciatore ausiliare
Carico in kW
Piano di
cottura
2,85
1,85
1,10
2,90
1,70
1,00
240 fino a 260 mm
200 fino a 220 mm
120 fino a 180 mm
Piano di
cottura in
vetroceramica
Diametro delle pentola
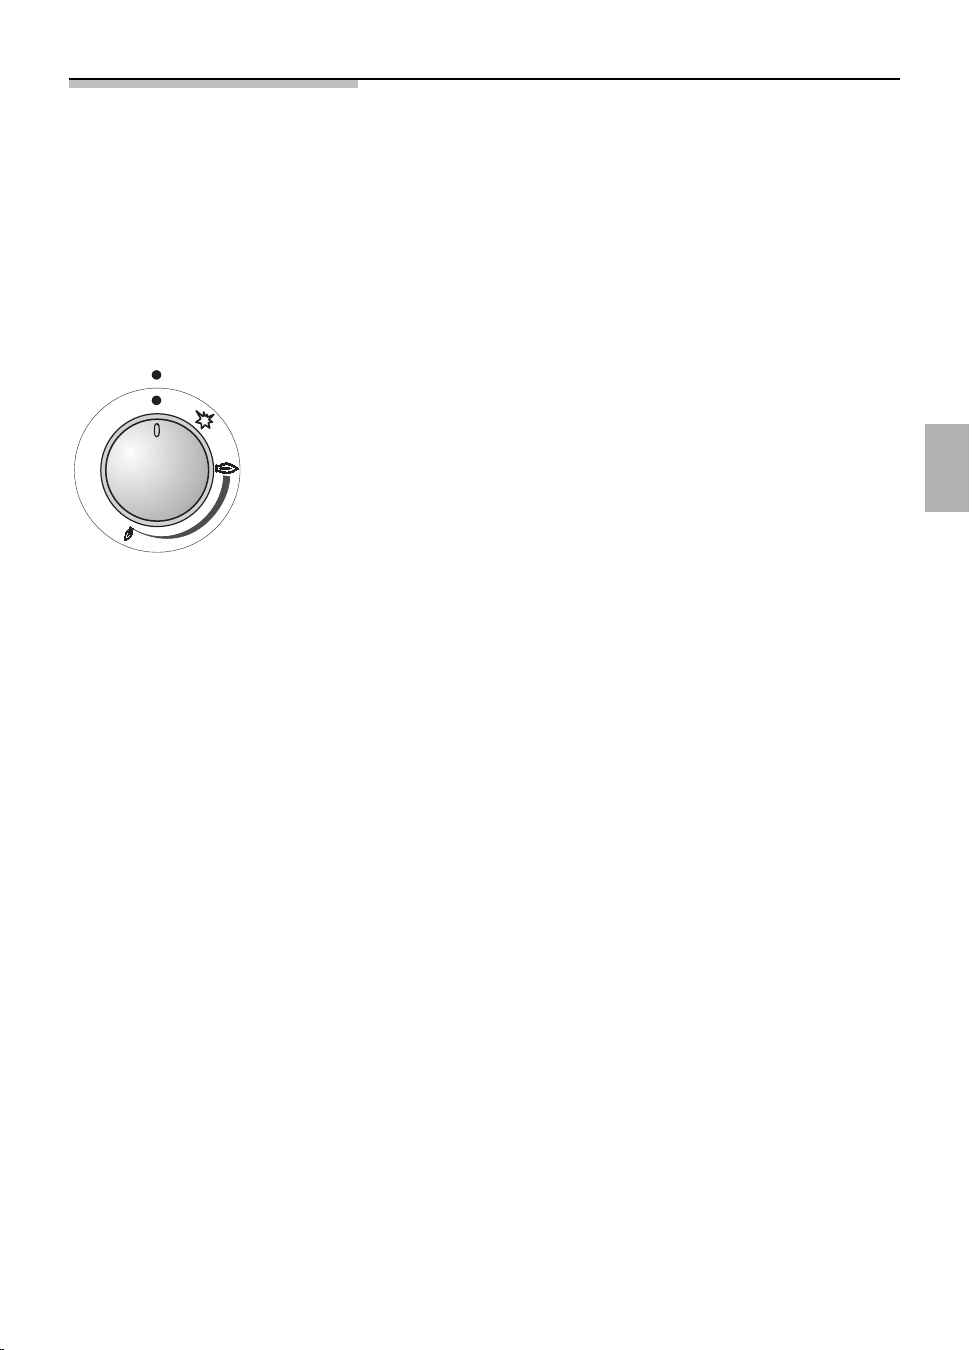
101
Accensione e regolazione dei bruciatori
L’appartenenza delle manopole ai bruciatori, si puó
notare dalla descrizione dell’apparecchio e dai
simboli segnati sul pannello dei rubinetti.
L’accensione dei bruciatori viene facilitata attraverso
l’accensione a scintilla elettrica.
Bruciatore del fornello E’possibile la regolazione continua tra la fiamma
grande e la piccola.
g = Fiamma grande
f = Fiamma piccola
Accensione mediante la
1. Premere la relativa manopola e girarla verso
scintilla elettrica sinistra sulla posizione della fiamma grande.
L’accensione elettrica agisce fino a quando la
manopola é premuta.
2. Dopo l’accensione della fiamma, tenere premuta
la manopola ancora per circa 5 secondi.
3. Prima di lasciar andare, premere con forza
ancora una volta.
4. Nel caso non vi é accensione o si spegne la
fiamma, ripetere la procedura dell’accensione
dopo circa 3 secondi.
5. Per spegnere il bruciatore, girare la manopola
verso destra fino alla posizione 0.
Accensione mediante
1. Premere la relativa manopola, girarla verso sinistra
fiammiferi o simili sulla posizione della fiamma grande, e accendere
il bruciatore con il fiammifero.
2. Tenere premuta la manopola per circa 5 secondi.
3. Se la fiamma si spegne, ripetere la procedura
dopo circa 3 secondi.
4. Per spegnere il bruciatore, girare la manopola
verso destra fino alla posizione 0.
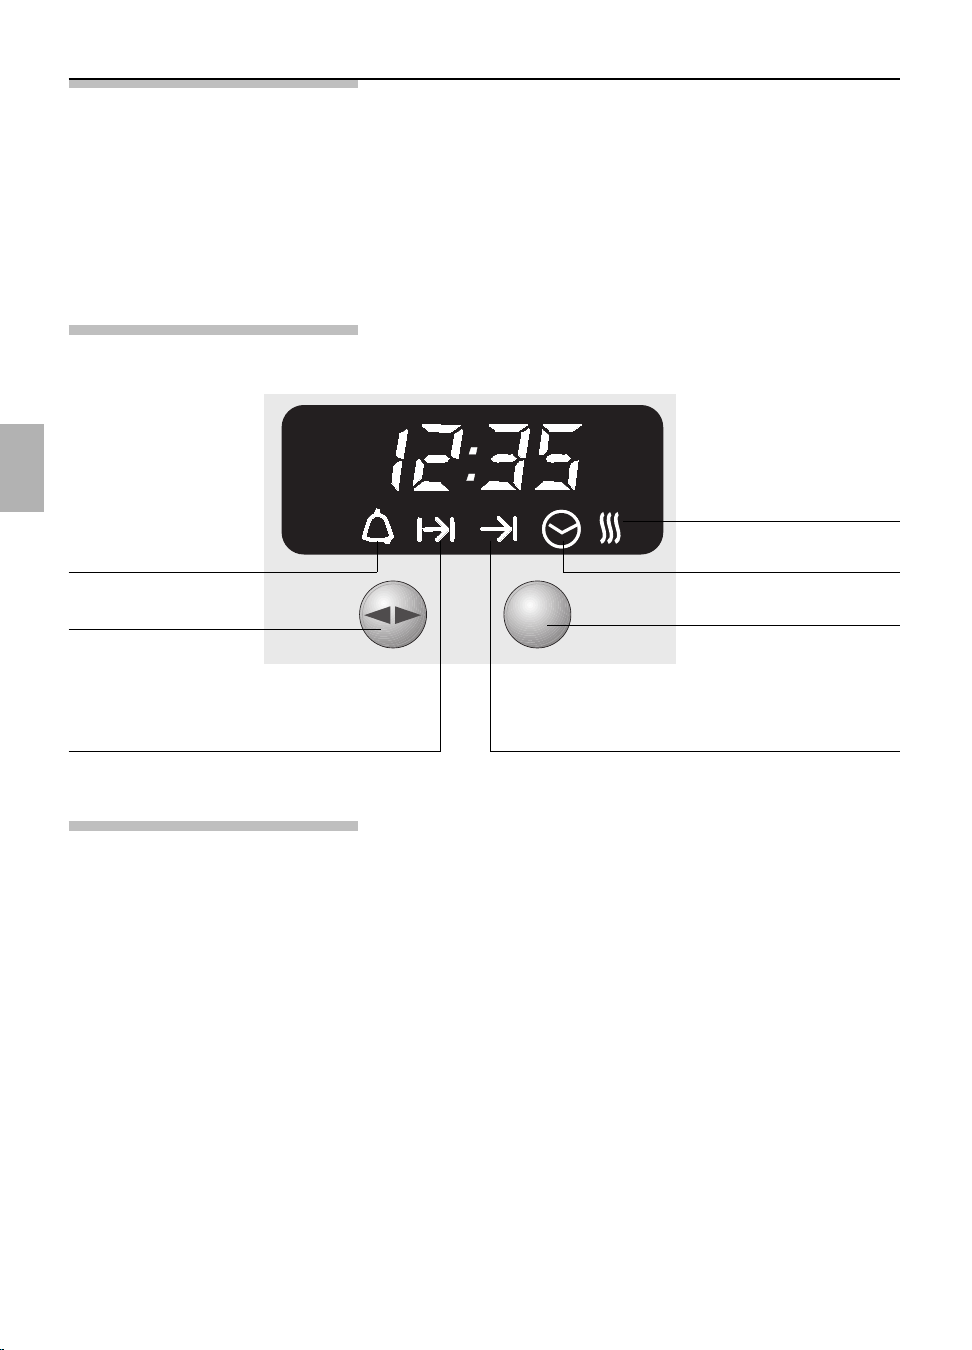
102
Orologio elettronico
Potete impostare l'orologio elettronico con una sola
mano. A tal fine, dopo avere premuto un tasto,
regolate l'ora con la manopola.
Le regolazioni sono possibili finché lampeggia
l'indicazione della funzione (~4 secondi).
Pannello commandi
Avvisatore contaminuti
Durata di funzionamento Fine tempo di funzionamento
Manopola
Emerge e scompare con
una leggera pressione
Ora
Riscaldamento rapido
Selettore delle funzioni
Funzioni speciali
Oscurare il display 1. Premere per 7 secondi il tasto >.
Ora il display si oscura e l’ora continua a
scorrere in sottofondo.
2. Per inserire di nuovo il display, premere
brevemente il tasto >.
Riscaldamento rapido Il riscaldamento rapido
s può essere regolato per
mezzo dell’orologio (vedi capitolo Accendere e
spegnere il forno).
Regolazione dell’ora attuale Vedi capitolo „Precede il primo impiego”.
Oscuramento notturno Tra le ore 22.00 e le ore 6.00 l’indicazione viene
del display oscurata automaticamente.
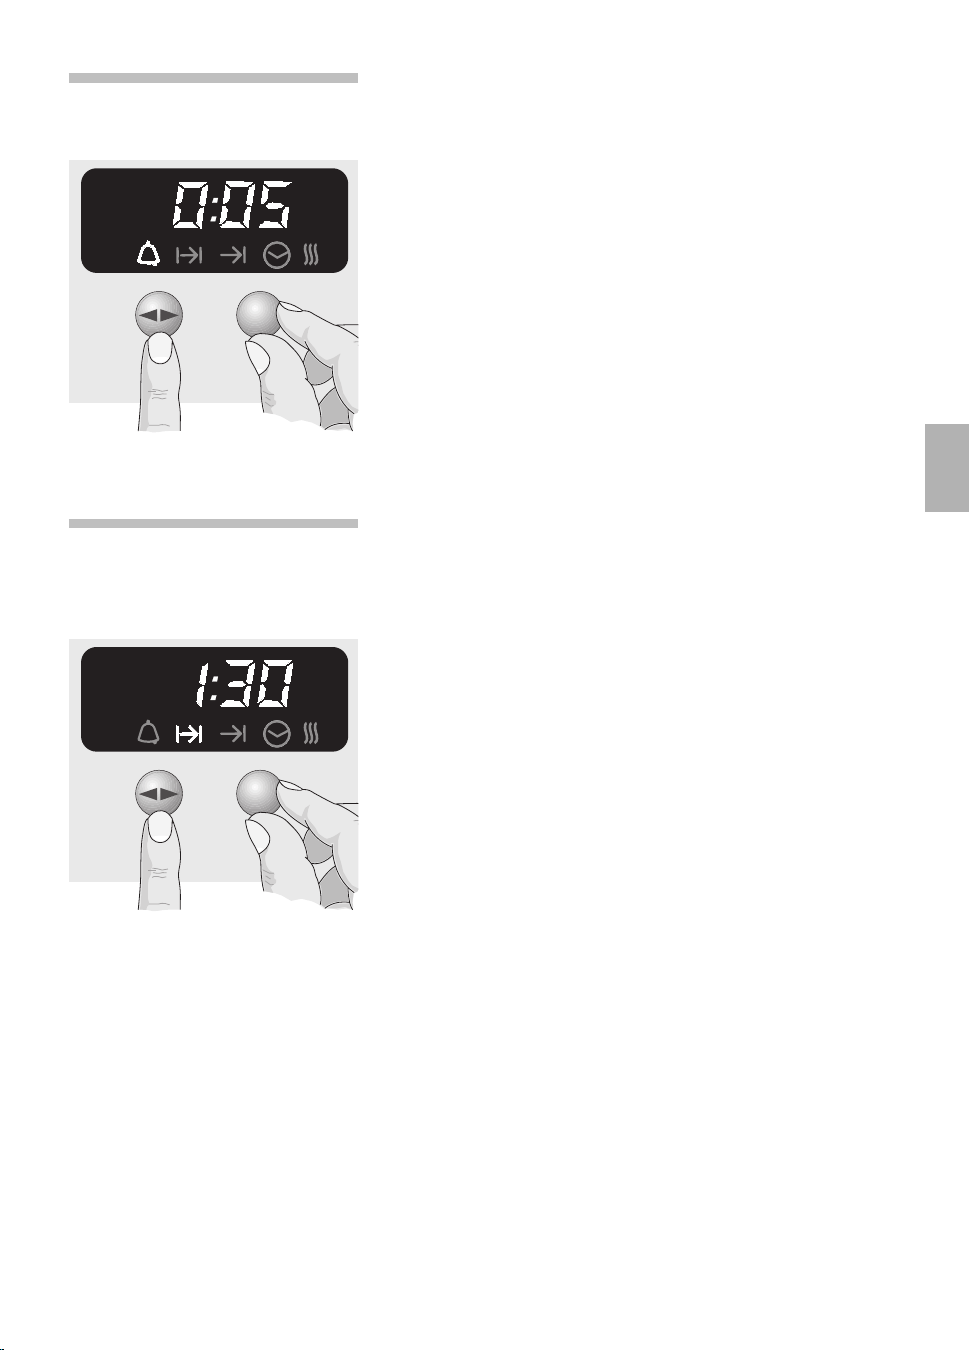
103
Timer automatico Tramite l’orologio elettronico potete inserire e
disinserire il forno.
Spegnimento automatico Se la cottura o l'arrosto al forno deve
iniziare subito è necessaria solo la regolazione della
durata di funzionamento.
1. Selezionate il sistema di riscaldamento e la
temperatura del forno.
2. Premere il tasto > finché il simbolo ?
non lampeggia, e regolare con la manopola la
durata di funzionamento
(esempio: 1 ora e 30 minuti).
Conclusa la regolazione, dopo ca. 4 secondi
viene visualizzata l’ora attuale.
Il simbolo
? indica il funzionamento automatico.
3. Alla fine della durata
(esempio: 1 ora e 30 minuti) viene emesso un
segnale acustico ed il simbolo ! lampeggia.
Il forno viene spento automaticamente.
Per disattivare anzi tempo il segnale acustico,
premere il tasto >.
4. Disinserite il forno.
5. Per interrompere il funzionamento automatico
premete di nuovo il tasto >.
Avvisatore 1. Premere il tasto > e regolare il tempo
contaminuti
(esempio: 5 minuti).
Dopo l'attivazione viene visualizzato il tempo
residuo.
2. Alla fine della durata viene emesso un segnale
acustico ed il simbolo
,
lampeggia.
Per disattivare anzi tempo il segnale acustico,
premere il tasto >.
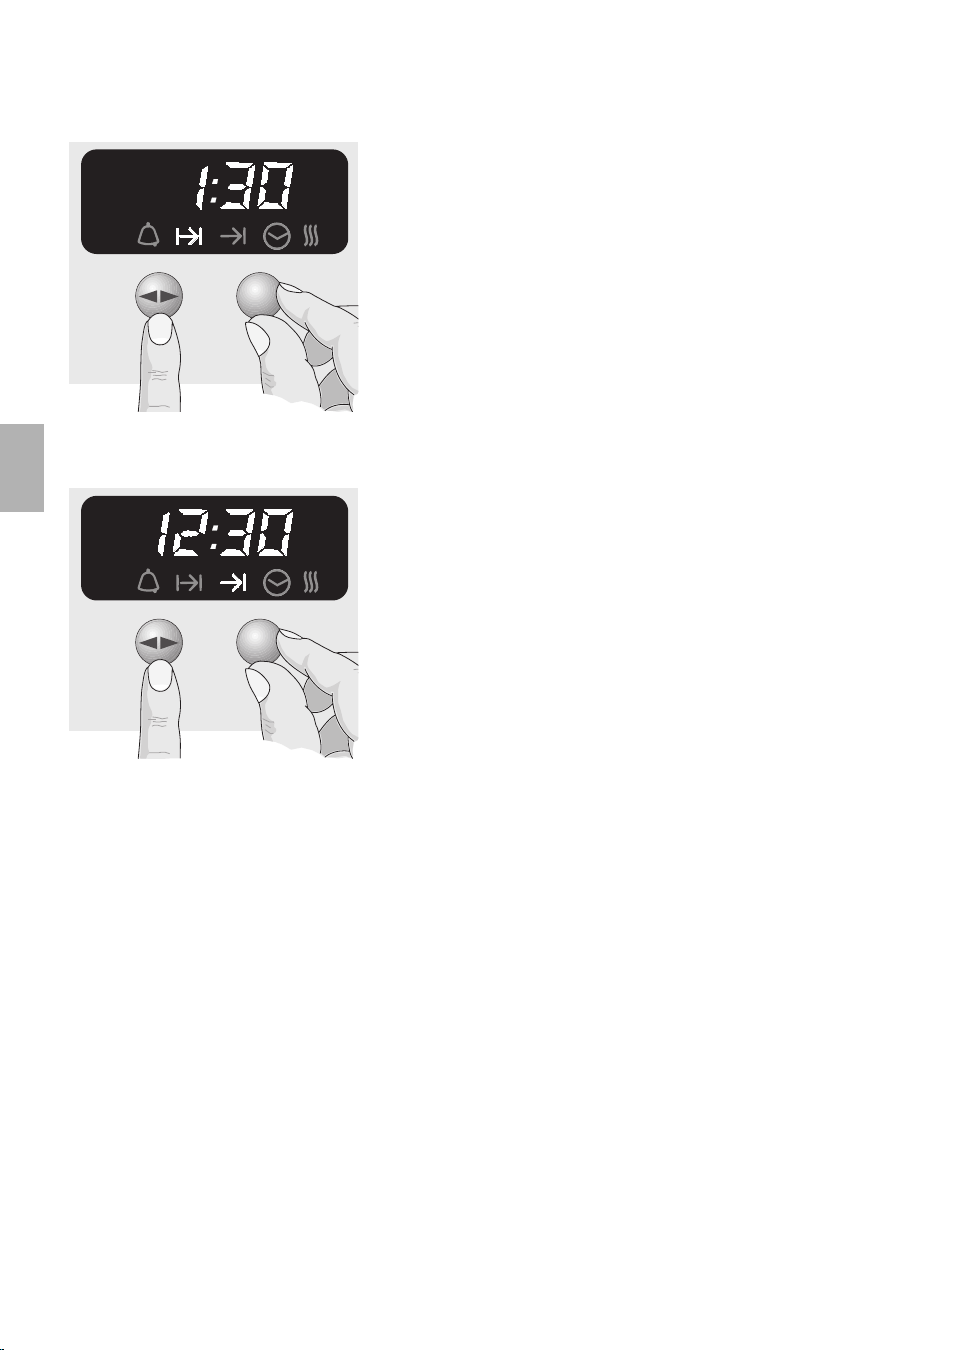
104
Accensione e spegnimento Se la cottura o l’arrosto al forno deve iniziare in un
automatici momento successivo, è necessaria la regolazione.
1. Selezionate il sistema di riscaldamento e la
temperatura del forno.
2. Premere il tasto > finché il simbolo ?
non lampeggia, e regolare con la manopola la
durata di funzionamento
(esempio: 1 hora e 30 minuti).
3. Premere il tasto > finché il simbolo ! non
lampeggia, e regolare con la manopola la fine
del tempo di funzionamento (esempio: ore 12:30).
Eseguita la regolazione, dopo ca. 4 secondi viene
visualizzata l’ora attuale.
Il simbolo ! indica il funzionamento automatico.
4. Il forno viene inserito (esempio: ore 11:00),
e disinserito (esempio: ore 12:30).
automaticamente con i tempi regolati.
5. Alla fine della durata viene emesso un segnale
acustico ed il simbolo ! lampeggia.
Per disattivare anzi tempo il segnale acustico,
premere il tasto >.
6. Disinserite il forno.
7. Per terminare il funzionamento automatico
premete di nuovo il tasto >.
Controllare, correggere e 1. Per controllare le impostazioni eseguite, premere
cancellare le regolazioni il tasto > finché il simbolo non lampeggia.
2. Se necessario potete correggere le regolazioni
con la manopola.
3. Se volete cancellare le vostre regolazioni,
riportate a 0:00 il tempo regolato e disinserite il
forno.
Avvertenze Le pietanze più idonee per la cottura con il timer
automatico sono quelle che richiedono poca
attenzione.
L'avvisatore contaminuti e la fine del tempo di
funzionamento possono essere programmati
preventivamente con un anticipo massimo di 24 ore.
Le regolazioni si possono leggere in qualsiasi
momento premendo il tasto
>.

105
Funzioni del forno
CircoTherm aria calda Con un sistema di riscaldamento, disposto nella
parete posteriore del forno, l'aria riscaldata viene
ricircolata nel forno, ottenendo così un'ottima
trasmissione del calore alle pietanze da cuocere o
arrostire.
Vantaggi:
–È possibile la cottura contemporanea su
3 altezze
– il forno si sporca poco
–brevi tempi di riscaldamento
– basse temperature del forno
Riscaldamento superiore/ Mediante elementi riscaldanti situati nella parte
inferiore (sistema di superiore e inferiore del forno, il calore viene
riscaldamento convenzionale) trasmesso alla pietanza da cuocere o arrostire.
Cottura e arrosto sono possibili su un solo livello
d'inserimento.
Vantaggi:
–cottura di dolci con copertura umida, pizza,
quiche
Grill Il calore viene prodotto dall'elemento riscaldante
superiore del forno e trasmesso alle pietanze da
grigliare.
– molto indicato per piccoli pezzi di carne piani,
p. es. bistecche, salsicciotti, pesce, verdura e
toast.
Grill superficie grande Vantaggi:
–tutta la superficie del grill si riscalda
–molto indicata per grandi quantità
Grill superficie piccola Vantaggi:
– solo la parte centrale della superficie della griglia
si riscalda
– molto indicata per piccole quantità
– risparmio energetico
*
/
(
)

106
Grill con ventola Nella cottura al grill, l'elemento riscaldante del grill e il
ventilatore vengono accesi e spenti alternativamente.
Il calore prodotto dall'elemento riscaldante del grill
viene distribuito uniformemente dalla ventola nel
vano del forno.
Vantaggi:
– molto indicato per polli e pezzi di carne grandi.
Riscaldamento inferiore Si accende solo l'elemento riscaldante nella parte
inferiore del forno.
Vantaggi:
– molto indicato per pietanze e dolci, che nella
parte inferiore devono avere anche una doratura
maggiore o una crosta.
Utilizzare solo poco prima della fine del tempo di
cottura o di arrosto.
Posizione cottura pizza Nella posizione di cottura pizza il riscaldamento
inferiore si aggiunge all’CircoTherm aria calda.
Vantaggi:
– cottura per il consumo immediato di cibi molto
succosi, per es. pizza e dolci succosi con lato
inferiore croccante;
–molto indicata per prodotti surgelati, per es.
pizza, patatine ecc.
Scongelamento Una ventola disposta sulla parete posteriore del
forno favorisce la circolazione dell’aria del forno
intorno agli alimenti surgelati.
La ventola gira senza riscaldamento
Vantaggi:
– scongelamento delicato
–I pezzi di carne, il pollame, il pane ed i dolci
surgelati si scongelano uniformemente.
,
.
&
e

107
Sistema di pulizia EasyClean
®
Per rendere più semplice la pulizia del forno,
l’apparecchio è dotato di un sistema ausiliario di
pulizia. Per mezzo dell'evaporazione guidata
automaticamente di una soluzione di lavaggio, i
residui di sporco sullo smalto si ammorbidiscono
a causa del calore e del vapore acqueo, e infine si
possono rimuovere più facilmente.
Per maggiori ragguagli vedere “Pulizia e
manutenzione”.
Vantaggi:
– pulizia del forno più facile
– trattamento delicato delle superfici smaltate del
forno
– ecologico
Riscaldamento rapido Avvertenza
Può essere aggiunto all’CircoTherm aria calda.
d
s
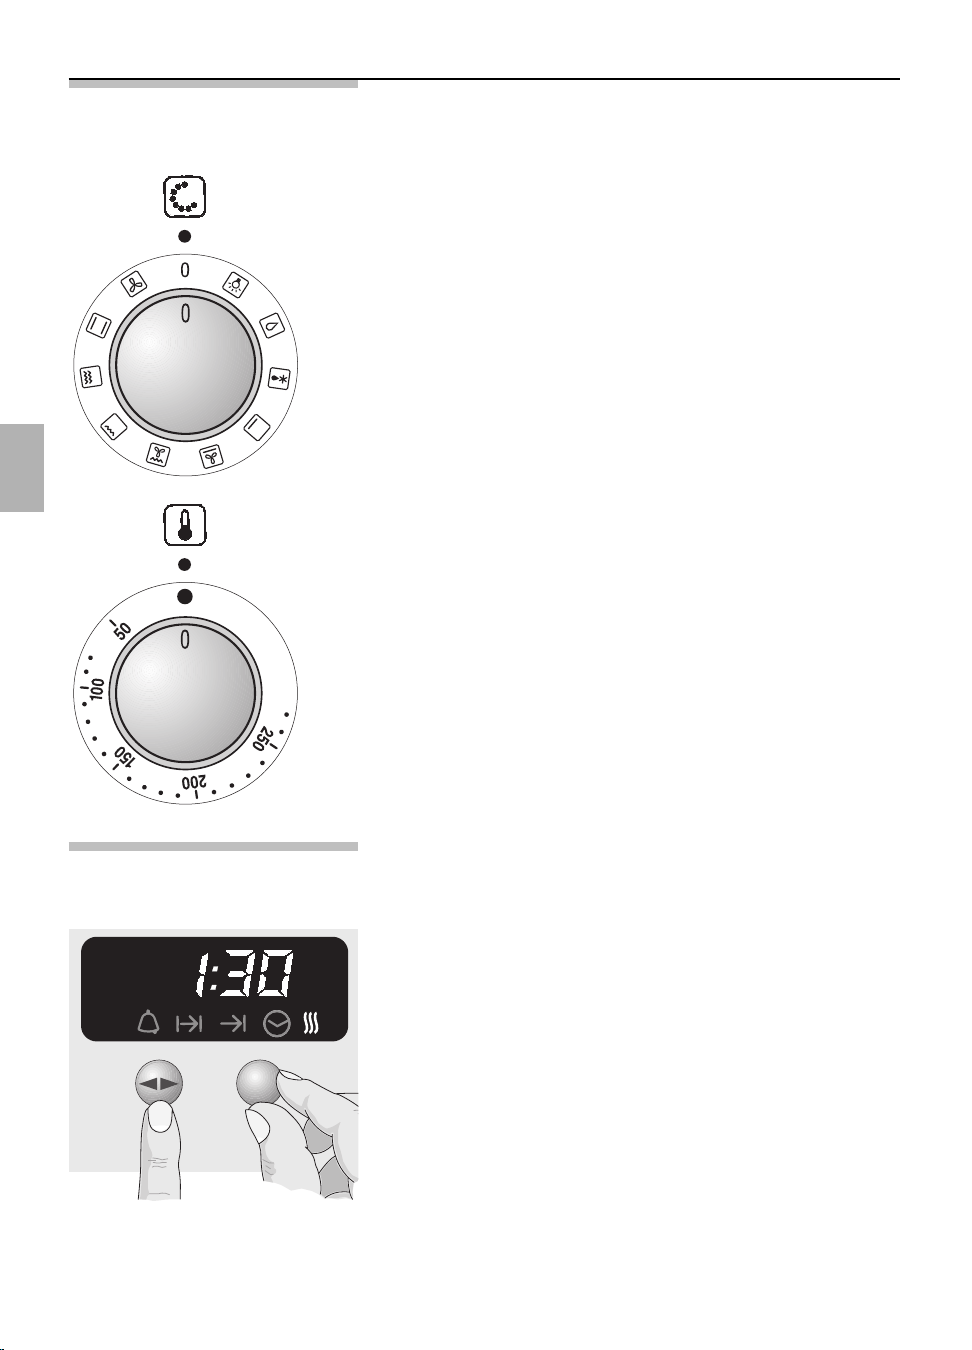
108
Accendere e spegnere il forno
Prima di accendere il forno, decidete quale sistema
di riscaldamento volete usare.
Accendere:
1. Disponete il selettore delle funzioni sul sistema
scelto.
2. Con il selettore della temperatura, impostate la
temperatura richiesta.
La temperatura impostata viene regolata
automaticamente.
La lampada spia s'illumina all'accensione del forno e
ad ogni postriscaldamento.
Spegnere:
Per spegnere, girate il selettore della temperatura e il
selettore delle funzioni su 0.
Avvertenza:
L’apparecchio è dotato di una ventola di
raffreddamento. Dopo avere spento il forno, la
ventola continua a funzionare finché il forno non si
raffredda.
Riscaldamento Accendere:
rapido
Dopo avere acceso il forno, per mezzo dell’orologio
all’aria calda si può aggiungere il riscaldamento
rapido s Premere il tasto > finché il simbolo s
non lampeggia. Dopo ca. 4 secondi entra in funzione
il riscaldamento rapido s.
Il simbolo s appare durante il riscaldamento.
Quando la temperatura regolata è stata raggiunta
esso scompare e viene emesso un segnale acustico.
Spegnimento anticipato:
Premere il tasto
>, finché il simbolo s non
lampeggia. Annullare il riscaldamento rapido con la
manopol
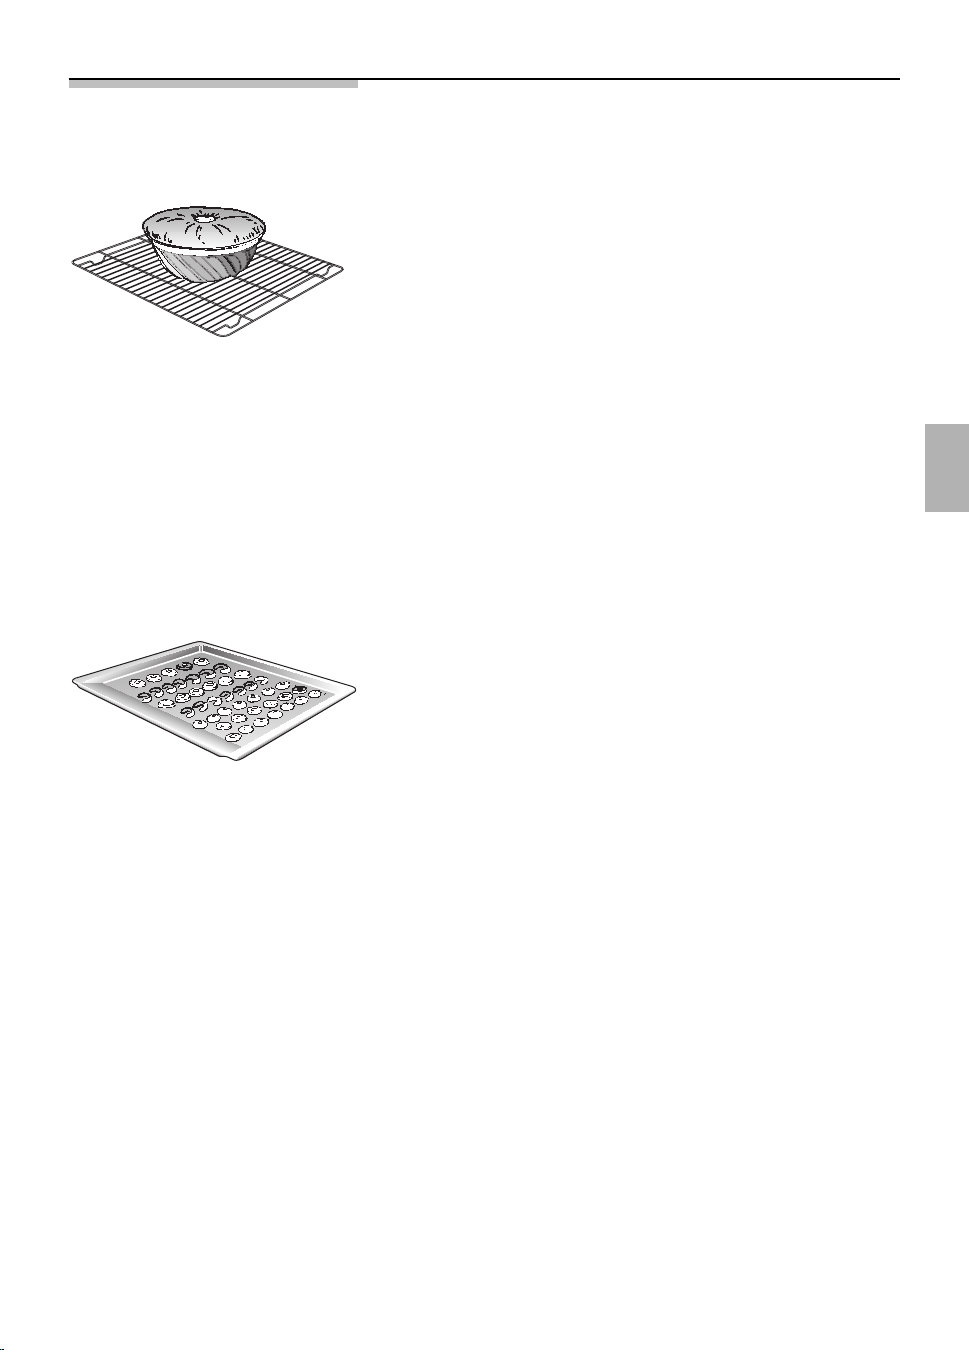
109
Cottura al forno
Cuocere negli stampi Poggiate gli stampi sempre sul centro della
griglia.
Consigliamo stampi in metallo scuri.
Avvertenze Con gli stampi da forno chiari di materiale a parete
sottile o con stampi di vetro il tempo di cottura si
prolunga ed il dolce non s’indora uniformemente.
Potete influenzare il risultato di doratura variando
l'impostazione della temperatura.
Se un dolce dopo l'estrazione dal forno si affloscia,
selezionate eventualmente un tempo di cottura più
lungo, oppure riducete un poco la temperatura.
Cuocere su teglie da forno La smussatura della teglia deve essere sempre
rivolta verso la porta del forno.
Per evitare danni inserire con precauzione gli
elementi.
Inserite le teglie sempre fino in fondo.
Utilizzate solo teglie da forno originali.
Cuocere in stampi di
* CircoTherm aria calda
altezza d’inserimento 1
lamiera stagnata / Riscaldamento superiore/inferiore
altezza d’inserimento 1
Se il dolce nella parte inferiore diventa troppo
oscuro:
controllate l'altezza d'inserimento.
Abbreviate il tempo di cottura e selezionate
eventualmente una temperatura più bassa.
Se il dolce nella parte inferiore diventa troppo
chiaro:
controllate l'altezza d'inserimento.
Prolungate il tempo di cottura, selezionate una
temperatura più bassa, oppure usate uno stampo in
lamiera scuro.

110
Consigli e astuzie
Il dolce su teglia da forno Togliete dal forno le teglie e la leccarda non
sotto è troppo chiaro utilizzate.
Il dolce in stampo sotto è Introducete lo stampo non su teglia da forno, ma
troppo chiaro sulla griglia.
Il dolce o i biscotti sotto Introducete il dolce o i biscotti a un livello superiore.
diventano troppo scuri
Il dolce si secca troppo Aumentale un poco la temperatura del forno.
Selezionate un tempo di cottura un poco più breve.
Nell’interno il dolce è umido Ridurre un poco la temperatura di cottura.
Nota: non è possibile abbreviare i tempi di cottura
aumentando le temperature (risultato: fuori cotto,
dentro crudo).
Selezionare un tempo di cottura un poco più lungo,
lasciare lievitare più a lungo la pasta del dolce.
Aggiungere meno acqua all’impasto.
I dolci in stampi o in forme Non mettete lo stampo direttamente innanzi alle
rettangolari con il sistema ad uscite dell’aria, presso la parete posteriore del forno.
CircoTherm aria calda dietro
diventano troppo scuri
Con un prodotto da cuocere Aprendo con precauzione, per breve tempo la porta
molto umido, per es. dolce del forno (1 o 2 volte, e per lunghi tempi di cottura
alla frutta, nel forno si più spesso), si può fare uscire il vapore acqueo
sviluppa molto vapore dal forno, riducendo così notevolmente la
acqueo, che si condensa formazione d’acqua.
sulla porta del forno.
Con CircoTherm aria calda, Controllare l’altezza d’inserimento.
forte colorito scuro irregolare
Dopo l’estrazione dal Usare meno liquido.
forno il dolce si affloscia
Per risparmiare energia Effettuate il preriscaldamento solo se indicato nella
ricetta.
Gli stampi per dolci di colore oscuro assorbono
meglio il calore.
Calore residuo: nel caso di lunghi tempi di cottura,
potete spegnere il forno 5 – 10 minuti prima della fine
del tempo di cottura.
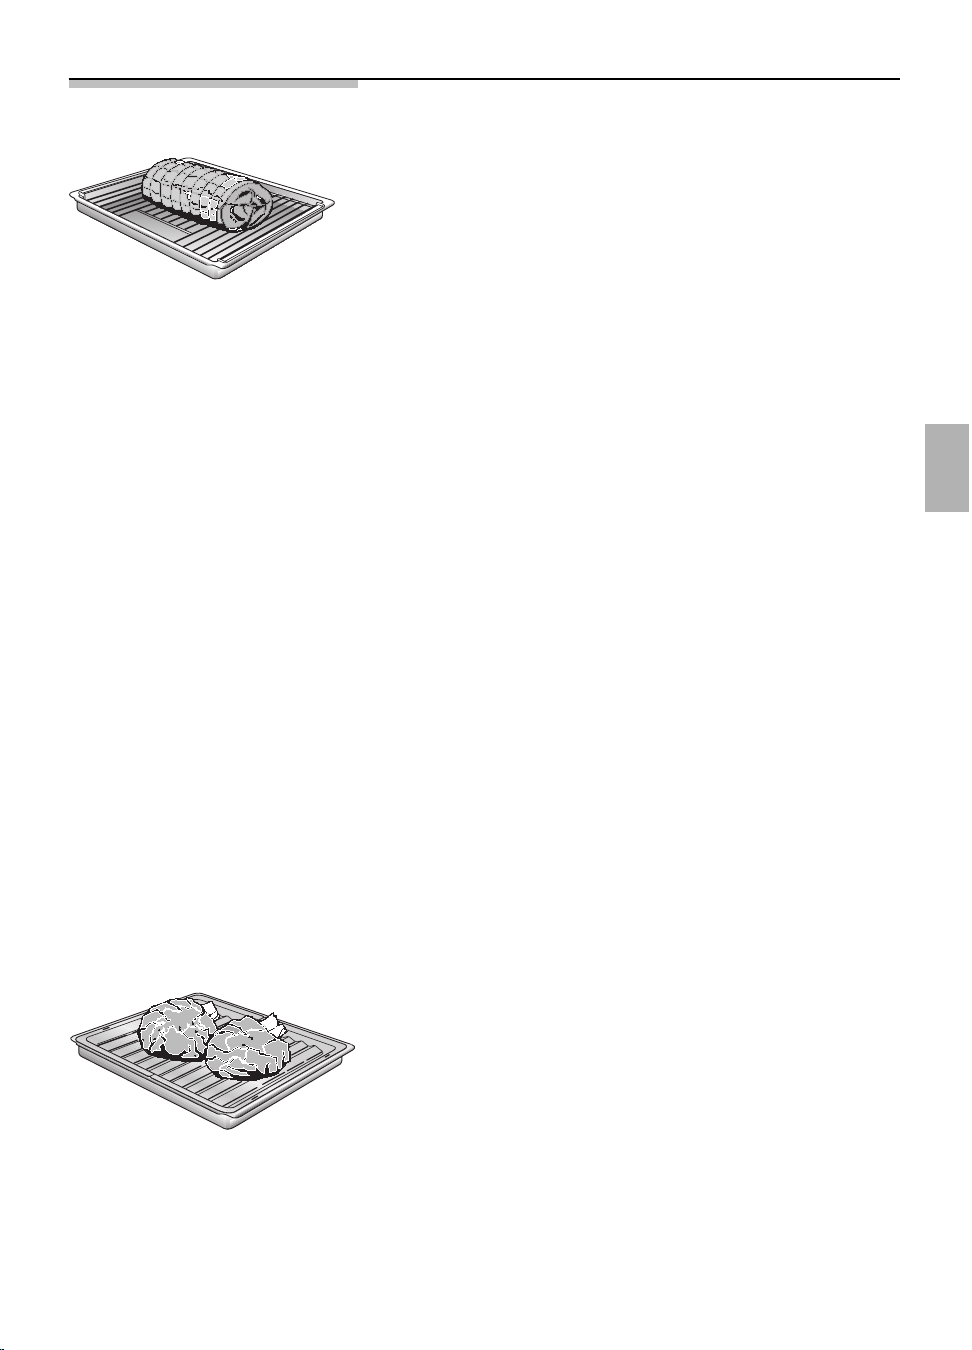
111
Arrosti al forno
Mettete la griglia nella leccarda e inseriteli
insieme sullo stesso livello.
Il pezzo di carne con un peso superiore a 750 g può
essere arrostito molto economicamente nel forno.
Arrosto in contenitore aperto Sciacquate con acqua la leccarda o il contenitore per
arrosto e mettete in esso la carne.
Per carne e polli grassi, secondo la grandezza ed il
tipo di arrosto, versate nella leccarda da
1
/
8
a
1
/
4
di
litro d'acqua. Spalmate a discrezione la carne magra
con grasso, oppure copritela con fettine di speck.
Il fondo (sugo d'arrosto), che si forma nella leccarda, è
un condimento molto saporito. Sciogliete il sugo con
acqua bollente, portatelo ad ebollizione e addensatelo
con amido alimentare, assaggiatelo e passatelo, se
necessario, attraverso un setaccio.
Introducete l'arrosto nel forno freddo
(il preriscaldamento non è necessario – risparmio
energetico).
Arrostire in contenitore
chiuso Deponete la carne in una pentola per arrosto,
copritela con un coperchio adatto e spingetela sulla
griglia nel forno.
Consigliamo di preparare l'arrosto di manzo in una
pentola per arrosto chiusa.
Arrosto al forno sulla teglia
per arrosti Disponete la teglia per arrosti nella leccarda.
(disponibile come accessorio Con questa teglia per arrosti il forno si sporca meno.
nel commercio specializzato)
Il grasso che cola ed il sugo dell'arrosto si
raccolgono nella leccarda.

112
Avvertenze Grandi arrosti alti, oca, tacchino, anatra
= lungo tempo di cottura, temperatura più bassa
Arrosti bassi di media grandezza
= tempo di cottura medio, temperatura media
Piccoli arrosti piani
= breve tempo di cottura, temperatura alta
Tempo di cottura per ogni cm d’altezza della carne
senz’osso ca. 13 - 15 minuti
Tempo di cottura per ogni cm d’altezza della carne
con osso ca. 15 - 18 minuti
Consigliamo, al primo tentativo, di regolare la
temperatura più bassa fra quelle indicate.
In generale la temperatura più bassa porta ad una
rosolatura più uniforme.
Consigliamo, per l’arrosto con
/, di rivoltare
l’arrosto dopo ca. la metà o due terzi del tempo di
cottura.
Usate solo stoviglie per arrosto con manici resistenti
ad alta temperatura.
Cuocete gli arrosti grandi senza griglia direttamente
nella leccarda.
Potete arrostire piccoli pezzi di carne su foglio di
alluminio. A tal fine sagomate il foglio di alluminio a
mo’ di stampo con gli orli sollevati, e deponetelo
sulla griglia.
Alla fine del tempo di cottura, lasciate l'arrosto per
altri 10 minuti circa nel forno spento, chiuso.
Nell’interno la carne Regolare un poco più bassa la temperatura di cottura.
non è cotta Nota: non è possibile abbreviare i tempi di cottura
aumentando le temperature (risultato: fuori cotto,
dentro crudo).
Selezionare tempi di cottura un poco più lunghi.
Con un arrosto molto umido, Aprendo con precauzione, per breve tempo la
per es. arrosto preparato con porta del forno (1 o 2 volte, e per lunghi tempi di
acqua, nel forno si sviluppa cottura più spesso), si può fare uscire il vapore
molto vapore acqueo, che acqueo dal forno, riducendo così notevolmente
si condensa sulla porta del la formazione d’acqua.
forno.

113
Cottura al grill Fare attenzione quando si usa il grill.
Tenere sempre lontano i bambini.
Avvertenze Cuocete al grill con la porta del forno chiusa.
Le temperature del grill si possono regolare.
Introducete sempre insieme griglia e leccarda.
Mettete la pietanza da cuocere al grill sempre al
centro della griglia.
Se l'elemento riscaldante del grill si spegne
automaticamente, è intervenuta la protezione di
surriscaldamento. L'elemento riscaldante del grill si
riaccende subito dopo.
Mettete la griglia nella leccarda e inseriteli
insieme sulla stessa altezza.
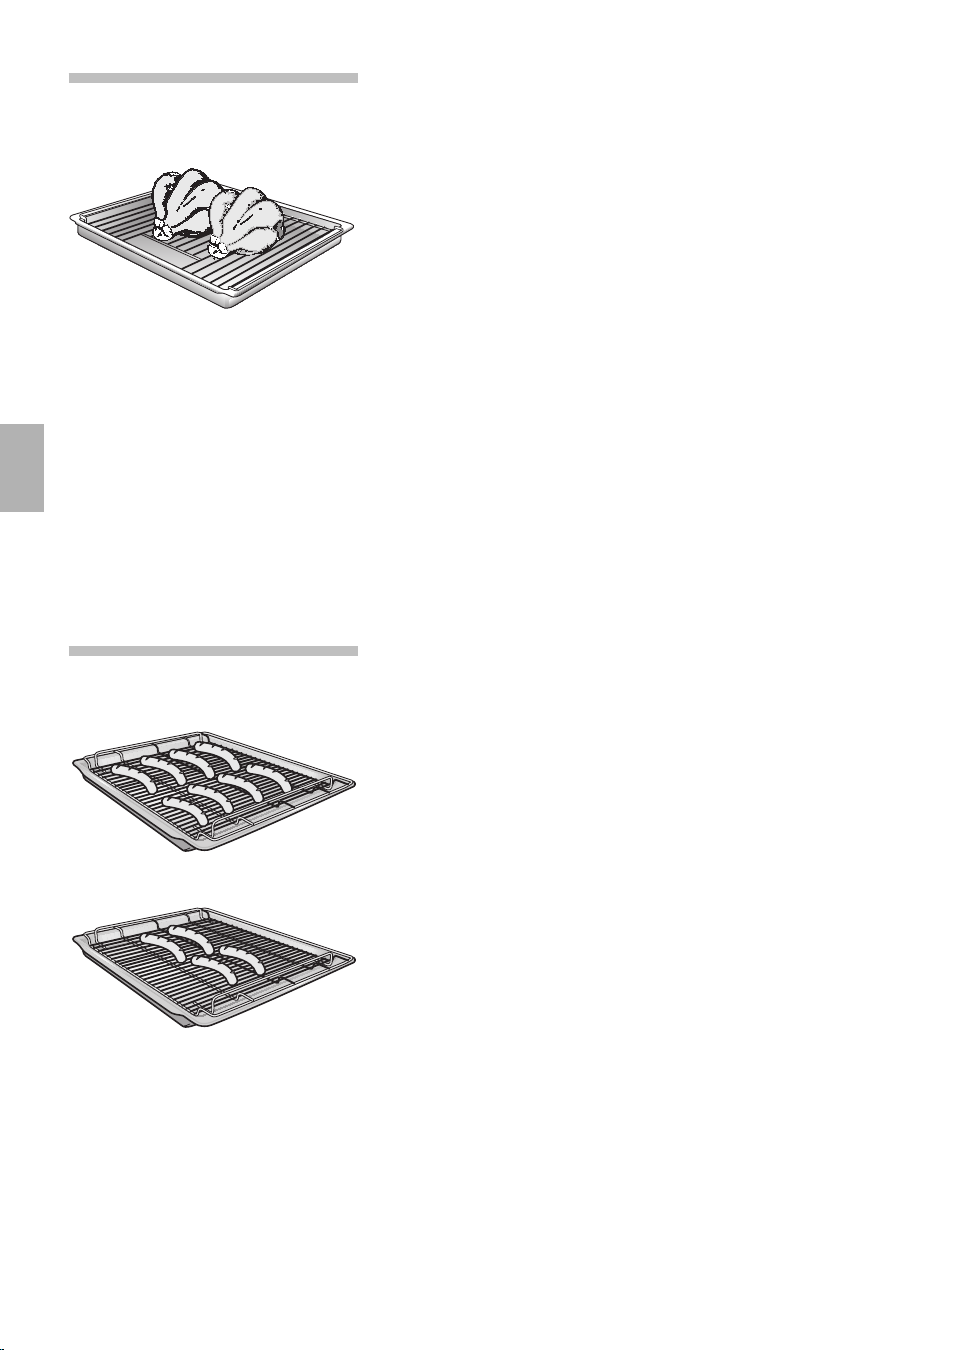
114
Grill con ventola , Per polli o arrosti (arrosto di maiale con cotenna)
molto croccanti.
Usate la griglia e la leccarda. Rivoltate i grandi pezzi
di arrosto dopo circa la metà del tempo cottura.
Dopo la cottura al grill, non poggiate le stoviglie di
vetro su una superficie fredda o bagnata, ma su un
canovaccio asciutto, per evitare che il vetro si rompa.
Nella cottura al termogrill, secondo la pietanza da
grigliare, al di sopra della griglia il forno si può
sporcare molto. Perciò pulite il forno dopo ogni
impiego, per evitare che lo sporco possa bruciare ed
attaccarsi.
Rivoltate il pollo intero dopo circa due terzi del tempo
di cottura. Affinché il grasso possa scolare, forate
sotto le ali la pelle dell'anatra e dell'oca.
Fate riposare la pietanza pronta per altri 10 minuti
circa a forno spento e chiuso.
Cottura al grill Per pietanze piane piccole.
(
Usate sempre la griglia e la leccarda.
Rivoltate la pietanza da grigliare dopo circa due terzi
del tempo.
Ungete leggermente con olio griglia e pietanza a
discrezione, anche più volte.
)

115
Scongelare e cuocere
Scongelamento con
aria calda CircoTherm
*
Avvertenze importanti Per scongelare e cuocere prodotti congelati o
surgelati utilizzare solo aria calda CircoTherm.
Per tutti gli alimenti surgelati, osservate in linea
di massima le indicazioni del produttore.
I prodotti congelati o surgelati (soprattutto la
carne) dopo essere stati scongelati richiedono
generalmente tempi di cottura più brevi rispetto ai
prodotti freschi, poiché il congelamento provoca
quasi una precottura.
Se s'inforna carne surgelata, al tempo di cottura si
deve aggiungere il tempo di scongelamento.
Il pollame surgelato deve essere sempre
scongelato prima della cottura, per poter togliere le
interiora.
Cucinate il pesce surgelato alle stesse temperature
del pesce fresco.
I pasti precotti surgelati in vaschette-porzioni di
alluminio possono essere infornati
contemporaneamente in quantità maggiore.
Livelli d’inserimento Con 1 teglia: livello 1
Con 2 teglie: livello 1 + 3.
Le indicazioni dei tempi rappresentano valori
orientativi, che vengono influenzati dalla forma e
dalla quantità dei prodotti surgelati.

116
Scongelamento e cottura Scongelate i prodotti surgelati crudi o alimenti
congelati in linea di massima a 50° C.
A temperature di scongelamento più alte vi è
pericolo di essiccazione.
Scongelate a 130 –140° C le pietanze surgelate
confezionate in foglio di alluminio o in contenitori
chiusi di alluminio.
Scongelare e riscaldare i prodotti da forno surgelati
ad una temperatura di 100 –140° C. Per ottenere
una crosta più bella, inumidite leggermente pane,
panini o dolci di pasta lievitata.
Scongelate i dolci asciutti surgelati ad una
temperatura di 160 –170° C, per 20 – 30 minuti.
Scongelate i dolci umidi surgelati (ricoperti con
frutta) a 160 –170° C, per 30 – 50 minuti. Avvolgete i
dolci in un foglio di alluminio per evitare che la frutta
si essicchi.
Scongelare e poi tostare i toast surgelati
(già imbottiti) a 160 – 170° C, per circa 20 minuti.
Pizza surgelata:
Seguire le istruzioni dei produttori.
Grado di scongelamento
e Solo per dolci delicati (p. es. torte alla panna).
Girate il selettore delle funzioni sulla posizione e.
Scongelate il dolce, secondo la grandezza e il tipo,
per 25 – 45 minuti.
Poi lasciatelo scongelare completamente fuori del
forno per 25-45 minuti.
Nel caso di piccole quantità (pezzi piccoli), il tempo
di scongelamento diminuisce a 15 – 20 minuti e il
tempo di fine scongelamento a 10 –15 minuti.

117
Pulizia e manutenzione
Avvertenze Per la pulizia non adoperate mai sostanze abrasive,
importanti
prodotti corrosivi e oggetti che graffiano.
Non raschiate residui di cibo bruciati, ma
ammorbiditeli con un panno umido e detergente.
Prodotti di pulizia particolarmente consigliabili
possono essere acquistati tramite il servizio
assistenza clienti.
Esterno dell'apparecchio
Fronte in acciaio Versate un detersivo liquido per piatti
inox/alluminio commerciale su un panno morbido, umido o su una
pelle per vetri.
Non usare detergenti aggressivi, spugne che
graffiano o panni per pulizia ruvidi.
In caso di forte sporcizia, usare detersivi commerciali
comuni per superfici di acciaio inox/alluminio
opacizzate. Osservare le istruzioni del produttore.
Smalto e vetro Versate un detersivo liquido per piatti
commerciale su un panno morbido, umido o su una
pelle per vetri.
Vetro della porta del forno Il vetro interno della porta del forno, al fine di
abbassare la temperatura, è dotato di un
rivestimento per riflettere il calore.
Esso non pregiudica la vista attraverso la finestra
della porta del forno.
A porta aperta questo rivestimento può apparire
come una patina chiara. Questa è una caratteristica
tecnica e non costituisce un difetto di qualità.
Piano di cottura Al piano di cottura è accluso un apposito libretto di
istruzioni per l'uso.
Osservate tutte le istruzioni per la pulizia in esso
indicate.
Forno Pulire il forno dopo ogni uso, specialmente dopo
l’arrosto o la cottura al grill.
Al successivo riscaldamento lo sporco bruciandosi si
attacca.
Lo sporco bruciato é molto difficile da rimuovere.

118
Avvertenze:
per evitare sporcizia usare:
• Aria calda Circo Therm. Nell'impiego di Aria
calda Circo Therm lo sporco è minore rispetto
agli altri tipi di funzionamento.
• per cuocere dolci molto umidi la leccarda.
• per l'arrosto il contenitore adatto ( pentola per
arrosti ).
Per una pulizia più facile
si può accendere la lampada del forno e sganciare la
porta del forno.
Per pulire la bocca del forno dietro la porta,
dovreste sganciare la guarnizione della porta del
forno.
Superfici smaltate Utilizzare una soluzione alcalina di lavaggio calda o
nel forno acqua e aceto.
Se il forno è molto sporco, è preferibile utilizzare un
detergente per forno.
Consigliamo pulitori per forno in forma di gel, poiché
questi possono essere applicati dov'è necessario.
Non eseguire nessuna pulizia a caldo con
detergenti appositamente previsti per il forno.
Dopo una pulizia, lasciare il forno aperto per farlo
asciugare.
Inoltre:
a temperature molto elevate lo smalto si cuoce.
Durante questo precesso potrebbero generarsi
variazioni cromatiche. Questo è normale e non
influisce in alcun modo sul funzionamento. Non
utilizzare detergenti corrosivi o spazzole abrasive
per trattare questi fenomeni di scolorimento.
I bordi delle lamiere sottili non sono completamente
smaltati e possono pertanto apparire grezzi.
La protezione contro la corrosione è garantita.

119
Rivestimento
catalitico
del forno
Pulizia delle superfici La parete posteriore è rivestita con uno strato di
catalitiche del forno smalto autopulente. Si pulisce automaticamente
mentre il forno è in funzione. Talvolta gli spruzzi di
dimensioni maggiori vengono eliminati soltanto dopo
ripetuti cicli di funzionamento del forno.
Non pulire mai la parete posteriore con detergenti
per forno.
Il leggero scolorimento dello smalto non influisce in
alcun modo sul processo di autopulizia.
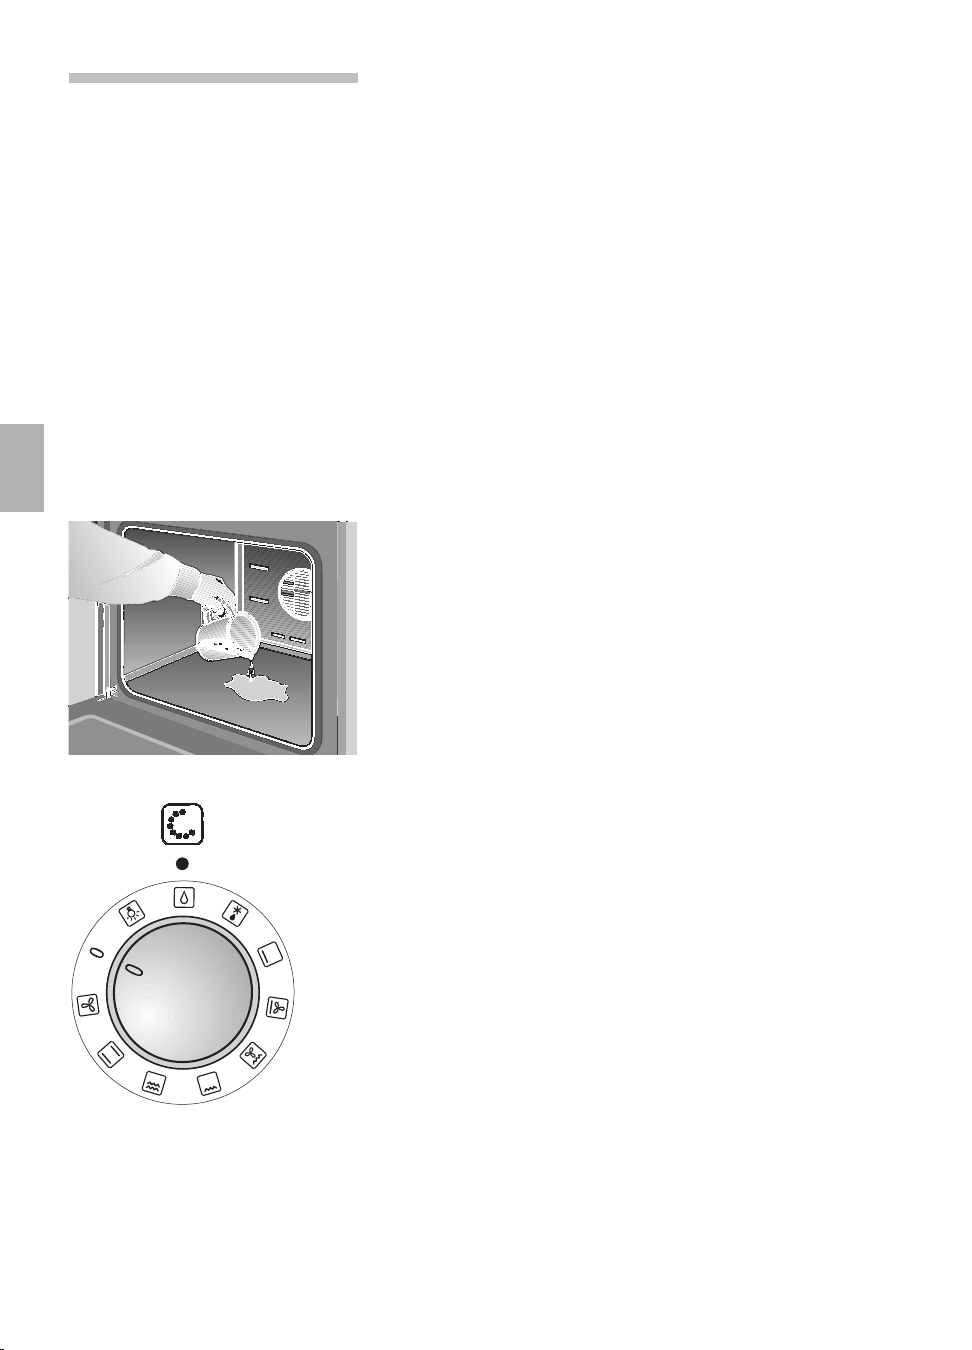
120
Sistema di pulizia
Per rendervi più agevole la pulizia del forno,
EasyClean
®
d
l'apparecchio è dotato di un sistema ausiliario di
pulizia. Per mezzo dell'evaporazione guidata
automaticamente di una soluzione di lavaggio,
i residui di sporco sullo smalto si ammorbidiscono,
a causa del calore e del vapore acqueo, e infine
possono essere rimossi più facilmente.
Attenzione:
Non versare acqua fredda nel forno caldo.
Il sistema ausiliario di pulizia può essere inserito
solo quando il forno si è completamente
raffreddato (temperatura ambiente).
Usate solo normale acqua di rubinetto, non acqua
distillata.
Inserire:
1. Togliete dal forno la teglia da forno e la leccarda.
La griglia può restare nel forno.
2. Versate nella vaschetta di fondo del forno circa
0,4 litri di acqua con un poco di detersivo.
In caso di sporco intenso, prima di accendere
potete attendere un poco per fare reagire la
soluzione di lavaggio.
3. Chiudete la porta del forno.
4. Ruotate il selettore funzioni sulla
posizione
d
. Le lampade spia per la pulizia del
forno e la temperatura del forno s’illuminano.
Trascorso il tempo di riscaldamento (4 minuti), la
lampada spia per la temperatura del forno si
spegne. Dopo altri 17 minuti il programma è
terminato. Risuona un segnale acustico.
Spegnere:
Ruotate il selettore delle funzioni sullo 0.
La lampada spia per la pulizia del forno si spegne.
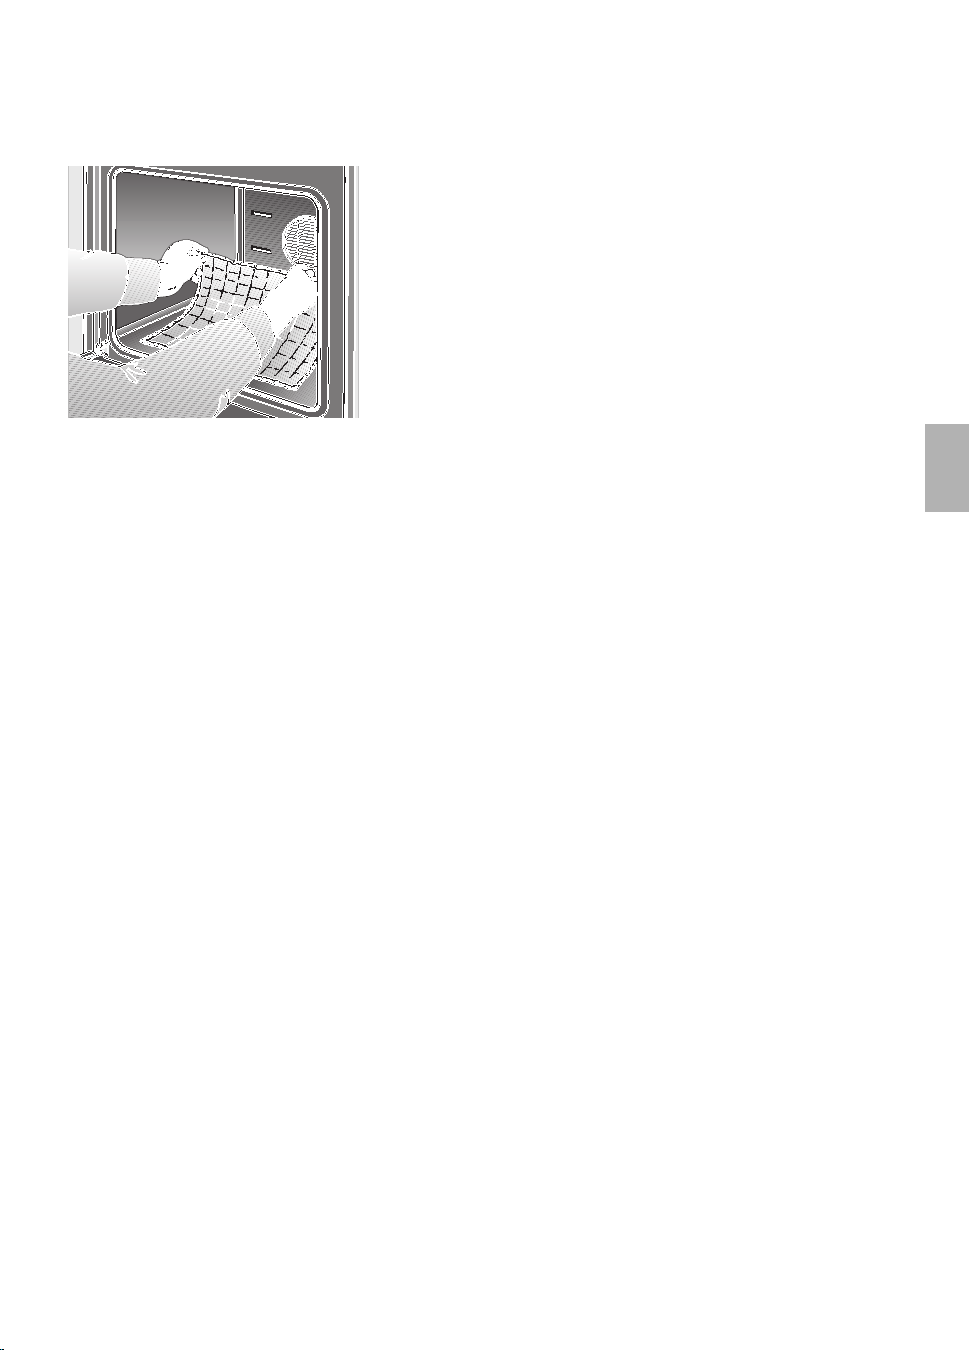
121
Dopo avere disinserito il Avvertenze:
sistema ausiliario di pulizia Non lasciare l'acqua residua nel forno per lungo
tempo, p. es. durante tutta la notte.
1. Aprite la porta del forno e assorbite l'acqua
residua con un panno-spugna grande, molto
assorbente.
2. Pulite il forno con il panno-spugna imbevuto della
soluzione di lavaggio, con una spazzola morbida,
oppure con una paglietta di plastica per lavare le
pentole.
Potete rimuovere i residui resistenti ancora
presenti con un raschietto per vetro
(per vetroceramica).
Attenzione: maneggiate il raschietto con
precauzione e non tenetelo con il manico troppo
inclinato, per evitare di graffiare lo smalto!
3. Potete rimuovere gli orli di calcare con un panno
imbevuto di aceto.
4. Strofinate di nuovo il forno con il panno-spugna
sciacquato in acqua pulita, e poi asciugatelo
strofinando con un panno morbido (anche sotto
la guarnizione della porta del forno).
Avvertenze:
Se il forno è molto sporco, potete ripetere
l'operazione dopo il raffreddamento.
In caso di sporco intenso con grasso, dopo l'arrosto
o la cottura sulla griglia, consigliamo di strofinare con
detergente per stoviglie i punti sporchi, prima di
attivare il sistema ausiliario di pulizia.
Dopo la pulizia, lasciate la porta del forno per circa
1 ora nella posizione di arresto obliqua a ca. 30°,
affinché le superfici smaltate del forno possano
asciugarsi bene.
Asciugatura rapida
1. Portate la porta del forno nella posizione di
arresto obliqua a ca. 30°.
2. Disponete il selettore delle funzioni sulla
posizione * e il selettore della temperatura
sulla 50° C.
Durata: 5 minuti.
3. Poi riportate il selettore delle funzioni e il selettore
della temperatura sullo 0.
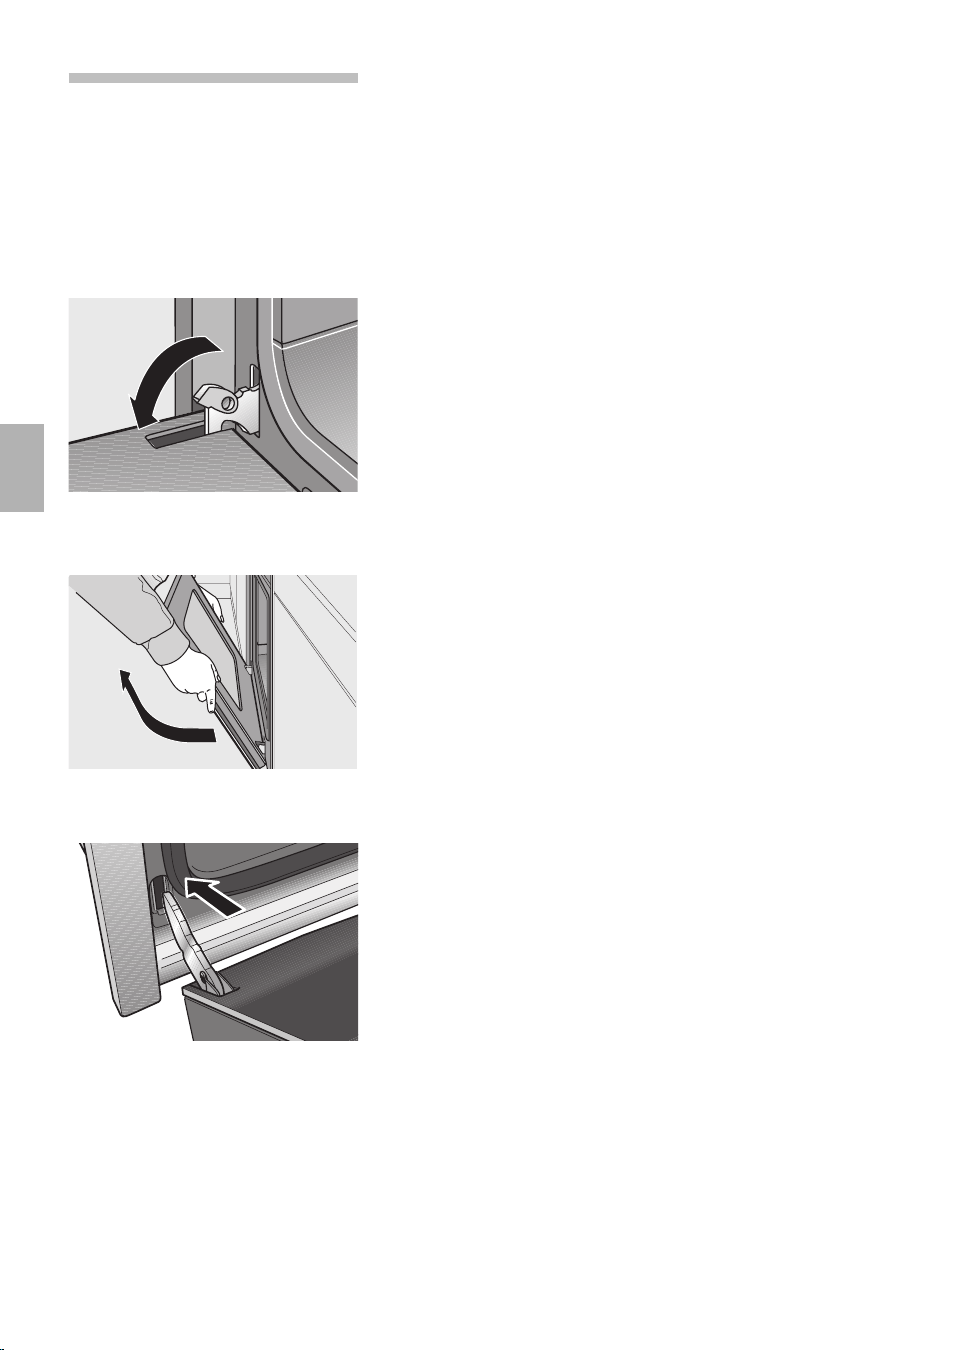
122
Smontare la porta
del forno
Porta del forno Avvertenza: oltre il sistema ausiliario automatico di
pulizia, per una pulizia più comoda l'apparecchio Vi
offre le possibilità seguenti.
Sganciare
Estraendo la porta del forno fare attenzione a
non toccare la cerniera. Pericolo di lesioni!
1. Aprite completamente la porta del forno.
2. Ribaltate completamente in fuori le leve di arresto
a sinistra e a destra.
3. Muovere la porta del forno in posizione obliqua
finché non si avverte una resistenza. Afferrarla
con entrambe le mani a sinistra ed a destra,
chiudere ancora un poco ed estrarre.
Agganciare
1. Inserite le due cerniere nei supporti a sinistra e a
destra e ruotate in basso la porta del forno.
2. Chiudete le leve di arresto a sinistra e a destra.
3. Chiudete la porta del forno.
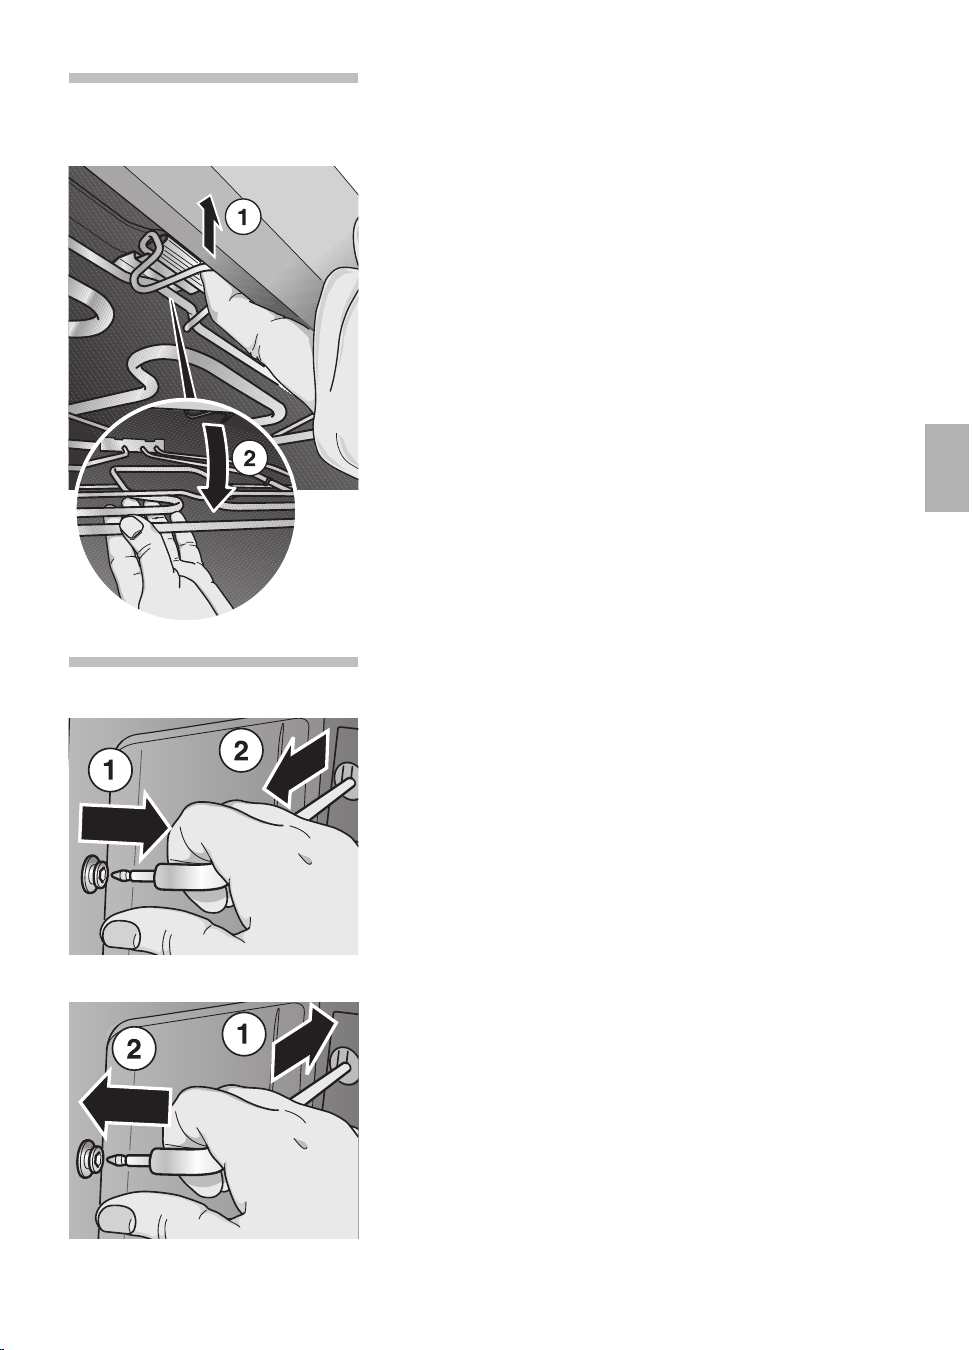
123
Abbassare l’ele-
Per pulire meglio il soffitto del forno, abbassare
mento riscaldante
l’elemento riscaldante del grill.
Attenzione: l’elemento riscaldante deve essere
freddo.
1. Premere la staffa d’arresto verso l’alto, finché non
si sente lo scatto di sgancio.
2. Sostenere l’elemento riscaldante ed abbassarlo
lentamente.
Dopo la pulizia
Sollevare di nuovo l’elemento riscaldante.
Tirare la staffa d’arresto verso avanti e premerla
verso l’alto finché non si arresta.
Griglia di aggancio
Sganciare
1. Estrarre la griglia di aggancio dalla boccola di
sostegno.
2. Sganciare la griglia.
Pulire le griglie con detersivo liquido per piatti e una
spugna oppure con una spazzola.
Agganciare
Dopo la pulizia montare le griglie di aggancio
nell'ordine inverso.
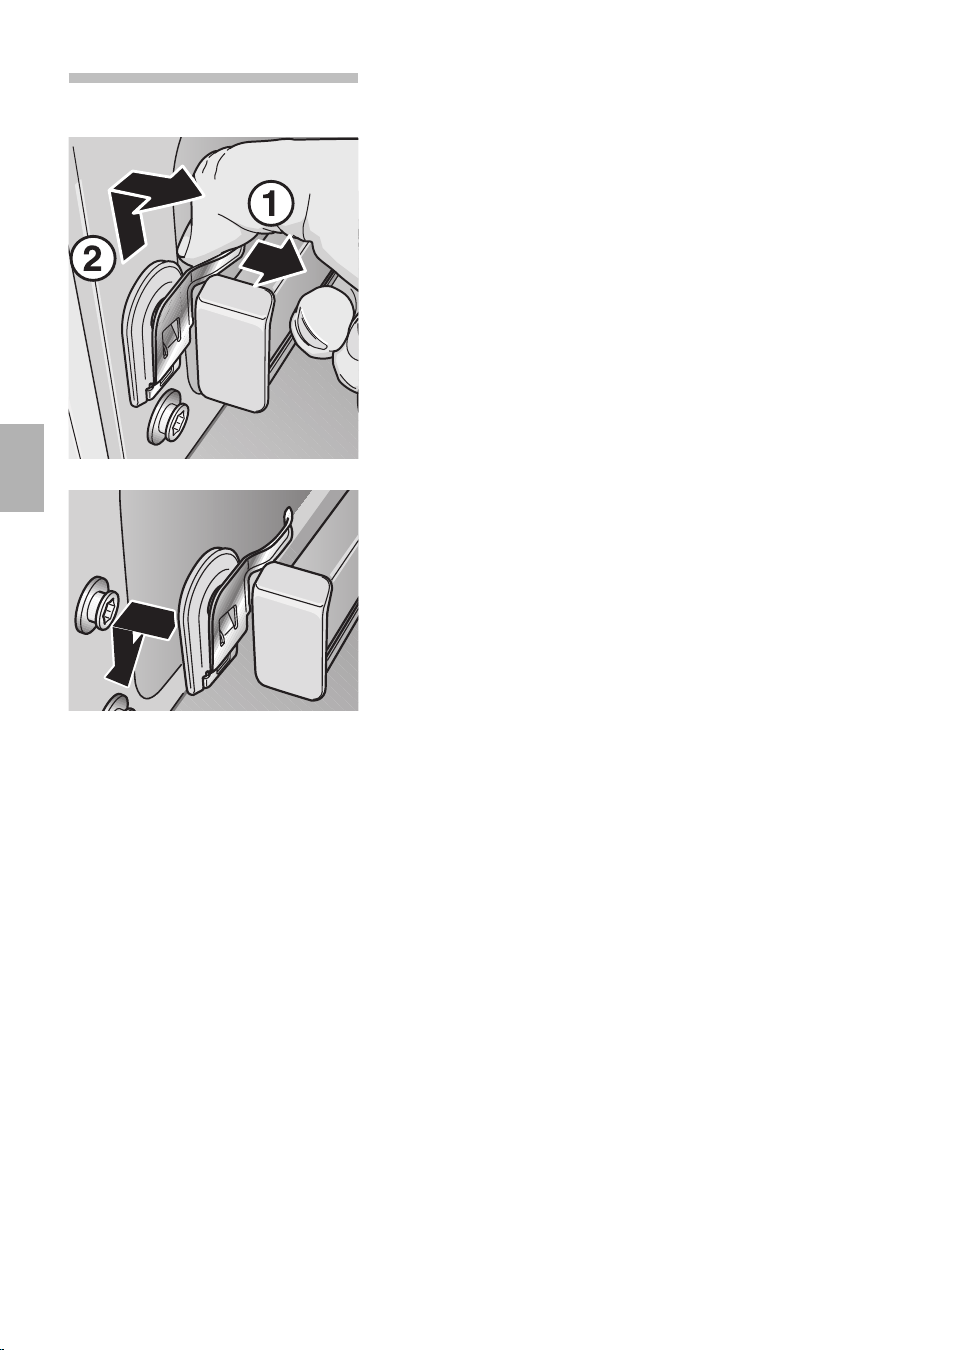
124
Guida telescopica Sganciare
1. Tirare le molle a lamina.
2. Mantenere la molla a lamina e spingere la guida
telescopica verso l’alto.
Pulire le guide telescopiche con detersivo liquido per
stoviglie e spugna oppure con una spazzola.
Agganciare
Inserire dietro la guida telescopica.
Spingere la guida telescopica nel supporto e
premerla verso il basso fino all’innesto.
Spingere sempre le guide telescopiche fino
all’arresto.
Chiudere la porta del forno solo quando tutte le
guide telescopiche sono state spinte nell’interno.
Attenzione: le guide telescopiche durante il
funzionamento del forno si riscaldano molto.
Prestare molta attenzione a non scottarsi quando
sono estratte.

125
Guasti e riparazioni
In caso di guasti o di riparazioni, che non siete in
grado di effettuare Voi stessi, il servizio assistenza
clienti è a Vostra disposizione. Trovate gli indirizzi
nell'elenco dei centri di assistenza.
Attenzione: non spendete inutilmente il vostro
denaro, chiamando il servizio assistenza per un
Vostro errore nell'uso.
Sigla del prodotto e Trovate questi dati sulla targhetta d'identificazione
numero di fabbricazione dell'apparecchio. La targhetta d'identificazione si
trova dietro la porta del forno, sotto a sinistra,
sull'orlo laterale del forno.
In caso di ricorso al servizio assistenza siete pregati
di indicare:
E-Nr. FD
Sostituzione della Attenzione: togliere corrente all’apparecchio!
lampadina del forno Fare ciò disinserendo il dispositivo automatico di
sicurezza oppure svitando i fusibili nella cassetta
delle valvole dell’impianto domestico.
1. Stendete nel forno freddo uno strofinaccio per
stoviglie, per evitare danni.
2. Svitate il coperchio della lampada girando a
sinistra.
3. Cambiare la lampada.
– Lampada ad incandescenza tipo E 14,
220–240 Volt, 40 Watt, termoresistente fino a
300° C.
–Trovate la lampada ad incandescenza presso il
servizio assistenza clienti, oppure nel
commercio specializzato.
Sostituzione della guarnizione
della porta del forno Smontate le guarnizioni della porta del forno
difettose semplicemente sganciandole.
Trovate la guarnizione nuova presso il servizio
assistenza clienti.

126
Che fare in questi casi?
Non sempre è necessario telefonare al servizio assistenza clienti. In molti casi potete
rimediare Voi stessi. Nella tabella seguente trovate alcuni suggerimenti.
Avvertenza fondamentale:
I lavori ai componenti elettronici dell'apparecchio devono essere eseguiti solo da un
tecnico. Prima di iniziare questi lavori, è indispensabile togliere tensione
all'apparecchio, disattivando l'interruttore di sicurezza, oppure svitando i fusibili nella
cassetta delle valvole della Vostra abitazione.
Che fare se . . . Causa possibile Rimedio
. . . il funzionamento generale è Fusibile guasto Controllare il fusibile elettrico nella
disturbato, p. es. le lampade cassetta delle valvole e sostituire in
spia non si accendono più? caso di guasto.
. . . liquido o pasta molto fluida L’apparecchio non Verificare il montaggio.
tendono a disporsi di lato? poggia o non é incassato
orizzontale.
. . . il forno e la zona di cottura L’interruttore a tempo é Regolare l’interruttore a tempo a
anteriore sinistra improvvisa- regolato su timer funzionamento senza timer automatico:
mente non funzionano più? automatico 1. Premere il tasto :.
2. riportare la durata di
funzionamento
? a 0:00.
. . . se il forno e la zona di L’alimentazione elettrica Regolare di nuovo l’ora attuale.
cottura anteriore sinistra si è interrotta brevemente.
improvvisamente non
funzionano più e il timer
elettronico indica 0:00
intermittente?
. . . se si verfica un malfunziona- Impulsi energetici Regolare di nuovo le funzioni relative.
mento delle funzioni con (per es. fulmine).
comando elettronico?
. . . se dopo avere inserito il Temperatura nel forno Fare raffreddare completamente il forno
sistema ausiliario di pulizia la ancora troppo alta, p. es. prima di usare il sistema ausiliario di
lampada spia non s’ilumina? per un uso prolungato pulizia.
delle zone di cottura.
Lampada spia difettosa. Fare sostituire da un tecnico
autorizzato.
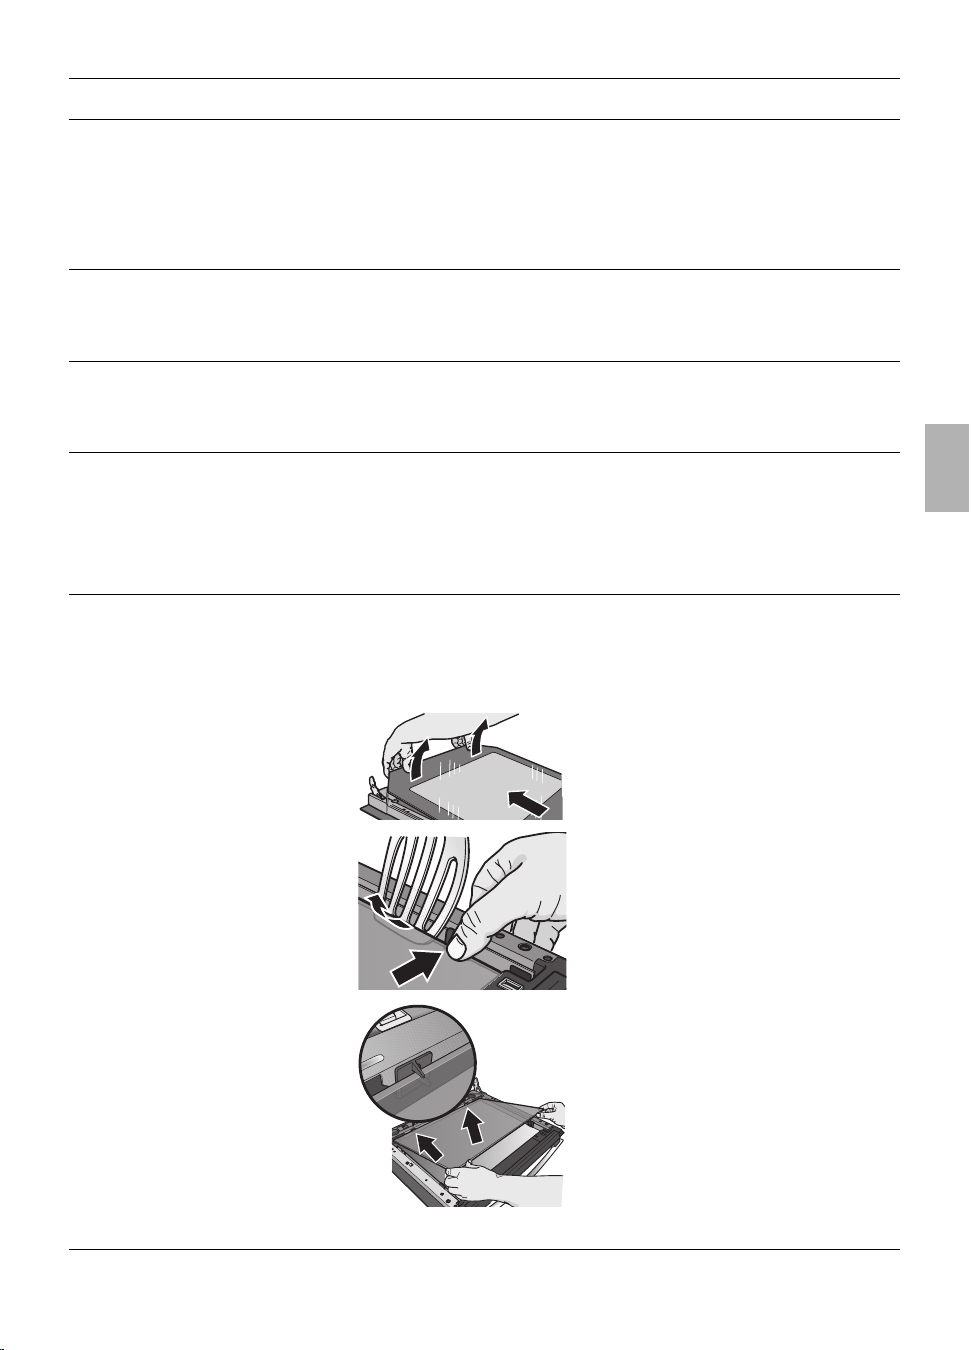
127
Che fare se . . . Causa possibile Rimedio
. . . dell’arrosto o alla griglia si Temperatura di cottura
sviluppa fumo? troppo alta.
Griglia o leccarda inserite Disporre la griglia nella leccarda ed
male. introdurle insieme in una altezza
d’inserimento.
. . . gli elementi ad inserimento Fenomeno normale Non vi è rimedio.
smaltati presentano macchine causato dal gocciolare
opache, chiare? di succo di carne.
. . . il vetro della porta o vetro Fenomeno normale. Accendere il forno per ca. 5 minuti
della finestra del forno si È causato dalla differenza a 100° C.
appanna? di temperatura.
. . . nel forno compare molta Fenomeno normale, per Durante la cottura ogni tanto aprire e
acqua di condensazione? es. in caso di dolce con richiudere la porta del forno, alla fine
copertura molto umida della cottura asciugare l’acqua di
(frutta) o di grande condensazione.
arrosto.
. . . dopo un lungo uso i vetri Sporco normale Sganciare la porta del forno e
della porta del forno sono deporla, con il lato anteriore rivolto
sporchi nell’interno? verso il basso, su uno canovaccio,
pulito.
Afferrare il vetro della porta accanto
alla cerniera, estrarlo e sollevarlo
leggermente. Staccare il vetro della
porta in direzione della cerniera.
Premere su un lato con il pollice il
fermaglio d’arresto e sull’altro lato
estrarre il vetro interno della porta
per es. con una paletta.
Montaggio dopo la pulizia:
inserire il vetro interno della porta
nella sede. Arrestare prima il lato
destro e poi l’altro lato.
Agganciare il vetro della porta
premendolo accanto alle cerniere.

128
Istruzioni di montaggio
Per l’installatore e il tecnico
die cucine
Avvertenze importanti Smaltire in modo regolamentare il
materiale d'imballaggio.
Non usare la maniglia della porta del
forno per il trasporto e il montaggio
dell'apparecchio.
Attenzione: l'allacciamento e la messa
in funzione devono essere eseguiti solo
da un tecnico autorizzato.
Impiegare per l'allacciamento un cavo
di collegamento alla rete
H05RR-F 3x1,5
9
.
Assorbimento nominale, tensione
nominale e N° del tipo di apparecchio:
vedi targa portadati dell’apparecchio,
dietro la porta del forno, in basso a
sinistra, sul bordo laterale del forno.
La targhetta d'identificazione si trova
sulla parete laterale dell'apparecchio.
La sicurezza elettrica dell'apparecchio
è assicurata solo se il cavo di terra
nell'impianto domestico è installato in
modo conforme alle disposizioni.
In caso di riparazioni dell'apparecchio
togliere sempre la corrente.
Cucine da incasso collegabili HSE-6PA4030
HSE-6PA3W30
HSE-6PL4030
L'apparecchio installato regolarmente
deve essere coperto su tutti i lati, in
modo che sia impossibile un contatto
con parti funzionali anche se isolate.
La copertura deve essere smontabile
solo con il ricorso ad utensili.

129
Programmi di mobili Per il forno da incasso sono utilizzabili
tutti i mobili per il montaggio del forno
di tutti i programmi di cucine. I mobili
per il montaggio del forno devono
essere lavorati con fogli per
impiallacciatura o rivestimenti in
materiale sintetico con adesivi resistenti
al calore (90˚ C). Se i rivestimenti in
materiale sintetico o gli adesivi non
sono sufficientemente termoresistenti, il
rivestimento può deformarsi o scollarsi.
Installazione del forno
Attenzione L'apparecchio può essere montato con
un solo fianco accanto ad un mobile
alto o ad una parete alta. L'altezza del
lato opposto non deve superare il piano
di lavoro nel quale è montata la cucina.
La distanza laterale della cucina rispetto
ad un mobile alto e rispetto alla parete
posteriore deve essere conforme alle
istruzioni di montaggio per la cucina da
incasso e rispettare la classe di
sicurezza per il riscaldamento indicata
nelle istruzioni.
Il montaggio dell’apparecchio da
cucina ad incasso deve avvenire solo
senza la corrente elettrica.
Per esempio disinserendo il fusibile nelle
rete della casa.
L’intaglio del piano di lavoro per la
madia di cottura ad incasso deve
essere già previsto (vedasi le istruzioni
per l’uso della madia di cottura ad
incasso).
560
490
100
100
30-50
585
550
m
ind.
mind. 560
15
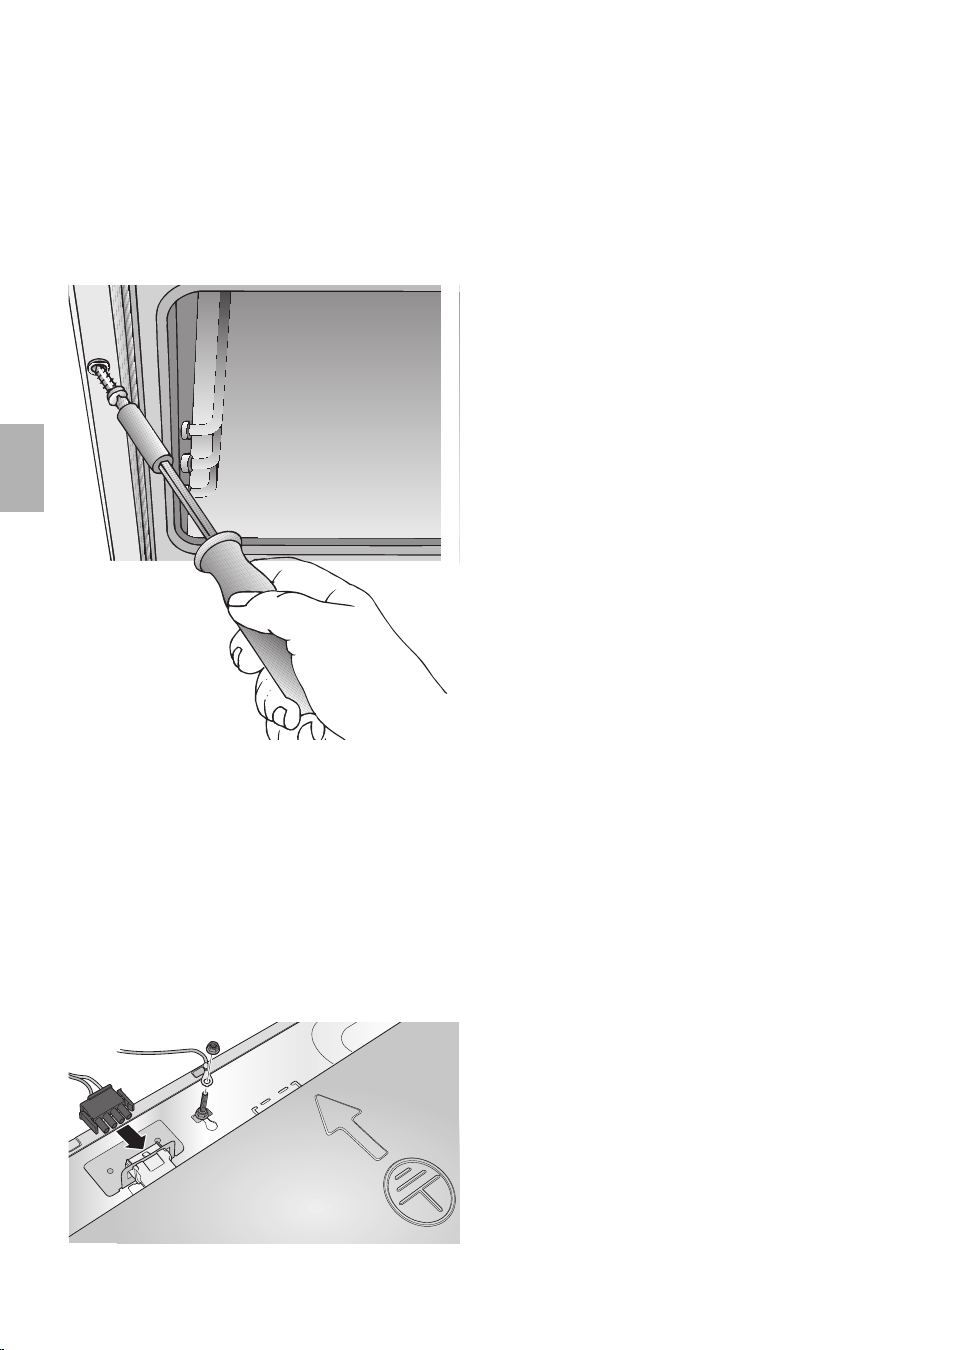
130
Montare 1.
Spingere la cucina nell’apertura
prevista del mobile incorporato e
allinearla orrizontalmente.
Importante per il funzionamento e
per la sicurezza:
Spingere del tutto l’apparecchio da
cucina.
2. Aprire lo sportello del forno e
fissare la cucina ai bordi laterali
del mobile, ciascun bordo con
una vite. Nell'avvitare le due viti
(sono accluse in una bustina alla
cucina da incasso) tenerle legger-
mente oblique verso l'esterno.
Preghiamo di usare solo queste viti.
3. Controllare che la cucina venga
montata orrizontalmente e ben
fissata e che le misure del
montaggio vengano rispettate.
Negli apparecchi con guide
telescopiche, le guide non devono
muoversi da sole.
Negli apparecchi con sistema
ausiliario di pulizia automatico,
dopo avere versato 0,4 litri di
liquido sul fondo del forno, il
liquido non deve traboccare in
avanti.
4. Con il cavo per il contatto di terra,
eseguire l’allacciamento elettrico tra
l’apparecchio da cucina e la madia
di cottura, mediante la spina di
allacciamento e la striscia prese.
5. Eseguire l’allacciamento elettrico tra
l’apparecchio da cucina e la presa di
corrente con contatto di terra
mediante la spina di allacciamento
alla rete.
6. Montaggio della madia di cottura.
Fare assolutamente attenzione
alle istruzioni per l’uso allegate
agli apparecchi.
7. Controllo del funzionamento.


5750 206 294
Printed in Germany 1006 Es.