Simple electronic controls are user-friendly. The LED screen shows refrigerator and freezer temperatures, displays water filter status, dispenser information, and more.
2. ICE PLUS
When this feature is activated, the freezer section will run at the coldest temperature for a 24- hour period to increase ice production.
3. FILTERED WATER AND ICE DISPENSER
The water dispenser offers fresh, chilled, filtered water through the door. The ice dispenser offers cubed or crushed ice.
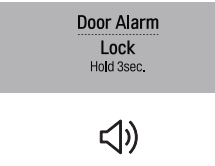
4. DOOR ALARM
A warning alarm sounds at 30-second intervals when the refrigerator or freezer door is left open for more than 60 seconds.
5. SPACEPLUS ICE SYSTEM
The icemaker automatically produces 80–130 ice cubes in a 24-hour period to keep the ice dispenser fully supplied. The in-door design creates more shelf space.
6. CRISPERS
LG’s crispers preserve humidity and help vegetables stay crisp.
7. GLIDE‘N’SERVE (In some models).
Provides storage space with a variable temperature control that keeps the compartment colder than refrigerator.
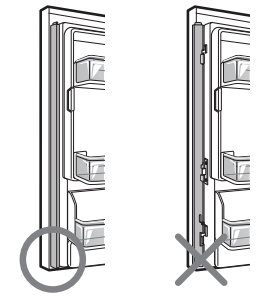
8. MULLION
The door mullion folds in when the left door is opened.
9. AUTO CLOSING HINGE
When you slightly push the door of the refrigerator, it is automatically closed. (The door is automatically closed within 30° of the opening angle.)
10. FRESH AIR FILTER
The Air Filter helps remove odors from the refrigerator.
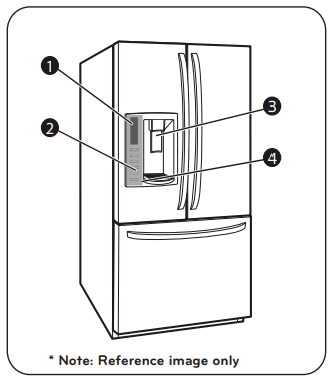
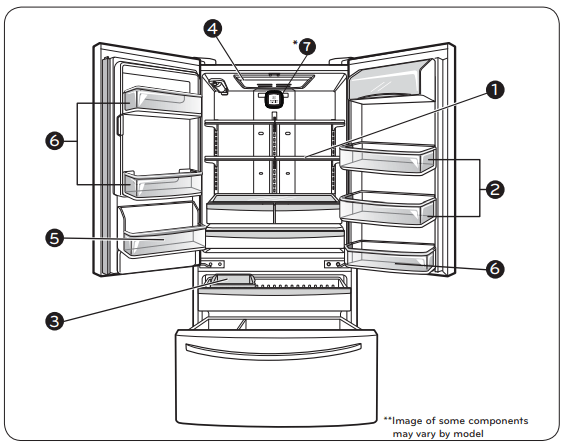
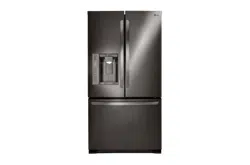
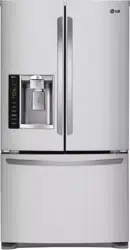
NOTE: This guide covers several different models. The refrigerator you have purchased may have some or all of the items listed below. The locations of the features shown below may not match your model.
KEY PARTS AND COMPONENTS
In addition to the special features and components outlined in the Special Features section, there are several other important components that are referenced in this manual.
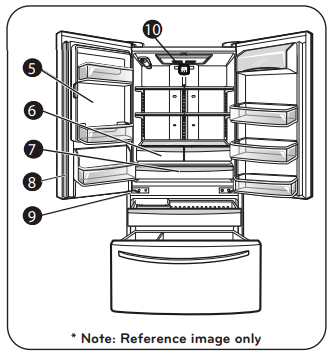
1. ADJUSTABLE REFRIGERATOR SHELVING
The refrigerator compartment shelves are adjustable to allow flexibility for storage needs.
2. GALLON STORAGE BINS
Three interchangeable bins can be arranged to suit your storage needs.
3. REMOVABLE ICE STORAGE BIN
The ice storage bin can be removed to fill ice buckets, coolers, or pitchers.
4. LED INTERIOR LAMPS
Refrigerator interior is lit by the LED array.
5. CAN STORAGE BIN
6. FIXED DOOR BINS
*7. FRESH AIR FILTER (on some models)
The Fresh Air Filter helps remove odors from the refrigerator.
USING YOUR REFRIGERATOR
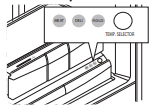
CONTROL PANEL FEATURES
NOTE: The shape of the buttons may not match your model.
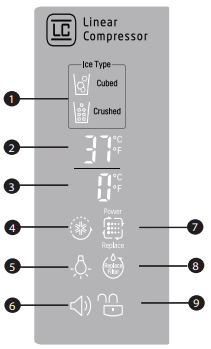
THE LED DISPLAY
The LED display shows the temperature settings, dispenser options, water filter, door alarm, and locking status messages.
1. DISPENSER SELECTION INDICATOR
Shows Cubed ice or Crushed Ice selection that will be dispensed when the push switch is pressed.
2. REFRIGERATOR TEMPERATURE
Indicates the set temperature of the refrigerator compartment in Celsius or Fahrenheit.
3. FREEZER TEMPERATURE
Indicates the set temperature of the freezer compartment in Celsius or Fahrenheit.
4. ICE PLUS
When the ICE PLUS button is pressed, the display will indicate the selected function has been activated.
5. DISPENSER LIGHT INDICATOR
When the LIGHT button is pressed, the display will indicate the selected function: The dispenser light is on, this indicator will appear on the display panel.
6. DOOR ALARM INDICATOR
This indicator shows that the door-open warning alarm is activated.
7. AIR FILTER BUTTON (on some models)
This indicator shows the air filter is activated.
8. WATER FILTER STATUS
This indicator shows the current status for the water filter. See Resetting the Filter Indicator.
9. LOCK STATUS
This indicator shows the current status for the control panel functions is set to LOCK.
ADJUSTING THE TEMPERATURES AND DISPLAY
Adjust Freezer Temperature
To adjust the temperature in the freezer compartment, press the FREEZER button to cycle through the the range of available settings.
Adjust Refrigerator Temperature
To adjust the temperature in the refrigerator compartment, press the REFRIGERATOR button to cycle through the range of available settings.
NOTE: The actual inner temperature varies depending on the food status, since the indicated temperature setting is the target temperature and not the actual temperature within the refrigerator.
Initially set the REFRIGERATOR CONTROL at 37 °F (3°C) and the FREEZER CONTROL at 0°F (-18°C). Leave them at these setting for 24 hours (one day) to stabilize. Then adjust the compartment temperature as illustrated above.
TEMPERATURE DISPLAY
To change the temperature display from Fahrenheit to Celsius:
Simultaneously press and hold the FREEZER and REFRIGERATOR buttons for more than 5 seconds.
Do the same to convert back to Fahrenheit.
POWER SAVING MODE (in some models)
The display will remain off until the next time the door is opened.
The display will also turn on when any button is pressed, and it will remain on for 20 seconds after the last door opening or button selection.
To deactivate the Power-Saving Mode, press the FREEZER and ICE TYPE / ICE PLUS buttons simultaneously and hold them for 5 seconds until the tone sounds.
NOTE: Power Saving Mode function is set on the product.
CAUTION WHEN CLOSING THE DOOR
CAUTION To reduce the risk of door scratches, please make sure that the refrigerator door mullion is always folded in.
OPERATING THE DISPENSER
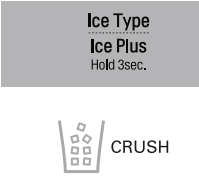
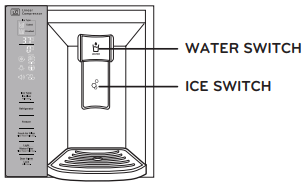
DISPENSING CRUSHED ICE
Press the ICE TYPE / ICE PLUS button to illuminate the Crushed Ice icon. Press the push ice switch with a glass or other container and crushed ice will be dispensed.
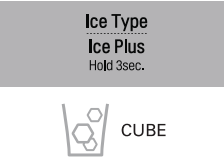
DISPENSING CUBED ICE
Press the ICE TYPE / ICE PLUS button to illuminate the Cubed Ice icon. Press the push switch with a glass or other container and cubed ice will be dispensed.
NOTE: Hold the glass or other container in place for a couple of seconds after dispensing ice or water to catch the last few cubes or drops. The dispenser is designed to not operate while either refrigerator door is open.
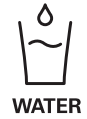
DISPENSING WATER
Press the push WATER switch with a glass or other container and chilled water will be dispensed.
When the water switch is pressed, the light will be illuminated.
Press the LIGHT / WATERFILTER button to turn the dispenser light on and off.
CAUTION
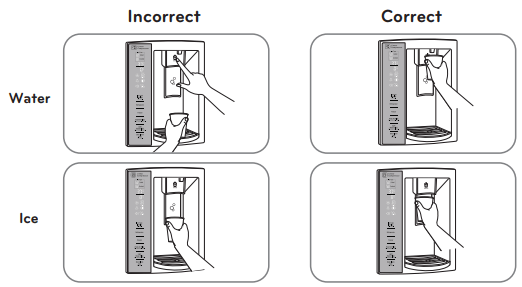
When filling container with a small opening, place the container as close as possible to the opening on the water or ice dispenser.
Do not dispense ice into fine china or crystal glasses. China or crystal can break.
SETTING THE FUNCTIONS
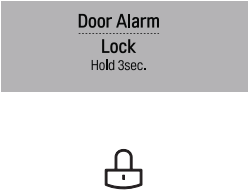
SETTING THE DISPENSER LOCK
Press and hold the DOOR ALARM / LOCK button for three seconds to lock the dispenser and all of the other control panel functions. Press and hold again for 3 seconds to unlock.
SETTING THE DOOR ALARM
The DOOR ALARM / LOCK button also controls the door alarm that sounds three times in 30-second intervals when a compartment door is left open for more than 60 seconds. The alarm stops sounding when the door is closed.
Press the DOOR ALARM/LOCK button once to activate and deactivate the door alarm function.
NOTE: Contact your local service center if the alarm continues to sound after the doors are closed.
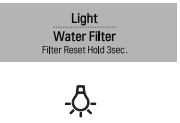
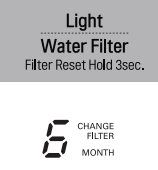
RESETTING THE FILTER INDICATOR
Press and hold the LIGHT / WATER FILTER button for more than 3 seconds to reset the filter indicator after the water filter has been replaced.
NOTE: It is recommended that the filter be replaced when the indicator light on the front dispenser reaches 0. If the water or ice cube taste starts to deteriorates.
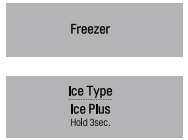
ACTIVATING ICE PLUS
Press by 3 seconds the ICE TYPE / ICE PLUS button once to activate the ICE PLUS function. The ICE PLUS icon on the display panel will illuminate when activated.
The ICE PLUS function runs the freezer compartment at the coldest setting for a 24- hour period to increase icemaking by up to about 20%, and then turns off automatically.
NOTE: Press the button again to deactivate the ICE PLUS function.
ACTIVATING FRESH AIR FILTER
The FRESH AIR FILTER has two settings, Auto ad MAX. In Auto mode, the Air Filter will cycle on and off in increments of ten minutes on and 110 minutes off.
If set to the MAX mode, the Air Filter will stay on continuously for four hours, cycling on and off in increments of ten minutes on and five minutes off.
After four hours, the Air Filter will switch to Auto mode.
Auto mode is the default mode.
Press the Air Filter button once for MAX mode.
When the REPLACE icon turns on, the air filter needs to be replaced. After replacing the air filter, press and hold the Air Filter button for 3 seconds to turn the icon light off. It is recommended to change the air filter approximately every six months.
DIAGNOSTIC FAILURE DETECTION
The diagnostic function automatically detects problems with your refrigerator, and a diagnostic code will appear in the display. NOTE: If a diagnostic code appears in the display during use, note the code and call your Service Center. Refer to the Warranty Card to obtain the telephone number of the Service Center near you.
SPACEPLUS ICE SYSTEM
CAUTION Keep hands and tools out of the ice compartment door and dispenser chute. You could break something or injure yourself.
The icemaker will stop producing ice when the ice bin is full. If you need more ice, empty the ice bin into the extra ice bin in the freezer compartment so the icemaker can keep producing ice.
Shake the ice bin occasionally to level the ice in it. Sometimes the ice piles up near the icemaker, causing the icemaker to misread the amount of ice cubes and stop producing ice.
NOTE: Storing cans or other items in the ice bin may damage the icemaker.
Keep the ice compartment door closed tightly. If the ice compartment door is not closed tightly, the cold air in the ice bin will freeze food in the refrigerator compartment. This could also cause the icemaker to not produce ice.
NOTE: If the On/Off switch on the icemaker is set to Off for an extended time, the ice compartment will gradually warm up to the temperature of the refrigerator compartment. To prevent ice cubes from melting and leaking from the dispenser, ALWAYS empty the ice bin when the icemaker is set to Off for more than a few hours.
CAUTION While you handle the ice bin, keep your hands out of blade. The blade has sharp edges could cause injury
NOTE: To open or close the ice room compartment, push or pull on the handle.
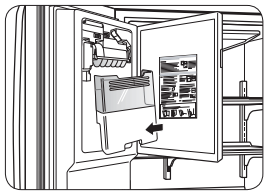
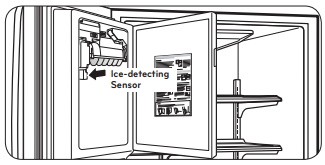
To remove the in-door ice bin, grip the front handle, slightly lift the lower part, and slowly pull out the bin as shown.
To reinstall the in-door ice bin, slightly slant the bin during replacement to avoid contact with the icemaker.
NOTE: Avoid touching the Ice-detecting sensor when replacing the ice bin. See the label on the ice compartment door for details.
AUTOMATIC ICEMAKER
Ice is made in the automatic icemaker and sent to the dispenser. The automatic icemaker can make 10 or 12 ice cubes (depending on your device) at a time, above 100 cubes per 24-hour period. This quantity may vary by circumstance, including freezer compartment temperature, room temperature, number of door openings, freezer load, and other operating conditions.
It takes about 12 to 24 hours for a newly installed refrigerator to make ice.
Icemaking stops when the ice storage bin is full.
To turn off the automatic icemaker, set the icemaker switch to OFF (O). To turn on the automatic icemaker, set the switch to ON (I).
The water pressure must be 20 and 120 psi on models without a water filter and between 40 and 120 psi on models with a water filter to make normal amount and size of ices.
NOTE: It is normal that a noise is produced when ice drops into the ice storage bin.
Even when the water pipe is not connected and the Ice Maker is turned on, the water valve operates. The noise is generated because the water pipe is not connected, which does not mean the icemaker is defective.
WARNING
Personal Injury Hazard
DO NOT place fingers or hands on the automatic icemaking mechanism while the refrigerator is plugged in.
ADJUSTING CONTROL SETTINGS
Give the refrigerator time to cool down completely before adding food. It is best to wait 24 hours before adding food to the refrigerator.
The mid-settings indicated in the previous section should be correct for normal household refrigerator usage. The controls are set correctly when milk or juice is cold to your liking and ice cream is firm.
The refrigerator control functions as the thermostat for the entire appliance. The higher the number setting, the longer the compressor will run to keep the temperature colder. The freezer control adjusts the cold air flow from the freezer to the refrigerator. Setting the freezer control to a lower temperature keeps more cold air in the freezer compartment to make it colder.
If you need to adjust the temperature in the refrigerator or freezer, begin by adjusting the refrigerator first. Wait 24 hours after the refrigerator adjustment to check the freezer temperature. If it is too warm or too cold, then adjust the freezer control as well.
Use the settings listed in the table below as a guide.
CONDITION/REASON:
RECOMMENDED ADJUSTMENT:
REFRIGERATOR section is too warm
Opening the door often
Adding a large amount of food
Room temperature is very warm
Adjust the REFRIGERATOR setting to the next highest number and wait 24 hours, then check.
FREEZER section is too warm/ ice is made too slowly
Opening the door often
Adding a large amount of food
Room temperature is very low (not cycling often enough)
Using ice frequently
Air vents blocked by objects
Adjust the FREEZER setting to the next highest number and wait 24 hours, then check.
Remove any objects blocking air flow.
REFRIGERATOR section is too cold
Controls not set correctly for your conditions
Adjust the REFRIGERATOR setting to the next lowest number and wait 24 hours, then check.
FREEZER section is too cold
Controls not set correctly for your conditions
Adjust the FREEZER setting to the next lowest number and wait 24 hours, then check.
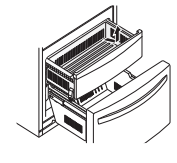
FREEZER SECTION
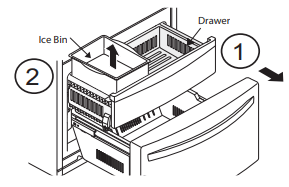
ICE BIN (In some models)
To remove Ice Bin:
Pull the drawer as much as possible (1).
Raise the ice box and take it out carefully (2).
To reinstall Ice Bin:
Take the drawer off as much as possible and put the ice bin in the right position.
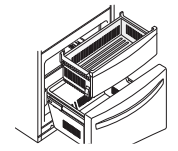
DURABASE (in some models).
Fully extend the freezer drawer. Lifting part and pull it up (1).
To put it back, insert the Durabase in the rail assembly (2).
DURABASE DIVIDER (in some models)
Allows organizing the Durabase area in 2 sections.
For moving the divider, just move it in the direction that you want.
WARNING: In order to prevent accidents, such as suffocation, DO NOT let 2children and pets play inside the durabase.
WARNING: There is enough space for the children to play.
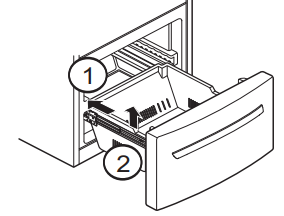
Pull-Out Drawer
To reinstall, pull out and fully extend both rails. Insert the end of rib in the bracket at left and right. Making sure that the guides at the front are lined up properly, gently push down on both sides.
REFRIGERATOR CARE AND CLEANING
The refrigerator, as well as the freezer, do their own de-freezing. This process does not prevent the build up of contaminants, therefore it is suggested that you clean both parts once a month; clean spilled liquids immediately.
REFRIGERATOR CLEANING
Unplug your refrigerator.
Pull out all of the removable parts (such as the vegetable and dairy doors).
Use a clean sponge (or a soft rag) and use it with lukewarm water mixed with detergent. Do not use abrasive or concentrated cleaners.
Hand wash it, and dry it thoroughly.
Plug the refrigerator back in.
OUTSIDE
Wax the outside in order to create better protection. Make sure you use a product specifically design to be used for electro-domestic products (car wax is acceptable). Use a clean, soft rag, and perform this task twice a year. For metal-made refrigerators, do not wax, simply clean it with water and detergent. Do not use concentrated or abrasive products.
NOTE: Avoid the usage of chemical products that contain phosphates or bleach.
INSIDE (Allow freezer to slightly warm up a small degree to prevent cloth from sticking)
In order to eliminate bad odors, clean the inside of the refrigerator with a mixture of baking powder and lukewarm water (one teaspoon of baking powder per cup of water). Ensure that the powder dissolves thoroughly, in order to prevent any sort of damage.
DOOR LINING AND GASKETS
Use only a mild detergent (such as dish soap).
PLASTIC PARTS (Covers and Panels)
Do not use abrasive, paper or rough products. These could damage the product.
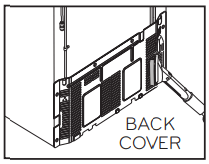
BACK COVER
NOTE: Back Cover should only be removed by a qualified technician.
In order to get an efficient performance of your refrigerator, clean the back cover of it at least twice a year.
REPLACING REFRIGERATOR LIGHTS
NOTE: The interior lighting for refrigerator uses LED lighting.
DO NOT try to change any LED module. LED lighting should only be replaced by qualified technician.
POWER INTERRUPTIONS
In case of a black out, call your electric company and ask how long it will last.
In case of a 24 hour or less black out, do not open the refrigerator; this will keep the food fresh.
In case of a longer black out, do one of the following options:
Pull out all of the frozen food and keep them in an ice chest.
Put 2 lbs (907 g) of frozen ice (make sure you use gloves) for each square foot (28 L) inside the freezer.
This task will preserve the food from 2 to 4 days.
In case you do not possess neither ice chest or dry ice, consume your food as soon as possible.
REMEMBER: In a power failure, a full freezer stays cold longer than a partially filled one. A freezer full of meat stays cold longer than a freezer full of baked goods. If you see that food contains ice crystals, it may be safely refrozen, although the quality and flavor may be affected. If the condition of the food is poor or if you feel it unsafe, dispose of it.
WHEN GOING ON VACATION
If you decide to leave your refrigerator on when going away, consider these steps:
Consume all of the perishable items and freeze the rest.
Empty the ice bin.
If you decide to leave your refrigerator off:
Remove all of the food.
Unplug your refrigerator.
Clean and dry it well.
Make sure the doors stay open (use blocks or tape) in order to prevent bad odors and fungi from happening.
WHEN MOVING
If you decide to take your refrigerator with you when moving, consider the following:
Remove all of the food from it, and place the frozen food in an ice chest with dry ice.
Unplug your refrigerator.
Empty the water from its tray.
Clean and dry it with a rag.
Pull out all of the removable parts, and wrap them with adhesive tape.
Depending on the model of the refrigerator, lift the top part of the refrigerator so it can roll with ease, or screw the levelers so it won´t scratch the floor. Consult to the section “Closing and Aligning Doors”.
Keep the doors closed with the cable glued to the refrigerator cabinet with an adhesive tape.
When your refrigerator arrives to your home, put everything back into place and read the section “Refrigerator Installation” in order to obtain installation preparation. In case your refrigerator has a factory ice maker, remember you have to reconnect the water supply.
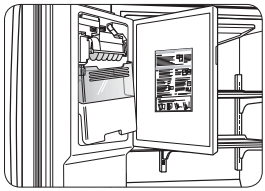
REPLACING THE WATER FILTER
It is recommended that you replace the filter approximately every 6 months, when the water filter indicator reaches 0 months, or when the ice and water dispenser noticeably decreases out-put.
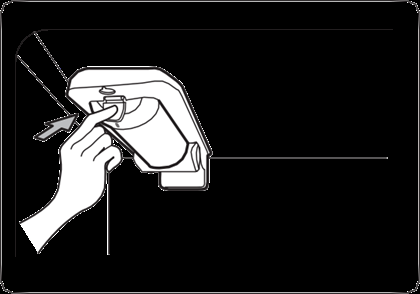
Remove the old cartridge.
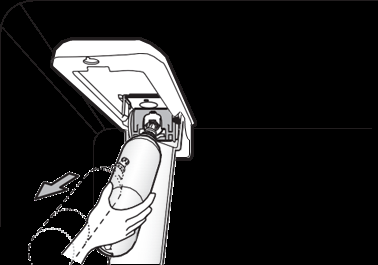
1. Press the push button to open the filter cover. NOTE: Replacing the filter causes a small amount of water (around 1 oz. or 25 cc) to drain. Place a cup under the filter hole to catch any waste.
2. Pull the cartridge downward.
3. Pull out the filter cartridge.
NOTE: When opened at a full angle the cartridge should easily come out.
Replace with a new cartridge.
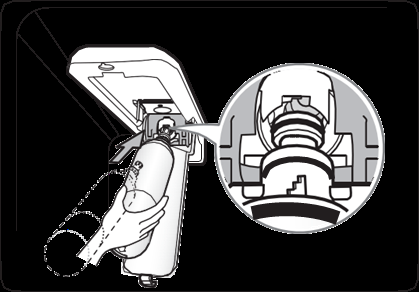
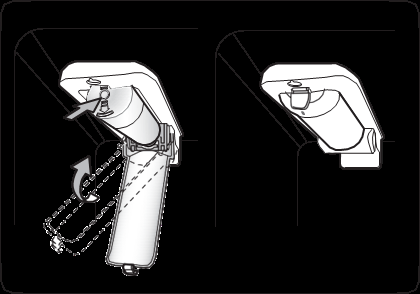
1. Take the new cartridge out of its packing and remove the protective cover from the o-rings. With cartridge ears in the horizontal position, push the new filter cartridge into the manifold hole until it stops.
2. Firmly lock in the cartridge.
The cover will click back into place.
NOTE: After replacing the filter, flush 2.5 gallons through filter before use (flush for approximately 5 minutes). Check the filter for leaks.
When the water filter indicator displays the message 0 Filter Month, hold 3 seconds.
Reset the water filter status display and indicator light by pressing and holding the LIGHT / WATER FILTER button for at least 3 seconds.
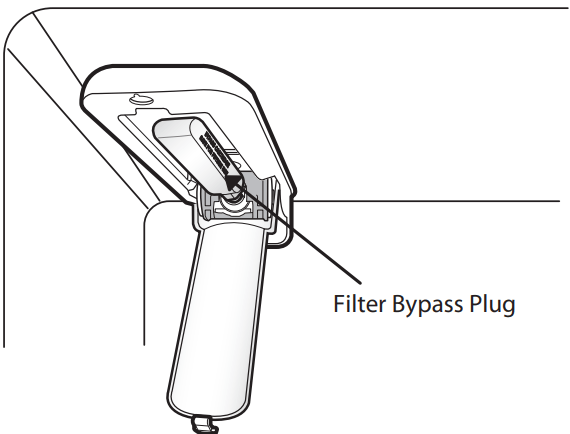
NOTE: Filter Bypass Plug
Keep the filter bypass plug.
You must use the filter bypass plug when a replacement filter cartridge is not available.
The icemaker will not operate without the filter or filter bypass plug inserted in the proper compartment.
To purchase replacement water filter cartridges, visit your local appliance dealer or parts distributor, or refer to the warranty card to obtain the telephone number of the service center near to you.
TROUBLESHOOTING GUIDE
UNDERSTANDING SOUNDS YOU MAY HEAR
Your new refrigerator might produce certain noises that your previous refrigerator did not. It is normal if you worry. Most of the new sounds you will be hearing are actually normal and expected. Hard surfaces like walls or floor can increase sounds and make them sound louder than they really are. The following list has a description of such sounds along with their causes.
The thawing timer will make a “click” sound when such timer will start and finish. Temperature controlling device will also make a “click” sound at the beginning and ending of the refrigerator cycle.
You will hear a bell sound caused by the flow of the refrigerant, water pipe or objects located on the superior part of the refrigerator.
Your refrigerator is designed to work efficiently to preserve your food at the desired temperature using the least of energy. You will be able to hear a pulsing sound coming from the ventilators and the evaporator.
The speed of the ventilator can speed up when you open the refrigerator door.
After each cycle you will hear a dripping sound due to the refrigerant liquid in your refrigerator.
Contraction and expansion of the inner walls can cause a slight popping sound.
You will hear a dripping sound caused during the thawing cycle.
During the defrosting cycle the water might cause a dripping sound.
You can hear some tight air sound over the capacitor caused by the fan.
Running water can be heard during the defrosting cycle.
Due to its low energy consumption design of the refrigerator; the fans will remain of, while the on-off switch activated the internal light of bin.
Problem
Possible Causes
Solutions
STRANGE SOUNDS OR SNOOZING/ VIBRATIONS
The refrigerator is not correctly positioned.
You need to adjust the leveling screws due the floor is unleveled or weak. Read the Installation section.
IT LOOKS LIKE THE COMPRESSOR MOTOR STAYS ON TOO LONG
The replaced refrigerator was an older model.
Modern refrigerators with a bigger storage capacity require longer periods of operation.
The room temperature is hotter than usual.
The motor will continue working when the room temperature is high. The motor might be on between 40% or 80% of the time. In high temperature conditions, the capacitor might run on periods of time.
The door is being opened very often or there has been a big amount of food in storage.
When adding or opening the door of the refrigerator, it warms it up. It’s normal that the refrigerator to run more that usual in order to cool the bins. (Read the section Food Storage Guide). To save energy, take what you need at once, order your food in order so it can be easily found and close the door immediately soon after you took out the food.
The refrigerator is plugged and the control has been adjusted correctly.
The refrigerator will take 24 hours to cool down completely.
Doors won’t close correctly.
Push firmly the Doors. If they don’t close. Read Doors will not close completely below.
The condenser pipes are dirty.
This will stop the air transfer and marked the motor to work longer and harder. Clean the pipes of the condenser.
DOORS WILL NOT CLOSE COMPLETELY
The refrigerator is not leveled.
Read Refrigerator Installation section to level refrigerator.
The food packages are blocking the doors.
Adjust the food bins in order to free space between the doors and the shelves.
The ice bin, the vegetable bin, the panels and the shelves from the door are out of place or position.
Push the containers and place the vegetable cover lid, the panels, shelves and any other container or bin in their right positions. Read the section Using your Refrigerator
The gaskets are sticking.
Clean the seal rings and the surface they might be in contact with. Use a piece of cloth with a small amount of paraffin and apply it over the seal rings.
The refrigerator wobbles or looks instable.
Level the refrigerator. Read the section Closing and Aligning the Doors
The doors were removed during the installation and they weren’t properly setup.
Remove and place again the door according to the section Refrigerator Doors: How to remove and reverse.
THERE´S ICE ON THE FOOD
The door hasn’t been closed completely.
Read Doors Will not Close Completely already mentioned.
The door is frequently opened.
When the door is opened, warm, humid air is allowed in the freezer resulting in frost.
THERE IS A WEIRD TASTE AND SMELL IN THE ICE
The ice maker has been installed correctly.
Don’t use the first ices made.
The ice has been on storage too long.
Dispose of that old ice and make new.
The food hasn’t been packed in the correct way.
Pack again the food because it can transfer odors and tastes to the ice.
The water supply contains mineral and sulfur.
You might need to install a filter in order to eliminate the odors and taste problems.
The inside of the refrigerator need cleaning.
Read the section Refrigerator Care and Cleaning.
The ice bin needs cleaning.
Empty the bin and discard the old ice cubes.
THERE´S WATER IN THE DRAINING BIN
The refrigerator is in defrosting cycle.
The water will evaporate. It is normal that some water falls on the bin.
It’s more humid than usual.
It might take a while for the water to evaporate. This is normal when the weather is hot and humid.
THE REFRIGERATOR SEEMS TO MAKE TOO MUCH NOISE
The sounds may be normal for your refrigerator.
Refer to the Understanding Sounds You May Hear section.
THE ICE MAKER IS NOT PRODUCING ICE OR ICE CUBES ARE FREEZING TOO SLOWLY
Door left open.
Wait 24 hours after hook-up for ice production. See the Adjusting the Controls section.
Check to see if something is holding the door open.
THE DOORS ARE HARD TO OPEN
The gaskets are dirty or sticky.
Clean the gaskets and surface that they are in contact with. Use a damp cloth with paraffin also apply over the seal rings.
The door opens itself as soon as you close it.
When you open the door, the warm air enters in the refrigerator. When this air is cooled down it occupies less volume and creates a vacuum effect. If it is difficult to open wait 5 minutes then check.
THE ICE MAKER DOES NOT WORK
The ice maker is off.
Turn the ice maker to the position on (I).
The water supply is down or not plugged.
Read the section Connecting the Water Line.
The freezer temperature is warm.
Wait 24 hrs for the freezer to reach its ideal temperature.
The ice cubes turn off the ice maker.
Hand level the ice cubes.
THE TEMPERATURE IS TOO HOT OR THERE´S HUMIDITY FORMED INSIDE THE REFRIGERATOR
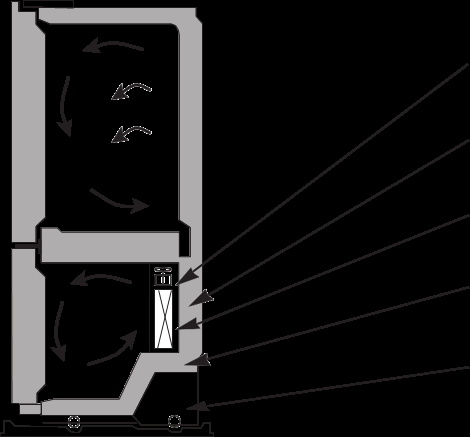
The air vents are blocked. The cool air flows from freezer to the refrigerator and returns thru the vents that dive this section.
With your hand find the vents and move and package that might be blocking the air flow. See the Multi Flow Section.
The doors open very easily.
When the doors are opened the warm and humid air enters. To keep your refrigerator cool, take what you need once and you’re your food organized to make it easy to find. Close the door a soon as you can.
The refrigerator control has not been adjusted for the room conditions.
Wait 24 hours to stabilize the temperature. If the temperature is cold or hot, move the control until the desire temperature is reached.
A large amount of food is just been placed inside the refrigerator.
After adding food to the refrigerator this will warm up. It might take some hours for the refrigerator to reach its temperature.
The food has not been well packed in each bin.
Wrap the food evenly and before packing anything dry all the bins to avoid humidity. If it is necessary, pack the food according to the section Food Storage Guide.
The doors haven’t been closed correctly.
Read Doors will not Close Correctly section.
The weather is humid.
In humid weathers, the air contains humidity, which introduces it self if the doors are opened.
The auto-defrosting cycle is over.
It’s normal that some water props get formed after the defrosting cycle is completed.
SMART DIAGNOSIS
SMART DIAGNOSIS (In some models).
Should you experience any problems with your refrigerator, it has the capability of transmitting data via your telephone to the LG service center. This gives you the capability of speaking directly to our trained specialists. The specialist records the data transmitted from your machine and uses it to analyze the issue, providing a fast and effective diagnosis.
If you experience problems with your refrigerator, call to the LG service center. Only use the Smart Diagnosis feature when instructed to do so by the LG call center agent. The transmission sounds that you will hear are normal and sound similar to a fax machine.
Smart Diagnosis cannot be activated unless your refrigerator is connected to power. If your refrigerator is unable to turn on, then troubleshooting must be done without using Smart Diagnosis. TM
Using Smart Diagnosis TM
First, call to the LG service center. Only use the Smart Diagnosis feature when instructed to do so by the LG call center agent.
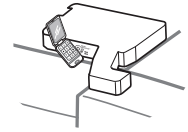
1. Lock the display. To lock the display, press and hold the Door / Alarm Lock button for three seconds. (If the display has been locked for over five minutes, you must deactivate the lock and then ractive it).
2. Open the right refrigerator door.
3. Hold the mouthpiece of your phone in front of the speaker that is located on the right hinge of the refrigerator door, when instructed to do so by the call cente
4. Press and hold the Freezer Temperature button for three seconds while continuing to hold your phone to the speaker.
5. After you hear three beeps, release the Freezer Temperature button.
6. Keep the phone in place until the tone transmission has finished. This takes about 15 seconds, and the display will count down the time. Once the countdown is over and the tones have stopped, resume your conversation with the specialist, who will then be able to assist you in using the information transmitted for analysis.
NOTE
For best results, do not move the phone while the tones are being transmitted.
If the call center agent is not able to get an accurate recording of the data, you may be asked to try again.