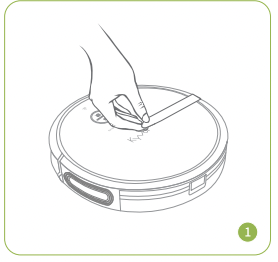
Peel off the sticker that reminds you of discovering the Power Switch.
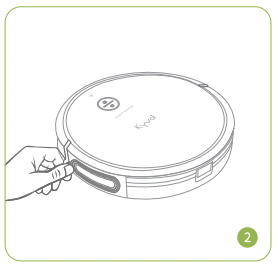
2. Remove the protection material from both sides of the robot.
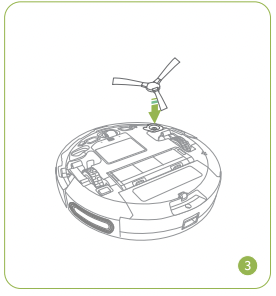
3. Attach the Side Brush into the Side Brush Mount on the bottom of the robot.
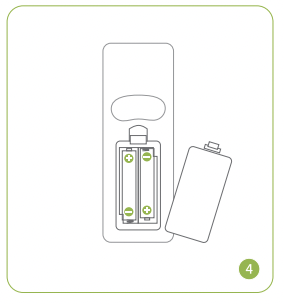
4. Install the AAA batteries into the Remote.
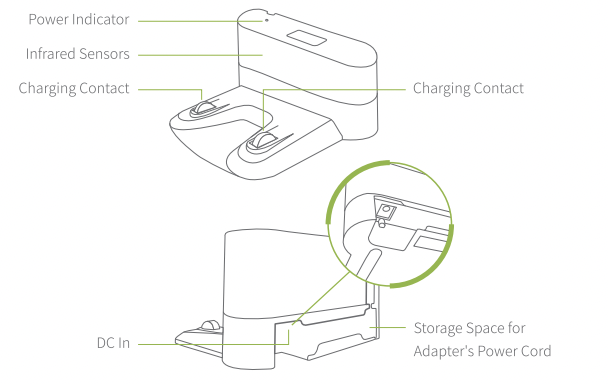
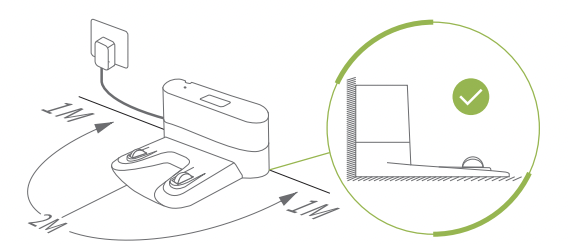
Place the Charging Base on a flat surface and against the wall, then connect the Power Adapter into the base and a socket at room. Remove all the objects within approximately a l-2m radius of the base.
Notes:
1 Ensure the base is powered, which is indicated by a solid white Power Indicator on it.
2 Place the charging base where the robot can easily access.
3 Always keep the Charging Base connecting to power to avoid that the robot can't find the Charging Base when its battery gets low.
4 It's recommended to tidy any surplus power cord into the Storage Space on the back of the base, which may help robot reduce the possiblity of getting stuck.
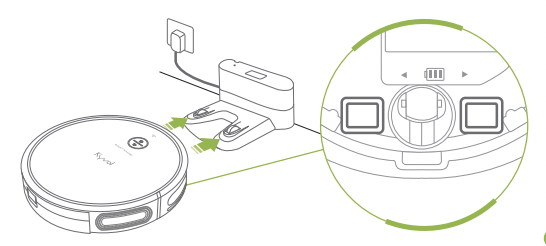
Please fully charge your robot before your first use. Manually align the Charging Contacts on the bottom of the robot with those on the Charging Base.
Charging
Pulse orange
Fully Charged:
Solid blue
Low Battery
Solid orange
Critical Low Battery:
Flash red
Notes
1. It takes 6-6.5 hours to reach a full charge, which could last to clean for around 150 minutes with Auto Mode and the minimum suction power.
2. The robot will find and return to the Charging Base when the battery gets low; while it will not move when the battery gets critical low, please manually get it to charge.
3. To extend the battery's lifespan, please recharge the robot at least once every 3 months if not using for long time.
4. Do not open the battery compartment and replace the battery by yourself. If the robot won't charge, please contact us for further assistance.
OPERATION GUIDE
CLEANING PREPARATION
Check and tidy the area to be cleaned to ensure a worry-free operation.
Notes:
1. Remove any object that may entangle the robot, such as power cords, ropes, etc.
2. The robot can climb to the top of objects with a thickness less than 15mm.
Please take the objects away if you do not want the robot to climb them.
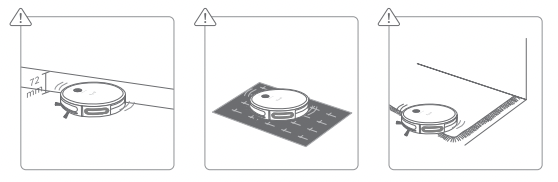
3. Do not operate the robot on the wet floor.
4. Keep the robot away from any furniture that may have the space <72mm (because the thickness of the robot is 72mm) on the bottom. The robot may get stuck if it goes in by accidently. The Magnetic Strip could be used in this situation.
5. The robot may not run on certain dark or black colored surfaces since the Anti-drop Sensors that recognize an edge or a stair may regard this color as an edge, then the robot will not clean over it.
6. Fold thetasseled edges underneath the Area Rugs to prevent tangling the robot.
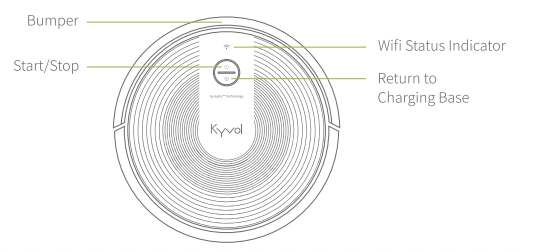
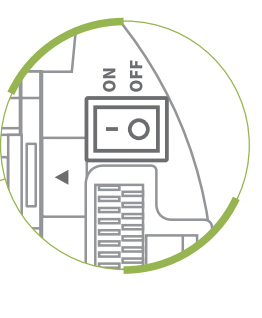
POWER ON/OFF
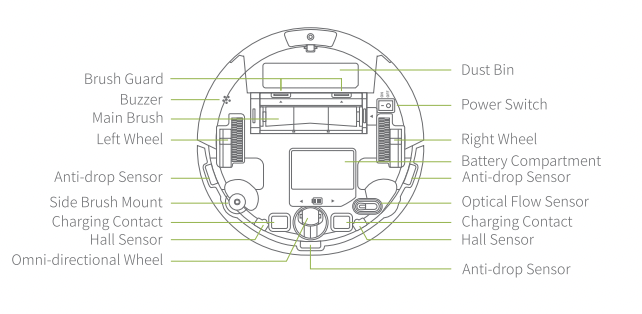
Press the Power Switch to ON on the bottom of the robot to power it on; to power it off, press the Power Switch to OFF.
CLEANING MODES
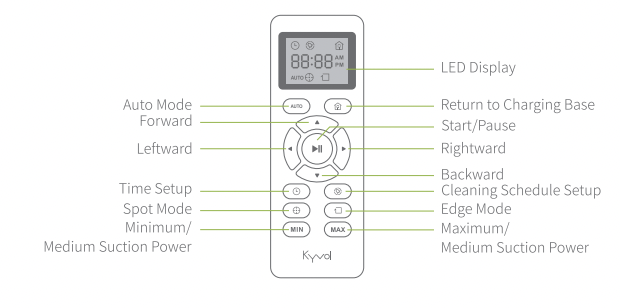
Auto Mode
After powering on, press on the robot or on the remote to initiate Auto Mode process, in which the robot will clean all accessible space with medium suction power (this is the default level) until the battery gets low.
* Press on the robot or on the remote to pause the cleaning process; press again to resume.
* Press on the robot or on the remote to pause the cleaning process, then press on the remote to manually adjust the direction of the robot.
* Press on the robot or the remote to get it back to the Charging Base.
* Press / on the remote to adjust the levels of the suction power.
Press forthe medium level; press it again to get back to the minimum level.
Press forthe maximum level; press it again to get back to the medium level.
Tips:
When the battery gets low, the robot will return to the Charging Base to make a self-charging. We recommend to fully charge the robot, then operate it as needed. If no cleaning plans, please let the robot always connect with the Charging Base.
If you set a schedule for Auto Mode, the robot will beep to respond to the schedule even in low-battery status, but can't perform the cleaning due to the low battery.
If the robot is not managed to find the Charging Base due to obstacles or getting stuck, please manually get it to contact with the Charging Base.
Spot Mode
This cleaning mode aims to intensively clean a specific area.
Step 1:
Locate any area where needs to be cleaned intensively, namely there exists much debris or dust, then move the robot to the center of the area.
Step 2:
Press to initiate the spot cleaning process in a spiral pattern. The maximum diameter of the sprial circle is around 1.2 meter (3.9ft). The process will last around 2 minutes, then the robot will go into standby mode if no any operation is resumed.
Press on the robot or on the remote to pause the current cleaning process; press again to switch to Auto Mode. If you'd like to resume spot mode, press on the robot or on the remote to pause the auto mode, then press again.
Press on the robot or on the remote to pause the cleaning process, then press on the remote to manually adjust the direction of the robot.
Press on the robot or the remote to get it back to the Charging Base.
Tips:
When the battery gets low, the robot will return to the Charging Base to make a self-charging. We recommend to fully charge the robot, then operate it as needed. If no cleaning plans, please let the robot always connect with the Charging Base.
If the robot is not managed to find the Charging Base due to obstacles or getting stuck, please manually get it to contact with the Charging Base.
Edge Mode
This mode is to thoroughly clean the edges along the wall or any furniture.
Press on the remote to initiate the edge cleaning process. The robot will clean for around 20 minutes along the edges, then return to the Charging Base.
* Press on the robot or on the remote to pause the cleaning process; press again to switch to Auto Mode. If you'd like to resume edge mode, press on the robot or on the remote to pause the auto mode, then press again.
* Press on the robot or on the remote to pause the cleaning process, then press on the remote to manually adjust the direction of the robot.
* Press on the robot or the remote to get the robot back to the Charging Base.
Tips
When the battery gets low, the robot will return to the Charging Base to make a self-charging. We recommend to fully charge the robot, then operate it as needed. If no cleaning plans, please let the robot always connect with the Charging Base.
If the robot is not managed to find the Charging Base due to obstacles or getting stuck, please manually get it to contact with the Charging Base.
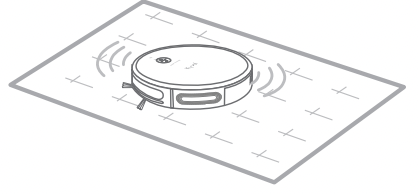
AUTO CARPET BOOST
The robot automatically increases the suction power on carpet to provide a deeper clean. When on a hard surface, the robot will return to the medium suction power to provide just the rightamount of power without wasting its battery.
Tip
If the level of the suction power is the maximum level before cleaning on a carpet, the robot will continue cleaning the carpet with the maximum power after moving on the carpet.
TIMESETUP
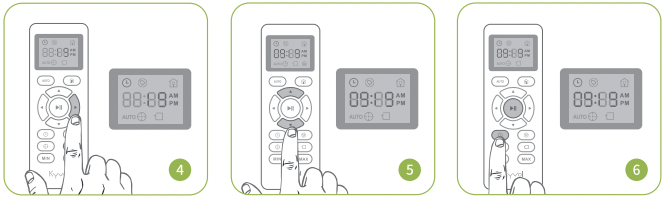
You can set the time in 12-hour clock format.
Power on the robot by pressing the Power Switch to ON.
Press to move to the option of MINUTE.
Press on the remote and the HOUR will flash on the LED Display.
Press to adjust the value of MINUTE.
Press to adjust the value of HOUR.
Press or to save the time you set. A beep from the robot indicates the successful setting.
Tip:
Make sure the remote and the robot are as close as possible when setting the time.
CLEANING SCHEDULE SETUP
Important:
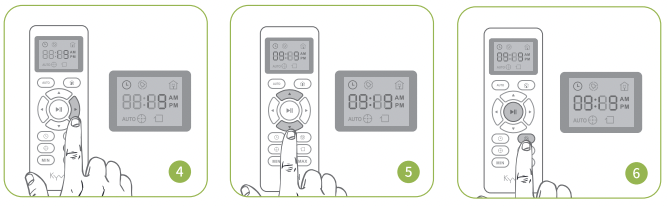
Make sure you've set up the time according to you local time before setting a cleaning schedule. The function of setting cleaning schedules is only available for Auto Mode. After setup, your robot will start cleaning at the scheduled time.
Power on the robot by pressing the Power Switch to ON.
Press to move to the option of MINUTE.
Press on the remote to start setting a schedule, the HOUR will flash on the LED Display.
Press to adjust the value of MINUTE.
Press to adjust the value of HOUR.
Press or to save the setting. A beep from the robot indicates the successful setting.
Tips:
Make sure the option of AM/PM is set correctly.
You can only select from options of 15,30,45 and 00 when setting MINUTE.
Make sure the remote and the robot are as close as possible when setting the schedule.
Only one schedule can be set when using the remote, and the schedule can be cancelled permanently by long pressing on the remote. Two beeps from the robot indicate the successful setting.
SLEEP MODE
To reduce battery consumption, the robot will go into the Sleep Mode when it is idle for 5 minute; press on the robot or any button on the remote to wake it up. Then you can press the corresponding button to operate the robot to clean as needed.
USINGTHE MAGNETICSTRIP
Magnetic Strip aims to set no-go areas such as petfood bowls or beds, as well as to prevent entering rooms if desired.
Step 1:
Verify the area you do not want the robot to access.
Step 2:
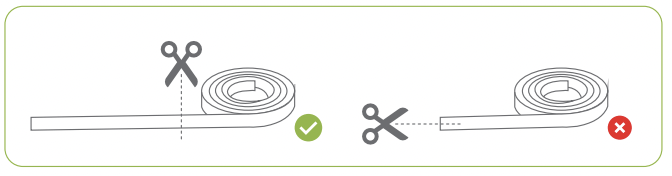
Correctly measure the length and width of the area, then cut the strip to a proper length.
Step 3:
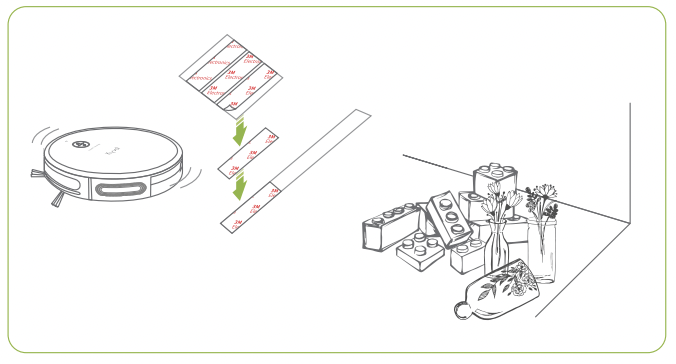
Peel off a piece of 3M Adhesive Pad, then affix it to one side of the Magnetic Strip; so do the other 3M Adhesive Pads.
Tip:
The number of the Adhesive Pads varies depending on the strip length.
Step 4:
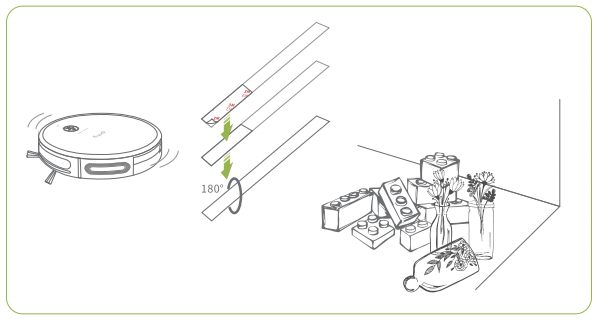
Peel off the other side of the 3M Adhesive Pads, then utilize them to affix the Magnetic Strip on the floor to make a barrier.
Tips:
If the strip is rolled up, please remove and affix it again on the floor; otherwise, it may not work effectively. It's not recommended to use strip on the carpet.
Make sure the strip is affixed on the same surface level as the robot's.
Keep the strip away from anything that can emit excessive heat.
MAINTENANCE AND CARE
To optimize the performance of your robot, we recommend to perform a regular maintenance and cleaning for some parts in the robot.
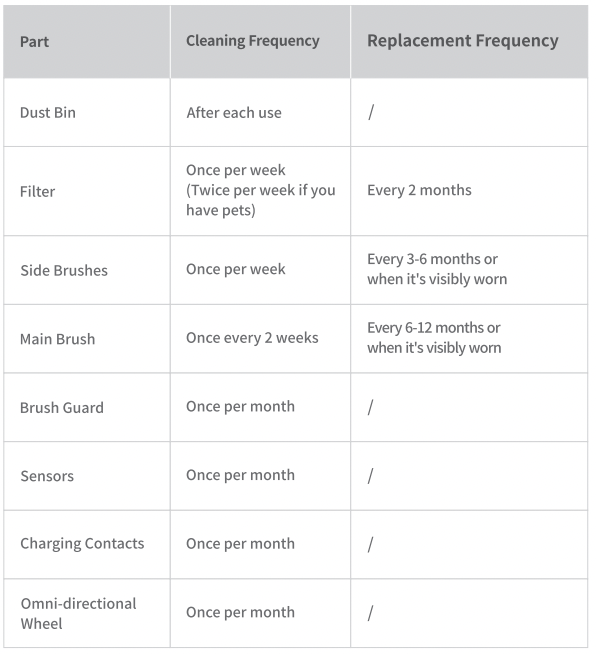
CLEANING AND REPLACEMENT FREQUENCY
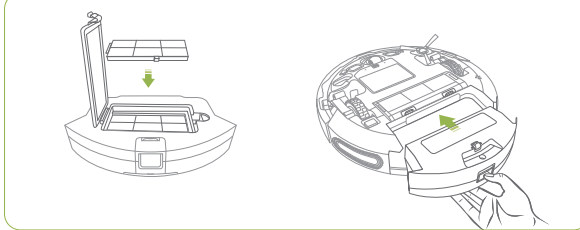
DUST BIN AND FILTER
Please empty the Dust Bin after each use and clean the Filter regularly.
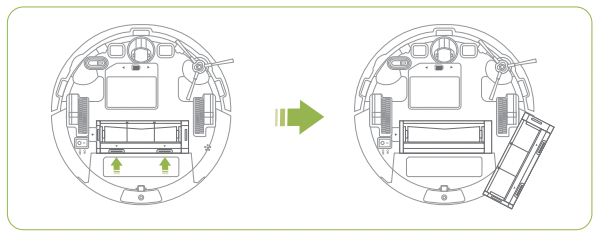
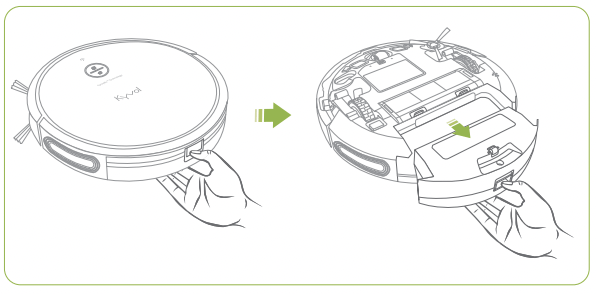
Step 1:
Press and hold the latch down to pull the Dust Bin out.
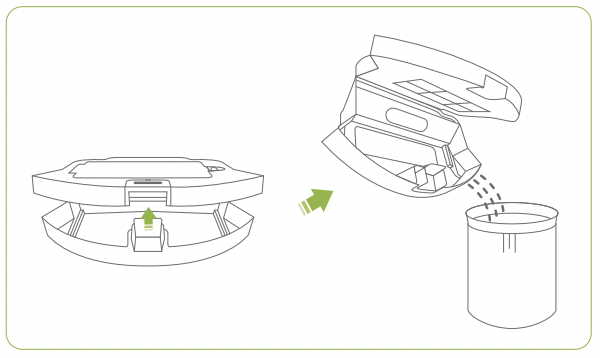
Step 2:
Open the upper cover of the Dust Bin to empty the dust into a trash bin.
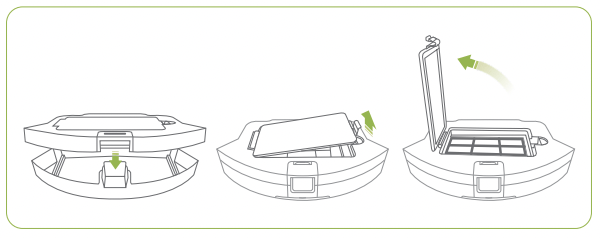
Step 3
Close the Dust Bin , then open the Filter Compartment
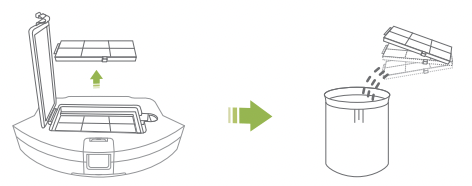
Step 4
Take the Filter out, then tap the Dust into a trash bin.
Tips
The filter consists of a black sponge. a piece of white HEPA and the holder. You can wash the sponge and holder. but do not wash the HEPA.
Step 5:
Place the Filter into the compartment. then insert the Dust Bin into the robot.
Tips:
The Filter can effectively filter the dust to prevent the dust from entering the inside of the robot, which can help protect the ventilation system of the robot and avoid the secondary air pollution.
The Cleaning Brush can be used to clean the filter as well.
SIDE BRUSH
Regularly cleaning or replacing the Side Brush is recommended since they may become bent or damaged after a period of use.
Step 1:
Pull out the side brush.
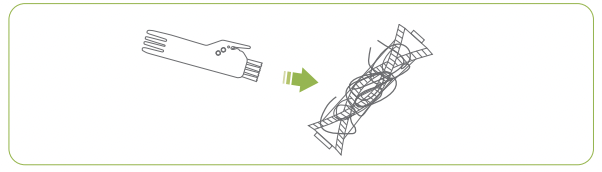
Step 2:
Utilize the blade of the Cleaning Brush to remove the hair or debris that is wrapping the brush.
Step 3:
Clean them with a damp cloth.
Step 4:
Snap the side brush into place. If the old brush are damaged, you can directly install the new brush.
MAIN BRUSH
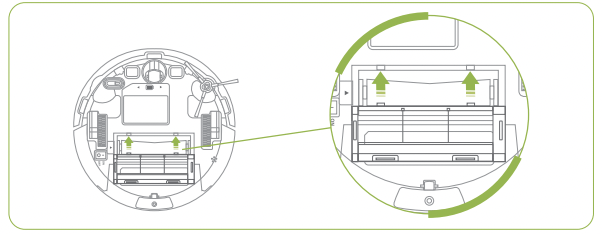
Step 1:
Turn overyour robot to find the Main Brush.
Step 2:
Simultaneously push the latches to remove the Brush Guard over the brush.
Step 3
Use the blade of the Cleaning Brush to cut the hair, and use the brush of it to remove the dirt.
Step 4:
Insert the Main Brush, then install the Brush Guard.
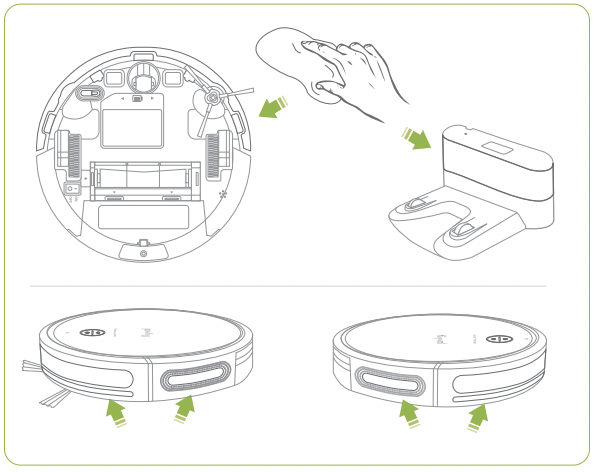
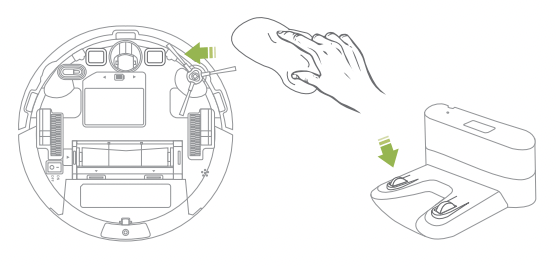
SENSORS AND CHARGING CONTACTS
Use a damp cloth to clean all sensors on the robot and the Charging Base.
2. Use a dry cloth to clean the Charging Contacts on the robot and Charging Base (alcohol is not recommended).
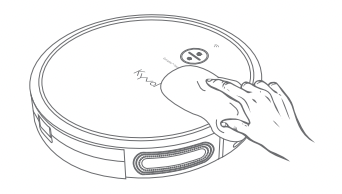
ROBOTTOP
Clean the top of the robot with a damp cloth.
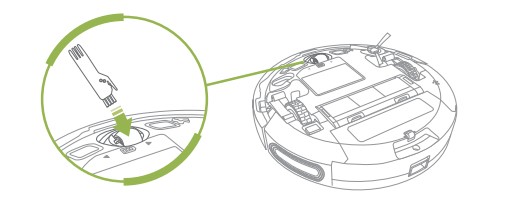
OMNI-DIRECTIONAL WHEEL
The Omni-directional Wheel can't be pulled out, please remove any hair or debris that is wrapping the wheel or entangled inside the wheel cavity with the Cleaning Brush we provided.
Tip:
Do not clean the Omni-directional Wheel with water.
TROUBLESHOOTING GUIDE
If you need any further assistance, please feel free to contact us.
FREQUENTLY ASKED QUESTIONS
Q1. The robot doesn't respond.
* Make sure you press the Power Switch to ON.
* Make sure the battery of your robot is not critical low.
* Check if the batteries in the remote have enough power when it's controlled by the remote.
* Make sure the distance between the remote and the robot is within the effective range (5m/16ft) when it's controlled by the remote.
Q2. The remote doesn't work.
* Check if the batteries in the remote have enough power.
* Make sure you press the Power Switch to ON.
* Make sure the battery of the robot is not critical low or it doesn't drain completely.
* Make sure the distance between the remote and the robot is within the effective range.
Q3. The robot stops working suddenly.
* Verify if the robot is trapped or gets stuck.
* Check if the battery of the robot is critical low.
* Make sure you did not pause the robot.
Q4. The robot cannot start the sheduled cleaning.
* Make sure you press the Power Switch to ON.
* Check if the scheduled time issetcorrectly(AM/PM).
* Check if the battery of the robot is low or critical low.
* Check if you've cancelld the schedule.
* If the status of the robot is abnormal(see page 26-27), it can't start the scheduled cleaning.
Q5. The suction power is weak.
* There are three levels of suction power available for this model. Please try to press / on the remote to adjust the level.
* Empty the Dust Bin and clean the Filter.
* Replace the HEPA inside of the Filter.
Q6. The robot produces loud or sharp noises.
* The robot will produce some certain sound when cleaning, which is normal. Please arrange your cleaning time to avoid being interrupted by the sound.
* If a sharp noise is heard, please check if the Main Brush or the Side Brush is tangled with any objects.
* Check if the robot collected the objects that can make noise inside of the Dust Bin.
* When the robot needs your help, it will beep. You can check what's happened to it.
Q7. The robot won't charge.
* Check if the Power Indicator on the Charging Base lit up.
* Make sure the Charging Contacts on the robot are aligned with those on the Charging Base.
* Clean the Charging Contacts with a dry clothjalcohol is not recommended).
Q8. The robot cannot return to the Charging Base.
* Remove the obstacles around the Charging Base so that the robot can detect where it is.
* Check if there is a long distance between the robot and the Charging Base. If yes, the journey will take more time.
* Check if the battery of the robot is critical low.
* Clean the part where there are sensors on the Bumper and the Charging Base.
Q9. The Main Brush on the bottom of the robot cannot work.
* Check if the brush is stuck by some objects; if yes, please remove them and clean the brush.
* Make sure the brush and its guard are installed properly.
Q10. The route created by the robot is not described as instructed.
* The gyroscope or the optical flow sensor is abnormal. Please place the robot on a flat surface and reboot it; check whether there is dust or oil residue left on the cover of the optical flow sensor.
* The robot is finding and returning to the Charging Base.
* Please directly contact us.
Q11. The cleaning time becomes shorter or less than 100 minutes.
*. The cleaning time varies with the cleaning mode, the suction power level and the material type of the surface.
* If the robot is not fully charged, the cleaning time will be shorter.
AGUIDETO INDICATORS AND BEEPS
When you robot needs help or attention, it will beep and the indicators on it will change accordingly to tell your what to check.
Solid Red Indicators
Beep(s)
Likely Cause
Solution
1 beep
The Left/Right Wheel of your robot is being stuck.
Power off your robot, then remove the objects that are wrapping the wheel.
2 beeps
The Side Brush of your robot is being stuck.
Power off your robot, then remove the the objects that are wrapping the Side Brush.
3 beeps
The suction inlet of your robot is being blocked.
Power off the robot, then remove and empty the Dust Bin.
Make sure there is no hairor debris blocking the suction inlet.
4 beeps
The Main Brush on the bottom of your robot is being stuck.
Power off the robot, then remove the objects that are wrapping the Main Brush.
Flashing Red Indicators
Beep(s)
Likely Cause
Solution
1 beep
The gyroscope or the optical flow sensor is abnormal.
Please place the robot on a flat surface and reboot it; check whetherthere isdustoroil residue left on the cover of the optical flow sensor.
2 beeps
The gyroscope or the optical flow sensor is abnormal.
Please gently press the left, middle and right part of the bumper to check whether it can pop out.
3 beeps
The Anti-drop Sensors of the robot are covered or dirty.
Please clean the Anti-drop Sensors with a damp cloth.
4 beeps
The battery of your robot gets critical low.
Please manually get your robot to the Charging Base to fully charge it.


 on the robot or
  on the remote to initiate Auto Mode process, in which the robot will clean all accessible space with medium suction power (this is the default level) until the battery gets low.
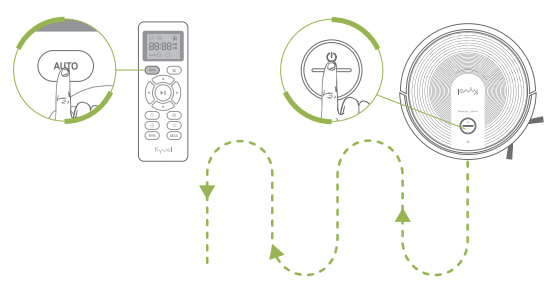
 on the remote to pause the cleaning process; press again to resume.
 on the robot or the remote to get it back to the Charging Base.
 /
/  on the remote to adjust the levels of the suction power.
 to initiate the spot cleaning process in a spiral pattern. The maximum diameter of the sprial circle is around 1.2 meter (3.9ft). The process will last around 2 minutes, then the robot will go into standby mode if no any operation is resumed.
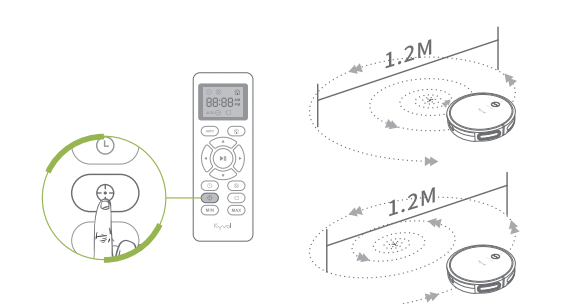
 on the robot or
  on the remote to manually adjust the direction of the robot.
 on the remote to initiate the edge cleaning process. The robot will clean for around 20 minutes along the edges, then return to the Charging Base.
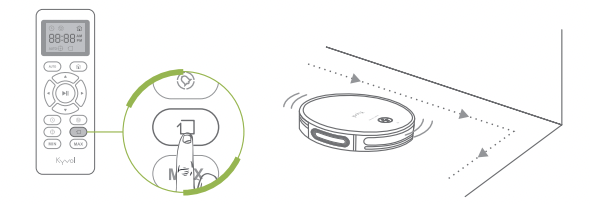

 to move to the option of MINUTE.
 on the remote and the HOUR will flash on the LED Display.
 to adjust the value of MINUTE.

 on the remote to start setting a schedule, the HOUR will flash on the LED Display.

 can be used to clean the filter as well.