SOS emergency call system (Mercedes-Benz emergency call system)
At a glance – Door control panel and seat adjustment
Adjusts the seats electrically
Switches the seat heating on/off
Switches the seat ventilation on/off
Switches AIRSCARF on/off
Locks/unlocks the vehicle
Opens/closes the trunk lid
Adjusts and folds the outside mirrors out/in electrically
Opens/closes the right side window
Opens/closes the rear right side win- dow
Child safety lock for the rear side windows
Opens/closes the rear left side window
Opens/closes the left side window
Opens the door
Sets the memory function
Sets the seat fore-and-aft adjustment
Adjusts the 4-way lumbar support
Seat adjustment using the multimedia system
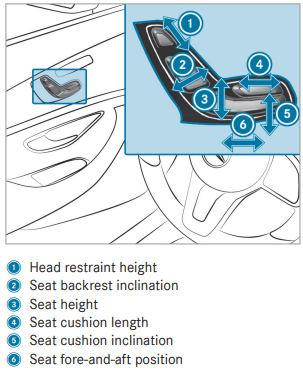
Adjusts the head restraints
Adjusts the seat height
Adjusts the seat backrest inclination
At a glance – Emergencies and breakdowns
What to do in the event of an accident
Safety vest
Button for SOS emergency call system
Checking and topping up operating fluids
Tow-starting and towing away
Flat tire
Starting assistance
Hazard warning light
Fuel filler flap with instruction labels for tire pressure fuel type and QR code for accessing e rescue car
Tow-starting and towing away
TIREFIT kit
Opening and closing
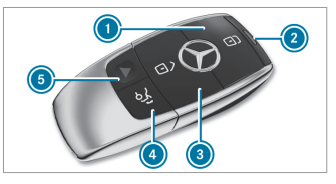
SmartKey
Overview of SmartKey functions
WARNING Risk of accident and injury due to children left unattended in the vehicle
If children are left unattended in the vehicle, they could:
Open doors, thereby endangering other persons or road users.
Get out of the vehicle and be hit by oncoming traffic.
Operate vehicle equipment and become trapped, for example.
In addition, children could also set the vehicle in motion, for example, by:
Releasing the parking brake.
Shifting the automatic transmission out of park position P or shifting manual transmission into neutral.
Starting the engine
When leaving the vehicle, always take the SmartKey with you and lock the vehicle.
Never leave children and animals unattended in the vehicle.
Keep the SmartKey out of reach of children.
NOTE Damage to the key caused by magnetic fields
Keep the key away from strong magnetic fields.
Locks
Battery check lamp
Unlocks
Opens the trunk lid
Panic alarm
The SmartKey may vary from the one shown in the diagram, depending on the vehicle equipment.
The SmartKey locks and unlocks the following components:
the doors
the trunk lid
the fuel filler flap
If the vehicle is not opened within approximately 40 seconds after unlocking, it locks again. Antitheft protection is armed again.
Do not keep the SmartKey together with elec‐ tronic devices or metal objects. This can affect the SmartKey's functionality.
If battery check lamp 2 does not light up after pressing theorbutton, the battery is discharged. Replace the SmartKey battery
Activating/deactivating the acoustic locking verification signal
Multimedia system:
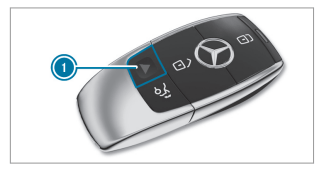
Activating/deactivating the panic alarm
Requirements:
The ignition is switched off
The panic alarm function is only available in certain countries.
To activate: press button 1 for approx‐ imately one second.
A visual and audible alarm is triggered.
To deactivate: briefly press button 1 again.
Press the start/stop button on the cockpit the SmartKey is inside the vehicle).
Changing the unlocking settings
Possible unlocking functions of the SmartKey:
Central unlocking
Unlocking the driver's door and fuel filler flap
To switch between settings: press the and buttons simultaneously for approximately six seconds until the battery check lamp flashes twice.
If the unlocking function for the driver's door and fuel filler flap has been selected:
Pressing the button a second time cen‐ trally unlocks the vehicle
Vehicles with KEYLESS-GO: If you touch the inner surface of the door handle on the driver's door, only the driver's door and fuel filler flap are unlocked.
Deactivating the SmartKey functions
If you do not use the vehicle or a SmartKey for an extended period of time, you can reduce the energy consumption of the respective Smart‐Key . To do so, deactivate the SmartKey func‐ tions
To deactivate: press thebutton on the SmartKey twice in quick succession. The battery check lamp of the SmartKey flashes twice briefly and lights up once.
To activate: press any button on the Smart‐Key.
When the vehicle is started with the Smart‐Key in the stowage compartment of the cen‐ ter console, the SmartKey functions are automatically activated (→ page 136).
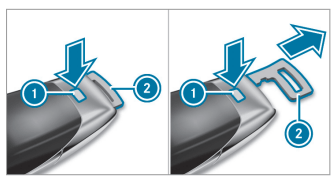
Removing/inserting the emergency key
To remove: press release button 1. Emergency key 2 is pushed out slightly.
Pull out emergency key 2 until it engages in the intermediate position.
You can use the intermediate position of emergency key 2 to attach the SmartKey to a key ring.
Press release button 1 again and fully remove emergency key 2.
To insert: press release button 1.
Insert emergency key 2 to the intermediate position or fully until it engages.
Replacing the SmartKey battery
DANGER Serious damage to health caused by swallowing batteries
Batteries contain toxic and corrosive sub‐ stances. Swallowing batteries may cause serious damage to health.
There is a risk of fatal injury.
Keep batteries out of the reach of chil‐ dren.
If batteries are swallowed, seek medical attention immediately.
ENVIRONMENTAL NOTE Environmental damage caused by improper disposal of batteries
Batteries contain pollutants. It is illegal to dispose of them with the household rubbish.
Dispose of batteries in an environmentally responsible manner.
Take discharged batteries to a qualified specialist workshop or to a collection point for used batteries.
Requirements:
You require a CR 2032 3 V cell battery.
Mercedes-Benz recommends that you have the battery replaced at a qualified specialist work‐ shop.
Remove the emergency key (→ page 65).
Press release button 2 down fully and slide cover 1 in the direction of the arrow.
Fold out cover 1 in the direction of the arrow and remove.
Remove battery compartment 3 and take out the discharged battery.
Insert the new battery into battery compart‐ ment 3. Observe the positive pole marking in the battery compartment and on the bat‐ tery when doing this.
Push in battery compartment 3.
Re-attach cover 1 and push it until it engages.
Problems with the SmartKey
Problem- Possible causes/consequences and Solutions
You can no longer lock or unlock the vehicle.
Possible causes are:
The SmartKey battery is discharged or nearly discharged.
There is interference from a powerful radio signal source.
Opening and closing
Problem Possible causes/consequences and M Solutions
The SmartKey is defective.
Check the battery using the battery check lamp and replace if necessary (→ page 65).
Use the emergency key to lock or unlock (→ page 65).
Have the SmartKey checked at a qualified specialist workshop.
You have lost a SmartKey.
Have the SmartKey deactivated at a qualified specialist workshop.
If necessary, have the mechanical lock changed as well.
Doors
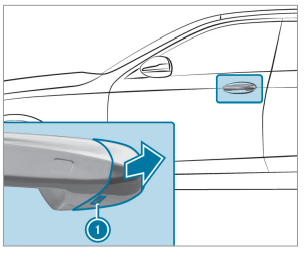
Unlocking and opening doors from the inside
Pull door handle 2.
Locking pin 1 pops up when the door is unlocked.
Centrally locking and unlocking the vehicle from the inside
To unlock: press button 1.
To lock: press button 2.
This does not lock or unlock the fuel filler flap.
The vehicle is not unlocked:
If you have locked the vehicle using the SmartKey.
If you have locked the vehicle using KEY‐ LESS-GO.
Locking/unlocking the vehicle with KEY‐ LESS-GO
Requirements
The SmartKey is outside the vehicle.
The distance between the SmartKey and the vehicle does not exceed 3 ft (1 m).
The driver's door and the door at which the door handle is used are closed.
To unlock the vehicle: touch the inner sur‐ face of the door handle.
To lock the vehicle: touch sensor surface or 2.
Convenience closing: touch recessed sen‐ sor surface 2 until the closing procedure is complete.
Further information on convenience closing (page 78).
If you open the trunk lid from outside it is auto‐ matically unlocked.
Problems with KEYLESS-GO
Problem -Possible causes/consequences and Solutions
You can no longer lock or unlock the vehicle using KEYLESS-GO.
Possible causes are:
The SmartKey functions have been deactivated (→ page 64).
The SmartKey battery is discharged or nearly discharged.
There is interference from a powerful radio signal source.
The SmartKey is faulty.
Activate the SmartKey functions (→ page 64).
Check the battery using the battery check lamp and replace if necessary (→ page 65).
Use the emergency key to unlock or lock the vehicle (→ page 65).
Have the vehicle and SmartKey checked at a qualified specialist workshop.
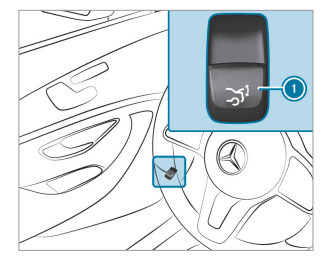
Activating/deactivating the automatic locking feature
The vehicle is locked automatically when the ignition is switched on and the wheels are turn‐ ing faster than walking pace.
To activate: press and hold button 2 for approximately five seconds until an acoustic signal sounds.
To deactivate: press and hold button 1 for approximately five seconds until an acoustic signal sounds.
In the following situations, there is a danger of being locked out when the function is activated:
While the vehicle is being tow started/ pushed.
The vehicle is being tested on the dynamom‐ eter.
Locking/unlocking the driver's door with the emergency key
If you wish to lock the vehicle entirely using the emergency key, first press the button for locking from the inside while the driver's door is open. Then proceed to lock the driv‐ er's door using the emergency key.
Insert the emergency key as far as it will go into opening 1 in the cover.
Pull and hold the door handle.
Pull the cover on the emergency key as straight as possible away from the vehicle until it releases.
Release the door handle.
To unlock: turn the emergency key counterclockwise to position 1.
To lock: turn the emergency key clockwise to position 1.
Carefully press the cover onto the lock cylin‐ der until it engages and is seated firmly.
Trunk
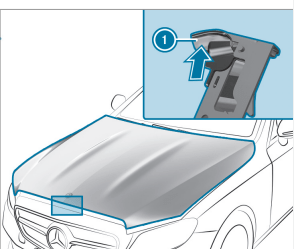
Opening the trunk lid
DANGER Risk of exhaust gas poisoning
Combustion engines emit poisonous exhaust gases such as carbon monoxide. Exhaust gases can enter the vehicle interior if the trunk lid is open when the engine is running, especially if the vehicle is in motion.
Always switch off the engine before opening the trunk lid.
Never drive with the trunk lid open.
NOTE Damage to the trunk lid by obsta‐ cles above the vehicle
The trunk lid swings upwards when it is opened.
Therefore, make sure that there is suffi‐ cient clearance above the trunk lid.
You have the following options for opening the trunk lid:
Pull trunk lid remote operating switch 1.
Press and hold the button on the SmartKey.
With the trunk lid unlocked, press the top of the Mercedes star.
To open, pull on the folded-out star when the rear view camera is activated.
Vehicles with HANDS-FREE ACCESS: Use your foot to kick below the bumper page 73).
Closing the trunk lid
WARNING Risk of injury from unsecured items in the vehicle
If objects, luggage or loads are not secured or not secured sufficiently, they could slip, tip over or be thrown around and thereby hit vehicle occupants.
There is a risk of injury, particularly in the event of sudden braking or a sudden change in direction.
Always stow objects in such a way that they cannot be thrown around.
Before the journey, secure objects, lug‐ gage or loads against slipping or tipping over.
Comply with the loading guidelines when loading the vehicle.
You have the following options to close the trunk lid:
Pull the trunk lid down using the handle recess and push it closed.
HANDS-FREE ACCESS function
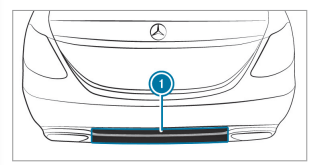
With HANDS-FREE ACCESS you can open the trunk lid by performing a kicking movement under the bumper.
Observe the notes when opening the trunk lid ( page 71).
WARNING Risk of burns caused by a hot exhaust system
The vehicle exhaust system can become very hot. If you use HANDS-FREE ACCESS, you could burn yourself by touching the exhaust system.
Always ensure that you only make a kicking movement within the detection range of the sensors.
NOTE Damage to the vehicle caused by unintentionally opening the trunk lid
When using an automatic car wash
When using a high pressure cleaner
Deactivate KEYLESS-GO or make sure that the SmartKey located is at least ft (3 m) away from the vehicle in such situations.
When making the kicking movement, make sure that your feet are firmly on the ground, other‐ wise you could lose your balance, e.g. on ice.
Requirements
The SmartKey is behind the vehicle.
Stand at least 12 in (30 cm) away from the vehicle while performing the kicking move‐ ment.
Do not come into contact with the bumper while making the kicking movement.
Do not carry out the kicking movement too slowly.
The kicking movement must be towards the vehicle and back again.
1- Detection range of the sensors
If several consecutive kicking movements are not successful, wait ten seconds.
System limitations
The system may be impaired or may not function if:
Snow or dirt, e.g. from road salt, covers the sensor area.
The kicking movement is made using a pros‐ thetic leg.
The trunk lid could be opened unintentionally, in the following situations:
A person's arms or legs are moving in the sensor detection range, e.g. when polishing the vehicle or picking up objects.
Objects are moved or placed behind the vehi‐ cle, e.g. tensioning straps or luggage.
Clamping straps, tarps or other coverings are pulled over the bumper.
A protective mat with a length reaching over the trunk sill down into the detection range of the sensors is used.
The protective mat is not secured correctly.
Work is being undertaken on the trailer hitch, on trailers or rear bicycle racks.
Deactivate the SmartKey functions (→ page 64) or do not carry the SmartKey about your person in such situations.
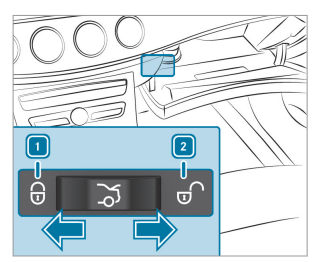
Switching separate trunk locking on or off
If you centrally unlock the vehicle while separate locking is activated, the trunk will remain locked.
To switch on: slide the switch to position 1
To switch off: slide the switch to position 2
If an accident has been detected, the trunk will unlock even if separate locking is switched on.
Unlocking the trunk with the emergency release from inside
Requirements
The 12‑V‑vehicle battery is connected and charged.
Press emergency release button 1 briefly.
The trunk lid unlocks and opens.
Activating/deactivating the trunk lid opening height restriction
Multimedia system:
Vehicle Vehicle Settings Trunk
Lid Restriction
This function allows you to avoid bumping the trunk lid on a low garage ceiling, for example.
Activate or deactivate the function.
Side windows
Opening and closing the side windows
WARNING Risk of entrapment when opening a side window
When opening a side window, parts of the body could be drawn in or become trapped between the side window and window frame.
When opening, make sure that nobody is touching the side window.
If someone is trapped, release the but‐ ton immediately or pull it in order to close the side window again.
WARNING Risk of becoming trapped when closing a side window
When closing a side window, body parts could be trapped in the closing area in the process.
When closing, make sure that no body parts are in the closing area.
If someone is trapped, release the but‐ ton immediately or press the button in order to reopen the side window.
WARNING Risk of becoming trapped when children operate the side windows
Children could become trapped if they oper‐ ate the side windows, particularly when unat‐ tended.
Activate the child safety lock for the rear side windows.
When leaving the vehicle, always take the SmartKey with you and lock the vehicle.
Never leave children unattended in the vehicle.
Requirements:
The power supply or the ignition is switched on.
Closes
Opens
The buttons on the driver's door take prece‐ dence.
To start automatic operation: press the button beyond the point of resistance or pull and release it.
To interrupt automatic operation: press or pull thebutton again.
Automatic operation for closing is available only for the front side windows.
When the vehicle is switched off, the side win‐ dows can continue being operated.
The function is available for around five minutes or until a door is opened.
All side windows can be opened or closed simul‐ taneously using button 1.
Switch on the ignition.
To open: press and hold button 1 to the point of resistance.
To open fully: press and hold button 1 beyond the point of resistance.
To close: pull and hold button 1.
Automatic reversing function of the side win‐ dows
If an object blocks a side window during the closing process, the side window opens again automatically. The automatic reversing function is only an aid and is not a substitute for your attentiveness.
When closing, make sure that no body parts are in the closing area.
WARNING Risk of becoming trapped despite there being reversing protection on the side window
The reversing function does not react:
To soft, light and thin objects, e.g. fingers
During resetting
This means that the reverse function cannot prevent someone from becoming trapped in these situations.
When closing, make sure that no body parts are in the closing area.
If someone becomes trapped, press the button to open the side window again.
Convenience opening (ventilating the vehicle before starting a journey)
WARNING Risk of entrapment when opening a side window
When opening a side window, parts of the body could be drawn in or become trapped between the side window and window frame.
When opening, make sure that nobody is touching the side window.
Release the button immediately if somebody becomes trapped.
WARNING Risk of becoming trapped when opening/closing the soft top .
When opening or closing the soft top, there is a risk that parts of the body could become trapped by moving parts such as the roof mechanism, the trunk lid, or the side win‐ dows.
When opening or closing, make sure that no body parts are in the vicinity of moving components.
Release the button if somebody becomes trapped.
Press and hold thebutton on the SmartKey.
The following functions are performed:
The vehicle is unlocked.
The side windows are opened when the trunk partition is open.
The soft top is opened when the trunk partition is closed.
The seat ventilation of the driver's seat is switched on.
To interrupt convenience opening: release thebutton.
Convenience closing (closing the vehicle from outside)
WARNING Risk of entrapment caused by inadvertent convenience closing
When the convenience closing feature is operating, parts of the body could become trapped in the closing area of the side win‐ dows.
Observe the complete closing proce‐ dure when using convenience closing.
When closing, make sure that no body parts are in the closing area.
WARNING Risk of becoming trapped when opening/closing the soft top .
When opening or closing the soft top, there is a risk that parts of the body could become trapped by moving parts such as the roof mechanism, the trunk lid, or the side win‐ dows.
When opening or closing, make sure that no body parts are in the vicinity of moving components.
Release the button if somebody becomes trapped.
Press and hold thebutton on the SmartKey.
The following functions are performed:
The vehicle is locked.
The soft top is closed.
The side windows are closed when the soft top is closed.
To interrupt convenience closing: release thebutton.
Convenience closing can also be operated with KEYLESS-GO (→ page 68).
Problems with the side windows
Problem- Possible causes/consequences and Solutions
A side window cannot be closed and you cannot see the cause.
Check to see whether any objects are in the window guide.
WARNING Risk of becoming trapped or fatally injured if reversing protection is not activated
If you close a side window again immediately after it has been blocked or reset, the side window closes with increased or maximum force. The reversing feature is then not active.
Parts of the body could become trapped in the closing area in the process.
Make sure that no parts of the body are in the closing area.
To stop the closing process, release the button or press the button again to reopen the side win‐ dow.
If a side window is obstructed during closing and reopens again slightly:
Immediately after the window is blocked, pull the corresponding switch again until the side window has closed, and hold the switch for an additional second.
The side window will be closed with increased force.
If a side window is obstructed again during closing and reopens again slightly:
Repeat the previous step.
The side window is closed without the automatic reversing function.
The side windows cannot be opened or closed using the convenience opening feature.
The SmartKey battery is discharged or nearly discharged.
Check the battery using the battery check lamp and replace if necessary (→ page 65)
Seats and stowing
Notes on the correct driver's seat position
Ensure the following when adjusting steering wheel 1, seat belt 2 and driver's seat 3:
You are sitting as far away from the driver's airbag as possible
You are sitting in an upright position
Your thighs are slightly supported by the seat cushion
Your legs are not fully extended and you can depress the pedals properly
The back of your head is supported at eye level by the center of the head restraint
You can hold the steering wheel with your arms slightly bent
You can move your legs freely
You can see all the displays on the instrument cluster clearly
You have a good overview of the traffic conditions
Your seat belt sits snugly against your body and passes across the center of your shoulder and across your hips in the pelvic area
Seats
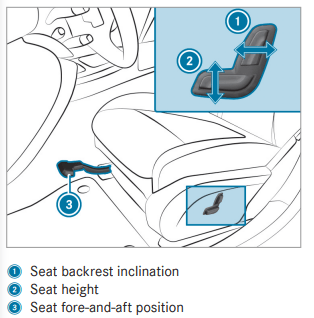
Adjusting the front seat mechanically and electrically (without Seat Comfort Package)
WARNING Risk of becoming trapped if the seats are adjusted by children
Children could become trapped if they adjust the seats, particularly when unattended.
When leaving the vehicle, always take the SmartKey with you and lock the vehicle.
Never leave children unattended in the vehicle.
The seats can be adjusted when the ignition is switched off
WARNING Risk of becoming trapped when adjusting the seat
When you adjust a seat, you or other vehicle occupants could become trapped, e.g. on the seat guide rail.
When adjusting a seat, make sure that no one has any part of their body within the sweep of the seat.
Observe the safety notes on "Airbags" and "Children in the vehicle".
WARNING Risk of accident due to the driver's seat not being engaged
If the driver's seat is not engaged, it could move unexpectedly while the vehicle is in motion. This could cause you to lose control of the vehicle.
Always make sure that the driver's seat is engaged before starting the vehicle.
WARNING Risk of accident due to adjusting the vehicle settings while the vehicle is in motion
You could lose control of the vehicle in the following situations in particular:
If you adjust the driver's seat, the head restraint, the steering wheel or the mirror while the vehicle is in motion
If you fasten your seat belt while the vehicle is in motion
Before starting the engine: In particular, adjust the driver's seat, head restraint, steering wheel and mirror, and fasten your seat belt.
WARNING Risk of becoming trapped if the seat height is adjusted carelessly
If you adjust the seat height carelessly, you or other vehicle occupants could be trapped and thereby injured.
Children in particular could accidentally press the electrical seat adjustment buttons and become trapped.
While moving the seats, make sure that hands or other body parts do not get under the lever assembly of the seat adjustment system.
WARNING Risk of injury due to head restraints not being installed or being adjusted incorrectly
If head restraints have not been installed or have not been adjusted correctly, there is an increased risk of injury in the head and neck area, e.g. in the event of an accident or when braking.
Always drive with the head restraints installed.
Before driving off, make sure for every vehicle occupant that the center of the head restraint supports the back of the head at about eye level.
Do not interchange the head restraints of the front and rear seats. Otherwise, you will not be able to adjust the height and angle of the head restraints correctly.
Adjust the head restraint fore-and-aft position so that it is as close as possible to the back of your head.
WARNING Risk of injury or death due to an incorrect seat position
The seat belt does not offer the intended level of protection if you have not moved the seat backrest to an almost vertical position
In particular, you could slip beneath the seatbelt and become injured.
Adjust the seat properly before beginning your journey.
Always ensure that the seat backrest is in an almost vertical position and that the shoulder belt is routed across the center of your shoulder.
WARNING Risk of injury due to excessive strain on the grab handle
If you apply your full body weight to the grab handle or pull it abruptly, the grab handle may be damaged or become loose from its anchorage.
Use the grab handles only to stabilize the seating position or to assist in getting in and out of the seat.
WARNING Risk of injury or death due to objects under the co-driver seat
Objects trapped under the co-driver seat can interfere with the function of the automatic co-driver airbag shutoff or damage the system.
Do not store any objects under the codriver seat.
When the co-driver seat is occupied, make sure that no objects are trapped under the co-driver seat.
NOTE Damage to the seats when moving the seats back
The seats may be damaged by objects when moving the seats back.
When moving the seats back, make sure that there are no objects in the footwell, under or behind the seats.
To adjust the seat fore-and-aft position: lift lever 3 and slide the seat into the desired position.
Make sure that the seat is engaged.
Adjusting the front seat electrically
Save the settings with the memory function (→page 102).
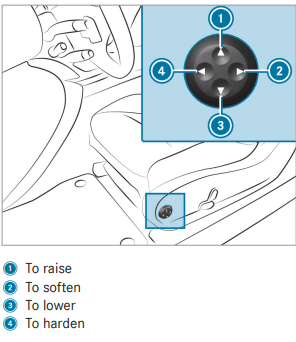
Adjusting the 4-way lumbar support
Using buttons 1 to 4, adjust the contour of the backrest individually to suit your back.
Light and visibility
Exterior lighting
Information about lighting systems and your responsibility
The various lighting systems of the vehicle are only aids. The driver of the vehicle is responsible for correct vehicle illumination in accordance with the prevailing light and visibility conditions, legal requirements and traffic situation.
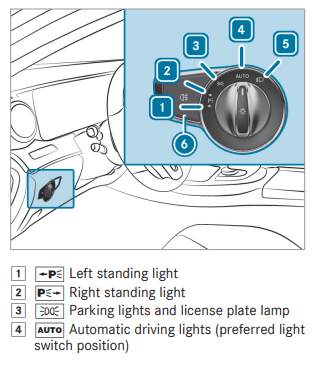
Light switch
Operating the light switch
When low beam is activated, the indicator lamp for the parking lamps will be deactivated and replaced by the low beam indicator lamp.
Always park your vehicle safely using sufficient lighting, in accordance with the relevant legal stipulations.
NOTE Battery discharging by operating the standing lights
Operating the standing lights over a period of hours puts a strain on the battery
Where possible, switch on the right or left parking light.
If the battery is insufficiently charged, the standing lamps or parking lamps will be switched off automatically to facilitate the next engine start.
The exterior lighting (except standing and parking lamps) will switch off automatically when the driver's door is opened.
Observe the notes on surround lighting.
Automatic driving lights function
The parking lamps, low beam and daytime running lamps are switched on automatically depending on the ignition status and the ambient light.
The automatic driving lights are only an aid. You are responsible for vehicle lighting.
Switching the rear fog lights on or off
Requirements:
The light switch is in the or position.
Press the button.
Please observe the country-specific laws on the use of rear fog lamps.
Operating the combination switch for the lights
Use the combination switch to activate the desired function.
To switching on:Turn the light switch to the or position.
Push the combination switch beyond the point of resistance in the direction of arrow .
When the high beam is activated, the indicator lamp for low beam will be deactivated and replaced by the indicator lamp for high beam.
To switching off :move the combination switch back to its starting position.
High-beam flasher
Pull the combination switch in the direction of arrow .
Turn signal light
To indicate briefly: push the combination switch briefly to the point of resistance in the direction of arrow .
The corresponding turn signal light will flash three times.
To indicate permanently: push the combination switch beyond the point of resistance in the direction of arrow .
Vehicles with Active Lane Change Assist:
Indicator operation activated by the driver can extend for the duration of the lane change.
If the driver indicated directly beforehand but a lane change was not immediately possible, the turn signal indicator may activate automatically.
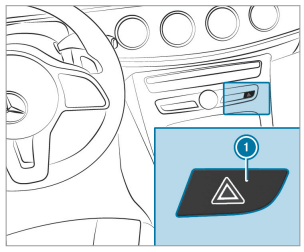
Activating/deactivating the hazard warning lights
Press button .
Cornering light
Cornering light function
The cornering light improves the illumination of the road over a wide angle in the turning direction, enabling better visibility on tight curves, for example. It can be activated only when the low beam is switched on.
The function is active in the following cases:
At speeds below 25 mph (40 km/h) when the turn signal light is switched on or the steering wheel is turned
At speeds between 25 mph (40 km/h) and 45 mph (70 km/h) when the steering wheel is turned
Traffic circle and intersection function: the cornering light is activated on both sides through an evaluation of the current GPS position of the vehicle. It remains active until after the vehicle has left the traffic circle or the intersection.
Adaptive Highbeam Assist
Adaptive Highbeam Assist function
The Adaptive Highbeam Assist automatically switches between the following types of light:
Low-beam headlamps
High beam
At speeds above 19 mph (30 km/h):
If no other road users are detected, the high beam will be switched on automatically.
The high beam switches off automatically in the following cases:
At speeds below 16 mph (25 km/h).
If other road users are detected.
If street lighting is sufficient.
At speeds above approximately 31 mph (50 km/h):
The headlamp range of the low beam is regu‐ lated automatically based on the distance to other road users.
The system's optical sensor is located behind the windshield near the overhead control panel.
Interior lighting
Adjusting the interior lighting
Adjusting the ambient lighting
Driving and parking
Driving
Notes on Mercedes-AMG vehicles
Observe the notes on the following topics in the Supplement, otherwise you may fail to recognize dangers.
AMG Performance exhaust system
AMG adaptive sport suspension system
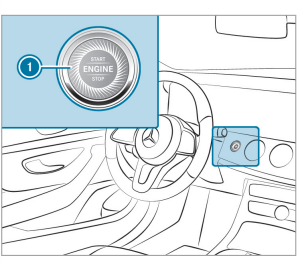
Switching on the power supply or ignition using the start/stop button
WARNING Risk of accident and injury due to children left unattended in the vehicle
If children are left unsupervised in the vehicle, they could, in particular:
open doors, thereby endangering other persons or road users.
get out and be struck by oncoming traffic.
operate vehicle equipment and become trapped, for example.
In addition, the children could also set the vehicle in motion, for example by:
releasing the parking brake.
shifting the automatic transmission out of park position
starting the vehicle.
Never leave children unattended in the vehicle.
When leaving the vehicle, always take the SmartKey with you and lock the vehicle.
Keep the vehicle SmartKey out of reach of children.
Requirements:
The SmartKey is located in the vehicle and the SmartKey battery is not discharged.
To switch on the power supply: press button once. You can, for example, activate the windshield wipers.
You can activate the windshield wipers, for example.
The power supply is switched off again if the following conditions are met:
You open the driver's door.
You press button twice.
To switch on the ignition: press button twice.
The indicator lamps in the instrument cluster light up
The ignition is switched off again if one of the following conditions is met:
You do not start the vehicle within 15 minutes and the transmission is in position or the electric parking brake is applied.
You press button once.
Starting the vehicle via Remote Online Services
Cooling or heating the vehicle interior before starting the journey
Ensure the following before starting the engine:
The legal stipulations in the area where your vehicle is parked allow engine starting via smartphone.
It is safe to start and run the engine where your vehicle is parked.
The fuel tank is sufficiently full.
The starter battery is sufficiently charged.
Charging the starter battery before starting the journey
If the vehicle battery is discharged, you receive a message on your smartphone.
You can then start the vehicle with the smartphone to charge the battery.
The vehicle is automatically switched off after ten minutes.
Ensure the following before starting the engine:
The legal stipulations in the area where your vehicle is parked allow engine starting via smartphone.
It is safe to start and run the engine where your vehicle is parked.
The fuel tank is sufficiently full.
Securing the engine against starting before carrying out maintenance or repair work:
Switch on the hazard warning light system.
or
Unlock the doors.
or
Open a side window or the sliding sunroof.
Breaking-in notes
Mercedes-AMG vehicles: observe the notes in the Supplement. Otherwise, you may not recog‐ nize dangers.
To preserve the engine during the first 1,000 miles (1,500 km):
Drive at varying road speeds and engine speeds.
Do not drive at speeds greater than 85 mph (140 km/h).
Drive the vehicle in drive program or .
Change gear before the tachometer needle is Ô of the way to the red area of the tachome‐ ter.
Do not shift down a gear manually in order to brake.
Avoid overstraining the vehicle, e.g. driving at full throttle.
Do not depress the accelerator pedal past the pressure point (kickdown).
Only increase the engine speed gradually and accelerate the vehicle to full speed after 1,000 miles (1,500 km).
This also applies when the engine or parts of the drivetrain have been replaced.
Please also observe the following breaking-in notes:
In certain driving and driving safety systems, the sensors adjust automatically while a certain distance is being driven after the vehicle has been delivered or after repairs. Full system effectiveness is not reached until the end of this teach-in process.
Brakepads, brake discs and tires that are either new or have been replaced only achieve optimum braking effect and grip after several hundred kilometers of driving. Compensate for the reduced braking effect by applying greater force to the brake pedal.
Maintenance and care
ASSYST PLUS service interval display
Function of the ASSYST PLUS service interval display
The ASSYST PLUS service interval display on the Instrument Display provides information on the remaining time or distance before the next service due date.
You can hide this service message using the back button on the left-hand side of the steering wheel.
Depending on how the vehicle is used, the ASSYST PLUS service interval display may shorten the service interval, e.g. in the following cases:
Mainly short-distance driving
When the engine is often left idling for long periods
In the event of frequent cold start phases
Mercedes-Benz recommends avoiding such operating conditions.
You can obtain further information concerning the servicing of your vehicle from a qualified specialist workshop, e.g. an authorized Mercedes-Benz Center.
Displaying the service due date
On-board computer:
Service ASSYST PLUS
The next service due date is displayed.
To exit the display: press the back button on the left-hand side of the steering wheel.
Make sure to observe the following further rela‐ ted subject:
Operating the on-board computer
Information on regular maintenance work
NOTE Premature wear through failure to observe service due dates
Service work which is not carried out at the right time or incompletely can lead to increased wear and damage to the vehicle.
Always observe the prescribed service intervals.
Always have the prescribed service work carried out at a qualified specialist workshop.
Special service requirements
The prescribed service interval is based on nor‐ mal operation of the vehicle. Maintenance work will need to be performed more often if the vehi‐ cle is operated under arduous conditions or increased loads.
The ASSYST PLUS service interval display is only an aid. The driver of the vehicle bears responsi‐ bility as regards to whether maintenance work needs to be performed more often than speci‐ fied based on the actual operating conditions and/or loads.
Examples of arduous operating conditions:
regular city driving with frequent intermedi‐ ate stops
mainly short-distance driving frequent operation in mountainous terrain or on poor road surfaces
when the engine is often left idling for long periods
operation in particularly dusty conditions and/or if air-recirculation mode is frequently used
In these or similar operating conditions, have the interior air filter, engine air cleaner, engine oil and oil filter etc. changed more frequently. The tires must be checked more frequently if the vehicle is operated under increased loads. Fur‐ ther information can be obtained at a qualified specialist workshop.
Battery disconnection periods
The ASSYST PLUS service interval display can only calculate the service due date when the battery is connected.
Note down the service due date displayed on the instrument display before disconnecting the battery (→ page 344).
Engine compartment
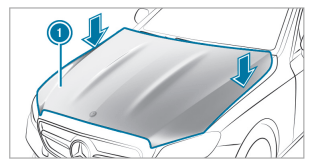
Active hood (pedestrian protection)
Operation of the active hood (pedestrian pro‐ tection)
In certain accident situations, the risk of injury to pedestrians can be reduced by the actuation of the active hood. The rear area of the hood is raised by approximately 3 in (85 mm).
For the drive to the workshop, reset the trig‐ gered active hood yourself. After the active hood has been triggered, pedestrian protection may be limited.
A qualified specialist workshop must re-instate the full functionality of the active hood.
The active hood is not available in all countries.
Resetting the active hood
WARNING Risk of burns from hot com‐ ponent parts in the engine compartment
Certain components in the engine compart‐ ment can be very hot, e.g. the engine, the radiator and parts of the exhaust system.
Allow the engine to cool down and only touch component parts described in the following.
With your hand flat, push down active hood 1 in the area around the hinges on both sides (arrows). The hood must engage in position.
If the active hood can be raised slightly at the rear in the area of the hinges, repeat the step until it engages correctly.
Opening/closing the hood
To open: pull lever 1 to release the hood.
Push handle 1 of the hood catch upwards and lift the hood by approximately 15 in cm).
To close: lower the hood and let it fall from a height of approximately 8 in (20 cm).
If the hood can still be lifted slightly, open the hood again and close it with a little more force until it engages correctly.
Engine oil
Checking the engine oil level using the oil dipstick
WARNING Risk of burns from hot com‐ ponent parts in the engine compartment
Certain component parts in the engine com‐ partment can be very hot, e.g. the engine, the cooler and parts of the exhaust system.
Let the engine cool down and only touch the component parts described as follows.
Requirements:
The engine must have an oil dipstick. If not, the engine oil level can be checked only with the onboard computer .
Depending on the engine, the oil dipstick may be installed in the engine compartment in different locations.
The waiting time before checking the oil level when the engine is at normal operating tempera‐ ture is five minutes.
Park the vehicle on a level surface.
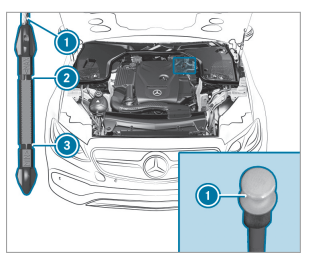
Pull oil dipstick 1 out and wipe off.
Slowly slide oil dipstick 1 into the guide tube to the stop, and pull it out again after approximately three seconds.
Oil level is correct: oil level is between 2 and 3.
Oil level too low: oil level is at 3 or below.
Oil level too high: oil level is above 2.
If the oil level is too low, add 1.1 US qt liter) of engine oil.
If the engine oil level is too high, have the excess engine oil removed immediately at a qualified specialist workshop.
Checking the engine oil level with an onboard computer
Requirements:
The engine oil level is determined during driving.
Determining the engine oil level can take up to 30 minutes with a normal driving style and even longer with an active driving style
In order to receive a result as quickly as possi‐ ble:
warm up the engine.
park the vehicle on a level surface.
leave the engine running at idle speed.
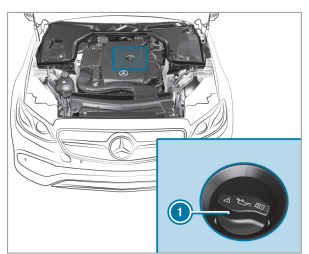
On-board computer:
Service Engine Oil Level
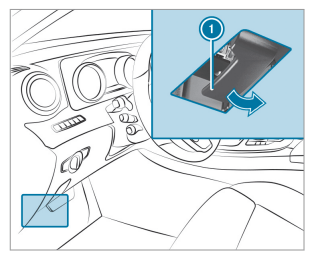
Turn cap 1 counter-clockwise and remove it.
Add engine oil.
Replace cap 1 and turn it clockwise as far as it will go.
Check the oil level again (→ page 348).
Checking coolant level
Park the vehicle on a level surface.
Check the coolant temperature display in the instrument cluster. The coolant temperature must be below 158 °F (70 °C).
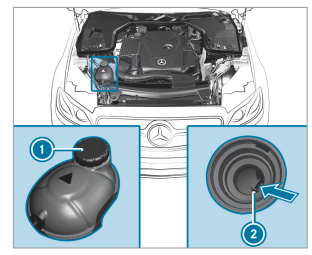
Slowly turn cap 1 counter-clockwise to relieve overpressure.
Continue turning cap 1 counter-clockwise and remove it.
The coolant level is correct:
If the engine is cold, up to marker bar 2.
If the engine is warm, up to 0.6 in (1.5 cm) over marker bar 2.
If necessary, add coolant that has been approved by Mercedes-Benz.
Further information on coolant
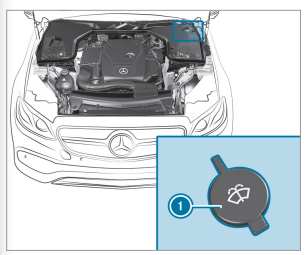
Adding washer fluid to the windshield washer system
Remove cap 1 by the tab.
Add washer fluid.
Keeping the air-water duct free
Keep the area between the hood and the windshield free of deposits, e.g. ice, snow and leaves.
Cleaning and care
Notes on washing the vehicle in a car wash
WARNING Risk of accident due to reduced braking effect after washing the vehicle
The braking effect is reduced after washing the vehicle.
After the vehicle has been washed, brake carefully while paying attention to the traffic conditions until the braking effect has been fully restored.
NOTE Damage due to unsuitable car wash
Before driving into a car wash make sure that the car wash is suitable for the vehicle dimensions.
Ensure there is sufficient ground clear‐ ance between the underbody and the guide rails of the car wash.
Ensure that the clearance width of the car wash, in particular the width of the guide rails, is sufficient.
To avoid damage to your vehicle when using a car wash, ensure the following beforehand:
to avoid possible water ingress in the vehicle, it is preferable to use car washes which allow the high-pressure pre-cleaning to be deacti‐ vated (specification for the convertible pro‐ gram).
it is imperative to avoid a subsequent hotwax treatment.
remove the SmartKey in order to ensure that the wind deflector on the windshield retracts.
Active Distance Assist DISTRONIC and the HOLD function are deactivated.
the 360° Camera or the rear view camera is switched off.
the side windows and soft top are closed completely.
the blower for the ventilation/heating is switched off. he windshield wiper switch is in position g.
the SmartKey is at a minimum distance of ft (3 m) away from the vehicle, otherwise the trunk lid could open unintentionally.
in car washes with a conveyor system: neu‐ tral N is engaged.
In car washes with a conveyor system: if you would like to leave the vehicle while it is being washed, make sure the SmartKey is located in the vehicle. The P gear is other‐ wise automatically engaged.
If, after the car wash, you remove the wax from the windshield and wiper rubbers, this will prevent smearing and reduce wiper noise.
Information on using a power washer
WARNING Risk of accident when using high-pressure cleaning equipment with round-spray nozzles
The water jet from a round-spray nozzle (dirt grinder) may cause damage to tires and sus‐ pension components that is not visible.
Components damaged in this way may fail unexpectedly.
Do not use high-pressure cleaning equipment with round-spray nozzles to clean your vehicle.
Damaged tires or suspension compo‐ nents must be replaced immediately.
To avoid damage to your vehicle, observe the fol‐ lowing when using a power washer:
keep the SmartKey at least 10 ft (3 m) away from the vehicle. Otherwise the trunk lid could open unintentionally.
maintain a distance of at least 11.8 in (30 cm) to the vehicle.
vehicles with decorative foil: parts of your vehicle are covered with a decorative foil. Maintain a distance of at least 27.6 in (70 cm) between the foil-covered parts of the vehicle and the nozzle of the power washer. Move the power washer nozzle around whilst cleaning. The water temperature of the power washer must not exceed 140 °F (60 °C).
observe the information on the correct dis‐ tance in the equipment manufacturer's oper‐ ating instructions.
do not point the nozzle of the power washer directly at sensitive parts such as tires, the soft top, the wind deflector net, slits, electri‐ cal component parts, batteries, light sources and ventilation slots.
Washing the vehicle by hand
Observe the legal requirements, e.g. in a number of countries, washing by hand is only permitted in specially designated wash bays.
Use a mild cleaning agent, e.g. car shampoo.
Wash the vehicle with lukewarm water using a soft car sponge. When doing so, do not expose the vehicle to direct sunlight.
Carefully hose the vehicle off with water and dry using a chamois. Take care not to point the water jet directly towards the air inlet grille.
Notes on paintwork/matte finish paintwork care
Observe the following information:
Cleaning and care
Avoiding paintworkdamage
Paintwork
Insect remains: soak with insect remover and rinse off the treated areas afterwards.
Bird droppings: soak with water and rinse off afterwards.
Tree resin, oils, fuels and greases: remove by rubbing gen‐ tly with a cloth soaked in petroleum ether or lighter fluid.
Coolant and brake fluid: remove with a damp cloth and clean water.
Tar stains: use tar remover.
Wax: use silicone remover.
Do not attach stickers, films or similar.
Remove dirt immediately, where possible.
Matte finish
Only use care products approved for Mercedes-Benz.
Do not polish the vehicle and alloy wheels.
Only use car washes that correspond to the latest engi‐ neering standards.
Do not use car wash programs with a final hot wax treat‐ ment.
Do not use paint cleaners, buffing or polishing products, gloss preservers, e.g. wax.
Always have paintwork repairs carried out at a qualified specialist workshop
Notes on cleaning decorative foils
Notes on cleaning decorative foils
Observe the following information:
Cleaning
Avoiding damage to the decorative foil
For cleaning, use plenty of water and a mild cleaning agent without additives or abrasive substances, e.g. a car shampoo approved for Mercedes-Benz.
Remove dirt immediately, where possible, whilst avoiding rubbing too hard. There is otherwise a risk of damaging the decorative foil irreparably.
If there is dirt on the finish or if the decorative foil is dull: use the Paint Cleaner recommended and approved for Mercedes-Benz.
Insect remains: soak with insect remover and rinse off the treated areas afterwards.
Bird droppings: soak with water and rinse off afterwards.
To prevent water stains, dry a foil-wrapped vehicle with a soft, absorbent cloth after every car wash.
The service life and color of decorative foils are impaired by:
sunlight
temperature, e.g. hot air blower
weather conditions
stone chippings and dirt
chemical cleaning agents
oily products
Do not use polish on matte decorative foil. Polishing will have the effect of shining the foil-wrapped surface.
Do not treat matte or structured decorative foils with wax. Permanent stains may occur.
Scratches, corrosive deposits, areas affected by corrosion and damage caused by incorrect care cannot always be completely repaired. In such cases, visit a qualified specialist workshop. You can obtain more information on care and cleaning products from the manufacturer. In the case of foil-wrapped surfaces, optical dif‐ ferences may occur between the surfaces that were not protected by a decorative foil after removing a decorative foil.
Notes on care of vehicle parts
Observe the following information:
Cleaning and care
Avoiding vehicle damage
Wheels/rims
Use water and acid-free wheel cleaners.
Do not use acidic wheel cleaners to remove brake dust. This could damage wheel bolts and brake components.
To avoid corrosion of the brake discs and brakepads, drive the vehicle for a few minutes after cleaning before parking it. The brake discs and brakepads warm up and dry out.
Windows
Clean the windows on the inside and outside using a damp cloth and cleaning agents recommended by Mercedes-Benz.
Do not use dry cloths or abrasive or solvent-based cleaning agents to clean the inside of windows.
Wiper blades
Fold out the wiper blades and clean them using a damp cloth.
Do not clean the wiper blades too often.
Exterior lighting
Clean the lenses with a wet sponge and mild cleaning agent, e.g. car shampoo.
Only use cleaning agents or cleaning cloths that are suitable for plastic lenses.
Sensors
Clean the sensors in the front and rear bumper and in the radiator grill with a soft cloth and car shampoo.
When using a power washer, maintain a minimum distance of 11.8 in (30 cm).
Rear view camera and 360° Camera
Open the camera cover with the multimedia system (^ page 199) .
Use clean water and a soft cloth to clean the camera lens.
Do not use a power washer.
Tailpipes
Clean with cleaning agents recommended by Mercedes-Benz, particularly in the winter and after washing the vehicle.
Do not use acidic cleaning agents.
Notes on care of the interior
When the airbags are deployed, plastic parts may break away.
Do not use any care or cleaning prod‐ ucts containing solvents to clean the cockpit
Observe the following information:
Cleaning and care
Avoiding vehicle damage
Seat belts
Clean with lukewarm and soapy water.
Do not use chemical cleaning agents.
Do not dry seat belts by heating them to over 176 °F (80 °C) or exposing them to direct sunlight.
Display
Clean the surface carefully with a microfiber cloth and a suit‐ able display care product (TFT/LCD).
Switch off the display and let it cool down.
Do not use any other cleaning products.
Plastic trim
Clean with a damp microfiber cloth.
For heavy soiling: use care product recommended for Mercedes-Benz.
Do not attach stickers, films or similar materials.
Do not allow cosmetics, insect repellent or sun cream to come in contact with the plastic trim.
Real wood/trim inserts
Clean with a microfiber cloth.
Black piano-lacquer look: clean with a damp cloth and soapy water.
For heavy soiling: use care product recommended for Mercedes-Benz.
Do not use solvent-based cleaning agents, polishes or waxes.
Headliner
Clean with a brush or dry shampoo.
Carpet
Use carpet and textile cleaning agents recommended for Mercedes-Benz.
Genuine leather seat covers
Clean with a damp cloth and then wipe with a dry cloth.
Leather care: use leather care agents that have been recommended for Mercedes-Benz.
Do not allow the leather to become too damp.
Do not use a microfiber cloth.
DINAMICA seat covers
Clean with a damp cloth.
Do not use a microfiber cloth.
Imitation leather seat covers
Clean with a damp cloth and 1% soapy water.
Do not use a microfiber cloth.
Cloth seat covers
Clean with a damp microfiber cloth and 1% soapy water and allow to dry.
Display messages and warning/indicator lamps
Display messages
Introduction
Notes on display messages
Display messages appear on the multifunction display.
Display messages with graphic symbols are simplified in the Operator's Manual and may differ from the symbols on the multifunction display. The multifunction display shows high-priority display messages in red. Certain display messages are accompanied by a warning tone.
Please respond in accordance with the display messages and follow the additional notes in this Operator's Manual.
For some display messages, a symbol is also shown:
Further information
Hide display message
You can select the desired symbol by swiping left or right on the left-hand Touch Control.
Press thesymbol to show further information on the multifunction display. Press the symbol to hide the display message.
You can hide low-priority display messages by pressing thebutton or the left-hand Touch Control. The display messages are then stored in the message memory.
Rectify the cause of a display message as quickly as possible.
High-priority display messages cannot be hidden. The multifunction display shows these display messages continuously until the cause of the message has been rectified.
Calling up stored display messages
On-board computer:
Service 1 Message
If there are no display messages, No Messages appears on the multifunction display.
Scroll through the display messages by swiping upwards or downwards on the left-hand Touch Control.
To exit the message memory: press the button.
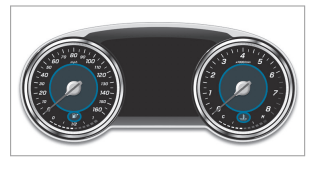
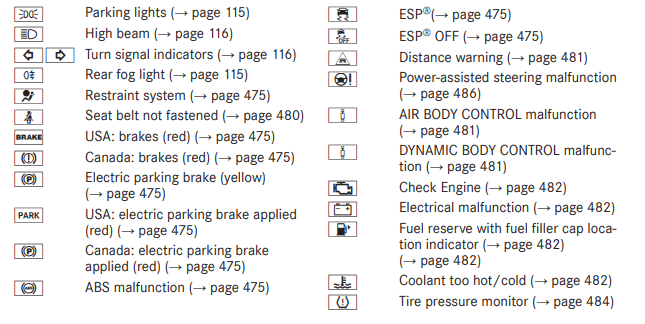
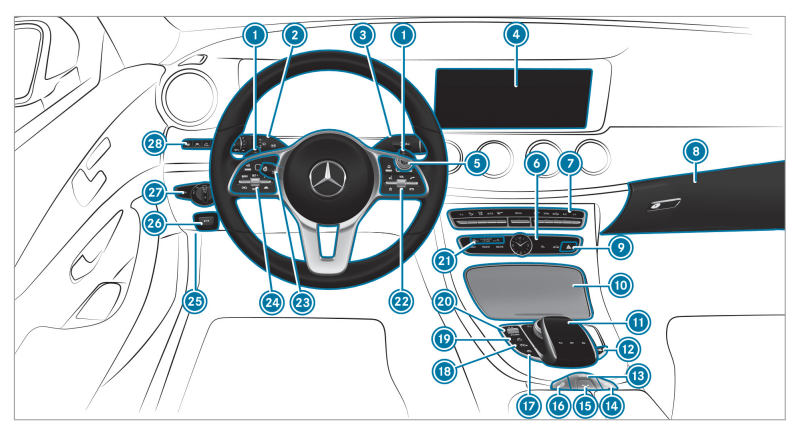
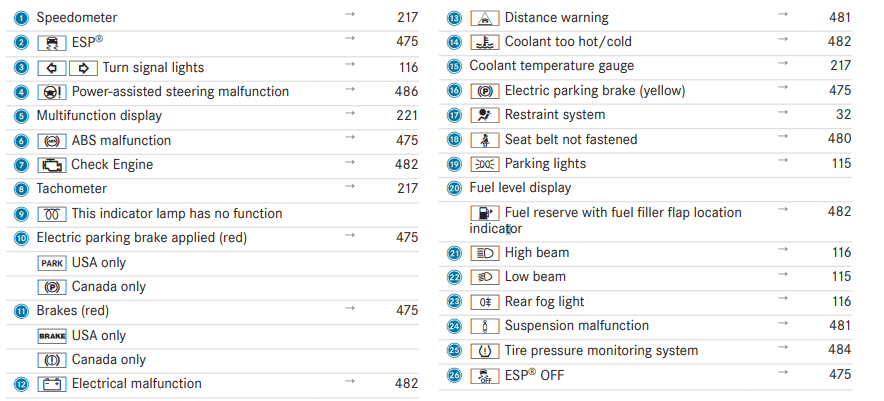
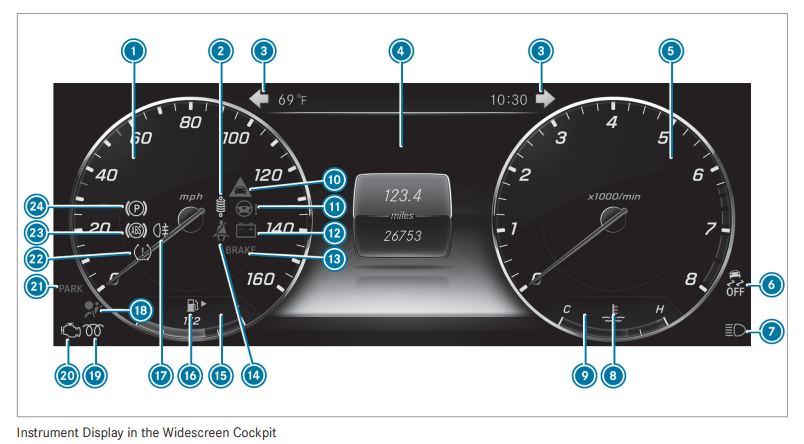
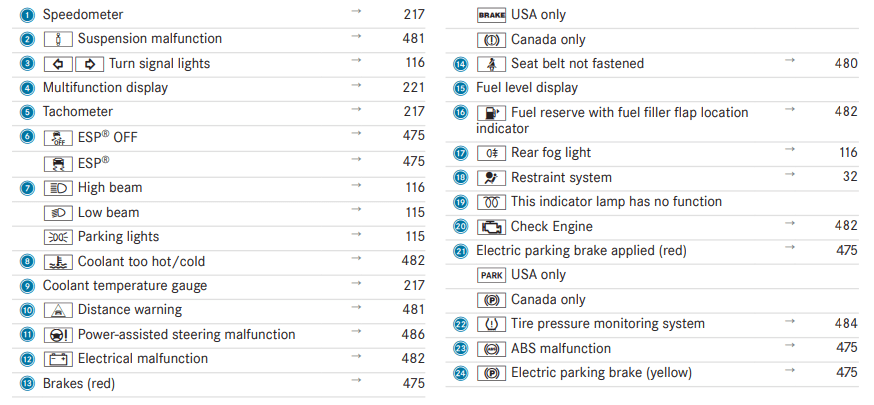
Overview of warning and indicator lamps Some systems will perform a self-test when the ignition is switched on. Some warning and indicator lamps may briefly light up or flash. This behavior is non-critical. These warning and indicator lamps indicate a malfunction only if they light up or flash after the engine has been started or during a journey. Instrument Display (standard)
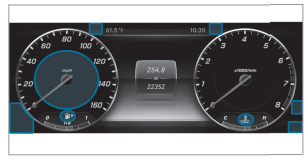
Widescreen Cockpit Instrument Display
Progressive setting
Vehicles with a Widescreen Cockpit: If you select the progressive display setting, the posi‐ tions of the indicator lamps on the Instrument Display will change.


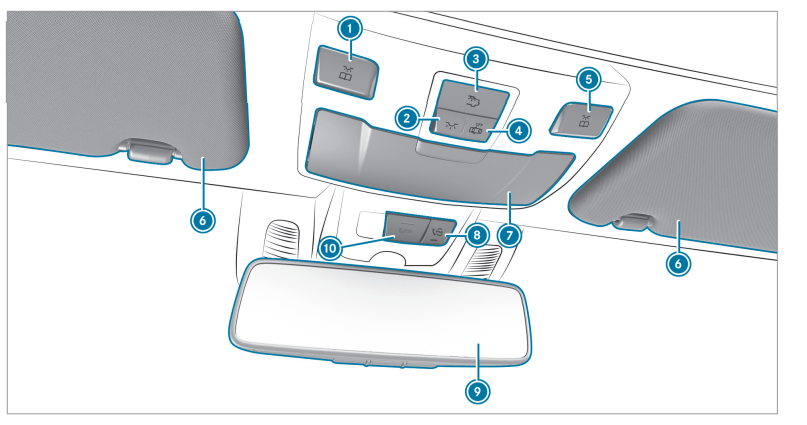
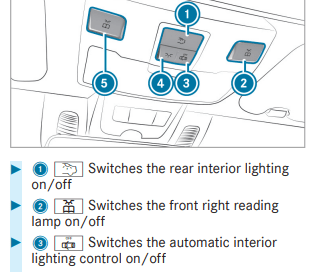
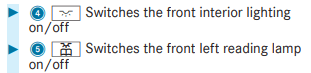
 Switches the left-hand reading lamp on/off
 Switches the front interior lighting on/off
 Switches the rear interior lighting on/off
 Switches automatic light control on/off
 Switches the right-hand reading lamp on/off
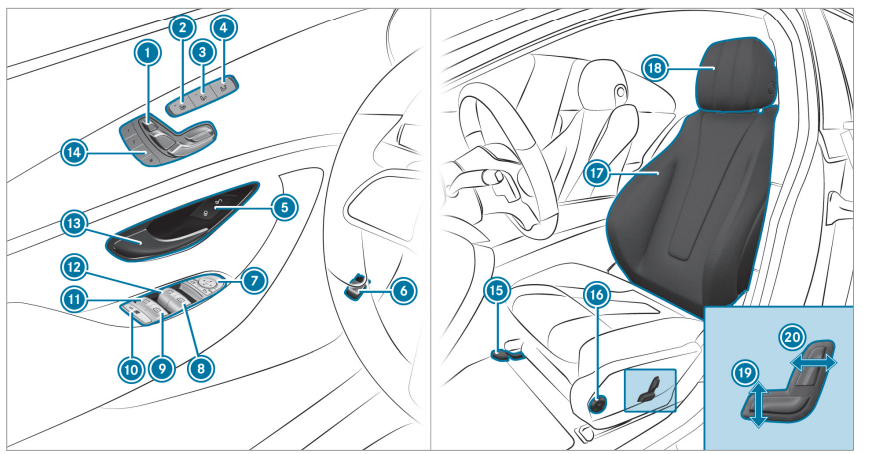
 Locks/unlocks the vehicle
 Opens/closes the right side window
 The SmartKey may vary from the one shown in the diagram, depending on the vehicle equipment.
 or
or button, the battery is discharged. Replace the SmartKey battery
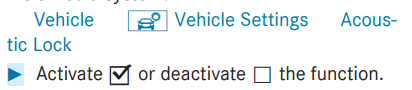
 ENVIRONMENTAL NOTE Environmental damage caused by improper disposal of batteries
 Batteries contain pollutants. It is illegal to dispose of them with the household rubbish.
 Dispose of batteries in an environmentally responsible manner.

 button on the SmartKey.
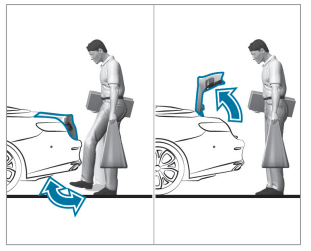

 Vehicle Settings Trunk
 or deactivate
  the function.
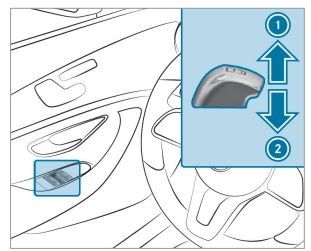
 button beyond the point of resistance or pull and release it.
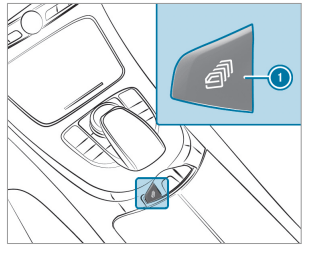
 button on the SmartKey.
 button on the SmartKey.
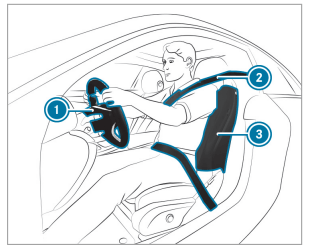

 indicator lamp for the parking lamps will be deactivated and replaced by the
  low beam indicator lamp.
 or left
  parking light.
 position.
 button.
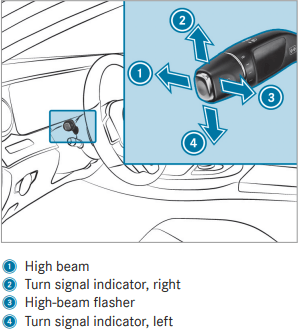
 .
. indicator lamp for high beam.
 .
. .
.


 once. You can, for example, activate the windshield wipers.
 or
or  .
.
 Further information
 Hide display message
 symbol to hide the display message.
 button or the left-hand Touch Control. The display messages are then stored in the message memory.