
GEAppliances.com
Refrigerators
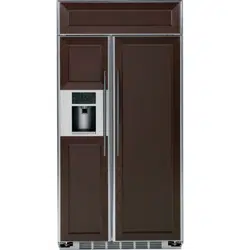
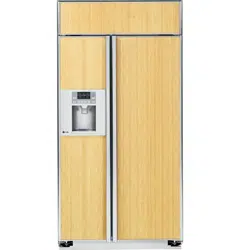
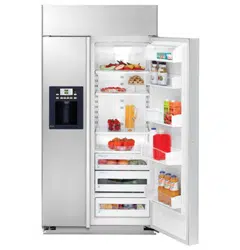
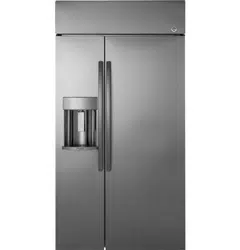
GE Profile
™
Built-In Side by Side
225D2637P001 49-60558-2 09-14 GE
La section française commence à la page 49
Réfrigérateurs
GE Profile Côte à Côte
Model 42, 48
Write the model and serial numbers
here:
Model # _________________________
Serial # __________________________
Find these numbers on a label inside
the refrigerator compartment at the
top on the right side.
Owner’s Manual and
Installation Instructions
Manuel d’utilisation
et d’installation
Safety Instructions
............2–4
Operating Instructions
Automatic Icemaker ................10
Care and Cleaning .............12, 13
ClimateKeeper
with Dual Evaporators ...............6
Drawers and Baskets ................9
Ice and Water Dispenser .......10, 11
Refrigerator Doors ..................8
Replacing the Light Bulbs ...........14
Shelves and Bins ....................7
Temperature Controls ...............5
Water Filter .........................6
Installation Instructions
Anti-Tip Brackets ...................34
Dimensions, Clearances ............17
Door, Grille Panels ..............36–38
Installation Space ..................17
Leveling ...........................35
Panel Dimensions ..............21–30
Water Line .....................33, 34
Water Supply ......................39
Troubleshooting Tips ......42–44
Normal Operating Sounds ..........41
Consumer Support
Consumer Support ........Back Cover
Performance Data Sheet ...........46
Warranty ..........................45
2
IMPORTANT SAFETY INFORMATION.
READ ALL INSTRUCTIONS BEFORE USING.
SAFETY
GE Appliances Website
For more information on your refrigerator’s operation, visit www.GEAppliances.com or
call 800.GECARES (800.432.2737). In Canada visit GEAppliances.ca or call 800.561.3344.
This is the safety alert symbol. This symbol alerts you to potential hazards that can kill or hurt you and others. All safety
messages will follow the safety alert symbol and the word “DANGER”, “WARNING”, or “CAUTION”. These words are defined as:
Indicates a hazardous situation which, if not avoided, will result in death or serious injury.
Indicates a hazardous situation which, if not avoided, could result in death or serious injury.
Indicates a hazardous situation which, if not avoided, could result in minor or moderate injury.
IMPORTANT SAFETY INSTRUCTIONS
To reduce the risk of fire, explosion, electric shock, or injury when using your
refrigerator, follow these basic safety precautions:
REFRIGERATOR SAFETY INFORMATION
WARNING
WARNING
DANGER
CAUTION
In refrigerators with automatic ice makers, avoid contact with the
moving parts of the ejector mechanism, or with the heating element
that releases the cubes. Do not place fingers or hands on the
automatic ice making mechanism while the refrigerator is plugged
in.
Do not clean glass shelves or covers with warm water when they
are cold. Glass shelves and covers may break if exposed to sudden
temperature changes or impact, such as bumping or dropping.
Tempered glass is designed to shatter into many small pieces if it
breaks.
Keep fingers out of the “pinch point” areas; clearances between the
doors and between the doors and cabinet are necessarily small. Be
careful closing doors when children are in the area.
Do not touch the cold surfaces in the freezer compartment when
hands are damp or wet, skin may stick to these extremely cold
surfaces.
Do not refreeze frozen foods which have thawed completely.
IMPORTANT SAFETY INSTRUCTIONS
To reduce the risk of injury when using your refrigerator, follow these basic
precautions.
This refrigerator must be properly installed and located in
accordance with the Installation Instructions before it is used.
Replace all parts and panels before operating.
Do not store or use gasoline or other flammable vapors and liquids
in the vicinity of this or any other appliance.
Because of potential safety hazards under certain conditions, we
strongly recommend against the use of an extension cord. However,
if you must use an extension cord, it is absolutely necessary that it
be a UL-listed (in the United States) or a CSA certified (in Canada),
3-wire grounding type appliance extension cord having a grounding
type plug and outlet and that the electrical rating of the cord be 15
amperes (minimum) and 120 volts.
To prevent suffocation and entrapment hazards to children, remove
the fresh food and freezer doors from any refrigerator before
disposing of it or discontinuing its use.
Do not allow children to climb, stand or hang on the door handles
or the shelves in the refrigerator. They could seriously injure
themselves.
Unplug the refrigerator :
• To disconnect power to the refrigerator. It cannot be turned off by
any setting on the control panel.
• To clean, replace a burned out light bulb, or make repairs.
Note: Repairs must be performed by a qualified Service Professional.
CAUTION
GEAppliances.com
3
WARNING
Explosion Hazard.
Keep flammable materials and vapors, such as gasoline, away from refrigerator. Failure to do so can
result in fire, explosion, or death.
WARNING
Tip Over Hazard.
This refrigerator is top heavy and must be handled with care. Failure to do so can result in the unit
tipping over and result in death or serious injury. Reference Installation Instructions for correct anti-tip
bracket installation.
INSTALLATION
Do not, under any circumstances, cut or remove the third (ground) prong from the power cord.
For personal safety, this appliance must be properly grounded.
The power cord of this appliance is equipped with a 3-prong
(grounding) plug which mates with a standard 3-prong
(grounding) wall outlet to minimize the possibility of electric
shock hazard from this appliance.
Have the wall outlet and circuit checked by a qualified
electrician to make sure the outlet is properly grounded.
Where a standard 2-prong wall outlet is encountered, it is
your personal responsibility and obligation to have it replaced
with a properly grounded 3-prong wall outlet. Do not use an
adapter.
The refrigerator should always be plugged into its own
individual electrical outlet which has a voltage rating that
matches the rating plate.
A 115 Volt AC, 60 Hz, 15- or 20-amp fused, grounded
electrical supply is required. This provides the best
performance and also prevents overloading house wiring
circuits which could cause a fire hazard from overheated
wires.
Never unplug your refrigerator by pulling on the power cord.
Always grip plug firmly and pull straight out from the outlet.
Repair or replace immediately all power cords that have
become frayed or otherwise damaged. Do not use a cord
that shows cracks or abrasion damage along its length or at
either end.
When moving the refrigerator away from the wall, be careful
not to roll over or damage the power cord.
CONNECTING ELECTRICITY
WARNING
Electrical Shock Hazard.
Plug into a grounded 3-prong outlet
Do not remove the ground prong
Do not use an adapter
Failure to follow these instructions can result in
death, fire, or electrical shock.
SAFETY (CONT.)
DO NOT USE AN ADAPTER PLUG OR EXTENSION CORD
(Adapter plugs not permitted in Canada)
Do not use an adapter plug to connect the refrigerator to a 2-prong outlet.
Do not use an extension cord with this appliance.
4
IMPORTANT SAFETY INFORMATION.
READ ALL INSTRUCTIONS BEFORE USING.
SAFETY (CONT.)
READ AND FOLLOW THIS SAFETY INFORMATION CAREFULLY.
SAVE THESE INSTRUCTIONS
WARNING
Suffocation and child entrapment hazard.
Remove fresh-food and freezer doors from the refrigerator, prior to disposal. Failure to do so can result
in child entrapment which can lead to death or brain damage.
Child entrapment and suffocation are not problems
of the past. Junked or abandoned refrigerators are
still dangerous even if they will sit for “just a few
days.” If you are getting rid of your old refrigerator,
please follow the instructions below to help prevent
accidents.
Before You Throw Away Your Old Refrigerator
or Freezer:
Take off the fresh food and freezer doors.
Leave the shelves in place so that children may not
easily climb inside.
Refrigerants
All refrigeration products contain refrigerants,
which under federal law must be removed prior
to product disposal. If you are getting rid of an old
refrigeration product, check with the company
handling the disposal about what to do.
PROPER DISPOSAL OF YOUR OLD REFRIGERATOR
IMPORTANT:
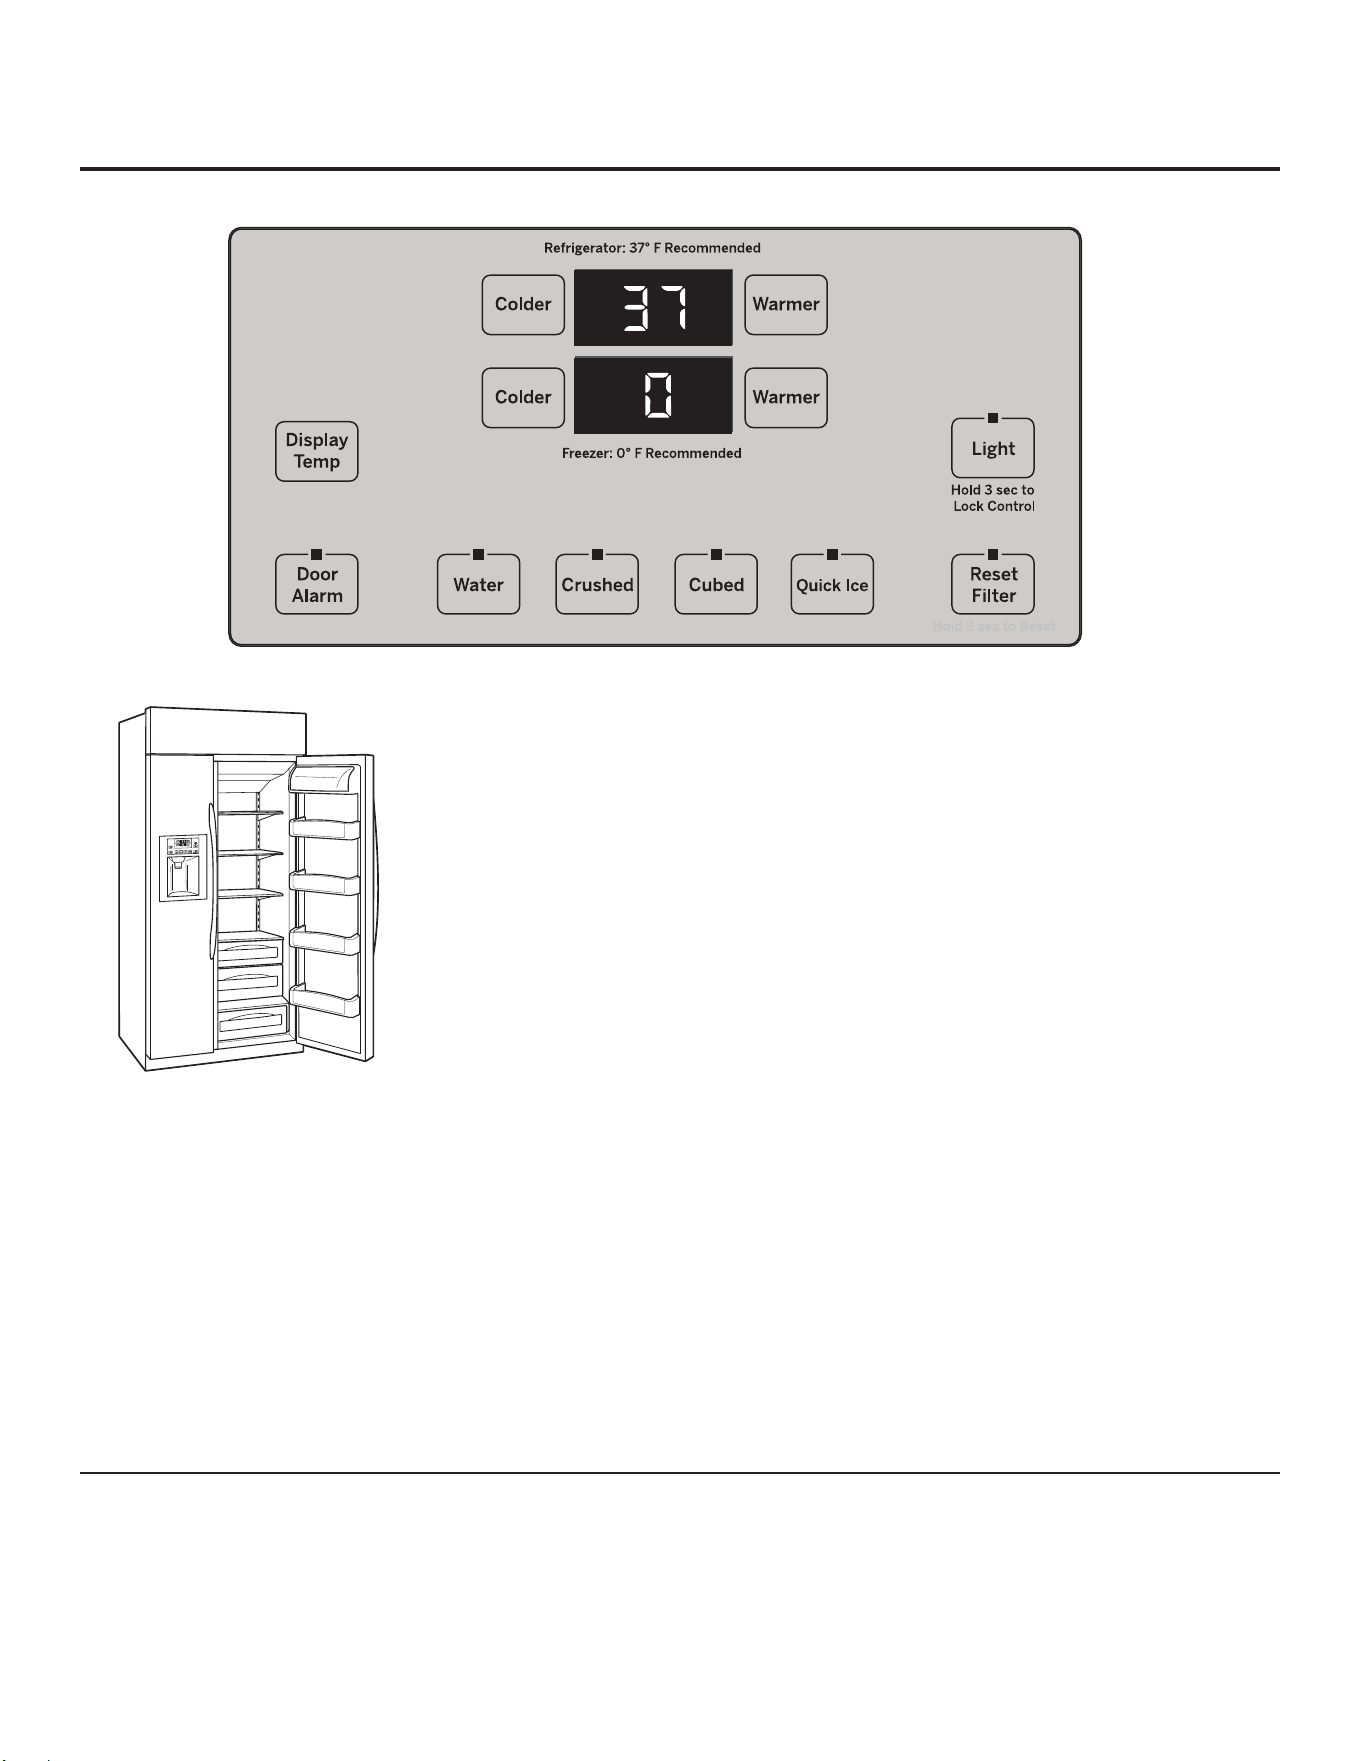
About the temperature controls. GEAppliances.com
The temperature controls are preset in the factory at 37°F for
the refrigerator compartment and 0°F for the freezer compartment.
Allow 24 hours for the temperature to stabilize to the preset
recommended settings.
The temperature controls can display both the SET temperature
as well as the actual temperature in the refrigerator and freezer.
The actual temperature may vary slightly from the SET temperature
based on usage and operating environment.
NOTE: The refrigerator is shipped with protective film covering
the temperature controls. If this film was not removed during
installation, remove it now.
The Performance Air-Flow System is designed to
maximize temperature control in the refrigerator
and freezer compartments. This unique special feature
consists of the Air Tower along the back
wall of the refrigerator and the freezer. Placing food
in front of the louvers on these components will not
affect performance.
Performance Air Flow System
To change the temperature, press and release
the WARMER or COLDER button. SET will illuminate in the
display, as well as the set temperature. To change the
temperature, tap either the WARMER or COLDER button
(while SET is illuminated) until the desired temperature
is displayed. Refrigerator temperatures can be adjusted
between 34°F and 47°F and
the freezer temperatures can be adjusted
between –6°F and +8°F.
Once the desired temperature has been set,
the temperature display will clear after 10 seconds.
To display the temperature, the DISPLAY TEMP button
may be tapped.
Several adjustments may be required. Each time you
adjust controls, allow 24 hours for the refrigerator to
reach the temperature you have set.
5

About the water filter.
6
About ClimateKeeper
®
with dual evaporators.
How it Works
The ClimateKeeper with dual evaporators system
IHDWXUHVWZRHYDSRUDWRUV³RQHIRU
the refrigerator and one for the freezer.
This provides two separate cooling systems, and
separates the airflow between the fresh food and
freezer compartments during normal cooling
operations.
The separate airflow system minimizes
the mixing of air between the two compartments,
which reduces fresh food odor transfer to improve
the taste of ice.
The ClimateKeeper system also reduces
the number of defrosting cycles in the freezer
evaporator, thereby reducing freezer burn.
ridge
older
Cartridge
Holder
Water filter cartridge
The water filter cartridge is located in the back upper right corner of
the refrigerator compartment.
When to replace the filter on models
with a replacement indicator light
There is a replacement indicator light for the water filter cartridge
on the dispenser. This light will turn orange to
tell you that you need to replace the filter soon.
The filter cartridge should be replaced when the replacement
indicator light turns red or if the flow of water to the dispenser or
icemaker decreases.
When to replace the filter on models
without a replacement indicator light
The filter cartridge should be replaced every six months
or earlier if the flow of water to the dispenser or
icemaker decreases.
Removing the filter cartridge
If you are replacing the cartridge, first remove the old one
by slowly turning it to the left. Do not pull down on the cartridge. A
small amount of water may drip down.
CAUTION: To reduce the risk associated with property damage due
to water leakage, read and follow instructions before installation
and use of this system. Installation and use MUST comply with all
state and local plumbing codes.
Installing the filter cartridge
1
Fill the replacement cartridge with water from the tap
to allow for better flow from the dispenser immediately
after installation.
2
Line up the arrow on the cartridge and the cartridge holder. Place
the top of the new cartridge up inside the holder.
Do not push it up into the holder.
3
Slowly turn it to the right until the filter
cartridge stops. DO NOT OVERTIGHTEN.
As you turn the cartridge, it will
automatically raise itself into position.
The cartridge will move about a ½ turn.
4
Run water from the dispenser for 1-1/2 gallons (about three
minutes) to clear the system and prevent sputtering.
5
Press and hold the RESET WATER FILTER pad (on some models) on
the dispenser for three seconds.
NOTE: A newly installed water filter cartridge may cause water
to spurt from the dispenser.
Filter bypass plug
Y
ou must use the filter bypass plug when a replacement filter
cartridge is not available. The dispenser and the icemaker will not
operate without the filter or filter bypass plug.
To use the filter bypass plug on Water by Culligan
™
models,
you must first remove the filter adaptor from the cartridge holder by
turning it to the left.
SmartWater
Filter Bypass
Plug
Filter Bypass
Plug
ter
ss
ug
Water by Culligan
)RUWKHPD[LPXPEHQH¿WWR\RXU¿OWUDWLRQV\VWHP*(UHFRPPHQGVWKHXVHRI*(EUDQGHG¿OWHUVRQO\8VLQJ*(EUDQGHG¿OWHUVLQ*(
and Hotpoint
®
UHIULJHUDWRUVSURYLGHVRSWLPDOSHUIRUPDQFHDQGUHOLDELOLW\*(¿OWHUVPHHWULJRURXVLQGXVWU\16)VWDQGDUGVIRUVDIHW\
DQGTXDOLW\WKDWDUHLPSRUWDQWIRUSURGXFWVWKDWDUH¿OWHULQJ\RXUZDWHU*(KDVQRWTXDOL¿HGQRQ*(EUDQGHG¿OWHUVIRUXVHLQ*(
DQG+RWSRLQWUHIULJHUDWRUVDQGWKHUHLVQRDVVXUDQFHWKDWQRQ*(EUDQGHG¿OWHUVPHHW*(·VVWDQGDUGVIRUTXDOLW\SHUIRUPDQFHDQG
reliability.
,I\RXKDYHTXHVWLRQVRUWRRUGHUDGGLWLRQDO¿OWHUFDUWULGJHVYLVLWRXUZHEVLWHDWZZZJHZDWHU¿OWHUVFRPRUFDOO*(3DUWVDQG
Accessories, 800.626.2002.
Customers in Canada should consult the yellow pages for the nearest Camco Service Center.
7
About the shelves and bins. GEAppliances.com
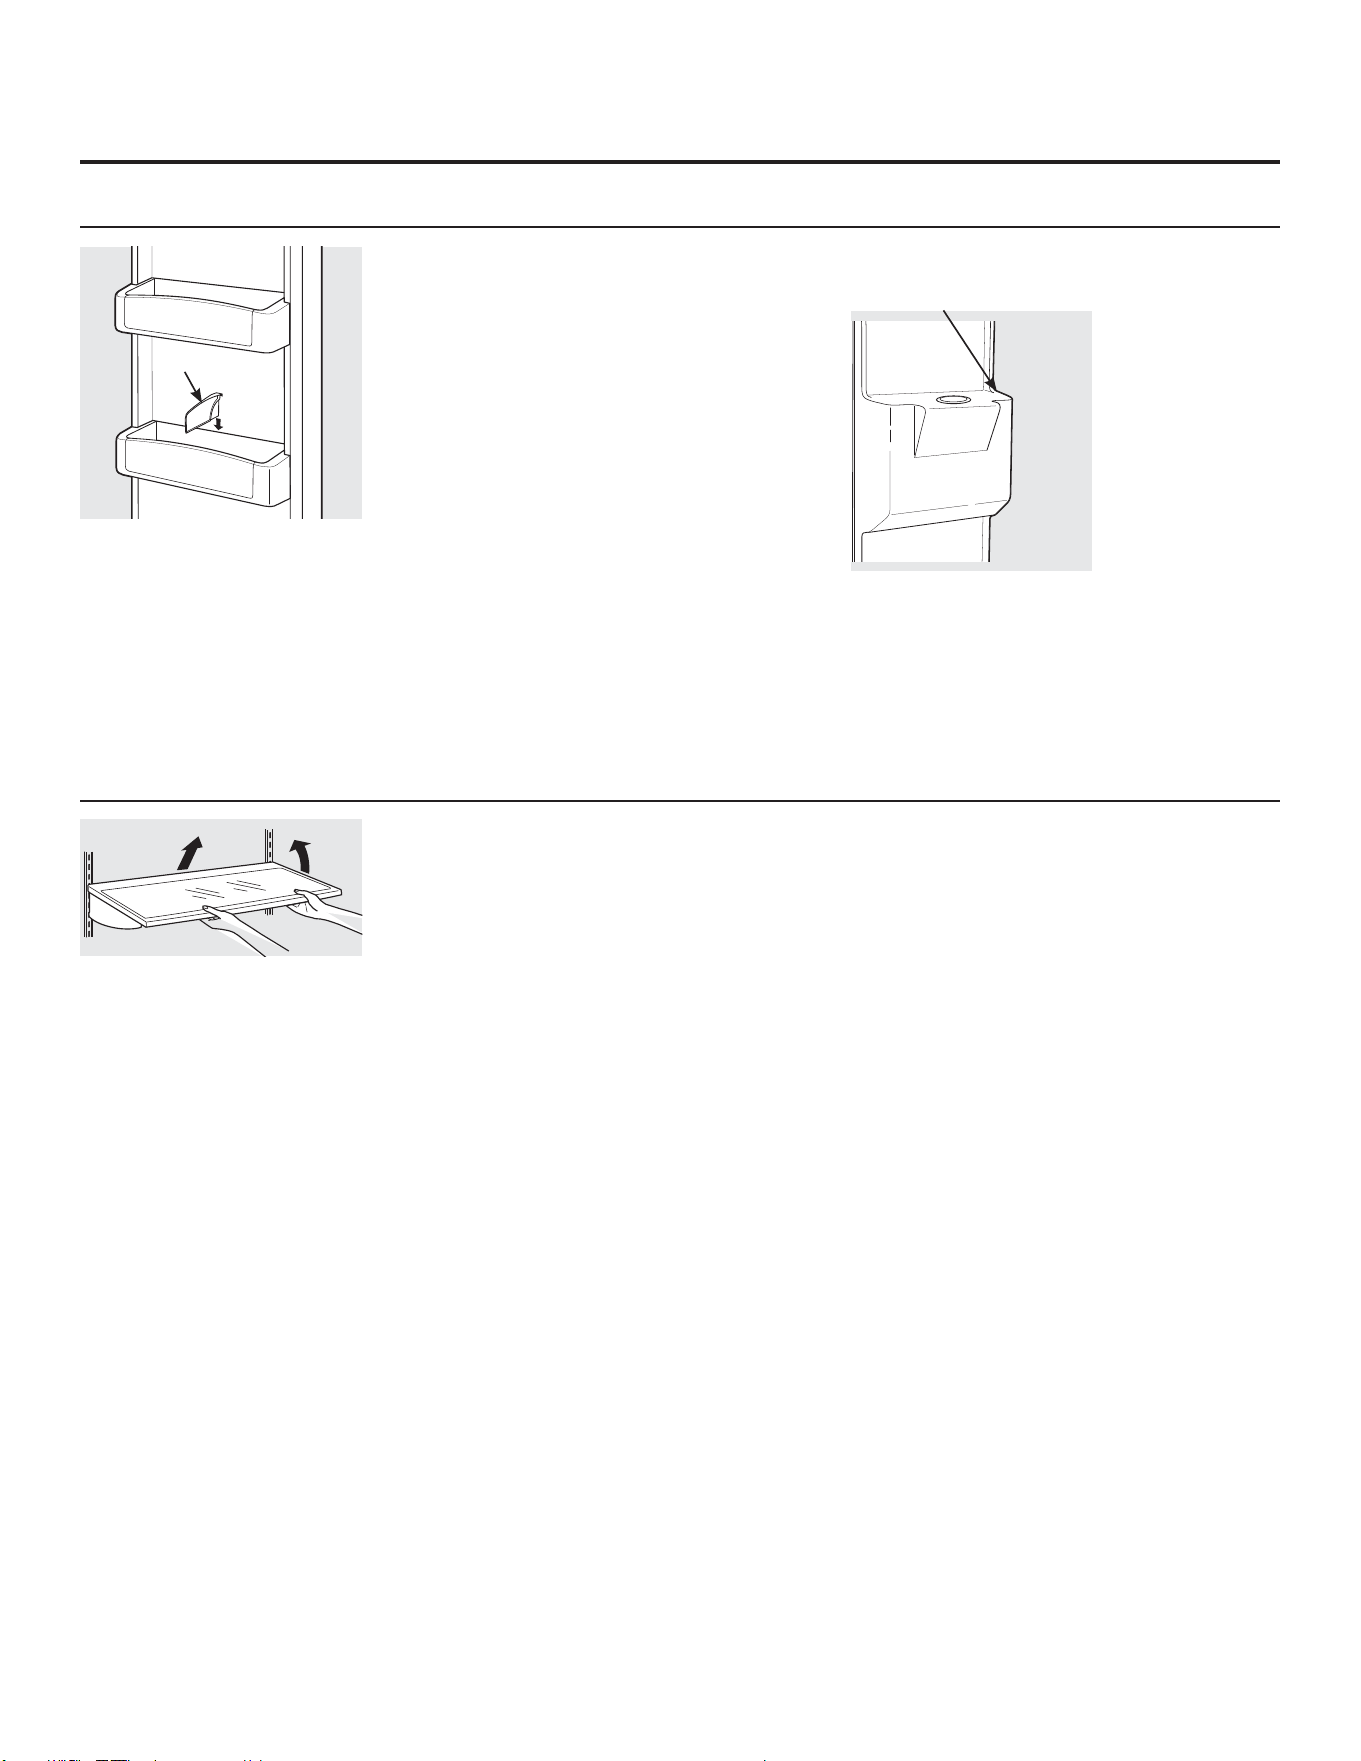
Refrigerator Door Bins and Freezer Door Bins
All door bins, except for the deep gallon
door bin and freezer bins, are adjustable
and can be moved up and down to meet your
storage needs. The deep gallon door
bin and the freezer bins can be removed
for cleaning.
To remove any bin: Lift the bin up and pull
it toward you.
To replace or relocate: Engage the back side
of the bin in the molded supports on the door.
Then push down on the front of the bin.
Bin will lock in place.
The snugger helps prevent tipping, spilling
or sliding of small items stored on the door shelf.
Place a finger on either side of the snugger near
the rear and move it back
and forth to fit your needs.
NOTE: Make sure
that items do not
block or fall into the
ice chute.
Not all features are on all models.
Refrigerator bins
Spillproof Shelves and Freezer Shelves
The special edges are designed to help prevent
spills from dripping to lower shelves.
To remove shelves:
Tilt shelf up at front, then lift it up and out of
tracks on rear wall of refrigerator.
To replace shelves:
Select desired shelf height. With shelf front
raised slightly, engage top lugs in tracks at rear
of cabinet. Then lower front of shelf until it locks
into position.
Make sure you push the shelves all the way
back in before you close the door.
Top freezer bin
Do not block
Snugger
8
About the refrigerator doors.
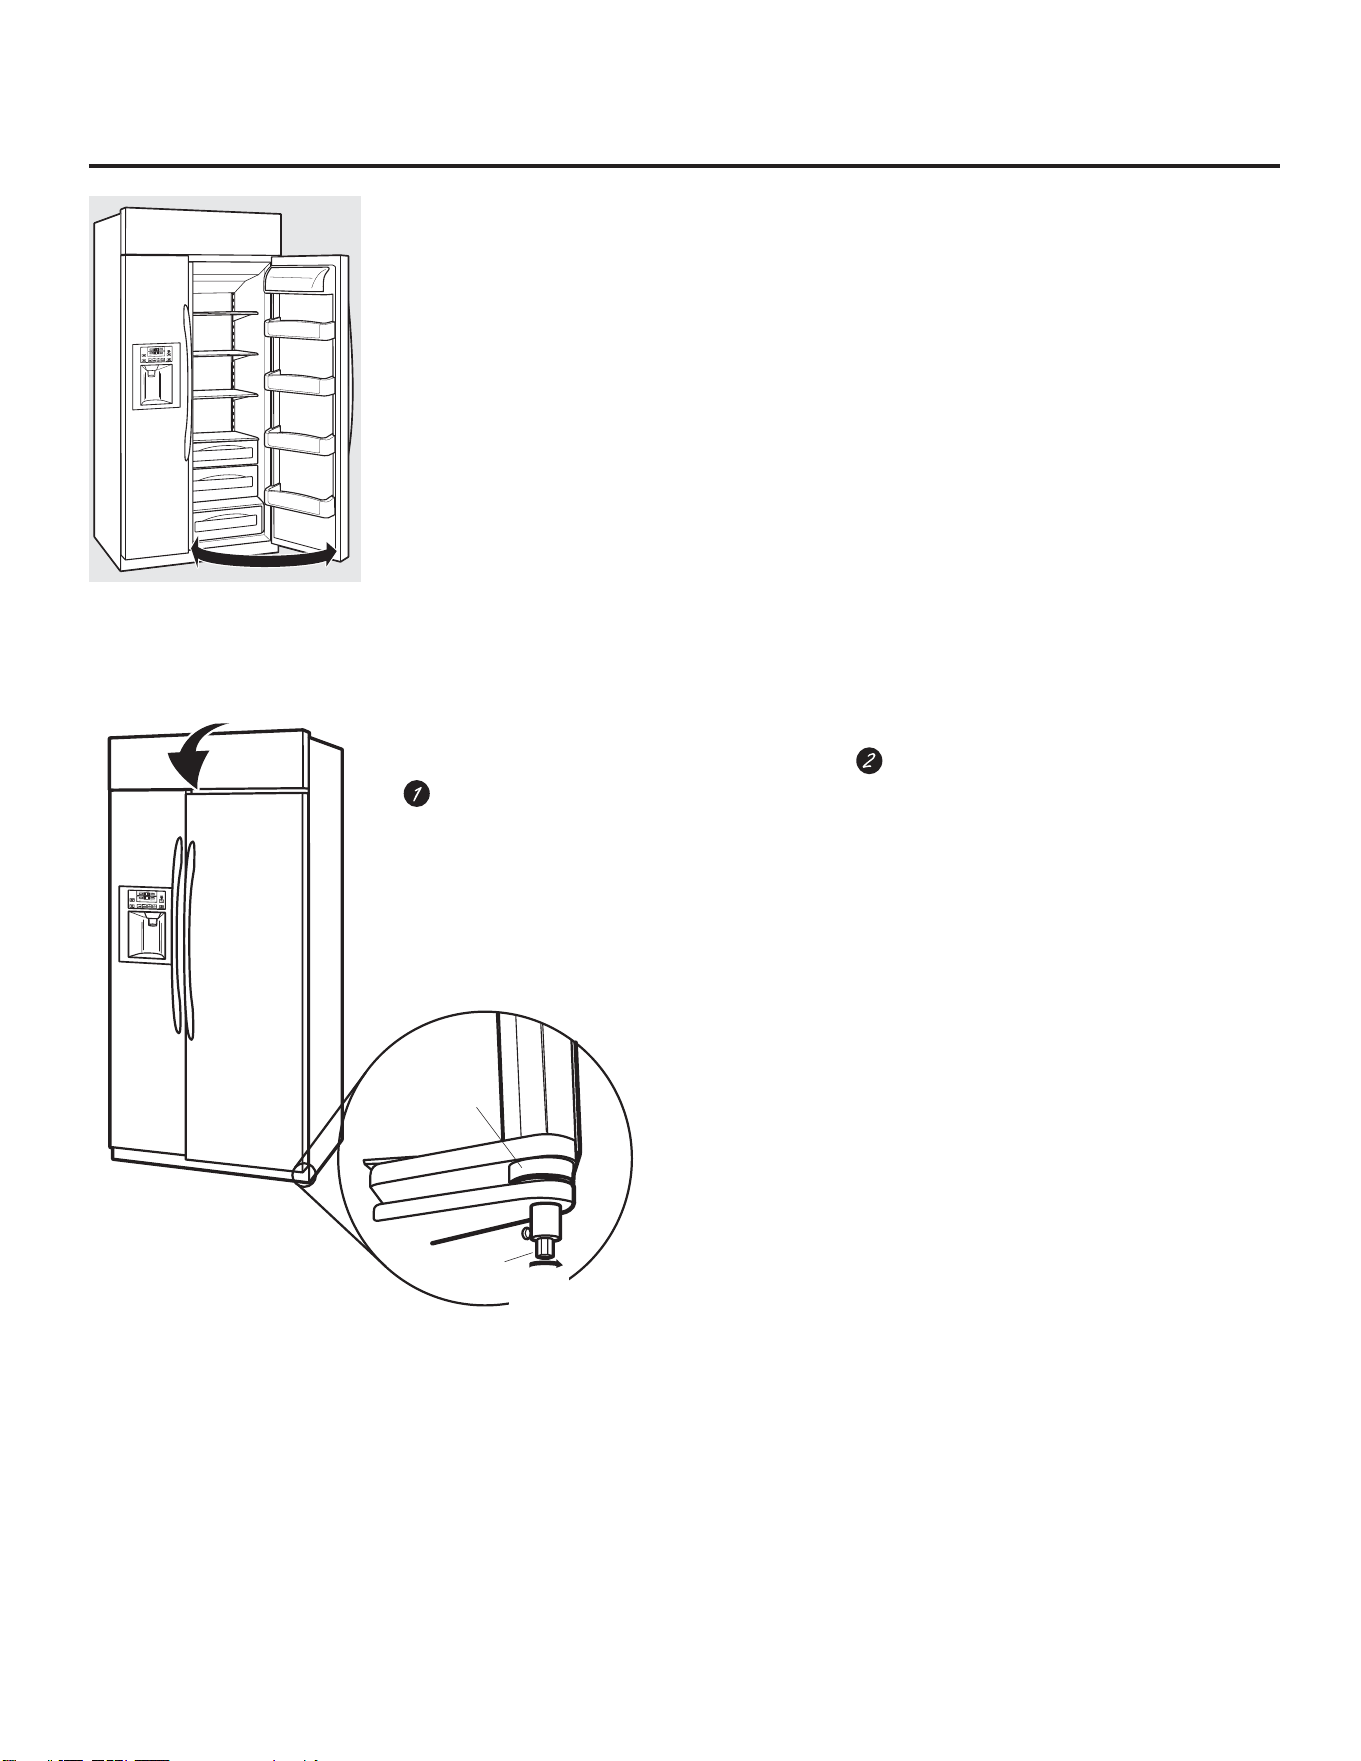
Refrigerator Doors
The refrigerator doors may feel different than
the ones you are used to. The secure door
opening/closing feature makes sure the doors
close all the way and are securely sealed.
When opening and closing the door,
you will notice a stop position. When
the door is at the 90° stop position,
it will automatically close.
The resistance you feel at the stop
position will be reduced as the door
is loaded with food.
When the door is at 90° open,
it will automatically close.
Beyond this stop the door will stay open.
Door Alignment
If doors are uneven, adjust the refrigerator door.
Using a 7/32” socket wrench, turn the door
adjusting screw clockwise to raise the
door, counterclockwise to lower
the door. (A nylon plug, imbedded in the
threads of the pin, prevents the pin from
turning unless a wrench is used.)
After one or two turns of the wrench, open
and close the refrigerator door
and check the alignment at the top
of the doors.
Bushing
Door Hinge
Case Hinge
7/32" Wrench
Raise
Clockwise
9
About the drawers and baskets. GEAppliances.com
Not all features are on all models.
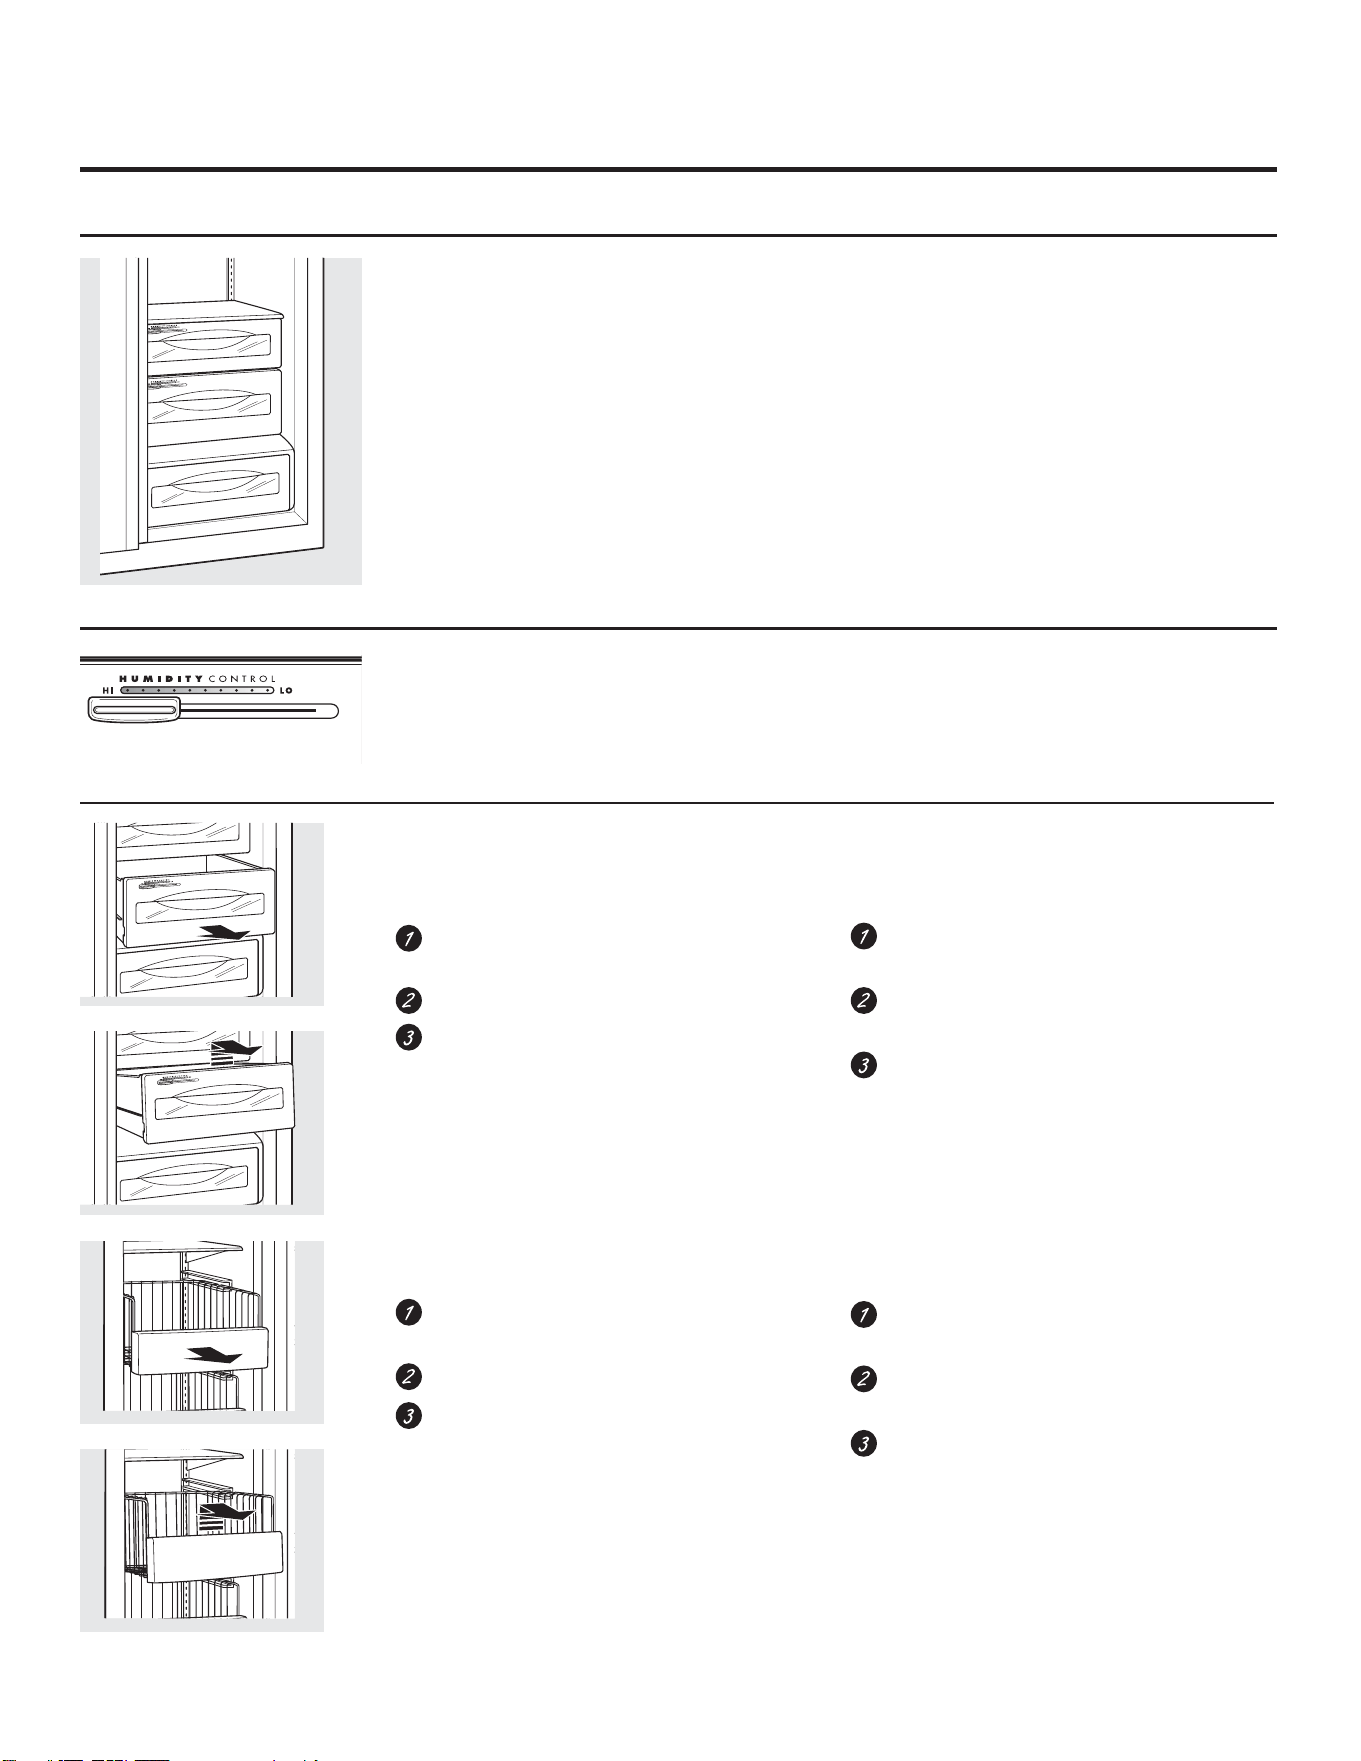
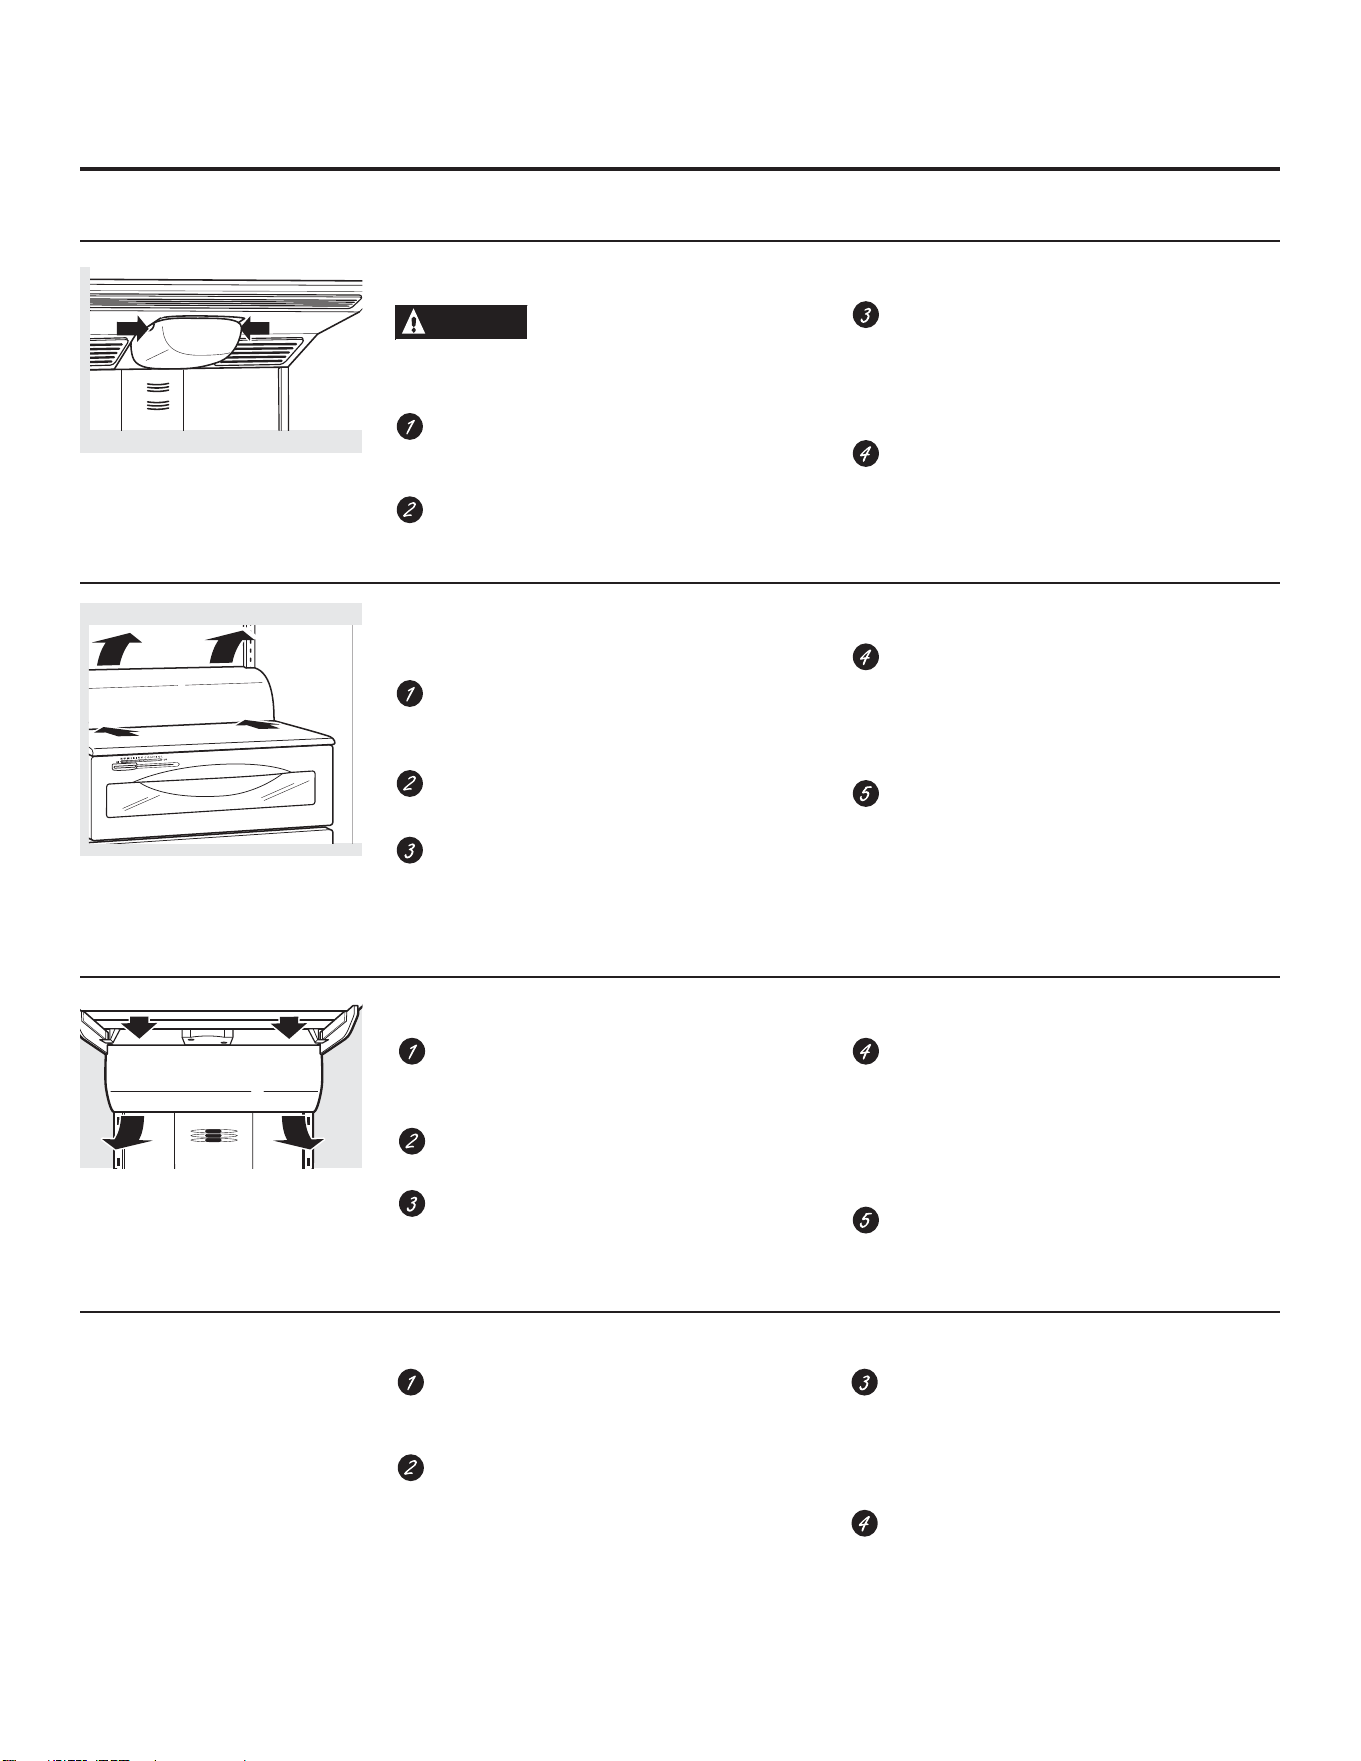
Fruit and Vegetable Drawers
Excess water that may accumulate in the
bottom of the drawers should be wiped dry.
Adjustable Humidity Drawers
Slide the control all the way to the HI setting to
provide high humidity recommended for most
vegetables.
Slide the control all the way to the LO
setting to provide lower humidity levels
recommended for most fruits.
To remove fresh food drawers:
Pull the desired drawer out to the
stop position.
Lift up slightly on the front of the drawer.
Pull the drawer slightly forward and
out of the refrigerator.
To replace fresh food drawers:
Tip the back rollers of the drawer behind the
rollers in the track.
Lower the front of the drawer into normal
position.
Slide the drawer to the back of the
refrigerator.
To remove freezer baskets:
Pull the desired basket out to the
stop position.
Lift up slightly on the front of the basket.
Pull the basket slightly forward and
out of the freezer.
To replace freezer baskets:
Place the back corners in the rail
with the basket tilted up.
Lower the basket down to the normal
position.
Slide the basket to the back of the freezer.
How to Remove and Replace the Drawers and Freezer Baskets
10
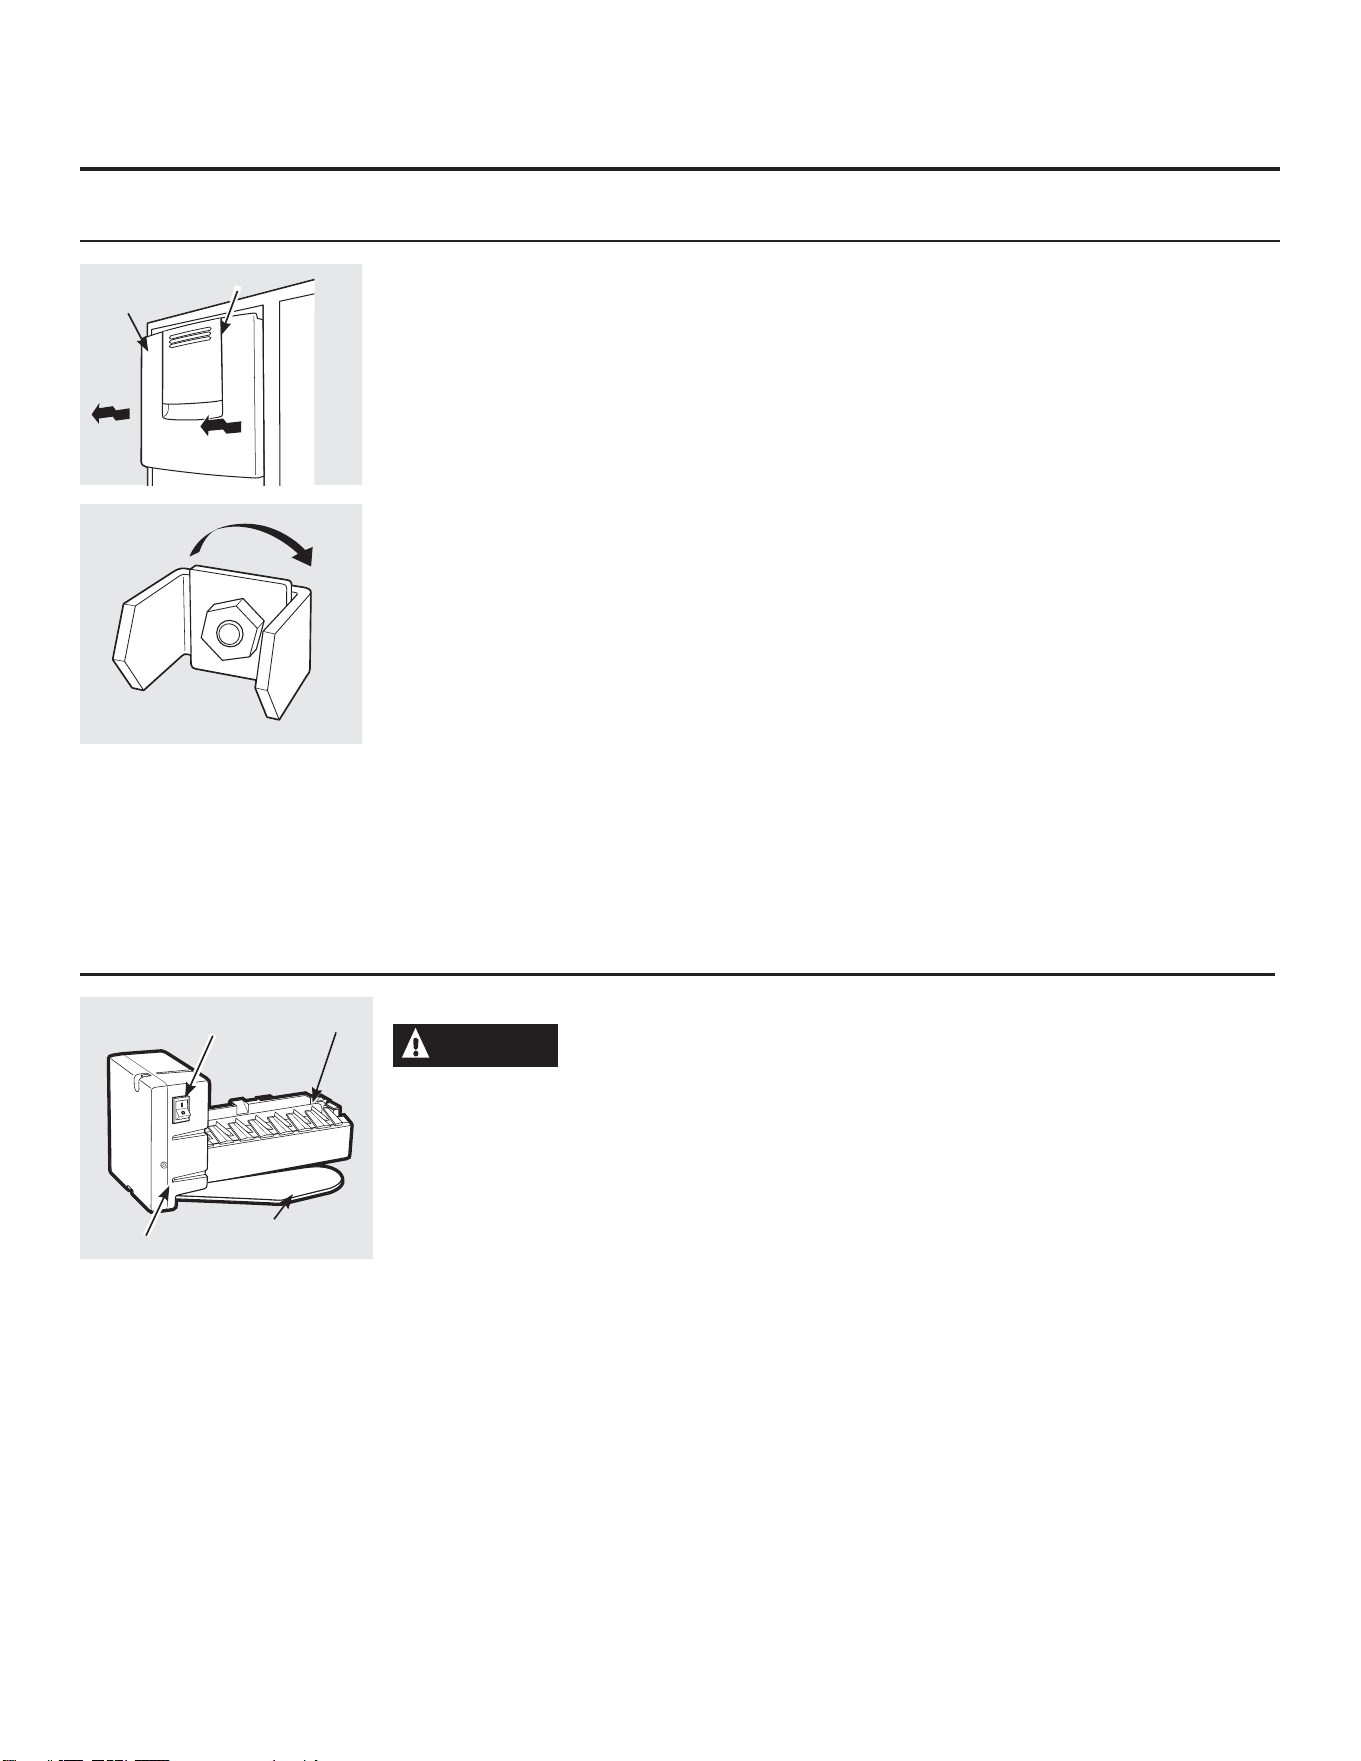
Ice Storage Bin
To remove:
Lift up the access door to reach the
icemaker. Set the icemaker power switch
to the O (off) position. With the access door
closed, support the storage bin at
the bottom while slightly lifting. Pull bin
straight out.
To replace:
Slide the bin back until the tab on
the bin locks into the slot on the shelf.
If the bin does not go all the way back,
remove it and rotate the drive mechanism 1/4
turn. Then push the bin back again.
Important facts about your
ice and water dispenser
Do not add ice from trays or bags to the
storage bin. It may not crush or dispense well.
Avoid overfilling glass with ice and use of
narrow or extra-tall glasses. Backed-up ice
can jam the chute or cause the door in the
chute to freeze shut. If ice is blocking the
chute, poke it through with a wooden spoon.
Beverages and foods should not be
quick-chilled in the ice storage bin.
Cans, bottles or food packages in the storage
bin may cause the icemaker
or auger to jam.
To keep dispensed ice from missing
the glass, put the glass close to, but not
touching, the dispenser opening.
Some crushed ice may be dispensed
even though you selected CUBED. This
happens occasionally when a few cubes
accidentally get directed to the crusher.
After crushed ice is dispensed, some water
may drip from the chute.
The first glass of water dispensed may
be warmer than the following ones.
This is normal.
About the ice and water dispenser and automatic icemaker.
A newly installed refrigerator may take 12 to 24 hours to begin making ice.
Automatic Icemaker
CAUTION
Avoid contact with the
moving parts of the ejector mechanism, or with
the heating element (located on the bottom of
the ice maker) that releases the cubes. Do not
place fingers or hands on the automatic ice
making mechanism while the refrigerator is
plugged in.
A newly-installed refrigerator may take 12–24
hours to begin making ice.
The icemaker will produce seven cubes per
F\FOH³DSSUR[LPDWHO\F\FOHVRUPRUHLQ
a 24-hour period, depending on freezer
compartment temperature, room temperature,
number of door openings
and other use conditions.
If the refrigerator is operated before the water
connection is made to the icemaker, set the
power switch to O (off).
When the refrigerator has been connected to
the water supply, set the power switch to I (on).
The green light will come on.
Throw away the first full bucket of ice.
Be sure nothing interferes with the sweep of the
feeler arm.
When the bin fills to the level of the feeler arm,
the icemaker will stop producing ice.
It is normal for several cubes to be joined
together.
If ice is not used frequently, old ice cubes will
become cloudy, taste stale and shrink.
After the icemaker has been turned on again,
there will be a delay of about 45 minutes before
the icemaker resumes operations.
NOTE: In homes with lower-than-average water
pressure, you may hear the icemaker water
valve cycle on several times when making one
batch of ice. Recommended water pressure is
60 psi.
Ice Storage
Bin
Access Door
Rotate
Drive
Mechanism
Feeler Arm
Ice maker
Green Power
Light
Power
Switch
11
About the ice and water dispenser. GEAppliances.com
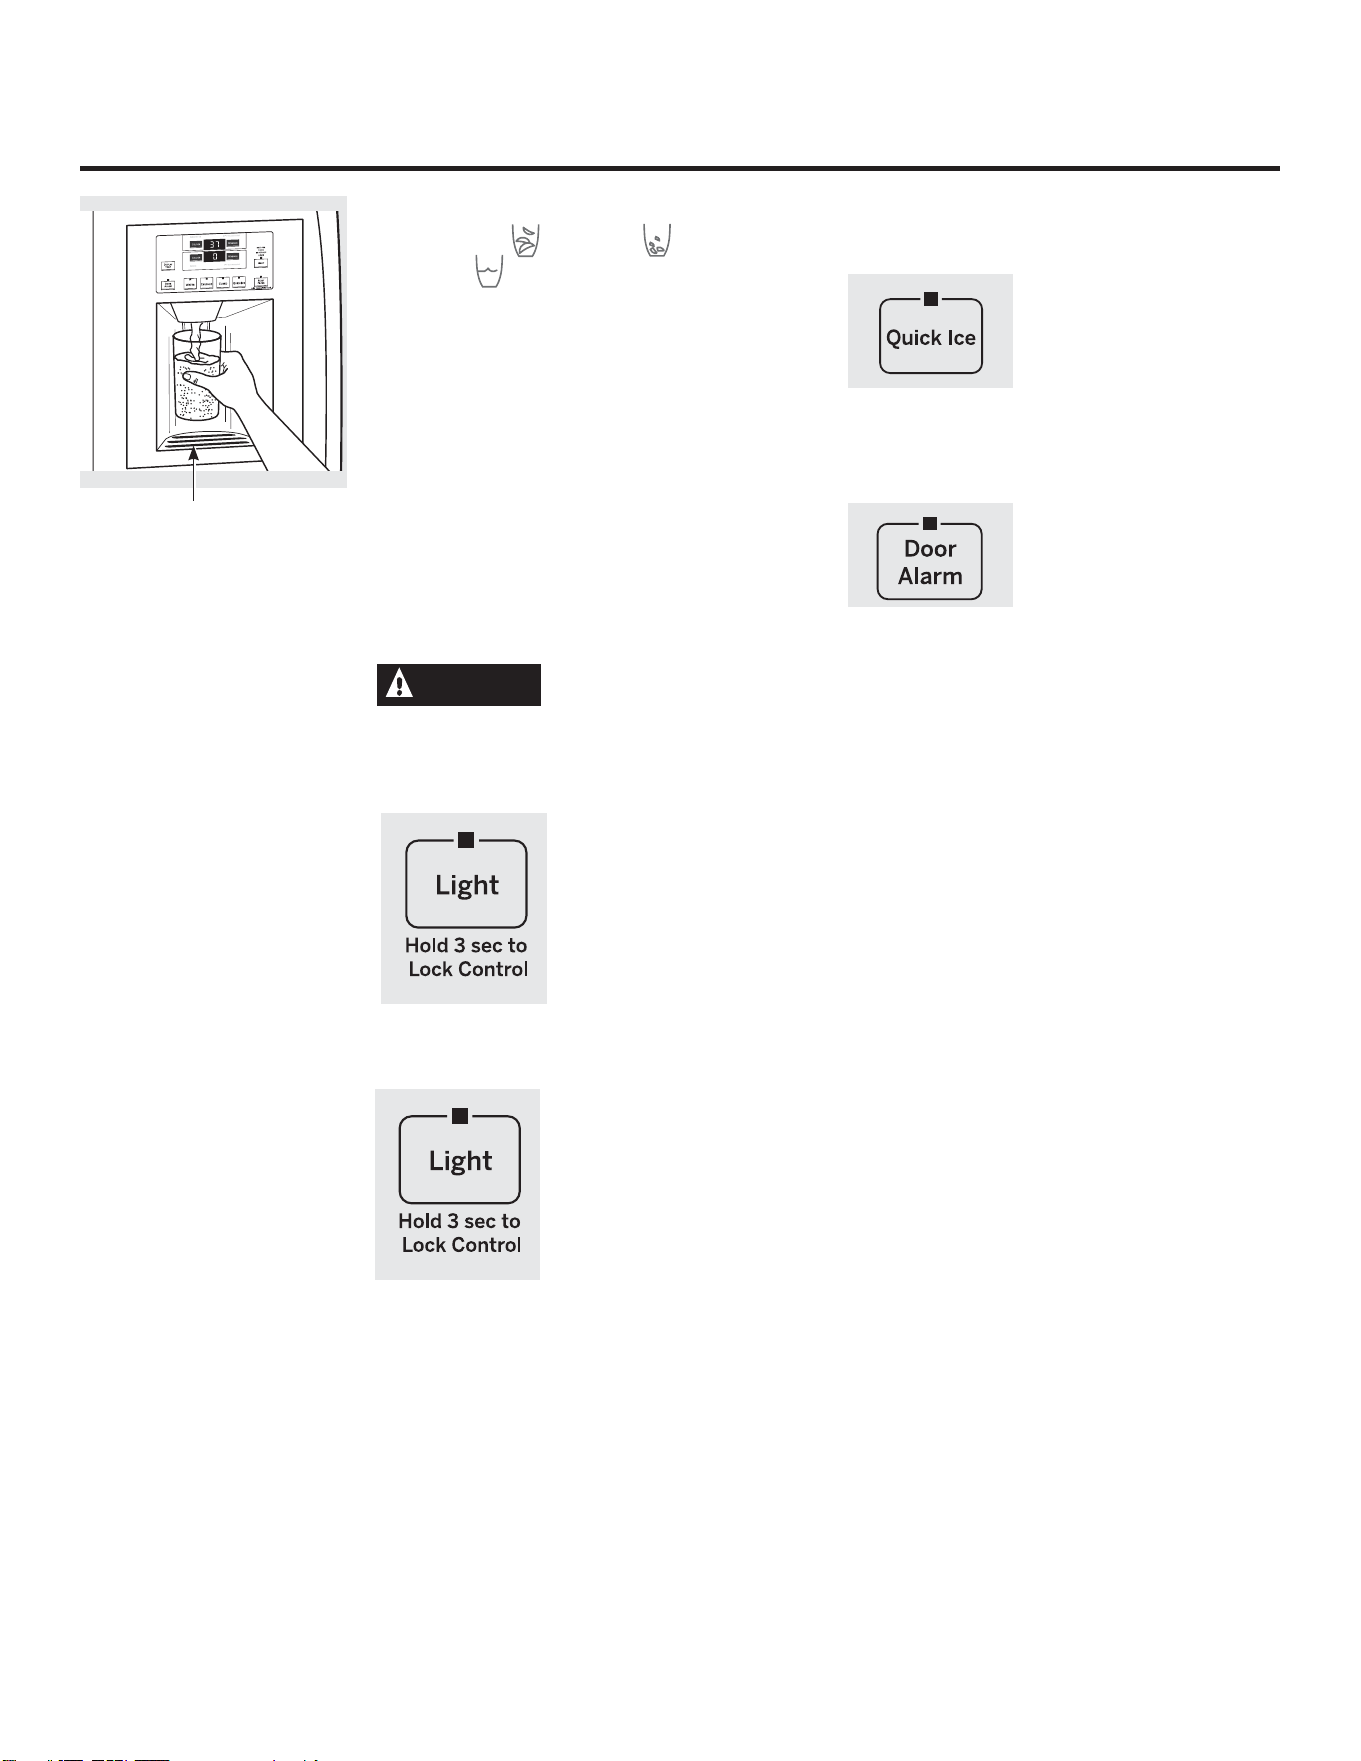
To Use the Dispenser
Select CUBED , CRUSHED
or WATER .
Press the glass gently against the middle of the
dispenser pad.
The spill shelf is not self-draining. To reduce
water spotting, the shelf and its grille should be
cleaned regularly.
If no water is dispensed when the
refrigerator is first installed, there may
be air in the water line system. Press the
dispenser arm for at least two minutes to
remove trapped air from the water line
and to fill the water system. To flush out
impurities in the water line, throw away the
first six glassfuls of water.
CAUTION
Never put fingers or any
other objects into the ice crusher discharge
opening.
Locking the Dispenser
Press the LIGHT button
for 3 seconds to lock the
dispenser and control
panel. To unlock, press and
hold the button again for 3
seconds.
Dispenser Light
This button turns the light on
the dispenser on and off. The
light also comes on when the
dispenser pad is pressed. If
this light burns out, it should
be replaced with a 6 watt
12V maximum bulb.
Quick Ice
When you need ice in a
hurry, press this button to
speed up ice production.
This will increase ice
production for the following
48 hours or until you
press the button again.
Door Alarm
To turn the Door
Alarm on, press the
DOOR ALARM button
once. The ACTIVE light will
come on. To turn it off,
press it again. When the
DOOR ALARM is active, the
ACTIVE light will flash if you
open the door and beep
if you keep the door open
for more than 2 minutes.
The light goes out and the
beeping stops when you
close the door.
Spill Shelf

12
Cleaning the Outside
The spill shelf and the area beneath it should
be cleaned periodically with a mild liquid dish
detergent.
Dispenser pad. Before cleaning, lock the
dispenser by pressing the LOCK/LIGHT
button for 3 seconds to prevent activating the
dispenser. Clean with warm water and a mild
liquid dish detergent. Rinse thoroughly and wipe
dry. Unlock the dispenser by pressing the LOCK/
LIGHT button for 3 seconds.
Door handles. Clean with a cloth dampened
with soapy water. Dry with a soft cloth.
Do not wipe the refrigerator with a soiled dish
cloth or wet towel. These may leave a residue
that can damage the finish. Do not use scouring
pads, powdered cleaners, bleach or cleaners
containing bleach because these products can
scratch and damage the finish.
The stainless steel doors and door handles
(on some models) can be cleaned with a
commercially available stainless steel cleaner.
Cleaners with oxalic acid such as Bar Keepers
Friend Soft Cleanser™ will remove rust, tarnish
and small blemishes. Use only a liquid cleanser
free of grit and rub in the direction of the brush
lines with a damp soft sponge. Do not use
appliance wax or polish on the stainless steel.
Cleaning the Inside
Turn off power at the circuit breaker or fuse
box before cleaning. If this is not practical,
wring excess moisture out of sponge or cloth
when cleaning around switches, lights or
controls.
8VHZDUPZDWHUDQGEDNLQJVRGDVROXWLRQ³
about a tablespoon (15 ml) of baking soda
to a quart (1 liter) of water. This both cleans and
neutralizes odors. Thoroughly rinse and wipe
dry.
Other parts of the refrigerator, including door
gaskets, snack pan and vegetable drawers, ice
storage bin and all plastic parts, can be cleaned
the same way.
Do not wash the tray or any plastic refrigerator
parts in the dishwasher.
CAUTION
Do not clean glass shelves
or covers with warm water when they are
cold. Glass shelves and covers may break
if exposed to sudden temperature changes
or impact, such as bumping or dropping.
Tempered glass is designed to shatter into
many small pieces if it breaks.
Dispenser drip area.
Care and cleaning of the refrigerator.
13
GEAppliances.com
For long vacations or absences, remove
food and unplug the refrigerator. Clean
the interior with a baking soda solution of one
tablespoon (15 ml) of baking soda to one quart
(1 liter) of water. Leave the doors open.
Set the icemaker power switch to the O (off)
position and shut off the water supply to
the refrigerator.
If the temperature can drop below freezing,
have a qualified servicer drain the water supply
system to prevent serious property damage
due to flooding.
Preparing for Vacation
Preparing to Move
Secure all loose items such as shelves and
drawers by taping them securely in place
to prevent damage.
WARNING
Due to the weight and size
of this refrigerator, and to reduce the risk of
personal injury or damage to the product,
A MINIMUM OF 4 PEOPLE ARE REQUIRED
TO BRING THE UNIT INTO THE HOME AND
2 PEOPLE ARE REQUIRED FOR PROPER
INSTALLATION.
Be sure the refrigerator stays in an upright
position during moving.
14
Replacing the light bulbs.
Setting the controls to OFF does not remove power to the light circuit.
5HIULJHUDWRU&RPSDUWPHQW³8SSHU/LJKW
CAUTION
Light bulbs may be hot.
Burned out bulbs may break when being
replaced.
Raise the grille panel, set the master power
switch to the O (off) position and allow
lamps to cool.
To remove the light shield, press on the
sides of the shield and pull down.
Replace the bulbs with appliance bulbs of
the same or lower wattage. Replace the
shield by engaging the bottom tab into the
slot and applying light forward pressure
until the shield snaps in place.
Set the master power switch to the I (on)
position and close the grille panel.
5HIULJHUDWRU&RPSDUWPHQW³/RZHU/LJKW
This light is located above the top drawer.
Raise the grille panel, set the master power
switch to the O (off) position
and allow lamps to cool.
Remove items from the shelf above
the light shield. Remove the shelf.
Use both hands to grasp each end
of the light shield. Press in on the bottom of
the shield with your thumbs while rotating
the cover up and out.
Replace the bulb with an appliance bulb of
the same or lower wattage. Replace the
shield by engaging the bottom tab into the
slot and applying light forward pressure
until the shield snaps in place.
Set the master power switch to the I (on)
position and close the grille panel.
Freezer Compartment
Raise the grille panel, set the master power
switch to the O (off) position and allow
lamps to cool.
Remove the items from the shelf just below
the light shield. Remove the shelf.
To remove the light shield, press down on
the top of the shield and pull the tabs out of
the slots. Tilt the shield forward and out.
Replace the bulb with an appliance
bulb of the same or lower wattage,
and reinstall the light shield. Replace
the shield by engaging the bottom tab into
the slot and applying light forward pressure
until the shield snaps in place.
Set the master power switch to the I (on)
position and close the grille panel.
Dispenser
Raise the grille panel, set the master power
switch to the O (off) position
and allow lamps to cool.
The bulb is located in the dispenser under
the control panel. Remove
the two screws from the light shield.
Slide the light shield toward the dispenser
to disengage the tabs, then remove the
light shield. Remove the light bulb by
turning it counterclockwise.
Replace the bulb with a bulb
of the same size and wattage. Replace
the light shield by sliding the tabs into
the slots in the front of the dispenser.
Replace the two screws.
Set the master power switch to the I (on)
position and close the grille panel.
(appearance may vary)
Installation
Instructions
Built-In Side-By-Side
Refrigerators
PSB42YS, PSB42YG, PSB48YS, PSB48YG
If you have questions, call 800.GE.CARES (800.432.2737) or visit our website at: GEAppliances.com
In Canada, call 1.800.561.3344 or visit our website at: www.geappliances.ca
BEFORE YOU BEGIN
Read these instructions completely
and carefully.
•
IMPORTANT ³ Observe all governing
codes and ordinances.
•
Note to Installer – Be sure to leave these
LQVWUXFWLRQVIRUWKHFRQVXPHU·VDQGORFDO
LQVSHFWRU·VXVH
•
Note to Consumer – Keep these instructions
ZLWK\RXU2ZQHU·V0DQXDOIRUIXWXUHUHIHUHQFH
•
Skill Level – Installation of this refrigerator
requires basic mechanical, carpentry and
plumbing skills. Proper installation is the
responsibility of the installer. Product failure
due to improper installation is not covered
under the GE Appliance Warranty.
See warranty information.
•
Completion Time – 90 minutes (new installations
require more time than replacement installations).
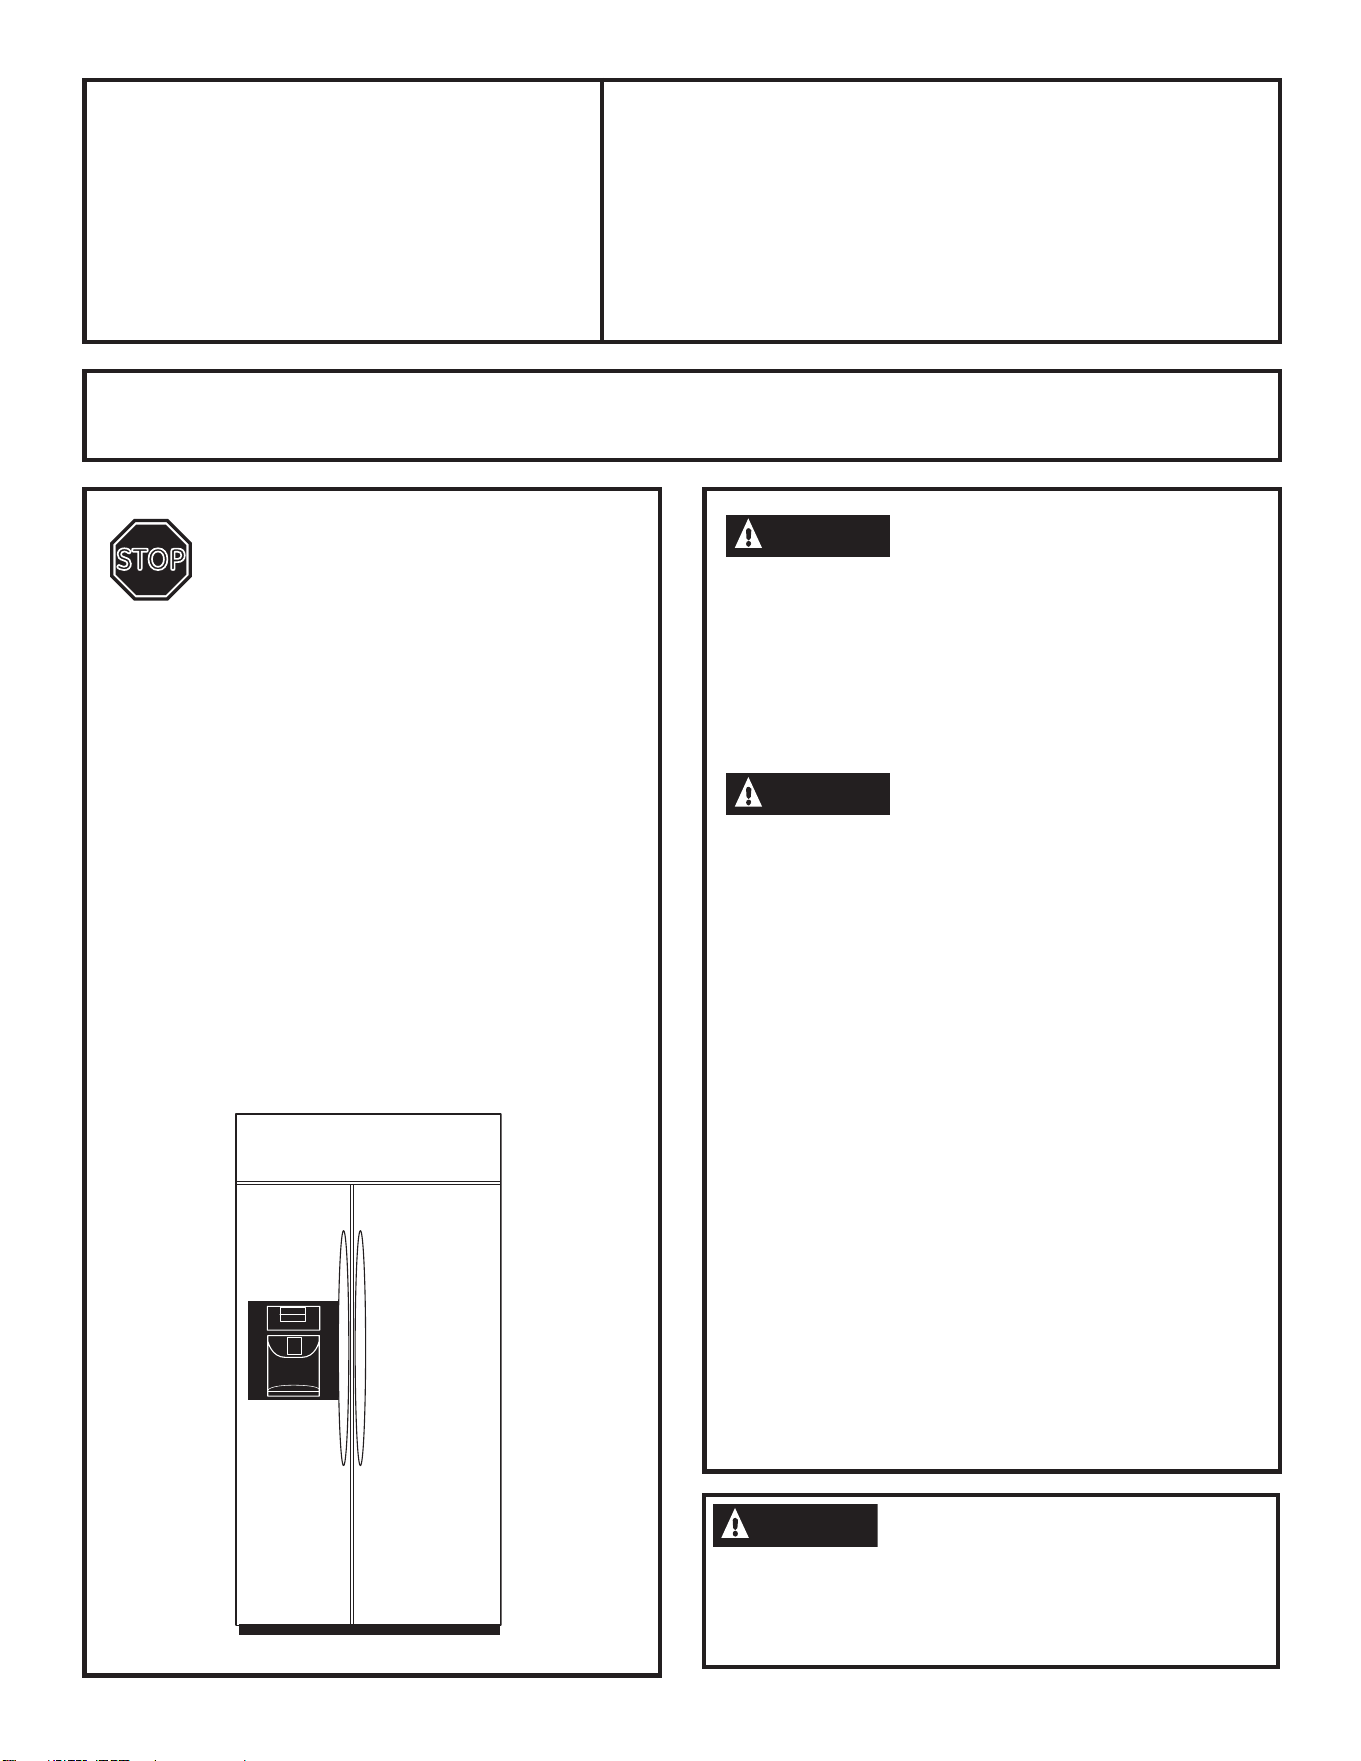
STOP
WARNING
Due to the weight and size of this refrigerator,
and to reduce the risk of personal injury or
damage to the product, A MINIMUM OF 4 PEOPLE
ARE REQUIRED TO BRING THE UNIT INTO THE
HOME AND 2 PEOPLE ARE REQUIRED FOR PROPER
INSTALLATION.
WARNING
• These refrigerators are top-heavy and must
be secured to prevent the possibility of tipping
forward. Anti-Tip protection is required.
See Step 4 on page 34 for details.
• Use this appliance only for its intended purpose.
• Immediately repair or replace electric power
supply cords that become frayed or damaged.
• Set the Master Power switch to the O (OFF)
position before cleaning or making repairs.
• Repairs should be made by a qualified service
technician.
For GE Profile
™
local service in your area,
call 1.800.432.2737.
For GE Profile service in Canada,
call 1.800.561.3344.
For GE Profile Parts and Accessories,
call 1.800.626.2002.
GEAppliances.com (in Canada, geappliances.ca)
READ CAREFULLY.
KEEP THESE INSTRUCTIONS.
15
WARNING
To reduce the risk associated with choking, do
not allow children under 3 years of age to have
access to small parts during the installation of this
product.
Installation Instructions
16
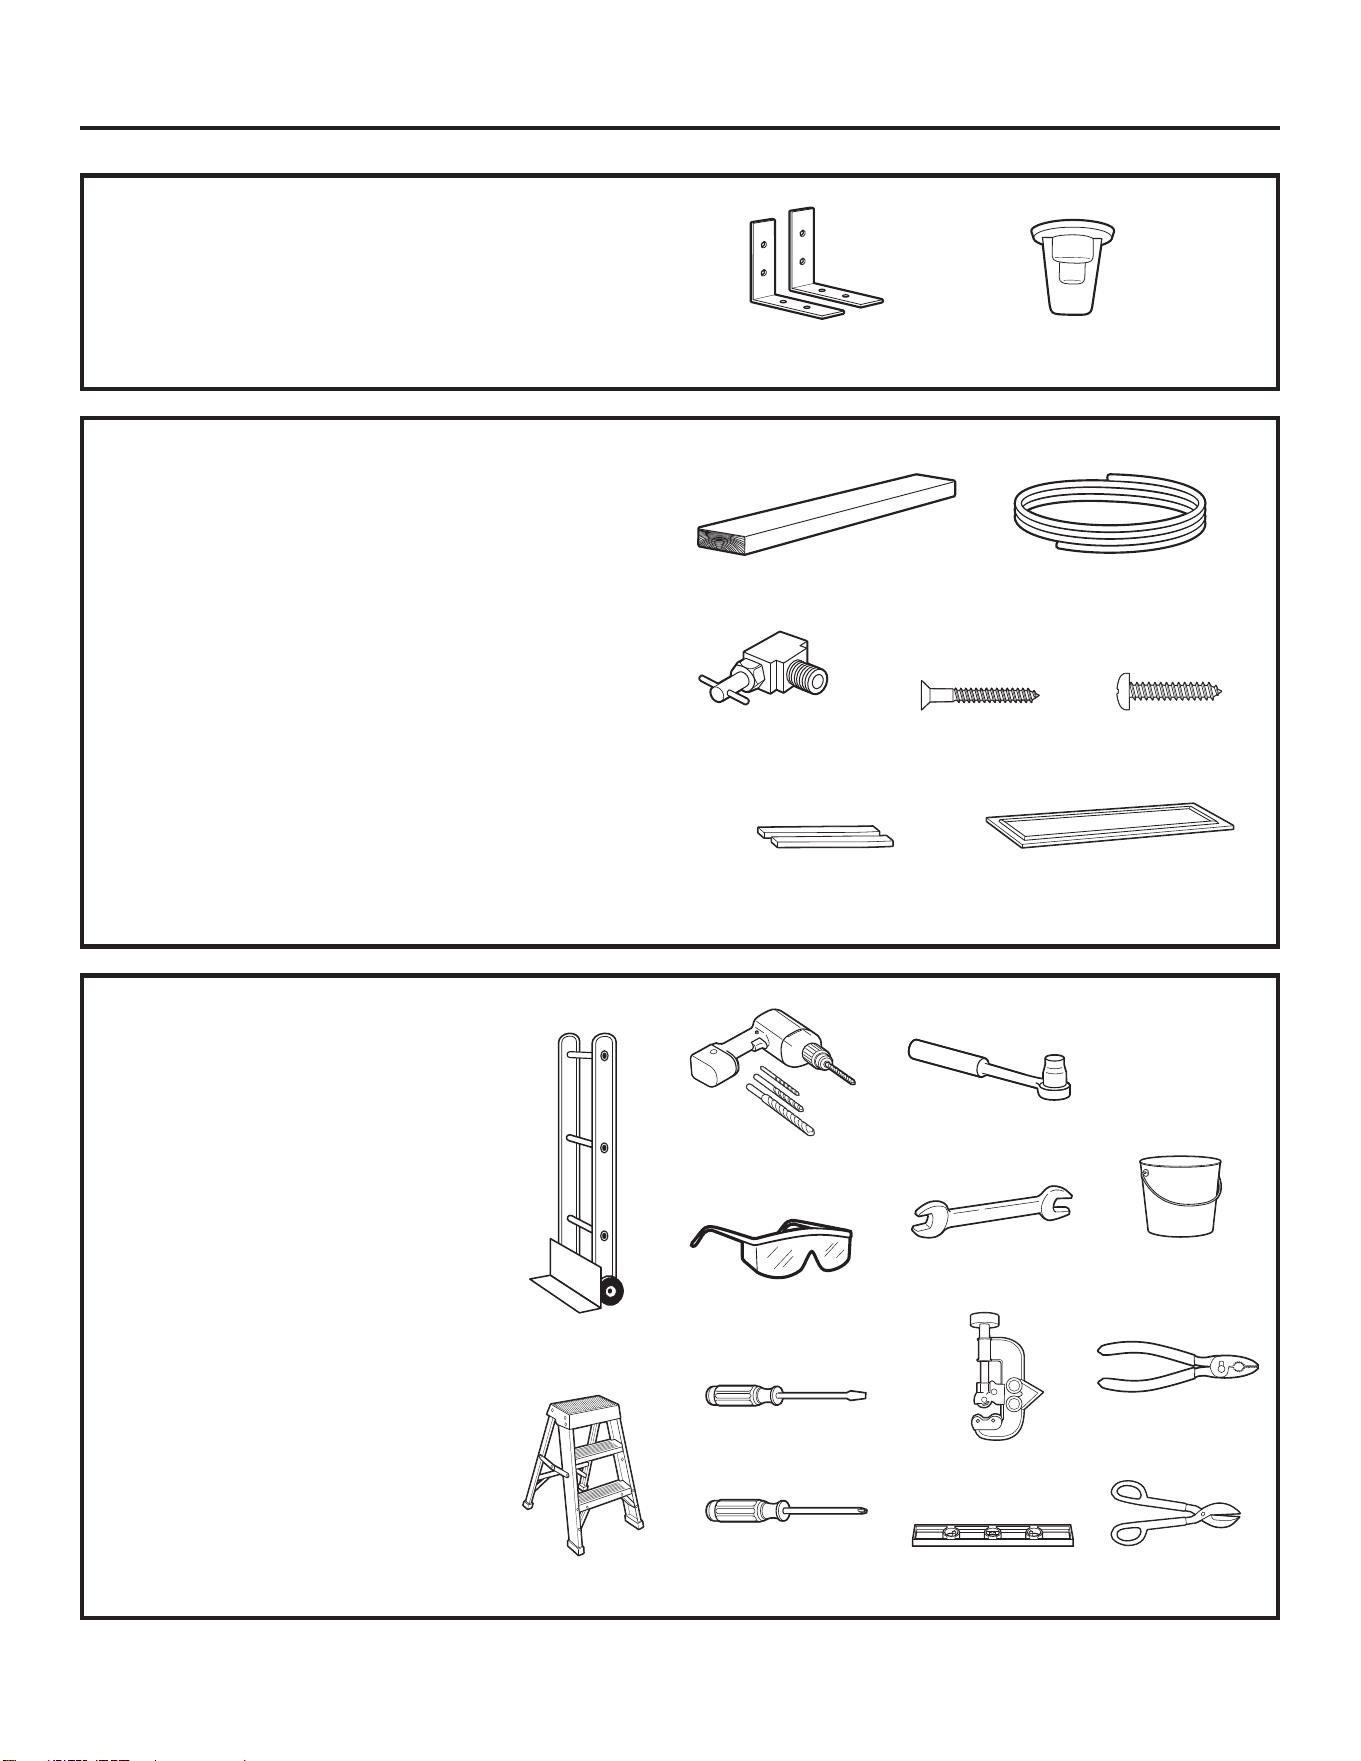
HARDWARE SUPPLIED
• Water filter bypass plug
• Anti-Tip brackets
Anti-Tip Brackets Water Filter Bypass Plug
MATERIALS REQUIRED
• 36” long, 2” x 4” wood block for Anti-Tip bracket
installation
• #12 or #14 wood screws for Anti-Tip bracket
• Screws to secure refrigerator to cabinets
• 1/4” O.D. copper water line tubing or GE
SmartConnect
™
refrigerator tubing kits
• Water shutoff valve
• Custom panels for doors and grille panel
(if installing custom panels)
• Special 3M Dual Lock adhesive strips for
1/4” side panels (if installing side panels)
36” Wood Block 1/4” O.D. Copper Water Line
Tubing or GE SmartConnect™
Refrigerator Tubing Kit
TOOLS REQUIRED
• Tinsnips to cut banding
• Stepladder
• Bucket
• Level
• Appliance dolly
• Tubing cutter
• Flathead screwdriver
• 1/2” open-end wrench
• #2 Phillips screwdriver
• Drill and appropriate bits
• 7/32”, 1/2” sockets
• Safety glasses
• 7/16” open-end wrench
• Pliers
Appliance Dolly
Stepladder
Safety Glasses
Water Shutoff
Valve
#12 or #14
Wood Screws
Screws
Special 3M Dual Lock
Adhesive Strips
Custom Panels
Sockets
Open-end
Wrenches
Bucket
Drill & Bits
Flathead
Screwdriver
Tubing Cutter
Phillips Head
Screwdriver
Level
Pliers
Tinsnips
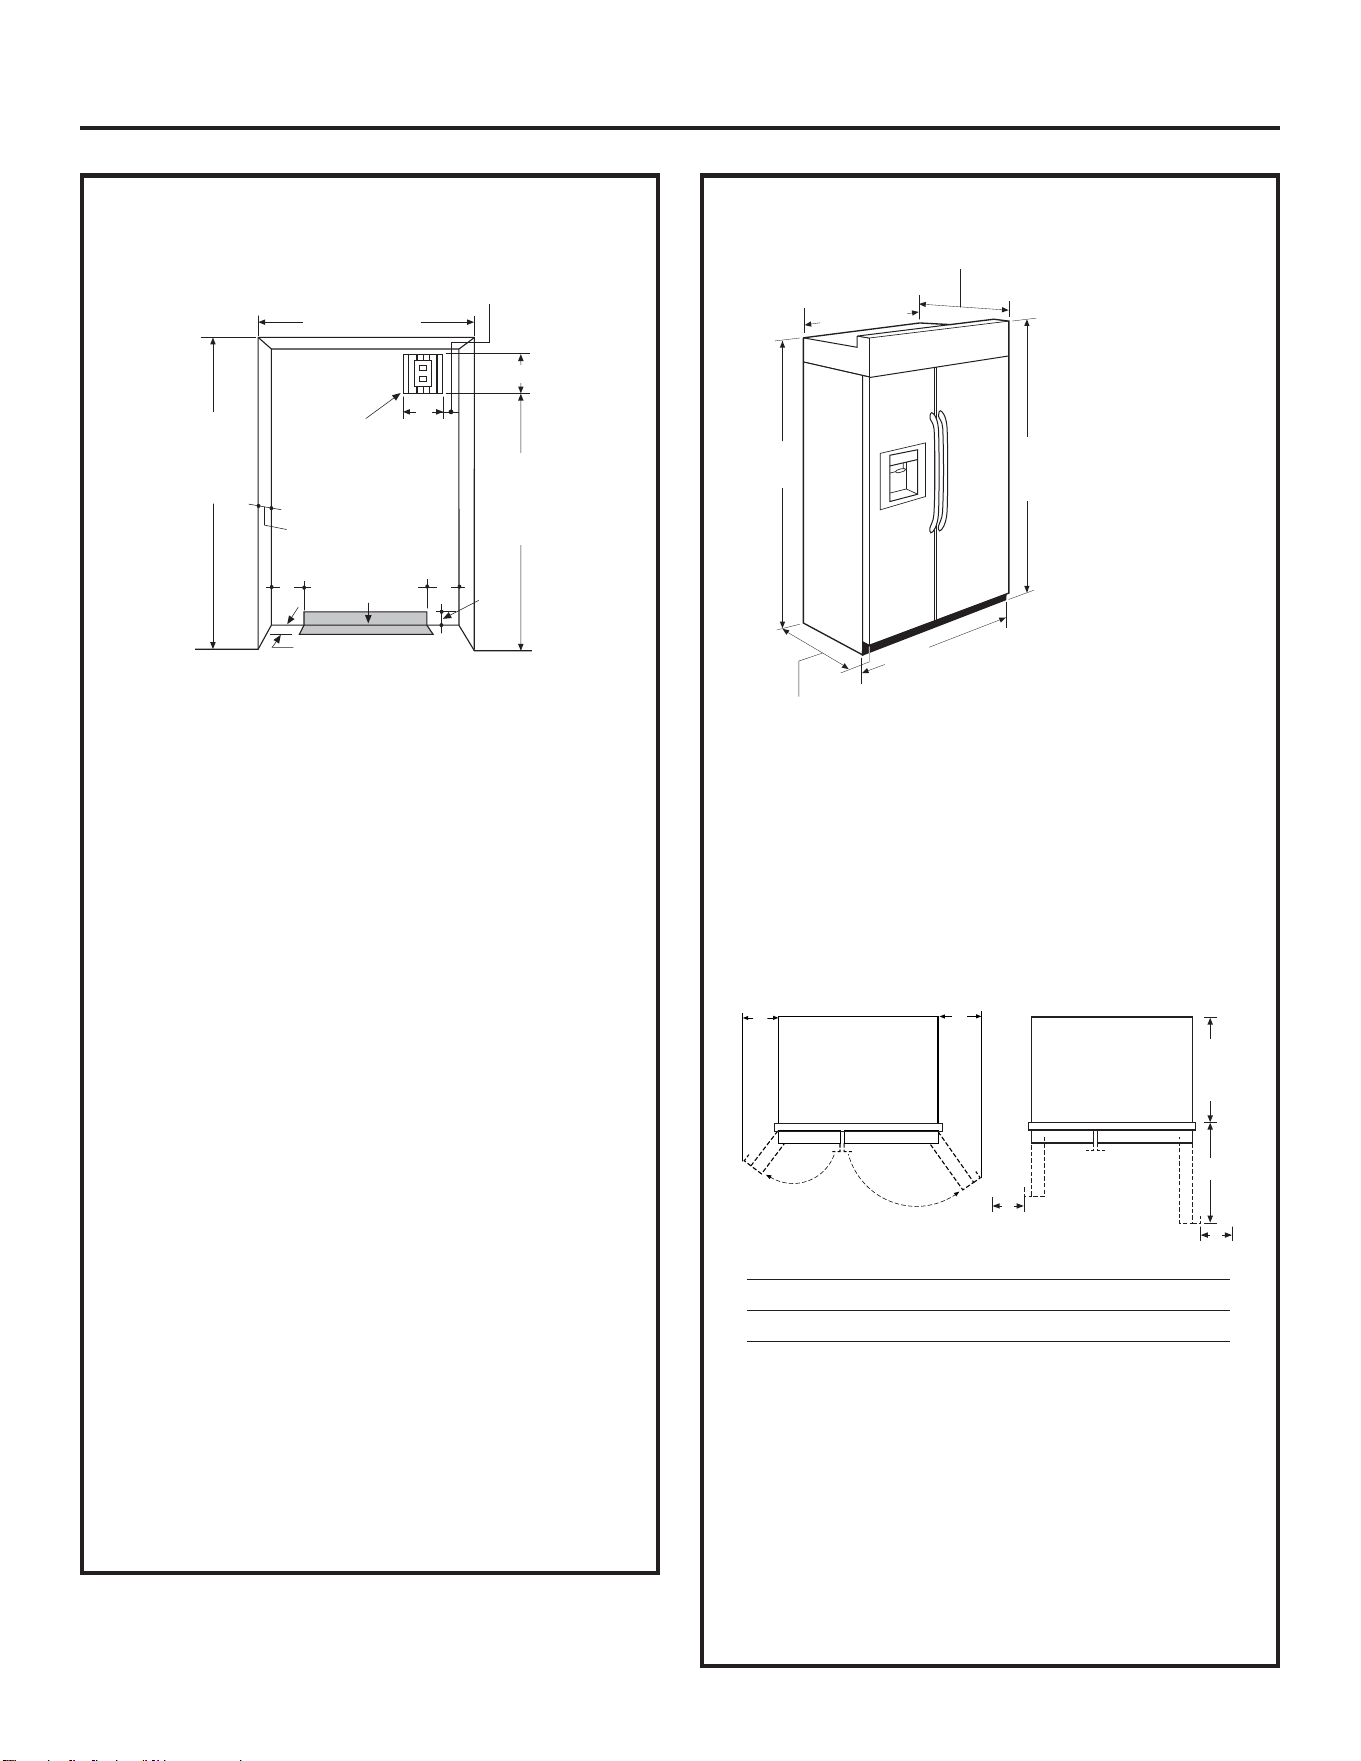
THE INSTALLATION SPACE
Water and Electrical Locations
The opening must be prepared with the electrical
and water supply located as shown.
The cutout depth must be 24”
The refrigerator will project forward, slightly
beyond adjacent cabinets, depending on your
installation.
Additional Specifications
• A 120 volt, 60Hz, 15 or 20 amp power supply
is required. An individual properly grounded
branch circuit or circuit breaker is
recommended. Install a properly grounded
3-prong electrical receptacle recessed into
the back wall. Electrical must be located on
rear wall as shown.
Note: GFI (ground fault interrupter) is not
recommended.
• Water line can enter the opening through the
floor or rear wall. The water line installed should
be 1/4” O.D. copper tubing or GE SmartConnect
™
tubing between the cold water line and water
connection location. The line should be long
enough to extend to the front of the refrigerator.
Installation of an easily accessible shutoff valve
in the water line is required.
DIMENSIONS AND CLEARANCES
Allow minimum clearances for Freezer door
(Dimension A) and Fresh Food door (Dimension B)
for a full 130° door swing and to allow for drawer
removal.
Four inch (4”) minimum clearance is required when
door swing is adjusted to 90°. If the 90° door stop
position is used, drawer access is maintained, but
drawer removal is restricted.
See illustrations, pages 18 and 19, to determine
door swing interaction with adjacent cabinets or
countertops.
*The finished cutout width must be: 41-1/2”
for 42” models and 47-1/2” for 48” models
*84" From
Floor to
Top Frame
**Case Width
25-3/8" Case Depth
Depth Including
Handles 26-7/8"
*81-3/4"
at Rear
42" Frame-to-Frame for 42" Models
48" Frame-to-Frame for 48" Models
*Finished Width
Electrical
Area
84 1/2" max
83 1/2" min
Finished
Opening
74"
From Floor
to Bottom
of Electrical
24"
5"
5"
3 1/2"
Water Supply
3 1/2"
3"
7"
7"
Product Clearances
These refrigerators are equipped with a 2 position
door stop. The factory set 130° door swing can be
adjusted to 90° if clearance to adjacent cabinets
or walls is restricted.
130° Door Swing 90° Door Swing
B
A
23-7/8“
Behind
Frame
C
D
D
Models A B C D
42” 12-3/16” 16” 24” 5”
48” 13-7/16” 18-9/16” 28” 5”
Installation Instructions
*Shipping height
The front height
may be adjusted
from 83-1/2” to
84-1/2” by adjusting
front and rear
leveling legs a
maximum of 1”.
**The case width must be: 41” for 42”
models and 47” for 48” models
17
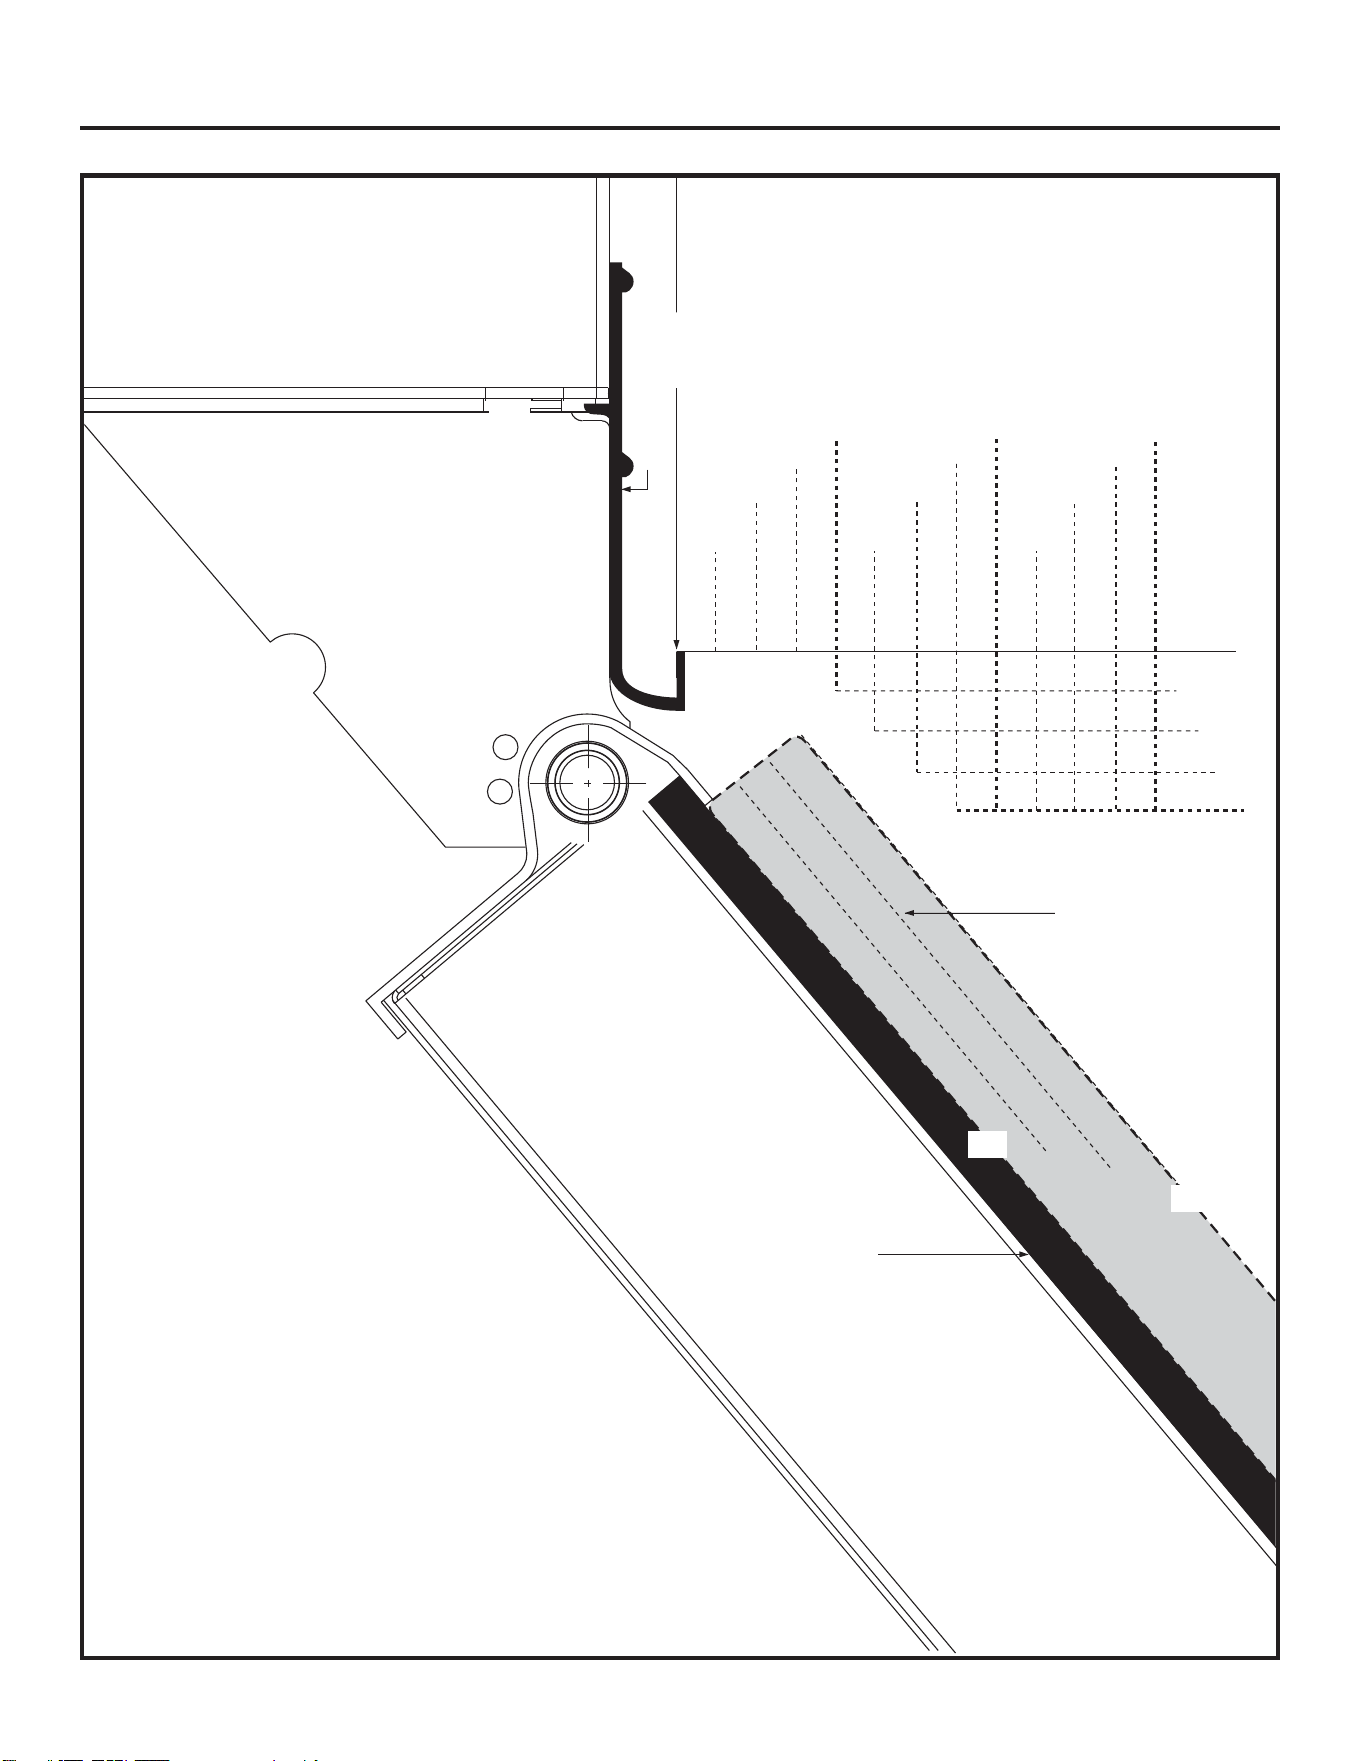
1/2"
1"
3/4" Custom Panel
(Nominal Size)
1/4"
1/2"
3/4"
2"
1-1/4"
1-1/2"
1-3/4"
3"
2-1/4"
2-1/2"
2-3/4"
1/4"
1/2"
3/4"
Fresh Food
Door
Backer Panel
23-7/8" From
Rear of
Refrigerator
1"
Refrigerator
Case
Trim
3/4"
1/4"
1"
Top View
130° Door Swing
(factory setting)
Scale 1:1
Installation Instructions
18
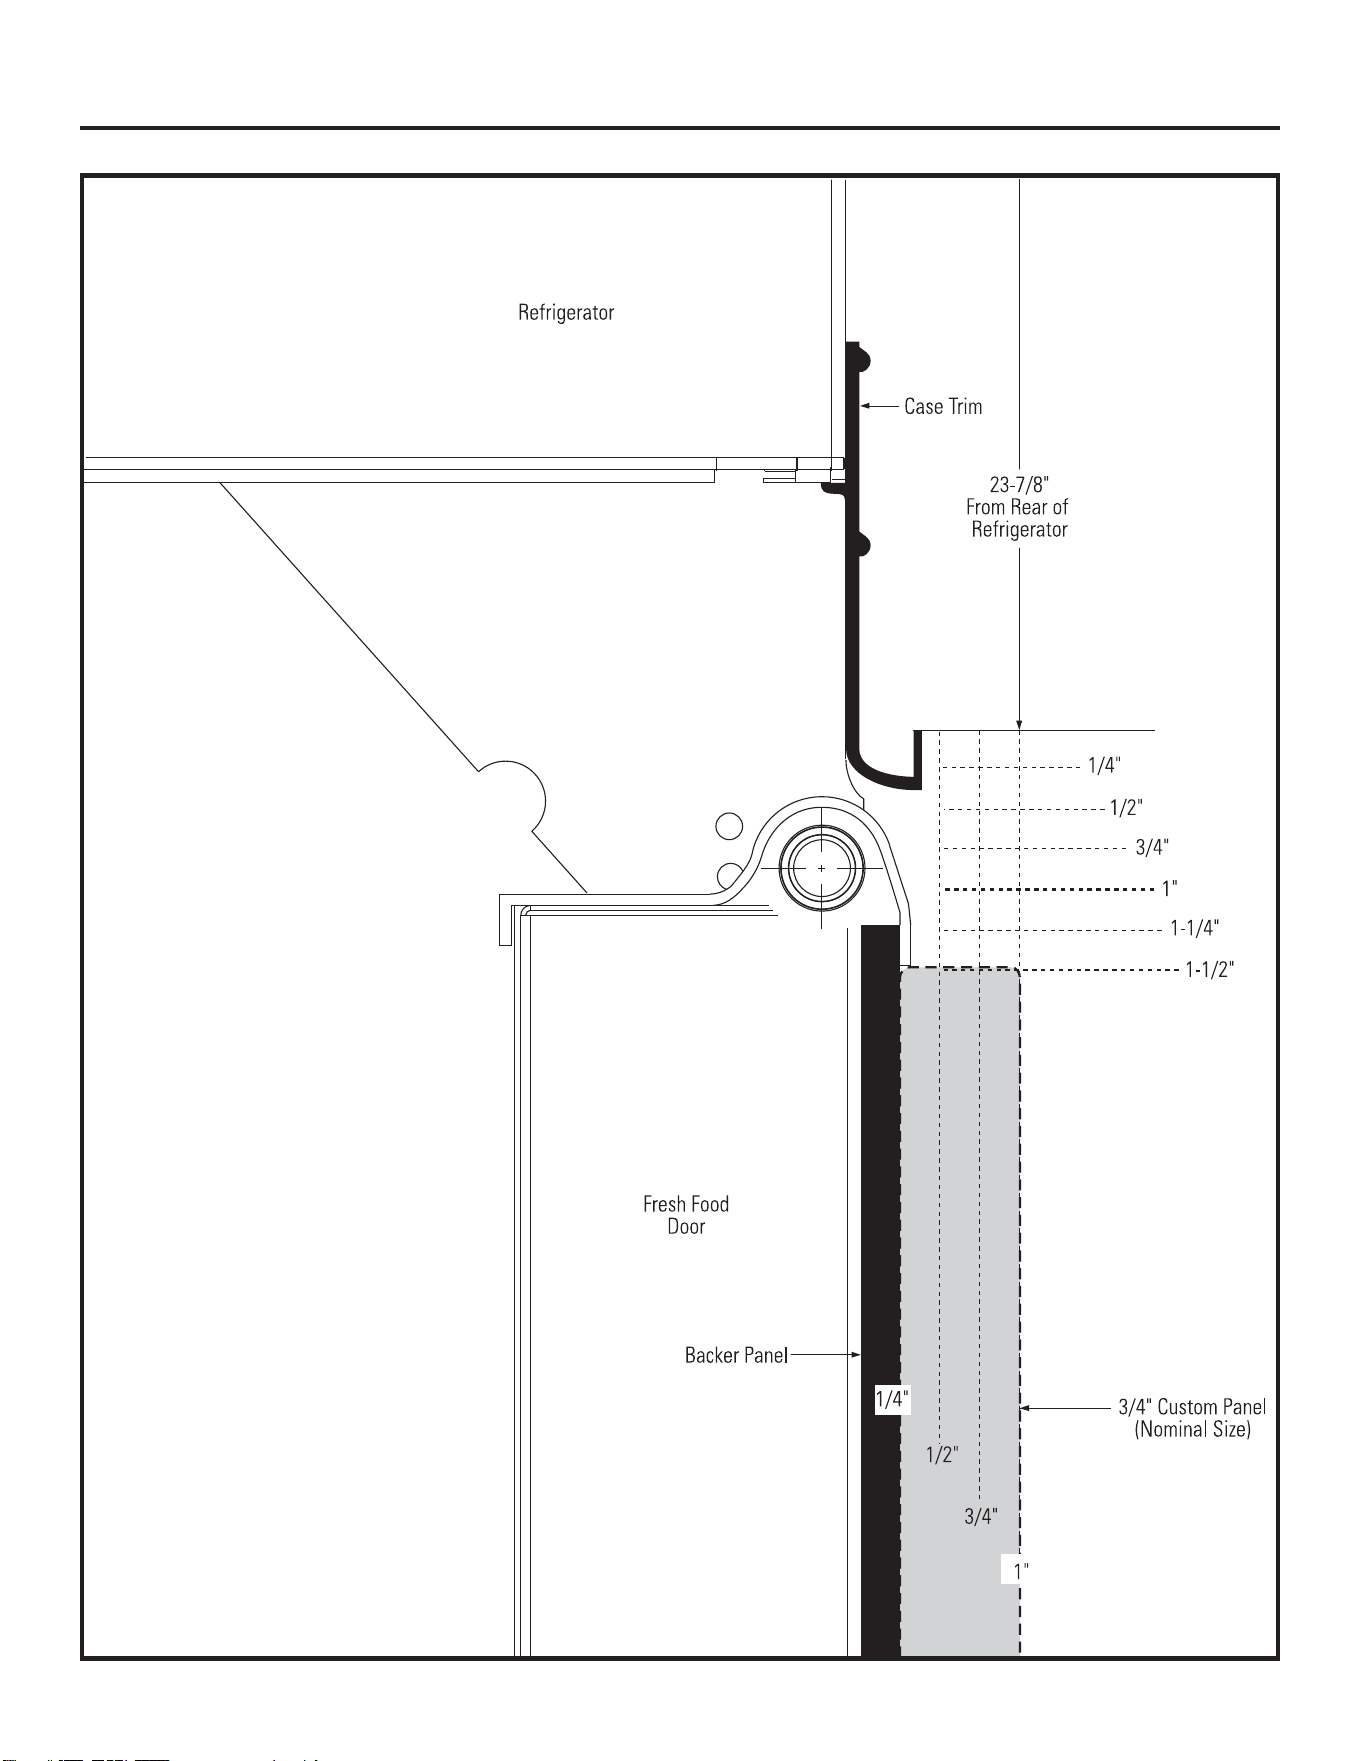
Top View
90° Door Swing
(optional setting)
Scale 1:1
Installation Instructions
19
CUSTOMIZATION BASICS:
Stainless Steel Wrapped Models
42”ZLGHPRGHO³36%<6
48”ZLGHPRGHO³36%<6
Stainless Steel wrapped refrigerators have wrapped
doors and grille panels, and beveled edges. These
models are shipped ready for installation.
Trimmed Models
42”ZLGHPRGHOV³36%<*
48”ZLGHPRGHOV³36%<*
Trimmed refrigerators are designed to be
customized with decorative panels. Field installed
custom door and grille panels are required. Panels
can be framed or full-width and can use either the
pre-installed handles or custom handles provided
by your cabinet manufacturer.
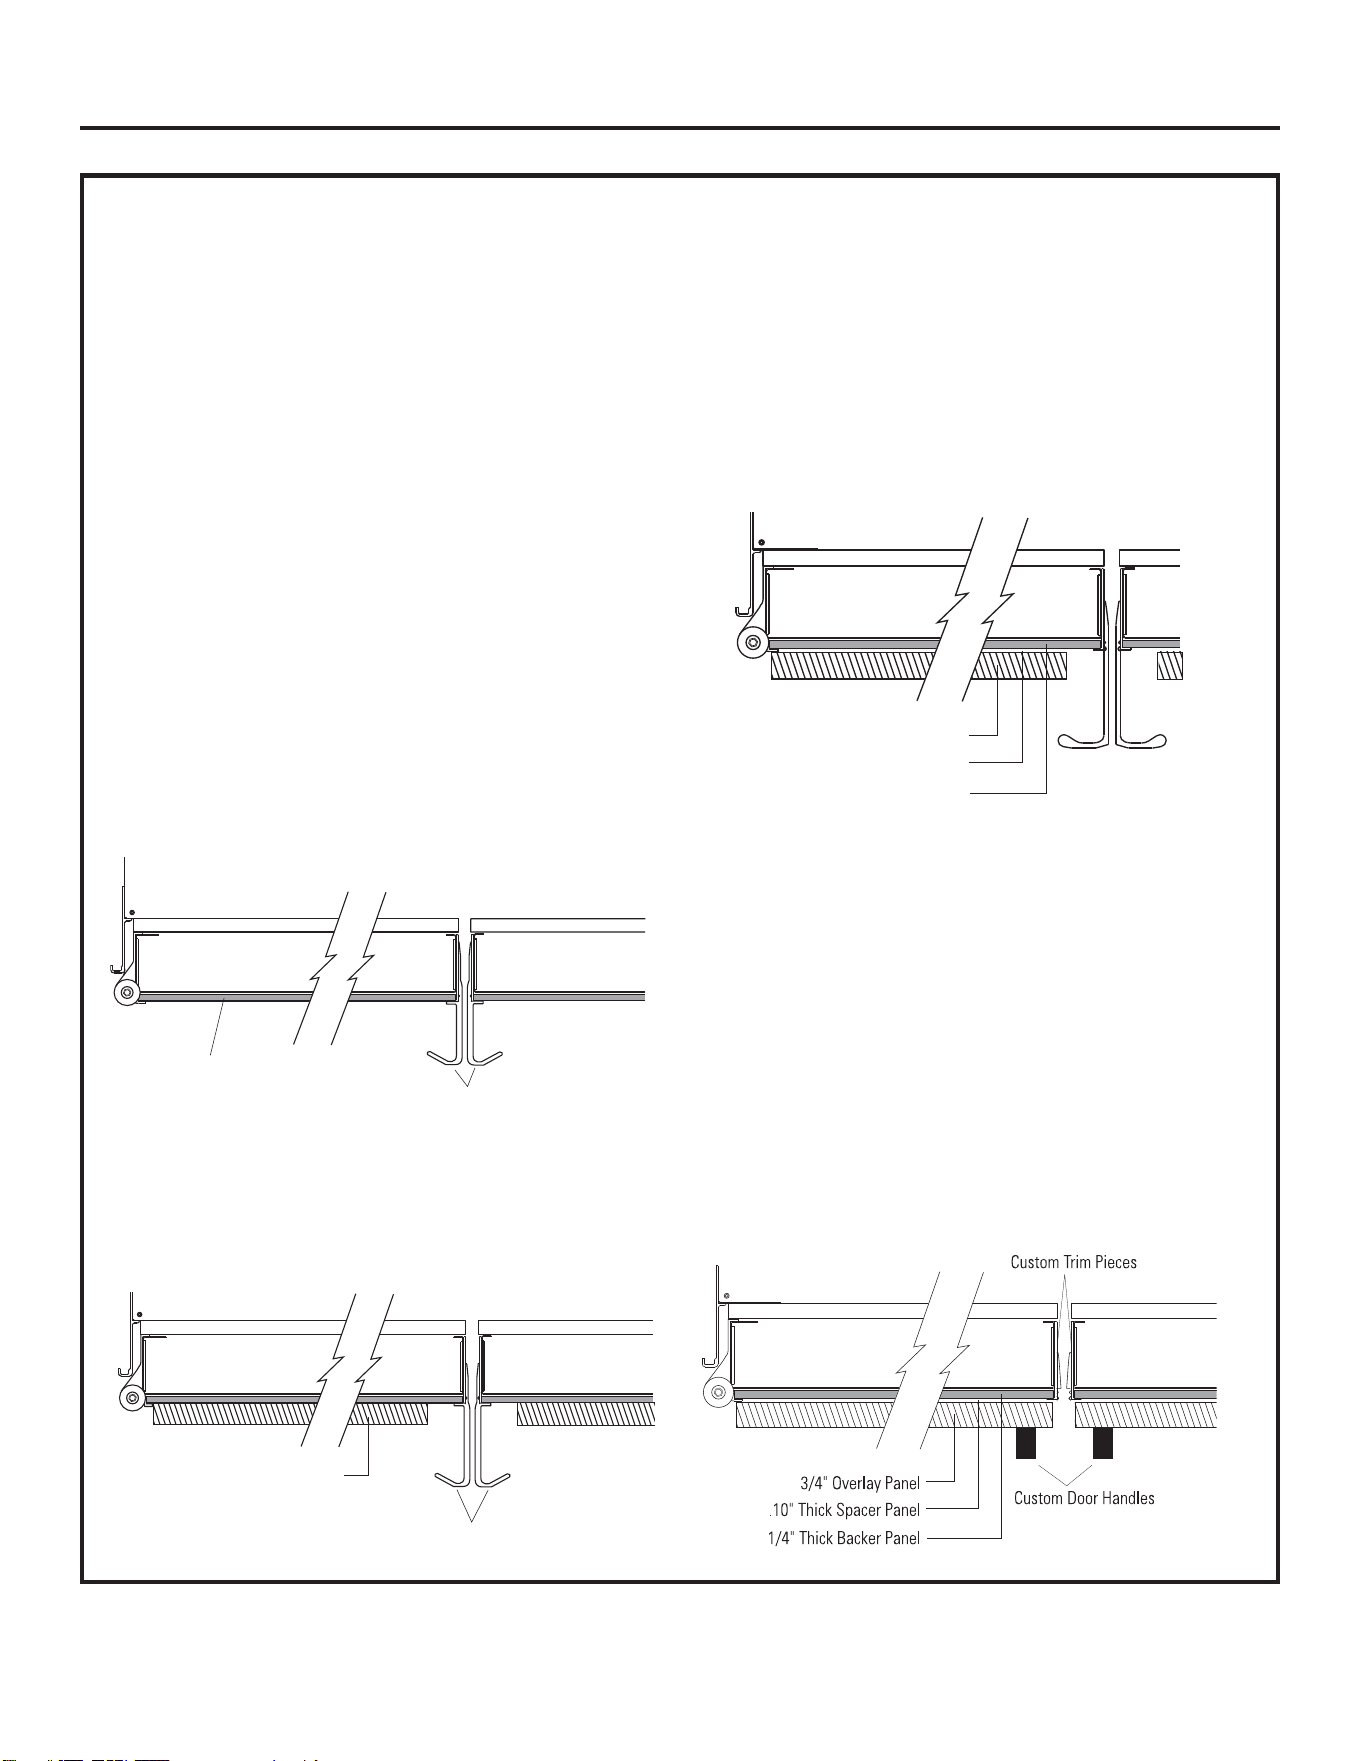
Framed Custom Panels
<RXPD\LQVWDOOFXVWRPSDQHOVIURP\RXUFDELQHW
manufacturer. The decorative panel slides into
the factory installed trim. A 1/4” finished panel
can be used.
<RXPD\LQVWDOOD” panel attached to a 1/4”
backer panel. If the pre-installed door handles are
used, the backer panel will be exposed by the handle
and therefore must be finished (page 24). Custom
handles can also be used.
Full-Width Overlay Custom Panels
Full-width overlay custom panels are designed
to slide into the factory-installed trim, no kits
required. In this design, you can achieve a nearly
trimless appearance.
A 0.10” spacer panel must be installed between
the finished 1/4” backer panel and 3/4”
appearance panel. If the pre-installed door
handles are used, the backer panel will be
exposed near the handle and therefore
must be finished (page 24).
Door Handles
The pre-installed handles can accommodate
both framed or overlay panels. Custom handles of
your choice, supplied by your cabinet maker, can
be installed only on 3/4” overlay panels. When
installing custom handles, measure to ensure
the mounting for the handles selected will clear
the dispenser when installed on the freezer door.
Handles need to mount on the upper and lower
wood panels of the freezer door and not
on the dispenser. If a custom handle is used, only
the 3/4” overlay panel must be exposed, and the
custom trim pieces should be installed (page 38).
Door Handles
3/4" Custom Panel
3/4" Overlay Panel
.10" Thick Spacer Panel
1/4" Thick Backer Panel
Framed Panel
Door Handles
Installation Instructions
20
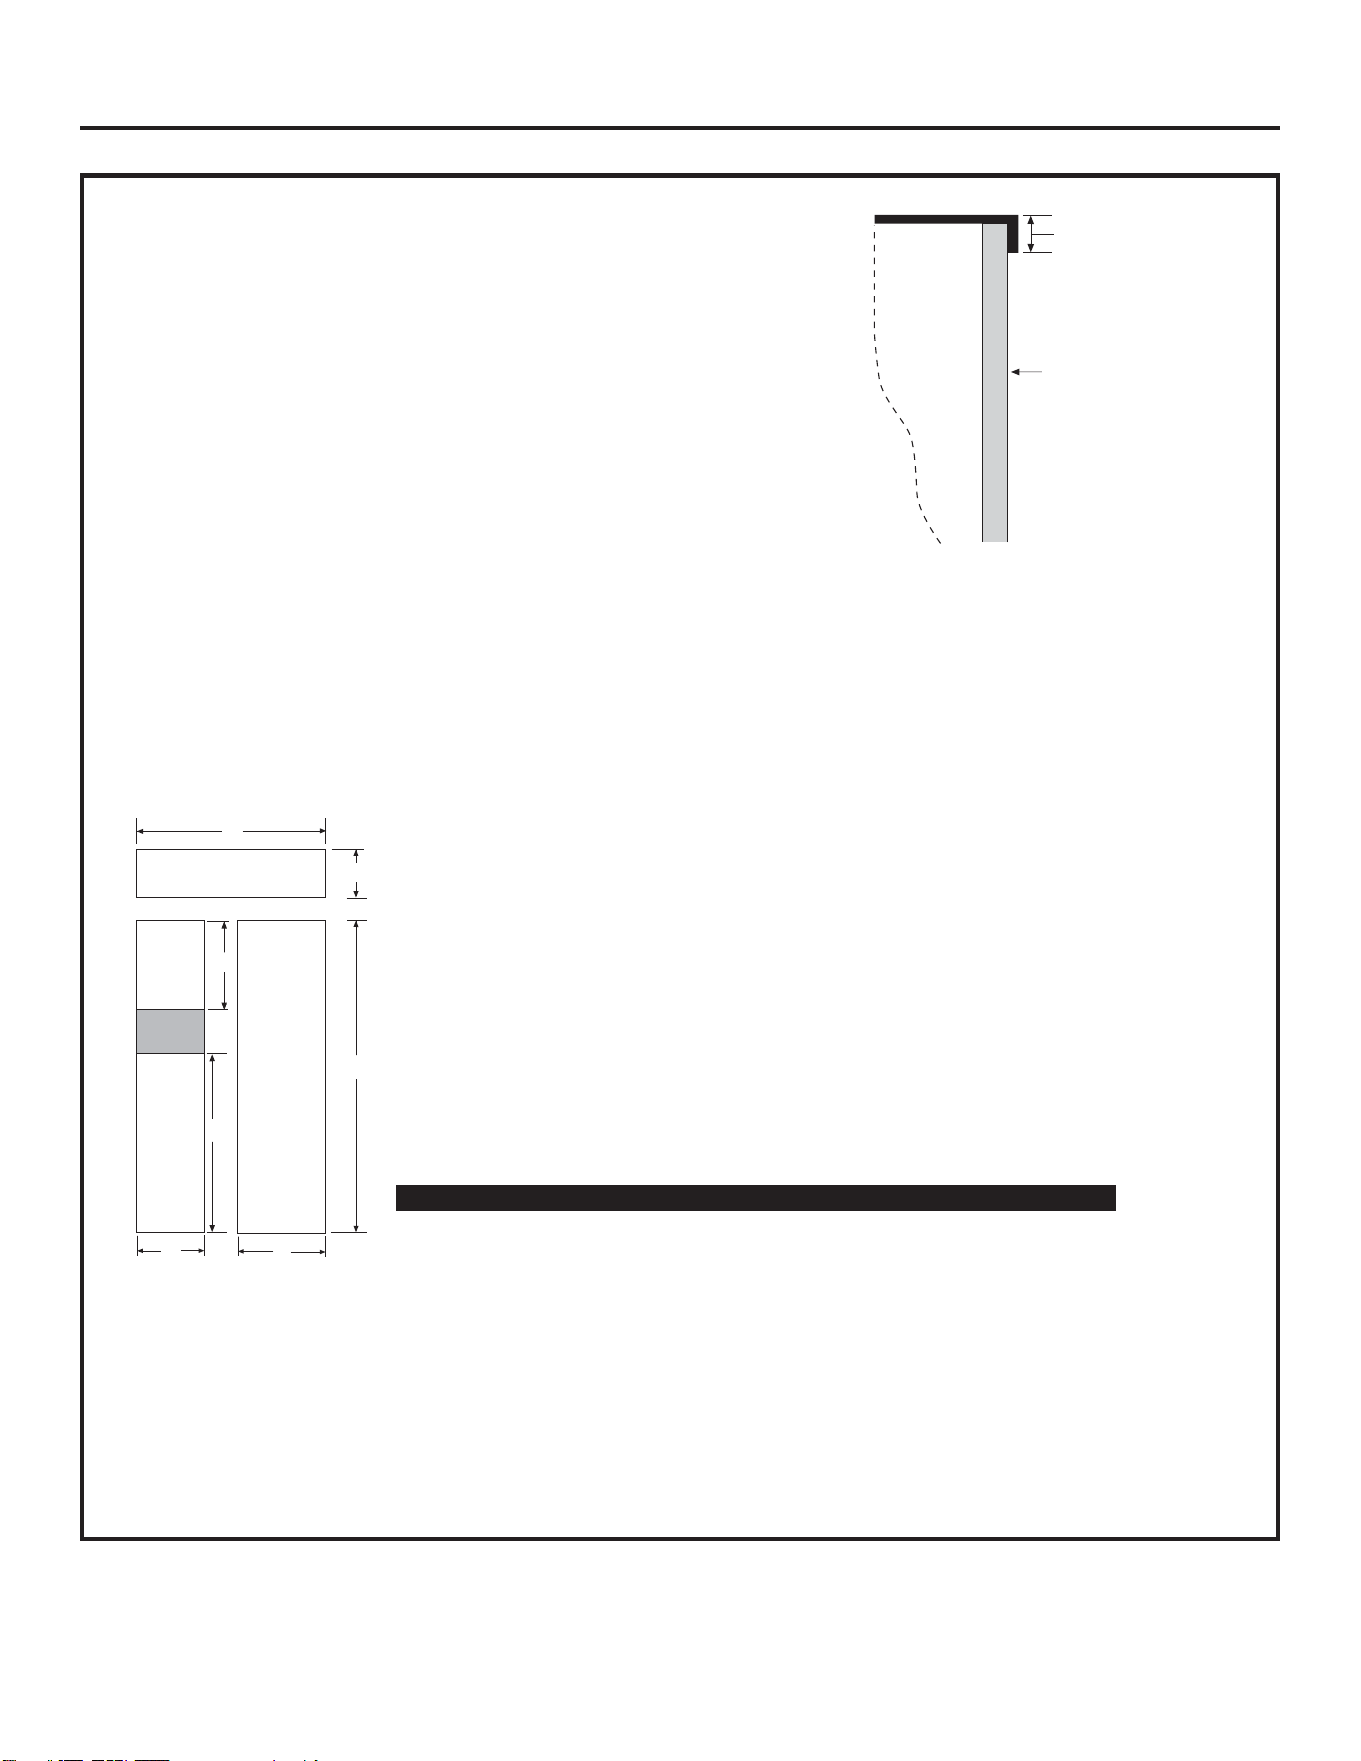
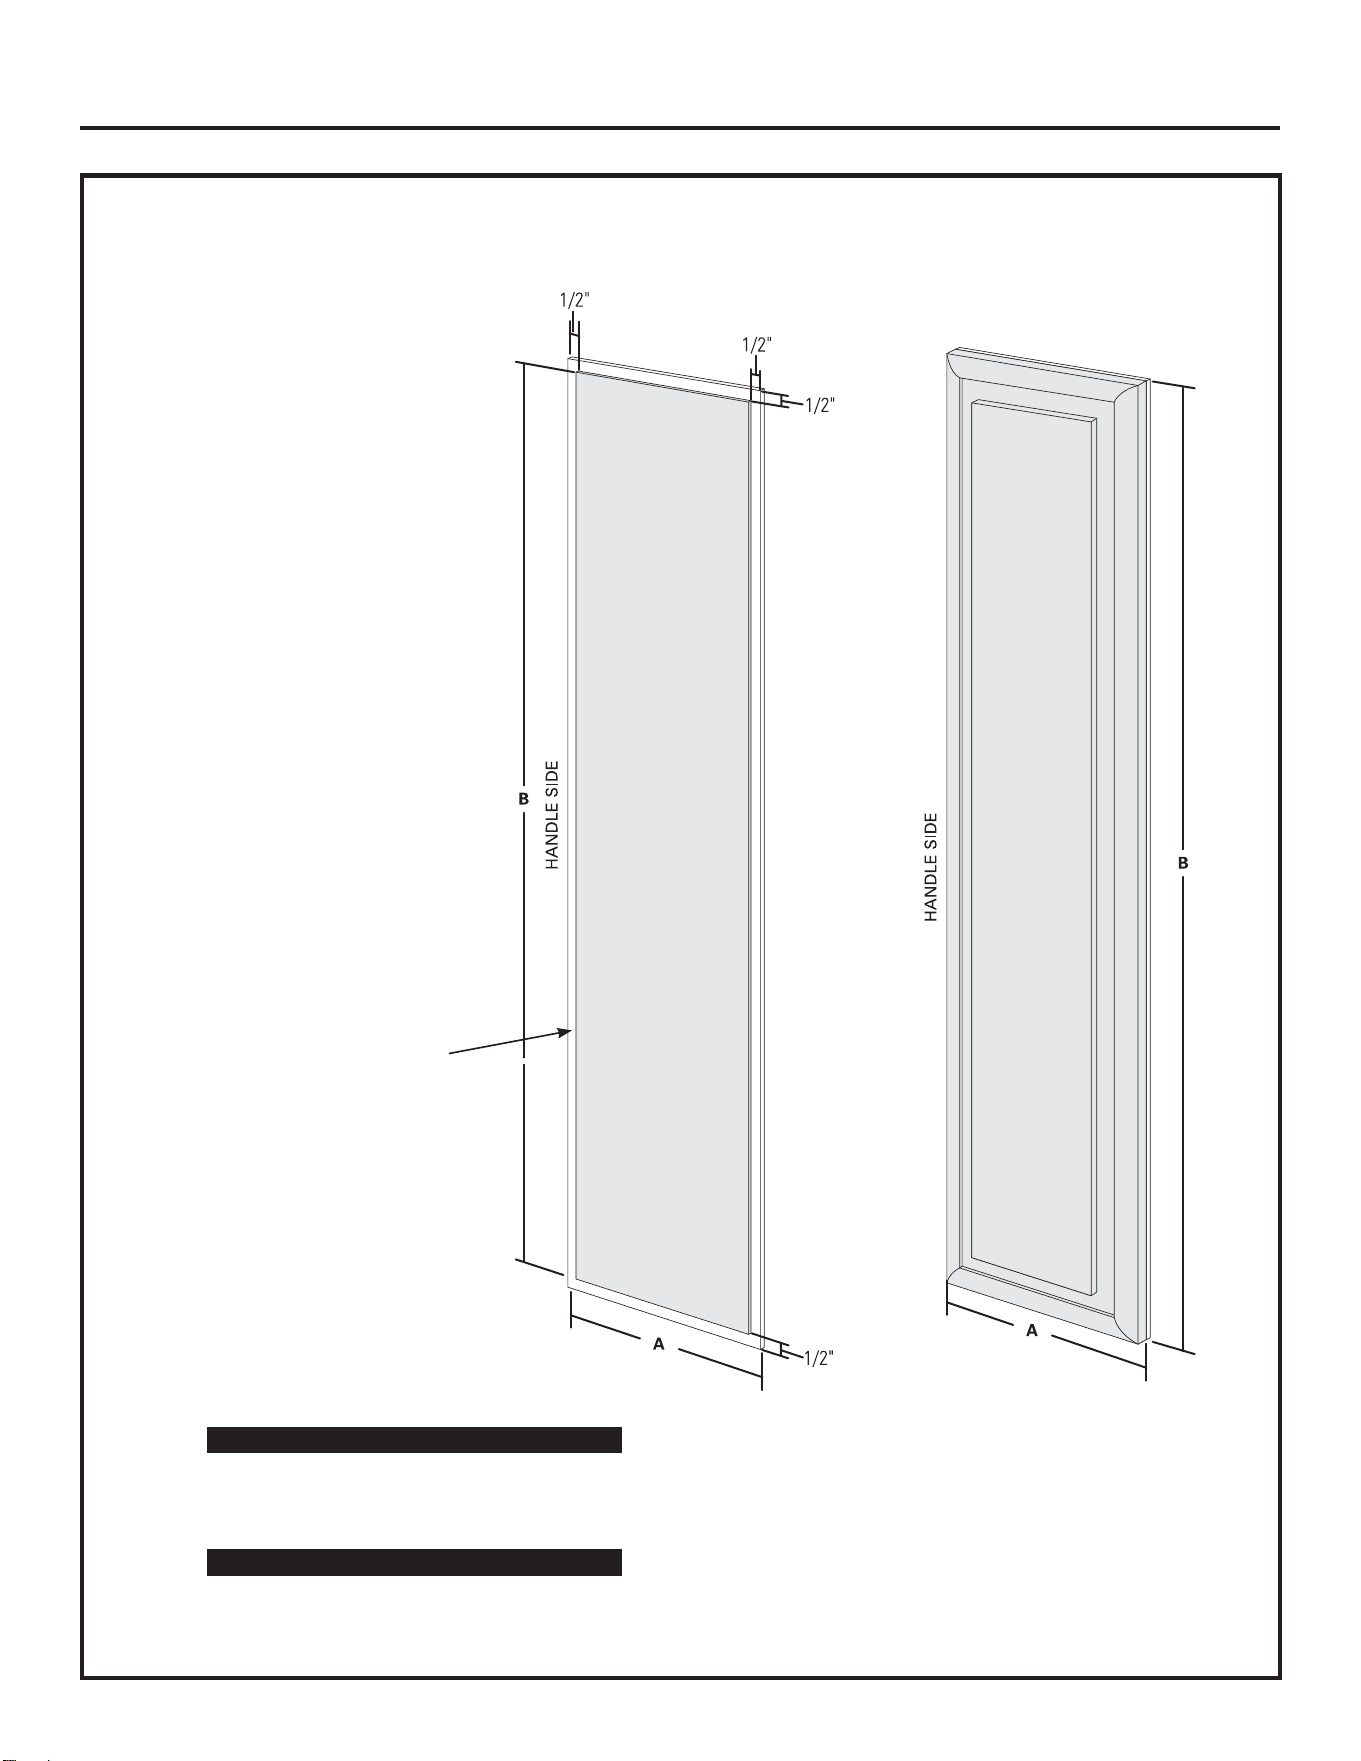
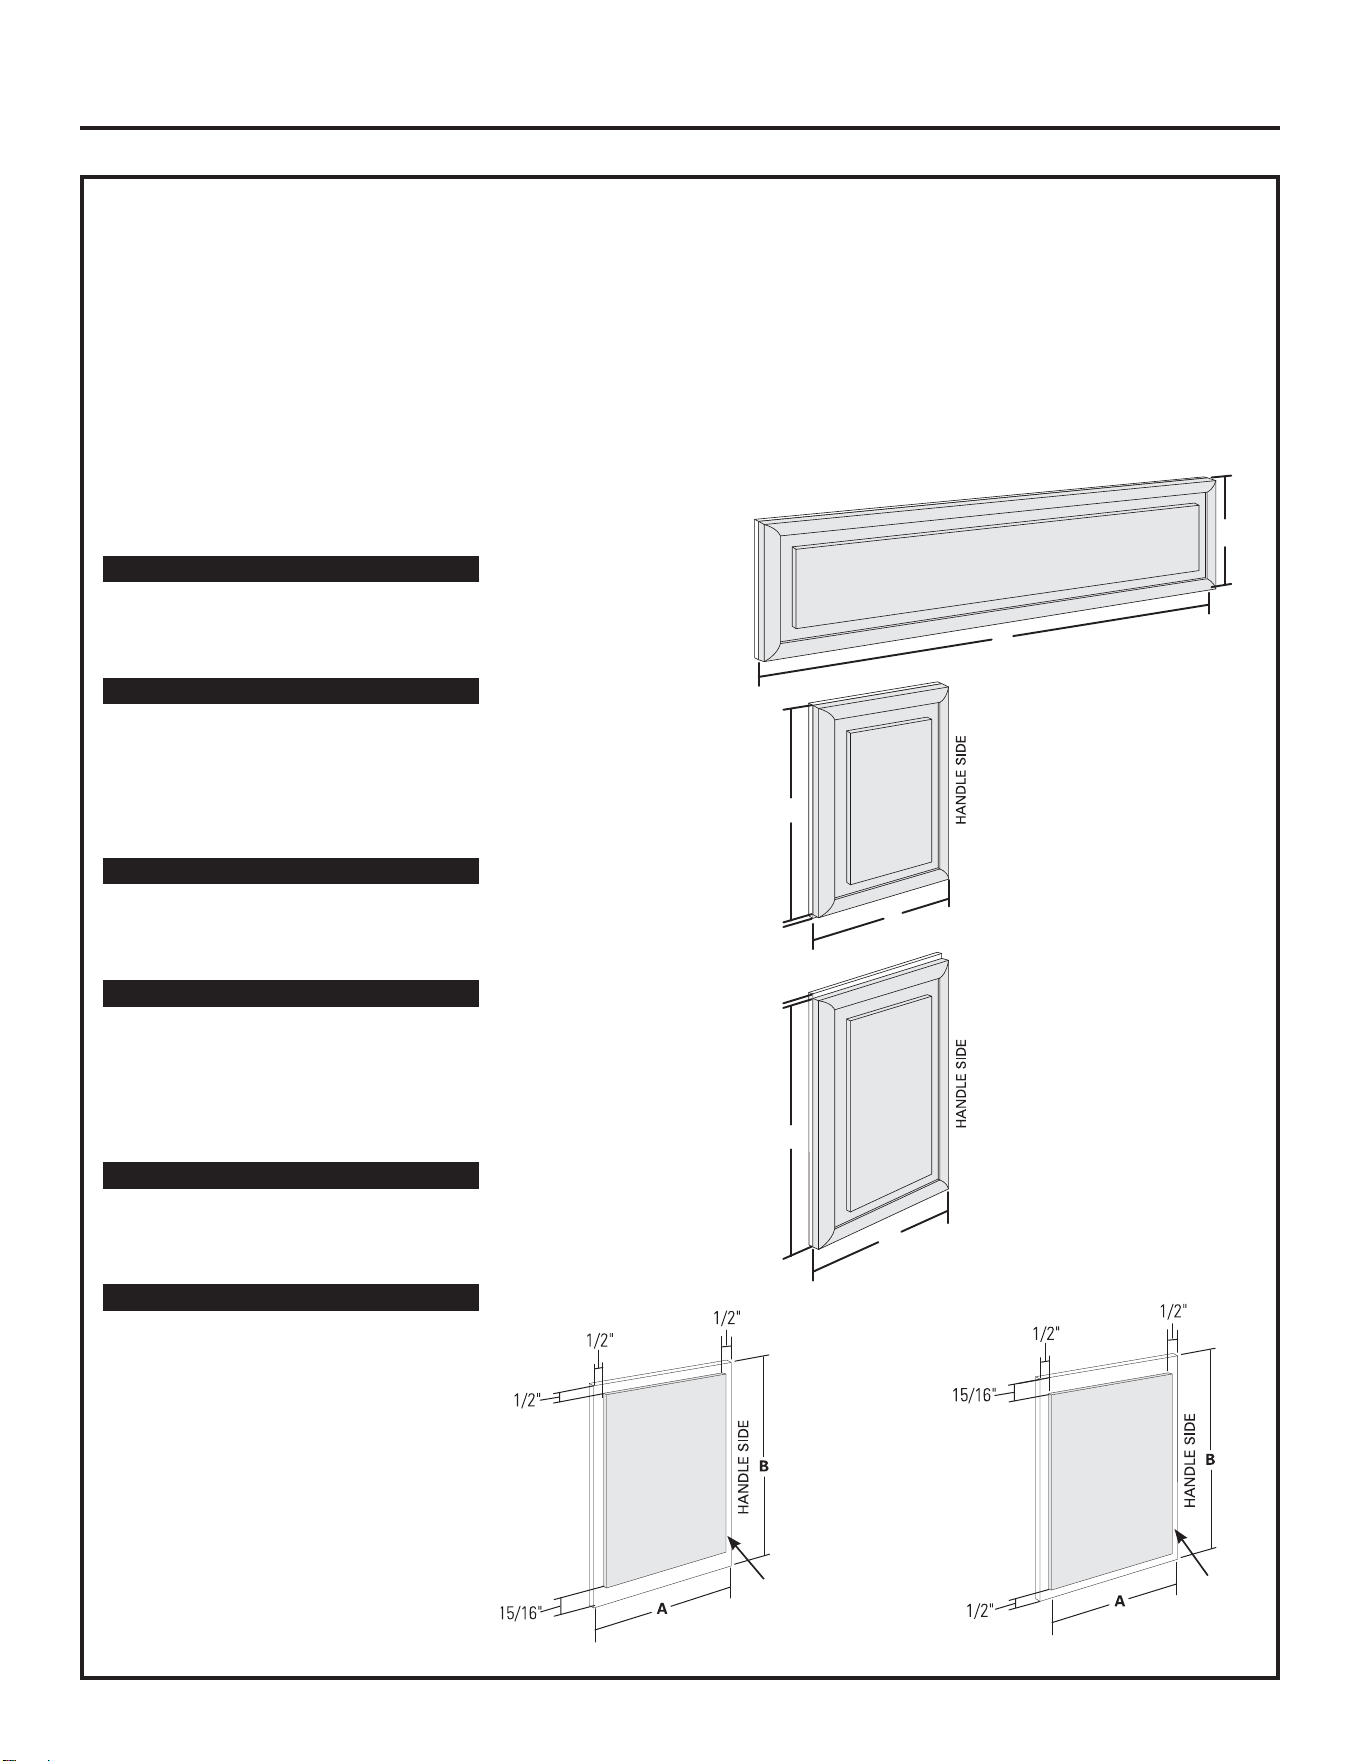
1/4” FRAMED PANEL DIMENSIONS
If you choose to install framed panels, they must be
cut to the dimensions shown. The panels will slide
into the frame on the doors and grille.
IMPORTANT NOTE: Maximum weight
is 70 pounds for the Fresh Food panel,
45 pounds total for Freezer panels and
15 pounds for the grille panel.
IMPORTANT NOTE: Dispenser Trim
The refrigerator is supplied with factory installed dispenser trim.
• If panel is less than 1/4” thick, a noticeable gap will be created
around the dispenser trim. Foam tape may be applied on
the door to improve the fit.
• If panel is more than 1/4” thick, the panel will not fit behind
the trim.
D
E
G
A
B
Grille Panel
C
Dispenser
Cutout
Freezer
Panel
Fresh Food
Panel
F
1/4"
Panel
Door
5/16"
Trim
Reveal
Front Panel Dimensions (in inches)
A B C D E F G
42” Models 40-1/8 10-7/8 68 22-1/2 16-1/2 35-1/4 18
48” Models 46-1/8 10-7/8 68 26-1/2 18-1/2 35-1/4 18
Installation Instructions
21

3/4” FRAMED CUSTOM PANEL OPTION
For a more custom appearance, 3/4” framed custom panels
may be installed on trimmed models. The overlay panel is
secured to a 1/4” finished backer panel. The assembled
custom panel then slides into the trim with the same procedure
described on page 37.
3/4” FULL-WIDTH OVERLAY
CUSTOM PANEL OPTION
This design provides a nearly trimless appearance. The full width overlay
panel covers most of the door trim. In this design, a spacer panel must
be installed between the finished backer and overlay panel.
NOTE: Left-to-right offset is not
equal to top-to-bottom offset.
NOTE: Left-to-right offset is not equal
to top-to-bottom offset.
.250 + .750 = 1.000 Maximum Total Panel
Thickness
IMPORTANT NOTE: Maximum total weight
is 70 pounds for any assembled Fresh Food
panel, 45 pounds total for the Freezer panels
and 15 pounds for the grille panel.
3/4"
Custom
Overlay
Panel
1/4"
Backer
Panel
Door
3/4"
Overlay Panel
Backer Panel
Custom
Overlay
Panel
1/4"
Backer
Panel
Door
.10 Inch
Spacer
Installation Instructions
22
.250 + .10 + .750 = 1.100 Maximum Total Panel Thickness
Spacer Panel
Overlay Panel
Backer Panel
3/8"
3-1/8"
5/16"
1" Thick Max.
or 3/4" Plus
1/4" Backer
B
2-1/2"
3-1/8" Min.
1/4" Max.
A
5/16"
Required for Optimal
Handle Clearance
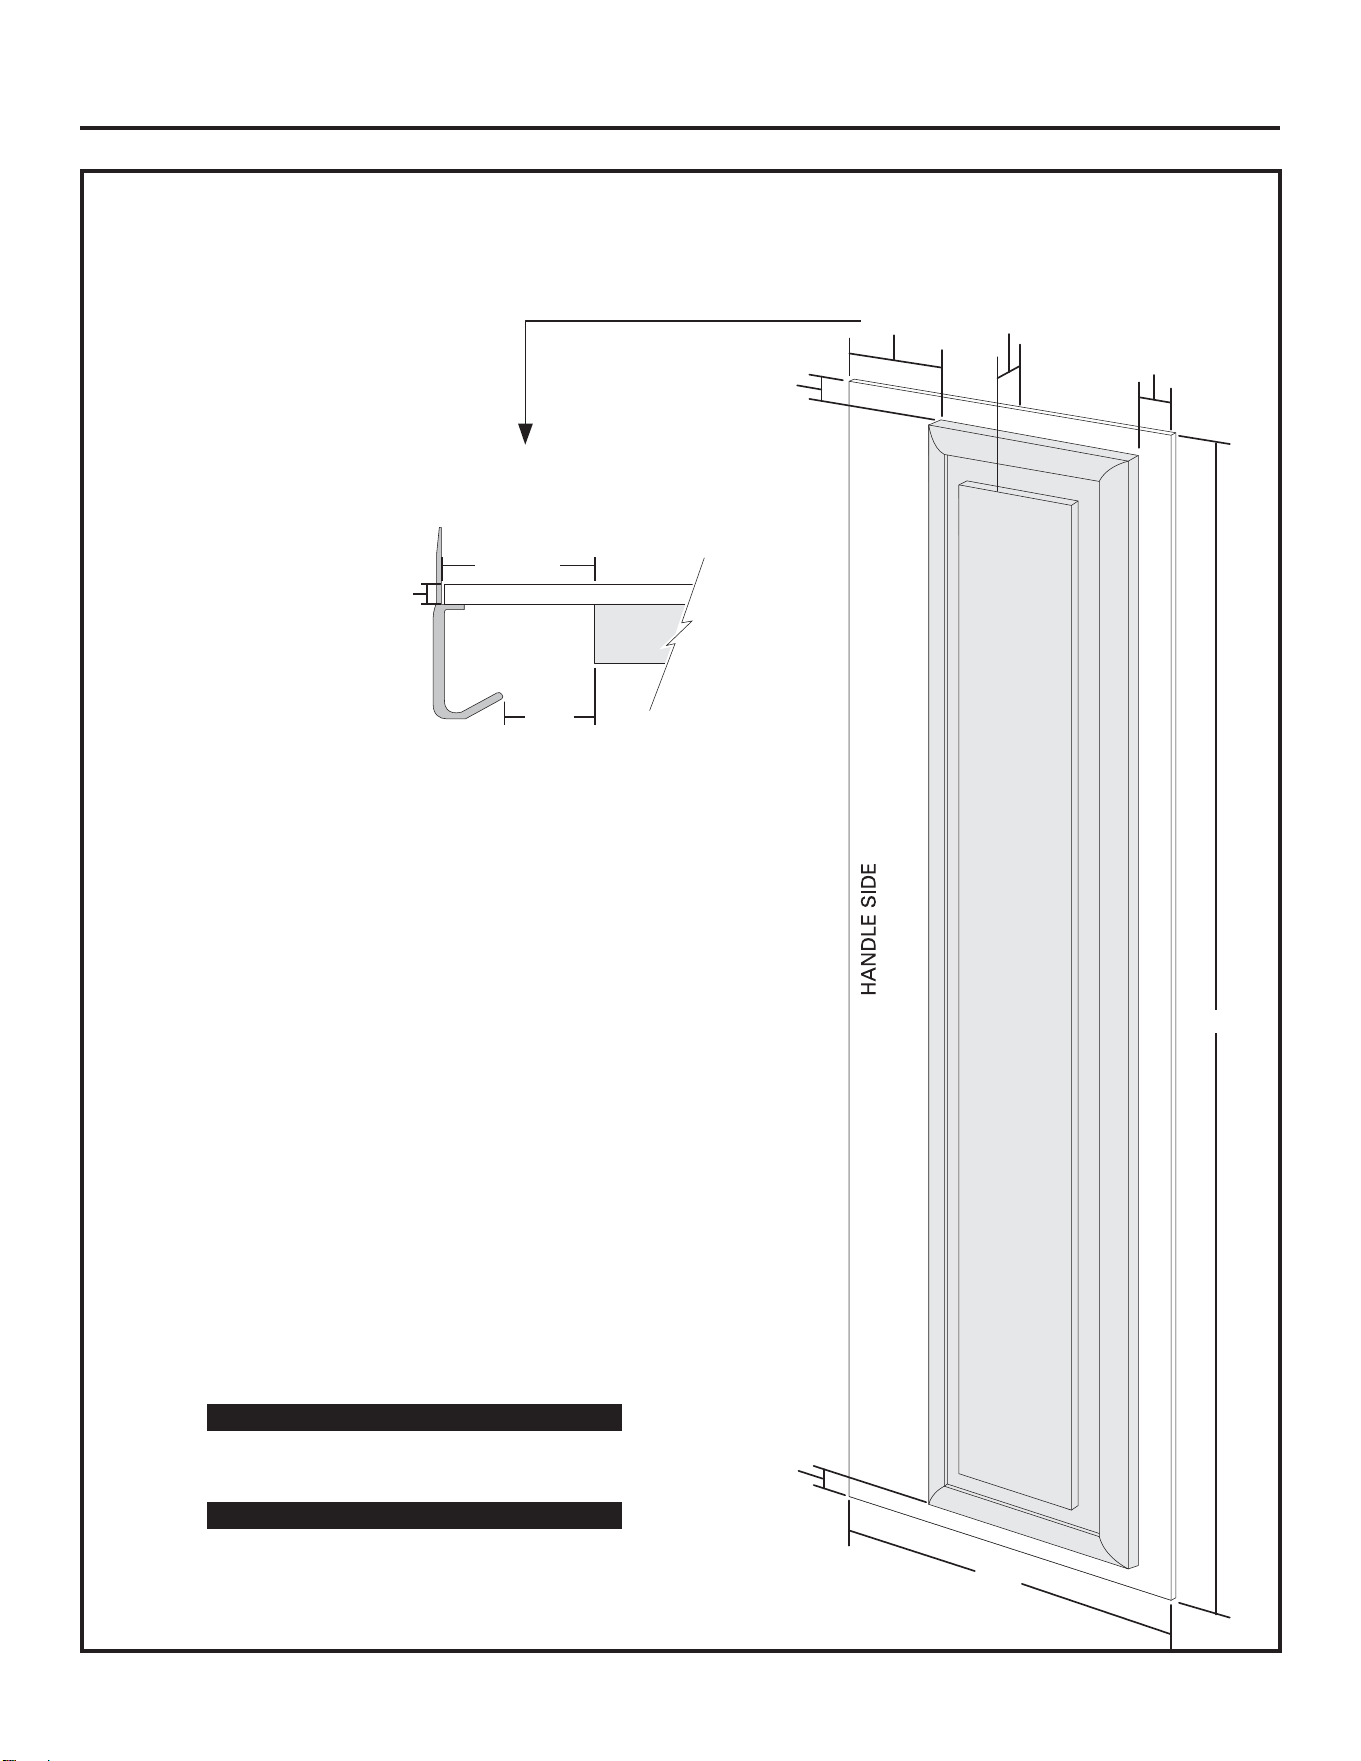
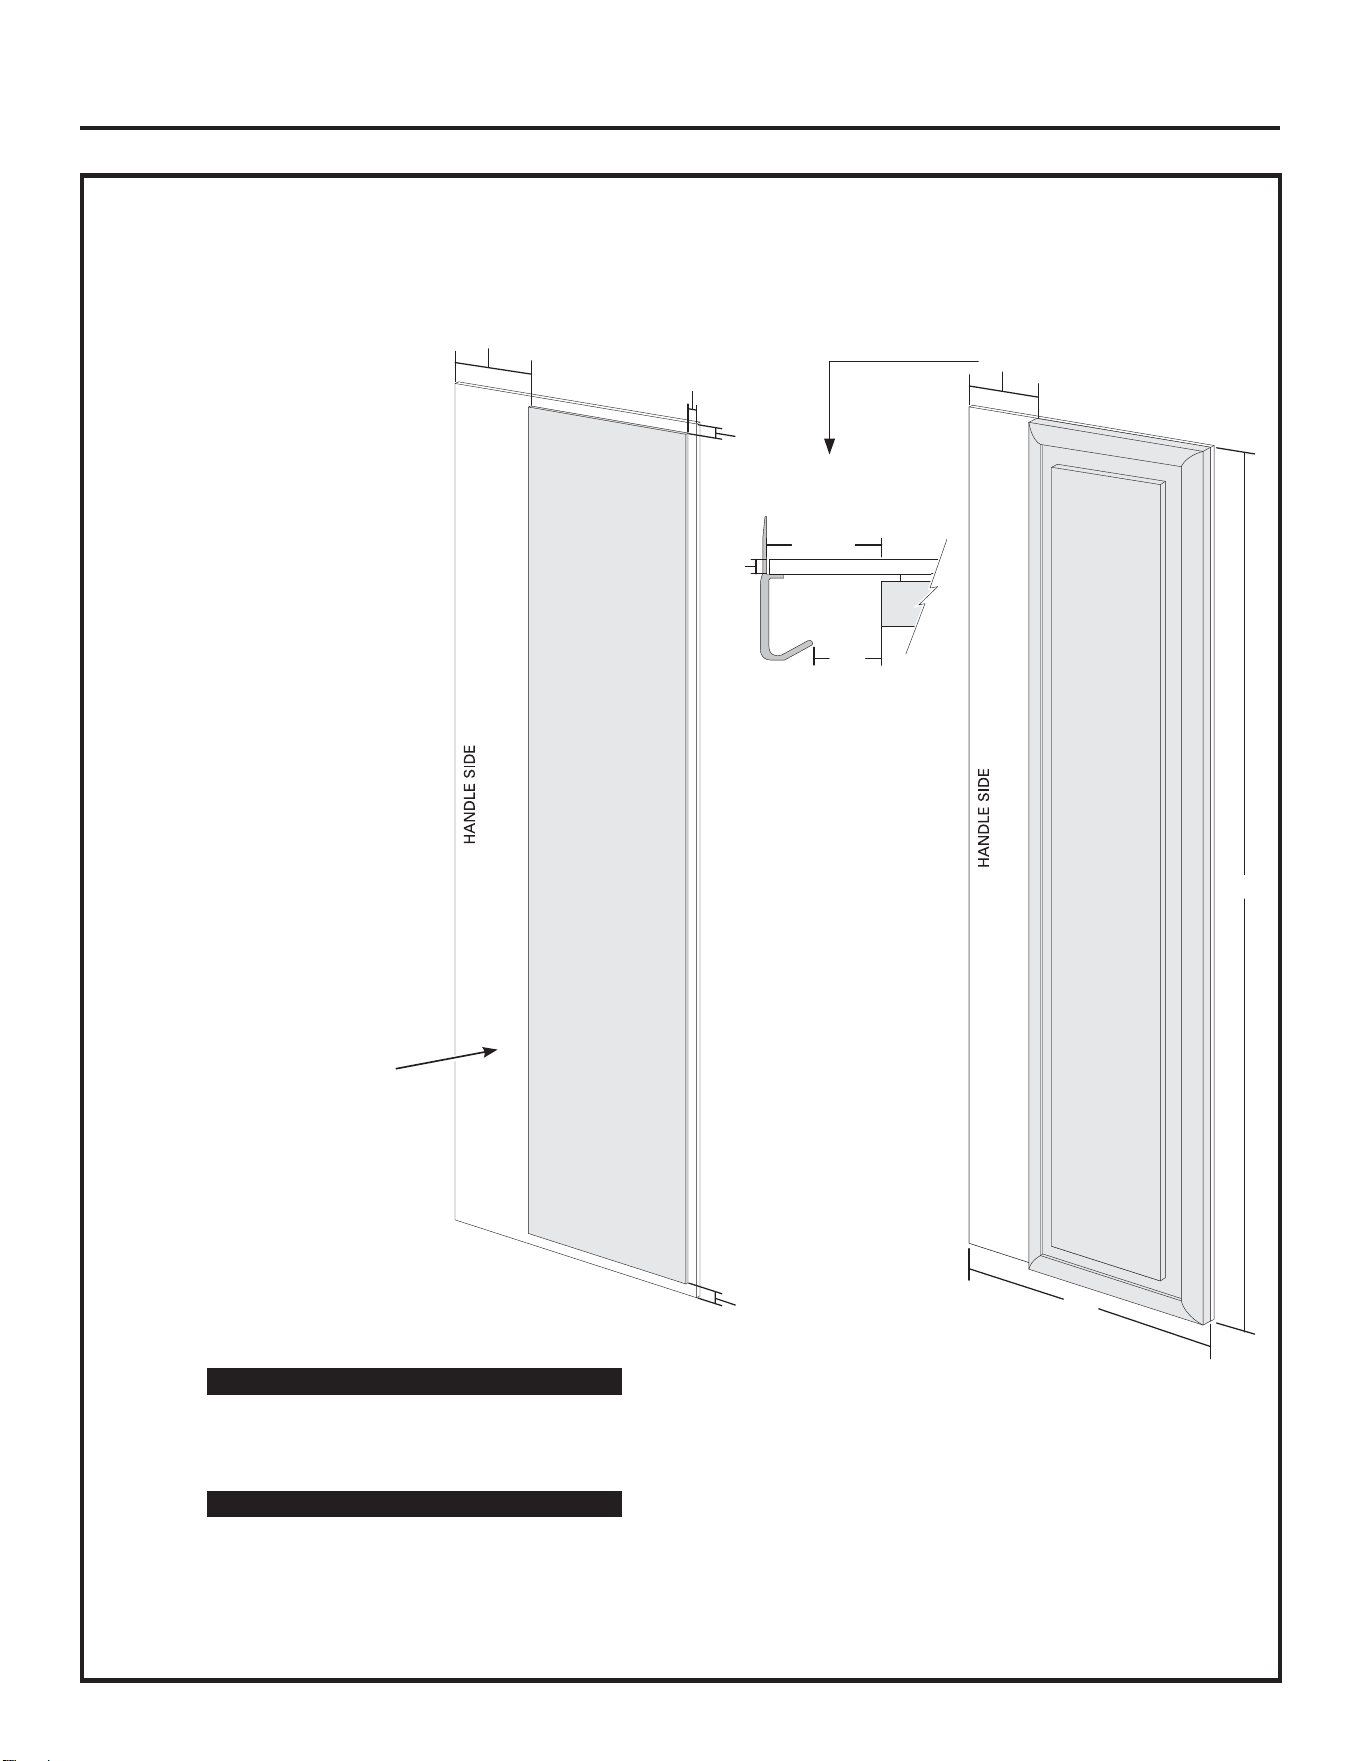
3/4” FRAMED CUSTOM WOOD PANELS WITH PRE-INSTALLED HANDLES
Secured to a 1/4” finished backer panel. This design provides a framed appearance.
Fresh Food Panel
Installation Instructions
23
42” Models A B
1/4” Backer Panel 22-5/16” 67-7/8”
3/4” Overlay Panel 18-13/16” 67-1/4”
48” Models A B
1/4” Backer Panel 26-7/16” 67-7/8”
3/4” Overlay Panel 22-15/16” 67-1/4”
2-1/2"
3-1/8" Min.
1/4"
Max.
Required for Optimal
Handle Clearance
3/8"
3-1/8"
1" Thick Max.
or 3/4" Plus
1/4" Backer
5/16"
A
5/16"
B
3/8"
1" Thick Max.
or 3/4" Plus
1/4" Backer
5/16"
5/16"
3-1/8"
A
B
1" Thick Max.
or 3/4" Plus
1/4" Backer
5/16"
5/16"
1/4"
1/4"
A
B
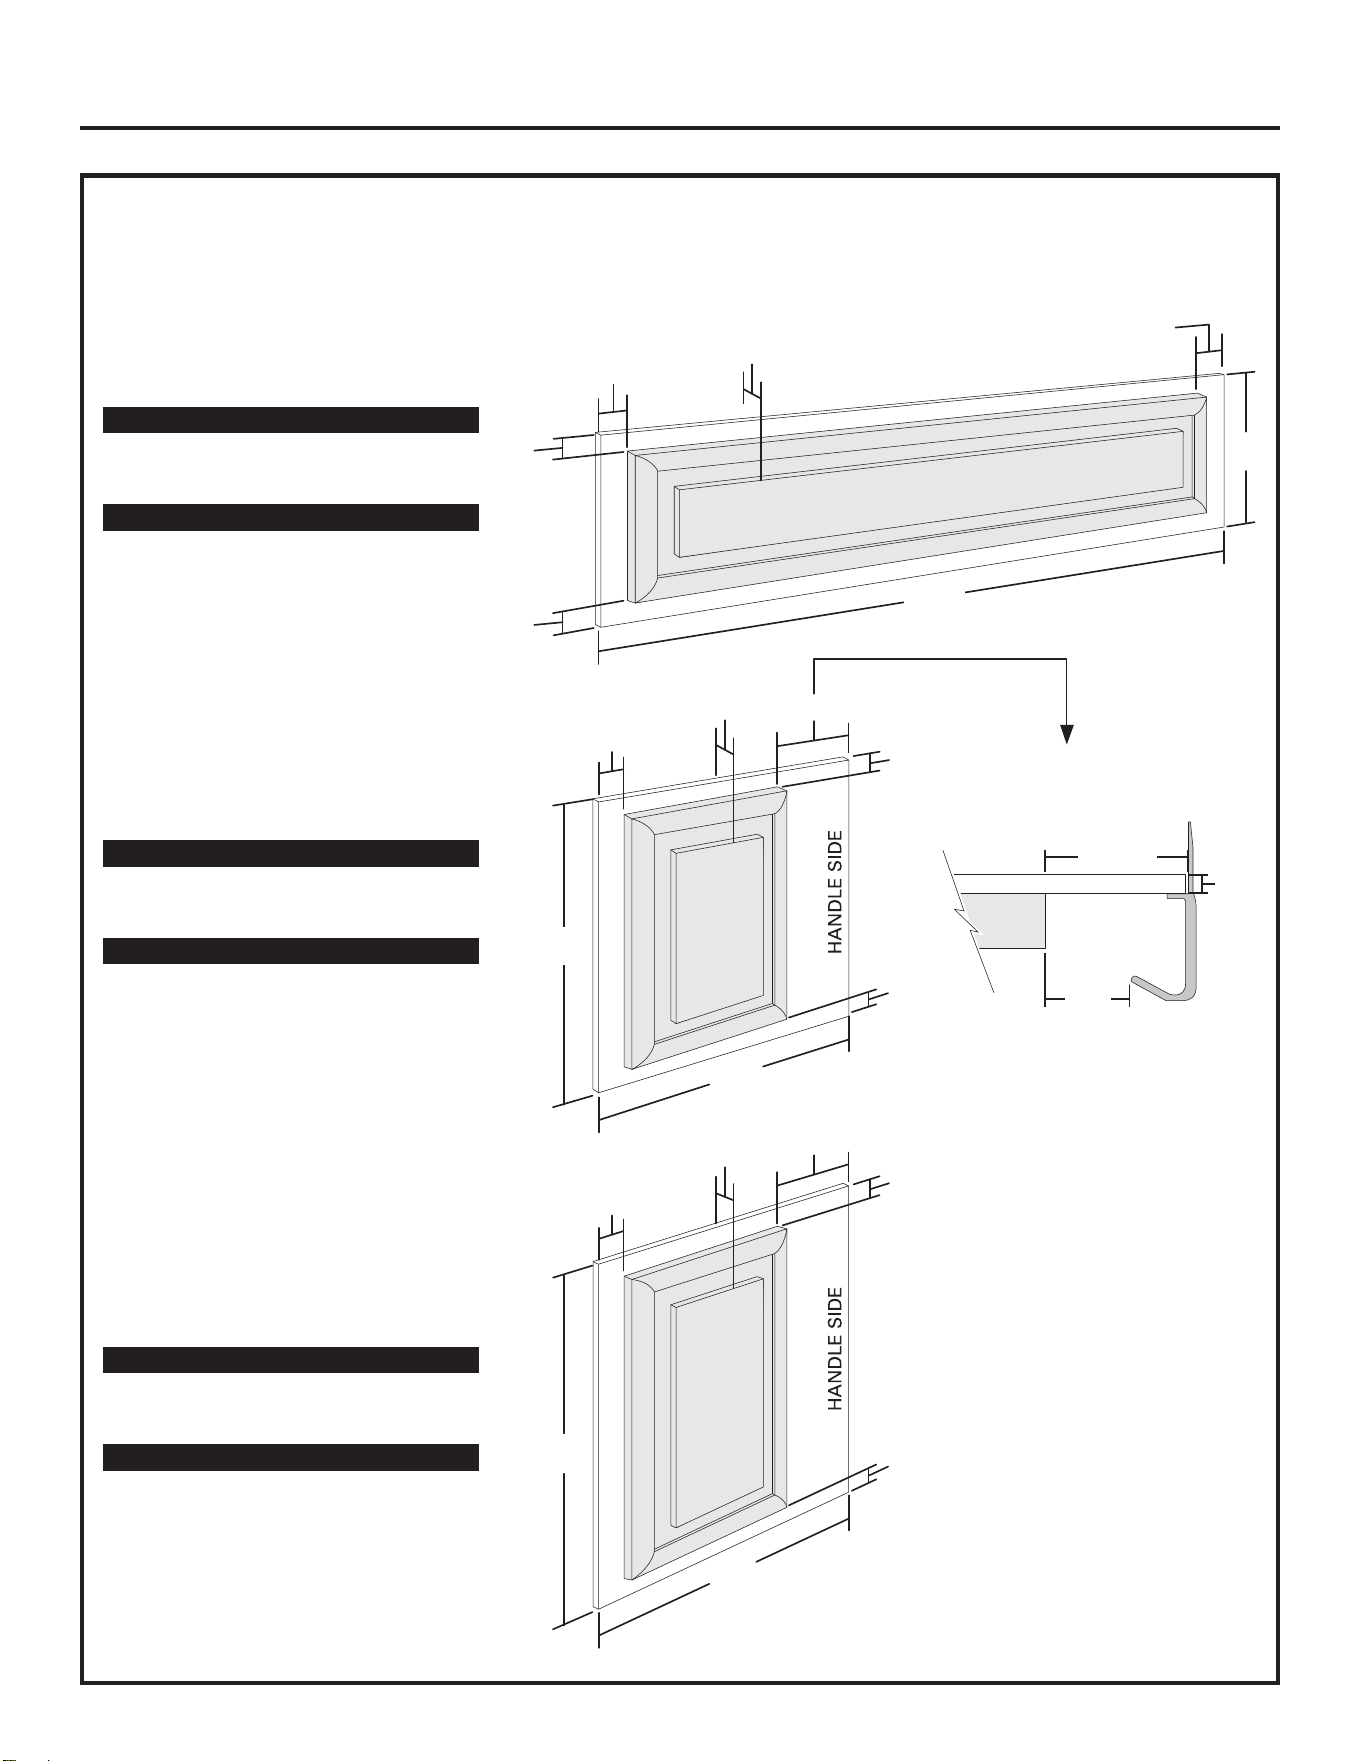
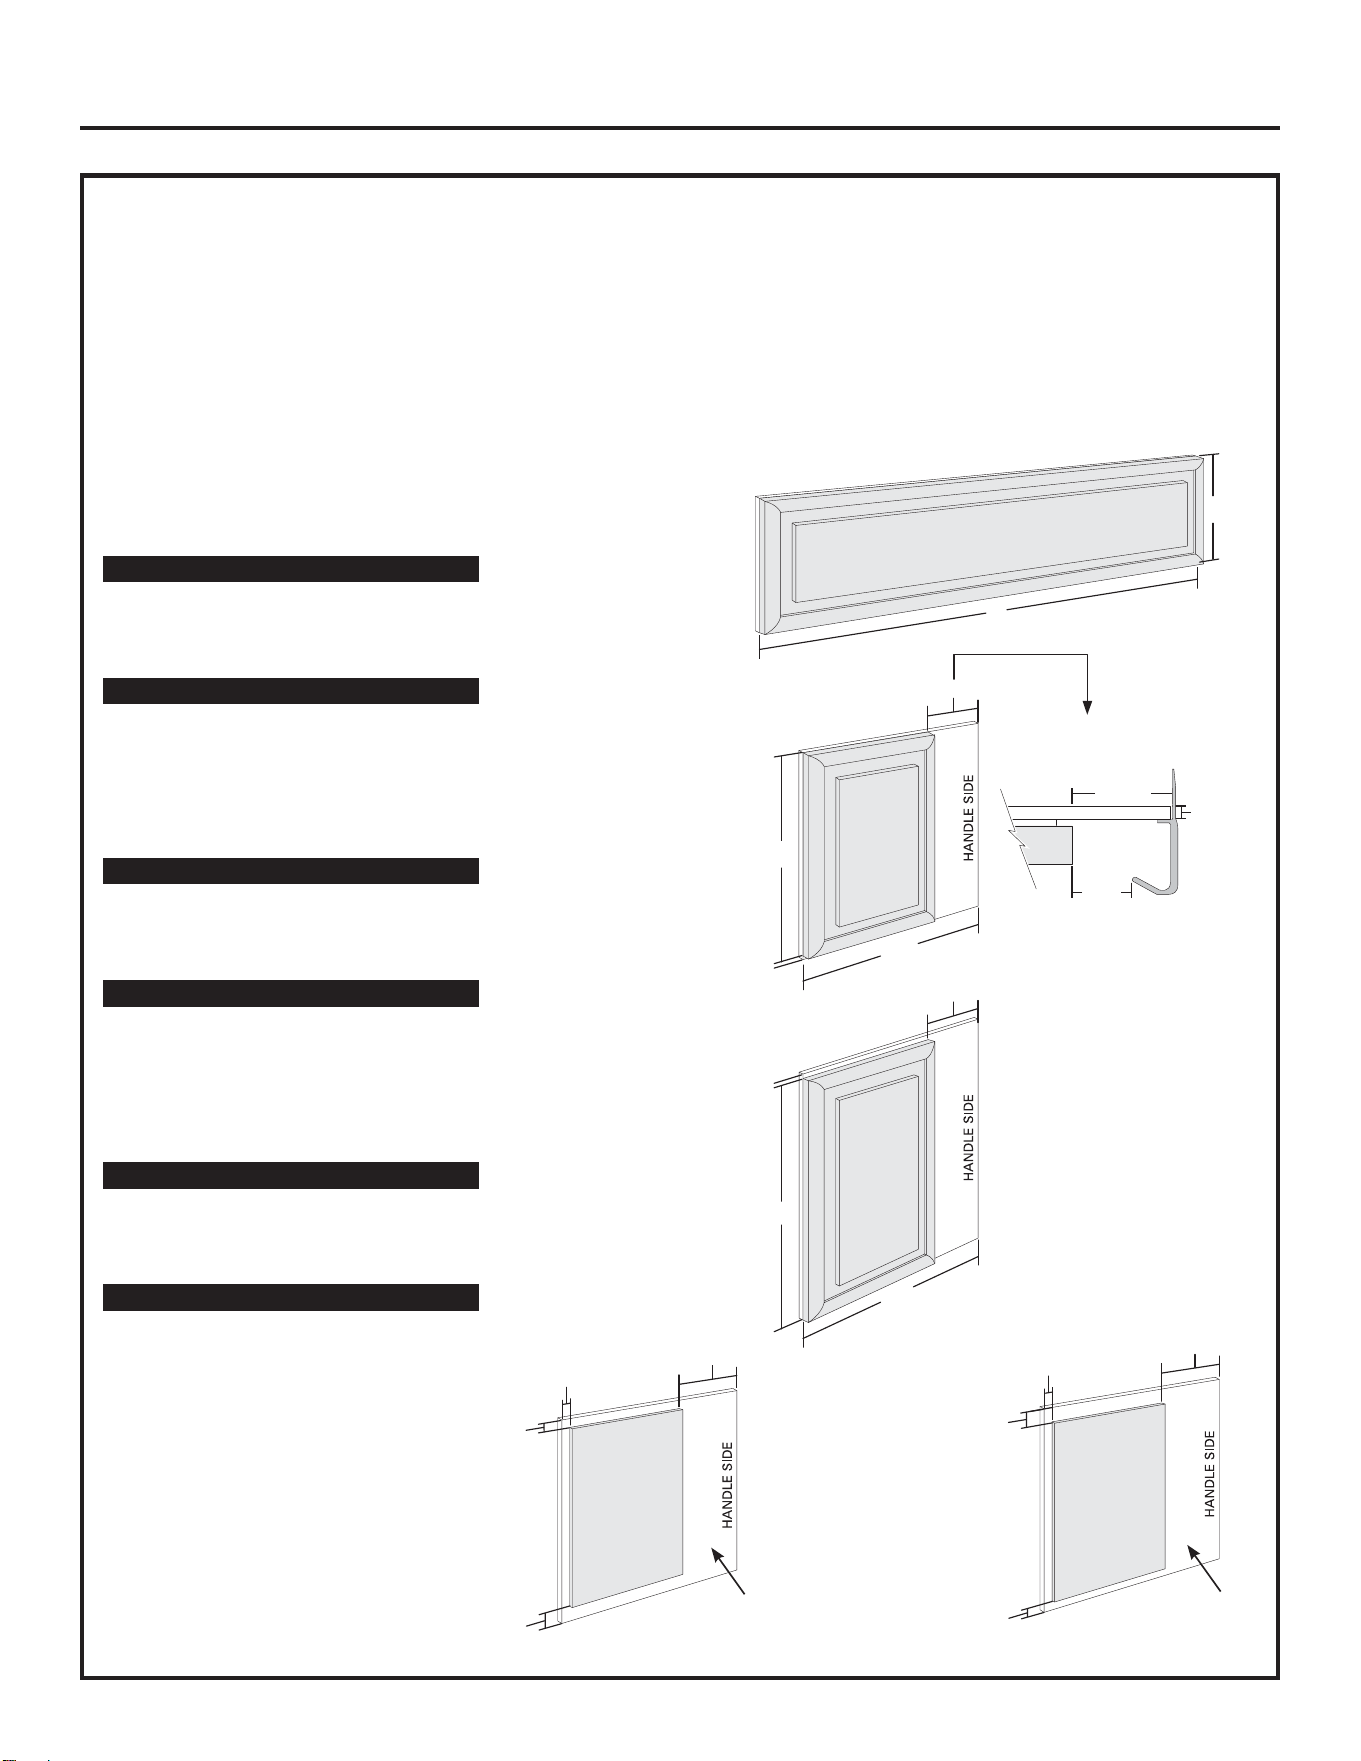
3/4” FRAMED CUSTOM WOOD PANELS WITH PRE-INSTALLED HANDLES
Secured to a 1/4” finished backer panel. This design provides a framed appearance.
Grille Panel
Upper Freezer Panel
Lower Freezer Panel
Installation Instructions
24
42” Models A B
1/4” Backer Panel 39-15/16” 10-3/4”
3/4” Overlay Panel 39-7/16” 10-1/8”
48” Models A B
1/4” Backer Panel 45-15/16” 10-3/4”
3/4” Overlay Panel 45-7/16” 10-1/8”
42” Models A B
1/4” Backer Panel 16-7/16” 17-13/16”
3/4” Overlay Panel 12-15/16” 17-3/16”
48” Models A B
1/4” Backer Panel 18-7/16” 17-13/16”
3/4” Overlay Panel 14-15/16” 17-3/16”
42” Models A B
1/4” Backer Panel 16-7/16” 35-1/8”
3/4” Overlay Panel 12-15/16” 34-1/2”
48” Models A B
1/4” Backer Panel 18-7/16” 35-1/8”
3/4” Overlay Panel 14-15/16” 34-1/2”
1/4"
Max.
Required for Optimal
Handle Clearance
3-1/8"
2-1/2"
3-1/8" Min.
B
A
3/4” FULL-WIDTH OVERLAY CUSTOM PANELS WITH PRE-INSTALLED HANDLES
This panel design provides a nearly trimless appearance.
Assemble the spacer panel
onto the finished backer
panel. Allow 1/2” clearance
on the top, bottom and
hinge side. Allow 3-5/8” on
the handle side. Secure the
panels with glue. Be sure to
observe clearances shown
on all sides.
Secure the overlay
panel to the assembled
backer/spacer panel.
Use glue and screws.
Countersink screws
into the backer panel.
Installation Instructions
25
42” Models A B
1/4” Backer Panel 22-5/16” 67-7/8”
0.10” Spacer Panel 18-3/16” 66-7/8”
3/4” Overlay Panel 19-5/16” 68-1/8”
48” Models A B
1/4” Backer Panel 26-7/16” 67-7/8”
0.10” Spacer Panel 22-5/16” 66-7/8”
3/4” Overlay Panel 23-7/16” 68-1/8”
3-5/8"
1/2"
1/2"
1/2"
Fresh Food Panel
Spacer
Panel
Finished
Backer
Panel
3-1/8" Min.
1/4"
Max.
Required for Optimal
Handle Clearance
3-1/8"
3-1/8"
5/16"
5/16"
A
B
A
B
A
B
2-1/2"
3/4” FULL-WIDTH OVERLAY CUSTOM PANELS WITH PRE-INSTALLED HANDLES
This panel design provides a nearly trimless appearance.
Assemble the spacer panel onto the backer panel. Allow 1/2” clearance on all four sides of the grille spacer
panel. Allow 1/2” clearance on the top and hinge side, 15/16” on the bottom and 3-5/8” on the handle side of
the upper freezer door panel. Allow 15/16” on the top, 1/2” clearance on the bottom and hinge side and 3-5/8”
on the handle side of the lower freezer door panel. Secure the panels with glue. Be sure to observe clearances
on all sides.
Secure the appearance panel to the assembled backer/spacer panel. Use glue
and screws. Countersink screws into the backer panel.
Grille Panel
Lower Freezer Panel
Upper Freezer Panel
Installation Instructions
26
42” Models A B
1/4” Backer Panel 39-15/16” 10-3/4”
0.10” Spacer Panel 38-15/16” 9-3/4”
3/4” Overlay Panel 40-3/16” 11”
48” Models A B
1/4” Backer Panel 45-15/16” 10-3/4”
0.10” Spacer Panel 44-15/16” 9-3/4”
3/4” Overlay Panel 46-3/16” 11”
42” Models A B
1/4” Backer Panel 16-7/16” 35-1/8”
0.10” Spacer Panel 12-5/16” 33-11/16”
3/4” Overlay Panel 13-7/16” 34-15/16”
48” Models A B
1/4” Backer Panel 18-7/16” 35-1/8”
0.10” Spacer Panel 14-5/16” 33-11/16”
3/4” Overlay Panel 15-7/16” 34-15/16”
42” Models A B
1/4” Backer Panel 16-7/16” 17-13/16”
0.10” Spacer Panel 12-5/16” 16-3/8”
3/4” Overlay Panel 13-7/16” 17-5/8”
48” Models A B
1/4” Backer Panel 18-7/16” 17-13/16”
0.10” Spacer Panel 14-5/16” 16-3/8”
3/4” Overlay Panel 15-7/16” 17-5/8”
3-5/8"
15/16"
1/2"
1/2"
Spacer
Panel
Finished
Backer Panel
3-5/8"
1/2"
15/16"
1/2"
Spacer
Panel
Finished
Backer Panel
Upper Freezer Panel
Spacer Assembly
Lower Freezer Panel
Spacer Assembly
3
3
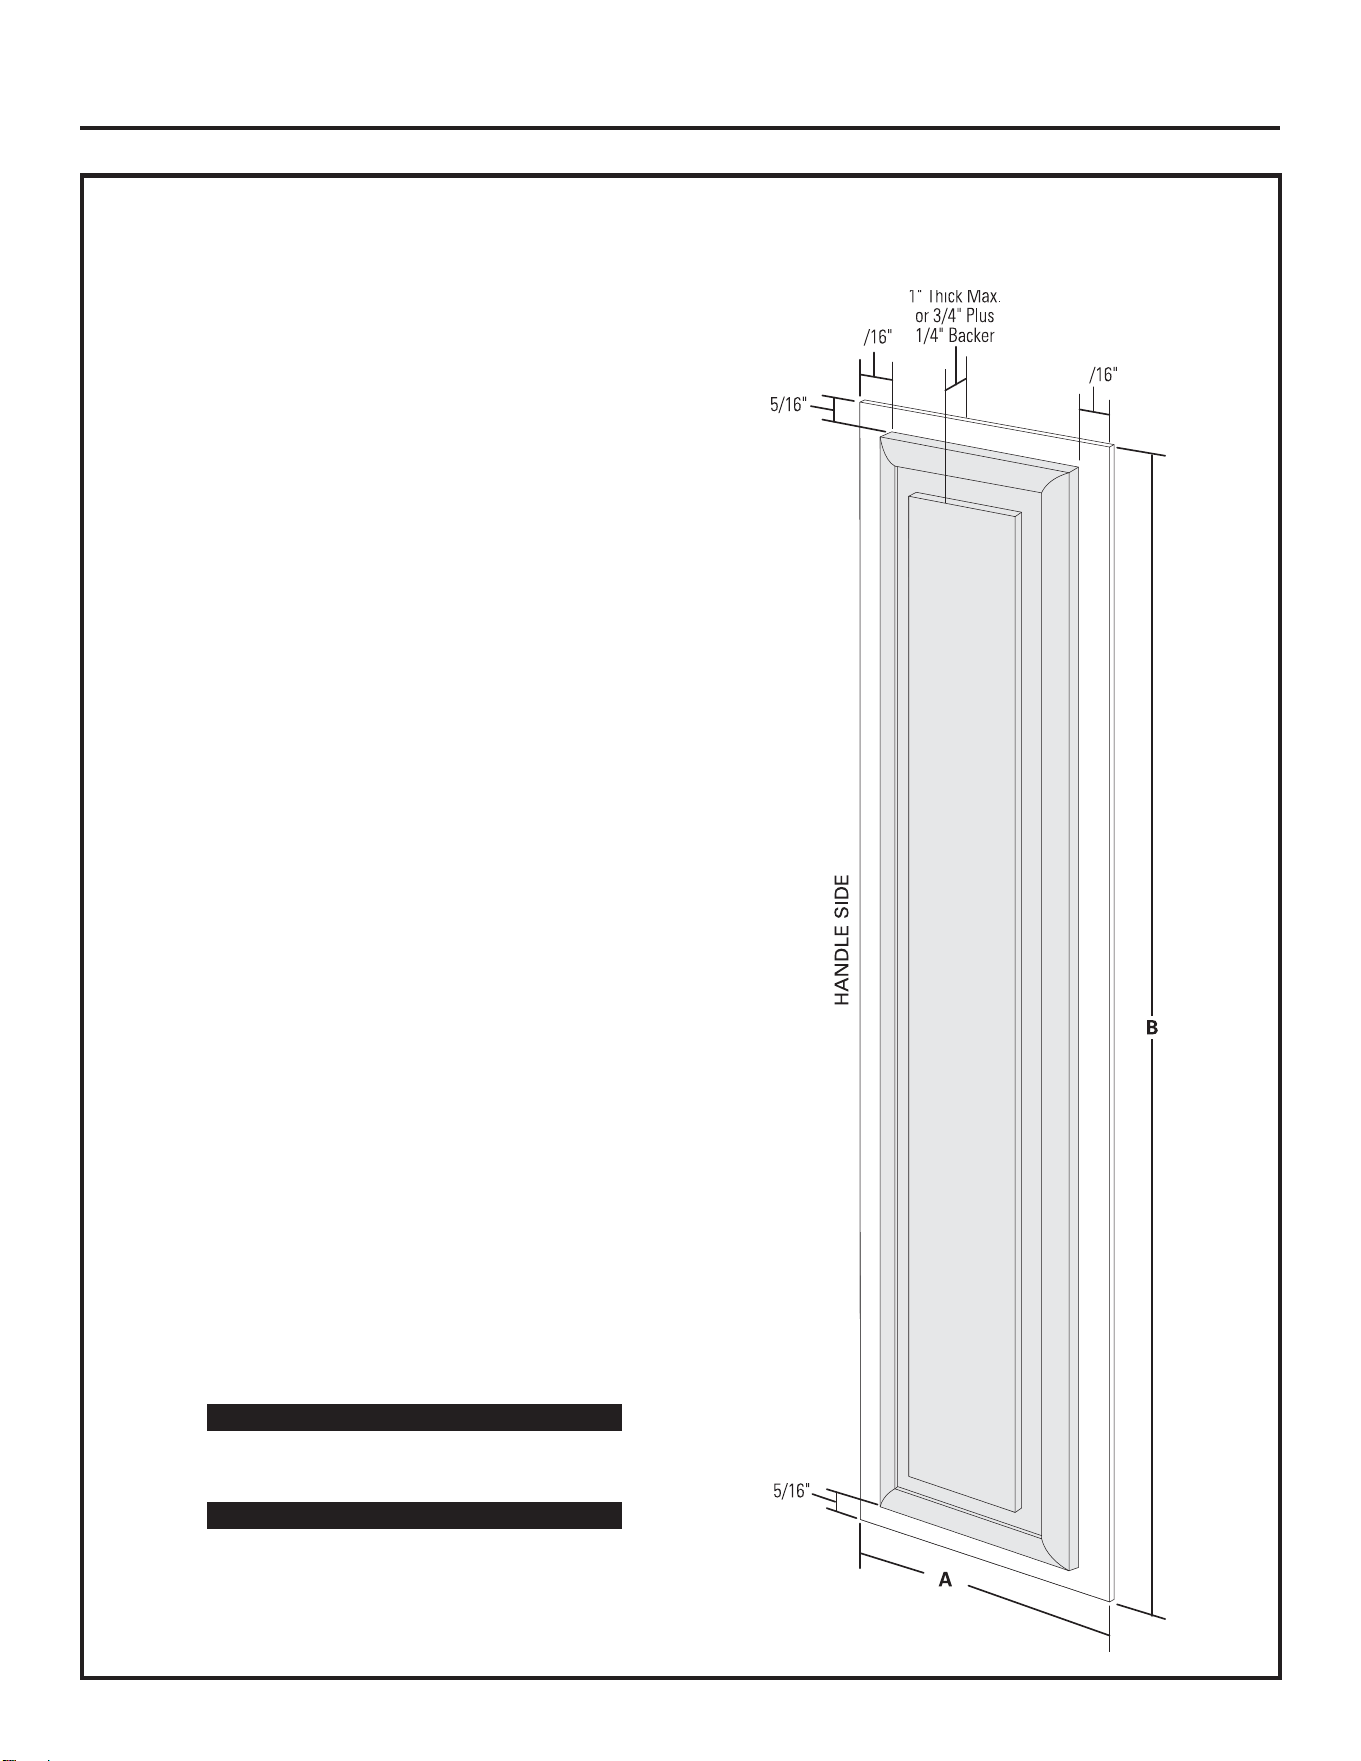
3/4” FRAMED CUSTOM WOOD PANELS WITH CUSTOM HANDLES
Secured to a 1/4” finished backer panel. This design provides a framed appearance.
Fresh Food Panel
Installation Instructions
27
42” Models A B
1/4” Backer Panel 22-5/16” 67-7/8”
3/4” Overlay Panel 21-15/16” 67-1/4”
48” Models A B
1/4” Backer Panel 26-7/16” 67-7/8”
3/4” Overlay Panel 26-1/16” 67-1/4”
3
3
3
3
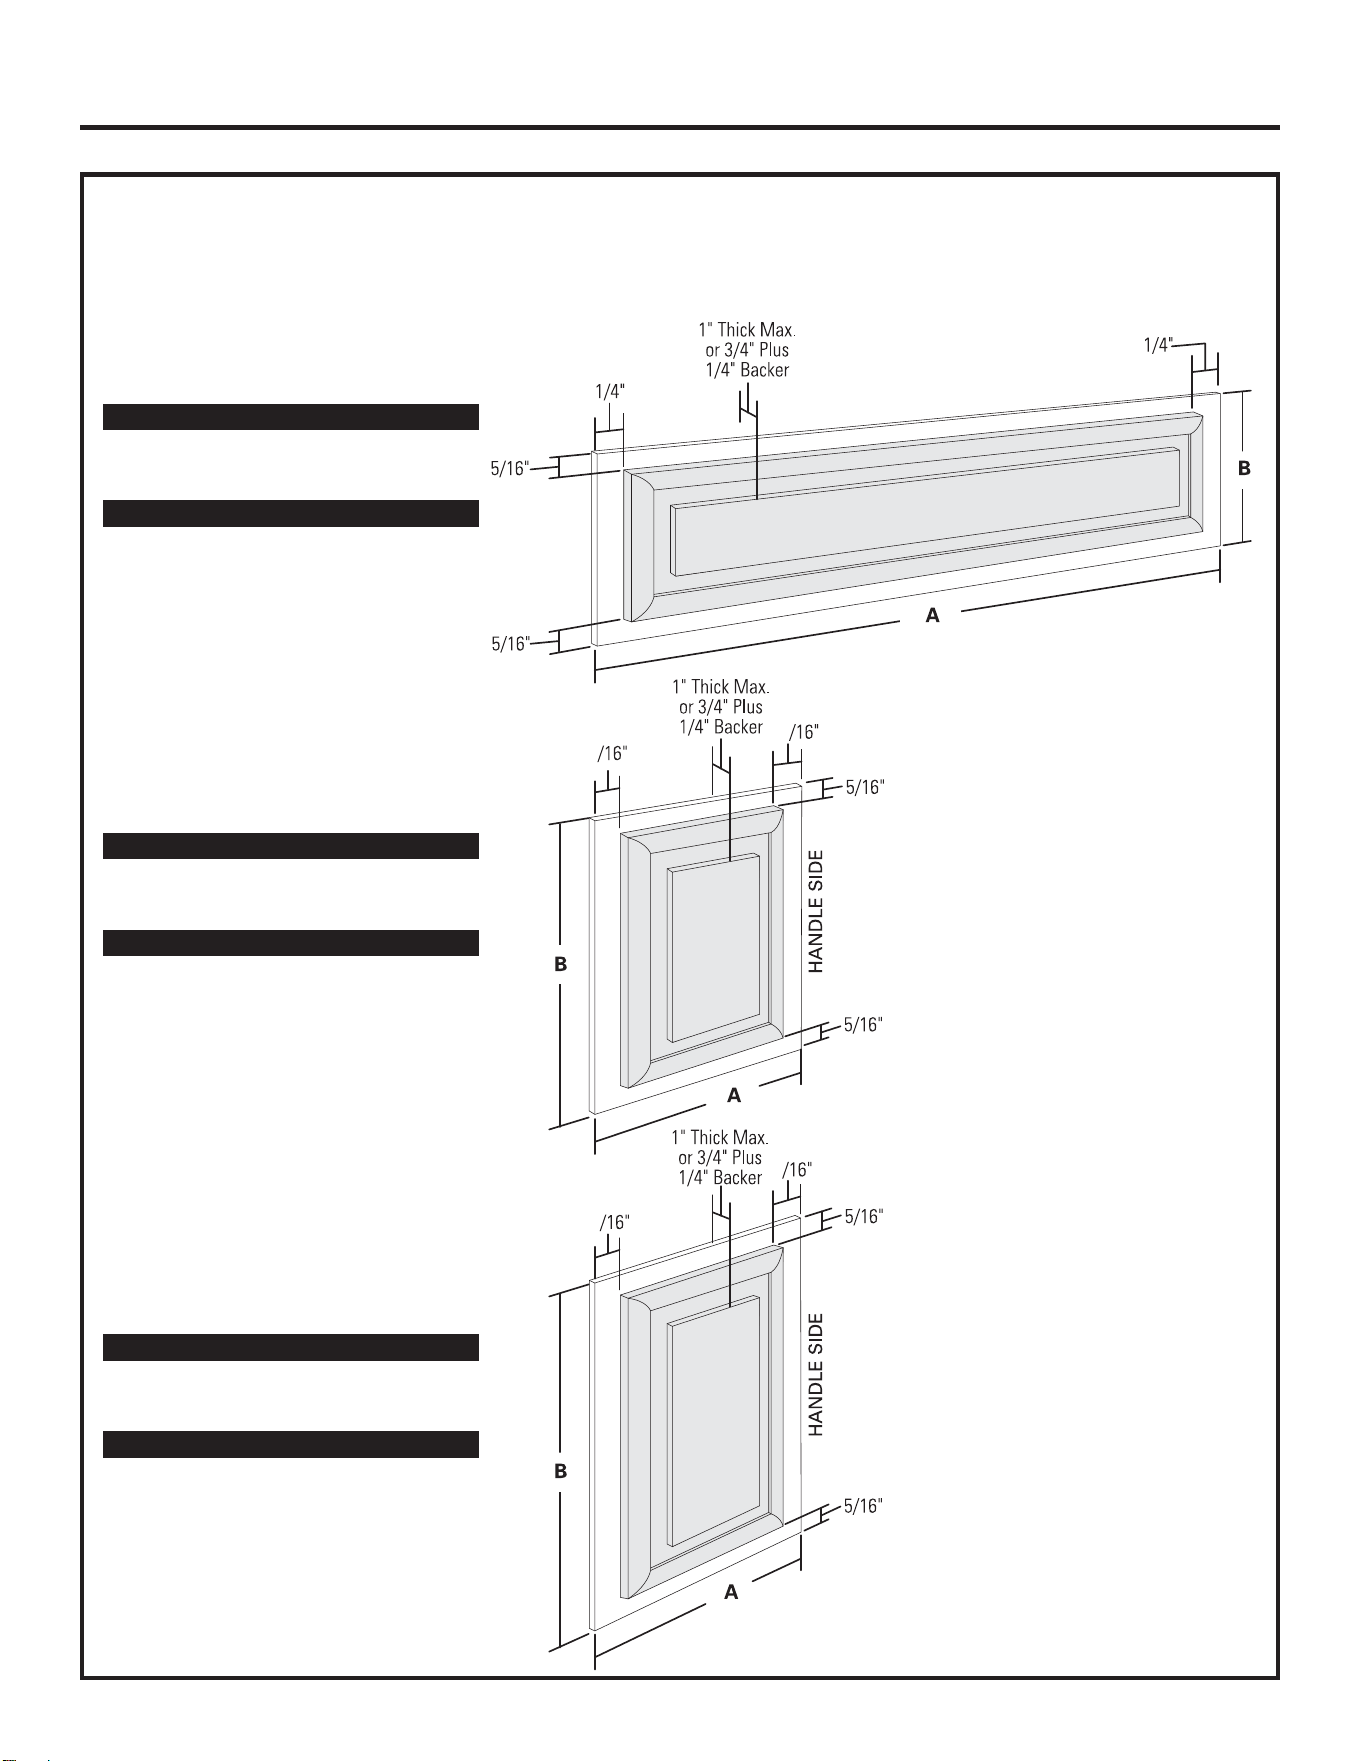
3/4” FRAMED CUSTOM WOOD PANELS WITH CUSTOM HANDLES
Secured to a 1/4” finished backer panel. This design provides a framed appearance.
Grille Panel
Upper Freezer Panel
Lower Freezer Panel
Installation Instructions
28
42” Models A B
1/4” Backer Panel 39-15/16” 10-3/4”
3/4” Overlay Panel 39-7/16” 10-1/8”
48” Models A B
1/4” Backer Panel 45-15/16” 10-3/4”
3/4” Overlay Panel 45-7/16” 10-1/8”
42” Models A B
1/4” Backer Panel 16-7/16” 17-13/16”
3/4” Overlay Panel 16-1/16” 17-3/16”
48” Models A B
1/4” Backer Panel 18-7/16” 17-13/16”
3/4” Overlay Panel 18-1/16” 17-3/16”
42” Models A B
1/4” Backer Panel 16-7/16” 35-1/8”
3/4” Overlay Panel 16-1/16” 34-1/2”
48” Models A B
1/4” Backer Panel 18-7/16” 35-1/8”
3/4” Overlay Panel 18-1/16” 34-1/2”
3/4” FULL-WIDTH OVERLAY CUSTOM PANELS WITH CUSTOM HANDLES
This panel design provides a nearly trimless appearance.
Assemble the spacer panel
onto the finished backer
panel. Allow 1/2” clearance
on all sides. Secure the
panels with glue. Be sure to
observe clearances shown
on all sides.
Secure the overlay
panel to the assembled
backer/spacer panel.
Use glue and screws.
Countersink screws
into the backer panel.
42” Models A B
1/4” Backer Panel 22-5/16” 67-7/8”
0.10” Spacer Panel 21-13/16” 66-7/8”
3/4” Overlay Panel 22-5/16” 68-1/8”
48” Models A B
1/4” Backer Panel 26-7/16” 67-7/8”
0.10” Spacer Panel 25-13/16” 66-7/8”
3/4” Overlay Panel 26-7/16” 68-1/8”
Fresh Food Panel
Spacer
Panel
Finished
Backer
Panel
Installation Instructions
29
3/4” FULL-WIDTH OVERLAY CUSTOM PANELS WITH CUSTOM HANDLES
This panel design provides a nearly trimless appearance.
Assemble the spacer panel onto the backer panel. Allow 1/2” clearance on all four sides of the grille spacer
panel. Allow 1/2” clearance on the top, hinge side and handle side, and 15/16” on the bottom of the upper
freezer door panel. Allow 15/16” on the top and 1/2” clearance on the bottom, hinge side and handle side
of the lower freezer door panel. Secure the panels with glue. Be sure to observe clearances on all sides.
Secure the appearance panel to the assembled backer/spacer panel. Use glue
and screws. Countersink screws into the backer panel.
Grille Panel
Lower Freezer Panel
Upper Freezer Panel
Installation Instructions
30
42” Models A B
1/4” Backer Panel 39-15/16” 10-3/4”
0.10” Spacer Panel 38-15/16” 9-3/4”
3/4” Overlay Panel 40-3/16” 11”
48” Models A B
1/4” Backer Panel 45-15/16” 10-3/4”
0.10” Spacer Panel 44-15/16” 9-3/4”
3/4” Overlay Panel 46-3/16” 11”
42” Models A B
1/4” Backer Panel 16-7/16” 35-1/8”
0.10” Spacer Panel 15-7/16” 33-11/16”
3/4” Overlay Panel 16-7/16” 34-15/16”
48” Models A B
1/4” Backer Panel 18-7/16” 35-1/8”
0.10” Spacer Panel 17-7/16” 33-11/16”
3/4” Overlay Panel 18-7/16” 34-15/16”
42” Models A B
1/4” Backer Panel 16-7/16” 17-13/16”
0.10” Spacer Panel 15-7/16” 16-3/8”
3/4” Overlay Panel 16-7/16” 17-5/8”
48” Models A B
1/4” Backer Panel 18-7/16” 17-13/16”
0.10” Spacer Panel 17-7/16” 16-3/8”
3/4” Overlay Panel 18-7/16” 17-5/8”
Spacer
Panel
Finished
Backer
Panel
Spacer
Panel
Finished
Backer
Panel
Upper Freezer Panel
Spacer Assembly
Lower Freezer Panel
Spacer Assembly
5/16"
A
B
5/16"
A
B
A
B
GROUNDING THE REFRIGERATOR
,03257$17³3OHDVHUHDGFDUHIXOO\
FOR PERSONAL SAFETY, THIS APPLIANCE MUST
BE PROPERLY GROUNDED.
The power supply cord of this appliance is
equipped with a three-prong (grounding) plug
which mates with a standard three-prong
(grounding) wall receptacle to minimize the
possibility of electric shock hazard from this
appliance.
Have the wall outlet and circuit checked by a
qualified electrician to make sure the outlet is
properly grounded.
Where a standard 2-prong wall outlet
is encountered, it is your personal responsibility
and obligation to have it replaced with a properly
grounded 3-prong wall outlet.
DO NOT, UNDER ANY
CIRCUMSTANCES, CUT
OR REMOVE THE THIRD
(GROUND) PRONG
FROM THE POWER CORD.
DO NOT USE AN ADAPTER
PLUG TO CONNECT THE REFRIGERATOR
TO A 2-PRONG OUTLET.
DO NOT USE AN EXTENSION CORD WITH
THIS APPLIANCE.
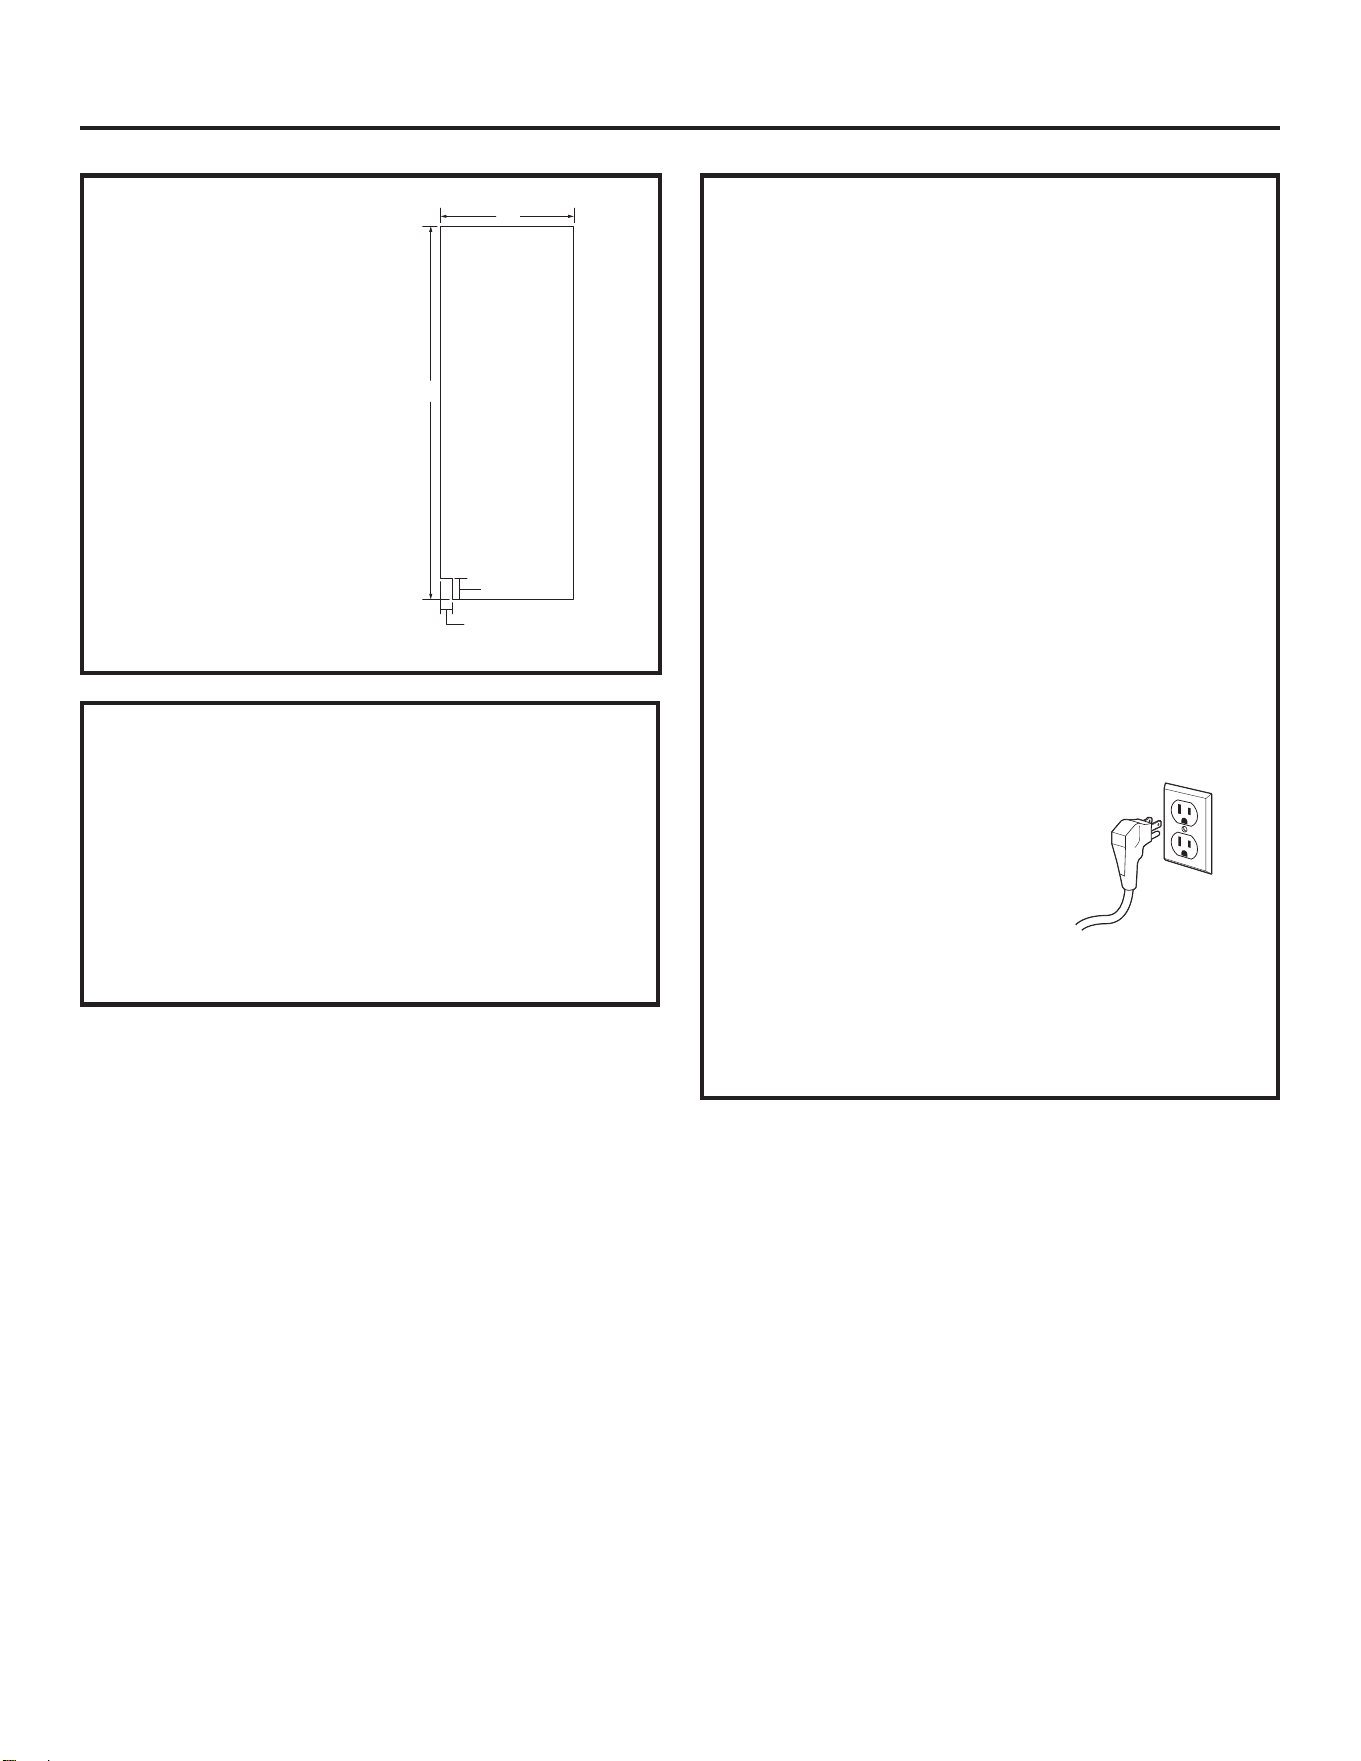
SIDE PANELS
Side panels (not
supplied) must be used
whenever the sides of
the refrigerator will be
exposed. The 1/4” side
panels will slip into the
side case trim. Order
side panels from your
cabinet manufacturer.
* Depending on
installation height.
FLOORING
For proper installation, this refrigerator must be
placed on a level surface of hard material that is
at the same height as the rest of the flooring. This
surface should be strong enough to support a fully
loaded refrigerator, or approximately 1500 lb.
NOTE: Protect the finish of the flooring. Cut a large
section of the cardboard carton and place under
the refrigerator where you are working.
24"
*84"
*3" to 4"
1-1/2"
Installation Instructions
31
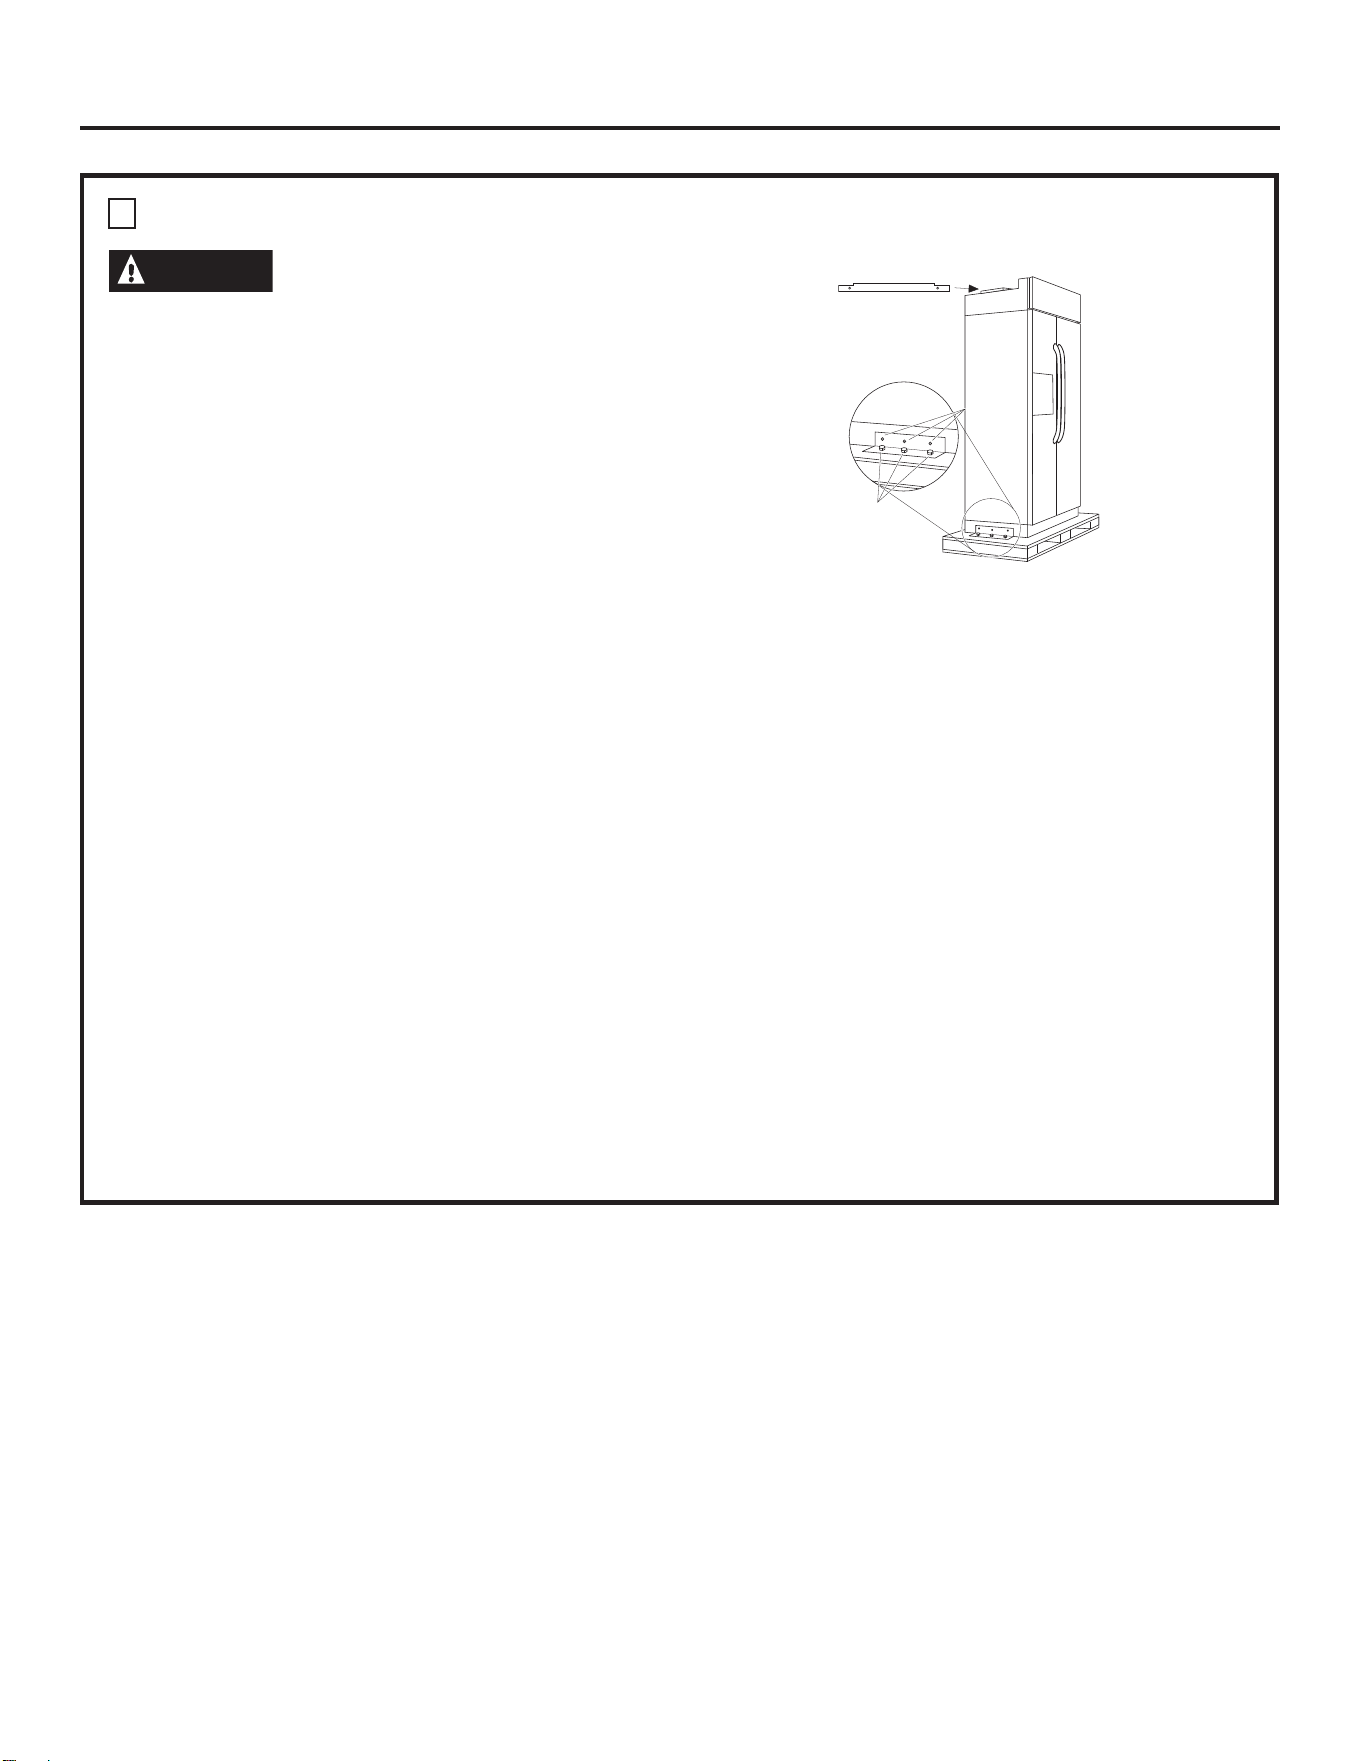
1 REMOVE PACKAGING
WARNING
Refrigerator is Top-Heavy³EH
careful when moving. When using an appliance
dolly, handle from Freezer side only.
• Carefully cut banding at the top and bottom;
remove outer carton.
• Slide out rear corner posts (2).
• Slide carton off top of cabinet.
NOTE: DO NOT LAY CABINET DOWN IN ORDER
TO REMOVE SKID!
• The unit is secured to the skid with six 7/16”
bolts and six 1/2” nuts.
• Remove all six 7/16” bolts that secure metal
brackets to the refrigerator.
• Remove the three 1/2” nuts and washers from
the Freezer side.
• Remove nut from rear wood block on Freezer
side.
• Tilt unit up on Freezer side toward Fresh Food
side.
• Push bolts down, remove metal bracket from
Freezer side. Remove wood block from Freezer
side.
• Slide the appliance dolly underneath the
Freezer side.
• Using corner posts (2 on front corners) to
prevent damage, secure unit to
appliance dolly.
NOTE: If corner posts are too long, cut the posts to
a shorter length.
• Lift the unit off the skid with the appliance dolly.
• Remove toekick taped to the top of the unit.
• Set toekick aside for final installation.
NOTE: DO NOT ATTEMPT TO ROLL OR DRAG UNTIL
UNIT IS OFF SKID.
NOTE: MAKE SURE THE WATER LINE IS CLEAR OF
$33/,$1&('2//<72$92,''$0$*(
Metal
Bracket
1/2" Nuts
Bolts
Toekick Taped to
Top of Unit
Installation Instructions
32
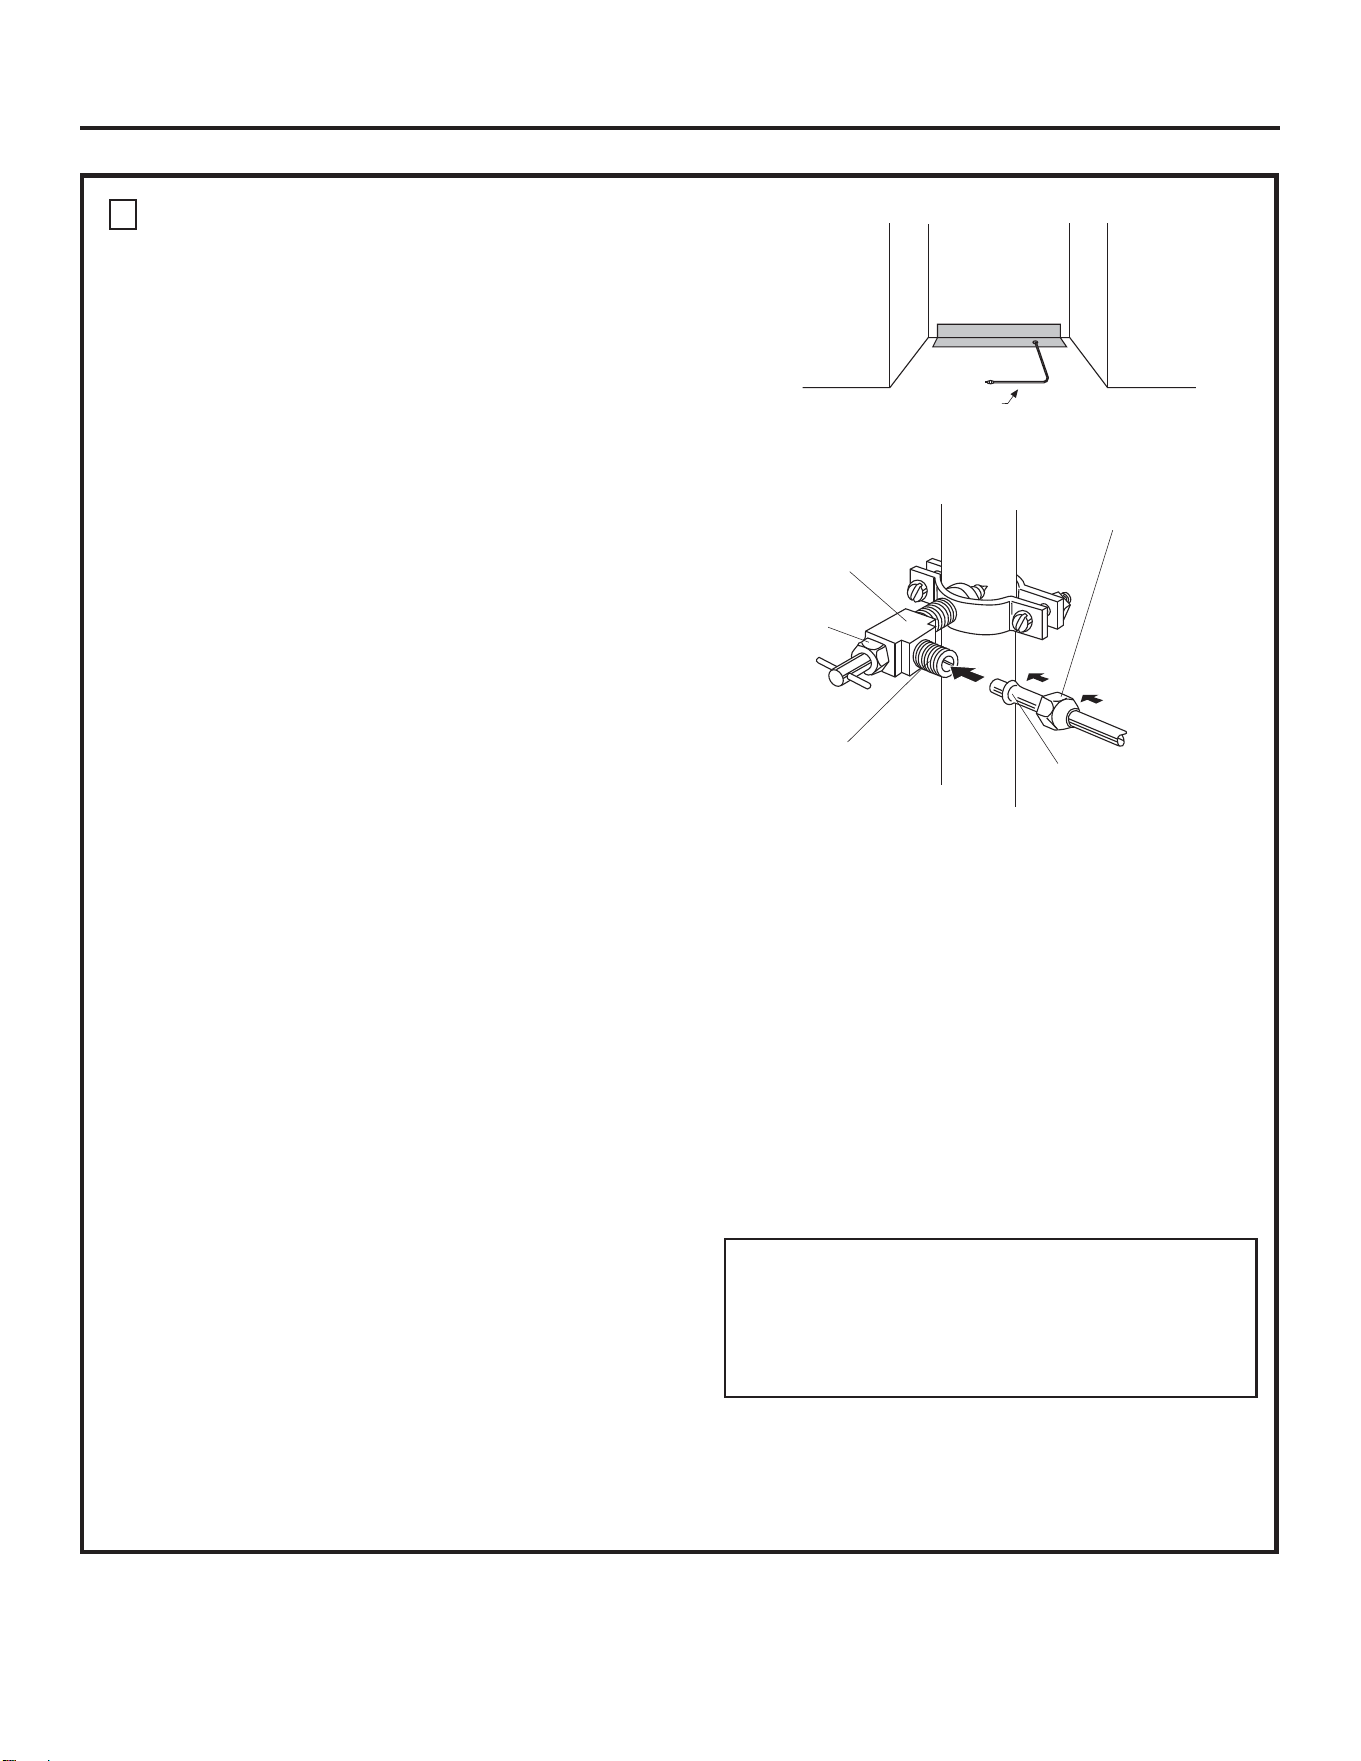
2 INSTALL WATER LINE
• A cold water supply is required for automatic
icemaker operation. The water pressure must
be between 40 and 120 psi.
• Route 1/4” O.D. copper tubing or GE
SmartConnect
™
tubing between cold water
line and the water connection location.
• Tubing should be long enough to extend to the
front of the refrigerator. Allow enough tubing to
accommodate bend leading into the water line
connection.
NOTE: The only GE approved plastic tubing is
supplied in the GE SmartConnect
™
Refrigerator
Tubing kits. Do not use any other plastic water
supply line; the line is under pressure at all times.
Certain types of plastic may crack or rupture with
age and cause water damage to your home.
GE SmartConnect
™
refrigerator tubing kits are
available in the following lengths:
2” (0.6m) WX08X10002
6” (1.8m) WX08X10006
15” (4.6m) WX08X10015
25” (7.6m) WX08X10025
Shut off the main water supply.
Turn on the nearest faucet long enough
to purge all the water from the line.
• Install a shutoff valve between the icemaker
water valve and cold water pipe in a basement
or cabinet. The shutoff valve should be located
where it will be easily accessible.
NOTE: It is best to install the valve into a vertical
water pipe. If you install the valve into a horizontal
water pipe, make the connection at the top
or side to avoid drawing off any sediment
from the water pipe.
• Drill a 1/4” hole in the water pipe.
• Fasten the shutoff valve to the pipe with pipe
clamp.
• Tighten the clamp screws until the sealing
washer begins to swell. Do not OVERTIGHTEN.
• Place a compression nut and ferrule (sleeve) for
copper tubing onto the end of the tubing and
connect it to the shutoff valve. Make sure the
tubing is fully inserted into the valve and ferrule
is tightened.
• For plastic tubing from a GE SmartConnect
™
refrigerator tubing kit, insert the molded end of
the tubing into the shutoff valve and tighten the
compression nut until it is hand tight, and then
tighten an additional turn with a wrench.
• Turn on the main water supply and
flush debris. Run about a quart of water
through the tubing into a bucket. Shut
off water supply at the shutoff valve.
NOTE: Saddle type shutoff valves are included in
many water supply kits. Before purchasing, make
sure a saddle type valve complies with your local
plumbing codes.
Floor
Copper Tubing,
or GE SmartConnect
™
Tubing
Saddle Type
Shutoff Valve
Compression Nut
Ferrule
(Sleeve)
Outlet Valve
Packing Nut
NOTE: Commonwealth of Massachusetts
Plumbing Codes 248CMR must be adhered to.
Saddle valves are illegal and use is not permitted
in Massachusetts. Consult with your licensed
plumber.
Installation Instructions
33
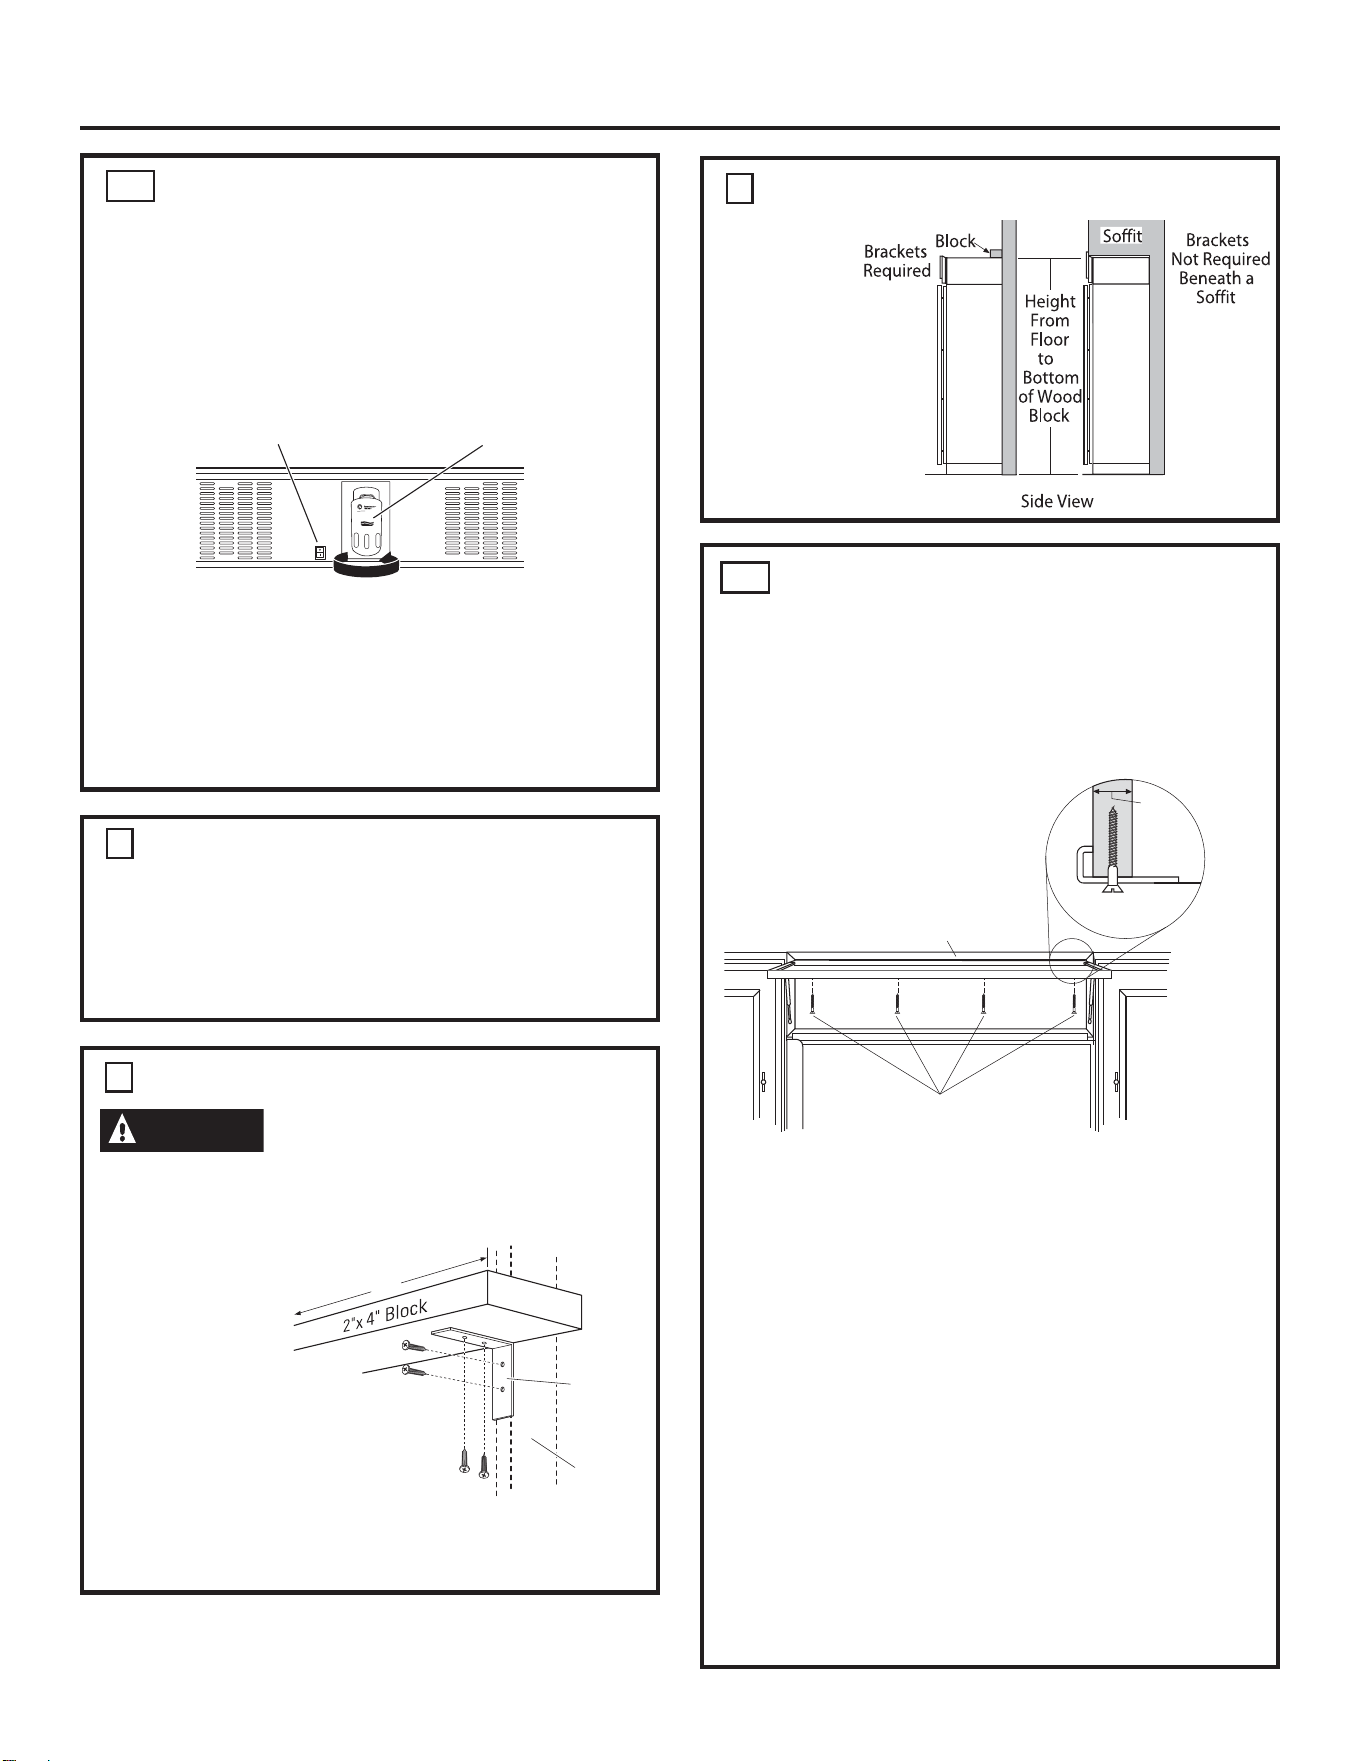
4A ALTERNATE ANTI-TIP
PRECAUTIONS
The refrigerator must be secured to prevent tipping.
The anti-tip brackets cannot be used on metal wall
studs. Use this Alternate Procedure to secure the
refrigerator against tip-over whenever metal wall
studs are encountered and there is not soffit.
• Adjust height of refrigerator to match
installation cutout opening 83-1/2” to 84-1/2”.
The refrigerator must be level and plumb with
cabinets. The top case trim at the front is 2-1/8”
higher than the rear and will overlap upper
cabinets or cabinet trim.
• Open grille panel to access the top case trim.
• Use a 3/16” bit to drill 4 evenly spaced clearance
holes through the metal top case trim.
• Use a 1/16” bit to drill pilot holes through the
metal clearance holes and into wood soffit. The
holes should be centered in the soffit or a 3/4”
minimum wood brace. The brace spanning the
enclosure must be securely fastened to cabinets
on both sides.
• Install four 1-1/2” drywall screws into the pilot
holes.
2A WATER LINE INSTALLATION WITH
A REVERSE OSMOSIS SYSTEM
SKIP THIS STEP WHEN NOT USING AN RO SYSTEM
NOTE: If the water supply to the refrigerator
is from a Reverse Osmosis Water System, use
WKHUHIULJHUDWRU·VILOWHUE\SDVVSOXJ8VLQJWKH
UHIULJHUDWRU·VZDWHUILOWUDWLRQFDUWULGJHZLWK
the RO filter can result in hollow ice cubes.
• Open the top grille to view the filtration cartridge.
Rotate the filtration cartridge counterclockwise
until removed.
• Insert filter bypass plug. Rotate the filter bypass
plug clockwise until tightly secured in place.
4
INSTALL ANTI-TIP BRACKETS
WARNING
The refrigerator is Top-Heavy and must be secured
to prevent the possibility of tipping forward.
•
Cut a 2” x 4” wood block 36” long,
and secure the block
to the mounting
brackets
provided, using
#12 or #14
wood screws.
•
Secure the brackets
with wood block
to the back wall so
that it is 82” (or the rear
installation height) from the finished floor. Use
#12 or #14 wood screws.
4
INSTALL ANTI-TIP BRACKETS (cont.)
•
Screws
must
penetrate
at least 1”
into vertical
wall studs.
3 INSTALL SIDE PANELS
SKIP THIS STEP WHEN NOT USING SIDE PANELS
If you are using 1/4” side panels, they should be
inserted into the case trim. Fasten the panels to the
refrigerator with the 3M Dual Lock adhesive strips
before setting refrigerator in place.
Install (4) 1-1/2” Drywall Screws
Through Trim and Into Soffit
or 3/4” Min. Wood Brace
Top Case Trim
Side View
Top Case Trim
19
mm
(3/4 “)
min.
ANTI-TIP PRECAUTIONS
Positioned
Anti-Tip
Bracket
Wall Stud
(Behind
Drywall)
Wood Screws
Mounted into
Vertical
Wood Studs
36"
Installation Instructions
34
Master Power Switch
Water Filter
Rotate Counterclockwise To Remove
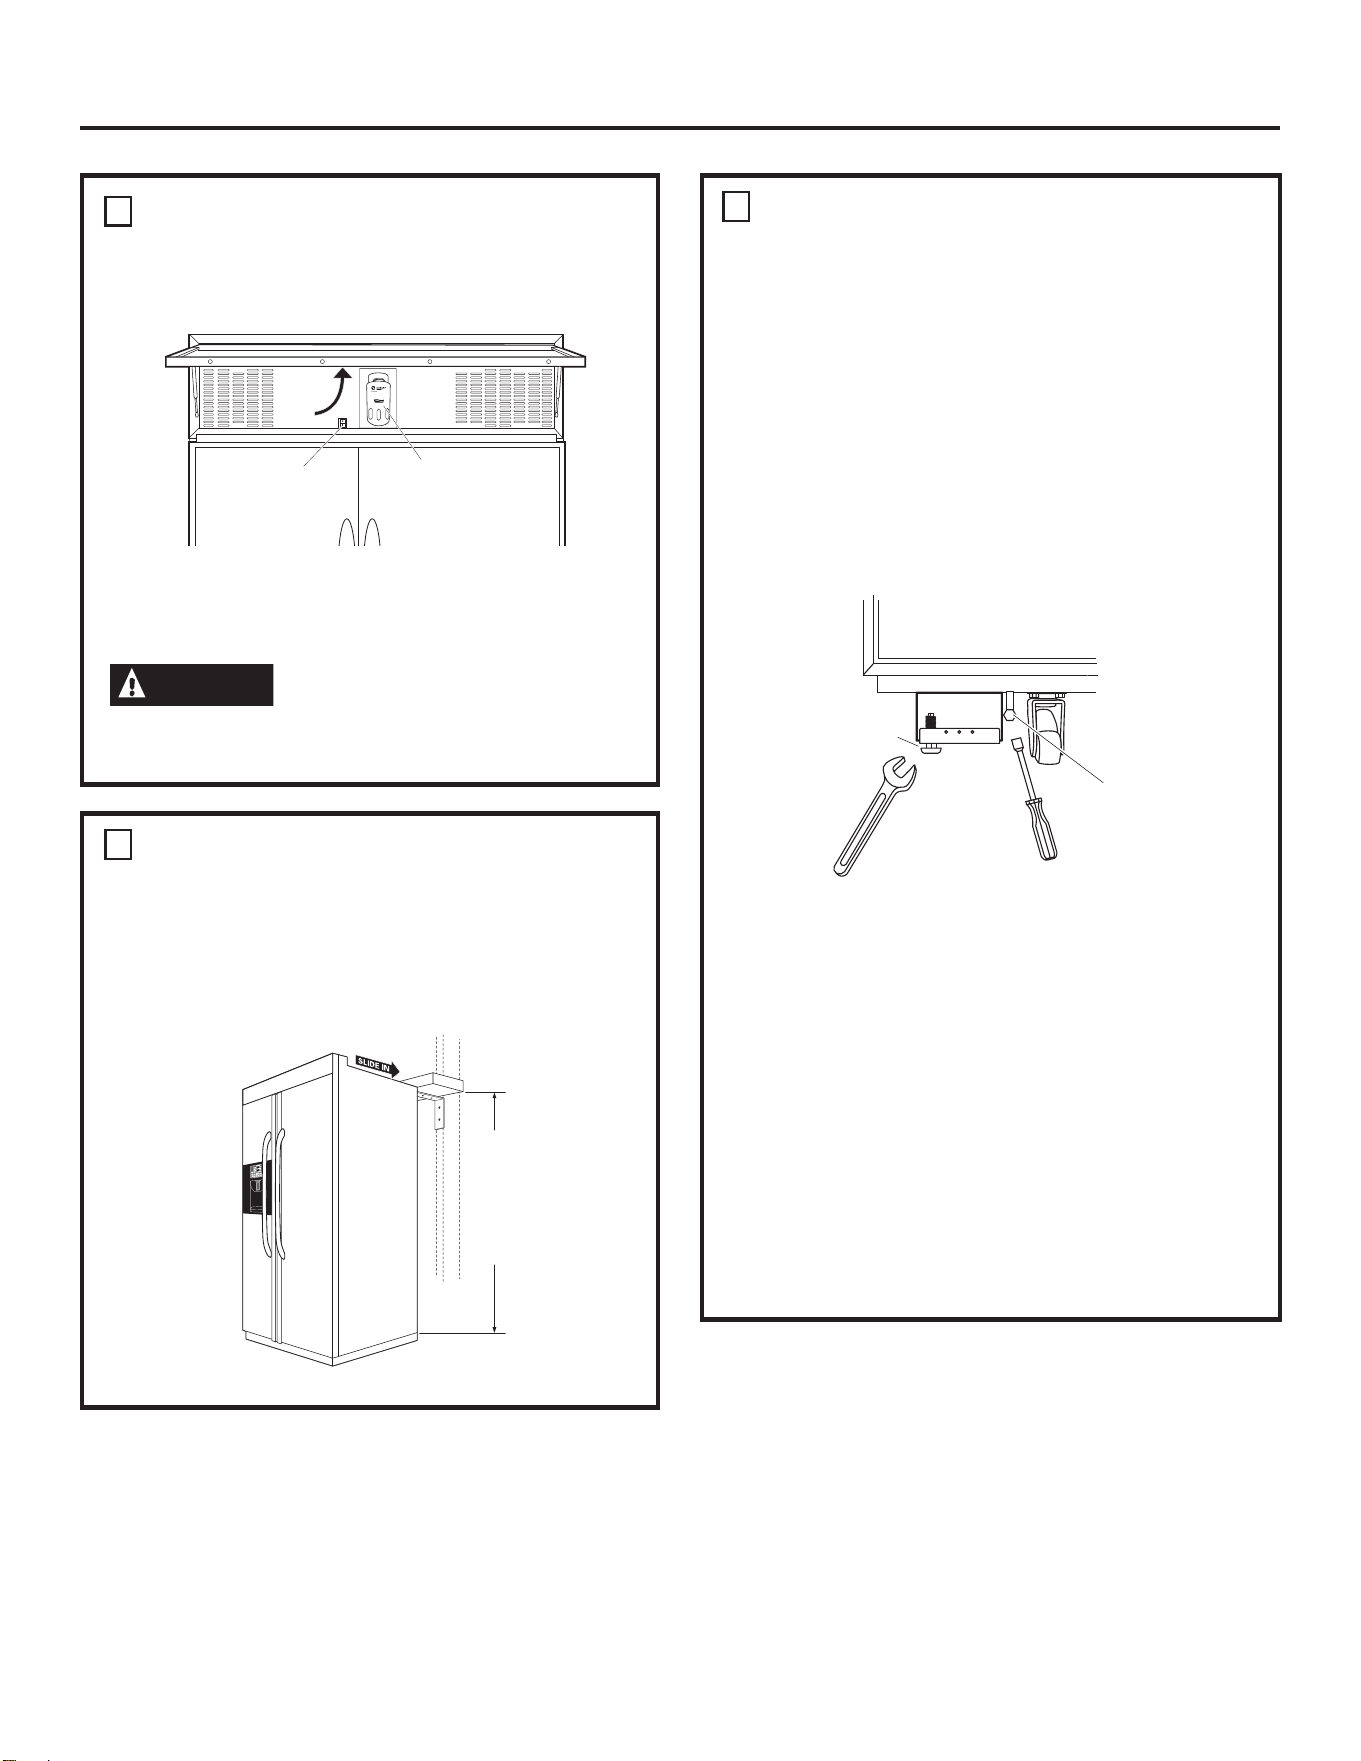
7 LEVEL REFRIGERATOR
All models have 4-point leveling. The front and back
are supported by leveling legs. Both are accessible
from the front of the refrigerator.
• To level the back of the refrigerator, turn the 1/2”
hex nut located above the front wheels. Turn
clockwise to raise or counterclockwise to lower
the refrigerator.
• For front leveling, use a 7/16” open-end wrench.
• Adjust height of refrigerator to match
installation cutout opening 83-1/2” to 84-1/2”.
The refrigerator should be level and plumb with
cabinets.
IMPORTANT NOTE: The refrigerator must be level.
If it is not, the doors may not align evenly at
the top. See Step 16.
NOTE:
The rear leveling legs and front leveling legs
are limited to a maximum height adjustment
of 1”. If the installation requires more than 84-1/2”
height, the installer should elevate the refrigerator
on a sheet of plywood or runners. Cabinet trim
could be added across the top of the opening
to shorten the opening. If you attempt to raise
the refrigerator more than 1”, you will damage
the front and rear leveling legs.
5 CONNECT POWER
• Connect refrigerator power cord plug to
a properly grounded receptacle. Set the
Master Power switch to the I (ON) position.
• Check to make sure power to refrigerator
is on by opening refrigerator door to see
if interior lights are on.
CAUTION
• After power has been established, turn the
Master Power switch to the O (OFF) position.
6 MOVE INTO INSTALLATION SPACE
• Slide the unit into the installation space.
• Place excess slack in the power cord on top
of the refrigerator.
• Use care to ensure the power cord is not
pinched behind the unit.
Raise
Grille
Panel
Water Filter
Master
Power Switch
Hex Nut Adjusts
Rear Leveling Legs
Leveling Leg
Height
from
Floor to
Bottom
of Wood
Block
82"
Installation Instructions
35
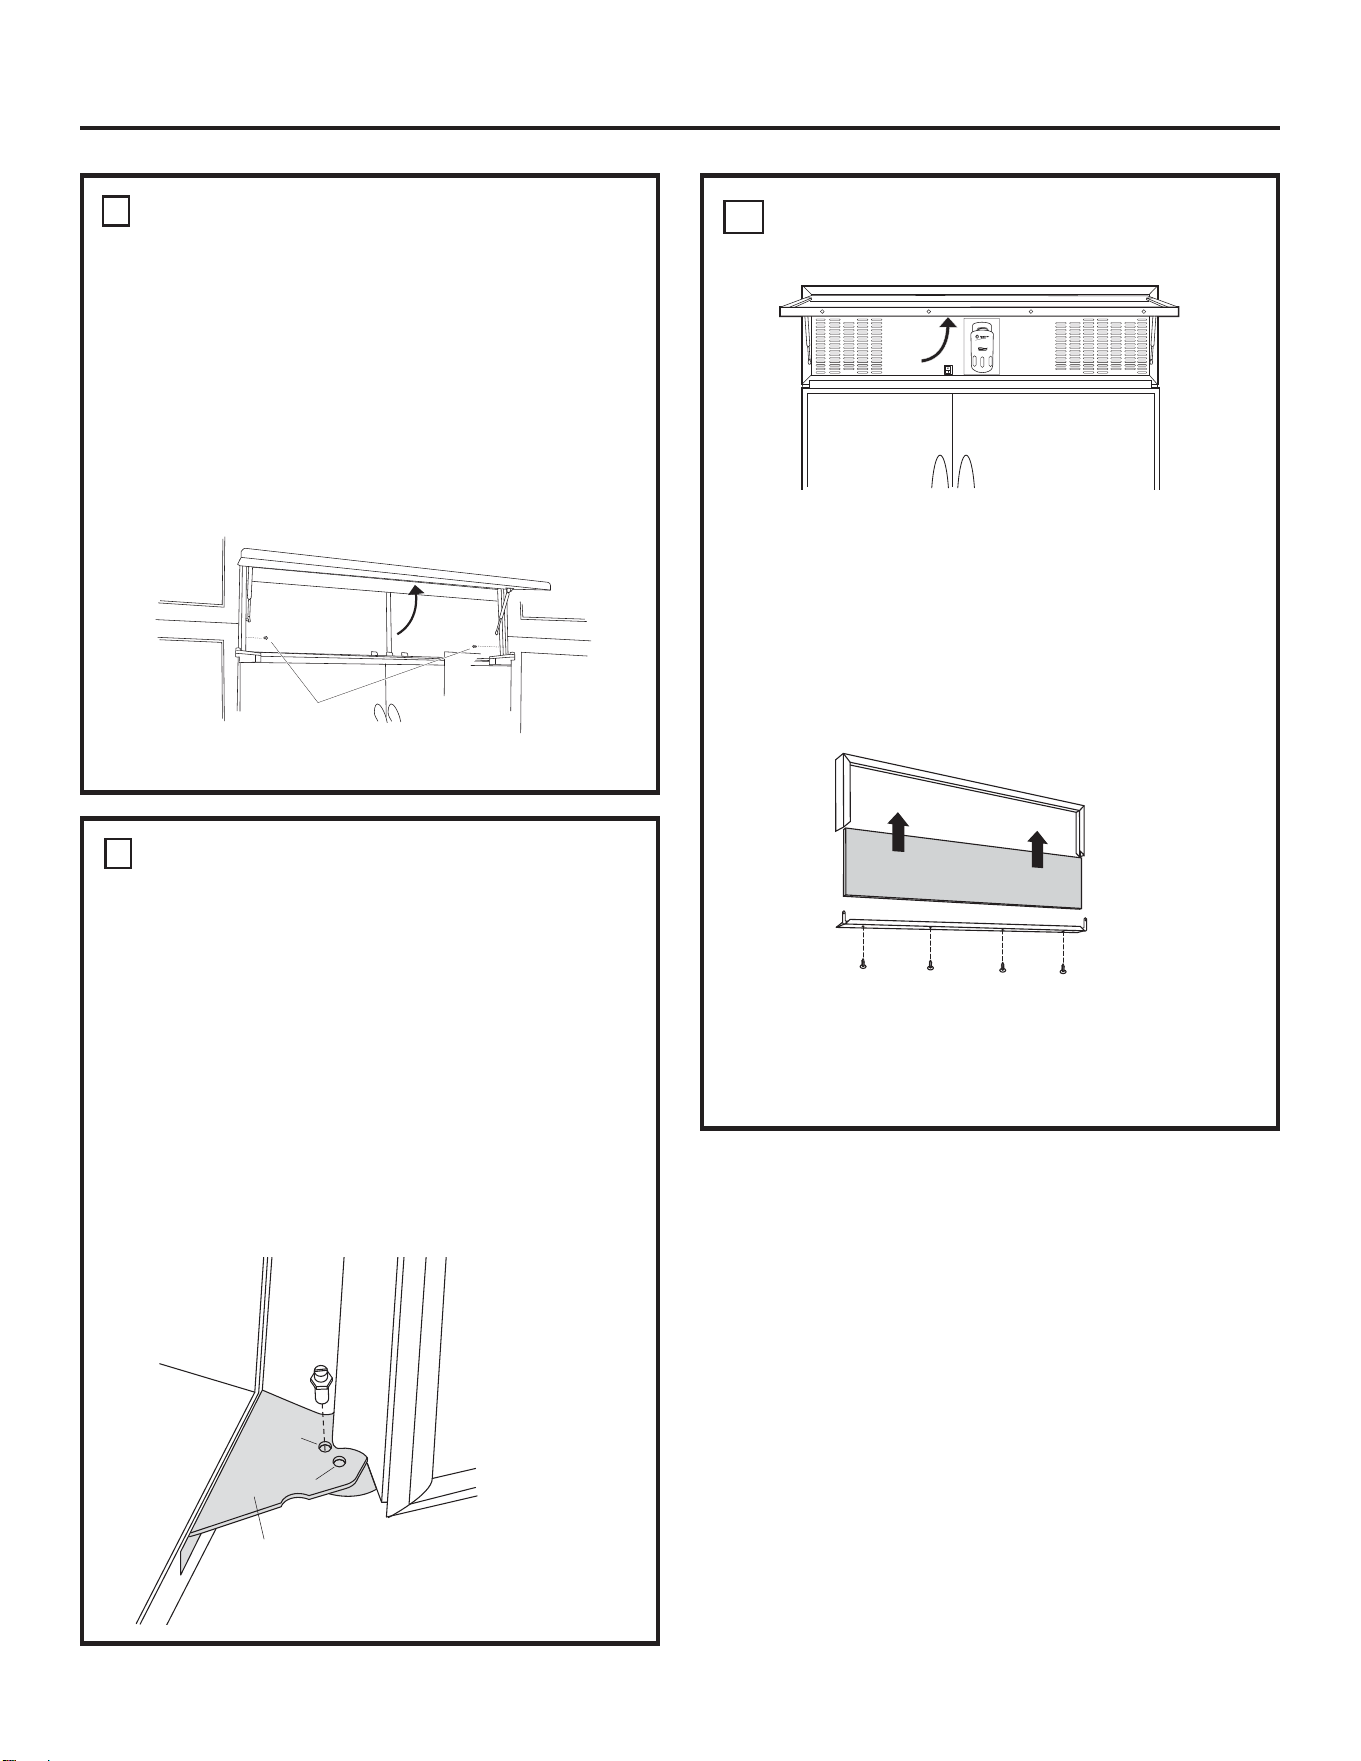
10 INSTALL GRILLE PANEL
• Raise the grille panel to the stop position.
• Remove 4 screws on bottom trim; retain
all screws.
• Remove bottom trim.
• NOTE: Stainless steel and acrylic panels are
covered with a protective film. Remove the film
before installing the panel.
• Slide panel over the metal backer panel and
under the trim.
• If necessary, tap with a wood block until panel
slips under the top trim piece.
• Reassemble bottom trim. Tighten screws.
Raise
Grille
Panel
8 SECURE REFRIGERATOR
TO CABINETS
Whenever possible, perform this step for anti-tip
security or when anti-tip brackets cannot be used.
The refrigerator must be secured to prevent
tipping.
• Raise the grille panel to access case trim.
• Drill a hole in the trim and drive a screw through
the trim into the adjacent cabinet.
• Follow the same procedure on the opposite side.
Drive Screws
Through Case Trim Into
Adjacent Cabinets
Raise Grille Panel
to Stop Position
9 ADJUST DOOR SWING
NOTE: This refrigerator has a 2-position door stop.
When space does not allow the door to swing open
fully to 130°, you may change the door swing to
a 90° opening.
SKIP THIS STEP IF DOOR OPENING IS
SATISFACTORY FOR YOUR INSTALLATION
SITUATION.
• Open the door to view the bottom hinge.
Note the door stop pin location. The pin is factory
installed in the 130° position.
• Partially close the door. From above, use
a flat-head screwdriver to unscrew the door
stop pin and reinstall into the 90° position.
90
130
Hinge
Door
Interior
Installation Instructions
36

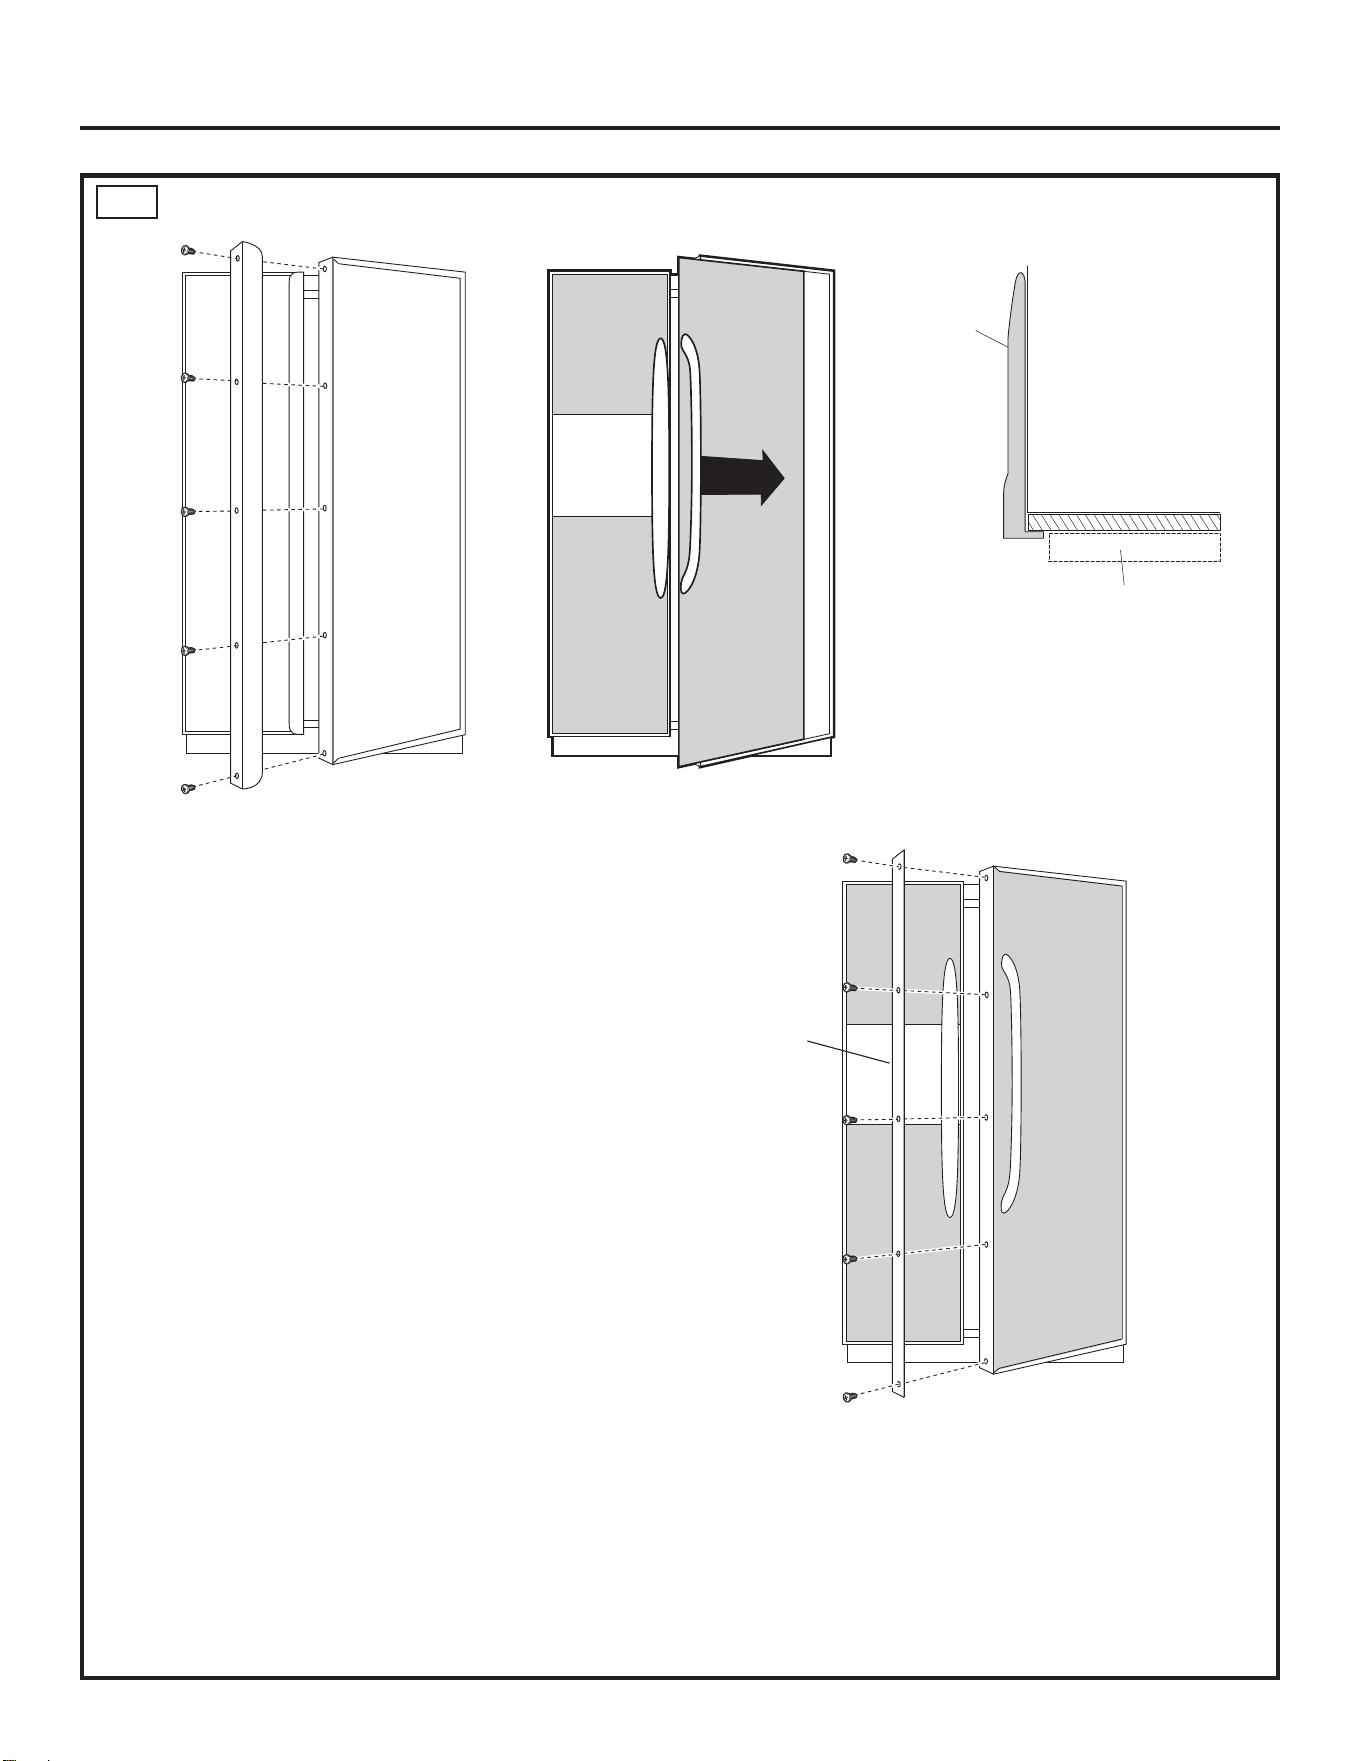
11 INSTALL DOOR PANELS
WITH PRE-INSTALLED HANDLES
Install 1/4” Decorative Panels:
• Remove Handles
Open door to 90°. Remove 5 Phillips head
screws from the Fresh Food and Freezer door
handles; retain all screws. Lift off door handles.
• Install Door Panels
NOTE: Carefully push the Fresh Food panel in until
it slides into the slot behind the trim. Gently push
to opposite side. Repeat procedure for upper and
lower Freezer panels.
• Reinstall Handles
Reinstall Fresh Food door handle with
the original 5 Phillips head screws. Tighten.
Repeat for Freezer door handle.
NOTE: Ensure that the edge of the handle does
not pinch the door gasket.
• 3/4” Custom Decorative Panels
If you choose to install custom wood panels,
they must be cut to dimensions shown on
pages 23–30. The panels will slide into the
frame on the doors and grille.
IMPORTANT NOTE: Maximum custom panel
thickness must not exceed 1-1/8” thick and 70
lbs for the Fresh Food door, 45 lbs total for the
Freezer door and 15 lbs for the Grille panel.
Installation Instructions
37
Fresh Food
Refrigerator
Door
Handle
3/4" Custom Panel
if Required
11A INSTALL DOOR PANELS
Install 1/4” Decorative Panels:
• Remove Pre-Installed Handles
Open door to 90°. Remove 5 Phillips head screws
from the Fresh Food and Freezer door handles;
retain all screws. Lift off pre-installed door handles.
• Install Door Panels
NOTE: Carefully push the Fresh Food panel in until
it slides into the slot behind the trim. Gently push to
opposite side. Repeat procedure for upper and lower
Freezer panels.
• Install Custom Trim
Install the custom trim with the original
5 Phillips head screws. Tighten. Repeat
for Freezer door.
NOTE: Ensure that the edge of the custom trim
does not pinch the door gasket.
• 3/4” Custom Decorative Panels
If you choose to install custom wood panels, they
must be cut to dimensions shown
on pages 23–30. The panels will slide
into the frame on the doors and grille.
If using custom handles, please see Door Handles
on page 20.
IMPORTANT NOTE: Maximum custom panel
thickness must not exceed 1-1/8” thick and 70 lbs for
the Fresh Food door, 45 lbs total for the Freezer door
and 15 lbs for the Grille panel.
Installation Instructions
38
Fresh Food
Refrigerator
Door
Handle
3/4" Custom Panel
if Required
Custom Trim

13 TURN ON THE POWER
• Set the Master Power switch to the I (ON)
position.
• Check to make sure power to refrigerator is on
by opening refrigerator door to see if interior
lights are on.
• The temperature controls are preset at 37°F
for the Fresh Food section and 0°F for the
Freezer section.
• Allow 24 hours to stabilize before making
adjustments.
Raise
Grille
Panel
Water Filter
Master
Power Switch
12 CONNECT WATER SUPPLY
Check to make sure that Master Power switch
is in the O (OFF) position.
• Locate and bring GE Smart Connect
™
tubing
to the front of the cabinet.
• Turn the water on to flush debris from line.
Run about a quart of water through tubing
into a bucket, then shut off water.
Copper Tubing
• Slip a 1/4” nut and ferrule onto end
of copper tubing. Insert tube into the union fitting
on the unit and tighten nut to union.
• Turn on the water to check for leaks.
GE SmartConnect
™
Tubing
• Insert the molded end of the tubing
into the refrigerator connection. Tighten
the compression nut until it is just hand tight.
• Tighten one additional turn with a wrench.
Overtightening can cause leaks.
• Turn on the water to check for leaks.
Note: Make sure excess tubing length does not
interfere with toekick installation.
Refrigerator
Water Supply
House
Water Supply
Installation Instructions
39
16 DOOR ALIGNMENT
• Stand back from the refrigerator to inspect
the door alignment.
• Shipping or the addition of heavy door panels
may have caused the doors to move slightly
out of alignment.
• If necessary, the Fresh Food door
may be adjusted up or down to align
with the Freezer door.
• Loosen the leveling mechanism.
• Use a 7/32” wrench to adjust the hinge pin
as shown.
• Tighten the leveling mechanism.
IMPORTANT NOTE: After the unit has been leveled,
if the fresh food door is higher than the freezer
door, adjust the front right leveling leg lower
to align the doors and, if required, raise the left
leveling leg to level the unit side to side.
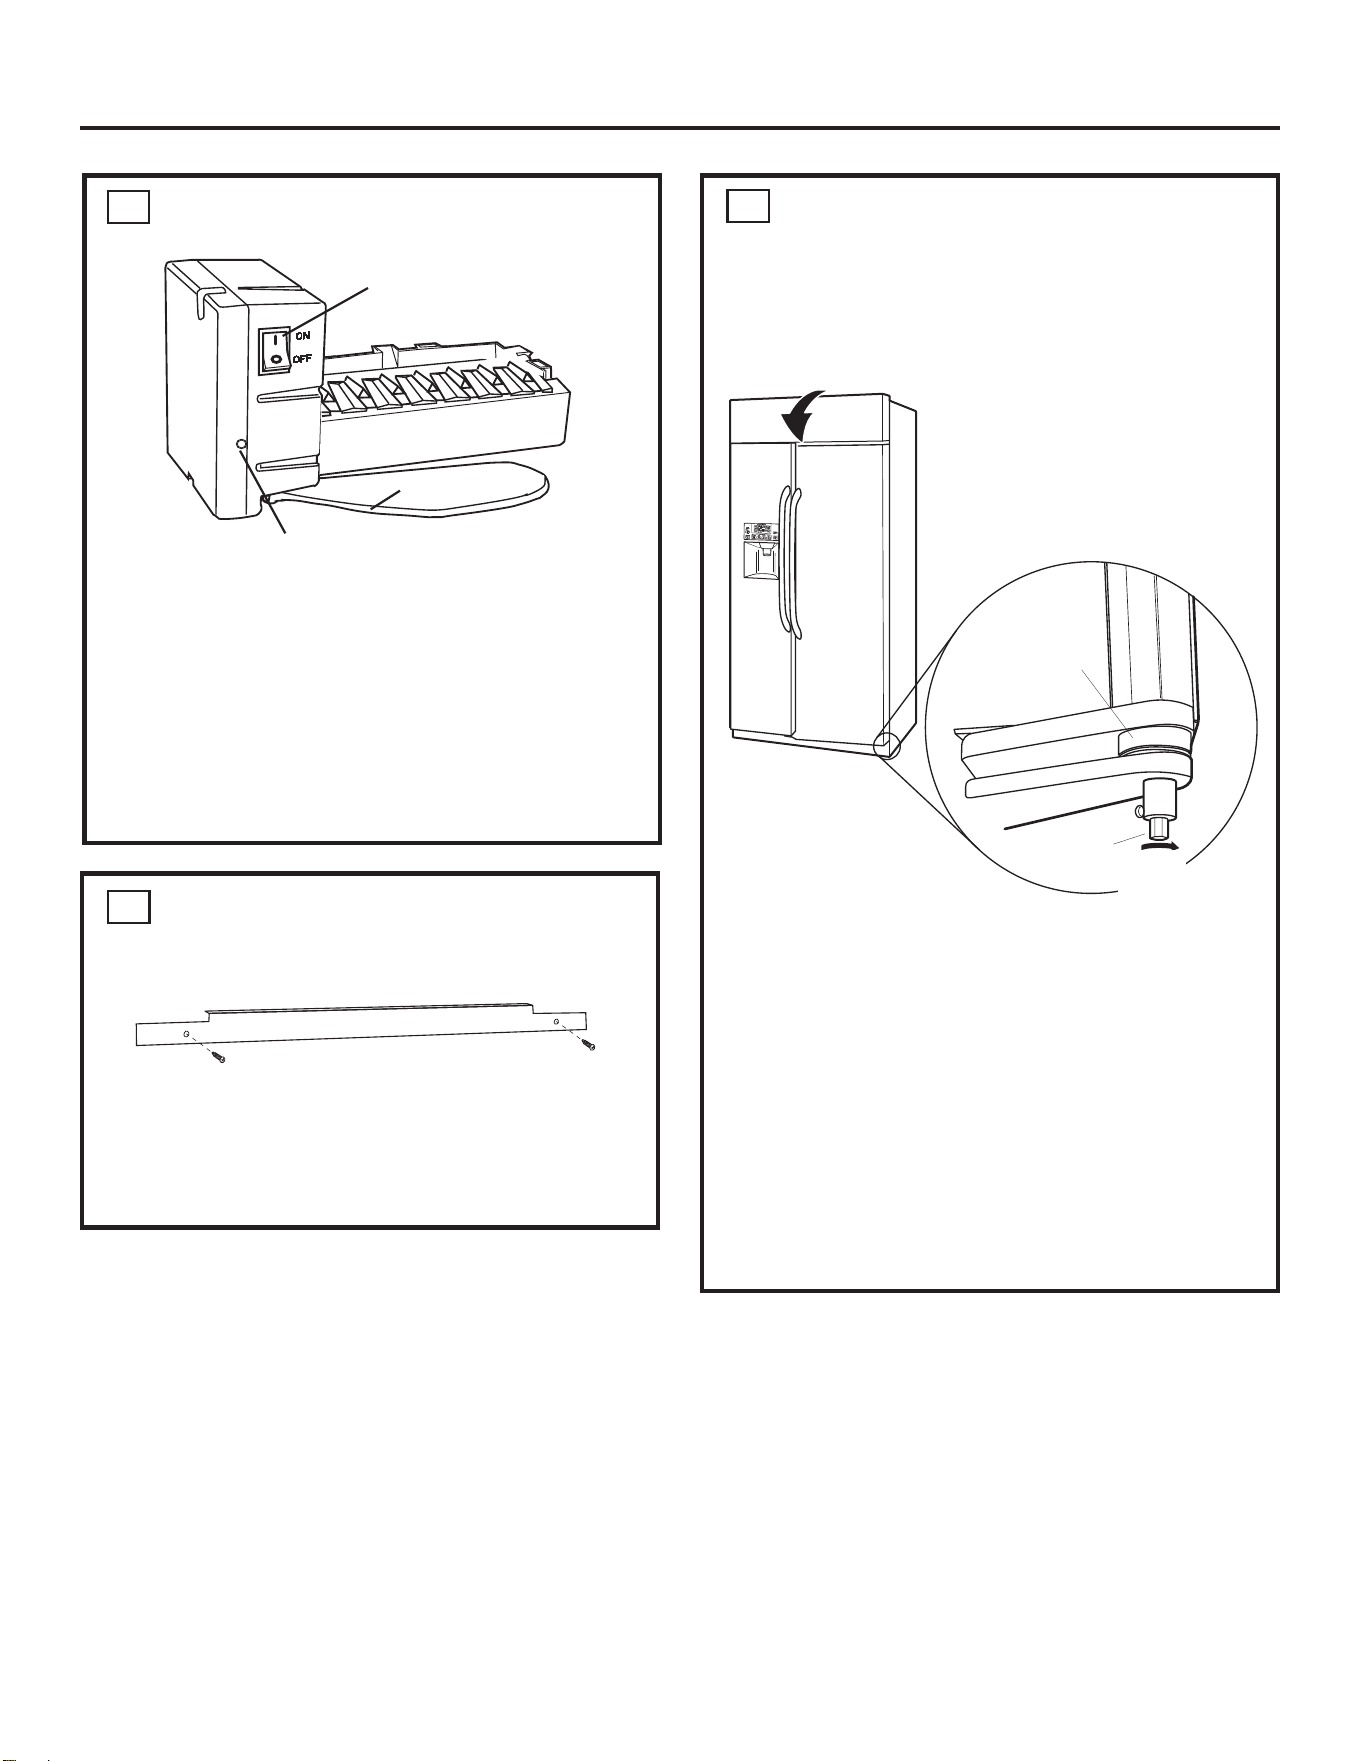
14 START ICE MAKER
• Flip the switch to I (ON). The icemaker will begin
operation automatically.
• Make sure nothing interferes with the sweep
of the feeler arm.
• Discard the first full bucket of ice cubes.
• To turn the icemaker off, set the switch to
O (OFF).
15 INSTALL TOEKICK
• Locate the supplied toekick (shipped taped
to the top of the refrigerator). Install with
2 screws
provided.
• The vented toekick must remain unobstructed for
proper air flow.
Supplied Toekick
Bushing
Door Hinge
Case Hinge
7/32" Wrench
Raise
Clockwise
Installation Instructions
40
Feeler Arm
Green Power Light
Power Switch
41
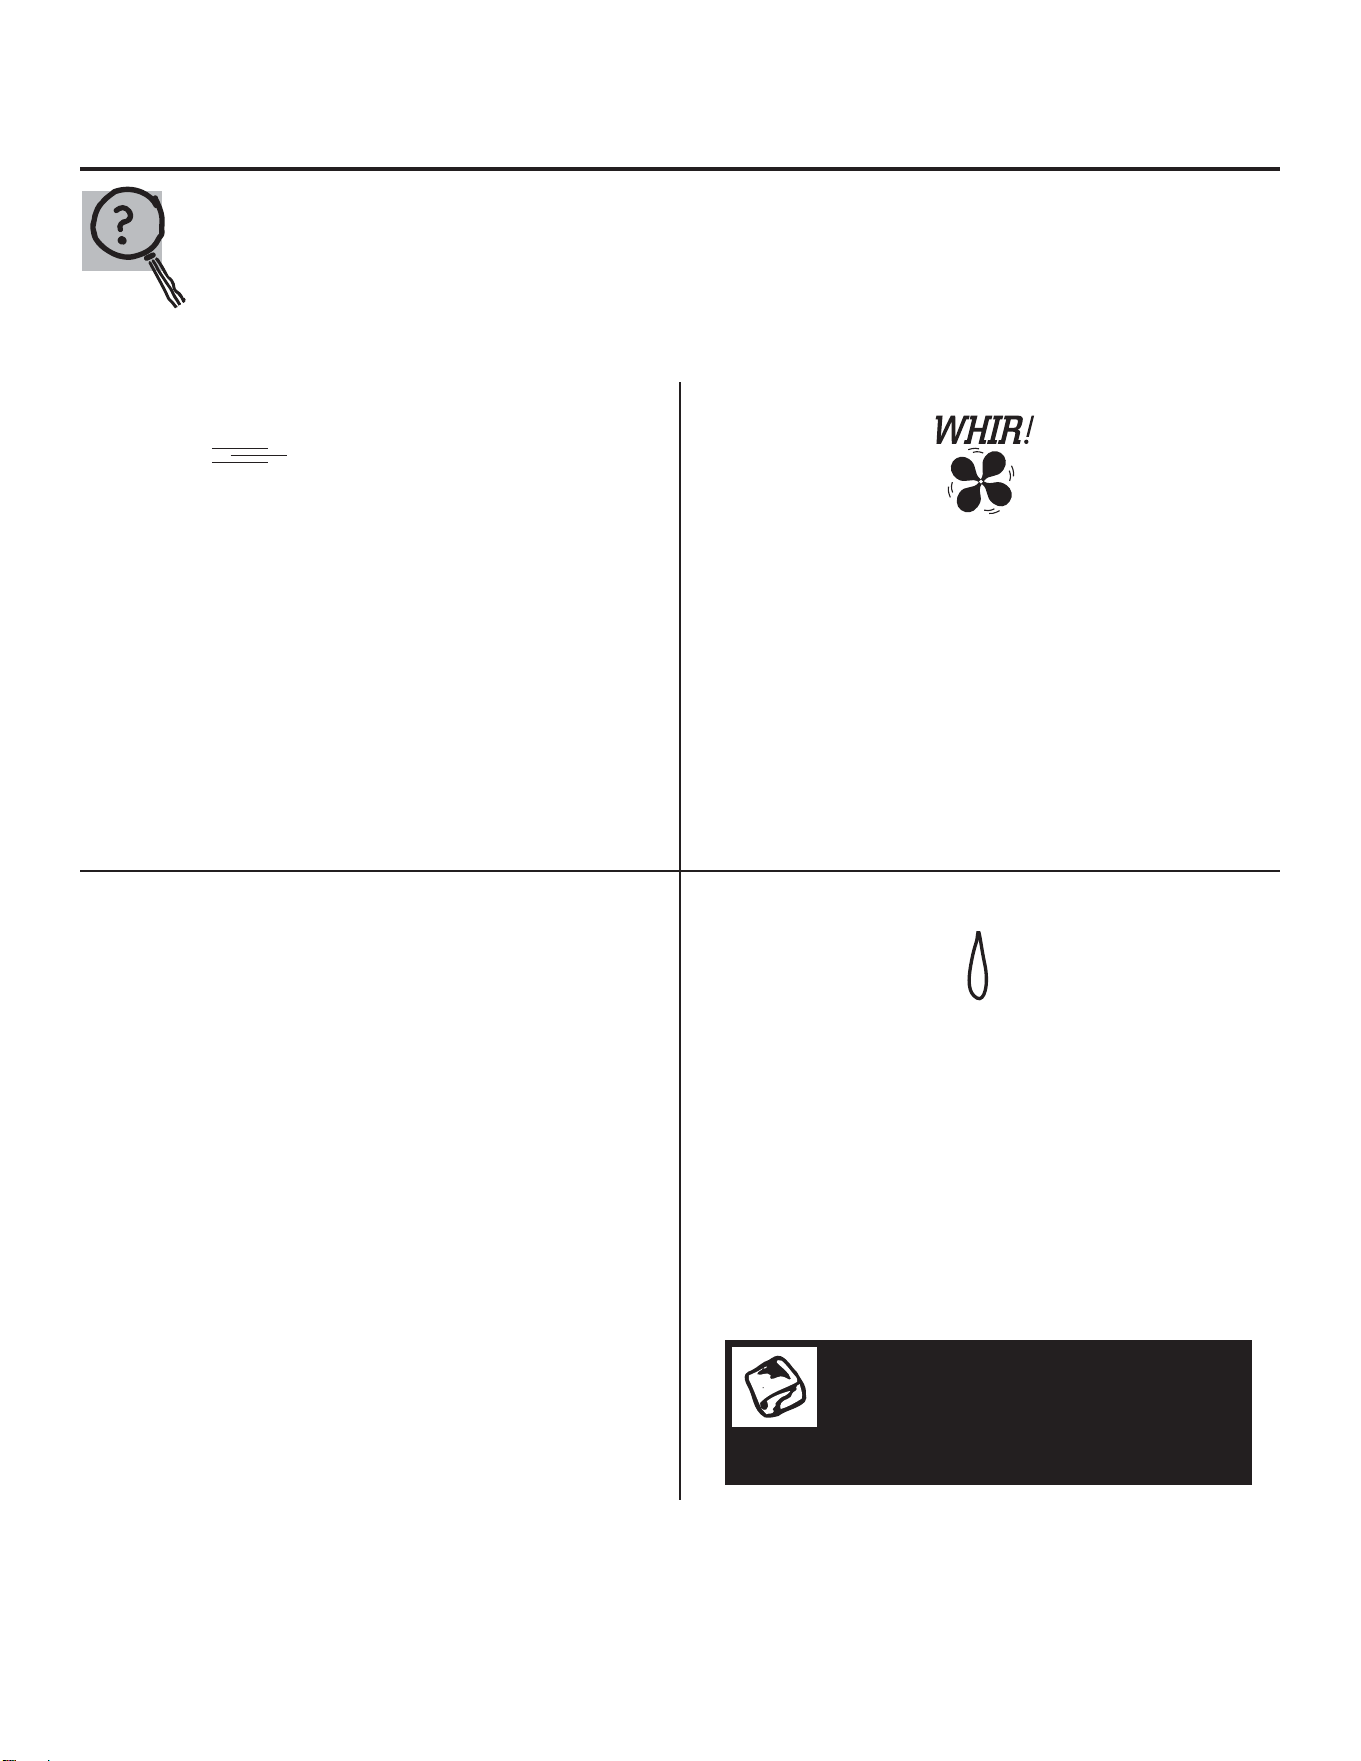
Normal operating sounds.
GEAppliances.com
Newer refrigerators sound different from older refrigerators.
Modern refrigerators have more features and use newer
technology.
HUMMM...
WHOOSH...
The new high efficiency compressor may run faster and
longer than your old refrigerator and you may hear a high-
pitched hum or pulsating sound while
it is operating.
<RXPD\KHDUDZKRRVKLQJVRXQGZKHQWKHGRRUVFORVH
This is due to pressure equalizing within
the refrigerator.
<RXPD\KHDUWKH
fans spinning at high speeds.
This happens when the refrigerator is first plugged in,
when the doors are opened frequently or when a large
amount of food is added to the refrigerator or freezer
compartments. The fans are helping to maintain the
correct temperatures.
If either door is open for over 3 minutes, you may hear the
fans come on in order to cool the light bulbs.
The fans change speeds in order to provide optimal
cooling and energy savings.
CLICKS, POPS,
CRACKS and CHIRPS
<RXPD\KHDUFUDFNLQJRUSRSSLQJVRXQGVZKHQWKH
refrigerator is first plugged in. This happens as the
refrigerator cools to the correct temperature.
The compressor may cause a clicking or chirping sound
when attempting to restart (this could take
up to 5 minutes).
The electronic control board may cause a clicking sound
when relays activate to control refrigerator components.
Expansion and contraction of cooling coils during and
after defrost can cause a cracking or popping sound.
After an icemaking cycle, you may hear the ice cubes
dropping into the ice bucket.
WATER SOUNDS
The flow of refrigerant through the freezer cooling
coils may make a gurgling noise like boiling water.
Water dropping on the defrost heater can cause
a sizzling, popping or buzzing sound during the
defrost cycle.
A water dripping noise may occur during the defrost cycle
as ice melts from the evaporator and flows
into the drain pan.
Closing the door may cause a gurgling sound due
to pressure equalization.
Do you hear what I hear? These sounds are normal.
For additional information on normal
icemaker and dispenser operating sounds,
see the About the automatic icemaker
and About the ice and water dispenser
sections.

Troubleshooting tips…
Troubleshooting Tips
Save time and money! Review the charts on the following
pages first and you may not need to call for service.
Problem Possible Causes What To Do
Refrigerator does not Refrigerator in defrost cycle. • Wait about 30 minutes for defrost cycle to end.
operate
Master power control set to OFF. • Set the control to an on setting.
Refrigerator is unplugged. • Push the plug completely into the outlet.
The fuse is blown/circuit • Replace fuse or reset the breaker.
breaker is tripped.
The refrigerator is in • Unplug the refrigerator and plug it back in.
showroom mode.
Vibration or rattling Refrigerator is not level. • See Level refrigerator.
(slight vibration
• See Door alignment.
is normal)
Motor operates for Normal when refrigerator • Wait 24 hours for the refrigerator to completely
long periods or cycles is first plugged in. cool down.
on and off frequently.
Often occurs when large • This is normal.
(Modern refrigerators
amounts of food are
with more storage
placed in refrigerator.
space and a larger
Door left open. • Check to see if package is holding door open.
freezer require more
Hot weather or frequent • This is normal.
operating time. They
door openings.
start and stop often
Temperature controls • See About the temperature controls.
to maintain even
set at the coldest setting.
Refrigerator or freezer Temperature control not set • See About the temperature controls.
compartment too warm cold enough.
Warm weather or frequent • Set the temperature control one step colder.
door openings. See About the temperature controls.
Door left open. • Check to see if package is holding door open.
Frost or ice crystals Door left open. • Check to see if package is holding door open.
on frozen food
Too frequent or too long
(frost within package
door openings.
is normal)
Divider between Automatic energy saver • This helps prevent condensation on the outside.
refrigerator and freezer system circulates warm
compartments liquid around front edge
feels warm of freezer compartment.
Automatic icemaker Icemaker power switch • Set the power switch to the on position.
does not work is in the off position.
Water supply turned off or • See Install water line.
not connected.
Freezer compartment • Wait 24 hours for the refrigerator to completely
too warm. cool down.
Piled up cubes in the storage • Level cubes by hand.
bin cause the icemaker
to shut off.
Ice cubes stuck in icemaker. • Turn off the icemaker, remove cubes and turn
(Green power light on the icemaker back on.
icemaker blinking).
42
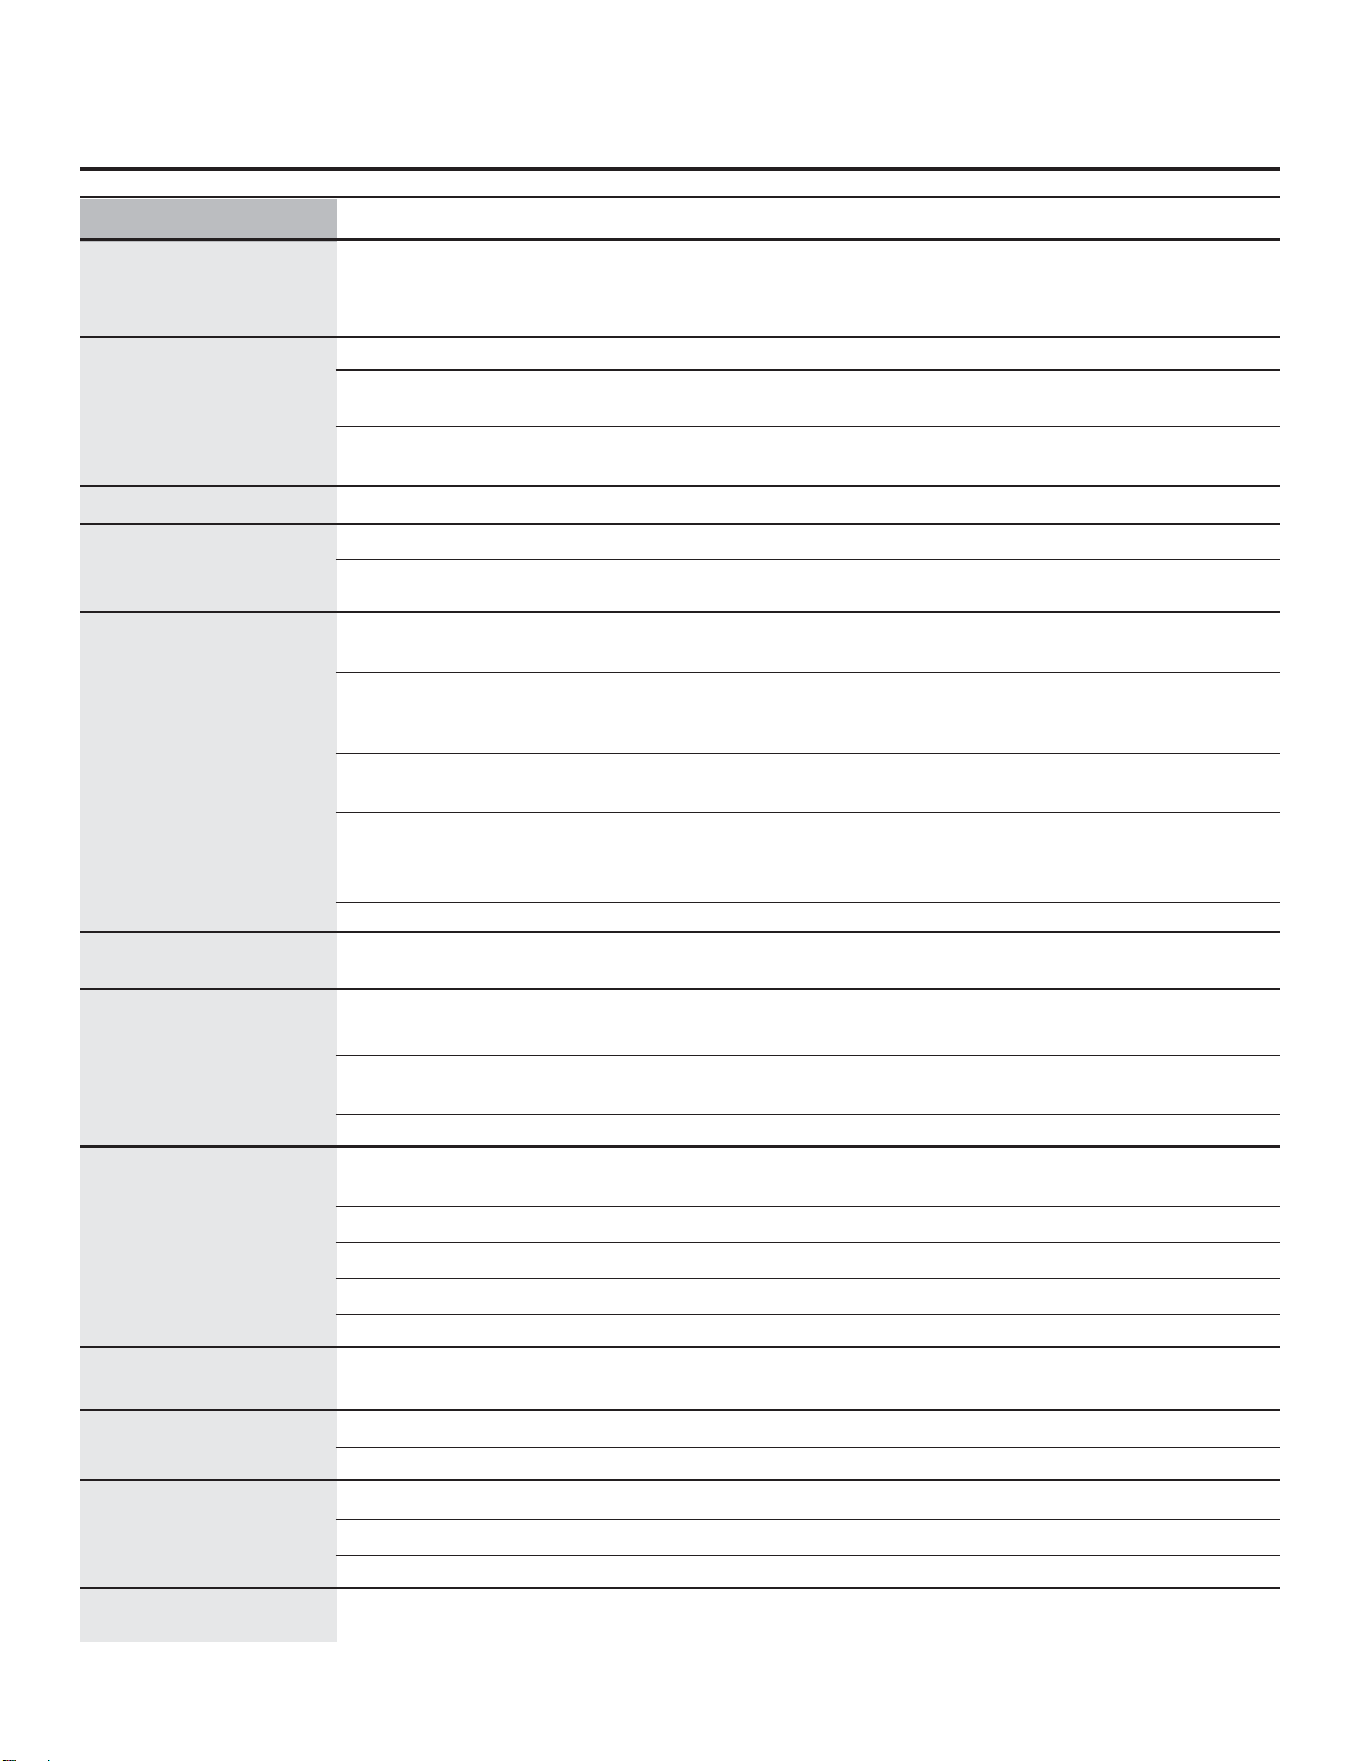
GEAppliances.com
43
Problem Possible Causes What To Do
Frequent “buzzing” sound Icemaker power switch is in the • Set the power switch to the O (off) position. Keeping it
I (on) position, but the water supply in the I (on) position will damage the water valve.
to the refrigerator has not been
connected.
Ice cubes have odor/taste Ice storage bin needs cleaning. • Empty and wash bin. Discard old cubes.
Food transmitting odor/taste • Wrap foods well.
to ice cubes.
Interior of refrigerator • See Care and cleaning.
needs cleaning.
Small or hollow cubes Water filter clogged. • Replace filter cartridge with new cartridge or with plug.
Slow ice cube freezing Door left open. • Check to see if package is holding door open.
Temperature control not set • See About the temperature controls.
cold enough.
Cube dispenser does Icemaker turned off or • Turn on icemaker or water supply.
not work water supply turned off.
An item is blocking or has fallen into • Remove any item that might be blocking, or has fallen into,
the ice chute inside the top door the chute.
bin of the freezer.
Ice cubes are frozen to • Remove cubes.
icemaker feeler arm.
Irregular ice clumps in • Break up with fingertip pressure and discard remaining clumps.
storage container.
• Freezer may be too warm. Adjust the freezer control to a
colder setting, one position at a time, until clumps do not form.
Dispenser is LOCKED. • Press and hold the LOCK/LIGHT button for 3 seconds.
Water has poor taste/odor Water dispenser has not been • Dispense water until all water in system is replenished.
used for a long time.
Water in first glass is warm Normal when refrigerator • Wait 24 hours for the refrigerator to completely cool down.
is first installed.
Water dispenser has not been • Dispense water until all water in system is replenished.
used for a long time.
Water system has been drained. • Allow several hours for replenished supply to chill.
Water dispenser does Water supply line turned • See Install water line.
not work off or not connected.
Water filter clogged. • Replace filter cartridge or remove filter and install plug.
Air may be trapped in the water system.
• Press the dispenser arm for at least two minutes.
Dispenser is LOCKED. • Press and hold the LOCK/LIGHT button for 3 seconds.
Refrigerator control setting is too cold. • Set to a warmer setting.
Water spurting from Newly-installed filter cartridge. • Run water from the dispenser for 3 minutes
dispenser (about one and a half gallons).
Water is not dispensed Water in reservoir is frozen. • Call for service.
but icemaker is working
Refrigerator control setting is too cold. • Set to a warmer setting.
No water or ice cube Supply line or shutoff valve is clogged.
• Call a plumber.
production
Water filter clogged. • Replace filter cartridge or remove filter and install plug.
Dispenser is LOCKED. • Press and hold the LOCK/LIGHT button for 3 seconds.
CUBED was selected but Last setting was CRUSHED. • A few cubes were left in the crusher from the previous
CRUSHED was dispensed setting. This is normal.
44
Problem Possible Causes What To Do
Orange glow in Defrost heater is on. • This is normal.
the freezer
Refrigerator has odor Foods transmitting • Foods with strong odors should be tightly wrapped.
odor to refrigerator.
• Keep an open box of baking soda in the refrigerator;
replace every three months.
Interior needs cleaning. • See Care and cleaning.
Door not closing Door gasket on hinge side • Apply paraffin wax to the face of the gasket.
properly sticking or folding over.
A door bin is hitting a shelf • Move the door bin up one position.
inside the refrigerator.
Refrigerator is not level. • See Level refrigerator.
• See Door alignment.
Moisture forms on Not unusual during • Wipe surface dry.
outside of refrigerator periods of high humidity.
Moisture collects inside Too frequent or too
(in humid weather, air long door openings.
carries moisture into
refrigerator when doors
are opened)
Interior light does No power at outlet. • Replace fuse or reset the breaker.
not work
Light bulb burned out. • See Replacing the light bulbs.
Water on kitchen floor Cubes jammed in chute. • Poke ice through with a wooden spoon.
or on bottom of freezer
Hot air from top Normal air flow cooling motor.
of refrigerator In the refrigeration process, it is
normal that heat be expelled in
the area above the refrigerator.
Refrigerator never Adaptive defrost keeps • This is normal. The refrigerator will cycle off after the
shuts off, but the compressor running during door remains closed for 2 hours.
temperatures are OK door openings.
Refrigerator beeping Door open. • Close door.
Actual temperature not Unit just plugged in. • Allow 24 hours for system to stabilize.
equal to Set temperature
Door open for too long. • Allow 24 hours for system to stabilize.
Warm food added to refrigerator. • Allow 24 hours for system to stabilize.
Defrost cycle is in process. • Allow 24 hours for system to stabilize.
Troubleshooting tips…
Refrigerator Warranty.
For US Customers, all warranty service provided by our Factory Service
Centers, or an authorized Customer Care
®
technician. To schedule
service, on-line, visit us at GEAppliances.com, or call 800.GE.CARES
(800.432.2737). Please have serial number and model number available
when calling for service.
In Canada, call 800.561.3344.
For The Period Of: GE Will Replace:
GE and GE PROFILE
™
MODELS:
One Year Any part of the refrigerator which fails due to a defect in materials or workmanship.
From the date of the During this limited one-year warranty, GE will also provide, free of charge, all labor and
original purchase related service to replace the defective part.
Thirty Days Any part of the water filter cartridge which fails due to a defect in materials or workmanship.
(Water filter, if included) During this limited thirty-day warranty, GE will also provide, free of charge, a replacement water
From the original filter cartridge.
purchase date of
the refrigerator
GE PROFILE MODELS ONLY:
Five Years Any part of the sealed refrigerating system (the compressor, condenser, evaporator and all
(GE Profile models only) connecting tubing) which fails due to a defect in materials or workmanship. During this limited
From the date of the five-year sealed refrigerating system warranty, GE will also provide, free of charge, all labor
original purchase and related service to replace the defective part in the sealed refrigerating system.
Service trips to your home to teach you how to use the
product.
Improper installation, delivery or maintenance.
Failure of the product if it is abused, misused, or used for
other than the intended purpose or used commercially.
Loss of food due to spoilage.
Replacement of house fuses or resetting of circuit breakers.
Damage caused after delivery.
Replacement of the water filter cartridge, if included, due to
water pressure that is outside the specified operating range
or due to excessive sediment in the water supply.
Replacement of the light bulbs, if included, or water filter
cartridge, if included, other than as noted above.
Damage to the product caused by accident, fire, floods or
acts of God.
Incidental or consequential damage caused by possible
defects with this appliance.
Product not accessible to provide required service.
Damage caused by a non-GE brand water filter.
Damage to finish, such as surface rust, tarnish, or small
blemishes not reported within 48 hours of delivery.
What GE Will Not Cover:
Staple your receipt here.
Proof of the original
purchase date is needed
to obtain service under the
warranty.
(;&/86,212),03/,(':$55$17,(6³<RXUVROHDQGH[FOXVLYHUHPHG\LVSURGXFWUHSDLUDVSURYLGHGLQWKLV
Limited Warranty. Any implied warranties, including the implied warranties of merchantability or fitness for
a particular purpose, are limited to one year or the shortest period allowed by law.
For US Customers: This warranty is extended to the original purchaser and any succeeding owner for products
purchased for home use within the USA. If the product is located in an area where service by a GE Authorized
Servicer is not available, you may be responsible for a trip charge or you may be required to bring the product to an
Authorized GE Service location for service. In Alaska, the warranty excludes the cost of shipping or service calls to
your home.
Some states do not allow the exclusion or limitation of incidental or consequential damages. This warranty gives
you specific legal rights, and you may also have other rights which vary from state to state. To know what your
OHJDOULJKWVDUHFRQVXOW\RXUORFDORUVWDWHFRQVXPHUDIIDLUVRIILFHRU\RXUVWDWH·V$WWRUQH\*HQHUDO
Warrantor US: General Electric Company. Louisville, KY 40225
For Customers in Canada: This warranty is extended to the original purchaser and any succeeding owner for
products purchased in Canada for home use within Canada. In-home warrant service will be provided in areas
where it is available and deemed reasonable by Mabe to provide.
Warrantor Canada: MC Commercial, Burlington, Ontario, L7R 5B6
45
The following pharmaceutical reduction claims have not been certi¿ed by NSF International or the state of California.
Claims tested and veri¿ed by independent laboratory:
Contaminant
Reduction AvHUDJH,Q¾XHQW
16)VSHFL½HG
Challenge Concentration
Avg %
Reduction
Average Product
Water
Concentration
Max Permissible
Product Water
Concentration
NSF Reduction
Requirements
NSF
Test Report
Atenolol 978 ng/L N/A 99.5% 5.0 ng/L N/A N/A J-00121587
Fluoxetine 907 ng/l N/A 99.4% 5.4 ng/L N/A N/A J-00121587
Ibuprofen 885 ng/L N/A 94.1% 52.3 ng/L N/A N/A J-00121588
Progesterone 1097 ng/L N/A 99.5% 5.0 ng/L N/A N/A J-00121589
Trimethoprim 415 ng/L N/A 99.5% 2.0 ng/L N/A N/A J-00121587
It is essential that the manufacturer’s recommended installation, maintenance and filter replacement requirements be carried out for the product to perform as advertised.
See Installation Manual for Warranty information.
Application Guidelines/Water Supply Parameters
Service Flow 0.5 gpm (21.9 lpm)
Water Supply Potable Water
Water Pressure 40-120 psi (2.8-8.2 bar)
Water Temperature 33°F-100°F (0.6°C-38°C)
Note: While the testing was performed under standard laboratory conditions,
actual performance may vary.
Replacement Cartridge: MWF. For estimated costs of replacement elements
please call 1-800-626-2002 or visit our website at www.geapplianceparts.com.
WARNING
To reduce the risk associated with ingestion of contaminants:
• Do not use with water that is microbiologically unsafe or of unknown quality
without adequate disinfectio
n before and after the system. Systems certL¿ed
for cyst reduction may be used on disinfected water that may contain ¿lterable
cysts. EPA Establishment Number 10350-MN-005.
NOTICE
To reduce the risk associated with property damage due to water leakage:
• Read and follow use instructions before installation and use of this system.
• Installation and use MUST comply with all state and local plumbing codes.
• Do not install if water pressure exceeds 120 psi (8.2 bar). If your water pressure
exceeds 80 psi, you must install a pressure-limiting valve. Contact a plumbing
professional if you are uncerta
in how to check your water pressure.
• Do not install where water hammer conditions may occur. If water hammer
conditions exist you must install a water hammer arrester. Contact a plumbing
professional if you are uncertain how to check for this condition.
• Do not install on hot water supply lines. The maximum operating water
temperature of this ¿lter system is 100º F (38º C).
• Protect ¿lter from freezing. Drain ¿lter when temperatures drop
below 33ºF (0.6ºC).
•
must be replaced every 6 months at the
rated capacity, or sooner if a noticeable reduction in ÀRw rate occurs.
For conditions of use, health claims certified by the California Department of Public
Health, and replacements, see performance data sheet. California Department
of Public Health Certification #05-1698. The contaminants or other substances
removed or reduced by this water filter are not necessarily in all users’ water.
Tested and cerWL½ed by NSF International
against NSF/ANSI Standard 42 and
Standard 53 in model GE MWF for the
reduction of the claims speci½Hd on the
performance data sheet.
REPLACEMENT
ELEMENT
46
Performance Data Sheet
SmartWater
™
Filtration System³GE MWF Cartridge
Performance Data Information
Capacity: 300 Gallons (1,135 Liters)
7KHFRQFHQWUDWLRQRIWKHFRQWDPLQDQWVWHVWHGIRUWKLV¿OWHULQZDWHUHQWHULQJWKHV\VWHPZDVUHGXFHGWR
DFRQFHQWUDWLRQOHVVWKDQRUHTXDOWRWKHSHUPLVVLEOHOLPLWIRUZDWHUOHDYLQJWKHV\VWHPDVVSHFL¿HGLQ
16)$16,6WDQGDUGDQG6WDQGDUG6\VWHPWHVWHGDQGFHUWL¿HGE\16),QWHUQDWLRQDODJDLQVW16)
ANSI Standard 42 and Standard 53.
Please see geappliances.com for complete listing of the contaminants tested and the amounts reduced

47
Notes.
GEAppliances.com

Mesures de sécurité .................49-51
Fonctionnement
Clayettes et bacs ............................54
ClimateKeeper
™
avec
évaporateurs double flux ...................53
Entretien et nettoyage
du réfrigérateur .........................59, 60
Le distributeur d’eau et de glaçons .....57, 58
Le filtre à eau ...............................53
Les commandes de température ...........52
Les portes du réfrigérateur ..................55
Les tiroirs et les paniers .....................56
Machine à glaçons automatique. . . . . . . . . . . . 57
Remplacement des ampoules ..............61
Instructions d’installation .........62–87
Alimentation d’eau ..........................86
Conduite d’eau ..........................80, 81
Dimensions des panneaux ..............68–77
Dimensions et espaces libres ...............64
Espace pour l’installation ....................64
Mise à niveau ...............................82
Panneaux des portes et de la grille .....83–85
Pattes anti-basculement ....................81
Conseils de dépannage ............ 89–92
Bruits normaux de fonctionnement .........88
Soutien au consommateur
Feuillet de données relatives à la
performance de la cartouche GWF .........94
Garantie pour la clientèle au Canada .......93
Soutien au consommateur .................95
Transcrivez les numéros de modèle et de série ici :
# de modèle _____________________________
# de série _______________________________
Ils figurent sur l’étiquette qui se trouve à l’interieur
du compartiment réfrigérateur en haute à droite.
48
49
INSTRUCTIONS IMPORTANTES DE SÉCURITÉ.
LISEZ TOUTES LES INSTRUCTIONS AVANT
D’UTILISER VOTRE RÉFRIGÉRATEUR.
INSTALLATION
AVERTISSEMENT
Risque d’explosion.
Conservez les matériaux et vapeurs inflammables tels que l’essence à l’écart de votre réfrigérateur. Une
explosion, un incendie voire la mort pourrait en résulter.
Dans les réfrigérateurs qui ont des machines à glaçons, évitez tout
contact avec les éléments mobiles du mécanisme d’éjection ou avec
l’élément chauffant situé à la partie inférieure de la machine à glaçons. Ne
mettez jamais vos doigts ou vos mains sur le mécanisme de fabrication
automatique de glaçons quand le réfrigérateur est branché.
Ne nettoyez pas les clayettes ou les couvercles en verre avec de l’eau tiède
quand ceux-ci sont froids. Les clayettes et couvercles en verre peuvent se
casser s’ils sont exposés à des changements soudains de température ou
si vous les cognez ou les faites tomber. Le verre trempé est conçu pour se
briser en petits morceaux en cas de casse.
Ne laissez jamais vos doigts dans des endroits où ils risquent d’être pincés.
L’écartement entre les portes et l’armoire est nécessairement petit. Faites
attention de fermer les portes quand des enfants se trouvent à proximité.
Ne touchez jamais les surfaces froides dans le compartiment congélation
quand vos mains sont humides ou mouillées. Votre peau peut coller à ces
surfaces extrêmement froides.
Ne recongelez pas les aliments surgelés qui ont complètement dégelé.
IMPORTANTES CONSIGNES DE SÉCURITÉ
Pour réduire le risque de blessures lorsque vous utilisez votre réfrigérateur,
veuillez suivre ces consignes de sécurité :
Vous devez bien installer et placer votre réfrigérateur,
conformément aux Instructions d’installation avant de l’utiliser.
Remettez toutes les pièces et panneaux en place avant d’utiliser
l’appareil.
Ne conservez jamais ou n’utilisez jamais d’essence ou d’autres
liquides ou gaz inflammables à proximité de votre réfrigérateur ou
de tout autre appareil électroménager.
Nous déconseillons fortement l’utilisation d’une rallonge à cause
des risques potentiels dans certaines conditions. Cependant, si
l’utilisation d’un cordon prolongateur est nécessaire, ce dernier doit
obligatoirement être homologué UL (aux USA) ou CSA (au Canada),
à trois brins avec mise à la terre pour appareil électroménager et
doit être équipé d’une fiche et d’une prise femelle avec terre. Les
caractéristiques électriques du cordon prolongateur doivent être de
15 ampères (minimum) et de 120 volts.
Pour éviter les risques d’asphyxie et d’enfermement pour les
enfants. Démontez les portes du congélateur et du compartiment
de réfrigération avant de le mettre au rebut ou d’interrompre son
utilisation.
Ne permettez jamais aux enfants de grimper, de monter, de se
tenir ou de se pendre aux étagères de votre réfrigérateur. Ils
peuvent endommager le réfrigérateur et se blesser sérieusement.
Débranchez votre réfrigérateur :
• Pour débrancher le réfrigérateur. L’alimentation électrique du
réfrigérateur ne peut pas être coupée par l’intermédiaire du
panneau de commande.
• Débranchez votre réfrigérateur avant de le nettoyer, Avant de
remplacer une ampoule grillée, et de le réparer.
NOTE : Nous vous recommandons fortement de faire accomplir
tout service par un technicien qualifié.
Site Internet d’Électroménagers GE
Pour de plus amples informations sur le fonctionnement de votre réfrigérateur, consultez le
site www.electromenagersge.ca ou composez le 800.561.3344.
CONSIGNES DE SÉCURITÉ POUR LE RÉFRIGÉRATEUR
SÉCURITÉ
IMPORTANTES CONSIGNES DE SÉCURITÉ
Pour réduire le risque d’incendie, d’explosion, de choc électrique ou de blessures
lorsque vous utilisez votre réfrigérateur, veuillez suivre ces consignes de sécurité :
AVERTISSEMENT
Ce symbole représente une alerte de sécurité. Ce symbole vous avise de dangers possibles pouvant causer la
mort, des blessures ou autres. Tous les messages de sécurité seront précédés du symbole d’alerte de sécurité ainsi
que des mots « DANGER », « AVERTISSEMENT » ou « MISE EN GARDE ». Ces messages sont les suivants :
Signale une situation qui présente un danger imminent et qui, si elle n’est pas évitée, entraînera des blessures
graves, voire la mort.
Signale une situation qui présente un danger imminent et qui, si elle n’est pas évitée, peut entraîner des
blessures graves, voire la mort.
.
Signale une situation qui présente un danger imminent et qui, si elle n’est pas évitée, peut entraîner des
blessures mineures ou graves.
AVERTISSEMENT
DANGER
MISE EN GARDE
MISE EN GARDE
50
INSTRUCTIONS IMPORTANTES DE SÉCURITÉ.
LISEZ TOUTES LES INSTRUCTIONS AVANT
D’UTILISER VOTRE RÉFRIGÉRATEUR.
N’UTILISEZ PAS DE FICHE D’ADAPTATION OU DE RALLONGE ÉLECTRIQUE
(Fiches d’adaptation non permises au Canada)
N’utilisez jamais de fiche d’adaptation pour brancher votre réfrigérateur à une prise murale du type standard à 2 alveoles.
N’utilisez jamais de rallonge électrique pour cet appareil électroménager.
SÉCURITÉ (CONT.)
Ne coupez pas ou n’enlevez pas, sous aucun prétexte, la troisième broche de mise à la terre du cordon
d’alimentation. Pour des raisons de sécurité, cet appareil doit être correctement mis à la terre.
Le cordon d’alimentation de cet appareil est équipé d’une
fiche à trois broches (pour une mise à la terre) qui s’adapte
à la prise de courant standard à 3 broches (pour une mise
à la terre) pour minimiser les risques de chocs électriques
par cet appareil.
Faites vérifier la prise murale et le circuit électrique par
un électricien qualifié pour s’assurer que le système est
correctement mis à la terre.
Dans le cas d’une prise biphasée, l’installateur a la
responsabilité et l’obligation de la remplacer par une
prise triphasée correctement mise à la terre. N’utilisez pas
d’adaptateur.
Le réfrigérateur doit toujours être branché à sa propre
prise électrique d’une tension nominale correspondant à
celle indiquée sur sa plaque signalétique.
Une alimentation électrique à 115 volts CA, 60 Hz, avec
un fusible de 15 ou 20 ampères et une mise à la terre est
nécessaire. Ceci permet d’obtenir un meilleur rendement et
évite de surcharger les circuits électriques du domicile qui
risque d’occasionner un incendie en surchauffant.
Ne débranchez jamais le réfrigérateur en tirant sur le
cordon d’alimentation. Prenez toujours fermement la fiche
en main et tirez pour la sortir de la prise.
Réparez ou remplacez immédiatement tout cordon
électrique usé ou endommagé. N’utilisez pas un cordon
fissuré ou présentant des dommages dus aux frottements
soit sur sa longueur ou aux extrémités.
Lorsque vous éloignez votre réfrigérateur du mur,
faites attention à ne pas le faire rouler sur le cordon
d’alimentation afin de ne pas l’endommager.
BRANCHEMENTS ÉLECTRIQUES
AVERTISSEMENT
Risque de choc électrique.
Branchez l’appareil dans une prise triple avec terre.
Ne retirez pas la broche de terre.
N’utilisez pas d’adaptateur.
Le non-respect de ces instructions peut entraîner des
risques d’incendies, des chocs électriques ou la mort.
AVERTISSEMENT
Risque de basculement
Ce réfrigérateur présente une partie supérieure lourde et il doit être manipulé avec précaution.
Autrement, l’appareil peut basculer et causer des blessures graves ou fatales. Reportez-vous aux
instructions d’installation pour la façon appropriée de poser la ferrure antibasculement.
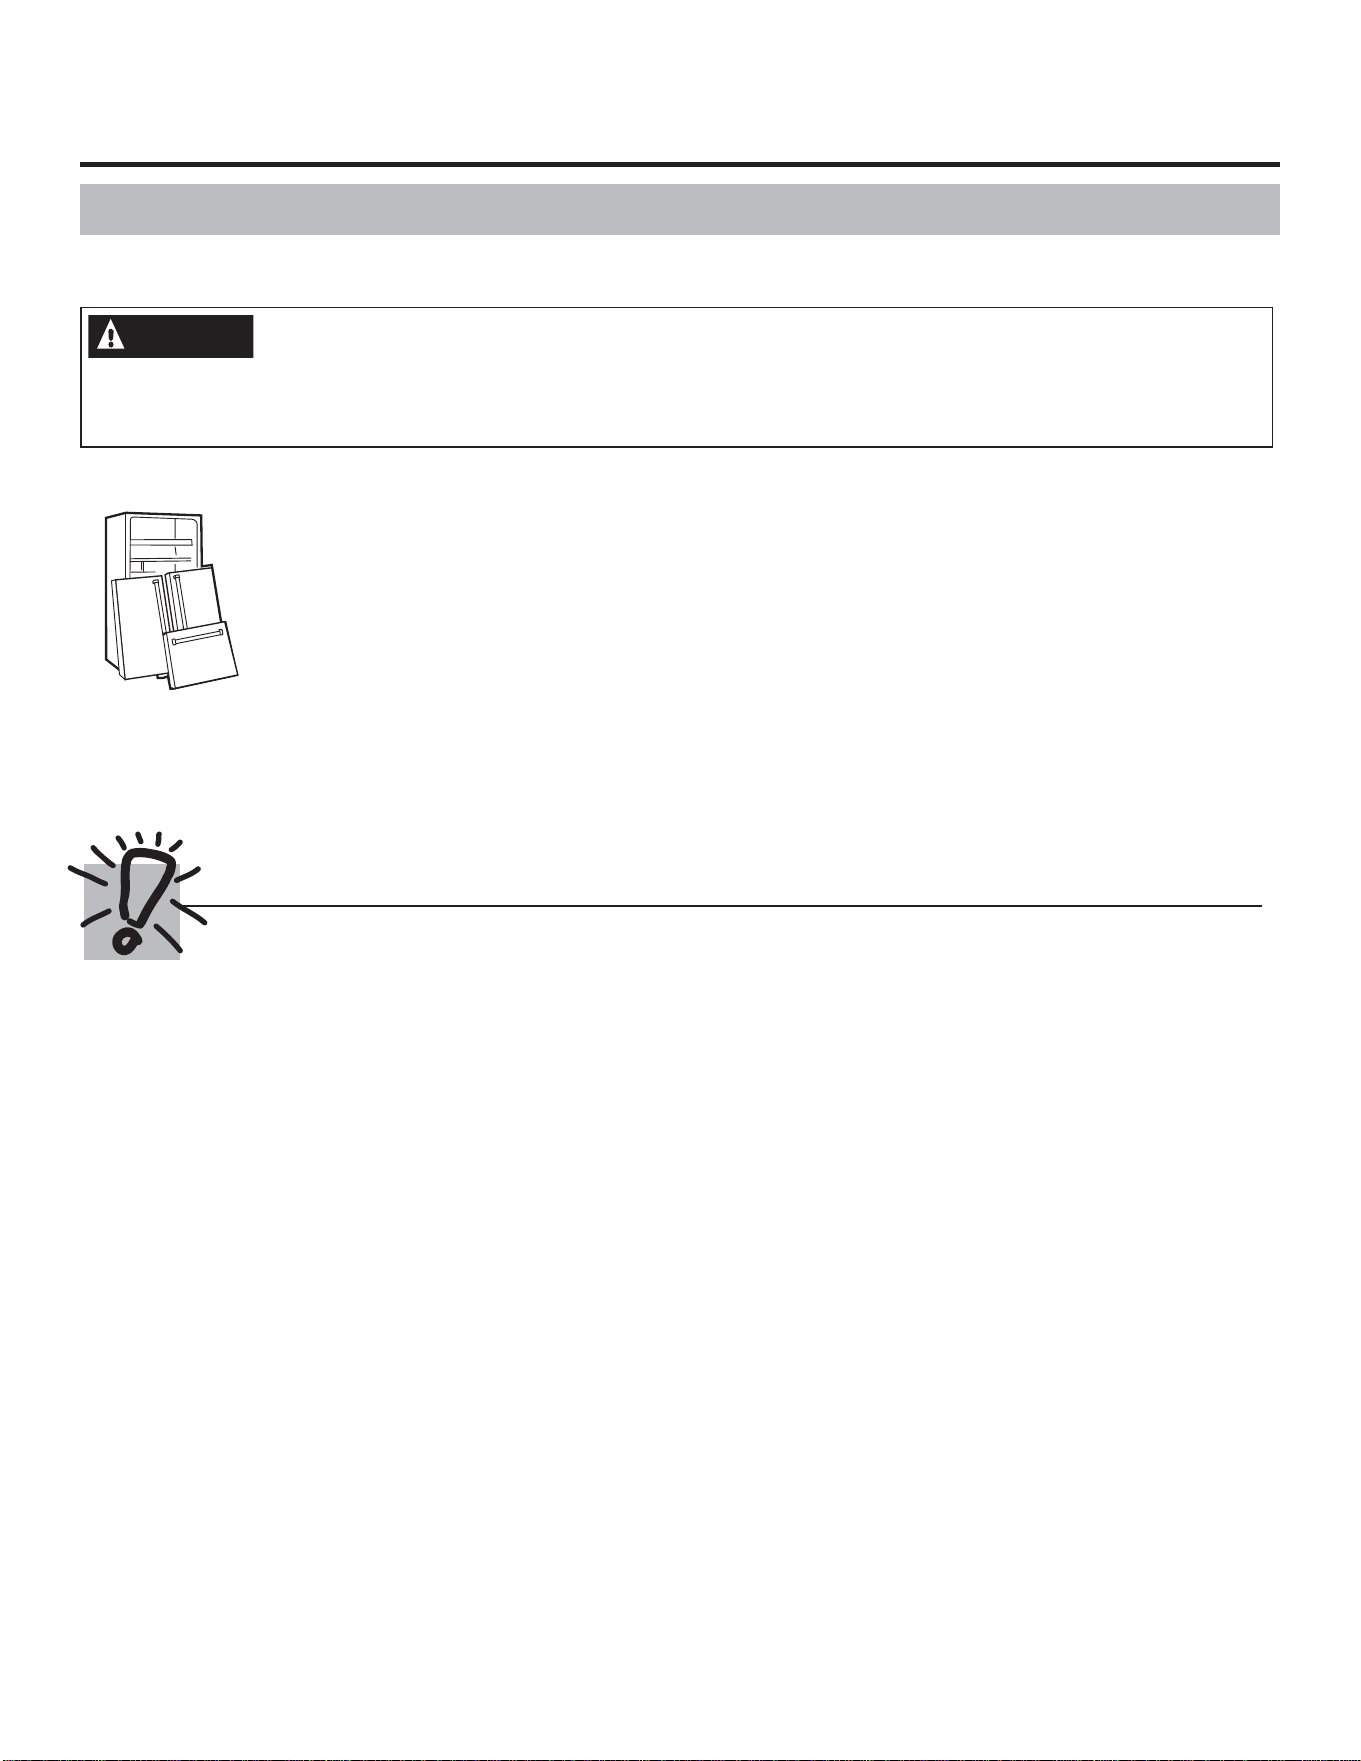
electromenagersge.ca
SÉCURITÉ (CONT.)
LISEZ ET SUIVEZ SOIGNEUSEMENT CES MESURES DE SÉCURITÉ.
CONSERVEZ CES INSTRUCTIONS
MISE AU REBUT APPROPRIÉE DE VOTRE ANCIEN RÉFRIGÉRATEUR
AVERTISSEMENT
Un enfant risque de suffoquer ou d’y être emprisonné.
Démontez les portes du compartiment de réfrigération et du compartiment de congélation du
réfrigérateur, avant mettre celui-ci au rebut. Le non-respect de cette recommandation peut entraîner
l’enfermement d’un enfant qui peut entraîner la mort ou des lésions cérébrales.
Les enfants pris au piège ou morts d’asphyxie sont
toujours d’actualité. Les réfrigérateurs jetés ou
abandonnés restent dangereux même si vous ne
les laissez au rebut que pour « quelques jours ». Si
vous voulez jeter votre ancien réfrigérateur, suivez les
instructions suivantes pour empêcher les accidents.
Avant de jeter votre ancien réfrigérateur ou
congélateur:
Démontez les portes du compartiment de
réfrigération et du compartiment de congélation.
Laissez les clayettes en place, pour éviter que des
enfants puissent facilement grimper dans votre
réfrigérateur.
Fluides frigorigènes
Les appareils réfrigérants contiennent des fluides
frigorigènes qui conformément à la législation fédérale
doivent être retirés avant la mise au rebut de l’appareil.
Si vous mettez au rebut un ancien réfrigérateur
contenant des fluides frigorigènes, vérifiez la procédure
à suivre auprès de la compagnie responsable de
l’élimination.
IMPORTANT:
51
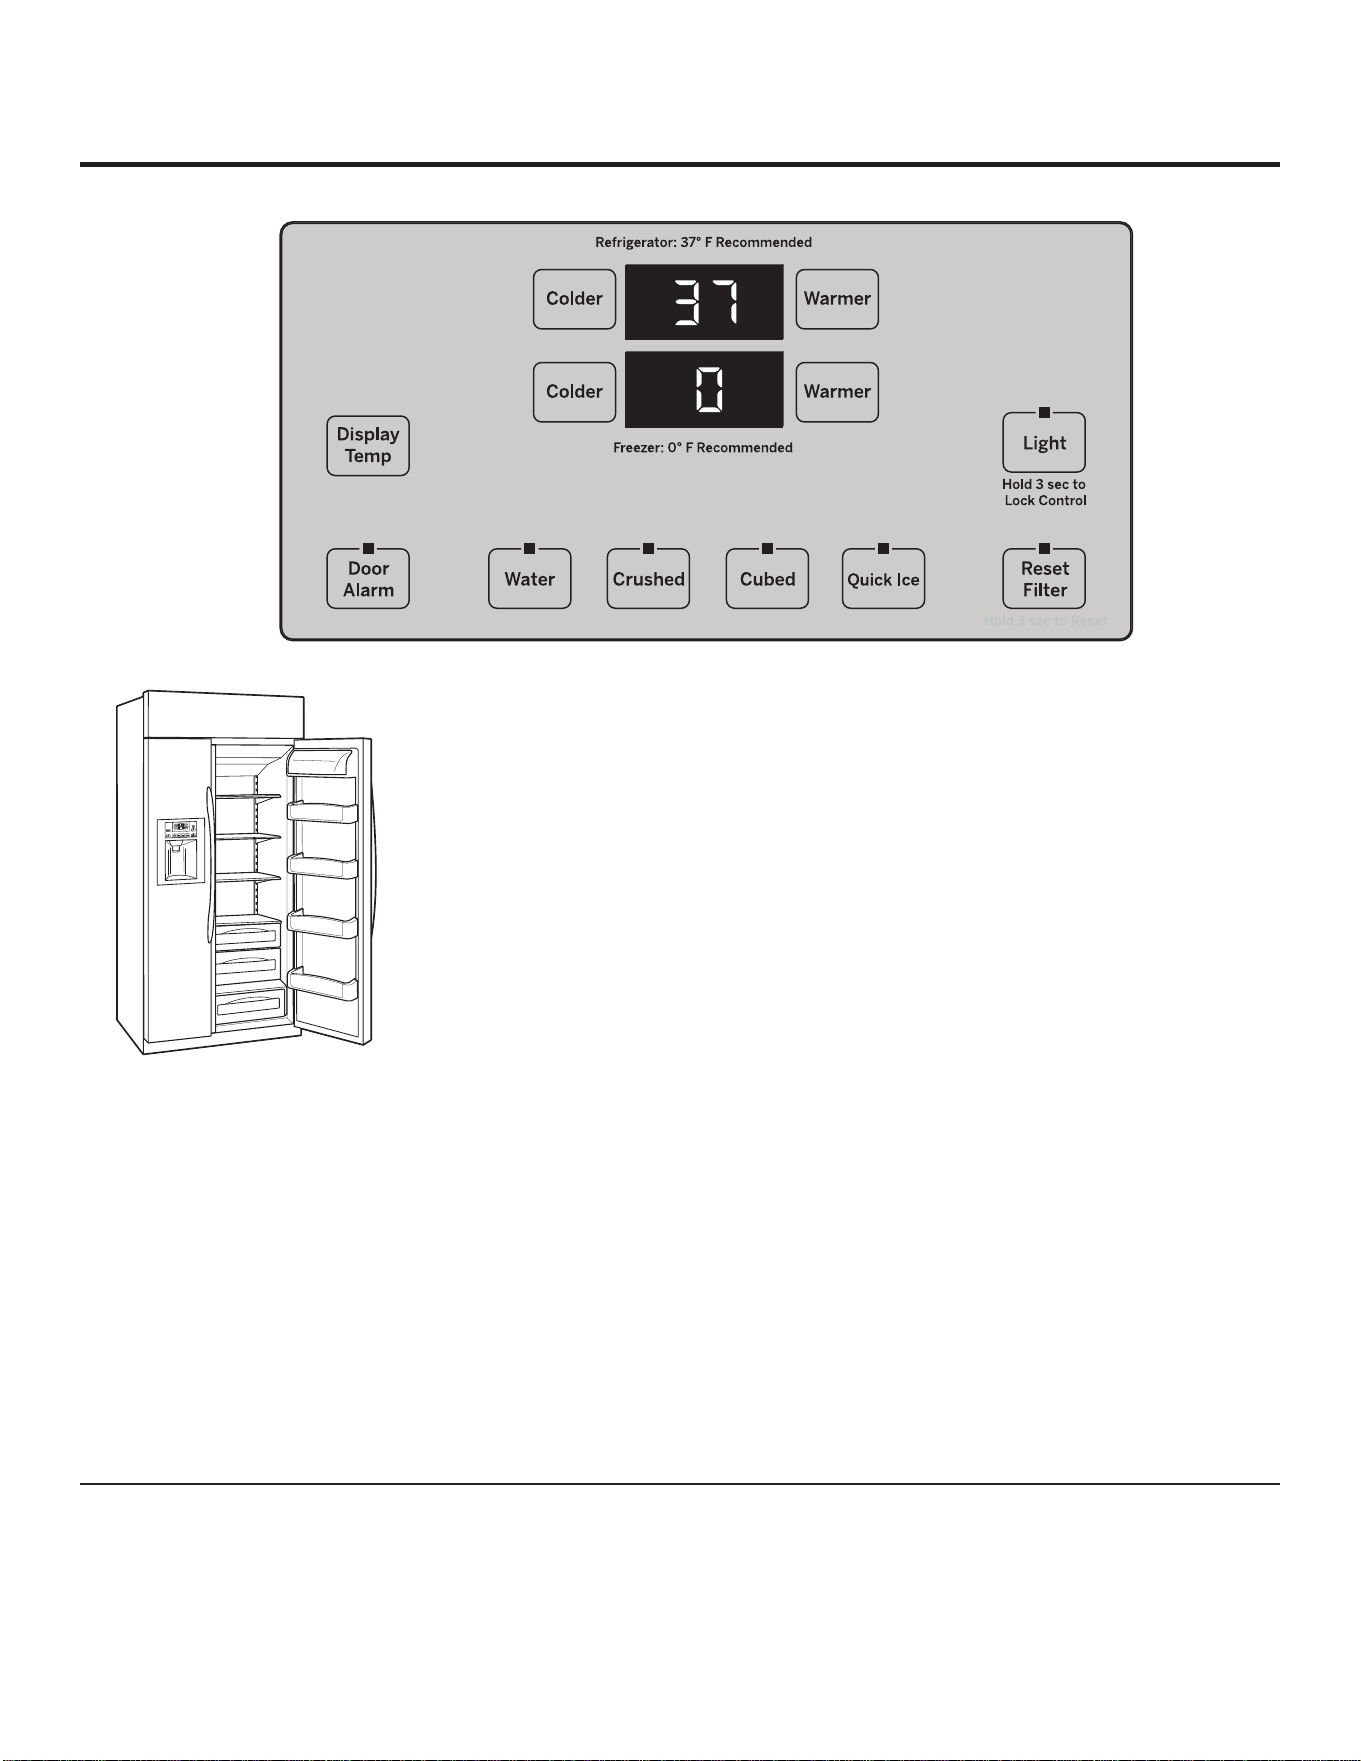
La température est pré-réglée à l’usine au numéro 37° F pour
le compartiment réfrigérateur et 0° F pour le compartiment congélateur.
Attendez 24 heures que la température se stabilise
aux temperatures recommandées pré-réglées.
Le réglage de température peut indiquer la température SET (réglée)
ainsi que la température réelle dans le compartiment réfrigération et
dans le compartiment congélation. La température SET (réglée) peut
varier légèrement de la température réelle, selon l’utilisation et les
conditions de fonctionnement.
NOTE : Le réfrigérateur est expédié avec une pellicule de protection
couvrant les commandes de température. Si cette pellicule n’a pas été
retirée au cours de l’installation faites-le maintenant.
Ce système est conçu pour maximiser le rendement dans
les compartiments du réfrigérateur et du congélateur. Ce
concept unique consiste en une canalisation d’air fixée
au long des parois arrières
du réfrigérateur et du congélateur. Le rangement
d’aliments en avant des persiennes de ces
compartiments n’affecte pas le rendement
de l’appareil.
Système de circulation d’air
Les commandes de température.
Pour changer la température, appuyez et relâchez
le bouton WARMER ou COLDER (Plus chaud ou Plus
froid). SET (réglée) s’allumera sur le cadran d’affichage,
ainsi que la température choisie. Pour changer
la température, appuyez brièvement sur le bouton
WARMER ou COLDER (pendant que SET est allumé)
jusqu’à ce que la température désirée apparaisse.
La température du réfrigérateur peut être ajustée entre
34 et 47° F celle du congélateur entre –6
et +8° F.
Quand vous aurez réglé la température choisie,
l’affichage de température disparaîtra après
10 secondes.
Pour afficher la température, vous devez taper
sur le bouton DISPLAY TEMP (affichage
de la température).
Plusieurs ajustements peuvent être nécessaires. Chaque
fois que vous ajustez les commandes, laissez passer 24
heures pour que le réfrigérateur atteigne
la température que vous avez sélectionnée.
52

Le filtre à eau.
53
Au sujet de ClimateKeeper
®
avec évaporateurs double flux. electromenagersge.ca
Comment il fonctionne
Le système ClimateKeeper avec évaporateurs
double flux a deux évaporateurs, le premier pour
le compartiment réfrigération et le second pourle
compartiment congélation.
Cela fournit deux systèmes de refroidissement
distincts, et sépare
la circulation d’air entre les compartiments
d’aliments frais et de congélateur pendant
les opérations normales de refroidissement.
Le système séparé d’aération
réduit le mélange d’air entre les deux
compartiments, ce qui réduit les transferts
d’odeurs d’aliments frais, et améliore le goût de
la glace.
Le système ClimateKeeper réduit également
le nombre de cycles de dégivrage dans
l’évaporateur du compartiment congélation,
ce qui permet de réduire les brûlures
de congélateur.
idge
older
Porte-cartouche
Cartouche du filtre à eau
La cartouche du filtre à eau se trouve dans le coin droit
arrière supérieur du compartiment réfrigérateur.
À quel moment remplacer le filtre des modèles avec
témoin de remplacement
Ce témoin indique la nécessité de remplacer la cartouche du filtre
à eau du distributeur. Ce témoin devient orange pour vous avertir
de remplacer bientôt le filtre.
Vous devez remplacer la cartouche de filtre lorsque le témoin
devient rouge ou quand le débit de l’eau du distributeur d’eau
ou de glace diminue.
À quel moment remplacer le filtre des modèles sans
témoin de remplacement
La cartouche du filtre doit être remplacée tous les six mois
ou moins si le débit d’eau du distributeur d’eau ou de glace diminue.
Retrait de la cartouche du filtre
Lorsque vous devez remplacer la cartouche, enlevez d’abord
la cartouche usagée en la tournant lentement vers la gauche.
Ne tirez pas sur la cartouche. Un peu d’eau peut s’écouler.
MISE EN GARDE : Pour réduire le risque associé aux dommages
matériels causés par des fuites d’eau, lisez et suivez les instructions
avant de procéder à l’installation et d’utiliser votre système.
L’installation et l’utilisation DOIVENT être conformes à tous
les codes locaux et nationaux de plomberie.
Installation de la cartouche du filtre à eau
1
Remplissez la cartouche de rechange avec de l’eau du robinet
immédiatement après l’installation afin de permettre un meilleur
débit du distributeur.
2
Alignez la flèche de la cartouche avec celle de porte-cartouche.
Placez le dessus de la nouvelle cartouche vers le haut à l’intérieur
du porte-cartouche. Ne l’enfoncez pas dans le porte-cartouche.
3
Tournez lentement la cartouche vers la droite
jusqu’à ce que la cartouche s’immobilise. NE SERREZ
PAS TROP FORT. Lorsque vous la tournez, elle
se relèvera automatiquement en place.
La cartouche fera approximativement un demi-tour.
4
Faites couler six litres d'eau du distributeur (environ
trois minutes) pour rincer le système et éviter les égouttements.
5
Appuyez et maintenez la touche RESET WATER FILTER (Réinitialiser
le filtre à eau) du distributeur enfoncée pendant trois secondes.
REMARQUE : Il est possible que de l’eau jaillisse du distributeur
après l’installation d’une cartouche neuve.
Bouchon de dérivation du filtre
Y
Vous devez utiliser le bouchon de dérivation du filtre si vous n’avez pas
de cartouche de rechange. Les distributeurs d’eau et de glace ne
fonctionneront pas si le filtre ou le bouchon de dérivation n’est pas installé.
Pour utiliser le bouchon de dérivation du filtre sur les modèles
Water by Culligan™, vous devez d’abord retirer l’adaptateur du
filtre du porte-cartouche en le faisant pivoter vers la gauche.
SmartWater
Bouchon de
dérivation du filtre
Bouchon de
dérivation du filtre
ter
ss
ug
Water by Culligan
Pour obtenir des résultats optimums de votre système de filtration, GE vous recommande d’utiliser uniquement des filtres GE SmartWater.
L’utilisation de filtres GE dans les réfrigérateurs GE et Hotpoint
®
vous garantit une performance optimale et une bonne fiabilité.
Les filtres GE SmartWater répondent aux normes rigoureuses de sécurité et de qualité NSF primordiales pour les produits de filtration
d’eau. GE n’a pas agréé des filtres de marques différentes pour une utilisation dans les réfrigérateurs GE et Hotpoint. Aucune assurance
n’est donnée que les filtres d’autres marques puissent respecter la qualité, performance et fiabilité exigées par GE.
Si vous avez des questions ou pour commander des cartouches de rechange supplémentaires, visitez notre site internet à l’adresse
www.gewaterfilters.com ou appelez le Service des pièces et accessoires GE au 1-800-626-2002.
Les clients canadiens peuvent consulter les pages jaunes pour connaître le Centre de service Camco le plus près.
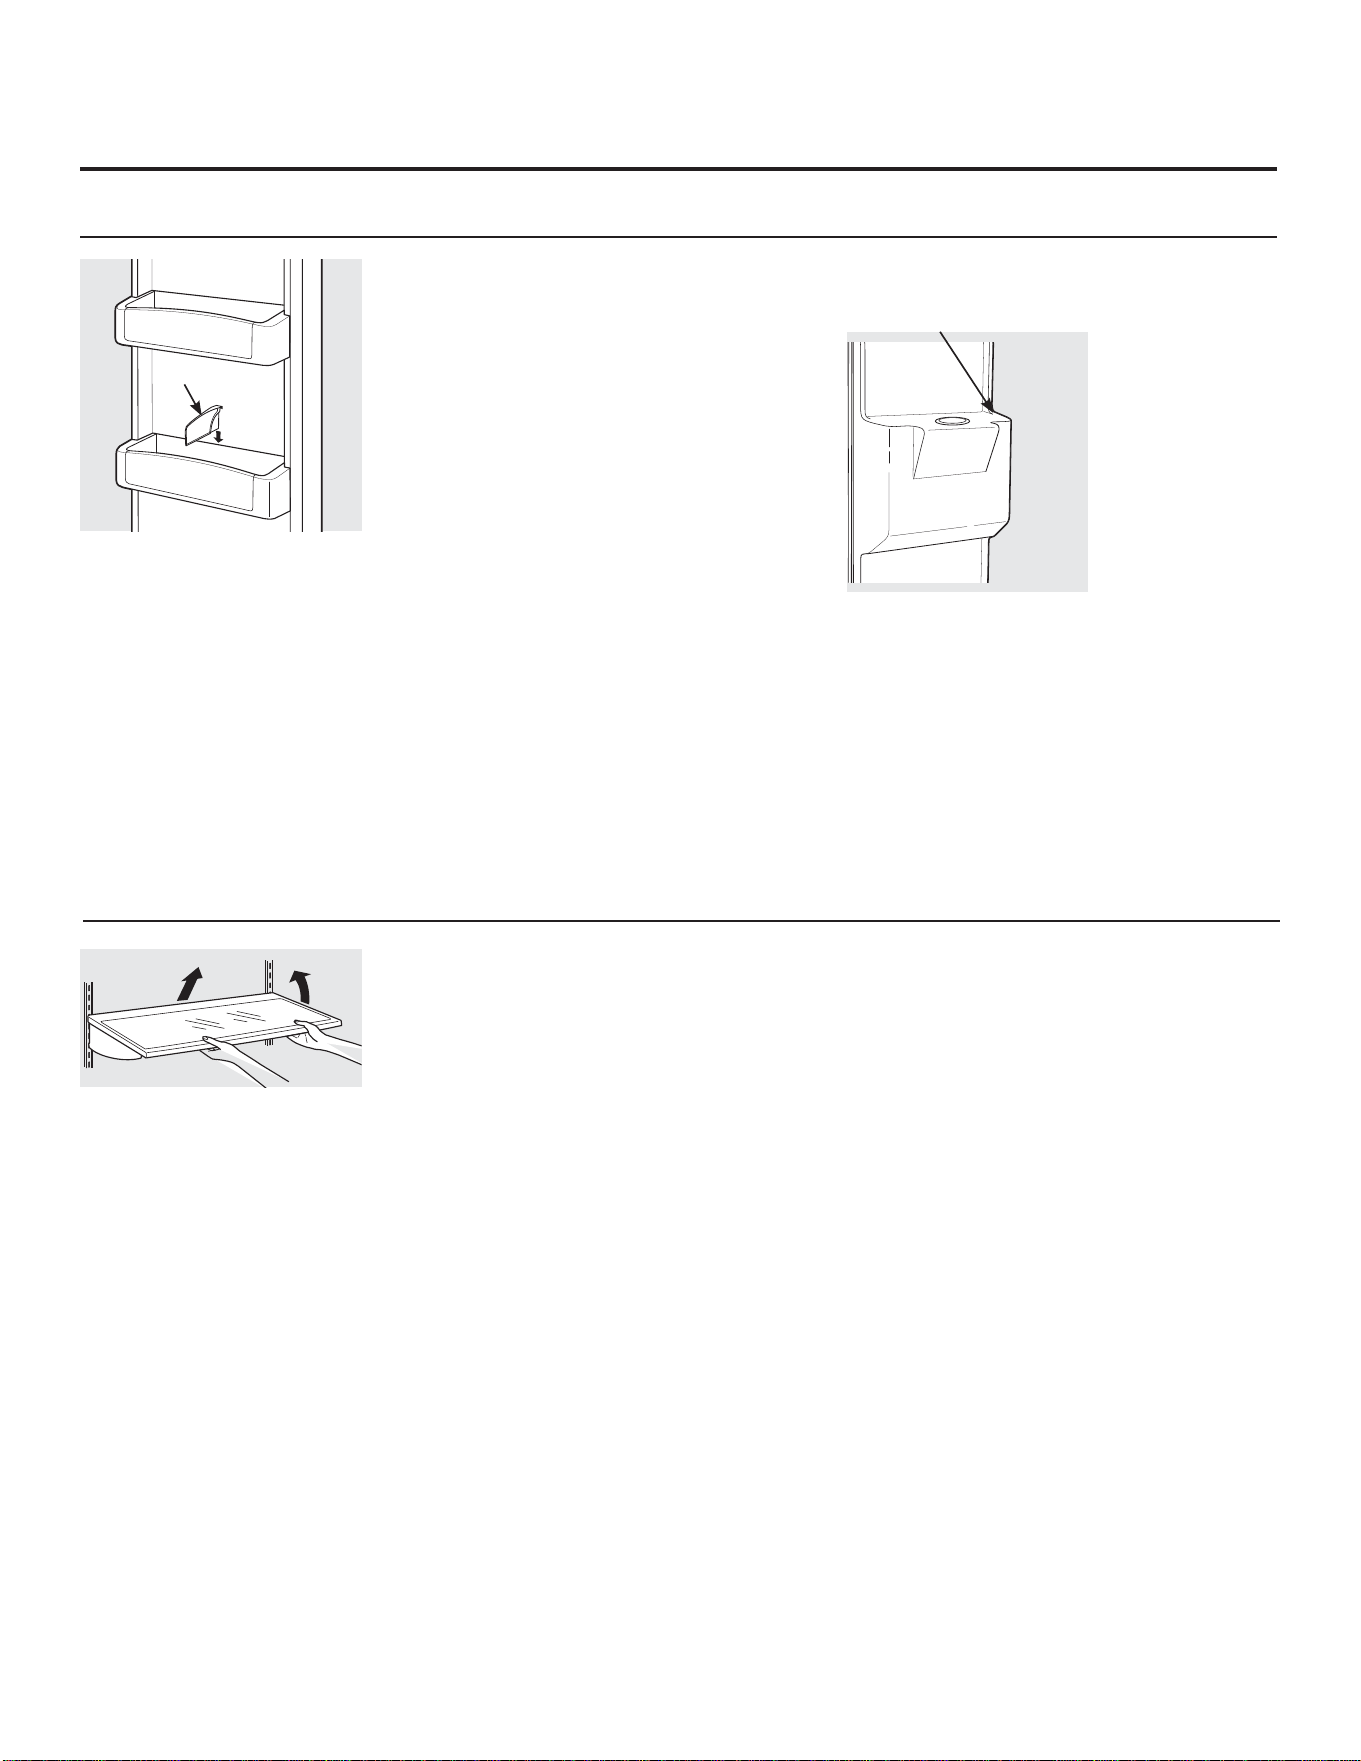
Clayettes et bacs.
Bacs de porte de réfrigérateur et bacs de porte de congélateur
Toutes les caractéristiques ne sont pas disponibles sur tous les modèles.
Bacs de porte de réfrigérateur
Vous pouvez ajuster tous les bacs de porte, sauf
le bac de porte profond d’un gallon
et les bacs du compartiment congélation,
et vous pouvez les bouger vers le haut et vers
le bas, pour remplir vos besoins de rangement.
Vous pouvez enlever, pour
les nettoyer, le bac de porte profond
d’un gallon et le bac du compartiment
congélation.
Pour enlever un bac : Soulevez le bac vers
le haut et tirez-le vers vous.
Remise en place ou relocalisation : Engagez
l’arrière du bac dans les soutiens moulés sur la
porte. Puis poussez vers le bas l’avant du bac.
Le bac se fixe en place.
L’ergot aide à empêcher que de petits articles
placés sur la clayette de la porte
se renversent, coulent ou glissent. Mettez
un doigt de chaque côté de l’ergot près
de l’arrière et faites bouger la clayette vers
l’avant ou vers l’arrière selon vos besoins.
NOTE: Assurez-vous
qu’aucun objet
ne bloque ou tombe
dans
la chute
à glaçons.
54
Clayettes anti-déversements et clayettes de congélateur
Ses bords spéciaux sont conçus pour empêcher
tout déversement aux clayettes inférieures.
Enlèvement des clayettes :
Faites basculer la clayette vers le haut
à l’avant, puis soulevez-la et faites-la sortir
des rails situés sur la paroi arrière
du réfrigérateur.
Remise en place des clayettes :
Choisissez la hauteur de clayette désirée. Avec
l’avant de la clayette soulevé légèrement,
engagez les ergots du haut
dans les rails à l’arrière de l’armoire. Ensuite,
abaissez l’avant de la clayette jusqu’à ce qu’elle
se fixe en place.
Prenez soin de pousser la clayette jusqu’au
fond pour refermer la porte.
Bac supérieur de porte de congélateur
Ne pas obstruer
L’ergot
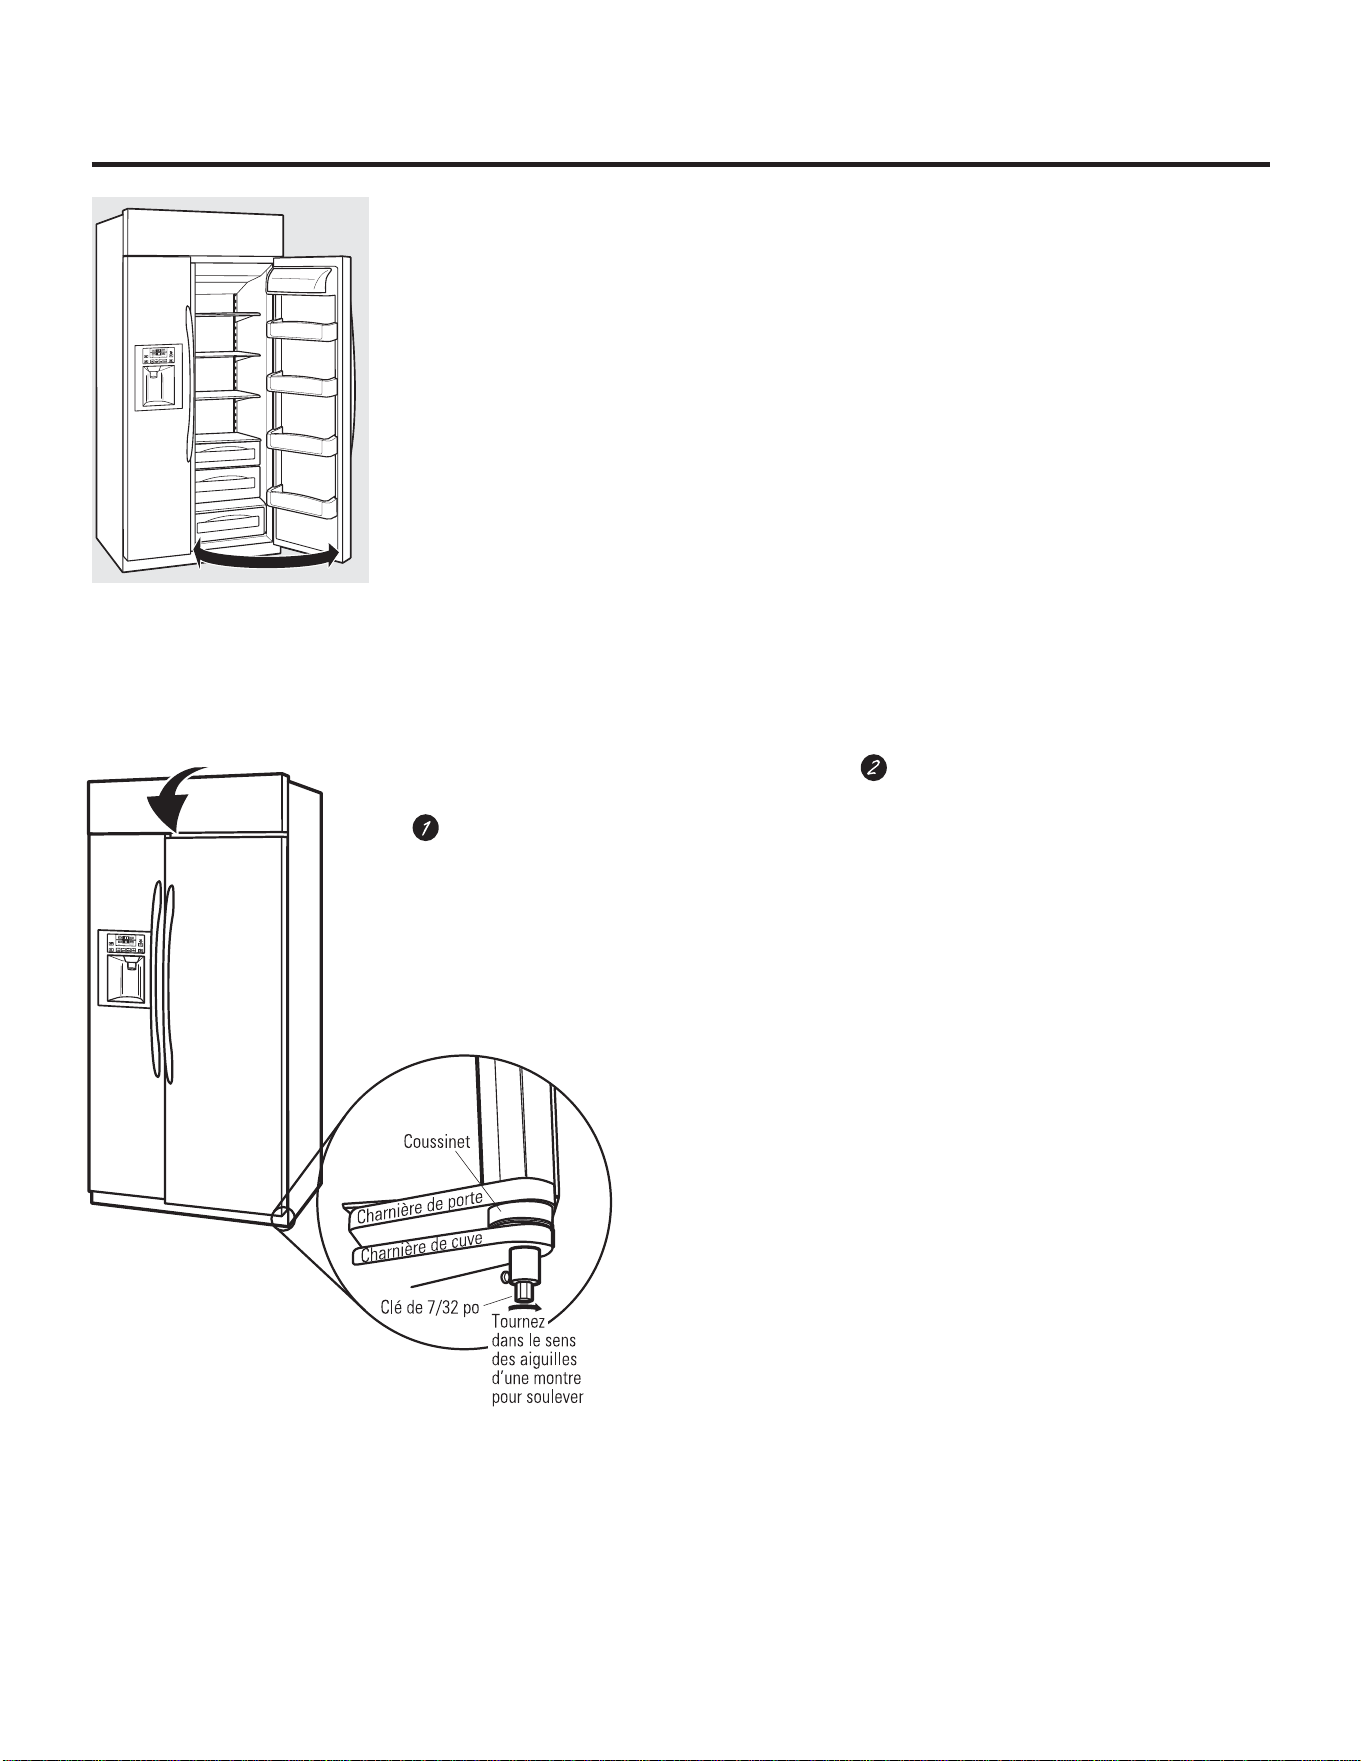
55
Les portes du réfrigérateur. electromenagersge.ca
Portes du réfrigérateur
Les portes de votre réfrigérateur ne sont
pas tout à fait comme celles dont vous
avez l’habitude. Un système sûr d’ouverture/
fermeture assure que les portes ferment
complètement et hermétiquement.
Lorsque vous ouvrez et fermez les portes, vous
remarquerez qu’elles sont munies
d’une position d’arrêt. Lorsque la porte
est en position d’arrêt de 90°, elle se ferme
automatiquement.
L’impression de résistance que vous ressentez
à la position d’arrêt diminue lorsque des
aliments sont rangés dans
la porte.
Lorsque la porte est ouverte de 90°,
elle se ferme automatiquement.
Au delà de cette position d’arrêt la porte
restera ouverte.
Alignement des portes
Si les portes ne soient pas alignées, réglez
la porte du compartiment réfrigérateur.
À l’aide d’une clé à douille de 7/32 po,
tournez la vis de réglage de la porte dans
le sens des aiguilles d’une montre pour
relever la porte, dans le sens opposé à
celui des aiguilles d’une montre pour
l’abaisser. (Une douille de nylon, encastrée
dans les filets de l’axe,
empêchera celui-ci de tourner si l’on
ne se sert pas d’une clé.)
Après avoir tourné la clé une ou deux fois,
ouvrez et fermez la porte du
compartiment réfrigérateur et vérifiez
l’alignement des portes à la partie
supérieure.
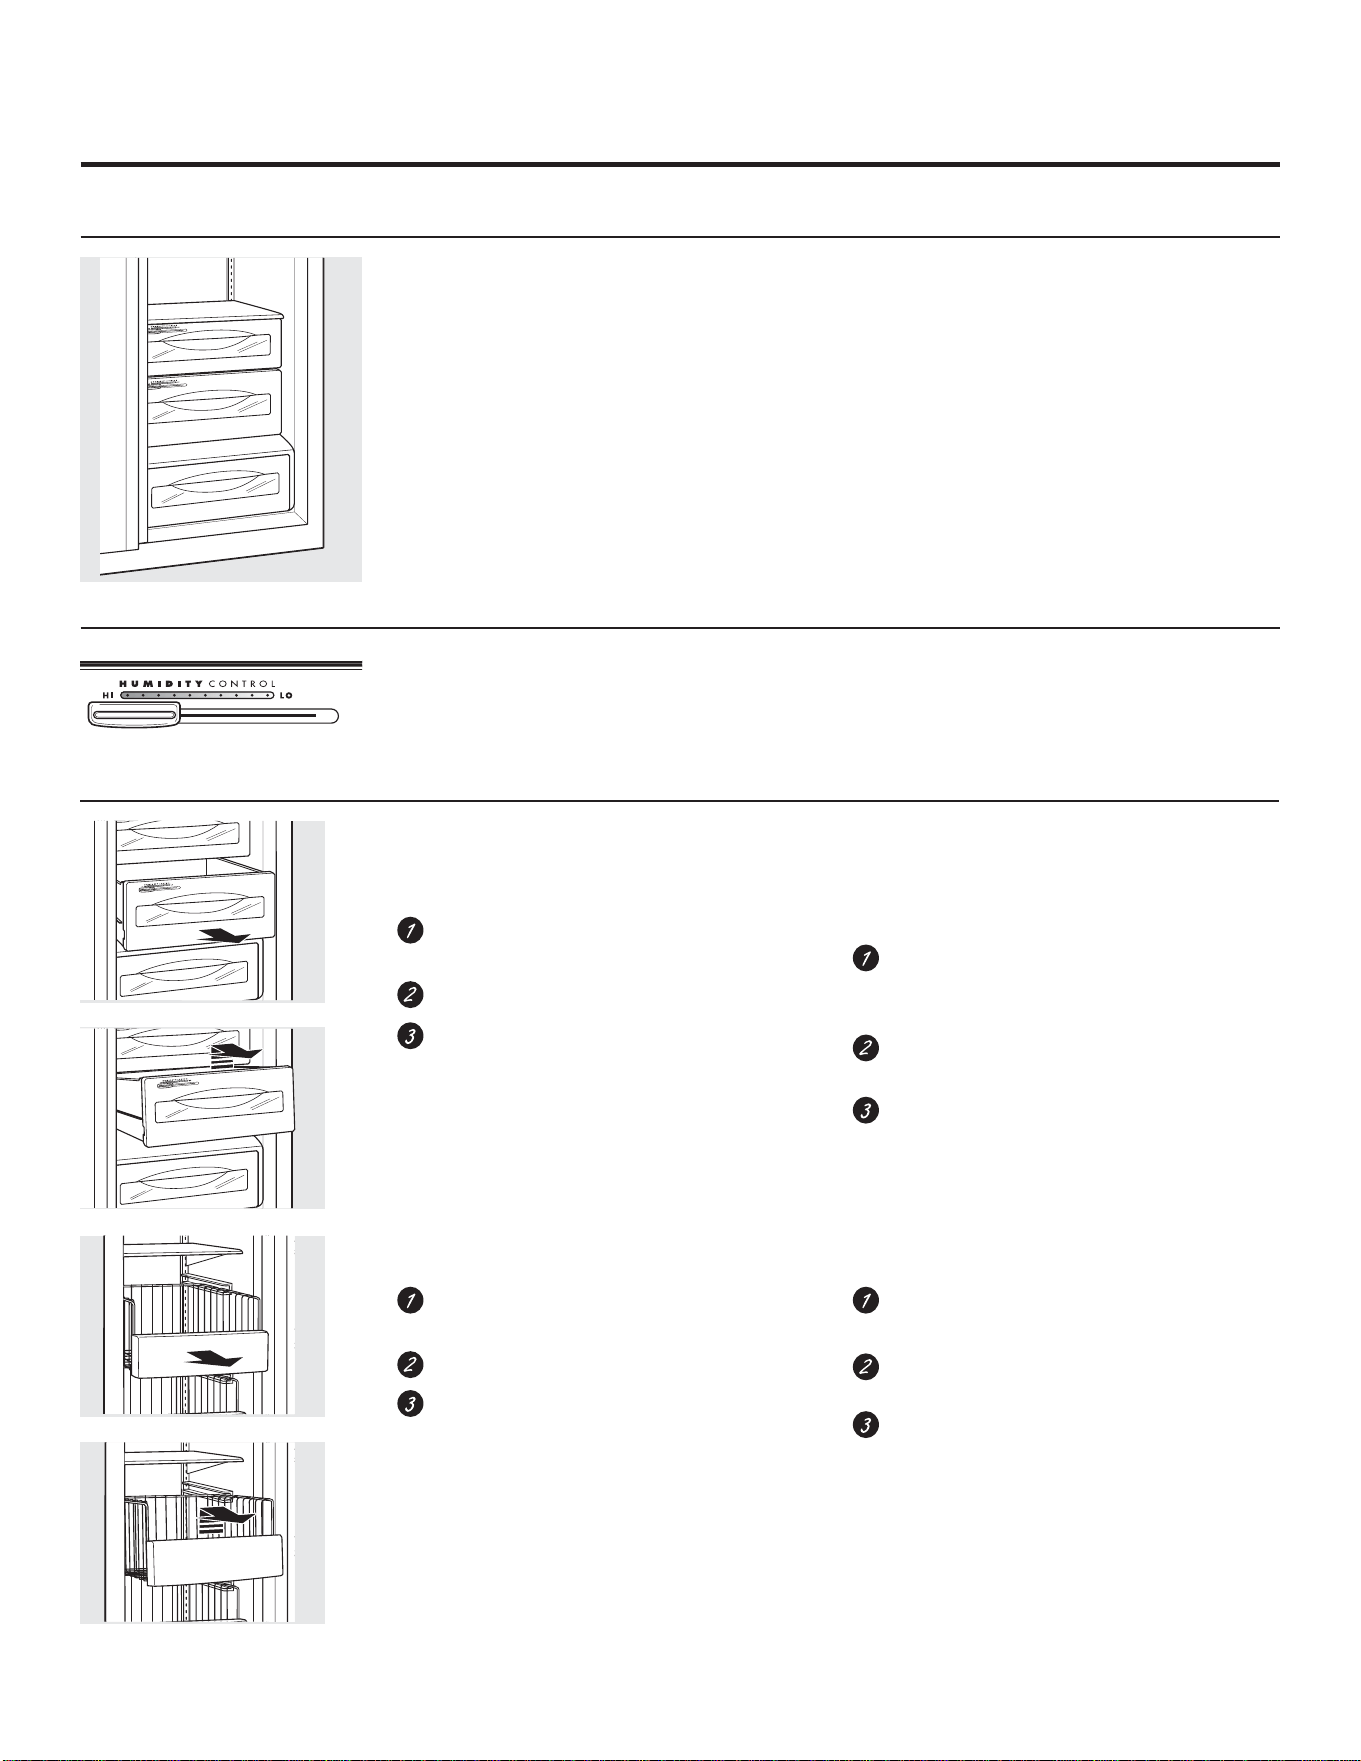
56
Les tiroirs et les paniers.
Toutes les caractéristiques ne sont pas disponibles sur tous les modèles.
Tiroirs à fruits et légumes
Si une quantité d’eau excessive s’accumule
dans le fond des tiroirs, essuyez-les.
Tiroirs avec humidité variable
Réglez la commande à HI pour que le tiroir
conserve un degré d’humidité élevé pour
la conservation des légumes.
Réglez la commande à LO pour abaisser
le degré d’humidité dans le tiroir pour
la conservation des fruits.
Pour enlever les tiroirs à aliments frais :
Faites sortir le tiroir désiré en le tirant
en dehors de sa position d’arrêt.
Soulevez légèrement l’avant du tiroir.
Tirez le tiroir légèrement vers l’avant
et faites-le sortir du réfrigérateur.
Pour remettre en place les tiroirs
à aliments frais :
Faites basculer les rouleaux arrières
du tiroir à l’arrière des rouleaux dans
le rail.
Abaissez l’avant du tiroir jusqu’à
sa position normale.
Faites glisser le tiroir jusqu’à l’arrière
du réfrigérateur.
Pour enlever les paniers
du compartiment congélation :
Faites sortir le panier désiré en le tirant en
dehors de sa position d’arrêt.
Soulevez légèrement l’avant du panier.
Tirez le panier légèrement vers l’avant
et faites-le sortir du compartiment
congélation.
Pour remettre en place les paniers
du compartiment congélation :
Placez les coins arrière dans le rail
avec le panier basculé vers le haut.
Abaissez le panier vers le bas jusqu’à
sa position normale.
Faites glisser le panier jusqu’à l’arrière
du compartiment congélation.
Comment enlever et remettre en place les tiroirs et les paniers
du compartiment congélation
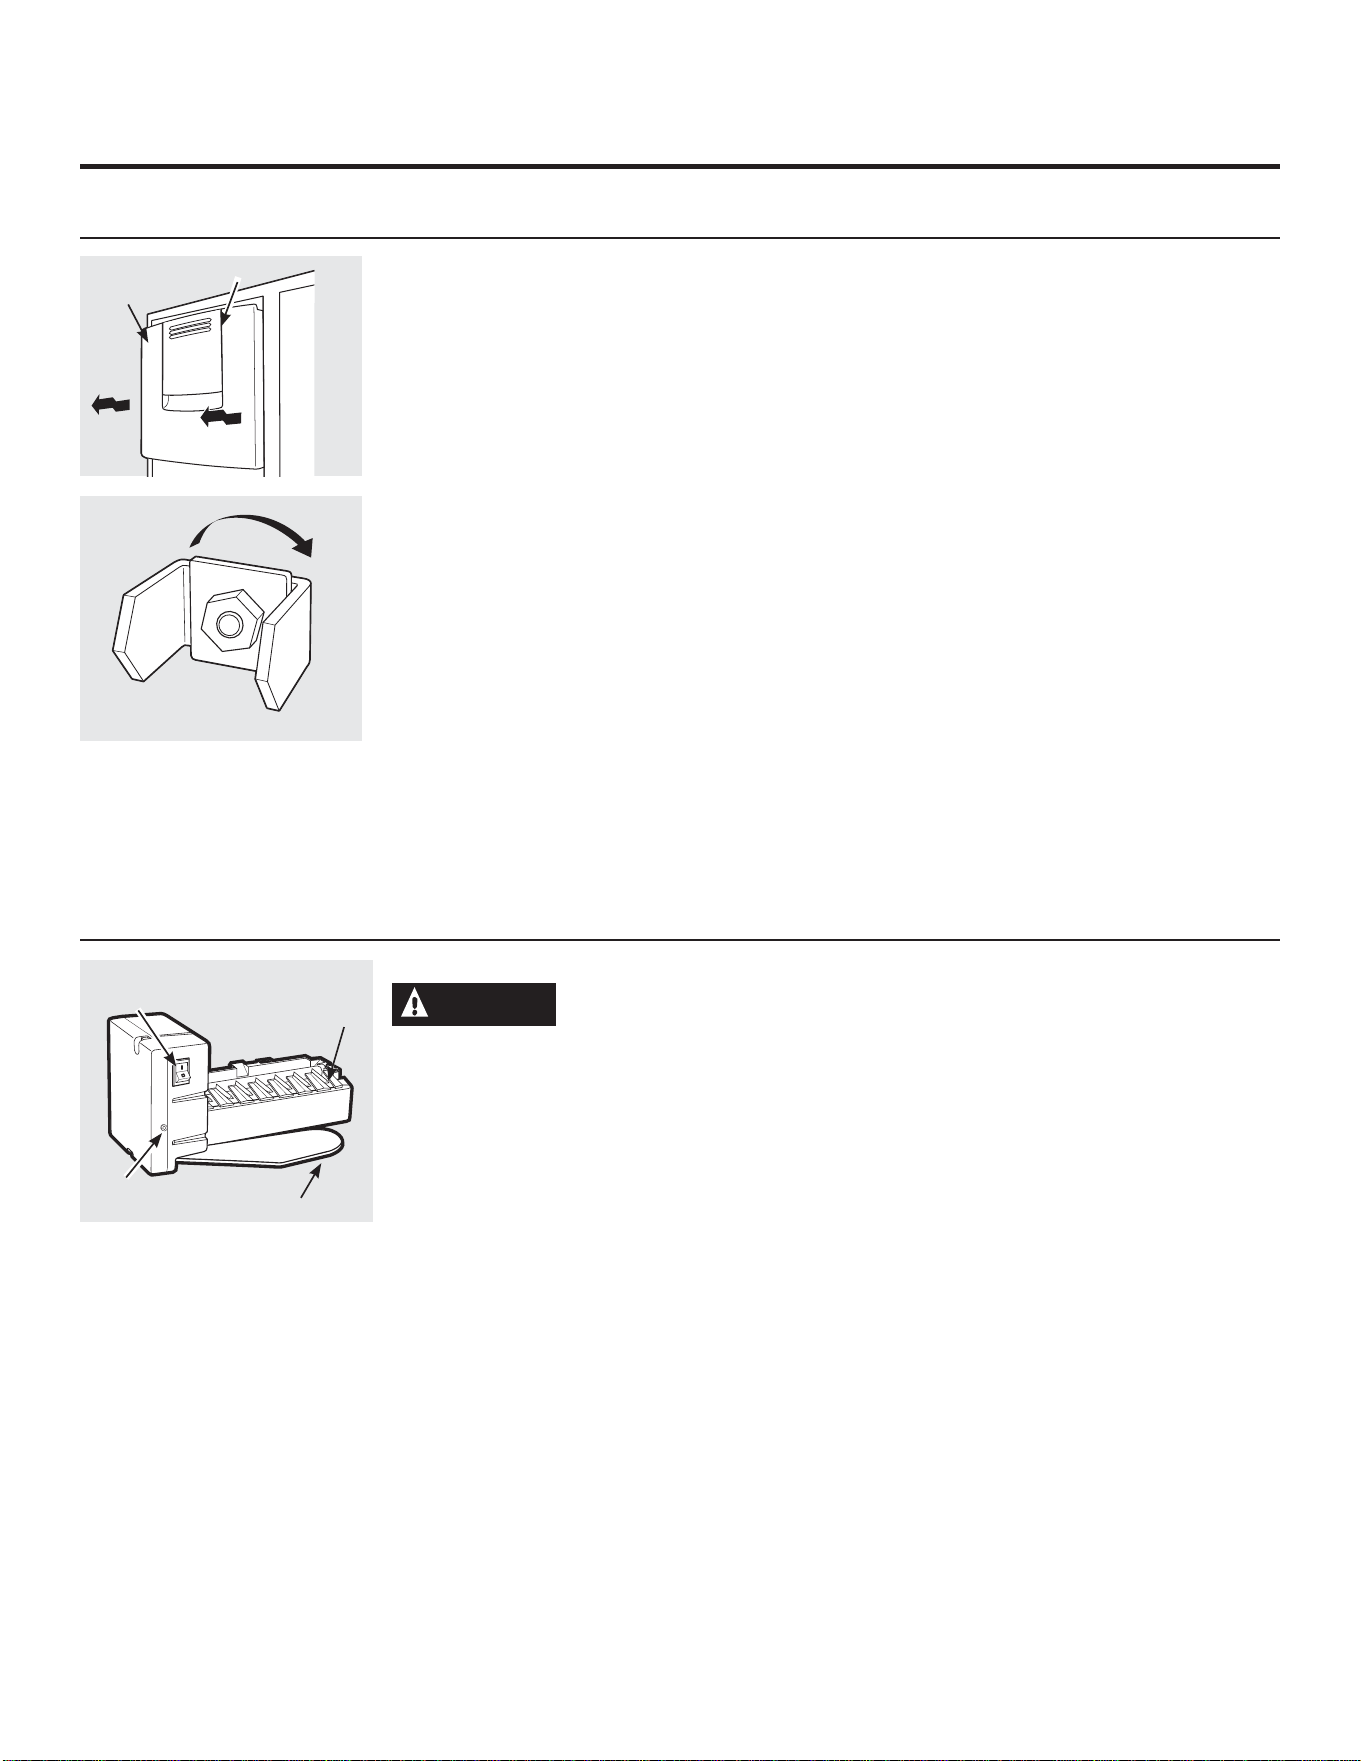
Il faut prévoir entre 12 et 24 heures avant qu’un réfrigérateur nouvellement installé commence à produire des glaçons.
Le distributeur d’eau et de glaçons
et la machine à glaçons automatique.
electromenagersge.ca
Bac à glaçons
Porte d’accès
Faites
tourner
Le
mécanisme
de mise en place
Machine à glaçons automatique
MISE EN GARDE
Évitez tout contact avec les
pièces mobiles du mécanisme d’éjection ou
l’élément chauffant (situé dans le bas de la
machine à glaçons) qui libère les cubes. Ne
placez pas les doigts ou les mains sur le
mécanisme de production de glace
automatique lorsque le réfrigérateur est
branché dans la prise électrique.
Il faut prévoir entre 12 et 24 heures avant
qu’un réfrigérateur nouvellement installé
commence à produire des glaçons.
La machine à glaçons produira environ
JODoRQVSDUF\FOH³VRLWHQYLURQF\FOHVWRXWHV
OHVKHXUHV³VHORQODWHPSpUDWXUH
du congélateur, la température ambiante,
la fréquence d’ouverture des portes et
d’autres conditions d’utilisation.
Si vous mettez votre réfrigérateur en marche
avant que la machine à glaçons ne soit
alimentée en eau, mettez l’interrupteur
d’alimentation à la position O (arrêt).
Lorsque la conduite d’eau est raccordée
au réfrigérateur, mettez l’interrupteur
d’alimentation à la position l (marche).
La lumière verte s’allume.
Jetez le premier bac de glaçons.
Assurez-vous que rien ne gêne
le mouvement du bras régulateur.
Si le bac à glaçons est plein jusqu’au niveau du
bras régulateur, la machine à glaçons s’arrêt de
produire des glaçons.
Il est normal que plusieurs glaçons soient collés
entre eux.
Lorsque vous n’utilisez pas souvent de glaçons,
les vieux glaçons perdent leur transparence,
prennent un goût désagréable, et diminuent de
taille.
Après avoir remis en marche la machine
à glaçons, il y a un délai d’environ 45 minutes
avant que la machine à glaçons se remette en
marche.
NOTE : Dans les maisons où la pression
de l’eau est plus faible que la normale, vous
entendrez la machine à glaçon se remettre en
marche à plusieurs reprises pour fabriquer un
lot de glaçons. Nous recommandons
une pression d’eau de 60 psi.
Bac à glaçons
Pour enlever :
Soulevez la porte d’accès pour atteindre
la machine à glaçons. Mettez l’interrupteur
d’alimentation électrique de la machine
à glaçons en position O (arrêt). Avec
la porte d’accès fermée, soutenez le bac
d’entreposage en bas tout en soulevant
légèrement. Tirez le bac droit pour le faire
sortir.
Pour remettre en place :
Faites glisser le bac vers l’arrière jusqu’à
ce que l’ergot du bac se fixe dans la fente
de la clayette. Si le bac ne va pas jusqu’à
l’arrière, enlevez-le et faites tourner
le mécanisme de mise en place
d’un quart de tour. Poussez alors
le bac vers l’arrière à nouveau.
Renseignments importants
concernant votre distributeur
d’eau et de glaçons
N’ajoutez pas dans le bac à glaçons des
glaçons non fabriqués par votre machine
à glaçons. Ils risquent d’être difficiles
à concasser ou à distribuer.
Évitez de trop remplir les verres de glaçons et
d’utiliser des verres étroits ou très hauts. Le
conduit peut se bloquer et le volet peut geler
et coincer. S’il y a des glaçons qui bloquent le
conduit, faites-les passer
au moyen d’une cuillère en bois.
Ne placez pas de boissons ou d’aliments dans
le bac à glaçons pour les rafraîchir. Les boîtes,
bouteilles et paquets alimentaires peuvent
coincer la machine
à glaçons ou la vis sans fin.
Afin que la glace distribuée ne puisse
manquer le verre, placer le verre à proximité
mais sans toucher l’ouverture
du distributeur.
Même si vous avez sélectionné CUBED
(glaçons), il est possible que de la glace
concassée tombe dans votre verre. Cela
se produit de temps à autre lorsque plusieurs
glaçons sont acheminés vers
le broyeur.
Après distribution de la glace concassée, de
l’eau peut s’écouler du conduit.
Le premier verre d’eau distribué peut être plus
chaud que les verres suivants. C’est normal.
57
Machine à glaçons
Bras régulateur
Interrupteur
d’alimentation
Voyant témoin in vert
d‘alimentation
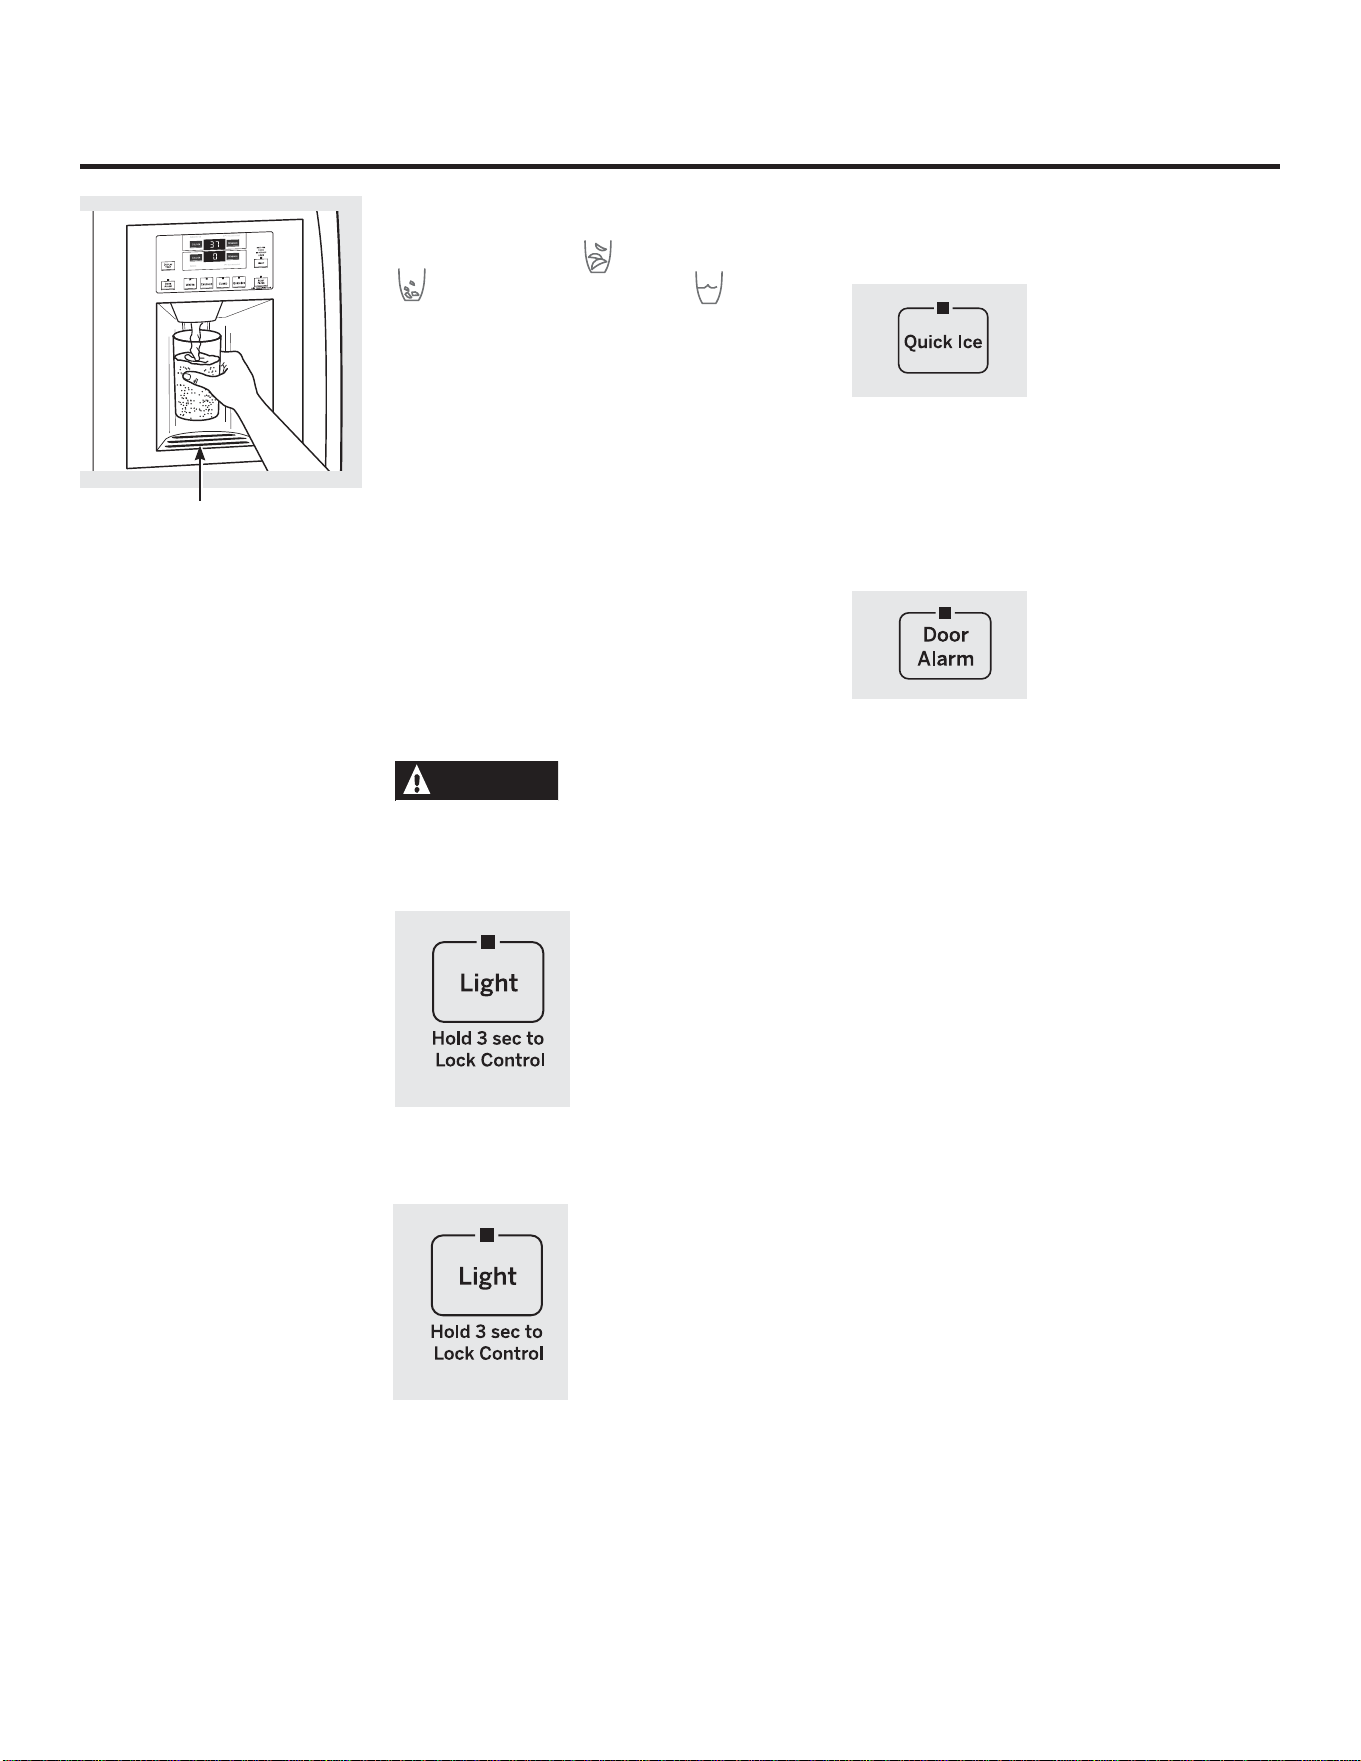
Le distributeur d’eau et de glaçons.
Pour utiliser le distributeur
Sélectionnez CUBED (glaçons), CRUSHED
(glace concassée) ou WATER (eau).
Appuyez doucement le verre contre
le milieu de la touche de distribution.
La clayette de trop-plein n’est pas munie
d’un système d’écoulement. Pour réduire
les taches d’eau, vous devez nettoyer
régulièrement la clayette et sa grille.
S’il n’y a pas d’eau distribuée lorsque
le réfrigérateur est initialement installé,
il y a peut-être de l’air dans la conduite
d’eau. Appuyez sur la commande de
distribution pendant deux minutes
au minimum pour expulser l’air
de la conduite d’eau et remplir
le système d’eau. Afin d’éliminer
les éventuelles impuretés provenant
de la conduite d’eau, jetez les six premiers
verres d’eau.
MISE EN GARDE
Ne mettez jamais les doigts ou d’autres
objets dans l’ouverture du distributeur.
Verrouillage du distributeur
Appuyez sur le bouton
LOCK/LIGHT pendant
3 secondes pour verrouiller
le distributeur et le
panneau de réglage. Pour
déverrouiller, appuyez sur
le bouton
et tenez-la enfoncée
pendant encore
3 secondes.
Lumière du distributeur
Ce bouton allume
et éteint la lumière. Vous
allumez également
la lumière en appuyant sur
la touche de distribution. Si
cette ampoule brûle, vous
devez la remplacer par une
ampoule d’au maximum 6
watts, 12V.
Glace rapide
Si vous avez besoin
de glace rapidement,
appuyez sur ce bouton
pour accélérer
la production de glace.
Cela augmente
la production de glace
pendant les 48 heures
suivantes ou jusqu’à
ce que vous appuyez
à nouveau sur ce bouton.
Alarme de porte
Pour brancher l’alarme
de porte, appuyez une
fois sur le bouton DOOR
ALARM (alarme de porte).
Le signal lumineux ACTIVE
(activée) s’allume. Pour
la débrancher, appuyez
encore une fois sur le
bouton. Quand l’alarme de
porte est activée, le signal
lumineux ACTIVE clignote
quand vous ouvrez la porte
et fait un signal sonore
si vous laissez la porte
ouverte pendant plus
de 2 minutes. La lumière
s’éteint et le signal sonore
s’arrête quand vous fermez
la porte.
58
Clayette de trop-plein
59
Nettoyage de l’extérieur
Vous devez nettoyer périodiquement
la clayette de trop-plein et les surfaces situées
autour d’elle à l’aide d’un détergent liquide
doux à vaisselle.
La touche de distribution. Avant de nettoyer,
verrouillez le distributeur en appuyant pendant
3 secondes sur le bouton LOCK/LIGHT
(verrouillage/lumière), afin d’éviter de mettre
en marche le distributeur. Nettoyez à l’aide
d’un détergent liquide doux à vaisselle et d’eau
chaude. Rincez soigneusement et séchez bien.
Déverrouillez le distributeur en appuyant sur le
bouton LOCK/LIGHT pendant 3 secondes.
Les poignées de porte. Nettoyez-les au moyen
d’un linge humecté d’eau savonneuse. Séchez
avec un linge doux.
N’essuyez pas le réfrigérateur avec un linge
à vaisselle sale ou une serviette humide :
ils pourraient laisser un résidu qui pourra
endommager le fini de surface. N’utilisez pas
de tampons à récurer, de produits nettoyants
en poudre, de javellisants ou de produits
nettoyants contenant un javellisant, car ces
produits peuvent égratigner et endommager le
fini de surface.
Vous pouvez nettoyer les portes et les
poignées de porte en acier inoxydable (sur
certains modèles) avec un nettoyant d’acier
inoxydable vendu sur le marché. Les nettoyants
qui contiennent de l’acide oxalique, tels que
Bar Keepers Friend Soft Cleanser
™
, éliminent
la rouille, le ternissement et les petites taches.
Utilisez uniquement un nettoyant liquide
exempt d’abrasif et frottez dans la direction
des lignes de brossage à l’aide d’une éponge
souple imbibée. N’utilisez pas de cire pour
appareils ménagers sur l’acier inoxydable.
Nettoyage de l’intérieur
Débranchez le courant au niveau de la boîte
à fusible ou du disjoncteur avant de nettoyer
votre réfrigérateur. S’il est trop difficile de le
faire, essorez bien votre linge ou votre éponge
pour enlever l’excès d’eau lorsque vous nettoyez
autour des interrupteurs, des lampes ou des
commandes.
Utilisez une solution d’eau tiède et de
ELFDUERQDWHGHVRXGH³HQYLURQPO
(une cuillère à soupe) de bicarbonate
GHVRXGHSDUOLWUHXQHSLQWHG·HDX³DILQ
de nettoyer tout en neutralisant les odeurs.
Rincez et essuyez bien.
Vous pouvez nettoyer de la même manière les
autres parties du réfrigérateur, y compris les
joints de porte, la clayette à amuse-gueules et
les tiroirs à légumes, le bac à glaçons et toutes
les pièces en matière plastique.
Ne lavez jamais au lave-vaisselle la clayette
ou une pièce en matière plastique de votre
réfrigérateur.
MISE EN GARDE
Ne nettoyez pas les clayettes ou
les couvercles en verre avec de l’eau tiède quand
ceux-ci sont froids. Les clayettes et couvercles en
verre peuvent se casser s’ils sont exposés à des
changements soudains de température ou si vous
les cognez ou les faites tomber. Le verre trempé est
conçu pour se briser en petits morceaux en cas de
casse.
Zone de ramasse-gouttes
du distributeur.
Entretien et nettoyage du réfrigérateur. electromenagersge.ca
60
Entretien et nettoyage du réfrigérateur.
Lorsque vous vous absentez pendant
une période prolongée, videz et débranchez le
réfrigérateur. Nettoyez l’intérieur avec
une solution d’eau et de bicarbonate de soude,
à raison 15 ml (d’une cuillère à soupe) de
bicarbonate par litre (1 pinte) d’eau. Laissez les
portes ouvertes.
Mettez l’interrepteur d’alimentation de
la machine à glaçons à la position O (arrêt)
et fermez l’alimentation d’eau au réfrigérateur.
Si la température risque de descendre
sous le point de congélation, demandez
à un réparateur de vidanger la conduite d’eau
afin d’éviter les dégâts sérieux causés par les
inondations.
Départ en vacances
Déménagement
Immobilisez tous les éléments amovibles,
tels que les clayettes et les bacs, à l’aide
de ruban gommé pour éviter de
les endommager.
AVERTISSEMENT
Ce réfrigérateur est lourd et de grande taille.
Aussi, pour réduire le risque de blessure
corporelle ou de dommage à ce produit, IL
FAUT AU MOINS 4 PERSONNES POUR
DÉMÉNAGER LE RÉFRIGÉRATEUR À VOTRE
MAISON ET IL FAUT 2 PERSONNES POUR BIEN
L’INSTALLER.
Assurez-vous que le réfrigérateur demeure
debout pendant son déménagement.
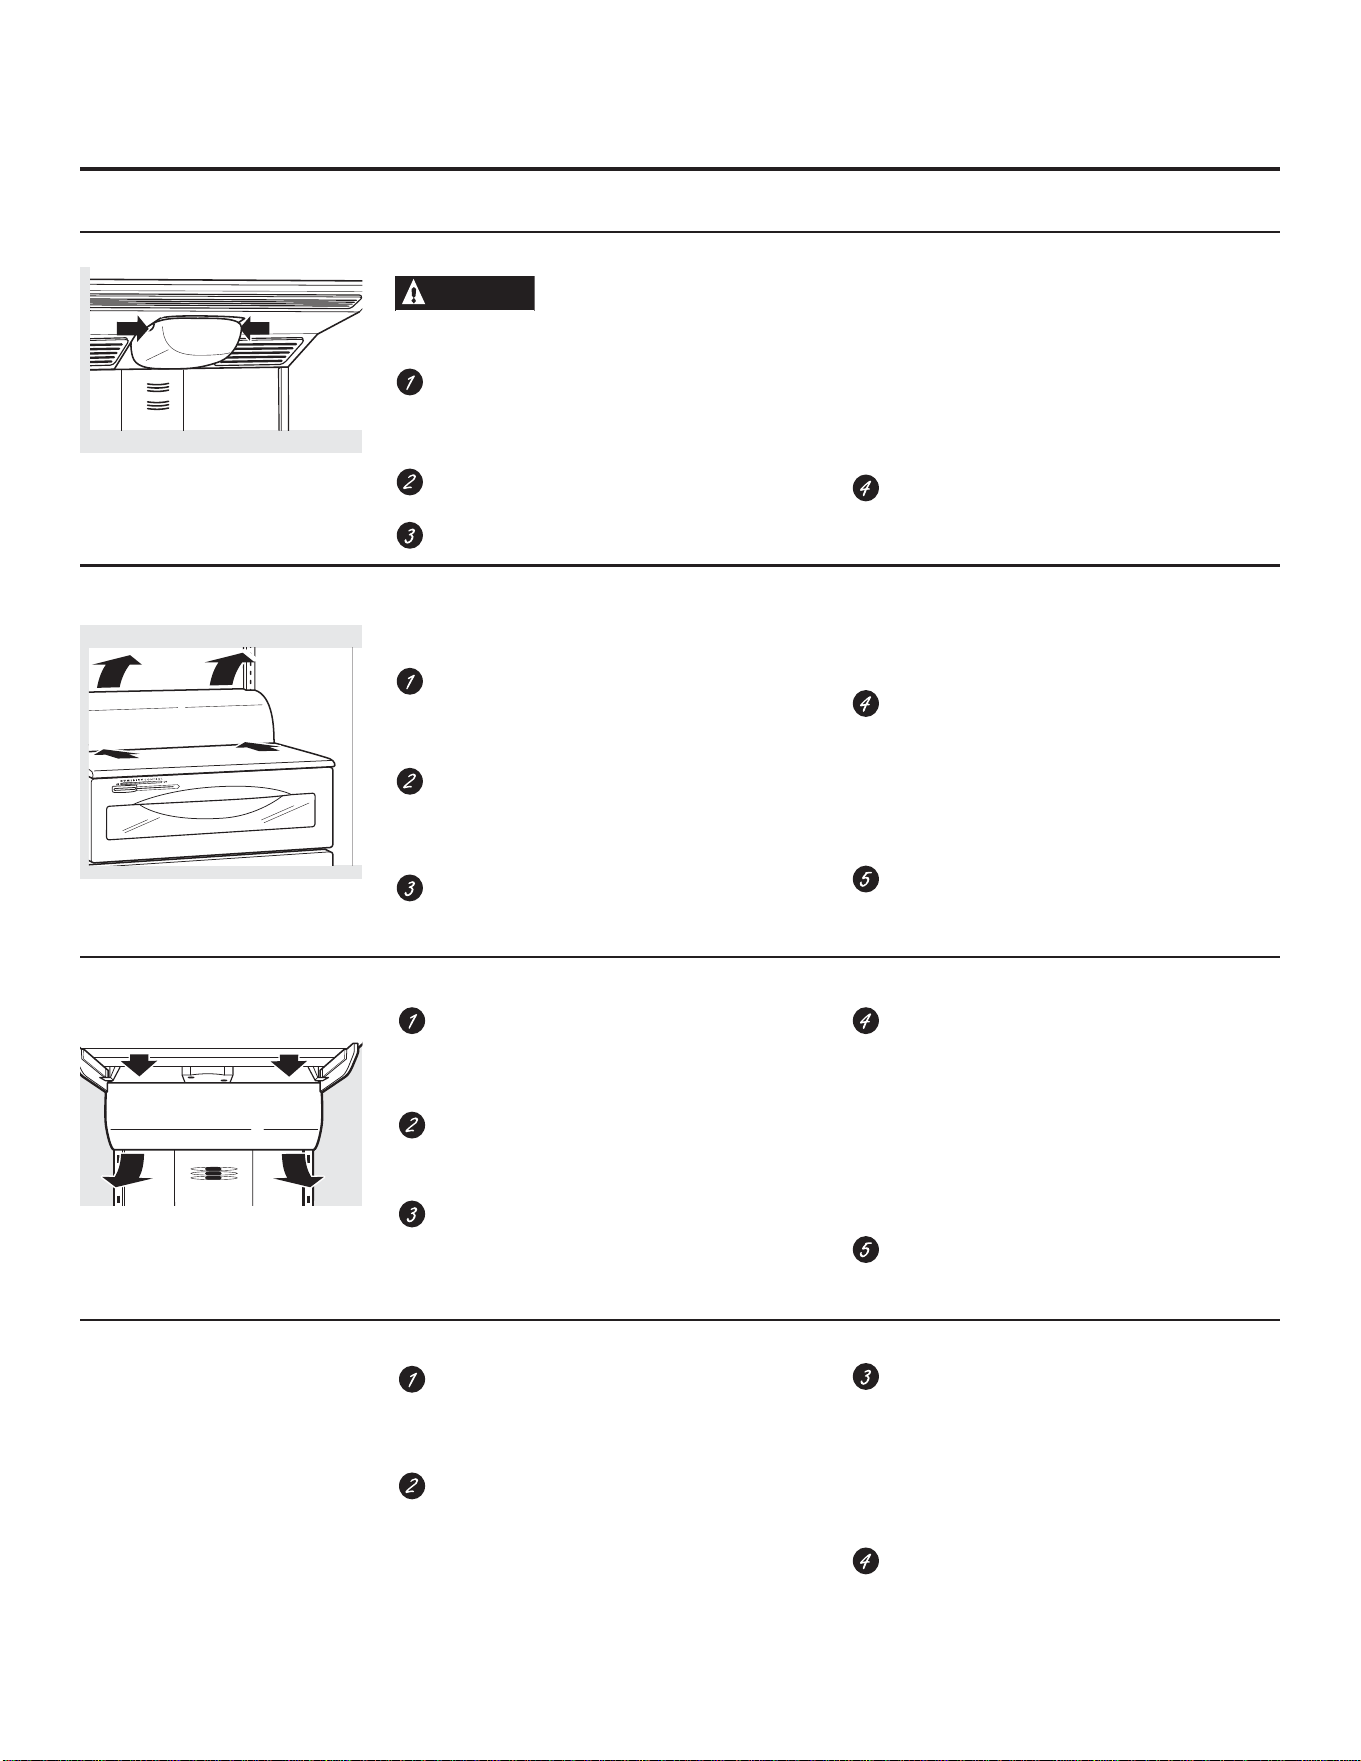
Remplacement des ampoules. electromenagersge.ca
Lorsque vous réglez les commandes sur OFF (Arrêt), l’alimentation électrique de l’ampoule n’est pas coupée.
&RPSDUWLPHQWUpIULJpUDWHXU³ODPSHVXSpULHXUH
ATTENTION
Les ampoules peuvent être très
chaudes. Une ampoule grillée peut se casser
durant son remplacement.
Soulevez le panneau de la grille, mettez
l’interrupteur général d’alimentation en
position O (arrêt) et laissez l’ampoule
refroidir.
Pour enlever le pare-lumière, appuyez sur
les côtés du pare-lumière et abaissez.
Remplacez l’ampoule par une ampoule
d’appareil électroménager de même
puissance ou de puissance inférieure.
Remettez en place le pare-lumière en
faisant entrer les taquets de derrière dans
les fentes de derrière. Tout en tenant en
place l’arrière du pare-lumière, faites entrer
les taquets de devant dans la fente de
devant.
Mettez l’interrupteur général d’alimentation
en position I (marche) et fermez le panneau
de la grille.
&RPSDUWLPHQWUpIULJpUDWHXU³ODPSHLQIpULHXUH
Cette lumière se trouve au dessus du tiroir
d’en haut.
Soulevez le panneau de la grille, mettez
l’interrupteur général d’alimentation
en position O (arrêt) et laissez l’ampoule
refroidir.
Enlevez tous les articles qui
se trouvent sur la clayette située
au-dessus du pare-lumière. Enlevez
la clayette.
Saisissez à deux mains les deux extrémités
du pare-lumière. Pressez le bas du pare-
lumière avec le pouce, tout en faisant
tourner le couvercle vers le haut pour le
faire sortir.
Remplacez l’ampoule par une ampoule
d’appareil électroménager de même
puissance ou de puissance inférieure.
Remettez en place le pare-lumière en faisant
entrer le taquet du bas dans
la fente et en mettant un peu de pression
en avant pour fixer le pare-lumière en place.
Mettez l’interrupteur général d’alimentation
en position I (marche) et fermez le panneau
de la grille.
Compartiment congélateur
Soulevez le panneau de la grille, mettez
l’interrupteur général d’alimentation en
position O (arrêt) et laissez l’ampoule
refroidir.
Enlevez tous les articles qui se trouvent sur
la clayette située au-dessous du pare-
lumière. Enlevez la clayette.
Pour enlever le pare-lumière, appuyez
en haut du pare-lumière et faites sortir les
taquets des fentes. Faites basculer
le pare-lumière pour le faire sortir.
Remplacez l’ampoule par
une ampoule d’appareil électroménager
de même puissance ou de puissance
inférieure et remettez en place le pare-
lumière. Remettez en place le pare-lumière
en faisant entrer
le taquet du bas dans la fente et en mettant
un peu de pression en avant
pour fixer le pare-lumière en place.
Mettez l’interrupteur général d’alimentation
en position I (marche)
et fermez le panneau de la grille.
Distributeur
Soulevez le panneau de la grille, mettez
l’interrupteur général d’alimentation
en position O (arrêt) et laissez l’ampoule
refroidir.
L’ampoule est dans le distributeur situé en
dessous du panneau de contrôle. Enlevez les
deux vis du pare-lumière. Faites glisser le
pare-lumière vers le distributeur pour faire
sortir les taquets, puis enlevez le pare-lumière.
Enlevez l’ampoule en la faisant tourner dans
le sens opposé à celui
des aiguilles d’une montre.
Remplacez l’ampoule par une ampoule
d’appareil électroménager de même
puissance ou de puissance inférieure.
Remettez en place le pare-lumière en
faisant entrer les taquets dans les fentes à
l’avant du distributeur. Remettez en place
les deux vis.
Mettez l’interrupteur général d’alimentation
en position I (marche)
et fermez le panneau de la grille.
61
(l’apparence peuvent varier)
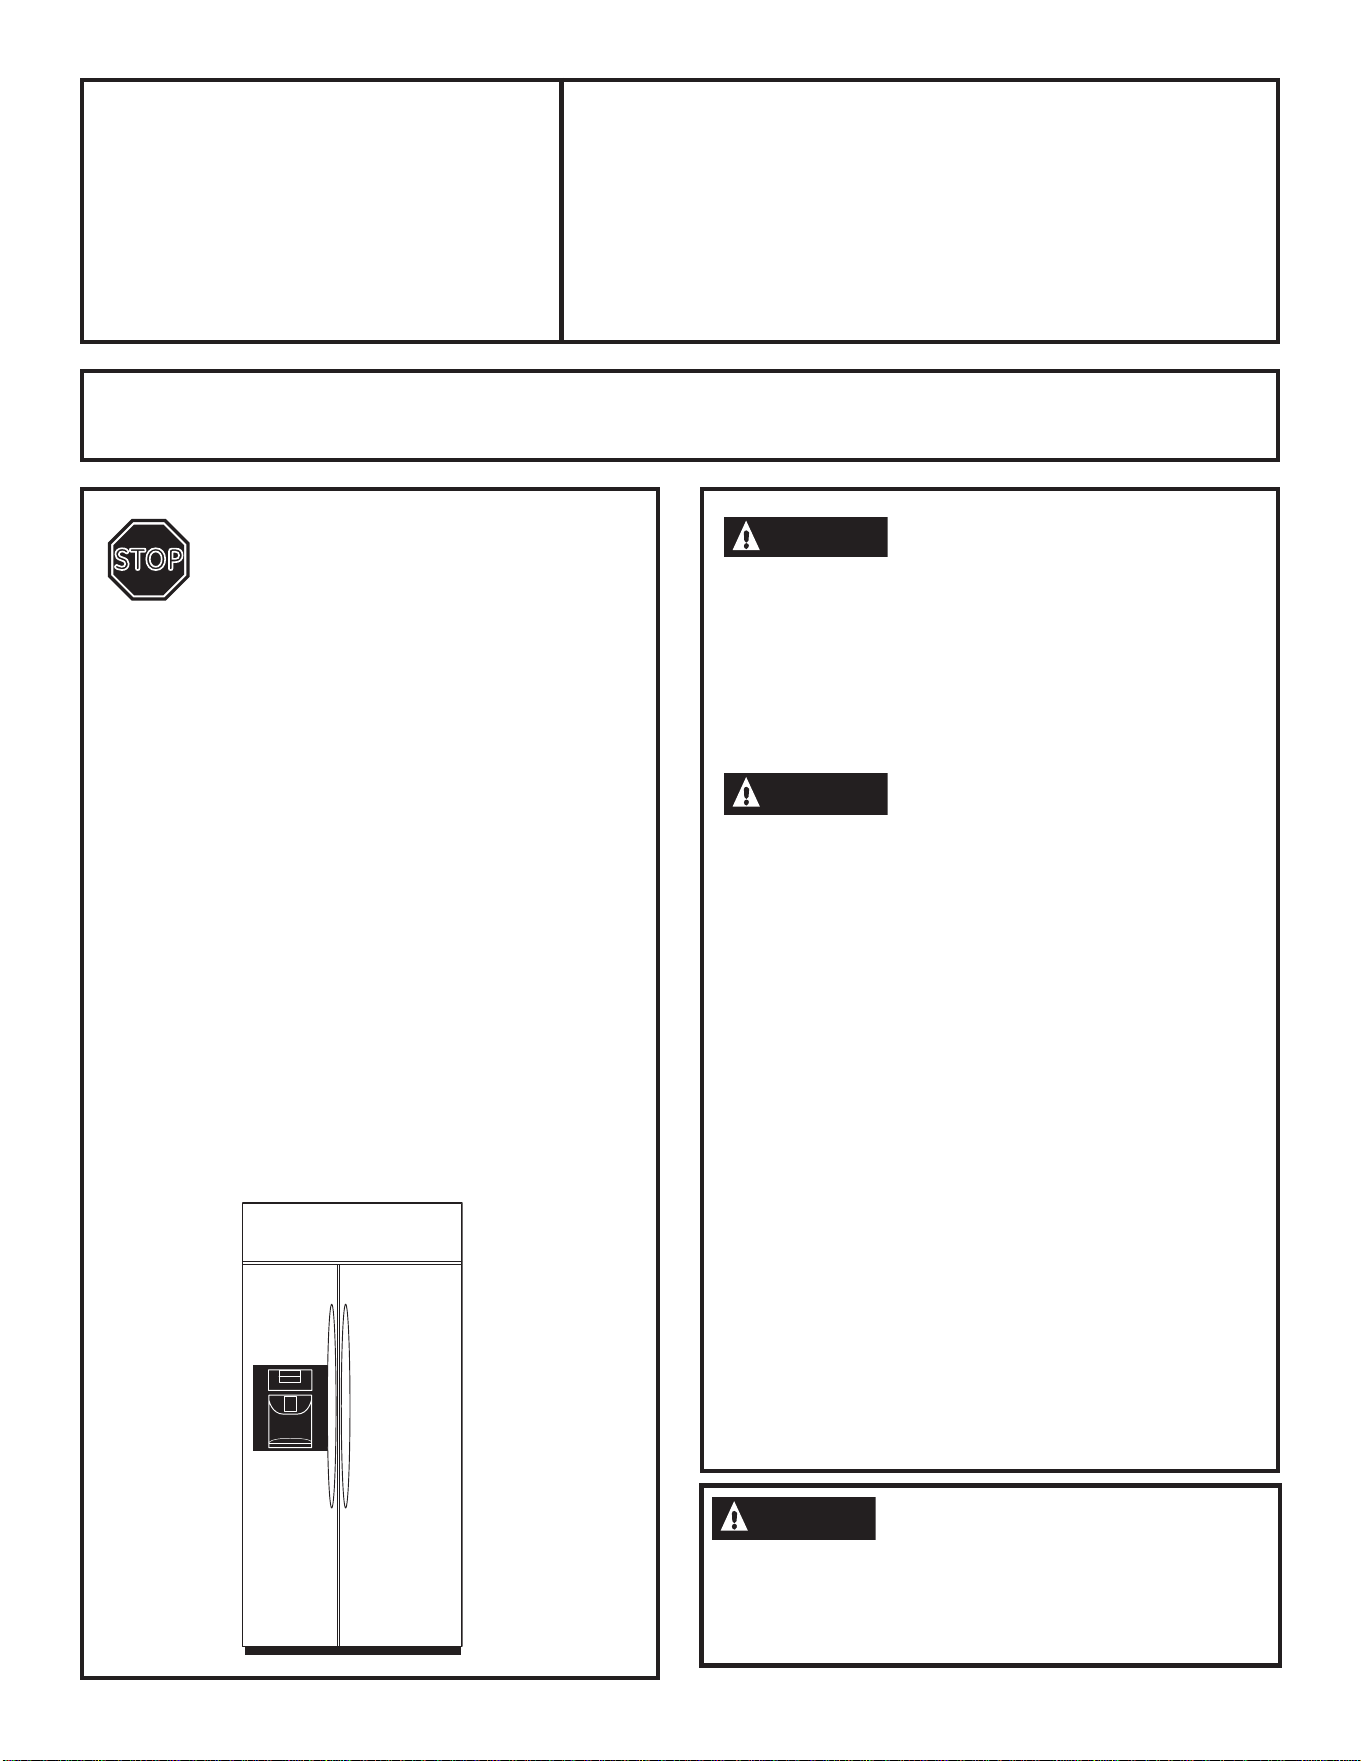
Instructions
d’installation
Réfrigérateurs encastrés à
compartiments juxtaposés
PSB42YS, PSB42YG, PSB48YS, PSB48YG
Si vous avez des questions, appelez le 1.800.561.3344 ou visitez notre site Web à l’adresse : www.
electromenagersge.ca
AVANT DE COMMENCER
Lire ces instructions complètement
et soigneusement.
•
IMPORTANT ³ Il faut respecter tous
les codes en vigueur.
•
Note pour l’installateur – Il faut prendre soin
de laisser ces instructions pour utilisation par
le client et l’inspecteur local.
•
Note pour le consommateur – Il faut conserver
ces instructions avec le manuel d’utilisation pour
consultation ultérieure.
•
Niveau de compétence – L’installation de
ce réfrigérateur nécessite des aptitudes de
base en mécanique, charpenterie et plomberie.
L’installateur est responsable de la qualité de
l’installation. Une défaillance du produit à cause
d’une mauvaise installation n’est pas couverte
par la garantie des appareils électroménagers
de GE. Consulter les renseignements dans
la garantie.
•
Durée de l’installation – 90 minutes
(une nouvelle installation prend plus de temps
qu’une installation de remplacement).
STOP
AVERTISSEMENT
À cause du poids et de la taille de ce réfrigérateur,
et pour réduire les risques de blessures et éviter
d’endommager le produit, IL FAUT AU MOINS
4 PERSONNES POUR AMENER L’APPAREIL DANS
LA MAISON ET 2 PERSONNES POUR FAIRE
L’INSTALLATION.
AVERTISSEMENT
• Ces réfrigérateurs sont plus lourds en haut qu’en
bas et il faut les maintenir en place pour éviter
la possibilité de basculement. Un dispositif
anti-basculement est nécessaire. Consultez
les détails, page 83, étape 4.
• Il ne faut utiliser cet appareil que pour l’usage pour
lequel il a été construit.
• Il faut réparer ou remplacer immédiatement
tout cordon d’alimentation qui est effiloché
ou endommagé.
• Mettez l’interrupteur principal sur O (l’arrêt)
avant de faire un nettoyage ou une réparation.
• Les réparations doivent être faites par
un technicien qualifié.
Pour une intervention GE Profile
™
au Canada,
appelez 1.800.561.3344.
Pour obtenir des pièces de rechange et des
accessoires GE Profile, appelez 1.800.626.2002.
www.electromenagersge.ca
À LIRE ATTENTIVEMENT.
CONSERVEZ CES INSTRUCTIONS.
62
AVERTISSEMENT
Interdissez tout accès aux petites pièces à tout
enfant de moins de trois (3) ans pendant
O·LQVWDOODWLRQSRXUpYLWHUOHVULVTXHVG·pWRXȹHPHQW
associés à ces pièces.
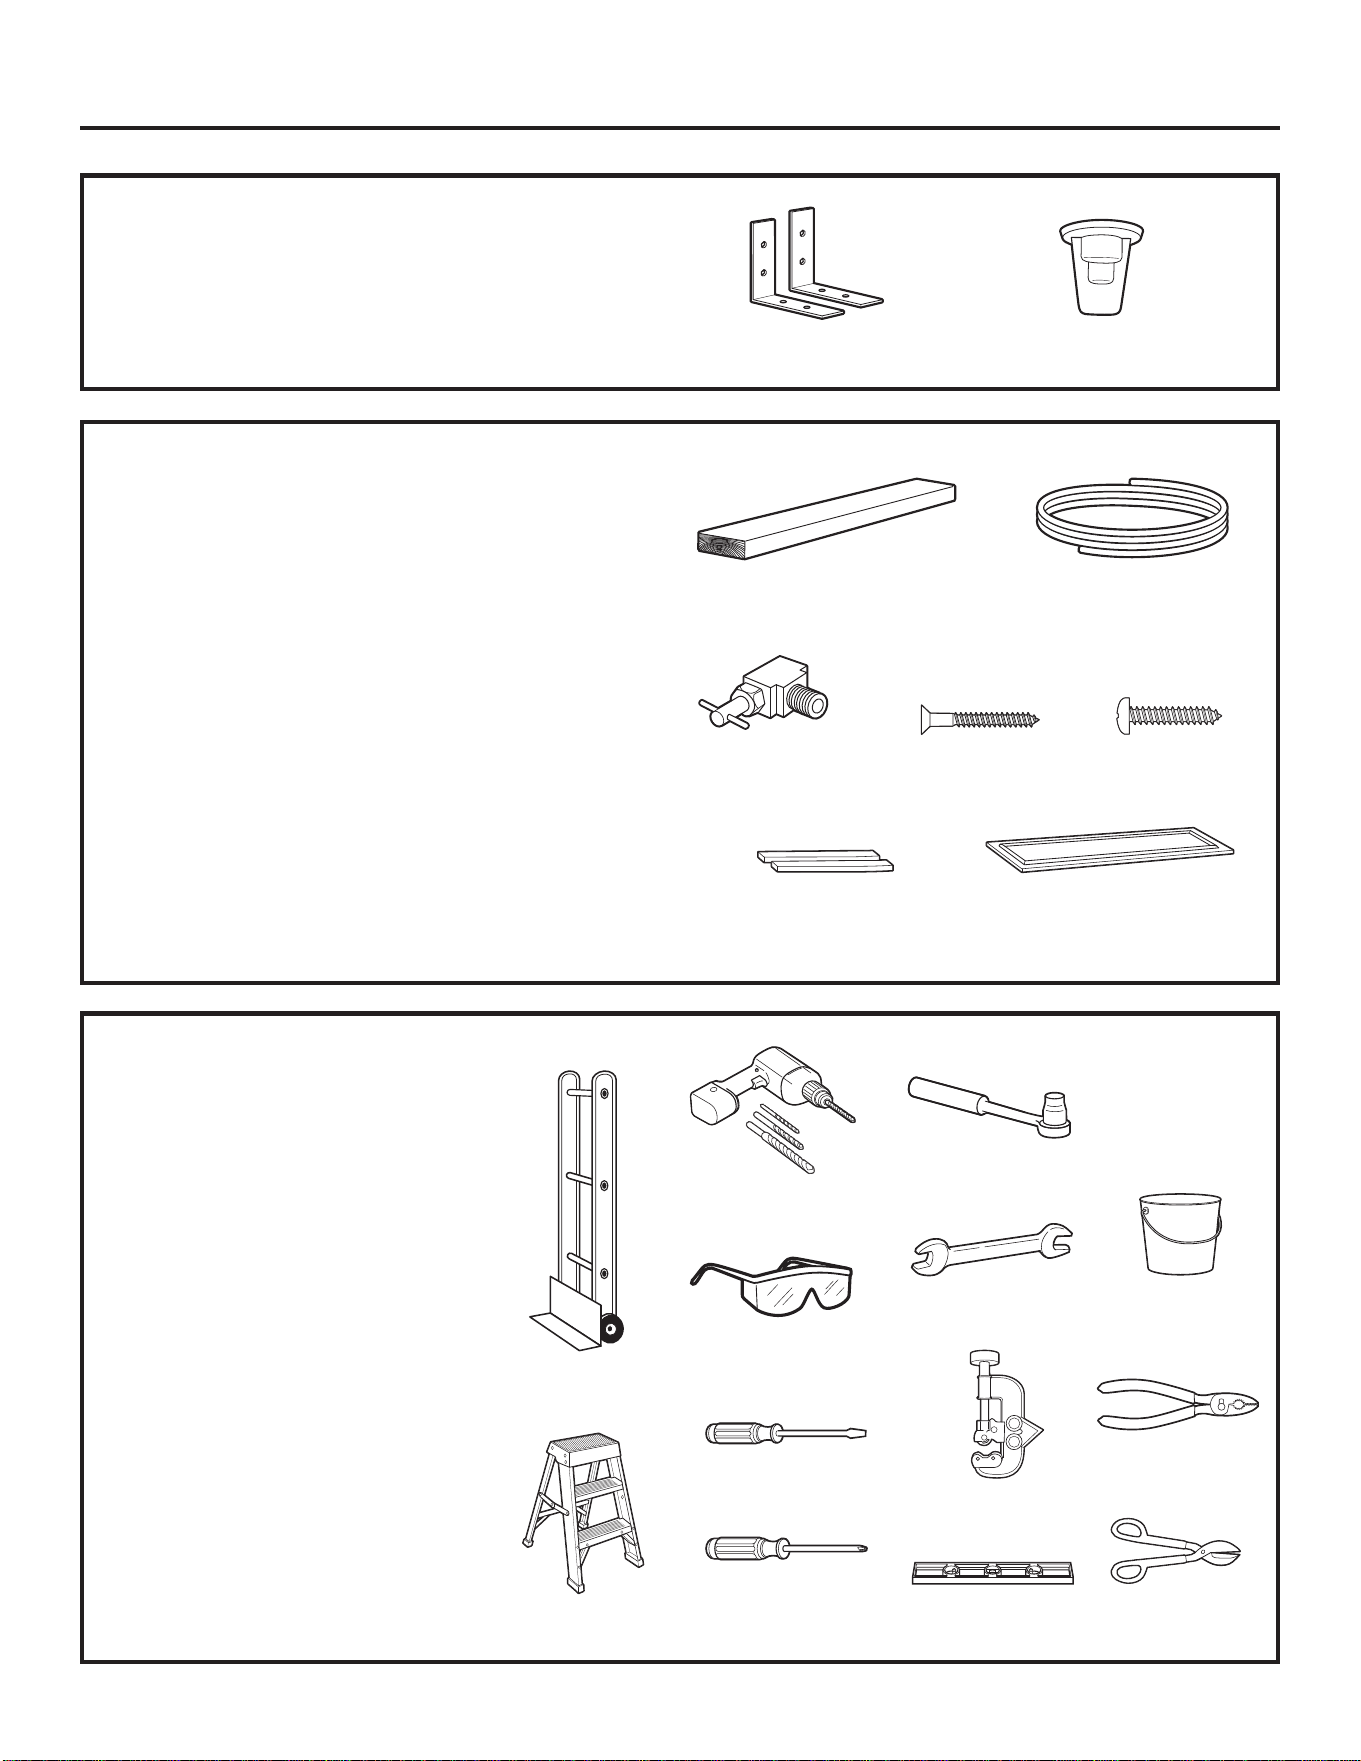
Instructions d’installation
63
QUINCAILLERIE FOURNIE
• Bouchon de dérivation du filtre à eau
• Pattes anti-basculement
Pattes anti-basculement Bouchon de dérivation du filtre à eau
MATÉRIEL NÉCESSAIRE
• Bloc de bois de 2 po x 4 po, de 90 cm
(36 po) de long, pour l’installation des
pattes anti-basculement
• Vis à bois n° 12 ou n° 14 pour les pattes
anti-basculement
• Vis pour fixer le réfrigérateur sur les armoires
• Tube de cuivre de 1/4 po de diamètre externe pour
la conduite d’eau, ou kit de tube pour réfrigérateur
GE SmartConnect
™
• Robinet d’arrêt d’eau
• Panneaux personnalisés pour les portes
et grille (en cas d’installation de panneaux
personnalisés)
• Bande adhésive spéciale 3M Dual Lock pour
les panneaux latéraux de 6 mm (1/4 po)
(en cas d’installation de panneaux latéraux)
Bloc de bois de 90 cm (36 po) de long
Tube de cuivre de 1/4 po de
diamètre externe pour la conduite
d’eau, ou kit de tube pour
réfrigérateur GE SmartConnect
™
OUTILS NÉCESSAIRES
• Cisailles à tôle pour couper
les bandes
• Escabeau
• Seau
• Niveau
• Diable
• Coupe-tube
• Tournevis à lame
• Clé plate de 1/2 po
• Tournevis cruciforme n° 2
• Perceuse et forets appropriés
• Douilles de 7/32 po et 1/2 po
• Lunettes de sécurité
• Clé plate de 7/16 po
• Pinces
Diable
Escabeau
Lunettes de sécurité
Robinet d’arrêt d’eau Vis à bois n° 12
ou n° 14
Vis
Bande adhésive
spéciale 3M Dual Lock
Panneaux personnalisés
Douille
Clé Seau
Perceuse et forets
Tournevis à lame
Coupe-tube
Tournevis
cruciforme
Niveau
Pinces
Cisailles à tôle
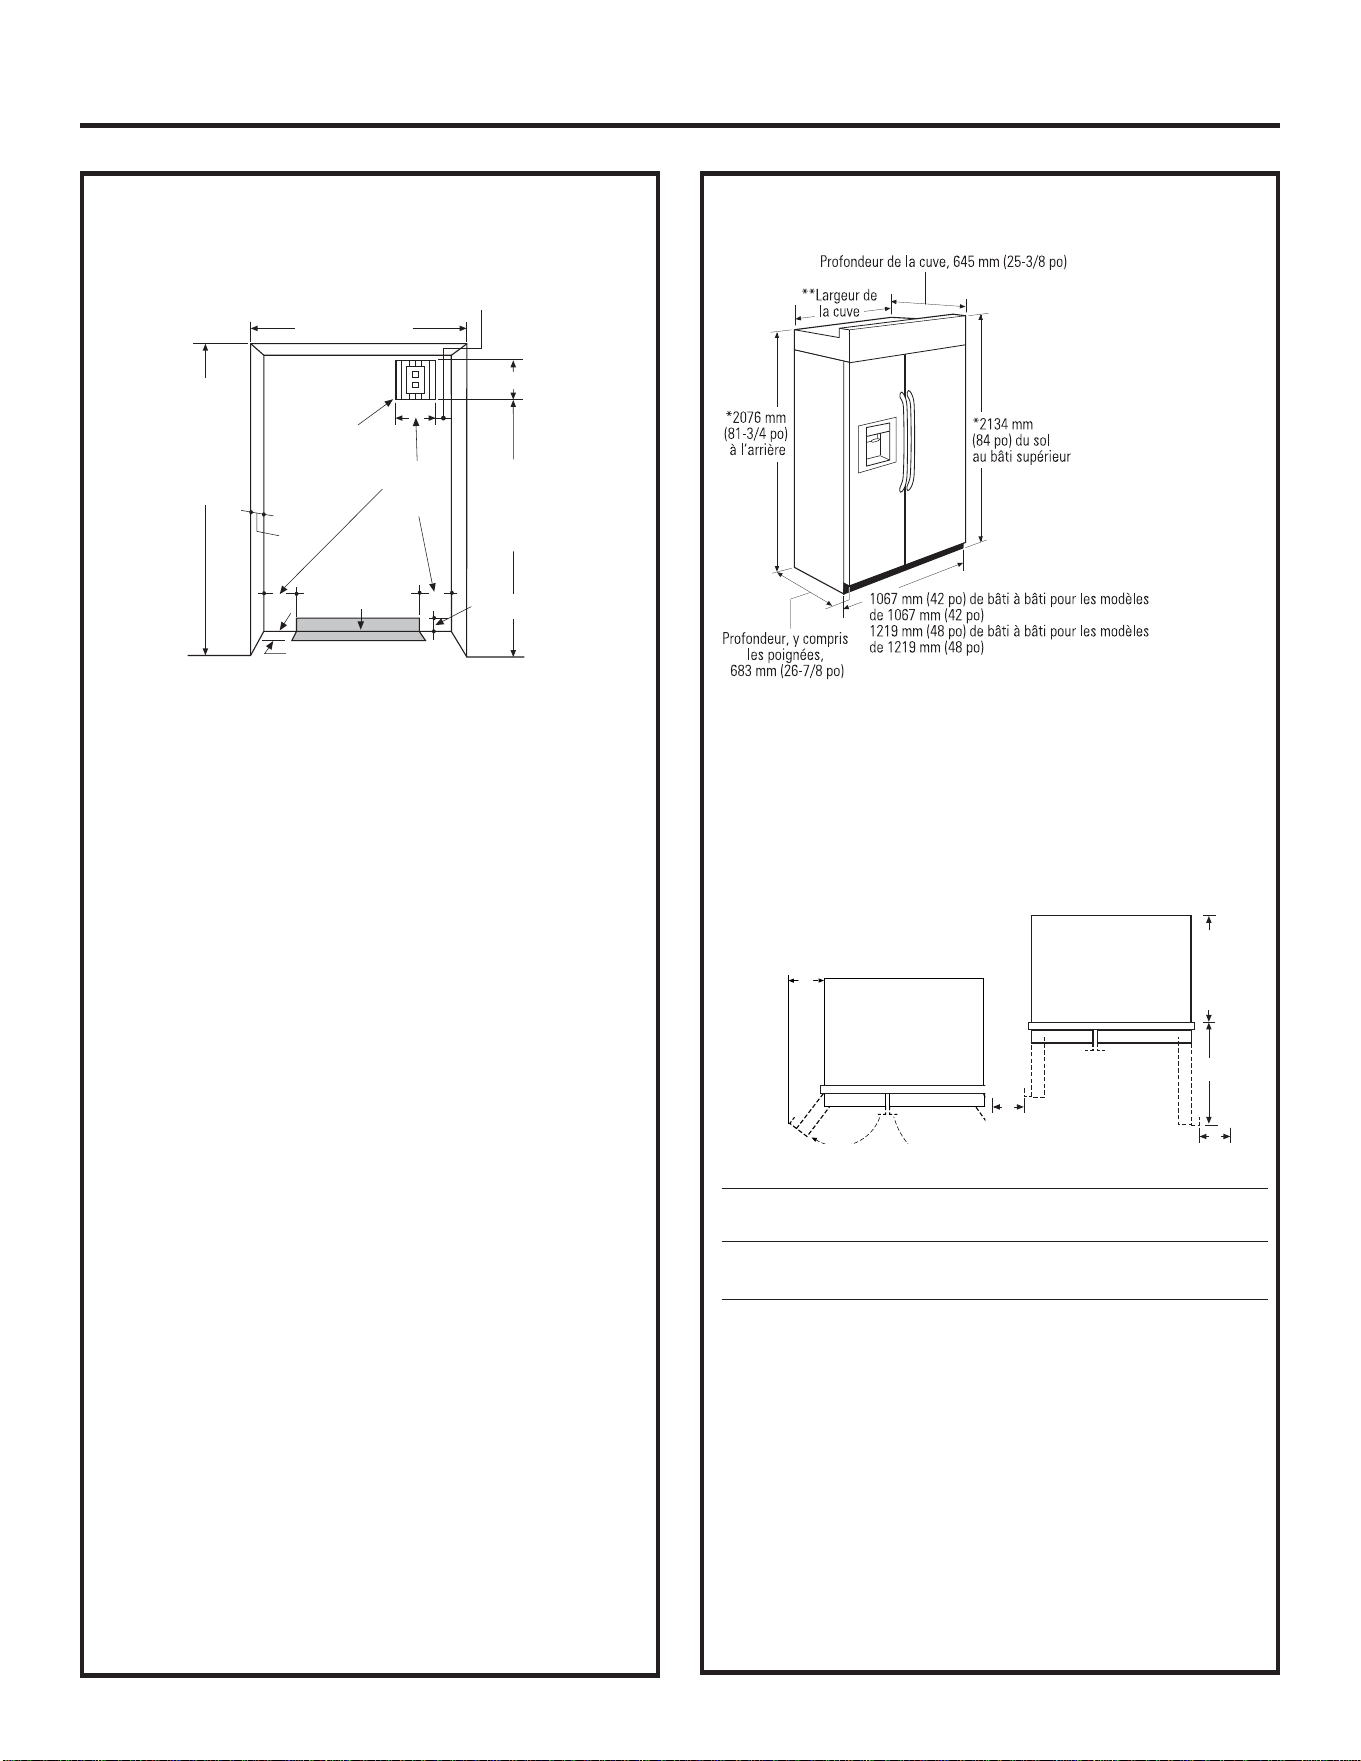
ESPACE POUR L’INSTALLATION
Emplacements de l’arrivée d’eau et d’électricité
L’ouverture doit être préparée avec les
alimentations d’électricité et d’eau aux endroits
indiqués.
L’espace doit avoir une profondeur
de 610 mm (24 po)
Le réfrigérateur doit dépasser légèrement
devant les armoires adjacentes, en fonction
de l’installation.
Spécifications supplémentaires
• Il doit y avoir une alimentation en 120 V, 60 Hz,
15 ou 20 A. Il est recommandé d’avoir un circuit
individuel correctement mis à la terre ou
un disjoncteur séparé. Installez une prise de
courant encastrée, correctement mise à la terre,
ou un coupe-circuit. La prise de courant doit
être sur le mur arrière, comme montré.
Note : Un disjoncteur differentiel (GFI) n’est pas
recommandé.
• La conduite d’eau peut entrer dans l’ouverture
à travers le sol ou le mur arrière. La conduite
d’eau doit être en tube de cuivre de 1/4 po de
diamètre externe ou en tube GE SmartConnect
™
,
entre la conduite d’eau froide et l’emplacement
du branchement d’eau. La conduite doit être
suffisamment longue pour s’étendre jusqu’à
l’avant du réfrigérateur. Il est recommandé
d’installer un robinet de coupure sur la conduite
d’eau dans un endroit d’accès facile.
DIMENSIONS ET ESPACES LIBRES
Il faut prévoir l’espace minimal pour la porte
de congélateur (dimension A) et la porte du
compartiment pour aliments frais (dimension B) pour
une ouverture totale de la porte de 130° et permettre
la sortie du tiroir.
Il faut un espace d’au moins 102 mm (4 po) quand
l’ouverture de la porte est réglée à 90°. Quand la butée
de porte est réglée à 90°, l’accès au tiroir est maintenu,
mais la sortie du tiroir est limitée.
Consultez les illustrations aux pages 67 et 68 pour
déterminer l’interaction des portes avec les placards
et les comptoirs adjacents.
*L’ouverture doit avoir une largeur finie
de 1054 mm (41-1/2 po) pour les modèles
de 1067 mm (42 po) et 1206.5 mm (47-1/2 po) pour
les modèles de 1219 mm (48 po)
*Largeur nie
Zone
électrique
Ouverture nie,
2146 mm maxi
et 2121 mm mini
(84-1/2 po maxi
et 83-1/2 po mini)
1880 mm (74 po)
du sol au bas
de la prise
de courant
610 mm
(24 po)
Alimentation
d‘eau
89 mm (3-1/2 po)
76 mm (3 po)
178 mm (7 po)
127 mm
(5 po)
89 mm (3-1/2 po)
Espace pour le réfrigérateur
Ces réfrigérateurs sont équipés d’une butée de porte à
deux positions. Le réglage d’usine à 130° peut être réglé
à 90° si l’espace entre le réfrigérateur et les armoires ou
les murs adjacents est restreint.
Ouverture de porte de 130° Ouverture de porte de 90°
130° Door Swin
A
606 mm
(23-7/8 p
o
derrière
le bâti
C
D
D
Modèles A B C D
1067 mm 310 mm 406 mm 610 mm 127 mm
(42 po) (12-3/16 po) (16 po) (24 po) (5 po)
1219 mm 342 mm 472 mm 713 mm 127 mm
(48 po) (13-7/16 po) (18-9/16 po) (28 po) (5 po)
Instructions d’installation
64
*Hauteur d’expédition
Il est possible de régler
la hauteur avant de 2121 à
2146 mm (83-1/2 à
84-1/2 po), en réglant d’un
maximum de 25 mm (1 po)
les pieds de mise
à niveau avant et arrière.
** Largeur de la cuve est 1041
mm (41 po) pour
les modèles de 1067 mm (42
po) et 1194 mm (47 po) pour
les modèles de
1219 mm (48 po)
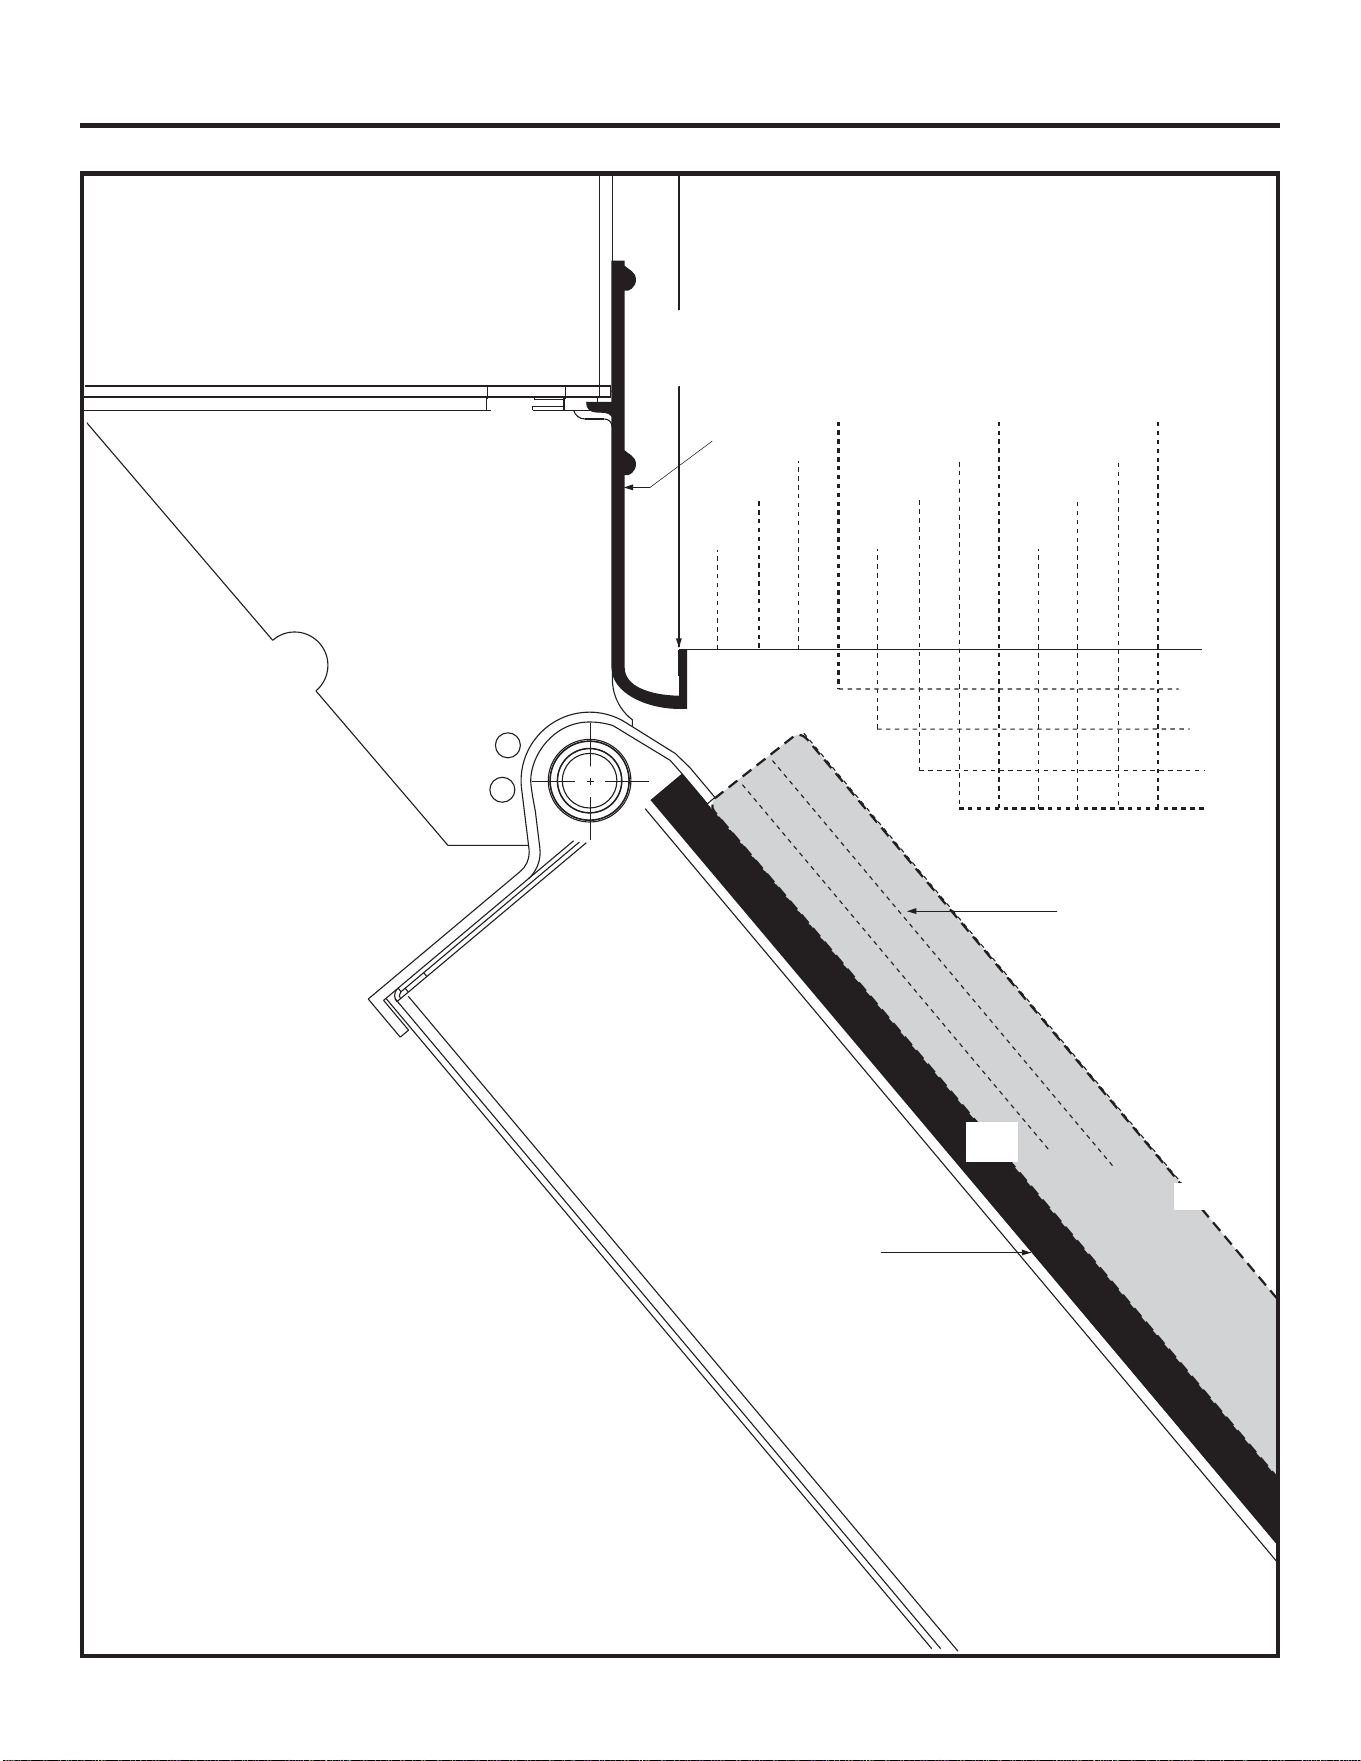
13 mm
(1/2 po)
Panneau personnalisé
de 19 mm (3/4 po)
(taille nominale)
6 mm
(1/4 po)
13 mm
(1/2 po)
38 mm
(1-1/2 po)
44 mm
(1-3/4 po)
6 mm
(1/4 po)
Porte du compartiment
pour aliments frais
Panneau de soutien
606 mm (23-7/8 po)
de l‘arrière du réfrigérateur
Réfrigérateur
Moulure
de cuve
6 mm
(1/4 po)
25 mm (1 po)
19 mm
(3/4 po)
25 mm
(1 po)
32 mm
(1-1/4 po)
51 mm
(2 po)
57 mm
(2-1/4 po)
64 mm
(2-1/2 po)
70 mm
(2-3/4 po)
76 mm
(3 po)
13 mm
(1/2 po)
19 mm
(3/4 po)
25 mm
(1 po)
19 mm
(3/4 po)
Vue supérieure Ouverture de
porte de 130° (réglage d’usine)
Échelle 1:1
Instructions d’installation
65
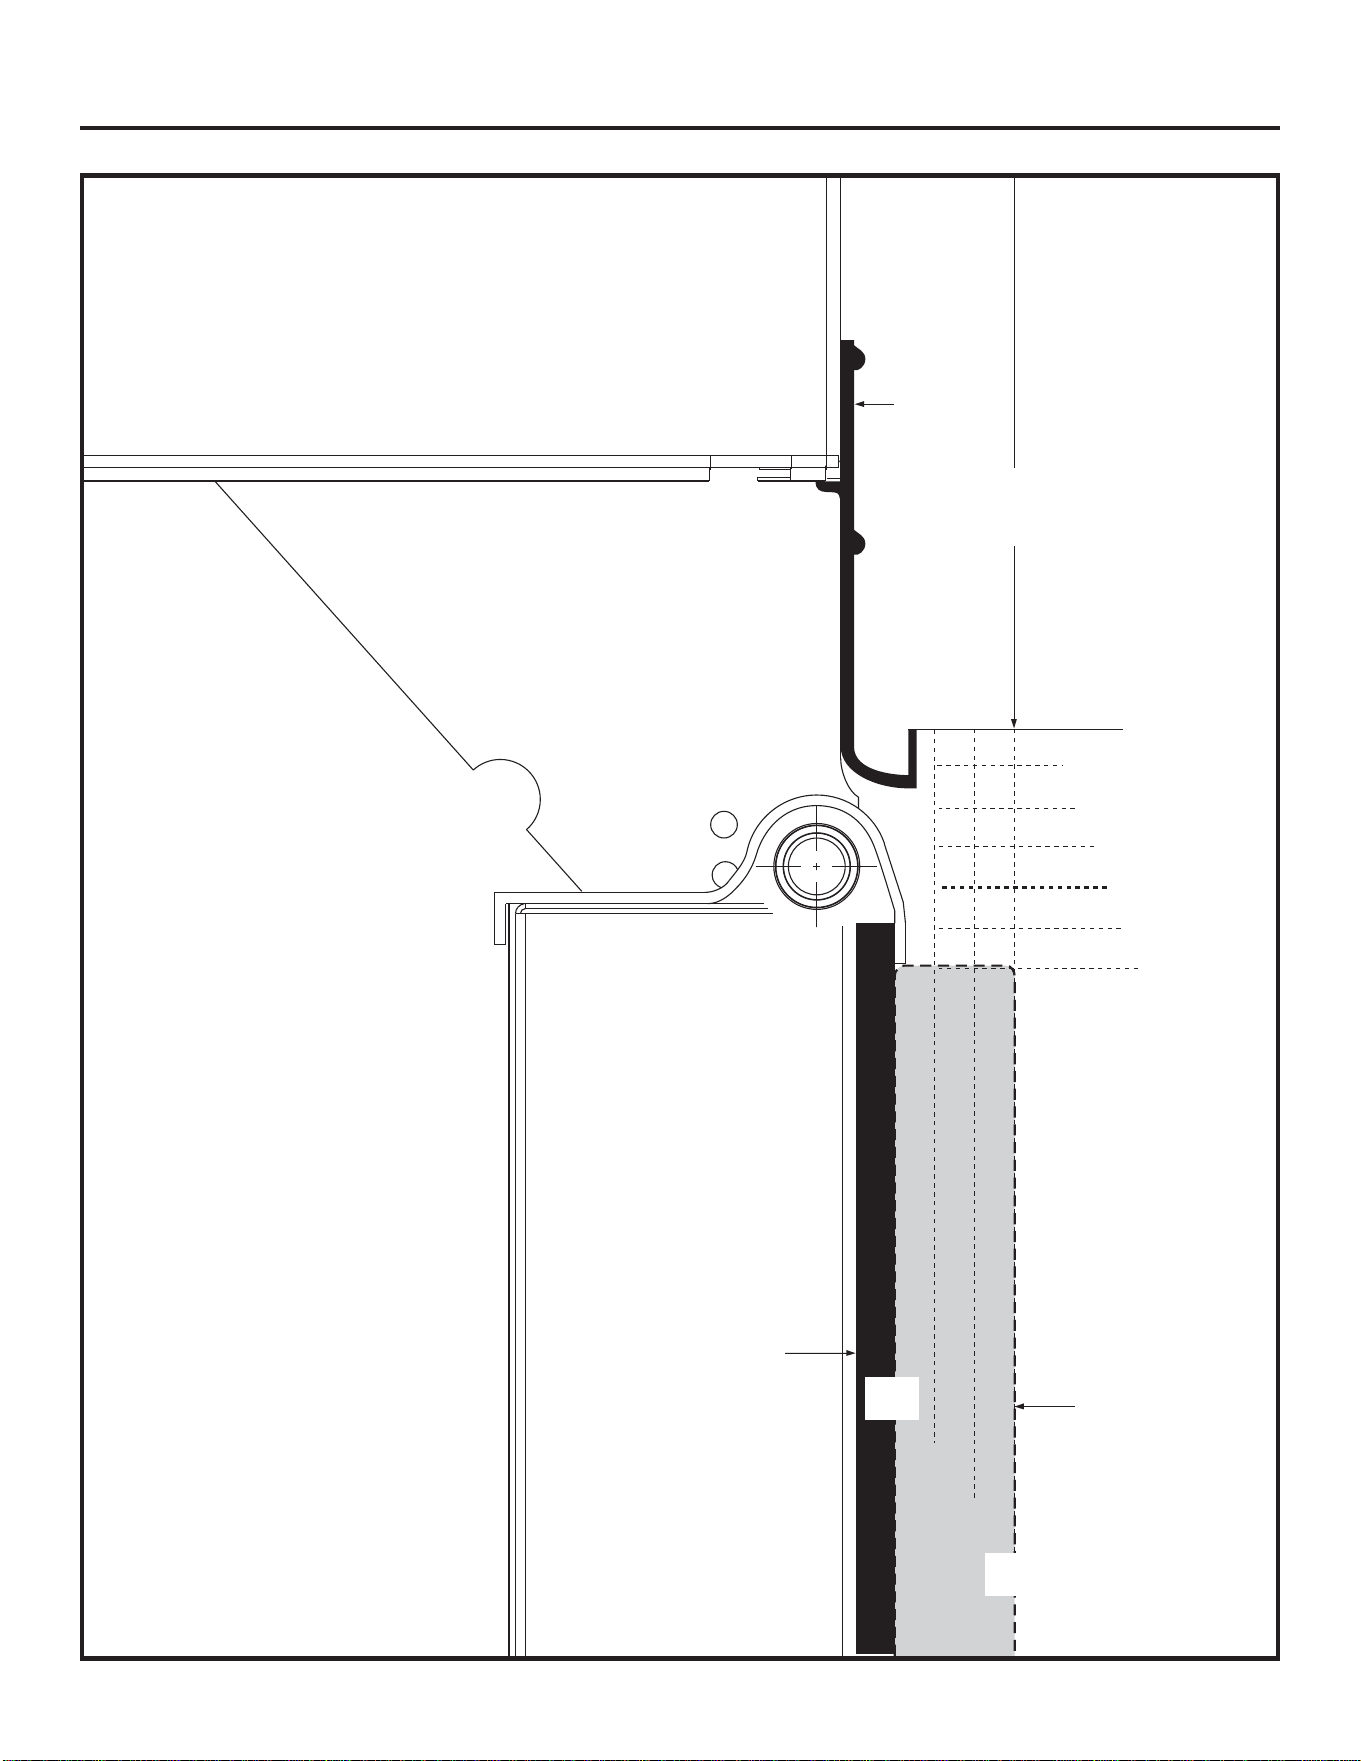
13 mm
(1/2 po)
6 mm (1/4 po)
13 mm (1/2 po)
19 mm (3/4 po)
25 mm (1 po)
32 mm (1-1/4 po)
38 mm (1-1/2 po)
606 mm (23-7/8 po)
de l‘arrière du réfrigérateur
Panneau personnalisé
de 19 mm (3/4 po)
(taille nominale)
Moulure
de cuve
Réfrigérateur
Porte du compartiment
pour aliments frais
Panneau de soutien
19 mm
(3/4 po)
6 mm
(1/4 po)
25 mm
(1 po)
Vue supérieure Ouverture
de porte de 90° (réglage
optionnel) Échelle 1:1
Instructions d’installation
66

Instructions d’installation
67
PRINCIPES DE BASE
DE LA PERSONNALISATION :
Modèles recouverts d’acier inoxydable
0RGqOHSRFP³36%<6
0RGqOHSRFP³36%<6
Des réfrigérateurs recouverts d’acier inoxydable
possède des portes recouvertes d’acier inoxydable
et des panneaux à grille et des extrémités biseautés.
Ces modèles sont livrés prêts à l’installation.
Modèles à cadre décoratif
0RGqOHVSRFP³36%<*
0RGqOHVSRFP³36%<*
Les réfrigérateurs à finition élégante sont conçus
pour être personnalisés avec la pose de panneaux
décoratifs. Une porte personnalisée installée sur
site et des panneaux à grille sont nécessaires.
Les panneaux peuvent disposer de cadres ou
pleine largeur et il est possible de les utiliser
avec les poignées pré-installées ou les poignées
personnalisées fournies par le fabricant de l’armoire.
Panneaux personnalisées encadrés
Vous pouvez installer des panneaux personnalisés
de votre fabricant. Le panneau décoratif coulisse
dans le cadre décoratif installé en usine. Un panneau
d’une finition de 1/4 po (6,3 mm) peut être utilisé.
Vous pouvez installer un panneau de 3/4 po (19 mm)
sur un panneau de support de 1/4 po (6,3 mm).
Si les poignées de la porte pré-installées sont
utilisées, le panneau de support sera exposé par
la poignée et devra être poli (page 73). Les poignées
personnalisées peuvent également être utilisées.
Panneaux personnalisés superposes
pleine largeur
Les panneaux personnalisés superposes pleine largeur
sont conçus pour coulisser dans le cadre décoratif
installé en usine, aucun kit n’est nécessaire. Dans ce
design, il est possible d’obtenir un aspect sans cadre
décoratif.
Un panneau d’espacement de 0,10 po (2,5 mm) doit
être installé entre le panneau de support
de 1/4 po (6,3 mm) et le panneau d’apparence
3/4 po (19 mm). Si les poignées de la porte
pré-installées sont utilisées, le panneau de support
dépassera de la poignée et il devra
être poli (page 73).
Poignées de porte
Les poignées de la porte pré-installées peuvent
accueillir les panneaux superposés ou encadrés. Les
poignées personnalisées à votre convenance, fournies
par le fabricant du réfrigérateur,
ne peuvent être installées que sur des panneaux
superposés 3/4 po (19 mm). Lors de l’installation des
poignées personnalisées, veillez à prendre
la mesure afin de vous assurer que le montage des
poignées sélectionnées masquera
le distributeur une fois installé sur la porte
du congélateur. Les poignées montées sur
les panneaux en bois inférieur et supérieur de
la porte du congélateur et non sur le distributeur. En
cas d’utilisation d’une poignée personnalisée, seul le
panneau superposé 3/4 po (19 mm)
doit être exposé, et les parties de la décoration
personnalisée doivent être installées (page 87).
Poignées de porte
Panneau personnalisé
de 19 mm (3/4 po)
Panneau couvrant de 19 mm (3/4 po)
Panneau d‘espacement de 2,5 mm (0,10 po)
Panneau arrière de 6 mm (1/4 po)
Panneau encadré
Poignées de porte
Parties de la
décoration personnalisée
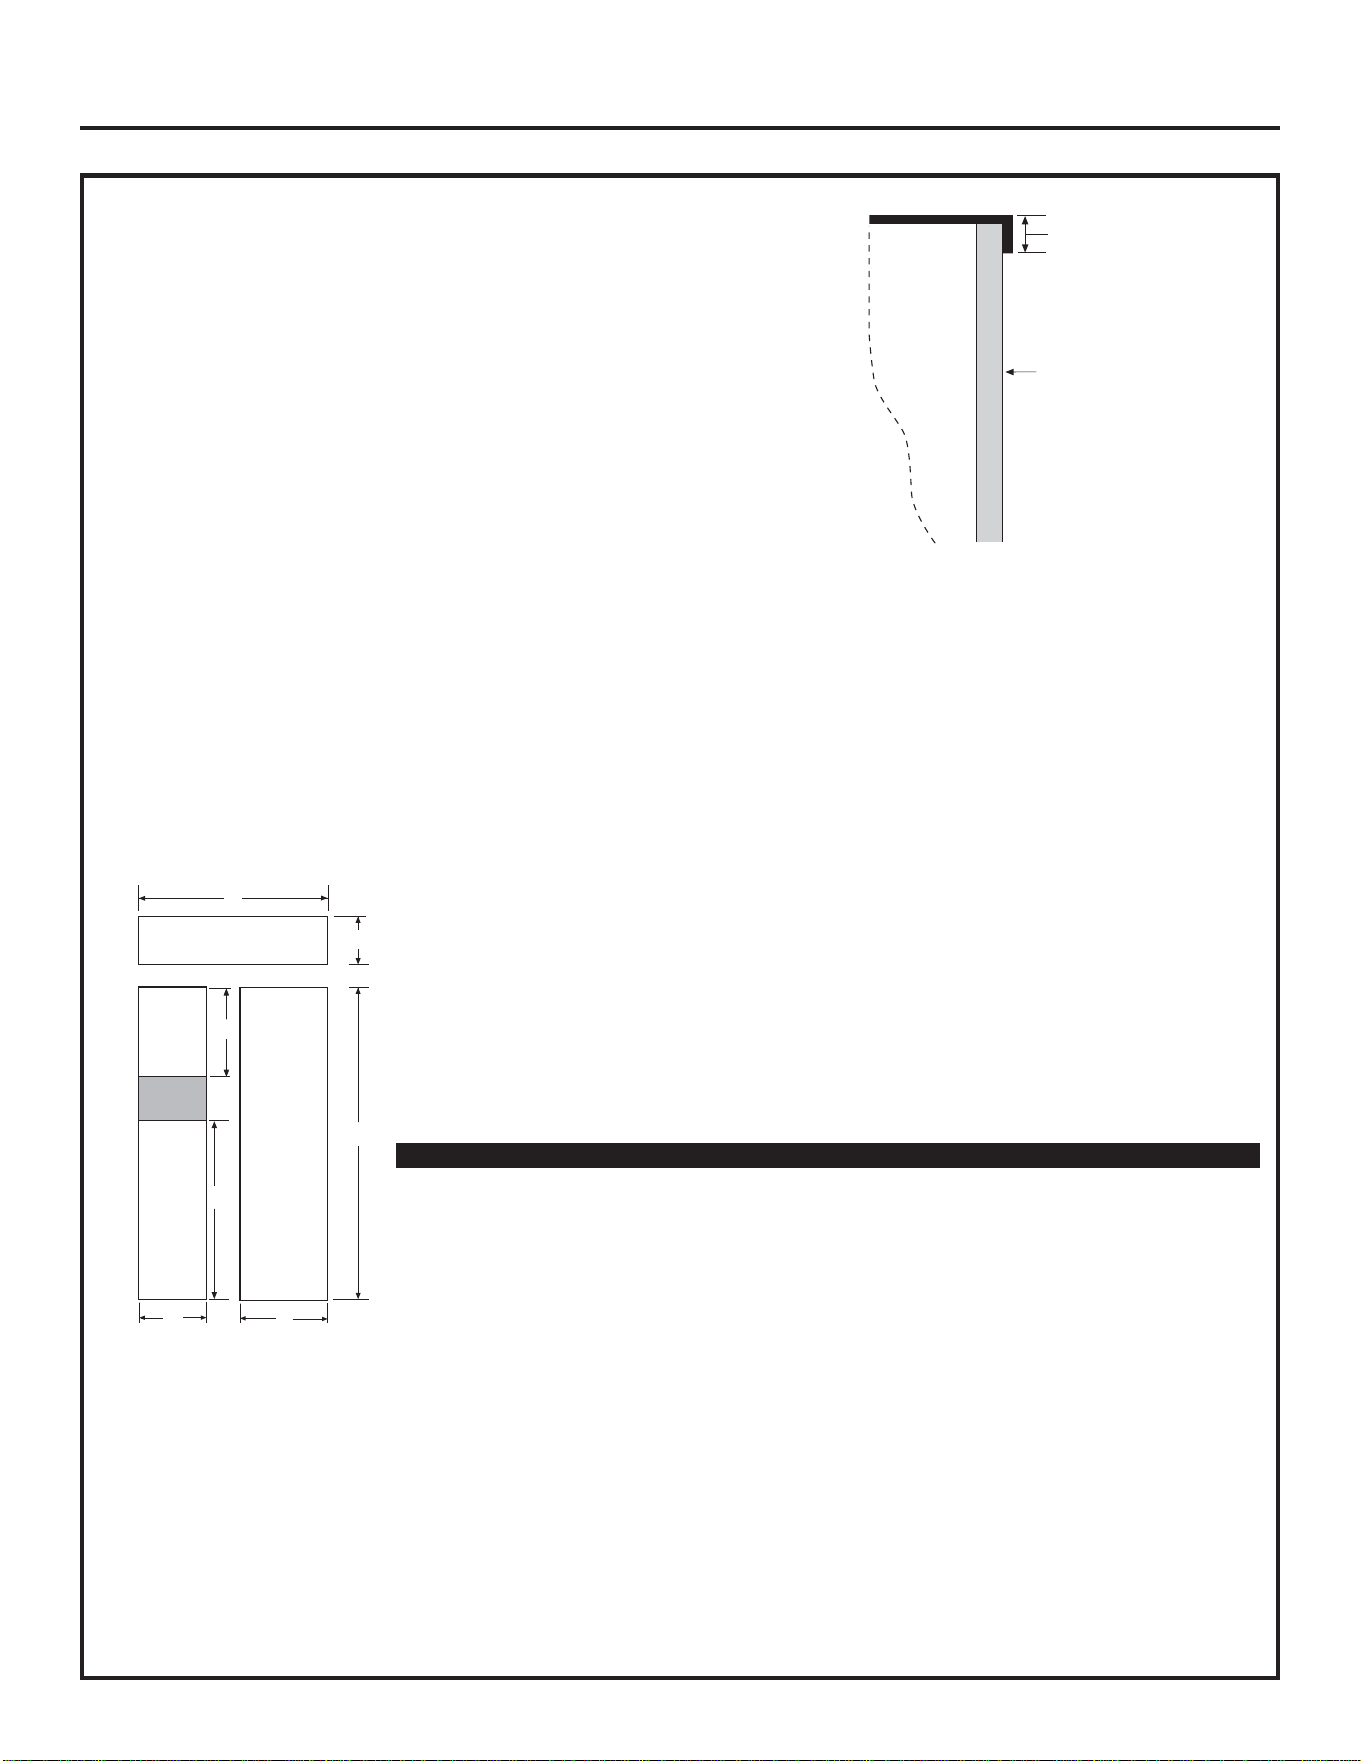
DIMENSIONS DES PANNEAUX ENCADRÉS
DE 6 mm (1/4 po)
En cas d’installation de panneaux encadrés, ceux-ci
doivent être coupés aux dimensions indiquées.
Les panneaux glissent dans le cadre des portes
et de la grille.
NOTE IMPORTANTE : Le poids du panneau
de la porte pour aliments frais ne doit pas
dépasser 31,7 kg (70 lb). Le poids du panneau
de la porte
du congélateur ne doit pas dépasser 20,6 kg
(45 lb).
Le poids du panneau de la grille ne doit pas
dépasser 6,8 kg (15 lb).
NOTE IMPORTANTE : Finition du distributeur
Le réfrigérateur est fourni avec la moulure du distributeur installée
en usine.
• Si le panneau a une épaisseur inférieure à 6 mm (1/4 po),
un espace visible est crée autour de la finition du distributeur.
Il est possible d’appliquer du ruban en mousse sur la porte pour
améliorer la finition.
• Si le panneau a une épaisseur supérieure à 6 mm (1/4 po),
il n’est pas possible de monter le panneau derrière la finition.
D
E
G
A
B
Panneau de grille
C
Découpe du
distributeur
Panneau du
congélateur
Panneau du
compartiment
pour aliments
frais
F
Panneau
de 6 mm
(1/4 po)
Porte
Bordure
de 8 mm
(5/16 po)
Dimensions des panneaux avant en millimètres (pouces)
A B C D E F G
Modèles de 1018 276 1726 571 420 896 456
1067 mm (40-1/8) (10-7/8) (68) (22-1/2) (16-1/2) (35-1/4) (18)
(42 po)
Modèles de 1170 276 1726 673 470 896 456
1219 mm (46-1/8) (10-7/8) (68) (26-1/2) (18-1/2) (35-1/4) (18)
(48 po)
Instructions d’installation
68
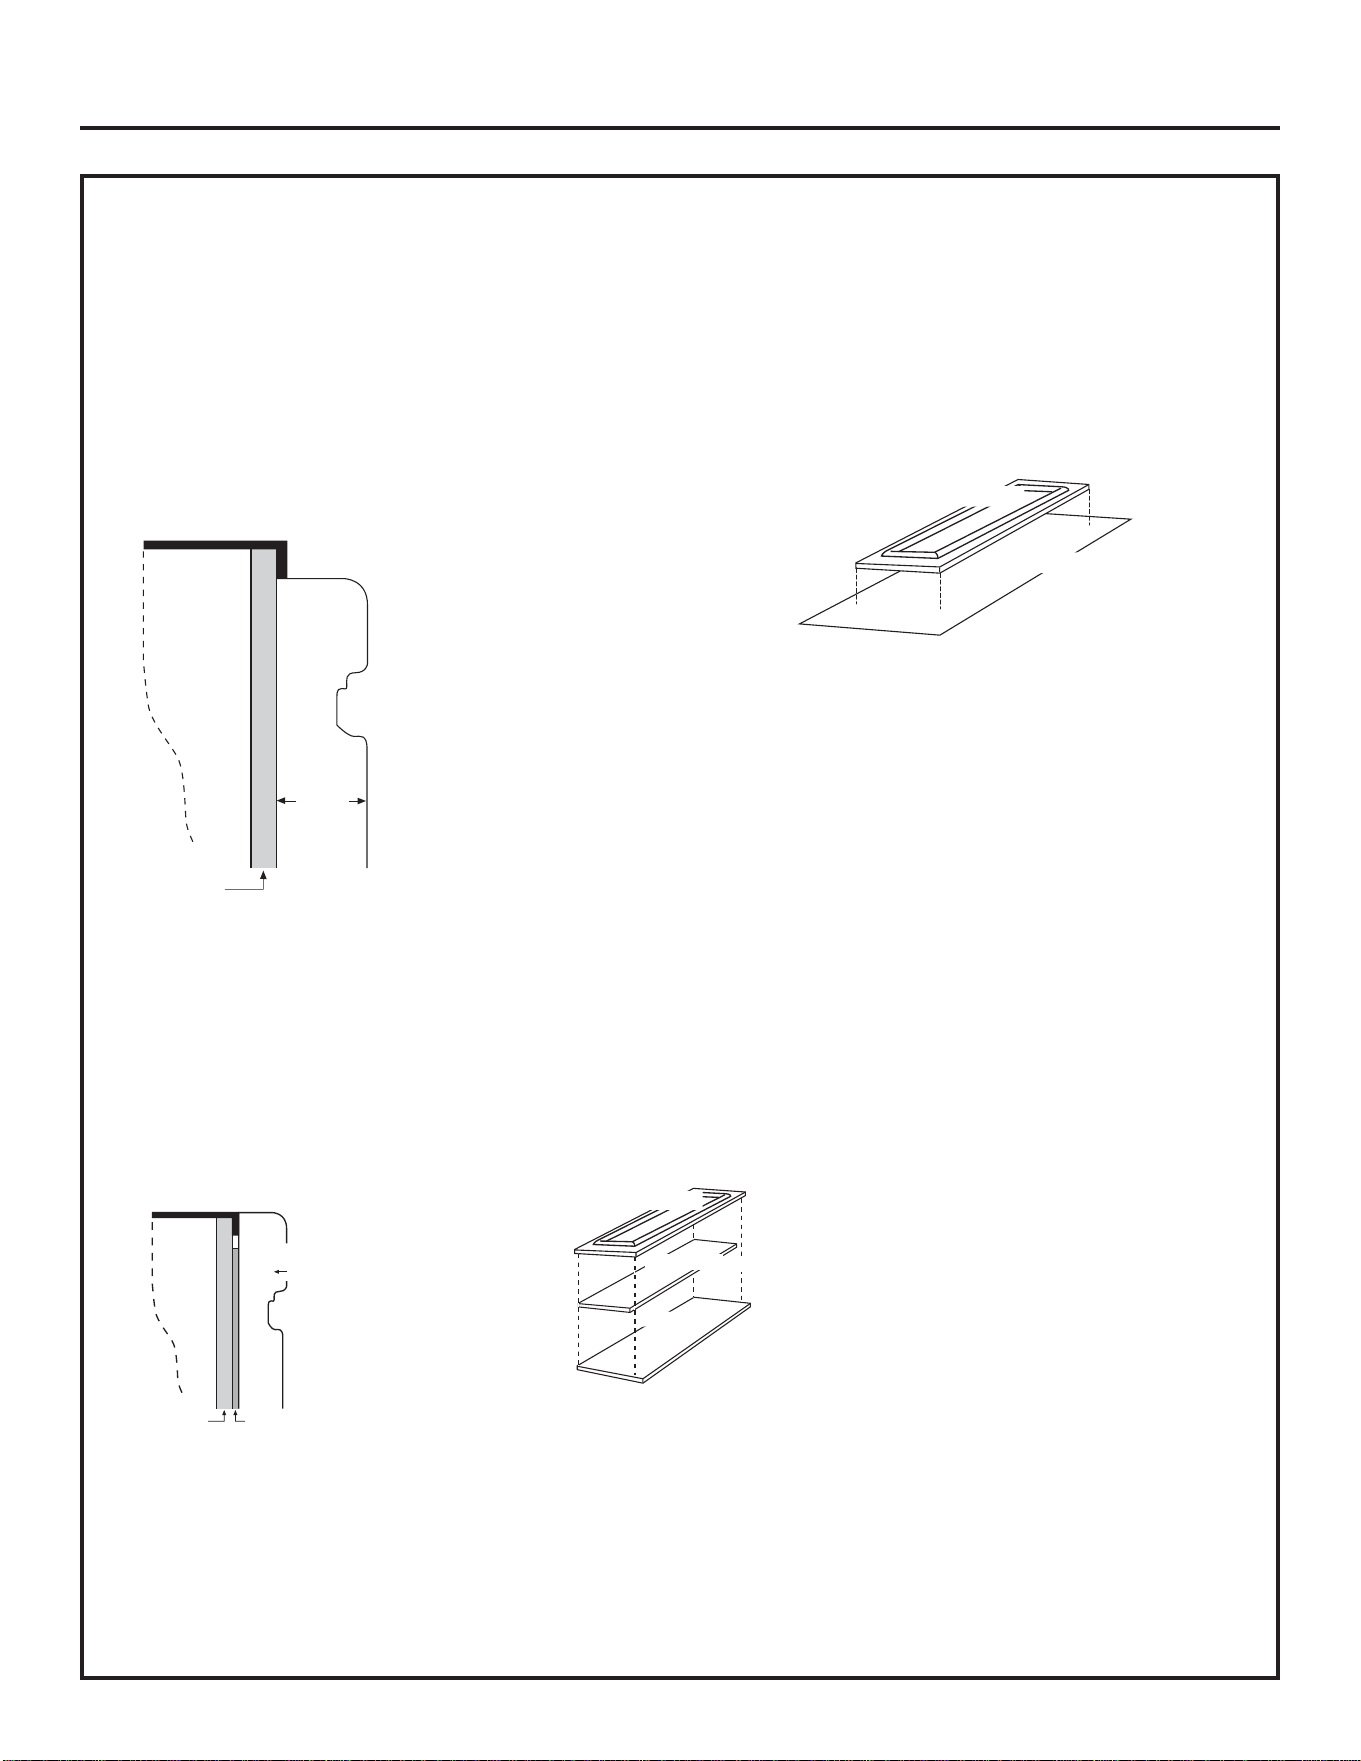
OPTION DE PANNEAU PERSONNALISÉ
ENCADRÉ DE 19 MM
Pour obtenir une apparence encore plus personnalisé,
il est possible d’installer des panneaux personnalisés
encadrés de 19 mm sur les modèles avec moulure.
Le panneau couvrant est fixé à un panneau arrière fini
de 6 mm. Le panneau personnalisé assemblé doivent
alors glisser dans la moulure en suivant la procédure
décrite, page 86.
NOTE : Le décalage de la gauche vers la
droite n’est pas égal au décalage du haut au
bas.
6,35 mm + 19,05 mm = 25,4 mm (0,250 + 0,750 = 1,000
po), épaisseur totale maximale du panneau
6,35 mm + 2,54 mm + 19,05 mm = 27,94 mm (0,250 + 0,10 + 0,750 =
1,100 po), épaisseur totale maximale du panneau
NOTE IMPORTANTE : Le poids total maximal pour tout panneau assemblé de porte du compartiment pour
aliments frais est de 31,7 kg (70 lb). Le poids total maximal du panneau assemblé de porte du congélateur
est de 20,6 kg (45 lb). Le poids total maximal du panneau assemblé de la grille est de 6,8 kg (15 lb).
OPTION DE PANNEAU COUVRANT PERSONNALISÉ PLEINE LARGEUR DE 19 MM
Cette conception donne un aspect presque sans garniture. Le panneau couvrant pleine largeur couvre
presque toute la garniture de porte. Pour ce panneau, vous devez installer un panneau d’espacement
entre le panneau arrière fini et le panneau couvrant.
Panneau
couvrant
personnalisé
de 19 mm
(3/4 po)
Panneau
arrière
de 6 mm
(1/4 po)
Porte
19 mm
(3/4 po)
Panneau couvrant
Panneau arrière
Panneau
couvrant
personnalisé
Panneau
arrière
de 6 mm
(1/4 po)
Porte
Panneau
d‘espacement
de 2,5 mm
(0,10 po)
Instructions d’installation
69
NOTE : Le décalage de la gauche vers la
droite n’est pas égal au décalage du haut
au bas.
Panneau couvrant
Panneau
arrière
Panneau d‘espacement
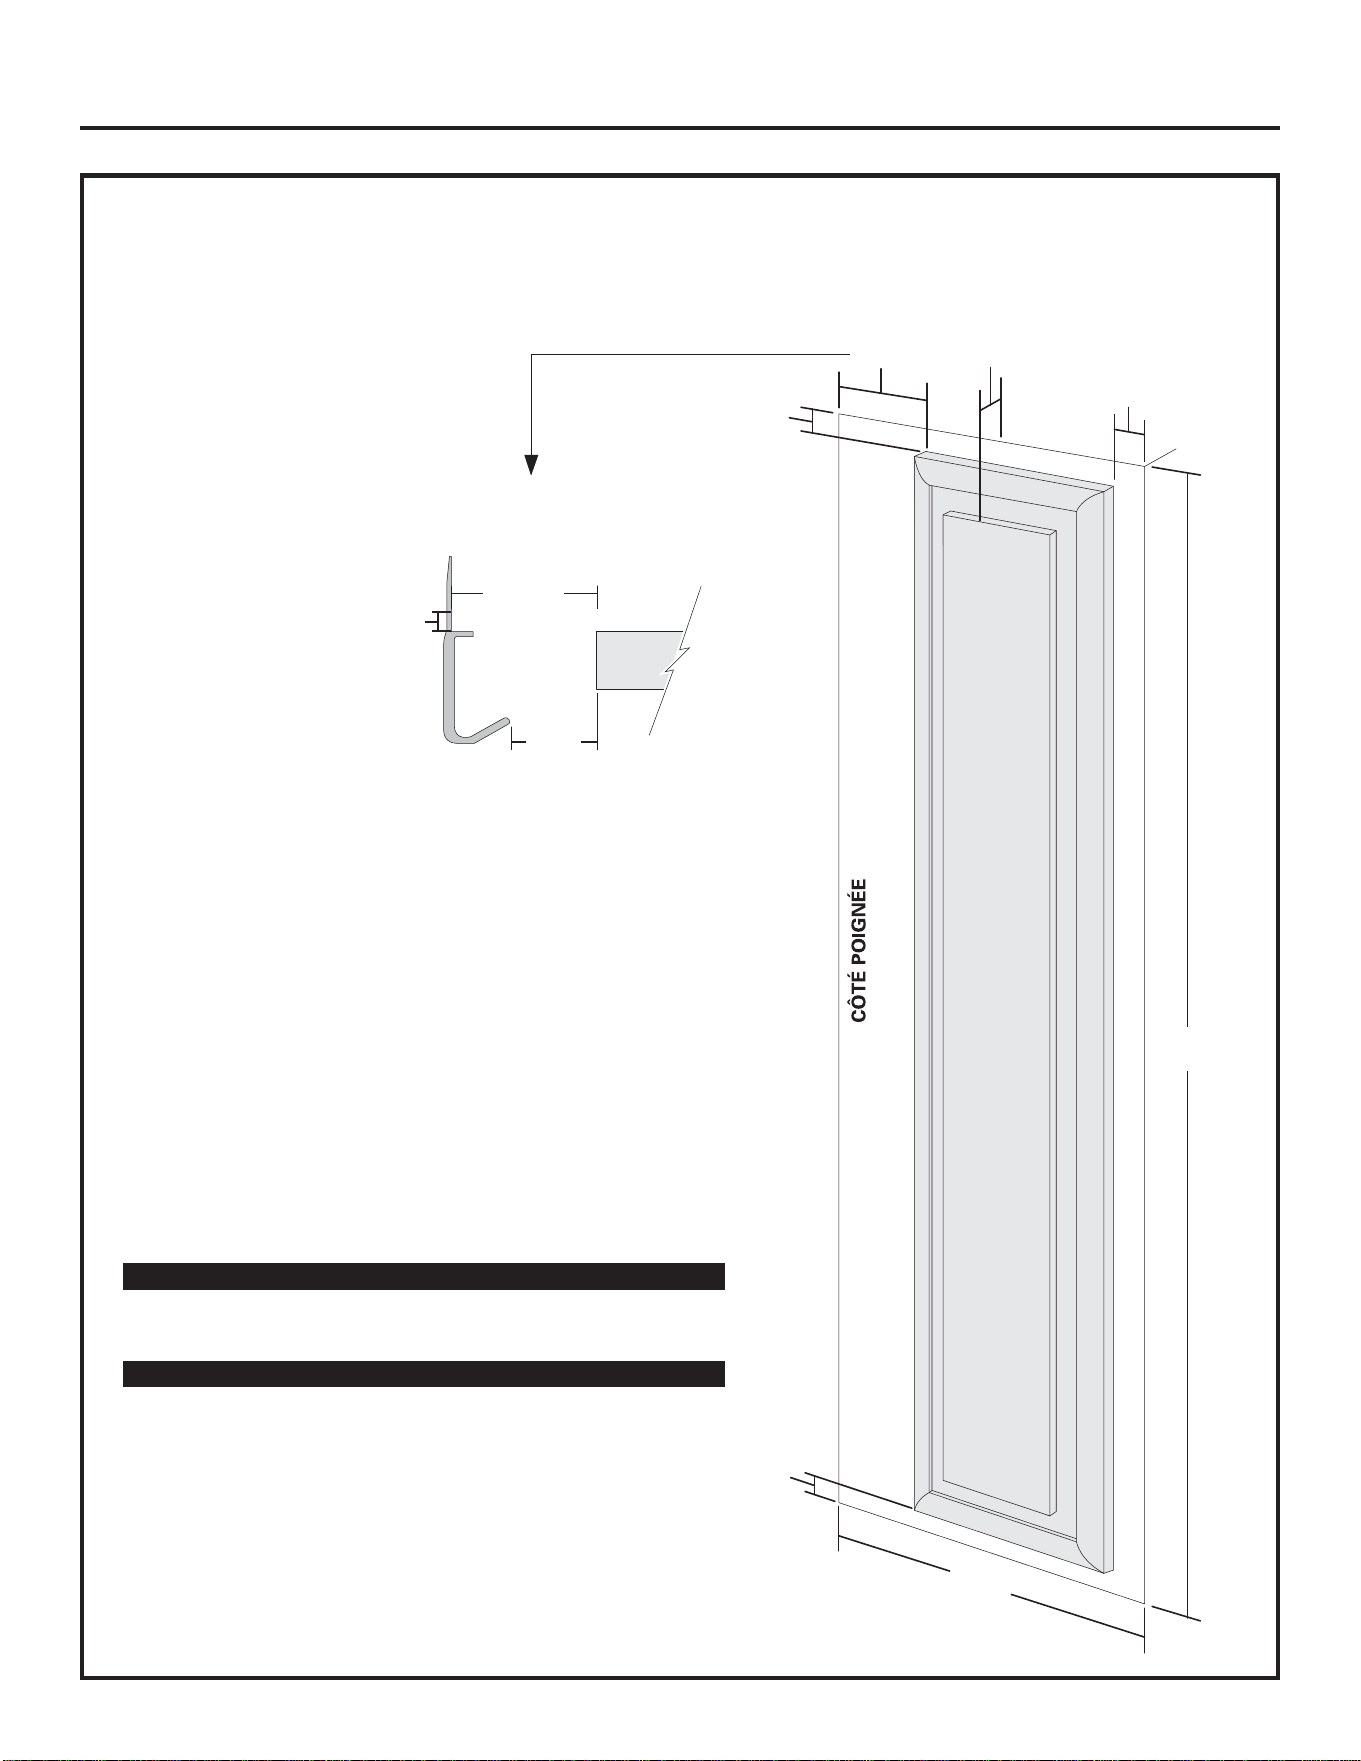
10 mm
(3/8 po)
79 mm
(3-1/8 po)
8 mm (5/16 po)
Épaisseur totale
de 25 mm (1 po)
ou 19 mm (3/4 po)
plus 6 mm (1/4 po)
pour le panneau arrière
B
64 mm
(2-1/2 po)
79 mm min.
(3-1/8 po)
6 mm max. (1/4 po)
A
8 mm (5/16 po)
Nécessaire pour obtenir l‘espace optimal
pour la poignée
PANNEAUX DE BOIS PERSONNALISÉS ENCADRÉS DE 19 MM
À POIGNÉES PRÉ-INSTALLÉES
Fixés à un panneau arrière fini de 6 mm. Cette conception
donne un aspect encadré.
Panneau de
compartiment pour
aliments frais
Instructions d’installation
70
Modèles de 1067 mm A B
Panneau arrière, 6 mm 567 mm (22-5/16”) 1724 mm (67-7/8”)
Panneau couvrant, 19 mm 478 mm (18-13/16”) 1708 mm (67-1/4”)
Modèles de 1219 mm A B
Panneau arrière, 6 mm 672 mm (26-7/16”) 1724 mm (67-7/8”)
Panneau couvrant, 19 mm 583 mm (22-15/16”) 1708 mm (67-1/4”)
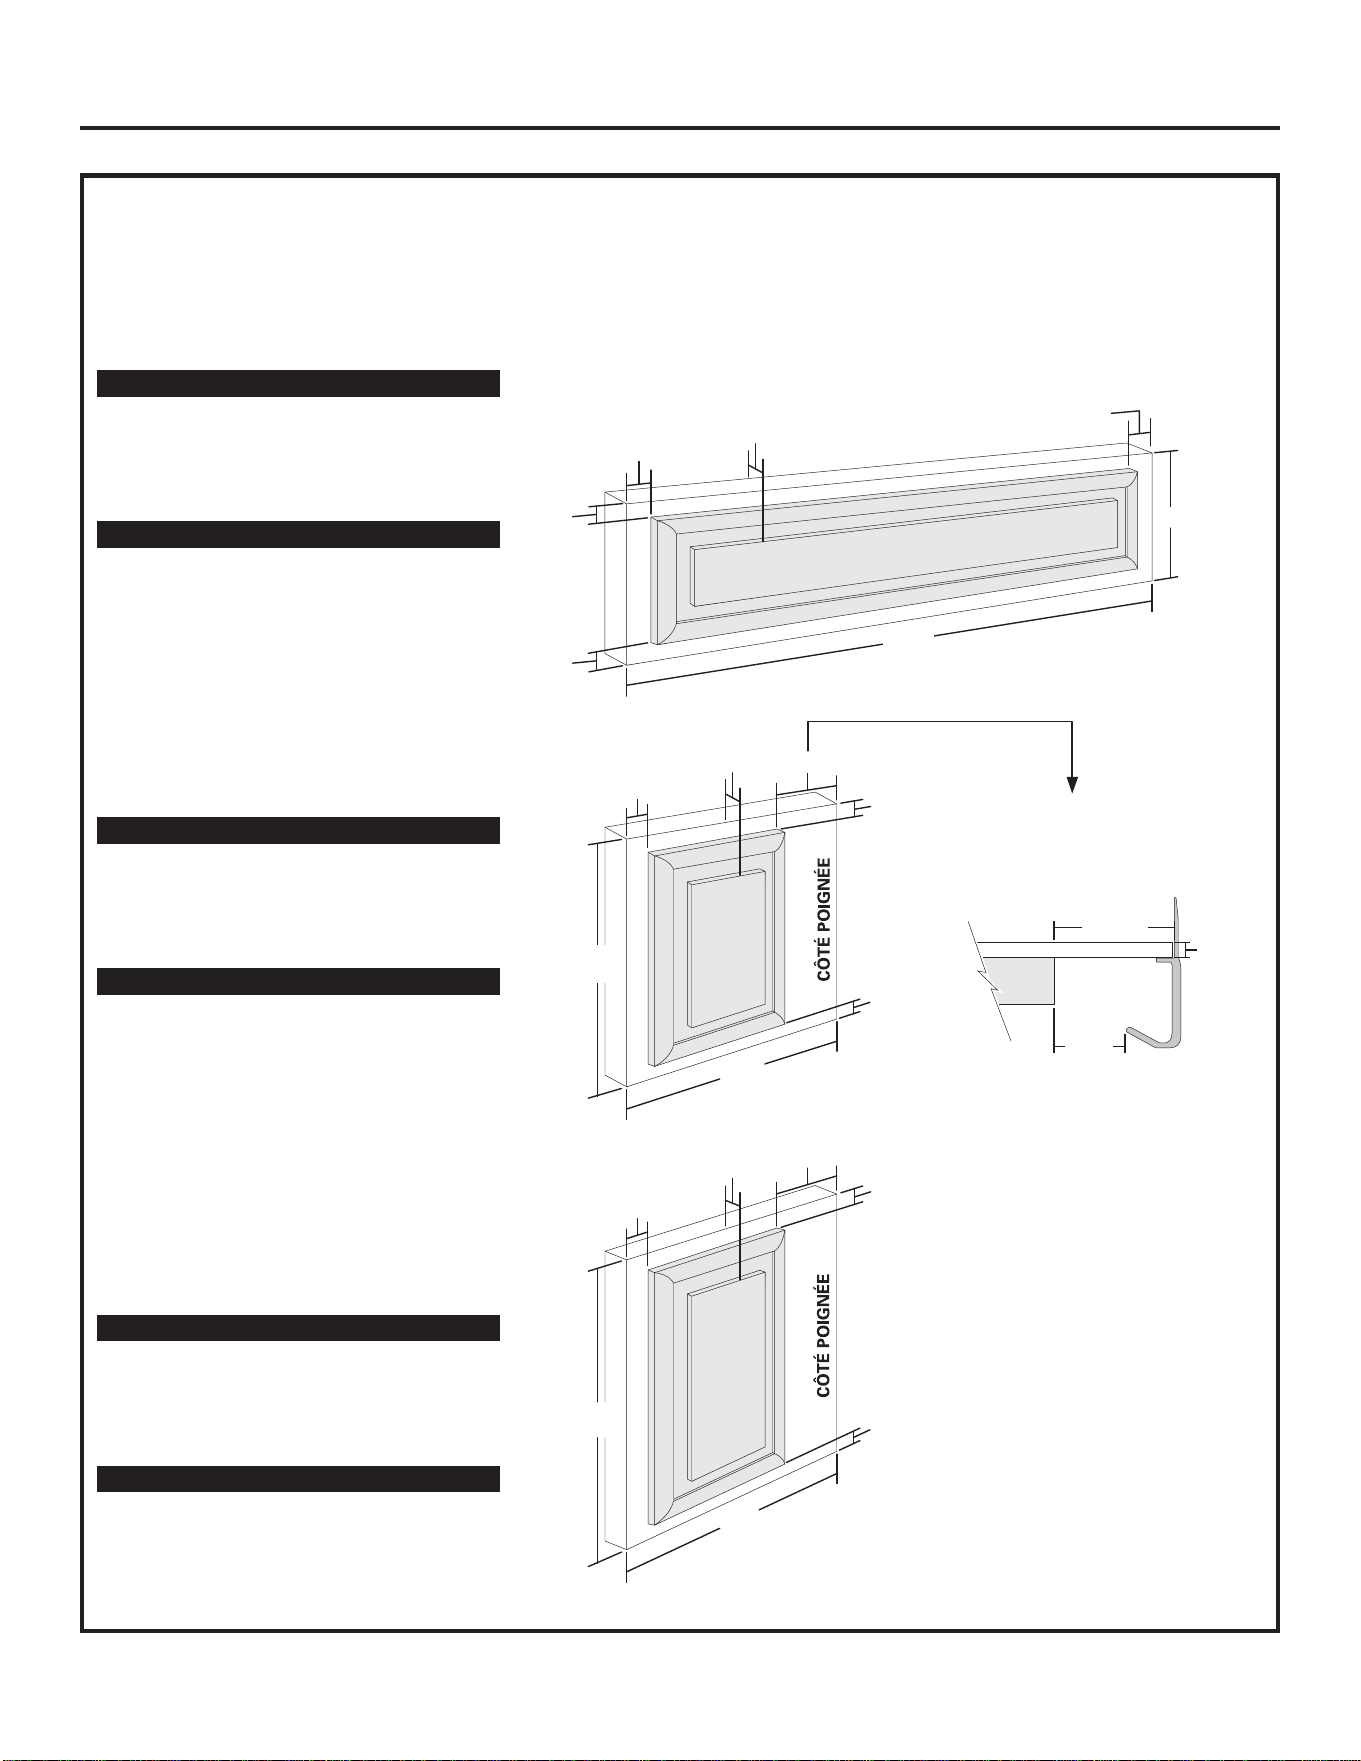
10 mm (3/8 po)
79 mm (3-1/8 po)
8 mm (5/16 po)
B
63 mm
(2-1/2 po)
79 mm min.
(3-1/8 po)
6 mm max.
(1/4 po)
A
8 mm (5/16 po)
Nécessaire
pour obtenir
l‘espace optimal
pour la poignée
10 mm (3/8 po)
79 mm (3-1/8 po)
8 mm (5/16 po)
B
8 mm (5/16 po)
Épaisseur de 25 mm
(1 po) max. ou 19 mm
(3/4 po) plus 6 mm (1/4 po)
pour le panneau arrière
A
8 mm
(5/16 po)
6 mm
(1/4 po)
B
8 mm
(5/16 po)
6 mm (1/4 po)
Épaisseur de 25 mm
(1 po) max. ou 19 mm
(3/4 po) plus 6 mm (1/4 po)
pour le panneau arrière
Épaisseur de 25 mm
(1 po) max. ou 19 mm
(3/4 po) plus 6 mm (1/4 po)
pour le panneau arrière
A
PANNEAUX DE BOIS PERSONNALISÉS ENCADRÉS DE 19 MM
À POIGNÉES PRÉ-INSTALLÉES
Fixés à un panneau arrière fini de 6 mm. Cette conception donne un aspect encadré.
Panneau de grille
Panneau supérieur
pour le congélateur
Panneau inférieur
pour le congélateur
Instructions d’installation
71
Modèles de 1067 mm A B
Panneau arrière, 1014 mm 273 mm
6 mm (39-15/16”) (10-3/4”)
Panneau couvrant, 1002 mm 257 mm
19 mm (39-7/16”) (10-1/8”)
Modèles de 1219 mm A B
Panneau arrière, 1167 mm 273 mm
6 mm (45-15/16”) (10-3/4”)
Panneau couvrant, 1154 mm 257 mm
19 mm (45-7/16”) (10-1/8”)
Modèles de 1067 mm A B
Panneau arrière, 418 mm 452 mm
6 mm (16-7/16”) (17-13/16”)
Panneau couvrant, 329 mm 437 mm
19 mm (12-15/16”) (17-3/16”)
Modèles de 1219 mm A B
Panneau arrière, 468 mm 452 mm
6 mm (18-7/16”) (17-13/16”)
Panneau couvrant, 379 mm 437 mm
19 mm (14-15/16”) (17-3/16”)
Modèles de 1067 mm A B
Panneau arrière, 418 mm 892 mm
6 mm (16-7/16”) (35-1/8”)
Panneau couvrant, 329 mm 876 mm
19 mm (12-15/16”) (34-1/2”)
Modèles de 1219 mm A B
Panneau arrière, 468 mm 892 mm
6 mm (18-7/16”) (35-1/8”)
Panneau couvrant, 379 mm 876 mm
19 mm (14-15/16”) (34-1/2”)
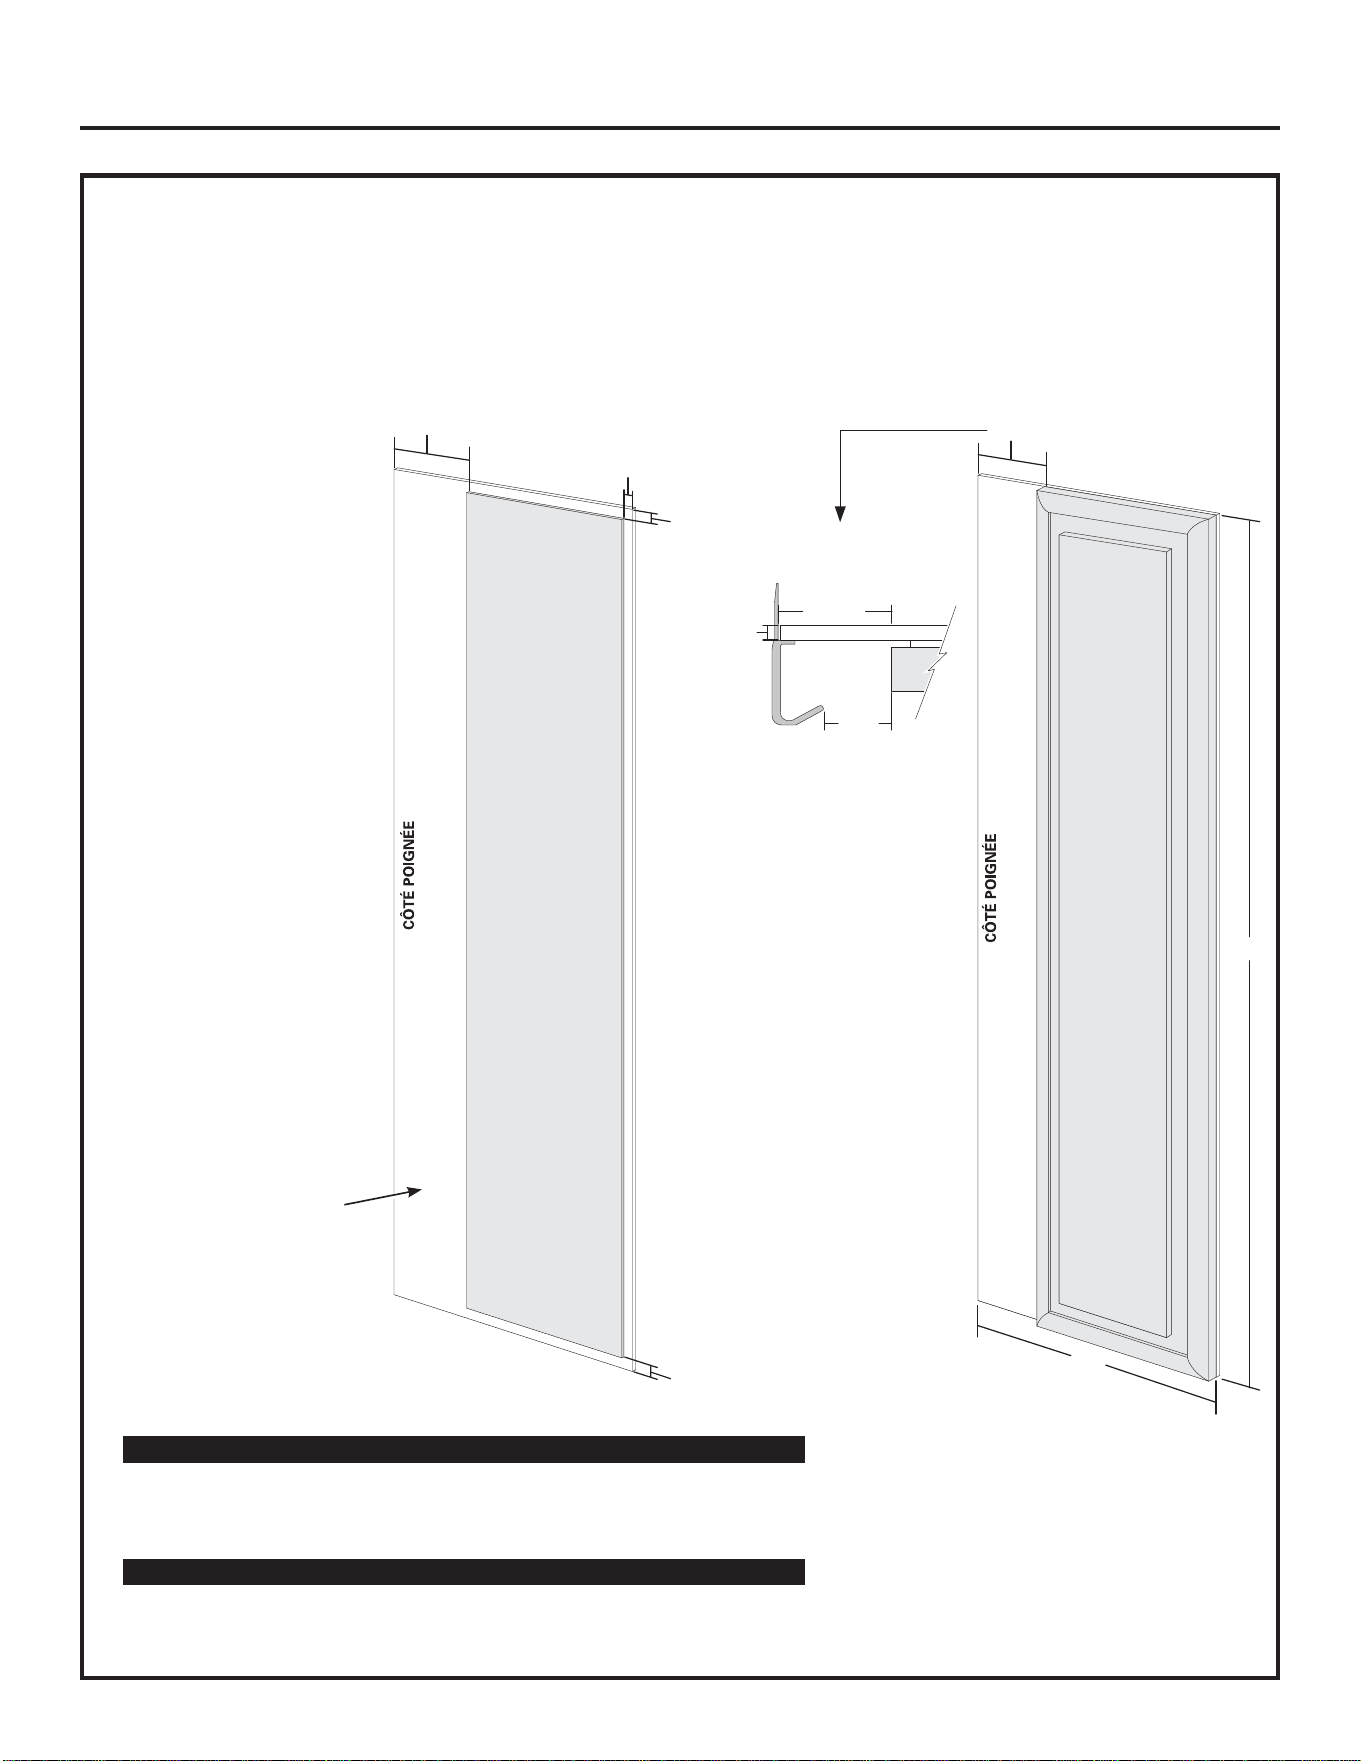
6 mm max.
(1/4 po)
Nécessaire pour obtenir
l‘espace optimal
pour la poignée
79 mm
(3-1/8 po)
64 mm
(2-1/2 po)
79 mm min.
(3-1/8 po)
B
A
PANNEAUX PERSONNALISÉS COUVRANTS PLEINE LARGEUR
DE 19 MM À POIGNÉES PRÉ-INSTALLÉES
Cette conception donne un aspect presque sans garniture.
Assemblez le panneau
d’espacement dans le
panneau arrière fini.
Laissez un espace libre
de 13 mm en haut,
en bas et du côté de
la charnière. Laissez
92 mm du côté de
la poignée. Fixez
les panneaux avec
de la colle. Assurez-
vous d’observer
les espaces libres
de tous les côtés.
Fixez le panneau
couvrant au panneau
arrière/d’espacement
assemblé. Utilisez
de la colle et des vis.
Fraisez les vis dans
le panneau arrière.
Panneau de compartiment pour aliments frais
Instructions d’installation
72
Modèles de 1067 mm A B
Panneau arrière, 6 mm 567 mm (22-5/16”) 1724 mm (67-7/8”)
Panneau d‘espacement, 2,5 mm 462 mm (18-3/16”) 1699 mm (66-7/8”)
Panneau couvrant, 19 mm 491 mm (19-5/16”) 1730 mm (68-1/8”)
Modèles de 1219 mm A B
Panneau arrière, 6 mm 672 mm (26-7/16”) 1724 mm (67-7/8”)
Panneau d‘espacement, 2,5 mm 567 mm (22-5/16”) 1699 mm (66-7/8”)
Panneau couvrant, 19 mm 595 mm (23-7/16”) 1730 mm (68-1/8”)
92 mm
(3-5/8 po)
13 mm
(1/2 po)
13 mm
(1/2 po)
13 mm
(1/2 po)
Panneau
d‘espacement
Panneau
arrière
fini
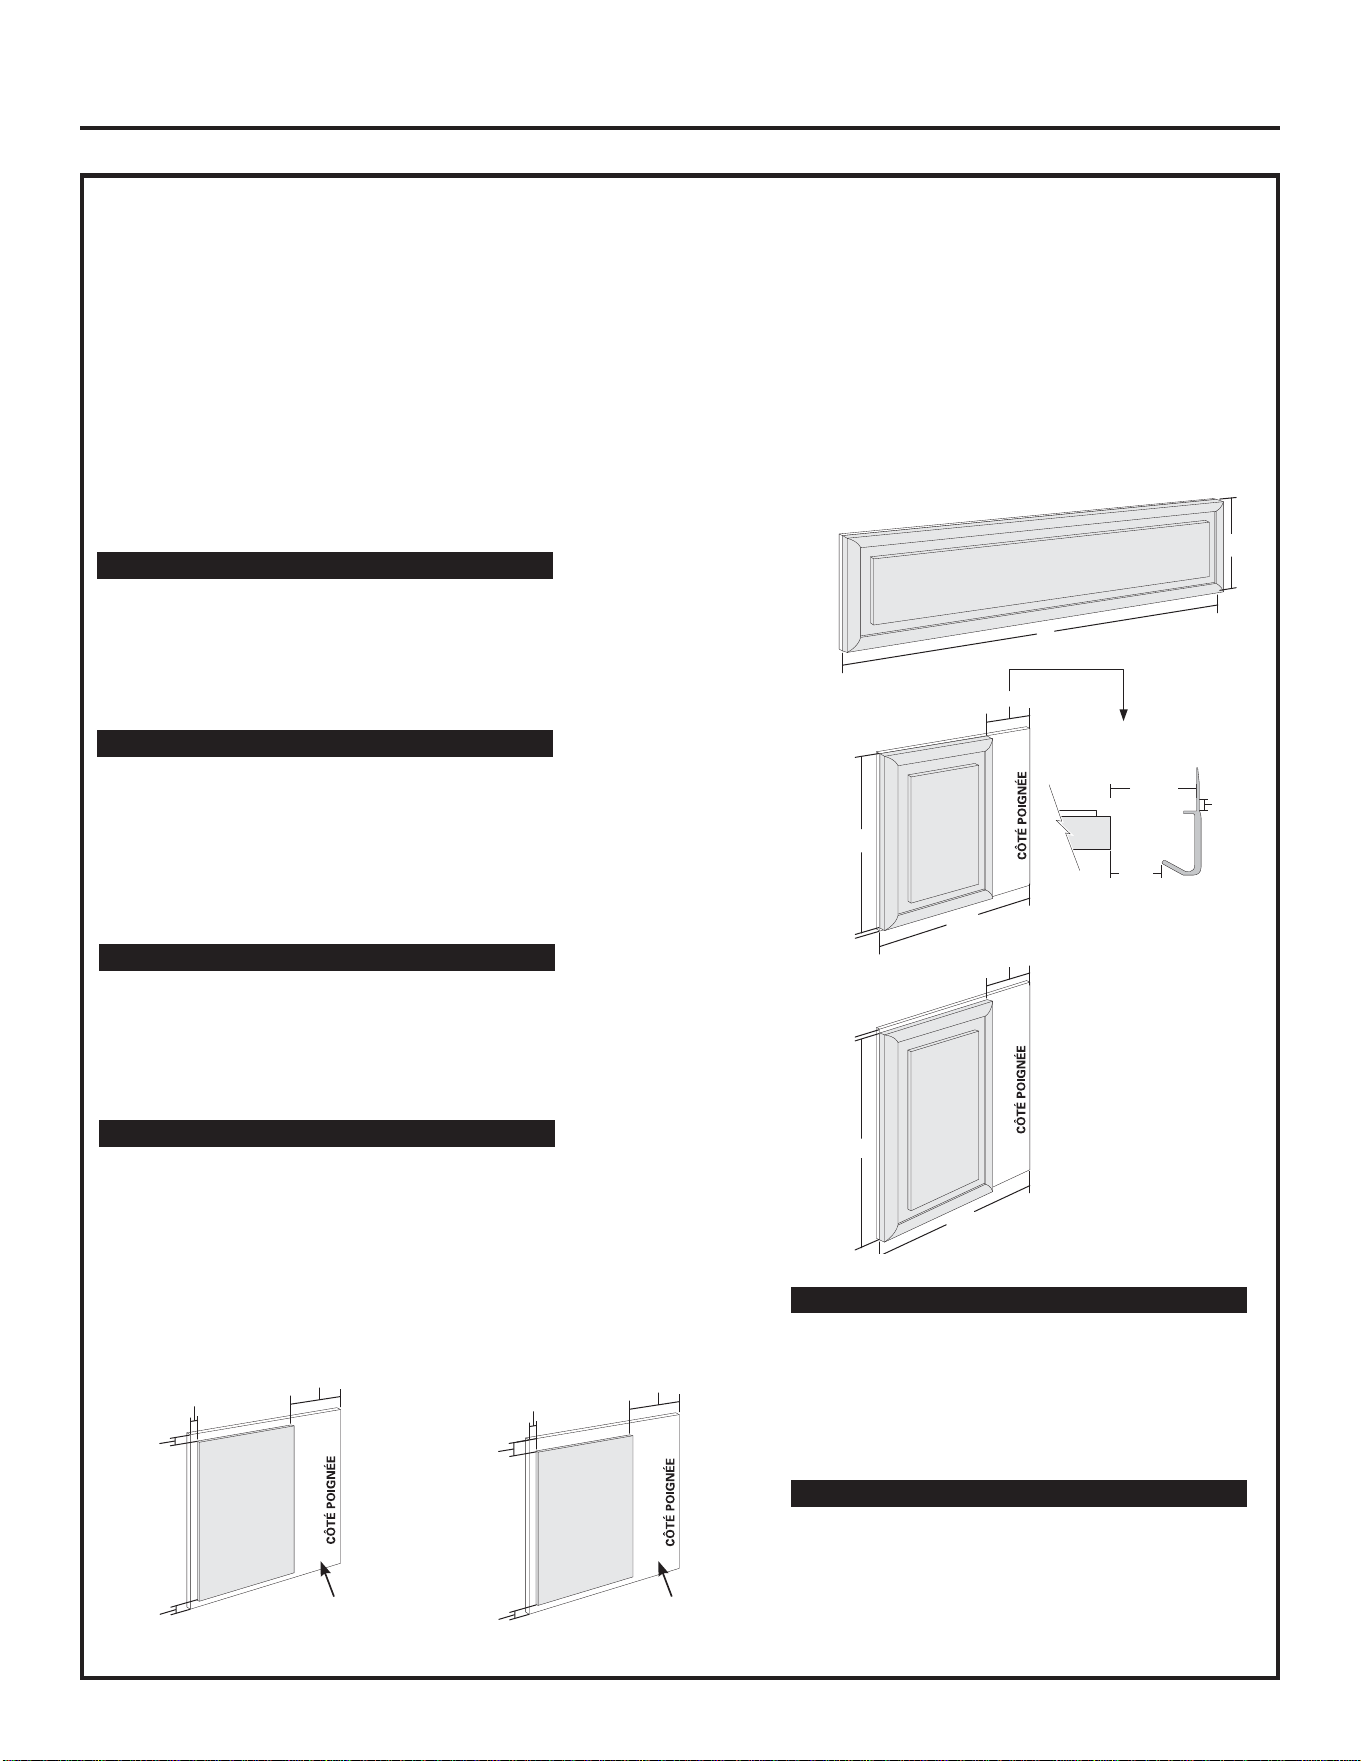
79 mm min.
(3-1/8 po)
6 mm
max.
(1/4 po)
Nécessaire pour obtenir
l‘espace optimal
pour la poignée
79 mm (3-1/8 po)
79 mm (3-1/8 po)
A
A
A
B
63 mm
(2-1/2 po)
8 mm (5/16 po)
8 mm (5/16 po)
B
B
PANNEAUX PERSONNALISÉS COUVRANTS PLEINE LARGEUR DE 19 MM
À POIGNÉES PRÉ-INSTALLÉES
Cette conception donne un aspect presque sans garniture.
Assemblez le panneau d’espacement au panneau arrière. Laissez 13 mm d’espace libre des quatre côtés du
panneau d’espacement de la grille. Laissez 13 mm d’espace libre en haut et du côté de la charnière,
24 mm en bas et 92 mm du côté de la poignée du panneau supérieur pour le congélateur. Laissez 24 mm
d’espace libre en haut, 13 mm en bas et du côté de la charnière et 92 mm du côté de la poignée du panneau
inférieur pour le congélateur. Fixez les panneaux avec de la colle. Assurez-vous de respecter
les espaces libres de tous les côtés.
Fixez le panneau d’apparence au panneau arrière/d’espacement assemblé.
Utilisez de la colle et des vis. Fraisez les vis dans le panneau arrière.
Panneau de grille
Panneau supérieur pour le congélateur
Panneau inférieur pour le congélateur
Instructions d’installation
73
Modèles de 1067 mm A B
Panneau arrière, 1014 mm 273 mm
6 mm (39-15/16”) (10-3/4”)
Panneau d’espacement, 989 mm 248 mm
2,5 mm (38-15/16”) (9-3/4”)
Panneau couvrant, 1024 mm 279 mm
19 mm (40-3/16”) (11”)
Modèles de 1219 mm A B
Panneau arrière, 1167 mm 273 mm
6 mm (45-15/16”) (10-3/4”)
Panneau d’espacement, 1141 mm 248 mm
2,5 mm (44-15/16”) (9-3/4”)
Panneau couvrant, 1176 mm 279 mm
19 mm (46-3/16”) (11”)
Modèles de 1067 mm A B
Panneau arrière, 418 mm 892 mm
6 mm (16-7/16”) (35-1/8”)
Panneau d’espacement, 313 mm 856 mm
2,5 mm (12-5/16”) (33-11/16”)
Panneau couvrant, 341 mm 887 mm
19 mm (13-7/16”) (34-15/16”)
Modèles de 1219 mm A B
Panneau arrière, 468 mm 892 mm
6 mm (18-7/16”) (35-1/8”)
Panneau d’espacement, 364 mm 856 mm
2,5 mm (14-5/16”) (33-11/16”)
Panneau couvrant, 392 mm 887 mm
19 mm (15-7/16”) (34-15/16”)
Modèles de 1067 mm A B
Panneau arrière, 418 mm 452 mm
6 mm (16-7/16”) (17-13/16”)
Panneau d’espacement, 313 mm 416 mm
2,5 mm (12-5/16”) (16-3/8”)
Panneau couvrant, 341 mm 448 mm
19 mm (13-7/16”) (17-5/8”)
Modèles de 1219 mm A B
Panneau arrière, 468 mm 452 mm
6 mm (18-7/16”) (17-13/16”)
Panneau d’espacement, 364 mm 416 mm
2,5 mm (14-5/16”) (16-3/8”)
Panneau couvrant, 392 mm 448 mm
19 mm (15-7/16”) (17-5/8”)
92 mm (3-5/8 po)
8 mm
(5/16 po)
13 mm
(1/2 po)
13 mm (1/2 po)
Panneau
d’espacement
Panneau
arrière fini
92
mm
(3-5/8 po)
13 mm
(1/2 po)
24 mm
(15/16 po)
13 mm (1/2 po)
Panneau
d’espacement
Panneau
arrière fini
Assemblage d’espacement
du panneau supérieur pour
le congélateur
Assemblage d’espacement
du panneau inférieur pour
le congélateur
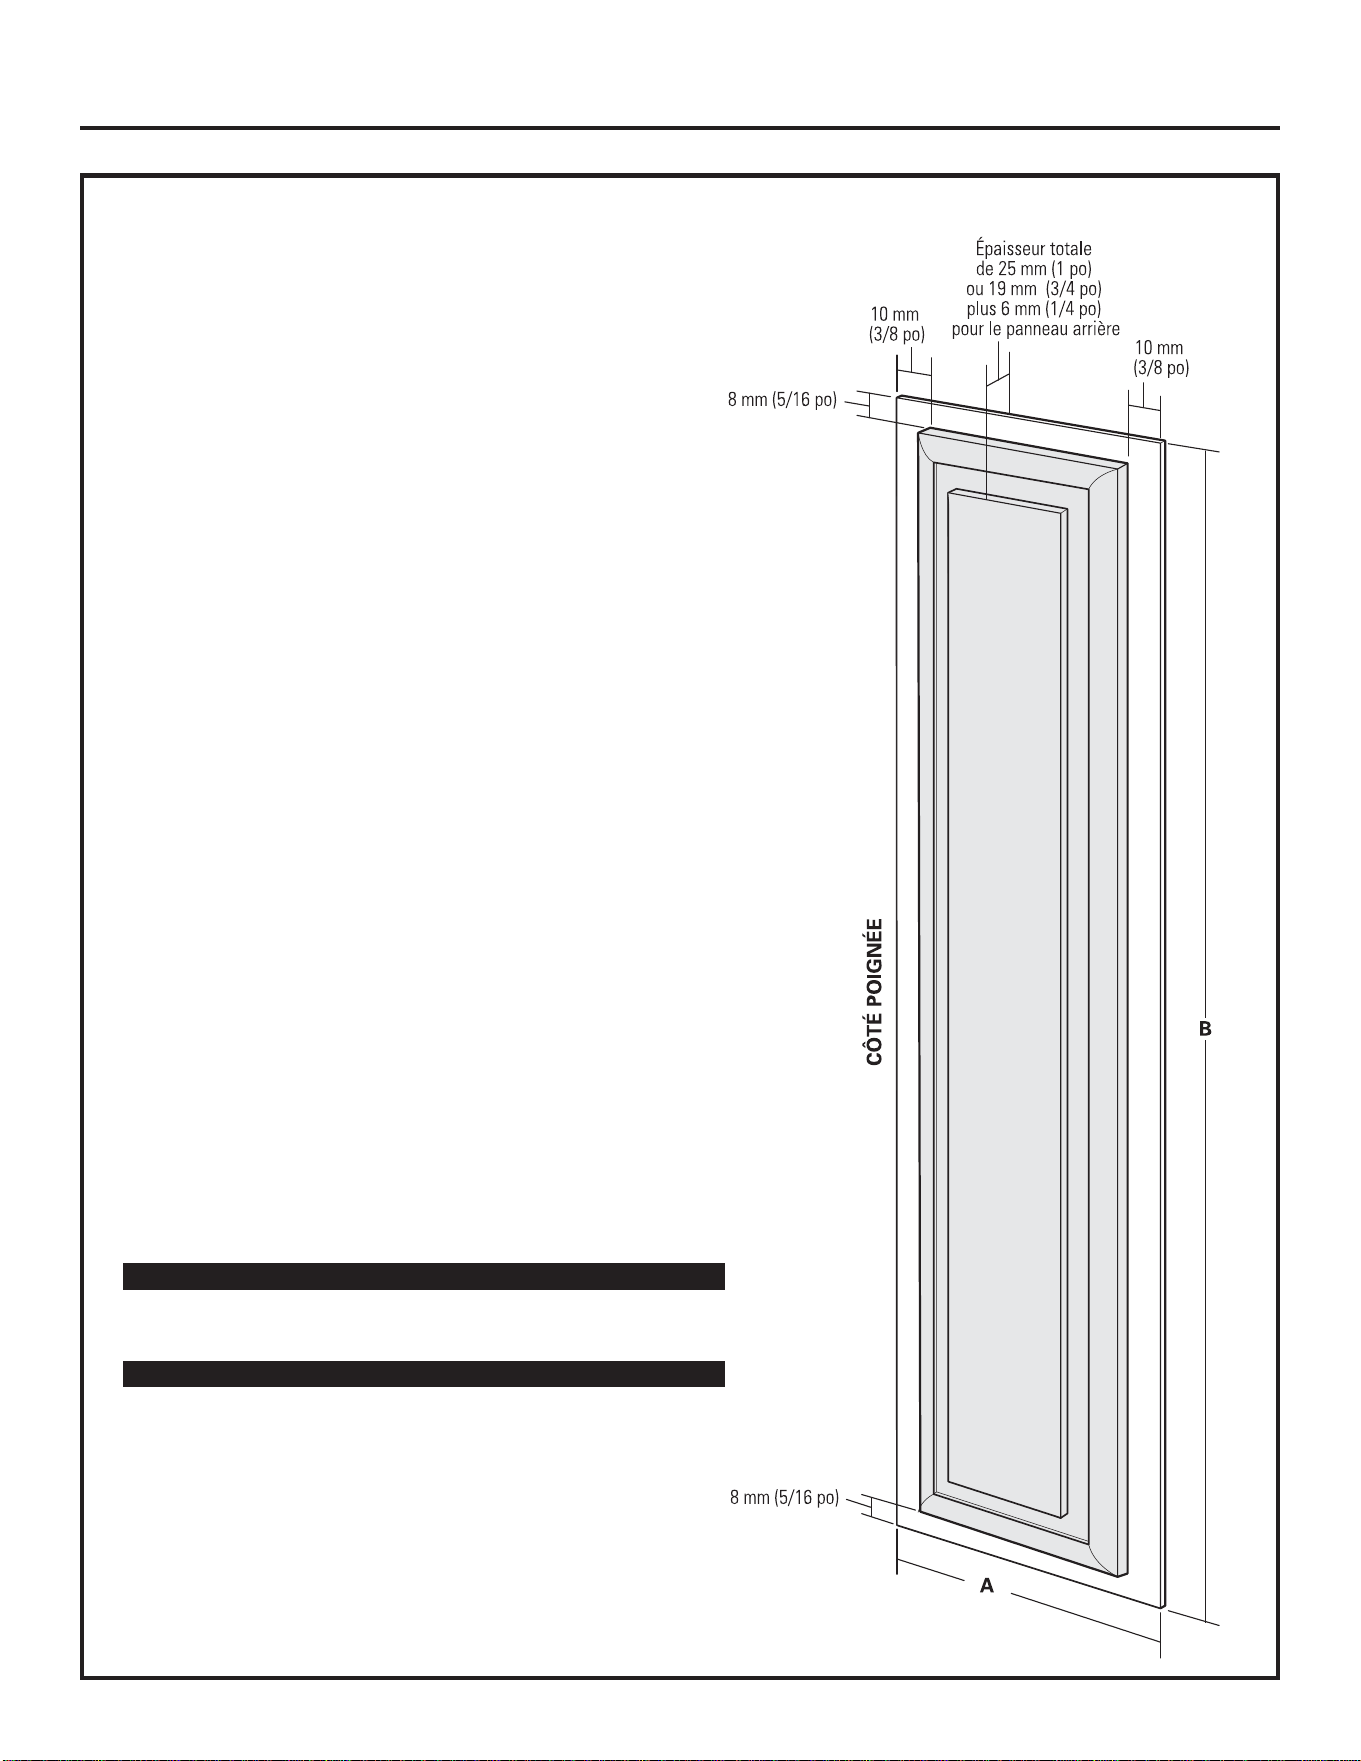
PANNEAUX DE BOIS PERSONNALISÉS ENCADRÉS DE 19 MM
À POIGNÉES PERSONNALISÉES
Fixés à un panneau arrière fini de 6 mm. Cette conception
donne un aspect encadré.
Panneau de
compartiment pour
aliments frais
Instructions d’installation
74
Modèles de 1067 mm A B
Panneau arrière, 6 mm 567 mm (22-5/16”) 1724 mm (67-7/8”)
Panneau couvrant, 19 mm 557 mm (21-15/16”) 1708 mm (67-1/4”)
Modèles de 1219 mm A B
Panneau arrière, 6 mm 672 mm (26-7/16”) 1724 mm (67-7/8”)
Panneau couvrant, 19 mm 662 mm (26-1/16”) 1708 mm (67-1/4”)
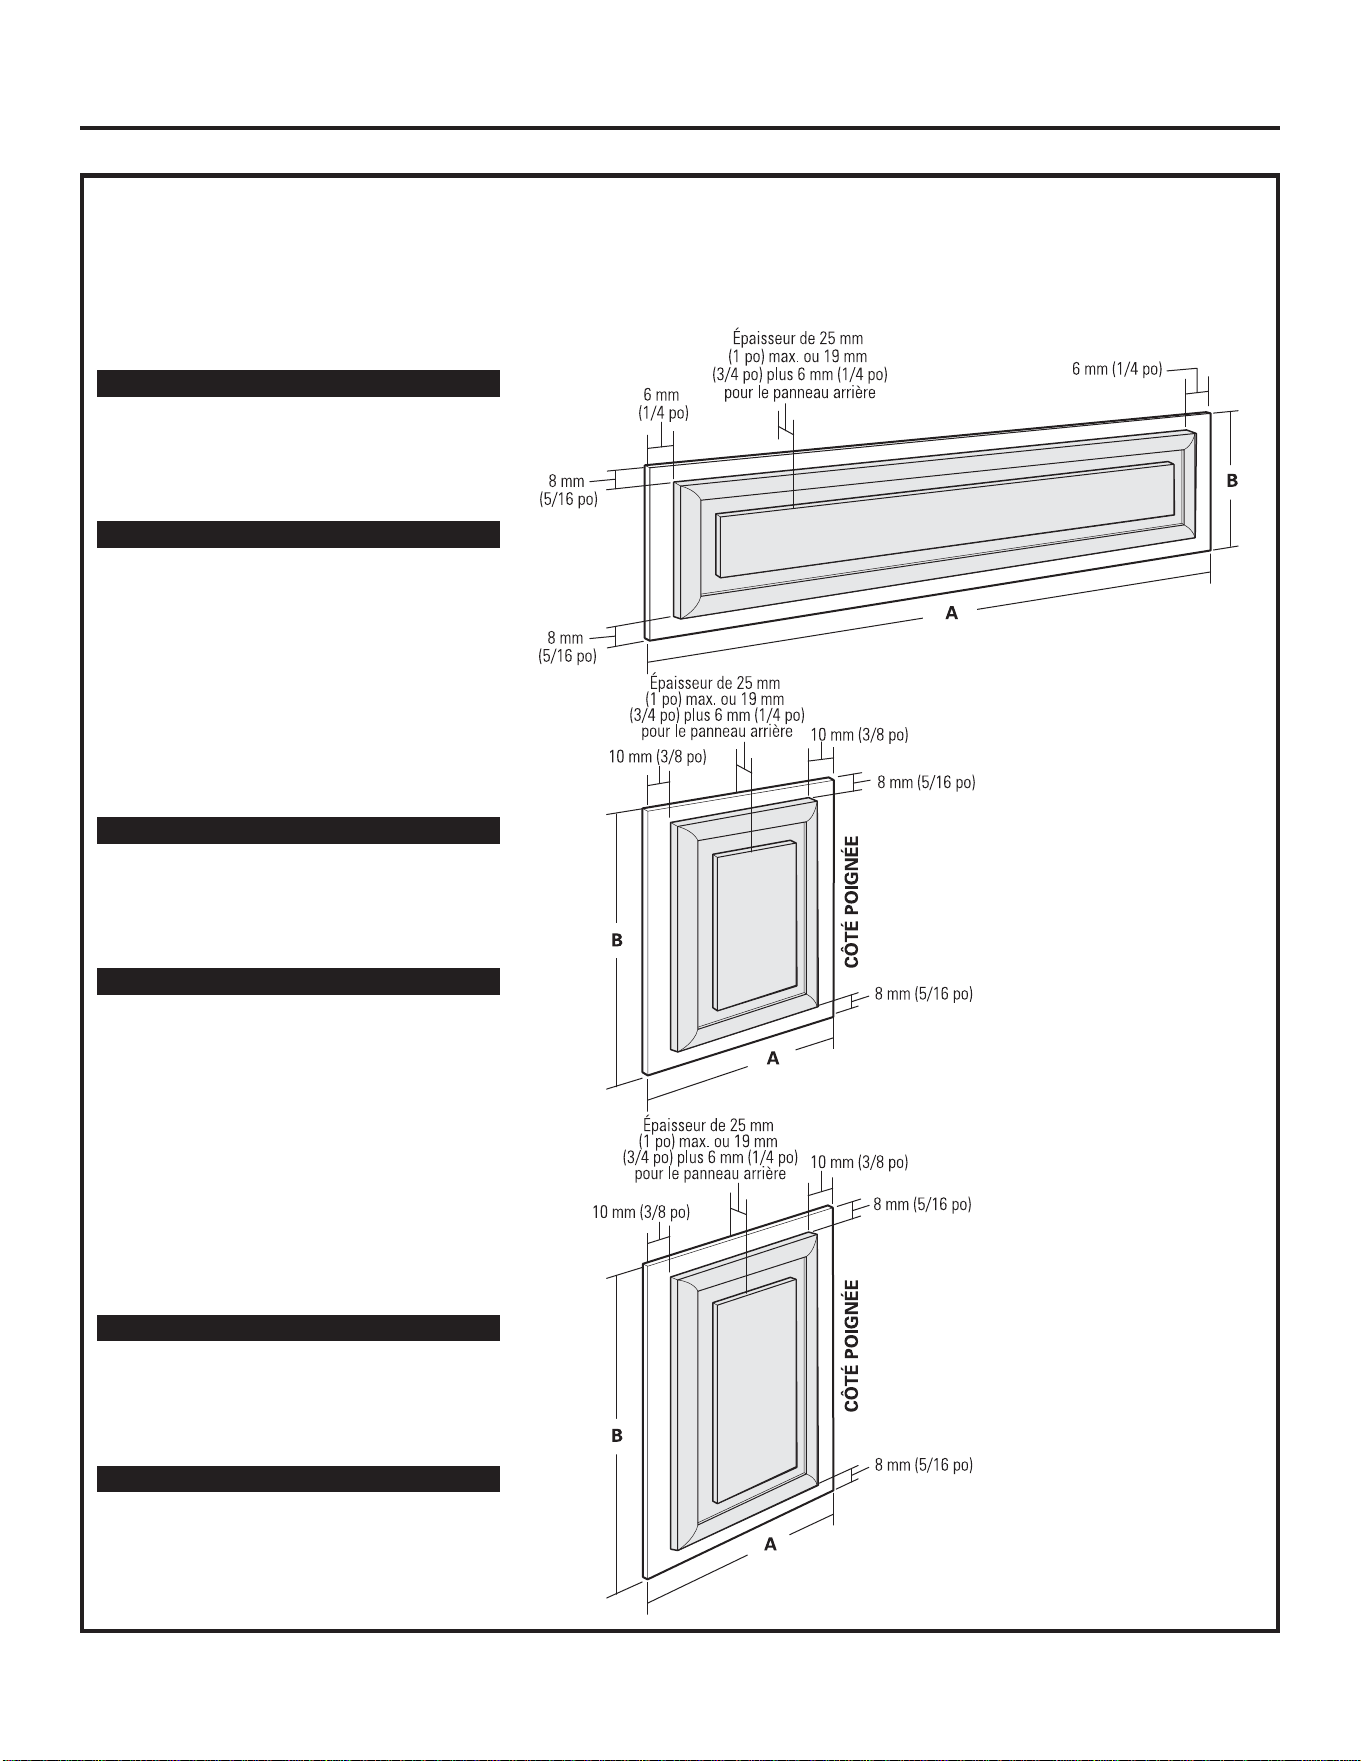
PANNEAUX DE BOIS PERSONNALISÉS ENCADRÉS DE 19 MM
À POIGNÉES PERSONNALISÉES
Fixés à un panneau arrière fini de 6 mm. Cette conception donne un aspect encadré.
Panneau de grille
Panneau supérieur
pour le congélateur
Panneau inférieur
pour le congélateur
Instructions d’installation
75
Modèles de 1067 mm A B
Panneau arrière, 1014 mm 273 mm
6 mm (39-15/16”) (10-3/4”)
Panneau couvrant, 1002 mm 257 mm
19 mm (39-7/16”) (10-1/8”)
Modèles de 1219 mm A B
Panneau arrière, 1167 mm 273 mm
6 mm (45-15/16”) (10-3/4”)
Panneau couvrant, 1154 mm 257 mm
19 mm (45-7/16”) (10-1/8”)
Modèles de 1067 mm A B
Panneau arrière, 418 mm 452 mm
6 mm (16-7/16”) (17-13/16”)
Panneau couvrant, 408 mm 437 mm
19 mm (16-1/16”) (17-3/16”)
Modèles de 1219 mm A B
Panneau arrière, 468 mm 452 mm
6 mm (18-7/16”) (17-13/16”)
Panneau couvrant, 459 mm 437 mm
19 mm (18-1/16”) (17-3/16”)
Modèles de 1067 mm A B
Panneau arrière, 418 mm 892 mm
6 mm (16-7/16”) (35-1/8”)
Panneau couvrant, 408 mm 876 mm
19 mm (16-1/16”) (34-1/2”)
Modèles de 1219 mm A B
Panneau arrière, 468 mm 892 mm
6 mm (18-7/16”) (35-1/8”)
Panneau couvrant, 459 mm 876 mm
19 mm (18-1/16”) (34-1/2”)
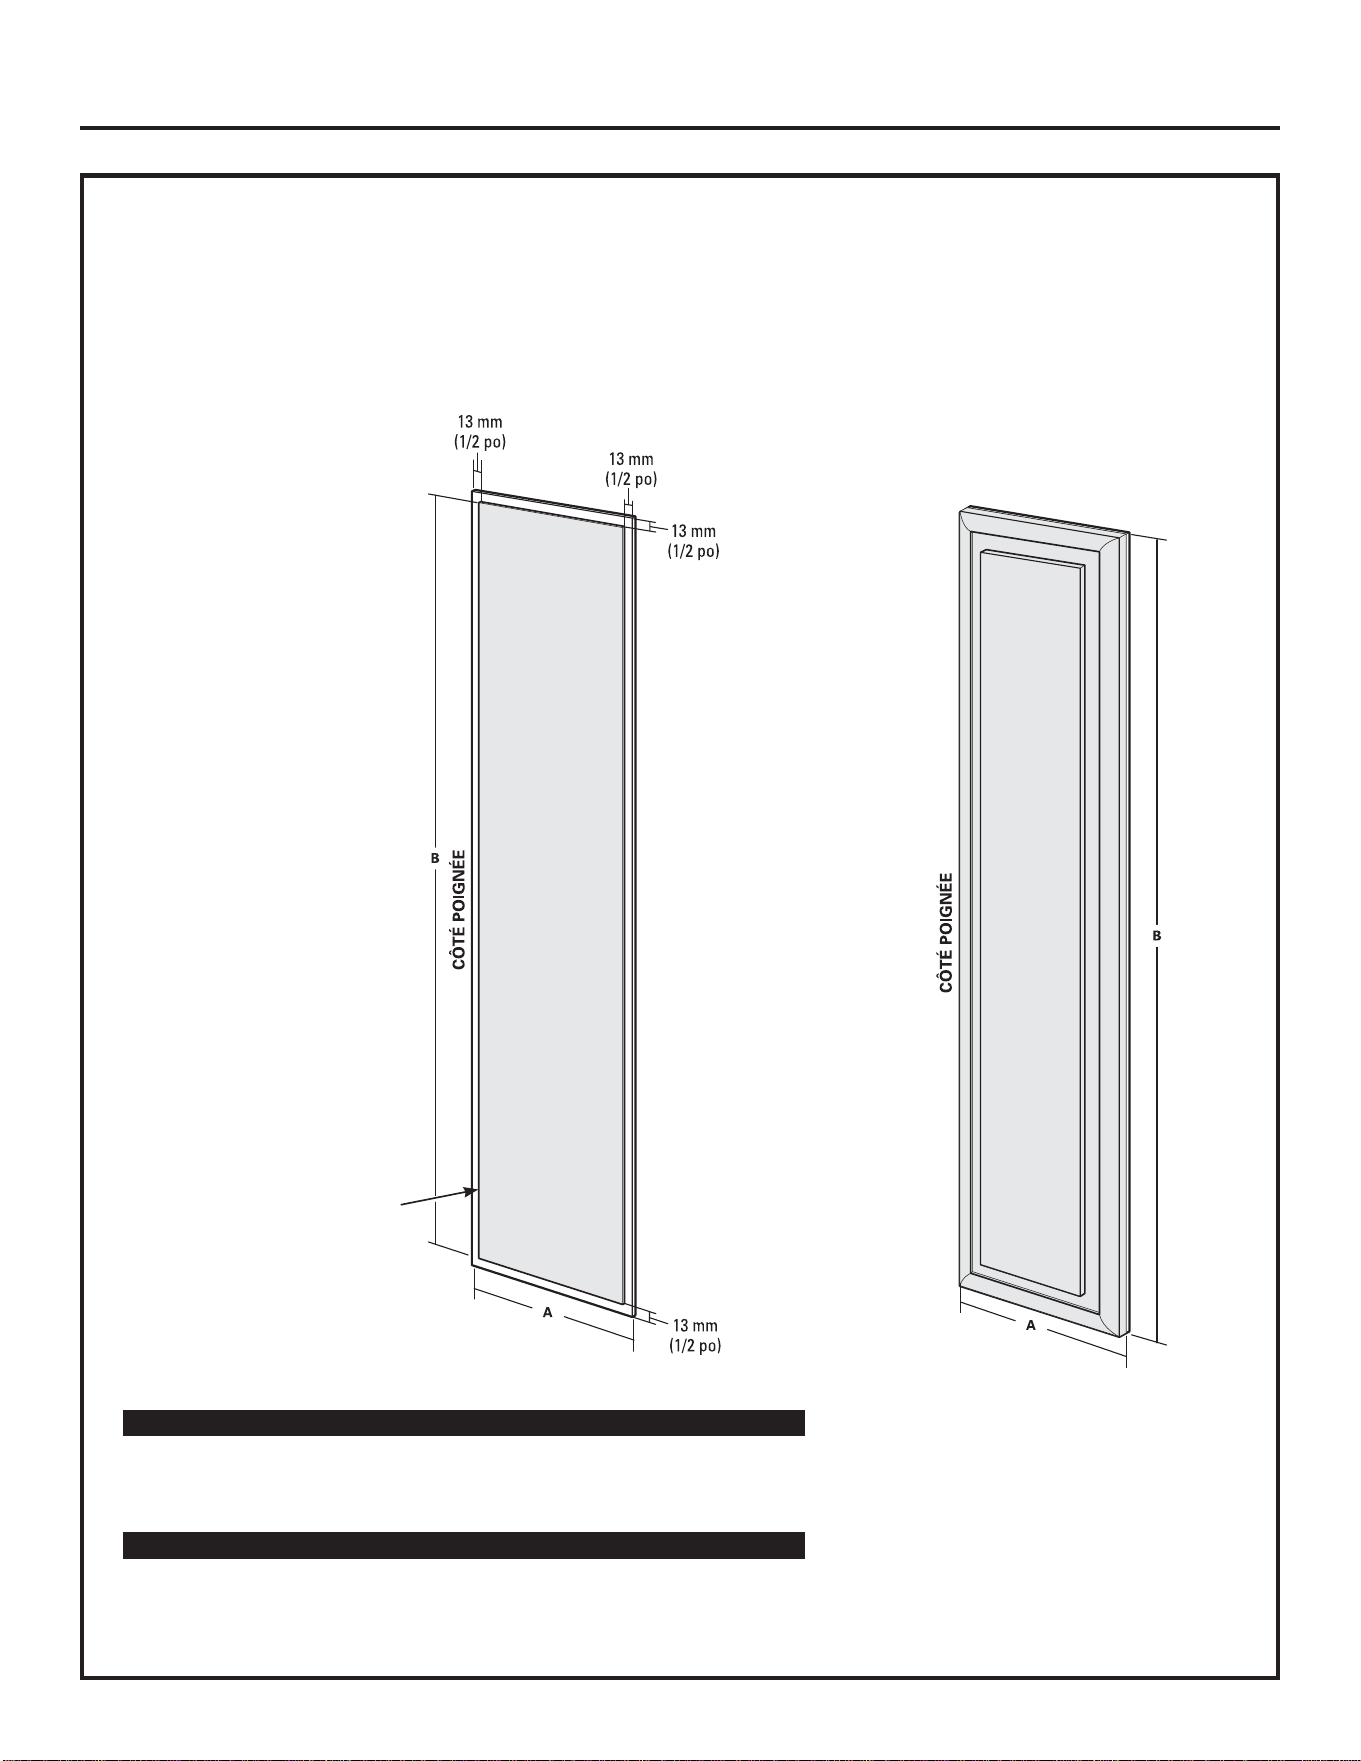
PANNEAUX PERSONNALISÉS COUVRANTS PLEINE LARGEUR DE 19 MM
À POIGNÉES PERSONNALISÉES
Cette conception donne un aspect presque sans garniture.
Assemblez le panneau
d’espacement dans
le panneau arrière fini.
Laissez un espace libre
de 13 mm en tous
les côtés. Fixez les
panneaux avec de
la colle. Assurez-vous
d’observer les espaces
libres de tous les côtés.
Fixez le panneau
couvrant au panneau
arrière/d’espacement
assemblé. Utilisez
de la colle et des vis.
Fraisez les vis dans
le panneau arrière.
Panneau de compartiment pour aliments frais
Instructions d’installation
76
Modèles de 1067 mm A B
Panneau arrière, 6 mm 567 mm (22-5/16”) 1724 mm (67-7/8”)
Panneau d‘espacement, 2,5 mm 554 mm (21-13/16”) 1699 mm (66-7/8”)
Panneau couvrant, 19 mm 567 mm (22-5/16”) 1730 mm (68-1/8”)
Modèles de 1219 mm A B
Panneau arrière, 6 mm 672 mm (26-7/16”) 1724 mm (67-7/8”)
Panneau d‘espacement, 2,5 mm 656 mm (25-13/16”) 1699 mm (66-7/8”)
Panneau couvrant, 19 mm 672 mm (26-7/16”) 1730 mm (68-1/8”)
Panneau
d‘espacement
Panneau
arrière
fini
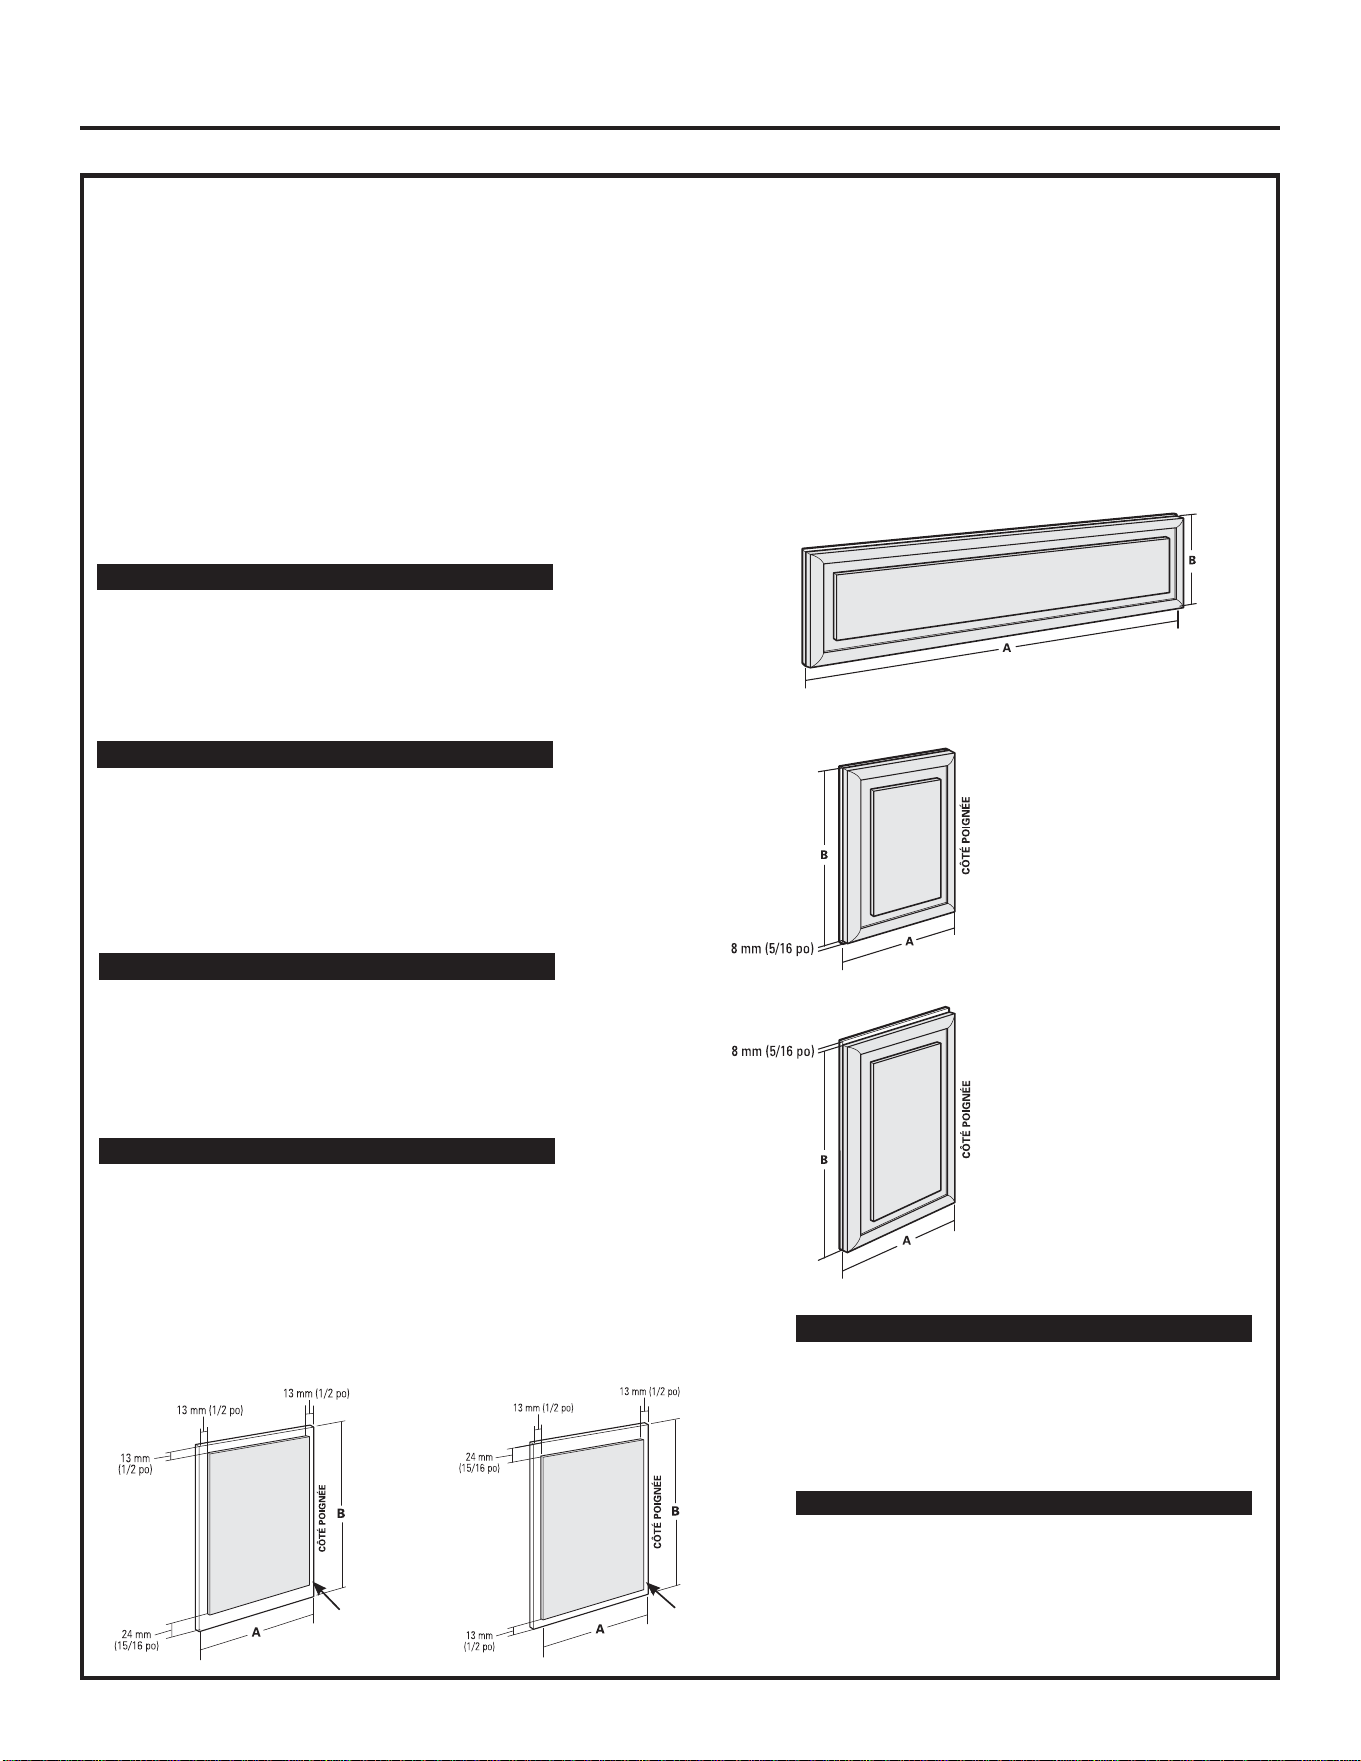
PANNEAUX PERSONNALISÉS COUVRANTS PLEINE LARGEUR DE 19 MM
À POIGNÉES PERSONNALISÉES
Cette conception donne un aspect presque sans garniture.
Assemblez le panneau d’espacement au panneau arrière. Laissez 13 mm d’espace libre des quatre côtés du
panneau d’espacement de la grille. Laissez 13 mm d’espace libre en haut, du côté de la charnière et
du côté de la poignée, et 24 mm en bas du panneau supérieur pour le congélateur. Laissez 24 mm d’espace
libre en haut et 13 mm en bas, du côté de la charnière et du côté de la poignée du panneau inférieur pour le
congélateur. Fixez les panneaux avec de la colle. Assurez-vous de respecter les espaces libres de tous
les côtés.
Fixez le panneau d’apparence au panneau arrière/d’espacement assemblé.
Utilisez de la colle et des vis. Fraisez les vis dans le panneau arrière.
Panneau de grille
Panneau supérieur pour le congélateur
Panneau inférieur pour le congélateur
Instructions d’installation
77
Modèles de 1067 mm A B
Panneau arrière, 1014 mm 273 mm
6 mm (39-15/16”) (10-3/4”)
Panneau d’espacement, 989 mm 248 mm
2,5 mm (38-15/16”) (9-3/4”)
Panneau couvrant, 1024 mm 279 mm
19 mm (40-3/16”) (11”)
Modèles de 1219 mm A B
Panneau arrière, 1167 mm 273 mm
6 mm (45-15/16”) (10-3/4”)
Panneau d’espacement, 1141 mm 248 mm
2,5 mm (44-15/16”) (9-3/4”)
Panneau couvrant, 1176 mm 279 mm
19 mm (46-3/16”) (11”)
Modèles de 1067 mm A B
Panneau arrière, 418 mm 892 mm
6 mm (16-7/16”) (35-1/8”)
Panneau d’espacement, 392 mm 856 mm
2,5 mm (15-7/16”) (33-11/16”)
Panneau couvrant, 418 mm 887 mm
19 mm (16-7/16”) (34-15/16”)
Modèles de 1219 mm A B
Panneau arrière, 468 mm 892 mm
6 mm (18-7/16”) (35-1/8”)
Panneau d’espacement, 443 mm 856 mm
2,5 mm (17-7/16”) (33-11/16”)
Panneau couvrant, 468 mm 887 mm
19 mm (18-7/16”) (34-15/16”)
Modèles de 1067 mm A B
Panneau arrière, 418 mm 452 mm
6 mm (16-7/16”) (17-13/16”)
Panneau d’espacement, 392 mm 416 mm
2,5 mm (15-7/16”) (16-3/8”)
Panneau couvrant, 418 mm 448 mm
19 mm (16-7/16”) (17-5/8”)
Modèles de 1219 mm A B
Panneau arrière, 468 mm 452 mm
6 mm (18-7/16”) (17-13/16”)
Panneau d’espacement, 443 mm 416 mm
2,5 mm (17-7/16”) (16-3/8”)
Panneau couvrant, 468 mm 448 mm
19 mm (18-7/16”) (17-5/8”)
Panneau
d’espacement
Panneau
arrière fini
Panneau
d’espacement
Panneau
arrière fini
Assemblage d’espacement
du panneau supérieur pour
le congélateur
Assemblage d’espacement
du panneau inférieur pour
le congélateur
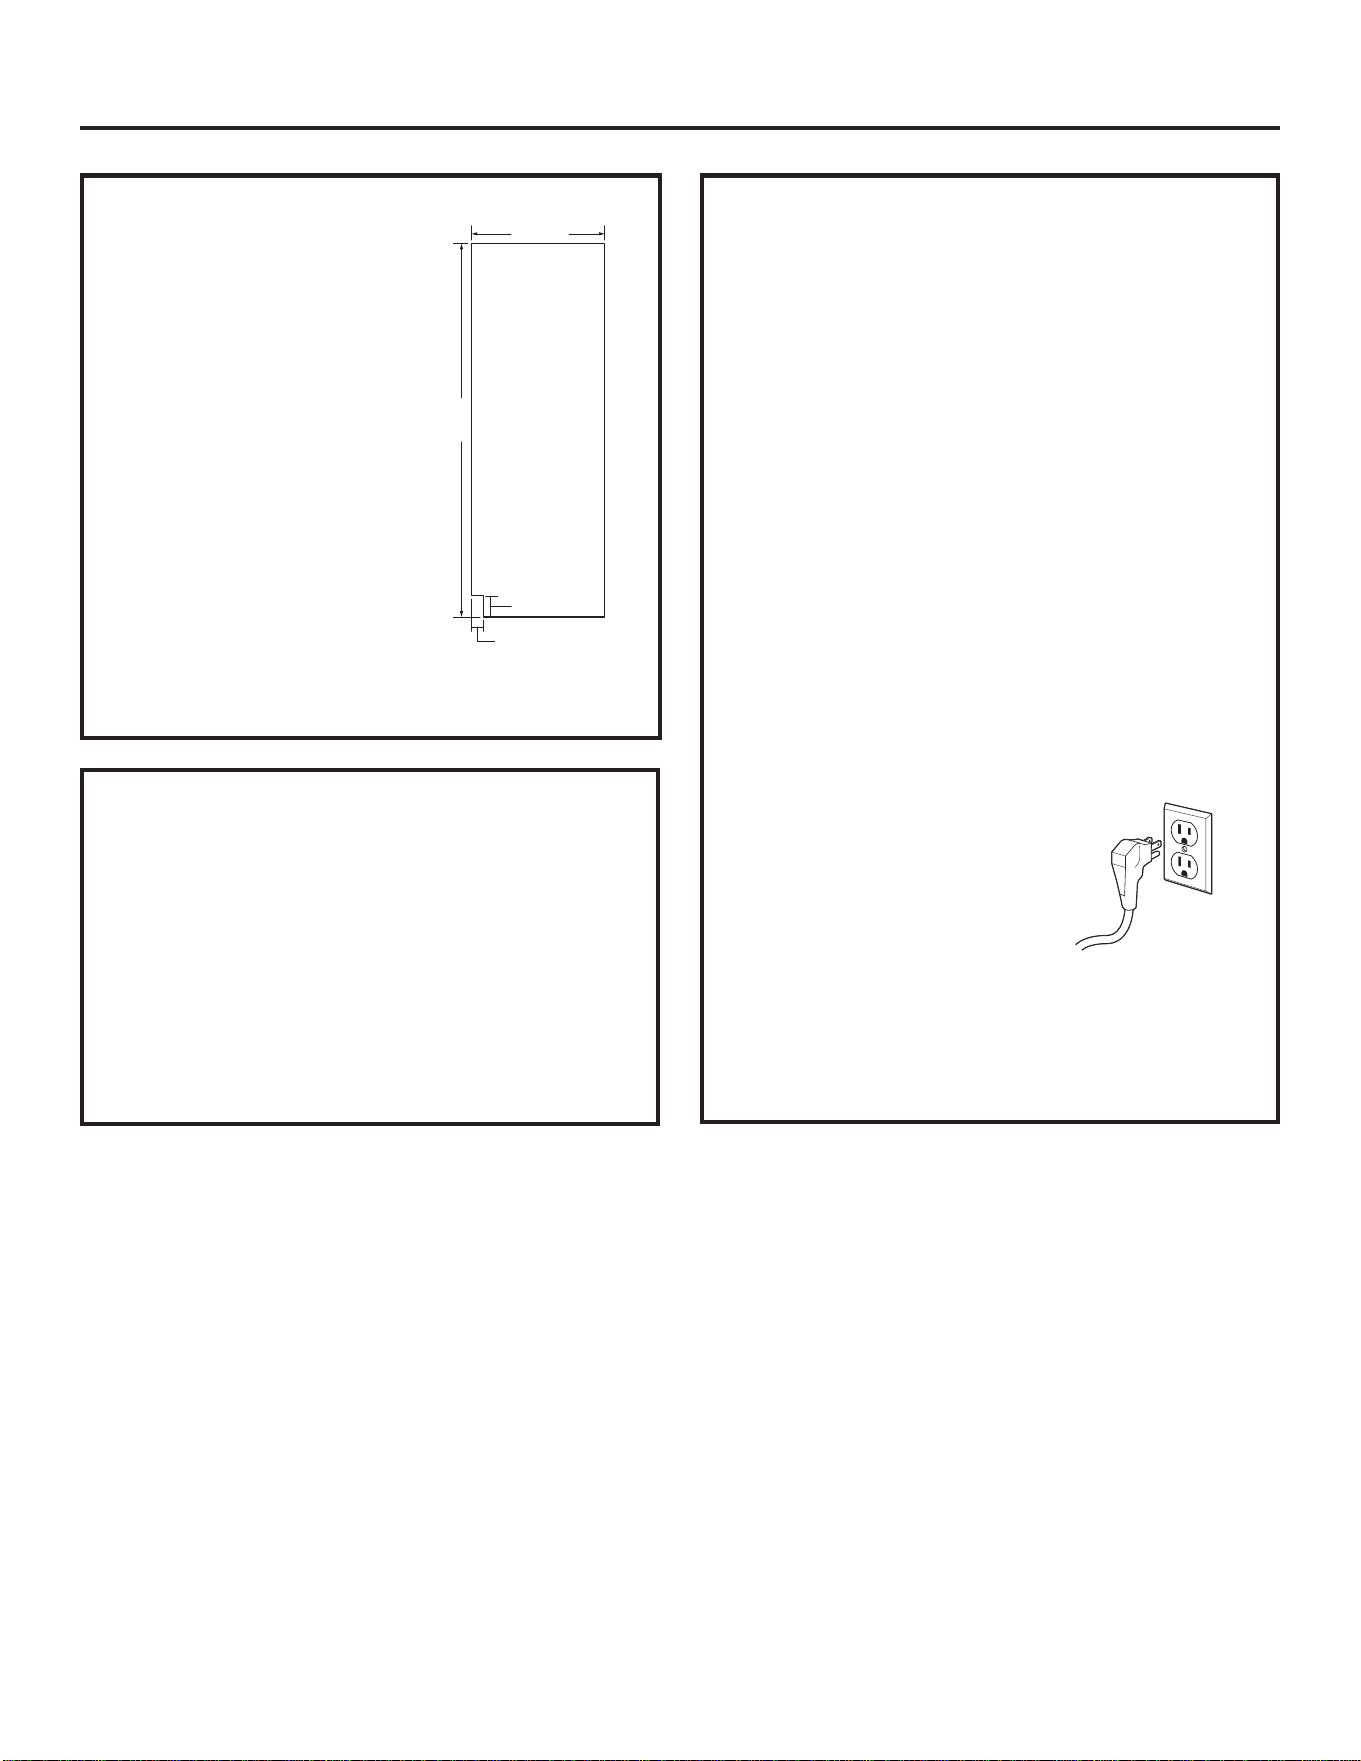
MISE À LA TERRE DU RÉFRIGÉRATEUR
,03257$17³OLUHDWWHQWLYHPHQW
POUR DES RAISONS DE SÉCURITÉ, CET APPAREIL
DOIT ÊTRE CORRECTEMENT MIS À LA TERRE.
Le cordon d’alimentation de cet appareil
est équipé d’une fiche à trois broches qui
correspond à la prise de courant à trois trous
(mise à la terre) standard pour minimiser les
risques de chocs électriques par cet appareil.
Il faut faire vérifier par un électricien qualifié
que les prises de courant et les circuits sont
correctement mis à la terre.
Quand la prise de courant n’a que deux trous,
l’installateur a la responsabilité et l’obligation
de la remplacer par une prise à trois trous
correctement mise à la terre.
IL NE FAUT JAMAIS,
POUR UNE RAISON QUELCONQUE, COUPER
OU ENLEVER LA TROISIÈME
BROCHE (MISE À LA TERRE) DU
CORDON D’ALIMENTATION.
IL NE FAUT PAS UTILISER
UN ADAPTATEUR
POUR BRANCHER LE
RÉFRIGÉRATEUR SUR UNE PRISE
À DEUX TROUS.
IL NE FAUT PAS UTILISER DE RALLONGE AVEC
CET APPAREIL.
PANNEAUX
LATÉRAUX
Il faut utiliser des
panneaux latéraux (pas
fournis) quand
les côtés du réfrigérateur
sont exposés. Des
panneaux de 6 mm (1/4
po) glissent dans les
moulures latérales de la
cuve. Commander
les panneaux chez
le constructeur des
armoires.
*En fonction de la hauteur d’installation.
SOL
Pour obtenir une installation correcte,
ce réfrigérateur doit être placé sur une surface
horizontale, en matériau dur qui est au même
niveau que le reste du sol. Cette surface doit
être suffisamment solide pour supporter
un réfrigérateur complètement rempli,
soit environ 680 kg (1500 lb).
NOTE : Il faut protéger le fini du sol. Coupez un grand
morceau de carton et le placez sous le réfrigérateur,
sur l’aire de travail.
610 mm
(24 po)
*2134 mm
(84 po)
*76 à 102 mm
(3 à 4 po)
38 mm
(1-1/2 po)
Instructions d’installation
78
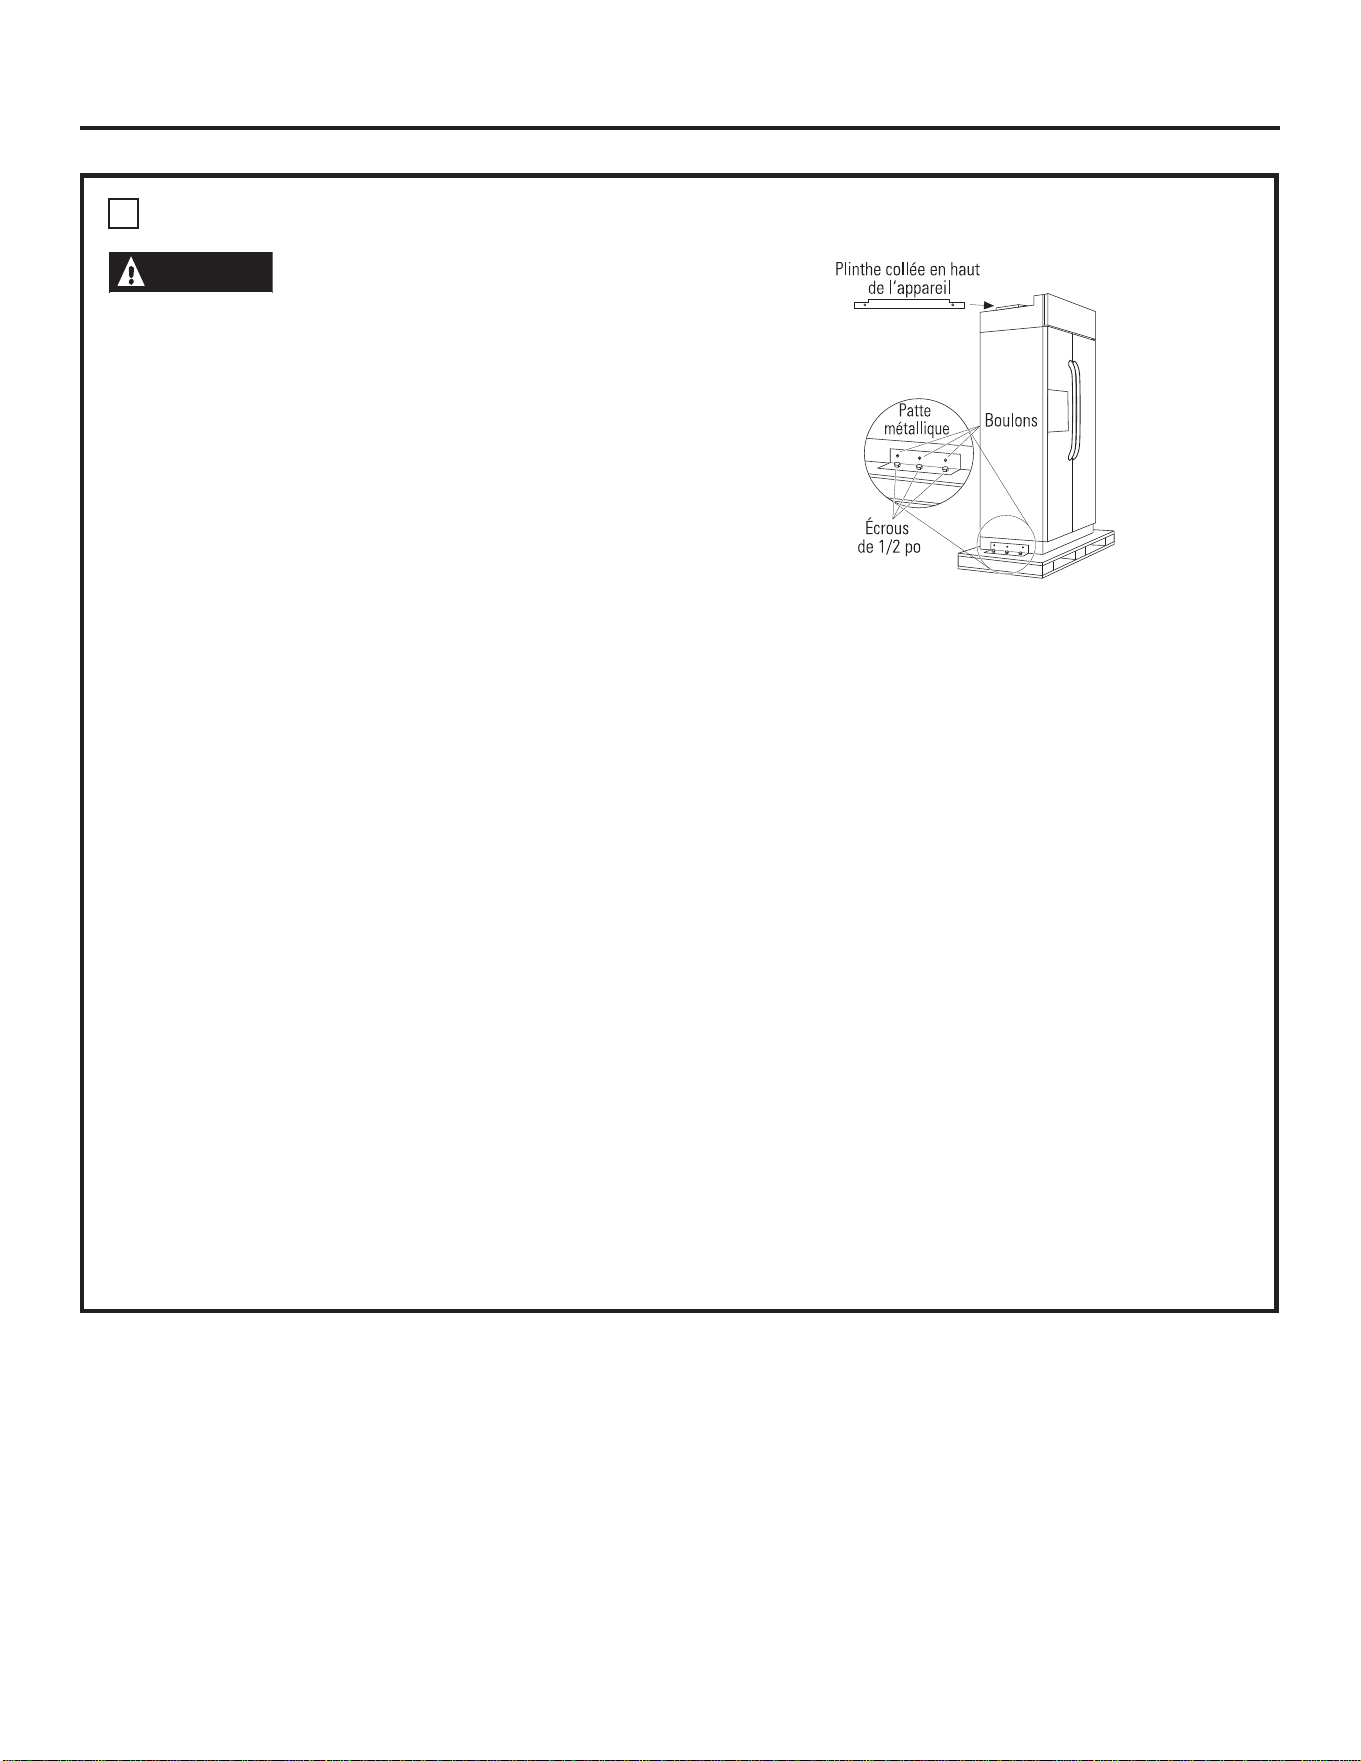
1 ENLÈVEMENT DE L’EMBALLAGE
AVERTISSEMENT
Le réfrigérateur est beaucoup plus lourd
en haut qu‘en bas. Il faut être prudent lors des
déplacements. Si un diable est utilisé, il faut
soulever le réfrigérateur sur le côté congélateur
seulement.
• Coupez avec précaution les bandes en haut
et en bas. Enlevez le carton extérieur.
• Glissez les deux montants de coins arrière (2).
• Glissez le carton vers le haut.
NOTE : IL NE FAUT PAS METTRE LA CUVE À PLAT
SUR LE SOL POUR ENLEVER LA PALETTE !
• L’appareil est maintenu sur la palette par six
boulons de 7/16 po et six écrous de 1/2 po.
• Enlevez les six boulons de 7/16 po qui
maintiennent les pattes métalliques sur
le réfrigérateur.
• Enlevez les trois écrous de 1/2 po
et les rondelles du côté congélateur.
• Enlevez l’écrou du bloc de bois en arrière
sur le côté de congélateur.
• Inclinez l’appareil, côté congélateur vers
le haut, vers le côté compartiment pour
aliments frais.
• Poussez les boulons vers le bas, enlevez
les pattes métalliques du côté congélateur.
Enlevez le bloc de bois du côté de congélateur.
• Glissez le diable sous l’appareil, côté
congélateur.
• En utilisant les montants des coins
(2 aux coins avant) pour éviter les dommages,
fixez l’appareil sur le diable.
NOTE : Si les montants de coins sont trop longs,
coupez les montants à une longueur appropriée.
• Avec le diable, soulevez l’appareil de la palette.
• Enlevez la plinthe collée sur le haut
de l’appareil.
• Mettez la plinthe de côté en attendant
l’installation finale.
NOTE: ,/1()$873$6(66$<(5'(528/(528
TRAÎNER L’APPAREIL AVANT QU’IL NE SOIT SORTI
DE LA PALETTE.
NOTE: VÉRIFIEZ QUE LA CONDUITE D’EAU N’EST
PAS PINCÉE PAR LE DIABLE.
Instructions d’installation
79
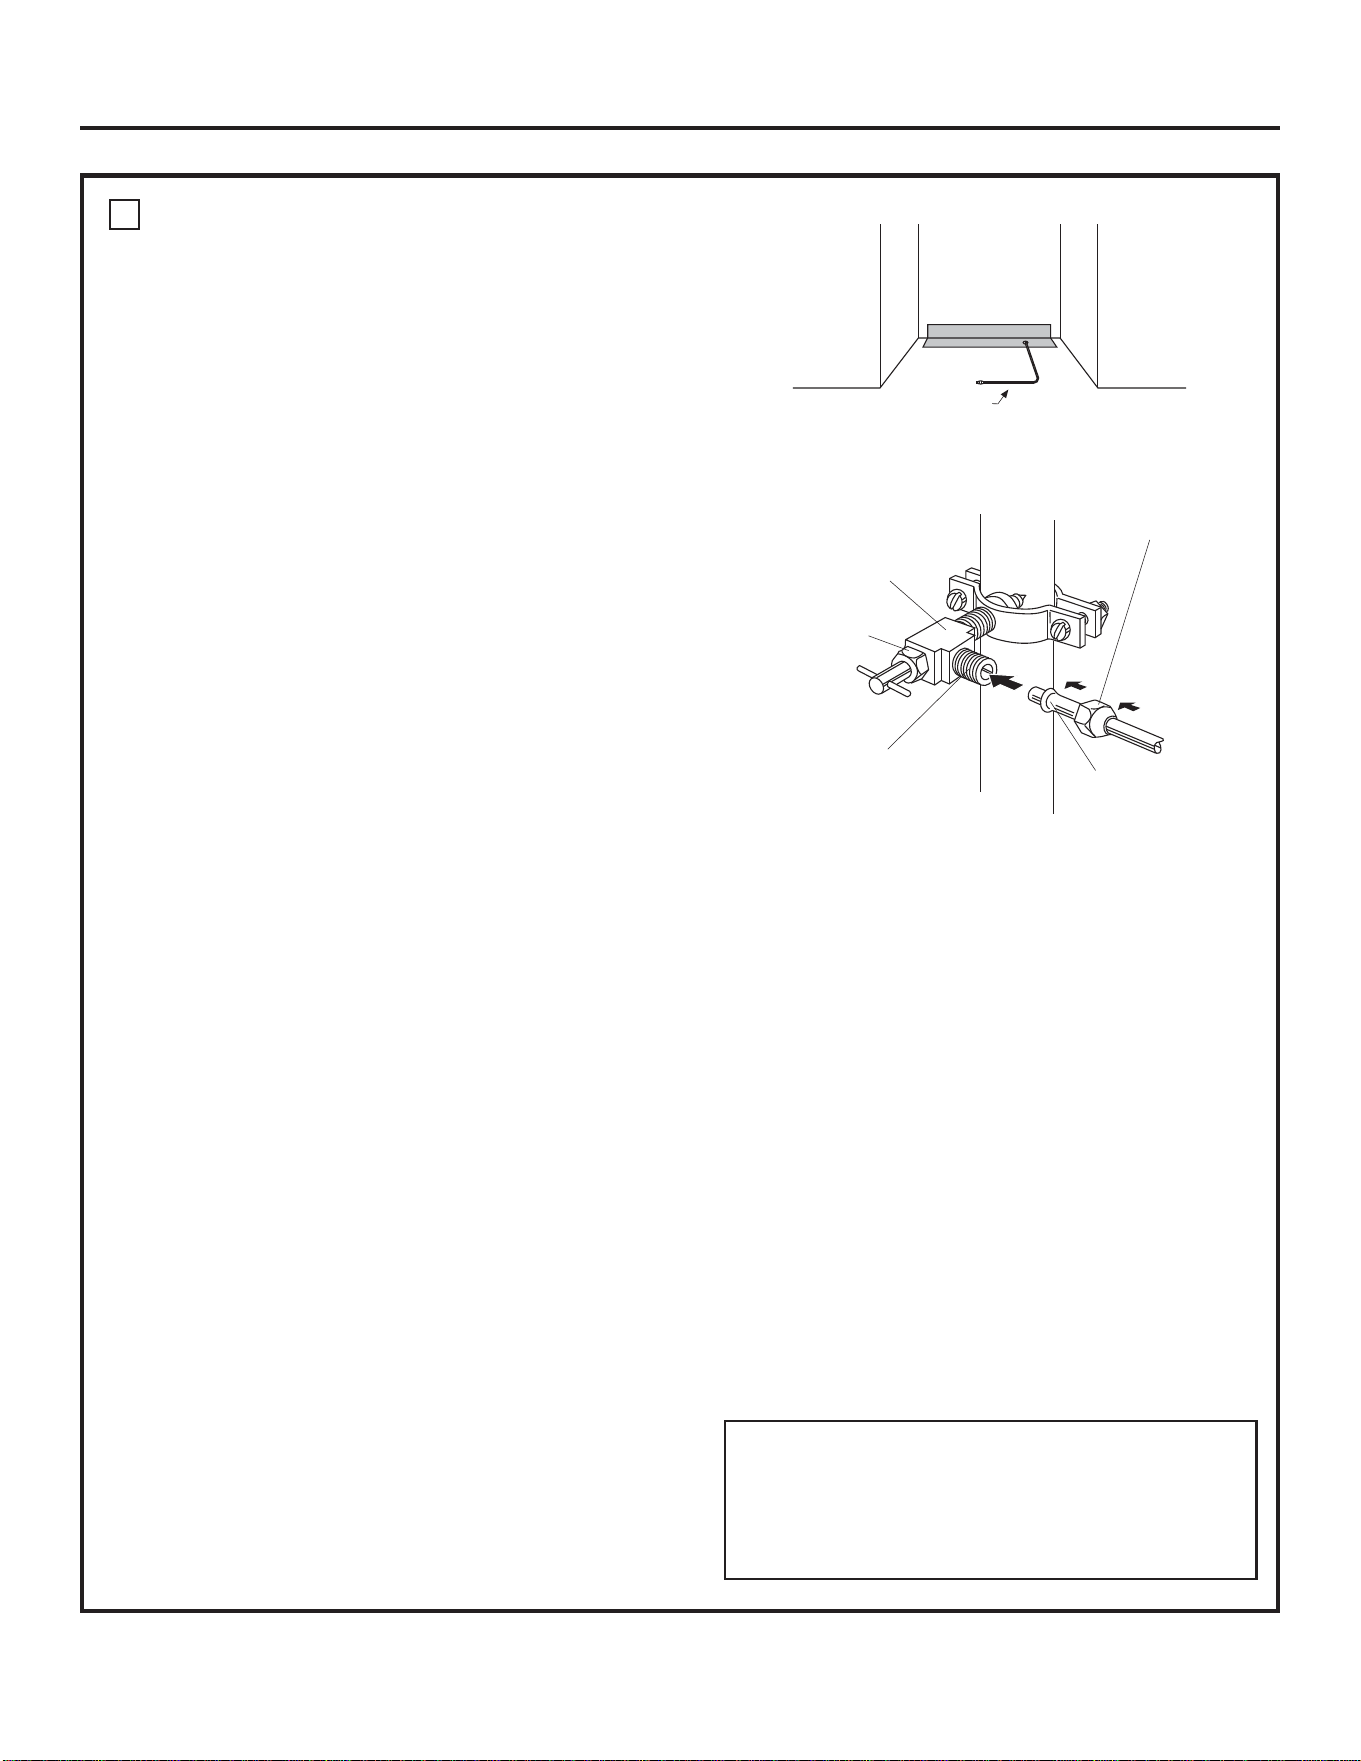
2 INSTALLATION DE
LA CONDUITE D’EAU
• Il faut avoir une alimentation d’eau froide pour
permettre le fonctionnement de la machine à
glaçons automatique. La pression d’eau doit être
entre 276 kPa et 827 kPa (40 et 120 psi).
• Mettez en place le tube de cuivre de
1/4 po de diamètre externe ou le tube GE
SmartConnect
™
entre la conduite d’eau froide
et le raccord de branchement d’eau.
• Le tube doit être suffisamment long pour
s’allonger jusqu’à l’avant du réfrigérateur. Il faut
prévoir une longueur de tube suffisante pour
permettre la courbe menant au raccord d’eau.
NOTE : Les kits de tubes pour réfrigérateurs GE
SmartConnect
™
sont les seuls tubes en plastique
approuvé par GE. Il ne faut pas utiliser une autre
conduite d’alimentation d’eau en plastique.
La conduite est continuellement sous pression.
Certains types de plastique peuvent se fissurer
ou se rompre avec le vieillissement et causer
des dégâts d’eau dans la maison.
Les kits de tube pour réfrigérateur GE
SmartConnect
™
sont offerts avec les longueurs
suivantes :
0,6 m (2 pi) WX08X10002
1,8 m (6 pi) WX08X10006
4,6 m (15 pi) WX08X10015
7,6 m (25 pi) WX08X10025
Coupez l’alimentation d’eau principale.
Ouvrez le robinet le plus proche assez longtemps
pour purger l’eau du tuyau.
• Installez un robinet de coupure entre la
vanne de la machine à glaçons et le tuyau
d’eau froide, dans le sous-sol ou l’armoire. Le
robinet de coupure doit être situé à un endroit
facilement accessible.
NOTE : Il est préférable d’installer le robinet
sur un tuyau d’eau vertical. Si le robinet est installé
sur un tuyau d’eau horizontal, faire le branchement
en haut ou sur le côté pour éviter l’écoulement des
sédiments du tuyau d’eau.
• Percez un trou de 1/4 po dans le tuyau d’eau.
• Montez le robinet de coupure d’eau sur
le tuyau, en utilisant un collier de tuyau.
• Serrez les vis du collier jusqu’à ce que
la rondelle commence à gonfler.
NE PAS SERREZ EN EXCÈS.
• Placez un écrou à compression et une bague
pour le tube de cuivre sur l’extrémité du tube
et le branchez sur le robinet de coupure.
Assurez-vous que le tube soit bien inséré
dans le robinet. Serrez la bague.
• Pour le tube en plastique du kit de tube
de réfrigérateur GE SmartConnect
™
, insérez
l’extrémité moulée du tube dans le robinet et
serrez l’écrou à compression à la main et serrez
ensuite d’un tour avec une clé.
• Ouvrez le robinet d’eau principal et rincez
les débris. Faire couler environ un litre d’eau
du tube dans un seau. Fermez le robinet de
l’alimentation d’eau.
NOTE : Les robinets à étrier sont inclus dans de
nombreux kits d’alimentation d’eau. Avant d’en
acheter un, vérifiez que le robinet à étrier est
conforme aux codes de plomberie locaux.
Sol
Tube en cuivre,
ou tube GE SmartConnect
™
Robinet de type
à étrier
Écrou à compression
Bague
Robinet de sortie
Écrou de
presse-garniture
NOTE : Vous devez vous conformer aux Codes
de plomberie 248CMR du Commonwealth of
Massachusetts. Les robinets à étrier sont illégaux et
leur utilisation n’est pas autorisée au Massachusetts.
Consultez votre plombier local.
Instructions d’installation
80
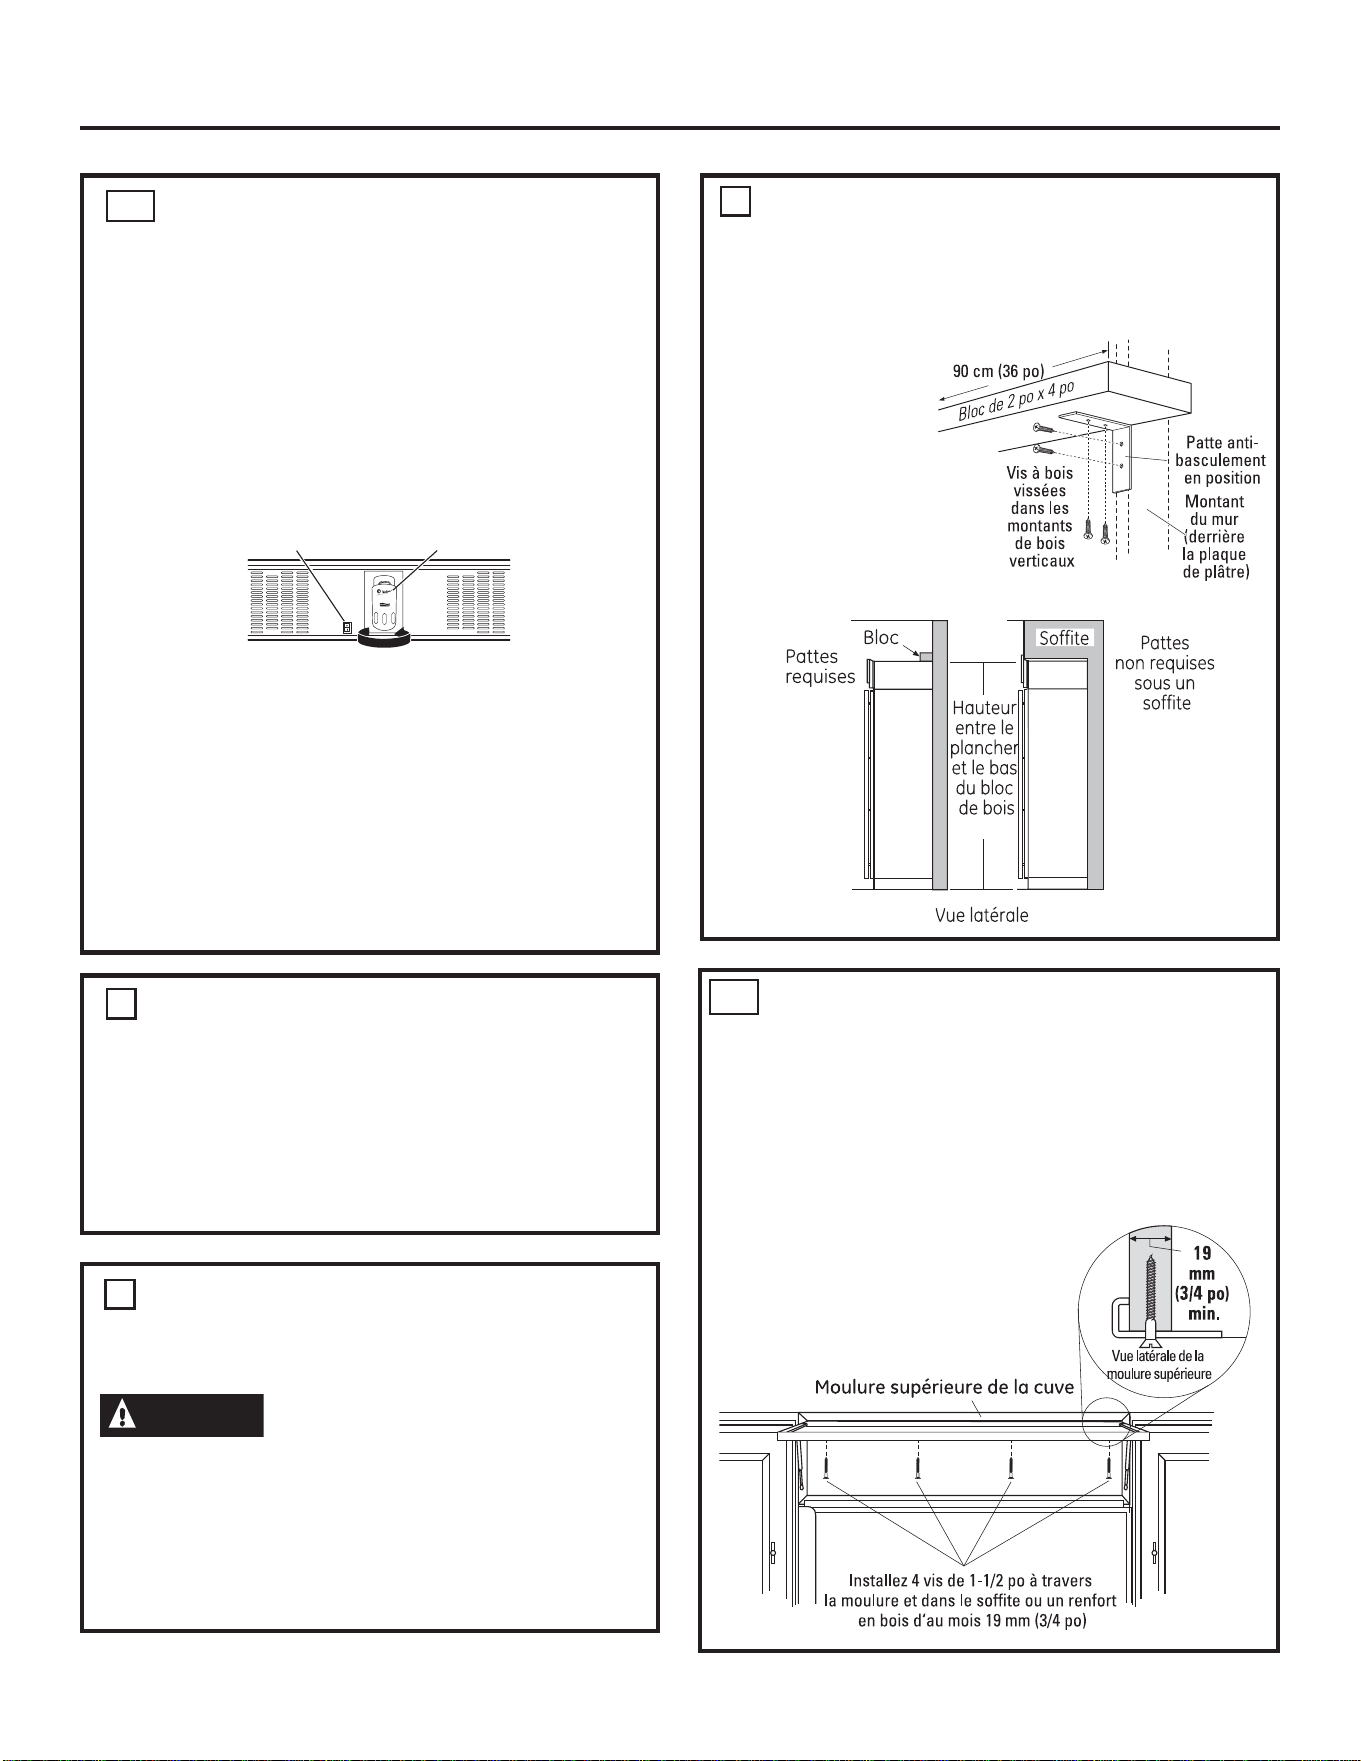
4A AUTRES PRÉCAUTIONS CONTRE
LE BASCULEMENT
Le réfrigérateur doit être fixé afin de prévenir le
basculement. Les pattes anti-basculement ne peuvent
pas être fixées sur des montants muraux métalliques.
Utilisez cette autre méthode pour empêcher le
réfrigérateur de basculer lorsqu’il y a présence de
montants muraux métalliques et absence de soffite.
2A INSTALLATION DE LA CONDUITE
D’EAU AVEC UN SYSTÈME
D’OSMOSE INVERSE
IGNOREZ CETTE ÉTAPE QUAND UN SYSTÈME
D’OSMOSE INVERSE N’EST PAS UTILISÉ
NOTE : Si la conduite d’alimentation d’eau d’un
réfrigérateur vient d’un système d’eau à osmose
inversée, utilisez le bouchon de dérivation du filtre du
réfrigérateur. L’utilisation de la cartouche de filtration
d’eau du réfrigérateur avec un système d’osmose
inverse peut causer la formation de glaçons creux.
• Ouvrez la grille supérieure pour observer la
cartouche filtrante. Tournez la cartouche filtrante
dans le sens inverse des aiguilles d’une montre pour
la déposer.
• Insérez le bouchon de dérivation du filtre.
Tournez le bouchon de dérivation du filtre dans
le sens des aiguilles d’une montre jusqu’à ce qu’il
soit fermement en place.
4
INSTALLEZ PATTES
ANTI-BASCULEMENT
AVERTISSEMENT
Le réfrigérateur est plus lourd en haut qu’en bas
et il faut le maintenir pour éviter la possibilité de
basculement vers l’avant.
•
Coupez un bloc de 2 po x 4 po de 90 cm (36 po) de
long et montez ce bloc sur les pattes de montage
fournies, avec des vis à bois n° 12 ou 14.
3 INSTALLEZ PANNEAUX LATÉRAUX
IGNOREZ CETTE ÉTAPE SI LES PANNEAUX LATÉRAUX
NE SONT PAS UTILISÉS
Si des panneaux latéraux de 4 mm (1/4 po) sont
utilisés, il faut les insérer dans la moulure de la cuve.
Fixez les panneaux contre le réfrigérateur avec trois
bandes adhésives 3M Dual Lock, avant de mettre
le réfrigérateur en place.
PRÉCAUTIONS CONTRE LE BASCULEMENT
Instructions d’installation
Interrupteur principal
Filtre à eau
Tournez dans le sens inverse des
aiguilles d’une montre pour enlever
4
INSTALLEZ PATTES
ANTI-BASCULEMENT
(suite)
•
Montez les pattes avec ce bloc de bois sur le mur
arrière de manière qu’il soit à 2083 mm (82 po)
(ou la hauteur arrière d’installation)
au-dessus
du sol fini.
Utilisez des vis
à bois
n° 12 ou 14.
•
Les vis doivent
pénétrer d’au moins
25 mm (1 po) dans
les montants
verticaux du mur.
81
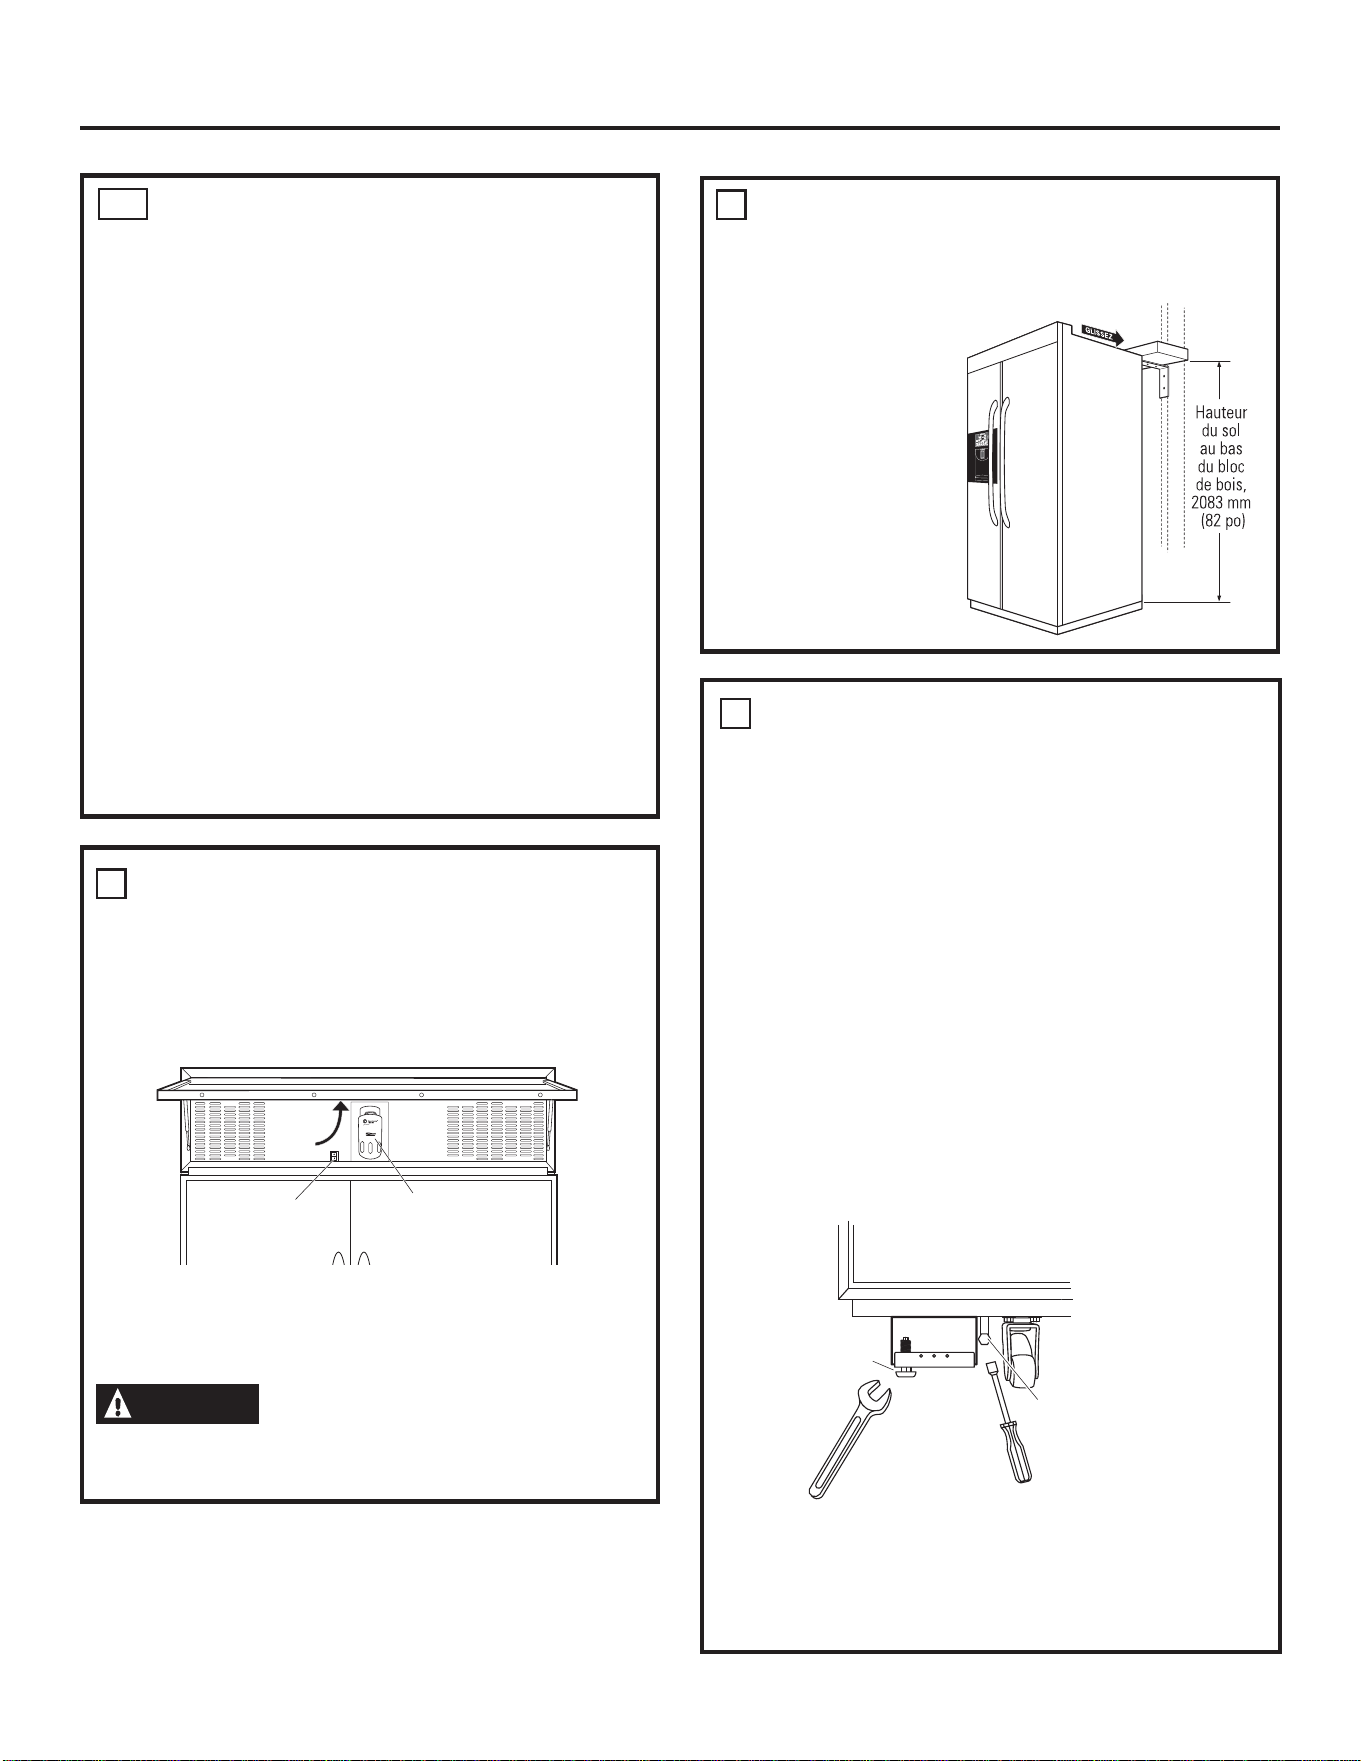
4A AUTRES PRÉCAUTIONS CONTRE
LE BASCULEMENT
(suite)
• Réglez la hauteur du réfrigérateur pour qu’elle
corresponde à l’ouverture entre 2121 à 2146 mm
(83-1/2 po et 84-1/2 po). Le réfrigérateur doit être
de niveau et d’aplomb avec les armoires.
La moulure supérieure à l’avant est 54 mm
(2-1/8 po) plus haut que la moulure arrière et
recouvre les moulures supérieures des armoires.
• Ouvrez le panneau de la grille pour obtenir accès
à la moulure supérieure de la cuve.
• Utilisez un foret de 3/16 po pour percer
4 trous équidistants dans la moulure métallique
supérieure de la cuve.
• Utilisez un foret de 1/16 po pour percer des trous
guides dans les trous du métal et dans le soffite de
bois. Les trous doivent être centrés dans le soffite
ou un renfort de bois de 19 mm (3/4 po) minimum. Le
renfort couvrant toute l’ouverture doit être fermement
monté sur les armoires des deux côtés.
• Installez quatre vis de 1-1/2 po pour plaque
de plâtre dans les trous guides.
7 MISE À NIVEAU DU RÉFRIGÉRATEUR
Tous les modèles ont quatre points de mise à niveau.
L’avant et l’arrière sont supportés par des pattes de
mise à niveau. Les deux sont accessibles de l’avant
du réfrigérateur.
• Pour mettre l’arrière du réfrigérateur de niveau,
tournez l’écrou 6 pans de 1/2 po qui se trouve
derrière les roues avant. Tournez dans le sens
des aiguilles d’une montre pour lever et dans
le sens inverse des aiguilles d’une montre pour
abaisser le réfrigérateur.
• Pour mettre de niveau l’avant, utilisez une clé
plate de 7/16 po.
• Réglez la hauteur du réfrigérateur pour
correspondre à l’ouverture entre 2121 et 2146
mm (83-1/2 po et 84-1/2 po). Le réfrigérateur doit
être de niveau et d’aplomb avec les armoires.
NOTE IMPORTANTE : Votre réfrigérateur doit être
vertical. S’il ne l’est pas, les portes peuvent ne pas
bien s’aligner en haut. Voir l’étape 16.
5 BRANCHEMENT DE
L’ALIMENTATION ÉLECTRIQUE
• Branchez la fiche du cordon d’alimentation
du réfrigérateur dans une prise de courant
correctement mise à la terre. Mettez
l’interrupteur principal sur I (marche).
• Pour s’assurer que le réfrigérateur est en marche,
ouvrez la porte du réfrigérateur
pour vérifier que la lampe intérieure s’allume.
MISE EN GARDE
• Après avoir vérifié la mise sous tension, mettez
l’interrupteur principal sur O (l’arrêt).
6 MISE EN PLACE DANS L’ESPACE
D’INSTALLATION
• Glissez l’appareil dans l’espace d’installation.
• Mettez l’excès
du cordon
d’alimentation
sur le dessus
du réfrigérateur.
• Prendre soin
de vérifier
que le cordon
d’alimentation
n’est pas pincé
derrière l’appareil.
Levez le
panneau
de grille
Filtre à eau
Interrupteur
principal
Écrou 6 pans
pour le réglage
des pattes arrière
de mise à niveau
Pattes de mise
à niveau
Instructions d’installation
82
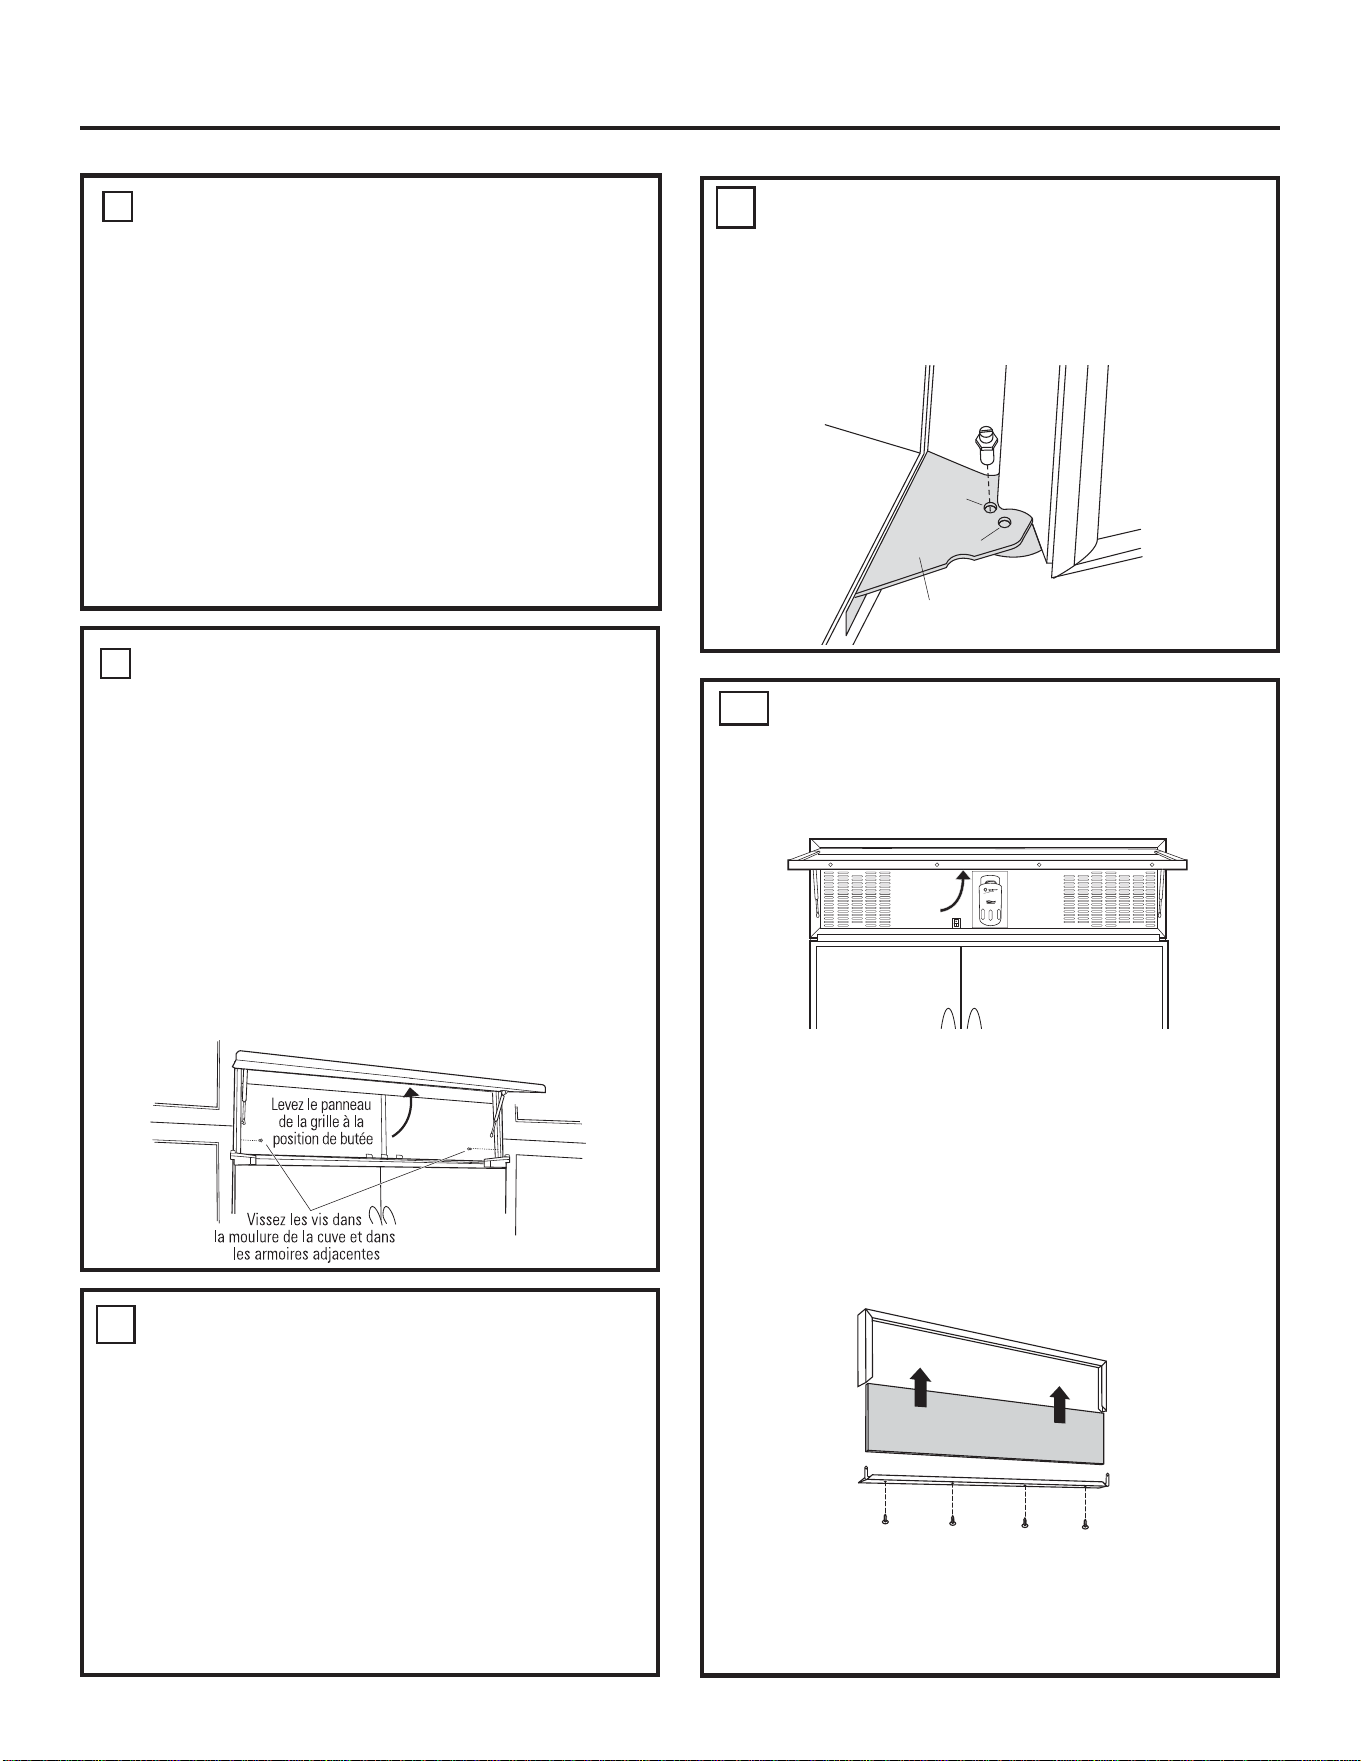
7 MISE À NIVEAU DU RÉFRIGÉRATEUR
(suite)
NOTE : Les pattes arrière de mise à niveau et les
pattes avant de mise à niveau sont limitées
à un réglage de hauteur maximal de 25 mm (1 po).
Si l’installation demande une hauteur supérieure
à 2146 mm (84-1/2 po), l’installateur doit élever
le réfrigérateur sur une plaque de contreplaqué
ou des patins. Il est possible d’ajouter une moulure
d’armoire sur le haut de l’ouverture pour réduire
l’ouverture. Toute tentative de soulever
le réfrigérateur de plus de 25 mm (1 po),
endommagera les pattes de mise à niveau
avant et arrière.
10 INSTALLATION DU PANNEAU
DE LA GRILLE
• Levez le panneau de la grille à la position
en butée.
•
Enlevez les 4 vis de la moulure inférieure.
Gardez toutes les vis.
• Déposez la moulure inférieure.
• NOTE : Les panneaux en acier inoxydable
et en acrylique sont couverts d’une pellicule
protectrice. Enlevez la pellicule avant d’installer le
panneau.
• Glissez le panneau sur le panneau métallique
de soutien et sous la moulure.
• Si nécessaire, tapez avec un bloc de bois jusqu’à
ce que le panneau glisse sous la moulure
supérieure.
• Réassemblez la moulure inférieure. Serrez les vis.
Levez le
panneau
de grille
8 FIXATION DU RÉFRIGÉRATEUR
AUX ARMOIRES
Dans la mesure du possible, exécutez cette
étape pour augmenter la sécurité contre les
basculements
ou lorsque des pattes anti-
basculement ne peuvent pas être utilisées.
Le réfrigérateur doit être maintenu en place pour
éviter le basculement.
• Levez le panneau de la grille pour obtenir accès
à la moulure de la cuve.
•
Percez un trou dans la moulure et posez une vis
à travers la moulure et dans l’armoire adjacente.
• Suivez la procédure de l’autre côté.
9 RÉGLAGE DE L’OUVERTURE
DES PORTES
NOTE : Ce réfrigérateur a deux butées de position
d’ouverture. Quand l’espace ne permet pas
l’ouverture de la porte à 130°, il est possible
de réduire l’ouverture à 90°.
IGNOREZ CETTE ÉTAPE SI L’OUVERTURE DE LA
PORTE EST SATISFAISANTE POUR L’INSTALLATION.
• Ouvrez la porte pour exposer la charnière
inférieure. Notez l’emplacement de l’axe
de butée de la porte. L’axe est installé
à la position de 130° à l’usine.
9 RÉGLAGE DE L’OUVERTURE
DES PORTES
(suite)
• Fermez partiellement la porte. Du dessus, avec
un tournevis, dévissez l’axe de la butée de porte
et l’installez à la position de 90°.
90
130
Charnière
Porte
Intérieur
Instructions d’installation
83
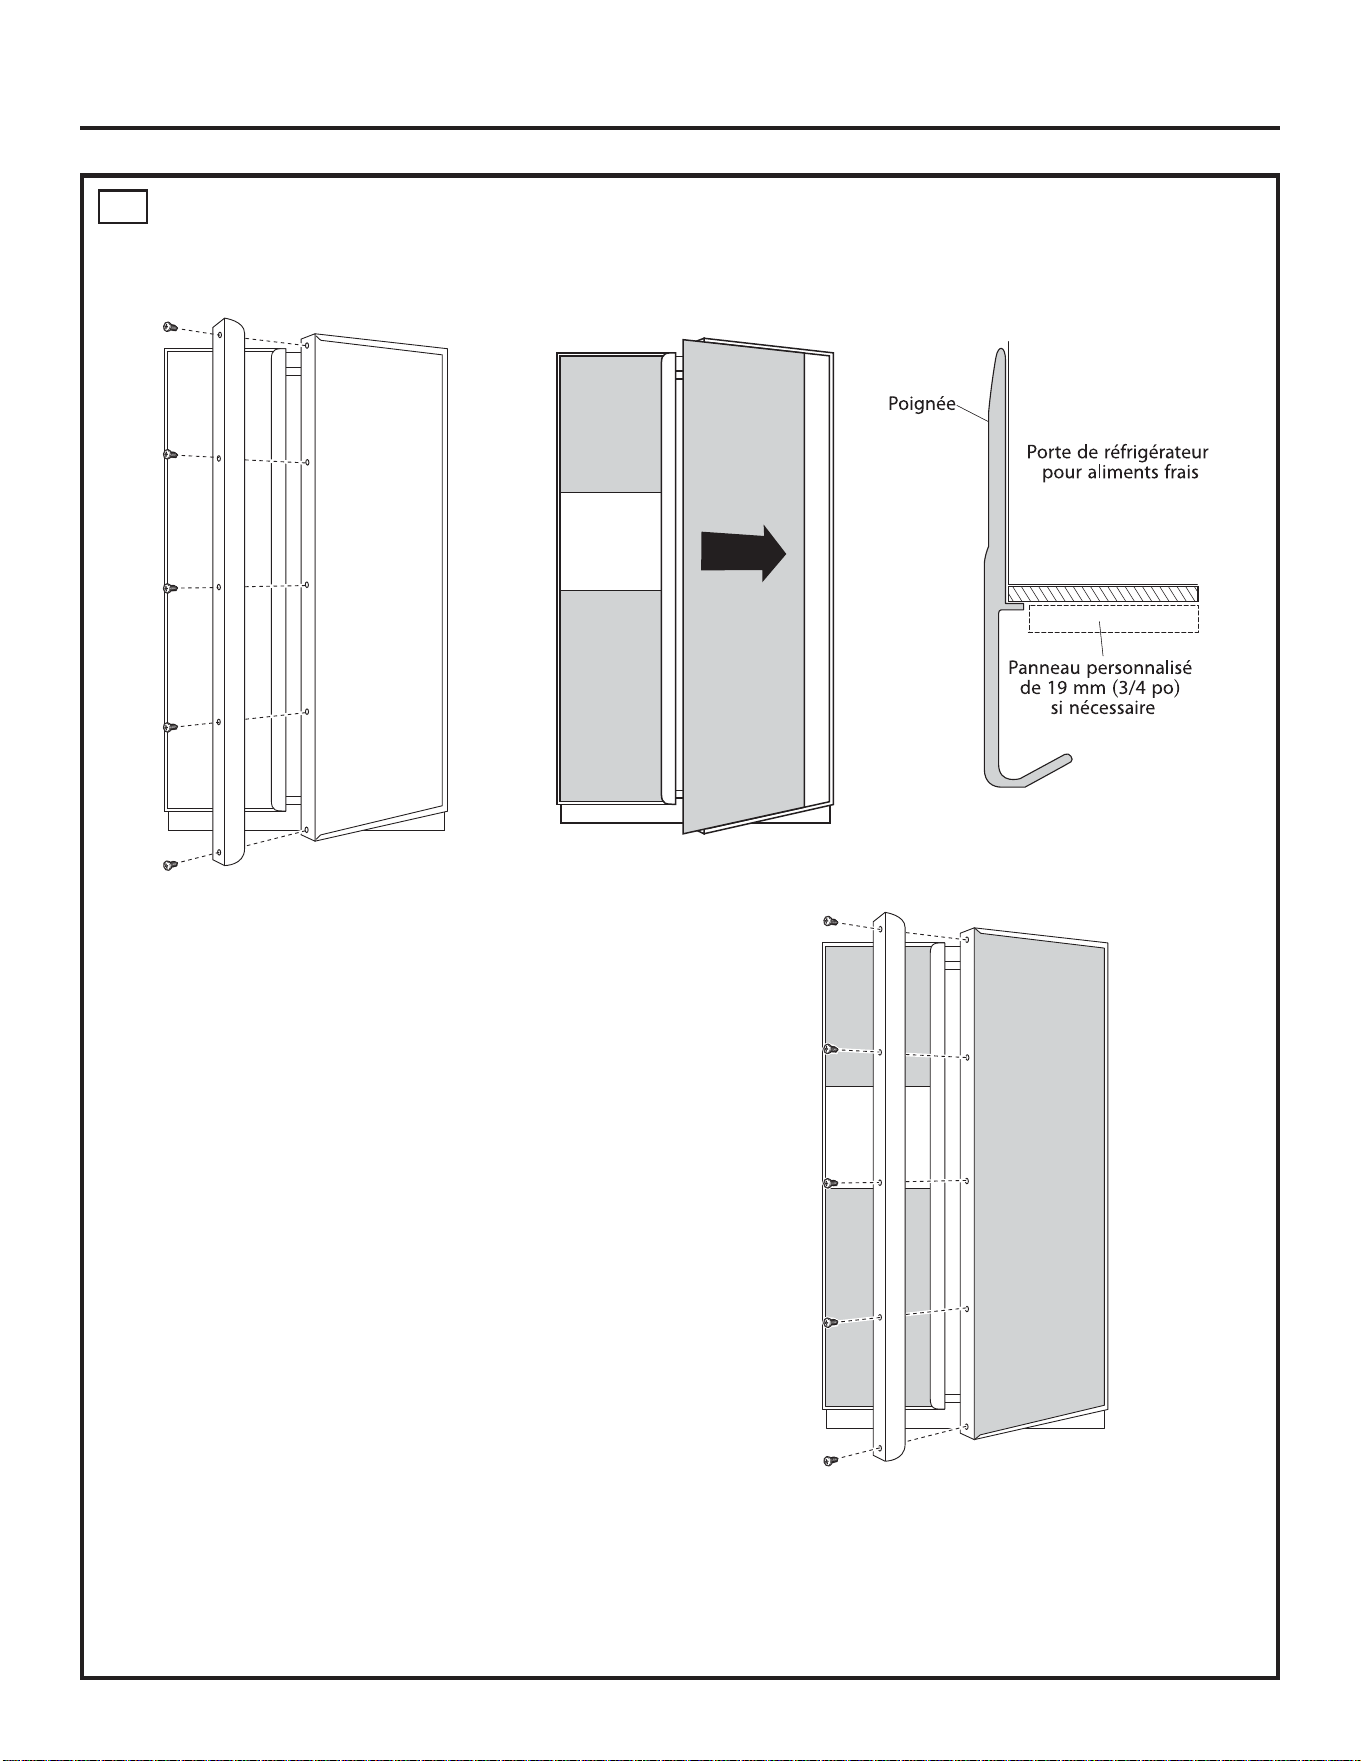
11 INSTALLATION DES PANNEAUX
DE PORTE À POIGNÉES
PRÉ-INSTALLÉES
Installation des panneaux décoratifs
de 6 mm (1/4 po) :
• Dépose des poignées
Ouvrez la porte à 90°. Enlevez les 5 vis
à tête cruciforme des poignées de porte
du compartiment d’aliments frais et
du congélateur. Gardez les vis. Enlevez
les poignées.
• Installation des panneaux de porte
NOTE : Poussez doucement le panneau de la porte
du compartiment d’aliments frais dans la fente
derrière la moulure. Poussez doucement jusqu’au
côté opposé. Répétez la procédure pour
les panneaux supérieur et inférieur du congélateur.
• Repose des poignées
Reposez la poignée de la porte
du compartiment pour aliments frais, en utilisant
les 5 vis à tête cruciforme originales. Serrez.
Répétez pour la poignée de la porte
du congélateur.
NOTE : Vérifiez que le bord de la poignée
ne pince pas le joint de la porte.
• Panneaux décoratifs sur mesure
de 19 mm (3/4 po)
Dans le cas d’installation de panneaux en bois,
les couper aux dimensions indiquées aux pages
72–79. Les panneaux glissent dans le cadre
des portes et de la grille.
Instructions d’installation
84
NOTE IMPORTANTE : L’épaisseur des
panneaux sur mesure ne doit pas dépasser
29 mm (1-1/8 po) et 31,7 kg (70 lb) pour
la porte du compartiment pour aliments
frais, 20,3 kg (45 lb) total pour la porte du
congélateur et 6,8 kg (15 lb) pour la grille.
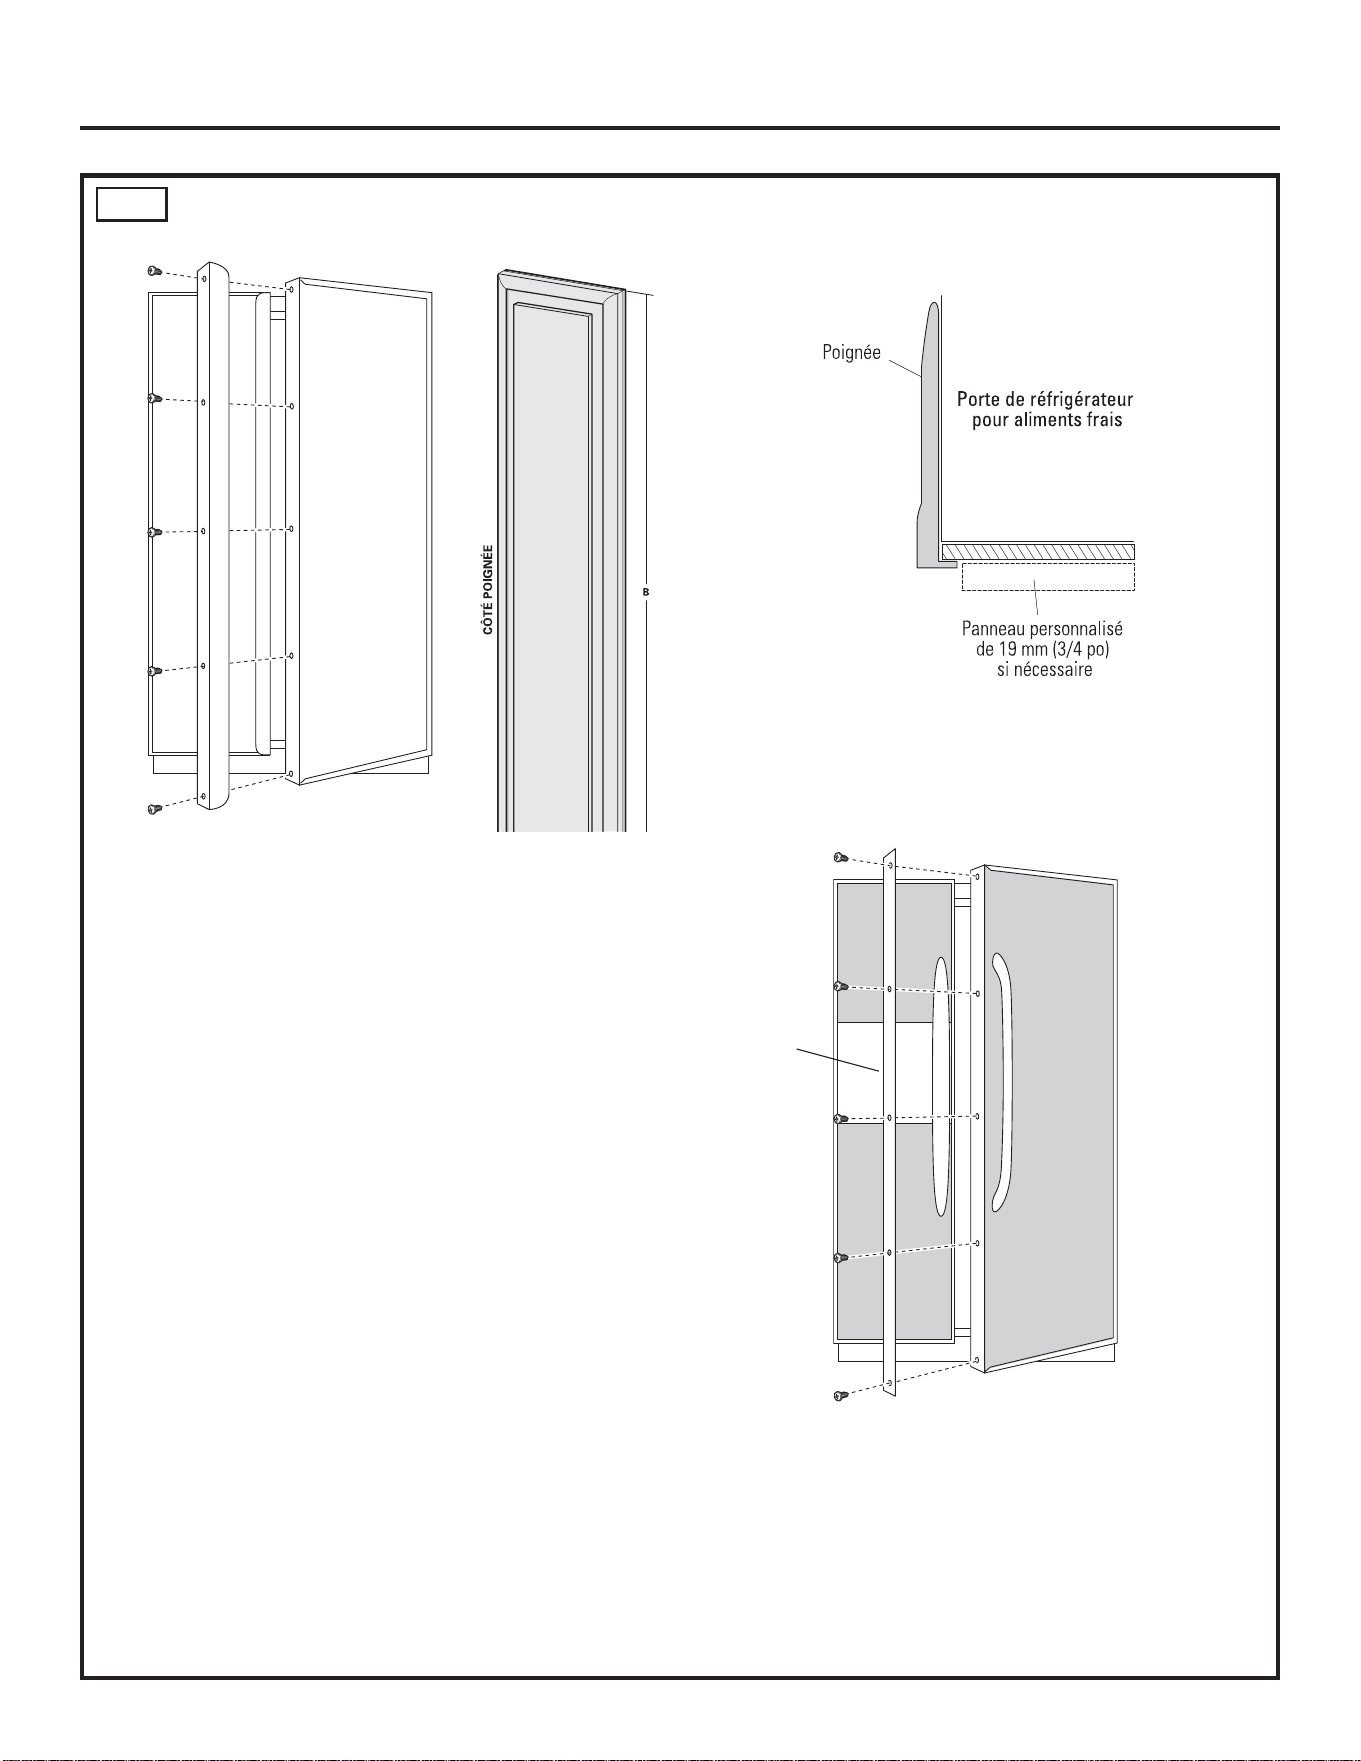
11A INSTALLATION DES PANNEAUX
DE PORTE
Installation des panneaux décoratifs de 6 mm (1/4 po) :
• Dépose des poignées pré-installées
Ouvrez la porte à 90°. Enlevez les 5 vis à tête
cruciforme des poignées de porte du compartiment
d’aliments frais et du congélateur. Gardez les vis.
Enlevez les poignées pré-installées.
• Installation des panneaux de porte
NOTE : Poussez doucement le panneau de la porte
du compartiment d’aliments frais dans la fente derrière
la moulure. Poussez doucement jusqu’au côté opposé.
Répétez la procédure pour les panneaux supérieur
et inférieur du congélateur.
• Installez la décoration personnalisée
Installez la décoration personnalisée, en utilisant
les 5 vis à tête cruciforme originales. Serrez.
Répétez pour la porte du congélateur.
NOTE : Vérifiez que le bord de la décoration
personnalisée ne pince pas le joint de la porte.
• Panneaux décoratifs sur mesure de 19 mm (3/4 po)
Dans le cas d’installation de panneaux en bois, les
couper aux dimensions indiquées aux pages 72–79.
Les panneaux glissent dans le cadre des portes
et de la grille. Si vous utilisez les poignées
personnalisées, veuillez vous reportez
à Poignées de porte, page 69.
NOTE IMPORTANTE : L’épaisseur des panneaux
sur mesure ne doit pas dépasser 29 mm (1-1/8 po)
et 31,7 kg (70 lb) pour la porte du compartiment pour
aliments frais, 20,3 kg (45 lb) total pour la porte du
congélateur et 6,8 kg (15 lb) pourla grille.
Instructions d’installation
85
Décoration
personnalisée
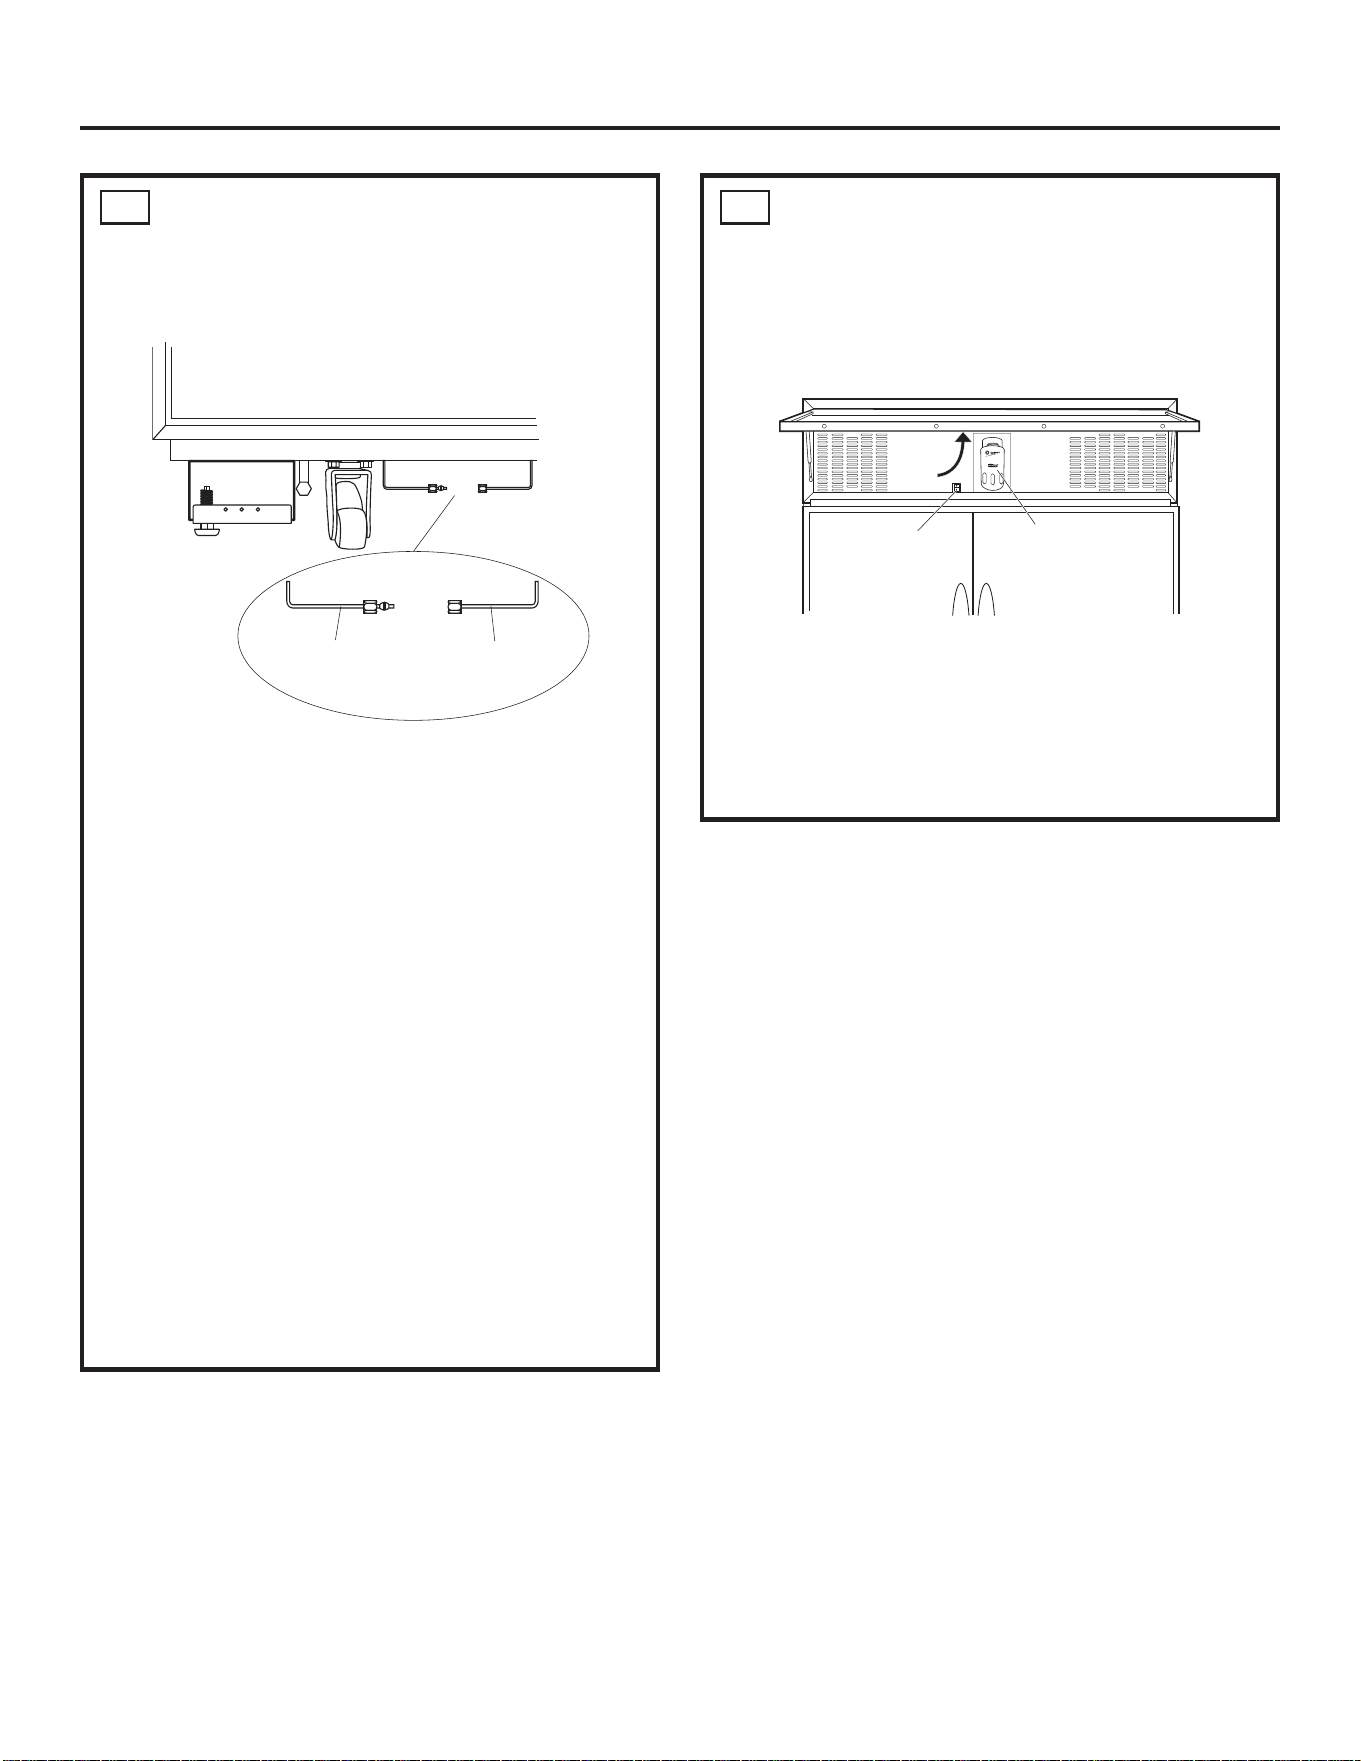
13 MISE SOUS TENSION
• Mettez l’interrupteur principal en position
de I (marche).
• Pour s’assurer que le réfrigérateur est sous
tension, ouvrez la porte et vérifiez que la lampe
intérieure est allumée.
• Les commandes de température sont réglées
en usine à 3 °C (37 °F) pour la section d’aliments
frais et -18 °C (0 °F) pour la section congélateur.
• Attendre 24 heures que la température
se stabilise avant de faire des réglages.
Levez le
panneau
de grille
Filtre à eau
Interrupteur
principal
12 BRANCHEMENT
DE L’ALIMENTATION D’EAU
Vérifiez que l’interrupteur principal est sur
O (l’arrêt).
• Amenez le tube GE SmartConnect
™
à l’avant
de l’armoire.
• Ouvrez l’eau pour rincer les débris de la conduite.
Faire coulez environ un litre d’eau dans un seau,
puis coupez l’eau.
Tube de cuivre
• Glissez un écrou de 1/4 po et une bague sur
l’extrémité du tube de cuivre. Insérez le tube
dans le raccord de l’appareil et serrez l’écrou.
• Ouvrez l’eau pour vérifier qu’il n’y a pas de fuite.
Tube GE SmartConnect
™
• Insérez l’extrémité moulée du tube dans
le raccord du réfrigérateur. Serrez l’écrou
à compression à la main.
• Serrez d’un tour de plus avec une clé.
Un serrage excessif peut causer des fuites.
• Ouvrez l’eau pour vérifier qu’il n’y a pas de fuite.
Note : Vérifiez que l’excès de tube ne gêne pas
l’installation de la plinthe.
Alimentation d‘eau
du réfrigérateur
Alimentation d‘eau
de la maison
Instructions d’installation
86
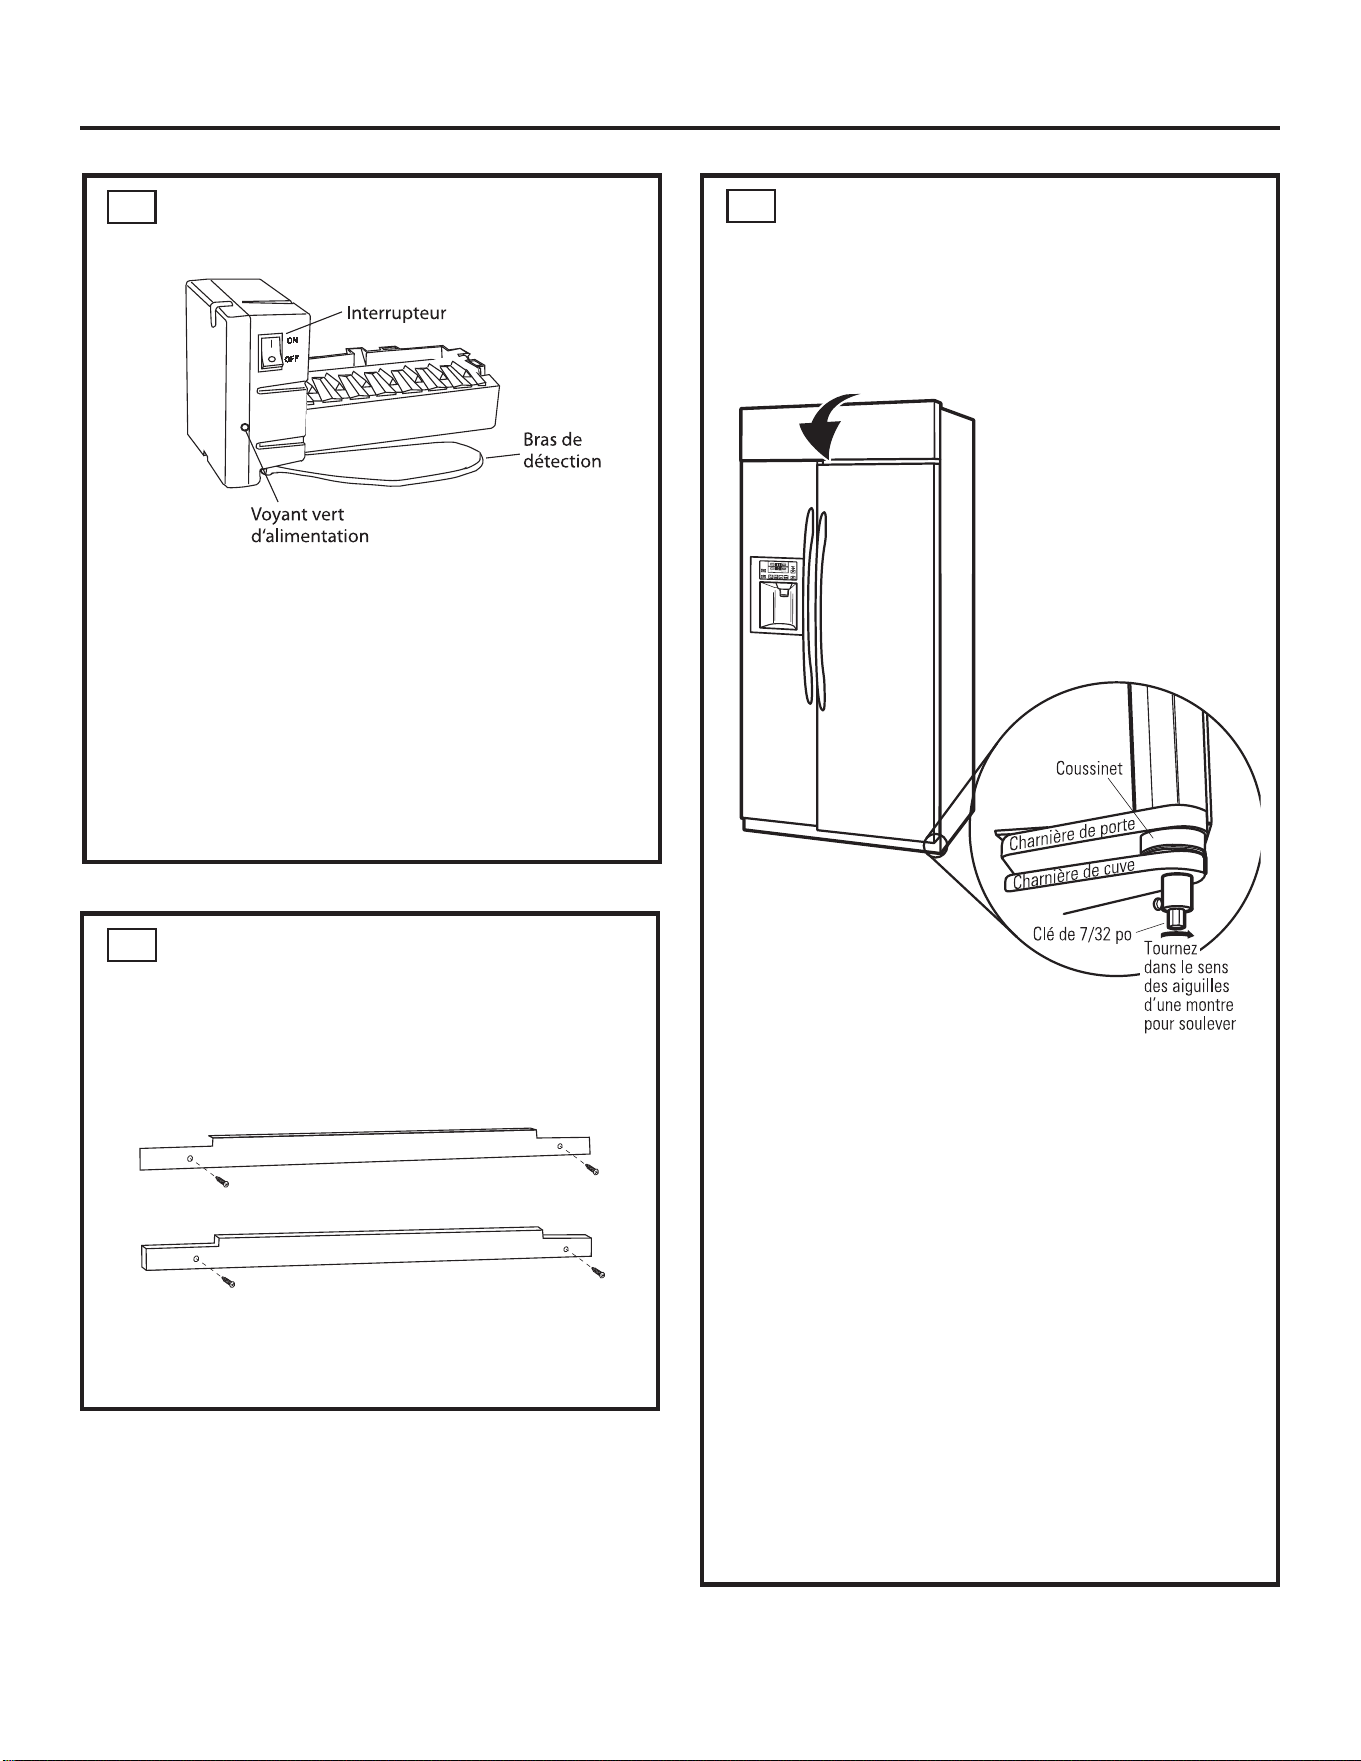
16 ALIGNMENT DES PORTES
• Reculez du réfrigérateur et vérifiez visuellement
l’alignement des portes.
• L’expédition ou l’addition de panneaux de
porte lourds peut avoir changé légèrement
l’alignement des portes.
• Si nécessaire, il est possible de déplacer
la porte du compartiment pour aliments frais
vers le haut ou le bas pour l’aligner avec la porte
du congélateur.
• Desserrez le mécanisme de mise à niveau.
• Avec une clé de 7/32 po, réglez l’axe de
la charnière, comme montré.
• Serrez le mécanisme de mise à niveau.
NOTE IMPORTANTE : Après avoir bien mis
à la verticale votre appareil, si la porte du
compartiment d’aliments frais est plus haute que
la porte du compartiment congélation, abaissez
le pied d’inclinaison avant droit pour aligner
les portes et, le cas échéant, montez le pied
d’inclinaison gauche pour bien mettre
à l’horizontale les deux côtés de votre appareil.
14 MISE EN MARCHE DE
LA MACHINE À GLAÇONS
• Mettez l’interrupteur sur I (marche).
La machine à glaçons commence à fonctionner
automatiquement.
• Vérifiez que rien n’interfère avec le déplacement
du bras de détection.
• Jetez le premier bac de glaçons.
• Pour arrêter la machine à glaçons, mettez
l’interrupteur sur O (l’arrêt).
15 INSTALLATION DE LA PLINTHE
• Trouvez la plinthe (expédiée maintenue
en place avec du ruban adhésif sur le dessus
du réfrigérateur). L’installez avec les deux vis
fournies.
• Pour la ventilation propre, gardez la plinthe sans
obstruction.
Plinthe fournie
Plinthe de 6 mm (1/4 po) ou plus
Instructions d’installation
87
Bruits normaux de fonctionnement.
88
Les réfrigérateurs plus récents font des bruits différents de ceux des
anciens. Les réfrigérateurs modernes présentent plus de fonctions
et sont plus avancés sur le plan technologique.
HUMMM...
OUUCH....
Le nouveau compresseur à rendement élevé peut
fonctionner plus longtemps et plus vite que votre ancien
réfrigérateur et vous pouvez entendre
un son modulé ou un ronflement aigu pendant
son fonctionnement.
Vous pouvez entendre un sifflement lorsque les portes
se ferment. Cela vient de l’équilibrage de pression dans
le réfrigérateur.
Vous pouvez entendre les ventilateurs tourner
à hautes vitesses. Cela se produit lorsque
le réfrigérateur vient d’être branché, lorsque les portes
sont ouvertes fréquemment ou lors de l’ajout d’une grande
quantité d’aliments dans les compartiments congélateur
ou réfrigérateur. Les ventilateurs permettent de maintenir
les bonnes températures.
Si une des portes est ouverte pendant plus de
3 minutes, vous pouvez entendre l’activation des
ventilateurs permettant de refroidir les ampoules.
Les ventilateurs changent de vitesses pour assurer des
économies d’énergie et un refroidissement optimaux.
CLICS, CLAQUEMENTS,
CRAQUEMENTS et GRÉSILLEMENTS
Vous pouvez entendre des craquements ou des
claquements lorsque le réfrigérateur est branché pour la
première fois. Cela se produit lorsque le réfrigérateur se
refroidit à la bonne température.
Le compresseur peut causer un clic ou un grésillement
lors de la tentative de redémarrage (cela peut prendre 5
minutes).
Le tableau de commande électronique peut causer
un clic lorsque les relais s’activent pour commander
les composants du réfrigérateur.
L’expansion et la contraction des serpentins
de refroidissement pendant et après le dégivrage peuvent
causer un craquement ou un claquement.
Après un cycle de fabrication de glaçons, vous pouvez
entendre les glaçons tomber dans le bac.
BRUITS D’EAU
Le passage de l’agent
frigorifique dans
les serpentins de refroidissement du congélateur
peut être accompagné d’un gargouillement semblable à
celui de l’eau en ébullition.
L’eau tombant sur l’élément chauffant de dégivrage
peut faire un bruit de grésillement, de claquement ou de
bourdonnement pendant le cycle de dégivrage.
Un bruit de suintement d’eau peut être entendu pendant le
cycle de dégivrage lorsque la glace
de l’évaporateur fond et tombe dans le bac
de récupération.
Fermer la porte peut causer un gargouillement
en raison de l’équilibrage de pression.
Entendez-vous ce que j’entends ? Ces bruits sont normaux.
Pour obtenir plus d’information sur
les bruits normaux de fonctionnement
de la machine à glaçons et le distributeur
d’eau et de glaçons, veuillez consultez
les sections Machine à glaçons
automatique et Le distributeur
d’eau et de glaçons.
OUIR !
Conseils de dépannage… electromenagersge.ca
89
&RQVHLOVGHGpSDQQDJH³eFRQRPLVH]GXWHPSVHWGHO·DUJHQW
Consultez d’abord les tableaux qui suivent et vous pourrez
peut-être éviter de faire appel à un réparateur.
Problème Causes possibles Correctifs
Le réfrigérateur Le cycle de dégivrage • Attendez environ 30 minutes afin que le cycle de
ne fonctionne pas est peut-être en cours. dégivrage puisse terminer.
L’interrupteur général • Mettez l’interrupteur général d’alimentation en position
d’alimentation est en position ON (marche).
OFF (arrêt).
Le réfrigérateur est débranché. • Enfoncez la fiche de l’appareil dans la prise murale.
Le disjoncteur ou le fusible • Remplacez le fusible ou réenclenchez le disjoncteur.
peut avoir sauté.
Le réfrigérateur se trouve • Débranchez le réfrigérateur et rebranchez-le.
sur le mode “salle d’exposition”.
Vibration ou bruit Le réfrigérateur n’est pas • Consultez Nivellement du réfrigérateur.
métallique (une légère
bien niveau.
• Consultez Alignement des portes.
vibration est normale)
Ceci est normal lorsque le • Attendez 24 heures pour que le réfrigérateur refroidisse
réfrigérateur vient d’être branché. complètement.
Une grande quantité d’aliments • C’est normal.
a été mise au réfrigérateur.
Porte laissée ouverte. • Vérifiez qu’il n’y a pas un paquet qui empêche
la porte de fermer.
Temps chaud ou ouverture • C’est normal.
fréquente des portes.
Les commandes de température • Consultez Les commandes de température.
ont été réglées à la température
la plus froide.
Température trop élevée La commande de température • Consultez Les commandes de température.
dans le congélateur ou n’a pas été réglée à une
le réfrigérateur température assez basse.
Temps chaud ou ouverture • Abaissez la commande de température d’une position.
fréquente des portes. Consultez Les commandes de température.
Porte laissée ouverte. • Vérifiez qu’il n’y a pas un paquet qui empêche la porte
de fermer.
Givre sur les aliments Porte laissée ouverte. • Vérifiez qu’il n’y a pas un paquet qui empêche la porte
surgelés (il est normal
de fermer.
que du givre se forme
Les portes ont été ouvertes
à l’intérieur du paquet)
trop souvent ou pendant trop
longtemps.
La séparation entre Le système automatique • Ceci empêche la formation de condensation sur
le réfrigérateur et le d’économie d’énergie fait l’extérieur du réfrigérateur.
congélateur est chaude
circuler du liquide chaud autour
du rebord avant du congélateur.
Formation lente des Porte laissée ouverte. • Vérifiez qu’il n’y a pas un paquet qui empêche la porte
glaçons de fermer.
La commande de température • Consultez Les commandes de température.
du congélateur n’est pas réglée
à une température assez froide.
Mauvais goût/odeur Le distributeur d’eau n’a pas été • Faites couler l’eau jusqu’à ce que l’eau du système soit
de l’eau utilisé depuis longtemps. remplacée par de l’eau fraîche.
Le moteur fonctionne
pendant de longues
périodes ou démarre et
s’arrête fréquemment. (Les
réfrigérateurs modernes
et leurs congélateurs
étant plus grands, leur
moteur doit fonctionner
plus longtemps. Ils
démarrent et s’arrêtent
afin de maintenir des
températures uniformes.)
Conseils de dépannage…
90
Problème Causes possibles Correctifs
La machine à glaçons L’interrupteur d’alimentation • Réglez l’interrupteur d’alimentation à la position
ne fonctionne pas de la machine à glaçons est de marche.
à la position d’arrêt.
L’alimentation en eau est coupée • Consultez Installation de la conduite d’eau.
ou n’est pas raccordée.
Le compartiment congélateur • Attendez 24 heures pour que la température
est trop chaud. du réfrigérateur se stabilise.
Un amas de glaçons dans le bac • Nivelez les glaçons à la main.
provoque l’arrêt de la machine
à glaçons.
Cubes de glace sont coincés dans • Réglez le commutateur de marche de la machine
la machine à glaçons. (La lumière à glaçons sur la position O (arrêt), enlevez les cubes
d’alimentation verte clignote). et mettez en marche la machine à glaçons.
Bourdonnement Le commutateur de marche de • Réglez le commutateur de marche sur la position
fréquent la machine à glaçons est dans O (arrêt), car le garder dans la position I (marche)
la position I (marche), mais endommagera le robinet d’eau.
l’arrivée d’eau au réfrigérateur
n’a pas été raccordée.
Odeur/saveur Il faut nettoyer le bac à glaçons. • Videz et lavez le bac à glaçons. Jetez les vieux glaçons.
anormale des
Des aliments ont transmis leur • Emballez bien les aliments.
glaçons
odeur/goût aux glaçons.
Il faut nettoyer l’intérieur • Consultez Entretien et nettoyage.
du réfrigérateur.
Petits glaçons ou glaçons Le filtre à eau est bouché. • Remplacez la cartouche du filtre avec une nouvelle
creux à l’intérieur cartouche ou installez le bouchon du filtre.
Le distributeur de
La machine à glaçons est éteinte ou
• Mettez en marche la machine à glaçons ou rétablissez
glaçons ne fonctionne
l’alimentation en eau a été coupée.
l’alimentation en eau.
pas
Un objet bloque ou est tombé • Enlevez tout objet qui bloque ou est tombé dans
dans la chute à glace située la chute.
à l’intérieur du bac supérieur
de la porte du compartiment
congélation.
Des glaçons sont collés au bras • Retirez les glaçons.
régulateur.
Blocs de glace irréguliers dans • Brisez-en autant que possible avec vos doigts et jetez ceux
le bac à glaçons. qui restent.
• Le congélateur est peut-être trop chaud. Réglez
la commande du congélateur sur une température plus
basse, en abaissant la commande d’une position à la fois
jusqu’à ce que les blocs de glace disparaissent.
Distributeur est VERROUILLÉ. • Appuyez et maintenez enfoncée le bouton LOCK/LIGHT
(verrouillage/lumière) pendant 3 secondes.
L’eau versée dans Normal lorsque le réfrigérateur • Attendez 24 heures pour que la température
le premier verre est est initialement installé. du réfrigérateur se stabilise.
chaude
Le distributeur d’eau n’a pas été • Faites couler l’eau jusqu’à ce que l’eau du système soit
utilisé depuis longtemps. remplacée par de l’eau fraîche.
Le réservoir d’eau vient • Attendez plusieurs heures pour que l’eau refroidisse.
d’être vidangé.
91
electromenagersge.ca
Problème Causes possibles Correctifs
Le distributeur d’eau L’alimentation en eau est • Consultez Installation de la conduite d’eau.
ne fonctionne pas coupée ou n’est pas raccordée.
Le filtre à eau est bouché. • Remplacez la cartouche du filtre avec une nouvelle
cartouche ou installez le bouchon du filtre.
Il y a de l’air dans la conduite • Appuyez sur le bras de distribution pendant
d’eau.
au moins deux minutes.
Distributeur est VERROUILLÉ. • Appuyez et maintenez enfoncée le bouton LOCK/LIGHT
(verrouillage/lumière) pendant 3 secondes.
Le réglage de commande est • Réglez le commande de température sur un réglage
trop froid. plus chaud.
L’eau jaillit La cartouche du filtre vient d’être • Faites couler l’eau du distributeur pendant 3 minutes
du distributeur installée. (environ 6 litres).
La machine à glaçons L’eau du réservoir est gelée. • Appelez un réparateur.
fonctionne, mais ne
Le réglage de commande est • Réglez le commande de température sur un réglage
distribue pas d’eau
trop froid. plus chaud.
La machine à glaçons La conduite d’eau ou • Appelez un plombier.
ne distribue ni eau le robinet d’arrêt est bouché.
ni glaçons
Le filtre à eau est bouché. • Remplacez la cartouche du filtre avec une nouvelle
cartouche ou installez le bouchon du filtre.
Distributeur est VERROUILLÉ. • Appuyez et maintenez enfoncée le bouton LOCK/LIGHT
(verrouillage/lumière) pendant 3 secondes.
CUBED (cubes de glace) Le réglage précédent était • Quelques cubes sont restés et ont été concassés à cause
était choisi mais CRUSHED CRUSHED. du réglage précédent. C’est normal.
(glace concassée) a été
distribuée
Odeur dans Des aliments ont transmis • Les aliments à odeur forte doivent être emballés
le réfrigérateur leur odeur au réfrigérateur. hermétiquement.
• Gardez une boîte ouverte de bicarbonate de soude dans
le réfrigérateur.
Il faut nettoyer l’intérieur. • Consultez Entretien et nettoyage.
De la condensation Cela n’est pas inhabituel pendant • Essuyez bien la surface extérieure.
s’accumule à l’extérieur les périodes de forte humidité.
De la condensation Les portes sont ouvertes trop
s’accumule à l’intérieur fréquemment ou pendant trop
(par temps humide, longtemps.
l’ouverture des portes
laisse entrer de l’humidité)
L’éclairage intérieur Il n’y a pas de courant au niveau • Remplacez le fusible ou réenclenchez le disjoncteur.
ne fonctionne pas de la prise.
L’ampoule est grillée. • Consultez Remplacement des ampoules.
Eau sur le sol ou au fond Il y a des glaçons bloqués dans • Faites passer les glaçons à l’aide d’une cuillère en bois.
du congélateur le conduit.
De l’air chaud sort Courant d’air normal provenant
du haut du réfrigérateur du moteur. Pendant le processus
de réfrigération, il est normal
que de la chaleur soit expulsée
au dessus du réfrigérateur.
Lueur orange dans Le cycle de dégivrage est • C’est normal.
le congélateur en cours.
Conseils de dépannage…
92
Problème Causes possibles Correctifs
Le réfrigérateur ne La fonction de dégivrage • Ceci est normal. Le réfrigérateur passe sur cycle
s’arrête jamais mais maintient le compresseur en d’arrêt lorsque les portes ont été fermées pendant
les températures sont marche au cours de l’ouverture 2 heures.
normales des portes.
Le réfrigérateur émet La porte est ouverte. • Fermez la porte.
un signal sonore
La température présente L’appareil vient d’être branché. • Pour stabiliser le système, laissez 24 heures s’écouler.
n’est pas égale à celle
La porte est restée ouverte trop • Pour stabiliser le système, laissez 24 heures s’écouler.
affichée
longtemps.
Des aliments chauds ont été • Pour stabiliser le système, laissez 24 heures s’écouler.
placés dans le réfrigérateur.
Cycle de dégivrage en cours. • Pour stabiliser le système, laissez 24 heures s’écouler.
La porte ne se ferme Le joint de la porte du côté des • Mettre une couche de cire de paraffine sur le joint
pas correctement charnières est collé ou replié. de la porte.
Un des contenants de porte • Remontez le contenant d’un cran.
touche une étagère dans
le réfrigérateur.
Le réfrigérateur n’est pas • Consultez Nivellement du réfrigérateur.
bien niveau.
• Consultez Alignement des portes.
93
Garantie du réfrigérateur.
Pour les clients des États-Unis, toutes les réparations en vertu de la garantie
sont fournis par nos Centre de Service d’Usine ou par un technicien autorisé
Customer Care®. Pour prévoir une réparation, consultez notre site GEAppliances.
com ou appelez le 800.GE.CARE5 (800.432.2737). Veuillez avoir votre numéro de
série et votre numéro de modèle à portée de main lorsque vous appelez pour
obtenir un service.
Au Canada, appelez le 800.561.3344.
Ce qui n’est pas couvert par GE :
Pour les clients des États-Unis : Cette garantie est étendue à l’acheteur d’origine et aux propriétaires suivants pour tout
produit acheté pour une utilisation domestique aux États-Unis. Si le produit est installé dans une région où ne se trouve
aucun réparateur autorisé GE, vous devrez peut-être assumer les frais de transport ou apporter l’appareil à un centre de
service autorisé GE. En Alaska, cette garantie exclut le coût d’expédition ou de dépannage à votre domicile.
Certains états n’acceptent pas d’exclusion ou de limites aux dommages indirects consécutifs. Certains droits particuliers
vous sont dévolus en vertu de la présente garantie et peuvent s’accompagner d’autres droits qui varient selon votre lieu
de résidence. Pour connaître vos droits juridiques, veuillez consulter le bureau local ou le bureau d’état des affaires aux
consommateurs ou le Procureur Général de votre état.
Garant :
États-Unis :
General Electric Company. Louisville, KY 40225
Pour les clients au Canada : Cette garantie est étendue à l’acheteur d’origine et aux propriétaires suivants pour tout
produit acheté aux Canada pour une utilisation domestique aux Canada.Le service à domicile en vertu de la garantie
sera fourni dans les régions où il est disponible et où Mabe estime raisonnable de le fournir.
Garant Canada: MC Commercial, Burlington, Ontario, L7R 5B6
Agrafez votre facture ici.
Pour bénéficier du service de
réparation sous garantie, une
preuve de la date d’achat initial
est nécessaire.
EXCLUSION DES GARANTIES TACITES - Votre recours exclusif est l’échange du produit suivant les modalités de la
Garantie Limitée. Toutes garanties tacites, y compris les garanties de valeurs marchandes ou d’adéquation à des
fins particulières, sont limitées à une durée d’un an ou à la durée la plus courte autorisée par la loi.
■ Les déplacements à votre domicile pour vous expliquer
l’utilisation de ce produit
■ Une installation, livraison ou maintenance défectueuse.
■ Une panne du produit par abus d’utilisation, par mauvaise
utilisation, par modification ou s’il a été utilisé dans un but autre
que celui pour lequel il a été fabriqué.
■ Détérioration des aliments.
■ Le remplacement des fusibles ou le réenclenchement du
disjoncteur du domicile.
■ Les dommages causés après la livraison.
■ Le remplacement de la cartouche filtrante, si incluse, à cause
d’une pression d’eau en dehors de la gamme de fonctionnement
recommandée ou à cause d’une concentration excessive de
sédiments dans l’eau d’alimentation.
■ Le remplacement des ampoules, si incluses, ou la cartouche
filtrante, si incluse, et dans des conditions autres que celles
susmentionnées.
■ Tout dommage causé par accident, incendie, inondation ou une
catastrophe naturelle.
■ Tout dommage fortuit ou indirect causé par des défauts
éventuels de cet appareil.
■ Le service s’il est impossible d’avoir accès au produit.
Dommages causés par un filtre à eau qui n’est pas de la marque GE.
Les dommages à la finition, tels que rouille de surface,
ternissement ou petites taches, non signalés dans un délai de 48
heures suivant la livraison.
Pendant la période de
garantie de :
GE remplacera :
MODÈLES GE et GE PROFILE™
Un An
A compter de la date
d’achat initial
Toute pièce du réfrigérateur qui s’avère défectueuse en raison d’un défaut de matériau ou de fabrication.
Pendant la validité de la présente garantie limitée d’un an, GE fournira également gratuitement la main
d’œuvre et le service pour réparer la pièce défectueuse.
Trente jours
(
filtre à eau, si inclus) A compter
de la date d’achat initial
Toute pièce de la cartouche filtrante qui ne fonctionne pas à cause d’un vice de matériau ou de main
d’œuvre. Pendant la validité de la présente garantie limitée de 30 jours, GE fournira gratuitement une
cartouche filtrante de remplacement.
MODÈLES GE PROFILE SEULEMENT :
Cinq Ans
A compter de
la date d’achat initial
Toute pièce du système fermé du réfrigérateur (compresseur, condenseur, évaporateur et tous les tuyaux
de raccordement) qui s’avère défectueuse en raison d’un défaut de matériau ou de fabrication. Pendant la
validité de la présente garantie limitée de cinq ans, GE fournira également gratuitement la main d’œuvre
et le service pour réparer la pièce défectueuse dans le système fermé du réfrigérateur.
94
Les énoncés de réduction pharmaceutiques n’ont pas été certifiés par la NSF International ou l’état de la Californie.
Énoncés éprouvés et vérifiés par un laboratoire indépendant :
Réduction
de contaminant
Moyenne pour l’eau
d’alimentation
Concentration d’amorce
spécifiée par NSF
% réduction
moyenne
Concentration
moyenne de
substance en sortie
Concentration
max permissible
en sortie
Exigences de
réduction NSF
Rapport
d’essai NSF
Aténolol 978 ng/L N/A 99.5% 5.0 ng/L N/A N/A J-00121587
Fluoxétine 907 ng/l N/A 99.4% 5.4 ng/L N/A N/A J-00121587
Ibuprofène 885 ng/L N/A 94.1% 52.3 ng/L N/A N/A J-00121588
Progestérone 1097 ng/L N/A 99.5% 5.0 ng/L N/A N/A J-00121589
Triméthoprime 415 ng/L N/A 99.5% 2.0 ng/L N/A N/A J-00121587
Il est impératif que les méthodes d’installation, d’entretien et de remplacement du filtre recommandées par le fabricant de ce produit soient respectées.
Consultez le manuel d’installation pour connaître les renseignements de la garantie.
Directives et paramètres de l’alimentation en eau
Débit fourni 0.5 gpm (21.9 lpm)
Alimentation en eau Eau potable
Pression d’eau 40-120 psi (2.8-8.2 bar)
Température de l’eau 33°F-100°F (0.6°C-38°C)
Remarque : Bien que les essais aient été effectués dans des conditions normales
de laboratoire, la performance actuelle peut varier.
Cartouche de rechange : MWF. Pour connaître les coûts évalués des articles de
rechange, veuillez appeler au 1-800-626-2002 ou visitez notre site internet au
www.geapplianceparts.com.
AVERTISSEMENT
Pour réduire le risqué associé à l’ingestion de contaminants :
• N’utilisez pas l’eau dont la salubrité microbiologique est inconnue ou
dangereuse sans avoir effectué une désinfection des composants d’arrivée
et de sortie du système. Les systèmes certifiés pour la réduction de kystes
peuvent être utilisés pour de l’eau désinfectée contenant des kystes filtrables.
Établissement EPA no 10350-MN-005.
AVIS
Pour réduire le risque associé aux dommages matériels causés par des fuites d’eau :
•
La cartouche du filtre jetable doit être remplacée tous les six (6) mois ou moins si
le débit d’eau du distributeur d’eau ou du distributeur de glace diminue.
Lisez et suivez les instructions avant de procéder à l’installation et d’utiliser votre système.
• L’installation et l’utilisation DOIVENT être conformes à tous les codes locaux
et nationaux de plomberie.
• Ne procédez pas à l’installation si la pression de l’eau dépasse 120 lb/po² (8,2 bars).
Si votre pression d’eau dépasse 80 lb/po² (552 kPa), il est nécessaire d’installer un système
de limitation de pression. Communiquez avec un plombier professionnel si vous n’êtes
pas sûr de la méthode de vérification de la pression d’eau.
• N’installez pas le système s’il y a des possibilités de coups de bélier. En cas de coup
de bélier, vous devez installer un dispositif anticoup de bélier. Communiquez avec un
plombier professionnel si n’êtes pas sûr de la méthode permettant de vérifier cette condition.
• Ne raccordez pas le système à des conduites d’alimentation d’eau chaude.
La température de service maximale de ce système de filtre est de 38 °C (100 °F).
• Protégez le filtre contre le gel. Vidangez l’eau du filtre lorsque la température se situe
sous 0,6 °C (33 °F).
•
Consultez la fiche technique de performance pour connaître les conditions d’utilisation,
les énoncés de santé certifiés par le service de santé publique de la Californie et les
remplacements. Certification du service de santé publique de la Californie
no 05-1698. Les contaminants qui peuvent être réduits ou éliminés par ce filtre à eau
ne sont pas obligatoirement présents dans votre eau.
Mis à l’essai et certifié par NSF International
conformément aux normes 42 et 53 de la
ANSI/NSF du modèle MWF de GE pour les
énoncés de réductions mentionnés à la
fiche technique de performance.
ARTICLE
DE RECHANGE
Données relatives au rendement
Capacité : 300 gallons (1135 litres)
/DFRQFHQWUDWLRQGHVFRQWDPLQDQWVWHVWpVSRXUFH¿OWUHGDQVO·HDXHQWUDQWGDQVOHV\VWqPHDpWpUpGXLWH
à une valeur inférieure ou égale à la limite admissible dans l’eau sortant du système, conformément aux
QRUPHVHWGHOD16)$16,/HV\VWqPHDpWpWHVWpHWFHUWL¿pSDU16),QWHUQDWLRQDOFRQIRUPpPHQW
aux normes 42 et 53 de la NSF/ANSI.
Veuillez visiter geappliances.com pour connaître la liste complète des contaminants testés et des
concentrations réduites.
Fiche technique de performance
Système de filtration SmartWater
MC
- Cartouche MWF de GE
95
Soutien au consommateur.
Site Web appareils électroménagers GE electromenagersge.ca
Vous avez une question ou vous avez besoin d’aide pour votre appareil électroménager? Contactez-nous par
Internet au site electromenagersge.ca 24 heures par jour, tous les jours de l’année.
Service de réparations 1.800.561.3344
Service de réparations GE est tout près de vous.
Pour faire réparer votre électroménager GE, il suffit de nous téléphoner.
Studio de conception réaliste
Sur demande, GE peut fournir une brochure sur l’aménagement d’une cuisine pour les personnes
à mobilité réduite.
Écrivez: Directeur, Relations avec les consommateurs, Mabe Canada Inc.
Bureau 310, 1 Factory Lane
Moncton, N.B. E1C 9M3
Prolongation de garantie electromenagersge.ca
Achetez un contrat d’entretien GE avant que votre garantie n’expire et bénéficiez d’un rabais substantiel.
Ainsi le service après-vente GE sera toujours là après expiration de la garantie.
Visitez notre site Web ou appelez-nous au 1.888.261.2133.
Pièces et accessoires
Ceux qui désirent réparer eux-mêmes leurs électroménagers peuvent recevoir pièces et accessoires
directement à la maison (cartes VISA, MasterCard et Discover acceptées).
Les directives stipulées dans le présent manuel peuvent être effectuées par n’importe quel utilisateur.
Les autres réparations doivent généralement être effectuées par un technicien qualifié. Soyez prudent,
car une réparation inadéquate peut affecter le fonctionnement sécuritaire de l’appareil.
Vous trouverez dans les pages jaunes de votre annuaire le numéro du Centre de service Mabe le plus proche.
Autrement, appelez-nous au 1.800.661.1616.
Contactez-nous
Si vous n’êtes pas satisfait du service après-vente dont vous avez bénéficié :
Premièrement, communiquez avec les gens qui ont réparé votre appareil.
Ensuite, si vous n’êtes toujours pas satisfait envoyez tous les détails–numéro de téléphone compris–au
Directeur, Relations avec les consommateurs, Mabe Canada Inc.
Bureau 310, 1 Factory Lane
Moncton, N.B. E1C 9M3
Inscrivez votre appareil électroménager electromenagersge.ca
Inscrivez votre appareil électroménager en direct, aussitôt que possible. Cela améliorera nos
communications et notre service après-vente. Vous pouvez également nous envoyer par la poste
le formulaire d’inscription joint à votre documentation.
Printed in Korea
Consumer Support.
GE Appliances Website In the U.S.: GEAppliances.com
Have a question or need assistance with your appliance? Try the GE Appliances Website 24 hours a day,
any day of the year! For greater convenience and faster service, you can now download Owner’s Manuals,
order parts or even schedule service on-line.
Schedule Service In the U.S.: GEAppliances.com
Expert GE repair service is only one step away from your door. Get on-line and schedule your service at your
convenience any day of the year! Or call 800.GE.CARES (800.432.2737) during normal business hours.
In Canada, call 1.800.561.3344
Real Life Design Studio In the U.S.: GEAppliances.com
*(VXSSRUWVWKH8QLYHUVDO'HVLJQFRQFHSW³SURGXFWVVHUYLFHVDQGHQYLURQPHQWVWKDWFDQEHXVHGE\SHRSOHRI
all ages, sizes and capabilities. We recognize the need to design for a wide range of physical and mental abilities
and impairments. For details of GE’s Universal Design applications, including kitchen design ideas for people with
disabilities, check out our Website today. For the hearing impaired, please call 800.TDD.GEAC (800.833.4322).
In Canada, contact: Manager, Consumer Relations, Mabe Canada Inc.
Suite 310, 1 Factory Lane
Moncton, N.B. E1C 9M3
Extended Warranties In the U.S.: GEAppliances.com
Purchase a GE extended warranty and learn about special discounts that are available while your warranty is still
LQHIIHFW<RXFDQSXUFKDVHLWRQOLQHDQ\WLPHRUFDOOGXULQJQRUPDOEXVLQHVVKRXUV*(&RQVXPHU+RPH
Services will still be there after your warranty expires. In Canada, call 1.888.261.2133
Parts and Accessories In the U.S.: GEApplianceParts.com
Individuals qualified to service their own appliances can have parts or accessories sent directly to their homes
(VISA, MasterCard and Discover cards are accepted). Order on-line today, 24 hours every day or by phone at
800.626.2002 during normal business hours.
Instructions contained in this manual cover procedures to be performed by any user. Other servicing generally
should be referred to qualified service personnel. Caution must be exercised, since improper servicing may cause
unsafe operation.
Customers in Canada should consult the yellow pages for the nearest Mabe service center, or call 1.800.661.1616.
Contact Us In the U.S.: GEAppliances.com
If you are not satisfied with the service you receive from GE, contact us on our Website with all the details including
your phone number, or write to: General Manager, Customer Relations
GE Appliances, Appliance Park
/RXLVYLOOH.<
In Canada: geappliances.ca, or write to: Director, Consumer Relations, Mabe Canada Inc.
Suite 310, 1 Factory Lane
Moncton, N.B. E1C 9M3
Register Your Appliance In the U.S.: GEAppliances.com
5HJLVWHU\RXUQHZDSSOLDQFHRQOLQH³DW\RXUFRQYHQLHQFH Timely product registration will allow for enhanced
FRPPXQLFDWLRQDQGSURPSWVHUYLFHXQGHUWKHWHUPVRI\RXUZDUUDQW\VKRXOGWKHQHHGDULVH<RXPD\DOVRPDLO
in the pre-printed registration card included in the packing material, or detach and use the form in this Owner’s
Manual. In Canada: geappliances.ca