This room air conditioner is designed to fit easily into a single or double hung window. However, since window designs vary, it may be necessary to make some modifications for safe, proper installation.
Make sure window and frame are structurally sound and free from dry and rotted wood.
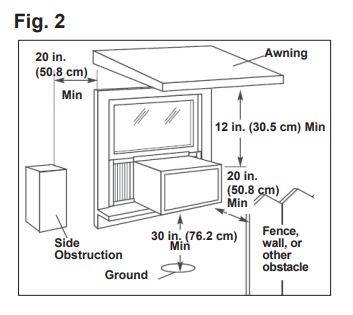
For maximum efficiency, install the air conditioner on a side of the house or building which favours more shade than sunlight. If the unit is in direct sunlight, it is advisable to provide an awning over the unit.
Provide sufficient clearance around the cabinet to allow for ample air circulation through the unit (See Fig. 2). The rear of the unit should be outdoors. It should not be in a garage, or inside a building. Keep unit as far away as possible from obstacles/obstructions and at least 30 in. (76 cm) above the floor or ground. Curtains and other objects within the room should be prevented from blocking the air flow.
Be certain that the proper electrical outlet is within reach of the installation. Use only a single outlet circuit rated at 15 amps. All wiring should be in accordance with local and national electrical codes.
DO NOT install unit where leakage of combustible gas is suspected. Your air conditioner may fail to operate in air containing oils (including machine oils), sulfide gas, near hot springs, etc.
NOTE: Your unit is designed to evaporate condensation under normal conditions. However, under extreme humidity conditions, excess condensation may cause basepan to overflow to the outside. The unit should be installed where condensation run-off cannot drip on pedestrians or neighbouring properties.
NOTE: It is normal for your unit to drip a small amount of water, especially on excessively humid days.
ASSEMBLY AND INSTALLATION
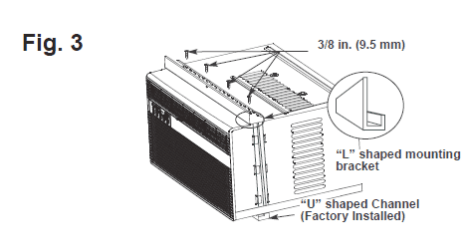
1. Assembly of the upper channel to the cabinet (factory installed on some units).
“L” Shaped Top Channel: install the “L” shaped channel to the top of the cabinet as shown in Fig. 3, using four (4) 3/8 in. (9.5 mm) screws.
2. Assembly of the side curtains to the cabinet.
Extend the shutter from the shutter frame and slide it into the shutter tabs on the side channel of the air conditioner, as shown in Fig. 4.
Slide the shutters into the top (“L” shaped) and bottom (“U” shaped) channels. The shutters are identified (on frame) as left and right.
3. Completing the installation.
Cut the foam (non adhesive) sealing strip to fit the area of the window sill that the air conditioner will rest on.
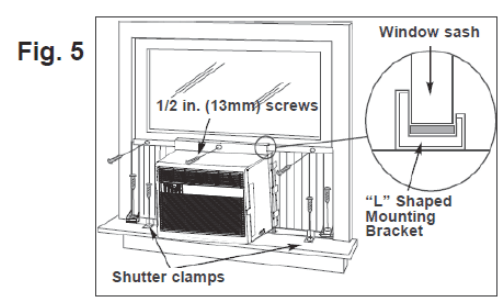
Carefully place the air conditioner into the window with the “L” shaped mounting bracket (on top) positioned in front of the upper window sash. The bottom of the cabinet should be positioned on the “recessed” portion of the window frame. Pull the window down until it rests just behind the front flange of the (top) “L” shaped mounting bracket (See Fig. 5).
Expand the shutter frames (fully) on each side and secure the top of the frames to the window sash using one 1/2 in. (13 mm) screw on each side and one in the “L” shaped mounting bracket (Fig. 5).
Secure the shutter clamp on each side of the lower part of the shutter, and secure to window sill using one 1/2 in. (13 mm) screw on each side (Fig. 5).
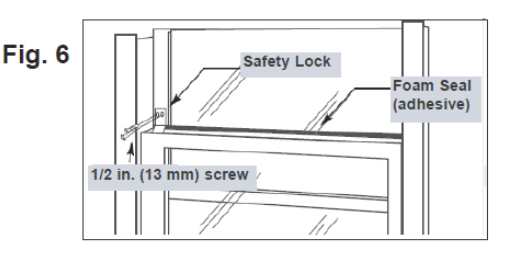
Place the second foam sealing strip to fit the opening between the inside and outside windows, then attach the safety lock to the outside window frame using one 1/2 in. (13 mm) screw (See Fig. 6).
PLEASE NOTE: Window applications come in a variety of different styles. Therefore, it may be necessary to modify your particular installation.
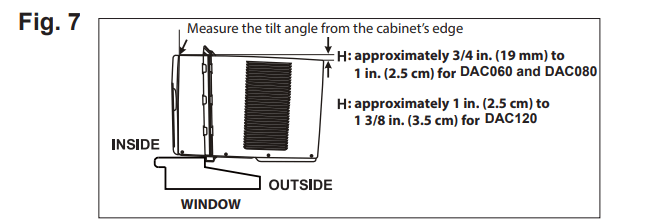
Check that the air conditioner is tilted downwards to the outside, about 3° to 4°, as shown in Fig. 7. After proper installation, condensed water should not drain from the overflow drain hole during normal use. If you notice water leaking out, check the angle of tilt, and make any necessary adjustments. However, on a very humid day, water leakage can occur – this is normal.
Note: To achieve 3° to 4°, you must measure the H, see figure 7.
Measure the tilt angle from the cabinet’s edge. The distance H should be approximately 3/4 in. to 1 in. (19 mm - 2.5 cm) for DAC060BEUWDB and DAC080BEUWDB. The distance H should be approximately 1 in. to 1 3/8 in. (2.5 cm - 3.5 cm) for DAC120BEUWDB.
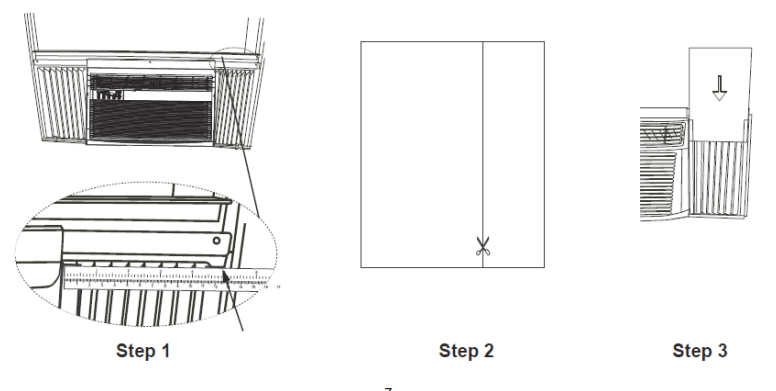
4. Installing the Energy Efficient Foam Insert
After the unit is installed in the window, measure the width of the side curtain.
If necessary, cut the foam insert down to the width of the side curtain.
Slide the foam insert into the side curtain.
Repeat for the other side. (See below)
NOTE: Apply the supplied weather-stripping where needed (cracks and spaces between the foam insert, window kit and window frame).
OPERATING INSTRUCTIONS
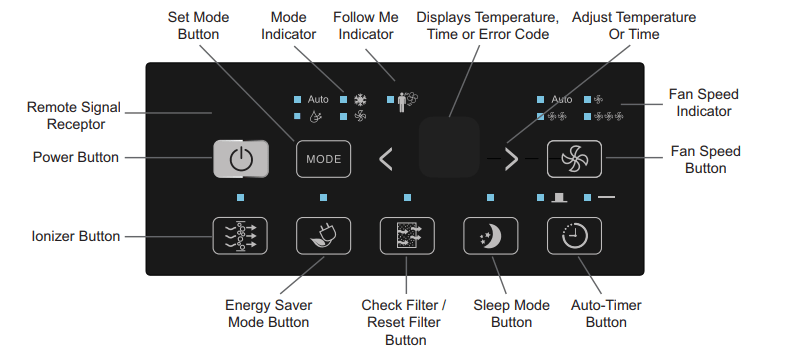
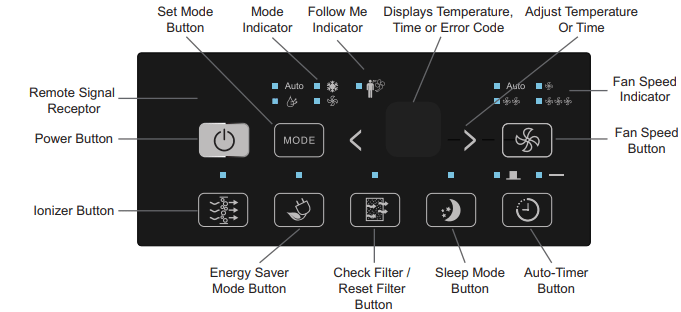
KEY PAD FEATURES
POWER: Turns unit On/Off. NOTE: The unit will automatically launch the Energy Saver function when it is in Cool, Dry and Auto modes.
IONIZER: The ionizer function will cause the air filter inside the unit to be negatively charged. Dust particles in the air are naturally positively charged and will be drawn to the negatively charged air filter, ensuring your home remains as dust free as possible.
ENERGY SAVER: Automatically cycles the fan on and off while the compressor is not in use. This function is available in Cool, Dry, and Auto modes (only Auto-Cool and Auto-Fan modes). The fan will continue to run for 3 minutes after the compressor shuts off. The fan then cycles on for 2 minutes at 10 minute intervals,until the room temperature is above the set temperature. At this point, the compressor turns back on and cooling restarts.
CHECK FILTER / RESET FILTER: The adjacent indicator light will illuminate as a reminder to clean the air conditioner filter (see page 12). Once the filter has been cleaned and replaced, depress the Check Filter button in order to resume operation.
SLEEP MODE: In this mode, the selected temperature will increase (when in cooling mode) by 1°C / 2°F one half-hour after Sleep mode has been selected. The temperature will then increase by another 1°C / 2°F after an additional half hour. This new temperature will be maintained for 6 hours before returning to the originally selected temperature. This ends the Sleep mode and the unit will continue to operate as originally programmed. The Sleep mode program can be cancelled at any time during operation by pressing the Sleep button again.
AUTO-TIMER: Used to initiate the Auto On/ Auto Off timer.
When the air conditioner is off (Auto-On feature):
Press the Auto-Timer button once and the adjacent Auto-On indicator light will illuminate.
Use the Temp/Timer control cursors to select a delayed ON time of up to 24 hours.
Select the appropriate mode under which you want the unit to operate (Auto-Cool-Dry-Fan Only).
Select the fan speed setting.
The time you selected will appear in the LED display.
When the air conditioner is on (Auto-Off feature):
Press the Auto-Timer button twice and the adjacent Auto-Off indicator light will illuminate.
Use the Temp/Timer control cursors to select a delayed OFF time of up to 24 hours.
The time you selected will appear in the LED display. The Auto-On and Auto-Off timer features can operate during the same program by defining the Auto-Off parameters immediately after the Auto-On parameters.The Auto-Timer may be cancelled at any time by turning the unit On/Off.
For example, if you want to turn the unit on one hour later, to operate for one hour and then stop, set Auto-On “1” and Auto-Off “2”.
Note: This is a “one-shot” timer.It does not continue to cycle on and off. It will turn the unit on (if set by the user) ONE time. It will turn the unit off (if set by the user) ONE time. If you require the unit to turn on/off again automatically, then you must set the timer again.
FAN SPEED: Select from four different fan settings: Low, Medium, High and Auto during Cool and Fan Only mode. Please note, during Dry mode the fan speed is automatically defined.
TEMP / TIMER CONTROL: Used to increase or decrease the Temperature setting in 1°C / 1°F increments, and AutoTimer On/Off settings in 30min./1hr. increments. Note: This appliance allows you to select the temperature scale to be displayed in either “Celsius” or “Fahrenheit” according to your preference.To change the temperature scale displayed on the electronic display, press both the “Temp/Timer” adjust arrows simultaneously to alternate between Celsius and Fahrenheit.
LED DISPLAY: Displays the following information independently - Set Temperature, Ambient Room Temperature, Auto Timer On/Off settings and error codes.
FOLLOW ME: There is a temperature sensor built into the remote control that will continuously collect the current room temperature. Keep the remote control with you as you move throughout your home and the unit will automatically adjust the set temperature based on the current temperature where you are located to reach the most comfortable condition and temperature.
To activate the FOLLOW ME feature, point the remote control at the unit and press the FOLLOW ME button. The remote will display the current temperature at its location. The remote will send a signal to the air conditioner every 3 minutes, so long as you remain within range of the unit. The FOLLOW ME light on the control panel of the unit will illuminate for 5 seconds every three minutes to indicate that it has received a signal from the remote. If the unit does not receive a signal from the remote during any 7 minutes interval, the unit will beep to indicate that the FOLLOW ME mode has ended.
To disable the FOLLOW ME feature when it is active, point the remote at the unit and press the FOLLOW ME button.
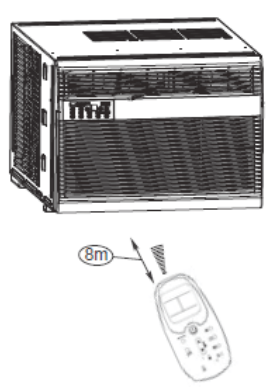
The maximum distance for the FOLLOW ME feature is 8 meters. This feature is available in Cool and Auto modes.
MODE: Allows you to scroll through and select the desired operating mode: Cool, Dry, Fan Only and *Auto. The selected mode will be denoted by the indicator lights.
*Auto mode is a pre-set factory program that automatically defines the mode (Cool or Dry) and fan speed, based on the set temperature. The unit will automatically launch the Energy Saver function when it is in Cool, Dry, or Auto modes.
USING THE REMOTE CONTROL
Location of the remote controller
Use the remote controller within a distance of 8 meters from the appliance, pointing it towards the receiver. Reception is confirmed by a beep.
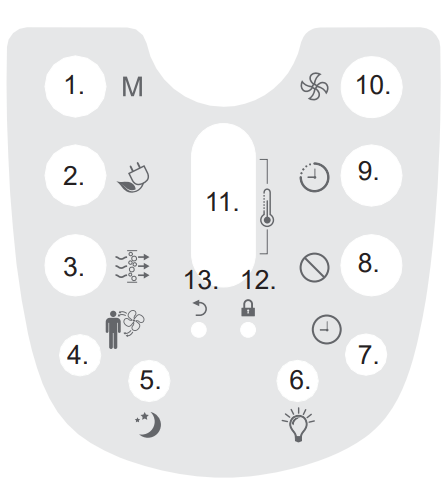
Electronic Display displays the following information:
Mode: press to cycle through available modes
Energy Saver: default setting which allows the fan to cycle on and off (instead of running continuously) when the compressor is not in use.
Ionizer: press to start the Ionizer function.
FOLLOW ME button: can only be activated by the remote control. - Press this button to start the FOLLOW ME function.
The unit will beep if it does not receive a signal from the remote for more than 7 minutes to indicate that the FOLLOW ME function is turning off.
Press this button again to turn the FOLLOW ME function off.
SLEEP: press to activate the SLEEP program.
LED: press to turn the LED back light on or off.
Clock: Depress the button for 3 seconds in order to set the clock. Press the increase or decrease arrow to adjust the time in 10 minute intervals
Cancel: cancels current Timer ON/OFF settings.
Timer: press to activate the Timer function.
Fan: press to choose fan speed.
Used to increase or decrease temperature settings in 1° increments on the Celcius or Fahrenheit scale.
Lock prevents the remote control settings from inadvertently being changed.
Restore remote control default settings.
NOTE: The clock feature is only available on the remote, the unit does not have a clock. The remote clock is a 24 hour clock only.
CHANGING THE BATTERIES ON THE REMOTE
The hand-held remote control will require two “AAA” alkaline batteries (included). Batteries should be replaced when:
No signal (beep) is heard when attempting to program the main unit.
The main unit does not respond to a command issued by the remote control.
Battery replacement:
Slide the rear cover on the remote in the direction of the arrow. Continue pulling (gently) until the cover separates completely from the unit.
Insert (2) batteries (AAA) following the same orientation (polarity) depicted inside the battery chamber (+/-).
Re-install rear cover.
If the remote control will not be used for extended periods of time (vacations etc.), batteries should be removed.
Protect the remote control from high temperatures, and keep it away from radiation exposure.
Keep the control panel receiver out of direct sunlight.
Do not mix old and new batteries.
Do not mix alkaline, standard (carbon-zinc), or rechargeable (ni-cad, ni-mh,etc) batteries.
The remote operates within a range of 8 meters (26 ft.) from the receiver located inside the main unit. Any obstruction between the receiver and remote may cause signal interference, limiting the ability to program the main unit.
This Class B digital apparatus complies with the Canadian ICES-003 standard. CAN ICES-3 (B)
NOTE: This equipment has been tested and found to comply with the limits for a Class B digital device, pursuant to Part 15 of the FCC Rules. These limits are designed to provide reasonable protection against harmful interference in a residential installation. This equipment generates, uses and can radiate radio frequency energy and, if not installed and used in accordance with the instructions, may cause harmful interference to radio communications. However, there is no guarantee that interference will not occur in a particular installation. If this equipment does cause harmful interference to radio or television reception, which can be determined by turning the equipment off and on, the user is encouraged to try to correct the interference by one or more of the following measures:
Reorient or relocate the receiving antenna.
Increase the separation between the equipment and receiver.
Connect the equipment into an outlet on a circuit different from that to which the receiver is connected.
Consult the dealer or an experienced radio/TV technician for help.
Changes or modifications not approved by the party responsible for FCC compliance could void the user’s authority to operate the equipment.
This appliance complies with Part 15 of the FCC Rules. Operation is subject to the following two conditions:
This device may not cause harmful interference.
This device must accept any interference received, including interference that may cause undesired operation.
CARE AND MAINTENANCE
CLEANING
NOTE: In order to avoid electric shock, please turn off the A/C and unplug the plug before maintenance or repair.
When cleaning the air conditioner be sure to disconnect the power cord from the electrical outlet.
DO NOT use gasoline, benzene, thinner, or any other chemicals to clean this unit, as these substances may cause damage to the finish and deformation of plastic parts.
Never attempt to clean the unit by pouring water directly over any of the surface areas, as this will cause deterioration of electrical components and wiring insulation.
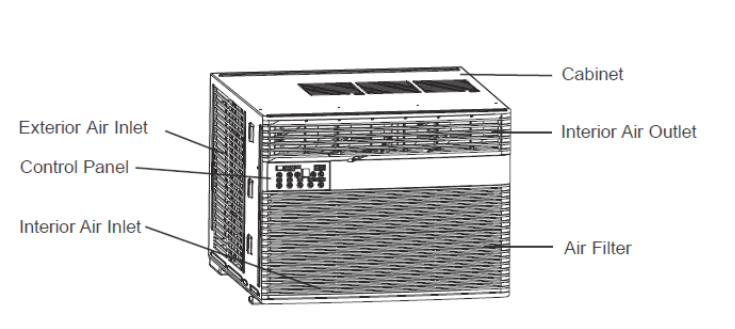
AIR FILTER
If the air filter becomes clogged with dust, air flow is obstructed and reduces efficiency. The air filter should be cleaned every 2 weeks.
AIR FILTER REMOVAL:
The air filter is located behind the air intake front grill. To remove the air filter, grasp the filter tab on the right side of the grill and slide it out to the right. If your air intake front grill has 2 indents, put the grill forward and remove the air filter.
To reinstall the air filter, reverse the above procedures. The air filter must be vacuumed or washed by hand in warm water. Dry thoroughly before re-installing.
CLEANING AIR FILTER:
Use a vacuum cleaner with a soft brush attachment.
Wash the filter in lukewarm water below 40°C (104°F). To get best results, wash with soapy water or a neutral cleaning agent.
Rinse the filter with clean water and dry thoroughly before re-installing.
END OF SEASON CARE
Operate the fan alone for half a day to dry out the inside of the unit.
Turn off power and remove plug from wall socket.
Clean filter.
Store (covered) air conditioner in a dry location.
DISPOSAL
Check for local regulatory compliance regarding the approved and safe disposal of this appliance.
TROUBLESHOOTING
Occasionally a problem may arise that is minor in nature, and a service call may not be neccessary. Use this troubleshooting guide for a possible solution. If the unit continues to operate improperly, call an authorized service depot or Danby’s Toll Free Number 1-800-263-2629 for assistance.
PROBLEM
POSSIBLE CAUSE
SOLUTION
Air conditioner will not operate
No power to the unit
Check connection of power cord to power source.
Check fuse or circuit breaker.
Set SELECTOR SWITCH to position other than “OFF”. The power cord “RESET” button must always be pushed in (engaged) for correct operation.
Inefficient or no cooling
Dirty air filter
Clean/replace air filter
Unit size inappropriate for application
Check with dealer to determine proper unit capacity for application
Blocked air flow
Remove obstruction from grill or outdoor louvres
Power interruption, settings changed too quickly, or compressor overload tripped
Turn the unit off and wait 5 minutes before attempting to restart
Noisy unit
Loose parts
Tighten loose parts
Inadequate support
Provide additional support to unit
Odors
Formation of mold, mildew, or algae on wet surfaces
Clean unit thoroughly
Place algaecide tablet in base pan
Water dripping outside
Hot and humid weather
Condensation run-off is normal under these conditions.
Water dripping inside
Unit is not properly angled to allow water to drain outside
Unit must be installed on an angle for proper condensation run-off. Check the unit and make any adjustments.
It is an extremely humid day
On an extremely humid day, this effect is expected. No action required.
Ice or frost build-up
Low outside temperature
When outdoor temperature is approximately 18.3°C (65°F) or below, frost may form when unit is in cooling mode. Switch unit to FAN (only) operation until frost melts.
Unit air filter is dirty
Remove and clean filter
NOTES:
If circuit breaker is tripped repeatedly, or fuse is blown more than once, contact a qualified technician.
When the unit is installed using proper installation steps, the unit is properly tipped toward the outdoors to allow for condensation run-off.
Q: What is the range of temperatures for the Danby 12000 btu unit? It is only showing one number so I don’t know if the temperature is set at 60 or 80 degrees Reply