Owner’s manual
Please read this manual carefully before operating
your device.
MODEL:
PC389P / PC389S
ENGLISH
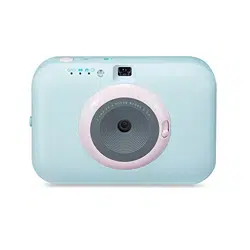
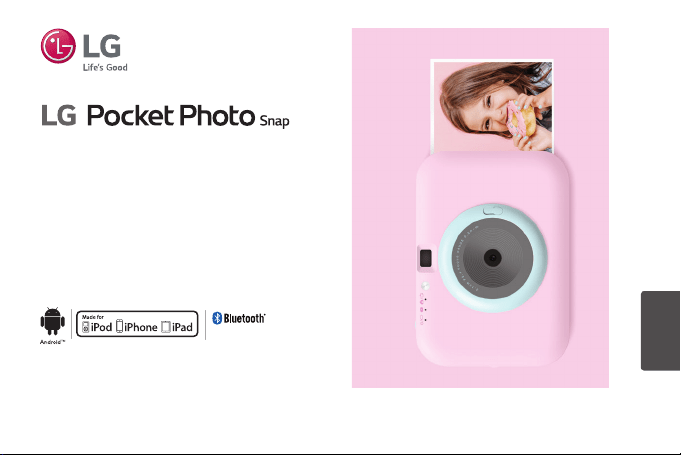
The actual device may differ from the image.
You can print easily the photo via
Bluetooth®
2
Safety information
CAUTION: TO REDUCE THE RISK OF ELECTRIC SHOCK
DO NOT REMOVE COVER (OR BACK) NO USER-
SERVICEABLE PARTS INSIDE REFER SERVICING TO
QUALIFIED SERVICE PERSONNEL.
This lightning ash with arrowhead symbol
within an equilateral triangle is intended
to alert the user to the presence of
uninsulated dangerous voltage within the
product’s enclosure that may be of sufcient magnitude
to constitute a risk of electric shock to persons.
The exclamation point within an equilateral triangle is
intended to alert the user to the presence
of important operating and maintenance
(servicing) instructions in the literature
accompanying the product.
WARNING: TO PREVENT FIRE OR ELECTRIC SHOCK
HAZARD, DO NOT EXPOSE THIS PRODUCT TO RAIN
OR MOISTURE.
WARNING: Do not install this equipment in a conned
space such as a book case or similar unit.
CAUTION: Do not use high voltage products around
this product (ex. Electrical swatter). This product may
malfunction due to electrical shock.
CAUTION: Do not block any ventilation openings. Install
in accordance with the manufacturer’s instructions.
Slots and openings in the cabinet are provided for
ventilation and to ensure reliable operation of the
product and to protect it from over heating. The
openings shall never be blocked by placing the product
on a bed, sofa, rug or other similar surface. This product
shall not be placed in a built-in installation such as a
bookcase or rack unless proper ventilation is provided
or the manufacturer’s instruction has been adhered to.
CAUTION
RISK OF ELECTRIC SHOCK
DO NOT OPEN

3
CAUTION concerning the Power Cord
The Power Plug is the disconnecting device. In case
of an emergency, the Power Plug must remain readily
accessible.
Check the specication page of this owner’s manual to
be certain of the current requirements.
Do not overload wall outlets. Overloaded wall outlets,
loose or damaged wall outlets, extension cords, frayed
power cords, or damaged or cracked wire insulation
are dangerous. Any of these conditions could result in
electric shock or re. Periodically examine the cord of
your device, and if its appearance indicates damage or
deterioration, unplug it, discontinue use of the device,
and have the cord replaced with an exact replacement
part by an authorized service center. Protect the power
cord from physical or mechanical abuse, such as being
twisted, kinked, pinched, closed in a door, or walked
upon. Pay particular attention to plugs, wall outlets, and
the point where the cord exits the device.
This device is equipped with a portable battery or
accumulator.
How to Safely remove the batteries or the battery
pack from the equipment: To Remove the old batteries
or battery pack, follow the assembly steps in reverse
order. To prevent contamination of the environment and
bring on possible threat to human and/or animal health,
the old batteries or the battery pack must be put in an
appropriate container at designated collection points.
Do not dispose of batteries or battery pack together
with other waste. It is recommended that you use local,
free reimbursement systems batteries or battery packs,
(may not be available in your area). The batteries or the
battery pack should not be exposed to excessive heat
such as sunshine, re or the like.
NOTICE: For safety marking information including
product identication and supply ratings, please refer to
the main label inside the apparatus.

4
WARNING:
y
The ash may turn on in dark places.
- Do not use a ash too close to a person’s eyes.
It may temporarily affect your eyesight.
Be especially careful when taking photos of
infants and young children.
- Do not take a photo towards a person driving a
bicycle or car, or riding a horse because the ash
may distract the operator.
It may cause trafc accidents.
y
Avoid direct sunlight, heat sources such as heaters,
and do not use or store ammable sprays or
ammable materials near the product.
- There is a risk of explosion or re.
y
Do not look through the view nder at the sun or
other strong light.
y
Do not wet your Pocket Photo or hold it with wet
hands. It may cause an electric shock.
y
Do not touch the inside of the Insertion part of
Photo cartridge (print head). There is a risk of burns.

5
CAUTION:
y
The apparatus should not be exposed to water
(dripping or splashing) and objects lled with liquids,
such as vases, shouldn’t be placed on the apparatus.
y
Minimum distance around the apparatus for
sufcient ventilation, no less than 5 cm.
(1.97 inches)
y
The ventilation should not be impeded by covering
the ventilation openings with items, such as
newspapers, table-cloth, curtains etc.
y
No naked ame sources, such as lighted candles,
should be placed on the apparatus.
y
The unit’s internal lithium battery should only be
serviced by an authorised service center.
y
Do not wet your Pocket Photo or hold it with wet
hands. It may cause an electric shock.
y
If foreign matter or water enters the Pocket Photo,
or there is a shock or damage, turn off the Pocket
Photo immediately.
y
This unit is not waterproof.
y
Place the product on a sturdy, level surface.
y
When used by children, adult care is required.
y
Do not use during exercise, walking or driving.
y
Do not wet your Pocket Photo.
Do not drop or shock your Pocket Photo. Also, do
not put it in a place where sand is likely to get in.
y
Do not leave it in a car interior, high temperature
place, humid place or coast for a long time.
y
Do not store Pocket Photo and lm in your closet
with insect repellent gas such as naphthalene
because it is harmful to Pocket Photo and lm.

6
Device operating temperature
When operating in cold weather, the device may
not print. Bring it inside from the cold and give
about 10 minutes to adjust to the specied
operating temperature (5 °C - 35 °C
(41 °F - 95 °F)). Then try printing again. (For the
appropriate use, it is recommended not to operate
it outdoors in winter.)
,
Note
CAUTION when using this product in
environments of low humidity
y
It may cause static electricity in environments
of low humidity.
y
It is recommended to use this product after
touching any metal object which conducts
electricity.
>
Caution

7
Contents
Safety information ......................2
STEP 1 Getting Started ..................8
Supplied items ............................. 8
Product Overview . . . . . . . . . . . . . . . . . . . . . . . . . . 8
STEP 2 Inserting Photo Cartridge .........9
About photo cartridge.....................11
STEP 3 Power On / Off..................13
STEP 4 Checking battery status .........14
Charging Battery..........................14
STEP 5 Installing App ...................16
Installing App for Android phone ..........16
App Setting ..............................17
Installing App for iPhone ..................18
Setting Bluetooth of iPhone ..............18
STEP 6 Printing Photo ..................19
Printing using Android phone .............19
Printing using iPhone .....................22
Using the edit mode.......................25
Notes on the printing .....................25
Checking where to buy paper .............27
Updating the device .......................28
STEP 7 Taking photos and
instant printing.........................29
Taking photos .............................29
Printing black-and-white photo ...........32
Using a strap..............................34
Checking Label .........................34
About LED Indicator ....................35
Specifications ..........................38
Troubleshooting ........................40
Paper Jam Solution ........................44
8
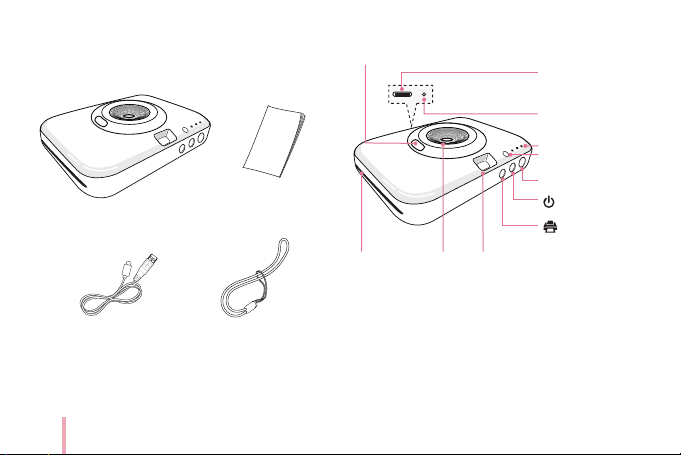
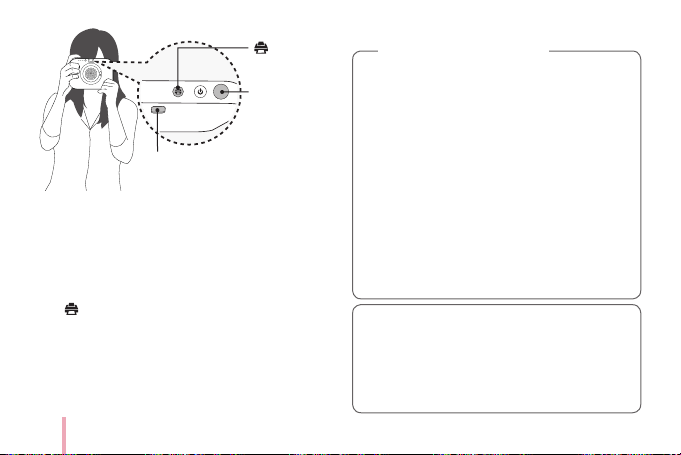
STEP 1 Getting Started
Supplied items
USB cable (Type C)
y
Depending on the model or region, supplied
items may differ. (ex. USB cable, strap etc.)
LG Pocket Photo Printer
Simple manual
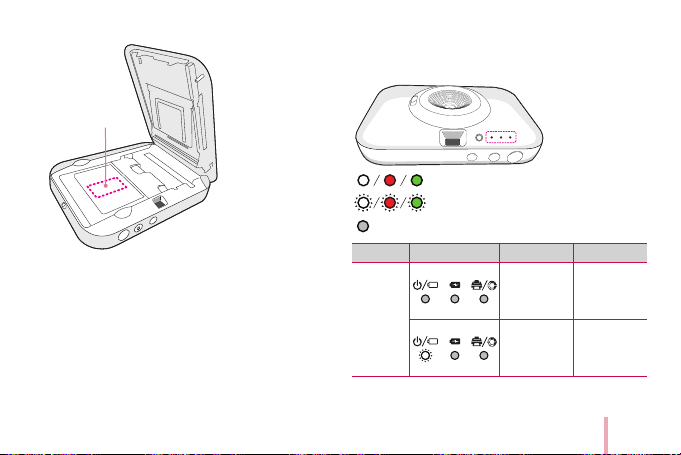
Product Overview
*Reset hole
LED indicator
Lens cover switch
USB port (Type C)
for recharging
Shutter
(
Power) button
(Reprint) button
View nderPaper exit slot Lens
Flash
Strap
*Reset hole: If you need to reset, press in the hole.
9
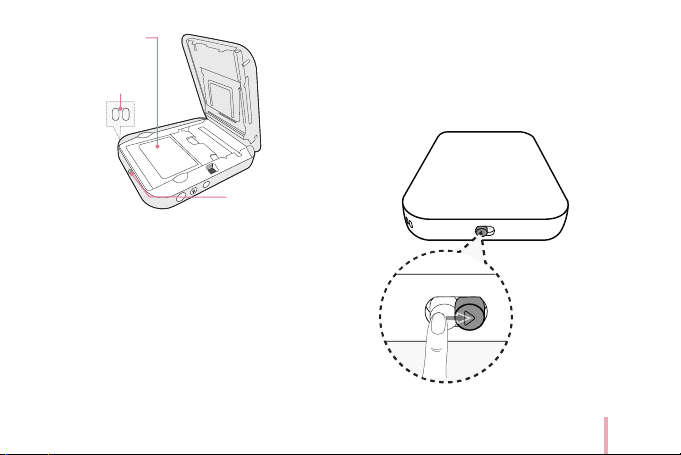
Insertion part of
Photo cartridge
Strap hole
Cover button
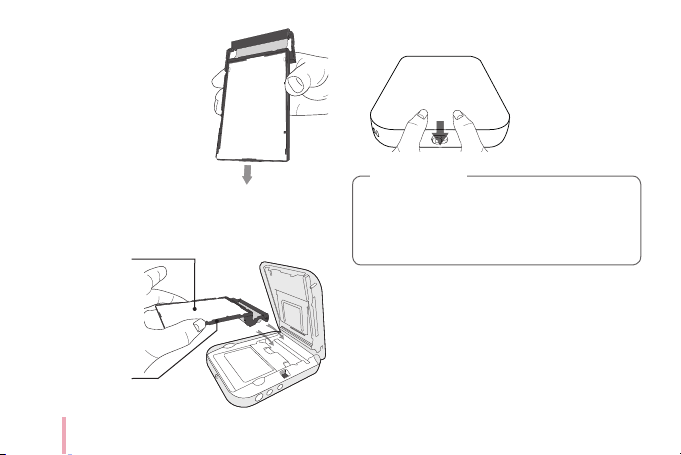
STEP 2 Inserting Photo
Cartridge
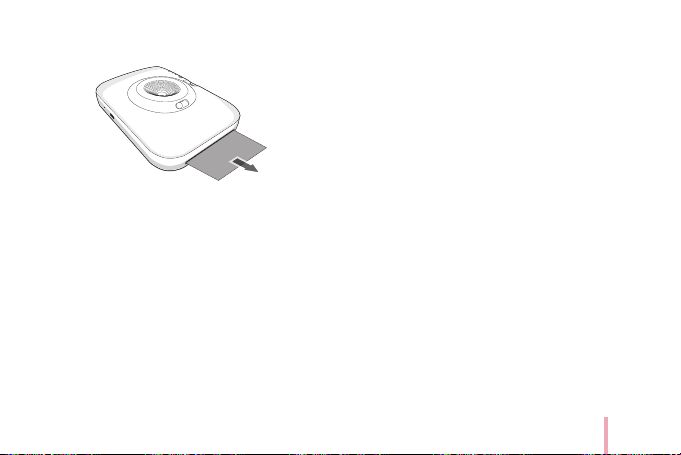
1. Slide the cover button sideways to open the bottom
cover.
2. Unpack the photo cartridge you bought.
10
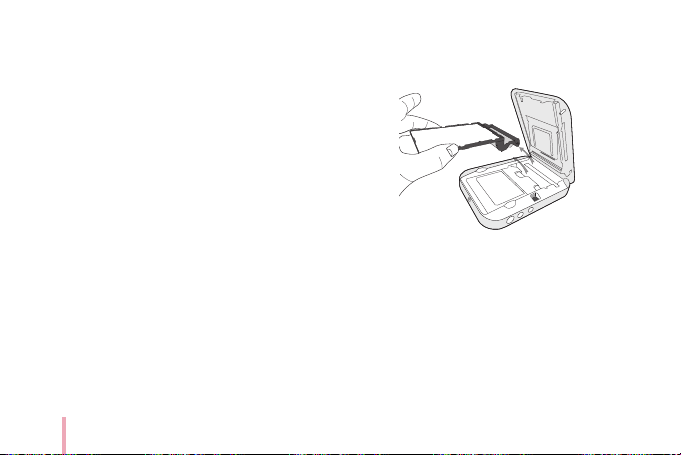
As shown in the following
picture, lightly knock the photo
cartridge in the direction of the
arrow 2 or 3 times to align the
paper to the back and put it in
the Pocket Photo.
3. Insert the photo cartridge
with the color ribbon facing forward as shown in the
following image and close the cover.
Photo Papers with
White side up,
Black side down.
4. Press the cover to close it completely.
You can check the total number of copies printed
through the Pocket Photo app after replacing
photo cartridge. If you have used all photo paper,
replace it with a new photo cartridge.
,
Note
11
y
Do not touch the color ribbon and the photo
paper when inserting the cartridge.
y
Do not touch the inside of the Insertion part of
Photo cartridge (print head). There is a risk of
burns.
y
When opening the bottom cover, your hand or
nger may get caught in the paper exit slot.
y
Unpack the cartridge in dust free place and
immediately put it into the unit. When you
handle or touch the cartridge, be careful not to
get dirt on it.
y
After inserting photo cartridge, do not open
the cover before using all photo paper.
y
When opening the bottom cover to replace the
photo cartridge, be careful not to touch the
inside of the Insertion part of Photo cartridge
(print head) and its surroundings.
Note on Photo Cartrigde
y
If there is foreign substance on the inside of
the Insertion part of Photo cartridge (print
head), wipe it off with a cotton bud or a soft
cloth.
About photo cartridge
Photo cartridge
Use exclusive photo cartridge for LG Pocket Photo.
Otherwise, the print quality cannot be guaranteed,
and it may cause damage of Pocket Photo.
12
Use exclusive Cartridge for LG Pocket Photo.
y
Using photo cartridge from other company
may result in malfunction, paper jam or low
quality.
y
Do not damage or bend the cartridge.
y
Do not expose to direct sunlight or moisture.
Do not allow the Pocket Photo to overheat.
y
Do not disassemble or modify the photo
cartridge.
y
Using a soiled cartridge may result in
malfunction.
y
Once unpacked, the cartridge may begin to
curl up or discolor after a period of time. It is
recommended to use them as soon as possible.
y
Do not place inside a car or, expose to direct
sunlight or moisture.
Note on Photo cartridge
y
Do not leave in a place where the temperature
or humidity is too high or low. It may reduce
the quality of the printed photo.
y
Please use photo cartridge in Pocket Photo as
soon as possible.
y
If the photo cartridge is placed at a low or high
temperature, set the photo cartridge to the
proper temperature and then take the picture.
y
Avoid airport checked luggage inspection and
other strong X-ray illumination. The effect
of fogging, etc. may appear on unused lm.
We recommend that you carry the camera
and/or the lm onto the aircraft as carry-on
luggage. (Check with each airport for more
information).
y
Store printed photos in a cool and dry place
away from strong light.
13
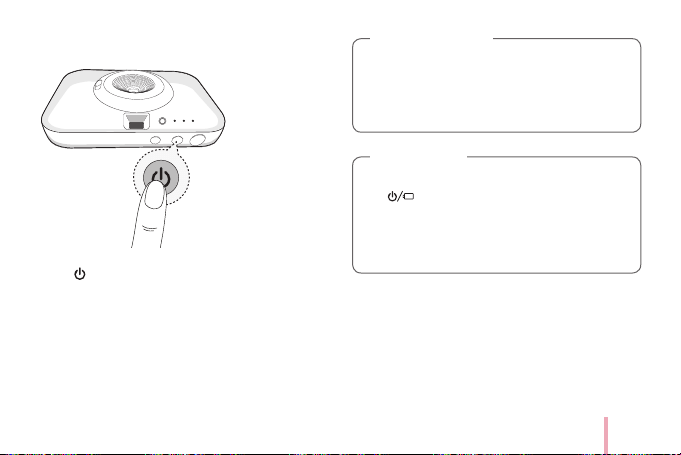
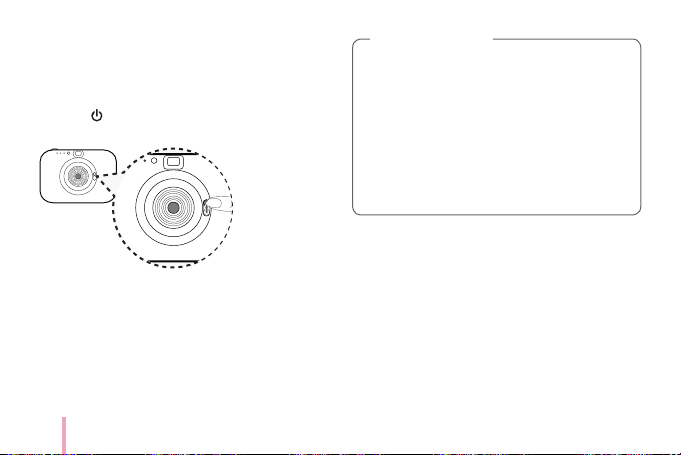
STEP 3 Power On / Off
Press (power) button for 2 seconds to turn
on or off.
Moving a Pocket Photo from a cold place to a
warm place can cause dew on the inside / outside
and print quality may deteriorate. Allow the dew
to dry sufciently before using the device.
>
Caution
y
When turning the device on, LED indicator
ashes for 3 seconds, then printing is
available.
y
For more information, see “About LED
indicator”.
,
Note
14
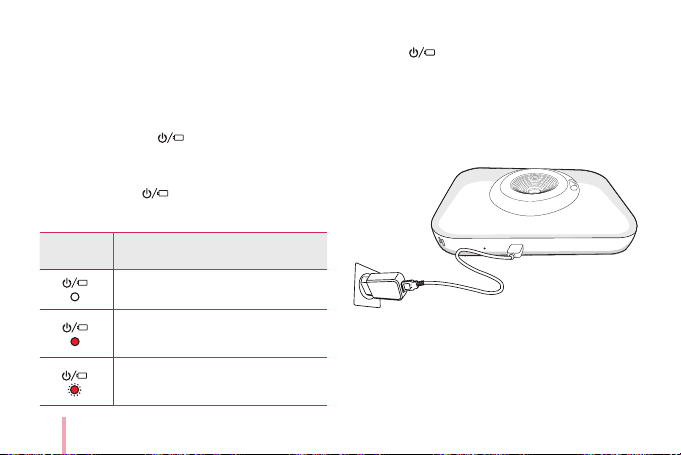
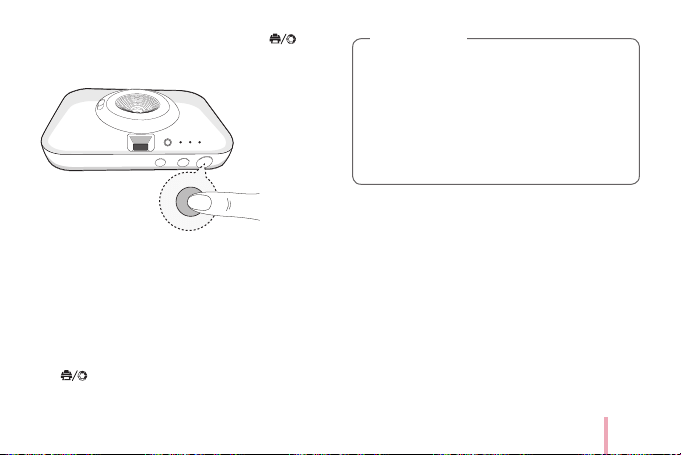
STEP 4 Checking battery
status
When you disconnect the Pocket Photo from the
charging cable, you can check the battery charge status
via the LED indicators .
If the power of the unit is turned on, you can check the
charging status by pressing 1 (Power) button.
The LED indicators will change depending on the
battery charging status.
LED color Condition
프린트 대기/
켜짐
(흰색)
전원 꺼짐
충전 중
충전 완료
전원을 켤때/
깜박임
(흰색)
Remaining battery is more than
30% / On
배터리 30%
이상(흰색)/
5장 이상 출력
가능
배터리 30%
미만
프린트 불가
(3회 깜박임)
배터리 부족
=>확인 후
삭제
인쇄 준비
업데이트
프로그램
읽는 중
인쇄 중
Remaining battery is less than 30%
/ On
배터리 30%
이상(흰색)/
5장 이상 출력
가능
배터리 30%
미만
프린트 불가
(3회 깜박임)
배터리 부족
=>확인 후
삭제
인쇄 준비
업데이트
프로그램
읽는 중
인쇄 중
No battery / Blinks quickly and turn
of f.
While the unit is on, if the battery is low, the LED
indicators
will blink quickly and turn off.
Charging Battery
This device uses a built-in battery. Before using it,
fully charge the battery using a USB cable (Type C) or
adapter, (Refer to image below).

15
Battery charging time: 2.5 hours
, Charging time may vary depending on the type of
adapter and charging environment.
Checking the charging status with LED indicators
on
front of Pocket Photo.
y
:
Power-off
: Charging : Full charge
y
0 % : Blinks quickly and turns off.
y
LG Pocket Photo is always charged when connected
to the power supply except when printing.
y
To charge this product, you must always use
a DC 5 V, 1.2A or more. Certied/Listed Adapter
which complies with LPS.
y
Handle with care during charging to prevent
electric shock.
y
Do not place near heating appliance.
y
Do not disassemble or deform.
y
Do not “shock” the Pocket Photo.
y
Avoid too high or low temperature or humidity.
y
The high-speed charging is not supported,
even if you connect the Quick charger of smart
phone and USB cable (USB C type). It works
with normal charge.
>
Caution

16
y
You can connect the device to PC using a
Smart phone USB cable (Type C), but charging
time can be longer.
y
The operating time on battery may vary
depending on the battery status, operational
status and environment conditions.
y
When the battery is discharged, printing is
available after charging it for more than 10
minutes. (Fully charge to print in a row)
,
Note
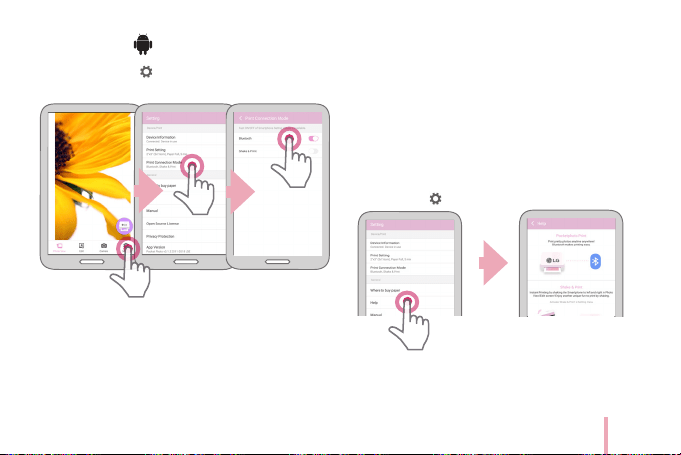
STEP 5 Installing App
Installing App for Android phone
Bluetooth®
From Play Store (Android market)
Search for “LG Pocket Photo”.
Using QR code
You can enter the Play Store (Android Market) by
scanning the QR code on the product box.
17
App Setting
Bluetooth®
Set the options in [
Setting
] / [Print Connection
Mode].
y
Bluetooth: When you turn on Bluetooth in the
Pocket Photo app, the Bluetooth on your Android
phone turns on.
y
Shake & Print: When you turn on Shake & Print
mode, select the desired photo from the main
screen of the Pocket Photo app and then shake your
smartphone to print.
See “Help” for details
For more information about the App, touch
[Help] on the [
Setting
].
18
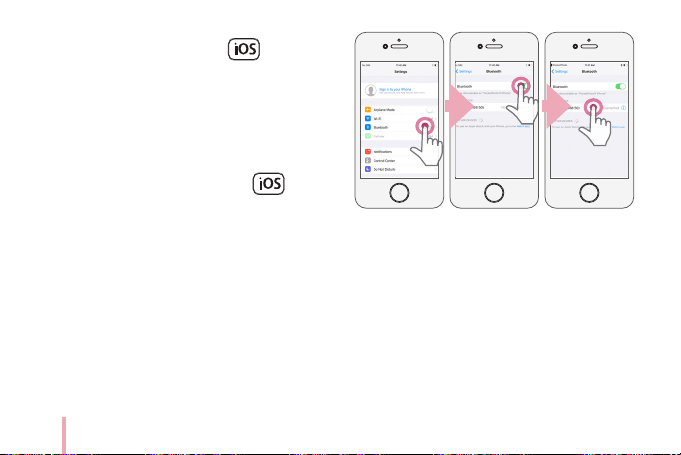
Installing App for iPhone
From App Store
Search for “LG Pocket Photo”.
Using QR code
You can enter the App Store by scanning the QR code
on the product box.
Setting Bluetooth of iPhone
1. On your iPhone’s home screen, touch [Settings].
2. Touch “Bluetooth” and touch the slider to turn
Bluetooth [On].
3. To connect your Pocket Photo device to the iPhone,
turn on your device and make sure it is discoverable
mode.
4. When you nd the device, touch the model name of
Pocket Photo on the screen.
19
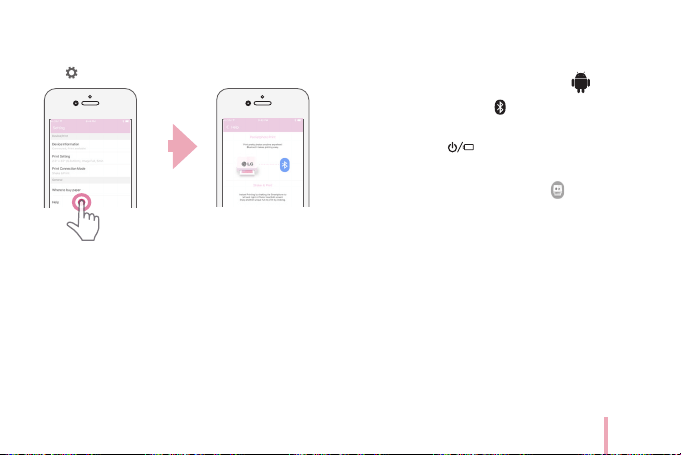
See “Help” for details
For more information about the App, touch [Help] on
the [
Setting
].
STEP 6 Printing Photo
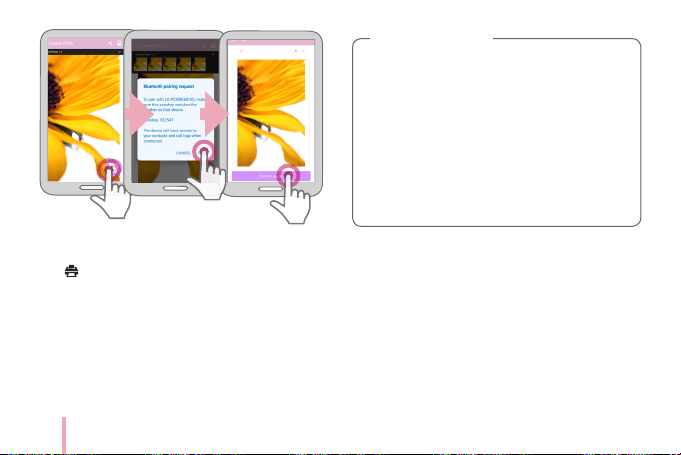
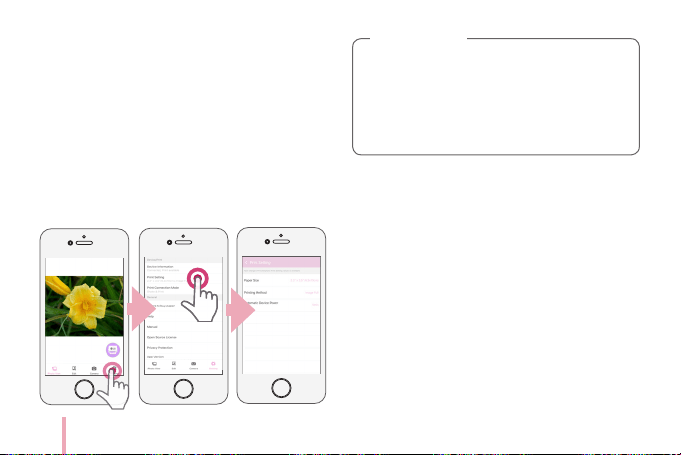
Printing using Android phone
Bluetooth®
Printing using Bluetooth (
Bluetooth®
)
Preparation: Turn the device on, and start printing with
the LED indicator
turning on.
1. Run LG Pocket Photo App on Android phone.
2. Select a photo to print, and touch [ ] (Print) on
Pocket Photo App.
3. [Device Connection] window appears. Touch
[CONNECT THE DEVICE], then it will start searching
for Bluetooth devices.
4.
When you select a connectable device, the [Bluetooth
Paring request] window appears. If you select [PAIR],
the print preview screen appears.
5. Touch [Print the photo] on the print window.
y
To print, set print mode or the number of photo
on the preview screen.
20
6. If you want to print a photo you took again, press
[ ] (Reprint) button on the top of Pocket Photo.
y
Check the power of the Pocket Photo, when
your device can not search for Bluetooth device.
y
A photo le of less than 10 MB can be printed
in case of Android.
y
Setting screen may differ depending on the
phone manufacturer.
y
When connecting to the other company’s
smartphone, some functions may be limited
depending on conditions.
>
Caution
21
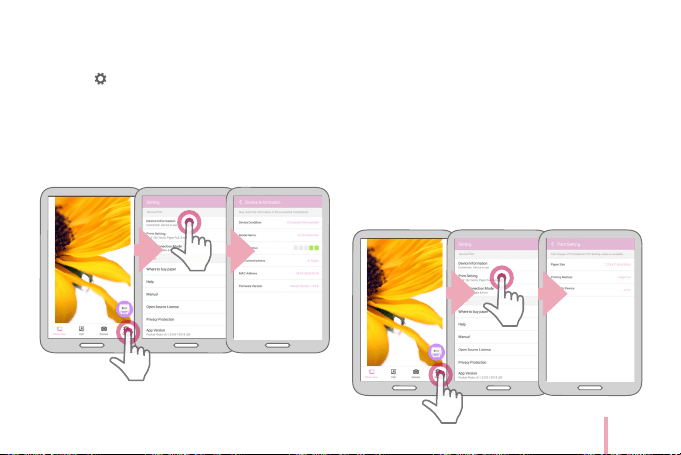
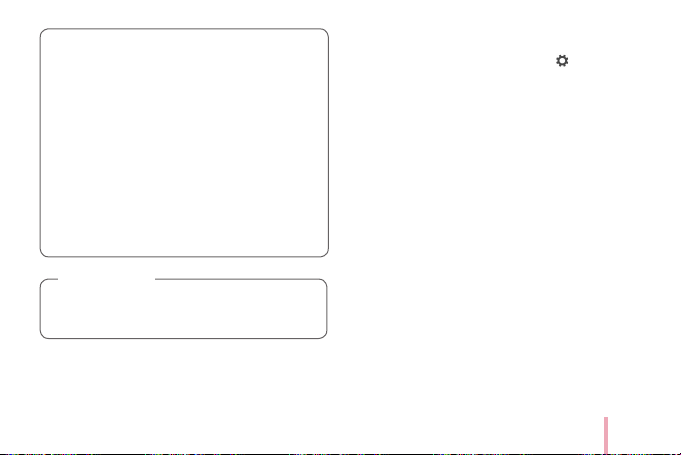
Setting Pocket Photo App of Android phone
1. Run LG Pocket Photo App on Android phone.
2. Go to [
Setting]
.
(To check [Device information], set the smartphone
Bluetooth to [On]) in the [Print Connection Mode]).
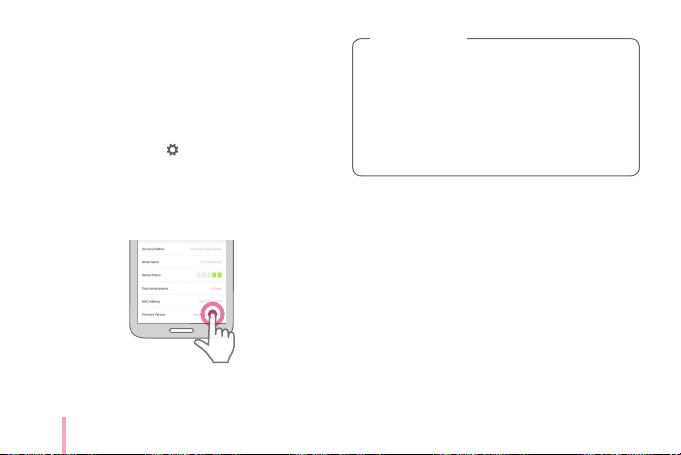
3. Touch [Device Information].
You can check device condition, battery status, total
printed photos, MAC address and rmware version.
You can change setting of printing method and
Automatic device power off in [Print setting].
y
Printing Method: You can set the printing method of
photo.
- Paper Full: Prints without white space. (The edge
of the image may be cut off.)
- Image Full: Prints an image as a whole. (White
space may occur at the edge of the paper.)
y
Automatic Device Power Off: Set a time so that
the device turns itself off. (Default is [5 minutes],
Example: 3 minutes, 5 minutes, 10 minutes)
22
y
If you change the time of Automatic Device
Power Off, the maximum number of prints can
be changed due to battery consumption.
y
It is recommended to keep the default settings
of the device.
,
Note
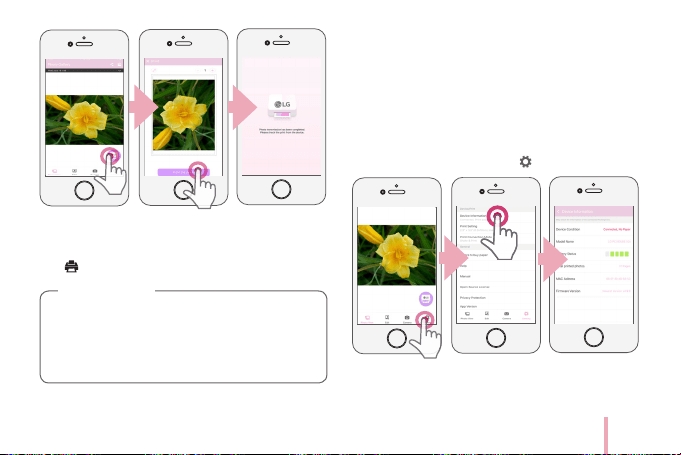
Printing using iPhone
Printing using Bluetooth (
Bluetooth®
)
Preparation: Turn the device on, and start printing with
the LED indicator turning on.
1. Run LG Pocket Photo App on iPhone.
2. Select a photo to print, and touch [ ] (Print) on
Pocket Photo App.
3. Touch [Print the photo] on the print window.
y
To print, set print mode or the number of photo
on the preview screen.
y
If Bluetooth is not connected, “Paired device
not found” message will appear. (Refer to the
Bluetooth setting for iPhone).
23
4. If you want to print a photo you took again, press
[ ] (Reprint) button on the top of Pocket Photo.
In case of iPhone/iPad/iPod, the last paired
iPhone/iPad/iPod is paired to PocketPhoto
automatically when you turn on PocketPhoto if
the Bluetooth on your iPhone/iPad/iPod is on.
,
Note
Setting iPhone Pocket Photo App
You can check device condition, battery status, total
printed photos, MAC address and rmware version.
1. Run LG Pocket Photo App on iPhone.
(To check [Device information], set the iPhone
Bluetooth to [On]).
2. You can check the device information by touching
[Device Information] on the [
Setting
]
24
You can change the settings for the printing method
and Automatic device power off in [Print setting].
y
Printing Method: You can set the printing method of
photo.
- Paper Full: Prints without white space. (The edge
of the image may be cut off.)
- Image Full: Prints an image as a whole. (White
space may occur at the edge of the paper.)
y
Automatic Device Power Off: Set a time so that
the device turns itself off. (Default is [5 minutes],
Example: 3 minutes, 5 minutes, 10 minutes)
y
If you change the time of Automatic Device
Power Off, the maximum number of prints can
be changed due to battery consumption.
y
It is recommended to keep the default settings
of the device.
,
Note

25
Using the edit mode
You can use the editing functions of the Pocket Photo
app to decorate your pictures with text, brushes
(drawing tools), frames, and more.
You can also calibrate your photos through various
lter modes.
If you want to change the text of a photo in the
editing function, the font applied is the same as
when you change the font of your smartphone.
(The Pocket Photo app does not support font
changes.)
,
Note
Notes on the printing
y
The printed image may differ from the original
image due to the printing method (Dye-sublimation
method).
y
Use the latest App of LG Pocket Photo, (when
printing a photo), it will make a better optimized
image.
y
The higher the resolution of an image, the printed
photo will have a higher quality. (The proper
resolution is more than 2560 x 1920 pixel).
y
Once the battery is fully charged, you can print 30
papers in a row.
y
The prints are based on ISO 24712 Color image
standard and the number of photos printed may vary
depending on user enviromental conditions (time,
temperature, humidity or printing method).
*ISO 24712 is the color standard regulated by ISO.
y
If there are more than one LG Pocket Photo device,
check the MAC address on the label to choose the
one you want to use. (Refer to “Checking Label”).

26
y
The Bluetooth searching and transferring may fail
depending on its environment. Check the Bluetooth
condition on your phone and try again.
y
If pairing multiple smartphones, re-pairing may occur.
y
If you print continuously, the print time may be
delayed. (takes about 1-2 minutes)
- Print time may vary depending on the
surrounding environment.
y
Only the last photo taken with the camera or printed
with the app can be reprinted. When the power is
turned off or reset, the reprint function is disabled.
y
If you do not have photo paper while you are
transferring photos through the Pocket Photo app,
you can print the photo by pressing the reprint
button after replacing the photo cartridge.
y
Do not pull paper out by force during printing.
y
Do not open the cover during printing or do
not print the photo, when cover is opened. It
may cause damage of Pocket Photo.
y
Do not place an object in front of the Paper
exit slot.
y
If the device is vibrated or given shock, the
quality of the printed photo may be reduced.
y
Pocket Photo APP’s resolution is optimized in
1440 x 2560 Pixels (Android device) and 750
x 1334(iOS) Pixels.
>
Caution
27
y
The printing quality may differ depending on
the original image (When too dark or dim).
Use the image after correcting it using Pocket
Photo App.
y
During the print cycle, the photo paper will
repeatedly come out and go back in about 5
times through the ejection port. Please wait
and do not pull out the photo by hand until
it is nally released, (printing complete).
y
If you want to print photos continuously, you
can remove the printed paper manually to print
the next photo.
When pressing the power button during printing,
the power is turned off after the paper is ejected.
,
Note
Checking where to buy paper
1. To check where to buy paper, go to [ setting].
2. After touching [Where to buy paper], select a
country.
28
Updating the device
You can update the device by pairing smart phone to
the latest software to enhance the products operation
and /or add new features.
1. Connect the device and smart phone via Bluetooth.
2. Run the Pocket Photo App and then, touch [Device
information] on the [ setting].
3. The current version and higher version are shown if
new version is existed.
4. When [N] mark appears, Touch [Firmware Version]
to update the device.
y
During the device update procedure, do not
turn off the power or press Reset button.
y
This device cannot be updated to previous
version.
y
If there is no higher version, the Message [This
is the lastest version.] appears.
,
Note
29
STEP 7 Taking photos and
instant printing
Taking photos
1. Press (power) button for 2 seconds to turn on.
2. Open the lens cover by lowering the lens cover
switch.
If the lens cover is closed, you can’t take a photo.
,
Note
3. Hold the Pocket Photo, conrm the desired
composition of the nal image by using view nder.
(It is recommended that you use the viewnder
eyepiece within 10 mm. (0.39 inches))
Optimal distance for taking photo is approximately
between 0.5 m and 1.5m. (1.64 ft ~ 4.92 ft)
The subject may shake when taking pictures. Hold
your elbows at your body when taking photos.
30
Shutter
View nder
(Reprint) button
4. To take a photo, press Shutter button for 2 seconds.
Then the Pocket Photo prints a photo you took with
a shutter sound.
※
When you are in a dark area, the ash may turn on
when taking photos.
5. If you want to print a photo you took again, press
[ ] (Reprint) button on the top of Pocket Photo.
y
Be careful not to touch the lens surface when
you take the photo.
y
Use a blower, cotton bud or soft cloth to
remove dirt on the lens or view nder.
y
Do not interrupt the ash, lens or paper exit
slot with nger or strap.
y
Do not take the photos where ash
photography is forbidden.
y
Do not look through the view nder at the sun
or other strong light.
y
Close the lens cover when the Pocket Photo is
not in use to protect the lens.
Note on taking photo
y
Do not leave the view nder in places exposed
to strong sunlight. Personal injury or re
could result if the lens should accidentally
concentrate the sunbeams on an object or a
person.

31
y
Only the last photo shot with the camera or
the last printed image with the app can be
reprinted. You can not use reprint function
when the power is turned off or reset.
y
During the print cycle, the photo paper will
repeatedly come out and go back in about 5
times through the ejection port. Please wait
and do not pull out the photo by hand until
it is nally released, (printing complete).
y
The ash has an effective range of between
0.7 m and 1.8 m. (2.3 ft ~ 5.91 ft)
,
Note
y
The subject will be out of focus if the distance
is less than 0.5 m. (1.64 ft)
y
Keep your eyes close to the viewnder when
taking photos.
y
When shooting with the camera the shooting
range of images viewed with the viewnder
and the images printed after shooting may
differ.
y
The quality of the photos printed with the
camera and the photos printed with the
Pocket Photo app may be different.
,
Note
32
Printing black-and-white photo
If you switch your Pocket Photo to black-and-white
shooting mode, you can print the photo in black and
white when taking photos.
1. Press (power) button to turn on.
2. Close the lens cover by raising the lens cover switch.
y
You can not switch to black-and-white
shooting mode, if you do not have a photo
cartridge in Pocket Photo. And you can not
switch to black-and-white shooting mode
while printing.
y
You can not switch to black-and-white
shooting mode, if error occurs in Pocket Photo.
y
When Pocket Photo is turned off and on, the
black-and-white shooting mode is maintained.
>
Caution
33
3. Press Shutter button for 5 seconds. The
LED
will light up in white and switch to black-and-white
shooting mode.
4. Open the lens cover by lowering the lens cover
switch.
5. When you take a photo, black and white photos are
printed through Pocket Photo.
6. When you change to the color shooting mode, close
the lens cover by raising the lens cover switch, and
then press the shutter button for 5 seconds.
LED turns off and changes to color mode.
y
When printing via the Pocket Photo app, the
camera prints in color even if it is set to black-
and-white shooting mode.
y
After switching to black-and-white shooting
mode, Black-and-white shooting mode is
still operated even when the Pocket Photo is
turned off and on.
,
Note
34
Using a strap
Wind (Attach) the strap as shown in the below image
to prevent dropping the Pocket Photo when you are
carrying it or when taking a photo.
y
Wind the strap around your wrist, never wrap
around your neck.
y
Use caution not to block paper exit slot with
the strap.
y
It is recommended to use the supplied strap
only.
,
Note
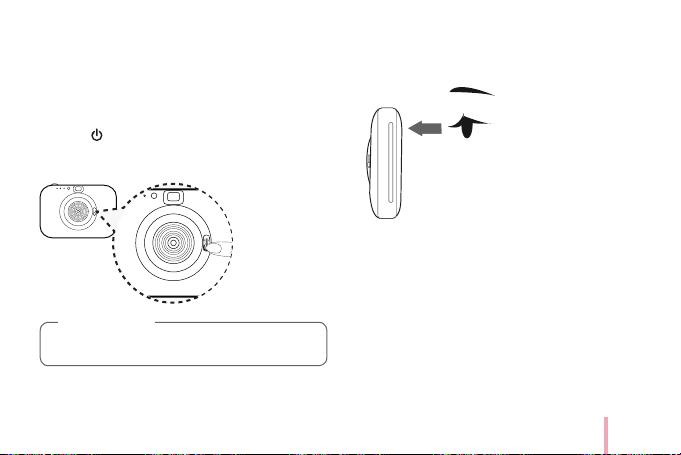
Checking Label
In case there are more than a LG Pocket Photo device,
check MAC address on the product label to choose one
you want to use.
1. Slide the cover button sideways to open the bottom
cover.
35
2. You can nd the product label.
Product label.
About LED Indicator
The LED indicators shows the device condition.
: LED On
: LED Blinks
: LED Off
Section LED color Condition Description
Power
프린트 대기/
켜짐
(흰색)
전원 꺼짐
충전 중
충전 완료
전원을 켤때/
깜박임
(흰색)
off
To print, turn
on the device.
프린트 대기/
켜짐
(흰색)
전원 꺼짐
충전 중
충전 완료
전원을 켤때/
깜박임
(흰색)
Turning on/
Blinks
Blinks until
ready after
turning on.
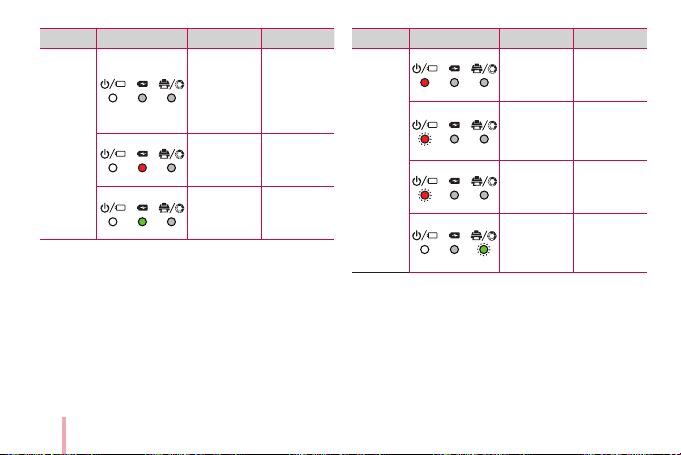
36
Section LED color Condition Description
Power
프린트 대기/
켜짐
(흰색)
전원 꺼짐
충전 중
충전 완료
전원을 켤때/
깜박임
(흰색)
Waiting/
On
Waits for
printing. Device
turns itself
off, if it is left
unused for a
while.
프린트 대기/
켜짐
(흰색)
전원 꺼짐
충전 중
충전 완료
전원을 켤때/
깜박임
(흰색)
Charging
Battery is
charging
프린트 대기/
켜짐
(흰색)
전원 꺼짐
충전 중
충전 완료
전원을 켤때/
깜박임
(흰색)
Full charge
Battery is fully
charged.
Section LED color Condition Description
Normal
operation
배터리 30%
이상(흰색)/
5장 이상 출력
가능
배터리 30%
미만
프린트 불가
(3회 깜박임)
배터리 부족
=>확인 후
삭제
인쇄 준비
업데이트
프로그램
읽는 중
인쇄 중
Charge the
battery/On
Remaining
battery is less
than 30%
배터리 30%
이상(흰색)/
5장 이상 출력
가능
배터리 30%
미만
프린트 불가
(3회 깜박임)
배터리 부족
=>확인 후
삭제
인쇄 준비
업데이트
프로그램
읽는 중
인쇄 중
Charge the
battery/ Blinks
quickly and
turn off.
To print, charge
the device.
배터리 30%
이상(흰색)/
5장 이상 출력
가능
배터리 30%
미만
프린트 불가
(3회 깜박임)
배터리 부족
=>확인 후
삭제
인쇄 준비
업데이트
프로그램
읽는 중
인쇄 중
Ready to turn
off/Blinks
quicky
Automatic
Device Power
Off is set.
배터리 30%
이상(흰색)/
5장 이상 출력
가능
배터리 30%
미만
프린트 불가
(3회 깜박임)
배터리 부족
=>확인 후
삭제
인쇄 준비
업데이트
프로그램
읽는 중
인쇄 중
Ready to
printing,
Cooling mode/
Blinks
Transferring
data via
Bluetooth or
Printing
37
Section LED color Condition Description
Normal
operation
배터리 30%
이상(흰색)/
5장 이상 출력
가능
배터리 30%
미만
프린트 불가
(3회 깜박임)
배터리 부족
=>확인 후
삭제
인쇄 준비
업데이트
프로그램
읽는 중
인쇄 중
Printing/On
Printing
(While
continuous
printing,
battery
temperature
is overheated.
Wait for a
while.)
Continuous
printing
during
charging /
Blinks
(Red
Green)
While
continuous
printing, the
temperature
inside the
Pocket Photo
will rise. At
this time,
charging is
temporarily
stopped to
protect the
battery, and
the LED
flashes.
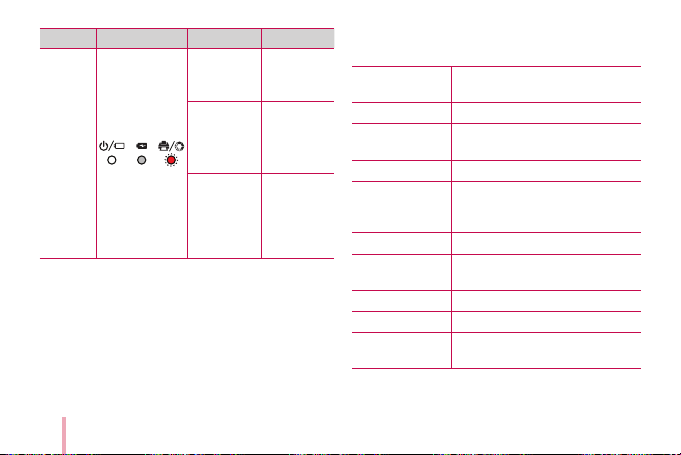
Section LED color Condition Description
Normal
operation
흑백모드
black-and-
white shooting
mode /
On
When you take
a photo, black
and white
photos are
printed.
리프린트할
출력물 없음
(3회)
리프린트할
출력물 없음
(3회)
고온/저온
(사용자 해결
불가)
업데이트
용지 부족
커버 열림
용지 걸림
에러
Updating /
Blinks
Data is
downloaded
and installed.
When update
is complete,
LED is turned
off.
Error
리프린트할
출력물 없음
(3회)
리프린트할
출력물 없음
(3회)
고온/저온
(사용자 해결
불가)
업데이트
용지 부족
커버 열림
용지 걸림
에러
High, Low
temperature/
On
Raise or lower
the ambient
temperature
then try again
in a while.
38
Section LED color Condition Description
Error
리프린트할
출력물 없음
(3회)
리프린트할
출력물 없음
(3회)
고온/저온
(사용자 해결
불가)
업데이트
용지 부족
커버 열림
용지 걸림
에러
No paper,
Paper jam/
Blinks
Insert the
photo cartridge
then try again.
Closed the lens
cover/ Blinks
Turn down
the lens cover
switch when
you take a
photo.
Reprint button
is disabled./
Blinks
You will need
to print at least
one photo
after turning
on the Pocket
Photo.
Specications
Paper size
63 mm x 94 mm (2.5 inches x
3.7 inches)
Image Sensor CMOS
Resolution
(Print)
310 dpi
Camera pixels Approx. 5 mega-pixels
View Angle
Diagonal 81 °
(Horizontal 68.5 °
/ Vertical 54 °)
Shutter Electronic shutter
View nder
Optical virtual image viewnder,
1G 2P
Shooting range 0.5 m (1.64 ft) or more
Shutter Speed Auto
Exposure
Control
Auto

39
Paper Feeding
Out
Automatic
Flash Auto (White LED)
Image le type/
size
PNG, JPEG (Baseline) / less than
10 MB (Progressive JPEG is not
supported.)
Media paper
used
Dye-sublimation photo paper
(exclusive for Pocket Photo)
Media paper
storage
environment
Temperature : 0 - 35 °C
(32 °F - 95 °F)
Humidity : 30 - 85 % RH
Device operation
environment
Temperature : 5 - 35 °C
(41 °F - 95 °F)
Humidity : less than 80 %
Optimum print
environment
Temperature : 10 - 32 °C
(50 °F - 89.6 °F)
Humidity : less than 80 %
LED indicator
Power / Waiting / Bluetooth
transmitting / Charging / Error
/ Condition of printer/ Update /
Black-and-White shooting mode
setting
Communication
Bluetooth 4.0
External
connector
USB-C port for charging battery
Bus Power
Supply (USB)
(Adapter) DC 5 V 0 1.2 A
Battery capacity
1,000 mAh Lithium-ion
rechargeable battery
Photo resolution More than 2,560 x 1,920 pixels
Dimensions
(W x H x D)
Approx.
152 mm x 108 mm x
36 mm (6 inches x 4.3 inches x
1.4 inches)
Pocket Photo
App supporting
version
y
Android v4.4 or higher
y
iOS v9.0 or higher

40
y
Your phone may be incompatible with the device
depending on its manufacturer, environment or
(Android or iOS) operating system.
y
Design and specications are subject to change
without prior notice.
y
All other product and brand names are trademarks
or registered trademarks of their respective owners.
Troubleshooting
Symptom Cause / Solution
No power The battery is discharged.
Be sure the device is connected
to charger or PC properly when
charging.
Bluetooth paring
does not work well.
Switch Bluetooth off and on
again on your smartphone,
then pair with the device in the
smartphone’s settings.
Turn on the device and try
pairing again in 5 seconds.
Be sure the device is on.

41
The paper is
jammed before
printing.
1. Turn the device off and on
again then the paper will be
ejected automatically.
2. If above solution does not
work, open the cover. Then
insert the photo cartridge
again.
At rst remove the photo
cartridge, and then gently
pull the remaining photo
paper out of the Insertion
part of Photo cartridge. At
this time, be careful not
to touch the inside of the
Insertion part of Photo
cartridge.
The paper is
jammed during
printing.
The printed photo
has lines.
If there are foreign substance
or dust on the inside of
the Insertion part of Photo
cartridge (print head), printed
photo may has lines.
In that case, wipe the foreign
substance off using the head
of a cotton bud or a soft cloth
and then try again. Clean the
part indicated in the following
picture.
No or incomplete
image is printed.
The edge of the
image on the photo
is cut off.
Set Print mode to [Image Full]
in the App’s setting then the
image is printed as a whole.

42
White space
appears at the edge
of the paper.
When print mode is set to
[Image Full] , white space may
appear if the aspect ratio of
the paper and your image is not
the same.
When print mode is set to
[
Paper Full
] , the edge of the
image can be cut off or white
space at the edge of the paper
may appear.
Quality of printed
photo is too low.
In case you magnify an image
using [ ] menu in the App,
the quality of the printed photo
may be reduced.
Turn off the Pocket Photo and
insert the new photo cartridge.
Be sure the photo size is bigger
than the proper resolution.
(2560 x 1920 pixels)
If you use another company’s
photo paper, print quality
cannot be guaranteed or it
could cause damage to the
Pocket Photo.
Device does not
print.
Preheating is needed. Wait for
about 2 minutes.
Be sure there are photo papers
in the device.
It may take time to print a
photo.
Be sure the photo le is less
than 10 MB.
Only baseline JPEG, PNG
(Max: 1350x1050) format is
supported.
Device is turned off
automatically.
Check [Automatic Device Power
Off] time in the App’s setting.
Above solutions do
not work.
Press Reset hole with a pointed
thing like mechanical pencil to
initialize.

43
The printed
photo is out of
focus by taking
photo.
Take a photo with a distance of at
least 0.5 m (1.64 ft) between you
and your subject.
Clean the lens.
When you take a photo, press the
shutter button slowly after holding
the Pocket Photo with both hands.
Also hold your elbows close to
your body.
The picture is
blurred.
Do not press onto or fold the photo
paper.
Do not block the paper exit slot
with your nger.
The photo you
printed is too
dark by taking
photo.
Keep a distance from the subject
of at least 0.5 m (1.64 ft). Optimal
distance for taking photo is
approximately 1.5m (4.92 ft).
Take a photo with the light behind
you.
The printed
photo is
different from
the image
viewed through
the viewnder.
Keep your eyes close to the
viewnder when taking photos.
Then conrm the desired
composition of the image and
takin a photo. (Viewnder eyepiece
distance: 10 mm (0.39 inches))
44
Paper Jam Solution
Do not pull the paper out. Turn the device off and on
again, the paper will be ejected automatically.
y
If there are foreign substance or dust on the inside
of the Insertion part of Photo cartridge (print head),
printed photo may has lines.
In that case, wipe the foreign substance off using
the head of a cotton bud or a soft cloth and then try
again. Refer to “Troubleshooting” to clean the part.
y
At rst remove the photo cartridge, and then gently
pull the remaining photo paper out of the Insertion
part of Photo cartridge. At this time, be careful not
to touch the inside of the Insertion part of Photo
cartridge.
y
If this problem is not solved, please refer to
“Troubleshooting”.
Paper Jam Solution
1. Slide the cover button sideways to open the bottom
cover and then remove the photo cartridge.
45
2. Gently pull the remaining photo paper out of the
Insertion part of Photo cartridge.