–
User Manual
Toaster
Manual de Instrucciones
Tostadora
Manuel d’Instructions
Grille-pain
P.N. 140495
Visit us at www.oster.com
TSSTRT2SST
TSSTRT4SST
MODELS/MODÈ LES
MODELOS
English-1
IMPORTANT SAFEGUARDS
When using your toaster, basic safety precautions should always be followed, including the following:
READ ALL INSTRUCTIONS BEFORE USE
SAVE THESE INSTRUCTION
S
Power Cord Instructions
THIS UNIT IS FOR HOUSEHOLD USE ONLY
Short Power Supply Cord Instructions
– –

English-2
– –
– –
Welcome
Congratulations on your purchase of an OSTER
®
Toaster!
To learn more about OSTER
®
products,
please visit us at www.oster.com.
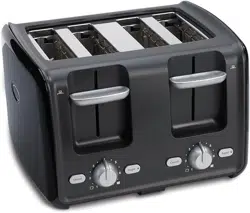
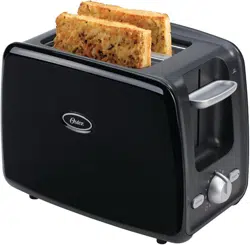
1. Bagel Button with Indicator Light
2. Frozen Button with Indicator Light
3. Lighter/Darker Knob
4. Cancel Button
5. Extra-Wide Bread Slots
6. Stainless Steel Bread Guides
7. Bread Carriage Lever
8. Toast Lift
9. Removable Crumb Tray
10. Retractable Cord Storage
11. Power Cord
5/6
7/8
10/11
3
2
1
4
4
9
3
21

English-3
Learning About Your Toaster
Toast is the default setting if no food or function select buttons are chosen.
1. Bagel Button with Indicator Light – Press this button if you want to toast
a bagel. The indicator will light to confirm that “Bagel” is selected.
2. Frozen Button with Indicator Light – Press this button if your food is frozen.
Use this button in combination with the Bagel, Waffle and Toast buttons.
The toaster will automatically defrost your food and then toast it in
one easy step. The button will light up when pressed.
3. Lighter/Darker Knob – Turn the knob to select how dark you would like your
food toasted; 1 is lightest, 7 is darkest.
4. Cancel Button – Press the cancel button to pop the food out of the bread slots
and stop the toasting process.
5. Extra-Wide Bread Slots – Wide slots (1.3 inches) allow you to toast bagels,
thickly-sliced homemade bread and English muffins.
6. Dual, Auto-Adjusting, Stainless Steel Bread Guides – Automatically adjust to
bread thickness for even toasting.
7. Bread Carriage Lever – Press to begin toasting your food.
8. Toast Lift – Press up on the bread carriage lever to lift food out of the bread
slots. Convenient and safe way of retrieving the smallest of toasted items.
9. Fully Removable Crumb Tray – For convenient and easy cleanup.
10. Retractable Cord Storage – Allows you to store extra cord in the toaster and
out of the way.
11. Power Cord
Preparing To Use Your Toaster for the First Time
If you are using your toaster for the first time, please be sure to:
1. Remove any stickers from the surface of the toaster and wipe the outside of
your toaster with a damp cloth.
2. Insert the Removable Crumb Tray into the crumb tray slot.
3. Make certain that the Bread Carriage Lever is in the uppermost position
before plugging in the toaster’s power cord.
4. Select a location for the toaster. The location should be:
the toaster.
5. Plug the Power Cord into 120 Volt, 60 Hz AC outlet.
6. Without inserting any food into the bread slots, push the Bread Lever all
the way down until it locks. (The carriage will not lock if the toaster is not
plugged into a power source.) The first toasting process will preheat the new
elements and burn off any dust which may have accumulated during storage
or manufacturing. It is normal for this burn off to create an odor. Your
OSTER
®
Toaster is now ready for use.
– –
– –
English-4
Adjusting the Power Cord length
Your toaster’s Retractable Cord Storage area allows you to adjust the length of
the Power Cord so that it is the exact length you desire when controls are off
and unit is unplugged and cool.
1. When retracting the cord, hold the plug with one hand and push the button to
retract cord.
2. The cord reel is compact for multi-layer retracting of the cord. In case cord is
not fully rewound, pull out the cord and steer cord evenly on the reel.
3. In case the cord is not pulled out easily, pull cord firmly.
4. Do not allow children to use retractable cord feature as the cord may cause
injury.
Using Your Toaster
Inserting the food into the bread slots and toasting:
Now you are ready to insert your food into the bread slots. Keep the following
tips in mind when inserting your food:
thickly sliced breads, English muffins, etc. Slices should not, however, be so
thick as to jam the bread slots.
freshness to ensure even toasting.
slot.
slot.
After you insert the food into the bread slots:
1. Choose between the Food Select Features or other Functions. If no food or
function is chosen, Toast is the default setting.
2. Select the desired darkness setting by turning the Lighter/Darker knob.
3. Press the Bread Carriage Lever down until it locks.
The Auto-Adjusting Bread Guides will automatically center the food for even
browning.
Tip: Your toaster has been designed for optimum toast balance. Some
elements on the inside of the toaster may glow more brightly than others
when in use. This is part of normal toaster operation.
After the desired level of darkness has been reached, the food will pop up
automatically. The Bread Carriage Lever will return to its original position
and the indicator lights will turn off.
4. Carefully remove the toasted food from the bread slots.
WARNING: Toasted food can be very hot. Handle with care.
Tip: To remove food jammed in the bread slots, unplug the toaster and
remove the food once the toaster has cooled down.
WARNING: Never insert your fingers or metallic utensils into the bread slots.
– –
– –

English-5
Using the Food Select Feature (Bagel, Waffle)
.
Using the Frozen Food Function
Your toaster can defrost your frozen food and then toast it. Now you can
take a frozen bagel out of the freezer and defrost and toast it – all in your
toaster – all in one easy step.
To defrost and toast your food:
1. Place food into the Bread Carriage.
2. Press the Frozen button if the food is frozen, then select your food type by
pressing the appropriate button. If no food is selected the toaster will operate
in Toast mode.
3. Select the desired darkness setting by turning the Lighter/Darker knob.
4. Press the Bread Carriage Lever.
Using the Cancel Function
To cancel the toast process:
Press the Cancel button. The toaster will stop toasting immediately and the
food will pop up automatically.
Cleaning Your Toaster
1. Unplug and allow the toaster to cool.
2. Once cool, wipe the outside of your toaster with a damp cloth.
– –
– –

– –
English-6
1 Year Limited Warranty
Sunbeam Products, Inc. doing business as Jarden Consumer Solutions or if in Canada, Sunbeam
Corporation (Canada) Limited doing business as Jarden Consumer Solutions (collectively “JCS”)
warrants that for a period of one year from the date of purchase, this product will be free from
defects in material and workmanship. JCS, at its option, will repair or replace this product or any
component of the product found to be defective during the warranty period. Replacement will be
made with a new or remanufactured product or component. If the product is no longer available,
replacement may be made with a similar product of equal or greater value. This is your exclusive
warranty. Do NOT attempt to repair or adjust any electrical or mechanical functions on this product.
Doing so will void this warranty.
This warranty is valid for the original retail purchaser from the date of initial retail purchase and
is not transferable. Keep the original sales receipt. Proof of purchase is required to obtain warranty
performance. JCS dealers, service centers, or retail stores selling JCS products do not have the right to
alter, modify or any way change the terms and conditions of this warranty.
This warranty does not cover normal wear of parts or damage resulting from any of the following:
negligent use or misuse of the product, use on improper voltage or current, use contrary to the
operating instructions, disassembly, repair or alteration by anyone other than JCS or an authorized
JCS service center. Further, the warranty does not cover: Acts of God, such as fire, flood, hurricanes
and tornadoes.
What are the limits on JCS’s Liability?
JCS shall not be liable for any incidental or consequential damages caused by the breach of any
express, implied or statutory warranty or condition.
Except to the extent prohibited by applicable law, any implied warranty or condition of
merchantability or fitness for a particular purpose is limited in duration to the duration of the above
warranty.
JCS disclaims all other warranties, conditions or representations, express, implied, statutory or
otherwise.
JCS shall not be liable for any damages of any kind resulting from the purchase, use or misuse of, or
inability to use the product including incidental, special, consequential or similar damages or loss of
profits, or for any breach of contract, fundamental or otherwise, or for any claim brought against
purchaser by any other party.
Some provinces, states or jurisdictions do not allow the exclusion or limitation of incidental or
consequential damages or limitations on how long an implied warranty lasts, so the above limitations
or exclusion may not apply to you.
This warranty gives you specific legal rights, and you may also have other rights that vary from
province to province, state to state or jurisdiction to jurisdiction.
How to Obtain Warranty Service
In the U.S.A.
If you have any question regarding this warranty or would like to obtain warranty service,
please call 1-800-334-0759 and a convenient service center address will be provided to you.
In Canada
If you have any question regarding this warranty or would like to obtain warranty service,
please call 1 800 1-800-667-8623 and a convenient service center address will be provided to
you.
In the U.S.A., this warranty is offered by Sunbeam Products, Inc. doing business as Jarden
Consumer Solutions located in Boca Raton, Florida 33431. In Canada, this warranty is offered
by Sunbeam Corporation (Canada) Limited doing business as Jarden Consumer Solutions,
located at 20 B Hereford Street, Brampton, Ontario L6Y 0M1. If you have any other problem
or claim in connection with this product, please write our Consumer Service Department.
PLEASE DO NOT RET
URN THIS PRODUCT TO ANY OF THESE
ADDRESSES OR TO THE PLACE OF PURCHASE
–
Españ ol-1 Españ ol-3 Españ ol-4
PRECAUCIONES IMPORTANTES
Obedezca siempre las precauciones elementales de seguridad cuando vaya a hacer
uso de su tostadora, incluyendo las siguientes:
LEA TODAS LAS INSTRUCCIONES ANTES DEL USO
–
Españ ol-1 Españ ol-3 Españ ol-4
GUARDE ESTAS INSTRUCCIONES
Instrucciones para el Cordó n de Potencia
ESTA UNIDAD ES SÓ LO PARA
USO DOMÉ STICO
Uso de un Cable Elé ctrico Corto
Españ ol-2
–
–

Españ ol-1 Españ ol-3 Españ ol-4
–
–
Bienvenido
¡Felicitaciones por haber efectuado la compra de una Tostadora OSTER
®
! Para
aprender má s sobre los productos de OSTER
®
, visítenos por favor en www.oster.com.
1. Botón de Rosca “Bagel” con Luz Indicadora
2. Botón de “Frozen” (Congelados) con Luz
Indicadora
3. Selector y Piloto de Tostadora
4. Botón de Cancel (Anulación)
5. Ranuras Extra Anchas
6. Guías para Rebanadas,
Hechas de Acero Inoxidable
7. Mando de Resistencias del Pan
8. Elevador de Tostadas
9. Bandeja para migas, totalmente extraíble
10. Area para guarder el cordón retractable
11. Cordón de Potencia
5/6
7/8
10/11
321
4
4
9
3
21

Españ ol-1 Españ ol-3 Españ ol-4
Conociendo Su Tostadora
Si no se selecciona ningú n botó n de funció n o alimento, el ajuste
predeterminado es “Toast” (Tostar).
1. Botó n de “Bagel” (Rosca) con Luz Indicadora – Presione este botó n si usted
desea tostar un bagel. Se encenderá el indicador para confirmar que se ha
seleccionado “Bagel”.
2. Botó n de “Frozen” (Congelados) con Luz Indicadora – Presione este botó n
si sus alimentos está n congelados. Utilice este botó n conjuntamente con
los botones de “Bagel”, “Waffle” y “Toast”. La tostadora descongelará
automá ticamente sus alimentos y luego los tostará fá cilmente en un solo
paso. El botó n se encenderá al presionarlo.
3. Selector y Piloto de Tostadora – Gire la perilla para seleccionar el grado al
cual le gustaría tostar sus alimentos: el nú mero es el má s ligero, y el nú mera
siete es el má s oscuro.
4. Botó n de Anulació n – Presió nelo para hacer saltar los alimentos
de la tostadora y cancelar el proceso de tostado.
5. Ranuras Extra Anchas – Las ranuras anchas (1.3 pulgadas) le permiten tostar
“bagels”, pan casero y bollitos.
6. Guías para Rebanadas Dobles, Autonivelantes, Hechas de Acero Inoxidable –
Se ajustan automá ticamente al grosor del pan.
7. Mando de Resistencias del Pan – Presió nelo para empezar a tostar sus
alimentos.
8. Elevador de Tostadas – Presione el mando de resistencias del pan para hacer
saltar los alimentos fuera de la tostadora.
9. Bandeja para migas, totalmente extraíble – Para una limpieza conveniente
y fá cil.
10. Area para guardar el cordó n retractable – Le permite guardar el cordó n extra
en la tostadora para que no estorbe.
11. Cordó n de Potencia
–
–
Españ ol-5 Españ ol-8 Français-1 Franç ais-2
–
Prepará ndose para Usar Su Tostadora por Primera Vez
Si va a utilizar su tostadora por primera vez, asegú rese de lo siguiente:
1. Quite cualquier pegatina de la superficie de la tostadora y limpie la carcasa
de su tostadora con un pañ o hú medo.
2. Inserte la bandeja para migas desmontable en la ranura de la bandeja para
migas.
3. Asegú rese de que el mando de resistencias del pan esté en la posició n
superior antes de enchufar el cordó n de potencia de la tostadora.
4. Elija una ubicació n para la tostadora. Dicha ubicació n:
posterior de los mostradores.
o estante que pueden estar sobre de la tostadora.
o los tapizados.
5. Enchufe el cordó n de potencia en un tomacorrientes de 120 voltios,
60 Hz CA.
6. Sin insertar alimento alguno en las ranuras, empuje el mando de pan
completamente hacia abajo hasta engranarlo (las resistencias no quedará n
engranadas si la tostadora no está enchufada a una fuente de potencia).
El primer proceso de tostado precalentará los nuevos elementos y quemará
cualquier polvo que se haya acumulado durante el almacenamiento o
fabricació n. Es perfectamente normal que dicho quemado produzca un
olor.
Su Tostadora OSTER
®
ya se encuentra lista para el uso.
Ajuste de la longitud del cordó n de potencia
El á rea para guarduar el cordó n retractable de su tostadora le permite ajustar
la longitud del cordó n de potencia de tal manera que tenga la longitud
exacta que usted desee, cuando los controles está n apagados y la unidad está
desenchufada y fría.
1. Para retractar el cordó n, sujete el enchufe con una mano y pulse el botó n
para retractar el cordó n.
2. El carrete del cordó n es compacto y permite mú ltiples capas para retractar
el cordó n. En caso de que el cordó n no esté totalmente enrollado, hale el
cordó n y encarrilelo en una manera uniforme en el carrete.
3. En caso de que el cordó n no se pueda halar fá cilmente, há lelo con firmeza.
4. No permita que los niñ os utilicen el cordó n retractable ya que el cordó n
puede causar alguna lesió n.
Uso de la Tostadora
Insertando alimentos en las ranuras y la operació n de tostadora
Ya está listo para insertar alimentos en las ranuras de pan. Tenga los siguientes
consejos en mente durante la inserció n de sus alimentos.
como bagels, bizcochos, rebanadas gruesas de pan, bollitos, waffles, etc.
Sin embargo, las rebanadas no deben ser tan gruesas que queden atascadas
en las ranuras.
Españ ol-6
Españ ol-5 Españ ol-8 Français-1 Franç ais-2
ser del mismo tamañ o y frescura para asegurar una tostadora uniforme.
en el centro de cada ranura.
en el centro de cualquiera de las ranuras.
Despué s de insertar los alimentos en las ranuras:
1. Elija entre las opciones de selecció n de comidas u otras funciones. Si no se
selecciona ninguna opció n de comida o funció n, el modo de tostado es el
ajuste predeterminado.
2. Para seleccionar el nivel de oscuridad que desee, gire la perilla Lighter
(Má s claro)/Darker (Má s oscuro).
3. Presione el mando de resistencias del pan hasta engranarlo.
La guía autoajustable para pan centrará automá ticamente el alimento para
obtener un tostado parejo.
Consejo: Su tostadora ha sido diseñ ado para un equilibro ó ptimo de
tostadora. Algunos de los elementos dentro de la tostadora pueden brillar
con má s intensidad que los otros cuando esté n en uso. Esto es parte del
funcionamiento normal de la tostadora.
Despué s de que el nivel deseado de la oscuridad se haya alcanzado,
el alimento hará estallar para arriba automá ticamente. El mando de
resistencias del pan volverá a su posició n original y las luces de indicador
dará n vuelta apagado.
4. Quite los alimentos tostados cuidadosamente de las ranuras.
ADVERTENCIA: Los alimentos tostados pueden estar sumamente calientes.
Mané jelos con cuidado.
Consejo: Para extraer los alimentos atascados en las ranuras, desenchufe
la tostadora y quite los alimentos una vez que la tostadora se haya
enfriado.
ADVERTENCIA: Jamá s inserte los dedos ni utensilios de metal en las ranuras.
Usando la Característica de Seleccionar de Alimento
(Bagels, Waffles)
Su Tostadora OSTER
®
ajustará el grado de claridad/ oscuridad de sus tostadas
con base en la clase de alimento que vaya a tostar. Debe seleccionar primero
la clase de alimento a tostar para que la tostadora pueda realizar el ajuste
correspondiente.
Para seleccionar el tipo de alimento:
Elija entre las opciones de modos Bagel (bagel) y Waffle (waffle)
predeterminado es Toast (Tostar).
“Bagel” se encenderá . Esta opció n permitirá que la tostadora se ajuste
al tiempo necesario para tostar los bagels segú n el nivel de dorado
seleccionado.
–

Españ ol-5 Españ ol-8 Français-1 Franç ais-2
Uso de la Funció n para “Frozen” (Alimento Congelado)
Su tostadora puede deshelar sus alimentos congelados y tostarlos despué s.
Ahora puede tomar un bagel congelado del congelador, deshelarlo y tostarlo –
todo esto en su tostadora en un solo paso fá cil.
Para deshelar y tostar sus alimentos:
1. Ponga los alimentos en las guías del pan.
2. Presione el botó n de Congelado “Frozen” si la comida está congelada,
luego seleccione su tipo de comida presionando el botó n apropiado. Si no se
selecciona un tipo de alimento, la tostadora funcionará en modo de tostado.
3. Seleccione el grado de tostado deseado girando la perilla Lighter/Darker
(Má s Claro/Má s Oscuro).
4. Presione la palanca de las Guías del Pan.
Cancelando el Proceso de Tostadora
Para cancelar el proceso de tostadora:
Presione el botó n de cancelació n “Cancel”. La tostadora repicará . La tostadora
dejará de tostar inmediatamente y los alimentos saltará n de manera automá tica.
Có mo limpiar su tostadora
1. Desenchú fela y dé jela enfriar.
2. Una vez que esté fría, limpie el exterior de la tostadora con un pañ o
hú medo.
Españ ol-7
–

Españ ol-5 Españ ol-8 Français-1 Franç ais-2
–
–
Garantía Limitada de 1 Añ o
Sunbeam Products, Inc. operando bajo el nombre de Jarden Consumer Solutions, o en Canadá ,
Sunbeam Corporation (Canada) Limited operando bajo el nombre de Jarden Consumer Solutions,
(en forma conjunta, “JCS”), garantiza que por un período de un añ o a partir de la fecha de compra,
este producto estará libre de defectos de materiales y mano de obra. JCS, a su elecció n, reparará o
reemplazará este producto o cualquier componente del mismo que presente defectos durante el período
de garantía. El reemplazo se realizará por un producto o componente nuevo o reparado. Si el producto
ya no estuviera disponible, se lo reemplazará por un producto similar de valor igual o superior. É sta
es su garantía exclusiva. No intente reparar o ajustar ninguna funció n elé ctrica o mecá nica de este
producto. Al hacerlo elimínará é sta garantía.
La garantía es vá lida para el comprador minorista original a partir de la fecha de compra inicial y la
misma no es transferible. Conserve el recibo de compra original. Para solicitar servicio en garantía
se requiere presentar un recibo de compra. Los agentes y centros de servicio de JCS o las tiendas
minoristas que venden productos de JCS no tienen derecho a alterar, modificar ni cambiar de ningú n
otro modo los té rminos y las condiciones de esta garantía.
Esta garantía no cubre el desgaste normal de las piezas ni los dañ os que se produzcan como resultado
de uso negligente o mal uso del producto, uso de voltaje incorrecto o corriente inapropiada, uso
contrario a las instrucciones operativas, y desarme, reparació n o alteració n por parte de un tercero
ajeno a JCS o a un Centro de Servicio autorizado por JCS. Asimismo, la garantía no cubre actos
fortuitos tales como incendios, inundaciones, huracanes y tornados.
¿Cuá l es el límite de responsabilidad de JCS?
JCS no será responsable de dañ os incidentales o emergentes causados por el incumplimiento de alguna
garantía o condició n expresa, implícita o legal.
Excepto en la medida en que lo prohíba la ley aplicable, cualquier garantía o condició n implícita de
comerciabilidad o aptitud para un fin determinado se limita, en cuanto a su duració n, al plazo de la
garantía antes mencionada.
JCS queda exenta de toda otra garantías, condiciones o manifestaciones, expresa, implícita, legal o de
cualquier otra naturaleza.
JCS no será responsable de ningú n tipo de dañ o que resulte de la compra, uso o mal uso del producto,
o por la imposibilidad de usar el producto, incluidos los dañ os incidentales, especiales, emergentes o
similares, o la pé rdida de ganancias, ni de ningú n incumplimiento contractual, sea de una obligació n
esencial o de otra naturaleza, ni de ningú n reclamo iniciado contra el comprador por un tercero.
Algunas provincias, estados o jurisdicciones no permiten la exclusió n o limitació n de los dañ os
incidentales o emergentes ni las limitaciones a la duració n de las garantías implícitas, de modo que es
posible que la exclusió n o las limitaciones antes mencionadas no se apliquen en su caso.
Esta garantía le otorga derechos legales específicos y es posible que usted tenga otros derechos que
varían de un estado, provincia o jurisdicció n a otro.
Có mo solicitar el servicio en garantía
En los Estados Unidos –
Si tiene alguna pregunta sobre esta garantía o desea recibir servicio de garantía, llame al
1-800-334-0759
y podrá obtener la direcció n del centro de servicio que le resulte má s conveniente.
En Canadá –
Si tiene alguna pregunta sobre esta garantía o desea recibir servicio de garantía, llame al
1-800-667-8623 y podrá obtener la direcció n del centro de servicio que le resulte má s conveniente.
En los Estados Unidos, esta garantía es ofrecida por Sunbeam Products, Inc. operando bajo el nombre
de Jarden Consumer Solutions, Boca Rató n, Florida 33431. En Canadá , esta garantía es ofrecida por
Sunbeam Corporation (Canada) Limited operando bajo el nombre de Jarden Consumer Solutions, 20 B
Hereford Street, Brampton, Ontario L6Y 0M1. Si usted tiene otro problema o reclamo en conexió n con
este producto, por favor escriba al Departamento de Servicio al Consumidor.
POR FAVOR NO DEVUELVA ESTE PRODUCTO A NINGUNA
DE ESTAS DIRECCIONES NI AL LUGAR DE COMPRA.
Españ ol-5 Españ ol-8 Français-1 Franç ais-2
PRÉ CAUTIONS
IMPORTANTES
L’utilisation d’un Grille-pain exige certaines précautions fondamentales,
y compris les suivantes:
LISEZ TOUTES LES INSTRUCTIONS
AVANT D’UTILISER L’APPAREIL
–
–

Españ ol-5 Españ ol-8 Français-1 Franç ais-2
CONSERVEZ CES INSTRUCTIONS
Instructions Spé ciales Quant au Cordon
CET APPAREIL EST DESTINÉ À UN
USAGE MÉ NAGER UNIQUEMENT
Utilisation de Corde de Prolongation
–
–
– –
Français-3
Bienvenue
Nous vous fé licitons d’avoir choisi un Grille-pain OSTER
®
!
Pour en savoir plus
sur les produits OSTER
®
www.oster.com.
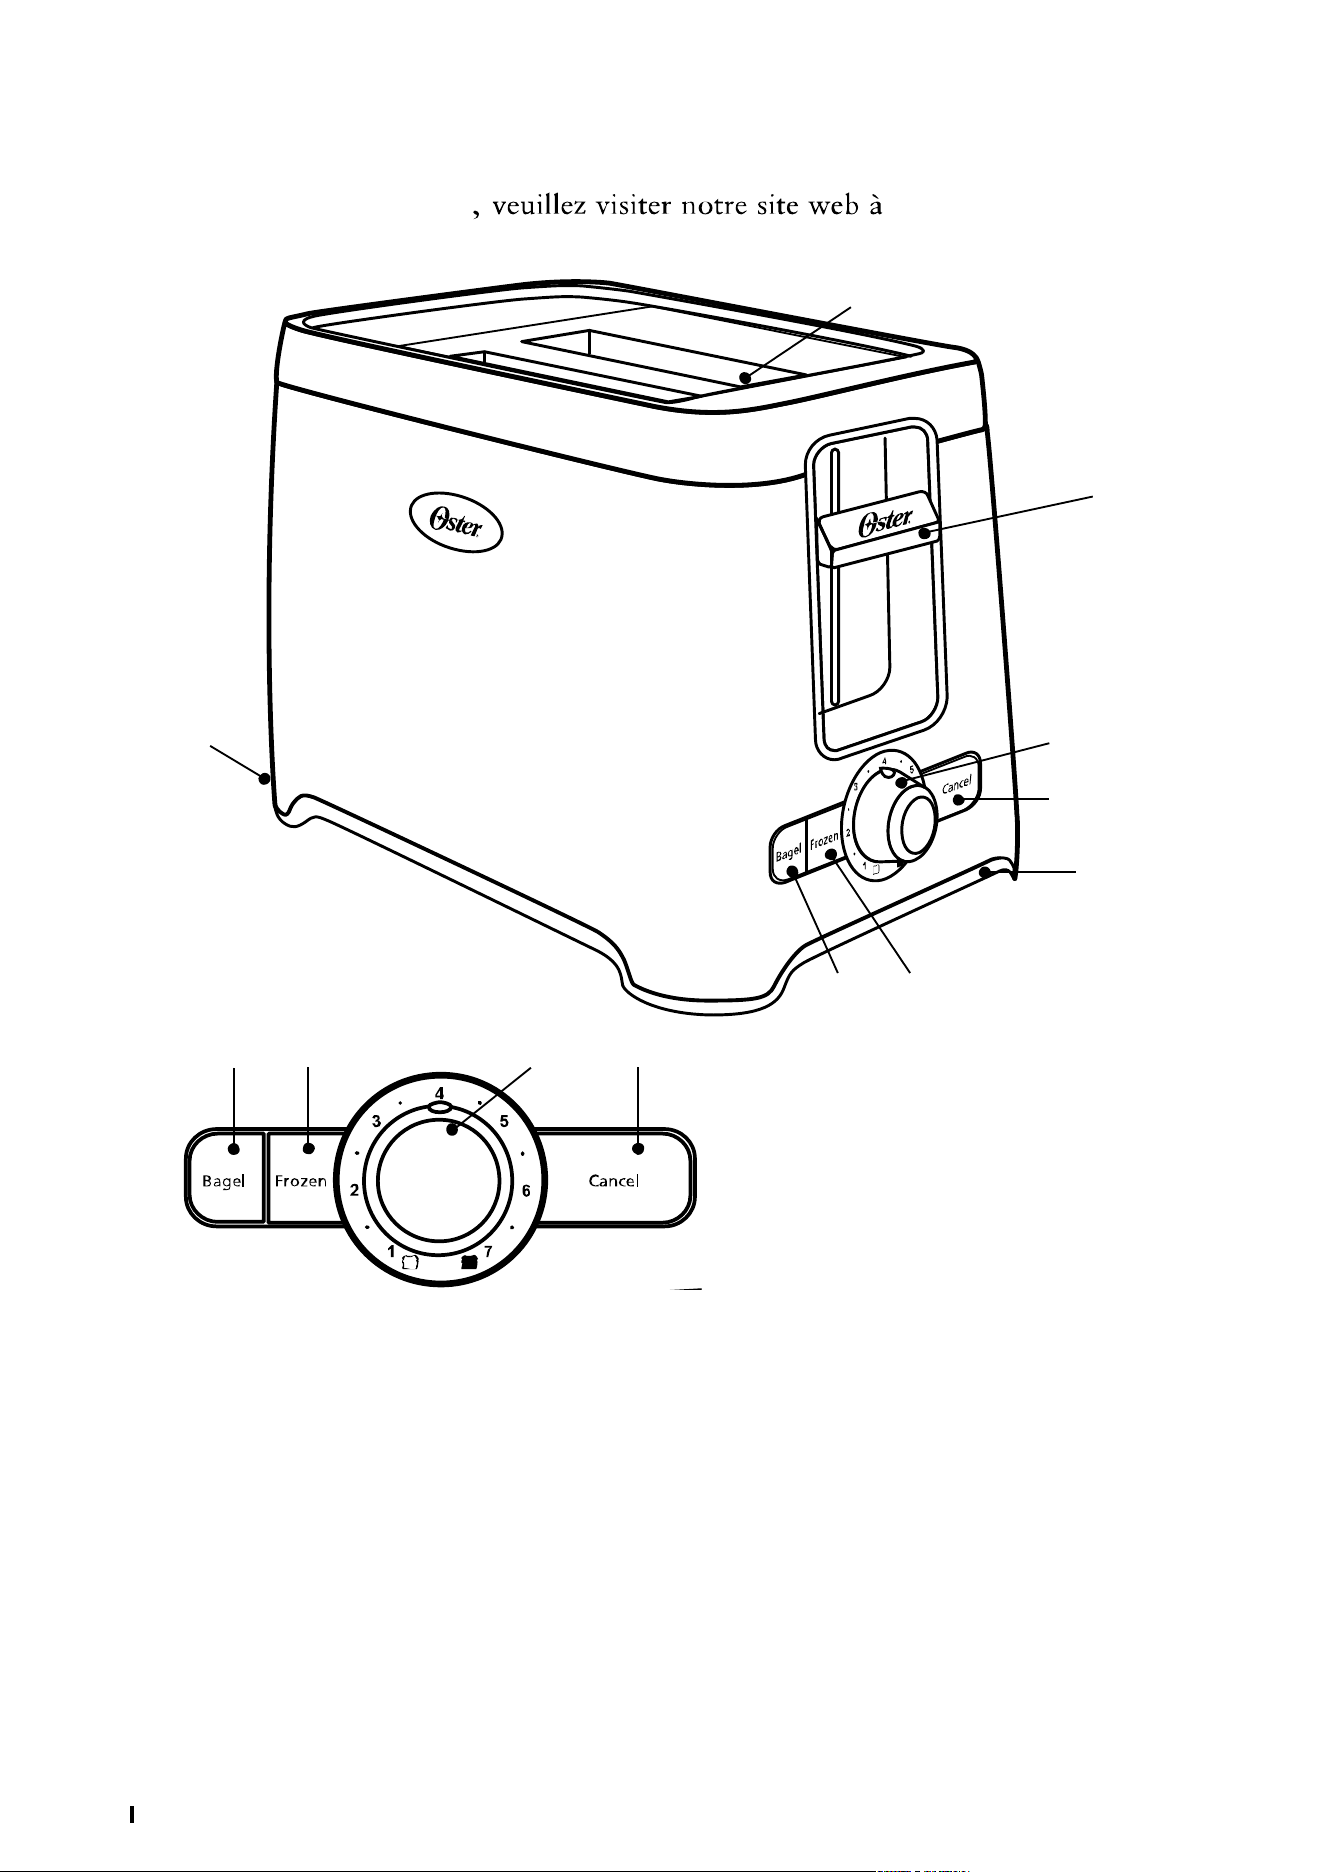
1. Bouton « Bagel » (Baguel) avec voyant
2. Bouton « Frozen » (Congelé) avec voyant
3. Bouton Clair / Foncé
4. Bouton d’Annulation
5. Fentes
6. Deux Guide-Pain Autoréglables
7. Manette du Chariot
8. Lève-Rôties
9. Ramasse-miettes amovible(s)
10. Espace de rangement du cordon rétractable
11. Cordon
5/6
7/8
10/11
321
4
4
9
3
21

Franç ais-4 Franç ais-5 Franç ais-6 Français-7 Franç ais-8
Familiarisez-Vous Avec Votre Grille-pain
Toast est le ré glage par dé faut si aucun bouton d’aliment ou de fonction
n’est choisi.
1. Bouton « Bagel » (Baguel) avec voyant – Appuyez sur ce bouton pour griller
un baguel. Le voyant s’allume pour confirmer que « Bagel » (Baguel)
a é té sé lectionné .
2. Bouton « Frozen » (Congelé ) avec Voyant – Appuyez sur ce bouton si
l’aliment est surgelé . Utilisez ce bouton en combinaison avec le bouton
« Bagel » (Baguel), « Waffle » (Gaufre), « Toast » (Pain grillé ) ou «
Pastry » (Pâ tisserie). Dé congé lation et grillage se font automatiquement
en une seule opé ration. Le voyant s’allumera en appuyant sur le bouton.
3. Bouton Clair / Foncé – Vous le tournez selon le degré de cuisson pré fé ré ;
1 est le ré glage le plus clair et 7 le plus foncé .
4. Bouton d’Annulation – Vous le pressez pour faire é jecter les aliments
et interrompre le cycle de grillage
5. Fentes – Ont 3,3 cm (1,3 po) de largeur : acceptent baguels, tranches de
pain é paisses et pains moufflets.
6. Deux Guide-Pain Autoré glables – S’ajustent automatiquement selon
l’é paisseur des tranches.
7. Manette du Chariot – Le grillage dé bute quand vous l’abaissez.
8. Lè ve-Rô ties – Vous mettez la manette du chariot en position extra-haute
pour sortir les aliments des fentes.
9. Ramasse-miettes amovible – Pour le nettoyage commode et facile.
10. Espace de rangement du cordon ré tractable – Il vous permet de ranger une
partie du cordon dans le grille-pain.
11. Cordon
– –
– –
Franç ais-4 Franç ais-5 Franç ais-6 Français-7 Franç ais-8
Pré paratifs pour la Toute Premiè re Utilisation
Si vous utilisez le Grille-pain pour la toute premiè re fois :
1. Retirez les é tiquettes qui adhè rent au Grille-pain et essuyez le corps avec un
linge humide.
2. Faites glisser le ramasse-miettes amovible en place.
3. Assurez-vous que la manette du chariot est dans sa position la plus é levé e
avant de brancher le Grille-pain.
4. Dé cidez où placer le Grille-pain. Choisissez un endroit –
au-dessus du grille-pain ;
par exemple ;
5. Branchez le cordon sur une prise de courant alternatif de 120 volts, 60 Hz.
6. Sans mettre quoi que ce soit dans les fentes, abaissez la manette du chariot
(Elle ne se bloquera que si le Grille-pain est
branché ).
ayant pu s’accumuler au cours de l’entreposage. L’odeur qui se dé gage est
Votre Grille-pain OSTER
®
Modification de la longueur du cordon :
L’espace de rangement de votre grille-pain vous permet d’ajuster la longueur du
refroidie é tant dé branché e.
1. Pour rentrer le cordon, tenir la prise d’une main et appuyer sur le bouton
pour rentrer le cordon.
2. La bobine du cordon est compacte afin que le cordon se ré tracte sur
plusieurs niveaux. Si le cordon ne s’est pas entiè rement enroulé , tirez le
cordon et dirigez-le de maniè re uniforme sur la bobine.
3.
le cordon.
4. Ne permettez pas aux enfants de manipuler le cordon afin d’é viter
toutes blessures
Utilisation du Grille-Pain
Pose des aliments dans les fentes et grillage :
des conseils pratiques suivants :
les baguels, les brioches plates, les tranches de pain é paisses, les pains
si é paisses qu’elles se coincent dans les fentes. N’oubliez pas que le grillage
ordinaire est le ré glage par dé faut.
– –
– –

Franç ais-4 Franç ais-5 Franç ais-6 Français-7 Franç ais-8
é paisseur et fraîcheur pour cuire uniformé ment.
au milieu de chaque fente.
des fentes.
Une fois les tranches posé es dans les fentes :
1. Choisissez entre les diverses options d’aliments ou d’autres fonctions. Si
aucun aliment ou fonction n’est choisi, grille-pain est le ré glage par dé faut.
2. Sé lectionnez le degré de brunissement souhaité en tournant le bouton
Clair/Foncé .
3.
Les guide-pain auto-ré glables vont centrer automatiquement les aliments
pour un brunissement uniforme.
Truc : OSTER
®
a conç u ce Grille-pain pour qu’il fournisse le grillage
optimal. Il est possible – et normal – que certaines parties des é lé ments
rougeoient plus vivement que d’autres au cours du fonctionnement.
Aprè s que le niveau dé siré de l’obscurité ait é té atteint, la nourriture sautera
position originale et les voyants de signalisation s’é teindront.
4. Retirez prudemment les tranches des fentes.
AVERTISSEMENT : Les aliments juste grillé s sont trè s chauds. Agissez avec
prudence.
Truc : Si un aliment se coince dans une fente, dé branchez et laissez
refroidir le Grille-pain avant de retirer l’aliment.
AVERTISSEMENT : Ne mettez jamais vos doigts ou des ustensiles mé talliques
dans les fentes.
Utilisation de la fonction Aliments
(Bagel, Waffle. [Baguel, Gaufre])
Le grille-pain OSTER
®
Toaster ajustera le ré glage Clair/Foncé selon le type
d’aliment que vous grillez. Vous devez sé lectionner le type d’aliment que vous
voulez griller afin le grille-pain puisse se ré gler en consé quence.
Pour sé lectionner le type d’aliment :
Choisissez le mode Bagel ou Waffle (Baguel, Gaufre).
n’est choisi.
Le voyant « Bagel » (Baguel) s’allume. Cette option é tant ré glé e, le grille-
pain ajustera la duré e grillage des baguels selon le degré de brunissement
que vous avez choisi.
– –
– –

Franç ais-4 Franç ais-5 Franç ais-6 Français-7 Franç ais-8
Utilisation de la fonction “Frozen” (Aliments congelé s)
Le Grille-pain est capable de dé congeler les aliments surgelé s puis de les griller.
Vous pouvez donc dé sormais sortir un baguel surgelé du congé lateur et le griller
dans votre Grille-pain en une seule opé ration.
Pour dé congeler et griller du pain :
1. Placez le pain dans le chariot
2. Appuyez sur le bouton « Frozen » (Congelé) si l’aliment est congelé puis
sé lectionnez le type d’aliment en appuyant sur le bouton correspondant.
Si aucun aliment n’est sé lectionné , le grille-pain fonctionnera en mode
« Toast » (Pain grillé ).
3. Sé lectionnez le degré de brunissement souhaité en tournant le bouton
Clair/Foncé .
4. Appuyez sur la manette du chariot du grille-pain.
Interruption du Grillage
Pour interrompre le cycle de grillage :
Appuyez sur le bouton d’annulation « Cancel ». Le grillage cessera
immé diatement et les tranches seront automatiquement é jecté es.
Nettoyage de votre grille-pain
1. Dé branchez et laissez refroidir le grille-pain.
2.
chiffon humide.
– –
– –
Franç ais-4 Franç ais-5 Franç ais-6 Franç ais-7 Franç ais-8
– –
Garantie limité e de un an
Sunbeam Products, Inc. faisant affaires sous le nom de Jarden Consumer Solutions ou, si au Canada,
Sunbeam Corporation (Canada) Limited faisant affaires sous le nom de Jarden Consumer Solutions
produit ou tout composant du produit déclaré défectueux pendant la pé riode de garantie. Le produit
ou composant de remplacement sera soit neuf soit réusiné. Si le produit n’est plus disponible, il sera
remplacé par un produit similaire de valeur é gale ou supérieure. Il s’agit de votre garantie exclusive.
N’essayez PAS de ré parer ou d’ajuster toute fonction électrique ou mé canique de ce produit, cela
annulera cette garantie.
transfé rée. Conservez votre facture d’achat originale. Les détaillants et les centres de service JCS ou les
magasins de détail vendant les produits JCS n’ont pas le droit d’altérer, de modifier ou de changer de
toute autre maniè re les termes et les conditions de cette garantie.
Cette garantie ne couvre pas l’usure normale des pièces ou les dommages résultant de toute cause
suivante : utilisation né gligente ou mauvaise utilisation du produit, utilisation d’un voltage ou d’un
courant incorrects, utilisation contraire aux instructions d’utilisation, démontage, réparation ou
altération par quiconque autre que JCS ou un centre de service autorisé de JCS. En outre, la garantie
ne couvre pas : les catastrophes naturelles comme les feux, les inondations, les ouragans et les
tornades.
Quelles sont les limites de responsabilité de JCS?
JCS ne sera pas tenu responsable de tout dommage conséquent ou accessoire causé par la violation de
toute garantie ou condition expresse, implicite ou ré glementaire.
Sauf si cela est interdit par les lois en vigueur, toute garantie ou condition implicite de valeur
ci-dessus.
JCS exclut toute autre garantie, condition ou repré sentation, expresse, implicite, réglementaire ou
autre.
JCS ne sera pas tenu responsable de tout dommage de toute sorte résultant de l’achat, de l’usage
de profits conséquents, accessoires, particuliers ou similaires, ou pour toute violation de contrat,
partie.
Certaines provinces, é tats ou juridictions ne permettent pas d’exclusion ou de limitation pour des
dommages conséquents ou accessoires ou de limitations sur la durée de la garantie implicite, de ce fait
Cette garantie vous donne des droits juridiques particuliers et vous pouvez également disposer d’autres
Pour obtenir un service au titre de la garantie
Aux É tats-Unis –
Pour toute question concernant cette garantie ou pour obtenir une réparation sous garantie, appelez
au 1-800-334-0759. L’adresse du centre de réparation le plus proche de chez vous vous sera fournie.
Au Canada –
Pour toute question concernant cette garantie ou pour obtenir une réparation sous garantie, appelez
au 1-800-667-8623. L’adresse du centre de réparation le plus proche de chez vous vous sera fournie.
Aux É .U., cette garantie est offerte par Sunbeam Products, Inc. faisant affaires sous le nom de Jarden
par Sunbeam Corporation (Canada) Limited faisant affaires sous le nom de Jarden Consumer
Solutions, situé au 20 B Hereford Street, Brampton, Ontario L6Y 0M1. Pour tout autre problème ou
NE RENVOYEZ PAS CE PRODUIT À UNE DE CES
ADRESSES NI OÙ VOUS L’AVEZ ACHETÉ

–
For product questions contact:
Sunbeam Consumer Service
USA: 1.800.334.0759
Canada: 1.800.667.8623
www.oster.com
©2010 Sunbeam Products, Inc. doing business as Jarden Consumer Solutions.
All rights reserved. Distributed by Sunbeam Products, Inc. doing business as
Jarden Consumer Solutions, Boca Raton, Florida 33431.
Pour les questions de produit:
Sunbeam Consumer Service
É tats-Unis: 1.800.334.0759
Canada: 1.800.667.8623
www.oster.com
©2010 Sunbeam Products, Inc. faisant affaires sous le nom de Jarden Consumer
Solutions. Tous droits reservé s. Distribué Sunbeam Products, Inc. faisant affaires sous le
nom de Jarden Consumer Solutions, Boca Raton, Florida 33431.
Para preguntas sobre los productos llame:
Sunbeam Consumer Service
EE.UU.: 1.800.334.0759
Canadá : 1.800.667.8623
www.oster.com
©2010 Sunbeam Products, Inc. operando bajo el nombre de Jarden Consumer Solutions.
Todos los derechos reservados. Distribuido por Sunbeam Products, Inc. operando bajo el
nombre de Jarden Consumer Solutions, Boca Raton, Florida 33431.
SPR-041610
Printed in China Imprimé en Chine Impreso en China