User manual Washer
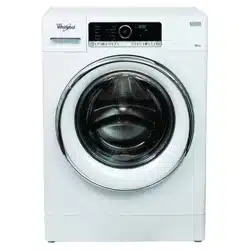
PRODUCT DESCRIPTION
APPLIANCE
-768370.png)
1. Worktop
2. Detergent dispenser
3. Control panel
4. Door handle
5. Door
6. Water filter/ emergency drain hose (if available) - behind plinth -
7. Plinth (removable)
8. Adjustable feet (4)
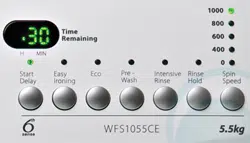
CONTROL PANEL
-596274.png)
1. On/Off button (Reset/Drain if pressed and held down)
2. Programme button
3. Colours 15° button
4. Fresh Care button
5. Dosing Aid button
6. Knob (Turn to select/ Press to confirm)
7. Start delay button
8. Temperature button
9. Spin Speed button
10.Options button (Key lock if pressed and held down)
11. Start / Pause button
12.Display
13. Programmes area
DETERGENT DISPENSER
-792072.png)
1. Main wash compartment -904144.png)
• Detergent for the main wash
• Stain remover
• Water softener
2. Prewash compartment -236623.png)
• Detergent for the prewash.
3. Softener compartment -558960.png)
• Fabric softener
• Liquid starch Pour in softener or starch solution only up to the “max” mark.
4. Release button -832052.png)
(Press to remove the detergent dispenser for cleaning).
FIRST TIME USE
See the section on DAILY USE for information on how to select and start a programme.
FIRST CYCLE
When you plug in the washing machine, it will switch on automatically.
- To remove any residues from the manufacturing process:
- Select the “Cotton” programme at a temperature of 95°C.
- Add a small amount of heavy duty detergent to the main wash compartment of the detergent dispenser (maximum 1/3 of the quantity recommended by the detergent manufacturer for lightly soiled laundry).
- Start the programme without adding any laundry.
DAILY USE
See the Use and Care Guide for more details on functions / see the last page for information on how to obtain the Use and Care Guide
1. LOAD LAUNDRY
-415596.png)
• Prepare your laundry according to the recommendations in the “HINTS AND TIPS” section. Make sure that pockets are empty, fasteners closed and ribbons tied together.
• Open the door and load the laundry. Observe the maximum load sizes given in the separate programme chart.
2. CLOSE THE DOOR
-47565.png)
• Make sure that no laundry gets stuck between door glass and the rubber seal.
• Close the door so that you can hear it click shut.
3. OPEN THE WATER TAP
4. SWITCH ON THE WASHING MACHINE
• Press the “On/Off” button until the programme button lights up. An animation appears on the control panel and the appliance plays a sound. The washing machine is then ready for operation.
5. SET THE DESIRED PROGRAMME
GUIDED MODE — the button light will guide you through setting your programme in the following order: Selection of programme/temperature/spin speed/ options. As soon as you confirm a selection by pressing the knob, the button light jumps to the next step.
Make sure that the programme button lights up.
-191564.png)
Turn the knob to select the desired programme. The indicator next to the selected programme lights up.
-435550.png)
Confirm the desired programme by pressing the knob.
- Change spin speed, if required
If you want to change the spin speed indicated on the display, make sure that the Spin button lights up. Turn the knob to select the desired spin speed, or Rinse hold, then press the knob to confirm. Refer to OPTIONS, FUNCTIONS AND INDICATORS for more information.
- Select options, if required
If you want to select additional options, make sure that the Options button lights up. The options which are selectable for your programme are indicated by the arrows which are lit up -542007.png)
Turn the knob to select the desired options. The symbol for the selected option will flash. Press the knob to confirm.
Some options/functions can be selected by pressing the button directly:
-180695.png)
Refer to the OPTIONS, FUNCTIONS AND INDICATORS section for more information.
INDIVIDUAL MODE
After you have switched on the washing machine, you are not forced to follow the GUIDED MODE.
The order in which you choose to set your programme is up to you.
To make a setting, first press the relevant button, then turn the knob to select, and finally press the knob to confirm.
The range of temperatures, spin speeds and options depend on the programme selected. It is therefore recommended that you start by selecting the programme.
6. ADD DETERGENT
- If you are not using the Dosing Aid function, pull out the detergent dispenser and add detergent (and additives/softener) now; observe the dosing recommendations on the detergent pack. If you have selected PREWASH or START DELAY, observe the recommendations in the OPTIONS, FUNCTIONS AND INDICATORS section. Then carefully close the detergent dispenser.
- If you are using the “Dosing Aid” function, add detergent later, after you have started the programme. Refer to the OPTIONS, FUNCTIONS AND INDICATORS section for more information.
- After having added detergent/additives, do not open the detergent dispenser to avoid any overflow.
7. START PROGRAMME
- Press and hold “Start/Pause” until the button lights up and stays on; the programme will start.
- If you have selected “Dosing Aid”, the washing machine indicates the recommended detergent amount for your laundry load after the programme starts.
Follow the instructions as indicated in the OPTIONS, FUNCTIONS AND INDICATORS/Dosing Aid section.
8. CHANGE THE SETTINGS OF A PROGRAMME WHICH IS RUNNING, IF REQUIRED
You can still change the settings while a programme is running.
The changes will be applied, provided the respective programme phase has not yet finished.
- Press the relevant button (for example the “Spin speed” button to change the spin speed). The selected value will flash for a few seconds.
- While it is flashing, you can adjust the setting by turning the knob. If the value stops flashing before you have adjusted it, press the button again.
- Press the knob to confirm the new setting. If you do not confirm it, the new setting will be confirmed automatically: It will stop flashing.
The programme will continue automatically. To change the settings of a programme which is running, you can also:
- Press “Start/Pause” to pause the programme which is running
- Change the settings as desired.
- Press “Start/Pause” again to continue the programme.
9. PAUSE A PROGRAMME WHICH IS RUNNING AND OPEN THE DOOR, IF REQUIRED
- Press and hold “Start/Pause” to pause a programme which is running.
- Provided the water level and/or temperature is/ are not too high, the door open indicator lights up. You can open the door, for example to add/ remove laundry.
- Press “Start/Pause” to continue the programme.
-534740.png)
10. RESET A PROGRAMME WHICH IS RUNNING, IF REQUIRED
- Press and hold the “On/Off” button until “rES” appears on the display.
-453550.png)
-415258.png)
The water drains, the programme ends and the door unlocks.
11. SWITCH OFF THE WASHING MACHINE AFTER THE PROGRAMME HAS ENDED
• “End” will appear on the display and the door open indicator will light up – you can remove your laundry.
-233203.png)
• Press “On/Off” to switch off the washing machine. The washing machine will switch off automatically after about a quarter of an hour after the programme ends, to save energy.
• Leave the door ajar so that the inside of the washing machine can dry
HINTS AND TIPS
SORT YOUR LAUNDRY ACCORDING TO
• Type of fabric/care label (cotton, mixed fibres, synthetics, wool, handwash items)
• Colour (separate coloured and white items, wash new coloured items separately)
• Delicates (wash small items – like nylon stockings – and items with hooks – like bras – in a cloth bag or pillow case with zip).
EMPTY ALL POCKETS
• Objects like coins or lighters can damage your laundry as well as the drum.
WASH CARE LABELS
The temperature in the washtub symbol indicates the maximum possible temperature for washing the item.
-399364.png)
CLEAN THE WATER FILTER REGULARLY
• This helps to prevent it from getting clogged, which could cause that the drain water cannot be pumped out anymore. Refer to the CARE AND MAINTENANCE/“Cleaning the water filter” section in the Use and Care Guide.
SAVINGS AND ENVIRONMENT
• Achieve the best use of energy, water, detergent and time by using the recommended maximum load size for the programmes, as indicated in the programme chart.
• Do not exceed the detergent dosages indicated in the detergent manufacturer’s instructions. Use the Dosing Aid function.
• Save energy by using a 60°C instead of a 95°C wash programme or a 40°C instead of a 60°C wash programme. For cottons, the Eco Cotton programme at 40°C or 60°C is recommended.
• Save energy and time by selecting a high spin speed to reduce the water content in the laundry before using a tumble dryer.
PROGRAMME CHART
-744333.png)
-284892.png)
OPTIONS, FUNCTIONS AND INDICATORS
OPTIONS which are directly selectable by pressing the dedicated button
Colours 15°
-401465.png)
Helps to preserve the colours of your laundry by washing them with cold water (15°C). Saves energy used in heating the water, while maintaining good wash results. Suitable for lightly soiled coloured laundry without stains.
Not selectable for Cotton 95°C.
Fresh Care
-732005.png)
Helps to keep your laundry fresh if you cannot remove it from the machine shortly after the programme ends.
The washing machine will start to tumble the laundry periodically after the programme ends. This lasts up to approximately 6 hours after the end of your wash programme. You can stop it at any time by pressing any button; the door unlocks and you can remove your laundry
Dosing Aid
-735324.png)
Helps to dose the right amount of detergent for your laundry load. Before using this option: The concentration of detergents available on the market varies considerably. For this reason, adjust the washing machine to the dosing amounts of the detergents which you use.
Furthermore, check if the washing machine’s preset water hardness level (soft) corresponds to your local water hardness level and adjust it if necessary (see “First use of the Dosing Aid” in the “Use and Care Guide”).
1) Select Dosing Aid:
After selecting the programme and options, press the “Dosing Aid” button; the Dosing Aid symbol lights up on the display.
2) Start programme:
Start the programme by pressing “Start/Pause”. – The drum will rotate to detect the laundry load; afterwards the display will show the recommended detergent amount in ml. -580552.png)
-21015.png)
3) Add detergent:
Pull out the detergent dispenser and pour in the quantity of detergent which is indicated on the display into the main wash compartment of the detergent dispenser. -960285.png)
If you have selected the “Prewash” option and you want to add detergent for the prewash as well, pour in half of the indicated detergent amount into the prewash compartment, in addition to the full amount which you have already added to the main wash compartment.
Instead of adding detergent to the detergent dispenser, it can also be added directly to the drum, in a detergent ball.
For programmes with prewash: Prewash detergent can be added to the drum, main wash detergent must be added to the main wash compartment of the detergent dispenser. In this case, use powder detergent for the main wash in order to ensure that it stays in the detergent dispenser until start of the main wash phase. After adding detergent, close the detergent dispenser (or door).
4) Press and hold “Start/Pause” to continue the programme.
OPTIONS which are selectable via the Options button -250197.png)
Prewash
-724839.png)
Helps to clean heavily soiled laundry by adding a prewash phase to the wash programme selected. For heavily soiled laundry, for example containing sand or granular dirt.
Extends the programme by about 20 minutes.
Add detergent to the prewash compartment of the detergent dispenser as well, or directly into the drum. Use powder detergent for the main wash in order to ensure that the detergent stays in the detergent dispenser until the start of the main wash phase.
Hot Finish
-256015.png)
The programme ends with a warm rinse phase. Relaxes the fibres of your laundry so that the laundry feels comfortably warm when taking it out a short time after the programme ends.
Bio Stains 15°
-360952.png)
Helps to remove all kinds of stains, except grease/oil. The programme begins with a cold water wash phase. Extends the programme by about 10 minutes. Pre-treatment recommended for stubborn stains. Not selectable for Cotton 95°C.
Heavy Soil
Helps to clean heavily soiled, stained laundry by optimising the efficiency of additives for stain removal.
-443514.png)
Add an appropriate amount of in-wash additive for stain removal (powder) to the main wash compartment, together with your detergent (powder only). May extend the programme by up to 15 minutes. Appropriate for use with oxygen-based stain removers and bleaching agents. Chlorine or perborate bleach agents must not be used.
Intensive Rinse
-26848.png)
Helps to avoid detergent residues in the laundry by extending the rinse phase. Particularly suitable for washing baby laundry, for people suffering from allergies and for areas with soft water.
Rapid
-433973.png)
Enables quicker washing. Only recommended for lightly soiled laundry. Not selectable for Cotton 95 °C.
FUNCTIONS
Rinse hold (option on Spin button)
-231358.png)
Avoids automatic spinning of the laundry at the end of the programme. The laundry remains in the last rinse water and the programme does not continue.
Suitable for delicate laundry which is not suitable for spinning, or which should be spun with a lower spin speed. Not suitable for silk. To end the “Rinse hold” function, choose between:
- drain the water, no spin:
turn the knob to select spin speed “0”, then press “Start/Pause”: The water will be drained and the programme ended
the default spin speed flashes – start the spin cycle by pressing “Start/Pause”. Or select a different spin speed by turning the knob, press it to confirm, and press “Start/Pause”.
Start delay
Moves the start of your programme to a later time.
Do not use liquid detergent with this function.
- Select programme, temperature and options.
- Press the “Start delay” button – the start delay symbol on the display flashes.
- Turn the knob to select a delay of up to 23 hours, which will be shown on the display. Confirm by pressing the knob.
- Press “Start/Pause” – the countdown for the delay starts. The colon on the display flashes. The door locks.
- If you have selected Dosing Aid: When you press “Start/Pause”, the washing machine calculates the recommended detergent amount. Add detergent as indicated on the display (see “Dosing Aid”). Press “Start/Pause” again to start the countdown for the selected delay period.
- After the delay time has been reached, the washing machine starts automatically. The display then indicates the remaining programme duration.
To cancel “Start delay”:
- Press “Start/Pause” to cancel start delay.
Key lock
-432576.png)
Locks the buttons and the knob on the control panel against unwanted operation.
To lock the buttons:
-731040.png)
- The washing machine must be switched on.
- Press and hold the option button until the key symbol on the display lights up. The knob and the buttons are now locked. Only “On/Off” works.
If you switch the washing machine off and on again, the key lock remains active until you unlock it.
-440453.png)
To unlock the buttons, press and hold the option button again, until the key symbol on the display goes off.
INDICATORS
Door can be opened.
| Failure: Water tap closed. The washing machine has no/insufficient water supply. |
-34912.png) |
| Failure: Water filter clogged. Water cannot be drained; water filter might be blocked |
| Failure: Call Service. Refer to Troubleshooting section in the Use and Care Guide |
In the event of any failures, refer to the Troubleshooting section in the “Use and Care Guide”.