Owner's Guide Dishwasher
Using The Dishwasher
Getting started
Features and appearance will vary throughout this manual.

- Load Dishwasher
For best dishwashing results, follow the loading guidelines found in the Loading section. No pre-rinsing of normal food soil is required. Scrape off hard soils, including bones, toothpicks, skins, and seeds. Remove leafy vegetables, meat trimmings, and excessive amounts of grease or oil.
- Add Detergent
Add needed amount of detergent to the detergent dispenser. Use detergent such as Finish® Quantum® Automatic Dishwashing Detergent. See Dispensers section.
- Add Rinse Agent
Add rinse agent such as Finish® Jet-Dry® Rinse Aid to the rinse agent dispenser. See Dispensers section.
NOTE: The use of rinse aid can further enhance the dishwasher’s drying performance.
- Select Cycle
Open the door and press the Cycle Select pad for the desired wash cycle. The light next to the Cycle Select pad will be lit to indicate which wash cycle has been selected.
NOTE: Cycle times vary based on soil level, water temperature, and options selected. The cycle must be selected with the door in the open position. The cycle will not start until the Start pad is pushed and the door is closed within 4 seconds.
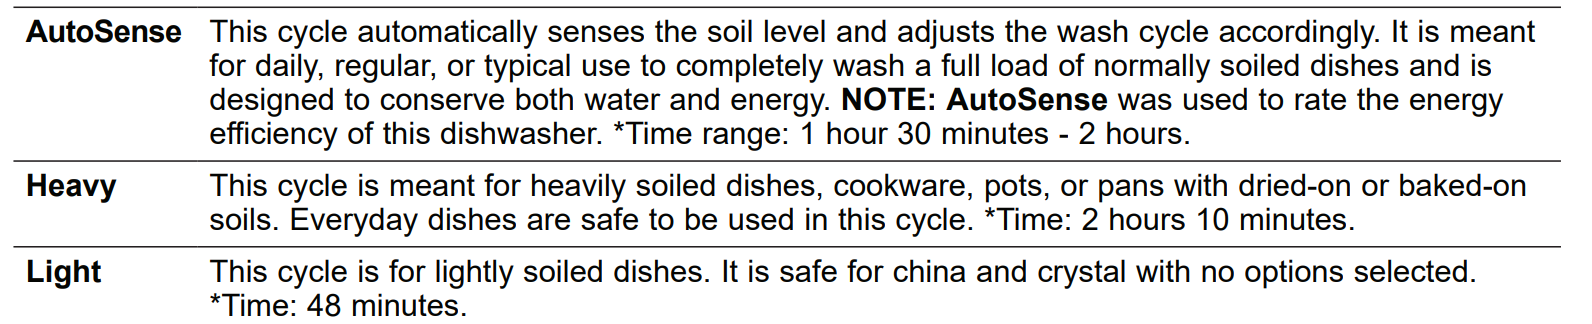
Washing time only. Does not include drying time, Auto Hot Start, or options.
NOTE: If the incoming water temperature is too low, the Auto Hot Start feature may add up to 11 minutes of additional time.
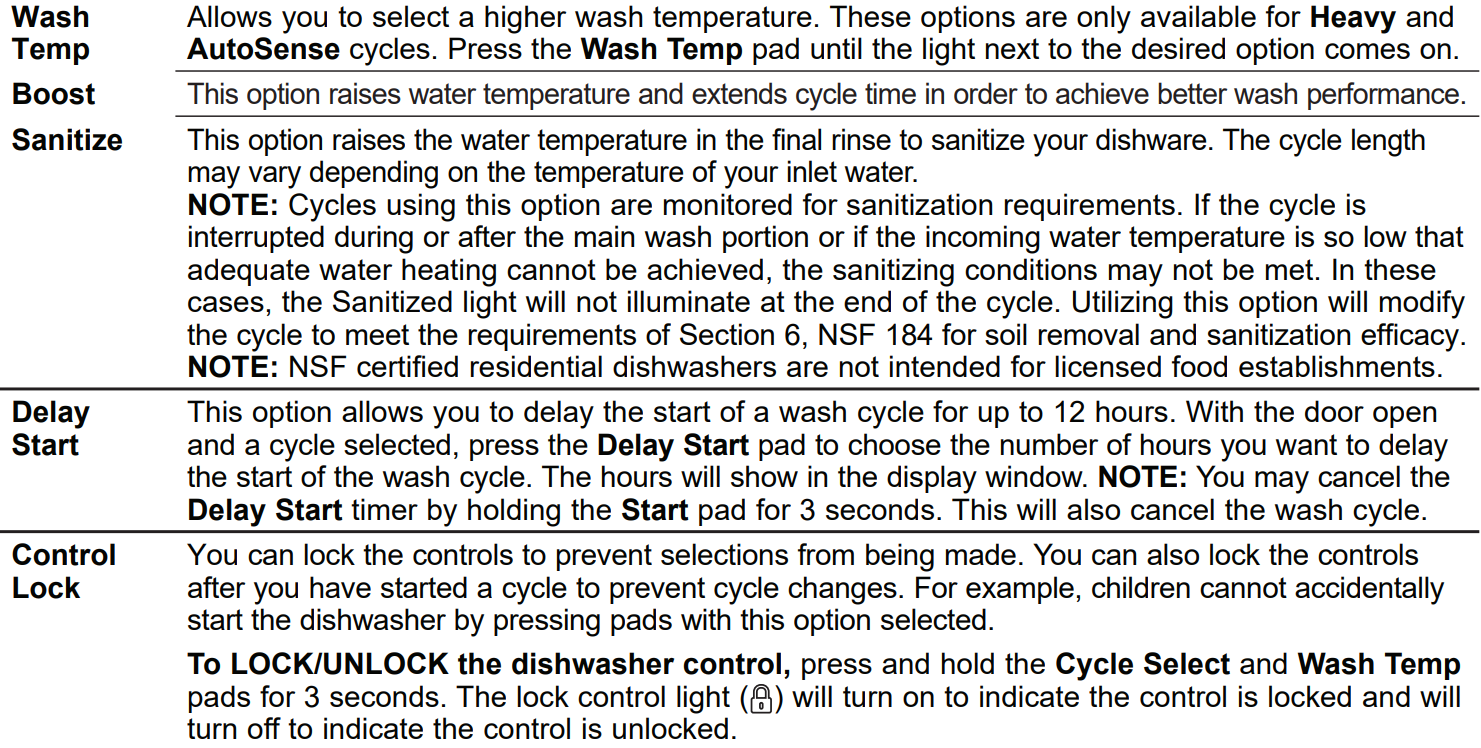
- Select Options
- Start Dishwasher
- Indicator Lights

- Display
Time Remaining During operation, the display shows the total number of minutes remaining in the cycle. During a delay start, the display will show hours of time remaining until the cycle starts.
Check the Water Temperature
The entering water should be at least 120°F (49°C) and not more than 150°F (66°C) for effective cleaning and to prevent dish damage. Check the water temperature with a candy or meat thermometer.
Turn on the hot water faucet nearest the dishwasher, place the thermometer in a glass and let the water run continuously into the glass until the temperature stops rising.
Sabbath/Door Wake Up Mode
To turn this option ON/OFF, press and hold the Start and Wash Temp buttons for 5 seconds, close the door and wait 3 minutes for the dishwasher to go into sleep mode. In the OFF mode, the control display, control sounds, and interior lights (on some models) will not respond to the door opening/closing. This mode can be used when observing certain religious holidays such as the Sabbath. To activate the control and interior lights (on some models), press any button.
Mute
To turn the dishwasher control sounds ON/OFF, press the Wash Temp button 5 times within 5 seconds.
Dispensers
Use a Rinse Agent
Rinse agents, such as Finish® Jet-Dry® Rinse Aid are designed for great drying action and to protect against spots and film build-up on your dishes, glasses, flatware, cookware, and plastic.
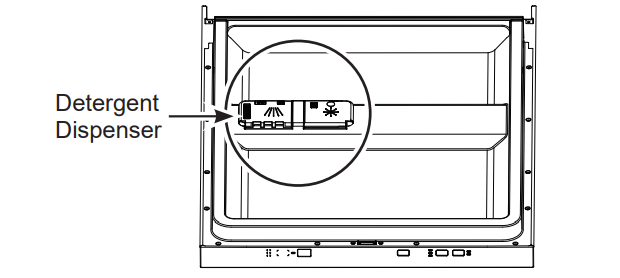
Filling the Rinse Agent Dispenser
The rinse agent dispenser holds 3.9 oz. (115 ml) of rinse agent. Under normal conditions, this will last approximately one month.
- Make sure the dishwasher door is fully open.
- Open the rinse agent dispenser door. (Rinse agent compartment is on the right side of dispenser.)
- Slowly add rinse agent until the cup is full. You may need to pause several times to allow rinse aid to settle.
- Clean up any spilled rinse agent with a damp cloth to prevent foam from forming inside the dishwasher.
- Close the rinse agent dispenser door.
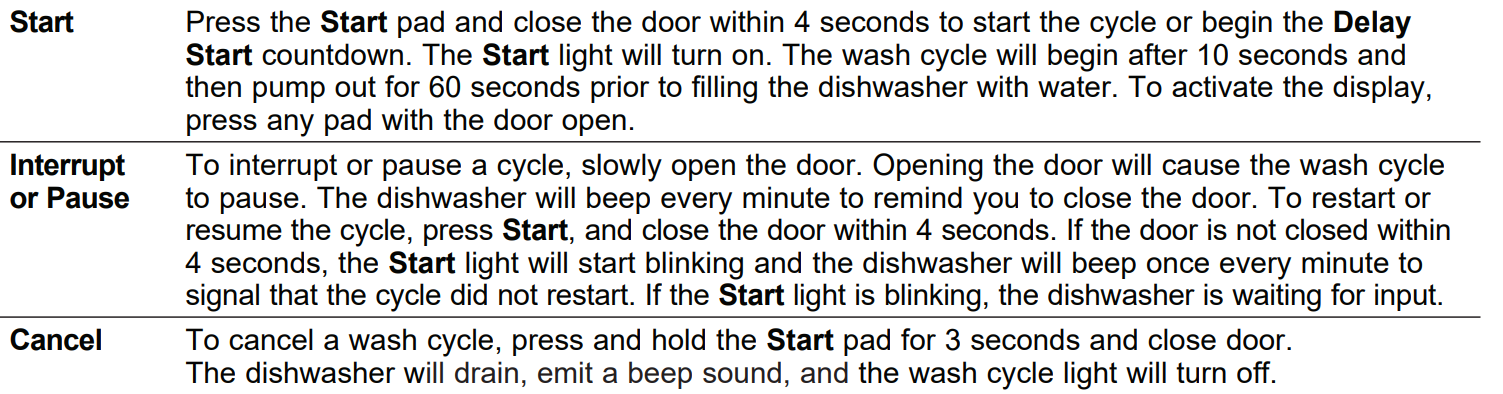
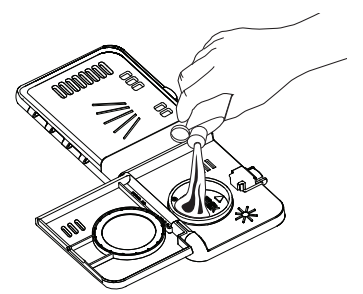
Detergent Dispenser
To open, press the button and the cover will flip back. The detergent dispenser has two compartments. The pre-wash compartment is the smaller compartment on the left side. Use the pre-wash compartment only when your water is extremely hard or when you have a heavy soiled load. The pre-wash compartment is not used when tablet or packet detergents are used.
NOTE: Do not block detergent dispenser with large or tall utensils.
You may use tablet, packet, powder, liquid or gel automatic dishwasher detergent. Make sure you use only detergents specifically labeled for use in automatic dishwashers. Never use liquid hand dish detergent in an automatic dishwasher. Sudsing and poor wash performance will result with the use of improper detergents.
Detergents should be stored in a dry location and in their original container to prevent loss of effectiveness. Place detergent in the cup just prior to starting the dishwasher and then close the cover. The cover will open during the wash cycle.
Filling the Detergent Dispenser
We recommends using detergent in tablet or packet form. Independent testing has shown this form of detergent is very effective in the dishwasher. Finish® Quantum® Powerball® is an example of this type of detergent. Simply put a tablet or packet into the main wash compartment and close the detergent cup cover. Please notice that the tablet or packet must be placed in the main wash compartment of the detergent cup. If the tablet or packet is placed in the prewash compartment or tossed in the bottom of the dishwasher, the detergent will be flushed down the drain in a very short period of time and will thus be wasted. Wash performance will be very poor as a result.
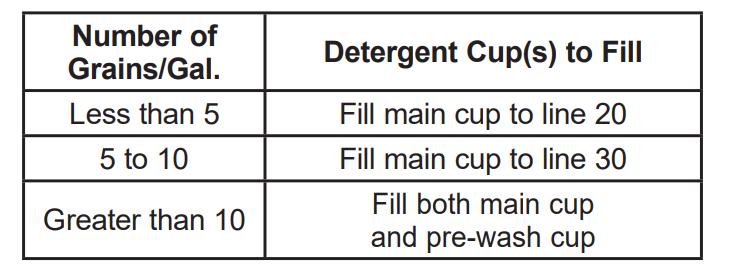
If you choose to use detergent in powder, liquid or gel form, the amount of detergent you use will be determined by the hardness of your water, the temperature of your water, and the food soil load inside the dishwasher. Contact your water company to get information about the hardness of the water in your area. Water hardness is measured in grains per gallon. Use this information and the table above to determine the amount of detergent to use. You may purchase a hard water test strip from GE Appliances. Call 1-877-959-8688 and ask for part number WD01X10295. In Canada, call 1-800-661-1616.
Use the table as a starting point and then adjust the amount of detergent you use. Use just enough to get good wash performance. Using just the right amount of detergent will provide great wash performance without wasting detergent or etching glassware.
Using too much detergent with very soft and/or very hot water may cause a condition called etching on your glassware. Etching is a permanent cloudiness in your glassware. This condition is irreversible. However, using too little detergent will cause poor wash performance.
NOTE: Using a detergent that is not specifically designed for dishwashers will cause the dishwasher to fill with suds. During operation, these suds will spill out of the dishwasher vents, covering the kitchen floor and making the floor wet.
Because so many detergent containers look alike, store the dishwasher detergent in a separate space from all other cleaners. Show anyone who may use the dishwasher the correct detergent and where it is stored.
While there will be no lasting damage to the dishwasher, your dishes will not get clean using a dishwashing detergent that is not formulated for automatic dishwashers.
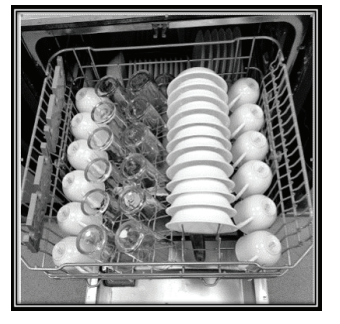
Loading
For best dishwashing results, follow these loading guidelines. Features and appearance of racks and silverware baskets may vary from your model.
Upper Rack
The upper rack is for glasses, cups, and saucers. This is also a secure place for dishwasher-safe plastic items. The upper rack can be used for odd sized utensils. Sauce pans, mixing bowls, and other similarly shaped items should be placed face down for best wash performance.
The cup shelf may be placed in the up or down position to add flexibility.
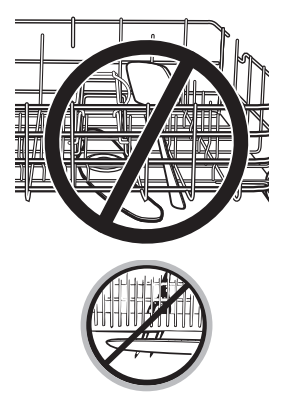
IMPORTANT: Ensure that items do not protrude through the bottom of the rack or silverware basket where they will block the rotation of the middle spray arm. This could result in noise during operation and/or poor wash performance.
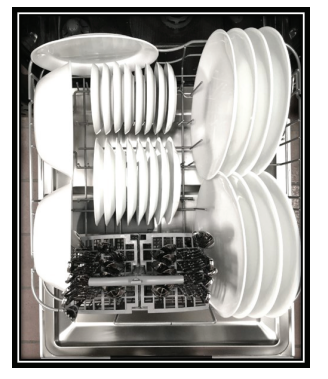
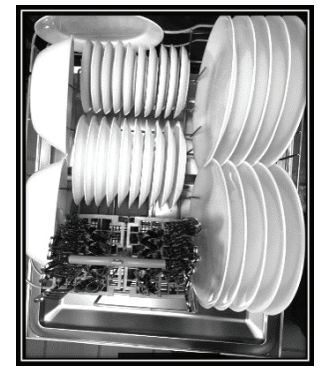
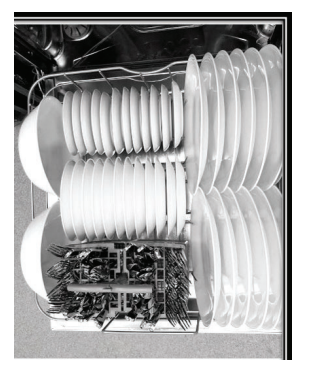
GDT225-226 Series
8 Place Settings

GDT225-226 Series
10 Place Settings
GDT225-226 Series
12 Place Settings
Upper Rack - Adjustment
CAUTION: A loaded upper rack may be heavier than anticipated. To prevent minor injury or damage to the contents, do not raise or lower the upper rack after the rack is loaded.
The upper rack may be adjusted to accommodate larger items.
To adjust the upper rack:
- Fully extend the upper rack and rotate open the two plastic end caps on the front of the rails.
- Remove the upper rack.
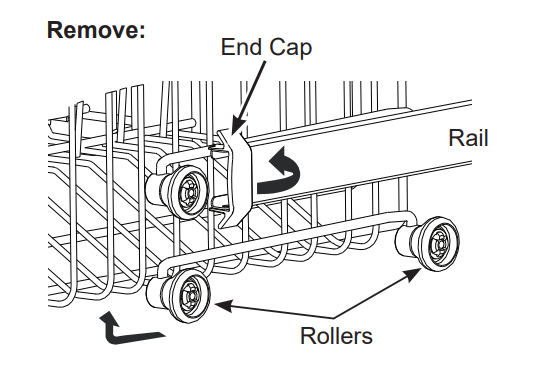
- Select the set of rollers on the side of the rack that provides the desired height, and reinstall the upper rack by guiding the rack rails between the appropriate set of rollers.
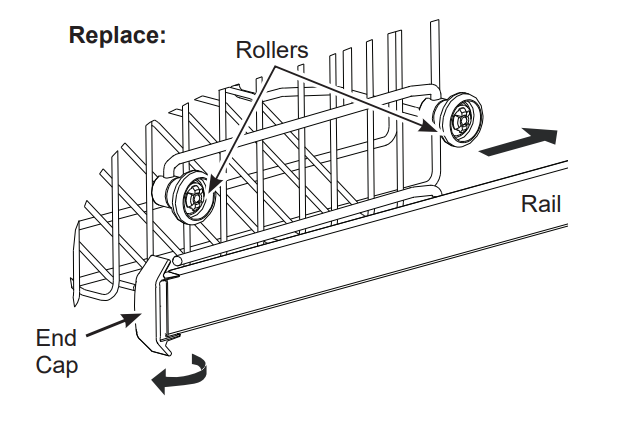
- With the rack reinstalled, rotate closed the two plastic end caps, ensuring the snap is properly engaged. Failure to properly engage the end caps may result in the rack falling from the dishwasher.
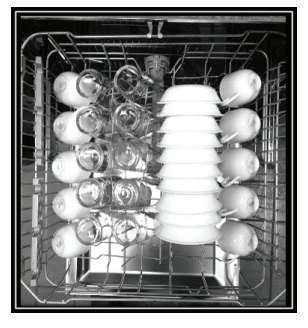
Lower Rack
When loading the lower rack, do not load large platters or trays in the front left. They may prevent detergent from circulating during the wash cycle.
The lower rack is best used for plates, saucers and cookware. Large items should go along the sides. Load platters, pots and bowls along the sides, in corners or in the back. The soiled side of items should face the center of the rack.
IMPORTANT: Ensure that items do not protrude through the bottom of the rack or the silverware basket where they will block the rotation of the lower spray arm. This could result in noise during operation and/ or poor wash performance.
GDT225-226 Series
8 Place Settings
GDT225-226 Series
10 Place Settings
GDT225-226 Series
12 Place Settings
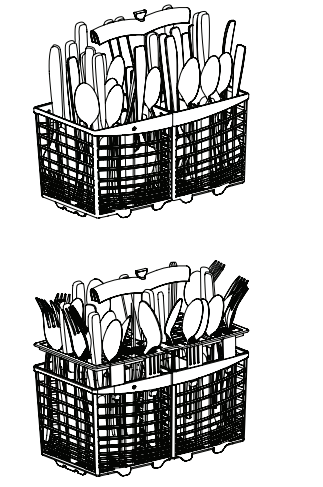
Silverware Basket
The silverware basket may be used without the topper for quick loading. With the topper, flatware is better positioned for the dishwasher to thoroughly wash and dry all pieces by preventing nesting.
Without the topper
Put the flatware in the removable basket with fork and knife handles up to protect your hands. Place spoons in the basket with handles down. Mix knives, forks and spoons so they don’t nest together. Distribute evenly. Small plastic items, such as measuring spoons and lids from small containers, should go in the bottom of the silverware basket with silverware on top.
With the topper
Place small plastic items, such as measuring spoons and lids from small containers, in the bottom of the basket and snap the topper in place. Insert spoons and forks, handles first, through the holes in the topper. Place knives, blades first, through the holes in the topper.
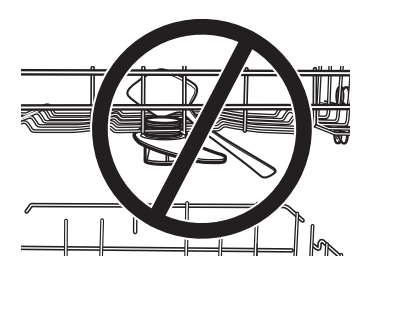
IMPORTANT: Do not load large or tall utensils where they may block the detergent dispenser or upper spray arm. This could result in noise during operation and/or poor wash performance.
Two-piece basket
To separate, grasp the basket at opposite corners and slide apart.
GDT225-226 Series
Connecting and disconnecting (Portable models only)
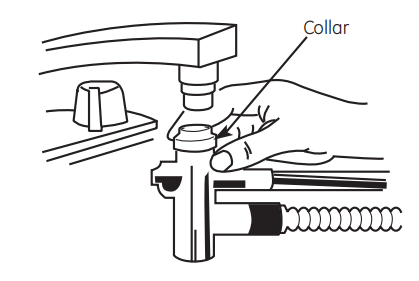
Connect the Unicouple to the Faucet (Portable Models Only)
- Run garbage disposer, if you have one, to clean out the disposer and thus allow water to drain from the sink through the disposer and down the drain.
- Run hot water faucet to purge cold water from the hot water line. The hot water must be between 120°F and 150°F for best wash performance.
- Roll the dishwasher to a position just in front of the sink.
- Pull the unicouple and its hoses completely out from storage compartment at rear of the dishwasher.
- Attach the unicouple to the faucet adapter following the three steps below:
- Depress the locking collar at the top of the unicouple.
- Place the unicouple completely over the faucet adapter.
- Release the locking collar. The unicouple should now be locked onto the faucet adapter
- Turn on the hot water faucet and check for leaks. If a unicouple leak was observed, take whatever actions are necessary to repair the leak. This may be as simple as tightening the faucet adapter. Or, it may require the services of a plumber if water is leaking from the interface between the moveable faucet arm and the fixed part of the faucet fastened to the sink.
NOTE: The unicouple’s small hose carries water from the faucet to the dishwasher. The large hose carries water from the dishwasher to the sink. Orient the faucet with the unicouple attached so water from the unicouple will run into the sink drain.
- Plug the dishwasher power cord into the electrical outlet.
Disconnect and Store Your Dishwasher (Portable Models Only)
Remove Power
- Unplug the dishwasher.
- Feed power cord back into its storage location.
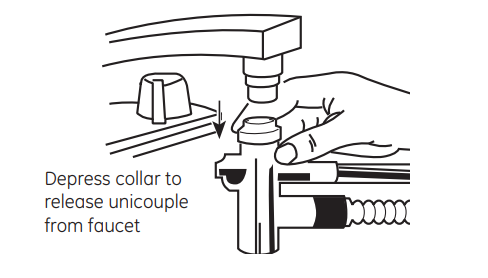
Remove Unicouple from Faucet
- Turn off hot water.
- Relieve water pressure from the unicouple assembly before disconnecting it from the faucet by depressing the red pressure relief button on the unicouple.

- Depress the locking collar and remove the unicouple from the faucet.
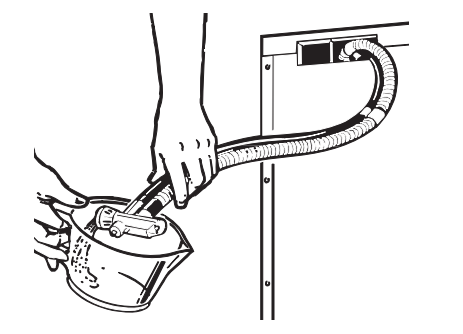
- Drain excess water from the unicouple. If the sink is 34” or higher from the floor, the excess water in unicouple hoses cannot be drained directly into the sink. It will be necessary to drain excess water from hoses into a bowl or suitable container that is held outside and lower than the sink.
- Feed the unicouple and hoses back into their storage pocket.
Store the Dishwasher
- Latch the dishwasher door closed.
- Roll the dishwasher into its storage location.
Care and cleaning
Control Panel
To clean the control panel, use a lightly dampened cloth. Then dry thoroughly.
Exterior Door Panel
Before cleaning the front panel, make sure you know what type of panel you have. Refer to the last two letters of your model number. You can locate your model number on the left-hand tub wall just inside the door. If your model number ends with BB or WW then you have a painted door panel. If your model number ends with SS, then you have a Stainless Steel door panel.
Follow the instructions below for cleaning the door panel for your specific model.
Painted Door Panel (model numbers ending in BB–black or WW–white)
Use a clean, soft, lightly dampened cloth, then dry thoroughly.
Do not use scouring pads or powered cleaners because these products can scratch the finish.
Stainless Steel Door Panel (model numbers ending in SS)
For cleaning rust and tarnish, cleaners with oxalic acid such as Bar Keepers Friend Soft Cleanser™ will remove rust, tarnish and small blemishes. Use only a liquid cleanser free of grit and rub in the direction of the brush lines with a damp soft sponge. Do not use appliance wax or polish on the stainless steel.
For other blemishes and marks, use Stainless Steel Magic or a similar product using a clean soft cloth. Do not use appliance wax, polish, bleach or products containing chlorine on Stainless Steel. You can order Stainless Steel Magic # WX10X29 through GE Appliances Parts by calling 877.959.8688. In Canada, call 800-661-1616.
Dishwasher Interior
To clean and de-odorize your dishwasher, use citric acid or Finish® Dishwasher Cleaner, a detergent additive. Finish® Dishwasher Cleaner will break up mineral deposits, and remove hard water film and stains.
You can order citric acid GE Appliances kit #WD35X151 through GE Appliances Parts by calling 877-959-8688 or visiting GEApplianceparts.com. In Canada, call 800-661-1616. You can purchase Finish® Dishwasher Cleaner at your local grocery store.
Upper Spray Head
Do NOT remove the upper spray head.
Clean with warm soapy water using a small plastic bristle brush.
Spray Arms
Because hard water chemicals will clog the spray arm jets and bearings, it is necessary to clean the spray arms regularly.
Wash the arms in soapy, warm water and use a soft brush to clean the jets. Replace them after rinsing thoroughly.
To remove the upper spray arm, twist the retaining nut 45° and pull the spray arm off the water supply tube.
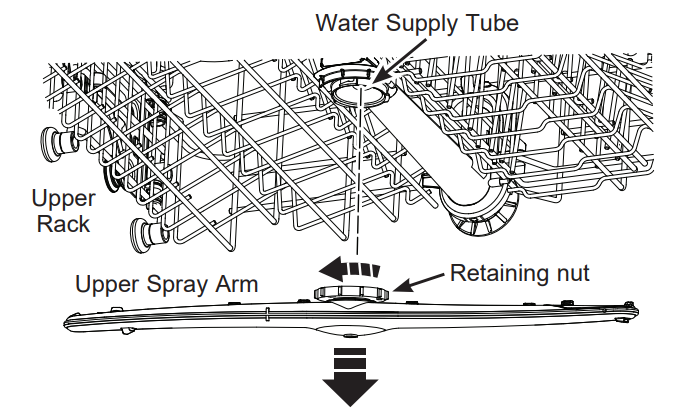
IMPORTANT: When replacing make sure to twist lock the retaining nut securely onto the water supply tube. Check that the spray arm is secure and that it rotates freely.
To remove the lower spray arm, remove the lower rack and lift spray arm out.
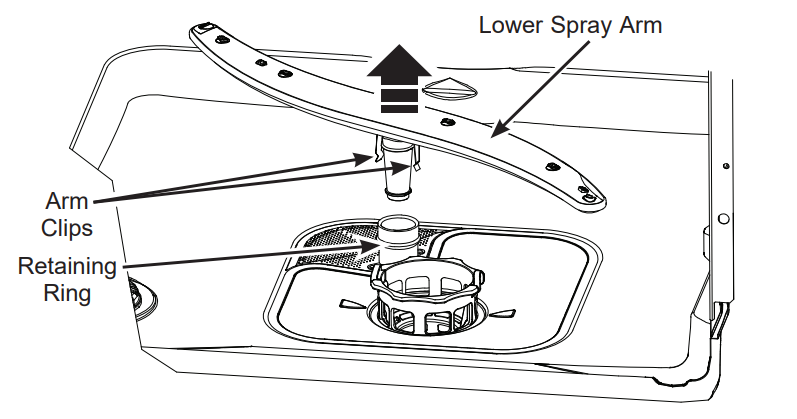
IMPORTANT: When replacing make sure to seat the arm clips over the retaining ring. Check that the spray arm is secure and that it rotates freely.
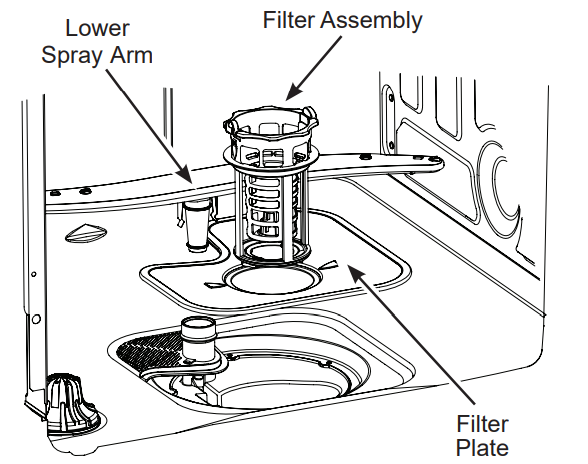
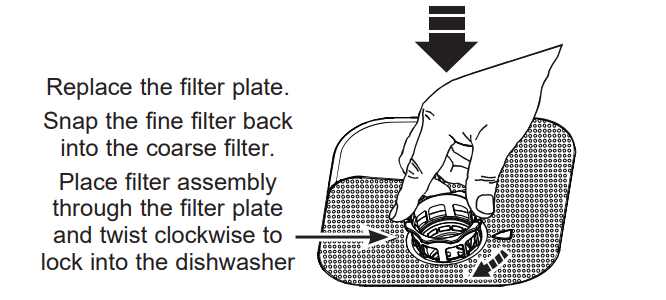
Filter Assembly
Inspect and clean the filters periodically. This should be done every month or more depending on usage. If there is a decrease in wash performance or dishes feel gritty, this is also an indication the filters need to be cleaned.
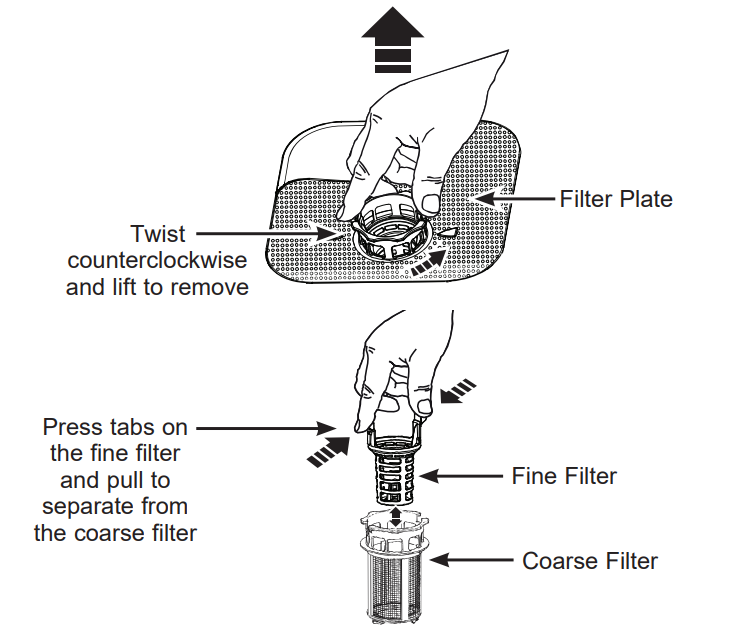
To clean the filter assembly, remove the bottom rack and lower spray arm. Twist the filter assembly counterclockwise and lift to remove. Remove the filter plate.
Rinse the filters with warm soapy water. Scouring pads or brushes can scratch the filter surfaces but a soft brush or sponge may be needed to remove stubborn soils or calcium deposits caused by hard water.
Once cleaned, replace the filter plate, insert the filter assembly through the plate and twist it clockwise until it locks in place. Make sure the filters are fully seated as improper replacement of the filters may reduce the performance level of the appliance. Replace the lower spray arm and lower rack.
IMPORTANT: Before replacing, make sure no objects have fallen into the opening in the bottom of the dishwasher.
Stainless Steel Inner Door and Tub
The stainless steel used to make the dishwasher tub and inner door provides the highest reliability available in a GE Appliances dishwasher.
If the dishwasher tub or inner door should be scratched or dented during normal use, they will not rust or corrode. These surface blemishes will not affect their function or durability.
Protect Against Freezing(Built-In Models Only)
If your dishwasher is left in an unheated place during the winter, ask a service technician to:
- Turn off electrical power to the dishwasher. Remove fuses or trip circuit breaker.
- Turn off the water supply and disconnect the water inlet line from the water valve.
- Drain water from the water inlet line and water valve. (Use a pan to catch the water.)
- Reconnect the water inlet line to the water valve.
Protect Against Freezing (Portable Models Only)
If your dishwasher is left in an unheated place during the winter, ask a service technician to:
- Unplug the dishwasher from the wall outlet.
- Turn the water off and remove the Unicouple from the faucet.
- Drain water from the Unicouple hose. (Use a pan to catch the water.)
Does Your Dishwasher Have an Air Gap?(Built-In Models Only)
An air gap protects your dishwasher against water backing up into it if a drain clogs. The air gap is not a part of the dishwasher. It is not covered by your warranty. Not all plumbing codes require air gaps, so you may not have one.

The air gap is easy to clean.
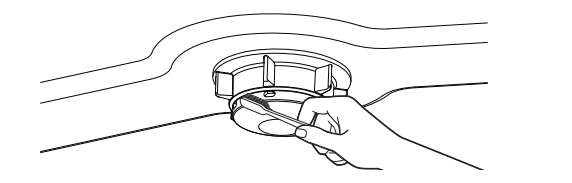
- Turn off the dishwasher and lift off the air gap cover.
- Remove the plastic cap under the cover and clean with a toothpick.
- Replace the cap and cover when the air gap is clean.
Troubleshooting Tips
Before you call for service
| Problem |
Possible Cause |
What To Do |
|
Start status indicator light flashing
|
The door was opened or the cycle was interrupted.
|
- Press the Start button once and close the door within 4 seconds to start the dishwasher. Press the Start button a second time when the dishwasher is running only if you wish to cancel the cycle.
|
|
Dishwasher BEEPS once every minute
|
This is a reminder that your dishwasher door has been left open during operation. It will continue beeping until you press Start and close the door.
|
- Press Start and close the door.
|
|
Beeping at the end of the cycle
|
This is normal. Dishwasher will beep twice at the end of the cycle.
|
- The dishwasher will beep (unless interupted) and the Clean light will display at the end of the wash cycle.
|
|
Dishes and flatware not clean
|
Filter assembly is clogged
|
- See the Care and Cleaning section.
|
|
Low inlet water temperature
|
- Make sure inlet water temperature is correct (see the USING THE DISHWASHER section). Turn on the hot water faucet nearest the dishwasher, let run until the water temperature stops rising. Then start the dishwasher and turn off the faucet. This ensures the entering water is hot. Select Wash Temp - Boost.
|
|
Water pressure is temporarily low
|
- Turn on a faucet. Is water coming out more slowly than usual? If so, wait until pressure is normal before using your dishwasher. Normal water pressure to the dishwasher should be 20-120 psi.
|
|
Air gap or disposer clogged (Built-In Models Only)
|
- Clean the air gap or flush the disposer.
|
|
High drain loop or air gap not installed (Built-In Models Only)
|
- Refer to the Installation Instructions for proper drain line installation.
|
|
Improper rack loading
|
- Make sure large dishware does not block the detergent dispenser or the wash arms. See the Loading section.
|
|
Poor performing detergent
|
- Use a highly rated detergent such as Finish® Quantum® Automatic Dishwashing Detergent.
|
|
Spots and filming on glasses and flatware
|
Extremely hard water
|
- Use rinse agents such as Finish® Jet-Dry® Rinse Aid to prevent spots and prevent new film build-up. If water is extremely hard, a softener may be required.
|
|
Low inlet water temperature
|
- Make sure water temperature is at least 120°F (49°C).
|
|
Overloading or improper loading of the dishwasher
|
- Load dishwasher as shown in the Loading section.
|
|
Old or damp powder detergent
|
- Make sure detergent is fresh. Use a highly rated detergent such as Finish® Quantum® Automatic Dishwashing Detergent.
|
|
Rinse agent dispenser empty
|
- Refill with rinse agent such as Finish® Jet-Dry® Rinse Aid.
|
|
Too little or low performing detergent
|
- Make sure you use the proper amount of highly rated detergent.
|
|
Cloudiness on glassware
|
Combination of soft water and too much detergent
|
- This is called etching and is permanent. To prevent this from happening, use less detergent if you have soft water. Wash glassware in the shortest cycle that will get it clean.
|
|
Low performing phosphatefree detergent
|
- See A white film on glassware, dishware and the interior in this TROUBLESHOOTING section.
|
|
Water temperature entering the dishwasher exceeds 150°F (66°C)
|
- This could be etching. Lower the water heater temperature.
|
|
Suds in the tub
|
Wrong detergent
|
- Use only automatic dishwasher detergents to avoid sudsing. Finish® Quantum® Automatic Dishwashing Detergent has been approved for use in all GE Appliances dishwashers.
|
|
Rinse agent was spilled
|
- Always wipe up rinse agent spills immediately.
|
| Detergent left in dispenser cups |
Dishes or utensils are blocking the detergent cup |
- Reposition the dishes, so the water from the lower spray arm can flush the detergent cup. See the Loading section. Reposition the tall utensils or heavy silverware that may be keeping the dispenser cup door from opening. See the Loading section. Don’t place large bowls or pots directly under the detergent dispenser
|
| Black or gray marks on dishes |
Aluminum utensils have rubbed against dishes |
- Remove marks with a mild, abrasive cleaner
|
| Dishes don’t dry |
Door not opened immediately after Clean light came on |
- For proper drying, the dishwasher door must be opened immediately after the Clean light comes on.
|
|
| Low inlet water temperature |
- Make sure inlet water temperature is at least 120°F. Use Wash Temp Boost. Select a higher cycle, such as Heavy.
|
|
| Rinse agent dispenser is empty |
- Check the rinse agent dispenser and fill as required.
|
|
| Control panel responded to inputs but dishwasher never filled with water |
Door may not be completely closed
|
- Make sure the door is firmly closed.
|
|
| Water valve may be turned off |
- Make sure water valve (usually located under the sink) is turned on.
|
|
| |
|
|
| Stained tub interior |
White film on inside surface— hard water minerals |
- We recommend Finish® Jet-Dry® Rinse Aid to help prevent hard water mineral deposits from forming. Run dishwasher with citric acid to remove mineral deposits. Citric acid (Part number: WD35X151) can be ordered through GE Appliances Parts. See back cover for ordering information. Alternatively, purchase Finish® Dishwasher Cleaner and follow the directions on the label.
|
|
| An overall yellow or brown film can be caused by iron deposits in water |
- A special filter in the water supply line is the only way to correct this problem. Contact a water softener company.
|
| Dishwasher won’t run |
Fuse is blown or circuit breaker is tripped
|
- Replace fuse or reset circuit breaker. Remove any other appliances from the circuit.
|
|
| Power is turned off |
- In some installations, the power to the dishwasher is provided through a wall switch, often located next to the disposer switch. Make sure it is on.
|
|
| Control panel is locked |
- Unlock control panel. See the Getting started section.
|
|
| Reboot your control |
- Turn off power to the dishwasher (at circuit breaker or wall switch) for 30 seconds, then turn back on.
|
|
| |
|
|
| Control panel lights go off when you’re setting controls |
Time too long between touching of selected pads |
- Each pad must be touched within 30 seconds of the others. To relight, touch any pad again or open the door and unlock.
|
|
| Water standing in the bottom of the tub |
Air gap is clogged
|
- Clean the air gap. See the Care and Cleaning section.
|
|
| High drain loop or air gap not installed |
- Refer to the Installation Instructions for proper drain line installation.
|
|
| Water won’t pump out of the tub |
Drain is clogged |
- If you have an air gap, clean it. See the Care and Cleaning section. If the dishwasher drains into a disposer, run disposer clear. Check to see if your kitchen sink is draining well. If not, you may need a plumber.
|
|
| |
|
|
|
| Sanitized or Cycle Sanitized light does not illuminate at the end of the cycle |
The door was opened and the cycle was interrupted during final rinse
|
- Do not interrupt the cycle by opening the door during the wash cycle.
|
|
| The incoming water temperature was too low |
- Raise the water heater temperature to between 120°F and 150°F.
|
|
| Noise |
Normal operating sounds:
Beeping at the end of the cycle (on some models)
Detergent cup opening Water entering dishwasher Motor stops and starts at various times during cycle Spray arms start and stop at various times
Drain pump sounds during pump out
Drain pump starts and stops several times during each drain
|
- These are all normal. No action is required.
|
|
| Rattling dishes when the spray arm rotates |
- Make sure dishes are properly loaded. See the Loading section.
|
|
| Rattling silverware against door during wash |
- Tall utensils may be placed in the upper rack to avoid bumping against inner door during wash cycle.
|
|
| A white film on glassware, dishware and the interior |
This problem is likely caused by a low quality phosphate-free dishwasher detergent |
- To remove the white film, run your dishes through a dishwasher cycle with citric acid. Use a WD35X151 citric acid kit found online. Otherwise, use Finish® Dishwasher Cleaner found at your local grocery store. Pour the citric acid in the detergent cup and close the cover. Place the filmed but otherwise clean glassware and dishware in the dishwasher. Leave silverware and other metal items out of the dishwasher. Turn the dishwasher on and let it run through a complete cycle without detergent. The glassware, dishware, and dishwasher should come out film free. Alternatively, a vinegar rinse may be used. Pour 1 cup of vinegar into dishwasher just after the detergent cup opens and let the dishwasher complete its cycle. This may be repeated several times a year as needed. The use of a rinse agent such as Finish® Jet-Dry® Rinse Aid may help minimize a repeat build up of film. Also, the use of a highly rated detergent such as Finish® Quantum® Automatic Dishwashing Detergent will help prevent film build-up.
|
|
Forget to Add a Dish?
Additional items may be added to the dishwasher at any time, ideally items would be added shortly after starting a wash cycle.
- Open the door to interrupt the cycle. Pull the door handle to release the door.
- Do not open the door all the way until the water spray action stops. Steam may rise out of the dishwasher.
- Add additional items.
- Press Start and close the door within 4 seconds to resume the cycle