Turning the dial to OFF stops cooling in both compartments - fresh food and freezer. It does not shut off power to the refrigerator.
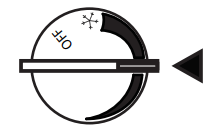
Temperature Control Dial (on some models)
The temperature control dial adjust refrigerator from warmest to coldest. The recommended factory setting is shown in illustration to the left. For colder temperature turn dial clockwise toward snowflake. For warmer temperature turn dial counter clockwise away from snowflake. Allow 24 hours for adjustment.
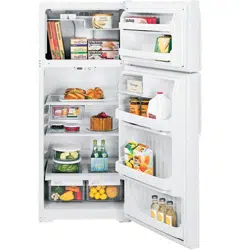
About the fresh food compartment shelves.
Shelf supports at various levels allow you to custom-space your shelves. Not all features are on all models.
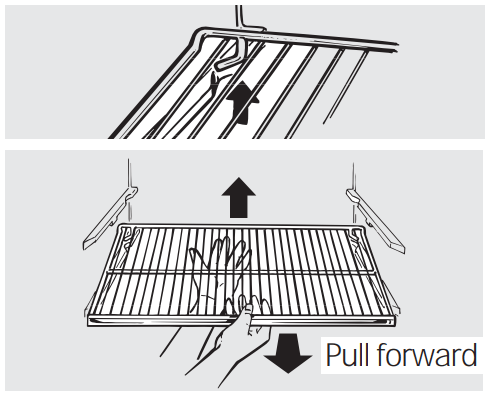
Half-Width Shelves
One end of the shelf rests on a molded side-wall support; a bracket on the other end hooks into a track on the rear cabinet wall.
To remove, lift the shelf up at front, then off the support and out of the track.
To replace, select desired shelf height. With shelf front raised slightly, hook the bracket’s top lug into the track, then lower the shelf onto the support.
NOTE: The shelf to the right of the track is designed to hook into the right-hand slot; the shelf to the left is designed to hook into the left-hand slot.
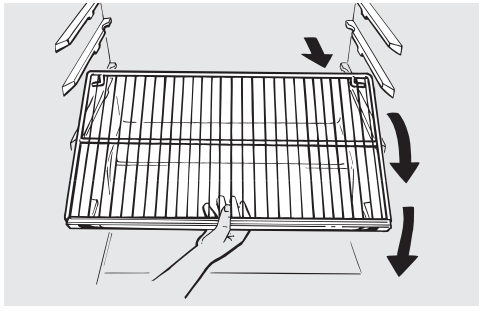
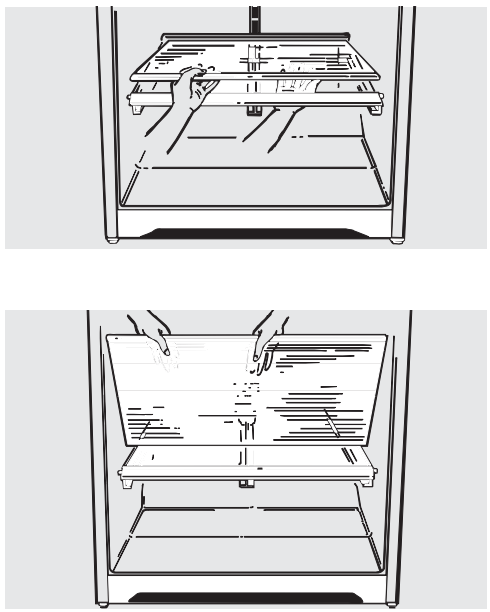
Full-Width Shelves
Some models have a stationary tempered glass shelf, a spillproof shelf or two steel wire stationary shelves. These shelves can be moved to another place in the fresh food compartment.
When placed correctly on the shelf supports, the shelf will stop before coming completely out of the refrigerator and will not tilt when you place food on it or remove food from it.
To remove the full-width shelves
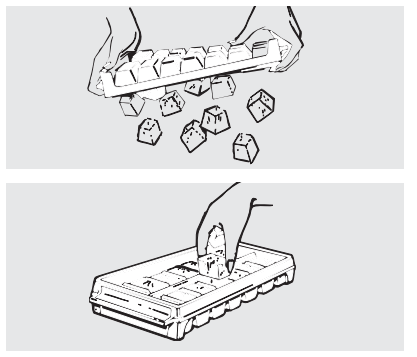
Ice Trays (on some models)
Ice trays are designed to release ice cubes easily. Hold tray upside-down over a container and twist both ends to release cubes.
For only one or two ice cubes, leave the tray right-side up, twist both ends slightly and remove desired number of cubes. Wash ice trays and storage bin in lukewarm water only. Do not put them in an automatic dishwasher.
About the freezer compartment shelves.
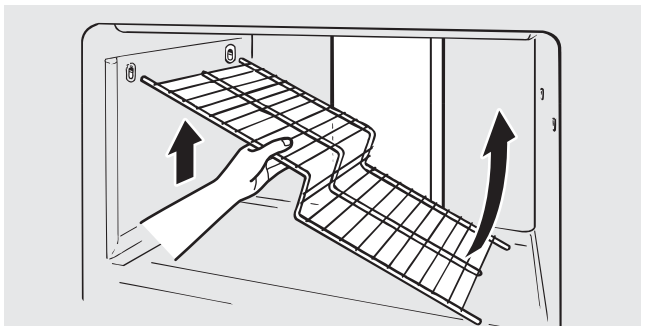
Step Shelf (on some models)
To remove the step shelf:
Lift left side of shelf slightly.
Move shelf to the left to free its right ends from holes in the cabinet wall.
Lower right side of shelf, move shelf to the right and take it out.
To replace the step shelf:
With shelf tilted as shown, fit left ends of shelf into holes in cabinet wall.
Lift left side of shelf slightly, swing shelf up, fit right ends of shelf into holes in cabinet wall, and lower shelf into place.
About the storage drawers.
Not all features are on all models.
Snacks Drawer
The snacks drawer can be moved to the most useful location for your family’s needs.
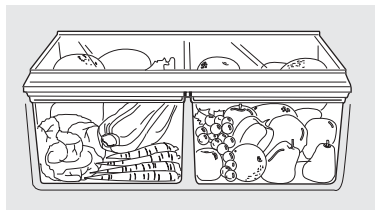
Fruit and Vegetable Drawers
Excess water that may accumulate in the bottom of the drawers should be emptied and the drawers wiped dry.
About storage drawer and cover removal.
Not all features are on all models.
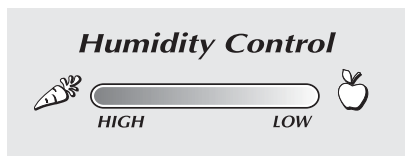
Adjustable Humidity Drawer (on some models)
Slide the control all the way to the HIGH setting to provide high humidity recommended for most vegetables.
Slide the control all the way to the LOW setting to provide lower humidity levels recommended for most fruits.
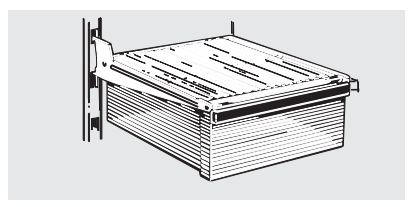
Drawer and Cover Removal
Drawers can be removed easily by grasping the sides and lifting up slightly while pulling drawers past the stop location.
To remove the cover, lift it off its support, pull it forward, tilt it and take it out.
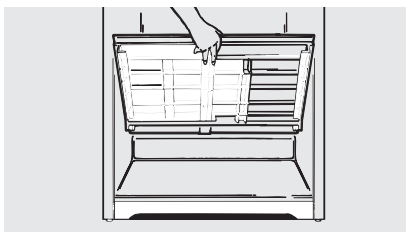
Twin Drawer Shelf
To remove:
Remove the drawers.
Reach in, push the front of glass cover up, and at the same time, pull it forward as far as it will come. Tilt it and take it out. Avoid cleaning the cold glass cover with hot water because the extreme temperature difference may cause to break.
Remove the drawer frame. (Always remove the glass cover before you take out the drawer frame.)
Lift the frame off the supports at each side and back, pull it forward, tilt it and take it out.
To replace:
Lower the frame until it rests on the supports at each side and back.
Replace the glass cover, pushing its rear edge firmly into the rear frame channel and gently lowering the front into place.
Replace the drawers.
About the automatic icemaker
A newly-installed refrigerator may take 12–24 hours to begin making ice.
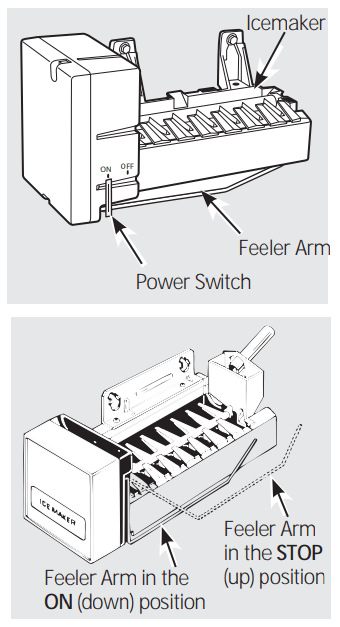
Automatic Icemaker (on some models).
The icemaker will produce approximately 70-100 cubes. in a 24-hour period, depending on the freezer compartment temperature, room temperature, number of door openings and other use conditions.
If the refrigerator is operated before the water connection is made to the icemaker, set the switch OFF or move the feeler arm to the STOP (up) position.
When the refrigerator has been connected to the water supply, set the switch ON position or move the feeler arm to the ON (down) position.
The icemaker will fill with water when it cools to 15°F. A newly-installed refrigerator may take 12 to 24 hours to begin making ice cubes.
Once the icemaker starts to make ice, it may take up to 48 hours to fill the bin, depending on the temperature settings and number of door openings.
You will hear a buzzing sound each time the icemaker fills with water.
Throw away the first few batches of ice to allow the water line to clear.
Be sure nothing interferes with the sweep of the feeler arm.
When the bin fills to the level of the feeler arm, the icemaker will stop producing ice.
It is normal for several cubes to be joined together.
If ice is not used frequently, old ice cubes will become cloudy, taste stale, shrink or fuse together.
Icemaker accessory kit:
If your refrigerator did not already come equipped with an automatic icemaker, an icemaker accessory kit is available at extra cost.
Check the back of the refrigerator for the specific icemaker kit needed for your model.
Care and cleaning of the refrigerator.
Cleaning the Outside
The door handles and trim (on some models). Clean with a cloth dampened with soapy water. Dry with a soft cloth.
Keep the outside clean. Wipe with a clean cloth lightly dampened with kitchen appliance wax or mild liquid dish detergent. Dry and polish with a clean, soft cloth.
Do not wipe the refrigerator with a soiled dish cloth or wet towel. These may leave a residue that can erode the paint. Do not use scouring pads, powdered cleaners, bleach or cleaners containing either bleach or ammonia because these products can scratch and weaken the paint finish.
The stainless steel doors and door handles (on some models) can be cleaned with a commercially available stainless steel cleaner. Cleaners with oxalic acid such as Bar Keepers Friend Soft Cleanser™ will remove rust, tarnish and small blemishes. Use only a liquid cleanser free of grit and rub in the direction of the brush lines with a damp soft sponge. Do not use appliance wax or polish on the stainless steel.
Cleaning the Inside
To help prevent odors, leave an open box of baking soda in the fresh food and freezer compartments.
Unplug the refrigerator before cleaning.
If this is not practical, wring excess moisture out of sponge or cloth when cleaning around switches, lights or controls.
Use warm water and baking soda solution - about a tablespoon (15 ml) of baking soda to a quart (1 liter) of water. This both cleans and neutralizes odors. Rinse and wipe dry.
After cleaning the door gaskets, apply a thin layer of petroleum jelly to the door gaskets at the hinge side. This helps keep the gaskets from sticking and bending out of shape.
Avoid cleaning cold glass shelves (on some models) with hot water because the extreme temperature difference may cause them to break. Handle glass shelves carefully. Bumping tempered glass can cause it to shatter.
Do not wash any plastic refrigerator parts in the dishwasher.
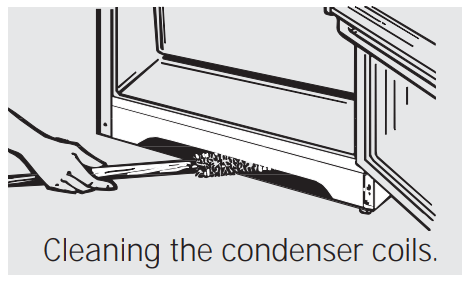
Condenser
There is no need for routine condenser cleaning in normal home operating environments. However, in environments that may be particularly dusty or greasy, the condenser should be cleaned periodically for efficient refrigerator operation.
To clean the condenser, turn the temperature control dial to OFF. Sweep away or vacuum up dust.
For best results, use a brush specially designed for this purpose. It is available at most appliance parts stores.
Moving the Refrigerator
Be careful when moving the refrigerator away from the wall. All types of floor coverings can be damaged, particularly cushioned coverings and those with embossed surfaces.
Turn the leveling legs at each front corner of the refrigerator counterclockwise until the rollers support the refrigerator. Pull the refrigerator straight out and return it to position by pushing it straight in. Moving the refrigerator in a side direction may result in damage to the floor covering or refrigerator.
When pushing the refrigerator back, make sure you don’t roll over the power cord or icemaker supply line (on some models).
After rolling the refrigerator back into place, turn the legs clockwise until the legs again bear the weight of the refrigerator.
Light Bulb Replacement
To replace a burned-out bulb, unplug the refrigerator from its electrical outlet, unscrew the bulb when cool and replace it with an appliance bulb of the same or lower wattage.
Turning the control to the OFF position does not remove power to the light circuit.
Preparing for Vacation
For long vacations or absences, remove food and unplug the refrigerator. Move the temperature control dial to the OFF position, and clean the interior with a baking soda solution of one tablespoon (15 ml) of baking soda to one quart (1 liter) of water. Leave the doors open.
Move the feeler arm to the STOP (up) position,or move the switch to the OFF position on the power switch model, and shut off the water supply to the refrigerator.
If the temperature can drop below freezing, have a qualified servicer drain the water supply system (on some models) to prevent serious property damage due to flooding.
Preparing to Move
Secure all loose items such as grille, shelves and drawers by taping them securely in place to prevent damage. Be sure the refrigerator stays in an upright position during moving.
Troubleshooting Tips
Problem
Possible Causes
What To Do
Refrigerator does not operate
Refrigerator in defrost cycle.
Wait about 30 minutes for defrost cycle to end.
Temperature control dial in OFF position.
Move the temperature control dial to a temperature setting.
Refrigerator is unplugged.
Push the plug completely into the outlet.
The fuse is blown/circuit breaker is tripped.
Replace fuse or reset the breaker.
Vibration or rattling (slight vibration is normal)
Roller screws or leveling legs need adjusting.
See Rollers and Leveling Legs.
Fresh food or freezer compartment too warm
Temperature control dial not set cold enough.
See About the temperature control dial.
Warm weather or frequent door openings.
Set the temperature control dial one step colder. See About the temperature control dial.
Door left open.
Check to see if package is holding door open.
Package blocking air duct in freezer compartment.
Check to see if package is blocking air duct in freezer compartment.
Motor operates for long periods or cycles on and off frequently. (Modern refrigerators with more storage space and a larger space and a larger freezer require more operating time. They start and stop often to maintain even temperatures.)
Normal when refrigerator is first plugged in.
Wait 24 hours for the refrigerator to completely cool down.
Often occurs when large amounts of food are placed in refrigerator
This is normal.
Door left open.
Check to see if package is holding door open.
Hot weather or frequent door openings.
This is normal.
Temperature control dial set at the coldest setting.
See About the temperature control dial.
Grille and condenser need cleaning.
See Care and cleaning.
Frost or ice crystals on frozen food (frost within package (frost within package is normal)
Door left open.
Check to see if package is holding door open.
Too frequent or too long door openings.
Automatic icemaker does not work (on some models)
Icemaker is not on.
Move the feeler arm to the ON (down) position,or on the power switch model, move the switch to the ON position.
Water supply turned off or not connected.
See Installing the water line.
Freezer compartment too warm.
Wait 24 hours for the refrigerator to completely cool down.
Piled up cubes in the storage bin cause the icemaker to shut off.
Level cubes by hand.
Frequent “buzzing” sound
Icemaker is on but the water supply to the refrigerator has not been connected.
Move the feeler arm to the STOP (up) position or move the power switch to the OFF position. Keeping it on will damage. the water valve.
Cubes too small
Water shutoff valve connecting refrigerator to water line may be clogged.
Call the plumber to clear the valve.
Slow ice cube freezing
Door left open.
Check to see if package is holding door open.
Temperature control dial not set cold enough.
See About the temperature control dial.
Ice cubes have odor/taste
Ice storage bin needs cleaning.
Empty and wash bin. Discard old cubes.
Food transmitting odor/taste to ice cubes.
Wrap foods well.
Interior of refrigerator needs cleaning.
See Care and cleaning.
Moisture forms on cabinet surface between the doors
Not unusual during periods of high humidity.
Wipe surface dry and reset temperature control dial one setting colder.
Moisture collects inside (in humid weather, air carries moisture into refrigerator when doors are opened)
Too frequent or too long door openings.
Refrigerator has odor
Foods transmitting odor to refrigerator.
Foods with strong odors should be tightly wrapped.
Keep an open box of baking soda in the refrigerator, replace every three months.
 Temperature Control Dial (on some models)