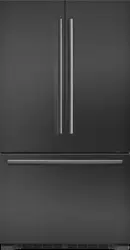
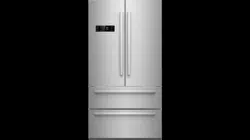
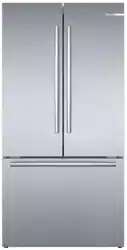
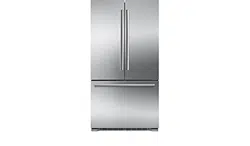
User Manual French Door Refrigerator
Getting to know your appliance
These operating and installation instructions apply to several models. The illustrations may differ from your particular model.
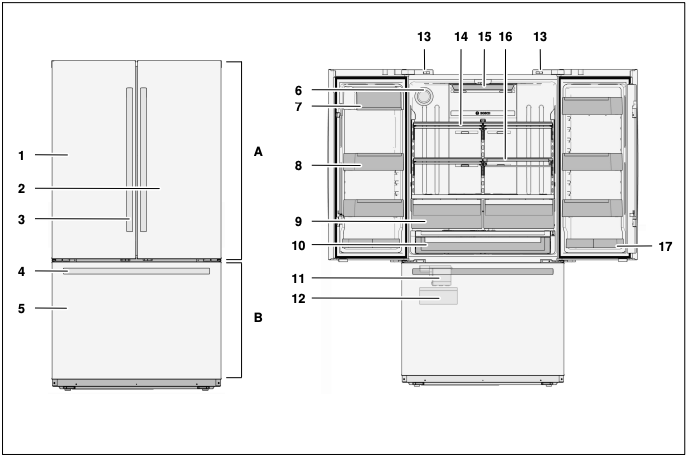
- A Refrigerator compartment can be adjusted between 34 °F (+1 °C) and 44 °F (+7 °C)
- B Freezer compartment can be adjusted between 9 °F (-13 °C) and -8 °F (-22 °C)
- 1 Left door for refrigerator compartment
- 2 Right door for refrigerator compartment
- 3 Door handle
- 4 Drawer handle
- 5 Freezer drawer
- 6 Water filter
- 7 Dairy bin
- 8 Door bin
- 9 Crisper drawers
- 10 Chiller drawer
- 11 Ice maker
- 12 Ice storage box
- 13 Switch for refrigerator compartment lamp
- 14 Adjustable shelf
- 15 Control and display panel
- 16 Retractable Shelf
- 17 Small tray
Control and display panel
Display
After the appliance is switched on and the refrigerator door is opened, the display panel light illuminates and stays lit up for 30 seconds. Then the lights go out.
Display control
After 30 seconds with no actions for door opening and no button operation the display panel light will go out. Every time the door is opened, closed or the display is touched, the display panel returns to normal.
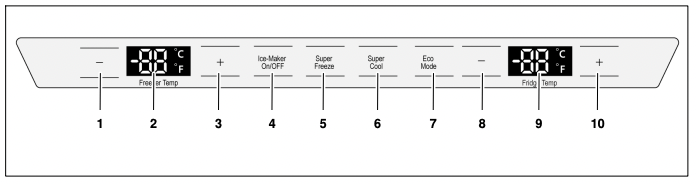
1 “Freezer Temp. –” button
Button for down-regulation of the temperature in the freezer compartment
2 Freezer compartment temperature display
Displays the temperature set for the freezer compartment.
3 “Freezer Temp. +” button
Button for up-regulation of the temperature in the freezer compartment
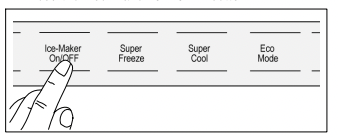
4 ”Ice Maker On/OFF” button
Button for switching the ice maker on and off.
5 “Super Freeze” button
Button for switching the ”Super freeze” function on and off.
6 “Super Cool” button
Button for switching the ”Super Cool” function on and off.
7 ”Eco Mode” button
Button for switching the Eco Mode on and off.
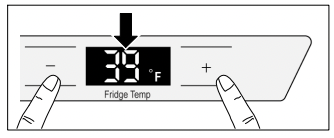
8 ”Fridge Temp. –” button
Button for down-regulation of the temperature in the refrigerator compartment
9 Refrigerator compartment temperature display
Displays the temperature set for the refrigerator compartment.
10 ”Fridge Temp. +” button
Button for up-regulation of the temperature in the refrigerator compartment
Operating tips
Opening and closing the refrigerator compartment doors
The refrigerator compartment doors can be opened and closed independently.
The left refrigerator compartment door has a foldaway door bar.

Risk of damage to the appliance! The door bar could become damaged if you attempt to close the left refrigerator compartment door when the door bar is not folded back. Before closing the refrigerator compartment doors, make sure that the door bar is folded at a right angle to the door.
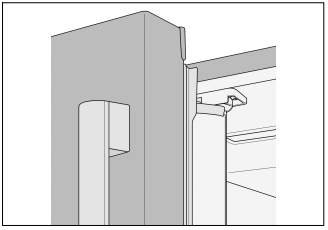
When closing the left refrigerator compartment door, the door bar folds behind the right refrigerator compartment door, forming a seal between the refrigerator compartment doors.
Switching on the appliance
After installing the appliance, wait at least 6 hours before plugging in the appliance. The oil in the compressor may have flowed into the refrigeration system during transport.
Connect the appliance plug to the outlet.
After the appliance has been plugged in, the refrigeration process will begin. The interior light in the refrigerator compartment switches on when the door is open.
It will take several hours for the inside of the appliance to reach the temperatures set at the factory. Do not place food in the appliance until these temperatures are reached.
Initial temperature
- Refrigerator compartment: 39 °F (+4 °C)
- Freezer compartment: 0 °F (-18 °C).
Setting the temperature
Freezer compartment
The temperature can be adjusted between 9 °F (-13 °C) up to -8 °F (-22 °C).
1. Press the “Freezer Temp. –" or the “Freezer Temp. +" button.
The freezer compartment temperature illuminate.
2. Repeatedly press the “Freezer Temp. –" or the “Freezer Temp. +" button until the desired freezer compartment temperature is set.
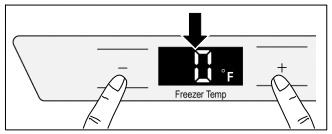
The temperature cannot be set circularly; every time the temperature will increase by 1 °F (1 °C) after the button is pressed once.
After the temperature adjustment is completed, the new temperature setting will be active for 15 seconds after button was pressed.
We recommend a setting of 0 °F (-18 °C).
Refrigerator compartment
The temperature can be adjusted between 34 °F (+1 °C) up to 44 °F (+7 °C).
1. Press the "Fridge Temp. –" or the "Fridge Temp. +" button.
The refrigerator compartment temperature illuminate.
2. Repeatedly press the "Fridge Temp. –" or the "Fridge Temp. +" button until the desired refrigerator compartment temperature is set.
The temperature cannot be set circularly; every time the temperature will increase by 1 °F (1 °C) after the button is pressed once.
After the temperature adjustment is completed, the new temperature setting will be active for 15 seconds after button was pressed.
We recommend a setting of 39 °F (+4 °C).
Perishable foods should not be stored at temperatures higher than 39 °F (+4 °C)
Temperature unit
The temperature can be displayed in degrees Fahrenheit (°F) or Celsius (°C).
After the appliance is switched on, the temperature appears in degrees Fahrenheit (°F).
To set the temperature unit:
Press the “Freezer Temp. –" and the Freezer Temp. +" button for 3 seconds.

The temperature unit switches.
Super Freeze
Food should be frozen as quickly as possible in order to retain their vitamins, nutritional value, appearance and flavor.
To prevent an undesirable rise in temperature when placing fresh food in the freezer compartment, switch on Super Freeze several hours beforehand.
As a rule, 4 to 6 hours is adequate. Allow for a minimum of 24 hours if planning to use the maximum freezing capacity.
Smaller quantities of food can be frozen without Super Freeze.
To switch on Super Freeze:
Press the ”Super Freeze” button.
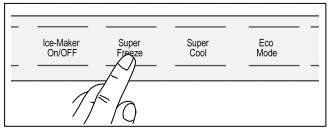
The corresponding button lamp lights up.
The temperature is set to -8 °F (-22 °C).
To switch off Super Freeze:
Press the ”Super Freeze” button.
The corresponding button lamp goes out.
After 6 hours Super Freeze mode will turn off automatically
Super Cool
Super Cool cools the refrigerator compartment down as low as possible.
Super Cool is particularly recommended for the following:
- Before placing large quantities of food in the refrigerator compartment.
- To cool drinks quickly.
To switch on Super Cool:
Press the ”Super Cool” button.
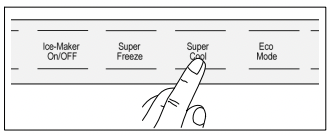
The corresponding button lamp lights up.
The temperature is set to 34 °F (+1 °C).
To switch off Super Cool:
Press the ”Super Cool” button. The corresponding button lamp goes out.
After 2.3 hours, Super Cool mode will turn off automatically.
Eco Mode
This mode is for going on vacation or not using the refrigerator for a long period of time.
The temperature of refrigerator compartment is automatically set to 44 °F (7 °C) and the temperature of the freezer compartment is set to 5 °F (-15 °C).
To switch on Eco Mode:
Press the ”Eco Mode” button.
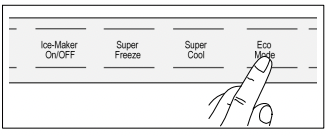
The corresponding button lamp lights up.
To switch off Eco Mode:
Press the ”Eco Mode” button. The corresponding button lamp goes out.
Refrigerator compartment
 WARNING Risk of explosion! Do not store explosive substances in the appliance.
The Refrigerator compartment is the ideal storage location for ready meals, cakes and pastries, preserved food, condensed milk, milk, cheese, spreads, sauces, dips and eggs.
When purchasing food, please note
The freshness at point of purchase is important for the shelf-life of your food. In principle, the fresher the produce when placed in the crisper drawers, the longer it stays fresh. Therefore, when buying food, always pay attention to the degree of freshness. Observe the expiration date specified by the manufacturer for ready products and bottled products.
Arranging Food in the Appliance
- Wrap or cover food before placing in the appliance. This will retain the aroma, color and freshness of the food. In addition, flavors will not be transferred between foods and the plastic parts in the appliance will not become discolored.
- Allow warm food and drinks to cool down before placing in the appliance.
- Do not block air outlet openings with food in the refrigerator compartment, otherwise the air circulation will be impaired. Food which is stored directly in front of the air outlet openings may be frozen by the cold air flowing out.
- Avoid contact of oil and fat with the plastic parts and door seal.
Fresh food compartment
The following foods are suitable for keeping in the fresh food compartment
- Fish, seafood, meat, sausage and cold meats, dairy products, ready meals
- Vegetables (e.g. carrots, asparagus, celery, leeks, beetroot, mushrooms, cabbage, broccoli, cauliflower, sprouts, kohlrabi)
- Lettuce varieties (e.g. lamb's lettuce, iceberg, chicory, round lettuce)
- Herbs (e.g. dill, parsley, chives, basil)
- Fruit (varieties not sensitive to cold, e.g. apples, peaches, berries, grapes).
CAUTION After power failure or disconnection of the appliance from the power source, the temperature of the fresh food compartment must be readjusted.
Freezer compartment
WARNING Risk of explosion! Never store products containing flammable propellants (such as spray cans) or explosive or easily combustible substances in the appliance.
CAUTION Do not refreeze thawing or thawed food. Never keep frozen food longer than the maximum storage duration.
Using the freezer compartment
- To store deep-frozen food.
- To freeze food.
- To make and store ice cubes.
Make sure that the freezer compartment drawers are always kept closed. The frozen food will thaw if the freezer compartment drawers are open. The freezer compartment will become covered with thick ice. Also: Energy will be lost due to high power consumption.
When the freezer compartment drawers are closed, low pressure occurs inside the compartment.
If you cannot reopen the freezer compartment drawers right away, wait two to three minutes until the low pressure has adjusted itself.
Freezing food
Purchasing Frozen Food
- Packaging must not be damaged.
- Use by the “expiration” date.
- Temperature in the supermarket freezer must be 0 °F (-18 °C) or lower.
- If possible, transport deep-frozen food in an insulated bag and place immediately in the Freezer Compartment.
Freezing fresh food
Freeze fresh and undamaged food only.
To retain the best possible nutritional value, flavor and color, vegetables should be blanched before freezing. Eggplants, peppers, zucchini and asparagus do not require blanching.
Literature on freezing and blanching can be found in bookshops.
Keep food that is to be frozen away from food that is already frozen.
- The following foods are suitable for freezing: Cakes and pastries, fish and seafood, meat, game, poultry, vegetables, fruit, herbs, eggs without shells, dairy products such as cheese, butter and quark, and ready meals and leftovers such as soups, stews, cooked meat and fish, potato dishes, soufflés and desserts.
- The following foods are not suitable for freezing: Types of vegetables that are usually consumed raw such as lettuce or radishes, eggs in shells, grapes, whole apples, pears and peaches, hard-boiled eggs, yogurt, butter milk, sour cream, crème fraîche and mayonnaise.
Packing Frozen Food
To prevent food from losing its flavor or drying out, place in airtight containers.
- Place food in packaging.
- Remove air.
- Seal the wrapping.
- Label packaging with contents and date of freezing.
Suitable Packaging:
Cling wrap, polyethylene hose film, aluminum foil, freezer containers. These products are available from specialist outlets.
Unsuitable Packaging:
Wrapping paper, greaseproof paper, cellophane, bin liners and used shopping bags.
Items Suitable for Sealing Packaged Food:
Rubber bands, plastic clips, string, cold-resistant adhesive tape, etc. Bags and tubular film made of polyethylene can be sealed with a film heat sealer.
Storage life of frozen food
The storage life depends on the type of food. At a temperature setting of 0 °F (-18 °C):
- Fish, sausage, ready meals, cakes and pastries: up to 6 months
- Cheese, poultry and meat: up to 8 months
- Fruit and vegetables: up to 12 months.
Thawing frozen food
CAUTION Risk of poisoning! Do not refreeze food that is beginning to thaw or has already thawed. The food cannot be refrozen until it has been prepared (boiled or fried). Do not store these refrozen products for the maximum storage period.
Depending on the type of food and its intended use, frozen food can be thawed as follows:
- in the refrigerator compartment
- in an electric oven with/without fan-assisted hot air
- in the microwave.
Ice maker
The ice maker makes ice cubes.
When the ice storage box is full, the ice maker stops ice production automatically.
The ice maker is capable of producing 2.8 - 3.3 lb kg) of ice in 24 hours depending on the temperature of freezer compartment, surrounding temperature, frequency of door opening/closing and other working conditions.
Points to observe when switching on for the first time
The ice maker only functions when the appliance is connected to the water supply.
The ice maker starts to make ice cubes as soon as the appliance has reached the set temperature.
When using the ice maker for the first time, do not use the first 30 to 40 ice cubes for reasons of hygiene.
Switching on
1. Make sure that ice storage box is in its place and locked into position.
2. Press the ”Ice Maker On/OFF” button

The corresponding button lamp lights up.
Before the ice maker is switched on again after a long period, clean the ice cube maker and the ice storage box.
When the ice maker is switched on, the temperature for the freezer compartment automatically shown on the display is 0° F (‐18 °C).
Notes on using the ice-maker
You will hear the sound of the motor after about two hours. This is the sound of the valve providing water to the ice maker and does not indicate a malfunction.
It is normal that several ice cubes may stick together or get crushed.
Ice making takes longer if you open the drawer frequently.
Switching off
Before switching the ice maker off, it is most important that you switch the water supply to the appliance off for a few hours.
1. Press the ”Ice Maker On/OFF” button.
The corresponding button lamp goes out.
2. Taking out and cleaning the ice storage box.
3. Taking out and cleaning the ice cube box.
Water filter
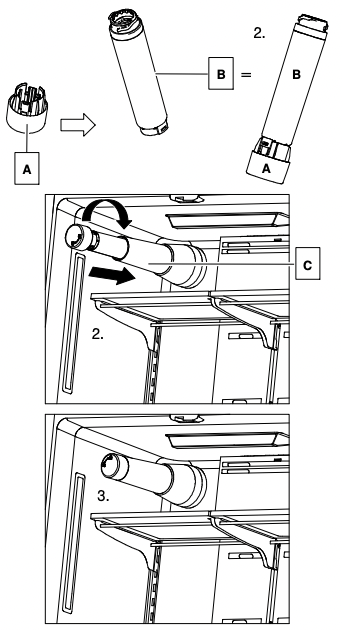
1. Remove water filter B from box.
2. Attach A (cap) onto to B (filter) (refer to picture above)
3. With A (cap) end facing you, insert the combined A-B unit from Step 2 into housing C and rotate clockwise (approximately ¾ turn) until it is locked into place. Do not over-rotate.
4. We recommend changing the filter every 6 months. When the filter has expired, turn knob counterclockwise until is loose and pull straight out. A small amount of water may drip out during the transition so we recommend having a towel available.
5. Remove cap A from old water filter and discard the old filter.
6. Repeat steps 1-3 to install the new filter. Use a permanent marker to write the filter change date on the new filter.
Interior Fittings
Adjustable Shelf
The Adjustable Shelf can be adjusted to the proper height required by various food items.
Adjusting
Tilt the shelf upward, raise it and pull it out towards you.
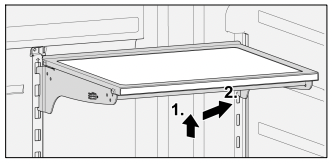
During installation, put the upper end of the fixed leg into the desired slot. Lower the shelf. The lower end of the fixed leg engages into a lower slot.
Retractable Shelf
Folding
Put fore-end of the retractable glass shelf up until it coincides with rear-end.
Unfolding
Pull out the retractable glass shelf directly until it is at the fore-end level of fixed glass shelf, then the buckle of retractable glass shelf will drop into the slot of fixed shelf and will not withdraw due to factor of gravity
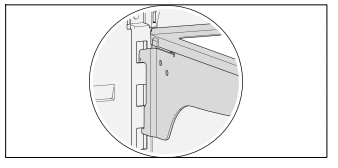
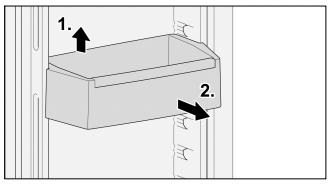
Door bin
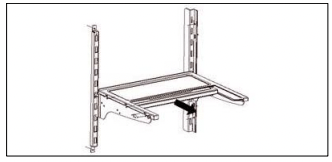
Lower freezer drawer
1. First open the left and right door of refrigerator.
2. Open the freezer compartment door.
3. Rotate 90 degrees in the direction 1 and then remove the lower freezer drawer in the direction 2.
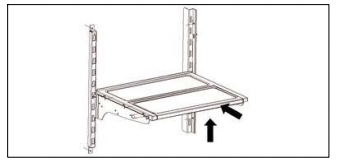
Chiller Drawer
The Chiller Drawer has a maximum load of 22 lb( 10 kg).
Pulling out and installing the Chiller Drawer
- Pull out the Chiller Drawer.
- Find the hooks at the left and right sides at the drawer bottom (shown in the figure).
- Hold the hook at two sides with a nose pliers and push it up and out of the groove of sliding rail and take out the hook at the other side with the same method.
- Take out the drawer.
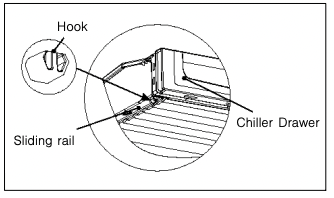
5. Install the drawer by putting the hook into the slots.
Switching off and disconnecting the appliance
Switching off the appliance
Unplug the appliance or switch off the fuse.
Disconnecting the appliance
- If the appliance is not used for an extended period of time: It is imperative that you disconnect the water supply to the appliance for a few hours before switching off the appliance.
- Remove all food from the appliance.
- Unplug the appliance.
- Empty and clean the ice maker and the ice storage box.
- Clean the appliance interior (see ”Cleaning the appliance”)
Defrosting
Freezer compartment
The fully automatic Nofrost system ensures that the freezer compartment remains free of ice. Defrosting is not required.
Refrigerator compartment
Defrosting takes place automatically.
The condensation runs through the drainage hole into an evaporation pan at the rear of the appliance.
Cleaning
WARNING Risk of electric shock! Unplug the appliance or turn off the circuit breaker or fuse before cleaning the appliance.
CAUTION To avoid personal injury or damage to property, observe the following: Never use a steam cleaner to clean the appliance. Do not use abrasive or acidic cleaning agents or solvents. Wipe lights and the control and display panel with a damp cloth only. Do not let water used for cleaning drip into the lights or onto the control and display panel. Do not let cleaning water run into the drainage hole in the evaporation area. Never clean shelves and containers in a dishwasher. The parts may warp.
CAUTION For cleaning the Black Stainless Steel we advise using a soft and dry towel. If the dirt on the surface is not easy to clean/to remove only with a soft dry towel, we advise to use warm water diluted with a neutral cleansing agent. Never use stainless steel cleaner. Use only a non-abrasive, mild cleansing soap and water solution for cleaning the Black Stainless Steel.
Cleaning the appliance
The Crisper Drawers and Chiller Drawer can be removed for cleaning.
- Unplug the appliance or turn off the circuit breaker.
- Remove all food from the appliance and store in a cool location.
- Clean the appliance with a soft cloth, using lukewarm water and a small amount of pH-balanced dishwashing liquid.
- Rub dry when done.
- Wipe the door seal with clear water only and then thoroughly wipe dry.
- After cleaning, reconnect to switch on the appliance.
LED light
The appliance features a maintenance-free LED light.
CAUTION Risk of eye injury from Class 1M laser light (IEC 60825)! Do not look directly into the light with optical instruments.
These lights must be repaired by an authorized technician only
Energy saving tips
- Install the appliance in a dry, well ventilated room, but not in direct sunlight and not near a heat source (radiator, stove, etc.). Use an insulating plate, if required.
- Allow warm food and drinks to cool down before placing in the appliance.
- When thawing frozen food, place it in the refrigerator compartment. The low temperature of the frozen products cools the food in the appliance.
- Open and close the appliance doors and drawers as quickly as possible.
Operating noises
Normal noises
- Humming - refrigerating unit is running. The fan in the circulating air system is running.
- Bubbling, whirring or gurgling noises - refrigerant is flowing through the tubing or water is flowing into the ice maker.
- Clicking - motor is switching on or off. The solenoid valve at the water connection is opening or closing.
- Rumbling - ready ice cubes from the ice maker are falling into the ice storage box.
Solving simple noise problems
The appliance is not level
Align the appliance using a level. Use the height-adjustable feet.
The appliance is touching adjacent units or appliances
Move the appliance away from adjacent units or appliances.
Loose or sticking drawers, baskets or storage areas
Check the removable parts and, if required, reinsert them.
Receptacles are touching each other
Move bottles or receptacles slightly away from each other.
Before Calling for Service
Before you call Customer Service: Please check whether you can troubleshoot yourself based on the following information. Customer Service may charge you for an unnecessary service call. Please see Warranty Statement for coverage and exceptions.
Appliance
No display on the display panel, interior light is not working, and the appliance is not working.
The power cord is not plugged in.
The fuse has blown or circuit breaker has been tripped.
- Replace fuse or reset the circuit breaker.
Check if electricity is present at outlet.
- Power outage. Wait until power has been restored. If necessary, contact an electrician or the utility company.
The interior light is not working
The light switch to the freezer or refrigerator compartment is sticking.
- Check whether the light switch can be moved.
The LED bulb is defective.
Food is too cold.
Temperature has been set too low.
- Adjust to a higher temperature.
Food is too warm
Door will not close properly.
- Align the appliance with a level. See ”Aligning the appliance”.
- Check the position of the drawers and correct, if necessary.
- Check the door seals and foldaway door bar; if necessary, clean or correct position.
Temperature has been set too high.
- Select a lower temperature.
Ventilation opening is blocked.
- Remove any food blocking the ventilation opening.
Doors were opened frequently or were open for an extended period of time.
- Wait until the temperature in the appliance drops.
A large amount of fresh food has been placed in refrigerator.
- Fresh food must first reach the correct storage temperature.
Appliance has an unpleasant odor.
Food with a strong odor was placed in the refrigerator.
- Wrap up the food or place it in an airtight container.
The interior compartment is dirty.
- Clean the interior compartment.
Water droplets are forming on the exterior of the appliance.
Door will not close properly.
- Align the appliance with a level. See ”Aligning the appliance”.
- Check the position of the drawers and correct, if necessary.
- Check the door seals and foldaway door bar; if necessary, clean or correct position.
Humidity is too high.
- This may be normal in certain regions.
Water droplets are forming inside the appliance.
Humidity is too high or doors have been opened frequently.
- Do not open doors as frequently or do not keep them open too long.
The door seals are not tight.
- Check the door seals and foldaway door bar; if necessary, clean or correct position.
Drawers can only be closed with great difficulty.
The drawer has not been inserted correctly.
- Insert the drawer correctly.
The drawer rails are dirty.
The ice maker is not making ice cubes.
The ice maker is switched off.
The appliance is not being supplied with water.
- Have a qualified technician check the water connection.
The water connection line has kinks in it.
- Shut off the water supply. Straighten out the kinks. Have damaged water connection lines replaced with original manufacturer parts.
Water pressure is too low.
- Have the water pressure checked.
The ice storage box is not inserted correctly.
- Insert the ice storage box correctly.
The water connection is installed incorrectly.
- If the water connection is not installed correctly, this can cause low water pressure and can damage the appliance.